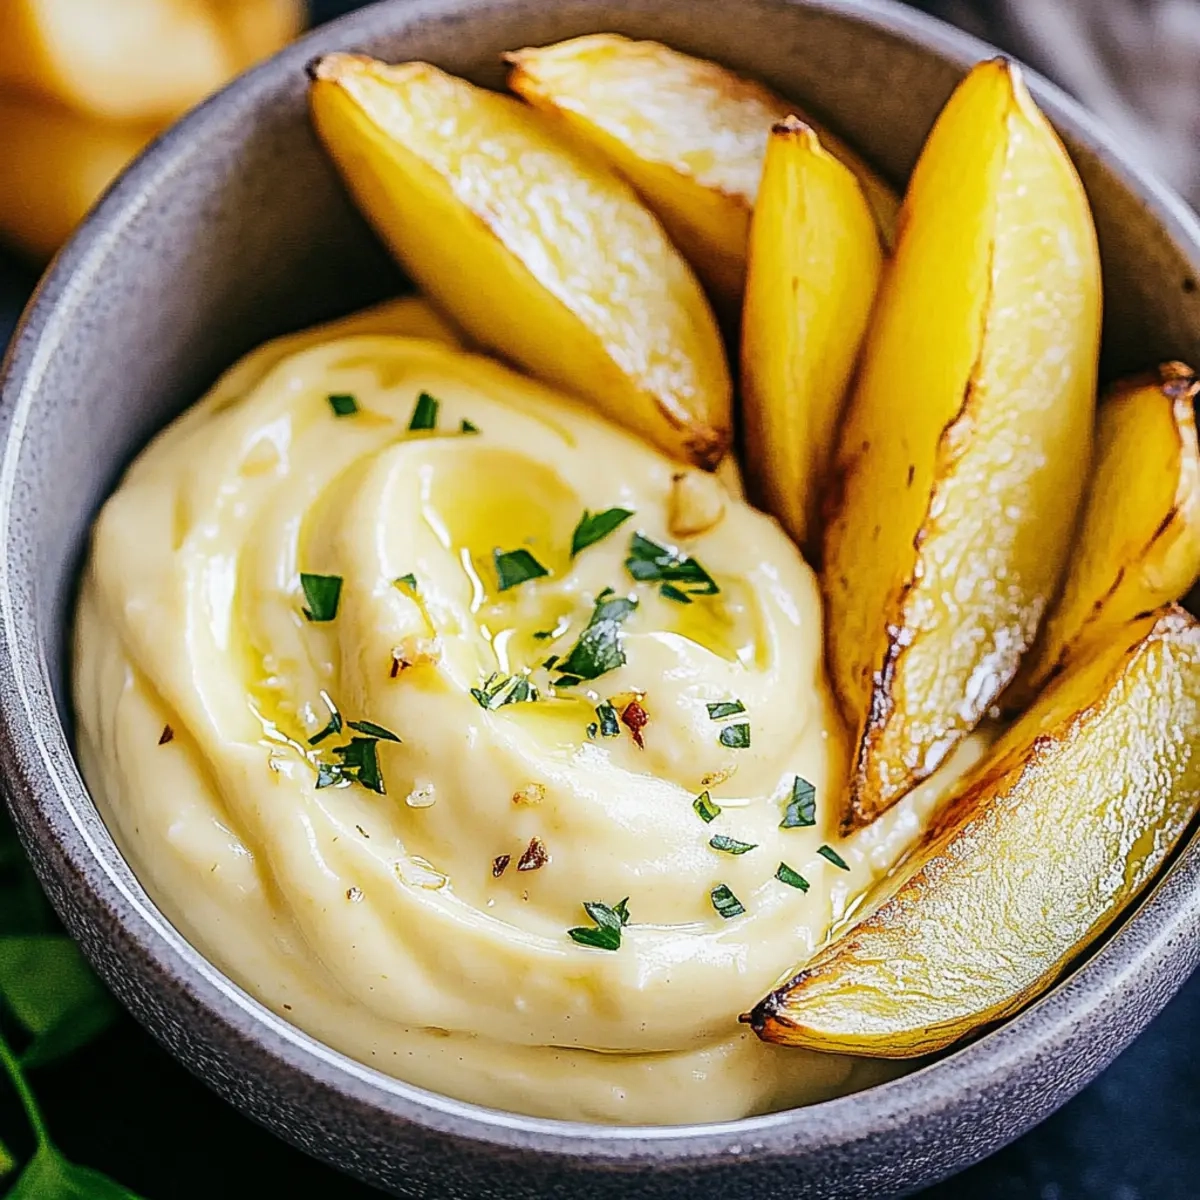
There’s something incredibly satisfying about creating a culinary masterpiece in just minutes. Picture this: you’re hosting friends, the aroma of garlic fills the air, and with only a handful of ingredients, you’ve transformed the ordinary into something extraordinary. This Homemade Garlic Aioli recipe is a game-changer, blending the rich flavors of olive oil and fresh garlic into a creamy dip that elevates any dish—from roasted veggies to crispy French fries.
Inspired by a spontaneous dinner party where store-bought sauces just wouldn’t cut it, I decided to whip up something that not only tasted better but also showcased a touch of culinary finesse. In less than 10 minutes, you can prepare this versatile condiment that will impress your guests and keep you out of the fast food lane for good. Whether you’re a seasoned chef or just dabbling in home cooking, this aioli is bound to become a staple in your kitchen. Let’s dive into this easy recipe that promises to be a flavor bomb!
Why You'll Love This Homemade Garlic Aioli
- This Homemade Garlic Aioli is incredibly easy to make, requiring just 10 minutes of your time for a gourmet result.
- The deep, rich flavors of garlic and olive oil come together to create a deliciously creamy dip that enhances any meal.
- Its versatility means you can enjoy it with everything from crispy fries to fresh vegetable platters, making it perfect for any occasion.
- Visually, the aioli boasts a beautiful, creamy texture that will impress your guests and elevate your dining experience.
Homemade Garlic Aioli Ingredients
Get ready to create a culinary delight with these simple ingredients that promise layers of flavor in every bite.
For the Aioli
- 2 cloves garlic – uses fresh garlic for a robust flavor that will make your taste buds sing.
- 1/4 teaspoon kosher salt – enhances the overall taste, balancing the flavors beautifully.
- 1/2 cup extra virgin olive oil – the key to a rich, creamy texture in this homemade garlic aioli.
- 1 teaspoon fresh lemon juice – adds a bright, zesty note that cuts through the creaminess.
This delightful mix invites you to say goodbye to store-bought sauces and embrace the fresh flavors of homemade garlic aioli!
How to Make Homemade Garlic Aioli
-
Prepare the setup: Wet a kitchen towel and wring it out until just damp. Shape it into a ring and nestle a medium bowl in the center. This creates a stable workspace as you mix your aioli.
-
Grate the garlic: Finely grate the garlic into the bowl. Add the kosher salt and egg yolk, whisking briefly to combine all the ingredients. The aroma of garlic will immediately fill your kitchen!
-
Emulsify the oil: Begin whisking the egg yolk mixture briefly, then slowly add the olive oil a few drops at a time. Keep whisking continuously until the aioli starts to emulsify, then increase the oil to a steady, thin stream while whisking continuously.
-
Finish the aioli: Once all the oil is incorporated, whisk a few more times to ensure thorough emulsification. Now, whisk in the fresh lemon juice. Taste your creation and adjust the salt if necessary.
Optional: Serve with fresh herbs for an added burst of flavor.
Exact quantities are listed in the recipe card below.
Make Ahead Options
These Homemade Garlic Aioli is perfect for busy home cooks looking to save time without sacrificing flavor! You can prepare the aioli up to 24 hours in advance, allowing the flavors to develop further. Simply complete the whisking steps and store the aioli in an airtight container in the refrigerator. To maintain its creamy texture and prevent it from separating, give it a gentle stir before serving. When you’re ready to enjoy it, simply drizzle in a bit more lemon juice or olive oil for a fresh finish. This makes it a convenient and delicious condiment for your meals throughout the week!
How to Store and Freeze Homemade Garlic Aioli
Room Temperature: Store homemade garlic aioli at room temperature for up to 2 hours to prevent spoilage. It’s best enjoyed fresh right after making!
Fridge: Keep any leftover aioli in an airtight container in the refrigerator for up to 3 days. This helps preserve its creamy texture and bold flavors.
Freezer: If you want to keep your aioli for longer, freeze it in an ice cube tray for easy portioning. It can last up to 2 months in the freezer.
Reheating: Thaw the aioli overnight in the fridge before serving. If separated, whisk it gently to reincorporate the ingredients for that smooth, luscious consistency.
Homemade Garlic Aioli Variations
Feel free to experiment and make this recipe your own, creating delightful twists that cater to your taste buds.
-
Vegan: Replace the egg yolk with aquafaba, the liquid from canned chickpeas, for a plant-based version that’s just as creamy.
-
Spicy: Add a dash of cayenne pepper or a few drops of hot sauce to the mixture for an extra kick that will tantalize your taste buds. This offers a delicious contrast to the mild garlic flavor.
-
Herbed: Mix in finely chopped fresh herbs like dill or basil for a fragrant, vibrant twist that elevates your aioli, making it perfect for summer dishes.
-
Roasted Garlic: Swap out fresh garlic for roasted garlic to create a sweeter, more mellow flavor that adds a lovely depth to your aioli.
-
Lemon Zest: Incorporate a teaspoon of lemon zest to amp up the citrusy brightness, providing a zesty zing that dances on your palate alongside the creamy base.
-
Smoked Paprika: Stir in a teaspoon of smoked paprika for a hint of smokiness that complements the garlic beautifully, transforming your aioli into something truly special.
-
Mustard Kick: Adding a teaspoon of Dijon mustard enhances the flavor profile, bringing a tangy richness that pairs perfectly with all types of dishes.
-
Nutty Twist: Fold in a tablespoon of tahini for a nutty, earthy flavor that adds a unique twist and creaminess, perfect for Mediterranean-inspired meals.
What to Serve with Homemade Garlic Aioli?
Creating a scrumptious meal to accompany your aioli is as easy as spreading a little culinary love.
-
Crispy French Fries: The golden crunch of fries pairs perfectly with the creamy aioli, making every bite a heavenly indulgence.
-
Grilled Vegetables: Marinated veggies, charred to perfection, become even more delightful with a dollop of garlic aioli, adding a rich, savory touch.
-
Savory Roasted Chicken: Juicy, herbed chicken served with aioli can elevate your dinner table, turning a simple meal into a festive occasion. The creaminess of the aioli complements the chicken beautifully.
-
Fresh Veggie Platter: Arrange an array of colorful raw vegetables; the aioli makes each crisp bite irresistible and satisfying, ensuring your guests keep coming back for more.
-
Seafood Delights: Whether shrimp or crispy calamari, garlic aioli is a lively companion that amplifies the oceanic flavors and adds a creamy twist.
-
Artisan Bread: Serve warm, crusty bread with a side of aioli for a fabulous starter, allowing your guests to dip and indulge in this simple yet luxurious treat.
-
Homemade Potato Chips: Crunchy, salty chips dunked in aioli create a wonderful contrast in textures, making them a perfect appetizer for your gathering.
-
Sparkling Citrus Mocktail: A refreshing drink made with sparkling water and a hint of lemon perfectly complements the robust flavors of your garlic aioli.
Feel free to mix and match these ideas to create a memory-filled meal that will leave everyone asking for seconds!
Chef's Helpful Tips
- For the Homemade Garlic Aioli, using fresh garlic is crucial as it provides a strong, vibrant flavor that store-bought versions can’t match.
- When emulsifying, be patient and start with just a few drops of oil at a time to ensure the mixture binds properly.
- If the aioli seems too thick, you can lighten it up by whisking in a teaspoon of warm water to achieve your desired consistency.
- Remember to taste your aioli before serving and adjust the salt or lemon juice to suit your preferences for a perfectly balanced dip.
Homemade Garlic Aioli Recipe FAQs
What type of garlic is best for making aioli?
Absolutely! Fresh, firm garlic cloves are ideal for making homemade garlic aioli. Look for cloves that are dry and free from dark spots or sprouts. If your garlic has developed any dark spots, it’s a sign of age and might not provide that vibrant flavor you’re after.
How long can I store homemade garlic aioli in the fridge?
Very! You can store your homemade garlic aioli in an airtight container in the refrigerator for up to 3 days. Just make sure to use a clean utensil each time you scoop some out to prevent any contamination. If you notice any separation, simply give it a good whisk before serving!
Can I freeze homemade garlic aioli?
Definitely! If you want to extend the shelf life of your garlic aioli, freeze it in ice cube trays. Once frozen, pop out the cubes and store them in a freezer bag. It will last up to 2 months. When you’re ready to use it, just thaw it overnight in the fridge, and give it a little whisk to return it to its creamy state!
What should I do if my aioli doesn’t emulsify?
Don’t worry, it happens to the best of us! If your aioli isn’t emulsifying, try this: Start again with a new egg yolk in a clean bowl. Whisk it lightly, then slowly drizzle in the failed aioli while whisking continuously. This often helps to reincorporate the mixture and achieve that luscious, creamy texture.
Is homemade garlic aioli safe for kids or people with egg allergies?
It’s important to be cautious! Homemade garlic aioli contains raw egg yolk, which may not be suitable for pregnant women, young children, or anyone with compromised immune systems. If you’re looking for a safer alternative, you can use pasteurized eggs or even replace the egg yolk with 1 tablespoon of mayonnaise for a similar texture without the risk.
Homemade Garlic Aioli
Ingredients
Equipment
Method
- Wet a kitchen towel and wring it out until just damp. Shape it into a ring and nestle a medium bowl in the center.
- Finely grate the garlic into the bowl. Add the kosher salt and egg yolk, whisking briefly to combine.
- Begin whisking the egg yolk mixture briefly, then slowly add the olive oil a few drops at a time.
- Once all the oil is incorporated, whisk a few more times to finish the aioli and whisk in the fresh lemon juice.
Leave a Reply