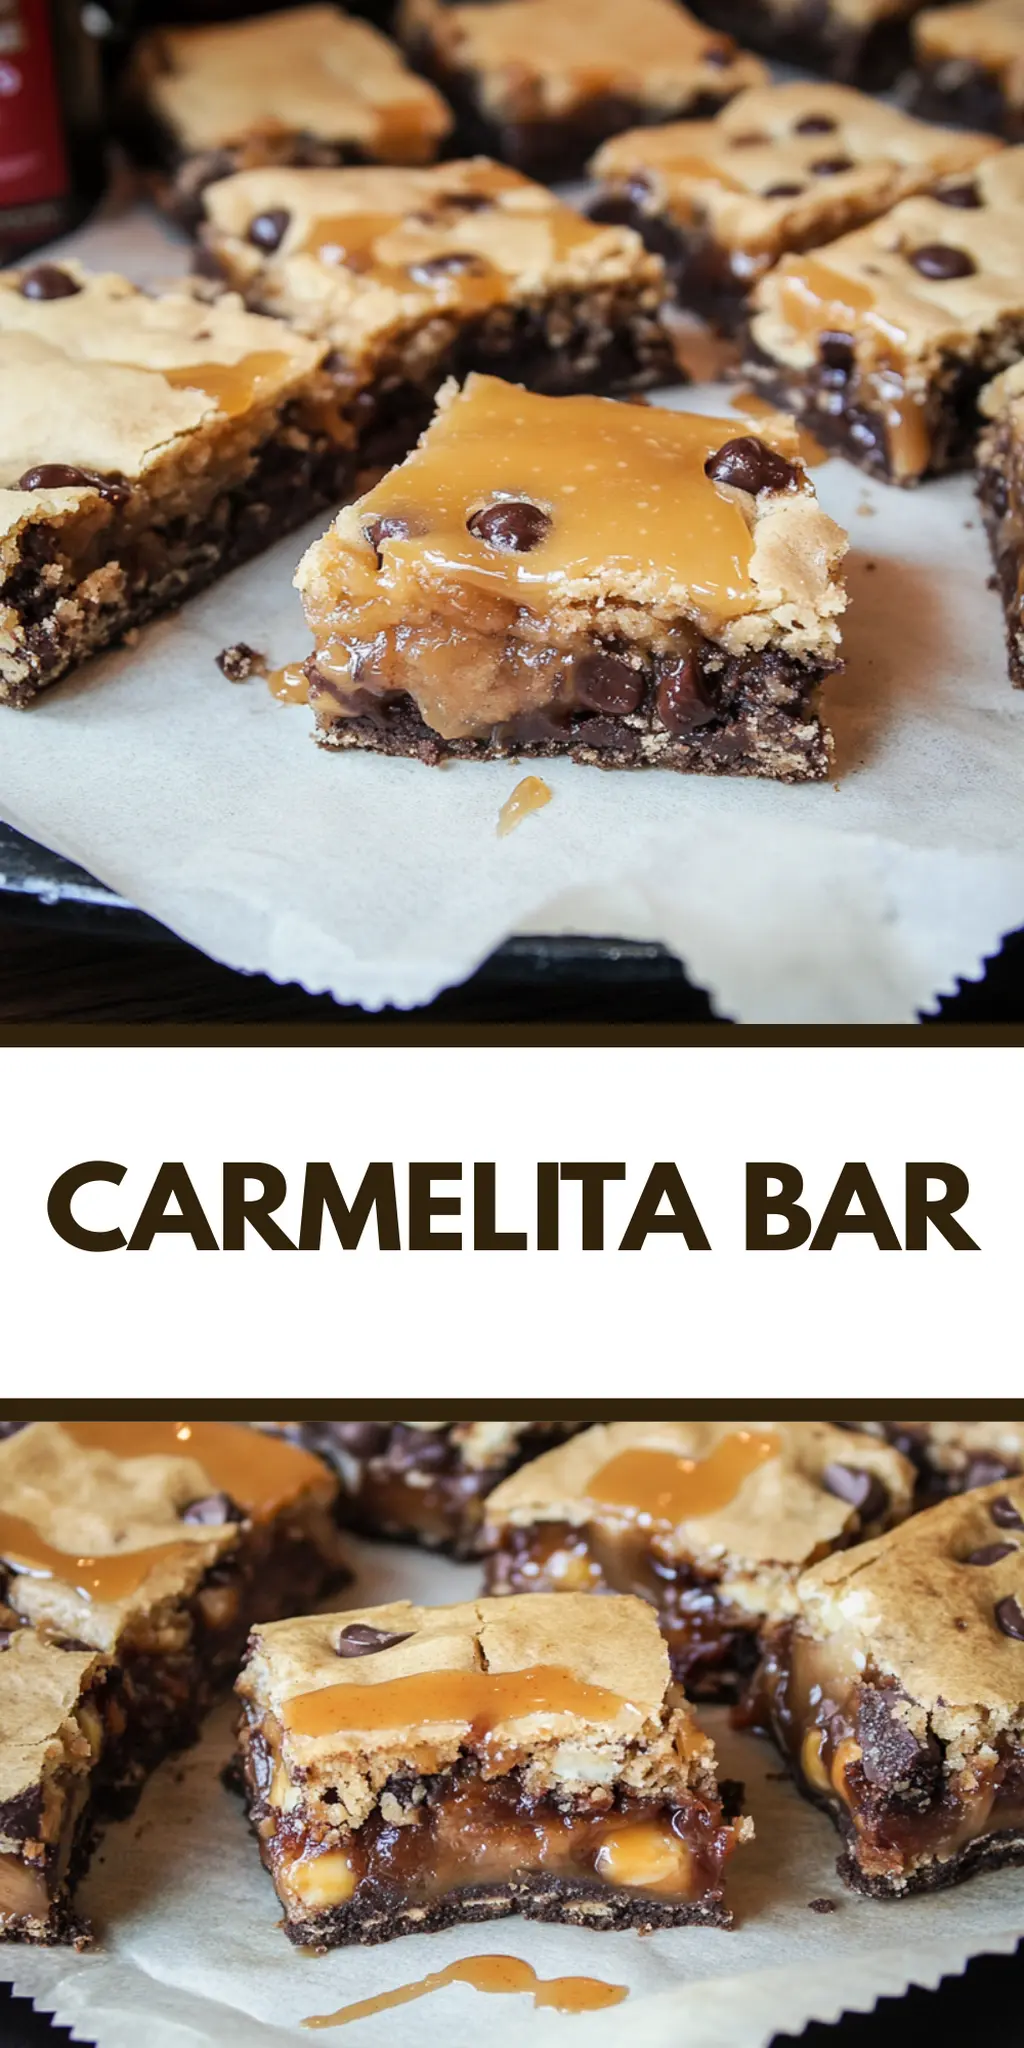
The moment I opened my pantry and spotted that roll of chocolate chip cookie dough, I felt a wave of inspiration wash over me. An idea popped into my head—what if I could create something that combines two childhood favorites: gooey caramel and soft, chewy cookies? That’s how my journey to perfecting Carmelita Bars began, and I can guarantee these delectable treats will transport your taste buds straight to dessert heaven.
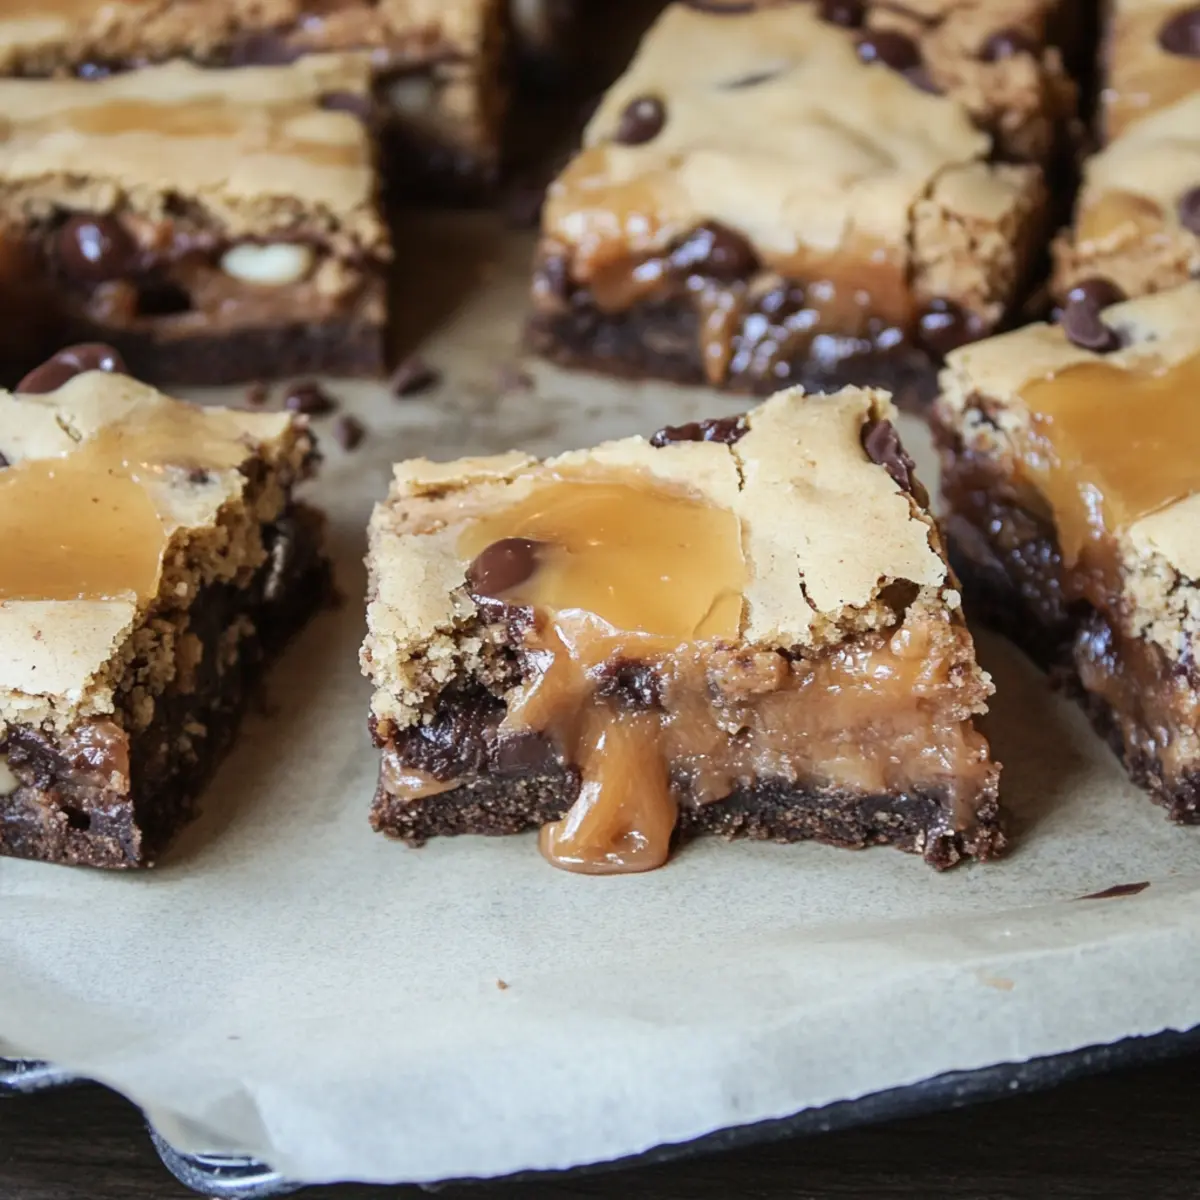
Each bite is a blissful combination of sweet, rich caramel enveloped in a layer of melted chocolate and creamy cookie goodness. Perfect for those cozy gatherings with friends or as a cozy treat just for yourself, these bars are not only a crowd-pleaser but also incredibly easy to whip up in under 45 minutes. So, say goodbye to the monotony of fast food and indulge in something homemade that you’ll be craving time and again! Ready to dive into the world of Carmelita Bars? Let’s get baking!
Why You'll Love This Carmelita Bar
- You’ll love how easy it is to prepare these bars in under 45 minutes, making them a perfect last-minute dessert option.
- The combination of gooey caramel, melted chocolate, and soft cookie creates an explosion of flavor in every bite that everyone will rave about.
- These Carmelita Bars are incredibly versatile; you can customize them by adding nuts or using different types of chocolate.
- Visually appealing and layered to perfection, they make for a stunning addition to any dessert table that will impress your guests.
Carmelita Bar Ingredients
• Delight in creating irresistible Carmelita Bars with these simple ingredients!
For the Base
- Refrigerated Chocolate Chip Cookie Dough – This convenient dough is the foundation, providing a soft and chewy base for your bars.
- Milk Chocolate Chips – The creamy chocolate adds richness, melting beautifully into the layers of flavor.
For the Caramel Layer
- Kraft Caramels – These chewy caramels create a gooey layer that perfectly complements the cookies.
- Evaporated Milk – Mixing with the caramels helps achieve a smooth, pourable consistency that seeps into every bite.
Take the time to gather these essential Carmelita Bar ingredients and get ready to whip up a treat that will leave everyone asking for seconds!
How to Make Carmelita Bars
-
Preheat your oven to 350°F. Generously spray a 9 x 13 pan with non-stick spray to ensure your bars won’t stick to the edges after baking.
-
Press a little more than half of the refrigerated chocolate chip cookie dough into the bottom of the prepared pan. You want an even layer, so it bakes perfectly.
-
Bake for 20 minutes. Keep an eye on it and remove from the oven once it’s slightly golden. Allow it to cool for a few minutes so that it can hold up the layers to come.
-
Melt the caramel! While your base cools, unwrap the Kraft Caramels and place them in a saucepan with the evaporated milk. Over low heat, stir frequently until the caramel is wonderfully smooth.
-
Layer the chocolate! Once the cookie base is slightly cooled, sprinkle the milk chocolate chips over the top. Then, pour the melted caramel evenly over the chocolate chips, allowing it to coat everything beautifully.
-
Crumble the remaining cookie dough over the caramel layer. This will form a delightful topping that adds texture and crunch.
-
Bake again for another 15-16 minutes, or until the top is lightly golden brown. This step seals all the flavors together for fab results.
-
Cool completely before cutting into squares. This will help the bars hold their shape when you serve them to eager friends or family.
Optional: Drizzle with additional melted chocolate for an extra special touch!
Exact quantities are listed in the recipe card below.
What to Serve with Carmelita Bars?
Indulging in homemade treats can be an experience to savor. Pair these delightful bars with complementary flavors and textures for a perfect dessert spread.
-
Vanilla Ice Cream: The creamy, cold contrast enhances the warm, gooey Carmelita Bars, creating a delightful temperature play. A scoop on the side will make each bite even more heavenly.
-
Fresh Berries: Ripe strawberries or blueberries add a refreshing burst of tartness that balances the sweetness of the bars, offering a light, fruity twist.
-
Coffee or Espresso: A steaming cup of coffee or robust espresso elevates the dessert experience, harmonizing beautifully with the rich, chocolatey flavors of the bars.
-
Milk: An old favorite, a glass of cold milk is always a comforting companion to these caramel-loaded delights. It softens the sweetness and is a nostalgic reminder of childhood treats.
-
Whipped Cream: Light and fluffy, a dollop of whipped cream on top adds a lovely texture and extra creaminess, making each bar feel like a gourmet dessert.
-
Chocolate Drizzle: For an indulgent touch, drizzle melted chocolate over the bars when they are cool. This simple addition will enhance their visual appeal and chocolate flavor.
-
Chopped Nuts: Adding chopped pecans or walnuts in the layered bars introduces a crunchy texture that contrasts wonderfully with the soft caramel and cookie.
-
Hot Chocolate: For a chocolaty experience, serve your Carmelita Bars alongside a rich cup of hot chocolate, creating a cozy dessert duo that’s perfect for chilly evenings.
Get creative and enjoy these pairings while making the Carmelita Bars the star of your sweet table!
Make Ahead Options
These delightful Carmelita Bars are not only a treat for the taste buds but also a fantastic option for meal prep that saves you valuable time during busy weeks! To prepare ahead, you can bake the cookie base up to 24 hours in advance. Just follow the directions up to step 3, let it cool completely, then cover and refrigerate it. The caramel layer can also be made and refrigerated for up to 3 days; just remember to let it come to room temperature before layering it onto the cookie base. When you’re ready to enjoy your Carmelita Bars, simply sprinkle the chocolate chips, layer the melted caramel, crumble the remaining cookie dough, and bake as directed. This way, you’ll have all the homemade goodness with significantly less effort when it’s time to serve!
How to Store and Freeze Carmelita Bars
Room Temperature: Keep Carmelita Bars in an airtight container at room temperature for up to 3 days for optimal freshness and flavor.
Fridge: Store in the refrigerator for up to 7 days. Make sure to cover with plastic wrap or in an airtight container to prevent drying out.
Freezer: Freeze uncut bars or individual slices in freezer-safe bags for up to 3 months. Be sure to remove excess air to prevent freezer burn.
Reheating: To enjoy warm bars, microwave individual slices for 10-15 seconds or heat in the oven at 350°F for 5-7 minutes until warmed through.
Carmelita Bar Variations
Feel free to get creative with your Carmelita Bars—each delightful twist will elevate your experience!
-
Nutty Crunch: Add 1/2 cup of chopped nuts, like pecans or walnuts, between the layers for a satisfying crunch. The nutty flavor perfectly complements the caramel and chocolate.
-
Sea Salt Flakes: Sprinkle coarse sea salt on top just before baking for a sweet and salty contrast. This little twist enhances the flavor, making every bite unforgettable.
-
Dark Chocolate: Swap milk chocolate chips for dark chocolate chips for a richer, more intense flavor. Dark chocolate provides a lovely balance to the sweetness of the caramel.
-
Flavored Caramels: Use flavored caramels like chocolate or vanilla for an extra dimension of taste. Try blending different caramel types to create a unique flavor profile in each bite.
-
Gluten-Free: Use gluten-free cookie dough to make these bars suitable for those on a gluten-free diet. Everyone deserves to enjoy the deliciousness!
-
Spicy Kick: Add a pinch of cayenne or crushed red pepper flakes to the caramel mix for a surprising kick. This unexpected heat will excite your taste buds!
-
Coconut Delight: Stir in 1/2 cup of shredded coconut into the chocolate layer for a tropical twist. Coconut adds a delightful texture and a hint of sweetness.
-
Fruit Filling: Layer in some dried fruit, like cherries or cranberries, for a chewy contrast to the gooey caramel. The fruity bites will add a refreshing brightness to the bars.
Chef's Helpful Tips
- To ensure your Carmelita Bars have a perfectly chewy base, make sure to press the cookie dough evenly into the pan without leaving any gaps.
- Avoid over-melting the caramels; melting them too quickly can lead to burnt spots, so low heat and frequent stirring are key for a smooth consistency.
- When layering the chocolate chips, allow the cookie base to cool slightly to prevent them from sinking too deep.
- For the best texture, let the bars cool completely before cutting, as this helps maintain their shape and makes for cleaner cuts.
Carmelita Bar Recipe FAQs
How do I choose the best ingredients for Carmelita Bars?
Absolutely! For the most delightful Carmelita Bars, select fresh refrigerated chocolate chip cookie dough without any signs of dryness or cracks. The milk chocolate chips should be glossy and smooth, while the Kraft Caramels need to be soft and chewy. This selection ensures that you’ll have a gooey, rich texture when baked.
How should I store Carmelita Bars?
Very! To keep your Carmelita Bars fresh, place them in an airtight container at room temperature for up to 3 days. If you’d like to extend their shelf life, store them in the refrigerator for up to 7 days, covered securely with plastic wrap or in an airtight container. This prevents them from drying out and losing that wonderfully chewy texture!
Can I freeze Carmelita Bars?
Absolutely! You can freeze uncut bars or individual slices for up to 3 months. Simply wrap them in plastic wrap, followed by aluminum foil, or place them in freezer-safe bags. Be sure to remove any excess air to prevent freezer burn. When you’re ready to indulge, thaw them in the fridge overnight and enjoy them at room temperature or warm them up in the microwave for a few seconds.
What if my cookie base is too crumbly?
Don’t worry! If your cookie base seems too crumbly and doesn’t hold together, it may be due to using cold dough or over baking. To remedy this, ensure your cookie dough is at room temperature before pressing it into the pan. If it still crumbles, mix in a touch of melted butter to help bind it. When baking, bake just until golden for the perfect chewy texture.
Are Carmelita Bars suitable for guests with dietary restrictions?
Very! These bars can easily be made to accommodate various dietary needs by using gluten-free cookie dough, dairy-free chocolate chips, and caramels if you need to cater to lactose intolerance. Always check labels for allergens as some ingredients may contain traces of nuts or gluten. You can even use natural sweeteners for a healthier twist!
How do I know when my Carmelita Bars are done baking?
Great question! Keep an eye on the baking time, especially during the second bake. You’ll know your Carmelita Bars are done when the top is lightly golden brown and the edges start to pull away from the sides of the pan. Stick a toothpick in the center: if it comes out with moist crumbs (but not wet batter), they’re ready to cool!
Carmelita Bar
Ingredients
Equipment
Method
- Preheat your oven to 350°F. Generously spray a 9 x 13 pan with non-stick spray.
- Press a little more than half of the refrigerated chocolate chip cookie dough into the bottom of the prepared pan.
- Bake for 20 minutes until slightly golden. Allow to cool for a few minutes.
- Melt the Kraft Caramels with evaporated milk over low heat until smooth.
- Sprinkle milk chocolate chips over the cookie base, then pour the melted caramel evenly over them.
- Crumble the remaining cookie dough over the caramel layer as a topping.
- Bake for another 15-16 minutes until the top is lightly golden brown.
- Cool completely before cutting into squares.
Leave a Reply