Forkono

  • BREAKFAST & BRUNCH
  • DESSERT RECIPES
  • DINNER RECIPES
  • LUNCH RECIPES
  • About uS
  • SNACKS & APPETIZERS
menu icon
go to homepage
  • BREAKFAST & BRUNCH
  • DESSERT RECIPES
  • DINNER RECIPES
  • LUNCH RECIPES
  • About uS
  • SNACKS & APPETIZERS
search icon
Homepage link
  • BREAKFAST & BRUNCH
  • DESSERT RECIPES
  • DINNER RECIPES
  • LUNCH RECIPES
  • About uS
  • SNACKS & APPETIZERS
×

Reindeer Donuts

November 30, 2025 by JudyWhite Leave a Comment

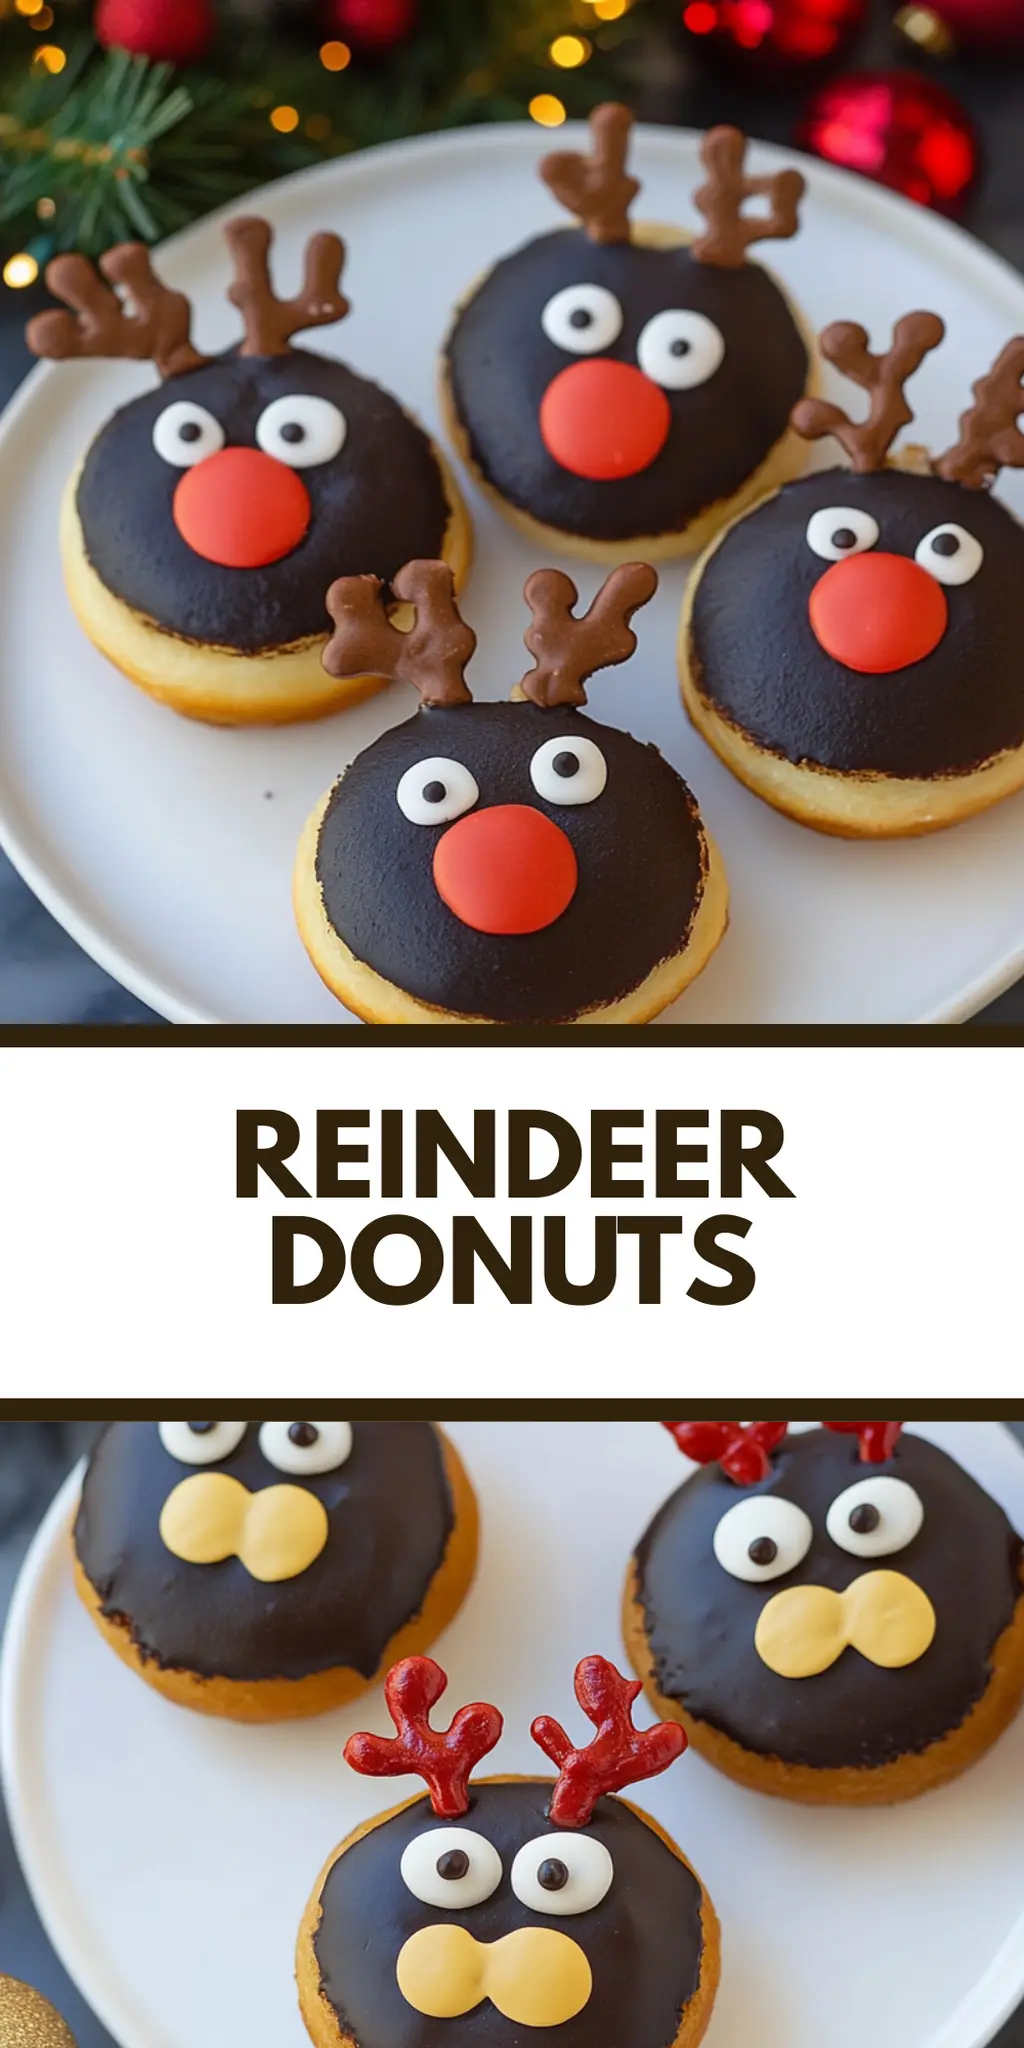
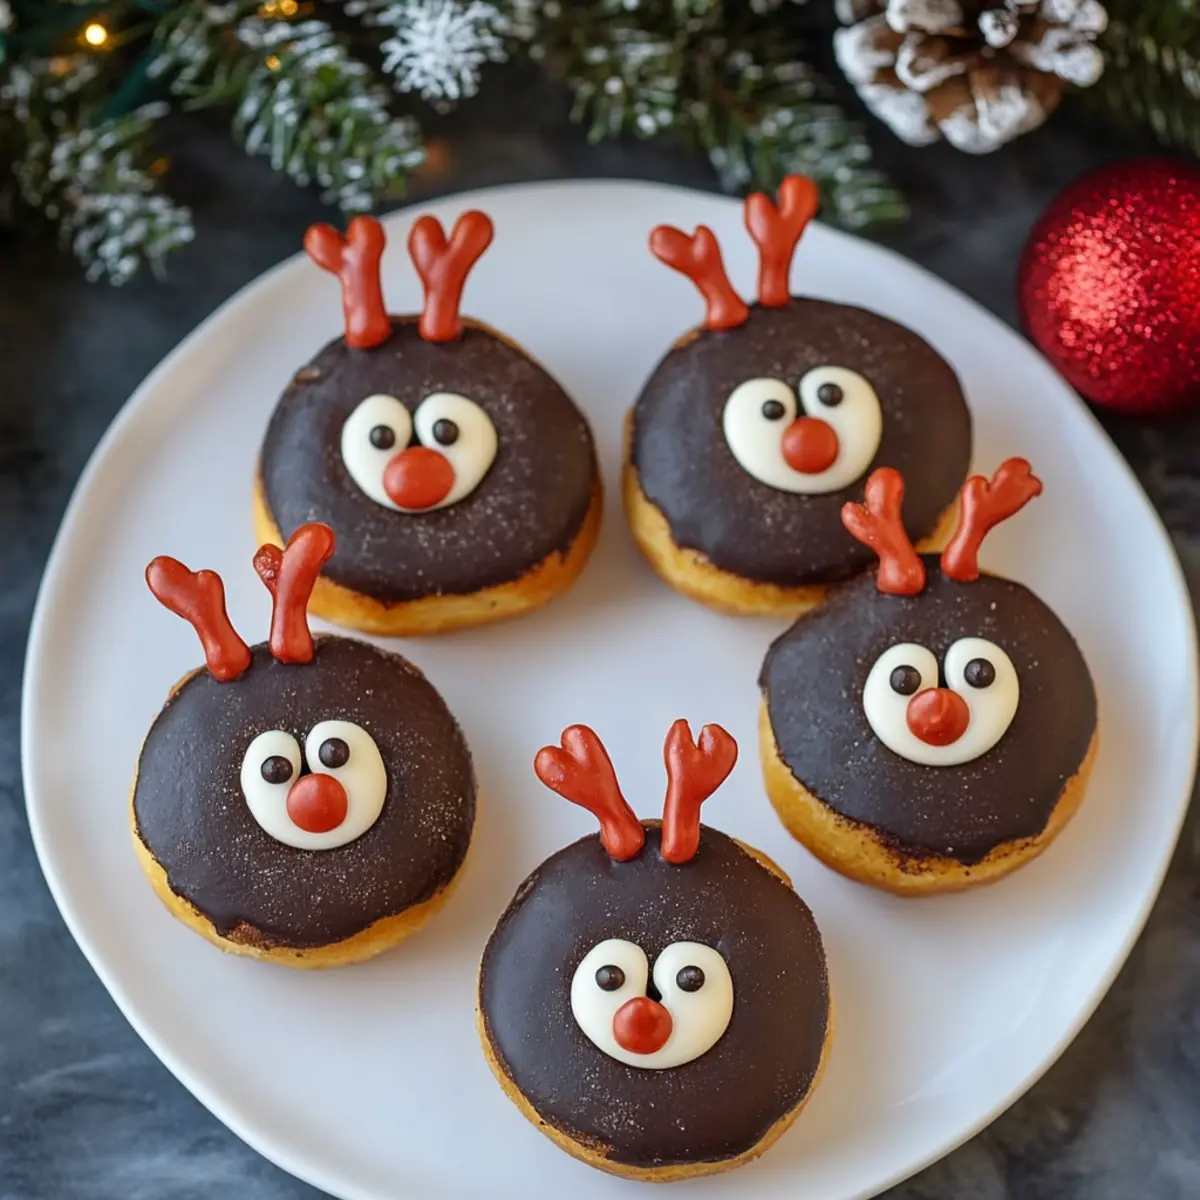
During a recent gathering with friends, the laughter and joy around the table took a delicious turn toward creativity. As I glanced at the array of holiday treats, a lightbulb went off in my head, sparking the idea for these delightful Reindeer Donuts. Picture this: soft, chocolatey donuts transformed into adorable reindeer, complete with pretzel antlers and candy eyes that will have everyone smiling.

The best part? These treats are incredibly easy to make, requiring just 30 minutes from start to finish. Whether you’re looking to add some festive flair to a party or simply want to impress your family during the holidays, these Reindeer Donuts are the perfect blend of whimsy and flavor. Trust me, watching them come to life as you assemble each one will bring out your inner child and turn dessert-making into a joyous experience. Let’s dive into this fun, festive recipe that’s sure to become a seasonal favorite!

Why You'll Love This Reindeer Donuts

  • These Reindeer Donuts are a breeze to make, taking just 30 minutes to whip up, allowing you to spend more time enjoying the festivities.
  • With their delightful combination of chocolate, candy, and pretzels, they burst with flavor that both kids and adults will admire.
  • Their whimsical design instantly captures attention, making them an eye-catching addition to any holiday spread.
  • Plus, their versatility means you can easily customize them with different candies to suit your personal taste or theme.

Reindeer Donuts Ingredients

Get ready to create these festive delights!

For the Donuts

  • Mini Chocolate Donuts – these serve as the delicious base for your Reindeer Donuts, offering rich chocolate flavor.

For the Decoration

  • Chocolate Chips – melt these down to use as ‘glue’ for attaching the decorations effortlessly.
  • Mini-Pretzels – break them in half to make perfect antlers that add a playful touch.
  • Candy Eyes – these fun little pieces make your donuts come alive with character!
  • Mini-Nilla Wafers – serve as the face of your reindeer, providing a lovely contrast in texture.
  • Red M&M’s – use these for the nose; they add a pop of festive color and sweetness to your Reindeer Donuts!

How to Make Reindeer Donuts

  1. Prepare your workspace.
    Lay out a sheet of parchment paper on a flat surface to create a clean area for decorating your Reindeer Donuts.

  2. Melt the chocolate.
    In a microwave-safe bowl, melt the chocolate chips in 30-second intervals, stirring between each until smooth. This melted chocolate will act as your ‘glue’ for the toppings.

  3. Add the antlers.
    Break a pretzel in half and gently push each half into the top of a mini donut to create antlers. Make sure they are secure and balanced!

  4. Attach the face.
    Using a toothpick, place a small dollop of the melted chocolate on the back of a mini-Nilla wafer. Press it into the lower center of the donut to create the reindeer’s face.

  5. Add the eyes.
    With the same toothpick technique, ‘glue’ two candy eyes just above the wafer. These playful features will give your reindeer personality!

  6. Finish with the nose.
    Take a red M&M and use your toothpick to apply a bit of melted chocolate on its back. Press it onto the face above the Nilla wafer for a bright, festive nose.

  7. Repeat the process.
    Continue decorating the remaining donuts, following the same steps for each one. Enjoy the creativity as your reindeer take shape!

  8. Let them set.
    Allow your assembled Reindeer Donuts to sit until the chocolate hardens completely, which gives them a lovely touch and keeps everything in place.

Optional: Drizzle extra melted chocolate over the donuts for a festive touch!

Exact quantities are listed in the recipe card below.

What to Serve with Reindeer Donuts?

These charming holiday treats are the perfect centerpiece, inviting creativity and camaraderie at your festive gatherings.

  • Hot Cocoa: A warm cup of rich hot cocoa enhances the chocolatey goodness of the donuts, making for a cozy pairing.

  • Milk and Cookies: The classic duo of milk and cookies never fails. A cold glass of milk beautifully balances the sweetness of the donuts.

  • Fruit Platter: Fresh fruit adds a refreshing contrast and a splash of color to your dessert table, making the donuts even more delightful.

  • Gingerbread Men: Another holiday classic, these spiced cookies complement the sweetness of the Reindeer Donuts while keeping the festive spirit alive.

  • Christmas Punch: A fruity holiday punch can bring joy to your party, perfectly cutting through the richness of the donuts with a tangy zest.

  • Spiced Tea: A warm cup of spiced tea with cinnamon notes offers a comforting, aromatic contrast that can bring out the richer flavors of each bite.

  • Sugar Cookies: Decorated sugar cookies add a playful touch and are a hit with kids, enhancing the overall festive experience for everyone.

  • Caramel Sauce: A drizzle of warm caramel over the donuts adds an indulgent twist, inviting guests to savor every delightful bite.

  • Nut Mix: A savory nut mix can balance out the sweetness, providing a satisfying crunch that pairs wonderfully with the donut’s soft texture.

How to Store and Freeze Reindeer Donuts

Room Temperature: Keep Reindeer Donuts in an airtight container at room temperature for up to 2 days to maintain their softness and flavor.

Fridge: For extended freshness, refrigerate the donuts in a tightly sealed container, where they can last up to 5 days.

Freezer: If you wish to store them longer, freeze the Reindeer Donuts in a single layer on a baking sheet before transferring to an airtight container. They can stay frozen for up to 1 month.

Reheating: To enjoy a warm treat, allow thawed donuts to come to room temperature, then pop them in the microwave for about 10-15 seconds or enjoy at room temperature.

Make Ahead Options

These Reindeer Donuts are a festive treat that can easily be prepped in advance, saving you time during the busy holiday season! You can prepare the mini chocolate donuts and store them in an airtight container for up to 3 days. Additionally, you can melt the chocolate and store it in a sealed container in the fridge for up to 1 week (just reheat gently before use). For best quality, assemble the donuts with pretzels, candy eyes, and M&M noses the day you plan to serve them, ensuring they look fresh and delightful. With these make-ahead options, you can enjoy your gatherings without the last-minute rush!

Reindeer Donuts Variations

Don’t hesitate to let your creativity shine with these delightful twists!

  • Gluten-Free: Use gluten-free mini donuts and certified gluten-free pretzels for a safe treat that everyone can enjoy.

  • Nut-Free: Swap out mini-Nilla wafers for nut-free cookies, ensuring a delicious reindeer treat for those with nut allergies.

  • Dairy-Free: Melt dairy-free chocolate chips for a vegan-friendly adaptation, keeping the sweetness without any dairy.

  • Colorful Treats: Explore different colored M&M’s or candy-coated chocolates to match your party theme; the variations will pop with color!

  • Seasonal Spices: Add a pinch of cinnamon or nutmeg to the melted chocolate for a warming spice twist that’ll elevate the flavor.

  • Caramel Drizzle: Drizzle some caramel sauce over the finished donuts for a sticky allure that adds an irresistible sweetness.

  • Coconut Flakes: Top your donuts with a sprinkle of toasted coconut for extra texture and a tropical twist on the festive delight.

  • Minty Fresh: Use mint chocolate chips as your ‘glue’ for a refreshing take that adds a fun, minty flavor to these reindeer delights.

Chef's Helpful Tips

  • Make sure to melt the chocolate chips slowly using the microwave in 30-second intervals to avoid burning.
  • When attaching the pretzel antlers, position them securely to ensure they don’t tip over.
  • For a cleaner look, use a toothpick for precise application of the melted chocolate on the mini-Nilla wafers and M&M’s.
  • Allow the Reindeer Donuts to harden in a cool place to set the decorations properly before serving.

Reindeer Donuts Recipe FAQs

What types of chocolate chips work best for melting?
Absolutely! You can use any kind of chocolate chips for your Reindeer Donuts, whether semi-sweet, dark, or even milk chocolate. Just ensure they’re made for melting; avoid regular chocolate bars, as they may not melt smoothly.

How should I store leftover Reindeer Donuts?
Keep those festive treats in an airtight container at room temperature for up to 2 days to preserve that delightful softness. If you want them to last longer, refrigerate them for up to 5 days in a tightly sealed container.

Can I freeze the Reindeer Donuts for later?
Definitely! To freeze your Reindeer Donuts, place them in a single layer on a baking sheet until solid, then transfer them to an airtight container. They can last up to 1 month in the freezer. When you’re ready to enjoy, let them thaw in the fridge overnight, or at room temperature for about an hour.

What should I do if the chocolate isn’t melting properly?
If your chocolate isn’t melting smoothly, try reducing the microwave time to 20-second intervals instead of 30. Stir gently after each interval until it’s completely melted. If it seems too thick, add a teaspoon of vegetable oil to help it blend smoothly.

Can these Reindeer Donuts be made gluten-free?
Very! To make these adorable treats gluten-free, simply substitute the mini chocolate donuts and Nilla wafers with gluten-free versions. Look for gluten-free chocolate chip varieties to ensure every ingredient suits your dietary needs while keeping the festive spirit intact!

Are Reindeer Donuts safe for pets?
Great question! While they are delightful for us humans, be cautious as the chocolate and candy can be harmful to pets, especially dogs. If pets are around, it’s best to keep these treats out of their reach!

Reindeer Donuts

Reindeer Donuts

Delightful Reindeer Donuts with chocolatey flavor and festive decorations, perfect for holiday gatherings.
Print Recipe Pin Recipe
Prep Time 30 minutes mins
Total Time 30 minutes mins
Servings: 12 donuts
Course: Dessert
Cuisine: Holiday
Calories: 150
Ingredients Equipment Method Nutrition Notes

Ingredients
  

For the Donuts
  • 12 mini Chocolate Donuts These serve as the base for your Reindeer Donuts.
For the Decoration
  • 1 cup Chocolate Chips Melt these to use as 'glue' for decorations.
  • 12 Mini-Pretzels Break them in half for antlers.
  • 24 Candy Eyes Use for decoration.
  • 12 Mini-Nilla Wafers Serve as the face of the reindeer.
  • 12 Red M&M's Use for the nose.

Equipment

  • microwave-safe bowl
  • parchment paper
  • Toothpick

Method
 

How to Make Reindeer Donuts
  1. Prepare your workspace by laying out parchment paper on a clean surface.
  2. Melt the chocolate chips in a microwave-safe bowl in 30-second intervals until smooth.
  3. Break a pretzel in half and push each half into the top of a mini donut to create antlers.
  4. Place a dollop of melted chocolate on the back of a mini-Nilla wafer and press it into the lower center of the donut.
  5. Glue two candy eyes above the Nilla wafer using the melted chocolate.
  6. Use a toothpick to apply melted chocolate on the back of a red M&M and press it onto the face above the Nilla wafer.
  7. Continue decorating the remaining donuts following the same steps.
  8. Allow the assembled donuts to sit until the chocolate hardens completely.

Nutrition

Serving: 1donutCalories: 150kcalCarbohydrates: 22gProtein: 2gFat: 7gSaturated Fat: 4gPolyunsaturated Fat: 0.5gMonounsaturated Fat: 2gCholesterol: 5mgSodium: 50mgPotassium: 50mgFiber: 1gSugar: 10gCalcium: 2mgIron: 4mg

Notes

Optional: Drizzle extra melted chocolate over the donuts for a festive touch.

Tried this recipe?

Let us know how it was!

Filed Under: DESSERT RECIPES

Butterfinger Nutter Butter Truffles

November 30, 2025 by JudyWhite Leave a Comment

There’s something truly irresistible about the combination of sweet and salty, and that’s exactly what you’ll find in these Butterfinger Nutter Butter Truffles. Imagine sinking your teeth into a creamy, crunchy delight that is both nostalgic and utterly satisfying—the perfect antidote to dull, fast-food desserts. I stumbled upon this recipe while searching for a way to impress friends with minimal effort. With just a handful of ingredients, including those beloved Nutter Butter cookies and fun-sized Butterfingers, these truffles come together in no time, making them a crowd-pleaser for any occasion.

Whether it’s a last-minute gathering or a cozy night at home, these bite-sized treats offer a delightful burst of flavor that will have everyone reaching for more. Plus, with only 20 minutes of prep time, you’ll have the perfect sweet indulgence ready to chill while you unwind. Let’s dive into this simple yet decadent recipe that turns a quick snack into an unforgettable experience!

Why You'll Love This Butterfinger Nutter Butter Truffles

  • These Butterfinger Nutter Butter Truffles are incredibly easy to make, letting you whip up a delicious treat in just 20 minutes.
  • The combination of creamy and crunchy textures, paired with the rich flavor of chocolate and the nostalgic taste of Butterfinger, creates a dessert that is simply unforgettable.
  • Their versatility means you can serve these truffles at any occasion, from casual get-togethers to festive celebrations.
  • With their eye-catching appearance and irresistible taste, these truffles are sure to impress and satisfy any crowd.

Butterfinger Nutter Butter Truffles Ingredients

Get ready to create a sweet sensation!

For the Truffle Mixture

  • Nutter Butter Cookies – 16 oz, crushed to provide a deliciously creamy foundation for your truffles.
  • Cream Cheese – 8 oz, softened for a smooth and rich texture that binds everything together.
  • Butterfinger Candy Bars – 10 Fun-Size, crushed to add that iconic chocolate-peanut butter crunch with every bite.

For the Chocolate Coating

  • Milk Chocolate Chips – 16 oz, melted until silky smooth to create a decadent outer layer for your truffles.

These ingredients come together to make the ultimate Butterfinger Nutter Butter Truffles that you and your loved ones will adore!

How to Make Butterfinger Nutter Butter Truffles

  1. Prepare the Baking Sheet:
    Line a baking sheet with parchment paper to prevent sticking and make cleanup a breeze once your delightful truffles are ready.

  2. Crush Cookies:
    Place the Nutter Butter cookies in a food processor and crush them until fine. This crumbly base will create a rich texture when combined with the cream cheese.

  3. Mix Cream Cheese:
    In a separate bowl, beat together the crushed cookies with the softened cream cheese. Mix until the mixture is well incorporated and creamy, about 1-2 minutes.

  4. Add Candy Bars:
    Crush the Fun-Size Butterfinger candy bars in the food processor until they’re chunky yet fine. Stir them into the cookie-cream cheese mixture until evenly combined, creating a delightful chocolate-peanut butter blend.

  5. Form Truffles:
    Roll the mixture into 1-inch balls using your hands, and place them on the prepared baking sheet. This step is where the fun really begins; get ready to indulge!

  6. Chill Truffles:
    Refrigerate the truffle balls until they’re firm, about 30 minutes. This chilling time helps them hold their shape when coated in chocolate.

  7. Melt Chocolate:
    In a microwave-safe bowl, melt the milk chocolate chips in 30-second intervals, stirring in between, until completely smooth. The chocolate should be silky and shiny—perfect for dipping!

  8. Coat Truffles:
    Use a fork to dunk each truffle into the melted chocolate, ensuring it’s fully coated. Tap off any excess chocolate and place back on the lined pan to set.

  9. Garnish:
    While the chocolate is wet, sprinkle additional crushed Butterfinger pieces on top of the truffles for an extra crunch. Once all are coated, return them to the refrigerator until the chocolate is firm.

Optional: Drizzle some melted white chocolate on top for an eye-catching finish!

Exact quantities are listed in the recipe card below.

Make Ahead Options

These Butterfinger Nutter Butter Truffles are perfect for busy home cooks looking to save time without sacrificing flavor! You can prepare the truffle mixture up to 24 hours in advance. Simply follow the recipe through forming the truffles, then place them in an airtight container and refrigerate until ready to finish. When it’s time to serve, melt the chocolate chips and coat the truffles as directed, ensuring they maintain that deliciously creamy center. To prevent any sogginess, be sure to refrigerate the truffles until you’re ready to dip them in chocolate, and remember to sprinkle on the crushed Butterfinger pieces while the chocolate is still wet for that extra crunch!

Butterfinger Nutter Butter Truffles Variations

Get ready to personalize your truffles to fit any taste preference or dietary need!

  • Gluten-Free: Use gluten-free cookie alternatives to keep the delightful crunch without the gluten.

  • Peanut-Free: Substitute with SunButter or another nut-free spread to maintain that creamy texture without the nuts.

  • White Chocolate Drizzle: Instead of milk chocolate, coat with white chocolate for a beautiful contrast and a sweet twist.

  • Miniature Treats: Roll the mixture into smaller balls for bite-sized poppable treats, perfect for parties or snacks.

  • Minty Fresh: Incorporate a few drops of peppermint extract into the mixture for a refreshing mint flavor; it adds a lovely holiday touch!

  • Spicy Kick: Mix in a pinch of cayenne or chili powder for those who enjoy a spicy twist that enhances the sweetness of the chocolate.

  • Cookie Layer: For an extra texture boost, crush some Nutter Butter cookies and mix them into the coating chocolate before dipping.

  • Nut Lover’s Delight: Fold in chopped nuts like pecans or almonds to the mixture for added crunch and flavor.

Each variation brings a unique twist while maintaining that beloved Butterfinger Nutter Butter essence. Enjoy exploring these delightful possibilities!

How to Store and Freeze Butterfinger Nutter Butter Truffles

Fridge: Store truffles in an airtight container for up to 1 week. Keep them chilled to maintain their texture and flavor, and enjoy them as a delightful dessert or snack.

Freezer: For longer storage, freeze truffles in a single layer on a baking sheet before transferring to an airtight container. They will stay fresh for up to 2 months; just remember to thaw them in the fridge before serving.

Reheating: For best results, let the truffles sit at room temperature for about 15 minutes before enjoying them, allowing the chocolate coating to soften slightly, enhancing the taste experience.

What to Serve with Butterfinger Nutter Butter Truffles?

Create a delightful dessert spread that complements these sweet truffles beautifully!

  • Coffee: The rich, bold flavors of coffee balance the sweetness of the truffles, enhancing every bite for coffee lovers.

  • Milkshake: A creamy chocolate or vanilla milkshake pairs perfectly, creating a retro dessert vibe that evokes nostalgia.

  • Fruit Salad: Fresh, bright fruits add a contrasting freshness and vibrant color, lightening up the dessert table with natural sweetness.

  • Ice Cream: Serve your truffles alongside a scoop of rich vanilla or salted caramel ice cream for a decadent treat.

  • Chocolate Sauce: Drizzling extra chocolate sauce enhances the already chocolatey goodness, inviting a delightful indulgence.

  • Whipped Cream: Light and airy, whipped cream serves as a perfect topping alongside the truffles for a touch of creamy texture.

  • Sparkling Water: For a refreshing contrast, fizzy sparkling water infused with lemon or lime cuts through the richness of the truffles.

  • Caramel Sauce: A drizzle of warm caramel next to the truffles adds a buttery richness that will have guests coming back for more.

  • Red Wine: A glass of sweet red wine nicely complements the flavors of the truffles, making for a more sophisticated pairing.

Chef's Helpful Tips

  • When making Butterfinger Nutter Butter Truffles, ensure your cream cheese is fully softened for a smoother blend with the crushed cookies.
  • Avoid overmixing the cookie-cream cheese mixture to keep the texture light and fluffy.
  • For a neater coating, use a fork with tines wide enough to easily dunk and lift the truffles from the melted chocolate.
  • Make sure the chocolate is at a temperature of around 90 to 95 degrees Fahrenheit for the best dipping consistency, which will help prevent it from clumping.

Butterfinger Nutter Butter Truffles Recipe FAQs

How do I select ripe ingredients for my Butterfinger Nutter Butter Truffles?
Absolutely! For the best flavor, ensure that your cream cheese is fresh and softened properly; this eliminates any lumps. When choosing Butterfinger candy bars, look for ones without any dark spots, as this may indicate that they’ve started to lose freshness.

What is the best way to store Butterfinger Nutter Butter Truffles?
Very! Store your truffles in an airtight container in the refrigerator for up to 1 week to maintain their delightful texture. If they’re not quite finished, you can layer them with parchment paper to avoid sticking—this way, they are easy to grab when you need a sweet treat!

Can I freeze Butterfinger Nutter Butter Truffles?
Absolutely! To freeze, line a baking sheet with parchment paper and place the truffles in a single layer, not touching. Freeze them for about 1-2 hours until firm, then transfer them to an airtight container. They’ll keep well for up to 2 months! Just remember to let them thaw in the fridge for a few hours before indulging.

What should I do if my chocolate coating is clumpy?
If your melted chocolate is clumpy, don’t worry! Stir in a tiny bit of vegetable oil (about 1 teaspoon for every cup of chocolate) to help smooth it out. Ensure you melt the chocolate slowly in the microwave, stirring after each 30-second interval to prevent overheating and clumping.

Are there any dietary considerations I should be aware of?
Very! These Butterfinger Nutter Butter Truffles contain gluten from the Nutter Butter cookies and dairy from the cream cheese and chocolate. If you’re concerned about gluten or dairy allergies, look for gluten-free cookie options or non-dairy substitutes. Always check labels to ensure they meet your dietary needs.

Butterfinger Nutter Butter Truffles

Butterfinger Nutter Butter Truffles

Enjoy these easy-to-make Butterfinger Nutter Butter Truffles, a delightful mix of creamy and crunchy flavors.
Print Recipe Pin Recipe
Prep Time 20 minutes mins
Chilling Time 30 minutes mins
Total Time 50 minutes mins
Servings: 24 truffles
Course: Dessert
Cuisine: American
Calories: 150
Ingredients Equipment Method Nutrition Notes

Ingredients
  

For the Truffle Mixture
  • 16 oz Nutter Butter Cookies crushed
  • 8 oz Cream Cheese softened
  • 10 Fun-Size Butterfinger Candy Bars crushed
For the Chocolate Coating
  • 16 oz Milk Chocolate Chips melted

Equipment

  • Food processor
  • microwave-safe bowl
  • Baking sheet
  • parchment paper
  • Fork

Method
 

How to Make Butterfinger Nutter Butter Truffles
  1. Line a baking sheet with parchment paper to prevent sticking.
  2. Crush the Nutter Butter cookies in a food processor until fine.
  3. In a separate bowl, beat together the crushed cookies with the softened cream cheese until creamy.
  4. Crush the Fun-Size Butterfinger bars until chunky yet fine, then stir into the cookie-cream cheese mixture.
  5. Roll the mixture into 1-inch balls and place them on the prepared baking sheet.
  6. Refrigerate the truffle balls until firm, about 30 minutes.
  7. Melt the milk chocolate chips in a microwave-safe bowl until smooth.
  8. Use a fork to dunk each truffle in the melted chocolate, coating it completely.
  9. Sprinkle additional crushed Butterfinger pieces on top of the truffles while the chocolate is wet.
  10. Return the truffles to the refrigerator until the chocolate is firm.

Nutrition

Serving: 1truffleCalories: 150kcalCarbohydrates: 20gProtein: 2gFat: 8gSaturated Fat: 4gPolyunsaturated Fat: 0.5gMonounsaturated Fat: 2gCholesterol: 10mgSodium: 50mgPotassium: 100mgFiber: 1gSugar: 12gVitamin A: 2IUCalcium: 2mgIron: 4mg

Notes

For an eye-catching finish, drizzle melted white chocolate on top of the truffles.

Tried this recipe?

Let us know how it was!

Filed Under: DESSERT RECIPES

  • « Previous Page
  • 1
  • …
  • 47
  • 48
  • 49

Recent Posts

  • Crispy Potatoes in Oven
  • Lucky Charms Pancakes
  • Cheeseburger
  • Boiled Corn on the Cob
  • St. Patrick’s Day Dessert Parfaits

Recent Comments

No comments to show.

Footer

  • Contact
  • Privacy Policy
  • About Us
  • Terms
  • ↑ back to top

Copyright © 2024 www.Forkono.com

Table Of Content