Forkono

  • BREAKFAST & BRUNCH
  • DESSERT RECIPES
  • DINNER RECIPES
  • LUNCH RECIPES
  • About uS
  • SNACKS & APPETIZERS
menu icon
go to homepage
  • BREAKFAST & BRUNCH
  • DESSERT RECIPES
  • DINNER RECIPES
  • LUNCH RECIPES
  • About uS
  • SNACKS & APPETIZERS
search icon
Homepage link
  • BREAKFAST & BRUNCH
  • DESSERT RECIPES
  • DINNER RECIPES
  • LUNCH RECIPES
  • About uS
  • SNACKS & APPETIZERS
×

Black Bottom Cupcakes

December 5, 2025 by JudyWhite Leave a Comment

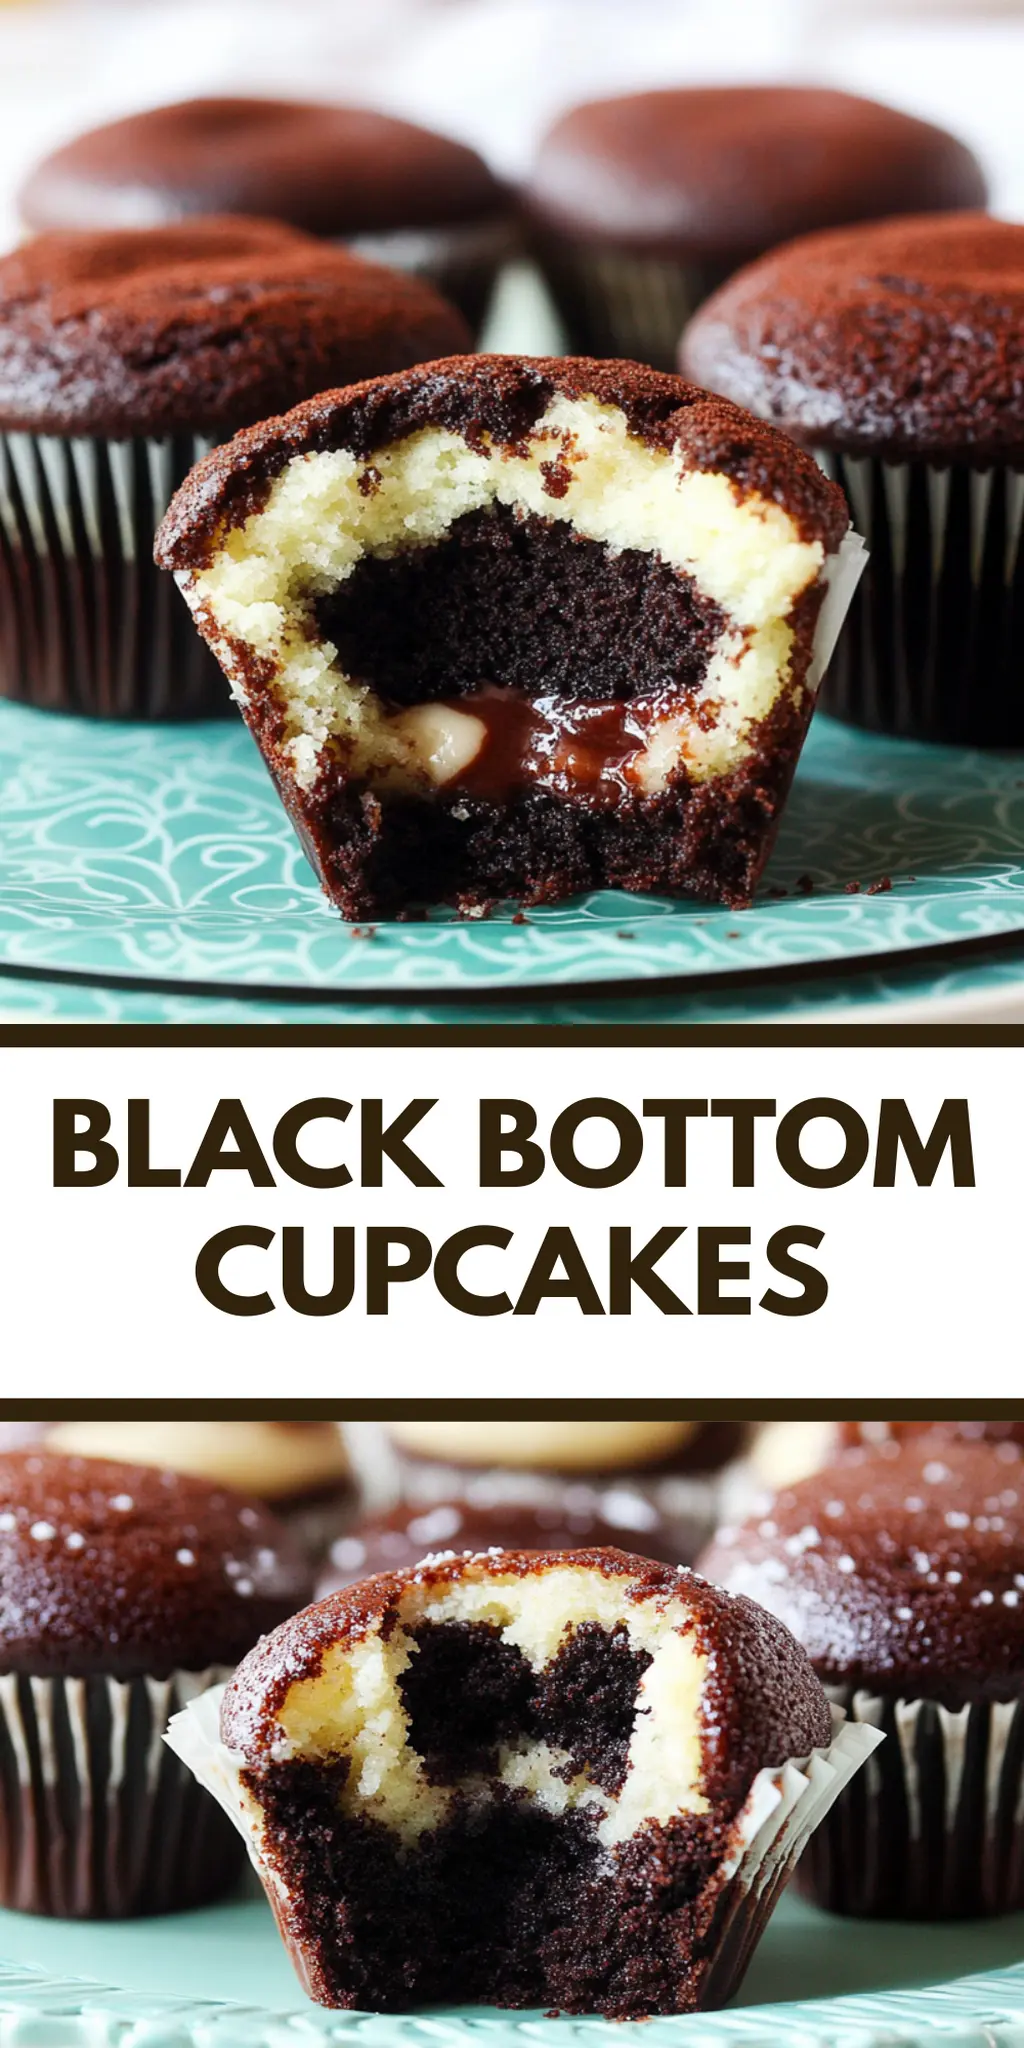
There’s an unmistakable joy in creating treats that not only satisfy your sweet tooth but also bring a cozy warmth to your kitchen. The moment I pulled these Black Bottom Cupcakes from the oven, I was greeted by a symphony of aromas—rich chocolate mingling with creamy sweetness that beckoned everyone lurking nearby. After a long week of mundane meals, the thrill of whipping up something fun and delicious was just what I needed.

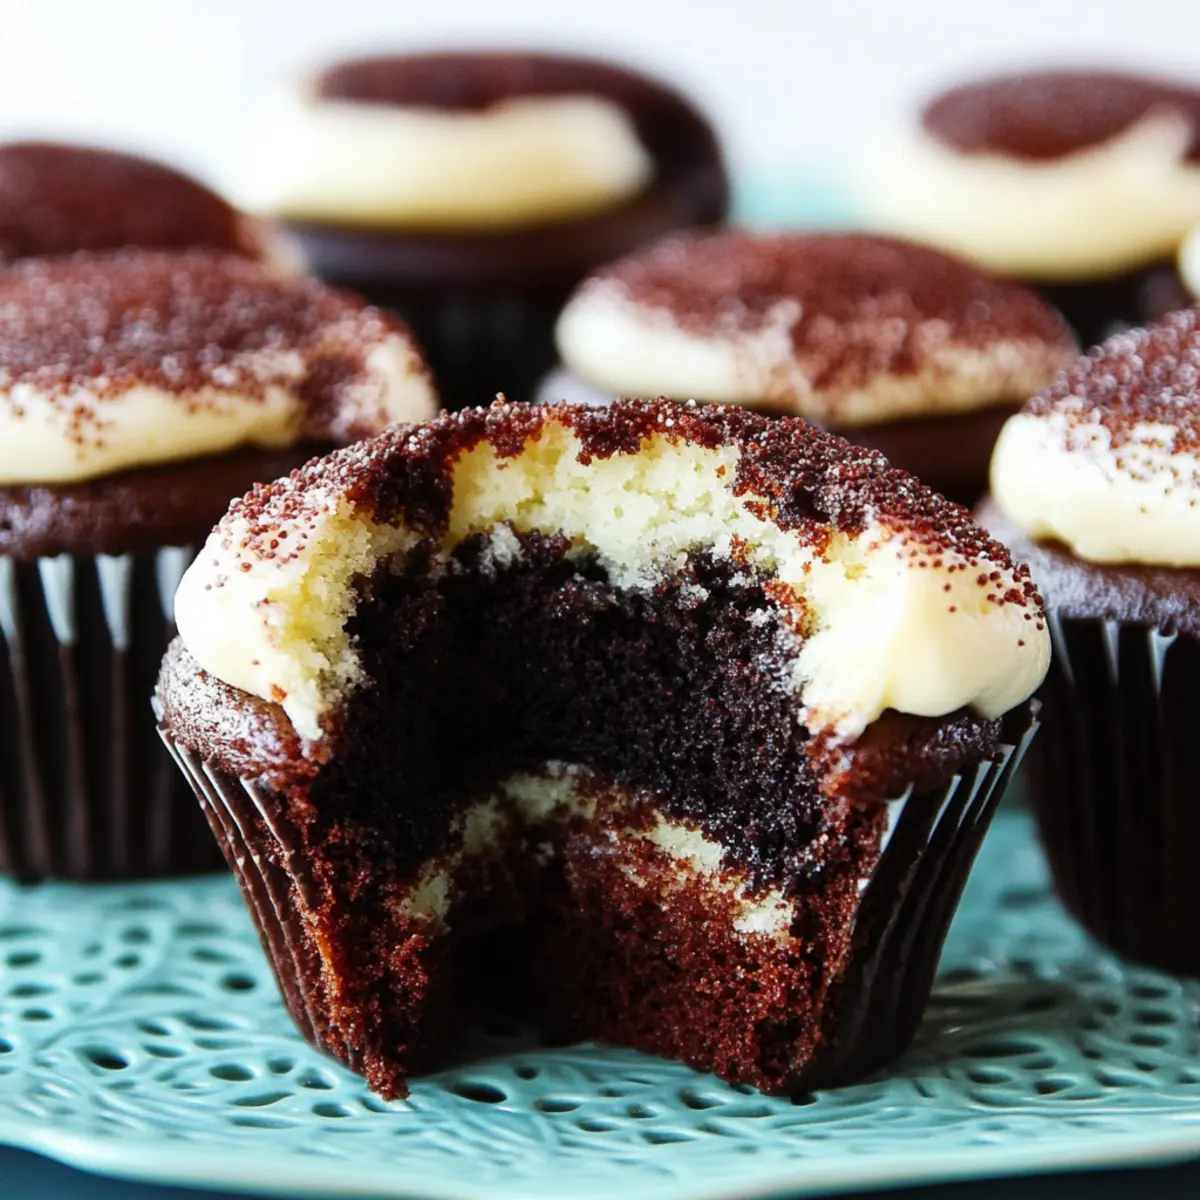
These little delights are more than just a cupcake; they are a journey of flavors and textures. With a fluffy chocolate base and a surprising cream cheese center, they redefine what a dessert can be—comforting yet unexpected. Plus, this recipe is incredibly simple, making it a perfect choice for anyone looking to impress without spending all day in the kitchen. If you’re tired of the same old fast-food options or seeking a homemade indulgence, these Black Bottom Cupcakes might just become your new favorite go-to treat! Let’s dive into this delightful baking adventure together.

Why You'll Love This Black Bottom Cupcakes

  • These Black Bottom Cupcakes are incredibly easy to make, allowing you to whip up a delicious dessert in just over half an hour.
  • The delightful combination of rich chocolate and creamy cream cheese creates a mouthwatering flavor explosion that will leave everyone wanting more.
  • Versatile and fun, these cupcakes can be dressed up for any occasion or enjoyed simply as a sweet treat at home.
  • Not only do they taste amazing, but their visually appealing layers make them a showstopper on any dessert table.

Black Bottom Cupcake Ingredients

Dive into the delicious magic of Black Bottom Cupcakes with these simple, must-have ingredients!

For the Cupcake Batter
• 1 1/2 cups Flour – adds the essential structure for a fluffy texture.
• 1 cup Sugar – sweetens the batter perfectly; you can adjust for less sweetness if desired.
• 1/4 cup Cocoa Powder – brings rich chocolate flavor that defines these cupcakes.
• 1 tsp Baking Soda – helps the cupcakes rise beautifully while baking.
• 1 cup Water – keeps the batter moist and enhances the overall flavor.
• 1/3 cup Oil – provides added moisture and a tender crumb.
• 1 tsp Vinegar – reacts with baking soda to boost the cupcake’s fluffiness.
• 1 tsp Vanilla – adds warmth and depth to the chocolate flavor.

For the Cream Cheese Filling
• 1 (8 oz) Cream Cheese, Softened – creates a deliciously creamy surprise in each cupcake.
• 1 Egg – binds the filling ingredients together for a smooth texture.
• 1/3 cup Sugar – sweetens the cream cheese mix, balancing the chocolate flavor.
• 1 cup Chocolate Chips – gives an extra chocolate hit that no one can resist!

Get ready to mix, bake, and delight in the scrumptiousness of these Black Bottom Cupcakes!

How to Make Black Bottom Cupcakes

  1. Preheat your oven to 350°F (175°C) and line a muffin pan with paper liners. This sets the stage for perfectly baked cupcakes that won’t stick.
  2. Beat together the softened cream cheese, egg, and sugar in a small bowl until smooth. Then, stir in the chocolate chips and set this deliciously creamy mixture aside.
  3. Whisk together flour, sugar, cocoa powder, and baking soda in a medium bowl. This dry blend will create the rich chocolate base of your cupcakes.
  4. Add the water, oil, vinegar, and vanilla to the dry ingredients. Beat everything together until the batter is well combined and smooth, with a lovely chocolate hue.
  5. Fill each liner about 1/3 full with the chocolate cupcake batter. Then, add a heaping teaspoon of the cream cheese mixture on top of each one, finishing with a sprinkle of sugar for sweetness.
  6. Bake the cupcakes in your preheated oven for 16-18 minutes. They are done when a toothpick inserted comes out clean, and they look beautifully risen.

Optional: Serve with a dollop of whipped cream for an extra indulgent treat!

Exact quantities are listed in the recipe card below.

Make Ahead Options

These Black Bottom Cupcakes are perfect for busy home cooks who want to save time while still enjoying a homemade treat! You can prepare the chocolate cupcake batter up to 24 hours in advance. Just mix all the wet and dry ingredients, cover the bowl tightly, and refrigerate. Additionally, the cream cheese filling can be made ahead and stored in the fridge for up to 3 days; simply keep it in an airtight container. When you’re ready to bake, preheat the oven, fill the liners with batter and cream cheese mixture, and bake as directed. This way, you’ll still savor that fresh-out-of-the-oven goodness with minimal effort!

What to Serve with Black Bottom Cupcakes?

Indulging in a sweet treat like this can inspire a delightful meal to share with loved ones.

  • Fresh Berries: Their juicy burst contrasts beautifully with the rich chocolate, offering a light and refreshing balance to the cupcakes.

  • Vanilla Ice Cream: A scoop of creamy vanilla ice cream melts perfectly atop the warm cupcakes, enhancing the dessert experience with extra indulgence.

  • Coffee or Espresso: The robust flavors of coffee elevate the chocolate notes, creating a delightful pairing that energizes your afternoon treat.

  • Chocolate Ganache: Drizzling warm chocolate ganache transforms your cupcakes into an extra decadent dessert, adding an even more luxurious chocolate layer.

  • Creamy Cheesecake Mousse: This airy mousse complements the cream cheese center, enhancing the creamy decadence without overwhelming the palate.

  • Minty Lemonade: A refreshing mint lemonade cuts through the sweetness, providing a zesty contrast that leaves you feeling invigorated.

  • Pecan Pie Bars: These rich, nutty treats offer a contrasting texture and flavor, making for an exciting dessert spread at your gathering.

  • Sparkling Water with Lime: The fizzy bubbles and citrus zing refresh your palate, ensuring that each bite of these Black Bottom Cupcakes remains delightful.

Black Bottom Cupcake Variations

Feel free to explore these delightful twists and swaps to make these cupcakes your own!

  • Gluten-Free: Substitute all-purpose flour with a 1:1 gluten-free baking blend for a deliciously inclusive treat.

  • Dairy-Free: Use a dairy-free cream cheese alternative and coconut oil instead of regular oil for a tasty option that everyone can enjoy.

  • Nutty Surprise: Fold in 1/2 cup of chopped nuts, like walnuts or pecans, for a delightful crunch that complements the creamy filling.

  • Minty Fresh: Add 1 teaspoon of peppermint extract to the cupcake batter for a refreshing twist that pairs beautifully with chocolate.

  • Spicy Kick: Incorporate a pinch of cayenne pepper into the cocoa powder to enhance the chocolate flavor with a surprising kick of heat.

  • Fruit Burst: Mix in 1/2 cup of fresh raspberries or chopped cherries into the cream cheese filling for a fruity zing that elevates each bite.

  • Caramel Drizzle: Drizzle warm salted caramel over the baked cupcakes for an added layer of decadence that will impress any sweet tooth.

  • Chocolate Chip Variations: Experiment with different types of chocolate chips, such as white chocolate or dark chocolate, to change the flavor profile each time!

How to Store and Freeze Black Bottom Cupcakes

Room Temperature: Keep your Black Bottom Cupcakes at room temperature in an airtight container for up to 2 days. This preserves their delightful moisture and flavor.

Fridge: For longer freshness, refrigerate the cupcakes in an airtight container for up to 5 days. Just allow them to come to room temperature before serving for the best taste.

Freezer: Freeze the unfrosted Black Bottom Cupcakes individually wrapped in plastic wrap, then place them in a freezer-safe bag. They will stay fresh for up to 2 months.

Reheating: To enjoy them warm, simply pop your cupcakes in the microwave for about 10-15 seconds, ensuring you savor that sweet, gooey cream cheese center!

Chef's Helpful Tips

  • For the best Black Bottom Cupcakes, always use room temperature cream cheese to ensure a smooth filling that mixes easily.
  • Avoid overmixing the batter after adding wet ingredients, as this can lead to dense cupcakes instead of light and fluffy ones.
  • When filling the cupcake liners, remember to leave enough space to allow them to rise without overflowing.
  • To check for doneness, insert a toothpick into the center of a cupcake; it should come out clean for perfect results.

Black Bottom Cupcakes Recipe FAQs

What’s the best way to select ripe ingredients for Black Bottom Cupcakes?
Absolutely! When choosing your ingredients, especially the cream cheese, make sure it’s softened to room temperature, making it easier to mix smoothly. For the chocolate chips, select high-quality semi-sweet chips for that perfect melt-in-your-mouth experience!

How should I store my Black Bottom Cupcakes after baking?
For optimal freshness, store your Black Bottom Cupcakes in an airtight container at room temperature for up to 2 days. If you want to extend their life, refrigerate them for up to 5 days. Just let them come to room temperature before serving to enjoy their delightful texture!

Can I freeze Black Bottom Cupcakes, and if so, how?
Absolutely! To freeze your Black Bottom Cupcakes, allow them to cool completely, then wrap each one individually in plastic wrap. Place the wrapped cupcakes in a freezer-safe bag, and they will stay fresh for up to 2 months. When you’re ready to enjoy them, simply thaw in the fridge overnight or microwave for about 10-15 seconds for a warm treat!

What should I do if my cupcakes become dense instead of fluffy?
Very! If your Black Bottom Cupcakes turn out dense, it might be due to overmixing the batter once the wet ingredients are added. Be sure to mix until just combined to maintain a light, airy texture. Also, ensure your baking soda is fresh—expired leavening agents won’t help your cupcakes rise!

Are there any dietary considerations I should be aware of when making Black Bottom Cupcakes?
Definitely! If you’re serving these cupcakes to guests with dietary restrictions, keep in mind the cream cheese and egg in the filling can be modified. For a dairy-free option, look for vegan cream cheese alternatives, and an egg substitute like applesauce or flaxseed meal can work well too. Just remember to adjust the consistency for the filling!

What if I can’t find cocoa powder for the Black Bottom Cupcakes?
If cocoa powder isn’t available, you can substitute it with unsweetened dark chocolate melted down. Use about 1 ounce of melted chocolate for every 3 tablespoons of cocoa powder called for in the recipe. This will result in a beautifully rich flavor profile while keeping the spirit of those delightful Black Bottom Cupcakes intact!

Black Bottom Cupcakes

Black Bottom Cupcakes

Indulge in Black Bottom Cupcakes, a delightful dessert that combines rich chocolate and creamy fillings.
Print Recipe Pin Recipe
Prep Time 15 minutes mins
Cook Time 18 minutes mins
Total Time 33 minutes mins
Servings: 12 cupcakes
Course: DESSERT RECIPES
Cuisine: American
Calories: 250
Ingredients Equipment Method Nutrition Notes

Ingredients
  

Cupcake Batter
  • 1.5 cups Flour adds the essential structure for a fluffy texture.
  • 1 cup Sugar sweetens the batter perfectly; you can adjust for less sweetness if desired.
  • 0.25 cups Cocoa Powder brings rich chocolate flavor that defines these cupcakes.
  • 1 tsp Baking Soda helps the cupcakes rise beautifully while baking.
  • 1 cup Water keeps the batter moist and enhances the overall flavor.
  • 0.33 cups Oil provides added moisture and a tender crumb.
  • 1 tsp Vinegar reacts with baking soda to boost the cupcake’s fluffiness.
  • 1 tsp Vanilla adds warmth and depth to the chocolate flavor.
Cream Cheese Filling
  • 8 oz Cream Cheese, Softened creates a deliciously creamy surprise in each cupcake.
  • 0.33 cups Sugar sweetens the cream cheese mix, balancing the chocolate flavor.
  • 1 cup Chocolate Chips gives an extra chocolate hit that no one can resist!

Equipment

  • muffin pan
  • Mixing bowls
  • Whisk
  • mixer

Method
 

Instructions
  1. Preheat your oven to 350°F (175°C) and line a muffin pan with paper liners.
  2. Beat together the softened cream cheese, egg, and sugar in a small bowl until smooth. Then, stir in the chocolate chips and set aside.
  3. Whisk together flour, sugar, cocoa powder, and baking soda in a medium bowl.
  4. Add the water, oil, vinegar, and vanilla to the dry ingredients. Beat until well combined and smooth.
  5. Fill each liner about 1/3 full with the chocolate cupcake batter, then add a heaping teaspoon of the cream cheese mixture on top.
  6. Bake the cupcakes for 16-18 minutes until a toothpick comes out clean.

Nutrition

Serving: 1cupcakeCalories: 250kcalCarbohydrates: 30gProtein: 4gFat: 13gSaturated Fat: 8gPolyunsaturated Fat: 0.5gMonounsaturated Fat: 3gCholesterol: 40mgSodium: 150mgPotassium: 160mgFiber: 1gSugar: 18gVitamin A: 5IUCalcium: 4mgIron: 8mg

Notes

Optional: Serve with a dollop of whipped cream for an extra indulgent treat.

Tried this recipe?

Let us know how it was!

Filed Under: BREAKFAST & BRUNCH

Immune Boosting Sunshine Citrus Smoothie

December 3, 2025 by JudyWhite Leave a Comment

As the vibrant colors of the season brighten my kitchen, I can’t help but think about the refreshing power of a good smoothie. The Immune Boosting Sunshine Citrus Smoothie has become my go-to remedy for those days when I need a little extra pep in my step. Picture this: the zesty aroma of freshly peeled oranges mingling with the tangy burst of lemon, all blended into a creamy delight with just a hint of sweetness.

This recipe came about on a particularly sunny afternoon when I was searching for something quick yet nourishing to help boost my immune system. With minimal effort—just ten minutes from start to finish—I crafted a smoothie that not only tastes divine but also delivers a punch of protein and vitamins with every sip. It’s perfect for busy mornings or an energizing snack in the afternoon. Grab your blender, and let’s bring some sunshine into your day!

Why You'll Love This Immune Boosting Sunshine Citrus Smoothie

  • This smoothie is a breeze to make, taking just ten minutes from start to finish, making it perfect for busy mornings or quick snacks.
  • You’ll love the bright and refreshing flavors that come from the combination of oranges and lemon, giving you a delicious boost of nutrition.
  • Its versatility means you can easily adjust the sweetness or add additional fruits according to your preference.
  • Plus, the vibrant colors and garnishing options make it an eye-catching treat that will impress anyone you serve it to.

Immune Boosting Sunshine Citrus Smoothie Ingredients

For the Smoothie

  • Fresh oranges – peel them for a zesty, vibrant base full of vitamin C.
  • Lemon juice – adds a tangy kick and enhances the immune-boosting powers of the smoothie.
  • Ripe banana – for natural sweetness and creaminess, making your smoothie smooth and delightful.
  • Plain Greek yogurt – introduces a protein punch that keeps you satisfied longer.
  • Honey or maple syrup – sweeten to taste; they’re great alternative sweeteners if you’re looking for a natural option.
  • Ice cubes – chill your smoothie to perfection for that refreshing, slushy texture.

Enjoy this Immune Boosting Sunshine Citrus Smoothie as a delicious way to brighten your day!

How to Make Immune Boosting Sunshine Citrus Smoothie

  1. Gather your ingredients. Start by assembling 2 fresh oranges, 1 lemon, 1 ripe banana, Greek yogurt, honey or maple syrup, and ice cubes. This will ensure a smooth and easy blending process!

  2. Peel the oranges and banana. Make sure to remove any seeds from the oranges, as they may affect the texture of your smoothie. You’ll want everything nice and ready for blending!

  3. Combine in a blender. Add the peeled oranges, freshly squeezed lemon juice, ripe banana, Greek yogurt, honey or maple syrup, and ice cubes to your blender. This mix is the heart of your Immune Boosting Sunshine Citrus Smoothie.

  4. Blend on high. Pulse the mixture until it’s smooth and creamy, about 30-60 seconds. If it’s too thick, feel free to adjust the consistency by adding a splash of water!

  5. Taste your smoothie. Before serving, take a moment to savor the flavors. Add more sweetener if desired—everyone loves a personalized touch to their delightful drink.

  6. Pour into glasses. Serve your gorgeous smoothie in tall glasses, and for a beautiful presentation, you can garnish with fresh orange slices or mint leaves on top.

Optional: For an extra nutrient boost, sprinkle some chia seeds on top!

Exact quantities are listed in the recipe card below.

How to Store and Freeze Immune Boosting Sunshine Citrus Smoothie

Refrigerator: Store any leftover smoothie in an airtight container for up to 2 days. Give it a good shake or stir before serving, as separation may occur.

Freezer: For longer storage, portion out the smoothie into freezer-safe bags or containers. It can be kept frozen for up to 3 months. Thaw in the fridge overnight before enjoying.

Preparation for Freezing: Pour the smoothie into ice cube trays for single-serving sizes. Once frozen, transfer the cubes to a freezer bag. Blend a few cubes with a splash of juice or water for a quick and refreshing treat.

Reheating: To enjoy, blend the thawed smoothie with more ice if you prefer it chilled. Adjust sweetness as needed for the best flavor experience.

What to Serve with Immune Boosting Sunshine Citrus Smoothie?

Brighten your meal table with delightful pairings that enhance the refreshing essence of this smoothie.

  • Avocado Toast: Creamy avocado on crispy bread complements the smoothie’s zesty notes, creating a balanced, satisfying breakfast.

  • Granola Parfait: Layered with yogurt, granola, and fresh berries, this delectable dish brings crunch and sweetness, perfect alongside your smoothie.

  • Chia Pudding: The subtle nuttiness of chia pudding adds a delightful textural contrast, enhancing the overall health benefits of your meal.

  • Oatmeal Bowl: A warm bowl of oatmeal topped with fruit echoes the smoothie’s flavors and provides lasting energy, ideal for powering through your day.

  • Coconut Water: Refreshing coconut water hydrates while introducing a tropical twist that pairs seamlessly with the smoothie’s citrus base, making it a perfect drink option.

  • Fruit Salad: A bright mix of seasonal fruits not only complements the smoothie but also adds vitamin variety and a splash of color to your plate.

Each pairing enhances the invigorating, healthful qualities of the Immune Boosting Sunshine Citrus Smoothie, ensuring a well-rounded, vibrant meal experience!

Make Ahead Options

These Immune Boosting Sunshine Citrus Smoothie components are perfect for meal prep enthusiasts! You can peel the oranges and banana, then store them in an airtight container in the refrigerator for up to 24 hours to retain their freshness. Additionally, you can prepare and combine the Greek yogurt, lemon juice, and sweetener in advance, refrigerating this mixture for up to 3 days. When you’re ready to enjoy the smoothie, simply blend the prepped fruits with the yogurt mixture and ice cubes until smooth. This way, you get a delightful smoothie that saves you time during busy mornings while still tasting just as refreshing and vibrant as when made fresh!

Immune Boosting Sunshine Citrus Smoothie Variations

Feel free to personalize this smoothie and make it your own with these delightful twists!

  • Dairy-Free: Swap Greek yogurt for coconut yogurt or almond milk for a creamy, plant-based option. The tropical flavor of coconut will transport you to a sunny beach paradise!

  • Extra Protein: Add a scoop of your favorite protein powder. Not only does this boost the nutrition, but it also makes the smoothie filling enough for a meal replacement.

  • Sweetness Swap: Use agave nectar or stevia instead of honey or maple syrup for a lower-calorie alternative. This small change can make a big difference for those watching their sugar intake.

  • Berry Blast: Blend in a handful of frozen berries for a fruity twist and added antioxidants. The pop of color from berries will not only enhance the visual appeal but also deepen the flavor profile.

  • Spicy Kick: Toss in a pinch of cayenne pepper for an unexpected warm spice that elevates the citrus notes. Just a little heat will awaken your taste buds in the most delightful way!

  • Nutty Texture: Throw in a tablespoon of almond butter or peanut butter. It’ll create a velvety consistency and a rich flavor that makes this smoothie even more satisfying.

  • Herb Infusion: Add a handful of fresh spinach or kale for an extra nutrient boost without sacrificing taste. With the bright citrus, you won’t even notice the greens!

  • Choco Citrus: Incorporate a tablespoon of cocoa powder for a chocolatey twist. Chocolate and citrus create a beautifully balanced and indulgent experience that’ll satisfy your sweet tooth perfectly!

Chef's Helpful Tips

  • When making the Immune Boosting Sunshine Citrus Smoothie, ensure that your fruits are ripe to maximize sweetness and flavor.
  • Avoid using overly ripe bananas, as they can affect the texture if too mushy.
  • For an extra creamy consistency, blend the yogurt and fruits first before adding ice cubes to avoid clumps.
  • Always taste the smoothie before serving; this allows you to adjust sweetness and tanginess to your liking, making every sip truly refreshing.

Immune Boosting Sunshine Citrus Smoothie Recipe FAQs

What should I look for when selecting oranges and lemons?
Absolutely! When choosing oranges, look for ones that are firm and heavy for their size, which indicates juiciness. Their skin should be bright and smooth, without any dark spots. For lemons, opt for those that have a vibrant yellow color and feel slightly soft to the touch—both signs of ripeness. If they are too hard, they might not be juicy enough for your smoothie.

How should I store leftover smoothie?
Very simple! Store any leftover Immune Boosting Sunshine Citrus Smoothie in an airtight container in the refrigerator for up to 2 days. Always give it a good shake or stir before serving, as separation will happen. If you notice a watery layer on top, it’s perfectly okay; just mix it back in!

Can I freeze the Immune Boosting Sunshine Citrus Smoothie?
Sure thing! To freeze, pour the smoothie into freezer-safe bags or containers. You can keep it frozen for up to 3 months. For convenience, consider pouring the smoothie into ice cube trays first. Then, transfer the frozen cubes to a freezer bag for easy portioning. To enjoy, simply thaw overnight in the fridge or blend a few cubes with a splash of juice for a refreshing boost!

What are some common troubleshooting tips if my smoothie is too thick?
If you find your smoothie too thick, no worries! Simply add a little water or your choice of juice—start with a tablespoon at a time, blending in between until you reach your desired consistency. If it ends up being too thin, try adding more Greek yogurt or a banana to thicken it back up, and give it another blend. Everyone’s taste is different, so feel free to adjust until it suits you!

Can I make this smoothie if I have allergies?
Absolutely! If you have allergies to dairy, you can substitute the plain Greek yogurt with a non-dairy yogurt like coconut or almond yogurt. For those allergic to citrus, consider blending fruits like strawberries or mangoes instead, while still keeping it refreshing with a yogurt base. Always read labels to ensure safety, and feel free to make this recipe yours!

Can my pet drink this smoothie?
Be cautious! While some ingredients may not be harmful in small amounts, the citrus in this smoothie isn’t great for pets, especially dogs and cats. If you want to treat your furry friend, consider making a pet-friendly smoothie using banana and yogurt without any citrus. Always check with your vet for safe snack options!

Immune Boosting Sunshine Citrus Smoothie

Immune Boosting Sunshine Citrus Smoothie

Enjoy this Immune Boosting Sunshine Citrus Smoothie packed with refreshing flavors and immune-boosting nutrients.
Print Recipe Pin Recipe
Prep Time 10 minutes mins
Total Time 10 minutes mins
Servings: 2 cups
Course: BREAKFAST & BRUNCH
Cuisine: American
Calories: 250
Ingredients Equipment Method Nutrition Notes

Ingredients
  

For the Smoothie
  • 2 fresh oranges peeled
  • 1 tablespoon lemon juice
  • 1 medium ripe banana
  • 1 cup plain Greek yogurt
  • to taste honey or maple syrup natural sweeteners
  • 1 cup ice cubes for chilling

Equipment

  • blender

Method
 

How to Make Immune Boosting Sunshine Citrus Smoothie
  1. Gather your ingredients: 2 fresh oranges, 1 lemon, 1 ripe banana, Greek yogurt, honey or maple syrup, and ice cubes.
  2. Peel the oranges and banana, removing any seeds from the oranges.
  3. Combine the peeled oranges, lemon juice, banana, Greek yogurt, sweetener, and ice in a blender.
  4. Blend on high until smooth and creamy, about 30-60 seconds.
  5. Taste and adjust sweetness if needed.
  6. Pour into glasses and garnish with fresh orange slices or mint leaves if desired.

Nutrition

Serving: 1cupCalories: 250kcalCarbohydrates: 40gProtein: 10gFat: 3gSaturated Fat: 1gMonounsaturated Fat: 1gCholesterol: 5mgSodium: 50mgPotassium: 400mgFiber: 5gSugar: 20gVitamin A: 500IUVitamin C: 120mgCalcium: 150mgIron: 1mg

Notes

For extra nutrients, top with chia seeds.

Tried this recipe?

Let us know how it was!

Filed Under: BREAKFAST & BRUNCH

  • « Previous Page
  • 1
  • …
  • 12
  • 13
  • 14

Recent Posts

  • Crispy Potatoes in Oven
  • Lucky Charms Pancakes
  • Cheeseburger
  • Boiled Corn on the Cob
  • St. Patrick’s Day Dessert Parfaits

Recent Comments

No comments to show.

Footer

  • Contact
  • Privacy Policy
  • About Us
  • Terms
  • ↑ back to top

Copyright © 2024 www.Forkono.com

Table Of Content