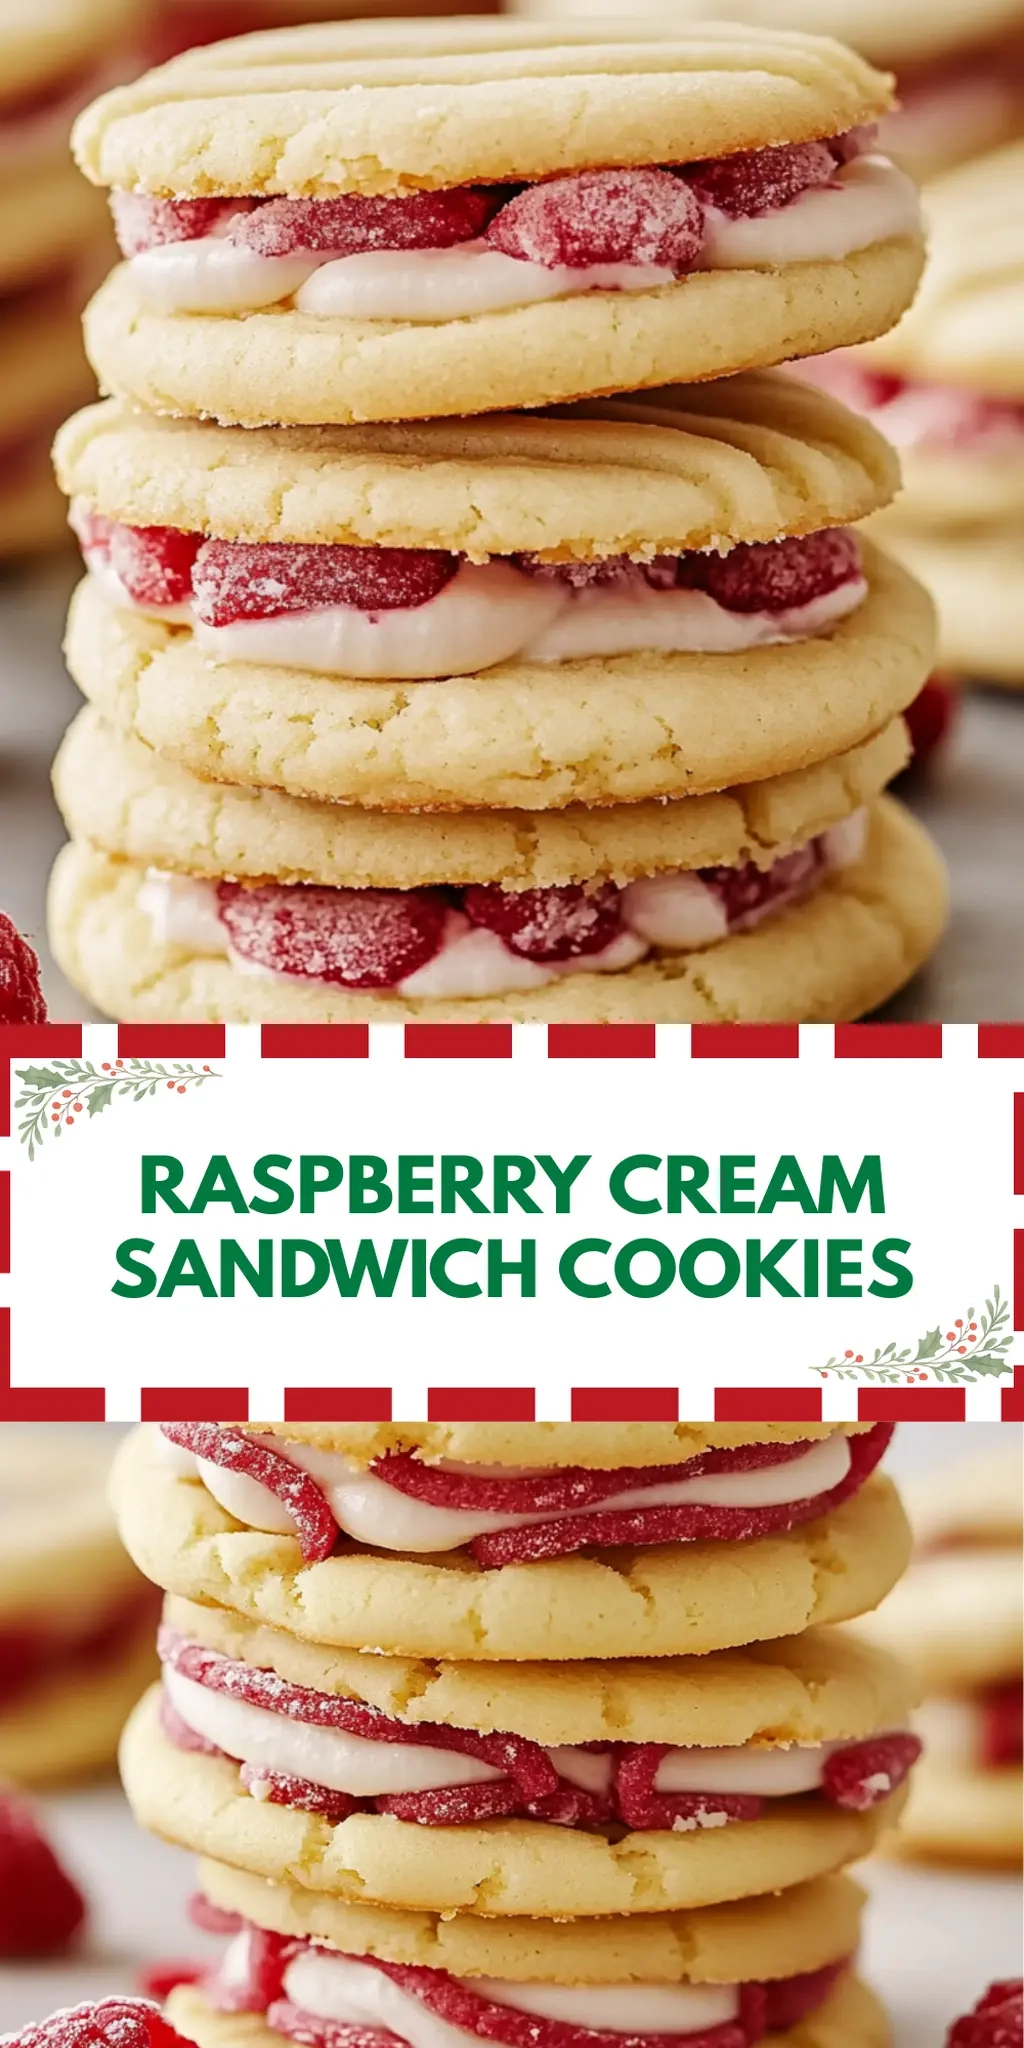
There’s a whimsical charm to baking, especially when it involves the delightful pairing of raspberries and creamy white chocolate. Picture this: a cozy afternoon, the warm sun streaming through the window, and the sweet aroma of Raspberry Cream Sandwich Cookies filling your home. These cookies are not just your average treat—they’re an enchanting combination of crunchy exteriors and luscious, fruity filling that will leave you and your loved ones craving more.
I first whipped these up during a laid-back weekend, searching for a way to use those freeze-dried raspberries I stumbled upon in the back of my pantry. The moment I took my first bite, it felt like a mini celebration of flavor, and I knew I had to share them. Perfect for any occasion, from a casual coffee catch-up to an elegant dessert table, these sandwich cookies are sure to impress without keeping you chained to the kitchen for hours.
So grab your apron and let’s dive into this easy yet crowd-pleasing recipe that will surely elevate your dessert game!
Why You'll Love This Raspberry Cream Sandwich Cookies
- These Raspberry Cream Sandwich Cookies are incredibly easy to make, allowing you to whip up a delightful treat without spending all day in the kitchen.
- The explosion of raspberry and white chocolate flavors creates a harmonious taste that will leave your taste buds dancing with joy.
- Their versatility makes them perfect for any occasion, whether it’s a cozy family gathering or an elegant soirée.
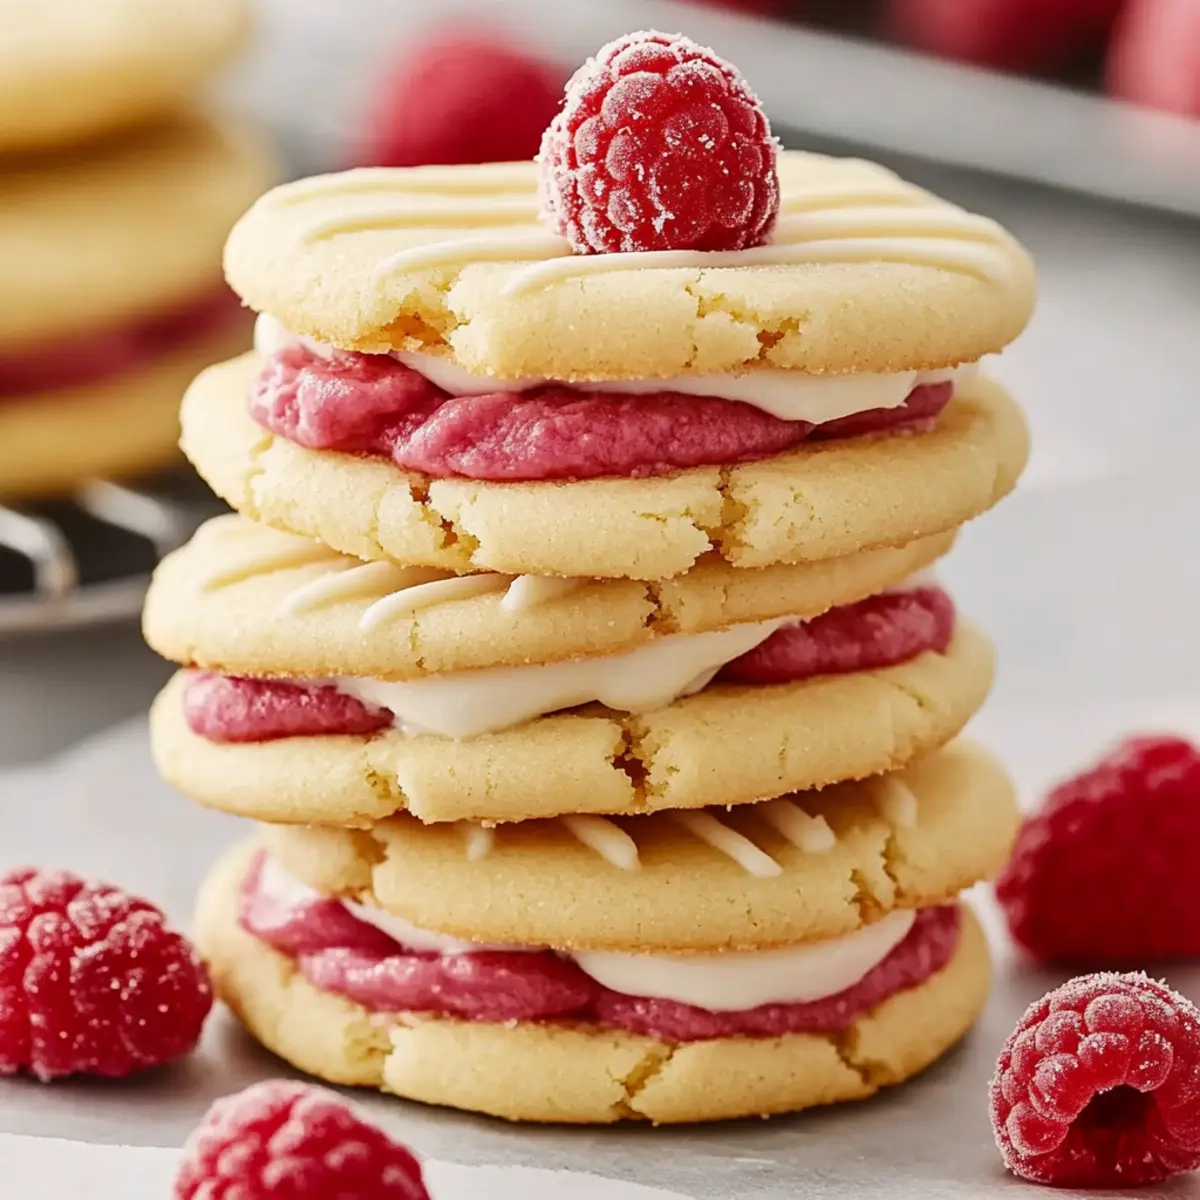
- Plus, the visual appeal of these beautiful cookies drizzled with white chocolate and sprinkled with crushed raspberries will impress anyone who lays eyes on them.
Raspberry Cream Sandwich Cookies Ingredients
• Get ready to bake something special!
For the Cookies
- All-purpose flour – This forms the base of your cookies for a perfect texture.
- Baking powder – Helps the cookies rise and stay soft.
- Fine sea salt – Enhances the sweetness of the cookies beautifully.
- Unsalted butter – Softened, it provides richness and helps create that delightful texture.
- Granulated sugar – Sweetens your cookies to perfection.
- Large egg – Binds the ingredients together while adding moisture.
- Vanilla extract – Adds a lovely depth of flavor; pure vanilla is best for the richest taste.
For the Filling
- Freeze-dried raspberries – These give a concentrated raspberry flavor; grind them for the best consistency.
- White baking chocolate – Melts beautifully for a creamy filling; opt for high-quality chocolate for a richer taste.
- Heavy cream – Whipped into the chocolate, it creates a luscious filling.
For the Topping
- Whole freeze-dried raspberries – Use these for an eye-catching finish that enhances flavor.
- White chocolate – Drizzle this over the tops for a decadent touch.
Now you’re all set to create those delightful Raspberry Cream Sandwich Cookies!
How to Make Raspberry Cream Sandwich Cookies
-
Preheat your oven to 350°F. Line two baking sheets with parchment paper to prevent sticking and ensure even baking.
-
Whisk together the flour, baking powder, and salt in a medium bowl until well combined. This mixture will create the perfect base for your cookie dough.
-
Beat the softened butter and granulated sugar in a large bowl with an electric mixer until the mixture is light and fluffy, about 2 to 3 minutes. Scrape down the bowl’s sides to ensure everything is well mixed. Then, add the egg and vanilla, beating until fully combined. Gradually beat in the flour mixture until just incorporated.
-
Scoop the dough using a small spring-loaded scoop and place it in a shallow dish with the remaining 2 tablespoons of sugar. Roll each scoop of dough in the sugar to coat. Arrange them 2 inches apart on the prepared baking sheets and gently flatten each ball slightly with your palm.
-
Bake for about 9-10 minutes, or until the cookies are set and slightly golden around the edges. Let them cool for 5 minutes on the sheet before transferring to a wire rack to cool completely.
-
Grind the freeze-dried raspberries into a fine powder using a food processor or mortar and pestle, then sift it twice to remove any seeds for a smooth filling texture.
-
Melt the white chocolate in a double boiler or microwave. Once melted, remove it from heat and whisk in the heavy cream until fully blended. Stir in the raspberry powder and allow the mixture to cool to room temperature.
-
Spread about 1 heaping teaspoon of raspberry filling onto the bottom of half the cookies. Top them with the remaining cookies to form sandwiches.
-
Decorate by filling a piping or zip-top bag with the remaining melted white chocolate. Drizzle it over the tops of each sandwich and finish with a sprinkle of crushed freeze-dried raspberries for an extra pop of color.
Optional: Serve with a cup of tea or coffee for a delightful afternoon treat!
Exact quantities are listed in the recipe card below.
Raspberry Cream Sandwich Cookies Variations
Feel free to let your creativity shine as you adapt this delightful recipe to suit your taste!
-
Gluten-Free: Substitute all-purpose flour with a gluten-free blend for a tasty, celiac-friendly option. Just make sure your baking powder is gluten-free, too!
-
Dairy-Free: Swap unsalted butter with coconut oil and use dairy-free chocolate to create a rich, creamy filling everyone can enjoy. The texture will slightly differ, but the flavor will remain incredible.
-
Fruitful Twist: Mix in a tablespoon of lemon zest or use freeze-dried strawberries instead of raspberries for a refreshing citrusy kick that brightens every bite. Both variations provide a delightful contrast to the creaminess.
-
Nutty Addition: Incorporate finely chopped nuts like almonds or hazelnuts into the cookie dough for added crunch and flavor. The nutty texture balances beautifully with the smooth filling.
-
Chili Chocolate: Sprinkle a pinch of cayenne pepper into your melted white chocolate for a whimsical kick that pairs surprisingly well with the sweet raspberry flavor. Spice up your desserts and impress your guests!
-
Minty Fresh: Fold in crushed mint leaves into the filling or topping for a refreshing minty twist that brings a whole new dimension to these scrumptious cookies. It’s perfect for spring gatherings!
-
Layered Delight: Transform these cookies into a cake by doubling the recipe, stacking the cookies with filling in between, and frosting the top with additional melted chocolate. A show-stopping dessert fit for any celebration!
-
Different Shapes: Use fun cookie cutters to create various shapes instead of traditional circles. You’ll add a playful element that kids and adults alike will love! Enjoy the process and have fun decorating!
Make Ahead Options
These Raspberry Cream Sandwich Cookies are perfect for meal prep, allowing you to enjoy them even on the busiest days! You can prepare the cookie dough up to 24 hours in advance by wrapping it tightly in plastic wrap and refrigerating. The baked cookies can also be stored in an airtight container for up to 3 days to maintain their freshness. If you want to prep the raspberry filling, mix it and keep it in the fridge in a sealed container for up to 3 days. When ready to serve, simply sandwich the filling between the cookies and drizzle with white chocolate for that delightful finish. By prepping ahead, you ensure that these treats are just as delicious and perfect for any occasion!
How to Store and Freeze Raspberry Cream Sandwich Cookies
Room Temperature: Keep the cookies in an airtight container at room temperature for up to 3 days to maintain their freshness and texture.
Fridge: If you prefer a chilled treat, store the Raspberry Cream Sandwich Cookies in the refrigerator for up to 5 days. Just be sure to separate layers with parchment paper to avoid sticking.
Freezer: For longer storage, freeze the cookies without filling in a single layer. Once frozen, transfer to an airtight container and enjoy them for up to 2 months. Thaw before filling and decorating.
Reheating: If enjoyed warm, pop the cookies in a preheated oven at 350°F for about 5 minutes before serving, allowing the flavors to come back to life!
What to Serve with Raspberry Cream Sandwich Cookies?
Elevate your dessert experience with delightful pairings that enhance the sweet, tangy flavors of these charming cookies.
-
Fresh Berries: Serve alongside a mix of fresh raspberries and strawberries for a vibrant, fruity contrast that echoes the cookie’s filling.
-
Vanilla Ice Cream: A scoop of creamy vanilla ice cream complements the cookies beautifully, providing a rich and cooling balance to the sweet flavors.
-
Herbal Tea: Steep a fragrant herbal tea, like chamomile or mint, to cleanse the palate and enhance the cookie’s fruity notes during your tea time.
-
Sparkling Water with Lime: Refresh your senses with a glass of sparkling water adorned with fresh lime slices. Its zesty flavor cuts through the sweetness of the cookies.
-
Cream Cheese Frosting: Spread a thin layer of cream cheese frosting on top for a tangy twist that adds depth and creaminess, taking indulgence to the next level.
-
Lemonade: Enjoy with a chilled glass of homemade lemonade for a fun, sunny pairing; the tartness of the lemonade complements the raspberry filling perfectly.
-
Chocolate-covered Strawberries: These delightful treats echo the white chocolate drizzle on the cookies, creating a symphony of flavors that any sweet tooth would adore.
Remember, the right pairing can elevate your Raspberry Cream Sandwich Cookies from delightful to unforgettable!
Chef's Helpful Tips
- Start by ensuring your butter is at room temperature for easy mixing, which results in a lighter texture for the Raspberry Cream Sandwich Cookies.
- Avoid overmixing the dough once you add the flour; stop as soon as you no longer see dry flour to prevent tough cookies.
- When baking, keep an eye on your cookies and rotate the trays halfway through to ensure even browning.
- Let the cookies cool completely on a wire rack to maintain their texture before adding the filling and decorations.
Raspberry Cream Sandwich Cookies Recipe FAQs
How do I choose the right freeze-dried raspberries?
Absolutely! Look for freeze-dried raspberries that are bright in color and free of dark spots or moisture. They should crumble easily when rubbed between your fingers. Avoid any that seem chewy or have an off smell, as these may be old or improperly stored.
What’s the best way to store leftover Raspberry Cream Sandwich Cookies?
To keep your cookies fresh, store them in an airtight container at room temperature for up to 3 days. You can also place them in the fridge for up to 5 days for a delightful chilled treat. Just remember to separate layers with parchment paper to avoid sticking.
Can I freeze Raspberry Cream Sandwich Cookies?
Yes, you can! To freeze, first place the filled cookies on a baking sheet in a single layer and freeze until solid. Afterward, transfer them to an airtight container and enjoy for up to 2 months. When you’re ready to enjoy, just thaw them at room temperature and then indulge!
What do I do if my cookies spread too much when baking?
Oh no! If that happens, it’s likely due to melted butter or too much mixing. Ensure that your butter is softened and not melted. When mixing, stop as soon as the dry ingredients are incorporated—this helps maintain structure. If they do spread, no worries; they’ll still taste fantastic!
Are these cookies suitable for those with allergies?
Great question! These Raspberry Cream Sandwich Cookies contain gluten, dairy, and eggs, making them unsuitable for those with related allergies. For a gluten-free version, you can substitute the all-purpose flour with a gluten-free blend. Always check ingredient labels, especially for chocolate, to ensure they meet your dietary needs.
How long do Raspberry Cream Sandwich Cookies last after baking?
Properly stored, these cookies will last for about 3 days at room temperature and up to 5 in the refrigerator. If you plan to keep them longer, freezing is the best option! They can stay fresh for up to 2 months in the freezer.
Raspberry Cream Sandwich Cookies
Ingredients
Equipment
Method
- Preheat your oven to 350°F. Line two baking sheets with parchment paper.
- Whisk together the flour, baking powder, and salt in a medium bowl.
- Beat the softened butter and granulated sugar in a large bowl with an electric mixer until fluffy, about 2 to 3 minutes. Add the egg and vanilla and beat until combined. Gradually beat in the flour mixture until just incorporated.
- Scoop the dough using a small spring-loaded scoop and roll in the remaining sugar. Arrange on baking sheets and gently flatten each ball slightly.
- Bake for about 9-10 minutes, or until set and slightly golden. Let cool on the sheet for 5 minutes before transferring to a wire rack.
- Grind the freeze-dried raspberries into a fine powder and sift to remove seeds.
- Melt the white chocolate and whisk in heavy cream until blended. Stir in the raspberry powder and cool to room temperature.
- Spread about 1 teaspoon of raspberry filling onto half the cookies and top with the remaining cookies.
- Drizzle melted white chocolate over the tops and sprinkle with crushed freeze-dried raspberries.