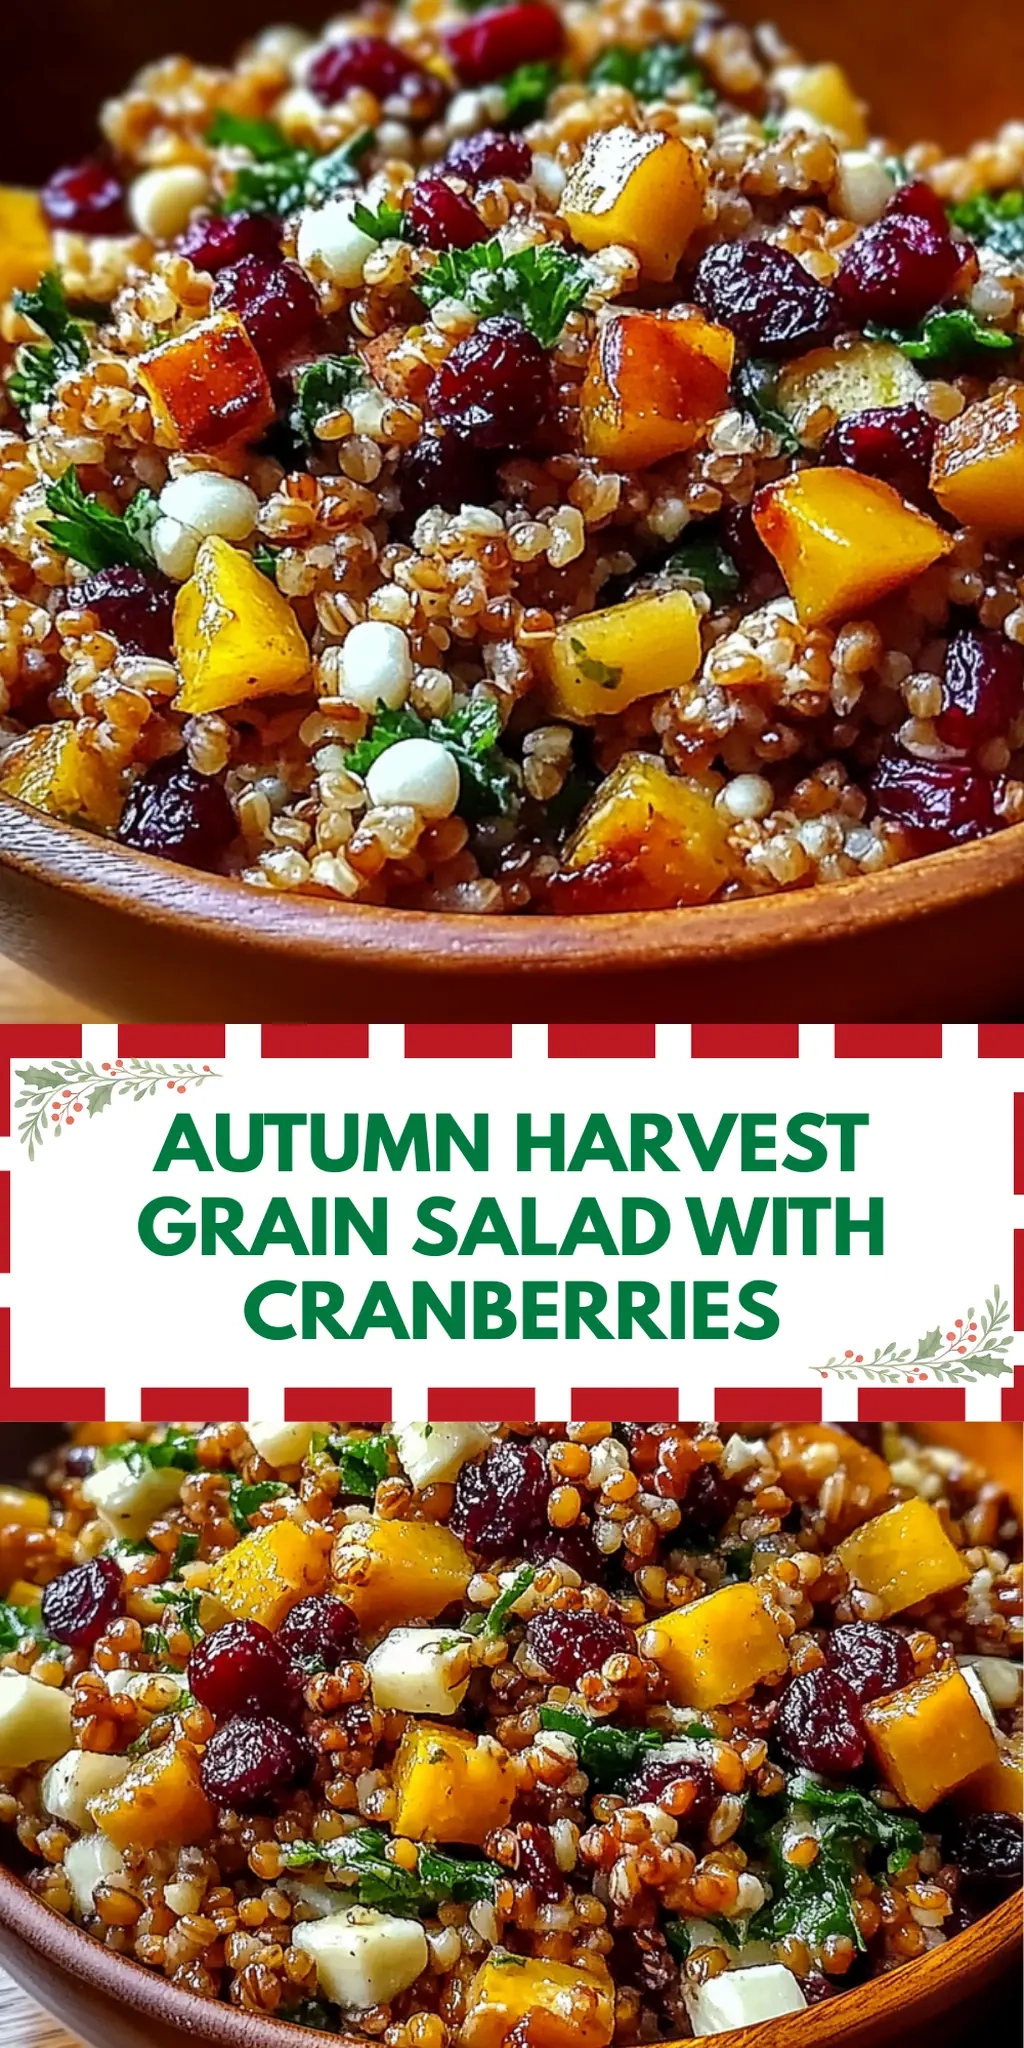
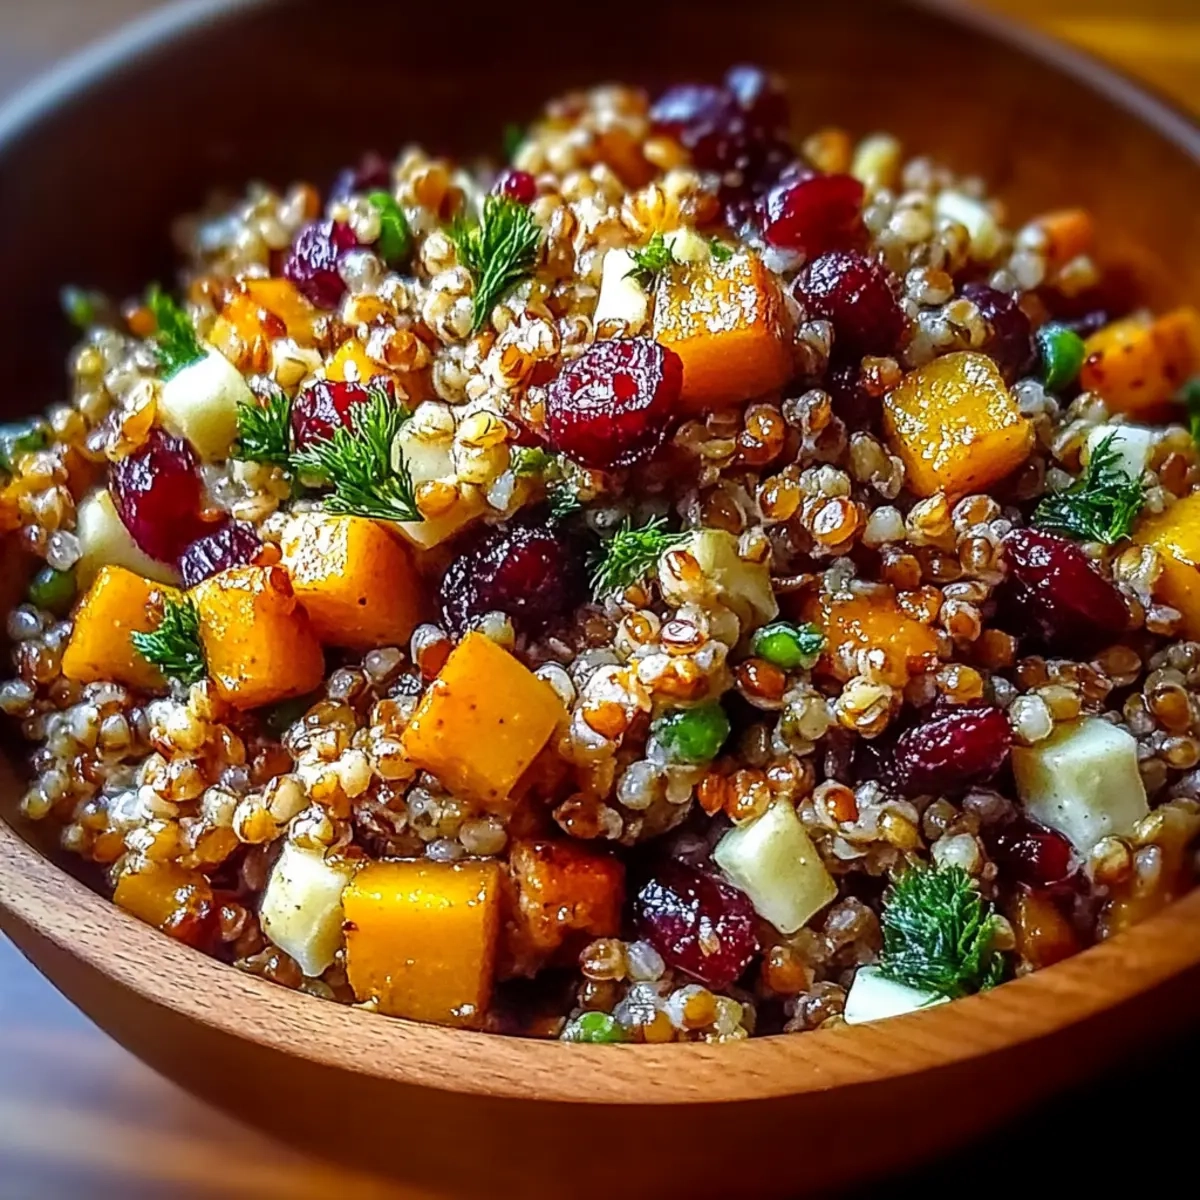
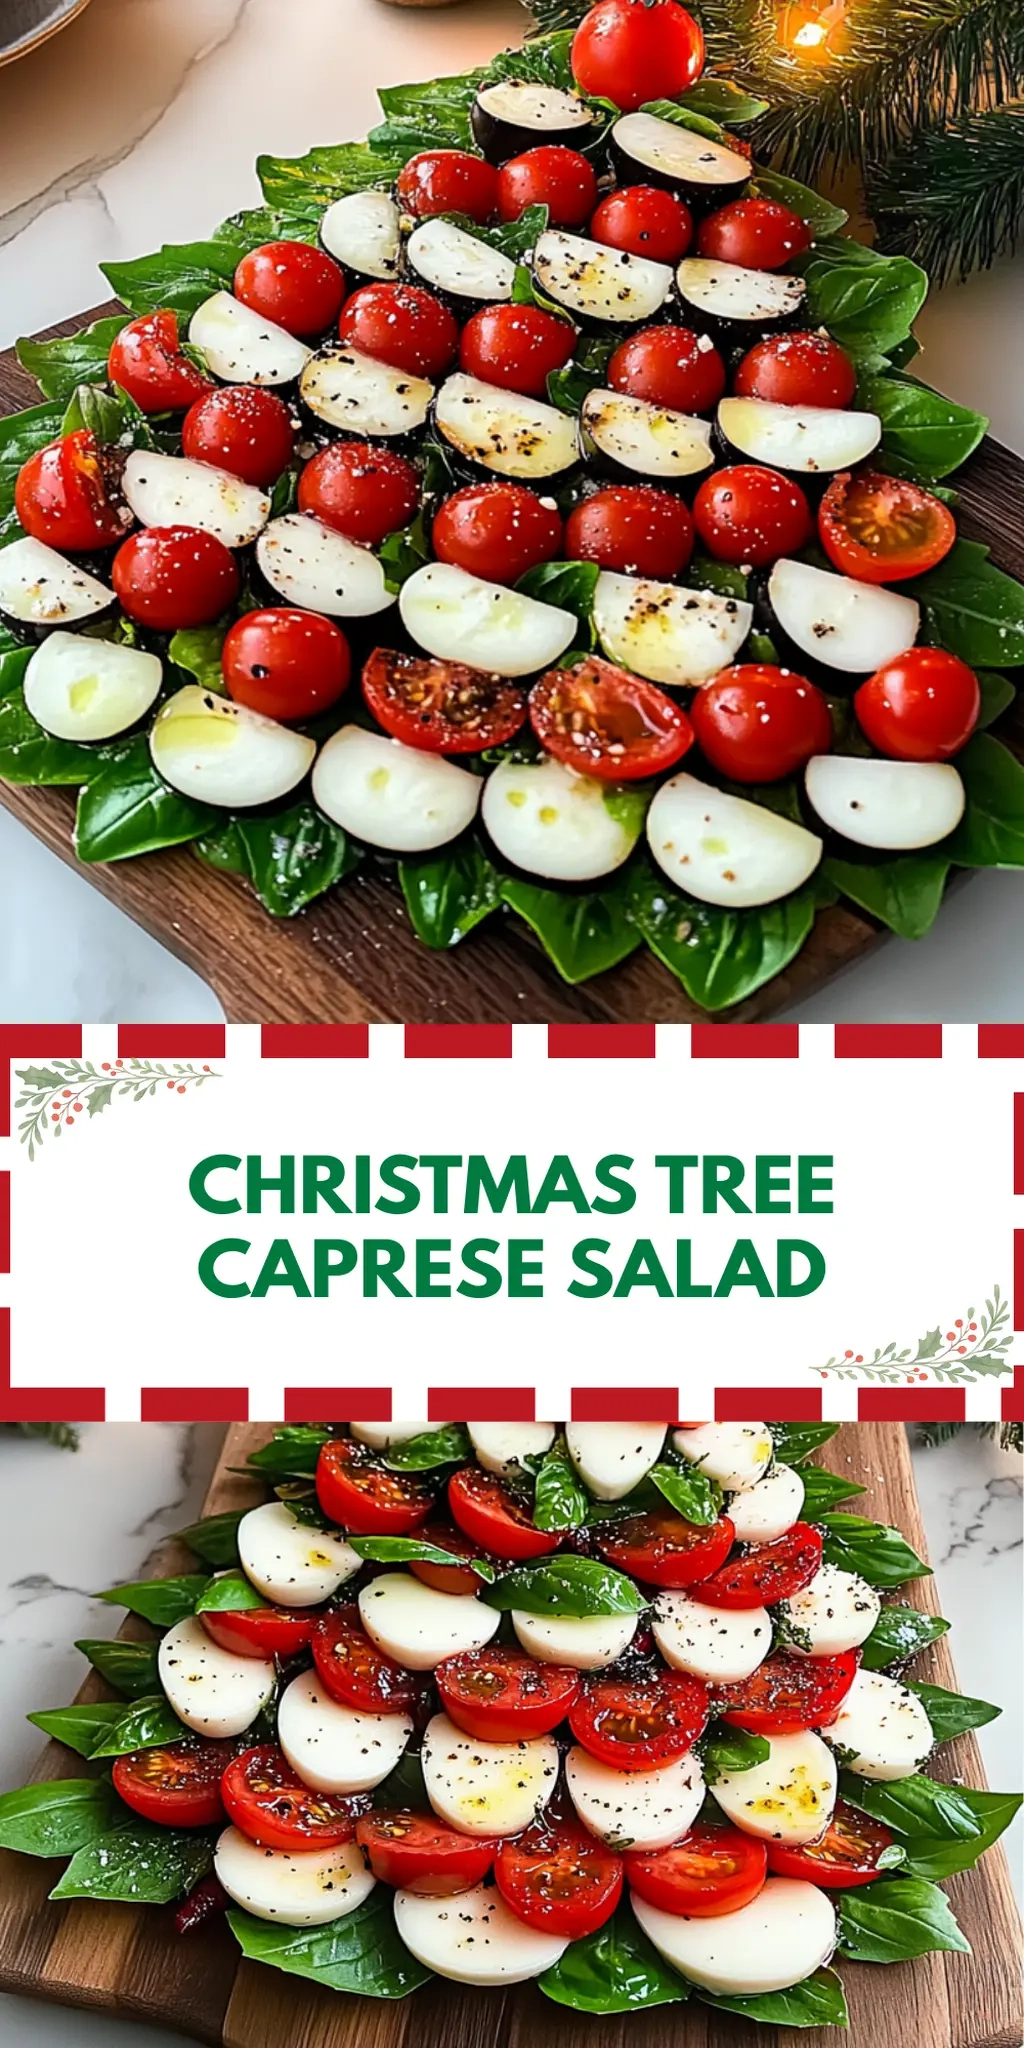
Forkono

  • BREAKFAST & BRUNCH
  • DESSERT RECIPES
  • DINNER RECIPES
  • LUNCH RECIPES
  • About uS
  • SNACKS & APPETIZERS
menu icon
go to homepage
  • BREAKFAST & BRUNCH
  • DESSERT RECIPES
  • DINNER RECIPES
  • LUNCH RECIPES
  • About uS
  • SNACKS & APPETIZERS
search icon
Homepage link
  • BREAKFAST & BRUNCH
  • DESSERT RECIPES
  • DINNER RECIPES
  • LUNCH RECIPES
  • About uS
  • SNACKS & APPETIZERS
×

Steakhouse Burger Sloppy Joes

December 16, 2025 by JudyWhite Leave a Comment

After a particularly hectic week, when takeout just didn’t cut it anymore, I found myself experimenting in the kitchen. That’s when I stumbled upon the magic of Steakhouse Burger Sloppy Joes. This recipe combines all the mouthwatering flavors of a classic burger with the comfort and ease of a sloppy joe, creating a dish that’s both familiar and refreshingly unique.

Picture this: juicy ground beef, sautéed with earthy mushrooms and sweet onions, all enveloped in a luscious, savory sauce. It’s a comforting hug in a bun, perfect for enjoying with friends or family on a cozy night in. Whether you’re not in the mood for the same old weeknight routine or you’re just craving something flavorful that isn’t fast food, these hearty sandwiches will satisfy your palate and bring a smile to your face. Plus, they come together in just 30 minutes! Let’s dive into this delicious recipe and elevate your dinner game.

Why You'll Love This Steakhouse Burger Sloppy Joes

  • This recipe is incredibly easy to make, allowing you to whip up a satisfying meal in just 30 minutes.
  • The rich flavors of juicy ground beef, sautéed mushrooms, and sweet onions create a mouthwatering combination that will leave everyone wanting more.
  • Versatile enough for a casual family dinner or a fun gathering with friends, these sloppy joes can cater to any occasion.
  • The visual appeal of the glossy sauce and colorful ingredients makes this dish as inviting to the eyes as it is to the taste buds.

Steakhouse Burger Sloppy Joes Ingredients

• Get ready for a flavor explosion!

For the Beef Mixture

  • Ground Beef – a rich, hearty base that delivers incredible flavor.
  • Butter – adds richness and helps sauté the vegetables to perfection.
  • Mushrooms – thinly sliced for a touch of earthiness that complements the beef.
  • White Onion – coarsely chopped to bring sweetness and depth to the dish.
  • Montreal Steak Seasoning – a perfect blend of spices that amplifies the savory taste.

For the Sauce

  • All-Purpose Flour – thickens the sauce and ensures a satisfying texture.
  • Chicken Broth – creates a savory liquid that binds the ingredients together beautifully.
  • Steak Sauce – adds that familiar, rich flavor of steak to elevate your Steakhouse Burger Sloppy Joes.
  • Dijon Mustard – gives a tangy kick that perfectly balances the savory elements.

How to Make Steakhouse Burger Sloppy Joes

  1. Heat a large skillet over medium-high heat. Add the butter, allowing it to melt and coat the pan. Stir in the mushrooms and onions, and sauté for about 5 to 7 minutes, until the veggies are golden and fragrant.

  2. Add the ground beef and Montreal steak seasoning to the skillet. Use a spatula to break up the meat while it cooks for about 5 minutes, or until browned and cooked through. Be sure to drain any excess fat if necessary.

  3. Sprinkle the flour over the meat and vegetables. Stir well to coat everything evenly, allowing it to cook for 1 minute to remove any raw flour taste. This step will help thicken your sauce later.

  4. Pour in the chicken broth slowly, stirring constantly to avoid lumps. Then, add the steak sauce and Dijon mustard. Bring everything to a gentle simmer, letting those amazing flavors meld together.

  5. Cook the mixture for 4 to 5 minutes, stirring occasionally. You’ll know it’s ready when the sauce thickens and becomes glossy, creating a mouthwatering coating for your sloppy joes.

  6. Serve the beef mixture hot on your favorite buns, and feel free to spoon on some extra sauce on top if desired. Each bite will straddle the line between indulgent and comforting!

Optional: Garnish with sliced pickles or crispy fried onions for an extra crunch.

Exact quantities are listed in the recipe card below.

Make Ahead Options

These Steakhouse Burger Sloppy Joes are a fantastic choice for meal prep, allowing you to savor homemade goodness even on the busiest days! You can sauté the mushrooms and onions for up to 24 hours in advance, then refrigerate them in an airtight container. The beef mixture can also be prepared ahead and stored in the fridge for up to 3 days—just let it cool completely before transferring it to a container. To maintain quality, reheat the mixture gently on the stove, stirring occasionally until heated through, then serve it hot on your favorite buns. Your family’s favorite comforting dish will be ready in no time, delivering that delicious taste without the stress!

Steakhouse Burger Sloppy Joes Variations

Feel free to get creative with this recipe and make it your own by trying out these delightful variations.

  • Turkey Swap: Use ground turkey instead of beef for a lighter option. It still delivers on flavor without all the calories!

  • Mushroom Medley: Incorporate a mix of mushrooms, like shiitake and portobello, for a deeper earthy flavor and a more meaty texture.

  • Spicy Kick: Add diced jalapeños or a splash of hot sauce for a fiery surprise. This adds a fun dimension that’ll awaken your taste buds!

  • Gluten-Free: Replace all-purpose flour with gluten-free flour or cornstarch, and serve on gluten-free buns for a celiac-friendly feast.

  • Smoky Flavor: Stir in a teaspoon of smoked paprika or use smoked steak sauce for an irresistible smoky twist that tastes like summer on a plate.

  • Vegan Delight: Opt for lentils or a plant-based meat alternative, and replace butter with olive oil for a hearty, vegan-approved meal that’s equally satisfying.

  • Herb Infusion: Toss in fresh herbs like thyme or rosemary during cooking for a fragrant, garden-fresh lift that enhances the entire dish.

  • Sweet Touch: Mix in a tablespoon of brown sugar or maple syrup to the sauce for a hint of sweetness that beautifully balances the savory components.

Let your culinary imagination soar, and enjoy crafting a unique version of these delicious sloppy joes!

What to Serve with Steakhouse Burger Sloppy Joes?

Looking to create a complete dining experience that will impress your family and friends?

  • Crispy Sweet Potato Fries: These offer a delightful sweetness that contrasts beautifully with the savory richness of the sloppy joes, creating a satisfying balance.

  • Classic Coleslaw: The crispness and tangy flavor of coleslaw will provide a refreshing counterpoint to the hearty sandwich, adding crunch and brightness.

  • Garlic Butter Corn on the Cob: Juicy, sweet corn slathered in garlic butter complements the flavors of the beef, bringing a taste of summer to your table. Each bite bursting with buttery goodness makes this a favorite side.

  • Zesty Pickle Chips: A simple yet essential addition, these add a tangy crunch that enhances every bite of the sloppy joes, brightening the overall flavor profile.

  • Brewed Iced Tea: A tall glass of refreshing iced tea is the perfect drink to wash down the rich flavors of these sloppy joes, providing a balance to the meal.

  • Chocolate Chip Cookies: End the meal on a sweet note with soft, chewy cookies that are always a crowd-pleaser; their sweetness perfectly contrasts the savory sloppy joes.

  • Garden Salad: A light garden salad with a zesty dressing will add a refreshing element, balancing the hearty the flavors of the dish. This makes it a colorful and nutritious addition to your meal.

How to Store and Freeze Steakhouse Burger Sloppy Joes

Fridge: Store any leftovers in an airtight container for up to 3 days. Reheat on the stovetop over low heat, adding a splash of broth to maintain moisture.

Freezer: For longer storage, freeze in a sealed container for up to 2 months. Thaw overnight in the fridge before reheating.

Reheating: Reheat on the stove or microwave until heated through. Adding a little water can help revive the sauciness of the Steakhouse Burger Sloppy Joes.

Buns: Keep your buns separately stored in an airtight bag to maintain their freshness. They can last up to a week at room temperature.

Chef's Helpful Tips

  • For the best Steakhouse Burger Sloppy Joes, ensure your skillet is preheated properly to achieve a nice sear on the beef, which enhances the overall flavor.
  • Avoid overcrowding the pan when cooking the beef, as this can lead to steaming instead of browning, so consider cooking in batches if necessary.
  • Make sure to sprinkle the flour evenly over the mixture and stir well to avoid clumps, which can affect the sauce’s texture.
  • Maintain a gentle simmer for the sauce to thicken adequately without burning, and adjust the cooking time based on how thick you prefer your sauce.

Steakhouse Burger Sloppy Joes Recipe FAQs

How do I choose the best ground beef for my Sloppy Joes?
Absolutely! Opt for grass-fed or organic ground beef for the best flavor and lean-to-fat ratio. Look for beef with a bright red color and minimal browning. Ideally, choose ground beef with about 15-20% fat content for optimal juiciness and flavor in your Steakhouse Burger Sloppy Joes.

How long can I store leftovers in the fridge?
Very! Leftovers can be stored in an airtight container in the fridge for up to 3 days. When you’re ready to enjoy them again, simply reheat on the stovetop over low heat, adding a splash of chicken broth to help maintain moisture and flavor.

Can I freeze my Steakhouse Burger Sloppy Joes?
Absolutely! To freeze, transfer the cooled beef mixture to a sealed container or heavy-duty freezer bag. They can be frozen for up to 2 months. When you’re ready to eat, just thaw overnight in the fridge, then reheat on the stove or in the microwave until heated through.

What should I do if my sauce is too thick?
No worries! If your sauce turns out too thick, simply stir in a little extra chicken broth, water, or even a splash of Worcestershire sauce. Start with just a tablespoon at a time until you reach your desired consistency. This will keep your Steakhouse Burger Sloppy Joes moist and enjoyable!

Are there any dietary considerations I should keep in mind?
Absolutely! If you’re cooking for someone with gluten sensitivity, substitute the all-purpose flour with a gluten-free blend or cornstarch. Also, consider whether anyone has allergies to mushrooms or mustard, as both ingredients are prominently featured. If making it pet-friendly, keep in mind that onions can be harmful to pets, so avoid sharing any leftovers with furry friends.

How can I tell when my mushrooms and onions are perfectly sautéed?
Great question! The key is to look for a golden-brown color and a tender texture. After sautéing for about 5 to 7 minutes, they should be fragrant and slightly caramelized. This step brings out their natural sweetness and enhances the flavor profile of your Steakhouse Burger Sloppy Joes, making each bite irresistible!

Steakhouse Burger Sloppy Joes

Steakhouse Burger Sloppy Joes

Discover the hearty and flavorful Steakhouse Burger Sloppy Joes, a comforting twist on classic burgers and sloppy joes.
Print Recipe Pin Recipe
Prep Time 10 minutes mins
Cook Time 20 minutes mins
Total Time 30 minutes mins
Servings: 4 sandwiches
Course: DINNER RECIPES
Cuisine: American
Calories: 450
Ingredients Equipment Method Nutrition Notes

Ingredients
  

For the Beef Mixture
  • 1 pound Ground Beef a rich, hearty base that delivers incredible flavor.
  • 2 tablespoons Butter adds richness and helps sauté the vegetables to perfection.
  • 8 ounces Mushrooms thinly sliced for a touch of earthiness that complements the beef.
  • 1 medium White Onion coarsely chopped to bring sweetness and depth to the dish.
  • 2 teaspoons Montreal Steak Seasoning a perfect blend of spices that amplifies the savory taste.
For the Sauce
  • 2 tablespoons All-Purpose Flour thickens the sauce and ensures a satisfying texture.
  • 1 cup Chicken Broth creates a savory liquid that binds the ingredients together beautifully.
  • 1/4 cup Steak Sauce adds that familiar, rich flavor of steak to elevate your Steakhouse Burger Sloppy Joes.
  • 1 tablespoon Dijon Mustard gives a tangy kick that perfectly balances the savory elements.

Equipment

  • Large skillet

Method
 

Cooking Instructions
  1. Heat a large skillet over medium-high heat. Add the butter, allowing it to melt and coat the pan.
  2. Stir in the mushrooms and onions, and sauté for about 5 to 7 minutes, until the veggies are golden and fragrant.
  3. Add the ground beef and Montreal steak seasoning to the skillet. Use a spatula to break up the meat while it cooks for about 5 minutes, or until browned and cooked through.
  4. Sprinkle the flour over the meat and vegetables. Stir well to coat everything evenly, allowing it to cook for 1 minute.
  5. Pour in the chicken broth slowly, stirring constantly to avoid lumps. Then, add the steak sauce and Dijon mustard.
  6. Bring everything to a gentle simmer, letting those amazing flavors meld together.
  7. Cook the mixture for 4 to 5 minutes, stirring occasionally. Serve the beef mixture hot on your favorite buns.

Nutrition

Serving: 1sandwichCalories: 450kcalCarbohydrates: 30gProtein: 25gFat: 25gSaturated Fat: 10gPolyunsaturated Fat: 3gMonounsaturated Fat: 12gTrans Fat: 1gCholesterol: 75mgSodium: 800mgPotassium: 600mgFiber: 2gSugar: 3gVitamin A: 400IUVitamin C: 5mgCalcium: 30mgIron: 2mg

Notes

For the best results, ensure your skillet is preheated properly. Optional garnishes include sliced pickles or crispy fried onions.

Tried this recipe?

Let us know how it was!

Filed Under: DINNER RECIPES

Pull Apart Parmesan Sage Butter Brioche Rolls

December 16, 2025 by JudyWhite Leave a Comment

There’s a certain comfort that comes from the smell of fresh-baked bread wafting through the house, and my latest addiction is none other than Pull Apart Parmesan Sage Butter Brioche Rolls. Imagine gathering friends and family around the table, with everyone tearing off warm, buttery rolls coated in rich garlic and herbal flavors. It’s the kind of dish that transforms an ordinary meal into a cozy gathering.

I found this recipe while reminiscing about my grandmother’s kitchen, where the simple act of cooking felt magical. With the holidays fast approaching, I wanted something that not only impressed but also brought everyone together—all while being easy enough for a weeknight dinner. The harmonious combination of parmesan and sage in these rolls elevates them to a special occasion staple.

These delightful rolls are as versatile as they are delicious. Serve them alongside a hearty soup, or simply enjoy them warm with a drizzle of honey. Trust me, this will become your go-to recipe, and everyone will be begging for seconds!

Why You'll Love This Pull Apart Parmesan Sage Butter Brioche Rolls

  • These rolls are incredibly easy to make, allowing you to focus on enjoying time with loved ones instead of spending hours in the kitchen.
  • The flavor is absolutely divine, featuring a perfect blend of parmesan and sage that elevates any meal.
  • Their versatility makes them an ideal companion to various dishes, from soups to salads or even as a standalone treat.
  • Visually, the golden brown color and inviting aroma make them a stunning centerpiece on your dining table, sure to impress your guests.

Pull Apart Parmesan Sage Butter Brioche Rolls Ingredients

For the Dough
• All-purpose flour – 2.5-3 cups for the perfect balance of structure and softness.
• Kosher salt – 0.5 teaspoon enhances the flavors of the rolls.
• Instant yeast – 2.25 teaspoons contributes to a light, airy texture.
• Warm whole milk – 2/3 cup activates the yeast and enriches the dough.
• Honey – 1 tablespoon adds a touch of sweetness for flavor depth.
• Large eggs – 2 large eggs help with structure and richness.
• Beaten egg – 1 large egg beaten for brushing gives a lovely golden finish.

For the Flavoring
• Salted butter – 1 stick at room temperature for a rich, creamy taste.
• Garlic – 1-2 cloves, smashed, infuse the rolls with savory goodness.
• Fresh sage leaves – 12-16 leaves provide earthy, aromatic notes that complement the parmesan beautifully.

As you gather these ingredients for your Pull Apart Parmesan Sage Butter Brioche Rolls, imagine the smiles they’ll bring to your table—a cozy reflection of the love and warmth that baking together evokes!

How to Make Pull Apart Parmesan Sage Butter Brioche Rolls

  1. Combine Ingredients: In a large bowl, mix together 2.5 to 3 cups of all-purpose flour, 0.5 teaspoon of kosher salt, and 2.25 teaspoons of instant yeast. This sets the foundation for fluffy rolls.

  2. Mix Wet Ingredients: In a separate bowl, whisk together 2/3 cup of warm whole milk, 1 tablespoon of honey, and 2 large eggs until fully combined. Pour this delicious mixture into the dry ingredients and stir until just combined.

  3. Knead the Dough: Shift the blended dough onto a lightly floured surface and knead for about 8-10 minutes until it’s smooth and elastic. You want that perfect texture—soft, yet holding its shape.

  4. Let it Rise: Place the kneaded dough in a greased bowl, cover with a kitchen towel, and let it rise in a warm spot until it doubles in size—this usually takes about 1 hour.

  5. Punch and Roll: Once risen, gently punch down the dough to release air and roll it out to your desired thickness, about ½ inch thick works great for these rolls.

  6. Shape into Balls: Cut the dough into even pieces and shape each piece into a ball. Aim for a uniform size to ensure even baking.

  7. Arrange in Pan: Place the dough balls neatly in a greased baking dish, ensuring they are slightly touching for those perfect pull-apart rolls.

  8. Prepare the Butter Mixture: In a small saucepan, melt 1 stick of salted butter along with smashed garlic and fresh sage leaves over low heat. Stir occasionally until fragrant—about 5 minutes.

  9. Pour Over Balls: Once the butter mixture is ready, pour it generously over the shaped dough balls in the baking dish. Watch that delicious garlicky goodness soak in!

  10. Final Rise: Cover the dish and let the rolls rise again until puffy, approximately 30 minutes. Patience is key—good things come to those who wait!

  11. Preheat the Oven: While the rolls are rising, preheat your oven to 350°F (175°C) so it’s ready when you are.

  12. Egg Wash: Brush the tops of the rolls with the beaten egg. This will give them that beautiful golden finish when baked.

  13. Bake: Place the baking dish in the oven and bake for 30-35 minutes, or until they turn golden brown and the aroma fills your home.

Optional: Sprinkle with additional parmesan and fresh sage before serving for an extra flavor boost.

Exact quantities are listed in the recipe card below.

Make Ahead Options

These Pull Apart Parmesan Sage Butter Brioche Rolls are a dream come true for busy home cooks! You can prepare the dough up to 24 hours in advance by following the first six steps, then wrap it tightly in plastic wrap and refrigerate to keep it fresh. When you’re ready to bake, simply remove the dough from the fridge, let it sit at room temperature for about 30 minutes, and shape the rolls as directed. Afterwards, pour the garlic sage butter over them and let them rise for another 30 minutes before baking. This approach not only saves time but ensures your rolls are just as fluffy and flavorful when served!

Pull Apart Parmesan Sage Butter Brioche Rolls Variations

Feel free to sprinkle your personal touch on these rolls, elevating them to your family’s favorite recipe.

  • Herb-Infused: Swap out sage for thyme or rosemary to create a unique flavor profile that’s equally delightful. Fresh herbs breathe new life into each roll!

  • Cheesy Surprise: Add shredded mozzarella or fontina cheese to the dough for an extra layer of gooey goodness. Melty cheese enhances every buttery bite.

  • Gluten-Free: Use a 1:1 gluten-free flour blend instead of all-purpose flour to make this recipe accessible to everyone at the table. You won’t sacrifice flavor or texture!

  • Spicy Kick: Incorporate a pinch of red pepper flakes into the butter mixture for a warm, zesty finish. Everyone will enjoy that unexpected heat!

  • Sweet Twist: For a sweet twist, mix in a tablespoon of cinnamon to the dough, and swap sage with caramelized onions. A delightful combination of sweet and savory!

  • Savory Spin: Try adding crumbled bacon or pancetta to the rolls for a savory element that pairs beautifully with the garlic. The crunch adds another layer of texture to the soft rolls.

  • Infused Butter: Use garlic herb butter or truffle butter instead of regular butter for a gourmet touch. Your rolls will take on an exquisite and luxurious flavor.

  • Honey Drizzle: Finish the rolls with a drizzle of honey after baking for a delightful contrast of sweet and savory. The warm rolls soaked in honey will have everyone coming back for more!

What to Serve with Pull Apart Parmesan Sage Butter Brioche Rolls?

These delectable rolls are perfect for creating a delightful, heartwarming meal.

  • Hearty Vegetable Soup: A comforting bowl of vegetable soup complements the soft, buttery rolls and adds a vibrant touch of health.

  • Classic Caesar Salad: The crisp romaine and creamy dressing provide a refreshing crunch, balancing out the rich flavors of the rolls.

  • Savory Roasted Chicken: Tender, juicy chicken pairs beautifully with these rolls, making for a satisfying and complete dinner experience.

  • Creamy Garlic Mashed Potatoes: Enhance the comfort factor with a side of creamy mashed potatoes, where each bite blends perfectly with the buttery goodness of the rolls.

  • Warm Honey Drizzle: A touch of warm honey on each roll offers a sweet contrast to the savory garlic and sage, elevating flavors with every tear.

  • Red Wine: A glass of smooth red wine not only enriches the meal but also enhances the flavors of the parmesan and sage in the rolls.

  • Fruit Salad: Add a fresh, fruity twist to your meal. The sweet, juicy fruits provide a light, refreshing counterpoint to the rich, buttery rolls.

  • Lemonade or Iced Tea: For a refreshing beverage, lemony drinks brighten the palate and perfectly complement the savory richness of the rolls.

  • Chocolate Mousse: End your meal on a sweet note with a silky chocolate mousse, contrasting beautifully with the warm, savory rolls.

How to Store and Freeze Pull Apart Parmesan Sage Butter Brioche Rolls

Room Temperature: Store leftover rolls in an airtight container at room temperature for up to 2 days. This keeps them soft and flavorful.

Fridge: For longer storage, keep the rolls in the refrigerator in an airtight container for up to 5 days. Just be sure to wrap them well to prevent drying out.

Freezer: You can freeze the Pull Apart Parmesan Sage Butter Brioche Rolls for up to 3 months. Wrap them tightly in plastic wrap and then in foil or a freezer bag.

Reheating: To reheat, thaw overnight in the fridge, then warm in a 350°F (175°C) oven for about 10-15 minutes for that fresh-baked taste!

Chef's Helpful Tips

  • For the Pull Apart Parmesan Sage Butter Brioche Rolls, make sure to use room temperature ingredients to ensure even mixing and proper dough rise.
  • A common mistake is to rush the kneading process; knead the dough until it is smooth and elastic to achieve the perfect texture.
  • When cutting and shaping the dough balls, aim for uniform size so that they bake evenly and remain soft and tender.
  • Finally, be generous with the garlic sage butter, as it not only enhances flavor but also keeps the rolls moist during baking.

Pull Apart Parmesan Sage Butter Brioche Rolls Recipe FAQs

What kind of flour should I use for Pull Apart Parmesan Sage Butter Brioche Rolls?
Absolutely! For these rolls, I recommend using all-purpose flour because it gives the right balance of structure and softness. If you want a slightly richer flavor, consider substituting a portion of the all-purpose flour with bread flour, which can provide additional chewiness.

How should I store leftover Pull Apart Parmesan Sage Butter Brioche Rolls?
It’s best to store any leftover rolls in an airtight container at room temperature for up to 2 days to maintain their softness. If you want them to last longer, wrap them well and refrigerate them for up to 5 days. Just make sure they’re sealed tightly to prevent them from drying out!

Can I freeze Pull Apart Parmesan Sage Butter Brioche Rolls?
Yes, you can freeze these delicious rolls! Wrap them tightly in plastic wrap and then in foil or place them in a freezer bag. They can be frozen for up to 3 months. When you’re ready to enjoy them, thaw them overnight in the fridge and then warm them in a 350°F (175°C) oven for about 10-15 minutes for that freshly baked taste.

What should I do if my dough doesn’t rise properly?
Very! If your dough isn’t rising, it could be due to several factors. First, make sure your instant yeast is fresh and active; check the expiration date! If the milk is too hot or too cold, it can affect the yeast’s ability to rise. Ideally, the warm milk should be around 100-110°F (37-43°C). If all else fails, consider placing the dough in a warm, draft-free area, like a turned-off oven with the light on, for a better rising environment.

Are Pull Apart Parmesan Sage Butter Brioche Rolls suitable for people with allergies?
Definitely! However, be careful with those who may have gluten or dairy allergies, as this recipe includes all-purpose flour and salted butter. For a gluten-free alternative, use a gluten-free flour blend suitable for baking. You could also swap the butter for a vegan margarine if you’re looking to avoid dairy. Just make sure to adjust the consistency accordingly, as these substitutions might affect the final texture of the rolls.

When is the best time to serve these rolls?
Oh, the more the merrier! These rolls are incredibly versatile and can be served at any time. They’re perfect as a cozy side for a family dinner, brunch gatherings, or even as a snack during movie nights. Their inviting aroma will make your home feel warm and inviting, and they’re sure to impress family and friends alike!

Pull Apart Parmesan Sage Butter Brioche Rolls

Pull Apart Parmesan Sage Butter Brioche Rolls

Experience the cozy delight of Pull Apart Parmesan Sage Butter Brioche Rolls, perfect for gatherings or weeknight dinners.
Print Recipe Pin Recipe
Prep Time 1 hour hr
Cook Time 35 minutes mins
Rising Time 30 minutes mins
Total Time 2 hours hrs 5 minutes mins
Servings: 12 rolls
Course: DINNER RECIPES
Cuisine: American
Calories: 200
Ingredients Equipment Method Nutrition Notes

Ingredients
  

For the Dough
  • 2.5-3 cups all-purpose flour for the perfect balance of structure and softness
  • 0.5 teaspoon kosher salt enhances flavors
  • 2.25 teaspoons instant yeast contributes to light, airy texture
  • 2/3 cup warm whole milk activates the yeast
  • 1 tablespoon honey adds sweetness
  • 2 large eggs helps with structure and richness
  • 1 large beaten egg for brushing
For the Flavoring
  • 1 stick salted butter at room temperature
  • 1-2 cloves garlic smashed
  • 12-16 leaves fresh sage provides earthy flavor

Equipment

  • Mixing bowls
  • Whisk
  • Baking dish
  • Saucepan
  • Kitchen towel

Method
 

How to Make Pull Apart Parmesan Sage Butter Brioche Rolls
  1. In a large bowl, mix together the flour, kosher salt, and instant yeast.
  2. In a separate bowl, whisk together warm whole milk, honey, and eggs until fully combined.
  3. Shift the blended dough onto a lightly floured surface and knead for about 8-10 minutes until smooth.
  4. Place the kneaded dough in a greased bowl, cover, and let it rise until doubled in size, about 1 hour.
  5. Once risen, gently punch down the dough and roll it out to about ½ inch thick.
  6. Cut the dough into even pieces and shape into balls.
  7. Place the dough balls in a greased baking dish, ensuring they are slightly touching.
  8. In a small saucepan, melt butter with smashed garlic and fresh sage over low heat for about 5 minutes.
  9. Pour the butter mixture over the shaped dough balls.
  10. Cover and let the rolls rise again until puffy, approximately 30 minutes.
  11. Preheat oven to 350°F (175°C).
  12. Brush the tops of the rolls with the beaten egg.
  13. Bake in the oven for 30-35 minutes until golden brown.

Nutrition

Serving: 1rollCalories: 200kcalCarbohydrates: 28gProtein: 5gFat: 8gSaturated Fat: 4gPolyunsaturated Fat: 1gMonounsaturated Fat: 2gCholesterol: 40mgSodium: 240mgPotassium: 100mgFiber: 1gSugar: 2gVitamin A: 5IUCalcium: 2mgIron: 6mg

Notes

For best results, use room temperature ingredients and knead the dough until smooth for the perfect texture.

Tried this recipe?

Let us know how it was!

Filed Under: DINNER RECIPES

Crispy Baked Ground Beef Tacos with Creamy Chipotle Sauce

December 16, 2025 by JudyWhite Leave a Comment

There’s a special joy in coming home after a long day, knowing that a plate of crispy baked ground beef tacos with creamy chipotle sauce awaits you. The sound of those golden tortillas crackling in the oven instantly lifts my spirits, and the aroma that fills the kitchen is simply irresistible. I stumbled upon this delectable recipe during one of those cooking experiments where I decided to elevate our go-to taco night, and boy, did I hit the jackpot!

These tacos not only satisfy that comfort food craving but also add a touch of flair to your weeknight routine. With just 25 minutes from start to finish, they are the perfect solution for those evenings when you’re tired of the same boring meals. The combination of seasoned beef, melty cheese, and that creamy chipotle sauce creates a mouthwatering explosion of flavors that keep everyone coming back for seconds. Trust me, when you serve these up, your family and friends will be raving about how a simple meal turned into a fiesta! Let’s dive in and make some magic happen in your kitchen.

Why You'll Love This Crispy Baked Ground Beef Tacos with Creamy Chipotle Sauce

  • These crispy baked ground beef tacos are incredibly easy to make, allowing you to whip up a delicious meal in just 25 minutes.
  • The flavor combination of seasoned beef, melty cheese, and the creamy chipotle sauce is an absolute crowd-pleaser that will keep everyone coming back for more.
  • Not only are they tasty, but they’re also versatile—feel free to customize them with your favorite toppings for a unique twist.
  • Plus, the golden, crispy tortillas offer a delightful visual appeal that makes your dinner look as good as it tastes.

Crispy Baked Ground Beef Tacos Ingredients

Get ready to assemble the delicious crunchy delights!

For the Beef Filling

  • Ground beef – a hearty base that absorbs all the flavors beautifully.
  • Taco seasoning – adds the perfect mix of spices for that authentic taco taste.
  • Water – helps create a luscious beef mixture when combined with seasoning.
  • Garlic – brings a rich aroma and flavor to your filling.
  • Lime juice – freshly squeezed for a zesty kick that brightens the dish.
  • Diced green chiles – adds a mild heat and extra flavor to the beef.
  • Salt – balances all the flavors; season to taste.
  • Pepper – provides a mild heat that complements the spices well.

For the Tacos

  • Colby Jack cheese – provides melty goodness; reserve some for sprinkling on top!
  • Corn tortillas – the perfect vehicle for your crispy baked ground beef tacos.

For the Creamy Chipotle Sauce

  • Mexican crema – rich and creamy base for the sauce; sour cream works too!
  • Chipotle peppers in adobo sauce – adds a smoky flavor with a touch of heat.
  • Honey – balances the spice with sweetness; can use sugar instead.
  • Lime juice – a splash brings acidity to the creamy sauce.
  • Garlic (for crema) – enhances the sauce’s flavor with its fragrant goodness.
  • Salt – to taste, ensuring the sauce is perfectly seasoned.

For Serving

  • Sour cream – a classic topping for extra creaminess.
  • Shredded lettuce – adds a fresh crunch to your tacos.
  • Fresh cilantro – for a burst of freshness and color.
  • Pico de gallo – brings tang and freshness as a topping.
  • Guacamole – for creamy indulgence that complements the crispy tacos.
  • Pickled red onions – add a tangy and slightly sweet crunch for a flavor boost.

These Crispy Baked Ground Beef Tacos with Creamy Chipotle Sauce are packed with layers of flavor that your family will adore!

How to Make Crispy Baked Ground Beef Tacos

  1. Preheat the oven to 425°F. Line 2 baking sheets with nonstick spray or lightly oil them to ensure your tacos come out perfectly crispy.

  2. Cook the beef in a skillet over medium heat with 1 Tbsp. oil until no longer pink, about 5-7 minutes. Drain excess fat for a lean filling.

  3. Mix in the taco seasoning, water, minced garlic, lime juice, diced green chiles, salt, and pepper. Cook, stirring occasionally, until most moisture evaporates (about 5 minutes).

  4. Combine 1 cup of shredded cheese into the beef mixture and stir until fully mixed. Remove from heat and let cool slightly.

  5. Warm the tortillas by wrapping them in a damp paper towel and microwaving for 45-60 seconds. Flip them halfway to achieve pliability.

  6. Fill each tortilla with about ¼ cup of the beef mixture, adding a sprinkle of cheese on top. Fold over to seal, then lightly brush with oil for extra crispness.

  7. Bake the tacos on prepared sheets for 15-20 minutes, or until they are golden brown and crispy, filling your kitchen with tantalizing aromas.

  8. Prepare the creamy chipotle sauce by blending all crema ingredients in a food processor until smooth. Taste and adjust seasoning as needed for perfection.

  9. Serve the crispy baked tacos warm with your favorite toppings and drizzle generous amounts of the creamy chipotle sauce over them.

Optional: Garnish with fresh cilantro for a vibrant touch!

Exact quantities are listed in the recipe card below.

Crispy Baked Ground Beef Tacos Variations

Feel free to get creative and make these tacos truly your own with some delightful twists!

  • Low-Carb: Use lettuce leaves instead of tortillas for a fresh, crunchy wrap that’s perfect for a keto-friendly meal.
  • Vegetarian: Substitute ground beef with black beans or lentils, seasoned just like the original for a hearty plant-based option.
  • Spicy Kick: Add more chipotle peppers or diced jalapeños for extra heat that sends your taste buds on an exhilarating ride.
  • Cheesy Bliss: Incorporate a blend of different cheeses like pepper jack or queso fresco for added flavor and creaminess.
  • Savory Sweet: Drizzle honey or maple syrup over the beef filling before baking to create a tender balance of sweet and savory flavors.
  • Herbaceous Touch: Mix in fresh chopped cilantro or parsley into the beef mixture for a fresh burst of flavor that elevates each bite.
  • Crunchy Texture: Top with crushed tortilla chips before serving for an extra layer of texture that adds a delightful crunch.
  • Fiesta Style: Serve with a variety of toppings like mango salsa or avocado crema to bring a fiesta of flavors to your table!

Let’s celebrate your culinary flair and enjoy these delicious variations together!

Make Ahead Options

These Crispy Baked Ground Beef Tacos with Creamy Chipotle Sauce are perfect for meal prep, making busy weeknights a breeze! You can prepare the beef filling up to 3 days in advance; simply cook it, let it cool, and store it in an airtight container in the refrigerator. The tortillas can be prepped up to 24 hours ahead as well—just wrap them tightly in plastic wrap. When you’re ready to serve, warm the tortillas in the microwave, fill them with the beef mixture and cheese, brush with oil, and bake until crispy, ensuring they taste just as delicious as if made fresh. This way, you can savor homemade goodness with minimal effort!

How to Store and Freeze Crispy Baked Ground Beef Tacos

Room Temperature: Store leftover tacos in an airtight container for up to 2 hours after cooking. They are best enjoyed fresh, but if you need to save them, refrigerate promptly.

Fridge: Keep the tacos refrigerated in a covered container for up to 3 days. To maintain their crispiness, consider reheating in the oven instead of the microwave.

Freezer: Freeze leftover tacos for up to 2 months. Wrap each taco individually in plastic wrap and place them in a freezer-safe bag to prevent freezer burn.

Reheating: When ready to enjoy, thaw overnight in the fridge and reheat in the oven at 350°F for about 10-15 minutes for a crispy finish.

What to Serve with Crispy Baked Ground Beef Tacos with Creamy Chipotle Sauce?

A delightful meal is just a few perfect pairings away, transforming your taco night into a feast for the senses.

  • Zesty Mexican Rice: Fluffy rice cooked with tomatoes, spices, and lime complements the bold flavors of the tacos perfectly.
  • Refried Beans: Creamy and savory, these will add a rich texture that pairs beautifully with the crispy tacos.
  • Fresh Corn Salsa: Provides a refreshing burst of sweetness and crunch that balances the richness of the chipotle sauce.
  • Grilled Veggies: Seasoned zucchini, bell peppers, and onions add a colorful and smoky flavor that enhances the meal.
  • Homemade Guacamole: This creamy dip is perfect for adding a luscious layer of flavor alongside the crispy tacos.
  • Refreshing Lemonade: A sweet and tart beverage that cuts through the richness of the beef and crema, making each bite even more enjoyable.
  • Churros with Chocolate Sauce: Finish off with these cinnamon-sugar treats for a sweet ending that both kids and adults will love!

Chef's Helpful Tips

  • For the Crispy Baked Ground Beef Tacos, ensure that the ground beef is fully cooked and drained of excess fat for a leaner filling.
  • When mixing the taco seasoning with the beef, be sure to let the moisture evaporate for a flavorful and thick mixture.
  • Warm your corn tortillas in the microwave with a damp paper towel to make them pliable and easier to fold without tearing.
  • Bake the tacos until golden brown and crispy, checking at the 15-minute mark to avoid overcooking.

Crispy Baked Ground Beef Tacos with Creamy Chipotle Sauce Recipe FAQs

What should I look for when selecting ground beef?
Absolutely! When choosing ground beef, look for meat that is bright red with minimal browning. Opt for lean ground beef, around 80% lean, which is less greasy and ideal for these tacos. Besides color, check for a moist but not slimy texture and avoid packages with dark spots or a strong odor.

How do I store leftover tacos?
Very! To store leftover crispy baked ground beef tacos, place them in an airtight container and refrigerate right after cooling for up to 3 days. To maintain the best texture, reheat in the oven rather than using the microwave, which can make the tortillas soggy. Heat them at 350°F for about 10-15 minutes until they’ve regained their crispiness.

Can I freeze the tacos, and how?
Of course! Freezing is a great option! After they’ve cooled, individually wrap each taco in plastic wrap, ensuring a tight seal to prevent freezer burn. Then, place them in a freezer-safe bag. They can be frozen for up to 2 months. Just remember to label the bag with the date so you can keep track!

What if my tortillas keep tearing when I fold them?
Oh no! If your tortillas are tearing, they may not be warm enough to be pliable. Try microwaving them a little longer in 10-second intervals until they’re warm and flexible. Alternatively, you can briefly heat them in a dry skillet for about 15-20 seconds on each side, which will also soften them and make them easier to work with.

Are these tacos suitable for people with food allergies?
Definitely! These tacos can be adjusted for various dietary needs. If you have allergies, consider using gluten-free taco seasoning and corn tortillas, which are usually safe. For dairy allergies, you can substitute the cheese and creamy chipotle sauce with a dairy-free alternative. Always check labels for any hidden allergens, especially in pre-packaged items like taco seasoning and Mexican crema.

Can I add other ingredients to the filling?
The more the merrier! You can absolutely customize the filling by incorporating vegetables like diced bell peppers, onions, or even corn for added flavor and nutrition. Just sauté them with the ground beef until tender before adding your seasonings. This creates a delicious explosion of textures and flavors while still keeping the essence of the crispy baked ground beef tacos with creamy chipotle sauce!

Crispy Baked Ground Beef Tacos with Creamy Chipotle Sauce

Crispy Baked Ground Beef Tacos with Creamy Chipotle Sauce

Enjoy Crispy Baked Ground Beef Tacos with Creamy Chipotle Sauce for a delightful meal that satisfies and excites the palate.
Print Recipe Pin Recipe
Prep Time 10 minutes mins
Cook Time 15 minutes mins
Cooling Time 5 minutes mins
Total Time 25 minutes mins
Servings: 6 tacos
Course: DINNER RECIPES
Cuisine: Mexican
Calories: 320
Ingredients Equipment Method Nutrition Notes

Ingredients
  

For the Beef Filling
  • 1 lb Ground beef
  • 1 packet Taco seasoning
  • 1/2 cup Water
  • 2 cloves Garlic minced
  • 1 Tbsp Lime juice freshly squeezed
  • 1/2 cup Diced green chiles
  • to taste Salt
  • to taste Pepper
For the Tacos
  • 2 cups Colby Jack cheese shredded, reserve some for topping
  • 12 small Corn tortillas
For the Creamy Chipotle Sauce
  • 1 cup Mexican crema or sour cream
  • 2 Tbsp Chipotle peppers in adobo sauce
  • 1 Tbsp Honey or sugar
  • 1 Tbsp Lime juice splash
  • 1 clove Garlic for crema, minced
  • to taste Salt
For Serving
  • 1 cup Sour cream for topping
  • 1 cup Shredded lettuce for topping
  • 1/2 cup Fresh cilantro for garnish
  • 1 cup Pico de gallo for topping
  • 1 cup Guacamole for topping
  • 1/2 cup Pickled red onions for topping

Equipment

  • Oven
  • Skillet
  • Food processor
  • baking sheets
  • Microwave

Method
 

Preparation Steps
  1. Preheat the oven to 425°F. Line 2 baking sheets with nonstick spray or lightly oil them to ensure your tacos come out perfectly crispy.
  2. Cook the beef in a skillet over medium heat with 1 Tbsp. oil until no longer pink, about 5-7 minutes. Drain excess fat for a lean filling.
  3. Mix in the taco seasoning, water, minced garlic, lime juice, diced green chiles, salt, and pepper. Cook, stirring occasionally, until most moisture evaporates (about 5 minutes).
  4. Combine 1 cup of shredded cheese into the beef mixture and stir until fully mixed. Remove from heat and let cool slightly.
  5. Warm the tortillas by wrapping them in a damp paper towel and microwaving for 45-60 seconds. Flip them halfway to achieve pliability.
  6. Fill each tortilla with about ¼ cup of the beef mixture, adding a sprinkle of cheese on top. Fold over to seal, then lightly brush with oil for extra crispness.
  7. Bake the tacos on prepared sheets for 15-20 minutes, or until they are golden brown and crispy, filling your kitchen with tantalizing aromas.
  8. Prepare the creamy chipotle sauce by blending all crema ingredients in a food processor until smooth. Taste and adjust seasoning as needed for perfection.
  9. Serve the crispy baked tacos warm with your favorite toppings and drizzle generous amounts of the creamy chipotle sauce over them.

Nutrition

Serving: 1tacoCalories: 320kcalCarbohydrates: 30gProtein: 20gFat: 15gSaturated Fat: 7gPolyunsaturated Fat: 1gMonounsaturated Fat: 6gCholesterol: 50mgSodium: 600mgPotassium: 400mgFiber: 3gSugar: 2gVitamin A: 500IUVitamin C: 5mgCalcium: 250mgIron: 2mg

Notes

Optional: Garnish with fresh cilantro for a vibrant touch!

Tried this recipe?

Let us know how it was!

Filed Under: DINNER RECIPES

Honey Mustard BLT Chicken Sliders

December 16, 2025 by JudyWhite Leave a Comment

When the weekend rolls around, I often find myself craving something that’ll elevate our usual family meals. That’s how I discovered these delectable Honey Mustard BLT Chicken Sliders, which have become a staple in my kitchen. Imagine biting into a warm, tender slider packed with flavorful grilled chicken, crispy bacon, and all the fixings, effortlessly brought together with a drizzle of honey mustard that dances on your taste buds.

What I adore most about this recipe is how easy they are to whip up; in just 37 minutes, you’ve got a crowd-pleasing dish that friends and family will rave about. Plus, with layers of fresh lettuce, juicy tomatoes, and melting cheese, it feels indulgent while still being relatively wholesome. Whether it’s a cozy family dinner or a gathering with friends, these sliders never fail to impress and make my heart feel warm—all while being a twist on the classic BLT! Let’s dive into this delicious recipe that you’ll want to make again and again!

Why You'll Love This Honey Mustard BLT Chicken Sliders

  • These Honey Mustard BLT Chicken Sliders are incredibly easy to make, allowing you to serve a delicious meal in just 37 minutes.
  • The combination of tender chicken, crispy bacon, and a drizzle of honey mustard creates a flavor explosion that everyone will crave.
  • They’re versatile enough to please both kids and adults at any gathering, making them an ideal choice for any occasion.
  • Plus, the vibrant colors of the fresh veggies and melted cheese make these sliders visually appealing and perfect for Instagram-worthy moments.

Honey Mustard BLT Chicken Sliders Ingredients

For the Chicken
• 2 pounds chicken – boneless chicken breasts work best for grilling and staying juicy.
• 4 tablespoons oil – helps the spices adhere and enhances grilling.
• 2 tablespoons paprika – adds a smoky flavor and rich color to the chicken.
• 1 tablespoon cayenne pepper – adjust to taste for that kick of heat!
• 1 tablespoon onion powder – brings a sweet onion flavor without the crunch.
• 2 teaspoons garlic powder – a must for that savory depth in each bite.
• 1/2 teaspoon dried thyme – adds an earthy note that complements the other spices.
• 1/2 teaspoon oregano – brings a hint of Mediterranean warmth.
• to taste salt – enhances all the other flavors beautifully.
• to taste pepper – fresh ground is best for a dash of zing.

For the Sliders
• 12 slider buns – soft and fluffy, perfect for holding all the deliciousness.
• to taste mayonnaise – for that creamy layer that adds richness.
• 1 tablespoon honey – sweetens and balances the tanginess of the mustard.
• 1 bottle Silver Spring Honey Mustard – a star ingredient that makes these sliders shine.
• 8 strips bacon – crispy goodness that adds a savory crunch.
• 12 slices colby jack cheese – melty and creamy, elevating the flavor profile.

For the Fresh Toppings
• 1/2 head lettuce – adds a refreshing crunch and vibrant color.
• 1/2 red onion – thinly sliced for a slightly sweet bite.
• 2 Roma tomatoes – juicy and fresh, perfect for that classic BLT feel.

Optional Add-ons
• 1/2 stick softened butter – for spreading on the buns for extra richness.
• 1 tablespoon chopped fresh parsley – adds a pop of color and freshness.
• 2 cloves minced garlic – for extra flavor in the combination!

With these ingredients, creating your Honey Mustard BLT Chicken Sliders will not only be easy, but incredibly satisfying too!

How to Make Honey Mustard BLT Chicken Sliders

  1. Coat the Chicken: Start by coating the chicken with oil, then season it generously with paprika, cayenne pepper, onion powder, garlic powder, dried thyme, oregano, salt, and pepper. Make sure every piece is well-covered for maximum flavor.

  2. Grill Until Perfect: Preheat your grill and cook the seasoned chicken for approximately 12 minutes, flipping halfway through. Look for that ideal doneness; it should be golden brown and reach an internal temperature of 165°F.

  3. Assemble the Sliders: Spread a layer of mayonnaise on each slider bun. This adds a creamy base that complements the savory ingredients beautifully.

  4. Layer with Love: On each bun, layer the grilled chicken, crispy bacon, a slice of colby jack cheese, and a handful of fresh lettuce, followed by thin slices of red onion and Roma tomatoes.

  5. Drizzle the Sauce: Finish your sliders by drizzling honey and Silver Spring Honey Mustard on top of the assembled toppings. This sweet and tangy sauce ties everything together for a burst of flavor.

  6. Add Optional Richness: If you fancy it, spread softened butter on the inside of the bun and sprinkle some chopped parsley on top of your sliders for a touch of elegance.

Optional: Serve with a side of crispy fries or a fresh salad for a complete meal.
Exact quantities are listed in the recipe card below.

What to Serve with Honey Mustard BLT Chicken Sliders?

Transform your sliders into a full meal with delightful sides that add variety and flavor.

  • Crispy Sweet Potato Fries: These fries offer a delightful sweetness that contrasts beautifully with the savory sliders, creating a satisfying crunch with every bite.

  • Coleslaw: A refreshing coleslaw brings a creamy, tangy element that complements the richness of the bacon and honey mustard, making each slider feel lighter.

  • Garlic Mashed Potatoes: Silky and rich, these mashed potatoes are perfect for soaking up any delicious sauce that drips from your sliders. A comforting classic!

  • Grilled Corn on the Cob: Sweet, charred corn adds a hint of summer to your meal. The sweetness pairs perfectly with the sliders, providing a burst of flavor.

  • Watermelon Salad: A refreshing burst of juicy watermelon cubes tossed with mint and feta creates a delicious contrast. It’s light, hydrating, and perfect for balancing spices.

  • Sparkling Lemonade: This invigorating drink complements the flavors of the sliders and refreshes your palate. The zingy citrus adds a playful touch to your meal.

  • Chocolate Brownies: To finish on a sweet note, the richness of fudgy brownies pairs delightfully with the savory sliders. After a savory feast, this is a dessert that truly satisfies.

Honey Mustard BLT Chicken Sliders Variations

Feel free to play around with this recipe and make it your own; the possibilities are delicious!

  • Spicy Twist: Add sliced jalapeños for a kick of heat that pairs perfectly with the sweetness of the honey mustard.

  • Bacon Swap: Use turkey bacon to create a lighter version that still gives you that crispy goodness.

  • Cheese Change: Try pepper jack cheese instead of colby jack for an extra dose of flavor and creaminess.

  • Gluten-Free: Substitute the slider buns with gluten-free options, ensuring everyone can enjoy these tasty bites.

  • Vegetarian Version: Swap out the chicken and bacon for grilled portobello mushrooms and avocado for a hearty, meatless meal.

  • Herbed Mayonnaise: Mix fresh herbs like basil or dill into the mayonnaise for a fresh, flavorful spread that elevates the sliders.

  • Sweetened Dip: Serve honey mustard alongside a sweet chili sauce for a unique dipping experience that brings an exciting twist.

  • Loaded Sliders: Add creamy avocado slices or sautéed mushrooms for a richer texture and flavor explosion in every bite.

Each of these variations brings something special to the table, ensuring that your Honey Mustard BLT Chicken Sliders are always exciting and bursting with new flavors!

Storage Tips for Honey Mustard BLT Chicken Sliders

Fridge: Store leftover sliders in an airtight container for up to 3 days to keep them fresh and delicious.

Freezer: If you want to save them for later, freeze the assembled sliders wrapped tightly in plastic wrap, followed by aluminum foil, for up to 2 months.

Reheating: When ready to enjoy, thaw in the fridge overnight and reheat in the oven at 350°F for 10-15 minutes until heated through, ensuring the flavors of your Honey Mustard BLT Chicken Sliders shine again!

Make Ahead Options

These Honey Mustard BLT Chicken Sliders are perfect for busy weeknights when you’re looking to save time without sacrificing flavor! You can marinate the chicken with oil and spices up to 24 hours in advance; this not only deepens the flavors but also ensures juicy results. Additionally, cook the bacon and slice the vegetables (lettuce, onion, and tomatoes) a day ahead to keep everything fresh. Store everything in airtight containers in the refrigerator. When you’re ready to serve, simply grill the marinated chicken, assemble with prepped ingredients, and drizzle with honey mustard for a delightful finishing touch. Enjoy restaurant-quality sliders at home with minimal effort!

Chef's Helpful Tips

  • When making Honey Mustard BLT Chicken Sliders, ensure the chicken is well-coated with oil and seasoning to lock in flavors.
  • Avoid overcrowding the grill; this gives each piece enough space for even cooking and a nice char.
  • Use an instant-read thermometer to ensure your chicken reaches an internal temperature of 165°F for safe consumption.
  • After cooking, let the chicken rest for a few minutes prior to slicing to retain its juices and keep the sliders moist.

Honey Mustard BLT Chicken Sliders Recipe FAQs

What kind of chicken is best for this recipe?
Absolutely! Boneless chicken breasts are ideal for these Honey Mustard BLT Chicken Sliders as they grill nicely, keeping the meat juicy and tender. You could also use chicken thighs if you prefer a richer flavor; just be sure to adjust the cooking time slightly.

How should I store leftover sliders?
Store any leftover sliders in an airtight container in the refrigerator for up to 3 days. To keep them fresh, I recommend wrapping them individually in plastic wrap before placing them into the container.

Can I freeze Honey Mustard BLT Chicken Sliders?
Yes, you can definitely freeze these sliders! To do so, wrap each assembled slider tightly in plastic wrap and then in aluminum foil to prevent freezer burn. They can be stored in the freezer for up to 2 months. To reheat, simply thaw them overnight in the fridge and bake at 350°F for 10-15 minutes until warmed through.

What if my chicken is dry after grilling?
Oh no! If your chicken turns out dry, it might be due to overcooking. Always use a meat thermometer to check for doneness – the chicken should reach an internal temperature of 165°F. For the best moisture retention, let the chicken rest for a few minutes after grilling before slicing to allow the juices to redistribute.

Are there any dietary considerations I should be aware of?
Yes! Those with allergies should be cautious about this recipe’s ingredients. The honey mustard sauce may contain gluten or other allergens, so be sure to check the label for possible allergens. For a gluten-free option, use gluten-free buns and check that your seasoning mix is free from gluten. Also, it’s always wise to avoid giving any leftovers to pets, especially those containing onions, garlic, or certain sauces.

How can I make these sliders vegetarian-friendly?
Very! To make these sliders vegetarian, substitute the grilled chicken with a plant-based protein like tofu or grilled portobello mushrooms. For added flavor, marinate the mushrooms in a similar spice mix before grilling! Replace the bacon with crispy tempeh or a smoked alternative for that savory crunch.

Honey Mustard BLT Chicken Sliders

Honey Mustard BLT Chicken Sliders

Delicious Honey Mustard BLT Chicken Sliders perfect for the weekend, featuring grilled chicken, crispy bacon, and a honey mustard drizzle.
Print Recipe Pin Recipe
Prep Time 15 minutes mins
Cook Time 22 minutes mins
Total Time 37 minutes mins
Servings: 12 sliders
Course: LUNCH RECIPES
Cuisine: American
Calories: 400
Ingredients Equipment Method Nutrition Notes

Ingredients
  

For the Chicken
  • 2 pounds boneless chicken breasts works best for grilling
  • 4 tablespoons oil helps spices adhere
  • 2 tablespoons paprika adds a smoky flavor
  • 1 tablespoon cayenne pepper adjust to taste
  • 1 tablespoon onion powder brings sweetness
  • 2 teaspoons garlic powder for savory depth
  • 1/2 teaspoon dried thyme adds earthiness
  • 1/2 teaspoon oregano brings Mediterranean warmth
  • to taste salt enhances flavors
  • to taste pepper fresh ground preferred
For the Sliders
  • to taste mayonnaise for creaminess
  • 1 tablespoon honey sweetens the sauce
  • 1 bottle Silver Spring Honey Mustard
  • 8 strips bacon crispy goodness
  • 12 slices colby jack cheese for melting
For the Fresh Toppings
  • 1/2 head lettuce adds crunch
Optional Add-ons
  • 1/2 stick softened butter for spreading
  • 1 tablespoon chopped fresh parsley for garnish
  • 2 cloves minced garlic for extra flavor

Equipment

  • Grill
  • Mixing bowl
  • measuring spoons
  • measuring cups

Method
 

How to Make Honey Mustard BLT Chicken Sliders
  1. Coat the chicken with oil and season with paprika, cayenne pepper, onion powder, garlic powder, thyme, oregano, salt, and pepper.
  2. Preheat the grill and cook the chicken for approximately 12 minutes, flipping halfway through.
  3. Spread mayonnaise on each slider bun as a creamy base.
  4. Layer grilled chicken, bacon, cheese, lettuce, red onion, and tomatoes on each bun.
  5. Drizzle honey and Silver Spring Honey Mustard over the toppings.
  6. Spread softened butter inside the buns and sprinkle parsley on top for garnish.

Nutrition

Serving: 1sliderCalories: 400kcalCarbohydrates: 30gProtein: 25gFat: 20gSaturated Fat: 8gPolyunsaturated Fat: 2gMonounsaturated Fat: 7gCholesterol: 70mgSodium: 800mgPotassium: 500mgFiber: 2gSugar: 5gVitamin A: 1500IUVitamin C: 10mgCalcium: 200mgIron: 2mg

Notes

Serve with crispy fries or a fresh salad for a complete meal.

Tried this recipe?

Let us know how it was!

Filed Under: LUNCH RECIPES

Banana Brown Sugar Muffins for Breakfast

December 16, 2025 by JudyWhite Leave a Comment

There’s something incredibly comforting about the warmth of freshly baked muffins filling your kitchen, especially when the aroma of bananas and brown sugar wafts through the air. Picture this: you wake up on a lazy Sunday morning, sunlight streaming through the window, and all you want is a delightful breakfast to reward your efforts. That’s when these Banana Brown Sugar Muffins come into play—simple yet indulgent, they transform ordinary bananas into a moist, flavorful treat that’s perfect for brunch or a quick bite during the week.

I stumbled upon this recipe during a quest to use up some overripe bananas, and it quickly became a family favorite. With just a handful of ingredients, these muffins are both easy to whip up and utterly satisfying. The blend of brown sugar and cinnamon on top offers a sweet crunch that perfectly complements the soft banana base. You’ll be amazed at how quickly you can have a dozen delicious muffins ready to share—or savor all to yourself! So, let’s dive in and elevate your breakfast game with this scrumptious recipe!

Why You'll Love This Banana Brown Sugar Muffins for Breakfast

  • These Banana Brown Sugar Muffins are incredibly easy to make, requiring just five minutes of prep time, so you can quickly whip them up even on a busy morning.
  • Their delightful flavor achieves the perfect balance of sweetness from the bananas and brown sugar, making each bite a heavenly experience.
  • With their fluffy texture and a crunchy topping of cinnamon and sugar, these muffins are visually appealing and guaranteed to impress anyone who sees them.
  • Plus, they are versatile enough to be enjoyed for breakfast, brunch, or as a delicious snack throughout the day.

Banana Brown Sugar Muffin Ingredients

For the Muffin Batter

  • Unbleached all-purpose flour – enhances structure and texture, giving your muffins a delightful base.
  • Baking powder – acts as a leavening agent, ensuring your muffins rise beautifully.
  • Baking soda – complements the acidity of the bananas for that perfect fluffy crumb.
  • Salt – a pinch balances sweetness, bringing out all the flavors effectively.
  • Large ripe bananas – the star ingredient; super ripe bananas provide natural sweetness and moisture.
  • Large egg – adds richness and binds the ingredients together for a perfect texture.
  • Greek yogurt or sour cream – keeps the muffins moist and adds a hint of tanginess.
  • Unsalted butter – adds essential flavor and richness to the muffins.
  • Brown sugar – this key ingredient in Banana Brown Sugar Muffins creates a deep, caramel-like sweetness.
  • Pure vanilla extract – enhances the overall flavor profile with its warm notes.

For the Muffin Topping

  • Granulated sugar – provides a sweet crunch on top, enhancing the muffin’s appeal.
  • Ground cinnamon – adds a warm, aromatic touch that perfectly complements the banana flavor.

How to Make Banana Brown Sugar Muffins

  1. Preheat the oven – Begin by preheating your oven to 350°F (175°C) and prepare a muffin tin by lightly greasing or lining it with muffin cups for easy removal.

  2. Mix dry ingredients – In a large bowl, whisk together 1.5 cups of unbleached all-purpose flour, 1 teaspoon of baking powder, 1 teaspoon of baking soda, and 0.5 teaspoon of salt until all ingredients are well combined.

  3. Combine wet ingredients – In another bowl, mash 3 large ripe bananas until smooth. Then, mix in 1 large egg, 0.25 cups of Greek yogurt (or sour cream), 0.5 cups of melted unsalted butter, 0.5 cups of packed brown sugar, and 1 teaspoon of pure vanilla extract until everything is well integrated.

  4. Combine mixtures – Pour the wet banana mixture into the bowl with the dry ingredients. Gently stir until just combined—avoid overmixing as this helps keep your muffins tender!

  5. Fill muffin tin – Using a spoon or ice cream scoop, fill each muffin cup about 2/3 full with the batter to allow room for rising.

  6. Prepare the topping – In a small bowl, mix 4 tablespoons of granulated sugar with 1 teaspoon of ground cinnamon. Evenly sprinkle this sweet mixture over the muffin batter in each cup for a delightful crunch.

  7. Bake the muffins – Place the muffin tin in the preheated oven and bake for about 20 minutes, or until a toothpick inserted in the center comes out clean. Your kitchen will smell heavenly at this point!

  8. Cool before serving – Once baked, allow the muffins to cool in the tin for a few minutes before transferring them to a wire rack to cool completely. Enjoy!

Optional: Serve warm with a pat of butter for extra indulgence.
Exact quantities are listed in the recipe card below.

How to Store and Freeze Banana Brown Sugar Muffins

Room Temperature: Store muffins at room temperature in an airtight container for up to 3 days to maintain freshness and flavor.

Fridge: If you need them to last longer, place the muffins in the fridge in a sealed container for up to a week, keeping them moist and delicious.

Freezer: For longer storage, freeze the Banana Brown Sugar Muffins by wrapping them individually in plastic wrap and placing them in a freezer-safe bag. They’ll stay fresh for up to 3 months.

Reheating: To enjoy your muffins warm, reheat them in the microwave for about 15-20 seconds or in a 350°F oven for 5-7 minutes straight from the freezer.

Banana Brown Sugar Muffin Variations

Feel free to sprinkle your creativity into these delightful muffins; the possibilities are endless!

  • Nutty Twist: Add 1/2 cup of chopped walnuts or pecans for a crunchy texture that perfectly complements the softness of the muffins. Nut enthusiasts will absolutely love the added depth of flavor!

  • Chocolate Lovers: Fold in 1/2 cup of mini chocolate chips into the batter for a sweet, decadent touch that takes these muffins to a whole new level of indulgence. A chocolatey surprise in each bite will be heavenly!

  • Fruit Fusion: Incorporate 1/2 cup of blueberries or chopped strawberries for a fruity explosion. Their natural sweetness and juicy bite will elevate your muffins to a delightful breakfast treat!

  • Dairy-Free: Swap the Greek yogurt for a non-dairy yogurt or applesauce, and use coconut oil instead of butter. This simple change keeps the muffins moist while accommodating dietary preferences—everyone can enjoy!

  • Spice It Up: Add a pinch of nutmeg or a dash of cardamom to the cinnamon topping for a warm and aromatic flavor twist. It infuses your muffins with cozy spices that’ll warm your heart.

  • Zesty Orange: Mix in the zest of one orange into the batter for a refreshing citrus twist. The bright citrus notes will make each muffin taste like a sunny morning, perfect for brightening your day!

  • Gluten-Free: Substitute the all-purpose flour with a gluten-free blend. Ensure you also use gluten-free baking powder to maintain that airy texture everyone loves.

  • Maple Sweet: Replace half of the brown sugar with pure maple syrup for an earthy sweetness that adds depth to your muffins. This will not only change the flavor profile but also create a delightful, moist crumb.

What to Serve with Banana Brown Sugar Muffins?

Imagine savoring these delightful muffins alongside perfectly paired accompaniments that enhance their sweet, comforting flavor and take your breakfast experience to another level.

  • Fresh Fruit Medley: A vibrant mix of berries and citrus adds a refreshing contrast, balancing the sweet richness of the muffins. The pops of color and flavor bring joy to your table!

  • Greek Yogurt Parfait: Creamy yogurt layered with honey and granola creates a wholesome balance of textures that complement the muffins wonderfully. Adding granola gives that delightful crunch, while the yogurt’s tanginess pairs beautifully with the sweetness.

  • Nutty Trail Mix: A handful of roasted nuts and seeds provides a satisfyingly crunchy texture and nutty flavor that contrasts with the soft muffins. Each bite becomes an adventure, perfect for those moments when you want a bit of everything.

  • Maple Syrup Drizzle: A touch of warm, rich maple syrup over the muffins transforms each bite into a little piece of heaven. The sweet syrup, with its unique flavor, enhances the muffin’s brown sugar notes beautifully!

  • Herbal Tea: A cup of soothing chamomile or mint tea provides a warm, calming beverage option that contrasts impeccably with the sweet muffins. The fragrant aroma of the tea will transport you to a tranquil breakfast nook.

  • Cinnamon-Spiced Coffee: The warmth of a freshly brewed cup of coffee, especially with hints of cinnamon, complements the muffins splendidly. It’s a classic pairing, perfect for those cozy mornings and lazy brunches.

Serve your Banana Brown Sugar Muffins with these delightful options, and watch your breakfast become a memorable feast!

Make Ahead Options

These Banana Brown Sugar Muffins for Breakfast are a fantastic choice for meal prep! You can mix the dry ingredients (flour, baking powder, baking soda, and salt) and store them in an airtight container for up to 3 days. Additionally, mash the ripe bananas and combine them with the wet ingredients (egg, Greek yogurt, melted butter, brown sugar, and vanilla) to prep ahead and refrigerate for up to 24 hours. When you’re ready to bake, simply follow the finishing steps, combining the prepped mixtures and filling the muffin tin. This way, you can enjoy freshly baked muffins any day of the week with minimal effort—just as delicious as if made that morning!

Chef's Helpful Tips

  • When making Banana Brown Sugar Muffins, ensure your bananas are very ripe for maximum sweetness and moisture.
  • Be careful not to overmix the batter, as this can result in dense muffins instead of light and fluffy ones.
  • For an even texture, consider using room temperature ingredients like the egg and yogurt before mixing.
  • Always keep an eye on your muffins towards the end of the baking time, as ovens can vary; start checking for doneness at the 18-minute mark.

Banana Brown Sugar Muffins for Breakfast Recipe FAQs

How ripe should the bananas be for this recipe?
Absolutely, the riper the bananas, the better! Look for bananas that have a few dark spots on the skin; this indicates sweetness and moisture. Ideally, you want bananas that are fully yellow with some brown spots, as they’ll mash easily and merge beautifully into your muffin batter.

How should I store the muffins after baking?
To keep your muffins fresh, store them at room temperature in an airtight container for up to 3 days. If you wish to extend their shelf life, placing them in the fridge in a sealed container can keep them tasty for up to a week. Just remember to let them cool completely before storing!

Can I freeze Banana Brown Sugar Muffins?
Very! Freezing is a fantastic way to keep your muffins for later. Wrap each muffin individually in plastic wrap, ensuring they’re well sealed to prevent freezer burn, and then place them in a freezer-safe bag. They’ll stay delicious for up to 3 months!

When you’re ready to enjoy, simply reheat in the microwave for 15-20 seconds or in a preheated oven at 350°F for about 5-7 minutes straight from the freezer.

What if my muffins turn out dense?
If your muffins come out dense, it’s likely due to overmixing. When combining the wet and dry ingredients, mix just until there are no dry spots. Another tip is to make sure your baking powder and baking soda are fresh; expired leavening agents can prevent proper rising. Check for doneness a tad earlier, around the 18-minute mark!

Are these muffins suitable for people with allergies?
These Banana Brown Sugar Muffins contain common allergens such as gluten and dairy. If you have a gluten allergy, you can substitute the all-purpose flour with a gluten-free blend. For a dairy-free option, swap out the Greek yogurt and butter for almond milk yogurt and coconut oil, respectively. Always check your specific ingredient labels for any allergy warnings!

Banana Brown Sugar Muffins for Breakfast

Banana Brown Sugar Muffins for Breakfast

Delight in these Banana Brown Sugar Muffins for Breakfast, simple to prepare and filled with flavor.
Print Recipe Pin Recipe
Prep Time 5 minutes mins
Cook Time 20 minutes mins
Cooling Time 10 minutes mins
Total Time 35 minutes mins
Servings: 12 muffins
Course: BREAKFAST & BRUNCH
Cuisine: American
Calories: 180
Ingredients Equipment Method Nutrition Notes

Ingredients
  

For the Muffin Batter
  • 1.5 cups unbleached all-purpose flour enhances structure and texture
  • 1 teaspoon baking powder acts as a leavening agent
  • 1 teaspoon baking soda complements the acidity of the bananas
  • 0.5 teaspoon salt balances sweetness
  • 3 large ripe bananas provides natural sweetness and moisture
  • 1 large egg adds richness
  • 0.25 cups Greek yogurt or sour cream keeps the muffins moist
  • 0.5 cups unsalted butter adds flavor and richness
  • 0.5 cups packed brown sugar creates caramel-like sweetness
  • 1 teaspoon pure vanilla extract enhances flavor profile
For the Muffin Topping
  • 4 tablespoons granulated sugar provides a sweet crunch
  • 1 teaspoon ground cinnamon adds warm, aromatic touch

Equipment

  • Muffin tin
  • Mixing bowls
  • Whisk

Method
 

How to Make Banana Brown Sugar Muffins
  1. Preheat the oven to 350°F (175°C) and prepare a muffin tin.
  2. In a bowl, whisk together flour, baking powder, baking soda, and salt.
  3. Mash the ripe bananas in another bowl and mix in egg, yogurt, melted butter, brown sugar, and vanilla extract until integrated.
  4. Combine the wet banana mixture with the dry ingredients, mixing gently.
  5. Fill each muffin cup about 2/3 full with batter.
  6. Mix granulated sugar and cinnamon and sprinkle over the batter in each cup.
  7. Bake in the preheated oven for about 20 minutes or until a toothpick comes out clean.
  8. Allow muffins to cool in the tin for a few minutes before transferring to a wire rack.

Nutrition

Serving: 1muffinCalories: 180kcalCarbohydrates: 28gProtein: 3gFat: 7gSaturated Fat: 4gPolyunsaturated Fat: 0.5gMonounsaturated Fat: 2gCholesterol: 30mgSodium: 180mgPotassium: 150mgFiber: 1gSugar: 10gVitamin A: 200IUVitamin C: 3mgCalcium: 50mgIron: 1mg

Notes

Serve warm with a pat of butter for extra indulgence. Ensure bananas are very ripe for maximum sweetness.

Tried this recipe?

Let us know how it was!

Filed Under: BREAKFAST & BRUNCH

Oreo Cake Donuts Recipe Using Chocolate Cake Mix

December 16, 2025 by JudyWhite Leave a Comment

There’s something irresistibly fun about combining two beloved treats into one delightful creation. Imagine sinking your teeth into a soft, fluffy donut infused with rich chocolate cake, topped with creamy vanilla frosting and a sprinkle of crunchy Oreo goodness. This isn’t just dessert; it’s a celebration of flavors and textures you won’t want to miss!

What I love most about this Oreo Cake Donuts Recipe Using Chocolate Cake Mix is how effortlessly it transforms a simple box mix into an indulgent treat. Perfect for a weekend brunch or a surprise dessert for movie night, these donuts are a nod to nostalgia while creating new memories.

The best part? You don’t need to be a baking expert to whip these up. With just a handful of ingredients and minimal time, you’ll have a batch of delicious donuts that are sure to impress family and friends. So let’s dive in and bring some sweet joy to your kitchen!

Why You'll Love This Oreo Cake Donuts Recipe Using Chocolate Cake Mix

  • This Oreo Cake Donuts recipe takes convenience to a whole new level, transforming a simple chocolate cake mix into a decadent delight with little effort.
  • You’ll love how quick and easy it is to whip up a batch, making them the perfect treat for any occasion, from breakfast to dessert.
  • The combination of chocolate cake, creamy frosting, and crunchy Oreo toppings creates a flavor explosion that will have everyone coming back for more.
  • Visually, these donuts are a feast for the eyes, making them an impressive centerpiece for your table that looks as good as they taste.
  • Every bite is not just delicious but also fun, blending two beloved treats into one amazing donut experience.

Oreo Cake Donuts Ingredients

For the Donuts
• Chocolate cake mix – this forms the base of your Oreo Cake Donuts, delivering rich chocolate flavor.
• Non-stick cooking spray – ensures your donuts pop out easily without any sticking.

For the Frosting
• Vanilla frosting – the creamy topping adds a delightful sweetness that complements the chocolate.

For the Topping
• OREO cookies – crumbled on top, they add a crunchy texture and iconic flavor to the dish.

How to Make Oreo Cake Donuts

  1. Prepare chocolate cake mix according to the instructions on the box. This creamy batter will be the foundation of your delectable donuts, so ensure it’s mixed well.

  2. Spray your donut pan with non-stick cooking spray to prevent any sticking. A light coating will ensure your donuts pop out beautifully and maintain their shape.

  3. Fill each donut mold with the prepared cake batter, about three-quarters full. This allows room for the donuts to rise while baking, creating that fluffy texture we all love.

  4. Bake in the oven at 350°F for 15 minutes or until cooked through. The donuts should spring back when lightly touched and have a lovely, dark chocolate color.

  5. Cool the donuts on a wire rack before frosting. Allowing them to cool completely ensures that your creamy vanilla frosting won’t melt away when applied.

  6. Frost each cooled donut generously with vanilla frosting, creating an inviting, creamy layer on top.

  7. Crumble OREO cookies and sprinkle them on top of the frosted donuts for that final touch of crunchy goodness. This adds an extra layer of flavor that your guests will love!

Optional: Drizzle with chocolate syrup for an extra indulgent treat.

Exact quantities are listed in the recipe card below.

Oreo Cake Donuts Variations

Explore the delightful ways to customize these Oreo Cake Donuts and make them your own!

  • Dairy-Free: Substitute the vanilla frosting with coconut or almond-based frosting for a creamy, dairy-free option. Celebrate the rich flavors without compromise!

  • Gluten-Free: Use a gluten-free chocolate cake mix instead of regular to cater to gluten sensitivities while keeping the taste just as divine.

  • Healthier Option: Replace the frosting with Greek yogurt to lighten things up; it adds tang and creaminess without all the sugar.

  • Nutty Twist: Mix in some finely chopped nuts like walnuts or pecans into the batter for an unexpected crunchy texture; they add a lovely depth of flavor too.

  • Spicy Kick: Add a pinch of cayenne pepper or cinnamon to the cake batter for a hint of warmth that perfectly contrasts the sweetness.

  • Flavor Infusion: Stir in a teaspoon of mint extract to the frosting for a refreshing twist. This will elevate your chocolate donuts to a whole new level of deliciousness!

  • Cereal Crush: Instead of OREO cookies, use crushed chocolate cereal for a fun twist on texture and crunch. It brings a nostalgic feel with every bite.

  • Drizzle Delight: Top with a chocolate or caramel drizzle along with the crumbled OREOs for a perfect touch of indulgence. This adds allure to every donut!

How to Store and Freeze Oreo Cake Donuts

Room Temperature: Keep the Oreo Cake Donuts at room temperature for up to 2 days in an airtight container to maintain freshness and softness.

Fridge: For longer-lasting donuts, store them in the fridge for up to a week. Make sure they are tightly wrapped to avoid drying out.

Freezer: You can freeze the donuts for up to 3 months. Place them in an airtight container or freezer bag, separating layers with parchment paper to prevent sticking.

Reheating: To reheat, place them in a microwave for 10-15 seconds or warm them in the oven at 350°F for a few minutes until heated through, bringing back that fresh-baked taste.

What to Serve with Oreo Cake Donuts?

Delight in the perfect pairing for your sweet treats, creating a joyful occasion for friends and family.

  • Fresh Fruit Salad: A colorful medley of seasonal fruits adds refreshing brightness, balancing the sweetness of the donuts. Each bite of juicy fruit cleanses the palate beautifully.

  • Coffee or Espresso: A rich cup of coffee enhances the chocolate flavors, providing a delightful contrast. The warmth of the beverage complements the soft, fluffy donuts perfectly.

  • Chocolate Milkshake: Indulge in a creamy chocolate milkshake that mirrors the donut flavors. This makes for a fun and nostalgic combination, evoking childhood memories.

  • Vanilla Ice Cream: A scoop of velvety vanilla ice cream creates a lovely creaminess that pairs well with the chocolatey treats. The cold and warm contrasts make every bite an experience.

  • Whipped Cream: Light and airy whipped cream adds a dreamy element to each bite, enhancing the overall indulgence. It’s a delightful way to elevate those sweet flavors even further.

  • Mini Cheesecakes: Serve up mini cheesecakes for a rich, creamy dessert that complements the donut’s crunch. Their sweetness contrasts beautifully with the donut’s texture, offering a variety of flavors.

  • Sparkling Water with Lemon: Quench your thirst with a refreshing glass of sparkling water. The brightness of lemon adds zest and complements the sweet donut flavors, making each bite even more enjoyable.

Make Ahead Options

These Oreo Cake Donuts Recipe Using Chocolate Cake Mix are perfect for busy home cooks looking to save time during hectic weekdays! You can prepare the cake batter up to 24 hours in advance; simply mix as instructed and refrigerate in an airtight container. On the day you want to serve them, just spray your donut pan and fill the molds with the chilled batter—no need for bringing it to room temperature. Additionally, you can frost and top the donuts with crumbled Oreos up to 3 days in advance; store them in a single layer in an airtight container to prevent sogginess. When you’re ready to indulge, just pull them out from the fridge, and enjoy your deliciously made-ahead treats without any hassle!

Chef's Helpful Tips

  • When making Oreo Cake Donuts, be sure to mix the chocolate cake batter just until combined to avoid overmixing, which can lead to dense donuts.
  • Using a light, even coating of non-stick cooking spray will help your donuts release easily from the mold without any damage.
  • Fill the donut molds about three-quarters full to allow for proper rising while baking.
  • Keep an eye on the baking time; if the donuts spring back when touched, they are done, ensuring a perfect texture.
  • Allow the donuts to cool completely before frosting them to prevent the frosting from melting.
  • Lastly, crumbling the OREO cookies just before sprinkling them on the donuts will keep them crunchy.

Oreo Cake Donuts Recipe FAQs

How do I choose the right chocolate cake mix for the Oreo Cake Donuts?
Absolutely! Any standard chocolate cake mix works well for this recipe. You can choose from classic, dark chocolate, or even a gluten-free option if you’re accommodating dietary preferences. Just make sure to read the back of the box for any specific preparation guidelines.

What’s the best method for storing leftover Oreo Cake Donuts?
Very! Store your Oreo Cake Donuts in an airtight container at room temperature for up to 2 days. For extended freshness, keep them in the fridge for up to a week, ensuring they’re tightly wrapped to prevent drying out. If you’re really looking to keep them longer, freezing is a great option.

Can I freeze Oreo Cake Donuts? What’s the best way to do it?
You certainly can! To freeze your Oreo Cake Donuts, first let them cool completely. Then, place them in an airtight container or freezer bag. It’s best to separate the layers with parchment paper to avoid sticking. They’ll stay good for up to 3 months. When you’re ready to enjoy them, just pop them in the microwave for 10-15 seconds or warm them in the oven at 350°F for a few minutes.

What should I do if my donuts come out dense or dry?
If your donuts turn out dense, it could be due to overmixing the batter. Mix just until combined for light, fluffy donuts. Make sure to follow the baking time closely, as baking too long can dry them out. If they’re still dry, try adding a bit of milk or yogurt to the batter next time to keep them moist.

Can I use other toppings or dietary substitutes on my Oreo Cake Donuts?
Absolutely! If you’re looking for alternatives, consider using crushed nuts or sprinkles instead of OREO cookies. For a healthier twist, you can use a light cream cheese frosting or a yogurt-based frosting. Just be cautious of any allergies, especially with nuts or dairy, if serving to guests.

Oreo Cake Donuts Recipe Using Chocolate Cake Mix

Oreo Cake Donuts Recipe Using Chocolate Cake Mix

Delight in this Oreo Cake Donuts Recipe Using Chocolate Cake Mix - a fun fusion of chocolate donuts topped with creamy frosting and crunchy Oreos.
Print Recipe Pin Recipe
Prep Time 10 minutes mins
Cook Time 15 minutes mins
Cooling Time 10 minutes mins
Total Time 35 minutes mins
Servings: 12 donuts
Course: DESSERT RECIPES
Calories: 180
Ingredients Equipment Method Nutrition Notes

Ingredients
  

For the Donuts
  • 1 box chocolate cake mix
  • 1 spray non-stick cooking spray
For the Frosting
  • 1 container vanilla frosting
For the Topping
  • 6 cookies OREO cookies crumbled on top

Equipment

  • Donut pan
  • Mixing bowl
  • Wire Rack

Method
 

How to Make Oreo Cake Donuts
  1. Prepare chocolate cake mix according to the instructions on the box.
  2. Spray your donut pan with non-stick cooking spray.
  3. Fill each donut mold with the prepared cake batter, about three-quarters full.
  4. Bake in the oven at 350°F for 15 minutes or until cooked through.
  5. Cool the donuts on a wire rack before frosting.
  6. Frost each cooled donut generously with vanilla frosting.
  7. Crumble OREO cookies and sprinkle them on top of the frosted donuts.

Nutrition

Serving: 1donutCalories: 180kcalCarbohydrates: 25gProtein: 2gFat: 8gSaturated Fat: 3gPolyunsaturated Fat: 1gMonounsaturated Fat: 2gCholesterol: 10mgSodium: 150mgPotassium: 80mgFiber: 1gSugar: 10gVitamin A: 100IUCalcium: 20mgIron: 1mg

Notes

Optional: Drizzle with chocolate syrup for an extra indulgent treat. Mix chocolate cake batter just until combined to avoid dense donuts.

Tried this recipe?

Let us know how it was!

Filed Under: DESSERT RECIPES

Cheesy Ground Beef and Potato Casserole

December 16, 2025 by JudyWhite Leave a Comment

Every kitchen has its go-to comfort dishes, and my Cheesy Ground Beef and Potato Casserole is a treasure that never fails to bring smiles all around the table. There’s something about the blend of savory beef, creamy cheese, and tender potatoes that envelops you like a warm hug. Just imagining the rich aroma wafting through the house is enough to make anyone’s mouth water!

I discovered this recipe during a hectic week when takeout was luring me in like a siren call. Instead, I decided to turn my pantry staples into something heartwarming and satiating. The great news? This casserole comes together in just one skillet, making it a breeze to prepare and clean up. Perfect for busy weeknights or when you’re looking to impress guests without spending all day in the kitchen.

Let me guide you through this simple yet delicious dish that epitomizes homemade goodness—your new family favorite awaits!

Why You'll Love This Cheesy Ground Beef and Potato Casserole

  • This Cheesy Ground Beef and Potato Casserole is incredibly easy to prepare, making it the perfect option for even the busiest of weeknights.
  • The combination of savory ground beef, creamy cheese, and tender potatoes delivers an unbeatable flavor that will have everyone coming back for seconds.
  • Its versatility allows you to customize it with any leftover vegetables or cheeses you have on hand, ensuring that every dish is unique and delightful.
  • Plus, its appealing layers and melty cheese create a visually stunning presentation that will impress guests and family alike.

Cheesy Ground Beef and Potato Casserole Ingredients

• Get ready to create a delightful dish!

For the Casserole

  • Oil – A tablespoon helps prevent sticking while adding flavor.
  • Potatoes (1.5 lbs) – Cut into 1 cm or ½” cubes for even cooking and delightful texture.
  • Onion (0.5 medium) – Finely diced to bring sweetness and depth to the dish.
  • Green Bell Pepper (0.5 medium) – Finely diced to add color and a mild tang.
  • Lean Ground Beef (1 lb) – Choose lean for a healthier casserole without sacrificing flavor.
  • Tomato Paste (2 tablespoons) – Adds a rich depth and umami to balance the flavors.
  • Garlic (2 cloves) – Minced for that aromatic punch that elevates every bite.
  • Seasoning Salt (1.5 teaspoons) – A blend of salts and spices that enhances the overall taste.
  • Italian Seasoning (1 teaspoon) – Infuses your dish with a classic, herby goodness.
  • Ground Mustard (0.5 teaspoon) – Offers a subtle tang that complements the beef beautifully.
  • Black Pepper (0.25 teaspoon) – Adds a mild heat and brings out the flavors.
  • Red Pepper Flakes (0.125 teaspoon) – Optional for those who like a bit of spice!
  • Low Sodium Broth (0.75 cup) – Use beef or chicken for moisture; it helps create a savory base.
  • Tomato Sauce (0.5 cup) – Adds moisture and richness to your casserole.
  • Cream (0.25 cup) – Ensures a luscious, creamy texture that brings everything together.
  • Shredded Cheese (1 cup) – Mozzarella or cheddar for that irresistible melty finish.
  • Fresh Chopped Parsley or Green Onions – For garnish that adds a pop of color and freshness.

This Cheesy Ground Beef and Potato Casserole will surely warm hearts and fill bellies, making it a favorite in your home!

How to Make Cheesy Ground Beef and Potato Casserole

  1. Heat the Oil: In a large skillet, add the oil over medium-high heat. This will create a non-stick surface, ensuring your potatoes cook evenly and don’t stick to the pan.

  2. Cook the Potatoes: Add the 1.5 lbs of cubed potatoes to the pan. Cook for 5-6 minutes, stirring often, until they turn light golden and start to soften. The goal is to achieve that perfect texture for the base!

  3. Sauté the Vegetables: Toss in the finely diced onion and green bell pepper. Sauté for 1-2 minutes, or until the onion becomes translucent. This fragrant mix adds depth and flavor to your casserole.

  4. Brown the Beef: Stir in the 1 lb of lean ground beef. Cook until it’s thoroughly browned, making sure to stir frequently. Drain any excess fat with a paper towel to keep your dish lean and delicious.

  5. Mix the Flavors: Stir in the 2 tablespoons of tomato paste, minced garlic, and seasonings (seasoning salt, Italian seasoning, ground mustard, black pepper, and red pepper flakes). Cook and mix for 1 minute, allowing the spices to awaken and meld beautifully.

  6. Add the Liquids: Pour in the 0.75 cup of broth, 0.5 cup of tomato sauce, and 0.25 cup of cream. Bring everything to a gentle simmer, cover, and reduce the heat to medium-low. Cook until the potatoes are tender, stirring often—this should take about 10-15 minutes.

  7. Melt the Cheese: Once the potatoes are tender, remove the skillet from the heat. Uncover, add the 1 cup of shredded cheese on top, and cover again just until the cheese melts. This final step is where the magic happens—watch for that gooey goodness!

Optional: Garnish with fresh chopped parsley or green onions for a vibrant finish!

Exact quantities are listed in the recipe card below.

Make Ahead Options

These Cheesy Ground Beef and Potato Casseroles are perfect for meal prep, saving you time on hectic weeknights! You can prepare the filling (cooked potatoes, beef, and sauces) up to 3 days in advance. Simply follow the directions until the sauce begins to simmer, then let it cool completely before transferring it to an airtight container in the fridge. When you’re ready to enjoy, just reheat in a skillet over medium heat until warm, top with cheese, cover until melted, and serve! For maintaining quality, be sure to stir occasionally while reheating to prevent sticking. You’ll have comforting, delicious casserole results with little effort!

How to Store and Freeze Cheesy Ground Beef and Potato Casserole

Fridge: Store any leftovers in an airtight container for up to 3 days. Allow it to cool to room temperature before sealing to maintain freshness.

Freezer: For longer storage, freeze the casserole for up to 2 months. Wrap tightly in plastic wrap and then aluminum foil to prevent freezer burn.

Reheating: When ready to enjoy, thaw overnight in the fridge, and reheat in the oven at 350°F (175°C) for about 20-25 minutes, until warmed through and cheesy again.

Room Temperature: Avoid leaving the Cheesy Ground Beef and Potato Casserole out for more than 2 hours to prevent any spoilage; always refrigerate promptly.

What to Serve with Cheesy Ground Beef and Potato Casserole?

Nothing rounds off a comforting casserole quite like the perfect sides that elevate your meal experience.

  • Garlic Bread: The buttery, garlicky flavor and crisp texture of garlic bread are perfect for mopping up the creamy sauce. Each bite transports you to a cozy Italian kitchen, enhancing the meal’s warmth.

  • Steamed Broccoli: Vibrant green broccoli adds a delightful crunch and a fresh palate cleanser. Its mild flavor complements the robust casserole, bringing balance to your plate.

  • Coleslaw: A refreshing and tangy coleslaw can provide a delightful contrast to the hearty dish. The crunch and acidity lighten every mouthful of creamy goodness, making it a balanced choice.

  • Mixed Green Salad: A simple mixed green salad with vinaigrette offers a fresh, crisp contrast. Tossed with seasonal veggies, it adds texture and brightness to the meal.

  • Roasted Carrots: Sweet and tender roasted carrots enhance the casserole’s savory appeal while adding a pop of color to your table. Their caramelized edges create a lovely pairing that feels special.

  • Red Wine: Pairing with a glass of robust red wine, perhaps a Merlot or Cabernet Sauvignon, elevates your dinner experience. The wine’s rich tannins complement the beef’s depth beautifully.

  • Chocolate Cake: For dessert, a slice of rich chocolate cake finishes the meal on a sweet note. Its indulgent flavors provide a delightful contrast to the savory casserole, making for a balanced end to your feast.

Cheesy Ground Beef and Potato Casserole Variations

Feel free to make this dish your own with these fun twists that enhance flavor and cater to dietary preferences!

  • Vegetarian: Substitute 1 lb of cooked lentils or mushrooms for the ground beef, and use vegetable broth for a hearty veggie casserole.

  • Spicy: Add 1 tablespoon of diced jalapeños or increase red pepper flakes for a delightful kick. The additional heat will awaken your taste buds!

  • Herbed: Toss in fresh herbs like thyme or rosemary for an aromatic twist that compliments the savory layers beautifully. Freshly chopped herbs elevate the entire dish.

  • Creamy Dairy-Free: Use coconut cream and dairy-free cheese alternatives to create a luscious consistency that fits a plant-based lifestyle without compromising on flavor.

  • Bacon Lovers: Crisp up 4 to 6 slices of bacon, chop them, and mix them in for a smoky flavor boost that pairs perfectly with the beef and potatoes.

  • Cheese Variety: Experiment with Gouda or Pepper Jack cheese for a unique taste profile. Each cheese brings its own character, transforming every bite.

  • Loaded Casserole: Top the casserole with crispy fried onions, fresh chives, or bacon bits for an extra crunchy, indulgent layer everyone will love.

  • Sweet Potato Swap: Replace regular potatoes with sweet potatoes for a nutritious alternative that adds a hint of natural sweetness and vibrant color to the dish.

Chef's Helpful Tips

  • For the Cheesy Ground Beef and Potato Casserole, ensure your potatoes are cut into uniform 1 cm cubes to promote even cooking and avoid any mushy texture.
  • A common mistake is overcooking the ground beef; cook it just until browned to keep it juicy and flavorful.
  • Next, always drain any excess fat after browning to lighten the dish while still keeping it rich.
  • When adding liquids, bring the mixture to a gentle simmer instead of boiling to allow the flavors to meld perfectly without compromising the potatoes’ texture.

Cheesy Ground Beef and Potato Casserole Recipe FAQs

How do I select the right potatoes for this casserole?
Absolutely! For the best results, choose starchy potatoes like Russets or all-purpose types like Yukon Golds. Look for firm potatoes without dark spots or blemishes—fresh potatoes will cook evenly and give you that delightful texture!

How should I store leftovers of the Cheesy Ground Beef and Potato Casserole?
You can store leftovers in an airtight container in the fridge for up to 3 days. Always let the casserole cool to room temperature before sealing it; this helps keep it fresh and prevents condensation inside the container.

Can I freeze Cheesy Ground Beef and Potato Casserole?
Yes, indeed! To freeze, wrap the casserole tightly with plastic wrap, followed by aluminum foil to avoid freezer burn. It can be kept for up to 2 months. When you’re ready to enjoy it, simply thaw overnight in the fridge, and then reheat in the oven at 350°F (175°C) for about 20-25 minutes or until hot and bubbly!

What if my casserole is too watery after cooking?
Very! If your casserole turns out watery, you might need to reduce the liquid next time. You can also try draining some of the liquid off before topping it with cheese. A thicker tomato paste or adding a small amount of cornstarch mixed with water can also help if you’re looking to fix it while cooking!

Is this casserole suitable for special dietary needs?
It can be! If you’re mindful of allergies, you can easily substitute the ground beef with turkey or a plant-based ground meat. For a dairy-free option, use a non-dairy cream and cheese alternative to make it suitable for lactose intolerance. Just pay attention to the labels for allergens!

How can I include more vegetables in my Cheesy Ground Beef and Potato Casserole?
The more, the merrier! You can add diced carrots, peas, or even spinach for extra nutrition and flavor. If using frozen veggies, toss them in right at the end of cooking to warm them up without overcooking. Don’t be afraid to experiment with your favorites!

Cheesy Ground Beef and Potato Casserole

Cheesy Ground Beef and Potato Casserole

Indulge in the warmth of Cheesy Ground Beef and Potato Casserole, a comforting dish that combines savory beef, creamy cheese, and tender potatoes.
Print Recipe Pin Recipe
Prep Time 15 minutes mins
Cook Time 30 minutes mins
Total Time 45 minutes mins
Servings: 6 servings
Course: DINNER RECIPES
Cuisine: American
Calories: 450
Ingredients Equipment Method Nutrition Notes

Ingredients
  

For the Casserole
  • 1 tbsp Oil
  • 1.5 lbs Potatoes cut into 1 cm cubes
  • 0.5 medium Onion finely diced
  • 0.5 medium Green Bell Pepper finely diced
  • 1 lb Lean Ground Beef
  • 2 tbsp Tomato Paste
  • 2 cloves Garlic minced
  • 1.5 tsp Seasoning Salt
  • 1 tsp Italian Seasoning
  • 0.5 tsp Ground Mustard
  • 0.25 tsp Black Pepper
  • 0.125 tsp Red Pepper Flakes optional
  • 0.75 cup Low Sodium Broth beef or chicken
  • 0.5 cup Tomato Sauce
  • 0.25 cup Cream
  • 1 cup Shredded Cheese Mozzarella or cheddar
  • Fresh Chopped Parsley or Green Onions for garnish

Equipment

  • Large skillet

Method
 

Directions
  1. In a large skillet, add the oil over medium-high heat.
  2. Add the cubed potatoes to the pan. Cook for 5-6 minutes, stirring often, until they turn light golden and start to soften.
  3. Toss in the finely diced onion and green bell pepper. Sauté for 1-2 minutes, or until the onion becomes translucent.
  4. Stir in the lean ground beef. Cook until it’s thoroughly browned, stirring frequently.
  5. Stir in the tomato paste, minced garlic, and seasonings. Cook for 1 minute.
  6. Pour in the broth, tomato sauce, and cream. Bring to a gentle simmer, cover, and reduce to medium-low. Cook until the potatoes are tender.
  7. Remove from heat, add the shredded cheese on top, and cover just until the cheese melts.
  8. Garnish with fresh chopped parsley or green onions.

Nutrition

Serving: 1bowlCalories: 450kcalCarbohydrates: 32gProtein: 28gFat: 24gSaturated Fat: 12gPolyunsaturated Fat: 0.5gMonounsaturated Fat: 9gCholesterol: 80mgSodium: 600mgPotassium: 900mgFiber: 4gSugar: 3gVitamin A: 400IUVitamin C: 30mgCalcium: 200mgIron: 3mg

Notes

Ensure potatoes are cut into uniform cubes for even cooking and avoid mushy texture. Drain excess fat after browning beef for a lighter dish.

Tried this recipe?

Let us know how it was!

Filed Under: DINNER RECIPES

Cardamom Spiced Rhubarb Cream Donuts

December 16, 2025 by JudyWhite Leave a Comment

There’s a certain charm that comes from the combination of spices and seasonal fruits, and that’s exactly what inspired my latest creation: Cardamom Spiced Rhubarb Cream Donuts. The moment I caught a whiff of warm, cardamom-scented dough filling my kitchen, I was transported to a world of cozy flavors. The distinctive warmth of cardamom perfectly complements the tartness of fresh rhubarb, creating a delightful balance that makes each bite a little celebration.

On one particularly rainy afternoon, I found myself yearning for something comforting and homemade. As I rummaged through my pantry, a hidden stash of rhubarb caught my eye, and inspiration struck. I decided to craft these donuts as a perfect treat, ideal for a casual get-together or a cozy breakfast at home. The result? Pillowy, golden donuts filled with luscious rhubarb compote and a velvety cream that will undoubtedly impress family and friends alike. Ready to bring this sweet adventure to your own kitchen? Let’s dive in!

Why You'll Love This Cardamom Spiced Rhubarb Cream Donuts

  • These Cardamom Spiced Rhubarb Cream Donuts are incredibly easy to make, allowing both novice and experienced bakers to enjoy them.
  • The unique flavor combination of cardamom and rhubarb creates a delightful taste sensation that will have everyone coming back for more.
  • Not only are they versatile enough to be served at breakfast, brunch, or dessert, but their vibrant colors and charming presentation make them visually stunning as well.
  • Plus, with a relatively quick prep and cook time, you can whip up a batch to impress your friends and family without spending all day in the kitchen.

Cardamom Spiced Rhubarb Cream Donuts Ingredients

For the Donut Dough
• Whole milk – helps activate the yeast for a fluffy texture.
• Instant yeast – allows for a quicker rise, making these donuts easy and efficient to prepare.
• Granulated sugar – sweetens the dough and nourishes the yeast for a better rise.
• Bread flour – provides the perfect chewiness and structure to your donuts.
• Unsalted butter – adds richness and flavor to each bite.
• Large egg – binds the ingredients and contributes to a tender crumb.
• Ground cardamom – infuses the dough with a warm, fragrant spice that pairs beautifully with rhubarb.
• Kosher salt – enhances the overall flavor of the donuts.

For the Rhubarb Compote
• Forced rhubarb – offers a tart contrast to the sweetness of the donuts, elevating the flavor profile.
• Granulated sugar – sweetens the compote to balance the tartness of the rhubarb.
• Orange zest and juice – adds citrus notes that brighten the dish.
• Kosher salt – a pinch helps to round out the flavors.
• Vanilla bean paste or extract – brings warmth and complexity to the compote.

For the Cream Filling
• Heavy cream – is whipped until fluffy for a light, airy filling.
• Mascarpone – lends a creamy, luxurious texture to the filling.
• Granulated sugar – sweetens the cream for a delightful treat.
• Vanilla bean paste or extract – enriches the cream with its sweet aroma.

For Frying and Finishing
• Neutral oil – essential for frying; it allows the donuts to cook evenly without an overpowering flavor.
• Granulated sugar (for tossing) – adds a sweet, sparkling finish to the hot donuts.

Get ready to experience the delightful harmony of flavors in these Cardamom Spiced Rhubarb Cream Donuts!

How to Make Cardamom Spiced Rhubarb Cream Donuts

  1. Combine whole milk and instant yeast in a bowl, allowing it to sit until frothy, about 5-10 minutes. This is the first step to ensure your donuts will be light and airy.

  2. Mix in the granulated sugar, bread flour, unsalted butter, large egg, ground cardamom, and kosher salt to the yeast mixture. Stir until a dough forms, then get ready for some kneading!

  3. Knead the dough on a floured surface for about 8-10 minutes until smooth and elastic. Place the dough in a greased bowl, cover with a clean towel, and let it rise until doubled in size, roughly 1 hour.

  4. Prepare the rhubarb compote by cooking forced rhubarb with granulated sugar, orange zest, orange juice, kosher salt, and vanilla in a saucepan over medium heat. Stir until soft, then cool completely.

  5. Whip the heavy cream in a mixing bowl until soft peaks form. Gently fold in mascarpone, granulated sugar, and vanilla bean paste until fully combined for a luscious filling.

  6. Roll out the dough on a floured surface to about 1/2-inch thickness, then cut into donut shapes. Let them rise again for 30 minutes for that perfect fluffiness.

  7. Heat neutral oil in a deep fryer or heavy pot to 350°F (175°C). Carefully fry the donuts until golden brown on both sides, about 2-3 minutes per side, then drain on paper towels.

  8. Toss the hot donuts in granulated sugar for a sweet dusting. Once cooled slightly, fill each with rhubarb compote and cream filling, delighting your taste buds!

Optional: Serve with a sprinkle of extra cardamom for added flavor.
Exact quantities are listed in the recipe card below.

How to Store and Freeze Cardamom Spiced Rhubarb Cream Donuts

Room Temperature: Store your donuts in an airtight container at room temperature for up to 2 days. This helps maintain their soft texture and delightful creaminess.

Fridge: If you need them to last longer, you can refrigerate the donuts for up to 5 days. Just remember to cover them in plastic wrap to prevent them from drying out.

Freezer: For longer storage, freeze the filled donuts in a single layer on a baking sheet. Once solid, transfer them to a freezer-safe bag and store for up to 3 months.

Reheating: To enjoy frozen donuts, thaw them overnight in the fridge. Reheat briefly in the microwave or oven (350°F) for 5 minutes to restore their fluffy perfection.

Make Ahead Options

These Cardamom Spiced Rhubarb Cream Donuts are a fantastic choice for meal prep, allowing you to enjoy a delicious homemade treat with minimal effort during the week! You can prepare the dough and let it rise up to 24 hours in advance; just be sure to store it in the refrigerator to prevent over-proofing. The rhubarb compote can also be made up to 3 days ahead; simply refrigerate it in a sealed container and reheat before filling the donuts. When you’re ready to serve, roll out the dough, cut into shapes, let rise briefly, fry them up, and fill. This way, you’ll enjoy these delightful donuts just as fresh and flavorful as if you made them all at once!

Cardamom Spiced Rhubarb Cream Donuts Variations

Feel free to get creative and personalize your donuts with these delightful adjustments!

  • Gluten-Free: Use a gluten-free flour blend to make these donuts suitable for gluten-sensitive friends; the flavor still shines through!

  • Vegan: Substitute almond milk for whole milk, replace butter with coconut oil, and use flax eggs for egg alternatives for a completely plant-based treat.

  • Spice Up: For a warm twist, add 1 tablespoon of cinnamon to the dough for a delightful cinnamon-cardamom flavor blend!

  • Fruity Twist: Swap out rhubarb with diced strawberries or tart cherries for a vibrant fruit variation that brings a different kind of sweetness.

  • Zesty Orange: Boost the orange flavor by adding 1 teaspoon of orange extract to the cream filling for an extra citrus kick that’s refreshing and bright.

  • Chocolate Love: Drizzle melted dark chocolate over the donuts after frying for a rich, indulgent finish that pairs beautifully with the rhubarb.

  • Nutty Crunch: Add 1/2 cup of chopped nuts like pistachios or almonds to the cream filling for a delightful crunch that complements the creamy texture.

  • Heat Element: For a bit of excitement, mix in a pinch of cayenne pepper to the dough; the heat will surprise and tantalize your taste buds!

What to Serve with Cardamom Spiced Rhubarb Cream Donuts?

Elevate your donut experience with delightful pairings that complement the warm spices and luscious cream filling.

  • Fresh Berries: These juicy, sweet-tart fruits brighten up each bite, creating a lovely contrast with the rich flavors of the donuts.
  • Sweetened Coffee: A creamy latte or caramel macchiato creates the ultimate morning indulgence, perfectly balancing the sweetness of the donuts.
  • Herbal Tea: A soothing chamomile or mint tea complements the spices in the donuts while providing a refreshing contrast.
  • Vanilla Ice Cream: The cold creaminess of vanilla ice cream perfectly contrasts the warmth of the donuts, taking dessert to a new level.
  • Maple Syrup: Drizzling a bit of maple syrup over the filled donuts adds a touch of sweetness, enhancing their flavor and making them more decadent.
  • Citrus Salad: A refreshing salad of oranges and grapefruits offers a bright, zesty contrast that lightens up the richness of the donuts.
  • Chocolate Drizzle: Enhance each donut with a warm chocolate drizzle for an irresistible addition; the flavors meld beautifully with the cardamom.
  • Lemon Curd: A dollop of tangy lemon curd adds a zesty twist that brightens each bite, perfectly balancing the sweet elements.
  • Sparkling Water: A bubbly sip refreshes the palate between bites, ensuring that the richness of the donuts doesn’t overwhelm.
  • Chocolate Coffee Cake: A slice of this moist, fudgy goodness pairs beautifully with the donuts, offering more texture and layers of flavor.

Chef's Helpful Tips

  • For the Cardamom Spiced Rhubarb Cream Donuts, make sure your milk is warm but not hot when combining it with yeast to activate it properly without killing the yeast.
  • Kneading the dough thoroughly is crucial as it develops gluten, ensuring your donuts have a delightful chewiness.
  • When frying, maintain the oil temperature around 350°F to achieve that perfect golden brown exterior while keeping the inside light and airy.
  • Lastly, let the donuts cool slightly before tossing them in sugar, as this allows the sugar to adhere better for a more satisfying sweetness.

Cardamom Spiced Rhubarb Cream Donuts Recipe FAQs

What is the best way to select rhubarb for this recipe?
Absolutely! Look for forced rhubarb with vibrant red stalks that have a firm texture. Avoid any stalks with dark spots or wilting, as they may be past their prime. The freshness of the rhubarb is key to getting that tart flavor to balance the sweetness of the donuts!

How should I store leftover Cardamom Spiced Rhubarb Cream Donuts?
You can keep your donuts at room temperature in an airtight container for up to 2 days to preserve their softness. If you want to make them last longer, store them in the refrigerator for up to 5 days, wrapped securely in plastic wrap to prevent drying out.

Can I freeze the filled donuts, and how do I do it?
Yes, you can definitely freeze the Cardamom Spiced Rhubarb Cream Donuts! Start by placing the filled donuts on a baking sheet in a single layer and freeze until solid, about 1-2 hours. Then, transfer them to a freezer-safe bag for up to 3 months. Just remember to label the bag with the date for easy reference!

What should I do if my donut dough isn’t rising?
Very! If your dough isn’t rising, it might be due to the yeast not activating properly. Ensure the milk is warm (around 110°F) but not hot, as too much heat can kill the yeast. If it’s been over an hour and there’s little change, consider letting it sit in a warmer area or even adding a couple of teaspoons of sugar to the yeast when you mix it, which can sometimes give it a little boost.

Are these donuts suitable for people with allergies?
While these delicious Cardamom Spiced Rhubarb Cream Donuts contain common allergens like gluten (in the flour) and dairy (in the milk and butter), you can make substitutions to accommodate allergies. For a gluten-free option, try using a gluten-free flour blend. You can substitute almond milk or a nut-free alternative for the dairy components. Always check labels to ensure there are no hidden allergens.

How do I know when the oil is ready for frying?
You’ll want the oil to reach about 350°F (175°C) for perfect frying! You can test the oil by sprinkling a tiny bit of dough into it—if it sizzles and rises to the top, it’s ready. Maintaining the right temperature is crucial for achieving that golden-brown color while keeping the donuts light and fluffy on the inside.

Cardamom Spiced Rhubarb Cream Donuts

Cardamom Spiced Rhubarb Cream Donuts

Delight in Cardamom Spiced Rhubarb Cream Donuts, a perfect blend of spices and fresh rhubarb.
Print Recipe Pin Recipe
Prep Time 30 minutes mins
Cook Time 20 minutes mins
Rising Time 1 hour hr 30 minutes mins
Total Time 2 hours hrs 20 minutes mins
Servings: 12 donuts
Course: DESSERT RECIPES
Cuisine: American
Calories: 250
Ingredients Equipment Method Nutrition Notes

Ingredients
  

For the Donut Dough
  • 1 cup whole milk helps activate the yeast for a fluffy texture
  • 2 teaspoons instant yeast allows for a quicker rise
  • 1/2 cup granulated sugar sweetens the dough
  • 3 cups bread flour provides chewiness
  • 1/4 cup unsalted butter adds richness
  • 1 large egg binds the ingredients
  • 1 teaspoon ground cardamom infuses warmth and fragrance
  • 1/2 teaspoon kosher salt enhances flavor
For the Rhubarb Compote
  • 2 cups forced rhubarb offers tart contrast
  • 3/4 cup granulated sugar sweetens the compote
  • 1 tablespoon orange zest adds citrus notes
  • 1/4 cup orange juice brightens the dish
  • 1/4 teaspoon kosher salt rounds out flavors
  • 1 teaspoon vanilla bean paste or extract brings warmth and complexity
For the Cream Filling
  • 1 cup heavy cream whipped until fluffy
  • 1/2 cup mascarpone lends creaminess
  • 1/4 cup granulated sugar sweetens the cream
  • 1 teaspoon vanilla bean paste or extract enriches the cream
For Frying and Finishing
  • 4 cups neutral oil for frying
  • 1/2 cup granulated sugar for tossing

Equipment

  • Mixing bowl
  • Deep fryer
  • Saucepan
  • Whisk
  • Rolling pin
  • Donut cutter
  • paper towels

Method
 

How to Make Cardamom Spiced Rhubarb Cream Donuts
  1. Combine whole milk and instant yeast in a bowl, allowing it to sit until frothy, about 5-10 minutes.
  2. Mix in the granulated sugar, bread flour, unsalted butter, large egg, ground cardamom, and kosher salt to the yeast mixture.
  3. Knead the dough on a floured surface for about 8-10 minutes until smooth and elastic.
  4. Prepare the rhubarb compote by cooking forced rhubarb with granulated sugar, orange zest, orange juice, kosher salt, and vanilla in a saucepan over medium heat.
  5. Whip the heavy cream in a mixing bowl until soft peaks form, then fold in mascarpone, granulated sugar, and vanilla until fully combined.
  6. Roll out the dough on a floured surface to about 1/2-inch thickness, then cut into donut shapes. Let them rise again for 30 minutes.
  7. Heat neutral oil to 350°F (175°C). Carefully fry the donuts until golden brown on both sides, about 2-3 minutes per side.
  8. Toss the hot donuts in granulated sugar for a sweet dusting, then fill each with rhubarb compote and cream filling.

Nutrition

Serving: 1donutCalories: 250kcalCarbohydrates: 30gProtein: 3gFat: 15gSaturated Fat: 9gPolyunsaturated Fat: 1gMonounsaturated Fat: 5gCholesterol: 40mgSodium: 150mgPotassium: 150mgFiber: 1gSugar: 10gVitamin A: 500IUVitamin C: 2mgCalcium: 50mgIron: 1mg

Notes

Allow donuts to cool slightly before tossing in sugar for better adherence.

Tried this recipe?

Let us know how it was!

Filed Under: BREAKFAST & BRUNCH

Gourmet Grilled Cheese Sandwich

December 16, 2025 by JudyWhite Leave a Comment

There’s something undeniably comforting about the crunch of golden-brown bread cradling gooey, melted cheese, and I found myself nodding in agreement one rainy afternoon. I had a few items in my fridge that seemed ordinary: sourdough, some cheese, and an apple. Suddenly, inspiration struck! What if I transformed this humble fare into a Gourmet Grilled Cheese Sandwich? The end result is a delightful twist on the classic that tantalizes the senses with layers of creamy camembert, sharp cheddar, and a hint of lemon zest that brightens every bite.

Whether you’re looking to impress at brunch or indulge in a cozy night in, this recipe is quick, satisfying, and sure to bring smiles all around. Let’s take a break from the fast-food routine and rediscover the joy of homemade comfort food with this easy yet elegant sandwich that’s bursting with flavor. Ready to elevate your cheese game? Let’s dive into the deliciousness of this Gourmet Grilled Cheese Sandwich!

Why You'll Love This Gourmet Grilled Cheese Sandwich

  • This Gourmet Grilled Cheese Sandwich is incredibly easy to make, allowing you to whip up a gourmet meal in just 20 minutes.
  • The unique combination of creamy camembert, sharp cheddar, and fresh apple creates a flavor explosion that will delight your taste buds.
  • With its vibrant presentation and tantalizing aroma, this sandwich is sure to impress your guests and elevate any meal.
  • Plus, it’s versatile enough to customize by adding your favorite ingredients or trying different cheeses, making it a perfect option for any occasion.

Gourmet Grilled Cheese Sandwich Ingredients

For the Bread
• Fresh sourdough bread – the tangy flavor of sourdough enhances the gourmet feel of this grilled cheese sandwich.

For the Cheeses
• Camembert cheese – this creamy cheese adds a luxurious texture; feel free to substitute with brie for a different taste.
• Sharp, aged cheddar – contributes a rich, bold flavor that complements the sweetness of the apple.

For the Flavor Boosters
• Fresh thyme – this herb adds a fragrant note; rosemary can be substituted for an earthy twist.
• Whole lemon (zested) – the lemon zest brightens the flavors beautifully; using lime zest offers a fresh contrast.

For the Sweetness
• Honeycrisp apple – its crisp texture and sweetness balance the richness of the cheeses; try a Granny Smith for more tartness.

Extra Seasoning
• Fresh ground pepper – adds just the right amount of heat; keep it to your taste preference for a customized kick.

Let these ingredients gather on your kitchen counter, and get ready to elevate your sandwich game with a Gourmet Grilled Cheese Sandwich that will leave everyone asking for seconds!

How to Make a Gourmet Grilled Cheese Sandwich

  1. Slice the Bread: Begin by cutting the fresh sourdough bread into four 1/2-inch thick slices. This thickness will provide a delightful crunch while holding all that gooey goodness inside.

  2. Layer the Cheeses: On two of the slices, add a generous portion of camembert cheese. Sprinkle fresh thyme, lemon zest, and ground pepper across the cheese to infuse each bite with aromatic flavors.

  3. Add the Apple: Thinly slice half of a honeycrisp apple and arrange the slices lovingly over the camembert. This touch of sweetness balances the richness of the cheese beautifully.

  4. Top with Cheddar: On the remaining two slices of sourdough, layer sharp cheddar cheese. Close the sandwich by placing the apple-topped slices over the cheddar slices, and gently press to hold everything together.

  5. Heat the Skillet: Preheat a large non-stick skillet over medium heat. Give it a light spray with avocado oil spray to prevent sticking, allowing the sandwich to crisp up nicely.

  6. Cook the Sandwich: Place the sandwich in the skillet with the cheddar side down. Cook for several minutes, giving it a gentle press with a spatula, until the cheese starts to melt and the bottom side is golden brown.

  7. Flip and Finish: Carefully spray the top sides of the sandwich and flip it over with a spatula. Cook this side for additional minutes until it becomes golden brown and the cheese is fully melted.

  8. Check for Doneness: Don’t be shy to flip the sandwiches a couple of times to ensure even cooking. Once the cheese is adorably gooey, remove the sandwiches from the pan and place them on a cutting board.

  9. Slice and Serve: Using a serrated knife, slice the sandwiches in half and serve them immediately, allowing the mouthwatering aroma to take center stage at your table.

Optional: Serve with a side of tangy dipping sauce for extra flavor.

Exact quantities are listed in the recipe card below.

What to Serve with Gourmet Grilled Cheese Sandwich?

Cozy up your meal with delectable sides that enrich the experience of your savory creation.

  • Tomato Basil Soup: A classic pairing that adds a burst of fresh flavor; dip your sandwich for an irresistible combination.

  • Garlic Butter Baby Potatoes: These crispy golden delights complement the richness of the cheese, providing a delightful crunch with every bite.

  • Mixed Green Salad: A refreshing mix of greens with a zesty vinaigrette adds brightness to your plate, balancing the richness of the grilled cheese.

  • Honey Roasted Carrots: Sweet, caramelized carrots introduce a savory-sweet element that harmonizes beautifully with your sandwich’s flavors.

  • Sweet Potato Fries: Their slightly sweet and crispy texture is a perfect contrast to your cheesy delight. These fries provide a comforting crunch.

  • Sparkling Apple Cider: A fizzy drink that echoes the apple notes in your sandwich; it’s refreshing and elevates the meal experience.

  • Dark Chocolate Squares: End on a sweet note; a piece of rich dark chocolate offers a luxurious finish that pairs wonderfully with cheese.

How to Store and Freeze Gourmet Grilled Cheese Sandwich

Room Temperature: Store leftover sandwiches at room temperature for up to 2 hours; keep them wrapped in foil to prevent drying out.

Fridge: If you have leftovers, refrigerate them in an airtight container for up to 3 days. Reheat in a skillet over low heat for crispy results.

Freezer: For longer storage, freeze the assembled sandwiches, wrapped tightly in plastic wrap, for up to 1 month. Thaw overnight in the fridge before reheating.

Reheating: To enjoy your frozen Gourmet Grilled Cheese Sandwich, reheat in a skillet or oven until thoroughly heated and the cheese is gooey again, enhancing that delicious flavor!

Gourmet Grilled Cheese Sandwich Variations

Feel free to unleash your culinary creativity with these delicious twists on the classic grilled cheese!

  • Vegan Version: Swap the cheeses for plant-based alternatives and use vegan butter for a creamy, dairy-free delight.

  • Bacon-Lover’s Delight: Add crispy bacon layers for a savory crunch that pairs perfectly with the sweetness of the apple.

  • Spicy Kick: Sprinkle some red pepper flakes or add sliced jalapeños inside to give your sandwich a fiery twist.

  • Savory Herb Blend: Mix fresh basil or parsley with the thyme for an aromatic twist that elevates the herbaceous flavor profile.

  • Caramelized Onions: Sauté onions until golden and sweet before adding them to your sandwich, enhancing the depth of flavor beautifully.

  • Tomato Addition: Slice fresh tomatoes and layer them within the sandwich for a juicy freshness that balances the richness of the cheese.

  • Nutty Crunch: Incorporate a sprinkle of toasted walnuts or pecans inside for a delightful texture and earthy flavor boost.

  • Gourmet Grilled Cheese Swirl: Spread a thin layer of pesto or sun-dried tomato spread on the bread before grilling for an explosion of flavor in every bite.

Make Ahead Options

These Gourmet Grilled Cheese Sandwiches are perfect for those busy weeknights! You can slice the sourdough bread and even layer the cheeses and apples up to 24 hours in advance, refrigerating them in an airtight container to prevent them from getting soggy. To retain the delicious texture, keep the assembled sandwiches separated with parchment paper. When you’re ready to enjoy them, simply heat your skillet and cook as directed, flipping until golden brown and the cheese is melted. This way, you’ll have a gourmet meal at your fingertips with minimal effort, making each bite just as delightful as when freshly made!

Chef's Helpful Tips

  • For the perfect Gourmet Grilled Cheese Sandwich, make sure your bread slices are evenly cut to achieve a balanced crunch and flavor.
  • Avoid overfilling the sandwich with cheese and toppings, as this can lead to spills and uneven melting.
  • When cooking, a medium heat allows the cheese to melt without burning the bread; be patient and don’t rush the process.
  • Flipping the sandwich multiple times ensures that every side gets that golden-brown color and crispy texture you desire.

Gourmet Grilled Cheese Sandwich Recipe FAQs

What type of sourdough bread should I use for this recipe?
Absolutely! For the best results, look for a fresh, crusty sourdough loaf. The tangy flavor of artisanal sourdough enhances the richness of the cheese beautifully. Consider checking for a loaf with a dense crumb and a crisp crust—these will provide that perfect crunch you want in a gourmet grilled cheese sandwich.

How should I store leftover sandwiches?
Very! If you have any gourmet grilled cheese sandwiches left, store them in an airtight container in the fridge for up to 3 days. To keep them from drying out, it’s best to wrap them tightly in foil or plastic wrap. When you’re ready to enjoy, just heat them in a skillet over low heat for that lovely, crisp finish.

Can I freeze the Gourmet Grilled Cheese Sandwich?
Absolutely! To freeze, assemble the sandwiches, wrap each tightly in plastic wrap, and place them in a freezer-safe bag or container. They can be stored like this for up to 1 month. When you’re ready to eat, just transfer to the fridge overnight to thaw, and then reheat in a skillet or oven until the cheese is gooey and delicious again.

How can I troubleshoot if my sandwich is not melting well?
If you’re finding that the cheese isn’t melting properly, there are a couple of tips to ensure gooey perfection! First, make sure you’re cooking on medium heat rather than high heat; this helps melt the cheese without burning the bread. I also recommend flipping the sandwich occasionally while cooking—this allows for even melting and a nice golden-brown crust on both sides. If needed, you can place a lid on the skillet for a couple minutes to create a little steam, which helps with melting.

Are there any dietary considerations I should be aware of?
Very! If someone in your home has allergies, keep in mind that this gourmet grilled cheese contains dairy and gluten. For lactose-intolerant friends or family, you could substitute with non-dairy cheeses, and for a gluten-free option, use gluten-free bread. Always ensure to check ingredient labels for any allergens that may affect you or your loved ones.

What’s a great way to add extra flavor or variety?
For sure! You can customize your gourmet grilled cheese sandwich by adding various ingredients. Consider incorporating sautéed mushrooms, sun-dried tomatoes, or even a smear of pesto for an elevated vibe. Experimenting with different cheeses, like Gruyère or gouda, can also add a delightful twist to the flavor profile. Mix and match based on your taste preferences to make it truly your own!

Gourmet Grilled Cheese Sandwich

Gourmet Grilled Cheese Sandwich

This Gourmet Grilled Cheese Sandwich features layers of creamy camembert and sharp cheddar, perfect for a comforting meal.
Print Recipe Pin Recipe
Prep Time 10 minutes mins
Cook Time 10 minutes mins
Total Time 20 minutes mins
Servings: 2 sandwiches
Course: LUNCH RECIPES
Calories: 450
Ingredients Equipment Method Nutrition Notes

Ingredients
  

For the Bread
  • 4 slices fresh sourdough bread the tangy flavor enhances the gourmet feel
For the Cheeses
  • 100 grams camembert cheese can substitute with brie
  • 100 grams sharp, aged cheddar
For the Flavor Boosters
  • 1 tablespoon fresh thyme can substitute with rosemary
  • 1 whole lemon (zested) lime zest can be used for contrast
For the Sweetness
  • 1 whole Honeycrisp apple or Granny Smith for tartness
Extra Seasoning
  • to taste fresh ground pepper

Equipment

  • large non-stick skillet

Method
 

How to Make a Gourmet Grilled Cheese Sandwich
  1. Slice the Bread: Cut the bread into four 1/2-inch thick slices.
  2. Layer the Cheeses: On two slices, add camembert, thyme, lemon zest, and ground pepper.
  3. Add the Apple: Thinly slice half of an apple and arrange on camembert slices.
  4. Top with Cheddar: On remaining slices, layer sharp cheddar and place apple slices on top.
  5. Heat the Skillet: Preheat a non-stick skillet over medium heat with a light spray of oil.
  6. Cook the Sandwich: Place the sandwich in the skillet with cheddar side down, and cook until golden.
  7. Flip and Finish: Spray the top side and flip, cooking until golden brown.
  8. Check for Doneness: Flip a couple of times for even cooking, then remove from the pan.
  9. Slice and Serve: Slice in half and serve immediately.

Nutrition

Serving: 1sandwichCalories: 450kcalCarbohydrates: 30gProtein: 14gFat: 28gSaturated Fat: 15gPolyunsaturated Fat: 1gMonounsaturated Fat: 10gCholesterol: 60mgSodium: 800mgPotassium: 300mgFiber: 2gSugar: 4gVitamin A: 800IUVitamin C: 5mgCalcium: 400mgIron: 2mg

Notes

For best results, keep bread slices evenly cut and do not overfill the sandwich.

Tried this recipe?

Let us know how it was!

Filed Under: LUNCH RECIPES

Simpele Vanille Donuts

December 16, 2025 by JudyWhite Leave a Comment

The first time I made Simpele Vanille Donuts, my kitchen transformed into a cozy retreat, filled with the warm, comforting scents of vanilla and freshly fried goodness. It was a chilly Sunday morning, and I had indulged in countless store-bought treats, realizing that nothing compares to the joy of crafting something delightful from scratch. As I mixed the dough, the anticipation built, the promise of sweet, fluffy donuts danced in the air.

What I discovered was not just a recipe, but a journey filled with simple pleasures and a dash of nostalgia. These donuts are incredibly easy to make, yet they pack a flavor punch that’s perfect for impressing guests or simply treating yourself.

Whether you’re a busy chef in need of a quick indulgence or someone yearning for the satisfaction of homemade delights, this recipe is for you. Let me guide you through creating these scrumptious little rings of happiness that will bring smiles to any face, including your own!

Why You'll Love This Simpele Vanille Donuts

  • These Simpele Vanille Donuts are incredibly easy to prepare, making them a perfect choice for both novice and seasoned bakers alike.
  • Each bite is bursting with rich vanilla flavor that elevates them above store-bought options, ensuring a delightful experience.
  • Their versatility allows you to customize toppings or fillings, catering to any mood or occasion.
  • Plus, their warm, sugary exterior is so visually appealing that they are sure to impress anyone at your table.

Simpele Vanille Donuts Ingredients

• Get ready to create something sweet!

For the Dough

  • Lukewarm milk – Helps activate the yeast for a fluffy texture.
  • Instant yeast – Ensures quick rising of the dough for an effortless bake.
  • White caster sugar – Adds sweetness and enhances the dough’s flavor.
  • Vanilla sugar – Infuses an aromatic vanilla essence into every bite.
  • Vanilla cream – Provides richness and contributes to the moistness of the donuts.
  • Softened butter – Gives a delightful richness and keeps the donuts tender.
  • Flour – The foundation of your dough; choose high-quality for best results.
  • Baking powder – Pairs with the yeast for extra lift and fluffiness.
  • Salt – Enhances flavors and balances the sweetness.

For Coating

  • Extra granulated sugar – Gives a sweet, crunchy exterior that complements the fluffy inside.

Embrace the delightful process of making your Simpele Vanille Donuts, and enjoy the magic of homemade treats!

How to Make Simpele Vanille Donuts

  1. Combine Ingredients: In a bowl, blend the lukewarm milk with instant yeast. Let this sit for a few minutes until frothy, which activates the yeast for that perfect rise.

  2. Mix Wet Ingredients: Add the white caster sugar, vanilla sugar, vanilla cream, and softened butter to the yeast mixture. Stir well until fully combined, creating a rich and decadent base for your donuts.

  3. Incorporate Dry Ingredients: Gradually add in the flour, baking powder, and salt to the wet mixture. Mix until a soft dough forms, ensuring all ingredients are well integrated for the best texture.

  4. Knead the Dough: Turn the dough out onto a floured surface and knead until smooth and elastic, about 5 minutes. Place it in a greased bowl, cover with a cloth, and let rise until it doubles in size—roughly 1 hour.

  5. Shape the Donuts: Roll out the risen dough to about 1/2 inch thick, then cut into donut shapes using a cutter. Place them on a baking sheet and let them rise again for about 30 minutes.

  6. Fry the Donuts: Heat oil in a deep fryer to 350°F. Fry the donuts in batches until they are golden brown on both sides, approximately 2-3 minutes per side.

  7. Coat with Sugar: Remove the donuts from the oil and allow them to drain on paper towels. While still warm, generously coat them in extra granulated sugar for that delightful crunch.

Optional: Serve them warm with a sprinkle of cinnamon sugar for an extra treat!

Exact quantities are listed in the recipe card below.

How to Store and Freeze Simpele Vanille Donuts

Room Temperature: Store your donuts in an airtight container at room temperature for up to 2 days for optimal freshness.

Fridge: If not consumed within 2 days, keep them in the fridge, where they can last for up to 5 days. However, this may slightly change their texture.

Freezer: Place cooled donuts in a single layer on a baking sheet. Once frozen, transfer them to a resealable bag or airtight container, where they can stay fresh for up to 3 months.

Reheating: To enjoy your Simpele Vanille Donuts again, simply warm them in the microwave for about 10-15 seconds or in the oven at 350°F for a few minutes until slightly heated through.

Simpele Vanille Donuts Variations

Feel free to get creative with your donuts—there’s always a way to make them uniquely yours!

  • Gluten-Free: Substitute all-purpose flour with a gluten-free blend to enjoy fluffy donuts without gluten worries. Just ensure the baking powder is gluten-free as well!

  • Vegan: Replace milk with almond or oat milk, use plant-based butter, and swap in a flax egg for extra moisture. These vegan donuts will still shine with awesome flavor!

  • Chocolate Drizzle: Melt dark chocolate and drizzle over the cooled donuts for a rich, indulgent treat that brings in an irresistible chocolatey twist.

  • Spicy Kick: Add a pinch of cayenne or a dash of cinnamon into the dough for a warming kick that plays beautifully with the sweet vanilla.

  • Lemon Zest: Mix in some finely grated lemon zest to enhance the flavor profile. This brightens up your donuts, adding a delightful citrusy note that cuts through the sweetness.

  • Filled Donuts: Create a pocket in the center before frying and pipe in your favorite jam or cream filling after frying for a surprise burst of flavor.

  • Coffee Infusion: Blend instant coffee granules into the milk for a soft coffee flavor that pairs wonderfully with the vanilla. It’s a great combo for coffee lovers!

  • Nutty Crunch: Fold in crushed nuts, like almonds or hazelnuts, before shaping the donuts for added texture and a delightful nutty flavor that complements the vanilla essence.

With these variations, every time you make these Simpele Vanille Donuts, they’ll feel like a new adventure! Enjoy experimenting and making memories in your kitchen!

What to Serve with Simpele Vanille Donuts?

The warmth and sweetness of freshly made donuts invite a delightful meal experience, bursting with comforting flavors.

  • Rich Hot Chocolate: A creamy cup of hot chocolate enhances the vanilla flavors while providing a cozy warmth alongside your donuts.
  • Berries Medley: Fresh berries add a pop of color and a tart contrast, perfectly balancing the sweetness of the donuts.
  • Vanilla Ice Cream: Serve a scoop of vanilla ice cream beside your donuts for a sumptuous treat that amplifies the vanilla essence.
  • Maple Glaze: Drizzle warm donuts with maple glaze for added sweetness and a delightful sticky texture that everyone will love.
  • Coffee: A rich cup of coffee pairs beautifully, deepening the flavors while offering a delightful contrast to the sweetness.
  • Cinnamon Sugar Coating: First coat the donuts in cinnamon sugar for an extra burst of flavor—it’s a match made in heaven.
  • Milkshake: Indulge in a vanilla or chocolate milkshake to complement the fluffy donuts, making it a whimsical treat for all ages.
  • Greek Yogurt: A side of creamy Greek yogurt adds a refreshing touch and balances the sweetness beautifully, making this pairing a guilt-free option.
  • Fruit Compote: A homemade fruit compote can elevate your donut experience, creating a luscious complement with every bite.

Make Ahead Options

These Simpele Vanille Donuts are a fantastic option for busy home cooks looking to save time without sacrificing flavor! You can prepare the dough up to 24 hours in advance by following the first three steps of the recipe, then cover it tightly with plastic wrap and refrigerate. To maintain their deliciousness, make sure to let the dough come to room temperature and rise for about 30 minutes before rolling out and shaping. Once shaped, the donuts can also be left to rise for an additional 30 minutes before frying, perfect for those impromptu cravings. Just finish by frying and coating them in sugar, and you’ll enjoy fresh donuts with minimal effort!

Chef's Helpful Tips

  • When making Simpele Vanille Donuts, ensure your milk is just warm to the touch, as too hot can kill the yeast.
  • Avoid over-kneading the dough; stop as soon as it becomes smooth and elastic to prevent tough donuts.
  • Allow the dough to rise in a warm area; if your kitchen is cold, you can place it in a slightly warmed oven turned off.
  • For the best frying results, maintain the oil temperature around 350°F to achieve that perfect golden-brown color without absorbing excess oil.

Simpele Vanille Donuts Recipe FAQs

What is the best way to select ripe ingredients for Simpele Vanille Donuts?
When it comes to the ingredients, I recommend using fresh, high-quality items for the best flavor. Ensure your milk is lukewarm and not too hot, as overheating can kill the yeast’s effectiveness. For the butter, choose softened unsalted butter for rich flavor without excess salt. Always check for the freshness of your vanilla cream and sugars, as these will impact the richness and sweetness of your donuts.

How should I store leftover Simpele Vanille Donuts?
To keep your donuts fresh, store them in an airtight container at room temperature for up to 2 days. If you need to store them longer, place them in the fridge where they can last up to 5 days, though this might change their texture slightly. It’s best to enjoy them while they’re still soft and fluffy!

Can I freeze Simpele Vanille Donuts?
Absolutely! To freeze your donuts, let them cool completely first. Place them in a single layer on a baking sheet and freeze until solid. Once frozen, transfer them to a resealable plastic bag or airtight container, labeling it with the date. They can be stored in the freezer for up to 3 months. When you’re ready to enjoy them, simply warm them in the microwave for about 10-15 seconds or place them in a preheated oven at 350°F for a few minutes until just heated through.

What should I do if my dough doesn’t rise properly?
If your dough doesn’t rise, it could be due to the yeast not being activated properly. Make sure your yeast is fresh and that the milk is lukewarm—not hot. Another reason for poor rising could be a cool environment; try placing your dough in a warm spot, like an oven that has been turned off after preheating. If your dough has risen poorly, you can gently knead it again, allow it to rise a second time for about 30 minutes, and try to fry them once more.

Are Simpele Vanille Donuts suitable for people with allergies?
While these donuts are a treat, they do contain common allergens such as dairy, gluten, and eggs (from the vanilla cream). If making this for someone with allergies or dietary restrictions, consider alternatives such as using almond milk and gluten-free flour, but do note that this may alter the texture and taste slightly. Always consult with the individual to ensure their specific needs are met!

Can I make these donuts healthier?
Yes! You can substitute some ingredients for healthier versions. For example, you can use almond flour instead of regular flour for a lower-carb option. Additionally, you could sweeten with a natural sweetener like honey or maple syrup, but be mindful that this may change the dough’s consistency, so you might need to adjust the liquid ingredients. Another tip is to bake them instead of frying for a lighter alternative. Enjoy exploring these options!

Simpele Vanille Donuts

Simpele Vanille Donuts

Enjoy the homemade delight of Simpele Vanille Donuts, bursting with rich vanilla flavor and easy to prepare.
Print Recipe Pin Recipe
Prep Time 30 minutes mins
Cook Time 10 minutes mins
Rising Time 1 hour hr 30 minutes mins
Total Time 2 hours hrs 10 minutes mins
Servings: 12 donuts
Course: DESSERT RECIPES
Cuisine: American
Calories: 250
Ingredients Equipment Method Nutrition Notes

Ingredients
  

For the Dough
  • 1 cup Lukewarm milk Helps activate the yeast for a fluffy texture.
  • 2 teaspoons Instant yeast Ensures quick rising of the dough for an effortless bake.
  • 1/2 cup White caster sugar Adds sweetness and enhances the dough's flavor.
  • 1 packet Vanilla sugar Infuses an aromatic vanilla essence into every bite.
  • 1/4 cup Vanilla cream Provides richness and contributes to the moistness of the donuts.
  • 1/4 cup Softened butter Gives a delightful richness and keeps the donuts tender.
  • 3 cups Flour The foundation of your dough; choose high-quality for best results.
  • 1 tablespoon Baking powder Pairs with the yeast for extra lift and fluffiness.
  • 1/2 teaspoon Salt Enhances flavors and balances the sweetness.
For Coating
  • 1 cup Extra granulated sugar Gives a sweet, crunchy exterior that complements the fluffy inside.

Equipment

  • Deep fryer
  • Mixing bowl
  • Rolling pin
  • Donut cutter
  • Baking sheet

Method
 

How to Make Simpele Vanille Donuts
  1. In a bowl, blend the lukewarm milk with instant yeast. Let this sit for a few minutes until frothy, which activates the yeast for that perfect rise.
  2. Add the white caster sugar, vanilla sugar, vanilla cream, and softened butter to the yeast mixture. Stir well until fully combined, creating a rich and decadent base for your donuts.
  3. Gradually add in the flour, baking powder, and salt to the wet mixture. Mix until a soft dough forms, ensuring all ingredients are well integrated for the best texture.
  4. Turn the dough out onto a floured surface and knead until smooth and elastic, about 5 minutes. Place it in a greased bowl, cover with a cloth, and let rise until it doubles in size—roughly 1 hour.
  5. Roll out the risen dough to about 1/2 inch thick, then cut into donut shapes using a cutter. Place them on a baking sheet and let them rise again for about 30 minutes.
  6. Heat oil in a deep fryer to 350°F. Fry the donuts in batches until they are golden brown on both sides, approximately 2-3 minutes per side.
  7. Remove the donuts from the oil and allow them to drain on paper towels. While still warm, generously coat them in extra granulated sugar for that delightful crunch.

Nutrition

Serving: 1donutCalories: 250kcalCarbohydrates: 30gProtein: 3gFat: 12gSaturated Fat: 7gMonounsaturated Fat: 4gCholesterol: 30mgSodium: 150mgPotassium: 120mgFiber: 1gSugar: 10gVitamin A: 300IUCalcium: 50mgIron: 0.5mg

Notes

For extra flavor, serve warm donuts with a sprinkle of cinnamon sugar.

Tried this recipe?

Let us know how it was!

Filed Under: BREAKFAST & BRUNCH

  • « Previous Page
  • 1
  • …
  • 26
  • 27
  • 28
  • 29
  • 30
  • …
  • 37
  • Next Page »

Recent Posts

  • One Pot Cheesy Pasta
  • Steak with Mushroom Sauce
  • St. Patrick’s Day Puppy Chow
  • Salmon with Lemon Butter
  • St. Patrick’s Day Puppy Chow

Recent Comments

No comments to show.

Footer

  • Contact
  • Privacy Policy
  • About Us
  • Terms
  • ↑ back to top

Copyright © 2024 www.Forkono.com

Table Of Content