Forkono

  • BREAKFAST & BRUNCH
  • DESSERT RECIPES
  • DINNER RECIPES
  • LUNCH RECIPES
  • About uS
  • SNACKS & APPETIZERS
menu icon
go to homepage
  • BREAKFAST & BRUNCH
  • DESSERT RECIPES
  • DINNER RECIPES
  • LUNCH RECIPES
  • About uS
  • SNACKS & APPETIZERS
search icon
Homepage link
  • BREAKFAST & BRUNCH
  • DESSERT RECIPES
  • DINNER RECIPES
  • LUNCH RECIPES
  • About uS
  • SNACKS & APPETIZERS
×

Tomato Tartlets with Puff Pastry

December 10, 2025 by JudyWhite Leave a Comment

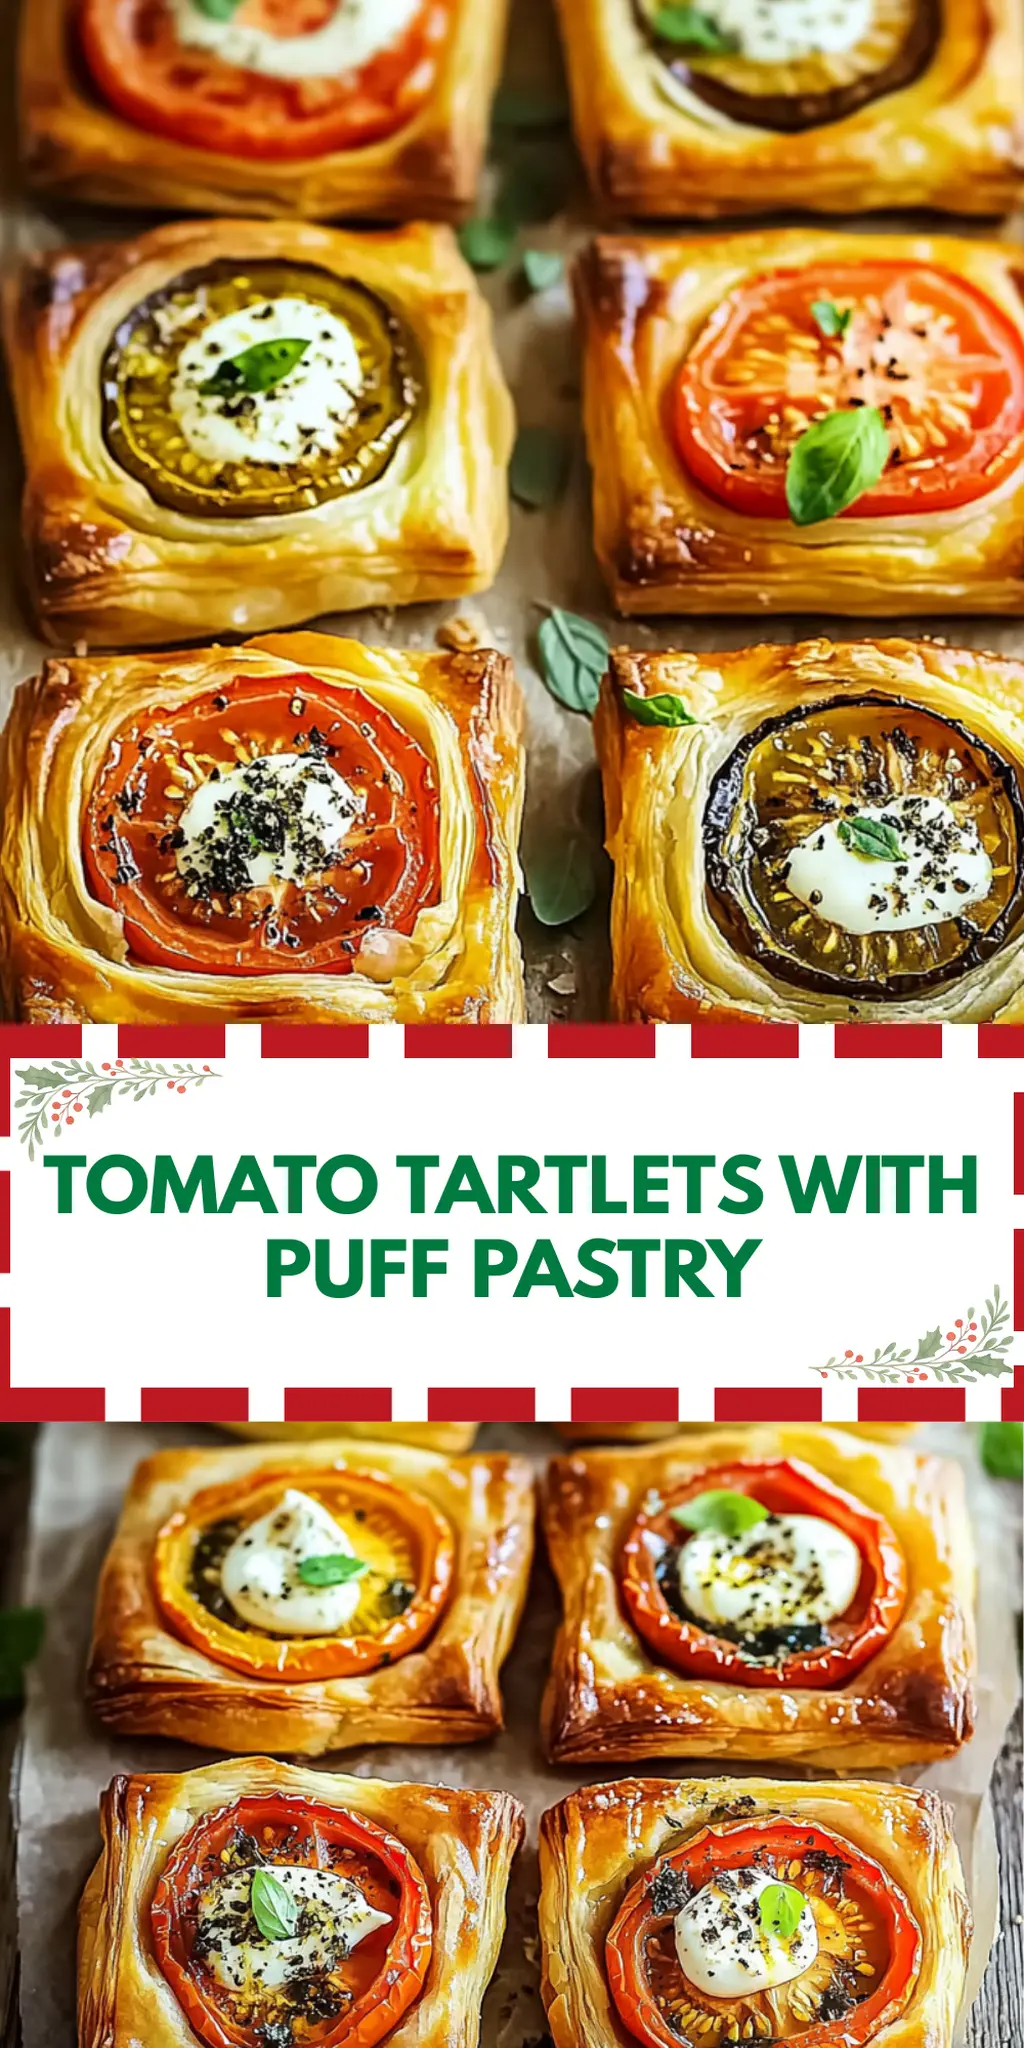
When the sun begins to shine just a little brighter, I often feel the urge to lighten up my meals, and these Tomato Tartlets with Puff Pastry are my go-to dish. Picture this: vibrant mini heirloom tomatoes nestled atop a bed of creamy, herb-infused ricotta, all encased in golden, flaky pastry. This dish not only looks stunning but also bursts with flavors that dance on your palate.

Whipping up these tartlets is a breeze—perfect for a spontaneous get-together or a delightful weeknight dinner. With just 30 minutes of prep and bake time, you’re gifted with a gourmet experience that impresses without the fuss. I still remember the joy of serving these at a friend’s gathering, where they vanished quicker than I could keep track!

Whether you’re seeking a satisfying treat to elevate your brunch table or a delicious appetizer for your next potluck, let’s dive into this recipe that promises simplicity and elegance in every bite.

Why You'll Love This Tomato Tartlets with Puff Pastry

  • These Tomato Tartlets with Puff Pastry are incredibly easy to make, allowing you to impress your guests without spending hours in the kitchen.
  • The delightful combination of creamy ricotta and fresh heirloom tomatoes creates a burst of flavor that will have everyone coming back for more.
  • Their versatility makes them perfect for any occasion, whether served as a fancy appetizer or a light lunch.
  • With just 30 minutes from start to finish, you’ll save time while still enjoying a gourmet treat that looks as good as it tastes.
  • These tartlets are not only delicious but also visually appealing, adding a pop of color to your table that is sure to impress.

Tomato Tartlets with Puff Pastry Ingredients

• Get ready to whip up something delicious!

For the Tartlet Base

  • Puff pastry – This flaky layer serves as the perfect canvas for your vibrant toppings.
  • Large egg – Use this for an egg wash to give your pastries that golden, shiny finish!

For the Cheese Mixture

  • Whole milk ricotta cheese – Its creamy texture brings richness to your Tomato Tartlets with Puff Pastry.
  • Grated Parmigiano-Reggiano – This adds a nutty depth of flavor that compliments the dish beautifully.
  • Kosher or sea salt – Essential for enhancing the ingredients’ natural flavors.
  • Freshly ground black pepper – This adds a subtle heat that brightens up the flavor profile.
  • Fresh basil (minced) – Offers a fragrant, herbaceous note that pairs perfectly with tomatoes.
  • Garlic powder – A dash of this enhances the savoriness of the cheese mixture.
  • Dried oregano – Provides an aromatic touch reminiscent of classic Italian cuisine.

For Topping

  • Mini heirloom tomatoes – Their sweetness and vibrant colors elevate the presentation and taste.
  • Olive oil – A drizzle on top adds richness and helps to caramelize the tomatoes during baking.
  • Flaky sea salt (to finish) – Sprinkling this on top just before serving adds a delightful crunch and burst of flavor.

How to Make Tomato Tartlets with Puff Pastry

  1. Preheat the oven – Set your oven to 425°F (220°C) and line a sheet pan with parchment paper to ensure easy cleanup and prevent sticking.

  2. Prepare the pastry – Roll out the puff pastry on a cutting board, then slice it into 9 even rectangles, leaving a quarter-inch border.

  3. Mix the cheese filling – In a bowl, whisk together ricotta, Parmigiano-Reggiano, kosher salt, black pepper, minced basil, garlic powder, and oregano until smooth and well combined.

  4. Assemble the tartlets – Place the puff pastry rectangles on the prepared baking sheet, spacing them about an inch apart. Spoon approximately 1½ tablespoons of the cheese mixture into the center of each rectangle.

  5. Add the tomatoes – Top each tartlet with halved mini heirloom tomatoes. Brush them with olive oil for a glossy finish and then brush the edges of the pastry with the egg wash you prepared earlier.

  6. Bake the tartlets – Bake in the preheated oven for 20 minutes, or until the pastry is golden brown. Halfway through baking, rotate the baking sheet for even cooking.

  7. Cool and garnish – Once baked, remove from the oven and let cool on a wire rack. Just before serving, sprinkle with fresh basil, flaky sea salt, and a dash of freshly ground pepper for a burst of flavor.

Optional: Drizzle with balsamic glaze for an extra touch of sweetness.

Exact quantities are listed in the recipe card below.

Make Ahead Options

These Tomato Tartlets with Puff Pastry are a fantastic choice for meal prep, allowing you to enjoy delicious bites without the last-minute rush! You can prepare the cheese filling (ricotta, Parmigiano-Reggiano, and herbs) up to 3 days in advance and store it in an airtight container in the refrigerator. Additionally, you can pre-cut the puff pastry and assemble the tartlets up to 24 hours before baking; simply cover them with plastic wrap to prevent drying out. When you’re ready to serve, just preheat your oven and bake them as directed for 20 minutes—they’ll be just as delightful and fresh! Enjoy the convenience and delectable results of homemade treats while saving time!

What to Serve with Tomato Tartlets with Puff Pastry?

Elevate your dining experience by pairing these delightful tartlets with complementary dishes that enhance their vibrant flavors.

  • Arugula Salad: A crisp arugula salad with a zesty lemon vinaigrette offers a fresh contrast to the richness of the tartlets.

  • Herbed Quinoa: Nutty quinoa cooked with herbs mirrors the savory notes of the cheese, providing a wholesome, fiber-rich side.

  • Roasted Veggies: Sweet roasted bell peppers and zucchini add a colorful, caramelized component that harmonizes with the tartlets’ flavors.

  • Chilled White Wine: A glass of chilled Sauvignon Blanc brings floral and fruity notes, perfectly balancing the dish’s savory richness.

  • Pesto Pasta: Tossed with olive oil, garlic, and Parmesan, pasta dressed in basil pesto echoes the tartlets’ herb-infused filling, creating a delightful pairing.

  • Olive Tapenade: A small bowl of olive tapenade offers a salty, umami punch that contrasts beautifully against the sweetness of the heirloom tomatoes.

  • Garlic Bread: Warm, crusty garlic bread allows for a satisfying crunch and serves as an excellent vessel to scoop up any leftover cheese filling.

  • Strawberry Sorbet: For dessert, a light strawberry sorbet refreshes the palate after the savory tartlets, completing the meal on a sweet note.

How to Store and Freeze Tomato Tartlets with Puff Pastry

Room Temperature: Store leftover tartlets at room temperature for up to 2 hours if they have not been refrigerated.

Fridge: If you have remaining Tomato Tartlets with Puff Pastry, refrigerate in an airtight container for up to 3 days. Reheat in the oven for the best texture.

Freezer: For longer storage, freeze the unbaked tartlets on a baking sheet until solid, then transfer to a freezer-safe bag for up to 2 months. Bake from frozen without thawing.

Reheating: To reheat baked tartlets, place them in a preheated oven at 350°F for about 10-15 minutes or until heated through and crispy.

Tomato Tartlets with Puff Pastry Variations

Get ready to explore the delightful possibilities that await these scrumptious tartlets!

  • Vegan Option: Swap out the ricotta for a plant-based alternative and use aquafaba for the egg wash. This won’t compromise on flavor while keeping it vegan-friendly!

  • Gluten-Free: Use gluten-free puff pastry to cater to those with dietary restrictions. Ensure all other ingredients are also gluten-free for a truly inclusive dish.

  • Herbed Ricotta: Add different herbs like thyme or dill to the ricotta filling for a fresh twist. These herbs create aromatic notes that elevate the overall dish.

  • Spicy Kick: Incorporate red pepper flakes or diced jalapeños into the cheese mixture for a little heat. The zesty addition complements the sweetness of the tomatoes beautifully.

  • Cheese Variety: Try substituting the Parmigiano-Reggiano with feta or goat cheese for a tangy flavor. Each cheese brings its unique character, transforming your tartlets into a new experience with every bite.

  • Roasted Garlic: For a deeper flavor, mix in some roasted garlic into the cheese filling. This adds a rich, buttery taste that pairs perfectly with the tart tomatoes.

  • Mushroom Medley: Sautéed mushrooms layered on top of the cheese mixture before adding the tomatoes offers a delightful texture and earthy flavor that will have everyone coming back for seconds!

  • Sweet Addition: For a hint of sweetness, drizzle a little honey or balsamic glaze over the tomatoes before baking. This contrasting flavor creates an exciting balance that tantalizes the taste buds.

Chef's Helpful Tips

  • When making Tomato Tartlets with Puff Pastry, ensure your puff pastry is cold before rolling it out, as this helps create a flaky texture.
  • Avoid overstuffing the tartlets with the cheese mixture; too much filling can prevent the pastry from rising properly.
  • To achieve a golden color, brush the edges with egg wash, but be careful not to let it drip onto the baking sheet.
  • Bake at 425°F for the full 20 minutes, but keep an eye on the pastry toward the end to avoid burning.

Tomato Tartlets with Puff Pastry Recipe FAQs

What kind of tomatoes should I use for the tartlets?
Absolutely! I recommend using mini heirloom tomatoes, as they add not only a burst of flavor but also vibrant colors that elevate your dish. Look for tomatoes that are firm and brightly colored. Avoid any that have dark spots all over, as these may be overripe.

How long can I store the leftover tartlets?
Very! You can keep your Tomato Tartlets with Puff Pastry in the refrigerator for up to 3 days. Just make sure to place them in an airtight container to maintain their freshness. When ready to enjoy, a gentle reheat in the oven will bring back that delicious texture.

Can I freeze the tartlets before baking?
Absolutely! To freeze, prepare the tartlets according to the recipe but do not bake them. Place them on a baking sheet and freeze until solid, about 1-2 hours. Once solid, transfer them into a freezer-safe bag. They can be stored in the freezer for up to 2 months. When you’re ready to bake, simply place them in the oven from frozen, increasing the bake time by a few minutes.

What should I do if the pastry isn’t rising properly?
I’ve encountered this too! If your pastry doesn’t rise as expected, it may be due to either warm puff pastry or overcrowding the baking sheet. Ensure the puff pastry is cold and chilled before rolling it out. Keep space between the tartlets, allowing hot air to circulate. Also, ensure your oven is fully preheated before baking!

Are there any dietary considerations for this recipe?
Very good question! This recipe contains dairy, so it’s not suitable for those with lactose intolerance or dairy allergies. If needed, a lactose-free ricotta could be a great substitute. Always check that your puff pastry is also dairy-free if you’re catering to dietary restrictions.

How do I keep the tartlets crispy when reheating?
For a delicious, crispy texture upon reheating, place the baked Tomato Tartlets with Puff Pastry in a preheated oven at 350°F (175°C) for about 10-15 minutes. This method rejuvenates the pastry so that it retains that lovely flakiness you adore. Enjoy every bite!

Tomato Tartlets with Puff Pastry

Tomato Tartlets with Puff Pastry

Delight in these Tomato Tartlets with Puff Pastry, featuring heirloom tomatoes and creamy ricotta, perfect for snacks or appetizers.
Print Recipe Pin Recipe
Prep Time 30 minutes mins
Cook Time 20 minutes mins
Total Time 50 minutes mins
Servings: 9 tartlets
Course: Snacks & Appetizers
Cuisine: Italian
Calories: 150
Ingredients Equipment Method Nutrition Notes

Ingredients
  

Tartlet Base
  • 1 sheet Puff pastry
  • 1 large egg for egg wash
Cheese Mixture
  • 1 cup Whole milk ricotta cheese
  • 1/4 cup Grated Parmigiano-Reggiano
  • 1/2 teaspoon Kosher or sea salt
  • 1/4 teaspoon Freshly ground black pepper
  • 2 tablespoons Fresh basil (minced)
  • 1/2 teaspoon Garlic powder
  • 1/2 teaspoon Dried oregano
Topping
  • 1 cup Mini heirloom tomatoes halved
  • 1 tablespoon Olive oil for drizzling
  • to taste Flaky sea salt for finishing

Equipment

  • Oven
  • sheet pan
  • parchment paper
  • Mixing bowl
  • Whisk
  • Cutting Board

Method
 

Preparation
  1. Preheat the oven to 425°F (220°C) and line a sheet pan with parchment paper.
  2. Roll out the puff pastry on a cutting board and slice it into 9 even rectangles, leaving a quarter-inch border.
  3. In a bowl, whisk together ricotta, Parmigiano-Reggiano, kosher salt, black pepper, minced basil, garlic powder, and oregano until smooth and well combined.
  4. Place the puff pastry rectangles on the prepared baking sheet, spacing them about an inch apart. Spoon approximately 1½ tablespoons of the cheese mixture into the center of each rectangle.
  5. Top each tartlet with halved mini heirloom tomatoes, brush with olive oil, and then brush the edges of the pastry with the egg wash.
  6. Bake in the preheated oven for 20 minutes, or until the pastry is golden brown, rotating halfway through for even cooking.
  7. Once baked, remove from the oven and let cool on a wire rack. Just before serving, sprinkle with fresh basil, flaky sea salt, and a dash of freshly ground pepper.

Nutrition

Serving: 1tartletCalories: 150kcalCarbohydrates: 12gProtein: 4gFat: 10gSaturated Fat: 3gPolyunsaturated Fat: 1gMonounsaturated Fat: 5gCholesterol: 25mgSodium: 200mgPotassium: 100mgFiber: 1gSugar: 2gVitamin A: 200IUVitamin C: 10mgCalcium: 150mgIron: 1mg

Notes

Drizzle with balsamic glaze for an extra touch of sweetness.

Tried this recipe?

Let us know how it was!

Filed Under: SNACKS & APPETIZERS

Cranberry Brie Bites

December 5, 2025 by JudyWhite Leave a Comment

As the crisp air settles in and holiday gatherings begin to fill our calendars, I can’t help but crave those comforting bites of flavor that bring people together. Just the thought of my Cranberry Brie Bites, bubbling with gooey cheese and a vibrant sweet-tart cranberry sauce, puts a smile on my face. Picture this: a flaky crescent roll hugging a warm morsel of brie, topped with crunchy pecans and a hint of rosemary. It’s like unwrapping a little present of happiness!

These bites are incredibly easy to whip up, making them a perfect choice for both seasoned chefs and home cooks eager to escape the fast-food rut. Whether you’re hosting a festive party or simply want a cozy snack, these treats marry deliciousness and convenience in a way that feels both special and approachable. Join me in creating a simple yet elegant dish that is sure to impress, and let’s indulge in the magic of home-cooked flavors!

Why You'll Love This Cranberry Brie Bites

  • These Cranberry Brie Bites are a breeze to make, allowing you to impress your guests without spending hours in the kitchen.
  • The combination of creamy brie and sweet-tart cranberry sauce creates a flavor explosion that everyone will adore.
  • With their delightful presentation and charming size, these bites are perfect for parties and gatherings, sure to wow your crowd.
  • Plus, they offer incredible versatility, allowing you to customize the toppings to suit your taste or seasonal ingredients.
  • Enjoy the ease of preparing a delicious appetizer that is both comforting and elegant, making every occasion feel extra special.

Cranberry Brie Bites Ingredients

Get ready to gather all the delightful flavors for your Cranberry Brie Bites!

For the Dough
• Crescent Roll – A flaky base that wraps all the delicious ingredients together.

For the Filling
• Brie Cheese – Creamy and luscious; it melts beautifully for that gooey center.
• Whole Cranberry Sauce – Adds a sweet-tart punch that complements the brie perfectly.
• Pecans, Chopped – Provides a satisfying crunch and nutty flavor contrast.
• Rosemary, Finely Chopped – A fresh herb that elevates the overall flavor profile.
• Orange Zest – Brightens the bites with a hint of citrus that balances richness.

How to Make Cranberry Brie Bites

  1. Preheat your oven to 350°F, filling your kitchen with warmth and anticipation. Generously spray a 24-count mini-muffin tin with non-stick spray to ensure your bites release easily once baked.

  2. Unroll the Crescent Roll dough onto a clean sheet of parchment paper. Pinch the seams together to create a seamless base. Gently flour a rolling pin and roll the dough out until it measures approximately 10″ x 15″, allowing for nice, even squares.

  3. Cut the dough into 24 squares, each about 2.5″ x 2.5″. These precious pieces will cradle the delicious filling and transform into golden bites of joy!

  4. Place each dough square snugly in one muffin spot of your prepared tin. This will create a lovely little cup for the flavorful ingredients to nestle into.

  5. Slice half of an 8″ wheel of brie cheese into 24 generous pieces. Each slice will become the creamy heart of your bites, ready to melt into gooey perfection.

  6. Layer a slice of brie into each dough square along with a pinch of chopped rosemary, 1 teaspoon of cranberry sauce, a sprinkle of orange zest, and some chopped pecans. This medley of flavors will create a symphony of taste that’s simply irresistible.

  7. Bake in the preheated oven for 10-12 minutes, watching for that glorious golden brown color that means they’re ready to make your taste buds dance with delight.

Optional: Serve warm with a drizzle of honey for an extra touch of sweetness.

Exact quantities are listed in the recipe card below.

Cranberry Brie Bites Variations

Feel free to explore these delightful twists that will elevate your Cranberry Brie Bites to new heights!

  • Nut-Free: Replace pecans with sunflower seeds for a nut-free version that still adds a crunchy texture.

  • Herb Infusion: Swap rosemary for fresh thyme or sage for a distinctly aromatic flavor that brings a new depth.

  • Spicy Kick: Mix a pinch of red pepper flakes into your cranberry sauce for a sweet and spicy flavor explosion.

  • Fruit Twist: Experiment with different jams, like fig or raspberry, for an unexpected fruity twist that complements the brie beautifully.

  • Balsamic Glaze: Drizzle a bit of balsamic reduction over the bites before serving to add a rich, tangy finish that takes them over the top.

For a mini-paragraph variation, consider using different cheeses, such as goat cheese or cream cheese, for a creamier filling. Each cheese offers a distinct flavor, transforming your bites into a unique experience each time.

  • Gluten-Free: Use gluten-free pastry dough to cater to those avoiding gluten while maintaining the yummy essence of this dish.

  • Sweet Treat: Add a sprinkle of cinnamon to the cranberry sauce for a warm, dessert-like flavor that makes these bites a delightful sweet appetizer.

These variations not only cater to different dietary needs but also ignite creativity in every batch you bake! Let your tastes guide you and enjoy the process of exploring new flavors.

How to Store and Freeze Cranberry Brie Bites

Room Temperature: Enjoy your Cranberry Brie Bites fresh for up to 2 hours after baking; they’re at their best when warm.

Fridge: Store cooled bites in an airtight container for up to 3 days. Reheat in the oven at 350°F for 5-7 minutes to restore their deliciousness.

Freezer: Freeze unbaked bites arranged on a baking sheet for about 1 hour before transferring them to a freezer-safe bag. They’ll keep well for up to 2 months.

Reheating: To reheat frozen Cranberry Brie Bites, bake directly from the freezer at 375°F for 15-20 minutes, ensuring that the cheese is melted and the dough is golden.

What to Serve with Cranberry Brie Bites?

Creating a full meal around these delightful bites will surely elevate your gathering or cozy night in.

  • Mixed Green Salad: A refreshing mix of greens adds a light crunch, balancing the richness of the bites beautifully.

  • Sparkling Apple Cider: This bubbly drink’s sweetness pairs wonderfully with the tart cranberries, enhancing the flavors in each bite.

  • Honey Glazed Carrots: The natural sweetness complements the savory dimensions of the bites, creating a pleasing contrast.

  • Cheese Platter: Adding a variety of cheeses can elevate your cheese experience, creating an elegant pairing that everyone will enjoy.

  • Spiced Red Wine: A comforting glass of warm spiced red wine enhances the cozy feel of the evening, perfect for autumn gatherings.

  • Chocolate Mousse Cups: To finish on a sweet note, rich chocolate mousse perfectly matches the playful elements of the bites and ends the meal indulgently.

Make Ahead Options

These Cranberry Brie Bites are a fantastic choice for meal prep enthusiasts looking to save time while still enjoying delightful homemade flavors! You can prepare the filling—slicing the brie, mixing the cranberry sauce with chopped pecans, rosemary, and orange zest—up to 3 days in advance. Simply refrigerate this mixture in an airtight container. On the day you’d like to serve, roll out the Crescent Roll dough, assemble the bites, and bake them fresh for about 10-12 minutes. This method ensures each bite comes out just as delicious and flaky as if made on the spot, allowing you to relax and enjoy your gathering without the last-minute rush!

Chef's Helpful Tips

  • When preparing your Cranberry Brie Bites, be sure to roll the Crescent Roll dough out evenly to avoid any undercooked spots.
  • A common mistake is overcrowding the muffin tin, so make sure each square has enough space to puff up.
  • For the best melting effect, take your brie cheese out of the refrigerator about 30 minutes before slicing to ensure it’s at room temperature.
  • Keep a close eye on the bites during the last few minutes of baking, as oven temperatures can vary and you want them golden brown without burning.

Cranberry Brie Bites Recipe FAQs

How do I choose the right Brie cheese for my Cranberry Brie Bites?
Absolutely! Look for Brie that has a smooth, creamy texture and a fresh aroma. Avoid any that have dark spots all over the rind or an overly pungent smell, as these indicate age or spoilage. A wheel of Brie with a soft, creamy center is ideal for melting perfectly in your bites.

How long can I store my Cranberry Brie Bites in the fridge?
Very! After baking, let your bites cool completely. Store them in an airtight container in the fridge for up to 3 days. When you’re ready to enjoy again, simply reheat them in the oven at 350°F for about 5-7 minutes. This will bring back that delightful gooeyness!

Can I freeze my Cranberry Brie Bites?
Definitely! To freeze, arrange the unbaked bites on a baking sheet lined with parchment paper and place them in the freezer for about 1 hour. Once they’re firm, transfer them to a freezer-safe bag. They can be stored for up to 2 months. When you’re ready to bake them, there’s no need to thaw; just pop them in the oven at 375°F for 15-20 minutes!

What should I do if my dough isn’t rising properly?
It’s a common hiccup, but don’t worry! If your Crescent Roll dough isn’t rising well, it may not have been rolled out evenly or may have spent too much time at room temperature before baking. Ensure that your dough squares are rolled out to the right thickness, and give them enough space in the muffin tin. Keeping an eye on them in the last few minutes of baking can help you catch that perfect golden brown!

Are there any dietary considerations I need to be aware of?
Absolutely! If you have guests with dairy allergies, consider using a non-dairy cheese alternative that melts well. For nut allergies, you can simply skip the pecans and substitute with sunflower seeds for that satisfying crunch. Always check the ingredient labels for any hidden allergens, especially in pre-made items like crescent rolls and cranberry sauce.

Can I add other toppings to my Cranberry Brie Bites?
The more the merrier! Feel free to customize your bites with other ingredients such as caramelized onions, chopped herbs like thyme or parsley, or even a drizzle of balsamic reduction post-baking. Experimenting with different flavors can lead to delightful and unique combinations that could become family favorites!

Cranberry Brie Bites

Cranberry Brie Bites

These Cranberry Brie Bites are delightful appetizers combining gooey brie and sweet-tart cranberry sauce, perfect for gatherings.
Print Recipe Pin Recipe
Prep Time 15 minutes mins
Cook Time 12 minutes mins
Total Time 27 minutes mins
Servings: 24 bites
Course: Snacks & Appetizers
Cuisine: American
Calories: 120
Ingredients Equipment Method Nutrition Notes

Ingredients
  

For the Dough
  • 1 roll Crescent Roll A flaky base
For the Filling
  • 8 ounces Brie Cheese Creamy and luscious; sliced
  • 1 cup Whole Cranberry Sauce Adds a sweet-tart punch
  • 1/2 cup Pecans, Chopped Provides a satisfying crunch
  • 1 tablespoon Rosemary, Finely Chopped Fresh herb
  • 1 teaspoon Orange Zest Brightens the bites

Equipment

  • mini-muffin tin
  • Rolling pin
  • Baking sheet

Method
 

How to Make Cranberry Brie Bites
  1. Preheat your oven to 350°F and spray a 24-count mini-muffin tin with non-stick spray.
  2. Unroll the Crescent Roll dough onto parchment paper and roll it out to 10" x 15".
  3. Cut the dough into 24 squares, approximately 2.5" x 2.5".
  4. Place each square in the prepared muffin tin.
  5. Slice the brie cheese into 24 generous pieces and layer into each dough square.
  6. Layer with chopped rosemary, cranberry sauce, orange zest, and pecans.
  7. Bake for 10-12 minutes until golden brown.

Nutrition

Serving: 1biteCalories: 120kcalCarbohydrates: 8gProtein: 2gFat: 10gSaturated Fat: 4gMonounsaturated Fat: 6gCholesterol: 15mgSodium: 200mgPotassium: 50mgFiber: 1gSugar: 2gVitamin A: 100IUVitamin C: 1mgCalcium: 50mgIron: 1mg

Notes

Optional: Serve warm with a drizzle of honey for added sweetness.

Tried this recipe?

Let us know how it was!

Filed Under: SNACKS & APPETIZERS

Cottage Cheese Flatbread

December 3, 2025 by JudyWhite Leave a Comment

There’s something incredibly satisfying about creating a warm, homemade flatbread from scratch. The first time I made Cottage Cheese Flatbread, I was amazed at how simple ingredients transformed into something so delightful. Picture this: as you knead the dough, the subtle aroma of fresh herbs fills your kitchen, promising a delicious outcome. This recipe is not only a feast for the senses, but it also offers a healthier alternative to the heavy, store-bought variety that often lacks flavor.

Perfect for a quick weeknight meal or as a crowd-pleaser at gatherings, these flatbreads come together in just 25 minutes. Paired with a generous spread of whipped cottage cheese and drizzled with olive oil, they boast a delightful balance of creaminess and crispiness that is sure to impress. Whether you enjoy them fresh out of the oven or as a base for your favorite toppings, you’ll find this Cottage Cheese Flatbread will not only elevate your dining experience but also ignite your passion for homemade cooking!

Why You'll Love This Cottage Cheese Flatbread

  • This Cottage Cheese Flatbread is incredibly easy to make, allowing you to whip up a warm, fresh bread in just 25 minutes.
  • The flavor combination of whipped cottage cheese and olive oil offers a delightful creaminess that pairs perfectly with the crispy edges of the flatbread.
  • Its versatility means you can enjoy it as a simple side, a base for your favorite toppings, or even a satisfying snack on its own.
  • Plus, its visual appeal, with golden-brown edges and a sprinkle of herbs, makes it a showstopper at any gathering.

Cottage Cheese Flatbread Ingredients

• Get ready to create something delicious!

For the Dough

  • All-purpose flour – forms the base of the flatbread for a soft texture.
  • Baking powder – helps the dough rise, making it light and fluffy.
  • Salt – enhances the overall flavor, balancing the dough.
  • Greek yogurt – adds moisture and a tangy flavor while helping to bind the dough.
  • Full-fat cottage cheese, whipped – creates a creamy, rich topping that elevates your flatbread.

For the Garnish

  • Olive oil – drizzles on top for a luscious finish, adding flavor and a beautiful sheen.
  • Dried oregano or thyme – infuses each flatbread with aromatic notes of herbs.
  • Garlic powder or crushed red pepper (optional) – add a kick of flavor or spice, perfect for those who like a little heat!

With these Cottage Cheese Flatbread ingredients, you’re one step closer to serving up a warm, flavorful treat that your friends and family will love!

How to Make Cottage Cheese Flatbread

  1. Combine the dry ingredients in a bowl. Mix together the all-purpose flour, baking powder, and a pinch of salt for a flavorful base. This step will create the foundation for your flatbread.
  2. Stir in the Greek yogurt. Add the Greek yogurt to the dry mixture and mix until a sticky dough forms. This creamy ingredient is essential for moisture and gives the flatbread its delightful texture.
  3. Knead the dough. On a lightly floured surface, knead the dough for about 2–3 minutes until it’s smooth and elastic. You want it to feel soft but not overly sticky.
  4. Divide the dough. Cut the dough into two equal portions and roll each into ovals approximately 1/4-inch thick. The thickness will help the flatbreads puff up beautifully in the oven.
  5. Preheat your oven. Set your oven to 450°F (232°C) and prepare a baking sheet by lining it with parchment paper. This temperature will help achieve those perfect golden-brown edges.
  6. Bake the flatbreads. Place the unbaked flatbreads on the prepared baking sheet and bake for 6–8 minutes until they puff and are slightly golden. Keep an eye on them during this time!
  7. Spread the cottage cheese. Remove the flatbreads from the oven and generously spread whipped cottage cheese over each one. This creamy layer adds delicious richness!
  8. Drizzle with olive oil. Add a drizzle of olive oil on top and sprinkle the flatbreads with dried herbs or optional spices for added flavor. This is where your creativity can shine!
  9. Return to the oven. Put the flatbreads back in the oven and bake for another 5–7 minutes until bubbly and crisp at the edges. You’re going to love the enticing aroma!
  10. Cool and serve. Once done, let the flatbreads cool slightly before slicing. They’re best enjoyed warm, making them a fantastic addition to any meal!

Optional: Serve with a side of marinara sauce for dipping or fresh veggies for a delightful appetizer.

Exact quantities are listed in the recipe card below.

Make Ahead Options

These Cottage Cheese Flatbreads are perfect for meal prep enthusiasts! You can prepare the dough up to 24 hours in advance by mixing the dry ingredients and incorporating the Greek yogurt, then tightly wrap the dough in plastic wrap and refrigerate it to keep it fresh. The whipped cottage cheese topping can also be made up to 3 days ahead; just store it in an airtight container in the fridge to maintain its creamy texture. When you’re ready to serve, roll out the dough and bake the flatbreads as directed, spreading the prepared cottage cheese just before the final baking. This way, you’ll have warm, delicious flatbreads with minimal effort, perfect for busy weeknights!

Cottage Cheese Flatbread Variations

Feel free to get creative and personalize your flatbread experience with these delightful twists and swaps!

  • Gluten-Free: Substitute all-purpose flour with a gluten-free blend to make it accessible for those with dietary restrictions.
  • Herb-Infused: Add fresh chopped basil or rosemary to the dough for an aromatic flavor that shines through every bite.
  • Cheesy Delight: Mix in shredded mozzarella or cheddar to the dough for a cheesy surprise that melts beautifully.
  • Spicy Kick: Incorporate finely chopped jalapeños or a pinch of cayenne pepper for an adventurous heat that awakens your taste buds.
  • Sweet Twist: Replace the herbs with a drizzle of honey and a sprinkle of cinnamon for a sweet flatbread that pairs perfectly with fruit.
  • Nutty Flavor: Add a tablespoon of ground flaxseed or chia seeds to the dough for a nutritious boost and subtle nutty taste.
  • Veggie Boost: Fold in finely grated zucchini or carrots to the dough for added moisture and nutrition, making it a real powerhouse.

Customize these Cottage Cheese Flatbread variations to match your cravings, and watch them become a favorite in your kitchen!

How to Store and Freeze Cottage Cheese Flatbread

Room Temperature: Store the flatbread wrapped in a clean kitchen towel for up to 1 day. This keeps them soft while allowing you to enjoy them fresh.

Fridge: If you have leftover flatbread, place it in an airtight container and refrigerate for up to 3 days. Reheat in the oven for a few minutes to restore crispiness.

Freezer: For longer storage, freeze the flatbreads in a single layer on a baking sheet until solid, then transfer to a freezer bag. They can be frozen for up to 2 months.

Reheating: To reheat, place the frozen flatbread directly in a preheated oven at 400°F (204°C) for 10–12 minutes or until warmed through and crispy again. Enjoy your Cottage Cheese Flatbread!

What to Serve with Cottage Cheese Flatbread?

Imagine the aroma of freshly baked flatbread filling your kitchen—a warm invitation for creating a complete and delightful meal.

  • Garden Salad: A light, crisp salad topped with your favorite vegetables and a vinaigrette offers a refreshing contrast to the rich flatbread.
  • Grilled Vegetables: Smoky, charred veggies enhance the flatbread’s flavor, bringing a delightful mix of textures and a burst of color to your plate.
  • Hummus Platter: Pairing with creamy hummus makes it a perfect dip for the flatbread, creating a satisfying and nutritious snack or appetizer.
  • Tomato Bruschetta: The tangy sweetness of tomatoes and basil on the flatbread adds a delicious Mediterranean twist that will tantalize your taste buds.
  • Roasted Garlic Aioli: A smooth, garlicky dip complements the crunchy edges of the flatbread, creating a warm, indulgent experience.
  • Wine Pairing: A light white wine, like Sauvignon Blanc, enhances the creamy flavors of the cottage cheese while complementing the herbs beautifully.

Each pairing brings something special to the table, transforming your Cottage Cheese Flatbread into a truly memorable meal!

Chef's Helpful Tips

  • When making Cottage Cheese Flatbread, be sure to knead the dough just until it is smooth to avoid a dense texture.
  • It’s important to use full-fat cottage cheese for a creamier topping that enhances the dish’s richness.
  • Keep an eye on the flatbreads while they bake, as oven temperatures can vary and you want them to be golden and puffed, not burnt.
  • After adding the cottage cheese, returning the flatbreads to the oven will help the cheese melt beautifully and create a satisfying crispness at the edges.

Cottage Cheese Flatbread Recipe FAQs

How can I tell if my cottage cheese is fresh enough to use?
Absolutely! When selecting cottage cheese, look for containers that are within the sell-by date and check for a creamy texture without any dark spots or off-odors. Fresh cottage cheese should have a mild, pleasant smell. If it’s clumpy or has any liquid separation, it might be best to avoid using it.

How long can I store leftover Cottage Cheese Flatbread?
You can keep your leftover Cottage Cheese Flatbread in the refrigerator for up to 3 days. Make sure to place it in an airtight container. Reheating in the oven for a few minutes can help restore that delightful crispiness.

Can I freeze Cottage Cheese Flatbread?
Absolutely! For freezing, place the baked flatbreads in a single layer on a baking sheet and freeze until solid—this usually takes about 1 hour. Once they’re frozen, transfer them to a freezer bag. They will stay fresh for up to 2 months. When you’re ready to enjoy them, just pop them directly in a preheated oven at 400°F (204°C) for about 10-12 minutes to reheat.

What should I do if my flatbread didn’t puff up during baking?
If your Cottage Cheese Flatbread doesn’t puff up, it might be due to the dough being overworked or not enough baking powder added. Make sure to knead the dough gently only until smooth. If you suspect the baking powder might be old, consider replacing it, as it could be less effective over time.

Are there any dietary considerations I need to keep in mind for Cottage Cheese Flatbread?
Absolutely! If you’re serving this flatbread to guests, note that it contains dairy (cottage cheese and Greek yogurt). For those who are lactose intolerant, you might substitute with lactose-free alternatives. Additionally, if anyone has a gluten sensitivity, you can experiment with a gluten-free flour blend, though results may vary.

What are some alternative toppings I can use besides cottage cheese?
The more the merrier! While whipped cottage cheese is fantastic, you can also try topping your flatbread with hummus, avocado, or even a vibrant tomato and basil mix for a fresh spin. Cheese lovers might enjoy adding mozzarella or feta for a delightful twist!

Cottage Cheese Flatbread

Cottage Cheese Flatbread

Enjoy this quick, homemade Cottage Cheese Flatbread for a delightful and healthier alternative to store-bought bread.
Print Recipe Pin Recipe
Prep Time 10 minutes mins
Cook Time 15 minutes mins
Total Time 25 minutes mins
Servings: 2 flatbreads
Course: Snacks & Appetizers
Cuisine: American
Calories: 250
Ingredients Equipment Method Nutrition Notes

Ingredients
  

For the Dough
  • 2 cups all-purpose flour forms the base of the flatbread for a soft texture
  • 2 teaspoons baking powder helps the dough rise, making it light and fluffy
  • 1 teaspoon salt enhances the overall flavor, balancing the dough
  • 1 cup Greek yogurt adds moisture and a tangy flavor while helping to bind the dough
  • 1 cup full-fat cottage cheese, whipped creates a creamy, rich topping
For the Garnish
  • 2 tablespoons olive oil drizzles on top for a luscious finish
  • 1 teaspoon dried oregano or thyme infuses each flatbread with aromatic notes of herbs
  • 1 teaspoon garlic powder or crushed red pepper optional for those who like a little heat

Equipment

  • Mixing bowl
  • Baking sheet
  • Oven
  • parchment paper
  • Rolling pin

Method
 

Directions
  1. Combine the dry ingredients in a bowl. Mix together the all-purpose flour, baking powder, and a pinch of salt for a flavorful base.
  2. Stir in the Greek yogurt. Add the Greek yogurt to the dry mixture and mix until a sticky dough forms.
  3. Knead the dough on a lightly floured surface for about 2–3 minutes until it's smooth and elastic.
  4. Divide the dough into two equal portions and roll each into ovals approximately 1/4-inch thick.
  5. Preheat your oven to 450°F (232°C) and prepare a baking sheet by lining it with parchment paper.
  6. Place the unbaked flatbreads on the prepared baking sheet and bake for 6–8 minutes until they puff and are slightly golden.
  7. Remove the flatbreads from the oven and generously spread whipped cottage cheese over each one.
  8. Add a drizzle of olive oil on top and sprinkle the flatbreads with dried herbs or optional spices.
  9. Put the flatbreads back in the oven and bake for another 5–7 minutes until bubbly and crisp at the edges.
  10. Let the flatbreads cool slightly before slicing. They're best enjoyed warm!

Nutrition

Serving: 1flatbreadCalories: 250kcalCarbohydrates: 30gProtein: 10gFat: 10gSaturated Fat: 5gPolyunsaturated Fat: 1gMonounsaturated Fat: 4gCholesterol: 20mgSodium: 300mgPotassium: 200mgFiber: 2gSugar: 2gVitamin A: 5IUCalcium: 15mgIron: 8mg

Notes

Serve with a side of marinara sauce for dipping or fresh veggies for a delightful appetizer.

Tried this recipe?

Let us know how it was!

Filed Under: SNACKS & APPETIZERS

  • « Previous Page
  • 1
  • …
  • 6
  • 7
  • 8

Recent Posts

  • Crispy Potatoes in Oven
  • Lucky Charms Pancakes
  • Cheeseburger
  • Boiled Corn on the Cob
  • St. Patrick’s Day Dessert Parfaits

Recent Comments

No comments to show.

Footer

  • Contact
  • Privacy Policy
  • About Us
  • Terms
  • ↑ back to top

Copyright © 2024 www.Forkono.com

Table Of Content