Forkono

  • BREAKFAST & BRUNCH
  • DESSERT RECIPES
  • DINNER RECIPES
  • LUNCH RECIPES
  • About uS
  • SNACKS & APPETIZERS
menu icon
go to homepage
  • BREAKFAST & BRUNCH
  • DESSERT RECIPES
  • DINNER RECIPES
  • LUNCH RECIPES
  • About uS
  • SNACKS & APPETIZERS
search icon
Homepage link
  • BREAKFAST & BRUNCH
  • DESSERT RECIPES
  • DINNER RECIPES
  • LUNCH RECIPES
  • About uS
  • SNACKS & APPETIZERS
×

Salade Méditerranéenne Avocat & Citron

January 3, 2026 by JudyWhite Leave a Comment

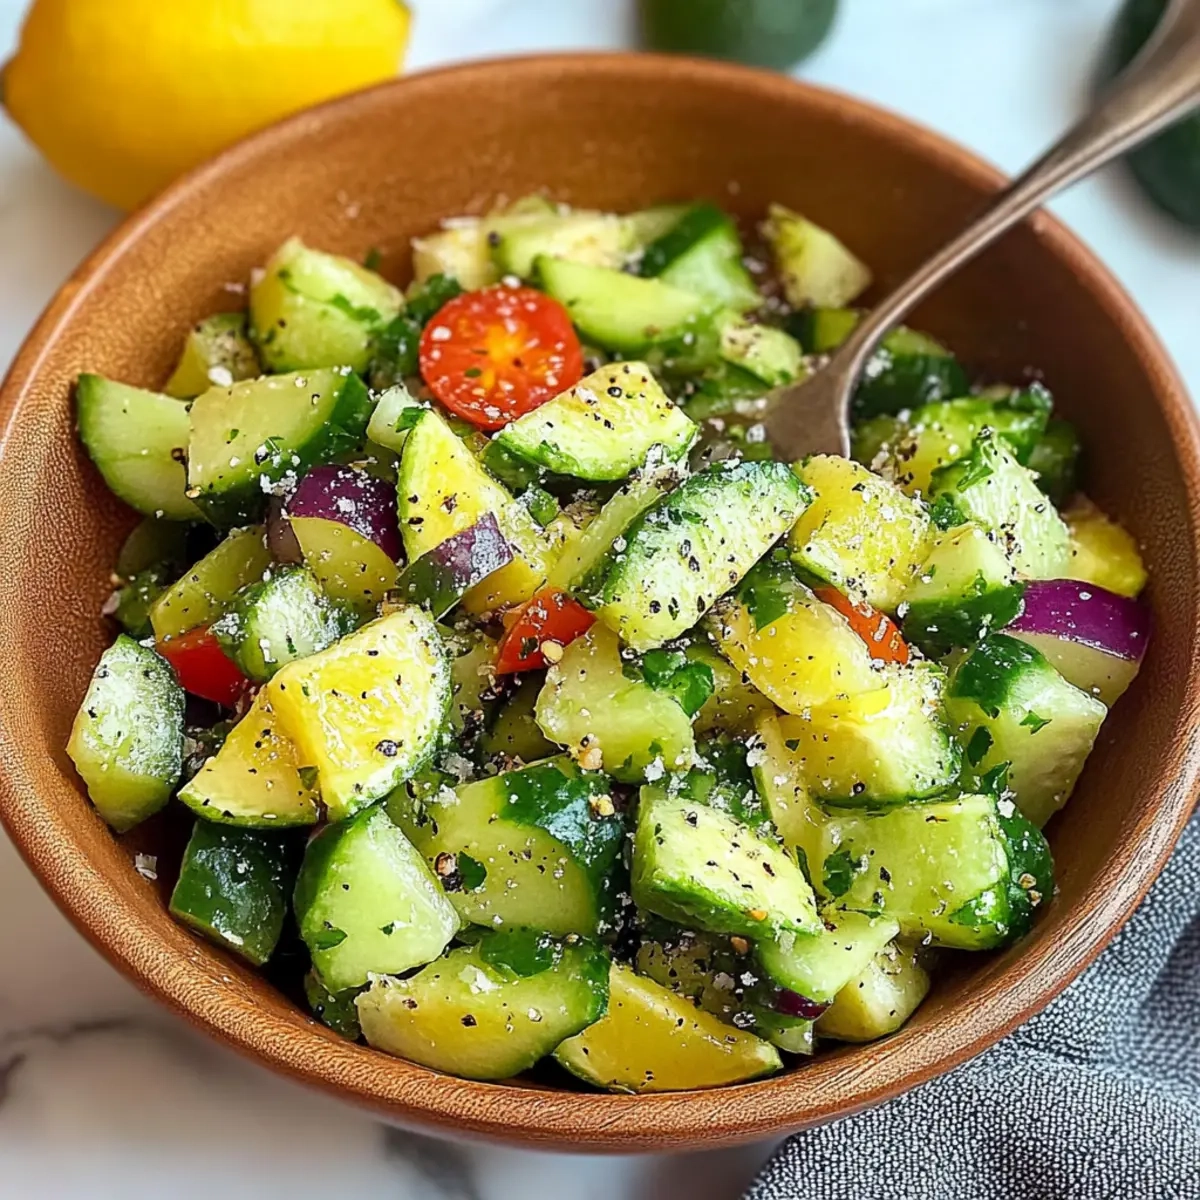
As the warmth of spring starts to unfold, I find myself craving something light yet bursting with flavor. That’s when I stumbled upon this delightful gem: Salade Méditerranéenne Avocat & Citron. It’s a vibrant medley of fresh avocados, juicy tomatoes, and crunchy cucumbers – a dish that not only looks beautiful on the plate but also tastes like a sun-drenched day in the Mediterranean.

Imagine the heavenly aroma of fresh basil mingling with zesty lemon and rich olive oil, inviting you to take just one more bite. Perfect for a sunny brunch or a quick weeknight dinner, this salad comes together in just 15 minutes, making it the ideal solution for those hectic evenings when you want something homemade and nutritious.

What’s more, the toasted pine nuts add the perfect crunch, while the creamy dressing ties it all together. This is more than just a salad; it’s a celebration of flavors that will leave your taste buds dancing. Let’s gather the ingredients and make this refreshing dish that will please both family and friends!

Why You'll Love This Salade Méditerranéenne Avocat & Citron

  • This salad is incredibly easy to prepare, taking just 15 minutes from start to finish, making it perfect for busy weeknights.
  • The vibrant ingredients create a burst of flavor that transports you to the Mediterranean with every bite.
  • Its versatility allows you to serve it as a light lunch, a side dish, or even as a main course with added protein.
  • With its stunning presentation and colorful components, this dish is sure to impress your guests and brighten up any table setting.

Salade Méditerranéenne Avocat & Citron Ingredients

• Fresh and vibrant ingredients await you!

For the Salad
• 3 ripe avocados – make sure they’re soft for a creamy texture.
• 4 tomatoes – juicy varieties like Roma or vine-ripened add flavor.
• 1 cucumber – choose a crisp option for a refreshing crunch.
• 1 bunch young onions – they bring a mild, sweet bite to the mix.
• 1 red bell pepper – adds a pop of color and sweetness.
• 1 handful fresh basil – fragrant leaves elevate the aromatic experience.

For the Dressing
• 3 tablespoons olive oil – opt for quality extra virgin for rich flavor.
• 1 tablespoon lemon juice – fresh juice brightens and complements the salad.
• 2 tablespoons mayonnaise – creamy balance ties the flavors together beautifully.

For the Topping
• 1 handful pine nuts (toasted) – these provide a delightful crunch; toasting enhances their nutty flavor.

Get ready to enjoy your Salade Méditerranéenne Avocat & Citron – a beautiful and refreshing dish that’s simple, healthy, and oh so satisfying!

How to Make Salade Méditerranéenne Avocat & Citron

  1. Chop the avocados, tomatoes, cucumber, young onions, and red bell pepper into bite-sized pieces. Aim for uniform pieces to ensure a delightful mix of flavors in each bite.

  2. Combine the chopped avocado, tomatoes, cucumber, young onions, red bell pepper, and fresh basil in a large mixing bowl. Use a gentle hand to maintain the integrity of the ripe avocados.

  3. Whisk together the olive oil, lemon juice, and mayonnaise in a separate bowl until creamy and well combined. This dressing will bring a rich and zesty flavor to your salad.

  4. Pour the dressing over the salad mixture and toss gently to combine all the ingredients. Be careful not to mash the avocados; you want them to keep their lovely shape.

  5. Sprinkle the toasted pine nuts on top just before serving to add that perfect nutty crunch and additional flavor. These little gems will elevate your salad even further!

Optional: Add a sprinkle of flaky sea salt for extra flavor.
Exact quantities are listed in the recipe card below.

Salade Méditerranéenne Avocat & Citron Variations

Let your creativity shine as you personalize this delightful salad to match your tastes and dietary needs!

  • Vegan Swap: Replace the mayonnaise with a plant-based alternative or use avocado to maintain creaminess without dairy.
    This simple change makes the salad suitable for vegans while retaining its rich flavors and satisfying texture.

  • Add Protein: Toss in cooked chickpeas or grilled chicken for a more filling meal option.
    These additions not only boost the protein content but also make the salad a heartier dish perfect for lunch or dinner.

  • Nut-Free Delight: Omit pine nuts and replace them with pumpkin seeds for a crunchy, nut-free alternative.
    These little seeds provide a delightful crunch while keeping the salad free from common allergens.

  • Spicy Kick: Stir in a diced jalapeño or a sprinkle of red pepper flakes to turn up the heat.
    A touch of spice can transform the entire experience, adding depth and intrigue with every bite.

  • Herb Infusion: Swap fresh basil with parsley or cilantro for a different herbaceous flavor profile.
    Each herb brings its own personality, allowing you to tailor the salad to your liking or the season.

  • Fruit Twist: Add sliced peaches, mangoes, or strawberries for a sweet and succulent twist to the dish.
    The fruity flavor will provide a lovely contrast to the savory ingredients, enhancing the Mediterranean experience.

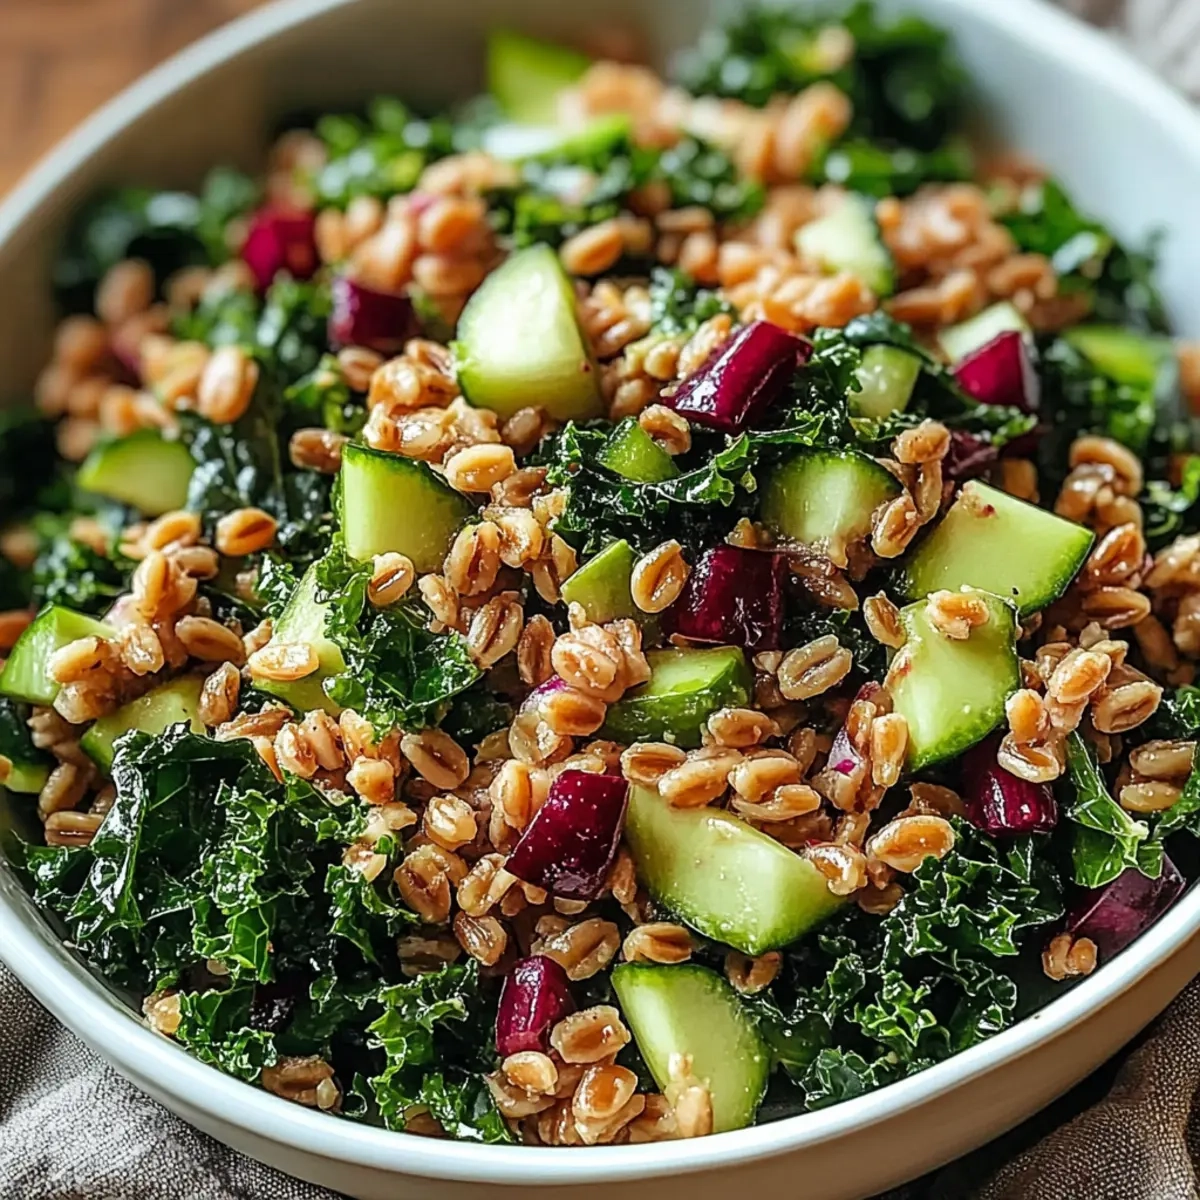
  • Whole Grain Addition: Mix in cooked farro or quinoa to make the salad more substantial and nutritious.
    This hearty addition elevates the dish, filling you up while adding unique flavors and textures to enjoy.

  • Savory Cheese: Crumble feta or goat cheese for an extra layer of savory goodness.
    These cheeses bring creaminess and tanginess that perfectly complement the fresh vegetables, making every bite special.

Make Ahead Options

Making your Salade Méditerranéenne Avocat & Citron ahead of time can save precious moments during your busy week! You can chop the vegetables (avocados, tomatoes, cucumber, young onions, and red bell pepper) and store them in an airtight container for up to 24 hours. To maintain freshness, squeeze a bit of lemon juice over the avocados to prevent browning. Prepare the dressing in advance as well, storing it separately in the fridge for up to 3 days. When you’re ready to enjoy your salad, simply toss everything together with the fresh basil and toasted pine nuts for vibrant, delicious results—perfect for hassle-free entertaining or a quick weeknight dinner!

Storage Tips for Salade Méditerranéenne Avocat & Citron

Room Temperature: Keep any leftover salad at room temperature for no more than 2 hours, as the creamy dressing can spoil quickly.

Fridge: Store the salad in an airtight container in the refrigerator for up to 1 day. However, it’s best enjoyed fresh, so consider making smaller batches!

Freezer: Freezing isn’t recommended for Salade Méditerranéenne Avocat & Citron, as avocados and fresh vegetables lose their texture and quality when thawed.

Reheating: This salad is best served chilled, so there’s no need to reheat. Just give it a good toss before serving if it’s been stored in the fridge!

What to Serve with Salade Méditerranéenne Avocat & Citron?

A vibrant, refreshing salad deserves the perfect accompaniments to create a delightful meal experience.

  • Grilled Chicken: The smoky flavors from grilled chicken enhance the freshness of the salad, adding protein and heartiness to your plate.

  • Quinoa Pilaf: A light and nutty quinoa pilaf provides a hearty base, balancing the crispness of the salad with its chewy texture.

  • Crispy French Bread: Serve with warm, crusty bread to scoop up every bit of the salad, making your meal feel indulgent yet simple.

  • Hummus Platter: Pairing this salad with a colorful assortment of hummus and veggies offers a delightful dip option, mixing vibrant flavors and textures.

  • Feta Cheese Crumbles: Adding feta contributes a salty creaminess that complements the avocados and bright vegetables, enhancing the Mediterranean flair.

  • Chilled White Wine: A refreshing glass of chilled Sauvignon Blanc brings out the citrusy notes, making every bite exceptionally enjoyable.

  • Lemon Sorbet: End the meal on a sweet note with a cool lemon sorbet; its acidity mirrors the lemon dressing, cleansing the palate beautifully.

Each pairing enhances the essence of Salade Méditerranéenne Avocat & Citron, inviting you to enjoy a balanced, harmonious meal that captures the spirit of home cooking!

Chef's Helpful Tips

  • For the Salade Méditerranéenne Avocat & Citron, make sure to choose ripe avocados that yield slightly to pressure for the best creamy texture.
  • A common mistake is over-mixing the salad; toss gently to preserve the shape of the avocado chunks.
  • When preparing your vegetables, try to cut them into uniform sizes for even flavor distribution in every bite.
  • Lastly, serve the salad immediately after dressing it to maintain the freshness and crunch of the ingredients.

Salade Méditerranéenne Avocat & Citron Recipe FAQs

What should I look for when choosing ripe avocados?
Absolutely! When selecting avocados, gently press the surface; it should yield slightly to pressure, indicating ripeness. Avoid any with dark spots or blemishes, as these can point to overripeness. If they’re too firm, place them in a paper bag at room temperature for a day or two until they soften up.

How can I store leftover Salade Méditerranéenne Avocat & Citron?
Very! To store the salad, transfer any leftovers to an airtight container and refrigerate. It will stay fresh for up to 1 day, but to maintain the flavor and texture, it’s best to enjoy it fresh. Always toss it gently before serving if it’s been in the fridge.

Can I freeze Salade Méditerranéenne Avocat & Citron?
Not recommended. Freezing this salad isn’t ideal because avocados and fresh vegetables will lose their textures and quality when thawed, resulting in a mushy consistency. Enjoy it fresh for the best experience!

What if I have allergies to certain ingredients?
The more the merrier! If you have allergies, consider substituting ingredients accordingly. For instance, you can replace mayonnaise with a dairy-free or yogurt-based alternative. If you’re allergic to nuts, simply omit the pine nuts or use sunflower seeds for the crunch. Always check labels to ensure safety.

How can I prevent the avocados from browning?
For sure! To keep your avocados vibrant, drizzle a bit of extra lemon juice on them right after cutting. This acidity slows down the browning process. If you’re preparing the salad in advance, store the avocado pieces in an airtight container with a layer of lemon juice on top prior to mixing with other ingredients.

Salade Méditerranéenne Avocat & Citron

Salade Méditerranéenne Avocat & Citron

A refreshing Salade Méditerranéenne Avocat & Citron bursting with flavor and vibrant ingredients, perfect for a light meal.
Print Recipe Pin Recipe
Prep Time 15 minutes mins
Total Time 15 minutes mins
Servings: 4 servings
Course: LUNCH RECIPES
Cuisine: Mediterranean
Calories: 350
Ingredients Equipment Method Nutrition Notes

Ingredients
  

For the Salad
  • 3 units ripe avocados make sure they're soft for a creamy texture.
  • 4 units tomatoes juicy varieties like Roma or vine-ripened add flavor.
  • 1 unit cucumber choose a crisp option for a refreshing crunch.
  • 1 bunch young onions they bring a mild, sweet bite to the mix.
  • 1 unit red bell pepper adds a pop of color and sweetness.
  • 1 handful fresh basil fragrant leaves elevate the aromatic experience.
For the Dressing
  • 3 tablespoons olive oil opt for quality extra virgin for rich flavor.
  • 1 tablespoon lemon juice fresh juice brightens and complements the salad.
  • 2 tablespoons mayonnaise creamy balance ties the flavors together beautifully.
For the Topping
  • 1 handful pine nuts (toasted) these provide a delightful crunch; toasting enhances their nutty flavor.

Equipment

  • Mixing bowl
  • Whisk

Method
 

Instructions
  1. Chop the avocados, tomatoes, cucumber, young onions, and red bell pepper into bite-sized pieces.
  2. Combine the chopped avocado, tomatoes, cucumber, young onions, red bell pepper, and fresh basil in a large mixing bowl.
  3. Whisk together the olive oil, lemon juice, and mayonnaise in a separate bowl until creamy and well combined.
  4. Pour the dressing over the salad mixture and toss gently to combine all the ingredients.
  5. Sprinkle the toasted pine nuts on top just before serving.

Nutrition

Serving: 1servingCalories: 350kcalCarbohydrates: 20gProtein: 5gFat: 30gSaturated Fat: 5gPolyunsaturated Fat: 2gMonounsaturated Fat: 20gSodium: 150mgPotassium: 700mgFiber: 7gSugar: 3gVitamin A: 500IUVitamin C: 30mgCalcium: 50mgIron: 1mg

Notes

Serve immediately after dressing to maintain freshness and crunch. Optional: Add a sprinkle of flaky sea salt for extra flavor.

Tried this recipe?

Let us know how it was!

Filed Under: LUNCH RECIPES

Pink Velvet Cake

January 3, 2026 by JudyWhite Leave a Comment

There’s something especially delightful about a cake that can instantly brighten your day—and my Pink Velvet Cake does just that! The first time I made it, I was in a creative mood, desperate to escape the ordinary chocolate and vanilla options that felt all too familiar. As soon as I pulled the layers from the oven, the warm, inviting fragrance filled my kitchen, and I knew I had stumbled upon a true gem.

With its tender crumb and subtle sweetness, this cake is perfect for any celebration or even a cozy afternoon at home. What makes it truly irresistible, though, is the luscious cream cheese frosting that dances on your taste buds, taking this dessert to a whole new level of indulgence.

Whether you’re impressing friends at a gathering or simply treating yourself, this Pink Velvet Cake promises not just flavor, but also a stunning visual treat. So, let’s dive into the recipe, and soon you’ll have a slice of happiness on your plate!

Why You'll Love This Pink Velvet Cake

  • This Pink Velvet Cake is incredibly easy to make, making it a great choice even for baking beginners.
  • With its delightful flavor and unique pink hue, it’s bound to be a showstopper at any event or gathering.
  • The versatility of this recipe allows you to customize it with different frostings or toppings to suit your taste and occasion.
  • Its beautiful appearance is sure to impress your guests and leave them asking for seconds.
  • Enjoying a slice of this cake not only brings joy but also creates lasting memories with friends and loved ones.
  • Every bite is a celebration of sweetness and creativity, making it truly a treat you’ll adore.

Pink Velvet Cake Ingredients

• Get ready to bake a delicious treat!

For the Cake

  • Cake flour – Essential for a soft, tender crumb in your Pink Velvet Cake.
  • Granulated sugar – Sweetens the cake and helps create that lovely fluffy texture.
  • Baking powder – Acts as a leavening agent, ensuring your cake rises beautifully.
  • Fine salt – Enhances the sweetness and balances flavors perfectly.
  • Unsalted butter – Brings richness and moisture; be sure it’s at room temperature for easy mixing.
  • Egg whites – The base for a light and airy cake; room temperature helps create a better volume.
  • Buttermilk – Adds a subtle tang and keeps the cake moist—don’t substitute with regular milk if possible!
  • Vegetable or canola oil – Keeps the cake ultra moist; you can even use melted coconut oil for a twist.
  • Vanilla extract – Adds warmth and depth to the flavor; vanilla bean paste works just as well!
  • Pink gel food coloring – Gives your cake that gorgeous, eye-catching hue.

For the Frosting

  • Unsalted butter – Use room temperature butter for a creamy and smooth frosting.
  • Cream cheese – Adds a tangy flavor that pairs perfectly with the sweetness of the cake.
  • Vanilla extract – Enhances the overall flavor of the frosting, making it extra delicious.
  • Fine salt – A pinch adds depth to the sweetness—don’t skip this step!
  • Powdered sugar – The base for your frosting, creating that luxurious sweetness.
  • Heavy whipping cream – Helps achieve a silky, spreadable consistency; room temperature is key.
  • Pink gel food coloring – Use to tint your frosting, creating a stunning visual appeal.

Get ready to bring this delightful Pink Velvet Cake to life in your kitchen!

How to Make Pink Velvet Cake

  1. Preheat your oven to 350°F (175°C) and grease or line your cake pans with parchment paper to prevent sticking. This step ensures a perfectly baked cake that’s easy to remove.

  2. Combine in a mixing bowl the cake flour, granulated sugar, baking powder, and fine salt. Whisk together until well blended, ensuring an even distribution of the dry ingredients that will work together for a fluffy texture.

  3. Beat in another bowl the unsalted butter, egg whites, buttermilk, vegetable oil, and vanilla extract until creamy and smooth. This mixture creates a luscious batter, perfect for infusing flavor and moisture into your cake.

  4. Gradually mix the dry ingredients into the wet ingredients, stirring gently until just combined. Avoid over-mixing; you want a batter that’s well-blended but still retains a fluffy texture.

  5. Color your batter by adding a few drops of pink gel food coloring. Stir until you reach your desired hue, creating that beautiful pink that makes this cake so special. The color will be more vibrant once baked!

  6. Pour the batter evenly into your prepared cake pans and smooth the tops with a spatula. Bake for 35 minutes or until a toothpick inserted into the center comes out clean. Keep an eye on your cakes for that perfect golden edge!

  7. Cool the cakes completely on wire racks; this prevents them from becoming soggy and ensures they’re easy to frost. The aroma will fill your kitchen—try not to eat the whole cake while waiting!

  8. Prepare the frosting by beating together the unsalted butter and cream cheese until light and fluffy. This will create the perfect base for your luxurious cream cheese frosting.

  9. Mix in the vanilla extract, fine salt, and powdered sugar until smooth and well combined. Don’t rush this step; the cream cheese adds a delightful tang that balances the sweetness beautifully.

  10. Gradually add the heavy whipping cream to your frosting, mixing until you reach your desired consistency for spreading or piping. It should be creamy and luscious, perfect for dolloping on your cake.

  11. Frost the cooled layers generously, stacking them together as you go, and add any additional decorations to make your Pink Velvet Cake pop. Your creation is now a stunning masterpiece ready to be enjoyed!

Optional: Add fresh berries or edible flowers on top for a touch of elegance.

Exact quantities are listed in the recipe card below.

Make Ahead Options

These Pink Velvet Cake layers are ideal for meal prep, allowing you to save crucial time on busy baking days! You can prepare the cake layers up to 2-3 days ahead of time. Simply bake them, allow them to cool completely, and then tightly wrap each layer in plastic wrap before refrigerating to maintain their moist texture. If you’d like, the frosting can also be made up to 2 days in advance; store it in an airtight container in the fridge—just give it a quick mix to revive its creamy consistency before frosting. When you’re ready to assemble, just layer the chilled cakes with frosting, and your beautiful Pink Velvet Cake is ready to impress with minimal last-minute effort!

What to Serve with Pink Velvet Cake?

The vibrant hues and delightful flavors of this cake are just the beginning; let’s create a full spread that elevates your dessert experience!

  • Fresh Berries: Their tartness beautifully balances the sweetness of the cake, adding a refreshing touch to each bite.

  • Vanilla Ice Cream: A classic pairing, the creamy texture of the ice cream complements the tender layers, creating a heavenly combination. Serve a scoop alongside a slice for a timeless delight!

  • Chocolate Ganache: Drizzling silky ganache over the cake adds rich flavor and decadence that contrasts wonderfully with the pink velvet.

  • Lemonade: The zesty brightness of a fresh lemonade refreshes the palate, making it an ideal pairing for this sweet treat. It’s the perfect sip alongside your cake slice!

  • Coconut Whipped Cream: Light and airy, this alternative topping enhances the cake’s softness while adding a tropical twist that feels indulgent.

  • Coffee: A strong brew provides a delightful contrast to the cake’s sweetness, making for a comforting afternoon treat. The warmth of coffee brings the whole experience to life!

  • Fruit Salad: A mixture of seasonal fruits adds color and a natural sweetness that complements the cake—and it keeps things light and vibrant.

  • Sparkling Water: For a refreshing non-sweet option, sparkling water with a hint of lemon recharges your taste buds between bites. It’s simple, but oh-so-refreshing!

  • Cheesecake Bites: For those who love multiple desserts, serving mini cheesecake bites provides a creamy, tangy contrast to the cake, satisfying any sweet tooth’s cravings!

How to Store and Freeze Pink Velvet Cake

  • Room Temperature: Store the unfrosted Pink Velvet Cake layers at room temperature for up to 2 days, covered in plastic wrap to maintain moisture. Avoid placing it in direct sunlight.

  • Fridge: If frosted, the Pink Velvet Cake can be kept in the refrigerator for up to 5 days. Use an airtight container or cover it loosely with plastic wrap to prevent the frosting from hardening.

  • Freezer: To freeze, wrap the unfrosted cake layers in plastic wrap and then aluminum foil. They can last up to 3 months in the freezer. Frost after thawing for the best texture.

  • Reheating: When ready to enjoy, allow the frozen cake to thaw in the fridge overnight. For a warm slice, microwave it for 10-15 seconds, just enough to take the chill off without melting the frosting.

Pink Velvet Cake Variations

Feel free to get creative with this recipe and make it your own with these delightful twists!

  • Dairy-Free: Substitute buttermilk with almond or coconut milk and use dairy-free butter for a scrumptious vegan option. You’ll still enjoy that light, fluffy texture!

  • Chocolate Swirl: Add 1 cup of cocoa powder to half the batter and create a marble effect by swirling it into the original batter. This chocolatey delight will take your cake to new heights!

  • Nuts: Fold in 1 cup of chopped walnuts or pecans for a satisfying crunch. The nutty flavor complements the sweetness, adding another layer of deliciousness.

  • Fruit Flavor: Replace part of the liquid with pureed strawberries or raspberries for a fruity twist. The natural sweetness intermingles perfectly with the cake base, making it even more irresistible!

  • Layered Delight: Make a multi-layered cake by baking in three cake pans and filling the layers with fruit preserves or chocolate ganache. It’s a treat that turns heads and takes your taste buds on an adventure!

  • Spiced Version: Add a teaspoon of cinnamon and a dash of nutmeg for a warm, spiced flavor profile. This adds depth and warmth, perfect for cozy gatherings or a festive moment.

  • Gluten-Free: Use a 1:1 gluten-free flour blend in place of regular flour. It maintains the texture while being perfect for gluten-sensitive guests, ensuring no one misses out!

  • Zesty Lemon: Infuse the batter with lemon zest or a splash of lemon juice for a refreshing twist. This brightens the flavor and adds a lovely citrus note that pairs beautifully with cream cheese frosting.

Chef's Helpful Tips

  • To ensure a light and airy Pink Velvet Cake, make sure your egg whites are at room temperature before beating them, as this helps achieve better volume.
  • Avoid over-mixing when combining your wet and dry ingredients; mixing just until incorporated will keep the cake tender.
  • For the frosting, it’s crucial to use room temperature butter and cream cheese to achieve a smooth and creamy texture without lumps.
  • When baking, check the cakes at the 30-minute mark to avoid overbaking, ensuring they remain moist and flavorful.

Pink Velvet Cake Recipe FAQs

How do I select the best ingredients for my Pink Velvet Cake?
Absolutely! When choosing ingredients, select high-quality pink gel food coloring for the best visual appeal. For the butter, make sure it’s unsalted and at room temperature for easy mixing and a creamy texture. Use fresh egg whites from large eggs for the best results. The buttermilk should also be fresh, as it contributes to the cake’s moisture and flavor.

What’s the best way to store my Pink Velvet Cake?
Very! If unfrosted, keep the cake layers at room temperature for up to 2 days wrapped in plastic wrap to maintain moisture. For a frosted cake, store it in the fridge in an airtight container for up to 5 days. This protects the frosting while keeping it at a delightful temperature for enjoying!

Can I freeze my Pink Velvet Cake?
Absolutely! To freeze your Pink Velvet Cake, wrap the unfrosted layers tightly in plastic wrap followed by aluminum foil, ensuring there are no air pockets. They can last up to 3 months in the freezer. When you’re ready to enjoy, thaw them in the fridge overnight, then frost them to retain that lovely texture. For a warm slice, microwave it for 10-15 seconds!

What should I do if my cake is too dry?
Oh no! If you find your Pink Velvet Cake has turned out dry, that’s usually because of over-baking. Try to check it 5 minutes before the end of the recommended baking time. If it does happen, you can still revive the cake by brushing the layers lightly with simple syrup (made from equal parts sugar and water boiled until syrupy) before frosting. This adds moisture and sweetness back into the cake!

Are there any allergies I should be aware of when making Pink Velvet Cake?
Very! This recipe contains eggs, dairy, and gluten, so be mindful of those with allergies. For a dairy-free version, you can substitute the buttermilk with almond milk mixed with vinegar or lemon juice for a similar tang. If you need a gluten-free alternative, consider using a 1:1 gluten-free baking flour blend. Always double-check labels to ensure they’re free of allergens suitable for your guests!

Pink Velvet Cake

Pink Velvet Cake

This Pink Velvet Cake features a tender crumb and luscious cream cheese frosting, perfect for celebrations.
Print Recipe Pin Recipe
Prep Time 25 minutes mins
Cook Time 35 minutes mins
Cooling Time 30 minutes mins
Total Time 1 hour hr 30 minutes mins
Servings: 8 slices
Course: DESSERT RECIPES
Cuisine: American
Calories: 350
Ingredients Equipment Method Nutrition Notes

Ingredients
  

For the Cake
  • 2 cups cake flour Essential for a soft, tender crumb.
  • 1.5 cups granulated sugar Helps create a fluffy texture.
  • 1 tbsp baking powder Acts as a leavening agent.
  • 0.5 tsp fine salt Enhances sweetness.
  • 0.5 cups unsalted butter Room temperature.
  • 4 large egg whites Room temperature.
  • 1 cup buttermilk Do not substitute with regular milk.
  • 0.5 cups vegetable or canola oil For ultra moist cake.
  • 2 tsp vanilla extract Adds warmth and depth.
  • 1 tbsp pink gel food coloring For the gorgeous hue.
For the Frosting
  • 0.5 cups unsalted butter Room temperature.
  • 8 oz cream cheese Adds tangy flavor.
  • 2 tsp vanilla extract Enhances flavor.
  • 0.5 tsp fine salt Adds depth to sweetness.
  • 4 cups powdered sugar Base for frosting.
  • 0.5 cups heavy whipping cream For creamy consistency.
  • 1 tbsp pink gel food coloring For tinting frosting.

Equipment

  • Mixing bowl
  • Whisk
  • Spatula
  • Cake Pans
  • Oven
  • wire racks

Method
 

Prepare the Cake
  1. Preheat your oven to 350°F (175°C) and grease or line your cake pans.
  2. Combine cake flour, granulated sugar, baking powder, and fine salt in a mixing bowl.
  3. Beat unsalted butter, egg whites, buttermilk, vegetable oil, and vanilla extract until creamy.
  4. Gradually mix the dry ingredients into the wet ingredients until just combined.
  5. Add pink gel food coloring, stirring until desired hue is reached.
  6. Pour batter into prepared pans and smooth the tops. Bake for 35 minutes or until a toothpick comes out clean.
  7. Cool the cakes completely on wire racks.
Prepare the Frosting
  1. Beat together unsalted butter and cream cheese until light and fluffy.
  2. Mix in vanilla extract, fine salt, and powdered sugar until smooth.
  3. Gradually add heavy whipping cream, mixing until desired consistency is achieved.
  4. Frost the cooled layers generously, adding decorations if desired.

Nutrition

Serving: 1sliceCalories: 350kcalCarbohydrates: 45gProtein: 4gFat: 18gSaturated Fat: 10gMonounsaturated Fat: 5gCholesterol: 50mgSodium: 210mgPotassium: 150mgFiber: 1gSugar: 30gVitamin A: 500IUCalcium: 50mgIron: 0.5mg

Notes

Optional: Add fresh berries or edible flowers on top for a touch of elegance.

Tried this recipe?

Let us know how it was!

Filed Under: BREAKFAST & BRUNCH

Baked Pumpkin Donuts with Brown Sugar Glaze

January 3, 2026 by JudyWhite Leave a Comment

As the chill of autumn sets in and the leaves begin to paint the world in shades of gold and crimson, there’s nothing quite like the cozy sensation of baking fragrant treats in the kitchen. If you’re searching for a delightful way to embrace the season, look no further than these Baked Pumpkin Donuts with Brown Sugar Glaze. Every bite of these soft, spiced donuts is like a warm hug – rich pumpkin flavor complemented by the sweet, buttery glaze that glistens like sunshine on a crisp morning.

What I adore most about this recipe is not just its irresistible taste, but how easily it transforms an ordinary afternoon into a cozy baking adventure. With only 39 minutes from start to finish, you can create a batch of these treats perfectly suited for sharing with friends or savoring solo. So, gather your ingredients and roll up your sleeves—let’s make some autumn magic happen in the kitchen!

Why You'll Love This Baked Pumpkin Donuts with Brown Sugar Glaze

  • These Baked Pumpkin Donuts with Brown Sugar Glaze are incredibly easy to make, allowing you to whip up a delicious treat in just 39 minutes.
  • The flavor profile is simply divine, combining rich pumpkin with warm spices and a sweet, buttery glaze that will have everyone coming back for seconds.
  • Their versatility means they can be enjoyed at breakfast, as a snack, or even at a festive gathering, making them perfect for any occasion.
  • Visually appealing with their glossy glaze, these donuts are sure to impress your friends and family, making them a crowd-pleaser that everyone will love.

Baked Pumpkin Donuts Ingredients

For the Donuts
• Pumpkin puree – adds moisture and a rich, seasonal flavor to your baked pumpkin donuts.
• Granulated sugar – sweetens the batter and helps create a tender crumb.
• Brown sugar – contributes to the deep flavor and adds caramel notes that enhance the pumpkin taste.
• Unsalted butter (melted & cooled) – provides richness and moisture; ensure it’s cooled to prevent cooking the eggs.
• Vegetable oil – keeps the donuts moist and fluffy; can be substituted with applesauce for a lighter option.
• Large eggs (room temperature) – bind ingredients together and add structure; use flax eggs for a vegan version.
• All-purpose flour – the base for your donuts, giving them structure; you can use whole wheat flour for a healthier option.
• Baking powder – ensures your donuts rise to a perfect fluffy consistency.
• Pumpkin spice – adds warm, aromatic flavors that evoke the essence of fall; feel free to use a homemade blend!
• Salt – enhances the sweetness and flavors of the other ingredients.

For the Glaze
• Unsalted butter (for glaze) – adds a glossy finish and richness to your sweet topping.
• Powdered sugar – gives the glaze its sweetness and smooth texture; sift it to prevent lumps.
• Heavy cream – creates a silky glaze that adheres beautifully to the donuts; you can substitute with milk for a lighter glaze.
• Vanilla extract – infuses added warmth and depth into the flavor of the glaze, balancing the sweetness perfectly.

How to Make Baked Pumpkin Donuts with Brown Sugar Glaze

  1. Preheat the oven to 350°F (175°C) and generously grease a donut pan. This ensures your donuts come out perfectly without sticking, ready to shine with their glossy glaze.

  2. Mix together pumpkin puree, granulated sugar, brown sugar, melted butter, vegetable oil, and eggs in a large bowl until smooth and well combined. This creates a wonderfully rich base filled with the flavors of autumn.

  3. Whisk together flour, baking powder, pumpkin spice, and salt in a separate bowl. Mixing these dry ingredients well helps to distribute the baking powder and spices evenly throughout the batter for a perfect rise.

  4. Combine the dry ingredients with the wet ingredients gradually, stirring gently until just combined. Overmixing can lead to denser donuts, so keep it fluffy!

  5. Spoon the batter into the prepared donut pan, filling each cavity about 2/3 full. This gives your donuts room to rise without overflowing—trust me, they’ll be delightful!

  6. Bake for 14 minutes or until a toothpick inserted into a donut comes out clean. This quick bake time ensures a soft texture that’s light and airy, perfect for indulgence.

  7. Cool the donuts in the pan for a few minutes before transferring them to a wire rack. This allows them to set and makes glazing easier without smushing them.

  8. Prepare the glaze by melting 4 tablespoons of butter in a bowl. Then whisk in the powdered sugar, heavy cream, and vanilla extract until smooth. This should be luscious and glossy, ready to elevate your donuts!

  9. Dip the tops of the cooled donuts into the glaze and allow them to set on a wire rack. The glaze will harden slightly, creating a sweet, buttery crown that’s simply irresistible.

Optional: Sprinkle with extra pumpkin spice for an extra pop of flavor.

Exact quantities are listed in the recipe card below.

How to Store and Freeze Baked Pumpkin Donuts with Brown Sugar Glaze

Room Temperature: Store donuts in an airtight container at room temperature for up to 2 days. This keeps them soft and fresh for your enjoyment!

Fridge: If you prefer keeping them longer, store in the fridge for up to 5 days, but let them come to room temperature before enjoying to restore the glaze’s silkiness.

Freezer: For extended storage, freeze the donuts in a single layer on a baking sheet, then transfer to a zip-top bag for up to 3 months. Simply thaw at room temperature when you’re ready to indulge.

Reheating: To reheat, pop the donuts in the microwave for about 10 seconds for a warm treat, bringing back that fresh-baked comfort for your Baked Pumpkin Donuts with Brown Sugar Glaze!

What to Serve with Baked Pumpkin Donuts with Brown Sugar Glaze?

Indulge in the cozy flavors of autumn by pairing these soft, spiced treats with delightful sides that elevate your baking experience.

  • Hot Apple Cider: Warm and aromatic, this classic fall drink complements the pumpkin spice, creating a heartwarming experience. The cider’s sweetness will beautifully enhance every bite of your donuts.

  • Maple Pecan Coffee Cake: A tender, nutty coffee cake brings in crunch and sweetness, perfectly balancing the softness of the donuts. A slice of this cake alongside your donuts creates a dreamy dessert table.

  • Cinnamon Whipped Cream: Light and fluffy, this whipped cream adds a fresh touch to each donut, while a sprinkle of cinnamon enhances the spiced flavors. It’s an easy way to take your treat to the next level!

  • Spiced Tea: A warm cup of spiced tea mingles wonderfully with pumpkin flavors, making for a comforting pairing. The embrace of spices from the tea rounds out the experience beautifully.

  • Cream Cheese Frosting: Rich and tangy, this frosting adds a creamy texture that envelops the donuts in deliciousness. It’s a fun twist for those who want a bit more than just glaze.

  • Roasted Nuts: Crunchy and flavorful, a mix of roasted almonds or pecans adds an earthy note that contrasts beautifully with the sweet glaze. Perfect for snacking alongside or topping the donuts!

With these delightful pairings, your baking adventure will be even more special, inviting family and friends to join in on the flavorful celebration!

Make Ahead Options

These Baked Pumpkin Donuts with Brown Sugar Glaze are fantastic for busy cooks looking to save time! You can prepare the batter up to 24 hours in advance; simply mix the wet and dry ingredients separately, then combine them before filling the donut pan. To maintain quality, store the batter in an airtight container in the refrigerator. Additionally, the baked donuts can be covered and kept at room temperature for up to 3 days or refrigerated for up to a week—they’ll still be just as delicious! When you’re ready to serve, warm the donuts briefly in the microwave for a fluffy texture, glaze them, and enjoy the taste of autumn at your leisure!

Baked Pumpkin Donuts Variations

Feel free to explore these delightful twists and substitutions to make these baked pumpkin donuts uniquely yours!

  • Gluten-Free: Substitute all-purpose flour with a gluten-free flour blend, ensuring a tender yet safe treat for those avoiding gluten. Enjoy the same savory pumpkin deliciousness without the worry!

  • Vegan: Replace eggs with flax eggs (1 tablespoon flaxseed meal + 2.5 tablespoons water per egg) and use coconut oil instead of butter. Your donuts will be just as moist and flavorful!

  • Spiced Up: Add a pinch of cayenne pepper or a dash of ground ginger for a spicy kick that contrasts beautifully with the sweetness of the glaze. This will awaken your taste buds with every bite!

  • Chocolate Drizzle: Swap in a smooth chocolate glaze instead of the brown sugar glaze to offer a rich and decadent dessert experience. This chocolatey twist will have both kids and adults smiling!

  • Maple Glaze: Replace the vanilla extract in the glaze with pure maple syrup for a warm, fall-inspired flavor twist. This gives your donuts an even cozier vibe with earthy undertones.

  • Nutty Flavor: Toss in chopped walnuts or pecans into the batter for an added crunch that elevates both texture and taste. These nutty bits provide a lovely contrast to the soft donut!

  • Dairy-Free: Use almond milk or coconut cream instead of heavy cream for the glaze, and swap butter for a plant-based alternative. You’ll achieve a deliciously creamy texture without any dairy!

  • Pumpkin Chocolate Chip: Fold in mini chocolate chips to the batter before baking for that extra pop of sweetness and surprise. Each bite brings a delightful chocolatey richness that pairs perfectly with pumpkin!

Chef's Helpful Tips

  • Make sure your eggs are at room temperature before mixing; this helps create a smooth batter for the Baked Pumpkin Donuts with Brown Sugar Glaze.
  • Avoid overmixing the batter once you combine the wet and dry ingredients to ensure a light and fluffy texture.
  • When filling the donut pan, use a piping bag or a zip-top bag with the corner snipped off for neat and easy portioning.
  • Bake your donuts until a toothpick inserted comes out clean; this usually takes around 14 minutes, but keep an eye on them to prevent overbaking.

Baked Pumpkin Donuts with Brown Sugar Glaze Recipe FAQs

What type of pumpkin puree should I use?
Absolutely! You want to use 100% pure pumpkin puree, which is often found canned. Avoid the flavored pie fillings, as they contain added sugars and spices that could alter your donut recipe. If you’re feeling adventurous, you can also make your own by roasting and pureeing fresh pumpkin for the most vibrant flavor!

How should I store leftover donuts?
Very simply! Store your Baked Pumpkin Donuts with Brown Sugar Glaze in an airtight container at room temperature for up to 2 days. If you want them to last longer, placing them in the fridge extends their freshness to about 5 days. Just make sure to let them come to room temperature before indulging again to keep that glaze nice and silky.

Can I freeze the baked donuts?
Of course! Freezing these treats is a great way to enjoy them later. First, freeze them in a single layer on a baking sheet until firm. Then, transfer them to a zip-top bag or airtight container and store in the freezer for up to 3 months. When you’re ready to enjoy them, simply let them thaw at room temperature, and you can even warm them up in the microwave for about 10 seconds for that fresh-baked taste!

What should I do if my donuts sink in the middle?
It can be disheartening, but don’t worry! If your Baked Pumpkin Donuts do sink, it usually means the batter may have been overmixed or the oven temperature was too low. Ensure you gently combine the wet and dry ingredients until just combined for a fluffy texture. Also, make sure your oven is properly preheated to 350°F (175°C) for even baking.

Can I make this recipe vegan or gluten-free?
Absolutely! To make these delightful donuts vegan, substitute the eggs with flax eggs (1 tablespoon of ground flaxseed mixed with 3 tablespoons of water for each egg, let it sit until it thickens). You can also replace the butter with coconut oil or a vegan butter alternative. For a gluten-free version, swap the all-purpose flour with a 1:1 gluten-free baking mix, ensuring it includes xanthum gum for structure. Enjoy the versatility!

Baked Pumpkin Donuts with Brown Sugar Glaze

Baked Pumpkin Donuts with Brown Sugar Glaze

These Baked Pumpkin Donuts with Brown Sugar Glaze are soft, spiced donuts with rich pumpkin flavor and a sweet, buttery glaze.
Print Recipe Pin Recipe
Prep Time 25 minutes mins
Cook Time 14 minutes mins
Total Time 39 minutes mins
Servings: 12 donuts
Course: DESSERT RECIPES
Cuisine: American
Calories: 180
Ingredients Equipment Method Nutrition Notes

Ingredients
  

For the Donuts
  • 1 cup Pumpkin puree
  • 1 cup Granulated sugar
  • 1/2 cup Brown sugar
  • 1/4 cup Unsalted butter (melted & cooled)
  • 1/4 cup Vegetable oil
  • 2 large Eggs (room temperature)
  • 2 cups All-purpose flour
  • 1 tbsp Baking powder
  • 2 tsp Pumpkin spice
  • 1/2 tsp Salt
For the Glaze
  • 4 tbsp Unsalted butter
  • 2 cups Powdered sugar sifted to prevent lumps
  • 1/4 cup Heavy cream
  • 1 tsp Vanilla extract

Equipment

  • Donut pan
  • Mixing bowls
  • Whisk
  • Spoon
  • Wire Rack

Method
 

How to Make Baked Pumpkin Donuts with Brown Sugar Glaze
  1. Preheat the oven to 350°F (175°C) and generously grease a donut pan.
  2. Mix together pumpkin puree, granulated sugar, brown sugar, melted butter, vegetable oil, and eggs in a large bowl until smooth and well combined.
  3. Whisk together flour, baking powder, pumpkin spice, and salt in a separate bowl.
  4. Combine the dry ingredients with the wet ingredients gradually, stirring gently until just combined.
  5. Spoon the batter into the prepared donut pan, filling each cavity about 2/3 full.
  6. Bake for 14 minutes or until a toothpick inserted into a donut comes out clean.
  7. Cool the donuts in the pan for a few minutes before transferring them to a wire rack.
  8. Prepare the glaze by melting 4 tablespoons of butter in a bowl. Then whisk in the powdered sugar, heavy cream, and vanilla extract until smooth.
  9. Dip the tops of the cooled donuts into the glaze and allow them to set on a wire rack.
  10. Optional: Sprinkle with extra pumpkin spice for an extra pop of flavor.

Nutrition

Serving: 1donutCalories: 180kcalCarbohydrates: 25gProtein: 2gFat: 8gSaturated Fat: 5gPolyunsaturated Fat: 0.5gMonounsaturated Fat: 2gCholesterol: 35mgSodium: 105mgPotassium: 150mgFiber: 1gSugar: 10gVitamin A: 5000IUCalcium: 15mgIron: 1mg

Notes

Make sure your eggs are at room temperature for a smooth batter. Avoid overmixing to keep the donuts fluffy. Use a piping bag for easy filling of the donut pan.

Tried this recipe?

Let us know how it was!

Filed Under: BREAKFAST & BRUNCH

Warm Sweet Potato White Bean Salad

January 3, 2026 by JudyWhite Leave a Comment

As I opened my fridge one busy afternoon, the vibrant colors of sweet potatoes and pomegranate seeds called out to me, promising warmth and comfort. I was hungry for something fresh and satisfying, but also healthy—and that’s how my Warm Sweet Potato White Bean Salad was born. The creamy, protein-packed white beans paired with the crispy quinoa create a delightful texture, while the sweet and spicy harissa dressing elevates each bite.

This salad has quickly become my go-to dish on nights when I crave something hearty yet light, especially as the seasons change and we welcome a fall flair. With its beautiful presentation and flavors that dance on your palate, it’s a recipe that impresses at potlucks, yet is easy enough for a weeknight dinner. Ready to transform your meals and reignite your passion for homemade cuisine? Join me in making this vibrant salad, and rediscover the joy of cooking at home!

Why You'll Love This Warm Sweet Potato White Bean Salad

  • This warm salad is incredibly easy to prepare, making it perfect for a quick weeknight dinner.
  • You will love the harmonious blend of flavors from the sweet potatoes, white beans, and zesty dressing that truly elevate this dish.
  • Its versatility allows you to serve it as a main course or a side dish, catering to various occasions.
  • The vibrant colors and textures not only make it visually appealing but also attract even the pickiest eaters to come back for seconds.

Warm Sweet Potato White Bean Salad Ingredients

For the Salad
• Sweet potato – cubed for a naturally sweet and nutritious base.
• Cooked quinoa – use this protein-rich grain to add texture and heartiness.
• Oil – use your favorite oil for sautéing, enhancing the flavors.
• Paprika – adds a smoky depth to the salad.
• Salt – always adjust to taste for the perfect seasoning.
• Garlic powder – for a touch of aromatic flavor that complements the sweet potatoes.
• Olive oil – this healthy fat brings richness to the dressing.
• Lemon juice – fresh juice brightens up the dish with acidity.
• Cumin – adds warmth and an earthy undertone.
• Harissa paste – a spicy twist that elevates the flavors of the salad.
• Maple syrup – a hint of sweetness that balances the spices.

For the Garnish
• Mint – finely chopped, it adds a refreshing burst to each bite.
• Feta – crumbled for a creamy, salty finish.
• White beans – canned and drained, packed with protein and fiber.
• Pomegranate seeds – for a pop of color and a sweet-tart crunch, making this a delightful Warm Sweet Potato White Bean Salad.

Feel free to customize these ingredients based on your preferences; this salad is all about celebrating flavors and creativity in your kitchen!

How to Make Warm Sweet Potato White Bean Salad

  1. Cook the quinoa: Start by preparing your quinoa according to package instructions. This usually involves rinsing it first, then simmering it in water until fluffy—about 15 minutes.

  2. Sauté the sweet potatoes: In a large pan, heat the oil over medium heat. Add the cubed sweet potato and sauté until tender, which should take around 10-12 minutes. You want them just soft enough to mash with a fork.

  3. Prepare the dressing: In a bowl, whisk together the paprika, salt, garlic powder, olive oil, lemon juice, cumin, harissa paste, and maple syrup. This sweet and spicy dressing brings the salad to life!

  4. Combine the salad ingredients: In a large mixing bowl, combine the cooked quinoa, sautéed sweet potatoes, white beans, mint, pomegranate seeds, and feta. It’ll be colorful and full of textures!

  5. Dress the salad: Drizzle the prepared dressing over your salad mixture. Gently toss everything together until it’s well combined, ensuring each bite is flavorful.

  6. Season to taste: Finally, season with additional salt and black pepper as desired. Taste and adjust the seasoning to make it perfectly suited for your palate.

Optional: Garnish with extra mint leaves for a refreshing touch.
Exact quantities are listed in the recipe card below.

How to Store and Freeze Warm Sweet Potato White Bean Salad

Fridge: Store leftover Warm Sweet Potato White Bean Salad in an airtight container for up to 3 days. The flavors intensify as it sits!

Freezer: While this salad is best enjoyed fresh, you can freeze individual portions in airtight containers for up to 2 months. Just be aware that the texture may change slightly after thawing.

Reheating: Thaw in the fridge overnight before reheating if desired. Gently warm in the microwave, stirring occasionally, until heated through. Enjoy the warm, comforting flavors once again!

Warm Sweet Potato White Bean Salad Variations

Feel free to let your culinary creativity shine by customizing this delightful salad—discover new textures and flavors!

  • Vegan: Omit the feta and replace it with avocado or a dollop of vegan cream cheese for a creamy finish.
  • Spicy Twist: Increase the amount of harissa paste or add a pinch of cayenne pepper to elevate the heat level.
  • Nutty Crunch: Toss in some chopped walnuts or toasted pine nuts for added crunch and a depth of flavor.
  • Herb Fusion: Experiment with fresh herbs like cilantro or parsley instead of mint for a unique twist on flavor.

Try adding a handful of arugula or spinach for an extra layer of freshness! The greens complement the sweetness while packing nutrients.

  • Dried Fruits: Mix in some dried cranberries or apricots for a sweet contrast that balances the savory flavors beautifully.
  • Citrusy Refresh: For a zesty kick, incorporate orange or lime juice into the dressing instead of lemon juice—this brightens each bite.

Each variation invites you to stir in your favorite ingredients and create a new tradition with this salad. Enjoy experimenting with it and let your taste buds lead the way!

What to Serve with Warm Sweet Potato White Bean Salad?

Creating a delicious meal is all about the perfect pairings that enhance your experience and ignite your senses.

  • Creamy Avocado Toast: The buttery richness of ripe avocado adds a smooth contrast to the salad’s textures. Top with a sprinkle of chili flakes for a little extra zing!

  • Roasted Brussels Sprouts: Crispy Brussels sprouts bring a satisfying crunch and earthy flavor, pulling the dining experience together beautifully. Their slight bitterness complements the sweetness of the sweet potato.

  • Crispy Chickpeas: Adding these protein-packed nuggets not only gives a delightful crunch but also layers in savory notes that pair well with the fresh pomegranate and feta.

  • Herbed Couscous: Light and fluffy couscous infused with fresh herbs offers a delicate balance, enhancing the flavors while absorbing the zesty salad dressing beautifully. It’s a wonderful way to make the meal more filling.

  • Lemon Garlic Hummus: This smooth, creamy dip highlights the tangy notes in your salad and encourages an engaging appetizer with warm pita or crunchy vegetables. It’s truly a complement to your warm salad.

  • Sparkling Water with Mint and Lime: Stay refreshingly hydrated with a fizzy drink. The mint enhances the salad’s fresh flavors, while the lime adds a sprightly kick, making every bite even more enjoyable.

  • Chocolate-Covered Strawberries: For dessert, indulge in these sweet bites that are rich and satisfying after the savory salad. Their luscious sweetness and slight tartness create a lovely finish to the meal.

  • Cheese Platter with Crackers: A simple cheese board featuring mild cheeses alongside crunchy crackers is perfect for nibbling between bites of salad. It adds variety and caters to any palate.

Mix and match these delightful sides for a colorful and satisfying meal that brings friends and family together!

Make Ahead Options

These Warm Sweet Potato White Bean Salad components are fantastic for meal prep enthusiasts! You can roast the sweet potatoes and cook the quinoa up to 3 days in advance, allowing the flavors to meld beautifully. Simply refrigerate them separately in airtight containers to maintain their quality; this prevents the sweet potatoes from getting mushy. The dressing can also be mixed ahead of time and stored in the fridge for up to 24 hours. When you’re ready to serve, combine everything in a large bowl, drizzle the dressing over, and toss gently. This way, you can enjoy a satisfying, homemade salad with minimal effort on busier days!

Chef's Helpful Tips

  • When making the Warm Sweet Potato White Bean Salad, be sure to cut the sweet potatoes into uniform cubes for even cooking.
  • It’s also beneficial to rinse the quinoa before cooking to remove any bitterness and enhance its flavor.
  • When sautéing the sweet potatoes, don’t overcrowd the pan, as this can cause them to steam instead of brown, resulting in a less appealing texture.
  • Lastly, allow the dressing to sit for a few minutes before adding it to the salad to let the flavors meld together more effectively.

Warm Sweet Potato White Bean Salad Recipe FAQs

How do I choose the right sweet potatoes?
Absolutely! Look for sweet potatoes that are firm and free of dark spots or wrinkles. The skin should be smooth, and they should feel heavy for their size. Avoid any that show signs of sprouting or have soft patches.

How should I store leftovers of the Warm Sweet Potato White Bean Salad?
Very easy! Store leftover salad in an airtight container in the fridge for up to 3 days. Keep in mind that the flavors deepen and develop over time, making it even tastier!

Can I freeze the Warm Sweet Potato White Bean Salad?
While I recommend enjoying it fresh, you can freeze individual portions in airtight containers for up to 2 months if needed. To freeze, simply let the salad cool completely before portioning it out. When you’re ready to eat, thaw it in the fridge overnight and reheat gently in a microwave, stirring occasionally for even warming.

What should I do if my sweet potatoes aren’t cooking evenly?
No worries—this can happen! If your sweet potatoes are browning too quickly while the inside remains hard, try cutting them into smaller cubes for more uniform cooking. Additionally, ensure that your pan isn’t overcrowded, as this can trap steam and hinder browning. Give them a good stir every few minutes to ensure even cooking.

Are there any dietary considerations when making this salad?
Great question! The Warm Sweet Potato White Bean Salad is vegetarian and can easily be made vegan by omitting the feta. If you’re serving it to someone with specific allergies, check their sensitivities to the ingredients—like beans or any nuts used in variations. For a gluten-free option, ensure that the quinoa is certified gluten-free, which is often the case!

How can I change the flavors of the salad dressing?
Absolutely! If you want to adjust the flavors, consider adding a pinch of cayenne pepper for more heat or a bit of honey instead of maple syrup for a different sweetness profile. You could also incorporate fresh herbs like basil or cilantro instead of mint for a fresh twist!

Warm Sweet Potato White Bean Salad

Warm Sweet Potato White Bean Salad

A comforting and healthy Warm Sweet Potato White Bean Salad featuring creamy white beans, quinoa, and a spicy harissa dressing.
Print Recipe Pin Recipe
Prep Time 15 minutes mins
Cook Time 15 minutes mins
Total Time 30 minutes mins
Servings: 4 servings
Course: LUNCH RECIPES
Cuisine: American
Calories: 350
Ingredients Equipment Method Nutrition Notes

Ingredients
  

For the Salad
  • 1 large sweet potato cubed
  • 1 cup cooked quinoa
  • 2 tablespoons oil for sautéing
  • 1 teaspoon paprika
  • to taste salt
  • 1 teaspoon garlic powder
  • 2 tablespoons olive oil for dressing
  • 1 tablespoon lemon juice fresh
  • 1 teaspoon cumin
  • 2 tablespoons harissa paste
  • 1 tablespoon maple syrup
For the Garnish
  • 2 tablespoons mint finely chopped
  • 1/2 cup feta crumbled
  • 1 can white beans canned and drained
  • 1/2 cup pomegranate seeds

Equipment

  • large pan
  • Mixing bowl

Method
 

Directions
  1. Cook the quinoa according to package instructions, about 15 minutes.
  2. In a large pan, heat the oil over medium heat and sauté the sweet potato for 10-12 minutes until tender.
  3. Whisk together the paprika, salt, garlic powder, olive oil, lemon juice, cumin, harissa paste, and maple syrup in a bowl to prepare the dressing.
  4. In a mixing bowl, combine the cooked quinoa, sautéed sweet potatoes, white beans, mint, pomegranate seeds, and feta.
  5. Drizzle the dressing over the salad mixture and toss until well combined.
  6. Adjust seasoning with additional salt and black pepper to taste.

Nutrition

Serving: 1servingCalories: 350kcalCarbohydrates: 55gProtein: 12gFat: 12gSaturated Fat: 3gPolyunsaturated Fat: 2gMonounsaturated Fat: 7gCholesterol: 10mgSodium: 400mgPotassium: 600mgFiber: 10gSugar: 5gVitamin A: 15000IUVitamin C: 20mgCalcium: 150mgIron: 3mg

Notes

For an extra refreshing touch, garnish with additional mint leaves.

Tried this recipe?

Let us know how it was!

Filed Under: LUNCH RECIPES

Harvest Bowl Salad with Apple Cider Vinaigrette

January 3, 2026 by JudyWhite Leave a Comment

After a whirlwind week of takeout and quick fixes, I found myself yearning for something wholesome—something with color, crunch, and a burst of flavors. That’s when the idea for this Harvest Bowl Salad with Apple Cider Vinaigrette came to life. Picture vibrant sweet potatoes roasted to perfection, mingling with the crispy bite of curly kale, and topped off with tangy goat cheese and crunchy toasted pecans.

This salad is a delightful reminder that wholesome food doesn’t have to be a tedious affair. The blend of savory and sweet, with that zesty homemade dressing giving it a beautiful finish, makes every bite a celebration of autumn’s best ingredients. Plus, it’s quick to whip up—perfect for busy weeknights or to impress guests at your next gathering! Let’s dive into how to create this colorful masterpiece that not only fills your stomach but also warms your soul.

Why You'll Love This Harvest Bowl Salad with Apple Cider Vinaigrette

  • This Harvest Bowl Salad with Apple Cider Vinaigrette is incredibly easy to make, allowing you to enjoy a nutritious meal without spending too much time in the kitchen.
  • The combination of roasted sweet potatoes, crispy kale, and tangy goat cheese creates a flavor explosion that will keep your taste buds dancing.
  • This recipe is versatile enough to serve as a main dish or a crowd-pleasing side, making it perfect for any occasion.
  • The vibrant colors and beautiful presentation of the salad make it a visually appealing dish that you’ll be proud to share with family and friends.

Harvest Bowl Salad Ingredients

Get ready to create a delightful Harvest Bowl Salad with Apple Cider Vinaigrette!

For the Salad
• Sweet Potatoes – packed with nutrients, they add natural sweetness and color when roasted.
• Thyme – adds a fragrant herbal note that complements the earthy flavors beautifully.
• Curly Kale – offers a hearty texture and vibrant color, making it a nutritional powerhouse.
• Red Onion – provides a sharp contrast with its crunchy texture and zesty flavor.
• Apple – use a Pink Lady or Gala for a sweet crunch that brightens every bite.
• Toasted Pecans – add a pleasing crunch and a toasty flavor that brings warmth to the dish.
• Goat Cheese – delivers a creamy tang that balances the salad’s sweet and savory elements.
• Garlic – a small amount adds aromatic depth to the overall flavor profile.

For the Apple Cider Vinaigrette
• Lemon Juice – a splash of acidity that enlivens the vinaigrette and enhances the salad.
• Apple Cider Vinegar – the star of the dressing, giving it that signature tangy flavor.
• Mustard – a teaspoon adds a zesty kick and helps emulsify the vinaigrette.
• Honey – a touch of sweetness that harmonizes with the vinegar for balance.
• Pepper – a sprinkle adds warmth and enhances the dish’s flavor complexity.
• Olive Oil – use a good quality oil for a light and rich base in your vinaigrette.
• Extra-Virgin Olive Oil – it provides an additional layer of flavor that elevates the dressing.
• Cloves – use sparingly; they contribute a warm spice note that’s subtly enchanting.
• Sea Salt and Kosher Salt – essential for enhancing all the flavors in both the salad and the vinaigrette.
• Black Pepper – freshly ground provides a bit of punch, tying it all together.

Enjoy creating this wholesome Harvest Bowl Salad with Apple Cider Vinaigrette that nourishes both body and spirit!

How to Make Harvest Bowl Salad with Apple Cider Vinaigrette

  1. Preheat the Oven: Start by setting your oven to 400°F (200°C). This prepares the perfect environment for roasting those sweet potatoes until they’re tender and delicious.

  2. Roast Sweet Potatoes: Toss the cubed sweet potatoes with olive oil, sea salt, and black pepper. Spread them on a baking sheet and roast for about 20 minutes, or until they are golden brown and tender.

  3. Combine Salad Ingredients: In a large bowl, mix the curly kale, chopped red onion, cubed apple, toasted pecans, crumbled goat cheese, and minced garlic. This colorful blend will add crunch and flavor to your Harvest Bowl Salad.

  4. Make the Vinaigrette: In a separate bowl, whisk together the lemon juice, apple cider vinegar, mustard, honey, pepper, extra-virgin olive oil, cloves, and Kosher salt. This simple dressing will lift the entire dish with its tangy sweetness.

  5. Assemble the Salad: Once the sweet potatoes are roasted, add them to the salad mixture. Drizzle the homemade vinaigrette over everything and toss gently to combine, ensuring each bite is flavorful.

  6. Serve Immediately: For the best texture and flavor, serve your Harvest Bowl Salad right away. Enjoy the vibrant colors and delicious crunch!

Optional: Top with additional goat cheese for an extra creamy finish.

Exact quantities are listed in the recipe card below.

Make Ahead Options

These Harvest Bowl Salads with Apple Cider Vinaigrette are ideal for meal prep enthusiasts looking to save time during busy weekdays! You can roast the sweet potatoes up to 24 hours in advance; just allow them to cool before storing in an airtight container in the refrigerator to maintain their tenderness. Additionally, you can chop the kale, red onion, and apple a day before serving, keeping them fresh by storing them separately and refrigerating. As for the vinaigrette, it can be prepared up to 3 days ahead—simply whisk all the ingredients together and keep it airtight in the fridge. When ready to enjoy, combine the components with the roasted sweet potatoes, toss with the dressing, and savor a refreshing, quick meal that’s just as delicious as when freshly made!

Storage Tips for Harvest Bowl Salad with Apple Cider Vinaigrette

Fridge: Store any leftover Harvest Bowl Salad in an airtight container for up to 3 days. This keeps the ingredients fresh while maintaining their vibrant colors.

Roasted Sweet Potatoes: Separate roasted sweet potatoes from the salad if possible. They can last in the fridge for up to 4 days, reheated in the oven for a crispy texture.

Freezer: While freezing the assembled salad isn’t recommended due to the texture changes, you can freeze the roasted sweet potatoes for up to 3 months. Just let them cool completely before sealing in a freezer bag.

Reheating: For the best results, reheat sweet potatoes in the oven at 375°F (190°C) for about 10-15 minutes, then toss them with the fresh salad ingredients for a delightful meal.

Harvest Bowl Salad Variations

Feel free to personalize your Harvest Bowl Salad and make it uniquely yours with these simple twists!

  • Vegan: Replace goat cheese with creamy avocado or a handful of nutritional yeast for a deliciously cheesy flavor without dairy.
  • Gluten-Free: Ensure all ingredients, especially the mustard and vinaigrette, are gluten-free certified to enjoy a worry-free meal.
  • Nuts-Free: Swap pecans for sunflower seeds or pumpkin seeds to maintain a satisfying crunch without the allergens.
  • Add Protein: For an extra protein boost, toss in some chickpeas or grilled chicken, making this salad even more filling.
  • Spicy Kick: Add a sprinkle of red pepper flakes or diced jalapeños for a spicy flavor punch that liven up the dish!
  • Fruit Twist: Experiment with seasonal fruit, like cranberries or pears, to bring sweet, juicy bursts alongside the savory elements.
  • Extra Herbs: Up the flavor by introducing fresh herbs like cilantro or parsley, boosting freshness and fragrant notes beautifully.
  • Sweet Potato Alternatives: Substitute sweet potatoes with roasted butternut squash or beetroot for a delightful twist on texture and flavor.

What to Serve with Harvest Bowl Salad with Apple Cider Vinaigrette?

The perfect accompaniment can elevate your wholesome meal into a delightful feast.

  • Quinoa Pilaf: This fluffy grain complements the salad’s textures, adding a nutty flavor to each bite.
  • Grilled Chicken Thighs: Juicy and savory, they bring a satisfying heartiness that meshes beautifully with the salad’s brightness.
  • Maple-Roasted Brussels Sprouts: Their sweet and savory profile enhances the dish’s autumn essence, making every forkful rich and inviting.
  • Cranberry Sauerkraut: This zesty side adds a playful acidity that harmonizes with the earthy flavors of the salad, balancing the sweetness beautifully.
  • Feta Stuffed Peppers: These offer a creamy, tangy contrast that makes the meal feel gourmet, adding a burst of flavor in every bite.
  • Sparkling Apple Cider: A refreshing drink choice that echoes the salad’s apple cider vinaigrette while providing a festive fizzy touch.
  • Pear & Walnut Tart: For dessert, this adds a sweet yet sophisticated end to your meal, echoing the salad’s combination of flavors.
  • Roasted Beet Hummus with Pita Chips: Creamy and colorful, this dip provides a delightful mix of flavors and textures, perfect for a light appetizer before the salad.

Chef's Helpful Tips

  • When preparing your Harvest Bowl Salad with Apple Cider Vinaigrette, ensure you cut the sweet potatoes into uniform pieces for even roasting and quicker cooking.
  • Remember to let the roasted sweet potatoes cool slightly before adding them to the salad to maintain the freshness of the greens.
  • For a well-balanced dressing, whisk the vinaigrette ingredients vigorously to fully combine the flavors, and taste it before serving to adjust seasoning if necessary.
  • Lastly, serve the salad immediately for the best texture, as wilted greens can detract from the overall dish.

Harvest Bowl Salad with Apple Cider Vinaigrette Recipe FAQs

How do I choose ripe sweet potatoes?
Absolutely! When selecting sweet potatoes, look for ones that are firm with smooth skin, avoiding any with dark spots or blemishes. A good sweet potato should feel heavy for its size; anything too light may be dried out.

How long can I store leftovers?
You can store your leftover Harvest Bowl Salad in an airtight container in the fridge for up to 3 days. However, it’s best to keep the roasted sweet potatoes and salad greens separate until you’re ready to eat to maintain texture and freshness.

Can I freeze the roasted sweet potatoes?
Very! To freeze your roasted sweet potatoes, allow them to cool completely first. Then, transfer them to a freezer-safe bag, remove as much air as possible, and seal. They can last in the freezer for up to 3 months. When you’re ready to enjoy them again, simply reheat in the oven at 375°F (190°C) for about 10-15 minutes.

What if my dressing is too tangy?
If you find that your vinaigrette has a stronger tang than you prefer, you can balance it out by whisking in a bit more honey or olive oil. Start with an additional tablespoon of honey for sweetness, or gradually add more olive oil for a smoother flavor. Taste it as you go along to reach your desired balance.

Is this salad safe for pets?
It’s generally best to avoid sharing this Harvest Bowl Salad with pets. While the sweet potatoes and apple are safe in moderation, ingredients like garlic and onion can be harmful to dogs and cats. Always check with your vet if you’re uncertain!

How can I adjust this recipe for dietary restrictions?
If you’re looking to modify your Harvest Bowl Salad, consider substituting the goat cheese with a dairy-free alternative for a vegan option. Likewise, if you’re nut-free, you can swap toasted pecans with pumpkin seeds for a crunchy finish without the allergens. Enjoy exploring the possibilities!

Harvest Bowl Salad with Apple Cider Vinaigrette

Harvest Bowl Salad with Apple Cider Vinaigrette

This Harvest Bowl Salad with Apple Cider Vinaigrette is a colorful, nutritious dish featuring roasted sweet potatoes, crispy kale, goat cheese, and a zesty vinaigrette.
Print Recipe Pin Recipe
Prep Time 15 minutes mins
Cook Time 20 minutes mins
Total Time 35 minutes mins
Servings: 4 servings
Course: LUNCH RECIPES
Cuisine: American
Calories: 400
Ingredients Equipment Method Nutrition Notes

Ingredients
  

For the Salad
  • 2 cups Sweet Potatoes cubed
  • 1 teaspoon Thyme
  • 4 cups Curly Kale chopped
  • 1 cup Red Onion chopped
  • 1 medium Apple cubed (Pink Lady or Gala)
  • 1 cup Toasted Pecans
  • 4 ounces Goat Cheese crumbled
  • 1 clove Garlic minced
For the Apple Cider Vinaigrette
  • 2 tablespoons Lemon Juice
  • 1/4 cup Apple Cider Vinegar
  • 1 teaspoon Mustard
  • 1 tablespoon Honey
  • 1 pinch Pepper
  • 1/4 cup Olive Oil good quality
  • 2 tablespoons Extra-Virgin Olive Oil
  • 1 pinch Cloves use sparingly
  • 1/2 teaspoon Sea Salt
  • 1/2 teaspoon Kosher Salt
  • 1 pinch Black Pepper freshly ground

Equipment

  • Oven
  • Baking sheet
  • Large Bowl
  • Whisk

Method
 

Preparation
  1. Preheat the Oven: Start by setting your oven to 400°F (200°C).
  2. Roast Sweet Potatoes: Toss the cubed sweet potatoes with olive oil, sea salt, and black pepper. Spread them on a baking sheet and roast for about 20 minutes, or until they are golden brown and tender.
  3. Combine Salad Ingredients: In a large bowl, mix the curly kale, chopped red onion, cubed apple, toasted pecans, crumbled goat cheese, and minced garlic.
  4. Make the Vinaigrette: In a separate bowl, whisk together the lemon juice, apple cider vinegar, mustard, honey, pepper, extra-virgin olive oil, cloves, and Kosher salt.
  5. Assemble the Salad: Once the sweet potatoes are roasted, add them to the salad mixture. Drizzle the homemade vinaigrette over everything and toss gently to combine.
  6. Serve Immediately: For the best texture and flavor, serve your Harvest Bowl Salad right away.

Nutrition

Serving: 1servingCalories: 400kcalCarbohydrates: 35gProtein: 10gFat: 25gSaturated Fat: 6gPolyunsaturated Fat: 5gMonounsaturated Fat: 12gCholesterol: 15mgSodium: 300mgPotassium: 600mgFiber: 6gSugar: 8gVitamin A: 200IUVitamin C: 30mgCalcium: 80mgIron: 2mg

Notes

Optional: Top with additional goat cheese for an extra creamy finish.

Tried this recipe?

Let us know how it was!

Filed Under: LUNCH RECIPES

Southern Peach Cobbler Pound Cake

January 3, 2026 by JudyWhite Leave a Comment

There’s nothing quite like the sweet, sun-kissed essence of summer captured in a slice of Southern Peach Cobbler Pound Cake. Picture this: a warm kitchen, the scent of ripe peaches mingling with the comforting aroma of cinnamon and cream cheese as this delightful cake bakes in the oven. It’s a scene that promises joy, nostalgia, and the kind of dessert that beckons friends and family to gather around the table.

I stumbled upon this recipe after a casual stroll through the local farmer’s market, where fresh peaches practically begged to be taken home. This cake marries the velvety richness of pound cake with the delightful and fruity notes of traditional peach cobbler. It’s simple enough for a weeknight treat yet impressive enough to be the star of any gathering.

Whether you’re looking to impress at a potluck or simply craving a slice of homemade comfort, this Southern Peach Cobbler Pound Cake with Cream Cheese delivers flavor and heart in every bite. Get ready to embrace the warmth of Southern baking—it’s time to roll up your sleeves and transform those fresh peaches into something spectacular!

Why You'll Love This Southern Peach Cobbler Pound Cake

  • This Southern Peach Cobbler Pound Cake is incredibly easy to make, requiring just a few simple steps for a delicious dessert.
  • The combination of cream cheese and fresh peaches creates a rich flavor that will have everyone asking for seconds.
  • Not only is this cake perfect for family gatherings, but it can also serve as a delightful treat for any occasion or potluck.
  • Its stunning presentation topped with a sweet vanilla glaze makes it visually appealing and perfect for impressing your guests.

Southern Peach Cobbler Pound Cake Ingredients

• You’ll need these delicious staples to create a comforting dessert.

For the Cake Batter

  • All-purpose flour – provides the backbone for your cake, giving it structure and stability.
  • Granulated sugar – sweetens the cake and helps create that delightful crust.
  • Salted butter (room temperature) – brings rich flavor and moisture; make sure it’s softened for easy blending.
  • Cream cheese (room temperature) – adds a decadent creaminess that elevates the overall taste.
  • Large eggs (room temperature) – bind all ingredients, contributing to a tender crumb.
  • Pure vanilla extract – enhances the flavor profile with its warm and aromatic notes.
  • Whole milk (room temperature) – helps to achieve a lighter, fluffier texture in the cake.
  • Cake flour – yields a tender, soft cake by reducing gluten formation.
  • Baking soda – provides lift during baking, ensuring a perfectly risen cake.
  • Ground cinnamon – infuses a warm, comforting spice that’s a nod to traditional cobblers.
  • Chopped peaches – not only adds sweetness but also gives the cake its signature fruity flavor.

For the Topping

  • Brown sugar (packed) – deepens the flavor while adding a hint of caramel sweetness.
  • Salted butter (melted) – combines beautifully with brown sugar for a rich topping.
  • Ground cinnamon – complements the fresh peaches, enhancing the cobbler experience.
  • Ground nutmeg – introduces a subtle warmth that elevates the dish’s flavor profile.

For the Glaze

  • Powdered sugar – adds sweetness and a smooth texture for the perfect finishing touch.
  • Milk – thins out the glaze for easy drizzling over the cake.
  • Pure vanilla extract – ties together the glaze with its delicious and fragrant notes.
  • Pinch salt – balances the sweetness, ensuring a harmonious flavor in every bite.

Embrace these essential ingredients to create your own Southern Peach Cobbler Pound Cake that will leave everyone craving more!

How to Make Southern Peach Cobbler Pound Cake

  1. Preheat your oven to 350°F and prepare a bundt pan or a 9×13 inch baking dish by greasing it gently. This step ensures your cake comes out easily and beautifully.

  2. Beat together the cream cheese and salted butter in a mixing bowl until the mixture is smooth and creamy. This will take about 2-3 minutes, ensuring it’s perfectly blended.

  3. Add granulated sugar gradually, continuing to beat until the mix becomes light and fluffy, about 3-5 minutes. This fluffiness is key to a moist cake.

  4. Incorporate the eggs one at a time, mixing well after each addition to ensure a homogenous batter. This helps the eggs fully emulsify for a rich texture.

  5. Stir in the vanilla extract and whole milk until everything is well combined. The mixture should be smooth and creamy at this point—your senses will love the aroma!

  6. Combine the cake flour, baking soda, ground cinnamon, and pinch of salt in a separate bowl. Whisk them together well to blend the dry ingredients evenly.

  7. Gradually add this dry mixture to the wet mixture, mixing until just combined. Avoid over-mixing to keep your cake tender and fluffy.

  8. Fold in the chopped peaches with a spatula gently. This step allows the peach pieces to disperse throughout the batter evenly, giving bursts of flavor.

  9. Pour the batter into the prepared baking pan and spread it evenly. This helps with an even rise and baking.

  10. Mix the brown sugar, melted butter, ground cinnamon, and ground nutmeg in a small bowl. Sprinkle this mixture generously over the top of the batter for a delightful caramelized crust.

  11. Bake in the preheated oven for about 75-90 minutes, or until a toothpick inserted comes out clean. Keep an eye on it—the aroma will be hard to resist!

  12. Cool the cake completely in the pan for about 15-20 minutes before transferring it to a wire rack. This will help maintain its structure while cooling.

  13. Frost the cooled cake with a glaze made from powdered sugar, milk, and vanilla extract for that finishing touch. Drizzle it on for a beautiful effect!

Optional: Top with extra chopped peaches or a sprinkle of cinnamon for an inviting presentation.

Exact quantities are listed in the recipe card below.

Southern Peach Cobbler Pound Cake Variations

Feel free to explore these tasty options to make the Southern Peach Cobbler Pound Cake even more unique and delightful!

  • Gluten-Free: Use a 1:1 gluten-free baking flour blend instead of all-purpose and cake flour for a deliciously gluten-free twist.
  • Peach-Free: Swap in chopped strawberries or blueberries for a berry bliss version, perfect for summer gatherings or a fresh dessert.
  • Nutty Crunch: Add ½ cup of finely chopped pecans or walnuts folded in with the peaches for an extra layer of texture and flavor.
  • Spicy Twist: Mix in 1 teaspoon of ground ginger or cardamom along with the cinnamon for a warming spiced cake that will surprise your taste buds.
  • Coconut-Lover’s: Incorporate 1 cup of shredded coconut to the batter for a tropical flair that pairs beautifully with the peaches. There’s something special about that coconut and peach combo!
  • Extra Sweet: For an added sweet touch, layer fresh peach slices and cinnamon sugar in between the batter layers before baking for fruity surprises.
  • Cream Cheese Frosting: Opt for a cream cheese frosting instead of a glaze—whip together cream cheese, butter, powdered sugar, and vanilla for a richer finish.
  • Savory Touch: Introduce a pinch of sea salt and a hint of rosemary or thyme for a savory contrast that complements the sweetness of the peaches.

Let your creativity lead the way as you transform this cake, making it your own special creation!

How to Store and Freeze Southern Peach Cobbler Pound Cake

Room Temperature: Store the cake in an airtight container at room temperature for up to 3 days to maintain freshness and flavor.

Fridge: If you want to keep the cake longer, refrigerate it in an airtight container for up to a week. This helps preserve the cream cheese frosting.

Freezer: Wrap slices of the Southern Peach Cobbler Pound Cake tightly in plastic wrap, then in aluminum foil. It can be frozen for up to 3 months.

Reheating: To enjoy a warm slice from the freezer, thaw overnight in the fridge, then microwave for 15-30 seconds or warm in the oven at 350°F for about 10 minutes.

What to Serve with Southern Peach Cobbler Pound Cake?

Creating a delightful meal around this luscious cake transforms dessert into a memorable dining experience.

  • Fresh Cream: A dollop of lightly whipped cream adds a luxurious touch that enhances the cake’s fruity flavor.

  • Vanilla Ice Cream: Serve warm slices with a scoop of vanilla ice cream for a classic pairing—think warm and cold sensations!

  • Cinnamon-Spiced Coffee: Pair this cake with a cup of coffee spiced with a hint of cinnamon for a deliciously cozy afternoon treat.

  • Peach Chutney: Elevate your dessert experience with a side of homemade peach chutney for a vibrant, tangy contrast.

  • Mixed Berry Salad: A light and refreshing mixed berry salad offers a burst of juicy freshness, balancing the cake’s richness perfectly.

  • Honeyed Yogurt: Drizzle some honey over Greek yogurt and serve it alongside the cake for a creamy, decadent complement.

  • Sweet Tea: Nothing screams Southern charm quite like a glass of sweet iced tea—it’s the perfect refreshing sip next to your cake.

  • Lemonade: A glass of tart lemonade cleanses the palate and adds a delightful citrus twist!

  • Chocolate Drizzle: For chocolate lovers, a light drizzle of chocolate sauce over the top can elevate each bite into a sweet, rich indulgence.

Indulge in these delightful pairings to create a full experience around the Southern Peach Cobbler Pound Cake, inviting warmth and joy to every gathering!

Make Ahead Options

These Southern Peach Cobbler Pound Cake are perfect for busy weeknights and can save you precious time! You can prepare the batter up to 24 hours in advance by mixing everything (excluding the chopped peaches), then refrigerate it in an airtight container. Just before baking, gently fold in the peaches to keep them fresh and vibrant. Alternatively, bake the cake and let it cool, then store it wrapped in plastic wrap for up to 3 days at room temperature or freeze for a month. When ready to enjoy, simply thaw and glaze the cake before serving. This way, you’ll have a delightful dessert ready with minimal effort, just as delicious as when freshly baked!

Chef's Helpful Tips

  • When making the Southern Peach Cobbler Pound Cake, ensure all your ingredients are at room temperature as this helps achieve a smooth batter and a potentially fluffier cake.
  • Avoid over-mixing the batter once you combine the dry and wet ingredients to keep the cake tender and light.
  • When folding in the chopped peaches, be gentle to maintain the integrity of the fruit pieces for better flavor distribution throughout the cake.
  • Lastly, keep an eye on the baking time; check for doneness around the 75-minute mark to prevent over-baking.

Southern Peach Cobbler Pound Cake Recipe FAQs

What type of peaches are best for this recipe?
Absolutely! For the best flavor, use ripe, sweet peaches that are slightly soft to the touch, which indicates they are juicy. Look for peaches with a warm, golden hue and a fragrant aroma—these are signs of peak ripeness.

How should I store leftover Southern Peach Cobbler Pound Cake?
You can store the cake in an airtight container at room temperature for up to 3 days. It remains delicious and fresh, but if you think you won’t finish it within that time, refrigerate it for up to a week to maximize the freshness of the cream cheese frosting.

Can I freeze Southern Peach Cobbler Pound Cake?
Very! To freeze, cut the cake into slices or keep it whole. Wrap each slice tightly in plastic wrap and then in aluminum foil. It can last in the freezer for up to 3 months. When you’re ready to enjoy, simply thaw in the fridge overnight, then warm it in the microwave for 15-30 seconds or bake at 350°F for about 10 minutes for that fresh-out-of-the-oven taste.

What should I do if my cake sinks in the middle?
Oh no! A sunken cake can happen for a few reasons. It’s usually due to overmixing, which leads to excess air causing the cake to rise too quickly and then fall. Make sure to fold in your dry ingredients gently and avoid overbeating. Additionally, check your oven temperature with a thermometer; it should be around 350°F for proper baking.

Is this cake suitable for those with dairy allergies?
Not exactly. This Southern Peach Cobbler Pound Cake contains cream cheese and butter, making it unsuitable for someone with dairy allergies. However, you can substitute dairy-free cream cheese and margarine in equal amounts to make it more allergy-friendly. Just keep in mind that the flavor and texture may vary slightly!

How can I enhance the flavor of the cake?
Definitely! You can add a splash of bourbon or almond extract for extra depth. Adding a bit of finely grated lemon or orange zest can also elevate the flavor profile, providing a delightful citrusy brightness that complements the peaches beautifully. Enjoy the creative process!

Southern Peach Cobbler Pound Cake

Southern Peach Cobbler Pound Cake

A delightful Southern Peach Cobbler Pound Cake that combines rich flavors of cream cheese and fresh peaches, perfect for gatherings.
Print Recipe Pin Recipe
Prep Time 20 minutes mins
Cook Time 1 hour hr 30 minutes mins
Cooling Time 20 minutes mins
Total Time 2 hours hrs 10 minutes mins
Servings: 12 slices
Course: DESSERT RECIPES
Cuisine: Southern
Calories: 350
Ingredients Equipment Method Nutrition Notes

Ingredients
  

For the Cake Batter
  • 2 cups All-purpose flour
  • 2 cups Granulated sugar
  • 1 cup Salted butter (room temperature)
  • 8 oz Cream cheese (room temperature)
  • 4 large Eggs (room temperature)
  • 1 tsp Pure vanilla extract
  • 1 cup Whole milk (room temperature)
  • 1 cup Cake flour
  • 1 tsp Baking soda
  • 1 tsp Ground cinnamon
  • 2 cups Chopped peaches
For the Topping
  • 1 cup Brown sugar (packed)
  • 1/2 cup Salted butter (melted)
  • 1 tsp Ground cinnamon
  • 1/4 tsp Ground nutmeg
For the Glaze
  • 1 cup Powdered sugar
  • 2 tbsp Milk
  • 1 tsp Pure vanilla extract
  • a pinch Salt

Equipment

  • Bundt pan
  • Mixing bowl
  • Whisk
  • Spatula
  • Oven

Method
 

Preparation
  1. Preheat your oven to 350°F and prepare a bundt pan or a 9x13 inch baking dish by greasing it gently.
  2. Beat together the cream cheese and salted butter in a mixing bowl until smooth and creamy.
  3. Add the granulated sugar gradually, continuing to beat until light and fluffy.
  4. Incorporate the eggs one at a time, mixing well after each addition.
  5. Stir in the vanilla extract and whole milk until well combined.
  6. Combine the cake flour, baking soda, ground cinnamon, and pinch of salt in a separate bowl.
  7. Gradually add the dry mixture to the wet mixture, mixing until just combined.
  8. Fold in the chopped peaches gently.
  9. Pour the batter into the prepared baking pan and spread it evenly.
  10. Mix the brown sugar, melted butter, ground cinnamon, and ground nutmeg in a small bowl.
  11. Sprinkle the mixture generously over the top of the batter.
  12. Bake in the preheated oven for about 75-90 minutes, or until a toothpick comes out clean.
  13. Cool the cake completely in the pan for about 15-20 minutes before transferring it to a wire rack.
  14. Frost the cooled cake with a glaze made from powdered sugar, milk, and vanilla extract.

Nutrition

Serving: 1sliceCalories: 350kcalCarbohydrates: 50gProtein: 4gFat: 16gSaturated Fat: 10gPolyunsaturated Fat: 1gMonounsaturated Fat: 5gCholesterol: 60mgSodium: 200mgPotassium: 200mgFiber: 1gSugar: 35gVitamin A: 500IUVitamin C: 5mgCalcium: 50mgIron: 1mg

Notes

Ensure all ingredients are at room temperature for best results. Avoid over-mixing to maintain tenderness.

Tried this recipe?

Let us know how it was!

Filed Under: BREAKFAST & BRUNCH

Winter Farro and Kale Salad

January 2, 2026 by JudyWhite Leave a Comment

When winter’s chill sets in and fresh produce seems scarce, it’s time to celebrate the hearty, nutritious ingredients that keep us nourished and warm. I discovered the vibrant, satisfying Winter Farro and Kale Salad on a particularly blustery evening when I craved something that was both nourishing and delicious. This bowl of goodness combines nutty farro and robust kale with bright pomegranate seeds, adding a pop of color that lifts the spirit on gray days.

With the comforting crunch of roasted broccoli and the rich flavor of chickpeas, this salad is a hearty meal in itself or a side dish that will impress any guest at your dinner table. Plus, it’s simple to make, taking just 40 minutes from prep to plate! Whether you’re trying to reclaim your kitchen from fast food habits or simply looking to add a nutritious twist to your weeknight meals, this recipe is a must-try. So, let’s gather our ingredients and dive into a salad that’s not just food, but a delightful celebration of winter’s bounty!

Why You'll Love This Winter Farro and Kale Salad

  • This Winter Farro and Kale Salad is not only easy to prepare but also comes together in just 40 minutes, making it perfect for busy weeknights.
  • Bursting with flavor from the combination of spices and fresh ingredients, every bite offers a delightful experience for your taste buds.
  • Its versatility allows you to enjoy it as a main dish or a side, accommodating any meal or occasion.
  • The visual appeal of vibrant greens and pops of pomegranate will impress your family and friends, making it a stunning centerpiece on your dinner table.

Winter Farro and Kale Salad Ingredients

For the Salad

  • Dry farro – a hearty grain that provides a nutty flavor and chewy texture for the salad.
  • Broccoli – rich in vitamins, it adds a satisfying crunch and beautiful color.
  • Red onion – brings a mild sweetness that complements the other flavors.
  • Avocado oil – a healthy fat option that adds richness without overpowering the dish.

For the Seasoning

  • Ground cumin – adds an earthy warmth that enhances the overall flavor profile.
  • Ground coriander – offers a citrusy note, balancing the salad beautifully.
  • Smoked paprika – infuses a subtle smokiness, elevating the dish to another level.
  • Dry basil – a hint of sweetness and depth that ties the flavors together.
  • Dry thyme – adds an aromatic touch that sings of winter.

For the Greens and Toppings

  • Kale – packed with nutrients, it serves as the hearty base of the salad.
  • Pomegranate seeds – provides bursts of sweetness and vibrant color.
  • Pepitas – these pumpkin seeds add a delightful crunch and nutty flavor.
  • Chickpeas – a source of plant-based protein, making the salad filling.

For the Dressing

  • Garlic – crushes easily and adds a pungent flavor that brightens the salad.
  • Extra virgin olive oil – complements the other ingredients with its fruity richness.
  • Dijon mustard – adds a tangy kick that brings depth to the dressing.
  • Lemon juice and zest – brightens up the dish with a refreshing citrus flavor.
  • Maple syrup – adds a touch of sweetness that balances the acidity.
  • Red pepper flakes (optional) – for those who like a little heat and zest.
  • Dry oregano – adds a hint of Mediterranean flavor that complements the salad.

Season with salt and pepper to taste, and you have a nutritious and delicious Winter Farro and Kale Salad ready to warm you up!

How to Make Winter Farro and Kale Salad

  1. Cook the farro according to package instructions, which usually takes about 20 minutes. Once it’s tender and chewy, drain the excess water and set it aside to cool slightly.

  2. Sauté broccoli and red onion in a large pot with avocado oil over medium heat. Cook for about 5-7 minutes, stirring frequently, until they are tender and vibrant in color.

  3. Add ground cumin, coriander, paprika, basil, and thyme to the pot, stirring continuously for another minute until the spices are fragrant and well combined.

  4. Combine the cooked farro, kale, pomegranate seeds, pepitas, and chickpeas into the pot, mixing gently until the kale is wilted but still bright green.

  5. Whisk together garlic, olive oil, Dijon mustard, lemon juice and zest, maple syrup, red pepper flakes (if using), oregano, salt, and pepper in a separate bowl. This dressing will bring all the flavors together beautifully.

  6. Pour the dressing over the salad mixture and toss well to combine. Make sure everything is coated evenly, and adjust seasoning if needed before serving.

Optional: Garnish with additional pomegranate seeds for a pop of color.

Exact quantities are listed in the recipe card below.

Make Ahead Options

These Winter Farro and Kale Salad make-ahead options are a lifesaver for those busy days when time is tight! You can cook the farro and sauté the broccoli and red onion up to 3 days in advance, storing them separately in airtight containers in the refrigerator. To maintain the salad’s vibrant quality, chop the kale and store it covered, but toss the pomegranate seeds, pepitas, and chickpeas in just before serving to keep their crunch. When you’re ready to enjoy the salad, simply combine everything in a bowl, whisk together the dressing, and drizzle it over the salad mixture for a delightful meal that tastes just as fresh and wholesome as if it were made that day!

What to Serve with Winter Farro and Kale Salad?

Add a touch of warmth and delight to your dinner table with these wonderful pairings that celebrate winter’s flavors.

  • Roasted Sweet Potatoes: Their natural sweetness and creamy texture perfectly balance the spices in the salad, making for a comforting duo.

  • Herbed Quinoa: Light and fluffy, quinoa adds a nutty flavor that enhances the hearty farro while providing a delightful contrast in texture.

  • Garlic Breadsticks: Crunchy on the outside and soft inside, these breadsticks provide a satisfying crunch, perfect for scooping up the salad.

  • Lemon Herb Grilled Chicken: Juicy chicken infused with fresh lemon and herbs complements the dish nicely, adding a protein boost without overpowering the salad.

  • Crispy Polenta Fries: The savory crunch of polenta fries contrasts beautifully with the tender greens, turning your meal into a delightful feast.

  • Warm Spiced Apple Cider: This cozy beverage, infused with cinnamon and nutmeg, adds a fragrant touch that enhances the flavors of your winter spread.

  • Chocolate Avocado Mousse: For dessert, this creamy, rich treat rounds out the meal while offering a healthy indulgence, making sure your dinner ends on a high note.

Feel free to mix and match these side dishes to create a complete winter meal that will warm your heart and satisfy your appetite!

How to Store and Freeze Winter Farro and Kale Salad

Fridge: Store leftover Winter Farro and Kale Salad in an airtight container in the fridge for up to 3 days. This helps maintain the salad’s freshness and flavors.

Freezer: For longer storage, freeze the salad without the dressing for up to 1 month. To do so, separate the components (greens and grains) and ensure they are sealed tightly to avoid freezer burn.

Reheating: Thaw overnight in the fridge before reheating. Gently warm the individual components in a pan over low heat, adding fresh kale and dressing just before serving to brighten the flavors.

Freshness Tips: To keep the kale crunchy, store it separately if you plan on keeping the salad longer. This will help retain the vibrant texture and prevent wilting.

Winter Farro and Kale Salad Variations

Feel free to explore these delightful twists and alternatives that can make this salad your very own!

  • Gluten-Free: Swap farro for quinoa or rice for a gluten-free option that still packs a nutritional punch. Both add a delightful complexity to the dish.

  • Add Protein: Grilled chicken, shrimp, or tofu can transform this salad into a hearty meal. It enhances the flavor while keeping you fuller for longer.

  • Crunch Boost: Toss in some crispy roasted chickpeas for an extra crunchy texture. They’re a wonderful way to elevate every bite and add a pop of flavor.

  • Flavorful Citrus: Substitute lemon juice with orange juice for a sweet citrus twist. This will brighten the salad and add a refreshing layer of flavor.

  • Herb Variability: Experiment with fresh herbs like parsley or cilantro in place of dry oregano. Fresh herbs elevate the dish and provide vibrant flavors that contrast beautifully.

  • Cheese Lovers: Crumbled feta or goat cheese can be added to enhance creaminess and richness. These cheeses add tang and a touch of sophistication to every forkful.

  • Spicy Kick: For those who enjoy heat, increase the red pepper flakes or add sliced jalapeños. This fiery twist will give your salad an exciting depth that warms the palate.

  • Nutty Delight: Incorporate toasted walnuts or sliced almonds for added crunch and heart-healthy fats. Nuts bring in a wonderful depth while complementing the salad’s existing flavors beautifully.

Chef's Helpful Tips

  • For the Winter Farro and Kale Salad, be sure to rinse the farro before cooking to remove any grit and enhance its flavor.
  • When sautéing the broccoli and red onion, keep the heat at medium to avoid burning the vegetables while ensuring they become tender.
  • If you want to save time, consider using pre-cooked farro which can be found in many grocery stores.
  • For the dressing, whisk the ingredients together vigorously to create an emulsion that clings nicely to the salad, ensuring even distribution of flavors.

Winter Farro and Kale Salad Recipe FAQs

How do I choose the right farro?
Absolutely! When selecting farro, look for a package that specifies “semi-pearled” or “pearled,” as these varieties will cook quicker while still retaining a nice chewy texture. Always check for a fresh expiration date and avoid any bags with dark spots or signs of moisture, which could indicate spoilage.

What’s the best way to store leftover Winter Farro and Kale Salad?
Very easy! Store any leftover salad in an airtight container in the fridge for up to 3 days. To maintain the freshness of the greens, consider keeping the dressing separate until you’re ready to eat. This way, the kale stays crisp and vibrant!

Can I freeze Winter Farro and Kale Salad?
Yes, you can! For optimal results, freeze the salad without the dressing for up to 1 month. To freeze, first, store the farro, kale, broccoli, chickpeas, and pomegranate seeds in freezer-safe bags or containers. When you’re ready to enjoy, simply thaw it overnight in the fridge, and then warm the components in a pan, adding fresh dressing right before serving.

What should I do if the dressing separates?
No worries! If your dressing separates, simply give it a good whisk again before drizzling it over your salad. You can also add a teaspoon of water or more lemon juice and whisk vigorously to help re-emulsify the mixture. Remember, the dressing is key to elevating the salad, so don’t skip this step!

Is this salad suitable for those with allergies?
While this Winter Farro and Kale Salad is naturally vegetarian and packed with nutrients, it’s always good to double-check for allergies. If you’re hosting someone with food sensitivities, you might want to substitute chickpeas for another protein source or omit pepitas if someone is allergic to seeds. Always read the ingredient labels, especially for packaged goods like farro and Dijon mustard, which could contain hidden allergens.

Tips for using overripe kale or vegetables?
If you find your kale is starting to wilt or is slightly overripe, don’t throw it away! You can refresh the leaves by soaking them in ice-cold water for about 10 minutes. For broccoli that’s a bit past its prime, trim off any dark spots; as long as it looks bright and green, it’s still good to sauté. Don’t let minor imperfections derail your cooking journey!

Winter Farro and Kale Salad

Winter Farro and Kale Salad

Celebrate winter with this hearty and nutritious Winter Farro and Kale Salad, perfect for busy weeknights.
Print Recipe Pin Recipe
Prep Time 10 minutes mins
Cook Time 30 minutes mins
Total Time 40 minutes mins
Servings: 4 servings
Course: LUNCH RECIPES
Cuisine: American
Calories: 320
Ingredients Equipment Method Nutrition Notes

Ingredients
  

For the Salad
  • 1 cup dry farro rinsed
  • 2 cups broccoli chopped
  • 1 medium red onion sliced
  • 2 tablespoons avocado oil
For the Seasoning
  • 1 teaspoon ground cumin
  • 1 teaspoon ground coriander
  • 1 teaspoon smoked paprika
  • 1 teaspoon dry basil
  • 1 teaspoon dry thyme
For the Greens and Toppings
  • 4 cups kale stems removed and chopped
  • 1 cup pomegranate seeds
  • 1/2 cup pepitas
  • 1 can chickpeas drained and rinsed
For the Dressing
  • 2 cloves garlic minced
  • 1/4 cup extra virgin olive oil
  • 1 tablespoon Dijon mustard
  • 2 tablespoons lemon juice
  • 1 teaspoon lemon zest
  • 1 tablespoon maple syrup
  • 1/4 teaspoon red pepper flakes optional
  • 1 teaspoon dry oregano
  • salt to taste
  • pepper to taste

Equipment

  • Large pot
  • Mixing bowl

Method
 

Preparation
  1. Cook the farro according to package instructions, about 20 minutes. Drain and set aside to cool slightly.
  2. Sauté broccoli and red onion in a large pot with avocado oil over medium heat for 5-7 minutes until tender.
  3. Add spices: ground cumin, coriander, paprika, basil, and thyme. Stir for 1 minute until fragrant.
  4. Combine farro, kale, pomegranate seeds, pepitas, and chickpeas into the pot; mix gently until kale is wilted.
  5. In a separate bowl, whisk together garlic, olive oil, Dijon mustard, lemon juice and zest, maple syrup, red pepper flakes, oregano, salt, and pepper.
  6. Pour the dressing over the salad mixture and toss well to combine. Adjust seasoning if needed before serving.

Nutrition

Serving: 1servingCalories: 320kcalCarbohydrates: 45gProtein: 10gFat: 14gSaturated Fat: 2gPolyunsaturated Fat: 3gMonounsaturated Fat: 8gSodium: 300mgPotassium: 600mgFiber: 10gSugar: 4gVitamin A: 1800IUVitamin C: 60mgCalcium: 70mgIron: 3mg

Notes

For added color, garnish with additional pomegranate seeds before serving.

Tried this recipe?

Let us know how it was!

Filed Under: LUNCH RECIPES

French Butter Cake

January 2, 2026 by JudyWhite Leave a Comment

There’s something incredibly satisfying about a slice of cake that melts in your mouth, and my journey with French Butter Cake has brought me just that. The moment you take the first bite, the fragrant notes of vanilla and almond wash over you, invoking a sense of comfort that warms the heart. This lovely cake isn’t just a treat; it’s an experience that transforms any gathering into a celebration, capturing the essence of homely indulgence.

A recent Sunday afternoon, I wandered into my kitchen yearning for a dessert that was uncomplicated yet delicious. With only a handful of ingredients and less than an hour to spare, the allure of this French Butter Cake called to me. The delightful richness combined with the lightness of yogurt makes every slice extra special. Whether you’re hosting a dinner party or simply wishing to elevate your afternoon coffee break, this cake is a crowd-pleasing hero that’s just waiting to be made. Let’s dive into this delicious recipe together!

Why You'll Love This French Butter Cake

  • This French Butter Cake is incredibly easy to make, requiring just a handful of ingredients and minimal preparation time.
  • The delightful flavors of vanilla and almond create a rich, comforting experience that will impress everyone at your gathering.
  • Its versatility makes it perfect for any occasion, whether it’s a casual afternoon snack or a fancy dinner party.
  • The beautiful golden color and glossy glaze elevate its visual appeal, making it as stunning to look at as it is delicious to eat.

French Butter Cake Ingredients

• Delight in the simplicity of this French Butter Cake recipe with these essential ingredients.

For the Cake

  • Plain yogurt or Greek yogurt – A key ingredient that keeps the cake moist and adds a subtle tang.
  • Granulated sugar – Sweetens the cake perfectly; feel free to adjust to your taste!
  • Large eggs – Helps bind the ingredients while contributing to a rich texture.
  • Vanilla extract – The soul of the cake; use pure extract for the best flavor.
  • Almond extract – Just a hint elevates the cake’s aromas; if you’re not a fan, you can omit it!
  • All-purpose flour – Provides structure; sift it for a lighter cake.
  • Baking powder – Ensures your cake rises beautifully; always check the expiration date!
  • Salt – A tiny pinch enhances the sweetness without being detectable.
  • Neutral flavored oil – Adds moistness; opt for canola or sunflower for a neutral taste.

For the Glaze

  • Granulated sugar – Sweeten up your glaze; using finely granulated helps it dissolve easier.
  • Butter (salted) – Adds richness and flavor to the glaze; you can use unsalted butter if preferred.
  • Water – Helps combine the glaze ingredients smoothly; make sure it’s at room temperature for best results.
  • Vanilla extract – A touch in the glaze brings harmony between the cake and glaze flavors.
  • Almond extract – For that extra note of flavor; just a drop goes a long way!

This dreamy French Butter Cake is just waiting to bring a touch of sweetness to your home!

How to Make French Butter Cake

  1. Preheat the oven to 350°F (175°C) and prepare your 9-inch round cake pan by greasing it lightly, ensuring your cake will release easily after baking.

  2. Mix the yogurt, granulated sugar, and eggs in a large bowl until the mixture is smooth and fully combined, creating a delightful, creamy base for the cake.

  3. Stir in the vanilla extract and almond extract, letting the beautiful aroma infuse your batter, promising a rich flavor in every bite.

  4. Combine the all-purpose flour, baking powder, and salt in a separate bowl, ensuring dry ingredients are thoroughly mixed for a perfect rise.

  5. Gradually add the dry mixture to the wet ingredients, mixing gently until just combined. Be careful not to over-mix; we want it tender and fluffy!

  6. Pour in the neutral oil and mix until the batter is completely smooth, which adds a luscious lightness to the cake.

  7. Transfer the batter into the prepared pan and bake for about 40 minutes, or until golden brown and a toothpick inserted in the center comes out clean.

  8. Prepare the glaze by combining the granulated sugar, butter, water, vanilla extract, and almond extract in a small saucepan over medium heat.

  9. Heat the mixture gently until the butter melts and the sugar dissolves, stirring occasionally to ensure everything comes together beautifully.

  10. Drizzle the glaze over the warm cake once it’s out of the oven, allowing it to be absorbed, which makes every bite gloriously sweet and decadent.

Optional: Top with sliced almonds for an added crunch!

Exact quantities are listed in the recipe card below.

French Butter Cake Variations

Feel free to get creative with this French Butter Cake recipe and make it your own!

  • Gluten-Free: Substitute all-purpose flour with a 1:1 gluten-free flour blend for a delightful gluten-free version. The cake remains just as tender and moist!

  • Citrus Zing: Add the zest of one lemon or orange to your batter for a refreshing citrus twist. This brightens the flavors and adds a lovely aroma.

  • Nutty Crunch: Fold in ½ cup of chopped walnuts or almonds before baking for an added texture and bonus flavor. The delightful crunch balances the cake’s softness beautifully.

  • Berry Bliss: Incorporate 1 cup of fresh blueberries or raspberries into the batter for a fruity burst. This twist creates an exciting contrast with the rich cake flavor.

  • Spiced Delight: Include ½ teaspoon of cinnamon or nutmeg in the dry ingredients for a cozy warmth. These spices add a wonderful depth to your cake’s flavor profile.

  • Chocolate Drizzle: Instead of the glaze, melt dark chocolate and drizzle it over the cooled cake for a decadent finish. The sweetness of chocolate elevates the experience to a whole new level!

  • Caramel Swirl: Fold caramel sauce into the batter before baking for an indulgent surprise in every slice. The caramel melts into the cake, making it even more irresistible.

  • Dairy-Free: Swap yogurt with a plant-based alternative, like coconut yogurt, to make it dairy-free without sacrificing moisture or flavor. Enjoy the cake while catering to dietary preferences!

What to Serve with French Butter Cake?

Create a delightful dining experience around your French Butter Cake with these delicious pairings.

  • Fresh Berries: Juicy strawberries and blueberries offer a burst of freshness that balances the cake’s richness beautifully.

  • Whipped Cream: The light, airy texture of whipped cream adds a luscious touch and complements the cake’s moistness wonderfully.

  • Coffee: A serving of rich coffee enhances the cake’s flavors, creating a perfect afternoon pick-me-up moment.

  • Chocolate Sauce: Drizzling warm chocolate sauce over the cake adds an indulgent touch for chocolate lovers; it creates a delightful contrast.

  • Tea: Light herbal tea or classic Earl Grey can cut through the buttery richness, providing a soothing pairing for dessert time.

  • Vanilla Ice Cream: The creaminess of vanilla ice cream elevates every bite, providing a chilly contrast to the warm cake.

  • Lemon Curd: A dollop of tangy lemon curd brightens the palate, creating a refreshing contrast to the cake’s sweet, rich flavors.

Hosting friends? Serve the cake with assorted toppings like chopped nuts or even candied ginger for a unique touch. Delight in these pairings—the perfect complement to your sweet, aromatic French Butter Cake!

How to Store and Freeze French Butter Cake

Room Temperature: Store the cake in an airtight container at room temperature for up to 3 days to keep it moist and delicious.

Fridge: If you prefer a chill, keep the cake in the refrigerator, wrapped tightly, for up to 5 days. Just remember to bring it to room temperature before serving for the best flavor!

Freezer: For longer storage, wrap the cake well in plastic wrap and aluminum foil, then freeze for up to 3 months. Thaw overnight in the fridge before enjoying!

Reheating: To revive the cake, warm individual slices in the microwave for 10–15 seconds, or pop them in a low oven (300°F) for a few minutes until just heated through.

Make Ahead Options

These French Butter Cakes are perfect for meal prep enthusiasts looking to save time during busy weeks! You can prepare the batter up to 24 hours in advance by mixing all the wet and dry ingredients separately, then combine them right before baking. Simply refrigerate the mixed wet ingredients (yogurt, sugar, and eggs) and the dry mixture (flour, baking powder, and salt) separately to maintain their freshness and prevent any reaction. On baking day, mix them together, pour the batter into the prepared pan, and bake as directed for a delicious cake that’s just as moist and flavorful as if made fresh! For the glaze, you can prepare it a day ahead and store it in the fridge; just gently reheat it before drizzling for that warm, inviting touch.

Chef's Helpful Tips

  • For the perfect French Butter Cake, make sure to mix the wet ingredients thoroughly before adding the dry ones to avoid lumps in the batter.
  • A common mistake is overmixing; remember to stir gently until just combined to keep the cake tender.
  • When it comes to measuring flour, spoon it into your measuring cup and level it off with a knife to avoid packing too much in.
  • Bake the cake at 350°F and keep an eye on it around the 35-minute mark to ensure it doesn’t overbake, as ovens can vary in temperature.
  • Lastly, let the cake cool slightly before adding the glaze so it can soak in beautifully, enhancing the overall flavor and texture.

French Butter Cake Recipe FAQs

What type of yogurt is best for this French Butter Cake?
Absolutely! You can use either plain yogurt or Greek yogurt for this cake. Greek yogurt adds a bit more creaminess, while plain yogurt gives a lighter texture. Just ensure it’s unflavored to keep the taste balanced.

How should I store my French Butter Cake?
For optimal freshness, store the cake in an airtight container at room temperature for up to 3 days. If you have leftovers after that, consider refrigerating it tightly wrapped for up to 5 days. Just remember, letting it come to room temperature before serving enhances its flavor!

Can I freeze the French Butter Cake?
Yes, indeed! To freeze, first allow the cake to cool completely. Then, wrap it tightly in plastic wrap followed by aluminum foil, ensuring there’s no air exposure. It can be stored in the freezer for up to 3 months. For the best experience, thaw it overnight in the fridge when you’re ready to enjoy it!

What if my cake sinks in the middle?
Very commonly, a sinking middle can happen if the oven temperature is too low, or if the batter is overmixed. To avoid this, make sure your oven is preheated properly and keep a close eye on your cake in the last few minutes of baking. A toothpick inserted in the center should come out clean. If you notice any cracks forming, that’s often a sign it’s done!

Is this cake suitable for people with nut allergies?
While this French Butter Cake includes almond extract for flavor, you can easily substitute it with an extra splash of vanilla extract if needed. This will ensure that those with nut allergies can enjoy a slice without worry!

French Butter Cake

French Butter Cake

This French Butter Cake recipe features a delightful blend of vanilla and almond flavors, creating a melt-in-your-mouth experience.
Print Recipe Pin Recipe
Prep Time 10 minutes mins
Cook Time 40 minutes mins
Total Time 50 minutes mins
Servings: 8 slices
Course: DESSERT RECIPES
Cuisine: French
Calories: 300
Ingredients Equipment Method Nutrition Notes

Ingredients
  

For the Cake
  • 1 cup plain yogurt or Greek yogurt keeps the cake moist
  • 1 cup granulated sugar sweetens the cake
  • 3 large eggs binds the ingredients
  • 2 teaspoons vanilla extract use pure for best flavor
  • 1 teaspoon almond extract optional, can be omitted
  • 2 cups all-purpose flour sifted for a lighter cake
  • 1 tablespoon baking powder check expiration date
  • 1/2 teaspoon salt enhances sweetness
  • 1/2 cup neutral flavored oil canola or sunflower
For the Glaze
  • 1 cup granulated sugar finely granulated helps dissolve
  • 1/4 cup butter (salted) adds richness
  • 1/4 cup water room temperature
  • 1 teaspoon vanilla extract harmonizes flavors
  • 1 teaspoon almond extract for extra flavor

Equipment

  • 9-inch round cake pan
  • Mixing bowl
  • Saucepan

Method
 

Preparation
  1. Preheat the oven to 350°F (175°C) and prepare your 9-inch round cake pan by greasing it lightly.
  2. Mix the yogurt, granulated sugar, and eggs in a large bowl until smooth.
  3. Stir in the vanilla extract and almond extract.
  4. Combine the all-purpose flour, baking powder, and salt in a separate bowl.
  5. Gradually add the dry mixture to the wet ingredients, mixing gently.
  6. Pour in the neutral oil and mix until the batter is smooth.
  7. Transfer the batter to the prepared pan and bake for about 40 minutes.
  8. Prepare the glaze by combining the granulated sugar, butter, water, vanilla extract, and almond extract in a saucepan over medium heat.
  9. Heat until the butter melts and the sugar dissolves.
  10. Drizzle the glaze over the warm cake once it’s out of the oven.

Nutrition

Serving: 1sliceCalories: 300kcalCarbohydrates: 40gProtein: 4gFat: 14gSaturated Fat: 6gPolyunsaturated Fat: 2gMonounsaturated Fat: 6gCholesterol: 80mgSodium: 150mgPotassium: 200mgFiber: 1gSugar: 20gVitamin A: 300IUCalcium: 50mgIron: 1mg

Notes

Optional: Top with sliced almonds for added crunch.

Tried this recipe?

Let us know how it was!

Filed Under: BREAKFAST & BRUNCH

Meringue Wreath Cookies

January 2, 2026 by JudyWhite Leave a Comment

The holiday season always has a way of bringing out the baker in me, and this year, I found myself drawn to a delightful childhood favorite: Meringue Wreath Cookies. Picture this: a sunny afternoon, the scent of vanilla fills the air, and laughter accompanies the sound of my mixer whirling away. These whimsical cookies not only satisfy my sweet tooth but also serve as a creative outlet.

After years of mastering classic recipes, I stumbled upon this gem while experimenting with egg whites and cream of tartar during a baking session. The result? Light, airy wreaths that are perfect for decorating with colorful sprinkles and sharing with loved ones. Their versatility makes them a delightful treat at any gathering—be it a holiday party or cozy family gathering.

So, whether you’re a seasoned chef or just beginning your culinary journey, let me guide you through this simple yet enchanting recipe that will add a festive flair to your dessert table!

Why You'll Love This Meringue Wreath Cookies

  • These Meringue Wreath Cookies are incredibly easy to make, allowing even novice bakers to enjoy a fun and festive experience in the kitchen.
  • The light and airy texture combined with the delightful vanilla flavor makes these cookies an irresistible treat for anyone with a sweet tooth.
  • Their versatility allows for creative decorating, making them perfect for any occasion, from holiday celebrations to everyday snacking.
  • Not only do they taste amazing, but their visually appealing design will impress guests and add a charming touch to any dessert table.

Meringue Wreath Cookies Ingredients

• Create this delightful recipe with ease!

For the Meringue
• 2 egg whites – Ensure your bowl and utensils are grease-free for better volume.
• 1 dash salt – A pinch helps stabilize the egg whites and enhances flavor.
• 0.5 teaspoon cream of tartar – This helps create that magical fluffy texture that makes meringue shine!
• 0.5 cup granulated sugar – Using superfine sugar can help it dissolve more easily, leading to a smoother meringue.
• 1 teaspoon vanilla extract – This adds a delightful depth of flavor to every bite.

For Decorations
• Green food coloring – Add as desired for a festive touch; mixing with the meringue gives a cheerful vibe.
• Sprinkles – Personalize your cookies with colorful sprinkles for an extra dose of fun!

How to Make Meringue Wreath Cookies

  1. Preheat your oven to 225°F. This low temperature is key for drying out the meringue, giving you that perfect crispiness.

  2. Beat the egg whites, salt, and cream of tartar in a mixing bowl until stiff peaks form. You’ll know it’s ready when you can turn the bowl upside down without spilling!

  3. Add sugar gradually while mixing. Continue until the mixture is thick, glossy, and forms stiff peaks. This is what makes your Meringue Wreath Cookies airy and delightful.

  4. Mix in the vanilla extract and 4 drops of green food coloring. Feel free to adjust the color to your liking! A cheerful green adds a festive flair.

  5. Prepare baking sheets by lining them with parchment paper or a silicone baking mat. This ensures that your delicate meringues don’t stick during baking.

  6. Pipe circles using a star tip to create wreath shapes. Aim for even pressure as you pipe to achieve beautiful, uniform wreaths.

  7. Create trees by piping in a swirling circular motion. Start with a larger circle at the base and work your way up with smaller circles on top for that charming tree shape.

  8. Sprinkle your festive decorations on top before baking. Watch those sprinkles add a pop of color and excitement!

  9. Bake in the preheated oven for 45 minutes. The meringues should be dry to the touch and lightly crisp.

  10. Turn off the oven and leave the cookies undisturbed for 1 hour. This helps them dry out completely and prevents cracking.

  11. Cool them on a wire rack before storing. Allow the cookies to cool completely to maintain their delightful crunch.

Optional: Garnish with edible glitter for an extra festive touch!

Exact quantities are listed in the recipe card below.

How to Store and Freeze Meringue Wreath Cookies

Room Temperature: Store the cookies in a dry, airtight container for up to 3 days to maintain their crispiness. Avoid exposure to humidity, which can make them soggy.

Fridge: While it’s preferable to keep Meringue Wreath Cookies at room temperature, you can refrigerate them if necessary. Just be sure they’re well sealed, and they’ll last up to 1 week.

Freezer: For longer storage, wrap the cookies in plastic wrap and place them in an airtight container. They can be frozen for up to 2 months without losing their delightful texture.

Reheating: If you want to refresh your cookies after thawing, pop them back in a preheated oven at 225°F for about 5-10 minutes to regain their crispiness.

Make Ahead Options

These Meringue Wreath Cookies are perfect for busy home cooks who want to save time without sacrificing flavor! You can prepare the meringue mixture up to 24 hours in advance. Simply follow steps 1 through 4, then refrigerate the mixture in an airtight container until you’re ready to pipe your cookies. It’s important to gently stir the mixture before piping to revive its airy texture. When it’s time to serve, just preheat your oven, pipe the wreaths onto lined baking sheets, and bake as directed. By preparing ahead, you’ll enjoy stress-free baking while still serving up delicious, festive treats that are just as delightful!

Meringue Wreath Cookies Variations

Feel free to let your imagination run wild as you customize these cookies to suit your taste and festive spirit!

  • Dairy-Free: Substitute the cream of tartar with lemon juice or vinegar for a dairy-free meringue. Your wreaths will still bake up beautifully!

  • Colorful Delight: Use different food colorings to create vibrant shades of your favorite colors for themed occasions—think pink for Valentine’s Day or spooky black and orange for Halloween.

  • Nutty Twist: Fold in finely chopped nuts like pistachios or hazelnuts into the meringue for a delightful crunch. These add a wonderful texture that complements the airy cookie.

  • Flavored Meringue: Swap vanilla extract for almond or peppermint extract to add a unique flavor profile. Imagine a minty holiday treat everyone will love!

  • Chocolate Drizzle: Once cooled, drizzle melted dark or white chocolate on top of the meringue cookies for an extra sweet touch. The rich chocolate contrasts with the light meringue perfectly.

  • Spiced Sensation: Add a dash of ground cinnamon or nutmeg into the meringue mix for a warm, cozy flavor that evokes feelings of holiday cheer.

  • Citrus Zing: Incorporate a bit of lemon or orange zest into the meringue for a subtle citrus twist that brightens the overall taste.

  • Gourmet Topping: Instead of sprinkles, consider crushed candy canes or edible glitter for an eye-catching finish that adds a festive touch to your decorations.

Each of these ideas invites you to get creative—a true testament to the versatility of these delightful Meringue Wreath Cookies!

What to Serve with Meringue Wreath Cookies?

The sweet crunch of these festive cookies invites delightful pairings that elevate any gathering.

  • Hot Chocolate: A rich, creamy cup adds warmth and contrasts the lightness of the meringue, creating a cozy dessert experience.
  • Fruit Salad: Fresh, juicy fruits provide a burst of flavor that complements the sweetness of the cookies, making for a refreshing balance.
  • Coffee: The robust notes of a freshly brewed cup bring out the vanilla flavor in the cookies, making each bite feel indulgent.
  • Whipped Cream: A dollop of fluffy whipped cream adds an elegant touch, enhancing the airy texture of the meringues while making them even more delightful.
  • Chocolate Ganache: Drizzling warm ganache over the cookies introduces a luscious, chocolatey twist that pairs beautifully with the delicate meringue.
  • Holiday Fruit Punch: A festive, fruity drink brings a vibrant note that pairs harmoniously with the meringue’s sweetness, perfect for cheerful gatherings.
  • Cheese Platter: Salty cheeses provide an unexpected yet delightful contrast to the sugar, creating a tantalizing balance of flavors.
  • Cupcakes: Light vanilla or almond-flavored cupcakes can mimic the sweetness, while their moist texture offers a lovely contrast to the crisp meringues.
  • Vanilla Ice Cream: Scoops of creamy ice cream add a delightful chill that pairs wonderfully, softening the light crunch of the wreaths.

Chef's Helpful Tips

  • For perfect Meringue Wreath Cookies, make sure your mixing equipment is absolutely grease-free to achieve maximum volume when whipping the egg whites.
  • Gradually add the sugar while mixing to ensure it dissolves completely, which will result in a glossy and stable meringue.
  • When piping your wreaths, maintain consistent pressure on the piping bag to create uniform shapes, ensuring that your cookies look as delightful as they taste.
  • Remember to bake at the low temperature of 225°F for the full 45 minutes and leave them in the oven for an additional hour after turning it off to guarantee a crisp texture.

Meringue Wreath Cookies Recipe FAQs

What should I look for in fresh egg whites?
Absolutely! When selecting egg whites, it’s crucial to ensure that the eggs are fresh. Look for clean eggs without cracks, and consider using pasteurized egg whites if you’re concerned about food safety. Fresh egg whites should be clear and free from any red or dark spots.

How should I store Meringue Wreath Cookies?
I recommend storing your Meringue Wreath Cookies in a dry, airtight container at room temperature. They’ll stay fresh and crisp for up to 3 days this way. Avoid exposing them to humidity, as this can make them lose their delightful crunch and become chewy.

Can I freeze Meringue Wreath Cookies?
Absolutely! For longer storage, you can freeze your Meringue Wreath Cookies. Simply wrap them individually in plastic wrap and place them in an airtight container. They can stay in the freezer for up to 2 months. When you’re ready to enjoy them, just thaw at room temperature or pop them in a preheated oven at 225°F for about 5-10 minutes to bring back that lovely crunch.

What if my meringue is not forming stiff peaks?
Very well! If your meringue isn’t forming stiff peaks, there could be a couple of issues. First, ensure that your mixing bowl and utensils are completely grease-free; any fat can prevent the egg whites from whipping up properly. If you added the sugar too quickly, it may not have dissolved completely, affecting the texture. Try mixing on a higher speed, and don’t forget that room temperature egg whites will whip up better than cold ones!

Are Meringue Wreath Cookies suitable for a gluten-free diet?
Yes, they are! Meringue Wreath Cookies are naturally gluten-free as they contain no wheat flour or gluten ingredients. However, if you’re preparing them for someone with severe allergies, always check your other ingredients, like vanilla extract, to ensure there are no hidden gluten sources.

Can pets eat Meringue Wreath Cookies?
No, it’s best to keep Meringue Wreath Cookies away from pets. While egg whites are not toxic, the sugar and added decorative components may not be healthy for them. Stick to treats designed specifically for our furry friends when you want to share a yummy snack!

Meringue Wreath Cookies

Meringue Wreath Cookies

These Meringue Wreath Cookies are light, airy, and perfect for holiday celebrations, making them a delightful treat for bakers of all levels.
Print Recipe Pin Recipe
Prep Time 15 minutes mins
Cook Time 45 minutes mins
Cooling Time 1 hour hr
Total Time 2 hours hrs
Servings: 12 cookies
Course: DESSERT RECIPES
Cuisine: American
Calories: 45
Ingredients Equipment Method Nutrition Notes

Ingredients
  

For the Meringue
  • 2 egg whites egg whites Ensure your bowl and utensils are grease-free for better volume.
  • 1 dash salt A pinch helps stabilize the egg whites and enhances flavor.
  • 0.5 teaspoon cream of tartar This helps create that magical fluffy texture that makes meringue shine!
  • 0.5 cup granulated sugar Using superfine sugar can help it dissolve more easily.
  • 1 teaspoon vanilla extract This adds a delightful depth of flavor to every bite.
For Decorations
  • green food coloring Add as desired for a festive touch.
  • sprinkles Personalize your cookies with colorful sprinkles for an extra dose of fun!

Equipment

  • mixer
  • Mixing bowl
  • piping bag
  • baking sheets
  • parchment paper

Method
 

Instructions
  1. Preheat your oven to 225°F.
  2. Beat the egg whites, salt, and cream of tartar in a mixing bowl until stiff peaks form.
  3. Add sugar gradually while mixing, continue until thick and glossy.
  4. Mix in the vanilla extract and green food coloring.
  5. Prepare baking sheets by lining them with parchment paper.
  6. Pipe circles using a star tip to create wreath shapes.
  7. Create trees by piping in a swirling circular motion.
  8. Sprinkle your festive decorations on top before baking.
  9. Bake in the preheated oven for 45 minutes.
  10. Turn off the oven and leave the cookies undisturbed for 1 hour.
  11. Cool them on a wire rack before storing.

Nutrition

Serving: 1cookieCalories: 45kcalCarbohydrates: 10gProtein: 1gSodium: 20mgPotassium: 5mgSugar: 9gCalcium: 1mg

Notes

Optional: Garnish with edible glitter for an extra festive touch.

Tried this recipe?

Let us know how it was!

Filed Under: BREAKFAST & BRUNCH

Raspberry Pistachio Cake

January 2, 2026 by JudyWhite Leave a Comment

The moment I took my first bite of a raspberry pistachio cake at a quaint café, my taste buds awakened to a world of vibrant flavors. It was a delightful symphony of nutty pistachios and tart raspberries, perfectly balanced by a creamy frosting that sent my heart fluttering. This inspiration led me to create my own version that not only captures those delicious notes but is also incredibly simple to make at home, no fancy pastry skills required!

Picture this: a moist, cake adorned with a luscious pistachio frosting, punctuated with juicy raspberries and a sprinkle of chopped pistachios. Whether you’re looking to impress at a dinner party or treat yourself on a cozy afternoon, this raspberry pistachio cake is sure to become a treasured recipe in your kitchen. With just a short prep time and some straightforward steps, you’ll have a show-stopping dessert that appeals to both the novice baker and the seasoned chef. Let’s dive into the recipe and bring a taste of that café magic right into your home!

Why You'll Love This Raspberry Pistachio Cake

  • This Raspberry Pistachio Cake is not only easy to make but also requires minimal time, making it perfect for bakers of all skill levels.
  • The delightful combination of nutty pistachios and succulent raspberries brings an explosion of flavor that will impress your friends and family.
  • Its stunning visual appeal, with vibrant frosting and fresh garnishes, makes it an eye-catching centerpiece for any occasion.
  • Whether served at a gathering or enjoyed as a personal treat, this cake is sure to be a crowd-pleaser that everyone will love.

Raspberry Pistachio Cake Ingredients

• Unlock the secrets to a delightful cake!

For the Cake

  • 250 g unsalted butter – softened to create a light, fluffy texture.
  • 240 g golden caster sugar – adds a subtle caramel flavor and perfect sweetness.
  • 1 tsp vanilla extract – enhances the overall flavor of the cake beautifully.
  • 4 large eggs – crucial for binding and moisture, giving your cake that perfect rise.
  • 150 g plain flour – the foundation for a light and tender crumb.
  • 2 tsp baking powder – ensures your cake rises perfectly, creating a lovely fluffy texture.
  • 0.25 tsp fine sea salt – balances sweetness and elevates all the flavors.
  • 100 g shelled pistachios – provides a nutty crunch and complements the raspberries beautifully.

For the Frosting

  • 175 g unsalted butter – soft and creamy for a luscious frosting.
  • 280 g sifted icing sugar – makes for a sweet, smooth, and easy-to-spread frosting.
  • 2 tbsp smooth pistachio cream – adds richness and a vibrant pistachio flavor to the frosting.
  • 0.5 tsp fine sea salt – enhances sweetness and rounds out the frosting flavors.
  • 1 tsp lemon juice – brightens the frosting with a refreshing zing.
  • 3 tbsp raspberry jam – introduces an extra layer of fruity goodness.

For the Topping

  • 250 g fresh raspberries – juicy and tart, they add a pop of color and flavor.
  • 2 tbsp roughly chopped pistachios – for an extra crunch and beautiful presentation.
  • sprigs of fresh mint – a lovely garnish to elevate your cake’s appearance and aroma.

This Raspberry Pistachio Cake is a delightful masterpiece waiting to happen!

How to Make Raspberry Pistachio Cake

  1. Preheat the oven to 350°F (175°C) and prepare your cake tin by greasing it lightly. This ensures your cake lifts out easily after baking.

  2. Cream together the softened unsalted butter and golden caster sugar in a large bowl until the mixture is light and fluffy, about 3-5 minutes. This step is crucial for a soft, airy cake.

  3. Incorporate the vanilla extract and add the eggs, one at a time, mixing well after each addition. This will help bind everything together and create a rich flavor profile.

  4. Sift the plain flour, baking powder, and fine sea salt into a separate bowl. Then, gently fold this dry mixture into your wet ingredients until just combined. Be careful not to overmix; you want to maintain that light texture!

  5. Add the shelled pistachios to the batter and fold them in until evenly distributed. Their nutty goodness will give the cake a delightful crunch in every bite.

  6. Pour the batter into the prepared cake tin and smooth the top with a spatula to ensure an even bake.

  7. Bake in the preheated oven for 35 minutes or until a skewer inserted into the center comes out clean. You’ll know it’s done when it’s golden brown and springy to touch.

  8. Cool the cake completely in the tin, then transfer it to a wire rack to cool down thoroughly. This will set the texture perfectly for frosting.

  9. For the frosting: Beat the softened butter and sifted icing sugar together until creamy and smooth, about 4-5 minutes. This creates the perfect base for your pistachio frosting.

  10. Mix in the smooth pistachio cream, fine sea salt, lemon juice, and raspberry jam until all ingredients are well combined and glossy. This frosting is deliciously rich!

  11. Generously frost the cooled cake with the pistachio frosting, ensuring even coverage for an enticing presentation.

  12. Top with fresh raspberries and sprinkle the chopped pistachios on top for a burst of color and flavor.

  13. Garnish with sprigs of fresh mint to elevate both the look and the enjoyable aroma of your creation.

Optional: Serve with a dollop of whipped cream for an extra treat!

Exact quantities are listed in the recipe card below.

Raspberry Pistachio Cake Variations

Feel free to explore these exciting twists to make your raspberry pistachio cake truly your own!

  • Gluten-Free: Substitute plain flour with a gluten-free blend for a cake that everyone can enjoy without missing out on flavor.

  • Nut-Free: Replace pistachios with sunflower seeds or pumpkin seeds for a delightful crunch without the nuts.

  • Dairy-Free: Use plant-based butter and a dairy-free frosting made from coconut cream for a creamy finish that still delights.

  • Fruit Twist: Incorporate different berries, like blueberries or strawberries, for a refreshing flavor boost that adds to your cake’s vibrancy.

  • Chocolate Kick: Add cocoa powder to the batter for a rich chocolate flavor that beautifully complements the raspberry and pistachio.

  • Citrus Zest: Grate some lemon or orange zest into the batter to infuse a bright, zesty note that pairs wonderfully with raspberries.

  • Spice It Up: Add a pinch of cardamom or cinnamon to the batter for warm, aromatic undertones that elevate the overall flavor.

  • Level Up the Frosting: Swap out the raspberry jam in the frosting for a tart lemon curd to create a tangy contrast that is simply irresistible.

Embrace your creative side and enjoy this cake in a way that resonates with your taste buds!

What to Serve with Raspberry Pistachio Cake?

The light, vibrant flavors of this cake deserve delightful companions to create a perfect dessert spread.

  • Velvety Vanilla Ice Cream: A scoop of creamy vanilla ice cream provides a cool contrast, balancing the cake’s nutty and fruity notes beautifully.

  • Fresh Berry Compote: Drizzling a homemade berry compote enhances the tartness of the raspberries, resulting in a refreshing burst of flavor.

  • Light Whipped Cream: Add a dollop of lightly sweetened whipped cream for a rich yet airy element that complements the cake’s textures perfectly.

  • Mint Tea: Steep a fragrant cup of mint tea alongside your cake for a soothing and refreshing beverage that beautifully echoes the mint garnish.

  • Chocolate Ganache: A silky chocolate ganache adds a layer of richness, giving an exciting flavor combination with the pistachios and raspberries.

  • Almond Biscotti: Serve crunchy almond biscotti for an added texture. The nutty flavor matches well with the pistachios, creating a delightful bite.

  • Prosecco or Sparkling Wine: A glass of bubbly prosecco enhances the celebratory feel of the cake, with its crisp notes brightening the dessert experience.

  • Lemon Sorbet: A scoop of zesty lemon sorbet provides a tart contrast that refreshes the palate after each indulgent slice of cake.

Make Ahead Options

Preparing your Raspberry Pistachio Cake ahead of time is a fantastic way to save precious minutes on busy days! You can make the cake itself up to 24 hours in advance; simply allow it to cool completely, wrap it tightly in plastic wrap, and refrigerate to maintain its moistness. For the frosting, whip it up three days ahead and store it in an airtight container in the fridge; just give it a quick stir before spreading it on the cake. When you’re ready to serve, frost your chilled cake, add those luscious raspberries and pistachios, and garnish with mint for a fresh touch. This way, you’ll have a stunning dessert that’s just as delicious as if it were freshly made!

How to Store and Freeze Raspberry Pistachio Cake

Fridge: Store your Raspberry Pistachio Cake in an airtight container for up to 3 days to keep it moist and fresh.

Freezer: Wrap individual slices tightly in plastic wrap and then place them in a freezer-safe bag for up to 3 months.

Reheating: Thaw frozen slices in the fridge overnight, then enjoy them at room temperature or warm them briefly in the microwave for a cozy treat.

Frosting Storage: If you have extra frosting, store it in an airtight container in the fridge for up to 1 week; re-whip before using.

Chef's Helpful Tips

  • When making the Raspberry Pistachio Cake, always ensure your butter is softened to room temperature for optimal creaminess and incorporation with sugar.
  • Avoid overmixing once you add the flour mixture to maintain a light and airy texture, which is key to a delicious cake.
  • For an even rise, make sure to sift your dry ingredients before folding them into the wet mixture and be cautious when adding the eggs to create a smooth batter.
  • Baking can vary, so consider checking your cake a few minutes before the suggested time to prevent overbaking, ensuring it stays moist and fluffy.

Raspberry Pistachio Cake Recipe FAQs

What kind of raspberries should I use for the cake?
Absolutely! Fresh raspberries are best for this Raspberry Pistachio Cake, as they provide the perfect tartness and moisture. Look for plump, vibrant berries without dark spots. If you can’t find fresh ones, you can use frozen raspberries, just be sure to thaw and drain them first to avoid excess moisture in the batter.

How should I store leftover Raspberry Pistachio Cake?
To keep your Raspberry Pistachio Cake fresh, store it in an airtight container in the fridge for up to 3 days. This will help maintain its moisture and flavor. You can also place it in a cake box lined with plastic wrap to protect it from drying out.

Can I freeze the Raspberry Pistachio Cake?
Yes, you can! To freeze, wrap individual slices of the cake tightly in plastic wrap and place them in a freezer-safe bag. This will prevent freezer burn and keep your cake fresh for up to 3 months. When you’re ready to enjoy a slice, thaw it in the refrigerator overnight, then let it reach room temperature before serving.

What should I do if my cake doesn’t rise?
If your Raspberry Pistachio Cake doesn’t rise, it may be due to expired baking powder or the batter being overmixed. Make sure to check your baking powder’s expiration date and gently fold the dry ingredients in until just combined. If your eggs were too cold, they could also affect the rise. Always use room temperature eggs for the best results!

Is this cake suitable for people with nut allergies?
Since this Raspberry Pistachio Cake contains pistachios, it’s not suitable for those with nut allergies. If you’re looking for an alternative, I recommend replacing the pistachios with sunflower seeds or pumpkin seeds which can give a similar crunch without the risk of nuts. Make sure to adjust the frosting as well since it includes pistachio cream.

Can I make this recipe vegan?
Absolutely! To make a vegan Raspberry Pistachio Cake, substitute the eggs with flax eggs (1 tablespoon of ground flaxseed mixed with 3 tablespoons of water for each egg) and replace the butter with vegan butter or coconut oil. Ensure that your pistachio cream and any other ingredients are also vegan-friendly for the best results!

Raspberry Pistachio Cake

Raspberry Pistachio Cake

This Raspberry Pistachio Cake is a delightful mix of nutty pistachios and tart raspberries, crowned with creamy frosting. It's perfect for any occasion.
Print Recipe Pin Recipe
Prep Time 20 minutes mins
Cook Time 35 minutes mins
Cooling Time 30 minutes mins
Total Time 1 hour hr 25 minutes mins
Servings: 12 slices
Course: DESSERT RECIPES
Cuisine: American
Calories: 350
Ingredients Equipment Method Nutrition Notes

Ingredients
  

For the Cake
  • 250 g unsalted butter softened
  • 240 g golden caster sugar adds a subtle caramel flavor
  • 1 tsp vanilla extract enhances flavor
  • 4 large eggs for binding and moisture
  • 150 g plain flour foundation for a light crumb
  • 2 tsp baking powder ensures cake rises
  • 0.25 tsp fine sea salt balances sweetness
  • 100 g shelled pistachios provides a nutty crunch
For the Frosting
  • 175 g unsalted butter soft and creamy
  • 280 g sifted icing sugar for a sweet frosting
  • 2 tbsp smooth pistachio cream adds richness
  • 0.5 tsp fine sea salt enhances sweetness
  • 1 tsp lemon juice brightens frosting
  • 3 tbsp raspberry jam extra layer of flavor
For the Topping
  • 250 g fresh raspberries for color and flavor
  • 2 tbsp roughly chopped pistachios for extra crunch
  • sprigs of fresh mint garnish for aroma

Equipment

  • Oven
  • Mixing bowls
  • Cake tin
  • Spatula
  • Wire Rack

Method
 

Cake Instructions
  1. Preheat the oven to 350°F (175°C) and prepare your cake tin by greasing it lightly.
  2. Cream together the softened unsalted butter and golden caster sugar in a large bowl until light and fluffy, about 3-5 minutes.
  3. Incorporate the vanilla extract and add the eggs one at a time, mixing well after each addition.
  4. Sift the plain flour, baking powder, and fine sea salt into a separate bowl, then gently fold this dry mixture into the wet ingredients until just combined.
  5. Add the shelled pistachios to the batter and fold them in until evenly distributed.
  6. Pour the batter into the prepared cake tin and smooth the top with a spatula.
  7. Bake in the preheated oven for 35 minutes or until a skewer inserted into the center comes out clean.
  8. Cool the cake completely in the tin, then transfer to a wire rack to cool down thoroughly.
  9. For the frosting, beat the softened butter and sifted icing sugar together until creamy and smooth, about 4-5 minutes.
  10. Mix in the smooth pistachio cream, fine sea salt, lemon juice, and raspberry jam until well combined.
  11. Generously frost the cooled cake with the pistachio frosting.
  12. Top with fresh raspberries and sprinkle the chopped pistachios on top.
  13. Garnish with sprigs of fresh mint.

Nutrition

Serving: 1sliceCalories: 350kcalCarbohydrates: 52gProtein: 4gFat: 16gSaturated Fat: 10gPolyunsaturated Fat: 3gMonounsaturated Fat: 2gCholesterol: 100mgSodium: 180mgPotassium: 150mgFiber: 1gSugar: 30gVitamin A: 500IUVitamin C: 5mgCalcium: 20mgIron: 1mg

Notes

Optional: Serve with a dollop of whipped cream for an extra treat.

Tried this recipe?

Let us know how it was!

Filed Under: BREAKFAST & BRUNCH

  • « Previous Page
  • 1
  • …
  • 18
  • 19
  • 20
  • 21
  • 22
  • …
  • 49
  • Next Page »

Recent Posts

  • Crispy Potatoes in Oven
  • Lucky Charms Pancakes
  • Cheeseburger
  • Boiled Corn on the Cob
  • St. Patrick’s Day Dessert Parfaits

Recent Comments

No comments to show.

Footer

  • Contact
  • Privacy Policy
  • About Us
  • Terms
  • ↑ back to top

Copyright © 2024 www.Forkono.com

Table Of Content