Forkono

  • BREAKFAST & BRUNCH
  • DESSERT RECIPES
  • DINNER RECIPES
  • LUNCH RECIPES
  • About uS
  • SNACKS & APPETIZERS
menu icon
go to homepage
  • BREAKFAST & BRUNCH
  • DESSERT RECIPES
  • DINNER RECIPES
  • LUNCH RECIPES
  • About uS
  • SNACKS & APPETIZERS
search icon
Homepage link
  • BREAKFAST & BRUNCH
  • DESSERT RECIPES
  • DINNER RECIPES
  • LUNCH RECIPES
  • About uS
  • SNACKS & APPETIZERS
×

Chicken Tzatziki with Rice

January 21, 2026 by JudyWhite Leave a Comment

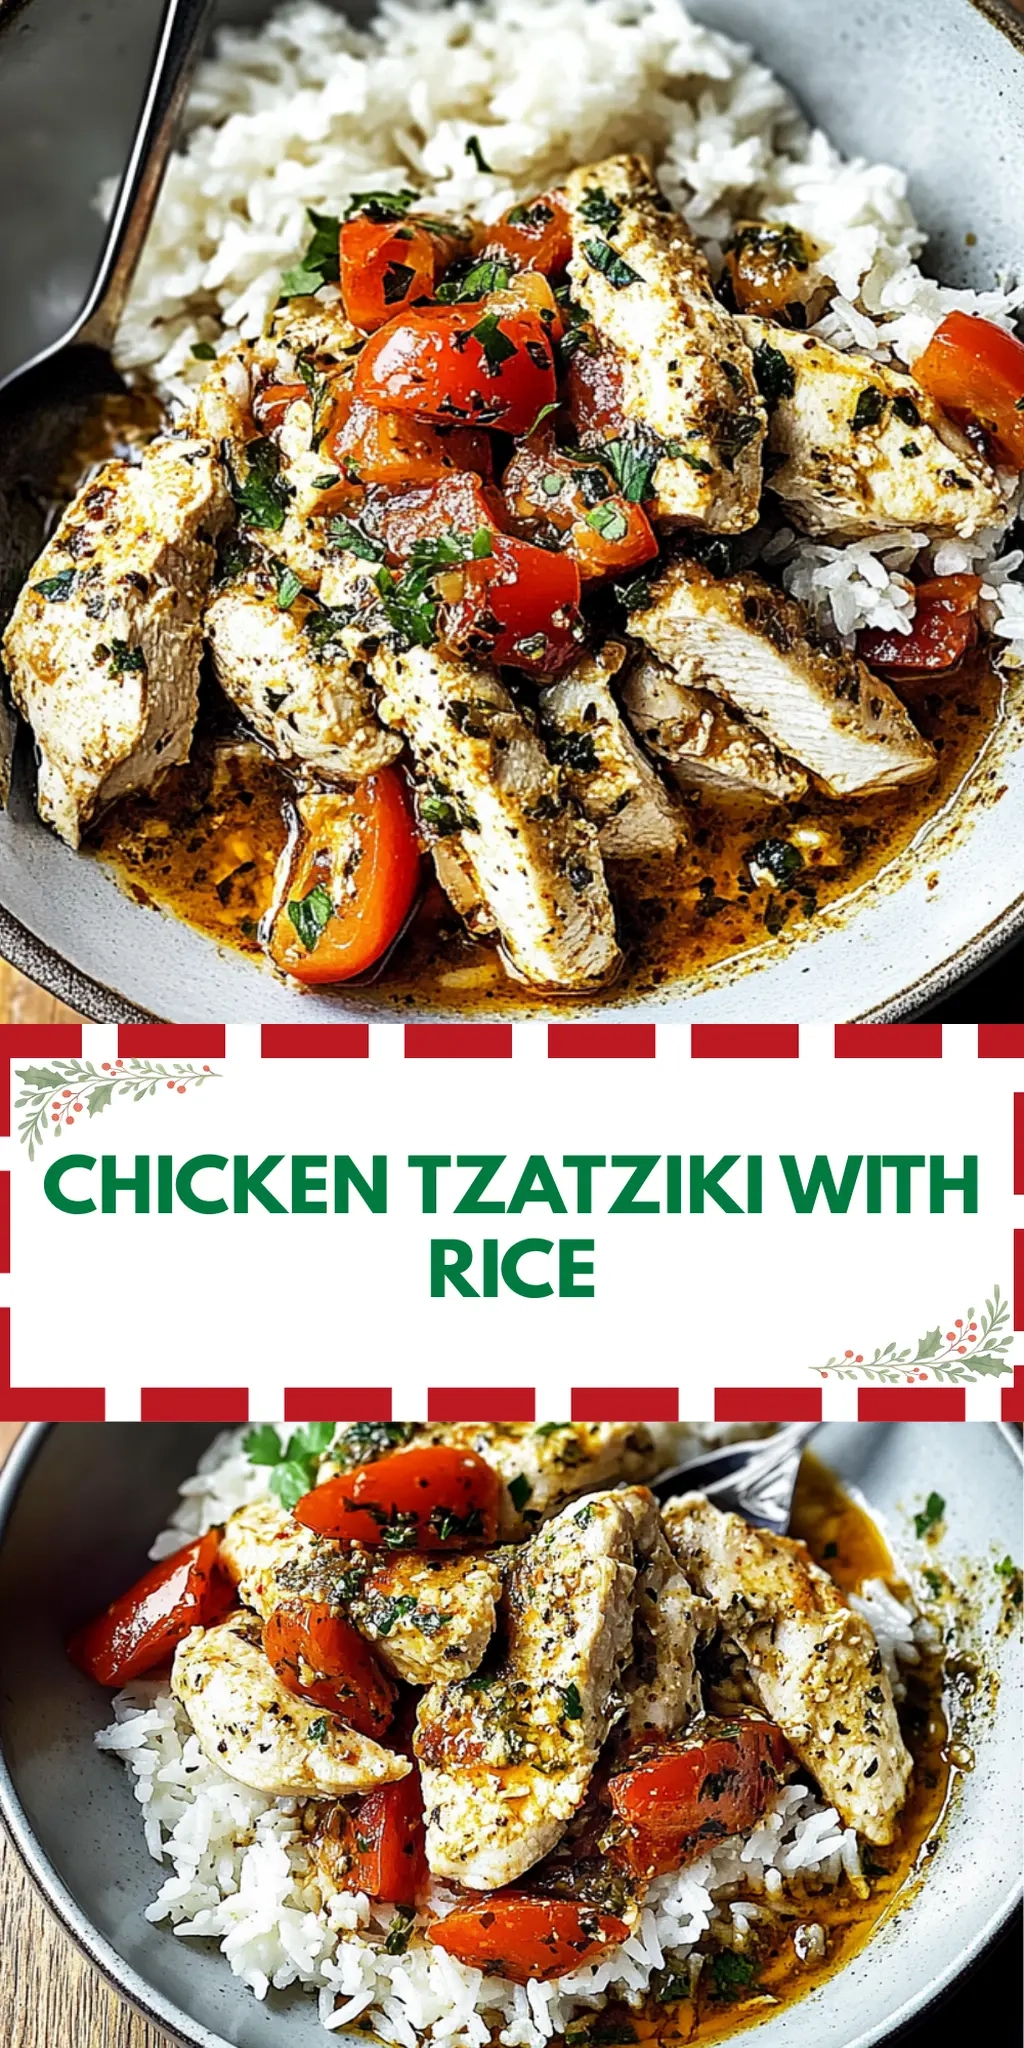
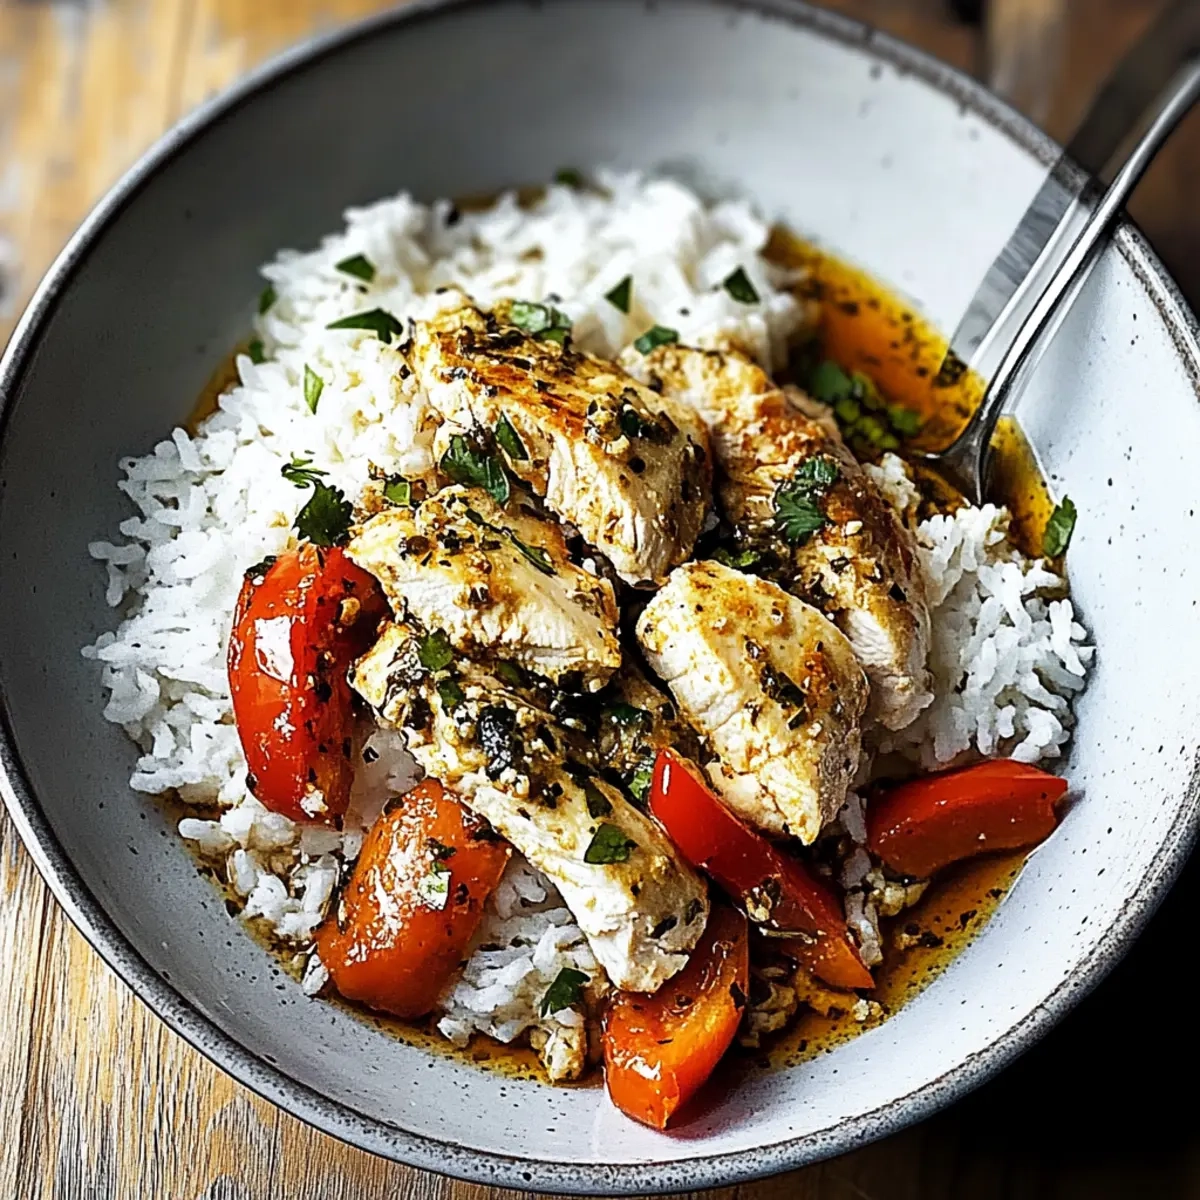
The first time I savored Chicken Tzatziki with Rice, I was transported to a sun-drenched Mediterranean terrace, where rich flavors danced in harmony. Picture this: tender, grilled chicken marinated in aromatic garlic and lemon, resting on a fluffy bed of basmati rice, all topped with a cool, creamy tzatziki that whispers of fresh dill and cucumber. As I prepared this dish for my family one summer evening, each bite was a reminder of how simple ingredients can create a lovely feast that feels both comforting and exotic.

Whether you’re tired of the same boring weeknight meals or just looking to impress with a dish that feels special without extra fuss, this chicken tzatziki recipe is a perfect choice. It’s not just about feeding the body; it’s about nourishing souls and sparking joy in every bite. So, roll up your sleeves and join me in crafting this delightful dinner that brings together the best of homemade goodness and vibrant flavor!

Why You'll Love This Chicken Tzatziki with Rice

  • This recipe is incredibly easy to make, allowing you to whip up a delicious meal without spending hours in the kitchen.
  • The balance of flavors is simply irresistible, with tender grilled chicken, creamy tzatziki, and fluffy rice creating a harmonious dish that will tantalize your taste buds.
  • Its versatility shines through as you can easily customize the ingredients or serve it with your favorite sides to suit any occasion.
  • The beautiful presentation of this dish is sure to impress your family and friends, making it a perfect crowd-pleaser for gatherings and special celebrations.

Chicken Tzatziki with Rice Ingredients

• Get ready to create a refreshing Mediterranean feast!

For the Chicken
• Boneless, skinless chicken breasts – a lean protein choice that becomes juicy when marinated.
• Fresh garlic – adds a punchy flavor that beautifully enhances the chicken’s taste.
• Olive oil – helps lock in moisture while grilling, giving the chicken a lovely golden color.
• Salt and pepper – essential seasonings to bring out the flavors in your Chicken Tzatziki with Rice!

For the Tzatziki Sauce
• Greek yogurt – provides a creamy and tangy base that perfectly complements the chicken.
• Cucumber – grated and squeezed for a refreshing crunch that balances the richness of the yogurt.
• Fresh dill – infuses the sauce with an herbaceous note, elevating its flavor profile.
• Lemon juice – brightens the tzatziki, enhancing its creaminess with a zesty twist.

For the Rice
• Long grain rice (basmati or jasmine) – serves as a fluffy bed for the chicken, absorbing all the flavors beautifully.
• Water – necessary for cooking the rice to fluffy perfection; don’t forget to salt it!

Grab your ingredients, and let’s dive into this delightful culinary journey together!

How to Make Chicken Tzatziki with Rice

  1. Marinate the chicken: In a mixing bowl, combine olive oil, minced garlic, lemon juice, salt, and pepper. Coat the chicken breasts generously and let them marinate for at least 30 minutes for maximum flavor.

  2. Grill the chicken: Preheat your grill to medium-high heat, about 375°F. Cook the marinated chicken for approximately 6–7 minutes per side, or until it reaches an internal temperature of 165°F and is beautifully charred.

  3. Prepare tzatziki sauce: In a separate bowl, mix together Greek yogurt, grated cucumber (ensure it’s squeezed to remove excess moisture), minced garlic, fresh dill, lemon juice, salt, and pepper until the mixture is creamy and well-combined.

  4. Cook rice: In a saucepan, bring 2 cups of water to a boil. Add rinsed rice and a pinch of salt, then lower the heat and cover. Allow it to cook until fluffy, about 15 minutes, following the package instructions.

  5. Serve: On a plate, create a base of fluffy rice, slice the grilled chicken on top, and drizzle with the creamy tzatziki sauce to finish.

Optional: Garnish with a sprinkle of extra dill or a slice of lemon for a fresh touch.

Exact quantities are listed in the recipe card below.

Chicken Tzatziki with Rice Variations

Feel free to explore various twists on this delightful dish that will awaken your culinary creativity!

  • Herbed Chicken: Add your favorite herbs like oregano or thyme to the marinade for an aromatic boost.

  • Spicy Kick: Mix in a pinch of cayenne pepper or red pepper flakes in the tzatziki for a zesty heat that dances on your palate.

  • Cucumber Avocado Tzatziki: Swap half of the cucumber for ripe avocado to create a creamy twist with a rich flavor.

  • Quinoa Base: Replace rice with fluffy quinoa for a protein-packed option that adds a delightful nuttiness to the meal.

  • Grilled Veggies: Toss some seasonal vegetables on the grill alongside the chicken for an added layer of flavor and a colorful presentation.

  • Lemon Zest: Add a teaspoon of freshly grated lemon zest to the tzatziki for an extra zing that brightens the sauce.

  • Baked Chicken Option: For a healthier alternative, bake the marinated chicken at 375°F for 25-30 minutes until cooked through, ensuring it stays moist and juicy.

  • Greek Salad Side: Pair your Chicken Tzatziki with a refreshing Greek salad of tomatoes, cucumber, and feta for a crispy, vibrant contrast.

How to Store and Freeze Chicken Tzatziki with Rice

  • Room Temperature: It’s best not to leave Chicken Tzatziki with Rice out for more than 2 hours. Store leftovers promptly to ensure food safety.
  • Fridge: Store any uneaten Chicken Tzatziki with Rice in an airtight container for up to 3 days. Keep the tzatziki separate until serving to maintain its freshness.
  • Freezer: You can freeze the cooked chicken and rice for up to 3 months. Thaw overnight in the fridge before reheating for the best texture.
  • Reheating: To reheat, place the chicken and rice in the microwave or on the stovetop until heated through, then top with fresh tzatziki just before serving.

Make Ahead Options

These Chicken Tzatziki with Rice are perfect for busy home cooks looking to save time during the week! You can marinate the chicken up to 24 hours in advance, allowing the flavors to develop beautifully. Additionally, the tzatziki sauce can be prepared and refrigerated for up to 3 days; simply store it in an airtight container to maintain its freshness. When you’re ready to serve, grill the marinated chicken according to the recipe instructions and cook the rice fresh for the best texture. This way, you’ll enjoy a delicious, hassle-free meal that feels crafted with love without the last-minute rush!

What to Serve with Chicken Tzatziki with Rice?

Elevate your homemade feast by pairing this vibrant dish with sides that enhance its Mediterranean charm and refreshing flavors.

  • Grilled Vegetables: The smoky taste of charred veggies like zucchini and bell peppers complements the grilled chicken beautifully, adding both color and nutrients.

  • Pita Bread: Soft, warm pita serves as a delightful vessel for scooping up the tzatziki, making every bite a fun, interactive experience.

  • Greek Salad: Crisp cucumbers, ripe tomatoes, and tangy feta create a fresh contrast to the warm chicken, balancing the hearty elements of your meal.

  • Roasted Potatoes: Crispy potatoes seasoned with herbs provide a hearty, comforting side that pairs well with the creamy tzatziki, adding texture to your plate.

  • Lemonade or Iced Tea: Refreshing drinks like lemonade or a cool glass of iced tea cleanse the palate and accentuate the zesty notes in your dish.

  • Baklava: End your meal with sweet, flaky baklava; its rich honey and nut flavors create a delightful finish that mirrors the aromatic spices of the main dish.

These pairings not only enhance the flavors of Chicken Tzatziki with Rice but also create an inviting meal that feels like a celebration of home-cooked goodness.

Chef's Helpful Tips

  • To ensure your Chicken Tzatziki with Rice turns out perfectly, always marinate the chicken for at least 30 minutes to allow the flavors to deeply penetrate the meat.
  • A common mistake is not removing excess moisture from the grated cucumber, so be sure to squeeze it well to prevent a watery tzatziki.
  • When grilling the chicken, using a meat thermometer can help you accurately check that the internal temperature reaches 165°F for safe consumption.
  • For the rice, remember that letting it rest for a few minutes after cooking will enhance its fluffiness and prevent it from becoming gummy.

Chicken Tzatziki with Rice Recipe FAQs

What should I look for when selecting chicken breasts?
Absolutely! When choosing chicken breasts, look for meat that is pinkish in color and plump, with no dark spots. The texture should be firm, not slippery. If possible, look for organic or free-range options for better flavor and quality.

How long can I store leftover Chicken Tzatziki with Rice in the refrigerator?
You can store any leftovers in an airtight container for up to 3 days. Make sure to keep the tzatziki sauce separate until you’re ready to serve to maintain its freshness and creamy texture.

Can I freeze Chicken Tzatziki with Rice?
Yes, you can freeze the cooked chicken and rice for up to 3 months! To do this, allow them to cool completely, then place them in airtight freezer bags or containers. When ready to enjoy, thaw them overnight in the fridge and reheat gently. For the best results, prepare fresh tzatziki sauce after thawing.

What if my tzatziki sauce is too watery?
Very! If your tzatziki is too watery, it’s likely due to excess moisture in the grated cucumber. To prevent this, ensure you squeeze out as much water as possible after grating. If you find it’s already too runny, you can add a little more Greek yogurt to thicken it up, which helps to maintain the creamy consistency.

Are there any dietary considerations I should keep in mind?
Definitely! If you or guests have dairy allergies, you can substitute Greek yogurt with a dairy-free yogurt alternative. Additionally, if you’re serving this dish to pets, avoid giving them any tzatziki sauce due to the garlic, which can be harmful to dogs. Always double-check labels for allergens when working with packaged ingredients.

Chicken Tzatziki with Rice

Chicken Tzatziki with Rice

A delightful Chicken Tzatziki with Rice recipe featuring tender grilled chicken, creamy tzatziki, and fluffy rice.
Print Recipe Pin Recipe
Prep Time 30 minutes mins
Cook Time 20 minutes mins
Total Time 50 minutes mins
Servings: 4 servings
Course: DINNER RECIPES
Cuisine: Mediterranean
Calories: 420
Ingredients Equipment Method Nutrition Notes

Ingredients
  

For the Chicken
  • 4 pieces Boneless, skinless chicken breasts lean protein choice
  • 3 cloves Fresh garlic minced
  • 2 tablespoons Olive oil for marinating
  • 1 teaspoon Salt
  • 1 teaspoon Pepper
For the Tzatziki Sauce
  • 1 cup Greek yogurt
  • 1 cup Cucumber grated and squeezed
  • 2 tablespoons Fresh dill chopped
  • 2 tablespoons Lemon juice freshly squeezed
For the Rice
  • 1 cup Long grain rice basmati or jasmine
  • 2 cups Water for cooking rice

Equipment

  • Grill
  • Mixing bowl
  • Saucepan

Method
 

Directions
  1. In a mixing bowl, combine olive oil, minced garlic, lemon juice, salt, and pepper. Coat the chicken breasts generously and let them marinate for at least 30 minutes for maximum flavor.
  2. Preheat your grill to medium-high heat, about 375°F. Cook the marinated chicken for approximately 6–7 minutes per side, or until it reaches an internal temperature of 165°F and is beautifully charred.
  3. In a separate bowl, mix together Greek yogurt, grated cucumber (ensure it's squeezed to remove excess moisture), minced garlic, fresh dill, lemon juice, salt, and pepper until the mixture is creamy and well-combined.
  4. In a saucepan, bring 2 cups of water to a boil. Add rinsed rice and a pinch of salt, then lower the heat and cover. Allow it to cook until fluffy, about 15 minutes, following the package instructions.
  5. On a plate, create a base of fluffy rice, slice the grilled chicken on top, and drizzle with the creamy tzatziki sauce to finish.

Nutrition

Serving: 1servingCalories: 420kcalCarbohydrates: 40gProtein: 35gFat: 15gSaturated Fat: 4gPolyunsaturated Fat: 1gMonounsaturated Fat: 6gCholesterol: 80mgSodium: 800mgPotassium: 800mgFiber: 2gSugar: 2gVitamin A: 200IUVitamin C: 5mgCalcium: 100mgIron: 2mg

Notes

Marinate the chicken for at least 30 minutes and squeeze cucumber dry to avoid watery tzatziki.

Tried this recipe?

Let us know how it was!

Filed Under: DINNER RECIPES

Garlic Steak and Potatoes

January 21, 2026 by JudyWhite Leave a Comment

There’s something almost hypnotic about the sound of sizzling steak paired with the fragrant whispers of garlic wafting through my kitchen. I first cooked this Garlic Steak and Potatoes recipe on a chilly evening when I craved a heartwarming meal that was both delicious and comforting. It became an instant favorite—not just for the rich flavors that dance across your palate, but for how effortlessly it brings family and friends together around the dinner table.

As I tossed tender Yukon Gold potatoes in olive oil, minced garlic, and aromatic herbs, I knew this simple yet sumptuous dish would transform a busy weeknight into an occasion. The beauty lies in its ease; preparation takes just 15 minutes, and in under an hour, you’ll have a stunning meal that rivals any fine dining experience—all without the stress! You wouldn’t believe you can create such magic in your own home. Let’s dive into this flavorful adventure!

Why You'll Love This Garlic Steak and Potatoes

  • Preparing this dish is a breeze, taking just 15 minutes to get everything ready, making it perfect for busy weeknights.
  • The combination of garlic, herbs, and creamy potatoes creates an unforgettable flavor that will leave everyone wanting more.
  • It’s incredibly versatile; you can easily customize the herbs or even swap out the steak for your favorite protein.
  • The visual appeal of a beautifully browned steak next to crispy, golden potatoes will impress your guests and elevate any dinner occasion.

Garlic Steak and Potatoes Ingredients

Let’s gather the essentials for this mouthwatering meal!

For the Steak

  • 1 lb ribeye or sirloin steak – choose ribeye for a richer flavor or sirloin for a leaner cut.

For the Potatoes

  • 1 lb baby Yukon Gold or red potatoes – their creamy texture complements the steak beautifully.

For the Garlic Butter

  • 6 cloves fresh garlic, minced – fresh garlic adds an aromatic depth you just can’t skip!
  • 4 tbsp unsalted butter – ensures a rich finish; you can substitute with olive oil if you prefer.

For the Cooking

  • 2 tbsp olive oil – a drizzle helps achieve that perfect golden-brown crust on the potatoes.
  • 2 sprigs fresh rosemary, chopped – adds a fragrant element; feel free to use dried if fresh isn’t available.
  • 2 sprigs fresh thyme, chopped – enhances the dish with a warm, earthy note.

For Seasoning

  • Salt and pepper to taste – essential for bringing out the flavors in your Garlic Steak and Potatoes!

How to Make Garlic Steak and Potatoes

  1. Preheat oven – Start by preheating your oven to 425°F (220°C). This high temperature is key for achieving perfectly crispy potatoes.

  2. Wash and prepare – Wash your baby Yukon Gold or red potatoes thoroughly, then cut them in halves or quarters for even cooking.

  3. Season the steak – Pat the ribeye or sirloin steak dry with paper towels. Sprinkle both sides with salt and pepper, making sure to cover them well to enhance the flavor.

  4. Toss the potatoes – In a large bowl, combine the halved potatoes with olive oil, minced garlic, chopped rosemary, thyme, salt, and pepper. Mix until every potato is well-coated.

  5. Spread on a baking sheet – Transfer the seasoned potatoes to a baking sheet, ensuring they’re evenly spaced. This helps them roast beautifully without steaming.

  6. Roast until golden – Place the baking sheet in the preheated oven and roast the potatoes for about 25-30 minutes, or until they are golden brown and tender when pierced with a fork.

  7. Sear the steak – While the potatoes are roasting, heat a skillet over medium-high heat. Add olive oil and sear the seasoned steak for approximately 4-5 minutes per side for a perfect medium-rare finish.

  8. Make the garlic butter – Once the steak is done, remove it from the skillet and let it rest. In the same skillet, melt the unsalted butter with smashed garlic until it becomes fragrant.

  9. Slice and serve – After the steak has rested for a few minutes, slice it against the grain into beautiful pieces. Serve alongside the crispy potatoes, drizzling the garlic butter sauce over the top for a delightful finish.

Optional: Garnish with additional fresh herbs for a pop of color and aroma.

Exact quantities are listed in the recipe card below.

How to Store and Freeze Garlic Steak and Potatoes

Fridge: Store leftover Garlic Steak and Potatoes in an airtight container for up to 3 days. Make sure to separate the steak and potatoes to maintain optimal texture.

Freezer: You can freeze cooked steak and potatoes for up to 3 months. Wrap them tightly in plastic wrap, followed by foil, to prevent freezer burn.

Reheating: Reheat in the oven at 350°F (175°C) for about 20 minutes, or until heated through. For best results, reheat potatoes separately to retain their crispiness.

Garlic Steak and Potatoes Variations

Feel free to get creative and customize this dish to match your taste, ensuring a delightful experience with every bite!

  • Herb Swap: Substitute rosemary and thyme with fresh oregano or sage for a different herbaceous flair. Each brings a unique flavor twist that can transform your meal.

  • Spicy Kick: Add a pinch of red pepper flakes or cayenne pepper when tossing the potatoes for a delightful heat that will awaken your taste buds. Spicy garlic butter makes a wonderful addition!

  • Mushroom Medley: Sauté sliced mushrooms in the garlic butter before drizzling it over the steak. This earthy touch adds depth and richness to your savory dish.

  • Sweet Potatoes: Swap out the Yukon Gold potatoes for sweet potatoes to introduce a natural sweetness and an appealing pop of color. You’ll appreciate the delightful contrast in flavors!

  • Pesto Boost: Drizzle some basil pesto over the cooked steak for a fresh, vibrant burst of flavor that complements the garlic beautifully. A fresh topping elevates the entire dish!

  • Marinade Magic: Marinate the steak in soy sauce and brown sugar for an Asian twist. This creates a juicy flavor explosion that pairs wonderfully with the garlic and buttery potatoes.

  • Cheese It Up: Sprinkle crumbled feta or grated Parmesan cheese over the roasted potatoes just before serving. This adds a savory finishing touch that’s simply irresistible.

  • Zest of Lemon: A squeeze of fresh lemon juice over the finished dish adds brightness and enhances the savory elements of both the steak and potatoes, leaving you refreshed after your meal.

What to Serve with Garlic Steak and Potatoes?

Creating the perfect meal experience means knowing how to complement your delightful Garlic Steak and Potatoes with the right sides and flavors.

  • Crispy Brussels Sprouts: These add a crunchy texture and slight bitterness that beautifully balances the richness of the steak. Toss them in olive oil and a sprinkle of salt before roasting until crispy.

  • Garlic Bread: Soft, buttery, and infused with garlic, it’s the perfect vehicle for savoring every drop of that luscious garlic butter sauce from your steak. Who can resist a warm slice?

  • Mixed Greens Salad: A fresh salad with a zesty vinaigrette provides a refreshing contrast to the hearty steak and potatoes, brightening every bite with vibrant flavors.

  • Creamy Coleslaw: This crunchy side dish offers a tangy sweetness that cuts through the savory steak, creating a delightful harmony of flavors and textures.

  • Red Wine: A glass of bold Cabernet Sauvignon complements the richness of the steak beautifully, enhancing the overall dining experience with each sip.

  • Chocolate Mousse: End the meal on a sweet note with a light and airy dessert that offers luxurious chocolate flavor—perfect after a savory feast!

Make Ahead Options

These Garlic Steak and Potatoes are ideal for busy weeknights, allowing you to prep in advance and save time during dinner. You can marinate the steak by seasoning it with salt and pepper up to 24 hours ahead of time; this allows for deeper flavor. For the potatoes, wash and cut them, then toss with olive oil, garlic, herbs, salt, and pepper, and refrigerate in an airtight container for up to 3 days. When you’re ready to enjoy, simply roast the potatoes and sear the steak according to the recipe. With these make-ahead steps, each bite will be just as delicious, bringing warmth and comfort to your table without added stress!

Chef's Helpful Tips

  • When preparing Garlic Steak and Potatoes, make sure to pat the steak dry before seasoning to achieve a nice crust while cooking.
  • It’s important to cut the potatoes into similar sizes to ensure they roast evenly and cook through properly.
  • For extra flavor, consider marinating the steak in olive oil and herbs for at least 30 minutes before cooking.
  • Keep an eye on the potatoes in the oven and give them a toss halfway through to promote even browning and crispiness.

Garlic Steak and Potatoes Recipe FAQs

How do I select the best potatoes for this recipe?
Absolutely! When choosing potatoes, look for baby Yukon Gold or red potatoes that are firm without any dark spots or blemishes. They should feel smooth and should be free from sprouting. For optimal results, choose potatoes that are similar in size so they cook evenly.

What is the best way to store leftover Garlic Steak and Potatoes?
To ensure your leftovers stay fresh, store them in an airtight container in the fridge for up to 3 days. I recommend separating the steak from the potatoes, as this helps maintain the crispy texture of the potatoes when reheating.

Can I freeze Garlic Steak and Potatoes? If so, how?
Definitely! You can freeze the cooked steak and potatoes for up to 3 months. Wrap each portion individually in plastic wrap, then place them in a heavy-duty freezer bag to avoid freezer burn. Be sure to label the bags with the date to keep track!

How can I reheat Garlic Steak and Potatoes without losing their quality?
For the best results, reheat in the oven at 350°F (175°C) for about 20 minutes, or until everything is heated through. If possible, reheat the potatoes separately to retain their crispiness. Simply spread them out on a baking sheet for even heating.

Are there any dietary considerations I should keep in mind with this recipe?
Yes! This recipe contains dairy from the butter, which may not be suitable for those with lactose intolerance. For a dairy-free alternative, try using olive oil instead of butter. If you’re serving this dish to pets, keep in mind that garlic is harmful to dogs and should be avoided entirely.

Garlic Steak and Potatoes

Garlic Steak and Potatoes

Delicious Garlic Steak and Potatoes create a heartwarming meal that brings family and friends together.
Print Recipe Pin Recipe
Prep Time 15 minutes mins
Cook Time 30 minutes mins
Total Time 45 minutes mins
Servings: 4 servings
Course: DINNER RECIPES
Cuisine: American
Calories: 610
Ingredients Equipment Method Nutrition Notes

Ingredients
  

For the Steak
  • 1 lb ribeye or sirloin steak choose ribeye for a richer flavor or sirloin for a leaner cut.
For the Potatoes
  • 1 lb baby Yukon Gold or red potatoes their creamy texture complements the steak beautifully.
For the Garlic Butter
  • 6 cloves fresh garlic, minced fresh garlic adds an aromatic depth.
  • 4 tbsp unsalted butter ensures a rich finish; can substitute with olive oil.
For the Cooking
  • 2 tbsp olive oil helps achieve that perfect golden-brown crust.
  • 2 sprigs fresh rosemary, chopped adds a fragrant element.
  • 2 sprigs fresh thyme, chopped enhances the dish with a warm, earthy note.
For Seasoning
  • Salt and pepper to taste essential for bringing out the flavors!

Equipment

  • Oven
  • Skillet
  • Baking sheet
  • Mixing bowl

Method
 

Cooking Instructions
  1. Preheat your oven to 425°F (220°C).
  2. Wash your baby Yukon Gold or red potatoes thoroughly, then cut them in halves or quarters for even cooking.
  3. Pat the ribeye or sirloin steak dry with paper towels. Sprinkle both sides with salt and pepper.
  4. Combine the halved potatoes with olive oil, minced garlic, chopped rosemary, thyme, salt, and pepper. Mix until every potato is well-coated.
  5. Transfer the seasoned potatoes to a baking sheet, ensuring they’re evenly spaced.
  6. Place the baking sheet in the preheated oven and roast the potatoes for about 25-30 minutes, or until golden brown and tender.
  7. While the potatoes are roasting, heat a skillet over medium-high heat and sear the seasoned steak for approximately 4-5 minutes per side for a perfect medium-rare finish.
  8. Once the steak is done, remove it from the skillet and let it rest. Melt unsalted butter with smashed garlic in the same skillet until fragrant.
  9. After the steak has rested, slice it against the grain and serve alongside the crispy potatoes, drizzling the garlic butter sauce over the top.

Nutrition

Serving: 1servingCalories: 610kcalCarbohydrates: 37gProtein: 40gFat: 36gSaturated Fat: 15gPolyunsaturated Fat: 2gMonounsaturated Fat: 22gTrans Fat: 1gCholesterol: 120mgSodium: 750mgPotassium: 1200mgFiber: 4gSugar: 1gVitamin A: 800IUVitamin C: 25mgCalcium: 30mgIron: 3mg

Notes

Garnish with additional fresh herbs for added color and aroma.

Tried this recipe?

Let us know how it was!

Filed Under: DINNER RECIPES

Spinach Artichoke Chicken

January 21, 2026 by JudyWhite Leave a Comment

There’s nothing quite like the satisfying sizzle that fills the kitchen as you bake up a delicious dinner, and my Spinach Artichoke Chicken is a perfect example. As the rich aroma of cream cheese mingles with the earthy scent of fresh spinach, I can’t help but feel transported to a cozy bistro tucked away in the heart of a bustling city. It’s a dish that feels fancy yet can easily grace your weeknight table in just 40 minutes.

Not only is this recipe easy to whip up, but it’s also a delightful way to incorporate nutritious greens into your meal. The combination of tender chicken, savory artichokes, and melted Parmesan creates a creamy and flavorful experience that leaves fast food in the dust. Whether you’re cooking for family, friends, or just indulging in some self-care at home, this dish is sure to leave everyone asking for seconds. Let’s dive into this comforting and crowd-pleasing favorite!

Why You'll Love This Spinach Artichoke Chicken

  • This Spinach Artichoke Chicken is incredibly easy to prepare, making it perfect for busy weeknights.
  • The burst of flavors from the creamy cheese, savory artichokes, and vibrant spinach will make your taste buds dance with joy.
  • With its elegant presentation, this dish will impress your family and friends, turning any meal into a special occasion.
  • Plus, it’s a versatile recipe that pairs beautifully with a variety of sides, ensuring it can fit into any dinner plan.

Spinach Artichoke Chicken Ingredients

For the Chicken
• Boneless, skinless chicken breasts – these are lean, versatile proteins that bake beautifully.
• Salt and pepper – essential for seasoning the chicken to enhance its natural flavor.

For the Creamy Mixture
• Fresh spinach, chopped – adds vibrant color and nutritious benefits to your Spinach Artichoke Chicken.
• Artichoke hearts, drained and chopped – offer a tangy, unique flavor that pairs wonderfully with the creamy elements.
• Cream cheese, softened – creates a rich, velvety base for the mixture; ensure it’s at room temperature for easy blending.
• Garlic powder – brings a punch of flavor without the hassle of fresh garlic.
• Grated Parmesan cheese – contributes a salty, nutty flavor, with half mixed in for creaminess and half sprinkled on top for a golden finish.

How to Make Spinach Artichoke Chicken

  1. Preheat your oven to 375°F (190°C). This will ensure your chicken cooks evenly and becomes beautifully golden brown. Spray a baking dish with nonstick cooking spray for easy cleanup.

  2. Season the chicken breasts with salt and pepper. This step is crucial to enhance the chicken’s natural flavors. Place the seasoned chicken in the baking dish, ready to be transformed.

  3. Mix the softened cream cheese, chopped spinach, artichokes, garlic powder, and half of the Parmesan cheese in a bowl. Blend until well combined and creamy, creating a luscious filling that’s full of flavor.

  4. Spread the creamy mixture generously over each chicken breast, coating them well. This will act as a tender and tasty layer, ensuring every bite is deliciously satisfying.

  5. Sprinkle the remaining Parmesan cheese on top of the chicken. This step will create a delightful crust as it bakes, adding that irresistible cheesy goodness we all love.

  6. Bake the dish for 25-30 minutes or until the chicken reaches an internal temperature of 165°F (74°C). The cheese should be bubbling and slightly golden—just wait until you smell that delightful aroma!

Optional: Serve with a squeeze of lemon juice for a refreshing touch.

Exact quantities are listed in the recipe card below.

What to Serve with Spinach Artichoke Chicken?

Transform your dinner experience with delicious sides that elevate your Spinach Artichoke Chicken to new heights, tantalizing the senses with every bite.

  • Creamy Mashed Potatoes: The silky smoothness of mashed potatoes pairs perfectly with the rich filling of the chicken, creating a comforting dish.

  • Garlic Bread: This crisp-on-the-outside, soft-on-the-inside delight is perfect for soaking up the creamy sauce left on your plate. Its aromatic garlic flavor balances the richness of the dish effortlessly.

  • Roasted Vegetables: Colorful and crunchy, a medley of roasted seasonal veggies adds a delightful contrast, enhancing the overall meal with bright flavors and textures.

  • Caesar Salad: The crisp lettuce and tangy dressing cut through the creaminess of the chicken, providing a refreshing balance to the main course. You’ll appreciate each forkful as the flavors dance together.

  • Steamed Rice: Fluffy rice acts like a blank canvas, soaking up the flavors from the Spinach Artichoke Chicken while offering a gentle texture. It’s comforting and satisfying!

  • White Wine: A chilled glass of Sauvignon Blanc brightens the palate, complementing the artichokes while enhancing the savory notes of the dish.

  • Lemon Sorbet: For dessert, this light, refreshing sorbet cleanses the palate and offers a delightful sweet contrast, making it the perfect finish to a satisfying meal.

Spinach Artichoke Chicken Variations

Feel free to get creative with this recipe and make it your own with these delicious tweaks!

  • Dairy-Free: Substitute cream cheese with cashew cream or a dairy-free cream cheese alternative for a creamy, plant-based twist.

  • Herbed Delight: Add a tablespoon of fresh chopped herbs like basil or thyme to the creamy mixture for an aromatic flavor boost. The freshness will elevate your dish to new heights!

  • Spice It Up: Incorporate red pepper flakes or diced jalapeños into the creamy blend for a spicy kick that adds a delightful heat to each bite.

  • Whole Wheat: Swap out regular chicken breasts for whole wheat chicken tenders for a healthier option that still delivers that juicy flavor.

  • Veggie-Packed: Toss in some sun-dried tomatoes or roasted red peppers for extra color, flavor, and nutrients, transforming this dish into a veggie lover’s dream!

  • Cheese Combinations: Experiment with different cheeses like feta or Gouda instead of Parmesan, offering a unique flavor profile that can delight cheese enthusiasts.

  • Stuffed Variation: Create stuffed portobello mushrooms using the same creamy mixture for an elegant appetizer or main dish that will wow your guests.

  • Crispy Topping: For an added crunch, sprinkle a breadcrumb and herb mixture on top before baking. This enhances texture and gives a lovely, golden crust that makes every bite satisfying.

Storage Tips for Spinach Artichoke Chicken

Fridge: Store any leftovers in an airtight container for up to 3 days. This helps maintain its creamy texture and flavors deliciously.

Freezer: Allow the dish to cool completely before wrapping tightly in plastic wrap and aluminum foil. It can be frozen for up to 3 months for later enjoyment.

Reheating: Thaw frozen Spinach Artichoke Chicken in the fridge overnight. Reheat in the oven at 350°F (175°C) until warmed through, about 20-25 minutes, to preserve its creaminess.

Make Ahead Options

Preparing Spinach Artichoke Chicken in advance is a fantastic way to save time for busy weeknights! You can mix the creamy spinach and artichoke filling up to 24 hours ahead of time and store it in the refrigerator. Simply prepare the filling as directed, allowing it to chill in an airtight container, which helps maintain its freshness and prevents browning. When you’re ready to cook, place the seasoned chicken in the baking dish, spread the cold filling on top, and then bake as directed for delicious results. This make-ahead approach ensures you can whip up a comforting meal in no time, keeping the flavors just as vibrant and enticing!

Chef's Helpful Tips

  • For the perfect Spinach Artichoke Chicken, ensure your cream cheese is completely softened to blend easily with the other ingredients.
  • Avoid overcooking the chicken by using a meat thermometer to check that it reaches 165°F for optimal juiciness.
  • When mixing the creamy filling, incorporate the ingredients until just combined to maintain a rich, velvety texture.
  • Baking at the right temperature of 375°F will give you a golden, bubbly top while keeping the chicken moist inside.

Spinach Artichoke Chicken Recipe FAQs

How do I select ripe spinach and artichokes for this recipe?
Absolutely! For spinach, look for bright green leaves without any dark spots or wilting; fresh spinach should feel crisp. For artichokes, you want to choose canned hearts that are firm and free from any discoloration. If using fresh artichokes, they should feel heavy and closed tightly.

How should I store leftovers of Spinach Artichoke Chicken, and how long will they last?
Store any leftovers in an airtight container in the fridge for up to 3 days. Make sure it’s completely cooled before sealing it to maintain that delicious creamy texture. Reheating is also a breeze; just pop it in the oven to bring back the warmth and flavor!

Can I freeze Spinach Artichoke Chicken? If so, how?
Very! To freeze, allow the dish to cool completely, then wrap it tightly in plastic wrap followed by aluminum foil. This double-layering helps prevent freezer burn. It can be frozen for up to 3 months. When you’re ready to enjoy it again, thaw it in the fridge overnight before reheating.

What should I do if my chicken breasts are dry after baking?
If your chicken turns out dry, it might have been overcooked; use a meat thermometer next time to ensure it reaches an internal temperature of 165°F (74°C). For added moisture, consider marinating the chicken in a bit of olive oil or lemon juice before baking next time. Keeping an eye on cooking times really helps!

Are there any dietary considerations I should keep in mind for this recipe?
I often suggest keeping allergies in mind! Both spinach and artichokes are generally safe, but if someone has a dairy allergy, consider substituting with a dairy-free cream cheese alternative. Always check the labels to be sure! If sharing with pets, avoid providing any leftover dish, especially due to the cream cheese and seasonings.

Can I use frozen spinach instead of fresh for this recipe?
Absolutely! If using frozen spinach, I recommend thawing it completely and then squeezing out as much moisture as possible. This prevents excess water from affecting the creamy filling’s texture. Just remember that frozen spinach can have a more muted flavor compared to fresh, so season it well!

Spinach Artichoke Chicken

Spinach Artichoke Chicken

This Spinach Artichoke Chicken combines tender chicken with creamy cheese, spinach, and artichokes, offering a delicious and nutritious meal.
Print Recipe Pin Recipe
Prep Time 10 minutes mins
Cook Time 30 minutes mins
Total Time 40 minutes mins
Servings: 4 servings
Course: DINNER RECIPES
Cuisine: American
Calories: 350
Ingredients Equipment Method Nutrition Notes

Ingredients
  

For the Chicken
  • 4 pieces Boneless, skinless chicken breasts
  • to taste Salt
  • to taste Pepper
For the Creamy Mixture
  • 2 cups Fresh spinach, chopped
  • 1 cup Artichoke hearts, drained and chopped
  • 8 ounces Cream cheese, softened ensure at room temperature
  • 1 teaspoon Garlic powder
  • 1 cup Grated Parmesan cheese half mixed in and half for topping

Equipment

  • Baking dish
  • Mixing bowl
  • meat thermometer

Method
 

Preparation Steps
  1. Preheat your oven to 375°F (190°C). Spray a baking dish with nonstick cooking spray.
  2. Season the chicken breasts with salt and pepper. Place them in the baking dish.
  3. Mix the softened cream cheese, chopped spinach, artichokes, garlic powder, and half of the Parmesan cheese together until creamy.
  4. Spread the creamy mixture over each chicken breast, coating them well.
  5. Sprinkle the remaining Parmesan cheese on top of the chicken.
  6. Bake for 25-30 minutes or until the chicken reaches an internal temperature of 165°F (74°C).

Nutrition

Serving: 1servingCalories: 350kcalCarbohydrates: 5gProtein: 32gFat: 22gSaturated Fat: 12gPolyunsaturated Fat: 1gMonounsaturated Fat: 8gCholesterol: 90mgSodium: 600mgPotassium: 600mgFiber: 1gSugar: 2gVitamin A: 2000IUVitamin C: 10mgCalcium: 300mgIron: 2mg

Notes

Optional: Serve with a squeeze of lemon juice for a refreshing touch.

Tried this recipe?

Let us know how it was!

Filed Under: DINNER RECIPES

Garlic Butter Chicken Bowtie Pasta

January 18, 2026 by JudyWhite Leave a Comment

There’s something about a busy weeknight that calls for a dish that checks all the boxes—delicious, quick, and satisfying. That’s why I love my Garlic Butter Chicken Bowtie Pasta; it effortlessly transforms the ordinary into something extraordinary. Imagine the tantalizing aroma of garlic sizzling in a pan, mingling with buttery goodness before enveloping tender chicken and perfectly cooked pasta. It’s a dish that never fails to impress, even when I’m short on time.

I stumbled upon this recipe during one of those chaotic evenings when takeout didn’t feel right, and I craved a home-cooked meal. With just a handful of ingredients, I discovered the perfect blend of flavors that appealed to my family’s taste and made their faces light up. You won’t believe how easily this beautiful creation can spark joy at the dinner table and keep those fast-food cravings at bay. Ready to elevate your weeknight dinners? Let’s dive into the deliciousness!

Why You'll Love This Garlic Butter Chicken Bowtie Pasta

  • This recipe is incredibly easy to prepare, making it perfect for busy nights when you need a meal in a hurry.
  • The rich flavor of garlic and butter combined with tender chicken creates a mouthwatering dish that will have everyone asking for seconds.
  • It’s also versatile enough to accommodate different tastes—feel free to add your favorite vegetables or swap out the protein for a fun twist.
  • Plus, the beautiful presentation of the bowtie pasta and garnished Parmesan cheese makes it a visually stunning dish that’s sure to impress family and friends at the table.

Garlic Butter Chicken Bowtie Pasta Ingredients

For the Chicken
• Boneless, skinless chicken breasts – 1 lb gives you juicy, tender bites that complement the pasta beautifully.
• Fresh garlic – 4 cloves minced ensures a robust flavor that elevates the entire dish.

For the Pasta
• Bowtie pasta – 8 oz holds the sauce wonderfully and adds a fun shape that appeals to all ages.
• Reserved pasta water – 1 cup used to achieve the perfect sauce consistency for your Garlic Butter Chicken Bowtie Pasta.

For the Sauce
• Unsalted butter – 4 tbsp provides a rich, creamy base for the sauce; feel free to use olive oil for a lighter option!
• Low-sodium soy sauce – 2 tbsp adds a depth of umami that perfectly balances the richness of the butter.
• Parmesan cheese – 1/2 cup freshly grated creates a finishing touch that’s cheesy and delicious.

How to Make Garlic Butter Chicken Bowtie Pasta

  1. Prepare the Chicken: Slice the boneless, skinless chicken breasts into bite-sized pieces and mince 4 cloves of fresh garlic. This will ensure even cooking and a burst of flavor throughout the dish.

  2. Cook the Pasta: Bring a large pot of salted water to a boil. Add the bowtie pasta and cook until al dente, about 8-10 minutes. Reserve 1 cup of pasta water before draining to help create a luscious sauce later on.

  3. Sauté the Chicken: In a skillet over medium heat, melt 2 tablespoons of unsalted butter. Add the diced chicken and season with salt and pepper. Sauté for about 6-8 minutes, or until the chicken is golden brown and cooked through.

  4. Add Garlic: Once the chicken is cooked, add the minced garlic to the skillet and stir for about one minute until it becomes fragrant, filling your kitchen with an irresistible aroma.

  5. Combine Pasta and Chicken: Toss the cooked pasta into the skillet with the chicken, adding 2 tablespoons of low-sodium soy sauce and a splash of the reserved pasta water. Mix gently to ensure everything is well-coated and flavorful.

  6. Finish with Butter and Cheese: Stir in the remaining 2 tablespoons of butter and top your dish with 1/2 cup of freshly grated Parmesan cheese just before serving. Enjoy the creamy goodness as it melts right into the pasta.

Optional: Garnish with chopped parsley for a fresh touch.

Exact quantities are listed in the recipe card below.

Garlic Butter Chicken Bowtie Pasta Variations

Customize your Garlic Butter Chicken Bowtie Pasta to suit your cravings and dietary needs for a meal that’s uniquely yours.

  • Gluten-Free: Swap in gluten-free pasta for a delicious, allergy-friendly option that still delivers on taste and texture.

  • Add Vegetables: Toss in sautéed spinach, cherry tomatoes, or broccoli to boost nutrition while adding vibrant color and flavor.

  • Creamy Upgrade: Stir in a splash of heavy cream or cream cheese for a richer, velvety sauce you won’t be able to resist.

  • Spice It Up: Sprinkle in red pepper flakes or diced jalapeños for a fiery kick that will warm your taste buds.

  • Lemon Zest: Add zest from a lemon before serving to introduce a refreshing citrus note, brightening the overall flavor profile.

  • Herb-Infused: Incorporate fresh herbs such as basil, thyme, or parsley for a fragrant finish that enhances each bite with a garden-fresh taste.

  • Basil Pesto Swap: Substitute soy sauce with basil pesto for a luscious, aromatic twist that lends an Italian flair to the dish.

  • Parmesan Alternatives: Experiment with different cheeses, like feta or goat cheese, for a unique creamy element that transforms the dish further.

What to Serve with Garlic Butter Chicken Bowtie Pasta?

Imagine the delight of a cozy dinner filled with flavorsome sides that take your meal to the next level.

  • Garlic Bread: A crunchy, buttery delight that echoes the garlic notes in the pasta, perfect for mopping up every last sauce drop.

  • Caesar Salad: Crisp romaine lettuce tossed in creamy dressing, providing a refreshing crunch that balances the richness of the pasta.

  • Steamed Broccoli: Bright green, tender florets add a nutritious touch, and their mild flavor complements the garlic butter beautifully.

  • Roasted Vegetables: A medley of seasonal veggies caramelized to perfection offers an earthy sweetness that pairs deliciously with the savory chicken pasta.

  • Lemon Basil Quinoa: Light and fluffy, this dish adds a zesty flair, enhancing the flavors of the garlic butter sauce and offering a healthy grain option.

  • Chocolate Mousse: For dessert, this decadent treat is a rich contrast to the meal, rounding off your dining experience with a sweet flourish.

  • Chardonnay: A chilled glass of this white wine’s elegant notes will elevate your dinner, pairing beautifully with both the chicken and buttery sauce.

Make Ahead Options

These Garlic Butter Chicken Bowtie Pasta creations are perfect for meal prep enthusiasts! You can dice the chicken and mince the garlic up to 24 hours in advance, storing them together in an airtight container in the refrigerator to maintain freshness. Additionally, you can cook the bowtie pasta up to 3 days ahead of time; just make sure to toss it with a little olive oil to prevent sticking. When you’re ready to serve, simply sauté the chicken with garlic, mix in the pasta, and finish with butter and Parmesan for a dish that’s just as delicious as if made fresh. This way, you can swiftly enjoy a homemade meal, even on those hectic weeknights!

How to Store and Freeze Garlic Butter Chicken Bowtie Pasta

Fridge: Store any leftovers in an airtight container for up to 3 days. Reheat gently in the microwave, adding a splash of water to restore moisture.

Freezer: You can freeze Garlic Butter Chicken Bowtie Pasta for up to 2 months. Place in a freezer-safe container, making sure it’s well-sealed to prevent freezer burn.

Reheating: To reheat from frozen, thaw overnight in the fridge and warm in a skillet over medium heat, adding a little reserved pasta water if needed.

Room Temperature: It’s best to avoid leaving this dish out at room temperature for more than 2 hours to maintain quality and safety.

Chef's Helpful Tips

  • When preparing your Garlic Butter Chicken Bowtie Pasta, be sure to dice the chicken into uniform pieces to ensure even cooking throughout.
  • Always melt the butter over medium heat to prevent it from burning, which can lead to a bitter taste in your sauce.
  • To enhance the garlic flavor, add it to the skillet just after the chicken is cooked, allowing it to infuse without overcooking.
  • Remember to reserve the pasta water, as it helps achieve the desired sauce consistency, so don’t forget this crucial step before draining the pasta.

Garlic Butter Chicken Bowtie Pasta Recipe FAQs

How do I choose the right chicken breasts for this recipe?
Absolutely! When selecting chicken breasts, look for ones that are plump and moist with no dark spots or any signs of discoloration. Ideally, they should feel firm and slightly springy to the touch. Always go for fresh chicken, but if you’re opting for frozen, ensure it’s well-packaged and free from frostbite for the best flavor and texture.

How should I store leftovers?
After enjoying your Garlic Butter Chicken Bowtie Pasta, store any leftovers in an airtight container. They will keep well in the fridge for up to 3 days. When reheating, you might want to splash a little water into the dish to restore its creamy consistency—trust me, it makes a big difference!

Can I freeze Garlic Butter Chicken Bowtie Pasta?
Very! You can freeze this dish for up to 2 months. Make sure to place it in a freezer-safe container, and press out as much air as possible to avoid freezer burn. When you’re ready to enjoy it again, thaw it in the fridge overnight. Reheat on the stovetop over medium heat, adding a splash of reserved pasta water to help regain that creamy texture.

What should I do if my pasta is sticky or clumpy?
No worries! If your pasta turns out sticky, it might be due to not enough water during cooking or overcooking the pasta. Next time, ensure you’re boiling in plenty of salted water. If it happens again, simply toss the clumped pasta with a splash of reserved pasta water in the skillet over low heat. This will help loosen it up and reincorporate it into the sauce beautifully!

Is this recipe suitable for anyone with dietary restrictions?
Absolutely! This Garlic Butter Chicken Bowtie Pasta can be made gluten-free by swapping in gluten-free pasta. For those who are lactose intolerant, you can use lactose-free butter and cheese without sacrificing flavor. Just be mindful of checking labels on the soy sauce if you have soy allergies. Always feel free to make it your own based on dietary needs!

Can I add vegetables to the Garlic Butter Chicken Bowtie Pasta?
The more the merrier! You can absolutely add vegetables like spinach, broccoli, or bell peppers to this dish for added nutrition and flavor. I recommend sautéing them with the chicken for a deliciously harmonious blend of flavors—just adjust cooking time accordingly to ensure everything is perfectly tender. Enjoy the vibrant colors and tastes!

Garlic Butter Chicken Bowtie Pasta

Garlic Butter Chicken Bowtie Pasta

Garlic Butter Chicken Bowtie Pasta is a quick and satisfying dish perfect for busy weeknights.
Print Recipe Pin Recipe
Prep Time 10 minutes mins
Cook Time 20 minutes mins
Total Time 30 minutes mins
Servings: 4 servings
Course: DINNER RECIPES
Cuisine: Italian
Calories: 600
Ingredients Equipment Method Nutrition Notes

Ingredients
  

For the Chicken
  • 1 lb boneless, skinless chicken breasts juicy, tender bites
  • 4 cloves fresh garlic minced
For the Pasta
  • 8 oz bowtie pasta holds the sauce wonderfully
  • 1 cup reserved pasta water for sauce consistency
For the Sauce
  • 4 tbsp unsalted butter rich, creamy base
  • 2 tbsp low-sodium soy sauce adds umami
  • 1/2 cup Parmesan cheese freshly grated

Equipment

  • Skillet
  • Large pot
  • Cutting Board
  • Knife

Method
 

How to Make Garlic Butter Chicken Bowtie Pasta
  1. Slice the boneless, skinless chicken breasts into bite-sized pieces and mince the fresh garlic.
  2. Bring a large pot of salted water to a boil. Add the bowtie pasta and cook until al dente, about 8-10 minutes. Reserve 1 cup of pasta water before draining.
  3. In a skillet over medium heat, melt 2 tablespoons of unsalted butter. Add the diced chicken and season with salt and pepper. Sauté for about 6-8 minutes until golden brown.
  4. Once the chicken is cooked, add the minced garlic to the skillet and stir for about one minute until fragrant.
  5. Toss the cooked pasta into the skillet with the chicken, adding 2 tablespoons of low-sodium soy sauce and a splash of the reserved pasta water. Mix gently.
  6. Stir in the remaining 2 tablespoons of butter and top with 1/2 cup of Parmesan cheese just before serving.

Nutrition

Serving: 1cupCalories: 600kcalCarbohydrates: 75gProtein: 35gFat: 20gSaturated Fat: 10gPolyunsaturated Fat: 2gMonounsaturated Fat: 7gCholesterol: 80mgSodium: 800mgPotassium: 600mgFiber: 3gSugar: 2gVitamin A: 400IUVitamin C: 2mgCalcium: 200mgIron: 2mg

Notes

Optional: Garnish with chopped parsley for a fresh touch.

Tried this recipe?

Let us know how it was!

Filed Under: DINNER RECIPES

Garlic Butter Chicken Bowtie Pasta

January 18, 2026 by JudyWhite Leave a Comment

There’s something about a busy weeknight that calls for a dish that checks all the boxes—delicious, quick, and satisfying. That’s why I love my Garlic Butter Chicken Bowtie Pasta; it effortlessly transforms the ordinary into something extraordinary. Imagine the tantalizing aroma of garlic sizzling in a pan, mingling with buttery goodness before enveloping tender chicken and perfectly cooked pasta. It’s a dish that never fails to impress, even when I’m short on time.

I stumbled upon this recipe during one of those chaotic evenings when takeout didn’t feel right, and I craved a home-cooked meal. With just a handful of ingredients, I discovered the perfect blend of flavors that appealed to my family’s taste and made their faces light up. You won’t believe how easily this beautiful creation can spark joy at the dinner table and keep those fast-food cravings at bay. Ready to elevate your weeknight dinners? Let’s dive into the deliciousness!

Why You'll Love This Garlic Butter Chicken Bowtie Pasta

  • This recipe is incredibly easy to prepare, making it perfect for busy nights when you need a meal in a hurry.
  • The rich flavor of garlic and butter combined with tender chicken creates a mouthwatering dish that will have everyone asking for seconds.
  • It’s also versatile enough to accommodate different tastes—feel free to add your favorite vegetables or swap out the protein for a fun twist.
  • Plus, the beautiful presentation of the bowtie pasta and garnished Parmesan cheese makes it a visually stunning dish that’s sure to impress family and friends at the table.

Garlic Butter Chicken Bowtie Pasta Ingredients

For the Chicken
• Boneless, skinless chicken breasts – 1 lb gives you juicy, tender bites that complement the pasta beautifully.
• Fresh garlic – 4 cloves minced ensures a robust flavor that elevates the entire dish.

For the Pasta
• Bowtie pasta – 8 oz holds the sauce wonderfully and adds a fun shape that appeals to all ages.
• Reserved pasta water – 1 cup used to achieve the perfect sauce consistency for your Garlic Butter Chicken Bowtie Pasta.

For the Sauce
• Unsalted butter – 4 tbsp provides a rich, creamy base for the sauce; feel free to use olive oil for a lighter option!
• Low-sodium soy sauce – 2 tbsp adds a depth of umami that perfectly balances the richness of the butter.
• Parmesan cheese – 1/2 cup freshly grated creates a finishing touch that’s cheesy and delicious.

How to Make Garlic Butter Chicken Bowtie Pasta

  1. Prepare the Chicken: Slice the boneless, skinless chicken breasts into bite-sized pieces and mince 4 cloves of fresh garlic. This will ensure even cooking and a burst of flavor throughout the dish.

  2. Cook the Pasta: Bring a large pot of salted water to a boil. Add the bowtie pasta and cook until al dente, about 8-10 minutes. Reserve 1 cup of pasta water before draining to help create a luscious sauce later on.

  3. Sauté the Chicken: In a skillet over medium heat, melt 2 tablespoons of unsalted butter. Add the diced chicken and season with salt and pepper. Sauté for about 6-8 minutes, or until the chicken is golden brown and cooked through.

  4. Add Garlic: Once the chicken is cooked, add the minced garlic to the skillet and stir for about one minute until it becomes fragrant, filling your kitchen with an irresistible aroma.

  5. Combine Pasta and Chicken: Toss the cooked pasta into the skillet with the chicken, adding 2 tablespoons of low-sodium soy sauce and a splash of the reserved pasta water. Mix gently to ensure everything is well-coated and flavorful.

  6. Finish with Butter and Cheese: Stir in the remaining 2 tablespoons of butter and top your dish with 1/2 cup of freshly grated Parmesan cheese just before serving. Enjoy the creamy goodness as it melts right into the pasta.

Optional: Garnish with chopped parsley for a fresh touch.

Exact quantities are listed in the recipe card below.

Garlic Butter Chicken Bowtie Pasta Variations

Customize your Garlic Butter Chicken Bowtie Pasta to suit your cravings and dietary needs for a meal that’s uniquely yours.

  • Gluten-Free: Swap in gluten-free pasta for a delicious, allergy-friendly option that still delivers on taste and texture.

  • Add Vegetables: Toss in sautéed spinach, cherry tomatoes, or broccoli to boost nutrition while adding vibrant color and flavor.

  • Creamy Upgrade: Stir in a splash of heavy cream or cream cheese for a richer, velvety sauce you won’t be able to resist.

  • Spice It Up: Sprinkle in red pepper flakes or diced jalapeños for a fiery kick that will warm your taste buds.

  • Lemon Zest: Add zest from a lemon before serving to introduce a refreshing citrus note, brightening the overall flavor profile.

  • Herb-Infused: Incorporate fresh herbs such as basil, thyme, or parsley for a fragrant finish that enhances each bite with a garden-fresh taste.

  • Basil Pesto Swap: Substitute soy sauce with basil pesto for a luscious, aromatic twist that lends an Italian flair to the dish.

  • Parmesan Alternatives: Experiment with different cheeses, like feta or goat cheese, for a unique creamy element that transforms the dish further.

How to Store and Freeze Garlic Butter Chicken Bowtie Pasta

Fridge: Store any leftovers in an airtight container for up to 3 days. Reheat gently in the microwave, adding a splash of water to restore moisture.

Freezer: You can freeze Garlic Butter Chicken Bowtie Pasta for up to 2 months. Place in a freezer-safe container, making sure it’s well-sealed to prevent freezer burn.

Reheating: To reheat from frozen, thaw overnight in the fridge and warm in a skillet over medium heat, adding a little reserved pasta water if needed.

Room Temperature: It’s best to avoid leaving this dish out at room temperature for more than 2 hours to maintain quality and safety.

What to Serve with Garlic Butter Chicken Bowtie Pasta?

Imagine the delight of a cozy dinner filled with flavorsome sides that take your meal to the next level.

  • Garlic Bread: A crunchy, buttery delight that echoes the garlic notes in the pasta, perfect for mopping up every last sauce drop.

  • Caesar Salad: Crisp romaine lettuce tossed in creamy dressing, providing a refreshing crunch that balances the richness of the pasta.

  • Steamed Broccoli: Bright green, tender florets add a nutritious touch, and their mild flavor complements the garlic butter beautifully.

  • Roasted Vegetables: A medley of seasonal veggies caramelized to perfection offers an earthy sweetness that pairs deliciously with the savory chicken pasta.

  • Lemon Basil Quinoa: Light and fluffy, this dish adds a zesty flair, enhancing the flavors of the garlic butter sauce and offering a healthy grain option.

  • Chocolate Mousse: For dessert, this decadent treat is a rich contrast to the meal, rounding off your dining experience with a sweet flourish.

  • Chardonnay: A chilled glass of this white wine’s elegant notes will elevate your dinner, pairing beautifully with both the chicken and buttery sauce.

Make Ahead Options

These Garlic Butter Chicken Bowtie Pasta creations are perfect for meal prep enthusiasts! You can dice the chicken and mince the garlic up to 24 hours in advance, storing them together in an airtight container in the refrigerator to maintain freshness. Additionally, you can cook the bowtie pasta up to 3 days ahead of time; just make sure to toss it with a little olive oil to prevent sticking. When you’re ready to serve, simply sauté the chicken with garlic, mix in the pasta, and finish with butter and Parmesan for a dish that’s just as delicious as if made fresh. This way, you can swiftly enjoy a homemade meal, even on those hectic weeknights!

Chef's Helpful Tips

  • When preparing your Garlic Butter Chicken Bowtie Pasta, be sure to dice the chicken into uniform pieces to ensure even cooking throughout.
  • Always melt the butter over medium heat to prevent it from burning, which can lead to a bitter taste in your sauce.
  • To enhance the garlic flavor, add it to the skillet just after the chicken is cooked, allowing it to infuse without overcooking.
  • Remember to reserve the pasta water, as it helps achieve the desired sauce consistency, so don’t forget this crucial step before draining the pasta.

Garlic Butter Chicken Bowtie Pasta Recipe FAQs

How do I select the best chicken breasts for this recipe?
Absolutely! Look for chicken breasts that are firm and slightly moist, with no dark spots or signs of bruising. Freshness is key, so check the sell-by date. If possible, try to buy organic or free-range chicken for a more flavorful meal.

What is the best way to store leftovers?
After enjoying your delicious Garlic Butter Chicken Bowtie Pasta, store any leftovers in an airtight container in the fridge for up to 3 days. It’s important to let the dish cool down completely before sealing the container to keep it as fresh as possible!

Can I freeze Garlic Butter Chicken Bowtie Pasta?
Yes! You can freeze this dish for up to 2 months. Here’s how: First, let it cool completely. Then, wrap it tightly with plastic wrap to prevent freezer burn, and place it in a freezer-safe container. When you’re ready to enjoy, just thaw it overnight in the refrigerator, then reheat it in a skillet over medium heat, adding a splash of reserved pasta water to bring back its creamy texture.

What should I do if my pasta is too dry when reheating?
If your pasta seems dry, don’t worry! Just add a couple of tablespoons of reserved pasta water or even a splash of chicken broth as you reheat it. This will help to moisten the dish and restore the delicious buttery sauce that makes this Garlic Butter Chicken Bowtie Pasta so special.

Are there any dietary considerations for this recipe?
Very! If you’re cooking for someone with lactose intolerance, feel free to substitute the butter with a dairy-free alternative and use nutritional yeast instead of Parmesan for a cheesy flavor. Also, check the soy sauce for gluten if that’s a concern—there’s always a gluten-free version available!

How can I incorporate more veggies into this dish?
The more the merrier! You can add fresh veggies like spinach, cherry tomatoes, or bell peppers. Just sauté them along with the chicken for the last few minutes of cooking. This not only boosts the nutritional content but also adds vibrant colors and flavors to your Garlic Butter Chicken Bowtie Pasta!

Garlic Butter Chicken Bowtie Pasta

Garlic Butter Chicken Bowtie Pasta

A quick and satisfying dish featuring garlic, butter, chicken, and bowtie pasta.
Print Recipe Pin Recipe
Prep Time 10 minutes mins
Cook Time 20 minutes mins
Total Time 30 minutes mins
Servings: 4 servings
Course: DINNER RECIPES
Cuisine: American
Calories: 550
Ingredients Equipment Method Nutrition Notes

Ingredients
  

For the Chicken
  • 1 lb Boneless, skinless chicken breasts gives you juicy, tender bites
  • 4 cloves Fresh garlic minced
For the Pasta
  • 8 oz Bowtie pasta holds the sauce well
  • 1 cup Reserved pasta water used to achieve perfect sauce consistency
For the Sauce
  • 4 tbsp Unsalted butter provides a rich, creamy base
  • 2 tbsp Low-sodium soy sauce adds depth of umami
  • 1/2 cup Parmesan cheese freshly grated

Equipment

  • Large pot
  • Skillet
  • Knife
  • Cutting Board

Method
 

How to Make Garlic Butter Chicken Bowtie Pasta
  1. Slice the boneless, skinless chicken breasts into bite-sized pieces and mince the garlic.
  2. Bring a large pot of salted water to a boil. Add the bowtie pasta and cook until al dente, about 8-10 minutes. Reserve 1 cup of pasta water before draining.
  3. In a skillet over medium heat, melt 2 tablespoons of unsalted butter. Add the diced chicken and season with salt and pepper. Sauté for 6-8 minutes until golden brown and cooked through.
  4. Add the minced garlic to the skillet and stir for about one minute until fragrant.
  5. Toss the cooked pasta into the skillet with the chicken, adding 2 tablespoons of soy sauce and a splash of reserved pasta water. Mix gently.
  6. Stir in the remaining 2 tablespoons of butter and top with Parmesan cheese just before serving.

Nutrition

Serving: 1servingCalories: 550kcalCarbohydrates: 60gProtein: 30gFat: 22gSaturated Fat: 10gPolyunsaturated Fat: 1gMonounsaturated Fat: 7gCholesterol: 80mgSodium: 700mgPotassium: 550mgFiber: 3gSugar: 2gVitamin A: 600IUVitamin C: 2mgCalcium: 200mgIron: 2mg

Notes

Optional: Garnish with chopped parsley for a fresh touch.

Tried this recipe?

Let us know how it was!

Filed Under: DINNER RECIPES

One Pot Tomato Basil Pasta

January 18, 2026 by JudyWhite Leave a Comment

When the craving for comforting pasta hits, I reach for this One Pot Tomato Basil Pasta, a recipe that never disappoints. The moment the garlic begins to sizzle in olive oil, my kitchen transforms into an aromatic haven, drawing everyone in. This dish not only delights the senses but also respects my busy schedule, coming together in just 25 minutes with minimal fuss.

It’s truly magical how a handful of wholesome ingredients can lead to something so vibrant and full of flavor. With the fresh basil mingling with juicy diced tomatoes, each bite feels like a celebration of home-cooked goodness. Whether you’re preparing a weeknight dinner or impressing friends at a casual gathering, this recipe is bound to become a staple. Plus, the one-pot setup means less cleanup, allowing you to savor the moment rather than fret about dishes. Let’s dive into this delightful culinary journey and bring some heart to your table!

Why You'll Love This One Pot Tomato Basil Pasta

  • You will love how easy this dish comes together in just 25 minutes, making it perfect for busy weeknights.
  • The combination of fresh basil and juicy tomatoes creates a burst of flavor that will have your taste buds dancing.
  • This recipe is incredibly versatile; you can easily add your favorite protein or veggies to customize it to your liking.
  • The stunning colors and aromas not only elevate your meal but also make it an eye-catching dish to impress your friends and family.
  • You’ll appreciate the one-pot preparation that saves you time on cleanup, allowing you to fully enjoy your delicious meal with loved ones.

One Pot Tomato Basil Pasta Ingredients

Get ready to whip up a delicious meal!

For the Pasta

  • 8 oz spaghetti or penne pasta – choose your favorite shape for a delightful texture.

For the Sauce

  • 1 can (14.5 oz) diced tomatoes, undrained – the foundation of flavor, perfect for our One Pot Tomato Basil Pasta.
  • 4 cloves garlic, minced – adds a warming aroma and depth to your dish.
  • 1 medium onion, finely chopped – brings sweetness and richness to the sauce.
  • 2 tbsp extra virgin olive oil – a heart-healthy fat that enhances the overall flavor.
  • 4 cups low-sodium vegetable broth – keeps it light while providing essential moisture to cook the pasta.

For the Finishing Touch

  • 1 cup fresh basil leaves, chopped – this bright herb adds freshness and a burst of color to your completed dish.

Feel free to gather these ingredients and prepare for a delightful cooking experience that will make your home smell divine!

How to Make One Pot Tomato Basil Pasta

  1. Heat the oil: In a large pot, add the extra virgin olive oil and heat it over medium heat. Sauté the finely chopped onion until it becomes translucent, about 5 minutes. The aroma of the cooking onion will draw you in!

  2. Add garlic: Stir in the minced garlic and cook for another minute, just until fragrant. This step is crucial as it builds the base of flavor for our pasta dish!

  3. Combine tomatoes: Next, gently stir in the can of diced tomatoes along with their juices. Mixing well ensures that every bite is infused with that juicy, tangy goodness.

  4. Cook the pasta: Pour in the low-sodium vegetable broth and add the pasta. Bring the mixture to a boil, then reduce the heat to low. Cover and simmer for about 10 minutes, stirring occasionally. The pasta should become al dente with a perfect chewy texture.

  5. Finish with basil: Once the pasta is cooked, remove the pot from heat and fold in the chopped fresh basil. The vibrant green basil will brighten up the dish, adding both flavor and visuals!

  6. Serve: Dish up the pasta immediately and, if desired, sprinkle some Parmesan cheese on top. This indulgent touch is sure to elevate your meal!

Optional: Garnish with a few whole basil leaves for an extra pop of color.

Exact quantities are listed in the recipe card below.

What to Serve with One Pot Tomato Basil Pasta?

The beauty of this vibrant pasta dish opens the door to a world of delightful pairings that elevate your meal.

  • Garlic Bread: The perfect crunchy companion, with its buttery goodness and garlic fragrance complementing the pasta’s rich flavors.
  • Caprese Salad: Fresh mozzarella, tomatoes, and basil create a refreshing contrast, enhancing the dish’s Italian essence while adding vibrant colors.
  • Roasted Vegetables: A medley of seasonal veggies brings added texture and depth, rounding out the meal with a healthy twist.
  • Caesar Salad: Crisp romaine and creamy dressing create a satisfying crunch, providing balance to the pasta’s softness and acidity.
  • Herb-Infused Olive Oil: Drizzle over each serving for an enticing finishing touch that highlights the dish’s fragrant basil notes.
  • Lemon Sorbet: A light and zesty dessert, cleansing the palate after the savory pasta, inviting a refreshing end to your meal.
  • Red Wine: A glass of Chianti or Merlot enhances the dining experience, harmonizing beautifully with the tomato and basil flavors.

These pairings not only complement the One Pot Tomato Basil Pasta but also invite a delightful tapestry of tastes and textures to your table. Enjoy your culinary adventure!

How to Store and Freeze One Pot Tomato Basil Pasta

Fridge: Store leftovers in an airtight container in the refrigerator for up to 3 days. Reheat on the stovetop, adding a splash of water to keep it moist.

Freezer: For long-term storage, freeze the pasta in a freezer-safe container for up to 2 months. Thaw overnight in the fridge before reheating.

Reheating: Reheat on low heat in a skillet or microwave. Add a little broth or water to help restore the creamy texture of your One Pot Tomato Basil Pasta.

Room Temperature: Avoid leaving the pasta out at room temperature for more than 2 hours to prevent spoilage.

One Pot Tomato Basil Pasta Variations

Feel free to make this delightful dish your own by trying out these creative twists!

  • Gluten-Free: Substitute the pasta with gluten-free penne or spaghetti for a friendly alternative without sacrificing flavor.
  • Extra Veggies: Toss in fresh spinach or zucchini for added nutrition and vibrant color, transforming your pasta into a heartier meal.
  • Protein Boost: Incorporate cooked chicken, shrimp, or chickpeas for a protein-packed twist that will satisfy even the hungriest of diners.
  • Spicy Kick: Add red pepper flakes or chopped jalapeños for a zesty heat that elevates the dish, appealing to those who crave a bit of spice.
  • Creamy Version: Stir in a splash of heavy cream or a dollop of mascarpone cheese after adding the basil for a rich and velvety finish.
  • Herb Fusion: Experiment with other herbs like oregano or parsley alongside the basil for an aromatic blend that surprises the palate with new layers of flavor.
  • Roasted Garlic: Roast a head of garlic, then mash the cloves into the sauce for a sweet, caramelized flavor that brings a whole new depth to your dish.
  • Cheesy Delight: Swap in a blend of cheeses like mozzarella or goat cheese, melting them into the dish right before serving for a cheesy, gooey experience that everyone will love.

Make Ahead Options

These One Pot Tomato Basil Pasta is perfect for busy home cooks looking to save time during hectic weekdays! You can chop the onions and garlic, and even measure out the vegetable broth up to 3 days in advance, storing them in airtight containers in the refrigerator to maintain their freshness. The diced tomatoes can remain in the pantry, so you’ll have everything prepped and ready to go. When it’s time to cook, simply sauté the onion and garlic as instructed, then add the remaining ingredients. Preparing ahead not only makes the cooking process quicker but ensures your dish stays just as delicious and vibrant. Enjoy restaurant-quality pasta with minimal effort!

Chef's Helpful Tips

  • For your One Pot Tomato Basil Pasta, ensure your onion is finely chopped for even cooking and sweet flavor development.
  • Avoid overcooking the garlic; it should be fragrant, not browned, to prevent bitterness in the dish.
  • When combining the diced tomatoes, use the juices as well for a richer flavor throughout the pasta.
  • Keep an eye on the pasta during the last few minutes of cooking to achieve that perfect al dente texture.

One Pot Tomato Basil Pasta Recipe FAQs

What type of pasta is best for One Pot Tomato Basil Pasta?
Absolutely! You can use any pasta shape you love, such as spaghetti or penne. Just be mindful of the cooking time; thicker pasta may require a bit longer to reach that perfect al dente texture.

How should I store One Pot Tomato Basil Pasta leftovers?
I recommend storing your leftovers in an airtight container in the refrigerator. They will stay fresh for up to 3 days. When you’re ready to enjoy them again, just reheat on the stovetop with a splash of water to retain moisture.

Can I freeze One Pot Tomato Basil Pasta?
Yes, indeed! For freezing, allow the pasta to cool completely before placing it in a freezer-safe container. You can keep it for up to 2 months. When you’re ready to eat, thaw it overnight in the fridge, then reheat gently on the stove, adding a bit of broth or water if needed to revive the creamy texture.

What should I do if my pasta is overcooked?
Very common! If you find your pasta is overcooked, try adding a splash of vegetable broth or water and gently reheating it. This can help revive some texture, but note it may still be softer than ideal. For next time, keep a close eye on the cooking time, stirring occasionally, to achieve that perfect al dente bite.

Can I add additional ingredients to One Pot Tomato Basil Pasta?
The more the merrier! Feel free to add your favorite vegetables or proteins, such as spinach, cherry tomatoes, or grilled chicken. Just be sure to adjust the cooking times a bit and add denser vegetables earlier to ensure everything is cooked perfectly.

Are there any dietary considerations I should keep in mind?
Absolutely! This One Pot Tomato Basil Pasta is naturally plant-based and can be egg-free if you choose a pasta that fits those criteria. If you have allergies, be cautious with the broth and ensure it’s low-sodium and vegetable-based. Additionally, always check basil for any allergies if you serve this dish to others.

One Pot Tomato Basil Pasta

One Pot Tomato Basil Pasta

Enjoy this One Pot Tomato Basil Pasta, a quick and easy recipe for a comforting dish that never disappoints, blending fresh basil and juicy tomatoes.
Print Recipe Pin Recipe
Prep Time 10 minutes mins
Cook Time 15 minutes mins
Total Time 25 minutes mins
Servings: 4 servings
Course: DINNER RECIPES
Cuisine: Italian
Calories: 350
Ingredients Equipment Method Nutrition Notes

Ingredients
  

For the Pasta
  • 8 oz spaghetti or penne pasta choose your favorite shape for a delightful texture.
For the Sauce
  • 14.5 oz canned diced tomatoes undrained, the foundation of flavor.
  • 4 cloves garlic minced, adds aroma and depth.
  • 1 medium onion finely chopped, brings sweetness.
  • 2 tbsp extra virgin olive oil heart-healthy fat.
  • 4 cups low-sodium vegetable broth provides moisture to cook pasta.
For the Finishing Touch
  • 1 cup fresh basil leaves chopped, adds brightness.

Equipment

  • Large pot

Method
 

How to Make One Pot Tomato Basil Pasta
  1. In a large pot, add the extra virgin olive oil and heat it over medium heat. Sauté the finely chopped onion until it becomes translucent, about 5 minutes.
  2. Stir in the minced garlic and cook for another minute, just until fragrant.
  3. Gently stir in the can of diced tomatoes along with their juices.
  4. Pour in the low-sodium vegetable broth and add the pasta. Bring to a boil, then reduce heat to low. Cover and simmer for about 10 minutes, stirring occasionally.
  5. Once the pasta is cooked, remove the pot from heat and fold in the chopped fresh basil.
  6. Dish up the pasta immediately and, if desired, sprinkle some Parmesan cheese on top.

Nutrition

Serving: 1servingCalories: 350kcalCarbohydrates: 50gProtein: 10gFat: 12gSaturated Fat: 2gMonounsaturated Fat: 8gSodium: 400mgPotassium: 800mgFiber: 6gSugar: 4gVitamin A: 500IUVitamin C: 20mgCalcium: 50mgIron: 2mg

Notes

Store leftovers in an airtight container in the refrigerator for up to 3 days. Reheat on the stovetop, adding a splash of water to keep it moist.

Tried this recipe?

Let us know how it was!

Filed Under: DINNER RECIPES

One Pot Cheesy Pasta

January 16, 2026 by JudyWhite Leave a Comment

Picture this: you’ve come home after a long day, feeling the weight of the world on your shoulders. The last thing you want is to whip up a complicated meal in the kitchen. That’s the moment I discovered the joy of One Pot Cheesy Pasta. It’s not just comfort food; it’s a warm embrace in a bowl. The sound of bubbling pasta mingling with creamy cheddar fills the air, instantly lifting your spirits.

With just a handful of ingredients and a mere 30 minutes, you can create a dish that’s as satisfying as it is simple. Whether you’re feeding a busy family or just indulging yourself on a cozy night in, this recipe is your ticket to a hassle-free dining experience. The rich flavors of garlic and cheese meld together beautifully, making it a crowd-pleaser for sure. Trust me, with this One Pot Cheesy Pasta, you’ll never look at weeknight dinners the same way again!

Why You'll Love This One Pot Cheesy Pasta

  • This recipe is incredibly easy to make, allowing you to enjoy a delicious meal without spending hours in the kitchen.
  • The creamy cheese and rich garlic flavors create a comforting dish that will have your taste buds dancing with joy.
  • Its versatility means you can customize it with your favorite proteins or vegetables, making it suitable for any occasion.
  • Plus, the vibrant, gooey appearance of the pasta is as delightful to look at as it is to eat, making it perfect for impressing guests or simply treating yourself.

One Pot Cheesy Pasta Ingredients

Get ready to create a dish that warms your heart!

For the Pasta
• 8 oz penne pasta – this shape holds sauces beautifully, making your One Pot Cheesy Pasta even creamier.

For the Cheese Sauce
• 1 cup shredded cheddar cheese – a classic choice that melts wonderfully and brings that signature cheesy flavor.
• 1 cup heavy cream – adds richness and creates a luscious consistency.
• 1 tsp garlic powder – this enhances the savory depth of flavor, complementing the cheese perfectly.

For Cooking
• 2 cups vegetable broth – gives the pasta a savory base that infuses delicious flavors as it cooks.
• Salt and pepper to taste – crucial for balancing flavors and making each bite sing.

How to Make One Pot Cheesy Pasta

  1. Gather ingredients
    Begin your culinary journey by bringing together all your delightful ingredients. Having everything on hand makes the cooking process smooth and enjoyable!

  2. Combine pasta and broth
    In a large pot over medium heat, mix the penne pasta with 2 cups of vegetable broth. Bring the mixture to a simmer, then cook according to package instructions until the pasta is al dente.

  3. Add cream and seasonings
    Reduce heat to low and stir in 1 cup of heavy cream, 1 teaspoon of garlic powder, along with salt and pepper. Mix well until everything is beautifully blended.

  4. Incorporate cheese
    Gradually add 1 cup of shredded cheddar cheese to the pot. Stir continuously as you watch the cheese melt into a creamy, dreamy concoction.

  5. Adjust seasoning
    Taste your One Pot Cheesy Pasta and adjust the seasoning if needed. A little more salt or pepper can elevate the dish to perfection!

  6. Serve and garnish
    Serve the pasta hot, garnished with fresh herbs or an extra sprinkle of cheese to make it even more inviting. Enjoy every scrumptious bite!

Optional: Top with crispy bacon bits for added crunch and flavor.
Exact quantities are listed in the recipe card below.

One Pot Cheesy Pasta Variations

Feel free to add your own twist to this comforting dish for a delightful surprise!

  • Gluten-Free: Substitute the penne pasta with your favorite gluten-free pasta blend for a safe and tasty option.

  • Veggie Boost: Mix in sautéed vegetables like spinach or bell peppers for added nutrition and vibrant color.

  • Meat Lover’s: Add cooked chicken, sausage, or bacon pieces for a heartier meal that’s bursting with flavor.

  • Spicy Kick: Sprinkle in red pepper flakes or diced jalapeños to bring a fiery element that will tantalize your taste buds.

  • Creamy Dream: Swap heavy cream for cream cheese for a thicker, richer sauce that coats every noodle.

  • Different Cheese: Experiment with cheese varieties like mozzarella or gouda for a unique flavor profile that changes up the classic taste.

  • Herb Infusion: Stir in fresh herbs like basil or thyme right before serving to elevate the dish with aromatic freshness.

  • Zesty Upgrade: Mix in a splash of lemon juice or zest before serving for a bright and tangy flavor boost that livens up every bite.

What to Serve with One Pot Cheesy Pasta?

Picture an inviting table filled with delightful dishes that perfectly complement each other. Elevate your meal with these delicious pairings!

  • Garlic Bread: The warm, buttery crunch of garlic bread creates a harmonious duo with the creamy pasta.

  • Roasted Broccoli: This vibrant green side brings a fresh crunch and a touch of earthiness that balances the richness of the cheese.

  • Caesar Salad: Crisp romaine and tangy dressing offer a refreshing contrast, making each bite of pasta feel even more indulgent.

  • Stuffed Mushrooms: These savory bites add a touch of elegance to the table, with their umami flavor enhancing the overall dining experience. Imagine popping one in your mouth alongside the cheesy goodness!

  • Aquamarine Sangria: A fruity and refreshing drink, this sangria complements the rich flavors of the pasta perfectly, cleansing the palate between bites.

  • Chocolate Mousse: For dessert, a light and airy chocolate mousse provides a sweet, decadent finish to your meal, creating a delightful end to your cheesy feast.

  • Steamed Asparagus: Tender asparagus spears drizzled with lemon juice bring a bright, zesty note that cuts through the creaminess, rounding out the meal beautifully.

  • Zesty Lemonade: This refreshing drink brightens up the table, making it a perfect pairing against the comforting pasta dish.

Feel free to mix and match these pairings to suit your mood!

Make Ahead Options

One Pot Cheesy Pasta is a glorious dish that’s perfect for meal prep! You can cook the pasta and make the cheese sauce up to 3 days in advance. To do this, simply combine the penne and vegetable broth and cook until al dente. After that, let it cool completely, then mix in the heavy cream and seasonings before refrigerating in an airtight container. To maintain quality, store the cheese separately and add it just before serving. When you’re ready to enjoy, gently reheat the pasta on the stovetop, incorporating the cheese until melted, and you’ll have a comforting meal ready in minutes!

How to Store and Freeze One Pot Cheesy Pasta

Fridge: Store any leftover One Pot Cheesy Pasta in an airtight container for up to 3 days. Reheat gently on the stove or in the microwave, adding a splash of cream or broth if needed.

Freezer: For longer storage, freeze the pasta in a freezer-safe container for up to 2 months. Thaw overnight in the fridge before reheating.

Reheating: When reheating, add a little extra cheese or cream to revive the creamy texture and enhance flavors. Stir frequently to ensure even heating.

Chef's Helpful Tips

  • When making One Pot Cheesy Pasta, remember to stir the pasta frequently to prevent it from sticking to the bottom of the pot.
  • If you want a thicker sauce, consider reducing the vegetable broth slightly or adding a bit more cheese for creaminess.
  • Use freshly shredded cheddar instead of pre-packaged cheese, as it melts better and enhances the flavor.
  • Always taste your pasta towards the end of the cooking time to get the perfect al dente texture before adding the cream and cheese mixture.

One Pot Cheesy Pasta Recipe FAQs

How do I choose the right penne pasta?
Absolutely! When selecting your penne pasta, look for a brand that uses high-quality durum wheat. Check the package for any visible damage or broken pieces. Ideally, the pasta should have a consistent, smooth texture and not feel overly soft or mushy.

What’s the best way to store leftover One Pot Cheesy Pasta?
To keep your One Pot Cheesy Pasta fresh, store leftovers in an airtight container in the refrigerator for up to 3 days. Make sure to let it cool completely before sealing. When you’re ready to enjoy it again, you can gently reheat it on the stove or in the microwave, adding a splash of cream or vegetable broth to restore its creamy consistency.

Can I freeze One Pot Cheesy Pasta?
Very! Freezing is a great option if you have leftovers. To freeze, let the pasta cool completely, then transfer it to a freezer-safe container. It will stay good for up to 2 months. When you’re ready to eat it, thaw it overnight in the fridge, then reheat on the stove with a bit of cream or cheese to bring back that deliciously creamy texture.

What should I do if my pasta sticks together while cooking?
No worries! If you notice your pasta sticking, simply give it a good stir every couple of minutes while simmering. Using enough broth is also essential; if you added too little liquid, the pasta may clump. If it does stick, try gently loosening it with a fork or adding a bit more liquid to the pot.

Is this recipe suitable for those with dietary restrictions?
Yes! This One Pot Cheesy Pasta can be made without dairy for a lactose-free version. Substitute the heavy cream with a non-dairy alternative, like almond or oat cream. For gluten-free options, choose gluten-free penne pasta. Always double-check ingredient labels for allergens if you have specific dietary needs or allergies, especially for the broth and cheese used.

What can I add for extra protein in my One Pot Cheesy Pasta?
The more the merrier! You can easily boost the protein content by adding cooked chicken, shrimp, or even some black beans or chickpeas. Just toss them in just before incorporating the cheese so everything heats through and melds beautifully together!

One Pot Cheesy Pasta

One Pot Cheesy Pasta

Enjoy this One Pot Cheesy Pasta, a comforting and easy dish perfect for weeknight dinners.
Print Recipe Pin Recipe
Prep Time 10 minutes mins
Cook Time 20 minutes mins
Total Time 30 minutes mins
Servings: 4 servings
Course: DINNER RECIPES
Cuisine: American
Calories: 400
Ingredients Equipment Method Nutrition Notes

Ingredients
  

For the Pasta
  • 8 oz penne pasta this shape holds sauces beautifully
For the Cheese Sauce
  • 1 cup shredded cheddar cheese classic choice that melts wonderfully
  • 1 cup heavy cream adds richness and creates a luscious consistency
  • 1 tsp garlic powder enhances the savory depth of flavor
For Cooking
  • 2 cups vegetable broth infuses delicious flavors
  • salt and pepper to taste

Equipment

  • Large pot

Method
 

How to Make One Pot Cheesy Pasta
  1. Gather ingredients.
  2. Combine pasta and broth.
  3. Add cream and seasonings.
  4. Incorporate cheese.
  5. Adjust seasoning.
  6. Serve and garnish.

Nutrition

Serving: 1servingCalories: 400kcalCarbohydrates: 45gProtein: 15gFat: 20gSaturated Fat: 10gCholesterol: 60mgSodium: 800mgPotassium: 300mgFiber: 2gSugar: 2gVitamin A: 500IUCalcium: 200mgIron: 1mg

Notes

Top with crispy bacon bits for added crunch and flavor.

Tried this recipe?

Let us know how it was!

Filed Under: DINNER RECIPES

Steak with Mushroom Sauce

January 16, 2026 by JudyWhite Leave a Comment

When the weekend rolls around, there’s a certain satisfaction in preparing a meal that feels like a celebration, even in the comfort of my own home. This Steak with Mushroom Sauce transforms a regular evening into a gourmet experience without hours of effort. Picture this: perfectly seared ribeye steaks, tender and juicy, crowned with a rich, creamy mushroom sauce that dances on your taste buds. The enticing aroma of garlic and fresh thyme fills the kitchen, creating a warm, inviting atmosphere that promises to impress anyone at the dinner table.

I stumbled upon this recipe during a cozy night in when takeout just wouldn’t cut it. With a few fresh ingredients, including savory mushrooms and luscious heavy cream, I discovered a dish that not only satisfied my cravings but also made me feel like a culinary powerhouse. If you’re tired of the same boring meals or fast food habits, this recipe is your ticket to home-cooked bliss. Just 30 minutes is all you need for a remarkable dining experience that will have your friends and family asking for seconds! Let’s dive in and elevate your cooking adventure!

Why You'll Love This Steak with Mushroom Sauce

  • This Steak with Mushroom Sauce is incredibly easy to prepare, making it perfect for a weeknight dinner or an impressive weekend meal.
  • The combination of tender, juicy ribeye steaks with a rich and creamy mushroom sauce delivers flavors that will wow your taste buds every time.
  • It’s also a versatile dish; you can easily customize the sauce with your favorite herbs or add extra vegetables for a personal touch.
  • Not to mention, the stunning presentation of this dish will leave your guests in awe, making it a true crowd-pleaser that elevates any dining experience.

Steak with Mushroom Sauce Ingredients

• Dive into the rich flavors of this comforting dish!

For the Steak

  • Ribeye Steaks – a tender cut that’s perfect for searing and bursting with flavor.
  • Salt – enhances the natural taste of the beef, just be generous but not overpowering.
  • Pepper – freshly ground adds a lovely kick that complements the steak beautifully.

For the Mushroom Sauce

  • Fresh Mushrooms – sliced to infuse the sauce with earthy flavors; you can use cremini or button mushrooms.
  • Heavy Cream – adds a rich, velvety texture, making the sauce indulgently creamy.
  • Garlic – minced for an aromatic punch, enhancing the overall flavor profile.
  • Unsalted Butter – brings depth and a silky finish to the sauce.
  • Beef Broth – adds savory richness, balancing the creaminess of the sauce.
  • Olive Oil – perfect for searing, giving a nice crust to the steaks.
  • Fresh Thyme – a finishing touch that elevates the dish with its vibrant aroma.

Get ready to impress with this mouthwatering Steak with Mushroom Sauce!

How to Make Steak with Mushroom Sauce

  1. Prepare the ingredients by slicing the fresh mushrooms and mincing the garlic cloves. This sets you up for a smooth cooking process and ensures everything is ready at your fingertips.

  2. Heat the olive oil in a skillet over medium-high heat. Season your ribeye steaks generously with salt and pepper before placing them in the hot skillet. Sear for about 4-5 minutes per side until they’re beautifully browned and reach a savory crust.

  3. Rest the steaks by removing them from the skillet and letting them sit covered on a plate. In the same skillet, melt the unsalted butter over medium heat. Add the mushrooms and minced garlic, sautéing until they turn a delicious golden brown, releasing their wonderful aromas.

  4. Combine the flavors by stirring in the heavy cream and beef broth. Add fresh thyme to the mix and let it simmer for about 5 minutes. This will allow the sauce to slightly thicken and develop a rich flavor.

  5. Slice the rested steak into tender pieces. Drizzle the creamy mushroom sauce over the top and prepare to indulge in this delightful dish!

Optional: Garnish with a sprig of fresh thyme for a beautiful presentation.

Exact quantities are listed in the recipe card below.

Make Ahead Options

These Steak with Mushroom Sauce preparations are perfect for busy weeknights, saving you precious time while ensuring a delicious meal! You can slice the fresh mushrooms and mince the garlic up to 24 hours in advance, just refrigerate them in an airtight container to maintain their freshness. The steak can be seasoned and kept in the refrigerator for up to 3 days; simply take it out about 30 minutes before cooking to bring it to room temperature. When you’re ready to serve, sear the steak as directed and prepare the mushroom sauce by sautéing the prepped mushrooms and garlic, then adding cream and broth. This way, you’ll enjoy gourmet results with minimal effort!

Steak with Mushroom Sauce Variations

Feel free to explore these delightful twists that will make your creamy mushroom sauce even more special.

  • Garlic-Butter Mushrooms:
    Enhance the sauce by substituting some heavy cream with butter for a richer flavor. The buttery finish is simply irresistible!

  • Bonus Veggies:
    Add in diced bell peppers or spinach for a pop of color and added nutrition. This gives your dish a fresh, vibrant touch.

  • Creamy Dream:
    Swap the heavy cream for sour cream or Greek yogurt for a tangy twist while still maintaining creaminess. It’s a delicious way to change things up!

  • Herb Infusion:
    Experiment with herbs like rosemary or parsley instead of thyme. Each herb brings its own unique fragrance and flavor that’ll brighten your dish!

  • Spicy Kick:
    Sprinkle in some crushed red pepper flakes to give your mushroom sauce an exciting heat. Just a pinch awakens your taste buds beautifully!

  • Mushroom Medley:
    Try a mix of different types of mushrooms, like shiitake and portobello, to create a depth of flavor and a satisfying texture that will leave you wanting more.

  • Wine Lover:
    For an adult twist, add a splash of red wine after sautéing the mushrooms. This depth of flavor is perfect for cozy evenings!

  • Nutty Addition:
    Stir in chopped toasted walnuts or pecans for a delightful crunch. Their nuttiness contrasts beautifully with the creaminess of the sauce.

How to Store and Freeze Steak with Mushroom Sauce

Fridge: Store leftover Steak with Mushroom Sauce in an airtight container for up to 3 days to maintain its freshness and flavor.

Freezer: If you want to freeze your dish, separate the steak from the sauce and store them in freezer-safe containers for up to 2 months.

Reheating: To enjoy your frozen steak and mushroom sauce, thaw overnight in the fridge. Reheat gently in a skillet over low heat, adding a splash of broth or cream to retain moisture.

What to Serve with Steak with Mushroom Sauce?

The perfect home-cooked meal calls for delicious sides that elevate your dining experience and complete the flavor journey.

  • Garlic Mashed Potatoes: The creamy richness complements the savory steak, making each bite utterly satisfying and indulgent. These mashed potatoes soak up the mushroom sauce beautifully!

  • Roasted Asparagus: With a crisp tenderness, roasted asparagus adds a fresh contrast to the hearty steak dish. Its vibrant color brings life to the plate, inviting everyone to dig in.

  • Arugula Salad: Tossed with a light lemon vinaigrette, this peppery salad adds a refreshing bite that balances the richness of the steak and mushroom sauce. It’s a bright palate cleanser!

  • Creamy Polenta: This velvety dish provides a delightful base for your steak, enhancing the meal’s comfort factor. The subtle corn flavor lets the sauce shine while adding a unique texture.

  • Wine Pairing – Red Bordeaux: A glass of this robust red wine brings out the rich flavors of the beef, making your dinner feel even more special. Its fruity notes perfectly complement the earthy tones of the mushrooms.

  • Chocolate Mousse: To end the meal on a sweet note, this airy dessert brings a touch of decadence. The dark chocolate flavor enhances the dinner’s luxurious feel, leaving your guests thrilled.

Chef's Helpful Tips

  • For the best results with your Steak with Mushroom Sauce, ensure your ribeye steaks are at room temperature before cooking, as this helps them cook evenly.
  • When searing the steaks, avoid overcrowding the skillet to achieve a perfect crust; cook them one at a time if necessary.
  • To enhance the flavor of your mushroom sauce, consider adding a splash of white wine after sautéing the garlic and mushrooms for an extra depth of flavor.
  • Keep an eye on your sauce while it simmers, as it can thicken quickly; adding a splash of beef broth can help achieve your desired consistency.

Steak with Mushroom Sauce Recipe FAQs

How do I choose the best ribeye steaks?
Absolutely! When selecting ribeye steaks, look for cuts with good marbling, which means small streaks of fat running through the meat. This marbling helps keep the steak juicy and flavorful as it cooks. Aim for steaks that are bright red and avoid those with dark spots or a dull appearance.

How long can I store leftover Steak with Mushroom Sauce in the fridge?
You can store leftover Steak with Mushroom Sauce in an airtight container in the refrigerator for up to 3 days. For the best flavor, try to consume it within this timeframe, as the sauce can lose creaminess over time. Reheating gently is key, so it retains its rich taste.

Can I freeze the Steak with Mushroom Sauce?
Yes, you can absolutely freeze your Steak with Mushroom Sauce for up to 2 months! I recommend separating the steak and sauce before freezing. Place the steak in one airtight container and the sauce in another. This way, you can thaw and reheat each component to perfection. When thawing, leave them in the fridge overnight and reheat gently.

What should I do if the mushroom sauce turns too thick?
Very! If you find your mushroom sauce is thicker than desired, simply add a splash of beef broth or heavy cream while it’s simmering. Stir it in gradually, allowing the sauce to loosen to your preferred consistency. This will not only adjust the thickness but also enrich the flavors.

Are there any dietary considerations I should be aware of?
Absolutely! If you or someone you’re serving has dairy allergies, consider substituting the heavy cream with a non-dairy cream alternative like coconut milk or cashew cream. As for pets, keep in mind that onions and garlic, commonly found in similar recipes, can be harmful to dogs. While this dish is delicious for your human guests, it’s best to keep it away from furry friends.

What’s the best way to reheat frozen Steak with Mushroom Sauce?
For the best results, thaw your frozen steak and mushroom sauce overnight in the fridge. Once thawed, reheat the steak gently in a skillet over low heat to maintain its tenderness. For the sauce, warm it in a separate pot over low heat, adding a spoonful of broth or cream as needed to keep it creamy and smooth. This two-step process helps ensure each bite is just as delicious as the first!

Steak with Mushroom Sauce

Steak with Mushroom Sauce

Enjoy a gourmet experience at home with this delicious Steak with Mushroom Sauce, featuring seared ribeye steaks and rich mushroom sauce.
Print Recipe Pin Recipe
Prep Time 10 minutes mins
Cook Time 20 minutes mins
Resting Time 5 minutes mins
Total Time 35 minutes mins
Servings: 2 steaks
Course: DINNER RECIPES
Cuisine: American
Calories: 600
Ingredients Equipment Method Nutrition Notes

Ingredients
  

For the Steak
  • 2 pieces Ribeye Steaks a tender cut perfect for searing
  • 1 teaspoon Salt to enhance natural taste
  • 1 teaspoon Pepper freshly ground
For the Mushroom Sauce
  • 8 ounces Fresh Mushrooms sliced, can use cremini or button
  • 1 cup Heavy Cream for richness
  • 2 cloves Garlic minced
  • 2 tablespoons Unsalted Butter for depth
  • 1 cup Beef Broth adds savory richness
  • 1 tablespoon Olive Oil for searing
  • 1 teaspoon Fresh Thyme for finishing touch

Equipment

  • Skillet

Method
 

Cooking Instructions
  1. Prepare the ingredients by slicing the fresh mushrooms and mincing the garlic cloves.
  2. Heat the olive oil in a skillet over medium-high heat. Season the ribeye steaks with salt and pepper, then sear for 4-5 minutes per side.
  3. Remove the steaks to rest, then melt unsalted butter in the skillet. Sauté mushrooms and garlic until golden brown.
  4. Stir in heavy cream and beef broth, and add fresh thyme. Simmer for about 5 minutes.
  5. Slice the rested steaks and drizzle with the mushroom sauce, then serve.

Nutrition

Serving: 1steakCalories: 600kcalCarbohydrates: 9gProtein: 50gFat: 40gSaturated Fat: 20gPolyunsaturated Fat: 2gMonounsaturated Fat: 15gCholesterol: 120mgSodium: 800mgPotassium: 800mgFiber: 2gSugar: 3gVitamin A: 300IUVitamin C: 2mgCalcium: 50mgIron: 3mg

Notes

Garnish with fresh thyme for a beautiful presentation.

Tried this recipe?

Let us know how it was!

Filed Under: DINNER RECIPES

Salmon with Lemon Butter

January 16, 2026 by JudyWhite Leave a Comment

With the tangy brightness of lemon and the rich, delicious undertones of butter, this Salmon with Lemon Butter recipe transforms a simple weeknight dinner into an extraordinary culinary experience. The moment the garlic hits the bubbly butter in the skillet, your kitchen will be filled with an irresistible aroma that promises delightful flavors.

Just the other day, I found myself craving something fresh and wholesome, a far cry from the convenience of takeout. As I rummaged through my fridge, the shiny salmon fillets caught my eye, and I knew I was about to create magic. This dish is not only quick—taking a mere 20 minutes—but also effortlessly elegant, making it perfect for impressing guests or treating yourself after a long day.

With just a handful of ingredients, you’ll discover how easy it is to craft a gourmet meal that delivers big on taste. Join me as we dive into this delectable recipe that’s all about simplicity, flavor, and, of course, that luscious lemon butter sauce!

Why You'll Love This Salmon with Lemon Butter

  • This recipe is incredibly easy to prepare, making it perfect for busy weeknights or spontaneous dinner guests.
  • The delightful combination of tangy lemon and rich butter elevates the flavor, bringing the salmon to life in every bite.
  • With just a few simple ingredients, you can create a meal that looks and tastes gourmet without breaking a sweat.
  • Plus, its stunning presentation makes it a visually appealing dish that will impress anyone at your dinner table.

Salmon with Lemon Butter Ingredients

• Discover the delightful ingredients that make this dish shine!

For the Salmon

  • Fresh salmon fillets – The star of the dish, choose fillets that are vibrant and firm for the best flavor.
  • Salt and pepper – Essential for enhancing the natural taste of the salmon; don’t hold back!

For the Lemon Butter Sauce

  • Unsalted butter – Adds a rich, creamy texture; ensure it’s softened for easy melting.
  • Medium lemon (juiced) – Provides a zesty brightness that complements the salmon beautifully.
  • Garlic cloves (minced) – Infuses the sauce with a fragrant kick; fresh garlic is always best!
  • Soy sauce – A touch of umami that balances the flavors perfectly.

For Garnish

  • Fresh herbs (parsley or dill) – Choose your favorite for a pop of color and freshness to finish the dish.

How to Make Salmon with Lemon Butter

  1. Preheat your skillet by heating it over medium heat. Add the unsalted butter to the pan and let it melt until it becomes bubbly and fragrant, a wonderful aroma that sets the stage for your salmon.

  2. Pat dry the fresh salmon fillets with a paper towel to remove excess moisture. Season both sides generously with salt and pepper to bring out their delicious natural flavors.

  3. Place the seasoned fillets skin-side down into the hot skillet. Cook for about 4-5 minutes without moving them; this helps achieve that golden, crispy skin we all love!

  4. Mix together in a bowl the melted butter, minced garlic, lemon juice, and soy sauce. Drizzle this zesty mixture over the cooking salmon, allowing the flavors to mingle beautifully.

  5. Flip the fillets carefully using a spatula. Cook for an additional 3-4 minutes until the salmon flakes easily with a fork, revealing its moist and tender interior.

  6. Garnish your succulent salmon with fresh herbs like parsley or dill. Drizzle any remaining lemon butter sauce over the top for an extra burst of flavor just before serving.

Optional: Serve with a side of steamed veggies for a delightful, balanced meal.

Exact quantities are listed in the recipe card below.

Make Ahead Options

These Salmon with Lemon Butter fillets are perfect for meal prep enthusiasts! You can season and marinate the salmon fillets with salt, pepper, and the lemon butter mixture up to 24 hours in advance, which not only saves time but allows the flavors to infuse beautifully. When you’re ready to cook, simply heat your skillet and follow the usual cooking instructions. To maintain quality, refrigerate the marinated salmon in an airtight container, ensuring it’s covered to prevent drying out. Just before serving, flip the fillets in the skillet and garnish with fresh herbs for that restaurant-quality touch. Enjoy a hassle-free, gourmet meal any night of the week!

Salmon with Lemon Butter Variations

Feel free to get creative and make this dish your own—there’s so much you can do!

  • Herb-Infused: Add fresh thyme or rosemary to the butter for an aromatic twist that complements the lemon beautifully.
  • Spicy Kick: Incorporate red pepper flakes into the lemon butter sauce for a lively heat that adds excitement to every bite.
  • Maple Glaze: Swap the soy sauce with maple syrup for a sweet and savory balance that brings a unique flavor dimension to your salmon.
  • Citrus Mix: Combine lemon juice with orange or lime juice for a bright and fruity sauce that brightens the dish even more.
  • Parmesan Crust: Top the salmon with freshly grated Parmesan and broil for a couple of minutes to create a cheesy, golden crust.
  • Mustard Glaze: Brush a mixture of Dijon mustard and honey over the salmon before cooking for a tangy and sweet infusion.
  • Zesty Pesto: Drizzle store-bought or homemade pesto over the top before serving for an Italian-inspired flavor boost.
  • Coconut Twist: Replace the butter with coconut oil for a slight tropical touch that adds depth while keeping the dish light.

Each variation provides a new way to experience the delightful flavors of this salmon dish, helping you keep meals exciting and scrumptious!

What to Serve with Salmon with Lemon Butter?

When you prepare Salmon with Lemon Butter, creating a balanced and delightful meal is a breeze!

  • Creamy Mashed Potatoes: These buttery, velvety potatoes provide a comforting base that pairs beautifully with the zesty salmon.

  • Garlic Roasted Asparagus: The slight crunch and earthy flavor of asparagus complements the richness of the salmon, enhancing the dish’s freshness.

  • Citrus Salad: A vibrant mix of greens, oranges, and a light vinaigrette brings a refreshing contrast that brightens every bite of salmon.

  • Quinoa Pilaf: This nutty grain adds a delightful texture, soaking up the lemon butter sauce perfectly while offering a wholesome touch.

  • Herbed Rice: Fluffy rice infused with fresh herbs is a simple yet elegant side, balancing the dish’s richness with its light flavors.

  • White Wine: A chilled glass of Sauvignon Blanc or Chardonnay brings floral notes that harmonize with the buttery lemon sauce.

  • Lemon Sorbet: For dessert, a scoop of sorbet cleanses the palate, providing a sweet, tangy finish that echoes the main dish’s flavors.

How to Store and Freeze Salmon with Lemon Butter

Fridge: Store any leftovers in an airtight container for up to 3 days to maintain freshness and flavor.

Freezer: Freeze your cooked salmon in a freezer-safe container for up to 2 months. Wrap it tightly in plastic wrap before placing it in the container to prevent freezer burn.

Reheating: When ready to enjoy, thaw in the fridge overnight and reheat in a skillet over low heat for best results, drizzling with a little extra lemon butter for added flavor.

Meal Prep: Consider making a double batch of this Salmon with Lemon Butter for easy meals throughout the week.

Chef's Helpful Tips

  • When making Salmon with Lemon Butter, always pat the salmon fillets dry before seasoning to ensure a beautifully crispy skin.
  • Avoid flipping the fish too soon to prevent it from sticking to the skillet; patience is key for that perfect golden crust.
  • Use fresh garlic for an intense flavor boost in your sauce, as it imparts a more vibrant taste than pre-minced options.
  • Monitor the cooking time closely to avoid overcooking the salmon, as it should flake easily yet remain moist and tender.

Salmon with Lemon Butter Recipe FAQs

How do I select the best salmon fillets?
Absolutely! When choosing salmon, look for fillets that are bright in color and firm to the touch. Avoid any that have dark spots or an overly fishy smell. Freshness is key, so purchasing from a trusted source or your local fish market is often the best route.

How should I store leftover Salmon with Lemon Butter?
Very! To store your leftover salmon, place it in an airtight container in the fridge for up to 3 days. Make sure it’s completely cooled down before sealing to maintain freshness. This way, you can enjoy your delicious meal again without compromising on flavor!

Can I freeze Salmon with Lemon Butter?
Certainly! I often make extra and freeze it for a future meal. To freeze, wrap your cooked salmon tightly in plastic wrap, then place it in a freezer-safe container or a zip-top freezer bag. It can be frozen for up to 2 months. When you’re ready to enjoy it, thaw it in the fridge overnight before reheating.

What if my salmon is overcooked?
Oh no! If you’ve accidentally overcooked the salmon, don’t fret. While it may lose some of its moisture, you can fix it. Try drizzling a little more lemon butter sauce over the top before serving or gently reheat in a skillet with a splash of broth or extra lemon juice to revive its tenderness.

Are there any dietary considerations I should keep in mind?
Absolutely! If you’re cooking for someone with allergies, be sure to note that this dish contains fish and soy sauce, which may contain gluten. There are gluten-free soy sauce options available if needed. If you’re sharing with pets, it’s best to keep the salmon seasoning to a minimum, avoiding garlic and other spices, as they can be harmful to pets.

How long can I keep the lemon butter sauce?
Yes! You can store any leftover lemon butter sauce in a sealed container in the fridge for up to 5 days. Just reheat gently on the stove before drizzling it over your salmon or using it for another dish. The flavors will still be vibrant and delicious!

Salmon with Lemon Butter

Salmon with Lemon Butter

This Salmon with Lemon Butter recipe combines fresh salmon with a tangy lemon butter sauce for a delicious weeknight dinner.
Print Recipe Pin Recipe
Prep Time 10 minutes mins
Cook Time 10 minutes mins
Total Time 20 minutes mins
Servings: 2 fillets
Course: DINNER RECIPES
Cuisine: American
Calories: 350
Ingredients Equipment Method Nutrition Notes

Ingredients
  

For the Salmon
  • 2 fillets fresh salmon Choose vibrant and firm fillets.
  • to taste salt
  • to taste pepper
For the Lemon Butter Sauce
  • 4 tablespoons unsalted butter Ensure it's softened for easy melting.
  • 1 medium lemon Juiced.
  • 2 cloves garlic Minced.
  • 1 tablespoon soy sauce
For Garnish
  • to taste fresh herbs Parsley or dill.

Equipment

  • Skillet

Method
 

Method
  1. Preheat your skillet over medium heat and melt the unsalted butter until bubbly and fragrant.
  2. Pat dry the fresh salmon fillets with a paper towel and season both sides generously with salt and pepper.
  3. Place the seasoned fillets skin-side down in the hot skillet and cook for about 4-5 minutes without moving them.
  4. Mix the melted butter, minced garlic, lemon juice, and soy sauce together in a bowl, then drizzle over the cooking salmon.
  5. Flip the fillets carefully using a spatula and cook for an additional 3-4 minutes until the salmon flakes easily.
  6. Garnish your salmon with fresh herbs and drizzle any remaining lemon butter sauce over the top before serving.

Nutrition

Serving: 1filletCalories: 350kcalCarbohydrates: 2gProtein: 30gFat: 24gSaturated Fat: 10gPolyunsaturated Fat: 4gMonounsaturated Fat: 8gCholesterol: 100mgSodium: 500mgPotassium: 700mgVitamin A: 500IUVitamin C: 15mgCalcium: 20mgIron: 1mg

Notes

Optional: Serve with a side of steamed veggies for a balanced meal.

Tried this recipe?

Let us know how it was!

Filed Under: DINNER RECIPES

Classic Meatloaf

January 14, 2026 by JudyWhite Leave a Comment

As I was rummaging through my kitchen for a comforting meal, the thought struck me—nothing beats a nostalgic Classic Meatloaf! The rich aroma of ground beef mingling with the sweetness of ketchup fills my home with warmth, reminiscent of cozy family dinners and laughter around the table. What I love most about this dish is its simple ingredients and the ease with which it comes together.

No need for fancy techniques or extensive prep work; just a few delightful ingredients and about an hour in the oven will yield a mouthwatering centerpiece that impresses everyone. Plus, it’s versatile enough to accommodate different tastes—feel free to add your favorite herbs or spices! This meatloaf isn’t just a meal; it’s a slice of home that brings back memories of love and satisfaction, making it perfect for those who crave homemade goodness over fast food chaos. Join me as I walk you through this classic recipe that promises to be a hit with family and friends alike!

Why You'll Love This Classic Meatloaf

  • This Classic Meatloaf is incredibly easy to make, allowing you to whip up a hearty meal with minimal effort.
  • The robust flavors of ground beef and tangy ketchup come together beautifully, creating a dish that is both satisfying and delicious.
  • Its versatility means you can customize it to suit any taste preference, whether adding extra spices or incorporating veggies.
  • Not only is it visually appealing with its inviting glaze, but it also saves time with a simple prep and cook process, making it perfect for busy weeknights.
  • Finally, this crowd-pleaser brings everyone together, turning mealtime into a cherished experience.

Classic Meatloaf Ingredients

• Gather these simple ingredients to create your delicious classic meatloaf!

For the Meatloaf

  • Ground beef (80/20) – the perfect fat-to-lean ratio keeps the meatloaf juicy and flavorful.
  • Plain breadcrumbs – act as a binder while adding a nice texture to the meatloaf.
  • Large eggs – help hold the ingredients together, so your meatloaf doesn’t fall apart.
  • Medium onion, finely chopped – introduces a subtle sweetness and depth of flavor.
  • Ketchup – brings moisture and a deliciously sweet glaze to the top, plus an extra dollop gives it that classic touch!
  • Garlic powder – adds a hint of savory goodness, enhancing the overall flavor profile.
  • Soy sauce – contributes a rich umami flavor that deepens the taste experience.
  • Salt and pepper – essential for bringing out the rich flavors of the meatloaf.

This classic meatloaf is sure to become a family favorite!

How to Make Classic Meatloaf

  1. Preheat your oven to 350°F (175°C). This step is essential to ensure your meatloaf cooks evenly and becomes beautifully golden on the outside.

  2. Combine all the ingredients in a large bowl. Gently mix together ground beef, breadcrumbs, chopped onion, ketchup (reserve some for topping), garlic powder, soy sauce, eggs, salt, and pepper until just combined. Avoid over-mixing to keep it tender.

  3. Shape the mixture. Transfer the meat blend to a lined baking sheet or loaf pan and mold it into a loaf shape, ensuring even thickness for consistent cooking.

  4. Spread reserved ketchup over the top. This simple glaze will caramelize beautifully in the oven, adding a sweet and tangy finish to your Classic Meatloaf.

  5. Bake for about 60 minutes. Keep an eye on it until the internal temperature reaches 160°F (70°C). The loft will be firm and slightly browned on top when ready.

  6. Rest for 10 minutes before slicing. This step is important as it allows the juices to redistribute, ensuring each slice is moist and packed with flavor.

Optional: Garnish with fresh parsley for a pop of color and added freshness!

Exact quantities are listed in the recipe card below.

What to Serve with Classic Meatloaf?

Imagine the warmth of your kitchen filled with the nostalgic aroma of classic comfort food, waiting to be complemented by delightful sides.

  • Creamy Mashed Potatoes: Their buttery texture and creamy richness are the perfect contrast to the hearty meatloaf.
  • Garlic Butter Green Beans: Bright, fresh, and slightly crisp, they add a wonderful crunch and absorb the meatloaf’s savory juices beautifully.
  • Roasted Brussels Sprouts: The caramelized edges and earthy flavor of sprout perfectly balance the meatloaf’s richness and add a gourmet touch.
  • Homestyle Macaroni and Cheese: This cheesy classic offers comfort in every bite, making it a fun and indulgent pairing that kids and adults adore.
  • Sweet Corn on the Cob: The natural sweetness and juicy kernels provide a delightful counterpoint to the savory depth of the meatloaf.
  • Tangy Cucumber Salad: A refreshing cucumber salad with a zingy dressing can brighten your plate, cutting through the richness of the meatloaf.
  • Dinner Rolls: Soft and fluffy, they’re perfect for mopping up any remaining glaze or gravy, adding a comforting touch to your meal.
  • Red Wine: A bold red like Cabernet Sauvignon enhances the flavors of the loaf, bringing out the savory profiles of the meat and sauce.
  • Chocolate Cake: For dessert, a moist chocolate cake can bring the meal to a luxurious close, offering a sweet final note to the savory feast.

Classic Meatloaf Variations

Get ready to personalize your Classic Meatloaf and explore delicious twists that delight your taste buds!

  • Turkey Substitute: Swap ground beef for lean ground turkey for a lighter option that’s just as flavorful.
  • Vegetable Boost: Add finely chopped bell peppers or carrots to the mix for extra nutrition and a hint of natural sweetness. These colorful additions brighten the loaf while enhancing its texture!
  • Spicy Kick: Incorporate diced jalapeños or a dash of hot sauce for a fiery twist that spices up the traditional flavor. Just remember to balance the heat with a touch of honey or brown sugar.
  • Herb Infusion: Mix in fresh herbs like parsley, thyme, or oregano to elevate the dish with herby freshness. The aromatic blend brings brightness, transforming your meatloaf into a garden delight!
  • Gluten-Free: Replace breadcrumbs with ground oats or gluten-free breadcrumbs to create a deliciously moist meatloaf that everyone can enjoy. Don’t forget to check your ketchup for gluten-free approval!
  • Cheesy Surprise: Fold in shredded cheese like cheddar or mozzarella into the meat mixture for a ooey-gooey delight that melts in your mouth. Cheese lovers will appreciate this gooey twist!
  • BBQ Flavor: Replace ketchup with your favorite barbecue sauce for a smoky sweetness and a tangy glaze that adds a bit of pizzazz. Your meatloaf will shine with this exciting flavor upgrade!
  • Italian Style: Add dried Italian herbs and swap ketchup for marinara sauce to create a Mediterranean flair. The warm scents of basil and oregano will transport you straight to Italy!

Make Ahead Options

These Classic Meatloaf preparations are perfect for busy weeknights! You can mix the meatloaf ingredients and shape it into a loaf up to 24 hours in advance, then simply cover it tightly with plastic wrap or foil before refrigerating. This not only saves you time but also allows the flavors to meld beautifully. For ultimate freshness, keep the ketchup topping separate and add it right before baking. When you’re ready to serve, just pop it in the oven straight from the refrigerator—no need to change the cooking time. Enjoy a delicious homemade meal with minimal effort, as it will be just as flavorful and comforting!

How to Store and Freeze Classic Meatloaf

Fridge: Store any leftover Classic Meatloaf in an airtight container for up to 3 days. Reheat slices in the microwave or oven until warmed through.

Freezer: Wrap the cooled meatloaf tightly in plastic wrap and then aluminum foil. It can be frozen for up to 3 months. Thaw in the fridge before reheating.

Reheating: For best results, reheat in the oven at 350°F (175°C) until heated through, ensuring it stays moist and delicious.

Serving: If you plan to serve your Classic Meatloaf later, consider slicing it before storing; this makes reheating easier for individual portions.

Chef's Helpful Tips

  • For the Classic Meatloaf, make sure to use ground beef with an 80/20 fat-to-lean ratio to keep your meatloaf juicy and flavorful.
  • When mixing the ingredients, combine them gently to avoid overworking the meat, which can lead to a dense loaf.
  • To ensure even cooking, shape your meatloaf uniformly and avoid any thick areas.
  • Always let the meatloaf rest for about 10 minutes before slicing, as this helps the juices redistribute and keeps your slices moist and tender.

Classic Meatloaf Recipe FAQs

How do I choose the right ground beef for classic meatloaf?
Absolutely! When selecting ground beef for your Classic Meatloaf, look for an 80/20 ratio, which means 80% lean meat and 20% fat. This balance is perfect for maintaining moisture and flavor during cooking. If you’re looking for a leaner option, you can use ground turkey or chicken, but keep in mind these leaner choices may require additional ingredients like breadcrumbs or moisture.

How should I store leftover classic meatloaf?
Very! Store any leftover Classic Meatloaf in an airtight container in the fridge for up to 3 days. I often cut it into slices before refrigerating to make reheating easier. Just pop those slices in the microwave or back into the oven until heated through!

Can I freeze classic meatloaf?
Yes, you can! To freeze your Classic Meatloaf, first, let it cool completely after baking. Then, wrap it tightly in plastic wrap, followed by a layer of aluminum foil. This prevents freezer burn, and it will keep well for up to 3 months. When you’re ready to enjoy it, transfer the wrapped meatloaf to the fridge to thaw overnight, and reheat it back in the oven at 350°F (175°C) until warmed through.

What should I do if my classic meatloaf is too dry?
If your Classic Meatloaf turns out dry, don’t fret! There are a few things you can try. First, make sure you’re not overcooking it; always check for an internal temperature of 160°F (70°C). For future batches, you can add a bit more ketchup or even some beef broth to the mixture before baking. This extra moisture helps keep the dish tender. You can also mix in some finely chopped veggies, like bell peppers or zucchini, for added moisture and flavor!

Is there a way to make classic meatloaf healthier?
Definitely! To lighten up your Classic Meatloaf, consider using lean ground turkey or chicken instead of beef. You can also substitute whole wheat breadcrumbs for plain ones or add oats to the mix for additional nutrients. Incorporate chopped vegetables like carrots or spinach for an extra boost of vitamins and minerals. Just remember to adjust the baking time based on the leaner meat choice!

Can pets eat classic meatloaf?
It’s important to be cautious! While the ingredients in Classic Meatloaf like beef, eggs, and veggies are often safe for pets, you should avoid letting them have the part that contains ketchup, soy sauce, and extra seasonings, as these can be harmful to them. If you want to share, consider making a pet-friendly version without any harmful additives!

Classic Meatloaf

Classic Meatloaf

This Classic Meatloaf combines ground beef and tangy ketchup for a comforting, home-cooked meal.
Print Recipe Pin Recipe
Prep Time 15 minutes mins
Cook Time 1 hour hr
Resting Time 10 minutes mins
Total Time 1 hour hr 25 minutes mins
Servings: 6 slices
Course: DINNER RECIPES
Cuisine: American
Calories: 250
Ingredients Equipment Method Nutrition Notes

Ingredients
  

For the Meatloaf
  • 2 lbs Ground beef (80/20) the perfect fat-to-lean ratio keeps the meatloaf juicy and flavorful.
  • 1 cup Plain breadcrumbs act as a binder while adding a nice texture to the meatloaf.
  • 2 large Eggs help hold the ingredients together.
  • 1 medium Onion, finely chopped introduces a subtle sweetness and depth of flavor.
  • 1 cup Ketchup brings moisture and a deliciously sweet glaze to the top.
  • 1 tbsp Garlic powder adds a hint of savory goodness.
  • 2 tbsp Soy sauce contributes a rich umami flavor.
  • 1 tsp Salt essential for bringing out the rich flavors.
  • 1 tsp Pepper essential for bringing out the rich flavors.

Equipment

  • Mixing bowl
  • Baking sheet
  • loaf pan
  • Oven

Method
 

How to Make Classic Meatloaf
  1. Preheat your oven to 350°F (175°C).
  2. Combine all the ingredients in a large bowl and gently mix until just combined.
  3. Shape the mixture into a loaf on a lined baking sheet or loaf pan.
  4. Spread reserved ketchup over the top.
  5. Bake for about 60 minutes until the internal temperature reaches 160°F (70°C).
  6. Rest for 10 minutes before slicing.

Nutrition

Serving: 1sliceCalories: 250kcalCarbohydrates: 15gProtein: 20gFat: 15gSaturated Fat: 6gPolyunsaturated Fat: 1gMonounsaturated Fat: 8gCholesterol: 100mgSodium: 600mgPotassium: 400mgFiber: 1gSugar: 5gVitamin A: 500IUVitamin C: 2mgCalcium: 20mgIron: 3mg

Notes

Garnish with fresh parsley for added freshness!

Tried this recipe?

Let us know how it was!

Filed Under: DINNER RECIPES

  • « Previous Page
  • 1
  • 2
  • 3
  • 4
  • 5
  • 6
  • …
  • 16
  • Next Page »

Recent Posts

  • Crispy Potatoes in Oven
  • Lucky Charms Pancakes
  • Cheeseburger
  • Boiled Corn on the Cob
  • St. Patrick’s Day Dessert Parfaits

Recent Comments

No comments to show.

Footer

  • Contact
  • Privacy Policy
  • About Us
  • Terms
  • ↑ back to top

Copyright © 2024 www.Forkono.com

Table Of Content