Forkono

  • BREAKFAST & BRUNCH
  • DESSERT RECIPES
  • DINNER RECIPES
  • LUNCH RECIPES
  • About uS
  • SNACKS & APPETIZERS
menu icon
go to homepage
  • BREAKFAST & BRUNCH
  • DESSERT RECIPES
  • DINNER RECIPES
  • LUNCH RECIPES
  • About uS
  • SNACKS & APPETIZERS
search icon
Homepage link
  • BREAKFAST & BRUNCH
  • DESSERT RECIPES
  • DINNER RECIPES
  • LUNCH RECIPES
  • About uS
  • SNACKS & APPETIZERS
×

Homemade Mayonnaise

December 29, 2025 by JudyWhite Leave a Comment

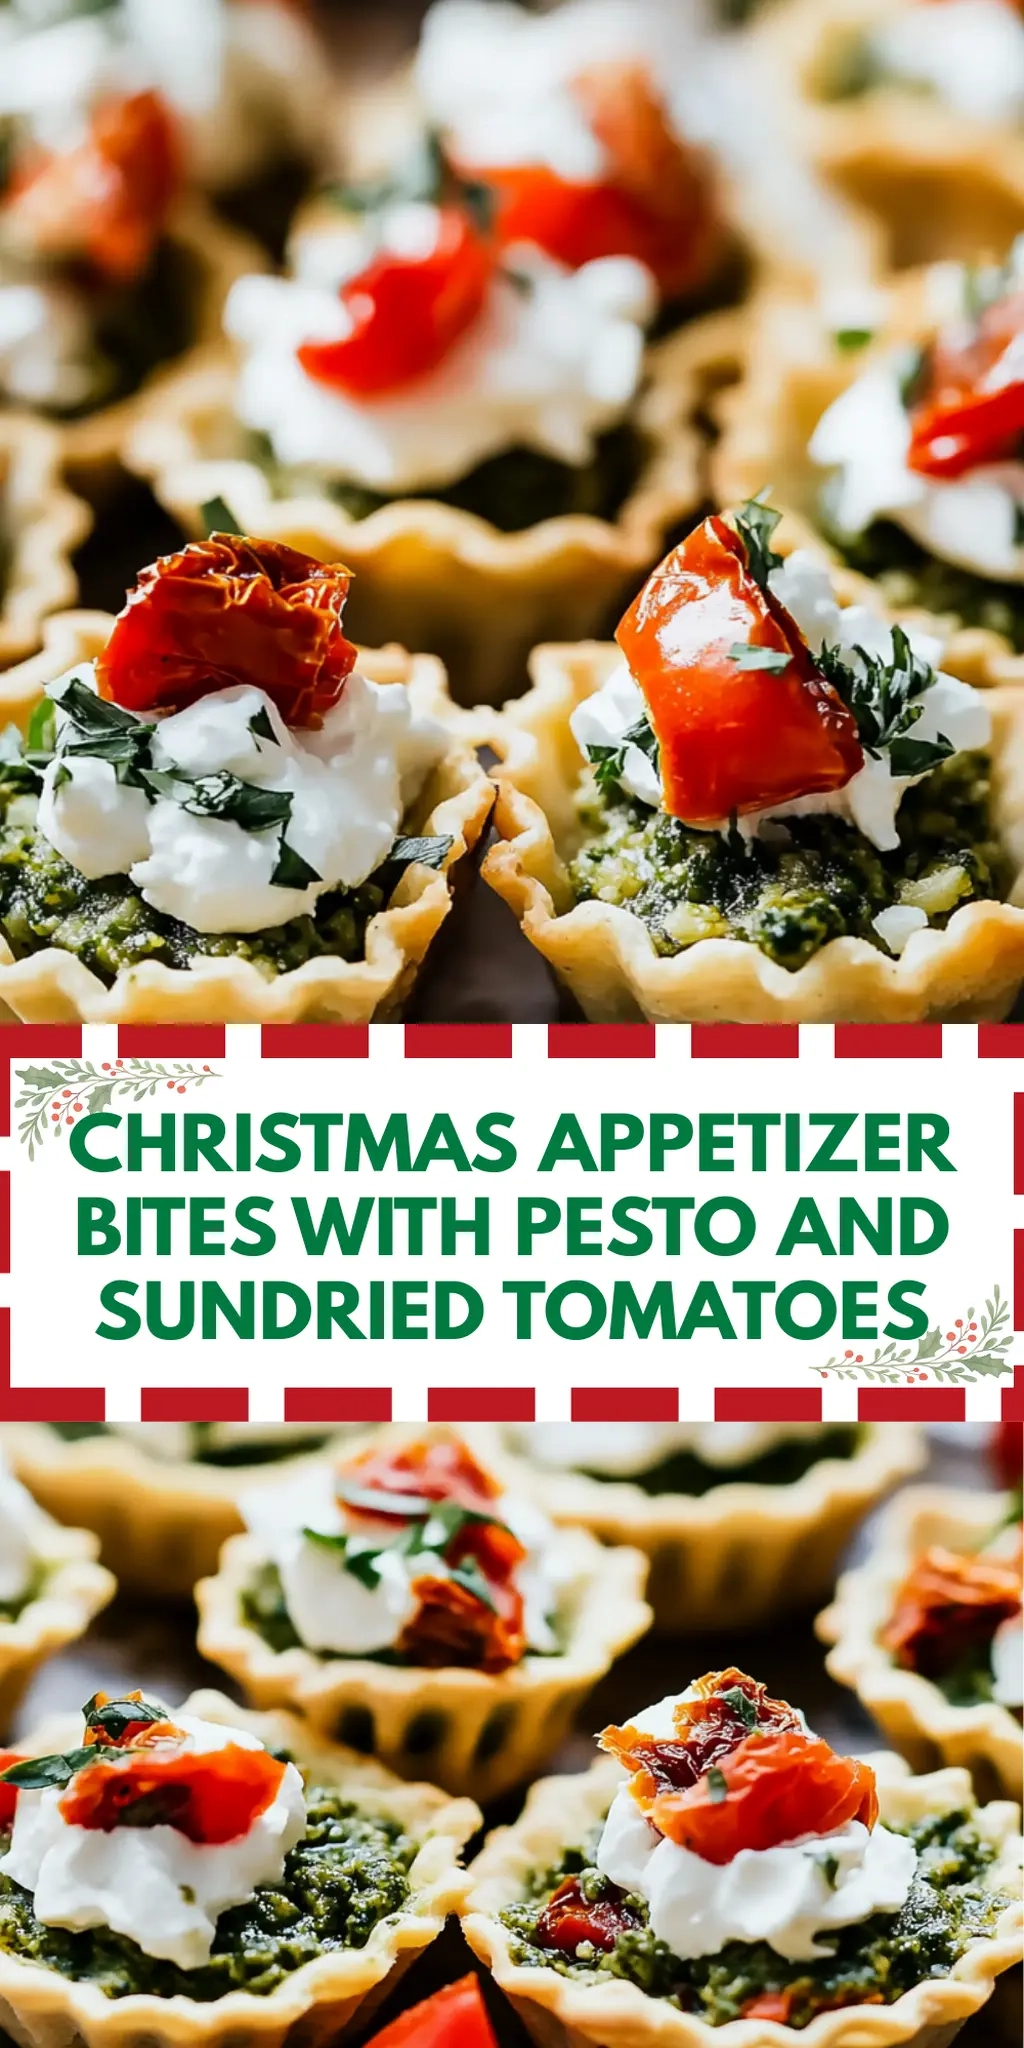
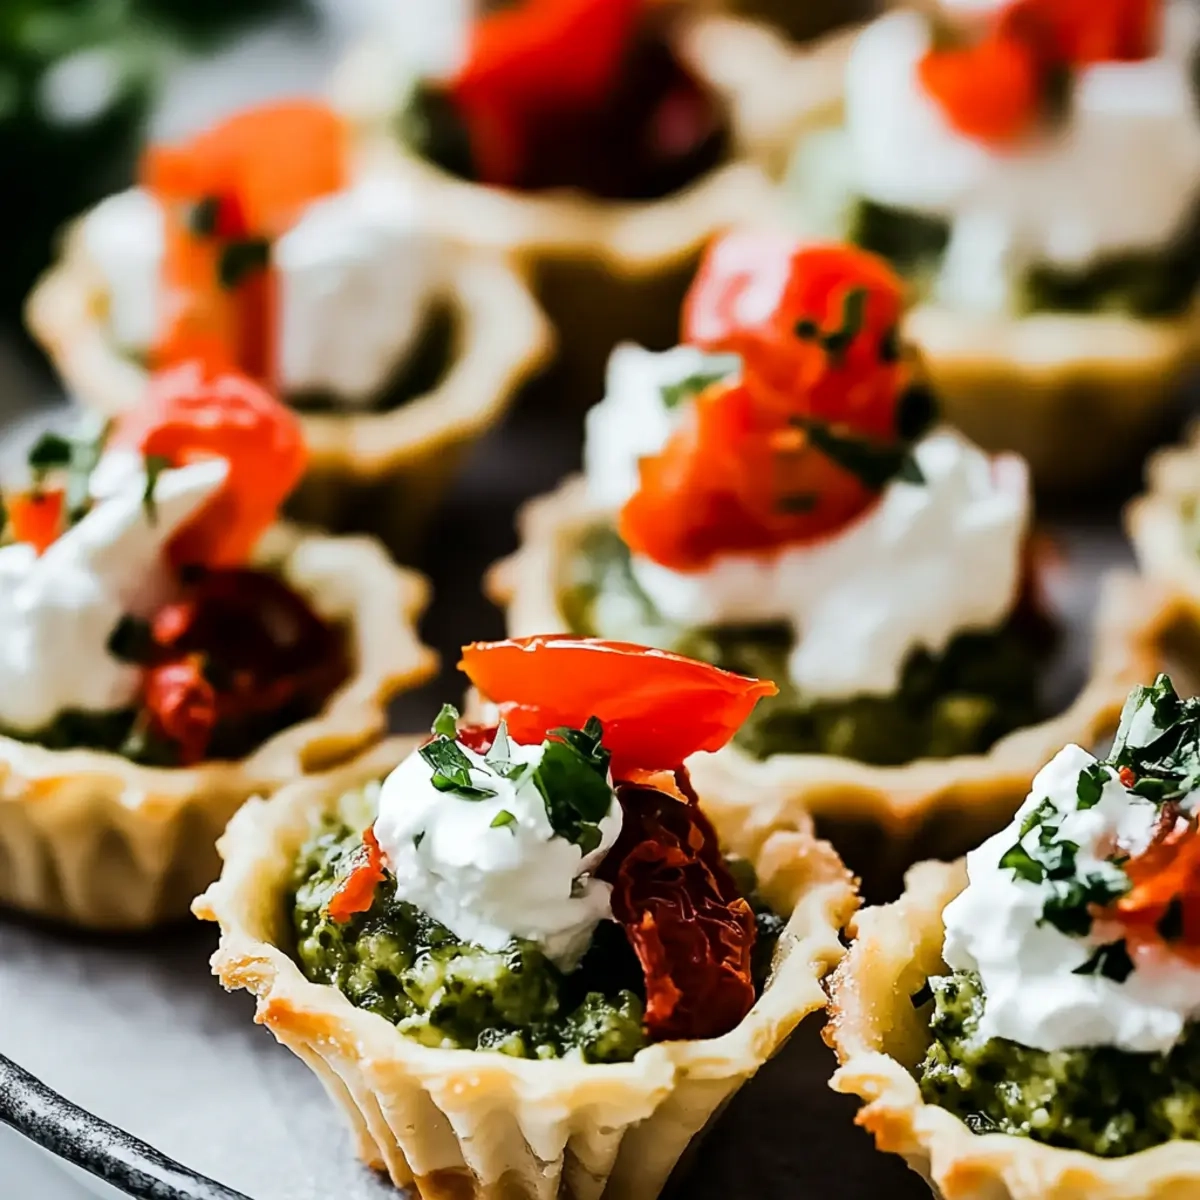
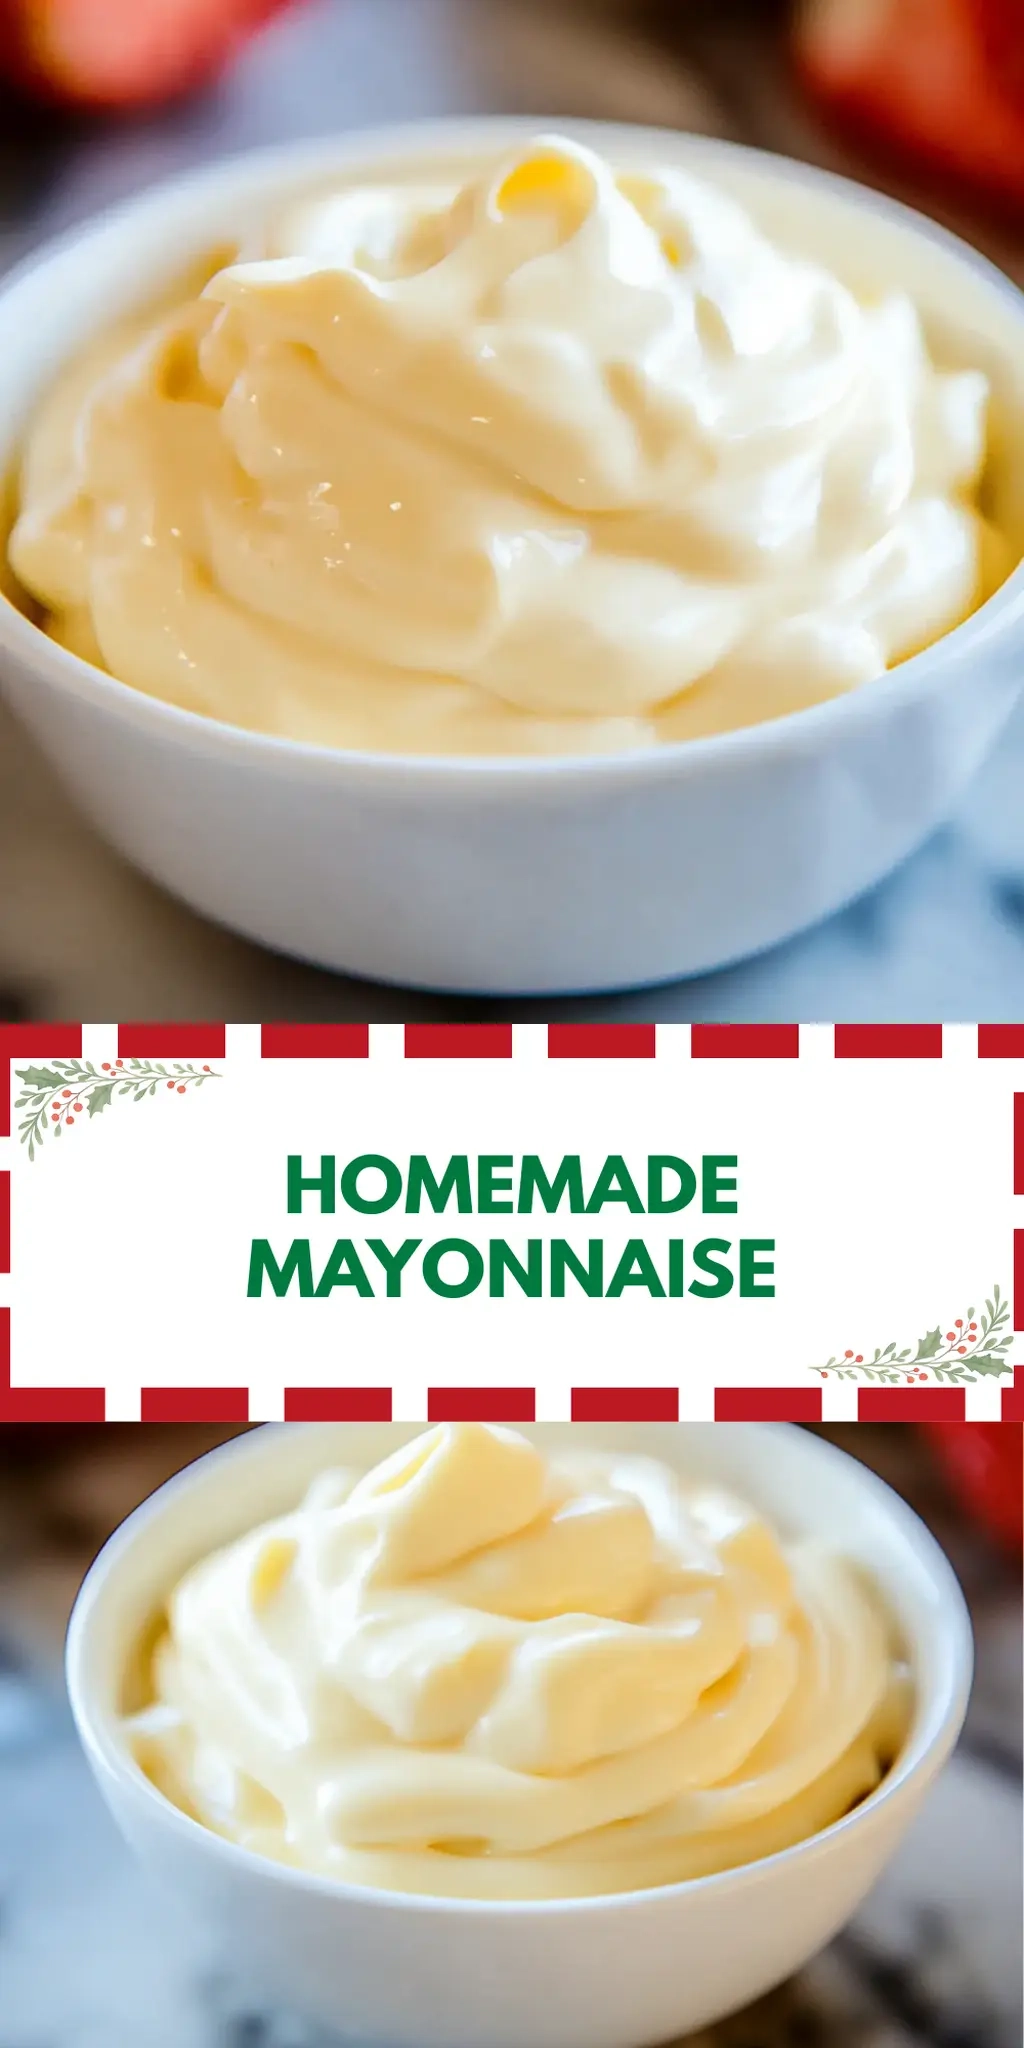
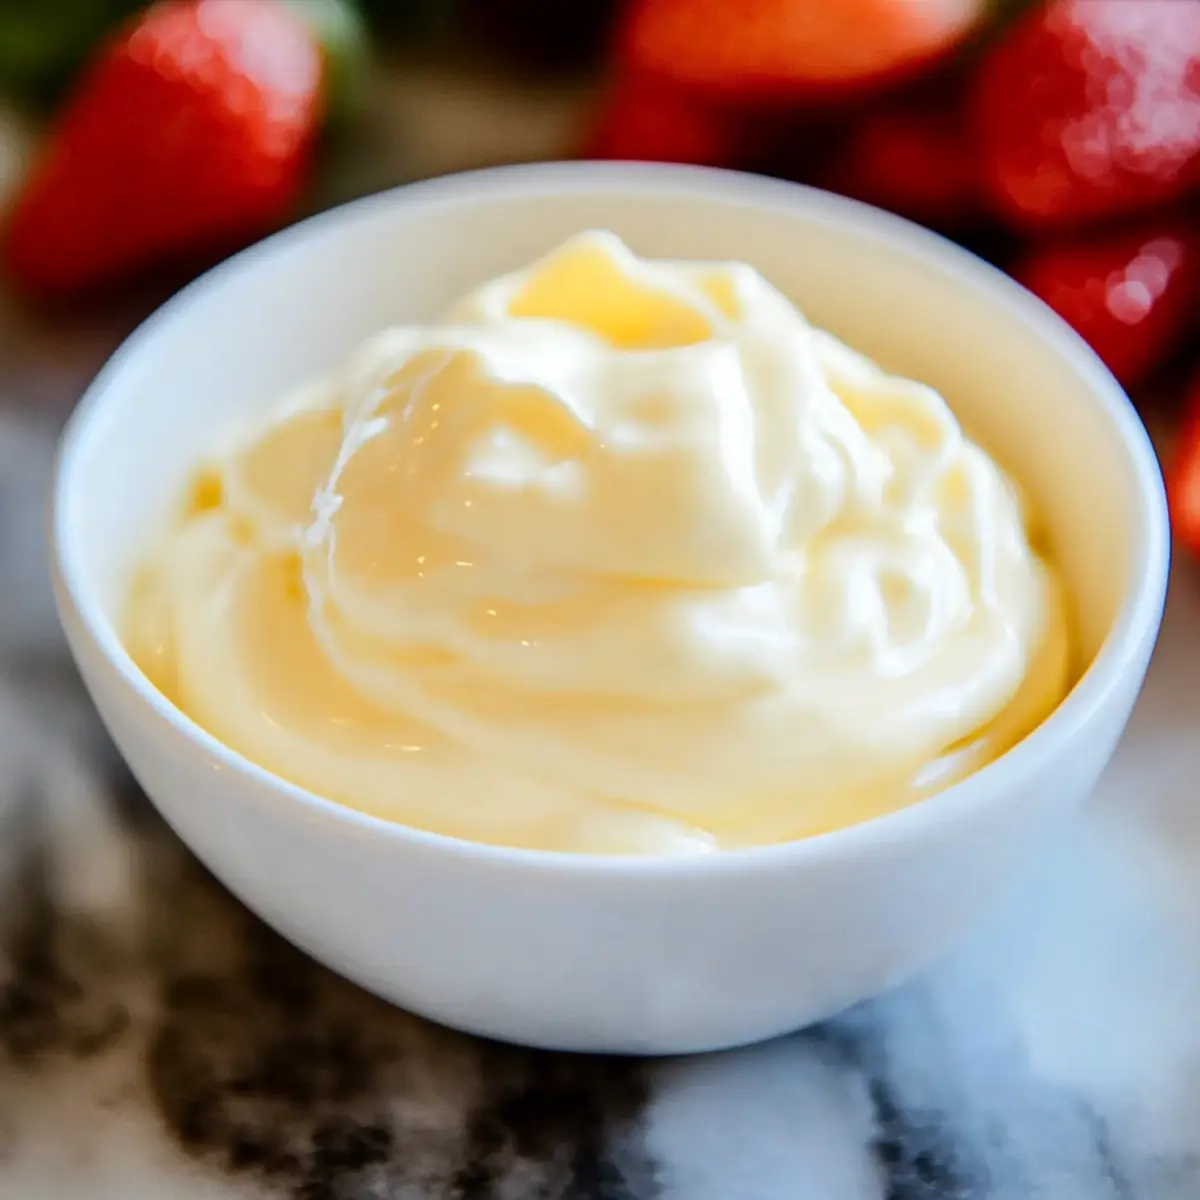
There’s something wonderfully satisfying about creating your own condiments from scratch, and homemade mayonnaise is no exception. One sunny afternoon, as I flicked through my pantry, I decided to give traditional mayo a twist. Why settle for store-bought when whipping up a creamy, flavorful batch is just a few simple ingredients away?

With just an egg, Dijon mustard, and a drizzle of oil, I transformed a humble condiment into a culinary delight fit for sandwiches, salads, and dips. The rich, velvety texture combined with a hint of tang is addictive—and the best part? It takes only ten minutes! Perfect for those who have grown weary of fast food and are eager to bring the freshness of homemade flavors into their kitchen.

Join me as I share this incredibly easy homemade mayonnaise recipe that not only elevates your dishes but also sparks joy in every bite. Let’s take a step away from the jar and discover the magic of creating something deliciously unique right in your own home!

Why You'll Love This Homemade Mayonnaise

  • This homemade mayonnaise recipe is incredibly easy, allowing you to whip up a creamy condiment in just ten minutes.
  • The bold flavors of Dijon mustard and fresh lemon juice elevate your dishes to a whole new level of deliciousness.
  • Its versatility means you can use it as a spread, dip, or dressing, making it perfect for any meal.
  • Plus, there’s nothing quite like the satisfaction of making it from scratch, showcasing your cooking skills with a visually appealing, homemade creation.

Homemade Mayonnaise Ingredients

• Discover the simplicity of making homemade mayonnaise with these easy-to-find ingredients.

For the Base

  • Large egg – acts as the emulsifier for a creamy texture.
  • Dijon mustard – adds a delightful tang that enhances flavor.
  • Red or white wine vinegar – provides acidity to balance the richness.
  • Fine sea salt – enhances all the other flavors in your mayo.

For the Oil

  • Safflower oil or vegetable oil – use either for a neutral flavor and silky finish.

Optional Twist

  • Fresh lemon juice – a touch brings brightness and freshness to the homemade mayonnaise.

How to Make Homemade Mayonnaise

  1. Combine the egg, Dijon mustard, red wine vinegar, and sea salt in a mixing bowl. This is the flavorful base of your mayonnaise. Whisk these ingredients together until they’re well blended, creating a vibrant concoction.

  2. Drizzle in the safflower oil slowly while whisking continuously. Watch as the mixture starts to emulsify and thicken—this is the magic moment! Keep whisking vigorously for about 1-2 minutes until you achieve that creamy texture.

  3. Mix in the fresh lemon juice, if using, until fully incorporated. This optional addition gives your homemade mayonnaise a refreshing brightness. Taste it, and enjoy the burst of flavor!

Optional: Add a pinch of garlic powder for an extra kick.

Exact quantities are listed in the recipe card below.

Homemade Mayonnaise Variations

Embrace your culinary creativity by personalizing this homemade mayonnaise to suit your tastes and dietary needs!

  • Herb-Infused: Add fresh herbs like basil or dill for a garden-fresh twist. Just a handful will elevate your mayonnaise to a fragrant delight!

  • Spicy Kick: Mix in a teaspoon of hot sauce or a pinch of cayenne pepper to heat things up. This spicy variation can make your dishes sing!

  • Garlic Lovers: Incorporate minced garlic or garlic powder for a zesty flavor. A creamy garlic mayo goes perfectly with sandwiches, adding a pungent touch.

  • Avocado Swap: Replace half of the oil with ripe avocado for a creamy, healthier alternative. It adds nutrients while maintaining that luscious texture!

  • Citrus Zest: Grate in some lemon or lime zest to brighten your mayo with a zesty flair. The added brightness will thrill your taste buds!

  • Smoky Flavor: Stir in a touch of smoked paprika for an irresistible smoky flavor. This twist creates a unique depth of flavor that’s perfect for adding character.

  • Vegan Version: Swap out the egg for aquafaba (chickpea brine) and use an oil that’s certified vegan for a delightful vegan mayonnaise. You won’t miss the egg!

  • Sweet Agrumato: For a hint of sweetness, incorporate a spoonful of honey or maple syrup. It brings a delightful surprise to your dressing or dip!

How to Store and Freeze Homemade Mayonnaise

Fridge: Store your homemade mayonnaise in an airtight container in the refrigerator for up to 1 week for optimal freshness and flavor.

Freezer: While it’s best enjoyed fresh, you can freeze homemade mayonnaise for up to 2 months. However, the texture may change, so it’s ideal for use in recipes rather than as a spread.

Thawing: To thaw, transfer the frozen mayonnaise to the fridge overnight. Whisk it gently before using to restore its creamy consistency.

Reheating: Homemade mayonnaise is best served cold, but if you need to bring it to room temperature, let it sit out for about 15-30 minutes before serving.

Make Ahead Options

Homemade mayonnaise is a fantastic candidate for meal prep, saving you valuable time during busy weeks! You can easily prepare the base ingredients—egg, Dijon mustard, red wine vinegar, and sea salt—up to 24 hours in advance; simply whisk these ingredients together and store them in an airtight container in the refrigerator. When you’re ready to enjoy your homemade mayonnaise, just drizzle in the safflower oil while whisking until emulsified. To maintain the best quality, be sure to cover it tightly and leave it in the fridge until you’re ready to finish. You’ll have creamy, fresh-tasting mayo that elevates your dishes with minimal fuss!

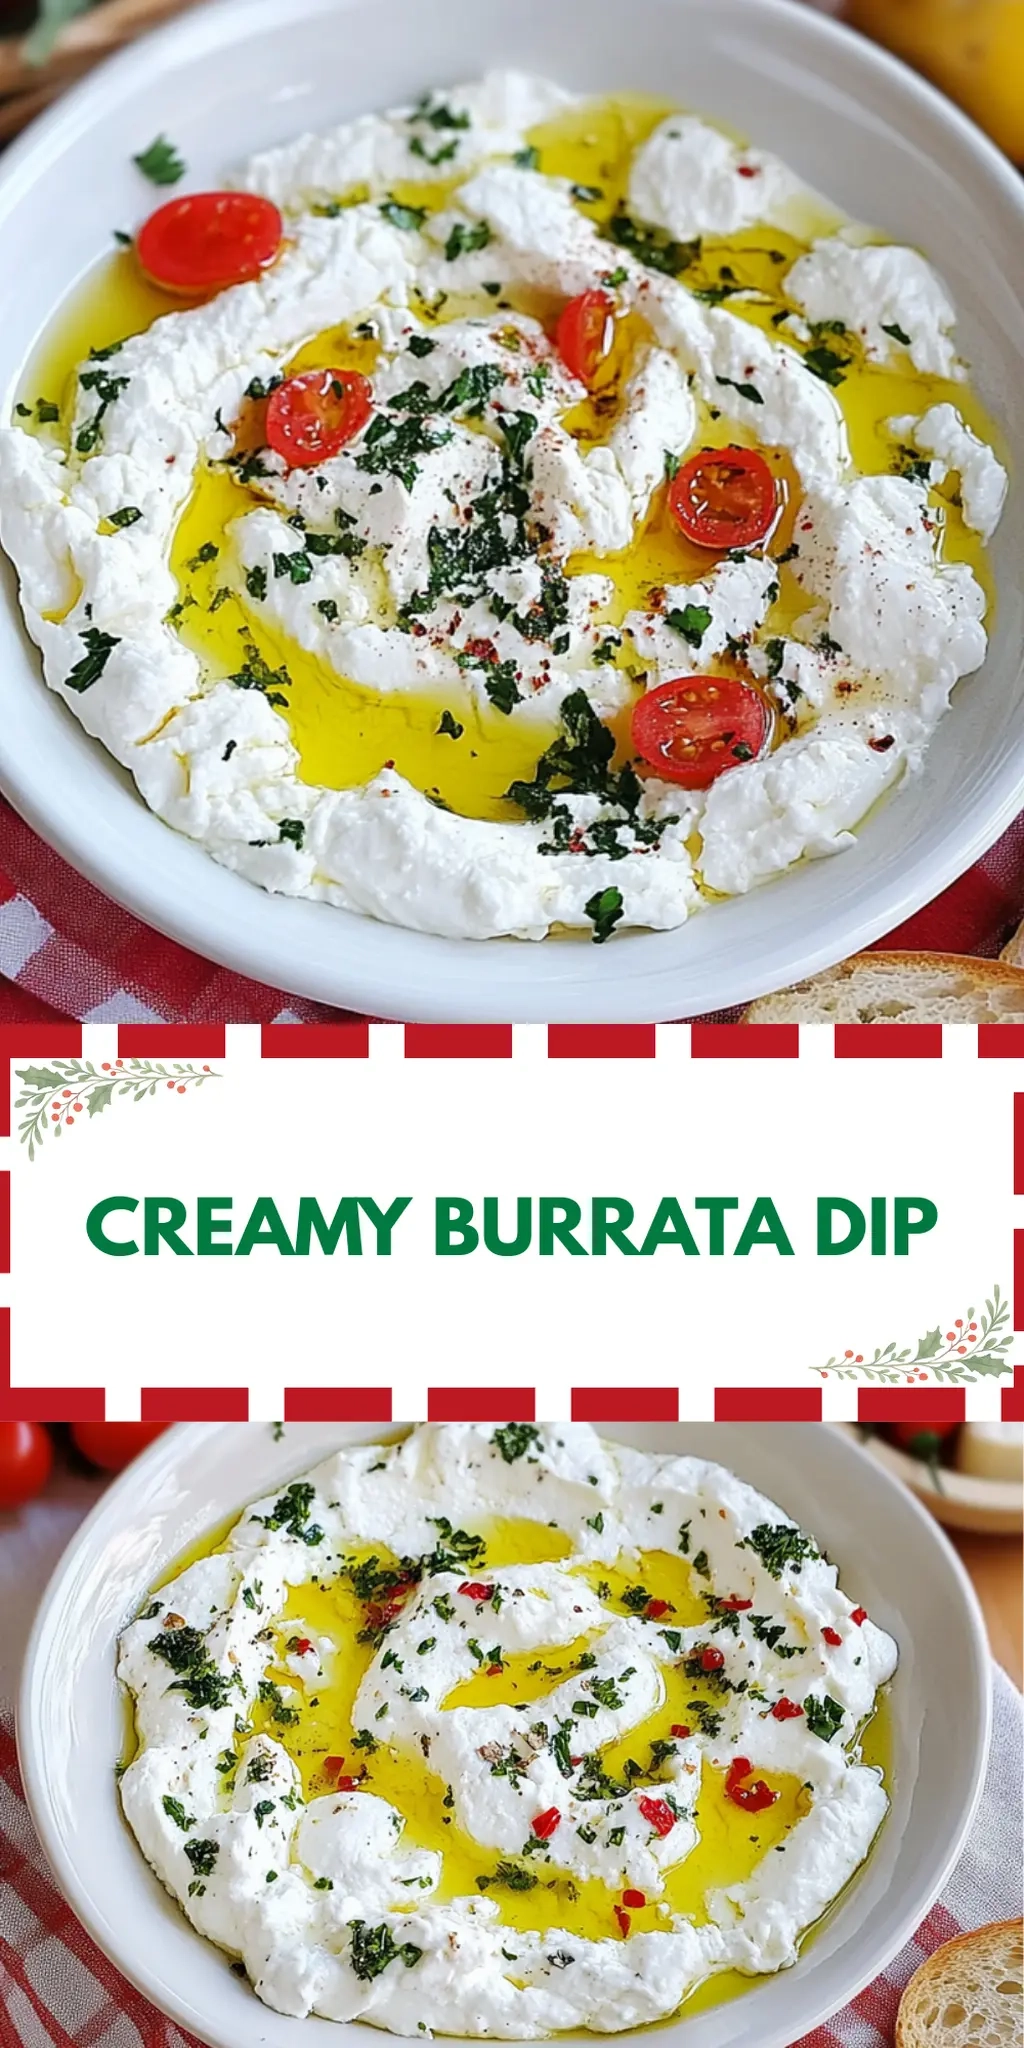
What to Serve with Homemade Mayonnaise?

Imagine enhancing your meals with delightful pairings that complement the rich, creamy nature of your homemade condiment.

  • Crispy French Fries: The perfect contrast to the smooth mayo; dip them in for a satisfying crunch and creaminess.

  • Fresh Vegetable Platter: Crisp veggies like carrots, cucumbers, and bell peppers provide a refreshing crunch when paired with your tangy mayo.

  • Grilled Chicken Sandwiches: Slather your mayo on grilled chicken for an ultra-juicy bite, adding depth and flavor to every mouthful.

  • Deviled Eggs: Elevate this classic appetizer by mixing in slightly tangy homemade mayo for a creamy filling that melts in your mouth.

  • Potato Salad: Use your mayonnaise as a base for potato salad, creating a creamy and tangy dressing that binds everything beautifully together.

  • Tuna Salad: A generous dollop of homemade mayo transforms simple canned tuna into a gourmet dish, packed with flavor and creaminess.

  • Buffalo Cauliflower Bites: These spicy bites contrast beautifully with the cool, creamy mayo; it’s a match made in flavor heaven.

  • Sparkling Lemonade: A refreshing drink that complements the richness of your mayo-laden dishes, providing a bright and zesty contrast.

  • Chocolate Chip Cookies: For a sweet end, serve these with a light dusting of sea salt; the savory notes of homemade mayo hint will surprise and delight.

Chef's Helpful Tips

  • When making Homemade Mayonnaise, ensure your egg is at room temperature to help the emulsification process.
  • A common mistake is adding the oil too quickly; drizzle it slowly while whisking to create that desired creamy texture.
  • Use a whisk or an immersion blender for smoother results, as this can significantly enhance the emulsification.
  • Always taste your mayonnaise after mixing; if it seems too rich, a splash more vinegar or lemon juice can brighten it up perfectly.

Homemade Mayonnaise Recipe FAQs

What is the best egg to use for homemade mayonnaise?
Absolutely! For the best results, use a large, fresh egg at room temperature. Fresh eggs not only emulsify better but also enhance the flavor of your homemade mayonnaise.

How should I store homemade mayonnaise?
Store your homemade mayonnaise in an airtight container in the refrigerator for up to 1 week. Be sure to keep it tightly sealed to maintain its freshness and prevent contamination.

Can I freeze homemade mayonnaise?
I don’t recommend freezing homemade mayonnaise because the high-fat content can cause it to separate, resulting in an undesirable texture. Instead, make smaller batches to avoid waste, as it keeps fresh in the fridge for about a week.

What should I do if my mayonnaise is too thin?
If your mayonnaise turns out too thin, don’t worry! Simply whisk in another tablespoon of oil gradually. If it still doesn’t thicken after that, you can start a new batch with another egg and mix the thin mayonnaise in, whisking until it emulsifies.

Can I use homemade mayonnaise for my pet?
While a tiny bit of mayonnaise isn’t harmful to pets, it’s best to avoid giving them any, especially if they have dietary restrictions or allergies. Always consult with your veterinarian before introducing new foods to your furry friends!

What if my mayonnaise curdles?
No problem—this happens if the oil was added too quickly or the egg was too cold. If your mixture curdles, you can start with a new egg yolk in a clean bowl, then slowly whisk in the curdled mayonnaise. This will help it emulsify again, giving you that creamy consistency you want!

Homemade Mayonnaise

Homemade Mayonnaise

This homemade mayonnaise is a quick and easy way to elevate your dishes with fresh flavors. Perfect for sandwiches, salads, and dips.
Print Recipe Pin Recipe
Prep Time 10 minutes mins
Total Time 10 minutes mins
Servings: 1 cup
Course: Snacks & Appetizers
Calories: 1000
Ingredients Equipment Method Nutrition Notes

Ingredients
  

Base Ingredients
  • 1 large egg acts as the emulsifier for a creamy texture
  • 1 tbsp Dijon mustard adds a delightful tang that enhances flavor
  • 1 tbsp red or white wine vinegar provides acidity to balance the richness
  • 1/2 tsp fine sea salt enhances all the other flavors in your mayo
Oil Ingredients
  • 1 cup safflower oil or vegetable oil use either for a neutral flavor and silky finish
Optional Ingredients
  • 1 tbsp fresh lemon juice brings brightness and freshness to the homemade mayonnaise

Equipment

  • Mixing bowl
  • Whisk

Method
 

Making the Mayonnaise
  1. In a mixing bowl, add the large egg, Dijon mustard, red wine vinegar, and fine sea salt. Give it a gentle whisk until everything blends smoothly.
  2. Slowly drizzle in the safflower oil while whisking continuously until the mixture emulsifies, turns creamy, and thickens—about 1-2 minutes.
  3. If using, whisk in the fresh lemon juice until perfectly combined.

Nutrition

Serving: 1cupCalories: 1000kcalProtein: 1gFat: 100gSaturated Fat: 10gPolyunsaturated Fat: 5gMonounsaturated Fat: 80gCholesterol: 200mgSodium: 200mg

Notes

Ensure all ingredients are at room temperature for better emulsification. Avoid adding oil too quickly.

Tried this recipe?

Let us know how it was!

Filed Under: SNACKS & APPETIZERS

Christmas Tree Caprese Salad

December 29, 2025 by JudyWhite Leave a Comment

When the holiday season rolls around, our homes are filled with laughter, love, and the enticing aroma of festive dishes. This year, I wanted to add a fun twist to our traditional gatherings, and that’s when I stumbled upon the concept of the Christmas Tree Caprese Salad. Imagine a beautiful arrangement of vibrant reds and greens, resembling a twinkling Christmas tree, all while delivering delightful flavors that even the pickiest eater will enjoy.

Not only is this dish a feast for the eyes, but it’s also incredibly easy to whip up, making it a perfect addition to any potluck or family dinner. With just a handful of fresh ingredients—creamy mozzarella, juicy tomatoes, and fragrant basil—you can create a show-stopping centerpiece that sparks joy and conversation around the table. Plus, the best part? It takes only 20 minutes to prepare! Let’s dive into how you can bring this delightful salad to life and elevate your holiday gatherings!

Why You'll Love This Christmas Tree Caprese Salad

  • This Christmas Tree Caprese Salad is not only visually stunning but also incredibly easy to prepare, making it a stress-free addition to your holiday celebrations.
  • The vibrant colors and festive shape are guaranteed to impress your guests and become a conversation starter around the table.
  • With fresh ingredients like mozzarella, tomatoes, and basil, every bite bursts with delightful flavor that will please even the pickiest of eaters.
  • Plus, this crowd-pleaser can be adapted to suit your personal taste, allowing for endless variations and creativity in your presentation.

Christmas Tree Caprese Salad Ingredients

• This delightful dish requires just a few fresh staples!

For the Salad

  • Medium Sized Mozzarella – 3-4 balls provide that creamy texture and fresh taste, essential for a classic Caprese.
  • Medium Sized Tomatoes – 4-5 pieces add vibrant color and juiciness to your Christmas Tree Caprese Salad.
  • Basil Leaves – A handful of fragrant basil leaves elevate the flavors and add a lovely aromatic touch.

For the Seasoning

  • Salt – Sprinkle to taste, enhancing the natural flavors of the fresh ingredients.
  • Balsamic Glaze – Drizzle to taste; it adds sweetness and acidity that beautifully balances the dish.

How to Make Christmas Tree Caprese Salad

  1. Layer the Ingredients: Start by placing slices of tomato, mozzarella, and basil on your Christmas Tree Charcuterie Board, arranging them in a festive tree shape. Feel free to get creative!
  2. Cut to Fit: If some of your ingredients are too large, carefully cut them in half. This little trick helps them fit perfectly in any corners, ensuring your tree looks beautiful from every angle.
  3. Season it Up: Once everything is layered, sprinkle a pinch of salt over the entire board. This step is key to enhancing the fresh flavors of your Christmas Tree Caprese Salad.
  4. Drizzle the Glaze: Just before serving, lightly drizzle your balsamic glaze over the salad. This keeps the mozzarella fresh and adds a delicious contrasting sweetness.
  5. Serve and Enjoy: Provide toothpicks or small forks for easy picking, and watch your guests enjoy this delightful holiday treat!

Optional: Garnish with extra basil leaves around the base for an added flourish.

Exact quantities are listed in the recipe card below.

Make Ahead Options

These Christmas Tree Caprese Salads are perfect for busy cooks looking to save time during the holiday rush! You can prep the individual components—slicing the mozzarella and tomatoes—up to 24 hours in advance. Simply layer them in your charcuterie board as directed, but hold off on adding the salt and balsamic glaze until just before serving. This ensures the mozzarella stays fresh and prevents the tomatoes from becoming soggy. When you’re ready to wow your guests, simply sprinkle the salt and drizzle the balsamic glaze for restaurant-quality results that are just as delicious as if made fresh that day!

Christmas Tree Caprese Salad Variations

Feel free to add your twist to this delightful dish and take your Christmas Tree Caprese Salad to a whole new level!

  • Vegan: Use plant-based mozzarella made from cashews or almonds to create a creamy, dairy-free version that still delivers on flavor.

  • Spicy Kick: Sprinkle red pepper flakes or drizzle with hot chili oil for a touch of heat that complements the freshness beautifully.

  • Extra Flavor: Add a layer of pesto between the tomatoes and mozzarella to infuse herby goodness into every bite.

  • Fruit Twist: Replace some tomatoes with slices of ripe peaches or strawberries for a sweet surprise that brightens the dish.

  • Grilled Goodness: Grill the tomatoes lightly before assembling for a smoky flavor that adds depth and an exciting texture.

  • Crunch Factor: Toss in some toasted pine nuts or walnuts for a satisfying crunch that contrasts the creaminess of the cheese.

  • Color Boost: Add cherry tomatoes or colorful grape tomatoes to the mix for an even more vibrant presentation.

  • Savory Herbs: Experiment with fresh mint or dill leaves alongside the basil for a refreshing herbal twist that brings a unique flavor profile.

Storage Tips for Christmas Tree Caprese Salad

Room Temperature: Enjoy your Christmas Tree Caprese Salad immediately for the best flavor and texture; if left out, it’s best consumed within 2 hours.

Fridge: Store any leftovers in an airtight container in the refrigerator for up to 3 days, keeping the flavors fresh.

Freezer: Freezing is not recommended for this salad, as the fresh ingredients like mozzarella and tomatoes do not freeze well and may become mushy upon thawing.

Reheating: Since this dish is served cold, simply take it out of the fridge and enjoy straight away. No reheating is needed!

What to Serve with Christmas Tree Caprese Salad?

Elevate your festive feast by pairing this vibrant salad with delightful sides and drinks that will leave everyone smiling.

  • Garlic Bread: The warm, buttery flavor of garlic bread complements the fresh ingredients, providing a delightful crunch that balances the salad’s creaminess.

  • Bruschetta: This classic Italian appetizer, with its toasted bread and fresh toppings, mirrors the flavors of the salad, making it a perfect companion.

  • Marinated Olives: These add a salty, punchy contrast that enhances the fresh flavors while providing a touch of Mediterranean flair to your table.

  • Roasted Vegetables: A medley of roasted seasonal veggies will bring warmth and earthiness to your meal, creating an irresistible harmony of textures and flavors.

  • Sparkling Water: Refreshing and light, sparkling water with a hint of citrus keeps the palate clean, allowing the salad’s flavors to shine through.

  • Cheesecake Bites: For a sweet finish, these bite-sized desserts add a creamy contrast to the fresh salad, leaving your guests blissfully satisfied.

  • Pasta Salad: A chilled pasta salad with pesto or sun-dried tomatoes can enhance the Italian theme while providing a filling, hearty option for your guests.

Pair these delicious options with your Christmas Tree Caprese Salad, and watch your holiday gathering turn into a memorable feast!

Chef's Helpful Tips

  • For the Christmas Tree Caprese Salad, always choose ripe tomatoes for the best flavor and texture.
  • When layering your ingredients, make sure to alternate colors to create a visually appealing presentation.
  • If you slice the mozzarella in advance, store it in a bit of water to keep it fresh until ready to use.
  • Remember to drizzle the balsamic glaze just before serving to maintain the integrity of the mozzarella and tomatoes.

Christmas Tree Caprese Salad Recipe FAQs

What kind of tomatoes should I use for the Christmas Tree Caprese Salad?
Absolutely! For the best results, opt for medium-sized, ripe tomatoes like Roma or vine-ripened. They should feel firm yet slightly yielding when pressed. Look for vibrant colors without dark spots, as this indicates freshness and flavor.

How should I store leftover Christmas Tree Caprese Salad?
Very good question! Store any leftover salad in an airtight container in the refrigerator for up to 3 days. To keep the flavors intact, avoid covering it tightly with plastic wrap as moisture can build up, compromising the texture of the mozzarella.

Can I freeze Christmas Tree Caprese Salad?
No, freezing isn’t recommended for this salad. The fresh ingredients, especially the mozzarella and tomatoes, will not hold up well in the freezer and may become mushy upon thawing. It’s best enjoyed fresh!

What should I do if my mozzarella is too firm?
If you find your mozzarella is a bit too firm, you can bring it to room temperature for about 30 minutes before assembling your salad. This will soften it and enhance its creaminess. Another tip is to soak it in a bit of olive oil with herbs for a sweeter, mellow flavor.

Is this Christmas Tree Caprese Salad suitable for people with dairy allergies?
Great question! Since this salad contains mozzarella cheese, it isn’t suitable for those with dairy allergies. However, you can substitute the mozzarella with a dairy-free cheese alternative or avocado for a creamy texture without the dairy, ensuring everyone can enjoy it!

How do I prevent the mozzarella from becoming soggy?
To avoid sogginess, drizzle the balsamic glaze just before serving. If you prefer, you can use a balsamic reduction, which has a thicker consistency and is less likely to make the salad watery. Always ensure your mozzarella is well-drained before use for the best texture!

Christmas Tree Caprese Salad

Christmas Tree Caprese Salad

This festive Christmas Tree Caprese Salad is a fun and delicious dish that is sure to delight your holiday gatherings.
Print Recipe Pin Recipe
Prep Time 20 minutes mins
Total Time 20 minutes mins
Servings: 6 servings
Course: Snacks & Appetizers
Cuisine: Italian
Calories: 150
Ingredients Equipment Method Nutrition Notes

Ingredients
  

For the Salad
  • 4 balls Medium Sized Mozzarella 3-4 balls will give your salad a creamy texture.
  • 5 pieces Medium Sized Tomatoes 4-5 pieces should be ripe.
  • 1 handful Basil Leaves Adds a lovely herbal note.
For the Seasoning
  • Salt Use to taste.
  • Balsamic Glaze Drizzle to taste.

Equipment

  • Cutting Board
  • Knife
  • Serving platter

Method
 

Preparation
  1. Layer Wisely: Start by adding your slices of tomato, mozzarella, and basil to your Christmas Tree Charcuterie Board.
  2. Adjust as Needed: If some items are too large, feel free to cut a few in half.
  3. Season Generously: Once your salad is beautifully layered, sprinkle a bit of salt over the entire board.
  4. Finish with Elegance: Just before serving, lightly drizzle your balsamic glaze over the salad.
  5. Serve with Flair: Provide toothpicks or forks on the side for your guests to easily pick up their servings.

Nutrition

Serving: 1servingCalories: 150kcalCarbohydrates: 6gProtein: 8gFat: 10gSaturated Fat: 5gMonounsaturated Fat: 3gCholesterol: 20mgSodium: 250mgPotassium: 200mgFiber: 1gSugar: 3gVitamin A: 500IUVitamin C: 15mgCalcium: 200mgIron: 1mg

Notes

Garnish with extra basil leaves for a pop of color and flavor. Ensure mozzarella is at room temperature for optimal creaminess.

Tried this recipe?

Let us know how it was!

Filed Under: SNACKS & APPETIZERS

Million Dollar Cream Cheese Dip Recipe

December 29, 2025 by JudyWhite Leave a Comment

There’s something incredibly comforting about the rich, creamy indulgence of a delectable dip—especially when it comes together in just five minutes. I remember gathering with friends for game nights, where we’d crowd around a table, chips in hand, eagerly diving into a bowl of this Million Dollar Cream Cheese Dip. The blend of crispy bacon, velvety cream cheese, and sharp Cheddar always left everyone wanting more.

This delightful recipe isn’t just about the flavors; it’s about creating moments. It’s perfect for potlucks, casual gatherings, or even just a cozy night at home when you want to treat yourself without the hassle of an elaborate prep. With its creamy texture and satisfying crunch from the slivered almonds, this dip is versatile enough to please everyone, whether you’re serving it alongside veggies or your favorite crackers. Trust me, once you try it, you’ll understand why it’s worth every single calorie. Let’s dive into making this irresistible Million Dollar Cream Cheese Dip!

Why You'll Love This Million Dollar Cream Cheese Dip

  • This Million Dollar Cream Cheese Dip comes together in just five minutes, making it incredibly easy to whip up for any occasion.
  • Packed with flavors from crispy bacon and sharp Cheddar, it will be a hit at your next gathering or game night.
  • The creamy texture combined with the crunch of slivered almonds creates a dip that is both satisfying and versatile, serving well with chips, veggies, or crackers.
  • Its stunning visual appeal and indulgent taste make it a perfect crowd-pleaser that will have everyone coming back for more.

Million Dollar Cream Cheese Dip Ingredients

Get ready to elevate your snack game with the perfect Million Dollar Cream Cheese Dip!

For the Dip

  • Thick-cut bacon – Adds a savory, crispy element that complements the creamy textures beautifully.
  • Mayonnaise – Helps create a smooth and luscious base for the dip.
  • Cream cheese – The star ingredient, giving the dip its rich and velvety consistency.
  • Extra-sharp Cheddar cheese – Packs a flavorful punch that brings depth and character to the dip.
  • Slivered almonds – Provides a satisfying crunch that contrasts with the creaminess of the dip.
  • Garlic powder – Enhances the savory flavor profile with a quick burst of garlic goodness.
  • Onion powder – Adds a subtle sweetness and depth to the overall flavor.
  • Thinly sliced scallions – Introduces a fresh, vibrant element that brightens up the dip.

Feel free to tweak any ingredients to suit your taste or dietary preferences!

How to Make Million Dollar Cream Cheese Dip

  1. Combine Creamy Base: In a mixing bowl, combine the cream cheese and mayonnaise. Stir until the mixture is smooth and creamy, creating a luscious base for the dip. This should only take about 1-2 minutes.

  2. Fold in Cheddar and Bacon: Gently fold in the shredded extra-sharp Cheddar cheese and crumbled thick-cut bacon. The combination of savory flavors will make your taste buds dance with joy!

  3. Add Crunchy Ingredients: Stir in the slivered almonds, garlic powder, onion powder, and thinly sliced scallions. Mix until all ingredients are well incorporated, ensuring every bite is packed with flavor.

  4. Serve and Garnish: Transfer the dip to a charming serving dish. For an extra touch, garnish with additional sliced scallions on top for a pop of freshness and color.

Optional: Serve with a variety of chips, veggies, or crackers for dipping!

Exact quantities are listed in the recipe card below.

Million Dollar Cream Cheese Dip Variations

Feel free to get creative and personalize this dip to suit your taste buds!

  • Bacon Alternatives: Swap out bacon for crispy pancetta or turkey bacon for a lighter twist without sacrificing that satisfying crunch.

  • Vegan Version: Use vegan cream cheese and mayonnaise for a completely plant-based dip. The flavor will remain rich and creamy, perfect for any gathering.

  • Nut-Free Option: Replace slivered almonds with sunflower seeds or omit them entirely for a nut-free version that still delivers on taste.

  • Herb-Infused: Add fresh herbs like dill or chives instead of scallions for a burst of flavor that brightens each bite. It’s a wonderful way to elevate the taste!

  • Spicy Kick: Include diced jalapeños or a few dashes of hot sauce to add a little heat that kicks the creaminess up a notch.

  • Extra Creamy: Enhance the texture by mixing in a dollop of sour cream or Greek yogurt, which adds a tangy layer to the dip.

  • Cheese Varieties: Experiment with different cheeses like pepper jack or gouda for a unique flavor profile. Each cheese brings its own character to the dip!

  • Sweet Element: Fold in some dried cranberries or chopped apples for a hint of sweetness that beautifully contrasts with the savory ingredients.

With these variations, you can create a dip that’s uniquely yours, making it the star of any gathering!

Make Ahead Options

This Million Dollar Cream Cheese Dip Recipe is perfect for meal prep, allowing you to enjoy flavorful bites with minimal effort! You can prepare the dip up to 24 hours ahead of time—simply follow the recipe until mixing all ingredients together, then refrigerate it in an airtight container. This overnight chilling not only enhances the flavor but also helps maintain its creamy texture. When you’re ready to serve, just give it a good stir, garnish with additional scallions, and serve alongside your favorite chips or veggies. Your friends and family will love that you managed to save time without sacrificing taste!

How to Store and Freeze Million Dollar Cream Cheese Dip

Fridge: Store the dip in an airtight container for up to 3 days. This helps maintain its creamy texture and flavor, perfect for those late-night snack cravings.

Freezer: You can freeze the Million Dollar Cream Cheese Dip for up to 2 months. Make sure to use a freezer-safe container, and thaw it in the fridge overnight before serving to restore its creamy consistency.

Reheating: If you plan to reheat, do so gently in the microwave or on the stovetop, stirring frequently. Avoid overheating, as it can alter the dip’s texture.

Serving Suggestions: Serve chilled or at room temperature for the best flavor experience, along with your favorite dippers like chips or fresh veggies!

What to Serve with Million Dollar Cream Cheese Dip?

Creating an unforgettable spread is easy when you know the right accompaniments to enhance your creamy, savory dip.

  • Fresh Veggies: Crunchy carrots, celery, and bell peppers bring a refreshing contrast that balances the rich flavors wonderfully.

  • Assorted Crackers: Different textures and flavors in crunchy crackers provide the perfect vehicle for dipping, enhancing the overall experience.

  • Pita Chips: The lightness and airy texture of pita chips make them an elegant option that pairs beautifully with the dip’s creaminess.

  • Cheese Platter: Add a variety of cheeses to complement the sharpness of the Cheddar—think Gouda or Brie for a delightful twist.

  • Spicy Grilled Shrimp: The heat from spicy shrimp will create a fantastic flavor contrast, making each bite even more exciting and delicious.

  • Red Wine: A fruity, medium-bodied red wine, like Merlot, will enhance the flavors of the dip while providing a lovely balance with its acidity.

  • Chocolate Brownies: End your meal on a sweet note with fudgy brownies that provide a rich, decadent contrast to the creamy dip.

With these delicious options, your gathering will become a memorable feast that keeps everyone coming back for more.

Chef's Helpful Tips

  • Start with room temperature cream cheese to ensure it blends smoothly with the mayonnaise for the Million Dollar Cream Cheese Dip.
  • Avoid overmixing when folding in the ingredients, as this can make the dip too dense and lose its creamy texture.
  • Feel free to swap in different cheeses or nuts if you want to customize the flavor and texture to your liking.
  • For optimal flavor, let the dip chill in the refrigerator for at least 30 minutes before serving to allow the flavors to meld.

Million Dollar Cream Cheese Dip Recipe FAQs

What type of bacon should I use for the Million Dollar Cream Cheese Dip?
Absolutely! For the best flavor and texture, I recommend using thick-cut bacon. It adds that extra crunch and savory depth that complements the creamy ingredients beautifully. Make sure to cook it until it’s crispy, then crumble it into pieces before mixing it into the dip.

How should I store the Million Dollar Cream Cheese Dip?
To store your delicious dip, place it in an airtight container in the fridge. It will stay fresh for up to 3 days. If you notice any dark spots on the surface, that’s a sign it might be time to toss it. Just give it a good stir before serving again to refresh its creamy texture!

Can I freeze the Million Dollar Cream Cheese Dip?
Yes, you can certainly freeze this dip! Transfer it to a freezer-safe container, ensuring it’s well sealed to prevent freezer burn. It can last up to 2 months in the freezer. When you’re ready to enjoy it, simply thaw it in the refrigerator overnight. Once thawed, give it a good stir before serving to get that creamy consistency back.

What if my dip turns out too thick?
No worries at all! If the texture of your Million Dollar Cream Cheese Dip is thicker than you’d like, simply add a tablespoon of milk or extra mayonnaise to the dip and mix well until it reaches your desired consistency. This will help restore that creamy, luscious texture.

Is this dip suitable for those with allergies?
Great question! This dip contains common allergens like dairy and nuts. If you’re accommodating allergies, consider using dairy-free cream cheese and mayonnaise. You can also leave out the almonds if nut allergies are a concern. Always double-check ingredient labels for any hidden allergens!

How long should I let the dip chill before serving?
I recommend letting the Million Dollar Cream Cheese Dip chill in the refrigerator for at least 30 minutes before serving. This allows the flavors to meld beautifully, enhancing the overall taste. If you can, let it sit even longer for the best results—up to 2 hours is ideal!

Million Dollar Cream Cheese Dip Recipe

Million Dollar Cream Cheese Dip Recipe

A quick and creamy dip featuring bacon, cream cheese, and cheddar, perfect for snacks and gatherings.
Print Recipe Pin Recipe
Prep Time 5 minutes mins
Chill Time 30 minutes mins
Total Time 35 minutes mins
Servings: 8 servings
Course: Snacks & Appetizers
Cuisine: American
Calories: 300
Ingredients Equipment Method Nutrition Notes

Ingredients
  

For the Dip
  • 8 oz cream cheese softened
  • 1/4 cup mayonnaise
  • 1 cup extra-sharp Cheddar cheese shredded
  • 6 slices thick-cut bacon cooked and crumbled
  • 1/2 cup slivered almonds
  • 1 tsp garlic powder
  • 1 tsp onion powder
  • 2 tbsp thinly sliced scallions plus extra for garnish

Equipment

  • Mixing bowl
  • Spatula
  • serving dish

Method
 

How to Make Million Dollar Cream Cheese Dip
  1. In a mixing bowl, combine the cream cheese and mayonnaise. Stir until smooth and creamy.
  2. Gently fold in the shredded Cheddar cheese and crumbled bacon.
  3. Stir in the slivered almonds, garlic powder, onion powder, and scallions.
  4. Transfer to a serving dish and garnish with additional sliced scallions.

Nutrition

Serving: 1cupCalories: 300kcalCarbohydrates: 5gProtein: 10gFat: 27gSaturated Fat: 10gPolyunsaturated Fat: 1gMonounsaturated Fat: 15gCholesterol: 55mgSodium: 500mgPotassium: 150mgFiber: 1gSugar: 1gVitamin A: 500IUCalcium: 200mgIron: 1mg

Notes

For best results, let the dip chill in the refrigerator for at least 30 minutes before serving.

Tried this recipe?

Let us know how it was!

Filed Under: SNACKS & APPETIZERS

Million Dollar Cream Cheese Dip Recipe

December 29, 2025 by JudyWhite Leave a Comment

There’s something incredibly comforting about the rich, creamy indulgence of a delectable dip—especially when it comes together in just five minutes. I remember gathering with friends for game nights, where we’d crowd around a table, chips in hand, eagerly diving into a bowl of this Million Dollar Cream Cheese Dip. The blend of crispy bacon, velvety cream cheese, and sharp Cheddar always left everyone wanting more.

This delightful recipe isn’t just about the flavors; it’s about creating moments. It’s perfect for potlucks, casual gatherings, or even just a cozy night at home when you want to treat yourself without the hassle of an elaborate prep. With its creamy texture and satisfying crunch from the slivered almonds, this dip is versatile enough to please everyone, whether you’re serving it alongside veggies or your favorite crackers. Trust me, once you try it, you’ll understand why it’s worth every single calorie. Let’s dive into making this irresistible Million Dollar Cream Cheese Dip!

Why You'll Love This Million Dollar Cream Cheese Dip

  • This Million Dollar Cream Cheese Dip comes together in just five minutes, making it incredibly easy to whip up for any occasion.
  • Packed with flavors from crispy bacon and sharp Cheddar, it will be a hit at your next gathering or game night.
  • The creamy texture combined with the crunch of slivered almonds creates a dip that is both satisfying and versatile, serving well with chips, veggies, or crackers.
  • Its stunning visual appeal and indulgent taste make it a perfect crowd-pleaser that will have everyone coming back for more.

Million Dollar Cream Cheese Dip Ingredients

Get ready to elevate your snack game with the perfect Million Dollar Cream Cheese Dip!

For the Dip

  • Thick-cut bacon – Adds a savory, crispy element that complements the creamy textures beautifully.
  • Mayonnaise – Helps create a smooth and luscious base for the dip.
  • Cream cheese – The star ingredient, giving the dip its rich and velvety consistency.
  • Extra-sharp Cheddar cheese – Packs a flavorful punch that brings depth and character to the dip.
  • Slivered almonds – Provides a satisfying crunch that contrasts with the creaminess of the dip.
  • Garlic powder – Enhances the savory flavor profile with a quick burst of garlic goodness.
  • Onion powder – Adds a subtle sweetness and depth to the overall flavor.
  • Thinly sliced scallions – Introduces a fresh, vibrant element that brightens up the dip.

Feel free to tweak any ingredients to suit your taste or dietary preferences!

How to Make Million Dollar Cream Cheese Dip

  1. Combine Creamy Base: In a mixing bowl, combine the cream cheese and mayonnaise. Stir until the mixture is smooth and creamy, creating a luscious base for the dip. This should only take about 1-2 minutes.

  2. Fold in Cheddar and Bacon: Gently fold in the shredded extra-sharp Cheddar cheese and crumbled thick-cut bacon. The combination of savory flavors will make your taste buds dance with joy!

  3. Add Crunchy Ingredients: Stir in the slivered almonds, garlic powder, onion powder, and thinly sliced scallions. Mix until all ingredients are well incorporated, ensuring every bite is packed with flavor.

  4. Serve and Garnish: Transfer the dip to a charming serving dish. For an extra touch, garnish with additional sliced scallions on top for a pop of freshness and color.

Optional: Serve with a variety of chips, veggies, or crackers for dipping!

Exact quantities are listed in the recipe card below.

What to Serve with Million Dollar Cream Cheese Dip?

Creating an unforgettable spread is easy when you know the right accompaniments to enhance your creamy, savory dip.

  • Fresh Veggies: Crunchy carrots, celery, and bell peppers bring a refreshing contrast that balances the rich flavors wonderfully.

  • Assorted Crackers: Different textures and flavors in crunchy crackers provide the perfect vehicle for dipping, enhancing the overall experience.

  • Pita Chips: The lightness and airy texture of pita chips make them an elegant option that pairs beautifully with the dip’s creaminess.

  • Cheese Platter: Add a variety of cheeses to complement the sharpness of the Cheddar—think Gouda or Brie for a delightful twist.

  • Spicy Grilled Shrimp: The heat from spicy shrimp will create a fantastic flavor contrast, making each bite even more exciting and delicious.

  • Red Wine: A fruity, medium-bodied red wine, like Merlot, will enhance the flavors of the dip while providing a lovely balance with its acidity.

  • Chocolate Brownies: End your meal on a sweet note with fudgy brownies that provide a rich, decadent contrast to the creamy dip.

With these delicious options, your gathering will become a memorable feast that keeps everyone coming back for more.

How to Store and Freeze Million Dollar Cream Cheese Dip

Fridge: Store the dip in an airtight container for up to 3 days. This helps maintain its creamy texture and flavor, perfect for those late-night snack cravings.

Freezer: You can freeze the Million Dollar Cream Cheese Dip for up to 2 months. Make sure to use a freezer-safe container, and thaw it in the fridge overnight before serving to restore its creamy consistency.

Reheating: If you plan to reheat, do so gently in the microwave or on the stovetop, stirring frequently. Avoid overheating, as it can alter the dip’s texture.

Serving Suggestions: Serve chilled or at room temperature for the best flavor experience, along with your favorite dippers like chips or fresh veggies!

Million Dollar Cream Cheese Dip Variations

Feel free to get creative and personalize this dip to suit your taste buds!

  • Bacon Alternatives: Swap out bacon for crispy pancetta or turkey bacon for a lighter twist without sacrificing that satisfying crunch.

  • Vegan Version: Use vegan cream cheese and mayonnaise for a completely plant-based dip. The flavor will remain rich and creamy, perfect for any gathering.

  • Nut-Free Option: Replace slivered almonds with sunflower seeds or omit them entirely for a nut-free version that still delivers on taste.

  • Herb-Infused: Add fresh herbs like dill or chives instead of scallions for a burst of flavor that brightens each bite. It’s a wonderful way to elevate the taste!

  • Spicy Kick: Include diced jalapeños or a few dashes of hot sauce to add a little heat that kicks the creaminess up a notch.

  • Extra Creamy: Enhance the texture by mixing in a dollop of sour cream or Greek yogurt, which adds a tangy layer to the dip.

  • Cheese Varieties: Experiment with different cheeses like pepper jack or gouda for a unique flavor profile. Each cheese brings its own character to the dip!

  • Sweet Element: Fold in some dried cranberries or chopped apples for a hint of sweetness that beautifully contrasts with the savory ingredients.

With these variations, you can create a dip that’s uniquely yours, making it the star of any gathering!

Make Ahead Options

This Million Dollar Cream Cheese Dip Recipe is perfect for meal prep, allowing you to enjoy flavorful bites with minimal effort! You can prepare the dip up to 24 hours ahead of time—simply follow the recipe until mixing all ingredients together, then refrigerate it in an airtight container. This overnight chilling not only enhances the flavor but also helps maintain its creamy texture. When you’re ready to serve, just give it a good stir, garnish with additional scallions, and serve alongside your favorite chips or veggies. Your friends and family will love that you managed to save time without sacrificing taste!

Chef's Helpful Tips

  • Start with room temperature cream cheese to ensure it blends smoothly with the mayonnaise for the Million Dollar Cream Cheese Dip.
  • Avoid overmixing when folding in the ingredients, as this can make the dip too dense and lose its creamy texture.
  • Feel free to swap in different cheeses or nuts if you want to customize the flavor and texture to your liking.
  • For optimal flavor, let the dip chill in the refrigerator for at least 30 minutes before serving to allow the flavors to meld.

Million Dollar Cream Cheese Dip Recipe FAQs

What type of bacon should I use for the Million Dollar Cream Cheese Dip?
Absolutely! For the best flavor and texture, I recommend using thick-cut bacon. It adds that extra crunch and savory depth that complements the creamy ingredients beautifully. Make sure to cook it until it’s crispy, then crumble it into pieces before mixing it into the dip.

How should I store the Million Dollar Cream Cheese Dip?
To store your delicious dip, place it in an airtight container in the fridge. It will stay fresh for up to 3 days. If you notice any dark spots on the surface, that’s a sign it might be time to toss it. Just give it a good stir before serving again to refresh its creamy texture!

Can I freeze the Million Dollar Cream Cheese Dip?
Yes, you can certainly freeze this dip! Transfer it to a freezer-safe container, ensuring it’s well sealed to prevent freezer burn. It can last up to 2 months in the freezer. When you’re ready to enjoy it, simply thaw it in the refrigerator overnight. Once thawed, give it a good stir before serving to get that creamy consistency back.

What if my dip turns out too thick?
No worries at all! If the texture of your Million Dollar Cream Cheese Dip is thicker than you’d like, simply add a tablespoon of milk or extra mayonnaise to the dip and mix well until it reaches your desired consistency. This will help restore that creamy, luscious texture.

Is this dip suitable for those with allergies?
Great question! This dip contains common allergens like dairy and nuts. If you’re accommodating allergies, consider using dairy-free cream cheese and mayonnaise. You can also leave out the almonds if nut allergies are a concern. Always double-check ingredient labels for any hidden allergens!

How long should I let the dip chill before serving?
I recommend letting the Million Dollar Cream Cheese Dip chill in the refrigerator for at least 30 minutes before serving. This allows the flavors to meld beautifully, enhancing the overall taste. If you can, let it sit even longer for the best results—up to 2 hours is ideal!

Million Dollar Cream Cheese Dip Recipe

Million Dollar Cream Cheese Dip Recipe

A quick and creamy dip featuring bacon, cream cheese, and cheddar, perfect for snacks and gatherings.
Print Recipe Pin Recipe
Prep Time 5 minutes mins
Chill Time 30 minutes mins
Total Time 35 minutes mins
Servings: 8 servings
Course: Snacks & Appetizers
Cuisine: American
Calories: 300
Ingredients Equipment Method Nutrition Notes

Ingredients
  

For the Dip
  • 8 oz cream cheese softened
  • 1/4 cup mayonnaise
  • 1 cup extra-sharp Cheddar cheese shredded
  • 6 slices thick-cut bacon cooked and crumbled
  • 1/2 cup slivered almonds
  • 1 tsp garlic powder
  • 1 tsp onion powder
  • 2 tbsp thinly sliced scallions plus extra for garnish

Equipment

  • Mixing bowl
  • Spatula
  • serving dish

Method
 

How to Make Million Dollar Cream Cheese Dip
  1. In a mixing bowl, combine the cream cheese and mayonnaise. Stir until smooth and creamy.
  2. Gently fold in the shredded Cheddar cheese and crumbled bacon.
  3. Stir in the slivered almonds, garlic powder, onion powder, and scallions.
  4. Transfer to a serving dish and garnish with additional sliced scallions.

Nutrition

Serving: 1cupCalories: 300kcalCarbohydrates: 5gProtein: 10gFat: 27gSaturated Fat: 10gPolyunsaturated Fat: 1gMonounsaturated Fat: 15gCholesterol: 55mgSodium: 500mgPotassium: 150mgFiber: 1gSugar: 1gVitamin A: 500IUCalcium: 200mgIron: 1mg

Notes

For best results, let the dip chill in the refrigerator for at least 30 minutes before serving.

Tried this recipe?

Let us know how it was!

Filed Under: SNACKS & APPETIZERS

Valentine’s Day Fruit Kebabs

December 27, 2025 by JudyWhite Leave a Comment

There’s a certain joy that comes with creating something special for the ones you love, and what could be more delightful than a platter of colorful, heart-shaped Valentine’s Day Fruit Kebabs? As I prepared these bright bites for my romantic dinner, the vibrant hues of juicy strawberries, refreshing kiwi, and plump blueberries transformed my kitchen into a celebration of love and happiness.

With just 15 minutes to whip together this eye-catching treat, these kebabs not only allow you to showcase your culinary flair but also bring a burst of flavor and nutrition to the table. Perfect for impressing a date, surprising the kids, or simply indulging in a sweet snack, they evoke all the warmth and joy of the season. Let’s dive into this simple yet charming recipe that will have everyone falling head over heels for fresh fruit!

Why You'll Love This Valentine's Day Fruit Kebabs

  • This recipe is incredibly easy to prepare, taking just 15 minutes to assemble and leaving you more time to enjoy with your loved ones.
  • The vibrant combination of strawberries, kiwi, and blueberries offers a refreshing burst of flavor that is sure to impress your guests.
  • These fruit kebabs are versatile, making them perfect for a romantic dinner, a fun snack for kids, or a delightful addition to any gathering.
  • Their heart-shaped presentation adds a beautiful visual appeal that is both charming and festive, making them a standout centerpiece for your celebration.

Valentine’s Day Fruit Kebabs Ingredients

For the Kebabs
• Kiwi – peeled and sliced to create that refreshing sweetness, perfect for balancing the other fruits.
• Strawberries – sliced for their bold color and juicy flavor, essential for a delightful presentation.
• Blueberries – a sprinkle of these little gems adds vibrant color and a burst of antioxidants.

For Optional Garnish
• Mint leaves – use to elevate the aesthetic and add a minty freshness to your Valentine’s Day Fruit Kebabs.
• Dark chocolate drizzle – a decadent touch that pairs beautifully with the fruit if you desire a sweeter treat!

Embrace the season of love with this delightful fruit treat!

How to Make Valentine’s Day Fruit Kebabs

  1. Prepare the Kiwi: Slice the kiwi into rounds and then cut each round in half. Arrange the pieces in a heart shape on a large, flat plate—this will be the beautiful base of your kebabs.

  2. Add Strawberries: Take your sliced strawberries and fill the spaces around the kiwi, arranging them artfully to create a vibrant contrast of red and green.

  3. Sprinkle Blueberries: Gently sprinkle the blueberries over the plate, tucking them in where there’s room. Their deep blue color will add a delightful pop to your display!

  4. Assemble the Kebabs: Skewer the kiwi, strawberries, and blueberries onto bamboo sticks, alternating between fruits for a cheerful and colorful look. Ensure you press lightly to keep everything secure!

  5. Serve and Enjoy: Once assembled, these heart-shaped fruit kebabs are ready to be savored. Bring them to the table and watch everyone light up with joy!

Optional: Drizzle with dark chocolate for an indulgent finish.

Exact quantities are listed in the recipe card below.

Valentine’s Day Fruit Kebabs Variations

Feel free to experiment and personalize your Valentine’s Day Fruit Kebabs with these delightful twists!

  • Tropical Touch: Swap kiwi for mango slices for a sweeter, exotic flavor that brightens up your kebabs. The juicy mango adds a lush sweetness that complements the tart berries beautifully.

  • Berry Bonanza: Use a mix of berries including raspberries and blackberries for richer colors and a variety of flavors. These berries provide a delightful tartness that balances the sweetness of strawberries.

  • Nutty Crunch: Add chopped nuts like almonds or pistachios to the drizzle for an added crunch. This sprinkle of texture creates an exciting contrast with the soft fruit, bringing joyful surprise in each bite!

  • Citrus Zing: Incorporate orange or lemon zest on top for a refreshing citrus kick. The zest enhances the flavors and adds a fragrant note that will brighten your entire dish.

  • Choco-berry Delight: Swap the chocolate drizzle for a yogurt dip made of vanilla Greek yogurt mixed with honey. This offers both a creamy texture and a delightful sweetness to the fruit.

  • Spiced Up: Inject a sprinkle of cinnamon or chili powder on the fruits before serving for a warm, spicy twist. This unexpected heat can elevate your fruit experience and excite your taste buds!

  • Herb Infusion: Garnish with fresh basil or mint leaves. Their aromatic hint brings a refreshing layer to the kebabs, making them feel even more festive and colorful.

Each variation enhances the sweetness and charm of your Valentine’s Day Fruit Kebabs, inviting you to explore the flavors of love!

What to Serve with Valentine’s Day Fruit Kebabs?

Indulging in fruity delights has never been sweeter! Let’s elevate your dish with these perfect pairings.

  • Mint Yogurt Dip: A cool, creamy dip that enhances the freshness of the kebabs and adds a delightful contrast.

  • Sparkling Water: Serve with a splash of fresh citrus for a refreshing beverage that uplifts the flavors of the fruits.

  • Dark Chocolate Fondue: For those craving richness, a chocolate dip transforms the experience into a luxurious dessert moment.

  • Cheese Platter: Include a variety of mild cheeses, like brie or goat cheese, which provide a nice balance of creamy textures next to the fresh fruit.

  • Mixed Nuts: Crunchy, roasted nuts add a delightful contrast, providing protein and a satisfying texture that pairs beautifully with the sweetness.

  • Fruit Smoothie: Blend leftover fruit into a smoothie for a refreshing, vibrant drink that ties right back into the kebab theme.

  • Fruit Tart: A light and flaky crust filled with rich cream and topped with seasonal fruits offers a beautiful and delicious finish to your meal.

These delightful accompaniments will have everyone raving about your Valentine’s Day Fruit Kebabs and ensure a truly memorable celebration!

Make Ahead Options

These Valentine’s Day Fruit Kebabs are perfect for meal prep enthusiasts! You can slice the kiwi and strawberries up to 24 hours in advance to save time, placing them in an airtight container to maintain freshness and prevent browning. The blueberries can also be prepped and stored in the same container. When you’re ready to serve, simply assemble the skewers with the prepped fruit, ensuring a delightful mix of colors and flavors. For the best presentation, drizzle with dark chocolate just before serving, so everything stays fresh and appealing. With this make-ahead strategy, you’ll have a beautiful, delicious treat ready for any celebration!

How to Store and Freeze Valentine’s Day Fruit Kebabs

Fridge: Keep assembled Valentine’s Day Fruit Kebabs in an airtight container for up to 2 days. This ensures they stay fresh while you prepare for your special occasion.

Room Temperature: It’s best to serve these kebabs immediately to enjoy their juicy goodness. However, if needed, they can stay out for about 1 hour at room temperature during your gathering.

Freezer: Fruit kebabs can be frozen, but it’s best to individually flash freeze the pieces first to prevent sticking. Use within 2 months for optimal taste and texture.

Reheating: These kebabs are best enjoyed cold; avoid reheating as this may compromise the texture and flavor. Simply serve straight from the fridge for a refreshing treat!

Chef's Helpful Tips

  • When making Valentine’s Day Fruit Kebabs, ensure your fruit is freshly washed and fully ripened to enhance the flavors.
  • Avoid overcrowding the skewers by choosing smaller-sized pieces for easier eating and a prettier presentation.
  • If you want a delightful contrast, consider adding a sprinkle of lime juice over the fruit to elevate the taste without overpowering it.
  • Keep the prepared kebabs refrigerated until you’re ready to serve to maintain their freshness and vibrant colors.

Valentine’s Day Fruit Kebabs Recipe FAQs

What type of kiwi should I choose for the kebabs?
Absolutely! When selecting kiwi, look for fruit that is slightly firm but yields gently to pressure—this indicates ripeness. Avoid any kiwi with dark spots all over as they may be overripe and mushy. A vibrant green color inside is what you want for a refreshing taste!

How should I store leftover fruit kebabs?
To keep your Valentine’s Day Fruit Kebabs fresh, store them in an airtight container in the refrigerator for up to 2 days. This way, they maintain their deliciousness and bright colors while you’re prepping other festive items for your celebration. Just remember to serve them cold for the best experience!

Can I freeze the kebabs for later use?
Very! To freeze your fruit kebabs, start by removing the fruit from the skewers and individually flash freeze the pieces on a baking sheet for about 1 hour. Once frozen, transfer them into a labeled freezer bag. They can stay fresh for up to 2 months! Just let them thaw in the fridge before enjoying them again.

What if the strawberries are too ripe?
If your strawberries are overly ripe, I recommend using them quickly in smoothies or desserts rather than for kebabs, since they can become mushy. Instead, opt for firm strawberries with bright red color for the best taste and presentation. If needed, try to mix them with other fruits that have a firmer texture for balance!

Are these kebabs suitable for young children?
Indeed they are! Valentine’s Day Fruit Kebabs make a fun and healthy snack. Kids typically enjoy colorful foods, and the kebabs are easy to hold. Just be sure to supervise younger children to avoid any choking hazards with the fruit pieces or skewers.

Can pets have any of the fruit used in this recipe?
While most fruits are safe for dogs in moderation, make sure to keep the kebabs away from your furry friends. Kiwi, for instance, should be offered cautiously, and all fruit should be checked for any potential allergies. Always consult your veterinarian if you’re unsure about any new foods for your pets!

Valentine's Day Fruit Kebabs

Valentine's Day Fruit Kebabs

Delightful heart-shaped Valentine's Day Fruit Kebabs featuring strawberries, kiwi, and blueberries for a colorful and nutritious treat.
Print Recipe Pin Recipe
Prep Time 15 minutes mins
Total Time 15 minutes mins
Servings: 4 kebabs
Course: Snacks & Appetizers
Cuisine: American
Calories: 50
Ingredients Equipment Method Nutrition Notes

Ingredients
  

For the Kebabs
  • 1 cup Kiwi peeled and sliced
  • 1 cup Strawberries sliced
  • 1 cup Blueberries fresh
For Optional Garnish
  • 1 cup Mint leaves for garnish
  • to taste Dark chocolate for drizzling

Equipment

  • bamboo skewers

Method
 

How to Make Valentine's Day Fruit Kebabs
  1. Slice the kiwi into rounds and then cut each round in half. Arrange the pieces in a heart shape on a large, flat plate.
  2. Take your sliced strawberries and fill the spaces around the kiwi, arranging them artfully.
  3. Gently sprinkle the blueberries over the plate, tucking them in where there's room.
  4. Skewer the kiwi, strawberries, and blueberries onto bamboo sticks, alternating between fruits.
  5. Bring them to the table and enjoy!

Nutrition

Serving: 1kebabCalories: 50kcalCarbohydrates: 13gProtein: 1gFat: 0.5gSodium: 1mgPotassium: 100mgFiber: 2gSugar: 8gVitamin A: 500IUVitamin C: 30mgCalcium: 20mgIron: 0.5mg

Notes

Ensure your fruit is freshly washed and fully ripened. Keep prepared kebabs refrigerated until serving.

Tried this recipe?

Let us know how it was!

Filed Under: SNACKS & APPETIZERS

Baked Brie with Honey and Pecans

December 27, 2025 by JudyWhite Leave a Comment

There’s something truly delightful about gathering friends and family around a warm, cheesy indulgence. Picture this: the oven hums softly as a creamy brie bakes to perfection, enveloped in a golden drizzle of honey and topped with crunchy pecans and fragrant thyme. This simple yet elegant dish, Baked Brie with Honey and Pecans, bursts with flavor and is a showstopper at any gathering.

After a long week of rush-hour traffic and takeout dinners, I found myself yearning for a comforting treat that could bring everyone together without a fuss. With only 15 minutes and a handful of ingredients, this recipe transformed my ordinary evening into a cozy celebration. Whether you’re hosting a casual wine night or looking for the perfect appetizer for a holiday feast, this baked brie will never disappoint. It’s not just about taste; it’s about creating a moment to savor, one bite at a time. Let’s dive into this irresistible recipe that combines ease, flavor, and just a dash of sophistication!

Why You'll Love This Baked Brie with Honey and Pecans

  • This Baked Brie with Honey and Pecans is incredibly easy to make, requiring only 15 minutes from prep to serving.
  • The combination of creamy brie, sweet honey, and crunchy pecans makes for an explosion of flavor that you’ll crave again and again.
  • Its versatility allows for endless pairings with crackers, fruits, and meats, making it perfect for any occasion.
  • Plus, it visually impresses guests with its gooey center and beautiful toppings, making it a true centerpiece on any table.

Baked Brie with Honey and Pecans Ingredients

For the Brie
• 8 ounce brie – use a high-quality brie for the creamiest texture.
• 1/4 cup honey – opt for local honey for a unique flavor boost.
• 1/4 cup toasted pecans – toasting enhances their nutty flavor and crunch.
• 1 teaspoon fresh thyme – fresh herbs add a delightful aroma to the dish.
• Flaky sea salt – a pinch enhances all the flavors beautifully.

For Serving
• Crusty bread – slices of a rustic loaf provide the perfect base for the brie.
• Crackers – choose a variety for different textures and tastes.
• Grapes – fresh grapes add a sweet and juicy contrast to the savory cheese.
• Candied pecans – these add an extra layer of sweetness and crunch alongside.
• Pears or apples, sliced – the crispness of fruit balances the richness of the brie.
• Salami – adding a savory element, creating a delightful contrast.

This combination of ingredients for the Baked Brie with Honey and Pecans is sure to impress family and friends alike!

How to Make Baked Brie with Honey and Pecans

  1. Preheat the oven to 350°F (175°C).
    This temperature is just right for melting the brie to creamy perfection without burning it.

  2. Prepare the baking sheet.
    Gently place the brie on a baking sheet lined with parchment paper to catch any drippings. This will make cleanup a breeze!

  3. Drizzle honey over the brie.
    Let the golden honey cascade down the sides, enhancing the cheese’s flavor with its natural sweetness.

  4. Sprinkle the toasted pecans and fresh thyme on top.
    The pecans add a wonderful crunch, and the thyme infuses a fresh aroma that complements the brie beautifully.

  5. Bake for 10 minutes, or until the brie is soft.
    Keep an eye on it, and you’ll know it’s ready when it’s gooey but not fully melted—just sublime!

  6. Serve with flaky sea salt, crusty bread, crackers, grapes, candied pecans, sliced pears or apples, and salami.
    Arrange everything on a beautiful platter, inviting everyone to dig in and enjoy the deliciousness!

Optional: Drizzle a bit more honey on top just before serving for an extra touch of sweetness.
Exact quantities are listed in the recipe card below.

Make Ahead Options

These Baked Brie with Honey and Pecans are perfect for meal prep, allowing you to enjoy this elegant dish with minimal last-minute effort! You can prepare the brie with honey, pecans, and thyme up to 24 hours in advance. Simply assemble it on the baking sheet, cover it tightly with plastic wrap, and refrigerate until you’re ready to bake. This method keeps the flavors vibrant and ensures the cheese remains fresh. When you’re ready to serve, preheat the oven and bake for about 10 minutes until it’s gooey. You’ll get the same delicious results with less fuss, making this a lifesaver for busy nights or entertaining!

How to Store and Freeze Baked Brie with Honey and Pecans

Room Temperature: Keep any leftovers at room temperature for up to 2 hours to avoid spoilage. After that, promptly refrigerate to preserve freshness.

Fridge: Store leftover Baked Brie with Honey and Pecans in an airtight container for up to 3 days. Reheat gently in the oven to maintain its delightful creaminess.

Freezer: Although best enjoyed fresh, you can freeze a whole, unbaked brie for up to 2 months. Wrap tightly in plastic wrap and foil to prevent freezer burn.

Reheating: When ready to enjoy, bake in a preheated oven at 350°F (175°C) for about 10-15 minutes until warmed through. Drizzle with extra honey if desired for that fresh finish!

What to Serve with Baked Brie with Honey and Pecans?

Elevate your gathering with delightful accompaniments that perfectly complement the rich creaminess of the brie.

  • Crusty Bread: A warm, rustic loaf creates the ideal base for spreading creamy brie, enhancing each bite with satisfying texture.

  • Fresh Grapes: Their cool, juicy sweetness balances the savory richness, adding a refreshing touch that keeps your palate engaged.

  • Sliced Pears: The crispness of pears contrasts beautifully with the gooey brie, offering a burst of flavor that feels elegant and delightful.

  • Savory Salami: A slice of salami introduces a savory, meaty element that enriches the overall flavor profile, making each spoonful feel indulgent.

  • Candied Pecans: These sweet, crunchy gems not only amplify the nutty flavor of the dish but also provide a delightful textural contrast.

  • Sparkling Wine: A chilled glass of sparkling wine brightens the palate, making it a fabulous pairing for this indulgent appetizer.

Baked Brie with Honey and Pecans Variations

Let your creativity flow by customizing this delicious baked treat to suit your taste and dietary preferences!

  • Nut-Free: Swap out pecans for sunflower seeds or pumpkin seeds for a similar crunch without the nuts.
  • Herbed Delight: Experiment with different herbs like rosemary or sage to give your baked brie an aromatic twist.
  • Sweet and Spicy: Add a sprinkle of crushed red pepper flakes alongside the pecans for a surprising kick that balances the sweetness.
  • Fruit Fusion: Top with sliced figs or cranberries for a burst of seasonal flavor and a pop of color on your platter.
  • Maple Magic: Replace honey with maple syrup for a deeper, caramel-like sweetness that pairs beautifully with the brie.

For a delightful summer touch, try adding some fresh berries after baking; their natural sweetness makes the dish even more decadent.

  • Savory Spin: Lay thin slices of prosciutto on top before baking for an irresistible savory punch that complements the creamy brie.
  • Cheesy Upgrade: For extra gooeyness, add a layer of gouda or camembert beneath the brie, creating a luscious cheese blend.
  • Gluten-Free: Serve with gluten-free crackers or vegetable sticks for a wholesome, guilt-free pairing that’s perfect for any gathering.

Chef's Helpful Tips

  • When making Baked Brie with Honey and Pecans, always use a high-quality brie for the creamiest texture and best flavor.
  • Avoid overbaking by checking the cheese after 10 minutes to ensure it is soft but not fully melted for that perfect gooeyness.
  • Consider adding a sprinkle of flaky sea salt just before serving to enhance all the flavors beautifully.
  • If you’re looking to impress, try using local honey for a distinct flavor twist that your guests will love.

Baked Brie with Honey and Pecans Recipe FAQs

How do I choose the best brie for this recipe?
Absolutely! For the best results, look for a high-quality brie with a relatively soft texture. Aim for a wheel that’s free of dark spots and has a creamy, even rind. If you can, visit a local cheese shop to find artisanal options, which can often offer a more robust flavor.

How should I store leftover Baked Brie with Honey and Pecans?
After you indulge in this delightful treat, store any leftovers in an airtight container in the fridge, where they will stay fresh for up to 3 days. Just remember to reheat it gently in the oven at 350°F (175°C) for about 10 minutes to restore its creamy texture!

Can I freeze Baked Brie with Honey and Pecans?
Yes, you can! Wrap your unbaked brie tightly in plastic wrap and then in foil to prevent freezer burn. It will keep well in the freezer for up to 2 months. When you’re ready to enjoy it, simply bake it straight from the freezer at 350°F (175°C) for about 10-15 minutes, or until warmed through. Drizzle some extra honey before serving for that wonderful fresh flavor!

What if I want to make this dish gluten-free?
Very! For a gluten-free version, simply swap out the crusty bread and crackers for gluten-free alternatives. There are plenty of excellent gluten-free crackers available at most grocery stores. Fresh fruits, nuts, and just a hint of flaky sea salt will keep everything fresh and delicious!

How can I enhance the flavors of my Baked Brie with Honey and Pecans?
To take this irresistible dish up a notch, consider infusing additional flavors. You might sprinkle in some crushed red pepper flakes for a little heat or use a flavored honey (like lavender or chili-infused) for a interesting twist. Just remember to adjust your toppings to balance flavors so each one shines through beautifully!

Baked Brie with Honey and Pecans

Baked Brie with Honey and Pecans

This Baked Brie with Honey and Pecans is a stunning and delicious appetizer perfect for any gathering.
Print Recipe Pin Recipe
Prep Time 15 minutes mins
Cook Time 10 minutes mins
Total Time 25 minutes mins
Servings: 8 servings
Course: Snacks & Appetizers
Calories: 250
Ingredients Equipment Method Nutrition Notes

Ingredients
  

For the Brie
  • 8 ounces brie use a high-quality brie for the creamiest texture
  • 1/4 cup honey opt for local honey for a unique flavor boost
  • 1/4 cup toasted pecans toasting enhances their nutty flavor and crunch
  • 1 teaspoon fresh thyme fresh herbs add a delightful aroma
  • flaky sea salt a pinch enhances all flavors beautifully
For Serving
  • crusty bread slices of a rustic loaf provide the perfect base
  • crackers choose a variety for different textures and tastes
  • grapes fresh grapes add a sweet and juicy contrast
  • candied pecans these add an extra layer of sweetness and crunch
  • pears or apples, sliced the crispness balances the richness of brie
  • salami adding a savory element

Equipment

  • Oven
  • Baking sheet
  • parchment paper

Method
 

How to Make Baked Brie with Honey and Pecans
  1. Preheat the oven to 350°F (175°C).
  2. Prepare the baking sheet by placing the brie on parchment paper.
  3. Drizzle honey over the brie.
  4. Sprinkle the toasted pecans and fresh thyme on top.
  5. Bake for 10 minutes, or until the brie is soft.
  6. Serve with flaky sea salt, crusty bread, crackers, grapes, candied pecans, sliced pears or apples, and salami.

Nutrition

Serving: 1servingCalories: 250kcalCarbohydrates: 20gProtein: 6gFat: 18gSaturated Fat: 10gPolyunsaturated Fat: 2gMonounsaturated Fat: 4gCholesterol: 30mgSodium: 200mgPotassium: 150mgFiber: 1gSugar: 12gVitamin A: 400IUVitamin C: 2mgCalcium: 150mgIron: 0.5mg

Notes

Use a high-quality brie and check for doneness after 10 minutes, ensuring it's soft but not fully melted. Adding a sprinkle of flaky sea salt enhances all flavors beautifully.

Tried this recipe?

Let us know how it was!

Filed Under: SNACKS & APPETIZERS

Baked Brie with Honey and Pecans

December 27, 2025 by JudyWhite Leave a Comment

There’s something truly delightful about gathering friends and family around a warm, cheesy indulgence. Picture this: the oven hums softly as a creamy brie bakes to perfection, enveloped in a golden drizzle of honey and topped with crunchy pecans and fragrant thyme. This simple yet elegant dish, Baked Brie with Honey and Pecans, bursts with flavor and is a showstopper at any gathering.

After a long week of rush-hour traffic and takeout dinners, I found myself yearning for a comforting treat that could bring everyone together without a fuss. With only 15 minutes and a handful of ingredients, this recipe transformed my ordinary evening into a cozy celebration. Whether you’re hosting a casual wine night or looking for the perfect appetizer for a holiday feast, this baked brie will never disappoint. It’s not just about taste; it’s about creating a moment to savor, one bite at a time. Let’s dive into this irresistible recipe that combines ease, flavor, and just a dash of sophistication!

Why You'll Love This Baked Brie with Honey and Pecans

  • This Baked Brie with Honey and Pecans is incredibly easy to make, requiring only 15 minutes from prep to serving.
  • The combination of creamy brie, sweet honey, and crunchy pecans makes for an explosion of flavor that you’ll crave again and again.
  • Its versatility allows for endless pairings with crackers, fruits, and meats, making it perfect for any occasion.
  • Plus, it visually impresses guests with its gooey center and beautiful toppings, making it a true centerpiece on any table.

Baked Brie with Honey and Pecans Ingredients

For the Brie
• 8 ounce brie – use a high-quality brie for the creamiest texture.
• 1/4 cup honey – opt for local honey for a unique flavor boost.
• 1/4 cup toasted pecans – toasting enhances their nutty flavor and crunch.
• 1 teaspoon fresh thyme – fresh herbs add a delightful aroma to the dish.
• Flaky sea salt – a pinch enhances all the flavors beautifully.

For Serving
• Crusty bread – slices of a rustic loaf provide the perfect base for the brie.
• Crackers – choose a variety for different textures and tastes.
• Grapes – fresh grapes add a sweet and juicy contrast to the savory cheese.
• Candied pecans – these add an extra layer of sweetness and crunch alongside.
• Pears or apples, sliced – the crispness of fruit balances the richness of the brie.
• Salami – adding a savory element, creating a delightful contrast.

This combination of ingredients for the Baked Brie with Honey and Pecans is sure to impress family and friends alike!

How to Make Baked Brie with Honey and Pecans

  1. Preheat the oven to 350°F (175°C).
    This temperature is just right for melting the brie to creamy perfection without burning it.

  2. Prepare the baking sheet.
    Gently place the brie on a baking sheet lined with parchment paper to catch any drippings. This will make cleanup a breeze!

  3. Drizzle honey over the brie.
    Let the golden honey cascade down the sides, enhancing the cheese’s flavor with its natural sweetness.

  4. Sprinkle the toasted pecans and fresh thyme on top.
    The pecans add a wonderful crunch, and the thyme infuses a fresh aroma that complements the brie beautifully.

  5. Bake for 10 minutes, or until the brie is soft.
    Keep an eye on it, and you’ll know it’s ready when it’s gooey but not fully melted—just sublime!

  6. Serve with flaky sea salt, crusty bread, crackers, grapes, candied pecans, sliced pears or apples, and salami.
    Arrange everything on a beautiful platter, inviting everyone to dig in and enjoy the deliciousness!

Optional: Drizzle a bit more honey on top just before serving for an extra touch of sweetness.
Exact quantities are listed in the recipe card below.

Baked Brie with Honey and Pecans Variations

Let your creativity flow by customizing this delicious baked treat to suit your taste and dietary preferences!

  • Nut-Free: Swap out pecans for sunflower seeds or pumpkin seeds for a similar crunch without the nuts.
  • Herbed Delight: Experiment with different herbs like rosemary or sage to give your baked brie an aromatic twist.
  • Sweet and Spicy: Add a sprinkle of crushed red pepper flakes alongside the pecans for a surprising kick that balances the sweetness.
  • Fruit Fusion: Top with sliced figs or cranberries for a burst of seasonal flavor and a pop of color on your platter.
  • Maple Magic: Replace honey with maple syrup for a deeper, caramel-like sweetness that pairs beautifully with the brie.

For a delightful summer touch, try adding some fresh berries after baking; their natural sweetness makes the dish even more decadent.

  • Savory Spin: Lay thin slices of prosciutto on top before baking for an irresistible savory punch that complements the creamy brie.
  • Cheesy Upgrade: For extra gooeyness, add a layer of gouda or camembert beneath the brie, creating a luscious cheese blend.
  • Gluten-Free: Serve with gluten-free crackers or vegetable sticks for a wholesome, guilt-free pairing that’s perfect for any gathering.

What to Serve with Baked Brie with Honey and Pecans?

Elevate your gathering with delightful accompaniments that perfectly complement the rich creaminess of the brie.

  • Crusty Bread: A warm, rustic loaf creates the ideal base for spreading creamy brie, enhancing each bite with satisfying texture.

  • Fresh Grapes: Their cool, juicy sweetness balances the savory richness, adding a refreshing touch that keeps your palate engaged.

  • Sliced Pears: The crispness of pears contrasts beautifully with the gooey brie, offering a burst of flavor that feels elegant and delightful.

  • Savory Salami: A slice of salami introduces a savory, meaty element that enriches the overall flavor profile, making each spoonful feel indulgent.

  • Candied Pecans: These sweet, crunchy gems not only amplify the nutty flavor of the dish but also provide a delightful textural contrast.

  • Sparkling Wine: A chilled glass of sparkling wine brightens the palate, making it a fabulous pairing for this indulgent appetizer.

Make Ahead Options

These Baked Brie with Honey and Pecans are perfect for meal prep, allowing you to enjoy this elegant dish with minimal last-minute effort! You can prepare the brie with honey, pecans, and thyme up to 24 hours in advance. Simply assemble it on the baking sheet, cover it tightly with plastic wrap, and refrigerate until you’re ready to bake. This method keeps the flavors vibrant and ensures the cheese remains fresh. When you’re ready to serve, preheat the oven and bake for about 10 minutes until it’s gooey. You’ll get the same delicious results with less fuss, making this a lifesaver for busy nights or entertaining!

How to Store and Freeze Baked Brie with Honey and Pecans

Room Temperature: Keep any leftovers at room temperature for up to 2 hours to avoid spoilage. After that, promptly refrigerate to preserve freshness.

Fridge: Store leftover Baked Brie with Honey and Pecans in an airtight container for up to 3 days. Reheat gently in the oven to maintain its delightful creaminess.

Freezer: Although best enjoyed fresh, you can freeze a whole, unbaked brie for up to 2 months. Wrap tightly in plastic wrap and foil to prevent freezer burn.

Reheating: When ready to enjoy, bake in a preheated oven at 350°F (175°C) for about 10-15 minutes until warmed through. Drizzle with extra honey if desired for that fresh finish!

Chef's Helpful Tips

  • When making Baked Brie with Honey and Pecans, always use a high-quality brie for the creamiest texture and best flavor.
  • Avoid overbaking by checking the cheese after 10 minutes to ensure it is soft but not fully melted for that perfect gooeyness.
  • Consider adding a sprinkle of flaky sea salt just before serving to enhance all the flavors beautifully.
  • If you’re looking to impress, try using local honey for a distinct flavor twist that your guests will love.

Baked Brie with Honey and Pecans Recipe FAQs

How do I choose the best brie for this recipe?
Absolutely! For the best results, look for a high-quality brie with a relatively soft texture. Aim for a wheel that’s free of dark spots and has a creamy, even rind. If you can, visit a local cheese shop to find artisanal options, which can often offer a more robust flavor.

How should I store leftover Baked Brie with Honey and Pecans?
After you indulge in this delightful treat, store any leftovers in an airtight container in the fridge, where they will stay fresh for up to 3 days. Just remember to reheat it gently in the oven at 350°F (175°C) for about 10 minutes to restore its creamy texture!

Can I freeze Baked Brie with Honey and Pecans?
Yes, you can! Wrap your unbaked brie tightly in plastic wrap and then in foil to prevent freezer burn. It will keep well in the freezer for up to 2 months. When you’re ready to enjoy it, simply bake it straight from the freezer at 350°F (175°C) for about 10-15 minutes, or until warmed through. Drizzle some extra honey before serving for that wonderful fresh flavor!

What if I want to make this dish gluten-free?
Very! For a gluten-free version, simply swap out the crusty bread and crackers for gluten-free alternatives. There are plenty of excellent gluten-free crackers available at most grocery stores. Fresh fruits, nuts, and just a hint of flaky sea salt will keep everything fresh and delicious!

How can I enhance the flavors of my Baked Brie with Honey and Pecans?
To take this irresistible dish up a notch, consider infusing additional flavors. You might sprinkle in some crushed red pepper flakes for a little heat or use a flavored honey (like lavender or chili-infused) for a interesting twist. Just remember to adjust your toppings to balance flavors so each one shines through beautifully!

Baked Brie with Honey and Pecans

Baked Brie with Honey and Pecans

This Baked Brie with Honey and Pecans is a delightful and easy appetizer that combines warm, creamy brie cheese with sweet honey and crunchy pecans.
Print Recipe Pin Recipe
Prep Time 15 minutes mins
Cook Time 10 minutes mins
Total Time 25 minutes mins
Servings: 8 servings
Course: Snacks & Appetizers
Calories: 250
Ingredients Equipment Method Nutrition Notes

Ingredients
  

For the Brie
  • 8 ounces brie use a high-quality brie for the creamiest texture
  • 1/4 cup honey opt for local honey for a unique flavor boost
  • 1/4 cup toasted pecans toasting enhances their nutty flavor and crunch
  • 1 teaspoon fresh thyme fresh herbs add a delightful aroma to the dish
  • flaky sea salt a pinch enhances all the flavors beautifully
For Serving
  • crusty bread slices of a rustic loaf provide the perfect base for the brie
  • crackers choose a variety for different textures and tastes
  • grapes fresh grapes add a sweet and juicy contrast to the savory cheese
  • candied pecans these add an extra layer of sweetness and crunch alongside
  • pears or apples, sliced the crispness of fruit balances the richness of the brie
  • salami adding a savory element, creating a delightful contrast

Equipment

  • Oven
  • Baking sheet
  • parchment paper

Method
 

Instructions
  1. Preheat the oven to 350°F (175°C).
  2. Prepare the baking sheet by placing the brie on a baking sheet lined with parchment paper.
  3. Drizzle honey over the brie.
  4. Sprinkle toasted pecans and fresh thyme on top.
  5. Bake for 10 minutes, or until the brie is soft.
  6. Serve with flaky sea salt, crusty bread, crackers, grapes, candied pecans, sliced pears or apples, and salami.

Nutrition

Serving: 1servingCalories: 250kcalCarbohydrates: 12gProtein: 7gFat: 20gSaturated Fat: 10gPolyunsaturated Fat: 2gMonounsaturated Fat: 5gCholesterol: 40mgSodium: 200mgPotassium: 150mgFiber: 1gSugar: 8gVitamin A: 500IUVitamin C: 5mgCalcium: 200mgIron: 1mg

Notes

For an extra touch of sweetness, drizzle a bit more honey on top just before serving.

Tried this recipe?

Let us know how it was!

Filed Under: SNACKS & APPETIZERS

Christmas Appetizer Bites with Pesto and Sundried Tomatoes

December 27, 2025 by JudyWhite Leave a Comment

There’s a special joy that envelops the kitchen during the holiday season, and nothing brings that festive spirit to life quite like a stunning appetizer. Imagine the delightful crunch of miniature phyllo shells giving way to a creamy, flavorful filling—these Christmas Appetizer Bites with Pesto and Sundried Tomatoes are your ticket to holiday cheer!

I first whipped these up for a casual gathering, and you would have thought I’d served gourmet fare; they disappeared faster than I could reach for seconds. With each bite, the tang of creamy cheeses mingles beautifully with the herby pesto and the rich, sun-dried tomatoes, striking the perfect balance of flavor.

Best of all, they’re a breeze to prepare! In just 25 minutes, you can create a crowd-pleaser that will put your holiday hosting on the map. Whether it’s a cozy gathering or a festive soirée, these bites will become a staple on your appetizer table. Let’s dive into the recipe and get your holiday vibes rolling!

Why You'll Love This Christmas Appetizer Bites with Pesto and Sundried Tomatoes

  • These Christmas Appetizer Bites with Pesto and Sundried Tomatoes are incredibly easy to whip up, making them perfect for busy holiday gatherings.
  • The combination of creamy cheese, vibrant pesto, and sun-dried tomatoes delivers a burst of flavor that everyone will rave about.
  • Their elegant presentation in mini phyllo shells adds a touch of sophistication, ensuring your table looks festive and inviting.
  • Plus, with just 25 minutes from start to finish, you can spend less time in the kitchen and more time enjoying the company of friends and family.

Christmas Appetizer Bites Ingredients

Here are the delightful ingredients that come together to make your Christmas Appetizer Bites with Pesto and Sundried Tomatoes a festive hit!

For the Filling

  • Reduced fat cream cheese – provides a creamy base that keeps the bites light and delicious.
  • Plain non-fat Greek yogurt – adds a tangy flavor and creaminess without packing on the calories.
  • Prepared pesto – infuses a burst of herby goodness, ensuring an aromatic and flavorful filling.
  • Diced olive-oil packed sundried tomatoes – contributes a rich, sweet flavor and chewy texture; remember to pat them dry for the best consistency!
  • Freshly grated parmesan cheese – offers a savory note that complements the other ingredients beautifully.

For Assembly

  • Mini phyllo shells – these crispy shells provide the perfect crunch and elegant presentation for your bites!

For Garnish

  • Fresh basil or parsley – not just for decoration, fresh herbs elevate the richness with a vibrant touch.

With these ingredients, you’re all set to create stunning Christmas Appetizer Bites with Pesto and Sundried Tomatoes that will impress your guests and keep the holiday spirit alive!

How to Make Christmas Appetizer Bites

  1. Preheat your oven to 350°F (175°C). This will ensure a perfectly cooked and golden outside on your delicious bites. A warm oven is essential for those crispy phyllo shells!

  2. Mix the cream cheese, Greek yogurt, pesto, sundried tomatoes, and parmesan cheese in a mixing bowl until smooth and creamy. This flavorful filling is the heart of your Christmas Appetizer Bites, so blend until it’s well combined!

  3. Spoon the creamy mixture into the mini phyllo shells, being careful not to overfill. Each shell should be generously filled but not overflowing—there’s a little room for that tasty topping!

  4. Bake the filled shells on a baking sheet for about 8 minutes, or until they are golden brown. Watch closely for a perfect crunch—it’s the key to delightful textures in every bite!

  5. Garnish your beautiful bites with fresh basil or parsley just before serving. Not only does it add color, but it also elevates the flavor profile—your guests will adore the presentation!

Optional: Serve with a side of additional pesto for dipping!

Exact quantities are listed in the recipe card below.

What to Serve with Christmas Appetizer Bites with Pesto and Sundried Tomatoes?

These delightful bites are perfect for a festive gathering, and they deserve a beautiful spread to accompany them.

  • Crispy Green Salad: A fresh salad with mixed greens and a lemon vinaigrette will balance the creamy richness of the bites, adding a burst of freshness.

  • Garlic Butter Breadsticks: The warm, buttery flavor of breadsticks provides a lovely contrast to the appetizer’s crunch. Perfect for dipping or savoring alongside!

  • Roasted Vegetable Platter: A colorful mix of seasonal veggies brings warmth and earthiness, enhancing the herbal notes of your Christmas Appetizer Bites.

  • Creamy Potato Gratin: This cheesy, comforting dish delivers a satisfying texture and richness, making it an indulgent pairing while complementing the bite-sized treats perfectly.

  • Cheese and Charcuterie Board: Offer a variety of cheeses and cured meats to create an elegant board where guests can mix and match with the appetizers.

  • Sparkling Wine: A bubbly drink complements the flavors and brings a celebratory touch to the evening while refreshing the palate between bites.

A well-rounded meal that embraces both rich and light elements will make your gathering unforgettable!

Make Ahead Options

These Christmas Appetizer Bites with Pesto and Sundried Tomatoes are perfect for meal prep, allowing you to enjoy the festive season without the last-minute kitchen rush. You can prepare the creamy filling up to 24 hours in advance; simply mix the cream cheese, Greek yogurt, pesto, sundried tomatoes, and parmesan cheese and refrigerate it in an airtight container. If you prefer, you can fill the mini phyllo shells with the mixture up to 3 hours ahead of time—just keep them covered to maintain their crispiness. When you’re ready to impress your guests, bake the filled shells for about 8 minutes, garnish with fresh herbs, and serve. This way, you’ll have all the deliciousness and none of the stress!

Christmas Appetizer Bites Variations

Feel free to mix and match to make these bites uniquely yours—each change adds a delightful twist!

  • Vegan: Substitute cream cheese and Greek yogurt with vegan cream cheese and coconut yogurt for a plant-based delight.

  • Spicy Kick: Add a pinch of red pepper flakes or a dash of hot sauce to the filling for a warm, spicy finish. This twist brings an exciting heat that will leave taste buds tingling!

  • Herb Boost: Experiment with different fresh herbs like dill or chives to elevate flavor profiles. Fresh herbs can provide an aromatic touch that refreshes each bite!

  • Cheese Variation: Swap parmesan for crumbled feta for a tangy explosion to contrast the sweetness of sundried tomatoes. The combination of flavors will entice and surprise your guests!

  • Nutty Crunch: Sprinkle toasted pine nuts or chopped walnuts on top before baking to add a delicious crunch and depth. The extra texture will make each bite more memorable!

  • Mediterranean Twist: Include chopped kalamata olives and roasted red peppers in the filling for a Mediterranean flair. These savory additions create a vibrant taste that dances on the palate!

  • Dairy-Free: Use dairy-free cheese and yogurt alternatives to craft a delicious version for those with dietary restrictions. This way, everyone can enjoy the festive flavor!

  • Smoky Flavor: Add smoked paprika or a teaspoon of liquid smoke to the mixture for an intriguing smoky essence. This twist opens new flavor dimensions that take your bites to the next level!

Storage Tips for Christmas Appetizer Bites with Pesto and Sundried Tomatoes

Room Temperature: Enjoy your Christmas Appetizer Bites at room temperature for up to 2 hours for optimal flavor and texture.

Fridge: Store leftovers in an airtight container in the fridge for up to 3 days. Reheat in the oven for about 5 minutes at 350°F (175°C) for crispy bites.

Freezer: For longer storage, freeze unbaked filled phyllo shells by placing them on a baking sheet, covering, and freezing for up to 1 month. Bake them straight from the freezer for about 10 minutes.

Reheating: To reheat, bake previously cooked bites in the oven at 350°F (175°C) for 5-7 minutes until warmed through and crispy.

Chef's Helpful Tips

  • For the Christmas Appetizer Bites with Pesto and Sundried Tomatoes, ensure that your cream cheese is at room temperature for easier blending to achieve a smooth filling.
  • A common mistake is overfilling the phyllo shells, so be sure to fill them generously but leave a small space to prevent overflowing during baking.
  • When mixing the filling, combine the ingredients well to avoid any lumps which can affect the texture of your bites.
  • Keep an eye on the baking time, as phyllo can brown quickly; it’s best to check for doneness a minute or two before the 8-minute mark.

Christmas Appetizer Bites with Pesto and Sundried Tomatoes Recipe FAQs

How do I choose the right sundried tomatoes?
Absolutely! When selecting sundried tomatoes, look for ones that are packed in olive oil as they tend to have a richer flavor and softer texture. Avoid tomatoes with dark spots or excessive wrinkles as these could indicate they are over-dried or not fresh. The best picks are plump and vibrant in color, giving your appetizer bites a burst of flavor.

How should I store leftover Christmas Appetizer Bites?
Very good question! Store your leftovers in an airtight container in the refrigerator for up to 3 days. Simply reheat them in the oven at 350°F (175°C) for about 5 minutes to maintain that crunchy texture and flavorful filling. Just make sure they don’t sit too long at room temperature—up to 2 hours is perfect for serving.

Can I freeze the Christmas Appetizer Bites?
Of course! For the best results, freeze the unbaked filled phyllo shells. Place them on a baking sheet and cover with plastic wrap until completely frozen, about 2 hours. Once frozen, transfer them to a zip-top freezer bag for up to 1 month. No need to thaw; just bake frozen bites at 350°F (175°C) for about 10 minutes. You’ll have fresh, crispy appetizers ready in no time!

What if my filling is too thick or lumpy?
Great concern! If your filling is thick or lumpy, add a splash of milk or cream to loosen it up. Mix thoroughly until smooth. If lumps persist, consider using an electric mixer for a creamy consistency. This ensures a wonderful mouthfeel in every bite, making those holiday flavors pop!

Are these suitable for someone with dairy allergies?
A worthy consideration! This recipe does contain dairy from cream cheese, Greek yogurt, and parmesan. However, you can absolutely substitute these with dairy-free alternatives. Look for plant-based cream cheese (like cashew or almond), a dairy-free yogurt, and nutritional yeast for a cheesy flavor. Just keep in mind that the texture and taste might vary, but they can still be delicious!

How do I ensure my phyllo shells stay crispy?
A perfect question! To keep your mini phyllo shells crispy, avoid overfilling, as excess filling can lead to sogginess. You can also bake them a bit longer if you want extra crispiness, just monitor them closely. A good rule of thumb is to check around the 6-minute mark to whisk them away once they’re a beautiful golden brown. Enjoy your culinary adventure!

Christmas Appetizer Bites with Pesto and Sundried Tomatoes

Christmas Appetizer Bites with Pesto and Sundried Tomatoes

Delightful Christmas Appetizer Bites with Pesto and Sundried Tomatoes bring festive cheer to your table.
Print Recipe Pin Recipe
Prep Time 25 minutes mins
Cook Time 8 minutes mins
Total Time 33 minutes mins
Servings: 12 bites
Course: Snacks & Appetizers
Calories: 120
Ingredients Equipment Method Nutrition Notes

Ingredients
  

For the Filling
  • 8 oz reduced fat cream cheese softened
  • 1 cup plain non-fat Greek yogurt
  • 1/2 cup prepared pesto
  • 1/2 cup diced olive-oil packed sundried tomatoes pat dry
  • 1/4 cup freshly grated parmesan cheese
For Assembly
  • 24 pieces mini phyllo shells
For Garnish
  • 1/4 cup fresh basil or parsley for decoration

Equipment

  • Mixing bowl
  • Baking sheet
  • Oven

Method
 

How to Make Christmas Appetizer Bites
  1. Preheat your oven to 350°F (175°C) for crispy phyllo shells.
  2. Mix the cream cheese, Greek yogurt, pesto, sundried tomatoes, and parmesan cheese in a mixing bowl until smooth and creamy.
  3. Spoon the creamy mixture into the mini phyllo shells, being careful not to overfill.
  4. Bake the filled shells on a baking sheet for about 8 minutes, or until golden brown.
  5. Garnish your bites with fresh basil or parsley just before serving.

Nutrition

Serving: 2bitesCalories: 120kcalCarbohydrates: 10gProtein: 5gFat: 8gSaturated Fat: 3gPolyunsaturated Fat: 1gMonounsaturated Fat: 4gCholesterol: 20mgSodium: 150mgPotassium: 120mgFiber: 1gSugar: 1gVitamin A: 200IUVitamin C: 2mgCalcium: 80mgIron: 1mg

Notes

For best results, ensure cream cheese is at room temperature and avoid overfilling phyllo shells. Check baking time closely as phyllo can brown quickly.

Tried this recipe?

Let us know how it was!

Filed Under: SNACKS & APPETIZERS

Christmas Appetizer Bites with Pesto and Sundried Tomatoes

December 27, 2025 by JudyWhite Leave a Comment

There’s a special joy that envelops the kitchen during the holiday season, and nothing brings that festive spirit to life quite like a stunning appetizer. Imagine the delightful crunch of miniature phyllo shells giving way to a creamy, flavorful filling—these Christmas Appetizer Bites with Pesto and Sundried Tomatoes are your ticket to holiday cheer!

I first whipped these up for a casual gathering, and you would have thought I’d served gourmet fare; they disappeared faster than I could reach for seconds. With each bite, the tang of creamy cheeses mingles beautifully with the herby pesto and the rich, sun-dried tomatoes, striking the perfect balance of flavor.

Best of all, they’re a breeze to prepare! In just 25 minutes, you can create a crowd-pleaser that will put your holiday hosting on the map. Whether it’s a cozy gathering or a festive soirée, these bites will become a staple on your appetizer table. Let’s dive into the recipe and get your holiday vibes rolling!

Why You'll Love This Christmas Appetizer Bites with Pesto and Sundried Tomatoes

  • These Christmas Appetizer Bites with Pesto and Sundried Tomatoes are incredibly easy to whip up, making them perfect for busy holiday gatherings.
  • The combination of creamy cheese, vibrant pesto, and sun-dried tomatoes delivers a burst of flavor that everyone will rave about.
  • Their elegant presentation in mini phyllo shells adds a touch of sophistication, ensuring your table looks festive and inviting.
  • Plus, with just 25 minutes from start to finish, you can spend less time in the kitchen and more time enjoying the company of friends and family.

Christmas Appetizer Bites Ingredients

Here are the delightful ingredients that come together to make your Christmas Appetizer Bites with Pesto and Sundried Tomatoes a festive hit!

For the Filling

  • Reduced fat cream cheese – provides a creamy base that keeps the bites light and delicious.
  • Plain non-fat Greek yogurt – adds a tangy flavor and creaminess without packing on the calories.
  • Prepared pesto – infuses a burst of herby goodness, ensuring an aromatic and flavorful filling.
  • Diced olive-oil packed sundried tomatoes – contributes a rich, sweet flavor and chewy texture; remember to pat them dry for the best consistency!
  • Freshly grated parmesan cheese – offers a savory note that complements the other ingredients beautifully.

For Assembly

  • Mini phyllo shells – these crispy shells provide the perfect crunch and elegant presentation for your bites!

For Garnish

  • Fresh basil or parsley – not just for decoration, fresh herbs elevate the richness with a vibrant touch.

With these ingredients, you’re all set to create stunning Christmas Appetizer Bites with Pesto and Sundried Tomatoes that will impress your guests and keep the holiday spirit alive!

How to Make Christmas Appetizer Bites

  1. Preheat your oven to 350°F (175°C). This will ensure a perfectly cooked and golden outside on your delicious bites. A warm oven is essential for those crispy phyllo shells!

  2. Mix the cream cheese, Greek yogurt, pesto, sundried tomatoes, and parmesan cheese in a mixing bowl until smooth and creamy. This flavorful filling is the heart of your Christmas Appetizer Bites, so blend until it’s well combined!

  3. Spoon the creamy mixture into the mini phyllo shells, being careful not to overfill. Each shell should be generously filled but not overflowing—there’s a little room for that tasty topping!

  4. Bake the filled shells on a baking sheet for about 8 minutes, or until they are golden brown. Watch closely for a perfect crunch—it’s the key to delightful textures in every bite!

  5. Garnish your beautiful bites with fresh basil or parsley just before serving. Not only does it add color, but it also elevates the flavor profile—your guests will adore the presentation!

Optional: Serve with a side of additional pesto for dipping!

Exact quantities are listed in the recipe card below.

Make Ahead Options

These Christmas Appetizer Bites with Pesto and Sundried Tomatoes are perfect for meal prep, allowing you to enjoy the festive season without the last-minute kitchen rush. You can prepare the creamy filling up to 24 hours in advance; simply mix the cream cheese, Greek yogurt, pesto, sundried tomatoes, and parmesan cheese and refrigerate it in an airtight container. If you prefer, you can fill the mini phyllo shells with the mixture up to 3 hours ahead of time—just keep them covered to maintain their crispiness. When you’re ready to impress your guests, bake the filled shells for about 8 minutes, garnish with fresh herbs, and serve. This way, you’ll have all the deliciousness and none of the stress!

What to Serve with Christmas Appetizer Bites with Pesto and Sundried Tomatoes?

These delightful bites are perfect for a festive gathering, and they deserve a beautiful spread to accompany them.

  • Crispy Green Salad: A fresh salad with mixed greens and a lemon vinaigrette will balance the creamy richness of the bites, adding a burst of freshness.

  • Garlic Butter Breadsticks: The warm, buttery flavor of breadsticks provides a lovely contrast to the appetizer’s crunch. Perfect for dipping or savoring alongside!

  • Roasted Vegetable Platter: A colorful mix of seasonal veggies brings warmth and earthiness, enhancing the herbal notes of your Christmas Appetizer Bites.

  • Creamy Potato Gratin: This cheesy, comforting dish delivers a satisfying texture and richness, making it an indulgent pairing while complementing the bite-sized treats perfectly.

  • Cheese and Charcuterie Board: Offer a variety of cheeses and cured meats to create an elegant board where guests can mix and match with the appetizers.

  • Sparkling Wine: A bubbly drink complements the flavors and brings a celebratory touch to the evening while refreshing the palate between bites.

A well-rounded meal that embraces both rich and light elements will make your gathering unforgettable!

Christmas Appetizer Bites Variations

Feel free to mix and match to make these bites uniquely yours—each change adds a delightful twist!

  • Vegan: Substitute cream cheese and Greek yogurt with vegan cream cheese and coconut yogurt for a plant-based delight.

  • Spicy Kick: Add a pinch of red pepper flakes or a dash of hot sauce to the filling for a warm, spicy finish. This twist brings an exciting heat that will leave taste buds tingling!

  • Herb Boost: Experiment with different fresh herbs like dill or chives to elevate flavor profiles. Fresh herbs can provide an aromatic touch that refreshes each bite!

  • Cheese Variation: Swap parmesan for crumbled feta for a tangy explosion to contrast the sweetness of sundried tomatoes. The combination of flavors will entice and surprise your guests!

  • Nutty Crunch: Sprinkle toasted pine nuts or chopped walnuts on top before baking to add a delicious crunch and depth. The extra texture will make each bite more memorable!

  • Mediterranean Twist: Include chopped kalamata olives and roasted red peppers in the filling for a Mediterranean flair. These savory additions create a vibrant taste that dances on the palate!

  • Dairy-Free: Use dairy-free cheese and yogurt alternatives to craft a delicious version for those with dietary restrictions. This way, everyone can enjoy the festive flavor!

  • Smoky Flavor: Add smoked paprika or a teaspoon of liquid smoke to the mixture for an intriguing smoky essence. This twist opens new flavor dimensions that take your bites to the next level!

Storage Tips for Christmas Appetizer Bites with Pesto and Sundried Tomatoes

Room Temperature: Enjoy your Christmas Appetizer Bites at room temperature for up to 2 hours for optimal flavor and texture.

Fridge: Store leftovers in an airtight container in the fridge for up to 3 days. Reheat in the oven for about 5 minutes at 350°F (175°C) for crispy bites.

Freezer: For longer storage, freeze unbaked filled phyllo shells by placing them on a baking sheet, covering, and freezing for up to 1 month. Bake them straight from the freezer for about 10 minutes.

Reheating: To reheat, bake previously cooked bites in the oven at 350°F (175°C) for 5-7 minutes until warmed through and crispy.

Chef's Helpful Tips

  • For the Christmas Appetizer Bites with Pesto and Sundried Tomatoes, ensure that your cream cheese is at room temperature for easier blending to achieve a smooth filling.
  • A common mistake is overfilling the phyllo shells, so be sure to fill them generously but leave a small space to prevent overflowing during baking.
  • When mixing the filling, combine the ingredients well to avoid any lumps which can affect the texture of your bites.
  • Keep an eye on the baking time, as phyllo can brown quickly; it’s best to check for doneness a minute or two before the 8-minute mark.

Christmas Appetizer Bites with Pesto and Sundried Tomatoes Recipe FAQs

How do I choose the right sundried tomatoes?
Absolutely! When selecting sundried tomatoes, look for ones that are packed in olive oil as they tend to have a richer flavor and softer texture. Avoid tomatoes with dark spots or excessive wrinkles as these could indicate they are over-dried or not fresh. The best picks are plump and vibrant in color, giving your appetizer bites a burst of flavor.

How should I store leftover Christmas Appetizer Bites?
Very good question! Store your leftovers in an airtight container in the refrigerator for up to 3 days. Simply reheat them in the oven at 350°F (175°C) for about 5 minutes to maintain that crunchy texture and flavorful filling. Just make sure they don’t sit too long at room temperature—up to 2 hours is perfect for serving.

Can I freeze the Christmas Appetizer Bites?
Of course! For the best results, freeze the unbaked filled phyllo shells. Place them on a baking sheet and cover with plastic wrap until completely frozen, about 2 hours. Once frozen, transfer them to a zip-top freezer bag for up to 1 month. No need to thaw; just bake frozen bites at 350°F (175°C) for about 10 minutes. You’ll have fresh, crispy appetizers ready in no time!

What if my filling is too thick or lumpy?
Great concern! If your filling is thick or lumpy, add a splash of milk or cream to loosen it up. Mix thoroughly until smooth. If lumps persist, consider using an electric mixer for a creamy consistency. This ensures a wonderful mouthfeel in every bite, making those holiday flavors pop!

Are these suitable for someone with dairy allergies?
A worthy consideration! This recipe does contain dairy from cream cheese, Greek yogurt, and parmesan. However, you can absolutely substitute these with dairy-free alternatives. Look for plant-based cream cheese (like cashew or almond), a dairy-free yogurt, and nutritional yeast for a cheesy flavor. Just keep in mind that the texture and taste might vary, but they can still be delicious!

How do I ensure my phyllo shells stay crispy?
A perfect question! To keep your mini phyllo shells crispy, avoid overfilling, as excess filling can lead to sogginess. You can also bake them a bit longer if you want extra crispiness, just monitor them closely. A good rule of thumb is to check around the 6-minute mark to whisk them away once they’re a beautiful golden brown. Enjoy your culinary adventure!

Christmas Appetizer Bites with Pesto and Sundried Tomatoes

Christmas Appetizer Bites with Pesto and Sundried Tomatoes

Delightful Christmas Appetizer Bites with Pesto and Sundried Tomatoes bring festive cheer to your table.
Print Recipe Pin Recipe
Prep Time 25 minutes mins
Cook Time 8 minutes mins
Total Time 33 minutes mins
Servings: 12 bites
Course: Snacks & Appetizers
Calories: 120
Ingredients Equipment Method Nutrition Notes

Ingredients
  

For the Filling
  • 8 oz reduced fat cream cheese softened
  • 1 cup plain non-fat Greek yogurt
  • 1/2 cup prepared pesto
  • 1/2 cup diced olive-oil packed sundried tomatoes pat dry
  • 1/4 cup freshly grated parmesan cheese
For Assembly
  • 24 pieces mini phyllo shells
For Garnish
  • 1/4 cup fresh basil or parsley for decoration

Equipment

  • Mixing bowl
  • Baking sheet
  • Oven

Method
 

How to Make Christmas Appetizer Bites
  1. Preheat your oven to 350°F (175°C) for crispy phyllo shells.
  2. Mix the cream cheese, Greek yogurt, pesto, sundried tomatoes, and parmesan cheese in a mixing bowl until smooth and creamy.
  3. Spoon the creamy mixture into the mini phyllo shells, being careful not to overfill.
  4. Bake the filled shells on a baking sheet for about 8 minutes, or until golden brown.
  5. Garnish your bites with fresh basil or parsley just before serving.

Nutrition

Serving: 2bitesCalories: 120kcalCarbohydrates: 10gProtein: 5gFat: 8gSaturated Fat: 3gPolyunsaturated Fat: 1gMonounsaturated Fat: 4gCholesterol: 20mgSodium: 150mgPotassium: 120mgFiber: 1gSugar: 1gVitamin A: 200IUVitamin C: 2mgCalcium: 80mgIron: 1mg

Notes

For best results, ensure cream cheese is at room temperature and avoid overfilling phyllo shells. Check baking time closely as phyllo can brown quickly.

Tried this recipe?

Let us know how it was!

Filed Under: SNACKS & APPETIZERS

Creamy Burrata Dip

December 25, 2025 by JudyWhite Leave a Comment

When the sun begins to set and the golden hour casts a warm glow over my kitchen, there’s nothing I love more than preparing a dish that brings everyone together. I recently stumbled upon a creamy burrata dip recipe that transformed my ordinary evenings into delightful gatherings. This isn’t just any dip; the luscious texture of burrata combined with a zesty basil vinaigrette creates a flavor explosion that makes my taste buds dance.

Just imagine sinking a piece of toasted baguette into this heavenly concoction as the rich cheese mingles with fresh herbs. With only 15 minutes of prep time, it’s a breeze to whip up for both casual nights at home and more festive occasions with friends. It’s a versatile appetizer that proves comforting indulgence doesn’t have to come from fast food chains. Join me as we dive into this delightful recipe that effortlessly elevates any meal!

Why You'll Love This Creamy Burrata Dip

  • This creamy burrata dip is incredibly easy to make, taking only 15 minutes of your time, which means you’ll spend less time in the kitchen and more time enjoying the company of your guests.
  • The combination of rich burrata and zesty basil vinaigrette creates a flavor experience that is simply unforgettable, making it a real crowd-pleaser at any gathering.
  • Its versatility allows you to serve it as an appetizer, a party snack, or even a delightful addition to a charcuterie board, showcasing how it fits into any occasion.
  • The visual appeal of this dip is undeniable, with its creamy texture beautifully drizzled with vibrant vinaigrette, making it a centerpiece that’s as stunning as it is delicious.

Creamy Burrata Dip Ingredients

Elevate your gatherings with this delightful dip!

For the Dip
• Burrata – The star of this dish, providing a rich, creamy texture that melts in your mouth.
• Oil from Sundried Tomatoes – Adds a hint of flavor and helps achieve that luscious consistency.
• Basil Chive Vinaigrette or Prepared Pesto – Use whichever you prefer for a herbaceous punch in your creamy burrata dip.
• Flaky Salt – Enhances the flavors; adjust to taste for the perfect balance.
• Pepper – A must for that subtle kick; freshly cracked is best!

For the Basil Vinaigrette
• Basil – Fresh basil is essential for that aromatic freshness, ensuring every bite is vibrant.
• Chives – Adds a mild onion flavor that beautifully complements the dip.
• Red Wine Vinegar – Provides a tangy note that brightens the overall flavor profile.
• Garlic – A small amount goes a long way in adding depth.
• Olive Oil – Helps to blend everything seamlessly into a pourable vinaigrette.
• Salt – Essential for seasoning; don’t forget to taste and adjust!
• Pepper – Just a pinch for added warmth and flavor.

For Serving
• Toasted Baguette – Perfect for dipping, adding a delightful crunch to the creamy dip experience!

How to Make Creamy Burrata Dip

  1. Combine the Dip: In a medium-sized bowl, gently combine the burrata, oil from the sundried tomatoes, basil chive vinaigrette (or prepared pesto), flaky salt, and pepper. Mix until smooth and creamy, ensuring all flavors meld well together.

  2. Prepare the Basil Vinaigrette: In a separate bowl, whisk together the basil, chopped chives, red wine vinegar, smashed garlic, olive oil, ½ tsp salt, and ¼ tsp pepper. Blend until fully incorporated for a refreshing, vibrant vinaigrette.

  3. Serve with Style: Spoon the creamy burrata dip into a serving bowl, then drizzle the basil vinaigrette generously on top. Serve with toasted baguette slices on the side, perfect for dipping into this delightful mixture.

Optional: Garnish with extra fresh basil leaves for a pop of color.

Exact quantities are listed in the recipe card below.

What to Serve with Creamy Burrata Dip?

As you gather around the table, the right accompaniments can elevate this sumptuous dip into a full meal experience that excites your palate.

  • Crispy Crostini: Perfectly toasted bread enhances the dip’s creamy texture while adding a satisfying crunch that contrasts beautifully.

  • Marinated Olives: These briny bites pair wonderfully, cutting through the richness of the burrata with their tangy flavor and vibrant aroma.

  • Fresh Arugula Salad: A simple salad with a lemon vinaigrette adds crispness and brightness, making your meal feel effortless yet gourmet.

Imagine a peppery arugula salad nestled beside the rich dip; it invites a refreshing balance to each taste.

  • Grilled Vegetables: Zucchini, bell peppers, and eggplant bring smoky notes to the table, creating a delightful tasting journey alongside the dip.

  • Wine Pairing: A crisp Sauvignon Blanc or rosé offers a refreshing contrast, accentuating the herbs and creamy goodness of the burrata.

  • Seasonal Fruit Platter: Serve slices of ripe peaches or berries for a sweet touch that complements the dip’s flavors, creating a vibrant, colorful spread.

Adding these thoughtful pairings will turn your creamy burrata dip into a feast that delights the senses and warms the heart!

Make Ahead Options

These Creamy Burrata Dip preparations are a lifesaver for busy weeknights! You can mix the burrata, sundried tomato oil, and spices up to 24 hours in advance, allowing the flavors to deepen. For the basil vinaigrette, prepare it ahead of time and store it in an airtight container in the refrigerator for up to 3 days—this keeps it fresh and vibrant. When you’re ready to serve, simply give the vinaigrette a quick stir, then drizzle it over the dip. This way, you can whip up a delicious appetizer in no time, allowing you to enjoy more moments with your loved ones!

How to Store and Freeze Creamy Burrata Dip

Fridge: Store any leftover creamy burrata dip in an airtight container for up to 3 days. Keep it refrigerated to maintain its fresh flavors.

Freezer: Freezing is not recommended for this dip due to the delicate texture of the burrata, which may become watery upon thawing.

Reheating: If you’ve refrigerated the dip, let it come to room temperature before serving. For a warm twist, gently reheat in a microwave or over low heat on the stove, stirring occasionally.

Serving Tip: Always drizzle the basil vinaigrette on top just before serving for that burst of freshness and color!

Creamy Burrata Dip Variations

Feel free to put your own spin on this creamy delight – there are countless ways to enhance its flavor and texture!

  • Herb-Infused: Add fresh thyme or dill to the dip for a unique herbal flavor. The aromatic twist brings a fragrant bouquet that is simply irresistible.

  • Spicy Kick: Mix in red pepper flakes or a dash of hot sauce for some heat. Just a little goes a long way in elevating that flavor profile!

  • Nutty Addition: Blend in toasted pine nuts or walnuts for a delightful crunch. These will add both flavor and texture, making every dip a surprise.

  • Roasted Garlic: Roast a whole bulb of garlic and blend it into the dip for a sweeter, mellow garlic flavor. It will transform your dip into a heavenly experience!

  • Sun-Dried Tomatoes: Fold in some chopped sun-dried tomatoes to enhance that rich, umami taste. They will give bursts of flavor and a pop of color to your dip!

  • Greek Yogurt Swap: For a lighter option, substitute part of the burrata with Greek yogurt. This will still give creaminess while cutting back on the richness.

  • Zesty Citrus: Incorporate a splash of lemon juice or zest into the vinaigrette for a refreshing brightness. It will elevate the flavor, making it sing!

  • Avocado Creaminess: Add mashed avocado to the dip for an even creamier texture and a lovely flavor boost. This twist will make it extra rich and satisfying!

Chef's Helpful Tips

  • When preparing your Creamy Burrata Dip, be sure to gently mix the ingredients to avoid breaking the burrata too much, which preserves its creamy texture.
  • For an extra flavor boost, consider adding a few chopped sun-dried tomatoes directly into the dip alongside the oil for added depth.
  • To ensure your basil vinaigrette is vibrant and fresh, blend the ingredients just until incorporated without overmixing, as this keeps the basil’s bright color intact.
  • Remember to serve the baguette toasted and warm, as this enhances the overall experience and provides the perfect contrast to the creamy dip.

Creamy Burrata Dip Recipe FAQs

How do I select ripe burrata?
Absolutely! When choosing burrata, look for balls that are firm yet slightly squishy to the touch. They should have a fresh aroma and be free from any dark spots or excess wrinkles on the surface, indicating freshness. Choose burrata with a tighter seal as it’s often fresher and has a better texture.

How should I store leftover creamy burrata dip?
Store any leftover dip in an airtight container in the refrigerator for up to 3 days. For the best taste and texture, ensure it’s sealed properly to avoid it absorbing any unwanted odors from the fridge. Before serving, let it come to room temperature to regain some of its creamy goodness!

Can Creamy Burrata Dip be frozen?
Unfortunately, freezing is not recommended for creamy burrata dip. The delicate nature of burrata may result in a watery texture once thawed. If you’re looking to store it for a later date, I suggest preparing the dip fresh rather than freezing it for optimal taste and texture.

What if my dip is too thick?
If your creamy burrata dip turns out thicker than you’d like, don’t fret! Simply add a teaspoon or two of olive oil or the oil from sundried tomatoes to loosen it. Mix gently until you achieve your desired consistency. A splash of cream or a bit of milk can also work wonders for those wanting an extra creamy dip!

Are there any dietary considerations I should be aware of?
Yes, it’s always good to check with guests about allergies. This creamy burrata dip contains dairy, which might not be suitable for those who are lactose intolerant or have dairy allergies. For a vegan twist, you might consider using a plant-based cheese alternative and adjusting the vinaigrette accordingly for a similar flavor profile.

How do I enhance the flavor of my creamy burrata dip?
To elevate your dip, you can mix in chopped sun-dried tomatoes or olives for an additional layer of flavor. For a kick, add a pinch of red pepper flakes to the dip or drizzle a flavored olive oil on top. It’s all about customizing to match your taste preferences!

Creamy Burrata Dip

Creamy Burrata Dip

This Creamy Burrata Dip is a luscious blend of burrata and zesty basil vinaigrette, perfect for gatherings.
Print Recipe Pin Recipe
Prep Time 15 minutes mins
Total Time 15 minutes mins
Servings: 4 servings
Course: Snacks & Appetizers
Calories: 300
Ingredients Equipment Method Nutrition Notes

Ingredients
  

For the Dip
  • 1 cup Burrata provides a rich, creamy texture
  • 2 tbsp Oil from Sundried Tomatoes adds flavor and helps achieve consistency
  • 1/4 cup Basil Chive Vinaigrette or Prepared Pesto herbaceous punch
  • 1 tsp Flaky Salt enhances flavors; adjust to taste
  • 1/2 tsp Pepper freshly cracked is best
For the Basil Vinaigrette
  • 1 cup Basil fresh for aromatic freshness
  • 2 tbsp Chives mild onion flavor
  • 2 tbsp Red Wine Vinegar provides a tangy note
  • 1 clove Garlic adds depth
  • 1/4 cup Olive Oil blends into a pourable vinaigrette
  • 1/2 tsp Salt essential for seasoning
  • 1/4 tsp Pepper for added warmth
For Serving
  • 1 loaf Toasted Baguette perfect for dipping

Equipment

  • Mixing bowl
  • Whisk
  • serving bowl

Method
 

How to Make Creamy Burrata Dip
  1. In a medium-sized bowl, gently combine the burrata, oil from the sundried tomatoes, basil chive vinaigrette (or prepared pesto), flaky salt, and pepper. Mix until smooth and creamy.
  2. In a separate bowl, whisk together the basil, chopped chives, red wine vinegar, smashed garlic, olive oil, salt, and pepper. Blend until fully incorporated.
  3. Spoon the creamy burrata dip into a serving bowl, then drizzle the basil vinaigrette generously on top. Serve with toasted baguette slices on the side.

Nutrition

Serving: 1cupCalories: 300kcalCarbohydrates: 18gProtein: 8gFat: 25gSaturated Fat: 8gPolyunsaturated Fat: 5gMonounsaturated Fat: 10gCholesterol: 25mgSodium: 500mgPotassium: 200mgFiber: 2gSugar: 1gVitamin A: 500IUVitamin C: 10mgCalcium: 150mgIron: 1mg

Notes

Garnish with extra fresh basil leaves for a pop of color. Store leftovers in an airtight container for up to 3 days.

Tried this recipe?

Let us know how it was!

Filed Under: SNACKS & APPETIZERS

  • « Previous Page
  • 1
  • …
  • 3
  • 4
  • 5
  • 6
  • 7
  • 8
  • Next Page »

Recent Posts

  • Crispy Potatoes in Oven
  • Lucky Charms Pancakes
  • Cheeseburger
  • Boiled Corn on the Cob
  • St. Patrick’s Day Dessert Parfaits

Recent Comments

No comments to show.

Footer

  • Contact
  • Privacy Policy
  • About Us
  • Terms
  • ↑ back to top

Copyright © 2024 www.Forkono.com

Table Of Content