Forkono

  • BREAKFAST & BRUNCH
  • DESSERT RECIPES
  • DINNER RECIPES
  • LUNCH RECIPES
  • About uS
  • SNACKS & APPETIZERS
menu icon
go to homepage
  • BREAKFAST & BRUNCH
  • DESSERT RECIPES
  • DINNER RECIPES
  • LUNCH RECIPES
  • About uS
  • SNACKS & APPETIZERS
search icon
Homepage link
  • BREAKFAST & BRUNCH
  • DESSERT RECIPES
  • DINNER RECIPES
  • LUNCH RECIPES
  • About uS
  • SNACKS & APPETIZERS
×

Glazed Applesauce Donuts

December 22, 2025 by JudyWhite Leave a Comment

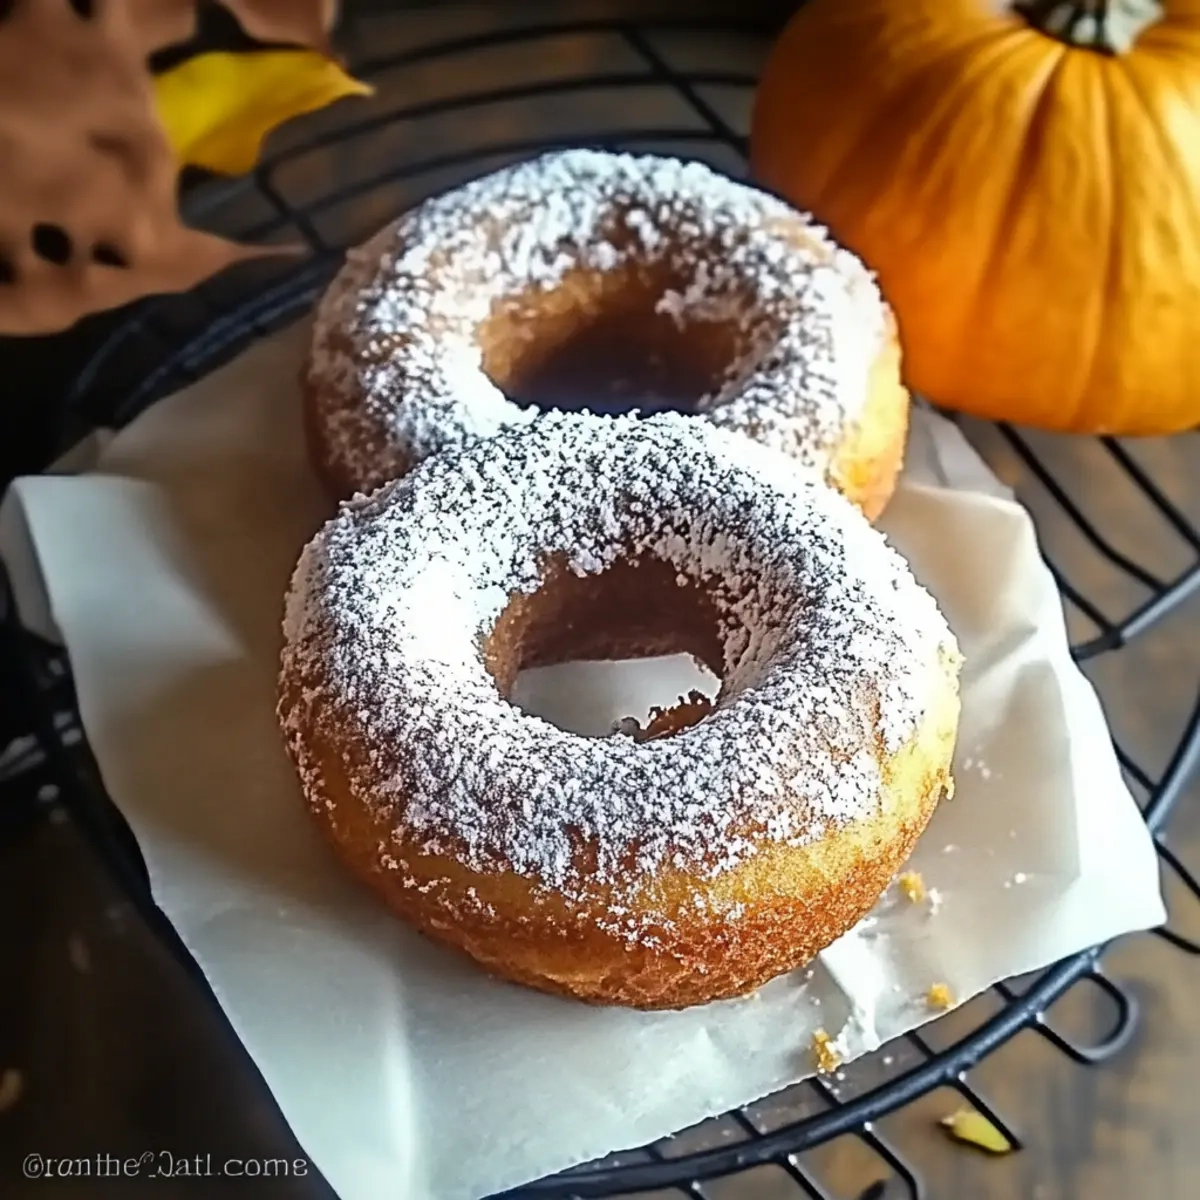
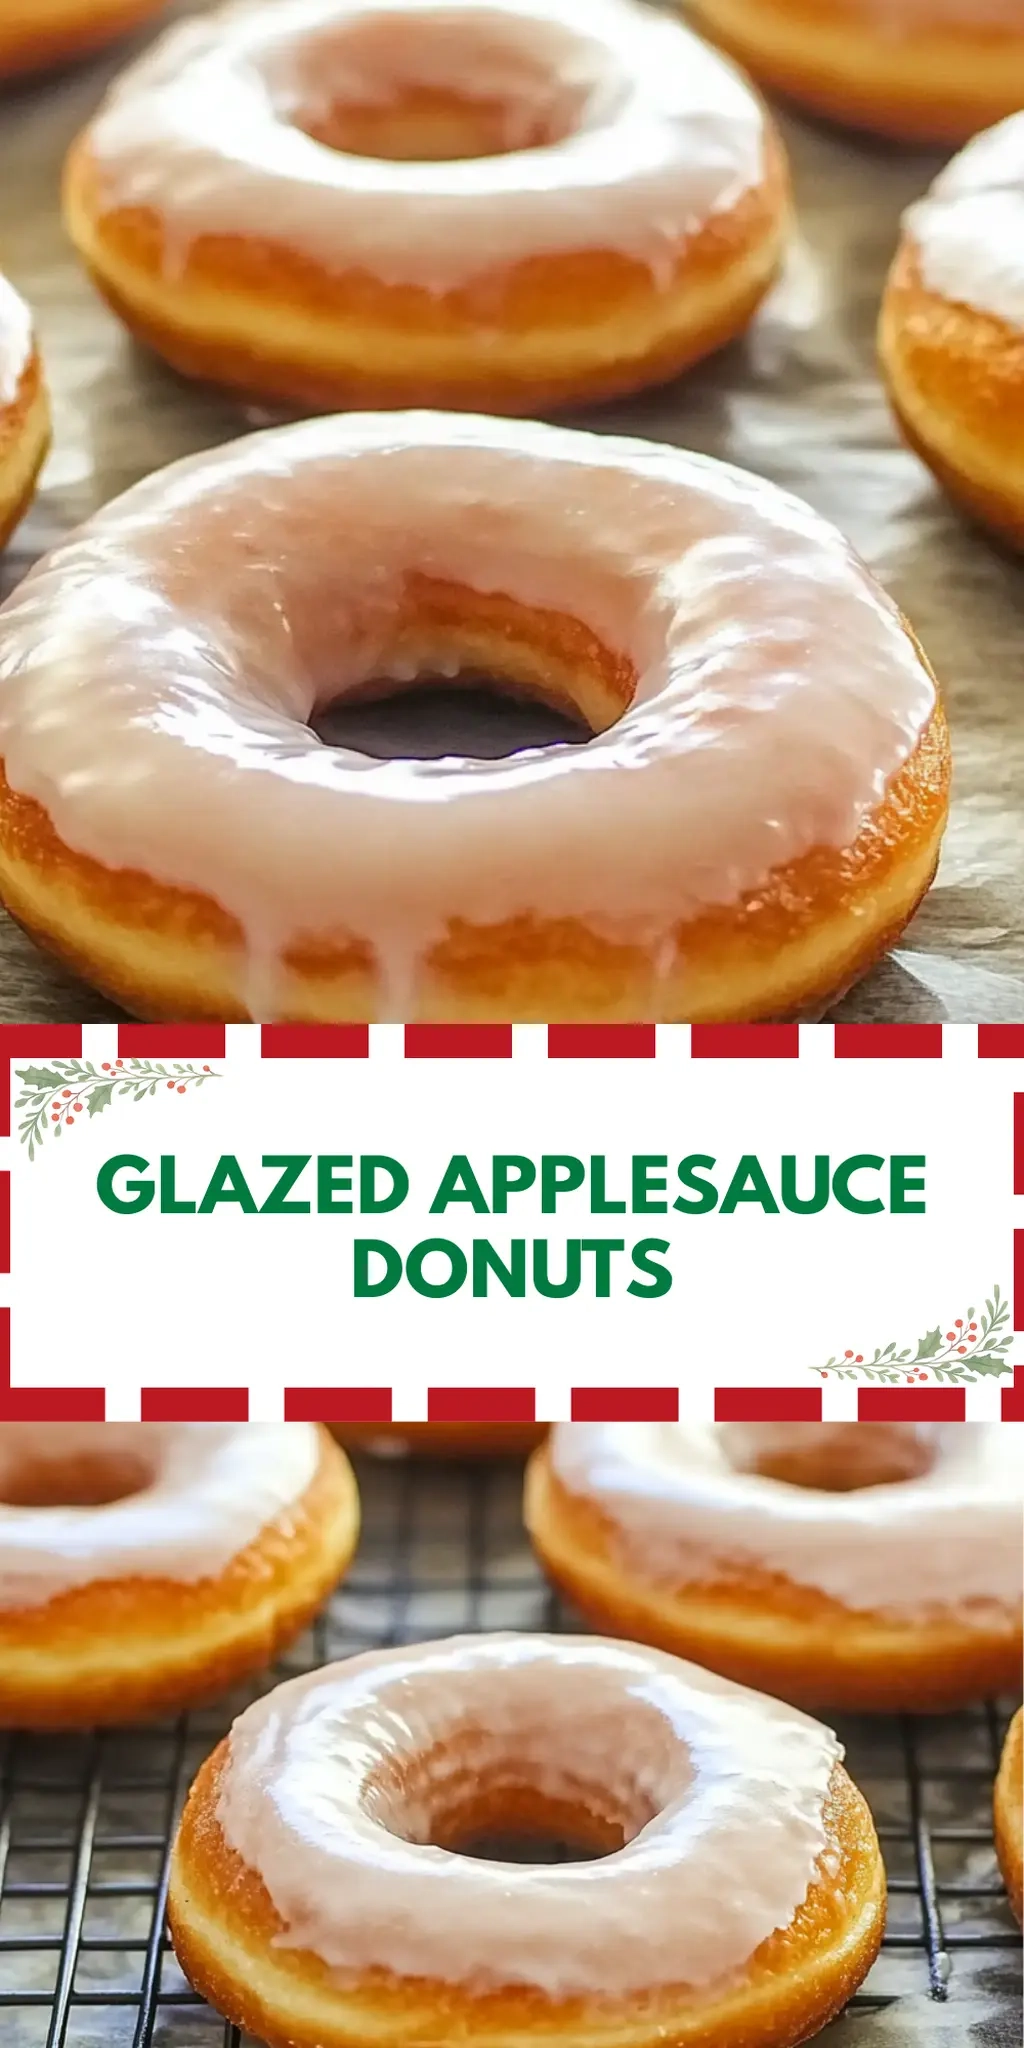
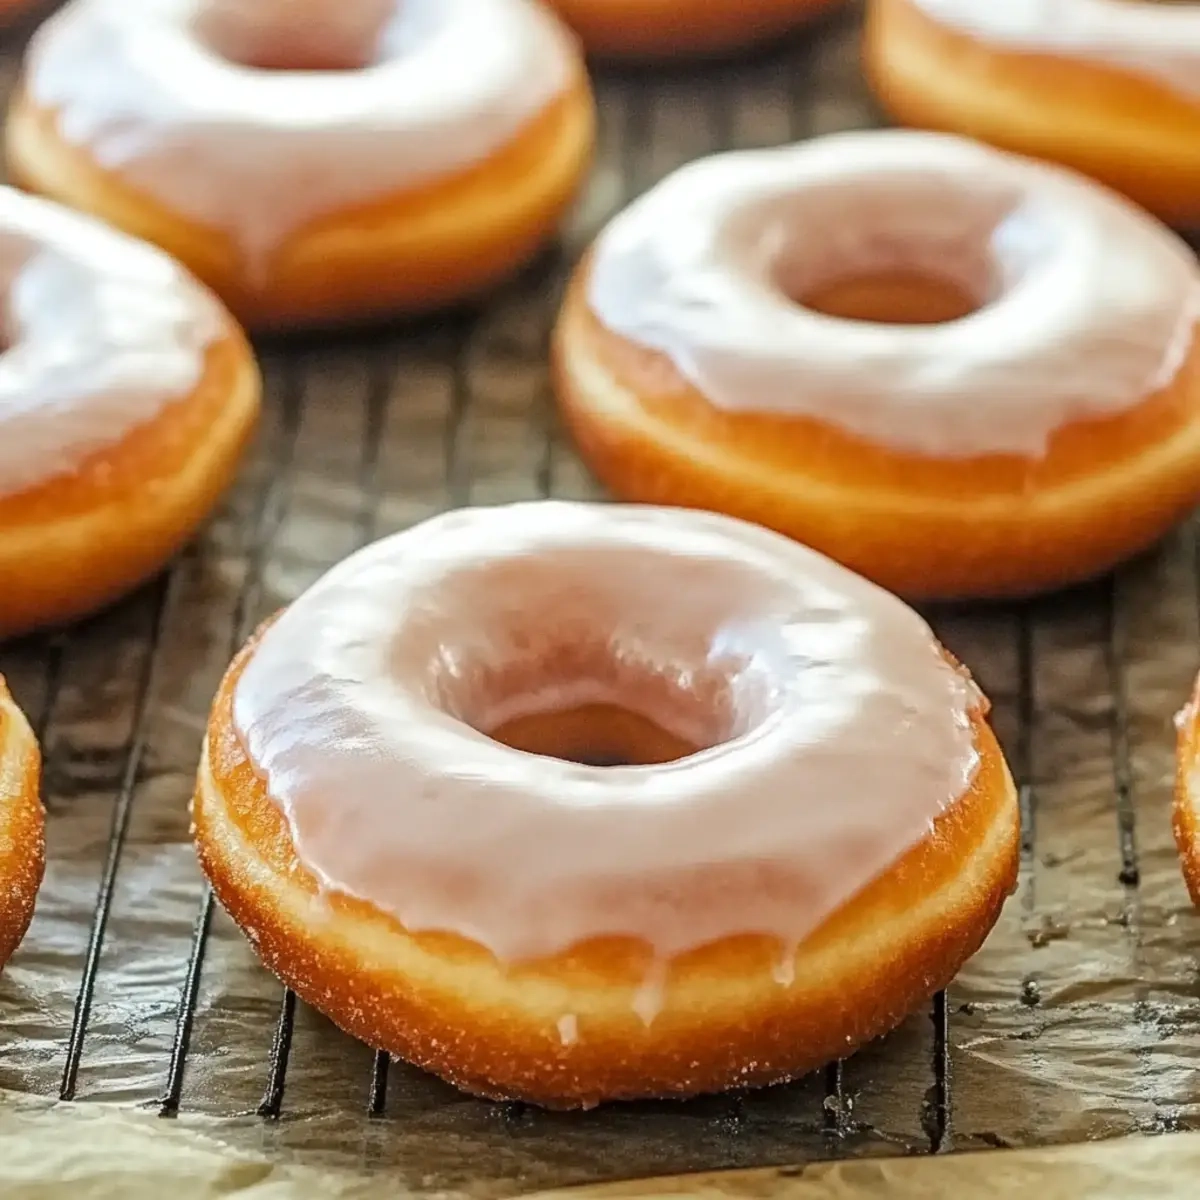
There’s something truly special about the moment you take the first bite of a warm donut, especially when it’s drizzled in a sweet, glossy glaze. I found myself in the kitchen one rainy afternoon, craving something delightful to pair with my coffee, when the idea for these Glazed Applesauce Donuts struck me. With the comforting, subtle sweetness of applesauce and a hint of cinnamon, this recipe transforms a simple ingredient into an indulgent treat that feels both homey and sophisticated.

These donuts are not only effortless to whip up but also perfect for sharing! Whether you’re planning a cozy brunch with friends or looking to sweeten your family’s morning routine, these donuts are a crowd-pleaser that will have everyone eagerly reaching for seconds. Join me as we dive into this easy recipe and bring the warm, inviting aroma of freshly baked donuts into your home—no frying required! Ready to savor the goodness? Let’s get started!

Why You'll Love This Glazed Applesauce Donuts

  • These Glazed Applesauce Donuts are incredibly easy to make, ensuring you can whip up a batch in no time.
  • The flavor is absolutely delightful, with the perfect balance of sweetness from the applesauce and a warm hint of cinnamon that makes each bite a cozy experience.
  • Their versatility means they can be enjoyed for breakfast, dessert, or even as an afternoon snack, making them a great addition to any occasion.
  • Plus, their beautiful glaze makes them visually appealing, ensuring they will impress guests and family alike.

Glazed Applesauce Donuts Ingredients

Creating these delightful donuts is easier than you think, and the ingredients are likely already in your pantry!

For the Donuts

  • 1 large egg – adds richness and helps bind the ingredients.
  • 1 cup milk – keeps the donuts moist; feel free to use any milk alternative!
  • 1/2 cup unsweetened applesauce – provides natural sweetness and moisture; use extra for the glaze.
  • 2/3 cup sugar – balances out the flavors; consider reducing for a less sweet donut.
  • 1 teaspoon vanilla extract – enhances the overall flavor with a lovely aromatic note.
  • 2 cups all-purpose flour – the base for your donuts; you can swap with whole wheat for added nutrition.
  • 2 teaspoons baking powder – essential for making the donuts fluffy.
  • 1 teaspoon ground cinnamon – brings warmth and spice; a must-have in this recipe!
  • 1/2 teaspoon kosher salt – enhances the sweetness and balances the flavors.

For the Glaze

  • 1 cup powdered sugar – gives the glaze its sweet and smooth texture.
  • 1/2 teaspoon ground cinnamon – adds an extra layer of flavor to the glaze.
  • 2 teaspoons unsweetened applesauce – complements the powdered sugar and gives the glaze a subtle fruitiness.
  • 4 teaspoons water – helps to achieve the perfect glaze consistency; feel free to add more for a thinner glaze.

These Glazed Applesauce Donuts are not just a treat for your taste buds, but a fun recipe to create together with loved ones!

How to Make Glazed Applesauce Donuts

  1. Preheat the oven to 350°F (175°C) and give your donut pan a light spray with cooking spray to ensure easy removal after baking.

  2. Whisk together in a mixing bowl the egg, milk, applesauce, sugar, and vanilla. Aim for a smooth and cohesive mixture that’s filled with delightful flavors.

  3. Combine the dry ingredients: gradually add the flour, baking powder, ground cinnamon, and salt into the mixing bowl. Stir until the batter is completely smooth, creating a thick yet pourable consistency.

  4. Spoon the batter into each cavity of the prepared donut pan, filling each almost to the top. Bake for 12-15 minutes, or until a toothpick inserted comes out clean—look for a light golden color.

  5. Cool the donuts in the pan for a few minutes, then carefully transfer them to a baking sheet lined with parchment paper to cool completely, allowing them to maintain their fluffy texture.

  6. Prepare the glaze by whisking together powdered sugar, ground cinnamon, applesauce, and water in a separate bowl. Mix until smooth, adding more water if necessary to reach the desired consistency.

  7. Dip the tops of each cooled donut into the glaze, twisting gently to ensure an even coating. Let any excess drip off before placing them glaze-side up on the lined baking sheet.

  8. Rest the glazed donuts for about 15 minutes, allowing the glaze to set and create a beautiful shine before serving.

Optional: Top with a sprinkle of cinnamon for an extra touch of flavor.

Exact quantities are listed in the recipe card below.

How to Store and Freeze Glazed Applesauce Donuts

  • Room Temperature: Keep the donuts in an airtight container at room temperature for up to 2 days. This way, they stay soft and delicious for your morning coffee.

  • Fridge: If you want them to last a bit longer, you can store the Glazed Applesauce Donuts in the refrigerator for up to a week. Just make sure they’re in an airtight container to prevent them from drying out.

  • Freezer: These donuts freeze beautifully! Wrap them individually in plastic wrap and then place them in a freezer bag. They can be frozen for up to 3 months. Thaw in the fridge overnight before enjoying.

  • Reheating: To warm up the donuts, simply microwave them for about 10-15 seconds. This will revive their soft texture and warm the glaze back up!

Make Ahead Options

These Glazed Applesauce Donuts are fantastic for meal prep, making your busy mornings a breeze! You can prepare the donut batter up to 24 hours in advance—just combine all the wet and dry ingredients but hold off on baking. Store the mixed batter in an airtight container in the refrigerator. Additionally, you can also glaze the donuts and store them in the fridge for up to 3 days; simply rewarm them in the oven for a few minutes before serving to regain that fresh-baked taste. This way, you’ll enjoy delightful, homemade donuts with minimal morning effort, just as delicious and fluffy as if they were baked fresh!

What to Serve with Glazed Applesauce Donuts?

These delightful treats are perfect for indulging your taste buds while sharing cozy moments with family and friends.

  • Fresh Brewed Coffee: The perfect pairing for sugary donuts, a cup of coffee enhances their flavors and provides a comforting morning ritual.

  • Warm Milk: A sweet and comforting option, warm milk complements the cinnamon notes in the donuts and balances their sweetness.

  • Fruit Salad: A zesty, fresh fruit salad brings a refreshing contrast to the fluffy sweetness of the donuts, adding both color and flavor to your brunch table.

Bright, juicy berries, crisp apples, and succulent oranges can all create a vibrant plate that perfectly harmonizes with your Glazed Applesauce Donuts.

  • Cinnamon Tea: A warm cup of cinnamon tea offers a soothing sip that draws out the spices in the donuts while making the meal feel even more indulgent.

  • Maple Syrup: Drizzle a little maple syrup over your donuts for an additional layer of sweetness and a touch of classic flavor that everyone loves.

  • Vanilla Yogurt Parfait: Layering yogurt with granola and fruit provides a lovely texture contrast while making a deliciously creamy treat beside your donuts.

  • Chai Latte: The spiced, creamy goodness of a chai latte beautifully complements the flavors of your donuts, making every bite feel like a warm hug.

  • Nutty Trail Mix: A crunchy blend of nuts and dried fruits adds a hearty texture contrast, balancing the sweet softness of your donuts for a satisfying snack across the board.

With these delicious pairings, your Glazed Applesauce Donuts will shine bright and bring smiles to every gathering!

Glazed Applesauce Donuts Variations

Feel free to get creative and make these delicious donuts your own with these fun twists!

  • Gluten-Free: Substitute all-purpose flour with a gluten-free blend to enjoy these treats without the gluten.

  • Maple Infusion: Replace sugar with maple syrup for a delightful and unique flavor that adds a cozy twist.

  • Spiced Up: Add a pinch of nutmeg or cardamom to the dry ingredients for an aromatic kick that will tantalize your taste buds.

  • Berry Boost: Fold in a cup of fresh blueberries or chopped strawberries into the batter for a fruity burst in every bite!

  • Nutty Delight: Stir in 1/2 cup of chopped nuts like walnuts or pecans for added crunch and depth; it’s a delightful surprise!

  • Cacao Kick: Mix in a few tablespoons of cocoa powder to create chocolate-glazed donuts that will surely please chocolate lovers.

  • Zesty Touch: Add the zest of one orange or lemon to the batter for a fresh citrus twist; it brightens up the flavor beautifully.

  • Chili Heat: For those who love a bit of spice, incorporate a pinch of cayenne pepper into the glaze for a sweet and spicy treat that’s unforgettable!

Chef's Helpful Tips

  • When making Glazed Applesauce Donuts, be sure to properly whisk the wet ingredients first to achieve a smooth and cohesive batter, which helps combine flavors effectively.
  • Avoid over-mixing your batter once you add the dry ingredients, as this can lead to dense donuts instead of light and fluffy ones.
  • For the glaze, start with a smaller amount of water and gradually add more until you reach the desired consistency, giving you the perfect coating for your donuts.
  • Remember to let your donuts cool for a few minutes in the pan before transferring them to avoid breaking them apart.

Glazed Applesauce Donuts Recipe FAQs

How do I choose the right applesauce?
Absolutely! For the best flavor, opt for unsweetened applesauce made from one hundred percent apples. You can also choose a brand that has no added sugars or preservatives. If you’re feeling adventurous, consider trying flavored applesauces, such as cinnamon or caramel, for a fun twist!

How should I store leftover donuts?
To keep your Glazed Applesauce Donuts fresh, store them in an airtight container at room temperature for up to 2 days. If you need them to last longer, pop them in the fridge for up to a week. Just make sure to check if they’re covered well so they don’t dry out!

Can I freeze these donuts for later?
Absolutely! Freezing Glazed Applesauce Donuts is an excellent way to save them for future enjoyment. First, allow the donuts to cool completely. Then, wrap each one tightly in plastic wrap, followed by placing them in a freezer-safe zip-top bag. They can stay fresh in the freezer for up to 3 months. When you’re ready to enjoy, simply thaw them in the fridge overnight.

What should I do if my donuts come out dense?
Very! If you find your donuts are denser than expected, it’s often due to overmixing the batter after adding the flour. To avoid this, mix just until the dry ingredients are incorporated. Also, ensure that your baking powder is fresh, as expired leavening agents can lead to undesired textures in baked goods.

Are these donuts safe for pets or those with allergies?
Good question! While these donuts are delicious for humans, they’re not suitable for pets due to high sugar content and certain ingredients like cinnamon. Additionally, be cautious if preparing for anyone with allergies; common allergens in this recipe include egg, milk, and wheat. Always substitute with allergy-friendly alternatives if necessary, and check with your guests for dietary restrictions!

Glazed Applesauce Donuts

Glazed Applesauce Donuts

Delight in these Glazed Applesauce Donuts, a perfect treat for breakfast or dessert with a touch of cinnamon.
Print Recipe Pin Recipe
Prep Time 10 minutes mins
Cook Time 15 minutes mins
Resting Time 15 minutes mins
Total Time 40 minutes mins
Servings: 12 donuts
Course: DESSERT RECIPES
Cuisine: American
Calories: 180
Ingredients Equipment Method Nutrition Notes

Ingredients
  

For the Donuts
  • 1 large egg adds richness and helps bind the ingredients.
  • 1 cup milk keeps the donuts moist; feel free to use any milk alternative!
  • 1/2 cup unsweetened applesauce provides natural sweetness and moisture; use extra for the glaze.
  • 2/3 cup sugar balances out the flavors; consider reducing for a less sweet donut.
  • 1 teaspoon vanilla extract enhances the overall flavor with a lovely aromatic note.
  • 2 cups all-purpose flour the base for your donuts; you can swap with whole wheat for added nutrition.
  • 2 teaspoons baking powder essential for making the donuts fluffy.
  • 1 teaspoon ground cinnamon brings warmth and spice; a must-have in this recipe!
  • 1/2 teaspoon kosher salt enhances the sweetness and balances the flavors.
For the Glaze
  • 1 cup powdered sugar gives the glaze its sweet and smooth texture.
  • 1/2 teaspoon ground cinnamon adds an extra layer of flavor to the glaze.
  • 2 teaspoons unsweetened applesauce complements the powdered sugar and gives the glaze a subtle fruitiness.
  • 4 teaspoons water helps to achieve the perfect glaze consistency; feel free to add more for a thinner glaze.

Equipment

  • Donut pan
  • Mixing bowl
  • Whisk

Method
 

How to Make Glazed Applesauce Donuts
  1. Preheat the oven to 350°F (175°C) and give your donut pan a light spray with cooking spray to ensure easy removal after baking.
  2. Whisk together in a mixing bowl the egg, milk, applesauce, sugar, and vanilla. Aim for a smooth and cohesive mixture that’s filled with delightful flavors.
  3. Combine the dry ingredients: gradually add the flour, baking powder, ground cinnamon, and salt into the mixing bowl. Stir until the batter is completely smooth, creating a thick yet pourable consistency.
  4. Spoon the batter into each cavity of the prepared donut pan, filling each almost to the top. Bake for 12-15 minutes, or until a toothpick inserted comes out clean—look for a light golden color.
  5. Cool the donuts in the pan for a few minutes, then carefully transfer them to a baking sheet lined with parchment paper to cool completely, allowing them to maintain their fluffy texture.
  6. Prepare the glaze by whisking together powdered sugar, ground cinnamon, applesauce, and water in a separate bowl. Mix until smooth, adding more water if necessary to reach the desired consistency.
  7. Dip the tops of each cooled donut into the glaze, twisting gently to ensure an even coating. Let any excess drip off before placing them glaze-side up on the lined baking sheet.
  8. Rest the glazed donuts for about 15 minutes, allowing the glaze to set and create a beautiful shine before serving.

Nutrition

Serving: 1donutCalories: 180kcalCarbohydrates: 26gProtein: 2gFat: 7gSaturated Fat: 1gPolyunsaturated Fat: 0.5gMonounsaturated Fat: 1gCholesterol: 30mgSodium: 150mgPotassium: 50mgFiber: 1gSugar: 10gVitamin A: 100IUCalcium: 50mgIron: 0.5mg

Notes

Optional: Top with a sprinkle of cinnamon for an extra touch of flavor. Be sure to let your donuts cool for a few minutes in the pan before transferring them to avoid breaking them apart.

Tried this recipe?

Let us know how it was!

Filed Under: BREAKFAST & BRUNCH

Cinnamon Roll Cupcakes

December 22, 2025 by JudyWhite Leave a Comment

There’s an undeniable warmth that fills the kitchen when you’re crafting something decadent from scratch. The delightful scent of cinnamon mingling with the sweet notes of vanilla brings back those cozy afternoons spent indulging in comforting treats. On a rainy afternoon, I decided to put a fun twist on a favorite classic, creating these delightful Cinnamon Roll Cupcakes.

Imagine biting into a fluffy cupcake, met with the gooey richness of cinnamon roll filling, all topped off with a luscious frosting that beckons for just one more bite. These cupcakes are perfect for a cozy weekend brunch or a delightful afternoon snack. Better yet, they take the familiar pleasure of cinnamon rolls and wrap them in a fun, portable form—no rolling mat required!

Let’s dive into this delicious recipe that’s surprisingly easy and practically foolproof, guaranteed to turn any hum-drum day into a sweet celebration!

Why You'll Love This Cinnamon Roll Cupcakes

  • These Cinnamon Roll Cupcakes combine the best of both worlds, offering the classic flavors of cinnamon rolls in a convenient cupcake form.
  • The recipe is surprisingly easy, making it perfect for both novice bakers and seasoned pros alike.
  • With their gooey filling and decadent frosting, these cupcakes are sure to impress and satisfy any sweet tooth.
  • They are versatile enough to serve at brunch, as an afternoon treat, or even at special occasions, bringing joy to every gathering.

Cinnamon Roll Cupcake Ingredients

Get ready to bring the magic of homemade cinnamon roll cupcakes into your kitchen!

For the Cupcake Base

  • All-purpose flour – A key ingredient for structure, providing the perfect base for your cupcakes.
  • Baking powder – Helps the cupcakes rise, giving them a light and fluffy texture.
  • Baking soda – Works in tandem with the baking powder for a beautifully airy result.
  • Table salt – Enhances the flavors and balances the sweetness of the cupcakes.
  • Cinnamon – The star spice that gives these cupcakes their enchanting aroma and flavor.
  • Large eggs – Helps bind the ingredients together while adding moisture.
  • Canola oil – Keeps the cupcakes moist and tender, so they stay fresh longer.
  • Sugar – Sweetens the batter, creating that wonderful indulgent taste.
  • Vanilla extract – Adds depth and a lovely vanilla essence to the cupcakes.
  • Sour cream – Contributes moisture and a slight tang, making cupcakes luxuriously rich.
  • Warm water (90-100°F) – Activates the yeast, creating a wonderfully fluffy texture in the cupcakes.
  • Instant yeast – Provides the light and airy lift that transforms these into delightful treats.

For the Cinnamon Roll Filling

  • Ground cinnamon – Adds that delightful, comforting warmth that makes cinnamon rolls irresistible.
  • Brown sugar – Sweetens and deepens the flavors in the filling, creating a gooey texture.
  • White sugar – Balances the filling sweetness for a deliciously sweet bite.
  • Olive oil – A surprise twist that can be used as a substitute for butter if you’re looking for a healthier option.

For the Topping

  • Unsalted butter (room temperature) – Creates a perfect crumble for topping, ensuring the filling stays soft and delicious.
  • Granulated sugar – Sweetens the topping with a slightly crunchy texture.
  • Brown sugar – Complements the crumble with a rich caramel flavor.
  • Powdered sugar (sifted) – Ideal for making a smooth, velvety frosting that pairs perfectly with the cupcakes.
  • Milk – Helps achieve the perfect consistency for a luscious frosting that holds its shape.

These amazing ingredients are what make each bite of these cinnamon roll cupcakes a delightful experience, replete with all the love of homemade treats!

How to Make Cinnamon Roll Cupcakes

  1. Mix Dry Ingredients: In a bowl, whisk together 1.25 cups all-purpose flour, 1.25 tsp baking powder, 0.5 tsp baking soda, 0.5 tsp table salt, and 1 tsp cinnamon until well combined.

  2. Whisk Wet Ingredients: In another bowl, combine 2 large eggs, 0.5 cups canola oil, 0.75 cups sugar, 2 tsp vanilla extract, 0.5 cups sour cream, and 0.5 cups warm water. Whisk until smooth and creamy.

  3. Combine Mixtures: Gently fold the wet mixture into the dry ingredients, stirring in 2.25 tsp instant yeast. Let the batter rise in a warm place for about 1 hour until it has doubled in size.

  4. Preheat and Prepare: Preheat your oven to 350°F (175°C) and line a cupcake pan with liners, ensuring they are ready for your delicious batter.

  5. Prepare Filling Mixture: In a separate bowl, combine 1.5 cups all-purpose flour, 0.5 tsp fine sea salt, 0.25 cups granulated sugar, 2 tbsp brown sugar, and 1 tbsp cinnamon.

  6. Add Butter: Mix in 0.25 cups room temperature unsalted butter until the mixture resembles a crumbly texture, then spread this topping over the risen dough evenly.

  7. Roll and Cut: Roll the dough tightly into a log. Cut the log into equal pieces with a sharp knife and gently place them in the cupcake liners.

  8. Bake: Bake for 20-25 minutes, or until the tops are golden brown and a toothpick inserted comes out clean.

  9. Prepare Frosting: In a mixing bowl, combine 1 cup sifted powdered sugar with 2 tbsp milk until smooth and creamy, creating a luscious frosting for your cupcakes.

  10. Frost and Enjoy: Once the cupcakes have cooled, generously frost each one with the prepared frosting, adding a delightful touch to these treats.

Optional: Sprinkle a dash of cinnamon on top for an extra flavorful garnish.

Exact quantities are listed in the recipe card below.

How to Store and Freeze Cinnamon Roll Cupcakes

Room Temperature: Keep your cupcakes in an airtight container at room temperature for up to 3 days. This will help maintain their moist texture and flavor.

Fridge: If you’re looking to prolong freshness, store them in the fridge for up to 1 week. Make sure they’re in an airtight container to prevent them from drying out.

Freezer: For longer storage, freeze the cupcakes in an airtight container for up to 3 months. Thaw them in the fridge overnight when you’re ready to enjoy.

Reheating: To enjoy warm, pop them in the microwave for about 10-15 seconds. This will revive the gooey texture of the filling, making your cinnamon roll cupcakes even more delightful!

What to Serve with Cinnamon Roll Cupcakes?

These delightful treats are not just a sweet indulgence; they can be part of a fully fabulous meal experience.

  • Fresh Fruit Salad: A medley of juicy fruits adds a refreshing contrast, perfectly balancing the sweetness while cleansing the palate.

  • Scrambled Eggs: Fluffy scrambled eggs bring a savory touch to your brunch spread, enriching the meal with protein-rich goodness.

  • Cream Cheese Glaze: Drizzling a tangy cream cheese glaze over the cupcakes enhances their richness and elevates the flavor profile beautifully.

  • Coffee or Tea: A warm cup of coffee or a fragrant tea complements the spices in the cupcakes, enhancing the cozy vibe of your gathering.

  • Vanilla Ice Cream: For an indulgent dessert experience, serve a scoop of vanilla ice cream alongside to contrast with the warm cupcakes.

  • Bacon or Sausage: The crispy, salty crunch of bacon or savory sausage adds a delightful textural contrast and heartiness to your meal.

  • Whipped Cream: A light dollop of whipped cream on top of the cupcakes makes for an extra creamy layer, enhancing the overall dessert experience.

Feel free to mix and match these ideas to craft a delightful brunch or afternoon treat with your Cinnamon Roll Cupcakes!

Cinnamon Roll Cupcake Variations

Embrace your creativity and customize these delightful cupcakes to suit your taste buds!

  • Gluten-Free: Substitute all-purpose flour with a 1:1 gluten-free baking blend for a fluffy gluten-free treat.
  • Dairy-Free: Swap sour cream with almond milk yogurt and use coconut oil instead of butter for a delicious, dairy-free version.
  • Nutty Twist: Add chopped pecans or walnuts to the filling for texture and a heartier flavor that enhances each bite.
  • Add Chocolate: Fold in mini chocolate chips to the batter or sprinkle on top of the frosting for a sweet chocolate surprise.
  • Spiced Variation: Introduce a pinch of nutmeg or pumpkin spice to the dough for a warm, spiced flavor that dances on your palate.
  • Maple Glaze: Use maple syrup instead of milk in the frosting for a maple-infused topping that takes these cupcakes to another level of delight.
  • Heath Bar Crunch: Crush Heath bars and sprinkle them on the frosting for a crunchy, toffee-like addition that provides a sweet contrast.
  • Cinnamon Roll Bites: Turn the filling into small bites by shaping dough into balls and baking them for a bite-sized version of your favorite treat.

No matter how you choose to personalize these cupcakes, each variation is sure to spread joy and deliciousness in every bite!

Make Ahead Options

These Cinnamon Roll Cupcakes are perfect for meal prep enthusiasts! You can prepare the batter and let it rise up to 24 hours in advance. Simply mix the dry and wet ingredients, combine them, and then store the mixture in the refrigerator to prevent over-proofing. For the filling, you can mix the crumble topping and keep it in an airtight container for up to 3 days. When you’re ready to bake, bring the batter to room temperature, roll it into a log with the filling, and bake as directed. This way, you’ll enjoy fresh cupcakes with minimal effort, saving you precious time on busy mornings!

Chef's Helpful Tips

  • When making cinnamon roll cupcakes, ensure your ingredients are at room temperature for a smoother batter.
  • A common mistake is overmixing; gently fold the wet and dry ingredients together to keep the batter light and airy.
  • Use a sharp knife to cut the dough into even pieces, allowing them to bake uniformly for the best texture.
  • Remember to bake until golden brown, checking around the 20-minute mark to avoid overbaking and losing that soft consistency.

Cinnamon Roll Cupcakes Recipe FAQs

How do I select the right cinnamon?
When selecting cinnamon for your cupcakes, look for ground cinnamon that has a rich aroma and a vibrant color. The best quality cinnamon should have a warm, sweet scent without any stale odor. If you can, try to find Ceylon cinnamon (true cinnamon) which has a delicate flavor, compared to Cassia cinnamon that is commonly found in stores.

How should I store leftover Cinnamon Roll Cupcakes?
Absolutely! Store your leftover Cinnamon Roll Cupcakes in an airtight container at room temperature for up to 3 days to keep their magical moisture. If you want them to last longer, you can refrigerate them for up to 1 week. Just ensure they are in an airtight container to avoid drying out.

Can I freeze Cinnamon Roll Cupcakes?
Yes! For longer storage, you can freeze the cupcakes for up to 3 months. To do this, allow them to cool completely after baking. Next, place them in an airtight container or wrap them individually in plastic wrap followed by aluminum foil. When you’re ready to indulge, thaw them in the fridge overnight and warm them in the microwave for 10-15 seconds to revive that delightful gooey texture.

What should I do if my cupcakes don’t rise?
If your cupcakes don’t rise, it’s likely due to inactive yeast. Ensure that the water you use to activate your instant yeast is warm (around 90-100°F). Also, always check the expiration date on the yeast. Additionally, remember to let the batter rise in a warm environment—too cool a place can hinder growth. If issues persist, try substituting with fresh yeast.

Are there any dietary considerations to keep in mind?
Definitely! If you’re cooking for someone with diet restrictions, consider using gluten-free flour as a substitute for all-purpose flour. You can also replace sugar with coconut sugar or use a sugar substitute suitable for baking. For a dairy-free version, substitute sour cream with a non-dairy yogurt. Always ensure your topping and ingredients are free from allergens if necessary.

How can I ensure my cupcakes don’t dry out while baking?
To keep your Cinnamon Roll Cupcakes delightful and moist, do not overbake them. Start checking around the 20-minute mark. Look for a golden-brown color on top and use a toothpick to check for doneness; it should come out clean or with a few moist crumbs—this keeps that soft texture intact.

Cinnamon Roll Cupcakes

Cinnamon Roll Cupcakes

Cinnamon Roll Cupcakes blend the classic flavors of cinnamon rolls in a fun, portable cupcake form, perfect for any occasion.
Print Recipe Pin Recipe
Prep Time 30 minutes mins
Cook Time 25 minutes mins
Rising Time 1 hour hr
Total Time 1 hour hr 55 minutes mins
Servings: 12 cupcakes
Course: DESSERT RECIPES
Cuisine: American
Calories: 250
Ingredients Equipment Method Nutrition Notes

Ingredients
  

Cupcake Base
  • 1.25 cups all-purpose flour
  • 1.25 tsp baking powder
  • 0.5 tsp baking soda
  • 0.5 tsp table salt
  • 1 tsp cinnamon
  • 2 large eggs
  • 0.5 cups canola oil
  • 0.75 cups sugar
  • 2 tsp vanilla extract
  • 0.5 cups sour cream
  • 0.5 cups warm water (90-100°F)
  • 2.25 tsp instant yeast
Cinnamon Roll Filling
  • 1 tbsp ground cinnamon
  • 0.25 cups brown sugar
  • 0.25 cups white sugar
  • 0.25 cups olive oil
Topping
  • 0.25 cups unsalted butter (room temperature)
  • 0.25 cups granulated sugar
  • 0.25 cups brown sugar
  • 1 cups powdered sugar (sifted)
  • 2 tbsp milk

Equipment

  • Mixing bowls
  • Whisk
  • Cupcake pan
  • Cupcake liners
  • Oven

Method
 

Preparation
  1. In a bowl, whisk together all-purpose flour, baking powder, baking soda, table salt, and cinnamon until well combined.
  2. In another bowl, combine eggs, canola oil, sugar, vanilla extract, sour cream, and warm water. Whisk until smooth and creamy.
  3. Gently fold the wet mixture into the dry ingredients, stirring in instant yeast. Let the batter rise in a warm place for about 1 hour until it has doubled in size.
  4. Preheat your oven to 350°F (175°C) and line a cupcake pan with liners.
  5. In a separate bowl, combine all-purpose flour, fine sea salt, granulated sugar, brown sugar, and cinnamon.
  6. Mix in unsalted butter until the mixture resembles a crumbly texture, then spread this topping over the risen dough evenly.
  7. Roll the dough tightly into a log. Cut the log into equal pieces and gently place them in the cupcake liners.
  8. Bake for 20-25 minutes, or until the tops are golden brown and a toothpick inserted comes out clean.
  9. In a mixing bowl, combine sifted powdered sugar with milk until smooth and creamy.
  10. Once the cupcakes have cooled, generously frost each one with the prepared frosting.

Nutrition

Serving: 1cupcakeCalories: 250kcalCarbohydrates: 35gProtein: 3gFat: 12gSaturated Fat: 7gPolyunsaturated Fat: 0.5gMonounsaturated Fat: 4gCholesterol: 50mgSodium: 150mgPotassium: 100mgFiber: 1gSugar: 15gVitamin A: 300IUCalcium: 50mgIron: 1mg

Notes

Optional: Sprinkle a dash of cinnamon on top for an extra flavorful garnish.

Tried this recipe?

Let us know how it was!

Filed Under: BREAKFAST & BRUNCH

Chocolate Chai Sourdough Loaf Cake

December 22, 2025 by JudyWhite Leave a Comment

There’s something so cozy about the fragrant blend of chocolate and chai wafting through my kitchen, reminding me of lazy afternoons spent with a steaming cup of tea in hand. That’s exactly the inspiration behind my Chocolate Chai Sourdough Loaf Cake—a delightful twist on classic flavors that feels both nostalgia-inducing and chic. When I first baked it, the fusion of rich chocolate with the warmth of chai spices caught me completely off guard, and since then, this loaf has become a staple in my home.

Whether you’re looking to impress guests at a gathering or simply treat yourself to something special without the hassle, this cake ticks all the boxes. With just 15 minutes of prep time and an incredibly moist texture, it’s the perfect antidote to those mundane weeknight desserts. Trust me, once your oven finishes its magic, the aroma will have you eagerly awaiting each slice while the rich frosting crowns it all in decadent glory. Let’s dive into a recipe that redefines comfort, shall we?

Why You'll Love This Chocolate Chai Sourdough Loaf Cake

  • This Chocolate Chai Sourdough Loaf Cake is incredibly easy to make, with just 15 minutes of prep time allowing you to enjoy deliciousness in no time.
  • The unique combination of chocolate and chai spices creates a flavor experience that is both comforting and sophisticated, making it a true crowd-pleaser.
  • Its versatility means it can be served as a delightful dessert, a fancy treat for brunch, or even a thoughtful gift for friends and family.
  • Visually, the rich frosting and optional chopped chocolate topping make this loaf cake a stunning centerpiece for any occasion.

Chocolate Chai Sourdough Loaf Cake Ingredients

Get ready to create a masterpiece with these essential ingredients!

For the Cake

  • Chocolate – semi-sweet or dark adds richness and depth.
  • Water – helps melt the chocolate smoothly.
  • Butter – ensure it’s softened for easy mixing and a tender crumb.
  • Brown Sugar – contributes moisture and a toasty flavor.
  • Eggs – bind the ingredients together while adding richness.
  • Vanilla Extract – enhances the overall flavor profile.
  • All-Purpose Flour – the backbone of your loaf for structure.
  • Sourdough Starter – can use discard for extra tang and moisture.
  • Chai Tea Latte Mix – infuses a warm spice blend into the cake.
  • Baking Powder – ensures your cake rises beautifully.
  • Salt – balances the sweetness and enhances flavors.
  • Yogurt – keeps the cake moist while adding a slight tang.

For the Frosting

  • Powdered Sugar – provides sweetness and a silky texture for the frosting.
  • Butter – softened to create a creamy base for the frosting.
  • Chai Tea Latte Mix – a final sprinkle of spice in the frosting for consistency.
  • Cream Cheese – brings creaminess and a slight tang to balance sweetness.
  • Vanilla Extract – rounds out the flavors beautifully in the frosting.

This Chocolate Chai Sourdough Loaf Cake is perfectly crafted for baking enthusiasts and those longing for a homely touch in their dessert!

How to Make Chocolate Chai Sourdough Loaf Cake

  1. Preheat the oven to 180°C (350°F) and grease a loaf pan with butter or cooking spray, ensuring it’s ready to hold your delightful batter.

  2. Melt the chocolate by combining it with water in a small bowl over low heat or in the microwave, stirring until smooth. Allow it to cool for a few minutes.

  3. Whisk together softened butter and brown sugar in a large mixing bowl until fluffy. Incorporate eggs, vanilla extract, yogurt, and your sourdough starter, creating a luscious, smooth batter.

  4. Combine the melted chocolate mixture into your batter, whisking until everything is well blended and heavenly.

  5. Mix the dry ingredients by combining chai tea latte mix, salt, and baking powder into the all-purpose flour, ensuring everything is evenly distributed.

  6. Fold the dry mixture into the wet batter gently, creating a harmonious blend. Mix just until no flour is visible for a tender loaf.

  7. Pour the combined batter into the prepared loaf pan, then bake for approximately 50 minutes. Test for doneness by inserting a skewer or toothpick; it should come out clean.

  8. Cool the loaf cake in the pan for about 10 minutes. Then, transfer it to a wire rack to cool completely, emulating the tantalizing aroma throughout your space.

  9. Prepare the frosting by adding all frosting ingredients into a food processor or stand mixer, then beat until light and fluffy, creating a luscious topping.

  10. Spread the frosting generously over the cooled loaf cake and sprinkle with chopped dark chocolate if desired for an elegant finish.

Optional: Drizzle with chocolate sauce for an extra touch of indulgence.

Exact quantities are listed in the recipe card below.

How to Store and Freeze Chocolate Chai Sourdough Loaf Cake

Room Temperature: Keep any leftover cake in an airtight container at room temperature for up to 3 days to maintain its moisture and flavor.

Fridge: If you want to extend its shelf life, store the Chocolate Chai Sourdough Loaf Cake in the fridge for up to 1 week. Make sure to wrap it tight to prevent drying out.

Freezer: For longer storage, slice the loaf and wrap each slice in plastic wrap, then place them in a freezer bag. This way, it will last up to 3 months, allowing for easy servings later.

Reheating: To enjoy a slice from the freezer, simply thaw it overnight in the fridge or microwave it briefly until warm, enhancing its delightful aroma and flavors.

What to Serve with Chocolate Chai Sourdough Loaf Cake?

Indulging in a slice of this delightful cake invites the perfect opportunity to create a full, comforting meal experience.

  • Spiced Chai Latte: This aromatic beverage echoes the chai flavors in the cake, enhancing the warm and cozy vibes of your dessert. Perfect for sipping as you savor each slice.

  • Vanilla Ice Cream: A scoop of creamy vanilla ice cream melts beautifully on top of the warm loaf cake, adding a luscious contrast that enhances the rich chocolate notes.

  • Toasted Nuts: Lightly toasted pecans or almonds add a satisfying crunch, complementing the cake’s soft texture while providing a nutty flavor that balances the sweet and spiced elements beautifully.

  • Fresh Berries: A mix of strawberries, blueberries, and raspberries brings a refreshing burst of tartness that cuts through the richness of the cake, elevating each bite with a pop of flavor.

  • Cinnamon Whipped Cream: A dollop of this fluffy topping enhances the cake’s spices, creating a lovely marriage of flavors that feels indulgent yet inviting.

  • Mint Tea: A cup of soothing mint tea pairs wonderfully with the chocolate and chai theme, offering a refreshing palate cleanser between bites.

  • Chocolate Ganache: For an extra slice of decadence, drizzle some silky chocolate ganache over your loaf cake, turning an already delightful dessert into a truly indulgent treat.

Enjoy this Chocolate Chai Sourdough Loaf Cake with these delicious pairings for a memorable, multi-sensory experience!

Chocolate Chai Sourdough Loaf Cake Variations

Feel free to explore these delightful twists on your warm, comforting loaf cake!

  • Gluten-Free: Substitute all-purpose flour with a 1:1 gluten-free blend; your loaf will still rise and delight!

  • Dairy-Free: Use coconut oil in place of butter and a non-dairy yogurt to create a rich yet cruelty-free dessert.

  • Nutty Twist: Add 100g of finely chopped walnuts or almonds for a satisfying crunch that contrasts beautifully with the soft cake.

  • Fruit-Filled: Fold in 100g of chopped apples or pears for a fruity surprise that adds moisture and flavor complexity.

  • Spicy Kick: Increase chai tea latte mix to 40g or add a pinch of cayenne or ginger for a warm and spicy flavor adventure.

  • Choco-Orange: Incorporate the zest of one orange into the batter for a refreshing citrus note that pairs wonderfully with chocolate and chai.

  • Caramel Drizzle: Drizzle with homemade or store-bought caramel sauce over the frosting for an indulgent touch that adds sweetness.

  • Add Chocolate Chips: Toss in 100g of chocolate chips to the batter for gooey pockets of chocolate delight in every slice.

Get creative and let your kitchen be the canvas for this delicious and versatile loaf cake!

Make Ahead Options

These Chocolate Chai Sourdough Loaf Cakes are perfect for busy home cooks looking to delight their taste buds without the last-minute fuss! You can prepare the batter up to 24 hours in advance, storing it in an airtight container in the refrigerator to keep it fresh. If you want even more convenience, you can bake the loaf cake and let it cool before refrigerating; it will stay delicious for up to 3 days. When you’re ready to enjoy, simply frost the cake once it’s cooled and serve it for a warm, inviting treat. This way, you’ll have a delightful dessert at your fingertips, ready to impress at a moment’s notice!

Chef's Helpful Tips

  • When making the Chocolate Chai Sourdough Loaf Cake, ensure your butter is truly softened to room temperature for easy blending with the sugar.
  • A common mistake is overmixing the batter after adding the flour; mix just until you can no longer see any flour for a tender cake.
  • For the best flavor, let your melted chocolate cool slightly before adding it to the batter to avoid cooking the eggs.
  • Keeping an eye on your baking time is crucial; start checking for doneness a few minutes early as ovens can vary.

Chocolate Chai Sourdough Loaf Cake Recipe FAQs

How do I choose ripe and flavorful ingredients for the Chocolate Chai Sourdough Loaf Cake?
Absolutely! When selecting chocolate, look for high-quality semi-sweet or dark chocolate with a cocoa percentage that you enjoy. For the butter, ensure it’s softened at room temperature for easy mixing—this helps achieve a tender crumb in your loaf. Also, check your sourdough starter; it should be active or at least recently refreshed for optimal flavor and rise.

How should I store the Chocolate Chai Sourdough Loaf Cake?
Very! To keep your leftover loaf moist and delicious, store it in an airtight container at room temperature for up to 3 days. If you want to extend its shelf life, you can wrap it tightly in plastic wrap and place it in the fridge, where it will last about a week. When storing, ensure that the cake is completely cooled to avoid condensation developing within the container.

Can I freeze leftover slices of the Chocolate Chai Sourdough Loaf Cake?
Absolutely! To freeze, slice the loaf first. Wrap each slice tightly in plastic wrap, then place them in a freezer bag, squeezing out the air for the best preservation—this will keep your loaf fresh for up to 3 months! When you’re ready to enjoy a slice, simply thaw it in the fridge overnight or microwave it briefly for a warm treat.

What should I do if my Chocolate Chai Sourdough Loaf Cake doesn’t rise properly?
Don’t worry; baking is an art! If your loaf doesn’t rise as expected, check if your baking powder is fresh, as expired leavening agents will affect the final rise. Also, ensure that your wet ingredients, especially the sourdough starter, are at room temperature before mixing. Lastly, be gentle when folding in the flour mixture—overmixing can lead to a denser cake.

Are there any dietary considerations I should be aware of when making the Chocolate Chai Sourdough Loaf Cake?
Definitely! If you have allergies, be mindful of the chocolate and butter, as they may contain allergens like dairy or nuts. For a dairy-free option, you can substitute the butter with a plant-based alternative and use almond or coconut yogurt. If you’re baking for pets, remember that chocolate is toxic to dogs and cats, so keep this cake out of their reach.

Chocolate Chai Sourdough Loaf Cake

Chocolate Chai Sourdough Loaf Cake

Delight in the comforting fusion of chocolate and chai with this Chocolate Chai Sourdough Loaf Cake.
Print Recipe Pin Recipe
Prep Time 15 minutes mins
Cook Time 50 minutes mins
Cooling Time 10 minutes mins
Total Time 1 hour hr 15 minutes mins
Servings: 12 slices
Course: DESSERT RECIPES
Cuisine: American
Calories: 350
Ingredients Equipment Method Nutrition Notes

Ingredients
  

For the Cake
  • 1 cup chocolate semi-sweet or dark
  • 1/2 cup water
  • 1/2 cup butter softened
  • 1 cup brown sugar
  • 2 large eggs
  • 1 teaspoon vanilla extract
  • 1 1/2 cups all-purpose flour
  • 1 cup sourdough starter can use discard
  • 1/4 cup chai tea latte mix
  • 1 teaspoon baking powder
  • 1/2 teaspoon salt
  • 1/2 cup yogurt
For the Frosting
  • 2 cups powdered sugar
  • 1/2 cup butter softened
  • 1/4 cup chai tea latte mix
  • 4 ounces cream cheese
  • 1 teaspoon vanilla extract

Equipment

  • loaf pan
  • Mixing bowls
  • Whisk
  • Spatula
  • stand mixer or food processor

Method
 

How to Make Chocolate Chai Sourdough Loaf Cake
  1. Preheat the oven to 180°C (350°F) and grease a loaf pan with butter or cooking spray.
  2. Melt the chocolate by combining it with water in a small bowl over low heat or in the microwave, stirring until smooth.
  3. Whisk together softened butter and brown sugar in a large mixing bowl until fluffy. Incorporate eggs, vanilla extract, yogurt, and sourdough starter.
  4. Combine the melted chocolate mixture into your batter, whisking until everything is well blended.
  5. Mix the dry ingredients (chai tea latte mix, salt, baking powder) into the all-purpose flour.
  6. Fold the dry mixture into the wet batter gently.
  7. Pour the combined batter into the prepared loaf pan, then bake for approximately 50 minutes.
  8. Cool the loaf cake in the pan for about 10 minutes, then transfer it to a wire rack to cool completely.
  9. Prepare the frosting by adding all frosting ingredients into a food processor or stand mixer, then beat until light and fluffy.
  10. Spread the frosting generously over the cooled loaf cake and sprinkle with chopped dark chocolate if desired.

Nutrition

Serving: 1sliceCalories: 350kcalCarbohydrates: 48gProtein: 5gFat: 15gSaturated Fat: 9gPolyunsaturated Fat: 2gMonounsaturated Fat: 3gCholesterol: 40mgSodium: 200mgPotassium: 150mgFiber: 2gSugar: 25gVitamin A: 500IUCalcium: 30mgIron: 1mg

Notes

For an extra touch of indulgence, drizzle with chocolate sauce.

Tried this recipe?

Let us know how it was!

Filed Under: BREAKFAST & BRUNCH

Spinach and Feta Breakfast Quesadilla

December 22, 2025 by JudyWhite Leave a Comment

When the sun peeks through the curtains and you feel that delightful morning hunger pang, nothing hits the spot quite like a Spinach and Feta Breakfast Quesadilla. The first crisp bite reveals layers of personality—warm, cheesy goodness mingling with bright spinach and the tang of feta. It’s a delicious embrace for your taste buds, all wrapped up in a conveniently portable tortilla.

Just the other day, I found myself tired of the same old breakfast routine, craving something nutritious yet quick to whip up before the day’s chaos began. This recipe came to the rescue! It’s an effortless way to sneak in those greens, and the burst of flavors transforms the ordinary morning meal into a gourmet experience. With only a handful of ingredients, you can create a dish that’s not only satisfying but also packed with protein to fuel your day ahead.

So roll up your sleeves and let’s dive into this easy, crowd-pleasing breakfast that promises to banish boring mornings for good!

Why You'll Love This Spinach and Feta Breakfast Quesadilla

  • This Spinach and Feta Breakfast Quesadilla is incredibly easy to prepare, making it perfect for busy mornings.
  • The delightful combination of flavors will elevate your breakfast experience with every crispy bite.
  • It’s a versatile dish that can be customized with your favorite ingredients, whether you want to add more veggies or switch up the cheese.
  • With just a total time of 15 minutes, you can enjoy a wholesome and satisfying meal without the hassle, ensuring you have more time to enjoy your day.

Spinach and Feta Breakfast Quesadilla Ingredients

• Get ready for flavor-packed bites!

For the Quesadilla

  • Extra virgin olive oil or butter – Use either for a rich, creamy flavor to sauté the spinach.
  • Spinach – Fresh spinach not only boosts nutrition but also adds a lovely color and texture.
  • Garlic powder – A sprinkle of this adds aromatic depth to your eggs.
  • Onion powder – It gives a subtle sweetness that complements the feta.
  • Large eggs – The main protein source that keeps you full throughout the morning.
  • Feta cheese – Adds a tangy twist that perfectly balances with the spinach in the quesadilla.
  • Large flour tortilla – A delightful wrap that holds all the delicious ingredients together.
  • Mozzarella cheese – Melts beautifully, providing an extra layer of creaminess.
  • Salt and pepper – Essential for seasoning, bringing all these flavors together!

This Spinach and Feta Breakfast Quesadilla is not just delicious, but also a nutritious way to start your day. Enjoy!

How to Make Spinach and Feta Breakfast Quesadilla

  1. Heat the olive oil in a large non-stick pan over medium heat. Add the spinach along with garlic powder and onion powder. Sauté for about 1 minute until the spinach begins to wilt and become vibrant.

  2. Add the eggs to the pan and scramble them with a spatula, breaking up the yolk as you cook. Once the eggs are fully cooked, about 1-2 minutes, stir in the feta cheese and remove the mixture from the heat.

  3. Lower the heat to medium-low and place the flour tortilla in the pan. Sprinkle half of the mozzarella cheese on one half of the tortilla, then top it with the egg, spinach, and feta mixture. Finish by adding the remaining mozzarella cheese and fold the tortilla over.

  4. Cook the quesadilla for about 90 seconds on one side until it’s crispy and the cheese starts to melt. Flip it carefully and cook for another 90 seconds until lightly browned and the cheese is fully melted.

  5. Transfer the quesadilla to a cutting board or plate, cut it in half, and enjoy the cheesy, wholesome goodness!

Optional: Serve with your favorite salsa or hot sauce for an extra zing.

Exact quantities are listed in the recipe card below.

Spinach and Feta Breakfast Quesadilla Variations

Feel free to let your creativity shine as you customize this delightful quesadilla to suit your taste!

  • Whole Wheat Tortilla: Swap the flour tortilla for a whole wheat variety for an added boost of fiber and a nutty flavor.

  • Go Dairy-Free: Use a plant-based cheese alternative for a creamy, dairy-free twist that’s just as satisfying.

  • Extra Veggies: Toss in diced bell peppers, mushrooms, or even cherry tomatoes for more color and nutrition, elevating each bite with freshness.

  • Spice it Up: Add a pinch of red pepper flakes or chopped jalapeños to ignite your taste buds with a fiery kick, while still maintaining that cheesy goodness.

  • Herbed Eggs: Mix in fresh herbs such as basil or parsley with the eggs for a fragrant flavor twist that brightens your quesadilla delightfully.

  • Protein-Packed: Add cooked bacon or shredded chicken into the egg mixture for a heartier quesadilla that will keep you fueled throughout the morning.

  • Sweet Option: Drizzle a bit of honey or maple syrup on top after cooking for an unexpected sweet-savory experience that’s truly delightful.

  • Skillet Variation: Try grilling the quesadilla on an outdoor grill for a smoky flavor that infuses all the cheesy goodness with the charred warmth of summer!

Embrace these variations, and let your culinary spirit run wild—they’re sure to please your palate and keep breakfast exciting!

How to Store and Freeze Spinach and Feta Breakfast Quesadilla

Room Temperature: Store the quesadilla at room temperature for up to 2 hours, ideal for serving fresh but not suitable for longer storage.

Fridge: Keep any leftovers in an airtight container in the fridge for up to 3 days. Reheat in a skillet for best results and to maintain crispiness.

Freezer: You can freeze the quesadilla for up to 2 months. Wrap it tightly in plastic wrap, then in aluminum foil before placing it in a freezer-safe bag. To enjoy, thaw overnight in the fridge and reheat in a skillet.

Reheating: To reheat, warm it in a skillet over medium heat for about 5 minutes per side, or until heated through and crispy. Enjoy your delicious Spinach and Feta Breakfast Quesadilla any time!

What to Serve with Spinach and Feta Breakfast Quesadilla?

Indulge in a delightful morning spread that complements this cheesy, nutritious dish.

  • Fresh Fruit Salad: A medley of sweet, juicy fruits provides a refreshing contrast to the savory quesadilla. The natural sweetness brightens up your breakfast experience.

  • Salsa: Whether you prefer mild or spicy, a zesty salsa adds a flavorful kick that pairs perfectly with the creamy feta. The vibrant colors will make your plate pop!

  • Avocado Slices: Creamy avocado slices enhance the richness of the quesadilla, adding a buttery texture that marries beautifully with the warm spinach and cheese.

  • Greek Yogurt: This tangy, creamy accompaniment offers a cooling effect against the heat of the salsa, while also boosting the protein content of your meal.

  • Coffee or Herbal Tea: Start your morning right with a warm beverage. Coffee adds a rich, robust flavor, while herbal tea provides a soothing counterpoint to your breakfast.

  • Crispy Hash Browns: These golden-brown potatoes add a delightful crunch, letting you enjoy different textures in each bite. They’re a classic breakfast side that’s always a hit!

Pairing these scrumptious accompaniments with your Spinach and Feta Breakfast Quesadilla transforms a simple meal into a culinary experience that you’ll look forward to each morning!

Make Ahead Options

These Spinach and Feta Breakfast Quesadillas are perfect for meal prep, making busy mornings a breeze! You can prepare the egg, spinach, and feta mixture up to 24 hours in advance. Simply cook the spinach with the spices, add the beaten eggs, and stir in the feta cheese, then let it cool before refrigerating. When you’re ready to serve, just assemble your quesadilla with the cheese and tortilla, and cook as directed. Remember to keep the mixture in an airtight container to maintain its freshness and prevent browning. Enjoying a delectable breakfast with minimal morning effort has never been easier!

Chef's Helpful Tips

  • For the Spinach and Feta Breakfast Quesadilla, make sure to sauté the spinach just until it wilts to retain its vibrant color and nutrients.
  • Avoid overcooking the eggs by removing them from heat as soon as they are fully scrambled; this ensures they remain soft and creamy.
  • When folding the tortilla, use a wide spatula to help maintain the filling without spilling.
  • Cook the quesadilla on medium-low heat to prevent burning while allowing the cheese to melt evenly.
  • Always let it rest for a minute before cutting to keep the filling intact.

Spinach and Feta Breakfast Quesadilla Recipe FAQs

What type of spinach should I use for the quesadilla?
Absolutely! Fresh spinach is best for this Spinach and Feta Breakfast Quesadilla as it maintains its color, nutrients, and texture. If you have frozen spinach, just make sure to thaw and thoroughly drain it before using to avoid excess moisture.

How should I store leftovers from the quesadilla?
Very simple! Store any leftover quesadilla in an airtight container in the fridge for up to 3 days. Reheating in a skillet works best for maintaining the crispy texture, just heat it over medium for a few minutes on each side.

Can I freeze the Spinach and Feta Breakfast Quesadilla?
Yes, you can freeze this delicious quesadilla! Wrap it tightly in plastic wrap and then in aluminum foil to prevent freezer burn. It will keep well in the freezer for up to 2 months. To enjoy it later, simply thaw it in the fridge overnight before reheating.

What common problems should I watch out for when making this dish?
When making the Spinach and Feta Breakfast Quesadilla, ensure the heat is not too high to prevent the tortilla from burning before the cheese melts. Avoid overcooking the eggs; they should be soft and creamy. If the filling spills out when you fold the tortilla, try using a wider spatula for better support.

Are there any dietary considerations I should be aware of?
Absolutely! If you or anyone eating the quesadilla has a lactose sensitivity, consider using lactose-free cheese alternatives or even skip the mozzarella altogether. For those allergic to eggs, you could substitute with scrambled tofu or chickpea flour for a vegan option. Always check to ensure that other ingredients, like tortillas, are free of allergens too!

Spinach and Feta Breakfast Quesadilla

Spinach and Feta Breakfast Quesadilla

Enjoy a delicious Spinach and Feta Breakfast Quesadilla, a flavorful and nutritious dish perfect for busy mornings.
Print Recipe Pin Recipe
Prep Time 5 minutes mins
Cook Time 10 minutes mins
Total Time 15 minutes mins
Servings: 2 quesadillas
Course: BREAKFAST & BRUNCH
Cuisine: American
Calories: 350
Ingredients Equipment Method Nutrition Notes

Ingredients
  

For the Quesadilla
  • 1 tablespoon Extra virgin olive oil or butter
  • 2 cups Fresh spinach washed and chopped
  • 1 teaspoon Garlic powder
  • 1 teaspoon Onion powder
  • 4 large Large eggs
  • 1 cup Feta cheese crumbled
  • 2 large Large flour tortillas
  • 1 cup Mozzarella cheese shredded
  • to taste Salt and pepper for seasoning

Equipment

  • Large non-stick pan

Method
 

Preparation Steps
  1. Heat the olive oil in a large non-stick pan over medium heat. Add the spinach along with garlic powder and onion powder. Sauté for about 1 minute until the spinach begins to wilt and become vibrant.
  2. Add the eggs to the pan and scramble them with a spatula, breaking up the yolk as you cook. Once the eggs are fully cooked, about 1-2 minutes, stir in the feta cheese and remove the mixture from the heat.
  3. Lower the heat to medium-low and place the flour tortilla in the pan. Sprinkle half of the mozzarella cheese on one half of the tortilla, then top it with the egg, spinach, and feta mixture. Finish by adding the remaining mozzarella cheese and fold the tortilla over.
  4. Cook the quesadilla for about 90 seconds on one side until it’s crispy and the cheese starts to melt. Flip it carefully and cook for another 90 seconds until lightly browned and the cheese is fully melted.
  5. Transfer the quesadilla to a cutting board or plate, cut it in half, and enjoy the cheesy, wholesome goodness!

Nutrition

Serving: 1quesadillaCalories: 350kcalCarbohydrates: 30gProtein: 20gFat: 18gSaturated Fat: 8gPolyunsaturated Fat: 1gMonounsaturated Fat: 5gCholesterol: 300mgSodium: 800mgPotassium: 400mgFiber: 2gSugar: 2gVitamin A: 2500IUVitamin C: 17mgCalcium: 200mgIron: 2mg

Notes

Optional: Serve with your favorite salsa or hot sauce for an extra zing.

Tried this recipe?

Let us know how it was!

Filed Under: BREAKFAST & BRUNCH

Creamy Limoncello Martini

December 21, 2025 by JudyWhite Leave a Comment

Picture this: a warm evening, the sun setting in a glorious shade of orange, and a gentle breeze stirring the air. Suddenly, you’re hit with an overwhelming craving for something refreshing yet indulgently creamy. Enter the Creamy Limoncello Martini, a delightful twist on a classic cocktail that transforms your average night into a mini celebration. I discovered this gem at a friend’s dinner party, where guests couldn’t help but rave about its bright citrusy flavor combined with the luxurious texture of heavy cream.

With just a handful of simple ingredients, including zesty limoncello and smooth vodka, this cocktail is perfect for impressing guests or simply treating yourself after a long day. In just 10 minutes, you can whip up this sophisticated drink that somehow balances elegance with ease—perfect for those who’ve grown tired of their usual fast-food routine. Trust me, once you try this velvety blend garnished with a lemon twist, you won’t want to go back! So, pour yourself a glass and let’s dive into the delightful world of homemade cocktails.

Why You'll Love This Creamy Limoncello Martini

  • This Creamy Limoncello Martini is the perfect blend of refreshing citrus and luxurious cream, making every sip a delightful experience.
  • You’ll love how quick and easy it is to prepare, taking just 10 minutes from start to finish, allowing you more time to enjoy your evening.
  • Its beautiful presentation with a graham cracker rim and lemon garnish makes it an eye-catching addition to any gathering, sure to impress your guests.
  • Plus, its versatility means you can easily adjust the garnish or sweetness to match your taste, making it a personalized treat for any occasion.

Creamy Limoncello Martini Ingredients

For the Cocktail
• Limoncello – This vibrant lemon liqueur brings a zesty flavor that defines the Creamy Limoncello Martini.
• Vodka – A smooth base spirit that adds depth without overshadowing the citrus.
• Heavy whipping cream – The key ingredient that creates that rich, velvety texture you’ll love.

For the Garnish (Optional)
• Cool Whip – A dollop on top makes for an irresistible creamy finish.
• Graham cracker crumbs – Sprinkle them on the rim for a sweet crunch that enhances the drink’s appeal.
• Lemon slices – Add a fresh, bright touch for garnish, elevating the aesthetics and flavor.

Dare to indulge in a Creamy Limoncello Martini that brightens any occasion!

How to Make Creamy Limoncello Martini

  1. Prepare the glass: Begin by tracing a wedge of lemon around the rim of your martini glass. This small but significant step adds a delightful touch, so dip the rim into granulated sugar or graham cracker crumbs.

  2. Fill the shaker: Grab your cocktail shaker and add a handful of ice. Pour in 2 ounces of limoncello, 1 ounce of vodka, and 2 ounces of heavy whipping cream. If you like a sweeter finish, add 1 tablespoon of Cool Whip.

  3. Shake it up: Seal the shaker and shake vigorously for 10-15 seconds. You want to mix it thoroughly until the outside feels cold and the ingredients are frothy and well-blended.

  4. Strain and serve: Carefully strain the mixture into your prepared martini glass, letting it flow smoothly for an elegant look. Enjoy the creamy texture!

  5. Garnish beautifully: Finish off your stunning cocktail by garnishing with a lemon wedge, lemon twist, lemon zest, or a sprinkle of fresh herbs for that extra pop of color and flavor.

Optional: Sprinkle some fresh graham cracker crumbs on top for added crunch and decoration.

Exact quantities are listed in the recipe card below.

What to Serve with Creamy Limoncello Martini?

Picture an elegant evening gathering where every sip of your cocktail is perfectly complemented by delightful bites and flavors that tantalize the palate.

  • Bruschetta: These crispy, toasted bread slices topped with fresh tomatoes and basil provide a contrasting crunch and vibrant flavor that pairs wonderfully with the martini’s creaminess.

  • Caprese Skewers: Juicy cherry tomatoes, fresh mozzarella, and basil drizzled with balsamic glaze add a refreshing, tangy brightness, creating a delightful harmony with the drink’s citrus notes.

  • Lemon Sorbet: A scoop of this light, icy treat will elevate the lemony essence in your martini, offering a cool, palate-cleansing option that’s refreshing between sips.

  • Shrimp Cocktail: Succulent shrimp served with tangy cocktail sauce delivers a savory bite that beautifully balances the sweetness of the Creamy Limoncello Martini.

  • Pistachio Cake: This moist, nutty dessert, subtly flavored with cardamom, enhances the cocktail’s indulgent qualities, making for a rich and satisfying end to your meal.

  • Cucumber Mint Salad: A light salad featuring crisp cucumbers and fresh mint offers a refreshing burst of flavor, contrasting the richness of the drink while enhancing its citrus profile.

  • Sparkling Water: A refreshing glass of plain or lemon-infused sparkling water elevates your drinking experience and keeps the effervescence alive alongside your martini.

  • Vanilla Mousse: Light and airy, this creamy dessert dotted with citrus zest mirrors the main flavors of your cocktail, creating a delightful end to the evening.

With these delectable pairings, your evening is set to be a celebration of flavors!

Make Ahead Options

These Creamy Limoncello Martinis are a fantastic option for meal prep enthusiasts looking to save time on busy evenings! You can prepare the cocktail mixture (limoncello, vodka, and heavy cream) up to 24 hours in advance by combining these ingredients in an airtight container and refrigerating. This not only keeps the flavors vibrant but also ensures your martini is just as delicious when you’re ready to serve. When it’s time to enjoy, simply shake the mixture with ice, strain into a garnished glass, and top with Cool Whip if desired. Your guests will be impressed with your effortless elegance!

Creamy Limoncello Martini Variations

Feel free to make this delightful cocktail your own with these creative twists that will enhance your sipping experience.

  • Dairy-Free: Substitute heavy cream with coconut cream for a tropical flair that keeps the richness while delighting dairy-free friends.

  • Herb-Infused: Add a sprig of fresh rosemary or basil while shaking to impart a lovely herbal aroma that beautifully complements the citrus.

  • Sparkling Touch: Top with a splash of sparkling water or Prosecco for added fizz, transforming your drink into a refreshing bubbly treat.

  • Fruit-Forward: Incorporate muddled berries, like raspberries or blueberries, in the shaker for an extra burst of flavor and a pop of color.

  • Flavor Game Changer: Swap limoncello for blood orange liqueur; this variation offers a deeper, slightly sweeter citrus profile that’s irresistible.

  • Frozen Delight: Blend all ingredients with ice instead of shaking for a slushy texture—a fabulous option for a summer gathering.

  • Chill with Citrus: Freeze lemon slices and use them as ice cubes for a stunning presentation while keeping your drink cold without dilution.

  • Sweetened Rim: Use a mix of crushed graham crackers and brown sugar for the rim to add richness that complements the cocktail’s creamy texture.

Each of these variations invites creativity, allowing you to craft a drink that resonates with your unique taste while elevating that sumptuous flavor profile we all adore!

How to Store and Freeze Creamy Limoncello Martini

Fridge: Keep any leftover cocktail in an airtight container in the fridge for up to 2 days. Note that the creamy texture may change slightly, so it’s best enjoyed fresh.

Freezer: Although not recommended for freezing due to the cream, you can freeze plain limoncello in an airtight container for up to 6 months to have on hand for future cocktails.

Reheating: If you prefer a chilled drink, simply let it thaw in the fridge overnight instead of reheating. Serve your Creamy Limoncello Martini cold for the best experience.

Garnish Storage: Store any unused graham cracker crumbs and lemon garnishes separately to maintain their freshness until you’re ready to serve.

Chef's Helpful Tips

  • For your Creamy Limoncello Martini, always ensure your ingredients are well chilled before mixing to achieve the perfect consistency.
  • A common mistake is skimping on the shaking; vigorous shaking for at least 10-15 seconds is essential for a frothy and well-blended drink.
  • When preparing the glass, the rim needs to be entirely coated for a consistent sweetness in every sip, so take your time with this step.
  • Lastly, serve the martini immediately after straining to enjoy its rich texture at its best, as the cream can separate if left to sit too long.

Creamy Limoncello Martini Recipe FAQs

How do I select the best limoncello for my martini?
Absolutely! When selecting limoncello, look for a brand that uses real lemon zest and has a bright yellow color without any artificial additives. A well-made limoncello should offer a sweet yet tangy flavor profile. If possible, sample a few brands to find the one that best suits your taste.

How should I store leftover Creamy Limoncello Martini?
For any leftover cocktail, simply transfer it into an airtight container and keep it in the refrigerator for up to 2 days. However, it’s important to note that due to the cream, the texture might change a bit over time, so it’s always best enjoyed fresh from the shaker.

Can I freeze Creamy Limoncello Martini?
It’s not recommended to freeze the entire cocktail with cream, as it may separate when thawed. However, you can freeze plain limoncello in an airtight container for up to 6 months. Just pour the limoncello into the container, seal it tightly, and remember to let it thaw in the refrigerator when you’re ready for another round!

What should I do if my cocktail is too sweet or too tart?
Very! If you find your Creamy Limoncello Martini is too sweet, consider reducing the amount of Cool Whip or using less limoncello. On the flip side, if it’s too tart, you can add a splash more of heavy cream or use a touch of simple syrup to sweeten it up. Shake each time after adjusting to mix well!

Are there any dietary concerns for this cocktail, like allergies?
If you’re serving this cocktail to others, be mindful that it contains dairy from the heavy cream and Cool Whip, which can be an issue for those with lactose intolerance or allergies. For a dairy-free alternative, consider using coconut cream or a non-dairy whipped topping. Just make sure to experiment a bit to find that perfect balance of flavor as a substitute!

Creamy Limoncello Martini

Creamy Limoncello Martini

Experience the refreshing yet indulgently creamy Creamy Limoncello Martini, a delightful twist on a classic cocktail.
Print Recipe Pin Recipe
Prep Time 10 minutes mins
Total Time 10 minutes mins
Servings: 1 cocktail
Course: DESSERT RECIPES
Cuisine: Cocktail
Calories: 300
Ingredients Equipment Method Nutrition Notes

Ingredients
  

For the Cocktail
  • 2 ounces Limoncello Zesty lemon liqueur
  • 1 ounce Vodka Smooth base spirit
  • 2 ounces Heavy whipping cream Creates velvety texture
For the Garnish (Optional)
  • 1 tablespoon Cool Whip Dollop on top for creamy finish
  • to taste Graham cracker crumbs For rim garnish
  • 1 slices Lemon slices For garnish

Equipment

  • Cocktail shaker
  • Martini glass

Method
 

How to Make Creamy Limoncello Martini
  1. Prepare the glass by tracing a wedge of lemon around the rim of the martini glass, then dip into granulated sugar or graham cracker crumbs.
  2. Fill the shaker with ice, then add 2 ounces of limoncello, 1 ounce of vodka, and 2 ounces of heavy whipping cream. Add 1 tablespoon of Cool Whip if desired.
  3. Seal the shaker and shake vigorously for 10-15 seconds until cold and frothy.
  4. Strain the mixture into your prepared martini glass.
  5. Garnish with a lemon wedge, lemon twist, or sprinkle fresh graham cracker crumbs on top.

Nutrition

Serving: 1cocktailCalories: 300kcalCarbohydrates: 20gProtein: 2gFat: 20gSaturated Fat: 12gCholesterol: 40mgSodium: 10mgPotassium: 100mgSugar: 15gVitamin A: 100IUVitamin C: 20mgCalcium: 50mg

Notes

To enjoy this cocktail at its best, serve immediately after straining and ensure ingredients are well chilled before mixing.

Tried this recipe?

Let us know how it was!

Filed Under: BREAKFAST & BRUNCH

Gluten-Free Pumpkin Donuts

December 20, 2025 by JudyWhite Leave a Comment

As the leaves turn vibrant shades of orange and gold, there’s nothing quite like the comforting aroma of freshly baked goods wafting through the kitchen. This season calls for a special treat, and that’s where these Gluten-Free Pumpkin Donuts come in. Inspired by the enchanting flavors of fall, these donuts are not just a sweet delight—they’re a warm hug on a chilly day.

I discovered this recipe during a weekend baking spree, determined to create something indulgent yet kind to my gluten-sensitive friends. With their soft, moist texture and a dusting of cinnamon sugar, these donuts are a perfect way to break free from the fast-food rut and embrace homemade goodness. Trust me, even the most ardent donut lover won’t miss the gluten! Join me in whipping up a batch of these delicious donuts that promise to impress and satisfy.

Why You'll Love This Gluten-Free Pumpkin Donuts

  • These Gluten-Free Pumpkin Donuts are incredibly easy to make, requiring just 5 minutes of prep time and 16 minutes of baking.
  • The rich pumpkin flavor combined with warm spices creates a delightful taste that perfectly embodies the essence of fall.
  • They are versatile enough to be enjoyed as a cozy breakfast treat or a sweet afternoon snack, making them perfect for any occasion.
  • Visually appealing with a beautiful dusting of cinnamon sugar, these donuts will impress both family and friends without keeping you in the kitchen for hours.

Gluten-Free Pumpkin Donuts Ingredients

• A delightful collection to create perfect donuts!

For the Batter

  • Coconut oil – adds moisture and a subtle flavor, perfect for gluten-free baking.
  • Large eggs – bind the ingredients together while giving a rich texture.
  • Granulated sugar – sweetens the donuts for a deliciously satisfying treat.
  • Pumpkin purée – provides moisture, flavor, and a lovely autumn hue.
  • Pumpkin pie spice – infuses the donuts with a warm, comforting aroma.
  • Ground cinnamon – enhances the pumpkin flavor and adds warm spice notes.
  • Bob’s Red Mill 1-to-1 baking flour – a great gluten-free substitute that behaves like traditional flour.
  • Salt – balances the sweetness and enhances all flavors.
  • Gluten-free baking powder – ensures the donuts rise and stay fluffy.

For the Glaze

  • Powdered sugar – creates a sweet, smooth glaze that coats the donuts beautifully.
  • Ground cinnamon – sprinkles a final touch of warmth to the glaze, complementing the pumpkin flavor perfectly.

Enjoy crafting these delightful gluten-free pumpkin donuts that promise to bring joy to every bite!

How to Make Gluten-Free Pumpkin Donuts

  1. Preheat your oven to 350°F (175°C) and grease a donut pan thoroughly. This ensures that your delightful donuts will slide out easily once baked, preventing any sticky surprises!

  2. Mix together the melted coconut oil and granulated sugar in a large bowl until well combined. This blend will help create a sweet, moist base for your donuts, setting the stage for deliciousness.

  3. Add the room temperature eggs and pumpkin purée into the mixture, and mix well. The pumpkin purée adds moisture and a lovely autumn flavor that you’ll adore with every bite.

  4. Whisk together the dry ingredients separately: pumpkin pie spice, ground cinnamon, baking flour, salt, and baking powder. It’s essential for a well-balanced flavor and fluffy texture in your donuts.

  5. Combine the dry ingredients with the wet mixture, stirring gently until just combined. Avoid over-mixing to keep your donuts light and airy—this is the secret to their softness!

  6. Fill the donut pan with the batter, ensuring each mold is about ¾ full. This will give your donuts the perfect shape as they rise and expand in the oven.

  7. Bake for about 16 minutes, or until a toothpick inserted into a donut comes out clean. Keep an eye on them for that golden brown color, which signals they’re ready to shine!

  8. Cool the donuts slightly before glazing. Combine powdered sugar and ground cinnamon in a bowl for the glaze, then gently coat the tops of your cooled donuts for that sweet finish.

Optional: Dust with extra cinnamon sugar for a delightful crunch.

Exact quantities are listed in the recipe card below.

Gluten-Free Pumpkin Donuts Variations

Feel free to get creative with these delightful donuts, enhancing your baking experience with a few simple tweaks!

  • Nut-Free: Substitute the coconut oil with applesauce or sunflower oil for a nut-free alternative, maintaining moisture without the flavors of nuts.

  • Spicy Kick: Add a pinch of cayenne pepper or ginger to the dry ingredients. This will elevate the flavor profile and give your donuts a warm, spicy edge.

  • Chocolate Lover’s: Fold in ½ cup of dairy-free chocolate chips into the batter for a rich twist that chocolate aficionados will love.

  • Maple Sweetened: Replace granulated sugar with maple syrup or coconut sugar to give your donuts a unique sweetness, perfect for those who prefer alternative sweeteners.

  • Pumpkin Cream Cheese Filling: Pipe a sweet cream cheese mixture into the center of each donut before baking for a delightful surprise in every bite.

  • Vegan: Substitute eggs with flaxseed meal (1 tablespoon flaxseed meal + 2.5 tablespoons water per egg), and use a plant-based milk to make these donuts vegan-friendly.

  • Gluten-Free Flour Blend: Experiment with a different gluten-free flour mix, like coconut or almond flour, for varying textures and flavors that will surprise your palate!

  • Fruit Zest: Add the zest of an orange or lemon to the mixture for a refreshing citrus note that brightens the overall flavor of your donuts.

Each of these variations promises to give your Gluten-Free Pumpkin Donuts a unique flair while keeping your baking journey fun and delicious!

Make Ahead Options

These Gluten-Free Pumpkin Donuts are perfect for meal prep, saving you time for busy mornings or last-minute gatherings. You can prepare the donut batter up to 24 hours in advance and store it in an airtight container in the refrigerator, which preserves the flavors and keeps everything fresh. When you’re ready to bake, simply fill the greased donut pan and put it in the oven as directed. Additionally, you can mix the glaze ahead of time and refrigerate it as well; just give it a stir before using. This way, you’ll have delicious, homemade Gluten-Free Pumpkin Donuts ready to enjoy with minimal effort, ensuring they taste just as delightful as when freshly made!

What to Serve with Gluten-Free Pumpkin Donuts?

As you savor the delightful essence of these donuts, let’s create a charming meal around them.

  • Coffee or Latte: The warm, robust flavors beautifully complement that sweet pumpkin taste, creating the ultimate cozy experience.

  • Chai Tea: The spiced notes pair wonderfully with the pumpkin, enhancing its flavors while adding a comforting warmth to your morning routine.

  • Fresh Fruit Salad: A bright mix of seasonal fruits balances the richness of the donuts, giving a refreshing, healthy contrast.

  • Maple Syrup Drizzle: A touch of maple syrup adds a sweet, sticky elegance that perfectly enhances the flavors of cinnamon and pumpkin.

  • Whipped Cream Topping: Light and airy, it adds a luscious finish to your donuts, making each bite feel indulgent.

  • Cream Cheese Spread: Soft and tangy, this spread adds a creamy texture that contrasts nicely with the soft donut, elevating the whole experience.

  • Vanilla Ice Cream: For a sweet dessert server, this pairing complements the flavors in a delightful way and adds a cooling effect.

  • Spiced Apple Cider: Warm cider infused with spices mirrors the pumpkin’s flavors, creating a perfectly festive pairing for fall.

How to Store and Freeze Gluten-Free Pumpkin Donuts

Room Temperature: Keep your gluten-free pumpkin donuts in an airtight container for up to 2 days. Enjoy them fresh for the best taste and texture!

Fridge: If you want to extend their shelf life, store the donuts in the fridge for up to 5 days. Make sure they’re well-wrapped to prevent drying out.

Freezer: For longer storage, freeze the glazed donuts in a single layer, then transfer to an airtight container. They can last up to 3 months, ensuring a delightful treat whenever you crave one!

Reheating: To enjoy chilled or frozen donuts, simply reheat them in the microwave for about 10-15 seconds, or pop them in a warm oven for a few minutes, reviving that fresh-baked goodness.

Chef's Helpful Tips

  • To ensure your Gluten-Free Pumpkin Donuts rise properly, make sure your baking powder is fresh as expired leavening agents won’t provide the lift needed.
  • Mixing in your wet and dry ingredients gently until just combined will prevent overworking the batter, leading to light and fluffy donuts.
  • If you find the batter too thick, you can add a splash of almond milk or coconut milk to achieve the desired consistency.
  • Remember to cool the donuts completely before glazing them to prevent the glaze from melting off.

Gluten-Free Pumpkin Donuts Recipe FAQs

What is the best way to select ripe pumpkins for pumpkin purée?
Absolutely! When choosing a pumpkin for purée, look for one that is firm and heavy for its size, with a smooth, blemish-free skin. A good rule of thumb is to select pumpkins that are deep orange in color, as this indicates ripeness and optimal flavor. Small to medium-sized pumpkins, often labeled as ‘sugar pumpkins’, are the best for purée.

How should I store leftover gluten-free pumpkin donuts?
Very! For room temperature storage, place your gluten-free pumpkin donuts in an airtight container lined with parchment paper to absorb moisture. They can stay fresh for up to 2 days. If you’d like to refrigerate them, simply wrap them in plastic wrap or foil and store them in the fridge for up to 5 days. Remember, allow them to come to room temperature before enjoying!

Can these gluten-free pumpkin donuts be frozen?
Absolutely! To freeze your donuts, first allow them to cool completely. Then, place them in a single layer on a baking sheet and freeze until solid—this usually takes about 1-2 hours. Once frozen, transfer them to an airtight freezer bag or container and store for up to 3 months. Remember to label them so you don’t forget when they were made!

What if my donuts come out dense or gummy?
No worries! If your gluten-free pumpkin donuts turn out dense or gummy, it might be due to overmixing the batter. Gluten-free flours require a gentle touch, so mix the wet and dry ingredients until just combined! Also, be sure your baking powder is fresh, as expired leavening agents can affect the texture. If you want to lighten the batter, adding a tablespoon of almond milk can help too.

Are gluten-free pumpkin donuts safe for those with nut allergies?
Definitely! This recipe specifically uses coconut oil and Bob’s Red Mill 1-to-1 baking flour, which are typically safe for those with nut allergies. However, make sure to double-check all ingredient labels, especially the baking flour, to confirm there are no nut-derived products in the mix. As always, if you have severe allergies, consult with a healthcare professional.

How can I make these donuts vegan?
Great question! To adapt this recipe into a vegan version, simply replace the two large eggs with a flaxseed meal or chia seed egg. To do this, mix 2 tablespoons of ground flaxseed or chia seeds with 6 tablespoons of water, allowing it to sit for about 5 minutes until it thickens. This will bind your batter just like eggs, giving you fluffy and delicious gluten-free pumpkin donuts!

Gluten-Free Pumpkin Donuts

Gluten-Free Pumpkin Donuts

Delicious Gluten-Free Pumpkin Donuts perfect for fall, combining rich pumpkin flavor and warm spices.
Print Recipe Pin Recipe
Prep Time 5 minutes mins
Cook Time 16 minutes mins
Cooling Time 10 minutes mins
Total Time 31 minutes mins
Servings: 12 donuts
Course: DESSERT RECIPES
Cuisine: American
Calories: 180
Ingredients Equipment Method Nutrition Notes

Ingredients
  

For the Batter
  • 1/2 cup coconut oil melted
  • 2 large eggs room temperature
  • 1 cup granulated sugar
  • 1 cup pumpkin purée
  • 2 teaspoons pumpkin pie spice
  • 1 teaspoon ground cinnamon
  • 1 cup Bob's Red Mill 1-to-1 baking flour
  • 1/2 teaspoon salt
  • 1 tablespoon gluten-free baking powder
For the Glaze
  • 1 cup powdered sugar
  • 1 teaspoon ground cinnamon

Equipment

  • Donut pan

Method
 

How to Make Gluten-Free Pumpkin Donuts
  1. Preheat your oven to 350°F (175°C) and grease a donut pan thoroughly.
  2. Mix together the melted coconut oil and granulated sugar in a large bowl until well combined.
  3. Add the room temperature eggs and pumpkin purée into the mixture, and mix well.
  4. Whisk together the dry ingredients separately: pumpkin pie spice, ground cinnamon, baking flour, salt, and baking powder.
  5. Combine the dry ingredients with the wet mixture, stirring gently until just combined.
  6. Fill the donut pan with the batter, ensuring each mold is about ¾ full.
  7. Bake for about 16 minutes, or until a toothpick inserted into a donut comes out clean.
  8. Cool the donuts slightly before glazing, then coat the tops with the glaze.

Nutrition

Serving: 1donutCalories: 180kcalCarbohydrates: 25gProtein: 2gFat: 8gSaturated Fat: 6gPolyunsaturated Fat: 1gCholesterol: 40mgSodium: 150mgPotassium: 120mgFiber: 1gSugar: 12gVitamin A: 500IUCalcium: 10mgIron: 1mg

Notes

Optional: Dust with extra cinnamon sugar for a delightful crunch.

Tried this recipe?

Let us know how it was!

Filed Under: BREAKFAST & BRUNCH

Blueberry Lemon Curd Donut Holes

December 20, 2025 by JudyWhite Leave a Comment

There’s a certain joy in creating warm, sweet bites that never fail to bring a smile — and these Blueberry Lemon Curd Donut Holes are the perfect way to elevate your treat game. Picture this: a soft, fluffy interior bursting with juicy blueberries, all enveloped in a sweet, tangy lemon glaze that dances on your taste buds. Just thinking about it makes my mouth water!

On a recent Sunday morning, as the sun streamed through my kitchen window, I decided to forgo the drive-thru and whip up a batch of these delightful donut holes instead. Not only are they simple to prepare, but they also banish any cravings for fast food by adding a homemade touch that feels like a warm hug. Whether you’re impressing guests or indulging in a little self-care, this recipe will quickly become your go-to weekend ritual. Let’s dive into how you can bring these little bites of heaven to your table!

Why You'll Love This Blueberry Lemon Curd Donut Holes

  • These Blueberry Lemon Curd Donut Holes are incredibly easy to make, allowing you to whip up a delicious treat in no time at all.
  • The burst of flavor from the juicy blueberries combined with the tangy lemon glaze creates an irresistible taste sensation that will leave everyone wanting more.
  • They are also wonderfully versatile, making them perfect for breakfast, dessert, or an afternoon snack at any gathering.
  • With their vibrant colors and delightful presentation, these donut holes are sure to impress your guests and brighten up any table.

Blueberry Lemon Curd Donut Holes Ingredients

For the Donut Holes

  • All-purpose flour – provides the perfect base for these fluffy bites.
  • Granulated sugar – balances the tartness of the blueberries and lemon.
  • Baking powder – helps the donut holes rise to that heavenly fluffiness.
  • Baking soda – adds a little extra lift for a light, airy texture.
  • Salt – enhances all the flavors, making each bite even more delicious.
  • Buttermilk – keeps the donut holes moist and tender; you can substitute with milk plus a squeeze of lemon juice!
  • Greek yogurt or sour cream – adds creaminess and tang; feel free to use low-fat versions for a lighter treat.
  • Salted butter (melted) – contributes rich flavor and moisture to the batter.
  • Vanilla extract – infuses a lovely sweetness that pairs beautifully with the blueberries.
  • Fresh or frozen blueberries – the star ingredient that adds juicy bursts of flavor throughout.
  • Avocado oil – perfect for frying, it has a high smoke point and a mild flavor.

For the Glaze

  • Salted butter (melted) – delivers a luscious richness that envelops each donut hole.
  • Fresh lemon juice – brightens the glaze with a tangy kick, complementing the blueberry flavor.
  • Granulated sugar – sweetens the glaze to perfection; adjust to taste!
  • Lemon zest – intensifies the lemon flavor, making the glaze irresistibly aromatic.
  • Powdered sugar – adds the ideal sweetness and a silky texture to the glaze.
  • Cultured buttermilk – adjust for consistency to achieve a drizzle-worthy glaze.
  • Vanilla extract or paste – a final touch that enhances the glaze’s flavor profile.

Now, you’re just a few steps away from enjoying these delightful Blueberry Lemon Curd Donut Holes!

How to Make Blueberry Lemon Curd Donut Holes

  1. Combine Dry Ingredients: In a large mixing bowl, whisk together the flour, granulated sugar, baking powder, baking soda, and salt until well mixed. This creates a solid base for your donut holes.

  2. Mix Wet Ingredients: In a separate bowl, blend the buttermilk, Greek yogurt (or sour cream), melted butter, and vanilla extract. Stir until smooth and creamy to ensure a delightful texture in the batter.

  3. Combine Mixtures: Gently fold the wet ingredients into the dry ones, mixing just until combined. It’s important not to overmix to keep your donut holes light and airy.

  4. Fold in Blueberries: Carefully add the blueberries to the batter, folding them in with a spatula. This ensures that each bite has a burst of juicy fruit flavor.

  5. Heat Oil: In a deep frying pan, heat avocado oil over medium heat until it reaches approximately 350°F. To check if it’s ready, drop a small amount of batter into the oil; it should sizzle immediately.

  6. Fry Donut Holes: Drop spoonfuls of the batter into the hot oil, being careful not to crowd the pan. Fry them until they are golden brown, about 3-4 minutes per side.

  7. Drain Oil: Once golden, remove the donut holes and let them drain on paper towels. This step helps eliminate excess oil for a lighter treat.

  8. Make the Glaze: In a separate bowl, whisk together the melted butter, lemon juice, granulated sugar, lemon zest, powdered sugar, cultured buttermilk, and vanilla extract until smooth. Adjust consistency with more buttermilk if needed.

  9. Glaze Donut Holes: Dip each warm donut hole into the lemon glaze, allowing the excess to drip off. Set them aside on a wire rack to let the glaze set for a few minutes.

Optional: Sprinkle with extra lemon zest for an added flavor boost!

Exact quantities are listed in the recipe card below.

How to Store and Freeze Blueberry Lemon Curd Donut Holes

Room Temperature: Store donut holes in an airtight container for up to 2 days. Keep them cool and away from direct sunlight to maintain freshness.

Fridge: If you want to extend their shelf life, keep the donut holes in the fridge for up to 5 days. Layer with parchment paper to prevent sticking and maintain texture.

Freezer: Freeze donut holes by placing them in a single layer on a baking sheet for 1-2 hours, then transfer to a freezer-safe bag. They’ll keep well for up to 3 months!

Reheating: For the best results, reheat frozen donut holes in a preheated oven at 350°F for about 10-15 minutes until warmed through. Glaze after reheating for that fresh-baked flavor!

Make Ahead Options

These Blueberry Lemon Curd Donut Holes are perfect for busy home cooks looking to save time without sacrificing flavor! You can prepare the batter up to 24 hours in advance; simply mix the dry and wet ingredients separately, then combine them and refrigerate. To keep the blueberries from sinking, fold them in just before frying. Additionally, you can make the lemon glaze ahead of time and store it in the fridge for up to 3 days. When you’re ready to enjoy, simply fry the donut holes as directed and glaze them while warm for irresistible, fresh-from-the-kitchen flavor that’s just as delightful as when made from scratch!

Blueberry Lemon Curd Donut Holes Variations

Feel free to get creative with these simple twists that will take your donut holes to the next level!

  • Gluten-Free: Substitute all-purpose flour with a gluten-free blend to make these donut holes friendly for gluten-sensitive diets. They’ll still turn out tender and delicious!

  • Berry Medley: Swap out blueberries for a mix of fresh raspberries, blackberries, or even chopped strawberries. Each berry adds its unique burst of flavor.

  • Citrus Kick: For a zesty variation, add a teaspoon of orange zest to the batter. The extra citrus will elevate the flavors beautifully!

  • Maple Glaze: Replace the lemon glaze with a maple syrup glaze by mixing powdered sugar with pure maple syrup until smooth. This gives a cozy, autumn twist to the classic.

  • Coconut Bliss: Fold in unsweetened shredded coconut into your batter for a tropical flair. The coconut adds a lovely chewiness that pairs wonderfully with the blueberries.

  • Chili Heat: For an adventurous kick, add a pinch of cayenne pepper to the glaze. The subtle heat complements the sweetness in a surprising way.

  • Nutty Crunch: Sprinkle chopped nuts like pecans or walnuts over the glaze for added texture and a nutty flavor that enhances the overall experience.

  • Mini Doughnut Shape: Use a mini doughnut maker instead of frying for bite-sized versions that are perfect for snacking. You’ll get those delightful donut holes in a unique shape!

Each of these variations brings a delightful twist and can make your Blueberry Lemon Curd Donut Holes even more special and personalized. Enjoy experimenting!

What to Serve with Blueberry Lemon Curd Donut Holes?

Savoring these delightful treats is just the beginning—complement them with simple sides that elevate your experience even further.

  • Fresh Fruit Salad: A refreshing mix of seasonal fruits enhances the sweetness of the donuts, offering a burst of color and flavor.

  • Creamy Greek Yogurt: Silky and tangy, a dollop of Greek yogurt served alongside adds a perfect contrast to the sweet glaze.

  • Coffee or Tea: A warm cup of coffee or herbal tea balances the sweetness, making for a cozy afternoon snack or breakfast.

  • Honey Drizzle: A light drizzle of honey on top adds an extra layer of sweetness that pairs beautifully with the tartness of the lemon.

  • Crispy Bacon: The salty, smoky flavor of crispy bacon creates a delightful savory contrast to the sweet donut holes.

Indulging in these pairings not only amplifies the flavors of the Blueberry Lemon Curd Donut Holes but also transforms them into a complete meal experience, perfect for any occasion!

Chef's Helpful Tips

  • To achieve the perfect texture in your Blueberry Lemon Curd Donut Holes, make sure to mix the wet and dry ingredients just until combined to avoid overmixing which can lead to dense donut holes.
  • When folding in the blueberries, do so gently to prevent them from breaking and releasing too much juice into the batter.
  • It’s important to monitor the oil temperature and keep it consistent around 350°F to ensure even cooking and a golden-brown exterior.
  • Lastly, after frying, allow the donut holes to cool slightly on paper towels before glazing to ensure the glaze adheres properly and adds a delightful finish.

Blueberry Lemon Curd Donut Holes Recipe FAQs

What type of blueberries should I use?
Absolutely! Fresh blueberries are ideal for these Blueberry Lemon Curd Donut Holes, as they offer the best flavor and juiciness. If fresh berries aren’t available, feel free to substitute with frozen blueberries. Just make sure to thaw and drain them to avoid excess moisture in the batter.

How should I store leftover donut holes?
To keep your delicious donut holes fresh, store them in an airtight container at room temperature for up to 2 days. If you want to extend their shelf life, refrigerate them for about 5 days. Layer them with parchment paper to help them maintain their delightful texture!

Can I freeze Blueberry Lemon Curd Donut Holes?
Yes, you can! To freeze, first place the donut holes in a single layer on a baking sheet and freeze for 1-2 hours until solid. Then, transfer them to a freezer-safe bag, removing as much air as possible. They will stay fresh in the freezer for up to 3 months.

How can I reheat frozen donut holes?
To enjoy your frozen donut holes, preheat your oven to 350°F. Arrange the donut holes on a baking sheet and reheat for about 10-15 minutes. This method ensures they warm through while retaining their soft and fluffy texture. Remember to glaze them after reheating for the perfect finish!

Are these donut holes safe for pets or people with allergies?
While Blueberry Lemon Curd Donut Holes are safe for human consumption, they may not be suitable for pets, particularly due to ingredients like sugar and butter. For those with allergies, always check the labels of your ingredients—substituting almond milk for buttermilk or using egg replacements can help accommodate various dietary needs.

What if my batter is too thick or too runny?
Very good question! If your batter is too thick, you can gently stir in a little more buttermilk—add a tablespoon at a time until the desired consistency is reached. Conversely, if it’s too runny, consider adding a touch more flour, about 1 tablespoon at a time, until it thickens enough to hold its shape when dropped into the oil. Remember, the goal is to achieve a dough that’s thick enough to hold its form while still being able to easily drop spoonfuls into the frying oil!

Blueberry Lemon Curd Donut Holes

Blueberry Lemon Curd Donut Holes

Delight in these Blueberry Lemon Curd Donut Holes, featuring soft, fluffy bites filled with juicy blueberries and a tangy lemon glaze.
Print Recipe Pin Recipe
Prep Time 20 minutes mins
Cook Time 20 minutes mins
Cooling Time 10 minutes mins
Total Time 50 minutes mins
Servings: 12 donut holes
Course: DESSERT RECIPES
Cuisine: American
Calories: 120
Ingredients Equipment Method Nutrition Notes

Ingredients
  

For the Donut Holes
  • 2 cups all-purpose flour
  • 3/4 cup granulated sugar
  • 2 teaspoons baking powder
  • 1 teaspoon baking soda
  • 1/2 teaspoon salt
  • 1 cup buttermilk can substitute with milk plus a squeeze of lemon juice
  • 1/2 cup Greek yogurt or sour cream low-fat versions work
  • 1/4 cup salted butter (melted)
  • 1 teaspoon vanilla extract
  • 1 cup fresh or frozen blueberries
  • 2 cups avocado oil for frying
For the Glaze
  • 1/4 cup salted butter (melted)
  • 1/4 cup fresh lemon juice
  • 1/2 cup granulated sugar adjust to taste
  • 1 tablespoon lemon zest
  • 1 cup powdered sugar
  • 2 tablespoons cultured buttermilk adjust for consistency
  • 1 teaspoon vanilla extract or paste

Equipment

  • large mixing bowl
  • separate mixing bowl
  • deep frying pan
  • Spatula
  • Whisk
  • Wire Rack

Method
 

How to Make Blueberry Lemon Curd Donut Holes
  1. In a large mixing bowl, whisk together the flour, granulated sugar, baking powder, baking soda, and salt until well mixed.
  2. In a separate bowl, blend the buttermilk, Greek yogurt (or sour cream), melted butter, and vanilla extract. Stir until smooth and creamy.
  3. Gently fold the wet ingredients into the dry ones, mixing just until combined.
  4. Carefully add the blueberries to the batter, folding them in with a spatula.
  5. In a deep frying pan, heat avocado oil over medium heat until it reaches approximately 350°F.
  6. Drop spoonfuls of the batter into the hot oil, frying them until golden brown for about 3-4 minutes per side.
  7. Once golden, remove the donut holes and let them drain on paper towels.
  8. In a separate bowl, whisk together the melted butter, lemon juice, granulated sugar, lemon zest, powdered sugar, cultured buttermilk, and vanilla extract until smooth.
  9. Dip each warm donut hole into the lemon glaze, allowing the excess to drip off. Set aside on a wire rack to let the glaze set for a few minutes.

Nutrition

Serving: 1donut holeCalories: 120kcalCarbohydrates: 16gProtein: 2gFat: 6gSaturated Fat: 3gPolyunsaturated Fat: 0.5gMonounsaturated Fat: 2gCholesterol: 20mgSodium: 150mgPotassium: 75mgFiber: 0.5gSugar: 6gVitamin A: 200IUVitamin C: 2mgCalcium: 50mgIron: 0.5mg

Notes

Optional: Sprinkle with extra lemon zest for added flavor.

Tried this recipe?

Let us know how it was!

Filed Under: BREAKFAST & BRUNCH

Gingerbread Espresso Martini Recipe

December 20, 2025 by JudyWhite Leave a Comment

As the chilly air settles in and the joyous spirit of the season begins to emerge, there’s a cocktail that perfectly captures those cozy vibes: the Gingerbread Espresso Martini. I was inspired to whip this up after discovering a blend of festive spices lurking in my pantry, just waiting to add warmth to my evenings. This delightful drink combines the robust flavor of freshly brewed espresso with the sweetness of gingerbread, transforming your usual martini into a festive delight that’s sure to impress.

Picture this: sipping on a creamy, spiced concoction crowned with a perfectly baked gingerbread cookie while cozying up with loved ones. This easy-to-make Gingerbread Espresso Martini Recipe is not only a treat for your taste buds but a delightful centerpiece for your holiday gatherings. Forget the mundane fast-food runs; this is the ideal antidote to hustle and bustle, offering a comforting sip of cheer. Let’s dive into this simple yet sensational recipe, perfect for both seasoned cooks and novices alike!

Why You'll Love This Gingerbread Espresso Martini

  • This Gingerbread Espresso Martini is incredibly easy to prepare, making it a fantastic choice for both novice and experienced mixologists.
  • The flavors are a delightful blend of rich espresso and festive gingerbread, creating a tasty experience that will surely impress your guests.
  • Its versatility allows you to enjoy this cocktail during holiday gatherings or even cozy evenings at home.
  • Plus, garnishing with a gingerbread cookie adds a charming visual appeal that makes every sip feel like a special occasion.

Gingerbread Espresso Martini Ingredients

• Dive into the festive flavors with this delightful Gingerbread Espresso Martini recipe!

For the Syrup

  • Dark brown sugar – a rich sweetness that enhances the overall depth of flavor.
  • Molasses – brings a warm, earthy taste that complements holiday spices.
  • Water – needed to dissolve the sugars and create a syrupy base.
  • Cinnamon sticks – infuse the syrup with a cozy aroma and warm spice notes.
  • Allspice berries – add a unique blend of flavors reminiscent of gingerbread.
  • Whole cloves – their strong, aromatic flavor elevates the festive profile.
  • Fresh grated ginger – introduces a zesty kick that brightens the drink.

For the Cocktail

  • Vodka – serves as the neutral base spirit, allowing other flavors to shine.
  • Irish cream liqueur – adds creaminess and a touch of sweetness for a decadent mouthfeel.
  • Coffee liqueur – enhances the espresso with a sweet, coffee flavor that’s impossible to resist.
  • Gingerbread syrup – the star ingredient that ties all the festive flavors together.
  • Espresso coffee – fresh brews bring a rich, bold coffee flavor that’s essential for this martini.

For Garnish

  • Gingerbread cookie – adds a delightful touch of festivity and a touch of nostalgia.

How to Make Gingerbread Espresso Martini

  1. Combine ingredients: In a saucepan, mix dark brown sugar, molasses, water, cinnamon sticks, allspice berries, cloves, and fresh grated ginger. Stir together to combine all the warm spices.

  2. Simmer: Bring the mixture to a boil, then reduce the heat and let it simmer for 20 minutes. Stir occasionally until it thickens slightly and becomes aromatic.

  3. Cool: Remove the saucepan from heat and allow the syrup to cool completely. This step is essential for blending the flavors beautifully.

  4. Mix: In a cocktail shaker, combine cooled syrup, vodka, Irish cream liqueur, coffee liqueur, gingerbread syrup, and fresh espresso coffee. This flavorful mix is what will truly elevate your martini!

  5. Shake: Secure the lid on the shaker and shake it well. Aim for a nice frothy texture, which usually takes about 15-20 seconds.

  6. Strain: Strain the mixture into a chilled martini glass, ensuring a smooth consistency without any solids.

  7. Garnish: Finally, add a gingerbread cookie on the rim of the glass. This not only looks adorable but offers a delightful bite alongside your drink.

Optional: Add a sprinkle of cinnamon on top for an extra festive touch.

Exact quantities are listed in the recipe card below.

Make Ahead Options

These Gingerbread Espresso Martinis are perfect for busy home cooks looking to streamline their holiday gatherings! You can prepare the gingerbread syrup up to 3 days in advance by following the syrup-making steps (just refrigerate it in an airtight container). This allows the flavors to deepen and truly shine. When you’re ready to serve, simply combine the refrigerated syrup with vodka, Irish cream liqueur, coffee liqueur, gingerbread syrup, and freshly brewed espresso in a cocktail shaker. Shake well, strain into a martini glass, and garnish with a gingerbread cookie! Your guests will be impressed with this festive cocktail that’s just as delicious and refreshing, making your hosting duties a breeze.

How to Store and Freeze Gingerbread Espresso Martini

Fridge: Store any leftover Gingerbread Espresso Martini in an airtight container for up to 3 days. Keep it chilled for quick access during holiday celebrations!

Freezer: If you want to momentarily stop the clock, you can freeze the syrup base separately in ice cube trays for up to 3 months. Just thaw and mix with fresh espresso when you’re ready to enjoy!

Reheating: While it’s best enjoyed fresh, if you’ve got extra syrup, gently reheat it on low heat before mixing into your martini for optimal flavor.

Gingerbread Espresso Martini Variations

There’s plenty of room to get creative with this festive cocktail, making it truly your own!

  • Spice It Up: Add a pinch of nutmeg or cardamom for a warm twist that intensifies the holiday flavors. These spices breathe new life into the drink while still keeping its cozy essence.

  • Make It Vegan: Swap the Irish cream liqueur for a coconut cream alternative to craft a delicious vegan version without losing creaminess. This option keeps the indulgence intact while catering to plant-based diets.

  • Chocolate Lovers Delight: Drizzle some chocolate syrup into the mix or rim the glass with cocoa powder for an irresistible chocolate-gingerbread fusion. This little touch brings a delightful decadence that’s hard to resist!

  • Nutty Flavor: For an extra layer of richness, consider adding a splash of hazelnut liqueur. This nutty twist will add depth and complexity, making every sip a new experience filled with nostalgia.

  • Mocha Magic: Incorporate a tablespoon of chocolate coffee syrup for an exciting mocha flavor that marries beautifully with the spices. This variation adds delightful sweetness and coffee richness, perfect for the chocoholics among us!

  • Lower Sugar: Substitute the brown sugar with a sugar alternative like stevia or monk fruit for a lighter version that doesn’t skimp on flavor. You can enjoy the holiday spirit while being mindful of sugar intake.

  • Extra Creamy: Switch out regular vodka for whipped cream vodka, enhancing the smooth texture and making it a true dessert-style martini that’s especially comforting on a cozy evening.

  • Chili Kick: For those who like a little heat, a dash of chili powder can be added to the mix. This unexpected twist surprises your palate and adds an intriguing layer of flavor!

Explore these variations, and make this Gingerbread Espresso Martini uniquely yours, sharing every delicious twist with family and friends!

What to Serve with Gingerbread Espresso Martini?

Picture a cozy gathering filled with laughter and the aroma of spices in the air, creating a perfect setting for delightful pairings.

  • Spiced Nuts: Ideal for snacking, these crunchy bites complement the cocktail’s warmth with spices that echo the festive flavors.
  • Chocolate-Covered Pretzels: The sweet and salty contrast enhances the rich sweetness of your martini, making each bite a blissful treat.
  • Cheesecake Bites: The creamy texture and slight tang of cheesecake pair beautifully with the boldness of espresso, creating a delightful harmony.
  • Pumpkin Spice Cupcakes: These fall-inspired treats bring warmth and sweetness, perfectly matching the cozy essence of your cocktail.
  • Cinnamon Rolls: Soft, gooey, and richly spiced, their warmth enhances the heartiness of the Gingerbread Espresso Martini experience, perfect for sharing.
  • Apple Cider: Spice-infused, this warm drink feels like a hug in a mug, echoing the gingerbread flavors for a perfectly festive balance.
  • Vanilla Ice Cream with Caramel Sauce: The smooth, creamy scoop is a classic match that will cool your palate while echoing the gingerbread notes with a decadent touch.
  • Mulled Wine: With its aromatic spices and rich flavors, this warm beverage is the ultimate companion, setting a festive tone for your evening.

Chef's Helpful Tips

  • When making the Gingerbread Espresso Martini, ensure that your syrup mixture simmers long enough to fully develop the flavors from the spices.
  • It’s important to cool the syrup completely before mixing, as this prevents the ice in your shaker from melting too quickly and diluting the drink.
  • Shake the cocktail vigorously for at least 15-20 seconds to achieve that desirable frothy texture, which makes the martini visually appealing.
  • Finally, use a chilled martini glass to serve, which enhances the drinking experience by keeping your cocktail cool longer.

Gingerbread Espresso Martini Recipe FAQs

How do I select the best ingredients for my Gingerbread Espresso Martini?
Absolutely! When choosing your ingredients, look for dark brown sugar that feels moist and has a rich aroma, as this enhances the drink’s sweetness. For spices, whole cloves and allspice should be aromatic and fresh. When selecting ginger, fresh roots without dark spots are ideal for that zesty kick.

How should I store my leftover Gingerbread Espresso Martini?
Very good question! Store any leftover Gingerbread Espresso Martini in an airtight container in the refrigerator for up to 3 days. This way, you can enjoy a quick festive sip whenever the mood strikes! Just give it a good shake before serving.

Can I freeze the Gingerbread Espresso Martini?
Absolutely! If you have leftover syrup, pour it into ice cube trays and freeze for up to 3 months. When you’re ready to indulge, simply pop out a cube and thaw it at room temperature or in a microwave. Combine it with fresh espresso and shake for a quick martini fix!

What if my Gingerbread Espresso Martini turns out too sweet?
If your cocktail is a bit too sweet for your palate, consider adding a little more espresso or a splash of club soda. This can help to balance out the sweetness and provide a refreshing twist. Remember, adjusting flavors to your taste makes the experience all the more enjoyable!

Are there any dietary considerations for this recipe?
Great question! The Gingerbread Espresso Martini contains alcohol, so it’s not suitable for those avoiding alcohol for health, religious, or personal reasons. If you have allergies, pay attention to the ingredients in the liqueurs, as some brands may contain dairy, nuts, or gluten. You can substitute the Irish cream liqueur with a dairy-free alternative for a more inclusive option.

Gingerbread Espresso Martini Recipe

Gingerbread Espresso Martini Recipe

This Gingerbread Espresso Martini combines festive gingerbread flavors and rich espresso for a perfect holiday cocktail.
Print Recipe Pin Recipe
Prep Time 10 minutes mins
Cook Time 20 minutes mins
Cooling Time 30 minutes mins
Total Time 1 hour hr
Servings: 1 cocktail
Course: DESSERT RECIPES
Cuisine: American
Calories: 350
Ingredients Equipment Method Nutrition Notes

Ingredients
  

Gingerbread Syrup
  • 1 cup dark brown sugar
  • 1/2 cup molasses
  • 1/2 cup water
  • 2 sticks cinnamon for infusion
  • 1 tablespoon allspice berries
  • 5 pieces whole cloves
  • 1 tablespoon fresh grated ginger adds zesty kick
Cocktail Ingredients
  • 2 ounces vodka neutral base spirit
  • 1 ounce Irish cream liqueur adds creaminess
  • 1 ounce coffee liqueur enhances espresso flavor
  • 1 ounce gingerbread syrup homemade syrup
  • 1 ounce espresso coffee freshly brewed
Garnish
  • 1 cookie gingerbread cookie for garnish

Equipment

  • Saucepan
  • Cocktail shaker
  • Martini glass

Method
 

Syrup Preparation
  1. In a saucepan, mix dark brown sugar, molasses, water, cinnamon sticks, allspice berries, cloves, and fresh grated ginger. Stir together to combine.
  2. Bring the mixture to a boil, then reduce heat and let it simmer for 20 minutes. Stir occasionally until it thickens slightly.
  3. Remove the saucepan from heat and allow the syrup to cool completely.
Cocktail Mixing
  1. In a cocktail shaker, combine cooled syrup, vodka, Irish cream liqueur, coffee liqueur, gingerbread syrup, and fresh espresso coffee.
  2. Secure the lid on the shaker and shake well for 15-20 seconds until frothy.
  3. Strain the mixture into a chilled martini glass.
  4. Add a gingerbread cookie on the rim of the glass to serve.

Nutrition

Serving: 1cocktailCalories: 350kcalCarbohydrates: 45gProtein: 2gFat: 7gSaturated Fat: 4gPolyunsaturated Fat: 0.5gMonounsaturated Fat: 2.5gCholesterol: 5mgSodium: 25mgPotassium: 150mgSugar: 30gVitamin A: 100IUCalcium: 50mgIron: 1mg

Notes

For an extra festive touch, sprinkle cinnamon on top before serving.

Tried this recipe?

Let us know how it was!

Filed Under: BREAKFAST & BRUNCH

Homemade Brownies Recipe

December 19, 2025 by JudyWhite Leave a Comment

There’s nothing quite like the sheer joy of pulling a pan of freshly baked brownies out of the oven. The moment that warm, fudgy aroma drifts through your kitchen, it transforms the atmosphere into something magical. The rich scent of cocoa and the hint of vanilla beckon you, promising a deliciously indulgent treat that’s perfect for cozy nights in or sharing with friends.

I stumbled upon this homemade brownies recipe during one of my weekend adventures in the kitchen, searching for a dessert that would elevate my usual routine. I wanted something that felt a bit fancy yet was still easy to whip up—even on a busy evening. These brownies hit all the right notes: they’re incredibly rich and chocolaty, with a delightful crust on top that gives way to a gooey interior. Plus, there’s a secret touch of espresso powder that enhances the chocolate flavor without overpowering it.

With just a few simple ingredients—most of which you probably have on hand—you’ll create a treat that delights the senses and satisfies that sweet craving. So, let’s dive into this homemade brownies recipe and bring some warmth and happiness to your kitchen!

Why You'll Love This Homemade Brownies Recipe

  • This homemade brownies recipe is incredibly easy to make, perfect for anyone looking to bake a delicious dessert without spending hours in the kitchen.
  • The rich chocolate flavor will have you craving more, while the addition of espresso powder takes it to a whole new level of indulgence.
  • These brownies are versatile enough to serve at a gathering or enjoy as a cozy treat at home, making them a great choice for any occasion.
  • Not only will you impress your friends and family with their fudgy texture and delightful crust, but the enticing aroma will fill your home with warmth and joy while they bake.

Homemade Brownies Recipe Ingredients

Discover the magic behind the perfect brownie!

For the Brownie Batter
• All-purpose flour – gives structure for your fudgy brownies.
• Baking powder – adds a slight lift for a lighter texture.
• Salt – enhances the chocolate flavor for a richer taste.
• Unsweetened cocoa powder – provides the deep chocolate richness you crave.
• Espresso powder – intensifies the chocolate flavor in your homemade brownies recipe.
• Unsalted butter – adds a creamy richness and moisture.
• Oil – helps achieve an extra fudgy texture.
• Granulated sugar – sweetens and creates that delightful crust.
• Large eggs – bind the ingredients and add moisture.
• Large egg yolk – enriches the batter for an even fudgier result.
• Vanilla extract – contributes warmth and depth of flavor.
• Chocolate chips – offer bursts of melty chocolate in every bite.

Enjoy this comforting treat with loved ones or savor it all to yourself!

How to Make Homemade Brownies

  1. Preheat the oven: Set your oven to 350°F (175°C). Prepare a 9×9-inch baking pan by lining it with parchment paper and giving it a light spray of non-stick baking spray.

  2. Sift the dry ingredients: In a large bowl, sift together the all-purpose flour, baking powder, salt, cocoa powder, and espresso powder. This ensures your brownies will be light and free of lumps—set this bowl aside.

  3. Melt the butter: In a medium saucepan, combine the unsalted butter, oil, and 1/3 cup of the granulated sugar. Heat over medium heat, stirring frequently until the butter melts completely. Remove from heat once smooth and glossy.

  4. Mix the wet ingredients: In a separate large mixing bowl, whisk together the eggs, egg yolk, vanilla extract, and the remaining sugar until well combined—about 30 seconds should do the trick.

  5. Combine the mixtures: Slowly pour the warm butter mixture into the egg mixture. Add it gradually while whisking constantly to ensure everything is fully incorporated.

  6. Fold in the dry ingredients: Gently add the sifted dry ingredients and the chocolate chips to the wet mixture. Using a rubber spatula, stir until just combined—be careful not to overmix for that perfect fudgy texture!

  7. Prepare for baking: Scrape the brownie batter into the prepared pan. Use the spatula to smooth the top, making sure it’s even and ready to go.

  8. Bake: Place your pan in the oven and bake for 28 to 30 minutes. Keep an eye on them until the edges feel firm and the top has that shiny, slightly cracked look.

  9. Cool and slice: Once baked, transfer the pan to a cooling rack. Allow the brownies to cool completely before slicing them into squares—this’ll help achieve those clean edges!

Optional: Dust with powdered sugar for an elegant touch before serving.
Exact quantities are listed in the recipe card below.

Make Ahead Options

These Homemade Brownies Recipe are perfect for meal prep enthusiasts! You can prepare the brownie batter up to 24 hours in advance. Simply follow the recipe instructions up until step 6, then cover the bowl with plastic wrap and refrigerate it. This helps the flavors meld together while keeping the batter fresh. When you’re ready to bake, just take the batter out, give it a gentle stir to incorporate, and spread it into the prepared pan. Bake as directed in step 8, and you’ll have delicious, fudgy brownies that taste just as good as if you’d made them fresh! Perfect for busy weeknights or unexpected guests!

What to Serve with Homemade Brownies Recipe?

There’s nothing quite like indulging in rich, chocolatey brownies as the centerpiece of a delightful dessert experience.

  • Vanilla Ice Cream: The creamy, cool ice cream pairs perfectly with warm brownies, creating a luxurious contrast that’s hard to resist.
  • Fresh Berries: Juicy strawberries or raspberries add a refreshing tartness that balances the sweetness of the brownies beautifully.
  • Chocolate Sauce: Drizzling warm chocolate sauce enhances the chocolate flavor, making each bite even more decadent and delightful.
  • Whipped Cream: A dollop of freshly whipped cream brings a light, airy texture to the dish, inviting you to take another bite.
  • Coffee: Enjoy a rich cup of coffee alongside your brownies; the warm, bold flavors enhance the chocolate and keep the experience cozy.
  • Nutty Caramel Sauce: A drizzle of nutty caramel adds a sweet, crunchy texture that complements the fudgy interior of the brownies.
  • Peanut Butter Swirl: Adding a peanut butter swirl to your brownies brings an irresistible salty-sweet flavor that chocolate lovers will adore.
  • Chocolate Mint Smoothie: A cool, minty smoothie grounds the indulgence of the brownies in refreshing freshness, creating a well-rounded dessert experience.

Homemade Brownies Recipe Variations

Feel free to get creative and customize these brownies to suit your taste buds!

  • Nutty Delight: Add 1/2 cup of chopped walnuts or pecans for a delightful crunch. The rich flavors of the nuts beautifully complement the chocolate.

  • Mint Chocolate: Stir in 1/2 teaspoon of peppermint extract into the batter for a refreshing twist. It brings a cool, invigorating flavor that transforms every bite.

  • Spicy Kick: Add a pinch of cayenne pepper or chili powder for a surprising heat that balances the sweetness perfectly. This spicy twist is sure to excite your palate!

  • Gluten-Free: Substitute the all-purpose flour with a 1-to-1 gluten-free baking blend. It’s a delicious way to cater to your gluten-sensitive friends.

  • Vegan-Friendly: Replace the eggs with 1/4 cup of unsweetened applesauce and use a plant-based butter alternative. You won’t miss a thing with this velvety vegan version.

  • Fruit Infusion: Fold in 1/2 cup of fresh raspberries or blueberries into the batter for a fruity burst. The combination of chocolate and berries is simply divine!

  • Caramel Swirl: Drizzle caramel sauce into the brownie batter just before baking for a sweet surprise. Swirling caramel gives an extra gooey texture and irresistible flavor.

  • Chocolate Overload: Mix in an additional 1/2 cup of chocolate chips or chunks for an extra chocolatey experience. It’s a chocoholic’s dream come true!

How to Store and Freeze Homemade Brownies

Room Temperature: Keep your brownies in an airtight container at room temperature for up to 3 days to maintain their fudgy texture and delicious flavor.

Fridge: If you want to extend freshness, store brownies in the fridge for up to a week in an airtight container. Let them come to room temperature before serving for the best taste.

Freezer: Freeze brownies by wrapping them tightly in plastic wrap, then aluminum foil, storing them for up to 3 months. Thaw in the fridge or at room temperature before enjoying.

Reheating: For a warm treat, reheat individual brownies in the microwave for about 10-15 seconds. This enhances the gooeyness and brings back that fresh-baked taste.

Chef's Helpful Tips

  • For the Homemade Brownies Recipe, be sure to sift your dry ingredients together to eliminate lumps and ensure a smoother batter.
  • A common mistake is overmixing the batter; instead, stir until just combined for that ideal fudgy texture.
  • Use a rubber spatula to gently incorporate the chocolate chips, as this helps maintain the integrity of your mixture.
  • When baking, check for doneness around 28 minutes, and remember that the brownies will continue to cook slightly as they cool in the pan.

Homemade Brownies Recipe FAQs

What kind of cocoa powder should I use for this brownies recipe?
Absolutely! Unsweetened cocoa powder is crucial for achieving that deep chocolate flavor in your homemade brownies recipe. I recommend using the highest quality cocoa powder for the best taste, as it significantly affects the overall richness. Brands like Valrhona or Ghirardelli work wonders!

How should I store leftover brownies?
To keep your brownies fresh longer, store them in an airtight container at room temperature for up to 3 days. If you want to extend their life, pop them in the fridge; they can last up to a week that way! Just be sure to let them return to room temperature before enjoying for optimal flavor and texture.

Can I freeze homemade brownies? If so, how?
Very! Freezing brownies is an excellent way to preserve your tasty treats. First, let the brownies cool completely. Once cooled, wrap them tightly in plastic wrap and then in aluminum foil. This double-wrapping method helps prevent freezer burn. They can last for up to 3 months in the freezer! When you’re ready to indulge, simply thaw them in the refrigerator overnight or at room temperature for a few hours.

What if my brownies turn out too cakey?
Ah, a common concern for brownie lovers! If your brownies feel cakey rather than fudgy, it’s typically due to overmixing or adding too much flour. To prevent this, mix your batter just until combined—no more! It’s also important to check your oven temperature, as baking too long can dry them out. Remember, the edges should be firm, but the center should still feel a bit soft when you take them out!

Are these brownies safe for my pet?
Unfortunately, no! Chocolate can be toxic to pets, especially dogs and cats. It’s best to keep your homemade brownies completely out of their reach. If you ever want to treat your furry friends, consider making a special pet-friendly treat using oats, peanut butter, and pumpkin instead!

Can I customize the recipe for dietary restrictions?
Absolutely! If you’re looking for gluten-free brownies, you can substitute the all-purpose flour with a 1-to-1 gluten-free flour blend. For a dairy-free option, replace the butter with coconut oil or a dairy-free butter substitute. You could also use flax eggs (1 tablespoon ground flaxseed mixed with 2.5 tablespoons of water) as an egg substitute for a vegan option. Just keep in mind that results will vary slightly with these swaps, but it’s a lovely way to tailor the recipe to your needs!

Homemade Brownies Recipe

Homemade Brownies Recipe

Experience the joy of making homemade brownies with this easy recipe that combines fudgy texture with rich chocolate flavor.
Print Recipe Pin Recipe
Prep Time 15 minutes mins
Cook Time 30 minutes mins
Cooling Time 15 minutes mins
Total Time 1 hour hr
Servings: 16 squares
Course: DESSERT RECIPES
Cuisine: American
Calories: 200
Ingredients Equipment Method Nutrition Notes

Ingredients
  

For the Brownie Batter
  • 1 cup All-purpose flour
  • 1 tsp Baking powder
  • 1/2 tsp Salt
  • 3/4 cup Unsweetened cocoa powder
  • 1 tsp Espresso powder
  • 1/2 cup Unsalted butter melted
  • 1/4 cup Oil
  • 1 1/4 cup Granulated sugar
  • 2 large Large eggs
  • 1 large Large egg yolk
  • 1 tsp Vanilla extract
  • 1 cup Chocolate chips optional

Equipment

  • 9×9-inch baking pan
  • medium saucepan
  • large mixing bowl
  • rubber spatula
  • sifter

Method
 

How to Make Homemade Brownies
  1. Preheat the oven to 350°F (175°C) and prepare a 9×9-inch baking pan by lining it with parchment paper and spraying it lightly with non-stick baking spray.
  2. In a large bowl, sift together the all-purpose flour, baking powder, salt, cocoa powder, and espresso powder.
  3. In a medium saucepan, combine the melted butter, oil, and 1/3 cup of the granulated sugar, and heat over medium until melted and smooth.
  4. In a separate mixing bowl, whisk together the eggs, egg yolk, vanilla extract, and remaining sugar until well combined.
  5. Gradually pour the warm butter mixture into the egg mixture while whisking constantly.
  6. Fold in the sifted dry ingredients and chocolate chips using a rubber spatula until just combined.
  7. Scrape the batter into the prepared pan and smooth the top evenly.
  8. Bake for 28 to 30 minutes, until the edges are firm and the top is shiny and slightly cracked.
  9. Allow to cool completely on a cooling rack before slicing into squares.

Nutrition

Serving: 1squareCalories: 200kcalCarbohydrates: 28gProtein: 2gFat: 10gSaturated Fat: 6gPolyunsaturated Fat: 1gMonounsaturated Fat: 1gCholesterol: 30mgSodium: 150mgPotassium: 120mgFiber: 1gSugar: 15gVitamin A: 200IUCalcium: 10mgIron: 1mg

Notes

Optional: Dust with powdered sugar before serving.

Tried this recipe?

Let us know how it was!

Filed Under: BREAKFAST & BRUNCH

Frosted Coffee Brownies

December 19, 2025 by JudyWhite Leave a Comment

There’s nothing quite like the rich aroma of fresh coffee wafting through the kitchen, especially when it transforms into a decadent treat. Enter frosted coffee brownies—a delightful fusion of bold flavors and soft, chewy texture that has saved me more than once from dessert indecision! These brownies are ideal for those cozy evenings when I crave something sweet but want to stay clear of the usual sugary fare.

Just picture yourself pulling a warm batch from the oven, the glossy frosting melting effortlessly in the nooks and crannies of each brownie square. With minimal prep time and simple ingredients, you’ll impress family and friends while keeping your worry-free style intact. Whether you need a quick pick-me-up or want to wow your loved ones at the next gathering, these frosted coffee brownies are nothing short of a kitchen hero. Let’s dive into this recipe that combines comforting chocolate with the boldness of coffee for an irresistible homemade snack!

Why You'll Love This Frosted Coffee Brownies

  • These frosted coffee brownies are incredibly easy to make, allowing even novice bakers to whip up a delicious treat without fuss.
  • The rich combination of chocolate and coffee creates an unforgettable flavor that will have everyone begging for more.
  • They are versatile enough to serve as a stunning dessert at gatherings or simply enjoy as an afternoon pick-me-up with your favorite beverage.
  • Lastly, their delectable visual appeal, complete with glossy frosting, makes them an eye-catching highlight on any dessert table.

Frosted Coffee Brownies Ingredients

• Here’s everything you need to create these delicious frosted coffee brownies!

For the Brownie Batter

  • Unsalted butter (melted) – gives the brownies a rich, buttery flavor and helps achieve a soft texture.
  • Granulated sugar – sweetens the brownies perfectly, ensuring they have that delightful sweetness.
  • Large eggs – bind the ingredients together and add moisture for a fudgy consistency.
  • Vanilla extract – enhances the overall flavor and adds a fragrant touch to the brownies.
  • Unsweetened cocoa powder – provides the deep chocolate flavor that pairs beautifully with coffee.
  • All-purpose flour – gives structure to the brownies; don’t overmix to keep them chewy!
  • Salt – a pinch amplifies the flavors and balances the sweetness.
  • Baking powder – helps the brownies rise slightly and achieve a better texture.
  • Instant coffee granules – infuses each bite with rich coffee flavor, elevating the chocolate experience!

For the Frosting

  • Unsalted butter (softened) – creates a creamy base for the frosting and balances sweetness.
  • Powdered sugar – sweetens the frosting and gives it that smooth, spreadable texture.
  • Heavy whipping cream – add in small amounts to achieve your desired consistency for the frosting.

How to Make Frosted Coffee Brownies

  1. Preheat the oven to 350°F (175°C) and grease a baking pan with a little butter or non-stick spray to ensure your brownies come out easily after baking.

  2. Mix melted unsalted butter and granulated sugar in a bowl until smooth and well combined, creating a delightful base for your brownie batter.

  3. Add eggs and vanilla extract to the mixture, then beat well until the mixture is creamy and fully incorporated. You want it to have a light, fluffy texture!

  4. Combine cocoa powder, flour, salt, and baking powder in another bowl. Whisk these dry ingredients together thoroughly, ensuring everything is evenly mixed for perfect brownies.

  5. Gradually incorporate the dry ingredients into the wet mixture, stirring gently until just combined. Avoid overmixing to keep those brownies chewy and fudgy.

  6. Stir in instant coffee granules to the batter, allowing their deep flavor to meld beautifully with chocolate, giving a rich, coffee undertone to your brownies.

  7. Pour the batter into the prepared baking pan and smooth the top. Bake in the preheated oven for about 35 minutes until a toothpick inserted comes out clean or with a few moist crumbs.

  8. Cool the brownies in the pan for a while, then transfer them to a wire rack to cool completely. Patience is key here—you want that glaze to sit nicely!

  9. For the Frosting: beat together softened unsalted butter and powdered sugar until smooth and creamy. Gradually add heavy whipping cream to reach your desired spreading consistency; it should be fluffy and luscious.

  10. Spread the frosting generously over the cooled brownies, ensuring every square is coated in this creamy goodness. Cut into squares and admire your masterpiece!

Optional: Top with chocolate shavings or a sprinkle of cocoa for an extra touch of elegance.

Exact quantities are listed in the recipe card below.

Make Ahead Options

These Frosted Coffee Brownies are a fantastic option for meal prep, making them perfect for a busy week! You can prepare the brownie batter up to 24 hours in advance and refrigerate it until you’re ready to bake. Just mix the wet and dry ingredients as per the recipe, cover the bowl, and store it in the fridge. When it’s time to bake, pour it into the prepared pan and cook as directed. If you want to frost them ahead, make the frosting up to 3 days in advance, storing it in an airtight container in the refrigerator—just give it a good stir before spreading it over the cooled brownies. This way, your homemade treat is just as delicious but saves you precious time when you’re ready to serve!

How to Store and Freeze Frosted Coffee Brownies

Room Temperature: Store brownies in an airtight container at room temperature for up to 3 days. This keeps them moist and delicious for quick snacking!

Fridge: To prolong freshness, place the frosted coffee brownies in the fridge in a covered container for up to 1 week. Let them sit at room temperature for 15 minutes before enjoying.

Freezer: For longer storage, freeze the brownies, unfrosted, wrapped tightly in plastic wrap and aluminum foil for up to 3 months. Thaw in the fridge overnight and frost just before serving.

Reheating: To enjoy warm brownies, place them in the microwave for 10-15 seconds. If frosted, be cautious and heat in short intervals to prevent melting the frosting.

What to Serve with Frosted Coffee Brownies?

There’s nothing like pairing a decadent brownie with delightful accompaniments to create the ultimate sweet experience.

  • Vanilla Ice Cream: A scoop of creamy vanilla ice cream melts beautifully on the warm brownies, enhancing your dessert with an indulgent twist.
  • Espresso: The bold flavors of espresso intensify the coffee taste in the brownies, making for a perfect pick-me-up moment.
  • Chocolate Sauce: Drizzle warm chocolate sauce over each square for an extra layer of richness that chocolate lovers will adore.
  • Whipped Cream: Light and fluffy, a dollop of whipped cream adds an airy contrast to the dense brownies, creating delightful harmony.
  • Raspberry Coulis: The tartness of raspberry coulis cuts through the sweetness of the brownies, adding a refreshing burst of flavor with every bite.
  • Caramel Drizzle: A warm caramel drizzle introduces a luscious sweetness that perfectly complements the deep chocolate and coffee flavors.

Serve these frosted coffee brownies alongside your favorite drink or dessert for a truly unforgettable treat that will leave everyone craving more!

Frosted Coffee Brownies Variations

Feel free to get creative and make these brownies your own with exciting twists and substitutions!

  • Nutty Crunch: Add 1/2 cup of chopped walnuts or pecans to the batter for a delightful crunch that complements the fudgy texture.

  • Mocha Magic: Replace instant coffee granules with espresso powder for an even bolder coffee flavor that coffee lovers will appreciate.

  • Minty Fresh: Stir in 1/2 teaspoon of peppermint extract for a refreshing mint chocolate twist that’s perfect for the holidays!

  • Gluten-Free: Substitute all-purpose flour with a gluten-free blend to accommodate gluten sensitivities without sacrificing flavor.

  • Spicy Kick: Mix in 1/4 teaspoon of cayenne pepper to the batter for a surprising and delightful heat that balances the sweetness.

For a mini-paragraph twist, consider drizzling melted dark chocolate over the frosted brownies for an elegant presentation. This addition not only enhances the chocolate flavor but also adds an extra layer of indulgence.

  • Decadent Caramel: Swirl in 1/3 cup of caramel sauce before baking for that luscious sweet layer that plays beautifully with chocolate and coffee.

  • Fruit Fusion: Fold in 1/2 cup of chocolate chips or dried cherries into the batter for added richness or a burst of tartness with each bite. They’ll surprise and delight everyone!

Each variation brings its own charm, making this a flexible recipe for all occasions!

Chef's Helpful Tips

  • When making Frosted Coffee Brownies, ensure your butter is fully melted before mixing with sugar to achieve a smooth and creamy base.
  • Avoid overmixing the brownie batter after adding the dry ingredients to maintain a chewy texture; mix just until combined.
  • When incorporating instant coffee granules, consider dissolving them in a little hot water first for a more intense flavor.
  • Make sure to let the brownies cool completely before frosting to prevent the icing from melting and losing its texture.

Frosted Coffee Brownies Recipe FAQs

How do I choose the best coffee for my Frosted Coffee Brownies?
Absolutely! Using high-quality instant coffee granules enhances the flavor of your brownies. Look for brands that use 100% Arabica beans for a smoother, more aromatic result. You can even experiment with flavored coffee granules if you’re looking to add a hint of vanilla or hazelnut!

What’s the best way to store leftover Frosted Coffee Brownies?
For room temperature storage, place your brownies in an airtight container where they’ll stay delicious for up to 3 days. If you want to keep them fresher for longer, you can transfer them to the fridge in a covered container, where they’ll last up to a week. Just allow them to sit out for 15 minutes before enjoying to return them to their ideal texture!

Can I freeze Frosted Coffee Brownies?
Absolutely! To freeze your brownies, I recommend freezing them unfrosted. Wrap the brownies tightly in plastic wrap and then in aluminum foil, or use a freezer-safe container to prevent freezer burn. They can be stored for up to 3 months. When you’re ready to enjoy, simply thaw them overnight in the fridge and frost just before serving for that fresh taste!

What if my brownies turn out too dry or crumbly?
If your brownies are too dry, it might be due to overbaking or too much flour. I suggest checking them a few minutes before the minimum baking time to ensure they remain fudgy. Using large eggs at room temperature can also help maintain moisture in your brownie mix. For a fudgier texture, you can add a bit more melted butter to the batter next time.

Can I make these brownies gluten-free?
Very much so! To make your Frosted Coffee Brownies gluten-free, substitute all-purpose flour with a 1:1 gluten-free flour blend. Just ensure it contains xanthan gum to help mimic the texture of regular flour. Your brownies will still be delectable, and that rich chocolate-coffee flavor will remain intact!

Are there any dietary considerations for pets?
Definitely! While these brownies are a delightful treat for humans, keep them away from pets, especially dogs. Chocolate and coffee are toxic to them, and consuming even a small amount could cause serious health issues. It’s always best to treat them to dog-friendly snacks instead!

Frosted Coffee Brownies

Frosted Coffee Brownies

Frosted Coffee Brownies combine rich coffee flavor with a decadent chocolate treat, perfect for sweet cravings.
Print Recipe Pin Recipe
Prep Time 15 minutes mins
Cook Time 35 minutes mins
Cooling Time 30 minutes mins
Total Time 1 hour hr 20 minutes mins
Servings: 12 squares
Course: DESSERT RECIPES
Cuisine: American
Calories: 200
Ingredients Equipment Method Nutrition Notes

Ingredients
  

For the Brownie Batter
  • 1/2 cup unsalted butter (melted) gives rich flavor
  • 1 cup granulated sugar sweetens the brownies
  • 2 large eggs binds the mixture
  • 1 teaspoon vanilla extract enhances flavor
  • 1/2 cup unsweetened cocoa powder provides deep chocolate flavor
  • 1 cup all-purpose flour gives structure
  • 1/4 teaspoon salt balances sweetness
  • 1/2 teaspoon baking powder helps the brownies rise
  • 2 tablespoons instant coffee granules infuses coffee flavor
For the Frosting
  • 1/4 cup unsalted butter (softened) creates a creamy base
  • 2 cups powdered sugar sweetens the frosting
  • 3 tablespoons heavy whipping cream adjust consistency of frosting

Equipment

  • baking pan
  • Mixing bowl
  • Whisk
  • Spatula

Method
 

Brownie Preparation
  1. Preheat the oven to 350°F (175°C) and grease a baking pan.
  2. Mix melted unsalted butter and granulated sugar until smooth.
  3. Add eggs and vanilla extract, then beat well until creamy.
  4. Combine cocoa powder, flour, salt, and baking powder in another bowl.
  5. Gradually incorporate dry ingredients into the wet mixture, stirring gently.
  6. Stir in instant coffee granules into the batter.
  7. Pour the batter into the prepared baking pan and smooth the top. Bake for about 35 minutes.
  8. Cool the brownies in the pan before transferring to a wire rack.
Frosting Preparation
  1. Beat together softened unsalted butter and powdered sugar until smooth.
  2. Gradually add heavy whipping cream to reach desired consistency.
  3. Spread frosting over cooled brownies and cut into squares.

Nutrition

Serving: 1squareCalories: 200kcalCarbohydrates: 30gProtein: 2gFat: 9gSaturated Fat: 5gPolyunsaturated Fat: 0.5gMonounsaturated Fat: 3gCholesterol: 30mgSodium: 150mgPotassium: 100mgFiber: 1gSugar: 18gVitamin A: 200IUCalcium: 20mgIron: 1mg

Notes

For an extra touch, top with chocolate shavings or a sprinkle of cocoa.

Tried this recipe?

Let us know how it was!

Filed Under: BREAKFAST & BRUNCH

  • « Previous Page
  • 1
  • …
  • 9
  • 10
  • 11
  • 12
  • 13
  • 14
  • Next Page »

Recent Posts

  • Crispy Potatoes in Oven
  • Lucky Charms Pancakes
  • Cheeseburger
  • Boiled Corn on the Cob
  • St. Patrick’s Day Dessert Parfaits

Recent Comments

No comments to show.

Footer

  • Contact
  • Privacy Policy
  • About Us
  • Terms
  • ↑ back to top

Copyright © 2024 www.Forkono.com

Table Of Content