Forkono

  • BREAKFAST & BRUNCH
  • DESSERT RECIPES
  • DINNER RECIPES
  • LUNCH RECIPES
  • About uS
  • SNACKS & APPETIZERS
menu icon
go to homepage
  • BREAKFAST & BRUNCH
  • DESSERT RECIPES
  • DINNER RECIPES
  • LUNCH RECIPES
  • About uS
  • SNACKS & APPETIZERS
search icon
Homepage link
  • BREAKFAST & BRUNCH
  • DESSERT RECIPES
  • DINNER RECIPES
  • LUNCH RECIPES
  • About uS
  • SNACKS & APPETIZERS
×

Shamrock Swirl Pie

December 29, 2025 by JudyWhite Leave a Comment

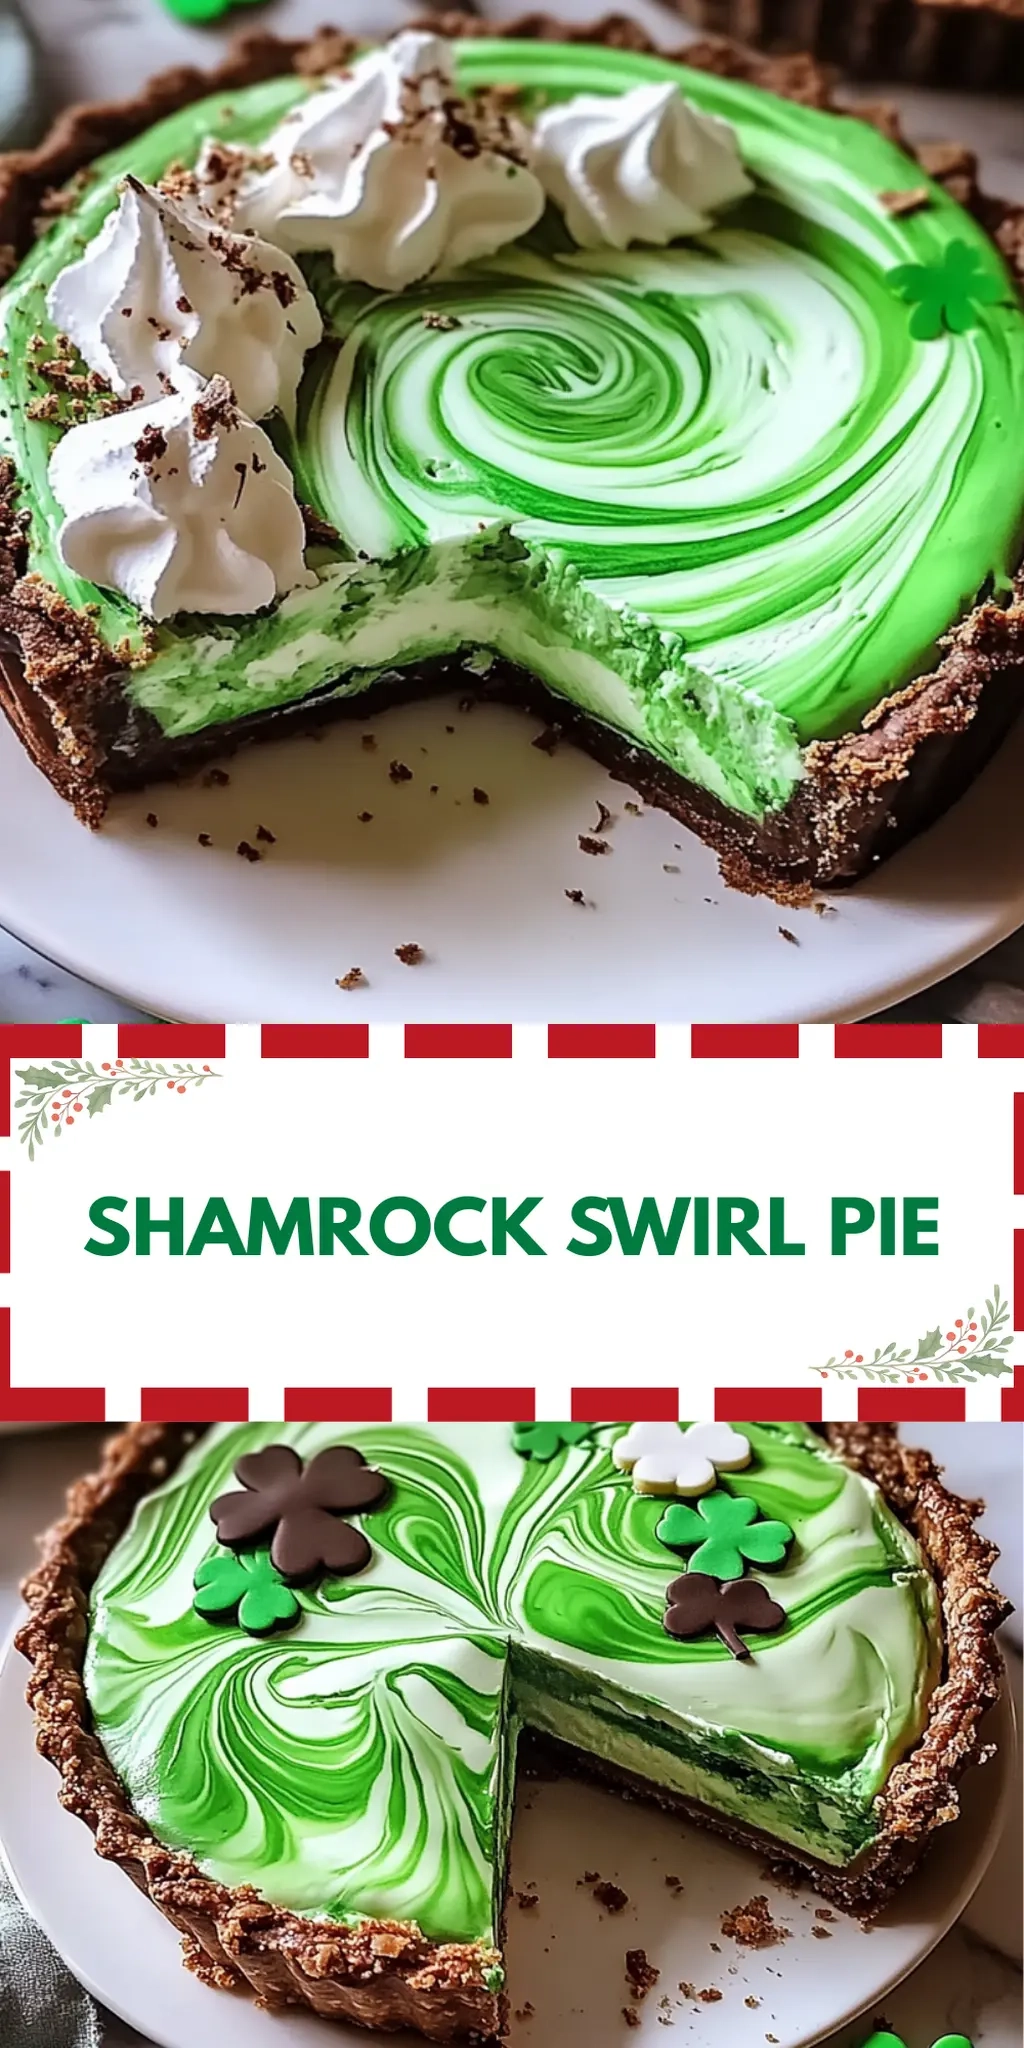
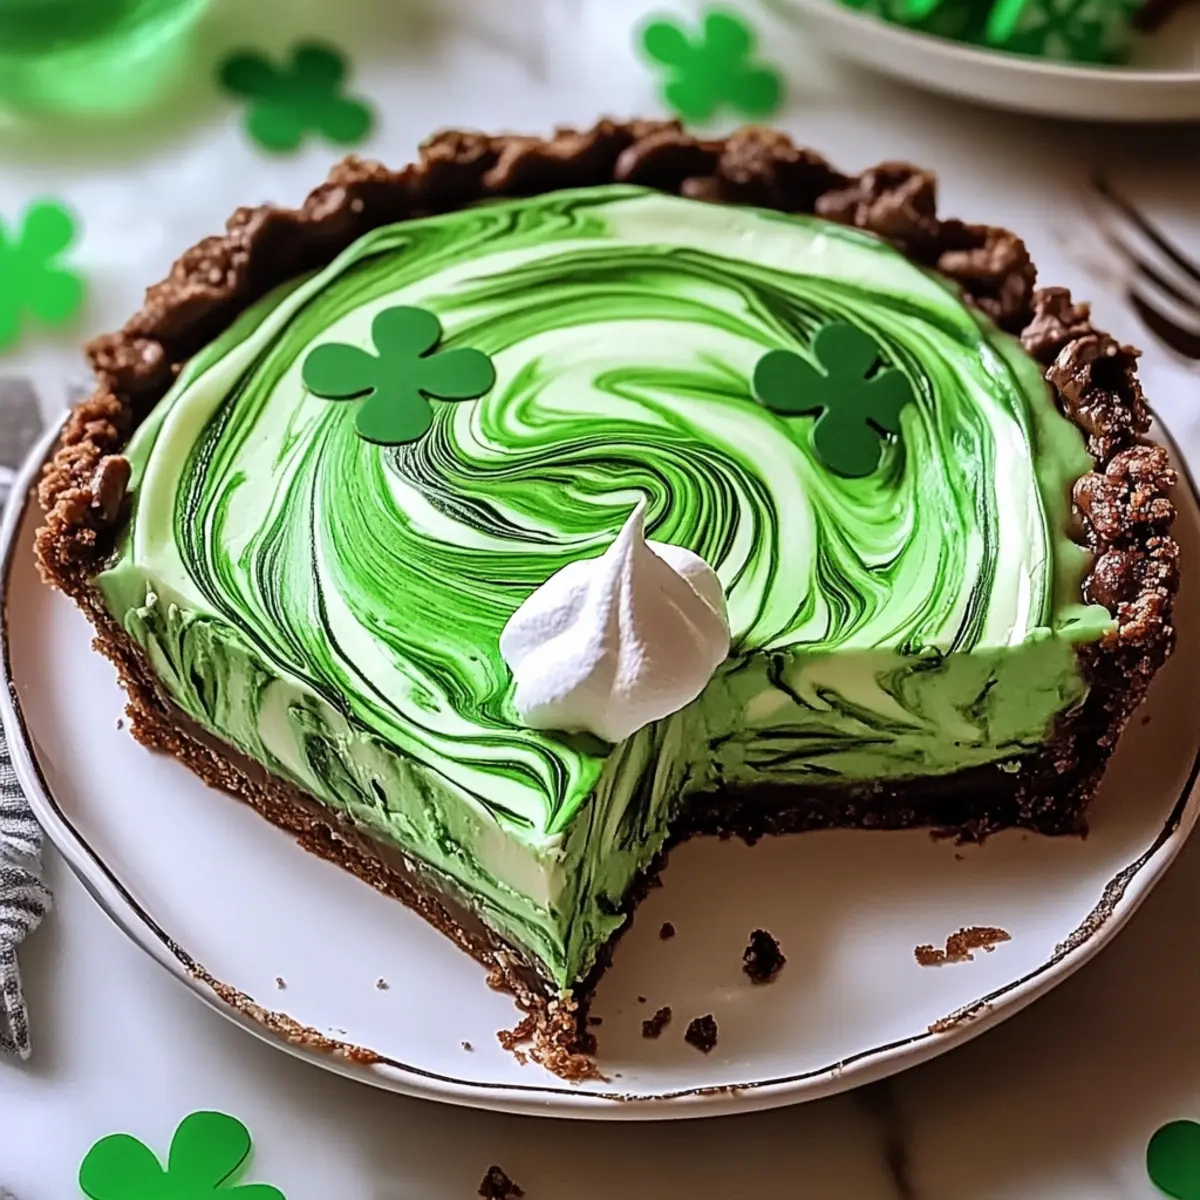
The moment I took my first bite of Shamrock Swirl Pie, I was transported to a whimsical world of flavor—a delightful fusion of minty freshness and rich chocolatey goodness. This enchanting dessert is a game-changer for anyone tired of the same old fast food; its vibrant green swirls and luscious textures create a joyous centerpiece for any gathering.

I’ll never forget when I decided to whip this up for a last-minute celebration. With just a handful of ingredients, including creamy, dreamy peppermint filling nestled in a chocolate cookie crust, it turned a simple evening into something truly special. Whether you’re looking to impress guests or simply treat yourself, this pie is incredibly versatile. Plus, the easy preparation means you can spend less time in the kitchen and more time enjoying the sweet moments that matter.

Get ready to indulge in a dessert that not only pleases the palate but also sparks joy with its colorful presentation. Let’s dive right into making your own Shamrock Swirl Pie!

Why You'll Love This Shamrock Swirl Pie

  • This Shamrock Swirl Pie is incredibly easy to make, allowing even beginner bakers to impress their friends and family without stress.
  • The delightful combination of creamy peppermint and rich chocolate flavors will leave everyone coming back for seconds.
  • Its vibrant green swirls make it a visually stunning addition to any dessert table, perfect for celebrations.
  • Plus, with minimal prep time, you can whip this up quickly and enjoy more time with your loved ones while they rave about your delicious creation.

Shamrock Swirl Pie Ingredients

• To create this delightful pie, gather these simple ingredients.

For the Crust

  • Chocolate cookie crumbs – gives a rich, chocolaty base that pairs perfectly with the mint filling.
  • Unsalted butter – adds moisture and helps bind the crumb mixture.

For the Filling

  • Cream cheese – provides a creamy texture that’s essential for the filling.
  • Powdered sugar – sweetens the filling while ensuring it remains smooth.
  • Peppermint extract – infuses a refreshing minty flavor that’s the star of this Shamrock Swirl Pie.
  • Green food coloring – adds a delightful vibrancy, making this pie festive and fun.

For the Topping

  • Heavy whipping cream – when whipped, adds lightness and volume to your filling.
  • Melted chocolate – drizzled on top for a decadent finish.
  • Whipped cream – for a light and airy garnish.
  • Chocolate shavings or chips – offer a delicious crunch and a touch of elegance.
  • Green sprinkles or edible glitter – make your pie even more festive and eye-catching!

How to Make Shamrock Swirl Pie

  1. Combine the chocolate cookie crumbs and melted butter in a mixing bowl. Stir until the crumbs are coated and resemble wet sand. Press this mixture firmly into the bottom of a pie pan to form a sturdy crust.

  2. Mix the cream cheese, powdered sugar, peppermint extract, and a few drops of green food coloring in another bowl. Blend until smooth and creamy, ensuring there are no lumps for that velvety filling we crave.

  3. Fold in the whipped heavy cream or whipped topping gently. Do this just until combined; you want to keep that light and airy texture that makes this pie so delightful.

  4. Pour the creamy peppermint filling into the chocolate crust. Use a spatula to spread it evenly and smooth the top, making it look as inviting as it tastes.

  5. Drizzle melted chocolate over the top of the pie in a swirl pattern. Let your creativity flow here; it adds a beautiful touch that everyone will admire!

  6. Chill the pie in the refrigerator for at least 4 hours, allowing it to set completely. This step is key for achieving that perfect slice.

  7. Serve your pie with a flourish! Garnish with dollops of whipped cream, sprinkle on chocolate shavings or chips, and finish it off with green sprinkles or edible glitter for that festive sparkle.

Optional: Add a few extra chocolate chips on top for a delightful crunch.
Exact quantities are listed in the recipe card below.

Shamrock Swirl Pie Variations

Let your creativity shine as you make this festive pie your own!

  • Gluten-Free: Use gluten-free chocolate cookie crumbs to create a delicious base without the gluten. Your guests will be none the wiser!

  • Vegan: Substitute cream cheese with a dairy-free alternative and use coconut whipped cream instead of heavy cream for a plant-based delight. The mint flavor still shines through!

  • Chocolate Mint Boost: Mix in chocolate chips or chunks into the peppermint filling for an extra indulgent twist. Every bite will have that delightful chocolate surprise.

  • Matcha Magic: Swap out half the peppermint extract with matcha powder to add a unique twist and beautiful color. It’s a tasty way to incorporate that earthy flavor!

  • Nutty Crunch: Add finely chopped nuts like almonds or pistachios into the crust for added texture and flavor. It contrasts beautifully with the soft filling and adds a delightful crunch.

  • Spicy Kick: Include a pinch of cayenne pepper in the filling for a surprising heat that pairs perfectly with the cool peppermint. It’s an unexpected combination that will have guests talking!

  • Berry Swirl: Swirl in a raspberry or strawberry puree into the filling before it sets for a fruity touch and gorgeous marbled effect. This also adds a refreshing tartness to balance the sweetness.

  • Layered Delight: Consider making a two-layer pie by adding a layer of chocolate pudding between the crust and filling. This deepens the chocolate flavor and makes each slice an adventure.

Each variation will add a personal touch, ensuring your Shamrock Swirl Pie is as unique as it is delicious!

Make Ahead Options

Getting a head start on your Shamrock Swirl Pie is a game-changer for busy weeknights! You can prepare the chocolate cookie crust and the peppermint filling up to 24 hours in advance. Just store the crust covered in the refrigerator to keep it fresh, and pour the filling on top when you’re ready to chill the pie. The pie needs at least 4 hours to set, so plan accordingly, or even do it the night before! When it’s time to serve, simply garnish with whipped cream, chocolate shavings, and a sprinkle of green sprinkles for a festive touch. This way, you’ll have a delightful dessert ready to impress without the last-minute stress!

What to Serve with Shamrock Swirl Pie?

The perfect accompaniment can elevate your enchanting Shamrock Swirl Pie from a delightful dessert to a fabulous feast fit for any celebration.

  • Mint Chocolate Chip Ice Cream: The creamy, minty flavor mirrors the pie’s refreshing filling, offering a cool contrast that melts beautifully in your mouth.

  • Fresh Fruit Salad: Bright, juicy fruits like berries and kiwi add a refreshing burst of flavor and bring a splash of color to your table.

  • Coffee or Mint Tea: A warm beverage provides a comforting balance to the coolness of the pie, enhancing the peppermint experience with every sip.

  • Chocolate Covered Strawberries: These treats not only make a lavish pairing but also add additional layers of chocolatey goodness that your guests will adore.

  • Mini Cheesecakes: Individual cheesecakes with a light citrus twist offer a delightful textural contrast, perfectly complementing the Shamrock Swirl Pie’s fluffy filling.

  • Lemon Sorbet: This light, zesty dessert cleanses the palate and makes an excellent refreshing finish alongside the minty pie.

Pair these delightful offerings with your Shamrock Swirl Pie for a gathering that sings with flavor and joy!

How to Store and Freeze Shamrock Swirl Pie

Fridge: Store your Shamrock Swirl Pie in an airtight container or cover it securely with plastic wrap. It will keep well for up to 3 days while maintaining its delicious flavors and textures.

Freezer: For longer storage, you can freeze the pie (without garnishes) for up to 2 months. Wrap it tightly in plastic wrap, then foil, to prevent freezer burn.

Reheating: While this pie is best enjoyed chilled, if you prefer a soft texture, let it thaw in the fridge overnight before serving. Avoid reheating in the microwave to maintain the integrity of the creamy filling.

Garnishing: Add fresh toppings like whipped cream or sprinkles just before serving for the best presentation and taste!

Chef's Helpful Tips

  • When making the Shamrock Swirl Pie, ensure your cream cheese is fully softened for a silky filling; this prevents lumps and creates a smooth texture.
  • Avoid overmixing the whipped cream with the filling as it can deflate the airy texture you’re aiming for.
  • For a sturdy crust, press the chocolate cookie mixture firmly into the pie pan, ensuring even coverage along the sides.
  • Remember to chill the pie for at least 4 hours; this helps the filling set correctly and enhances the overall flavor.

Shamrock Swirl Pie Recipe FAQs

How do I pick the best ingredients for my Shamrock Swirl Pie?
Absolutely! When selecting your ingredients, aim for fresh cream cheese that is softened to room temperature for easy mixing. Check that your chocolate cookie crumbs are fresh and free from moisture, as dark spots can indicate spoilage. For the peppermint extract, look for pure extracts rather than imitation for a more authentic flavor. And for the heavy whipping cream, make sure it’s fresh and has a good cream layer—this will help achieve that dreamy texture!

How should I store my Shamrock Swirl Pie?
Very! To store your pie in the fridge, simply cover it tightly with plastic wrap or place it in an airtight container, where it will remain fresh for up to 3 days. Keeping it chilled will preserve its delightful flavors and creamy texture. If it’s not finished within that time frame, consider freezing it.

Can I freeze Shamrock Swirl Pie, and if so, how?
Absolutely! To freeze your Shamrock Swirl Pie, wrap it tightly in plastic wrap followed by a layer of aluminum foil. This will help prevent freezer burn and maintain its lovely texture. You can freeze it for up to 2 months. When you’re ready to enjoy it again, simply transfer it from the freezer to the fridge and let it thaw for about 6 hours or overnight.

What should I do if my pie doesn’t set properly?
If your Shamrock Swirl Pie hasn’t set after chilling for at least 4 hours, it might be due to under-mixing the cream cheese or not folding in the whipped cream thoroughly. For the best results, ensure the cream cheese is fully blended and smooth before adding the other ingredients. If it still needs a helping hand, you can pop it back in the freezer for about an hour to firm it up a bit more before serving.

Is the Shamrock Swirl Pie safe for those with allergies?
Very much! This pie contains common allergens such as dairy (cream cheese and whipped cream) and gluten (chocolate cookie crumbs). If you’re making it for someone with allergies, be sure to use gluten-free cookie crumbs and alternative dairy options like almond cream cheese or whipped coconut cream. Always check labels for cross-contamination when shopping for ingredients!

How long does Shamrock Swirl Pie last in the fridge?
The pie will stay fresh in the refrigerator for up to 3 days when stored correctly in plastic wrap or an airtight container. If you’re making it for an event, consider making it a day ahead—this allows the flavors to meld beautifully and saves you some time on the big day!

Shamrock Swirl Pie

Shamrock Swirl Pie

Shamrock Swirl Pie is a delightful chocolate-mint creation filled with creamy peppermint, topped with a rich chocolate drizzle, making it a perfect festive dessert.
Print Recipe Pin Recipe
Prep Time 20 minutes mins
Chill Time 4 hours hrs
Total Time 4 hours hrs 20 minutes mins
Servings: 8 slices
Course: DESSERT RECIPES
Cuisine: American
Calories: 320
Ingredients Equipment Method Nutrition Notes

Ingredients
  

For the Crust
  • 2 cups chocolate cookie crumbs
  • 1/2 cup unsalted butter melted
For the Filling
  • 8 oz cream cheese softened
  • 1 cup powdered sugar
  • 1 teaspoon peppermint extract
  • 2 drops green food coloring
For the Whipped Topping
  • 1 cup heavy whipping cream or whipped topping
  • 1/2 cup melted chocolate
For Garnishing
  • 1 cup whipped cream
  • 1/4 cup chocolate shavings or chips
  • 1 tablespoon green sprinkles or edible glitter

Equipment

  • Mixing bowl
  • pie pan
  • Spatula

Method
 

Instructions
  1. Combine chocolate cookie crumbs and melted butter in a mixing bowl. Stir until well mixed, then press the mixture firmly into the bottom of a pie pan to form a tasty crust.
  2. Mix cream cheese, powdered sugar, peppermint extract, and a few drops of green food coloring in a bowl. Blend until smooth and creamy, ensuring there are no lumps for a delightful filling.
  3. Fold in the whipped heavy cream (or whipped topping) gently. The mixture should become light and airy.
  4. Pour the peppermint filling into the chocolate crust. Smooth the top evenly with a spatula.
  5. Drizzle melted chocolate over the top of the pie in a swirl pattern.
  6. Chill the pie in the refrigerator for at least 4 hours, or until it has set thoroughly.
  7. Garnish the pie right before serving with whipped cream, chocolate shavings or chips, and green sprinkles or edible glitter.

Nutrition

Serving: 1sliceCalories: 320kcalCarbohydrates: 30gProtein: 3gFat: 20gSaturated Fat: 10gCholesterol: 50mgSodium: 150mgPotassium: 100mgFiber: 1gSugar: 15gVitamin A: 500IUCalcium: 50mgIron: 1mg

Notes

Ensure cream cheese is softened for a smooth filling. Chill the pie for at least 4 hours for best results.

Tried this recipe?

Let us know how it was!

Filed Under: BREAKFAST & BRUNCH

Buttery Raspberry Swirl Cookies

December 28, 2025 by JudyWhite Leave a Comment

With the arrival of a crisp afternoon, I found myself drawn to the kitchen, eager to fill the air with the comforting scent of baking. It was then that I decided to whip up a batch of Buttery Raspberry Swirl Cookies—an ode to simple pleasures. You know that feeling when something so delightful can be made at home, transforming your day in less than thirty minutes? These cookies embrace that, blending the richness of butter with the sweet-tart surprise of raspberry jam.

What’s especially enchanting about these treats is the way they look when they come out of the oven—golden, inviting swirls that are just begging to be shared. Plus, with just a handful of ingredients, they’re a perfect solution for anyone who’s tired of store-bought snacks. Whether it’s a cozy family gathering or a quiet evening with a book, let these buttery bites bring a touch of indulgence to your day. Ready to turn your kitchen into a bakery? Let’s dive into this delightful recipe!

Why You'll Love This Buttery Raspberry Swirl Cookies

  • These buttery raspberry swirl cookies are incredibly easy to make, allowing you to whip up a delicious treat in less than thirty minutes.
  • Their delightful flavor combines rich butter and sweet-tart raspberry jam, creating a taste sensation that will appeal to everyone.
  • Visually, the golden swirls are as inviting as they are delicious, making them the perfect centerpiece for any gathering.
  • With just a handful of simple ingredients, you can satisfy your sweet tooth without the hassle of complicated baking techniques.
  • These cookies are perfect for sharing with friends and family, ensuring you’ll be the star of any get-together.
  • Enjoy the indulgent experience of freshly baked cookies right from your own kitchen.

Buttery Raspberry Swirl Cookies Ingredients

For the Cookie Dough
• Unsalted butter – Creaming butter adds richness and makes your cookies tender.
• Granulated sugar – Sweetens the dough while helping create a delightful golden crust.
• Large egg – Acts as a binder, giving structure to your buttery raspberry swirl cookies.
• Vanilla extract – Enhances the flavor, bringing warmth to the overall taste of the cookies.
• All-purpose flour – Provides the necessary structure; be sure to spoon and level it for accuracy.
• Baking powder – Helps the cookies rise, ensuring they bake to light, fluffy perfection.
• Salt – Balances sweetness and enhances the overall flavor.

For the Raspberry Filling
• Raspberry jam – Adds a sweet and tart surprise, making each bite a burst of fruity goodness.
• Cornstarch – Thickens the jam and prevents it from leaking during baking, ensuring those beautiful swirls stay magnificent.

How to Make Buttery Raspberry Swirl Cookies

  1. Cream Together: In a large mixing bowl, beat the unsalted butter and granulated sugar together until fluffy and light in color. This typically takes about 3-5 minutes; it enhances flavor and texture.

  2. Add Egg and Vanilla: Mix in the large egg and 1 teaspoon of vanilla extract until fully combined. The mixture should be smooth and creamy before moving on.

  3. Combine Dry Ingredients: In a separate bowl, whisk together 2½ cups of all-purpose flour, ½ teaspoon of baking powder, and ½ teaspoon of salt. This step ensures even distribution of the leavening and salt.

  4. Mix Together: Gently fold the dry ingredients into the butter mixture until just combined. Avoid over-mixing here; you want tender cookies, not tough ones!

  5. Roll the Dough: Divide the dough into two equal portions. Roll each portion between two sheets of parchment paper into rectangles about ¼-inch thick. This helps achieve even shapes for your swirls.

  6. Prepare the Jam: In a small bowl, mix the raspberry jam with 1 tablespoon of cornstarch until smooth. This will help thicken the jam and keep it from leaking.

  7. Assemble the Cookies: Spread the raspberry jam mixture evenly over each rectangle of dough. Carefully roll them up tightly like a jelly roll, then wrap each log in plastic wrap.

  8. Chill the Dough: Refrigerate the logs for 2 hours or place them in the freezer for 30 minutes. Chilling helps the cookies retain their shape while baking, resulting in those beautiful swirls.

  9. Slice and Bake: Preheat your oven to 350°F (175°C). Slice the chilled logs into ½-inch thick rounds. Place them on a baking sheet lined with parchment paper and bake for 10–12 minutes, or until the edges turn lightly golden.

  10. Cool and Store: Allow the cookies to cool on the baking sheet for a few minutes before transferring them to a wire rack or container. This helps them firm up perfectly.

Optional: Dust cookies with powdered sugar for an extra touch of sweetness.

Exact quantities are listed in the recipe card below.

Buttery Raspberry Swirl Cookies Variations

Feel free to get creative with these variations, customizing your cookies to match your taste buds’ desires!

  • Jam Swap: Use strawberry or apricot jam instead of raspberry for a different flavor profile. Each swap brings its own fruity excitement and sweetness.

  • Nutty Touch: Add ½ cup chopped walnuts or pecans to the dough. The nuts create a delightful crunch that complements the softness of the cookie.

  • Citrus Zest: Incorporate 1 teaspoon of lemon or orange zest into the dough for a refreshing twist. The vibrant citrus notes will brighten each bite!

  • Chocolate Drizzle: Melt dark or white chocolate and drizzle over the cooled cookies. The rich chocolate adds a luscious layer of indulgence.

  • Gluten-Free: Substitute all-purpose flour with a gluten-free flour blend to make these cookies gluten-free. You’ll still enjoy their tender, buttery goodness!

  • Add Spice: Sprinkle a pinch of cinnamon or nutmeg into the dough. These warm spices create a cozy, aromatic twist to the classic cookie flavor.

  • Sour Cream Substitute: For a tangy twist, swap half of the butter with sour cream. It keeps the cookies moist and adds a delightful tanginess.

  • Heat it Up: Add a dash of cayenne pepper to the jam for a surprisingly delightful kick. The balance of sweet and spicy will intrigue your taste buds.

What to Serve with Buttery Raspberry Swirl Cookies?

Indulging in freshly baked cookies is a delight, but pairing them with the right treats elevates the experience even further.

  • Rich Hot Chocolate: The creamy sweetness of hot chocolate contrasts beautifully with the tart raspberry, creating a comforting warm drink.
  • Vanilla Ice Cream: A scoop of smooth vanilla ice cream elevates your cookie’s flavors, making each bite a heavenly blend of warmth and creaminess.
  • Fresh Berries: A side of juicy strawberries or blueberries enhances the fruity notes, adding a refreshing touch to your dessert platter.
  • Sweet Tea: A chilled glass of sweet tea balances the cookies’ richness while providing a refreshing twist to your afternoon snack.
  • Cheese Platter: Soft cheeses like brie or mascarpone pair wonderfully, their creaminess complementing the buttery texture and tart sweetness of the cookies.
  • Almond Biscotti: For a delightful crunch, serve almond biscotti alongside. The nutty flavors enhance the overall taste experience while providing a lovely contrast.

Enjoy the blend of flavors and textures as you create a memorable moment around the table with family and friends!

How to Store and Freeze Buttery Raspberry Swirl Cookies

Room Temperature: Store your cookies in an airtight container at room temperature for up to 3 days to maintain freshness and flavor.

Fridge: If you’d like to keep your cookies a bit longer, they can last in the fridge for up to 1 week in an airtight container, but they may lose some of their texture.

Freezer: For longer storage, freeze the cookies in a sealed bag or container for up to 3 months. Make sure to layer them with parchment paper to prevent sticking.

Reheating: To enjoy the cookies warm, simply reheat them in the oven at 300°F (150°C) for about 5-7 minutes. Enjoy those delightful butterscotch raspberry swirls!

Make Ahead Options

These Buttery Raspberry Swirl Cookies are perfect for busy home cooks looking to save time! You can prepare the dough logs up to 24 hours in advance by rolling them up and refrigerating. This chilling step not only helps with shaping but also enhances the flavors. If you want to prep even further ahead, you can freeze the rolled logs for up to 3 months; just ensure they are tightly wrapped to prevent freezer burn. When you’re ready to bake, simply slice the chilled or frozen logs into rounds and bake them as directed. With this make-ahead approach, you’ll enjoy fresh, delicious cookies with minimal fuss!

Chef's Helpful Tips

  • To ensure a light and tender texture in your buttery raspberry swirl cookies, cream the butter and sugar for about 3-5 minutes until fluffy and pale.
  • When rolling the dough, be sure to use two sheets of parchment paper to easily create the desired ¼-inch thickness without sticking.
  • Remember not to over-mix the dough after adding the dry ingredients, as this can lead to tough cookies rather than tender ones.
  • Lastly, chilling the rolled dough for 2 hours or freezing for 30 minutes is crucial for keeping the cookie shapes intact during baking and achieving those lovely swirls.

Buttery Raspberry Swirl Cookies Recipe FAQs

What type of butter is best for making cookies?
Absolutely! I recommend using unsalted butter for these Buttery Raspberry Swirl Cookies. This allows you to control the saltiness and enhances the sweet flavors from the granulated sugar and raspberry jam.

How do I choose the right raspberry jam for this recipe?
Look for a raspberry jam that has a good balance of sweetness and tartness. Ideally, it should contain real fruit and minimal additives. You want a jam that spreads easily and maintains its texture during baking, which complements the buttery cookies perfectly!

How should I store leftover cookies?
Store your cookies in an airtight container at room temperature for up to 3 days. For longer freshness, you can refrigerate them in an airtight container for up to 1 week, but be aware that they might lose some of their original texture.

Can I freeze Buttery Raspberry Swirl Cookies? If so, how?
Yes! To freeze your cookies, follow these steps:

  1. Allow them to cool completely before freezing.
  2. Layer the cookies in a sealed freezer bag or container separated by parchment paper to avoid sticking.
  3. They can be frozen for up to 3 months. When you’re ready to enjoy, simply reheat them in the oven at 300°F (150°C) for 5-7 minutes. Trust me, you’ll love how fresh they taste!

What should I do if my cookie dough is too sticky?
If your dough feels too sticky to handle, don’t worry! You can add a little extra flour, about a tablespoon at a time, until it becomes easier to work with. Just remember not to over-mix, as this can lead to tougher cookies!

Are these cookies suitable for those with dietary restrictions?
These Buttery Raspberry Swirl Cookies do contain gluten and dairy, so they may not be suitable for those with gluten or lactose intolerances. You can try using gluten-free flour and a dairy-free butter alternative to create a version that accommodates more dietary needs. Always double-check those labels for allergies!

Buttery Raspberry Swirl Cookies

Buttery Raspberry Swirl Cookies

These Buttery Raspberry Swirl Cookies combine the richness of butter with sweet-tart raspberry jam, creating an irresistibly delightful treat.
Print Recipe Pin Recipe
Prep Time 15 minutes mins
Cook Time 12 minutes mins
Chilling Time 2 hours hrs
Total Time 2 hours hrs 27 minutes mins
Servings: 12 cookies
Course: DESSERT RECIPES
Cuisine: American
Calories: 150
Ingredients Equipment Method Nutrition Notes

Ingredients
  

For the Cookie Dough
  • 1 cup unsalted butter softened
  • 3/4 cup granulated sugar
  • 1 large egg
  • 1 teaspoon vanilla extract
  • 2.5 cups all-purpose flour spooned and leveled
  • 1/2 teaspoon baking powder
  • 1/4 teaspoon salt
For the Raspberry Filling
  • 1/2 cup raspberry jam
  • 1 tablespoon cornstarch

Equipment

  • Mixing bowl
  • Whisk
  • parchment paper
  • Baking sheet
  • plastic wrap
  • refrigerator or freezer

Method
 

How to Make Buttery Raspberry Swirl Cookies
  1. In a large mixing bowl, beat the unsalted butter and granulated sugar together until fluffy and light in color, about 3-5 minutes.
  2. Mix in the large egg and 1 teaspoon of vanilla extract until fully combined.
  3. In a separate bowl, whisk together 2½ cups of all-purpose flour, ½ teaspoon of baking powder, and ½ teaspoon of salt.
  4. Gently fold the dry ingredients into the butter mixture until just combined.
  5. Divide the dough into two equal portions. Roll each portion between two sheets of parchment paper into rectangles about ¼-inch thick.
  6. In a small bowl, mix the raspberry jam with 1 tablespoon of cornstarch until smooth.
  7. Spread the raspberry jam mixture evenly over each rectangle of dough, then carefully roll them up tightly like a jelly roll.
  8. Refrigerate the logs for 2 hours or freeze for 30 minutes.
  9. Preheat your oven to 350°F (175°C). Slice the chilled logs into ½-inch thick rounds and place them on a baking sheet.
  10. Bake for 10-12 minutes, or until the edges turn lightly golden.
  11. Allow the cookies to cool on the baking sheet for a few minutes before transferring them to a wire rack.

Nutrition

Serving: 1cookieCalories: 150kcalCarbohydrates: 22gProtein: 1gFat: 7gSaturated Fat: 4gMonounsaturated Fat: 3gCholesterol: 30mgSodium: 70mgSugar: 8gVitamin A: 200IUCalcium: 10mgIron: 0.5mg

Notes

Optional: Dust cookies with powdered sugar before serving.

Tried this recipe?

Let us know how it was!

Filed Under: BREAKFAST & BRUNCH

Strawberry Custard Cake with Graham Cracker Crust

December 27, 2025 by JudyWhite Leave a Comment

Every time I open my refrigerator and see fresh strawberries, I can’t help but feel inspired. The sweet, juicy scent fills the kitchen, whispering promises of delightful desserts. That’s how I found myself whipping up this Strawberry Custard Cake with Graham Cracker Crust – a twist on classic flavors that brings nostalgia and excitement in every bite!

This recipe is a true crowd-pleaser, perfect for summer barbecues or a cozy family gathering. The combination of creamy custard, tart strawberries, and a buttery graham cracker crust creates a symphony of textures and tastes that your loved ones won’t forget. Plus, it’s refreshingly easy to make, ensuring that your baking efforts result in a showstopper without the stress. Imagine serving this colorful delight after dinner and watching everyone eagerly dive in!

So, dust off those graham crackers and let’s transform those strawberries into a fresh, creamy masterpiece that will have everyone asking for seconds! Your new favorite dessert is just a few steps away.

Why You'll Love This Strawberry Custard Cake with Graham Cracker Crust

  • This Strawberry Custard Cake with Graham Cracker Crust is incredibly easy to make, perfect even for novice bakers who want to impress.
  • The combination of creamy custard and fresh strawberries delivers a burst of flavor that will liven up any gathering.
  • Its versatility means you can adapt it with different fruits or toppings to suit every occasion.
  • Plus, the visual appeal of this colorful cake will undoubtedly have everyone reaching for their cameras before diving in.

Strawberry Custard Cake Ingredients

For the Crust
• Graham crackers – a crunchy base that adds a delightful sweetness.
• Butter – melted for binding the crust together and adding richness.

For the Cake Filling
• Unsweetened crushed pineapple – brings a tropical essence and natural sweetness.
• Strawberry pie filling – provides a burst of flavor and vibrant color, key to this Strawberry Custard Cake.
• Frozen unsweetened strawberries – thawed and chopped, they add fresh fruit texture.
• Miniature marshmallows – contribute a fluffy lightness to the cake filling.
• Frozen whipped topping – thawed for a smooth, creamy consistency that holds everything together.

This delightful assembly of ingredients is sure to create a memorable dessert that your family will adore!

How to Make Strawberry Custard Cake

  1. Crush the graham crackers using a rolling pin or a food processor until they reach fine crumbs. Mix these crumbs with melted butter until well combined, creating a sandy texture.

  2. Press the mixture firmly into the bottom of a baking dish, spreading it evenly, to form a strong crust. This step is crucial for a sturdy base—aim for a thickness that’s about 1/4 inch.

  3. Combine the crushed pineapple, strawberry pie filling, and chopped thawed strawberries in a large mixing bowl. Stir gently to create a colorful, fruity mixture that’s bright and inviting.

  4. Fold in the miniature marshmallows and thawed whipped topping into the strawberry mixture. Be gentle to keep the lightness of the whip—this adds a fluffy texture that balances perfectly!

  5. Pour the strawberry mixture over the graham cracker crust, smoothing the top to ensure even distribution. This beautiful layer will soon captivate your family’s taste buds!

  6. Refrigerate the dessert for at least one hour, allowing the flavors to meld beautifully. When it’s firm and chilled, it’s ready to serve—just slice and enjoy the delightful layers!

Optional: Add a sprinkle of fresh mint leaves on top for a refreshing touch.

Exact quantities are listed in the recipe card below.

How to Store and Freeze Strawberry Custard Cake

Fridge: Store the Strawberry Custard Cake in an airtight container in the refrigerator for up to 3 days. This keeps the flavors fresh and the texture intact.

Freezer: If you want to save some for later, freeze the cake before adding the whipped topping, wrapping it tightly in plastic wrap, for up to 2 months. Thaw in the fridge when ready to serve.

Reheating: There’s no need to reheat this cake, as it’s best served chilled straight from the fridge. Just slice and enjoy for a refreshing treat!

Strawberry Custard Cake Variations

Feel free to let your creativity shine by customizing this delightful dessert!

  • Berry Medley: Substitute strawberries with blueberries or raspberries for a vibrant mix that bursts with flavor. A combination of berries not only adds color but complexity in taste.

  • Nutty Crunch: Add crushed walnuts or pecans to the graham cracker crust for an added crunchy texture. This nutty addition gives a satisfying bite and complements the sweetness of the filling beautifully.

  • Coconut Twist: Incorporate shredded coconut into the filling for a tropical flair. This will introduce a delightful chewiness and enhance the soft flavors of the strawberries.

  • Citrus Zing: Stir in freshly grated lemon or orange zest into the filling for a refreshing citrus kick. The zest elevates the overall flavor profile, brightening every bite with its aromatic essence.

  • Chocolate Drizzle: Top the cake with a luscious chocolate drizzle before serving. The smooth, rich chocolate adds a luxurious layer, creating an elegant finish that’s hard to resist.

  • Vegan-Friendly: Swap the whipped topping with a plant-based alternative and use coconut oil instead of butter for a vegan version. This adaptation ensures everyone can enjoy this treat without compromising flavor or texture.

  • Spicy Kick: Add a pinch of cayenne or a dash of cinnamon to the filling for a surprising hint of spice. Just a small amount transforms the sweetness into a captivating sensation.

  • Gourmet Touch: Enhance with a layer of mascarpone cheese mixed into the whipped topping for a rich and luxurious creaminess. It brings a sophisticated twist that’s perfect for special occasions.

Make Ahead Options

These Strawberry Custard Cake with Graham Cracker Crust is perfect for those busy weeknights when you want a delightful dessert without the last-minute fuss! You can prepare the crust and the fruity filling up to 24 hours in advance, simply crushing the graham crackers and mixing them with melted butter for the crust, and then combining the crushed pineapple, strawberry pie filling, and chopped strawberries for the filling. Store the crust in an airtight container to keep it fresh. When you’re ready to serve, just fold in the marshmallows and whipped topping, pour the mixture over the crust, and refrigerate for at least an hour to set. This way, you’ll have a stunning dessert ready to impress, just as delicious as if you made it the same day!

What to Serve with Strawberry Custard Delight Cake?

Bringing together flavors with the Strawberry Custard Delight Cake sets the stage for a delightful meal experience.

  • Refreshing Fruit Salad: This bright mix of seasonal fruits adds a fresh touch that complements the cake’s sweetness beautifully. The contrast of textures between the juicy fruit and creamy cake is simply irresistible!

  • Grilled Chicken Skewers: Lightly seasoned and grilled, these provide a savory balance to your sweet dessert. Pairing savory options with your cake will bring a well-rounded dining experience everyone will enjoy.

  • Vanilla Ice Cream: A scoop of creamy vanilla ice cream adds a classic touch and provides a chilled contrast to the cake’s soft layers. Enhance the dessert with a melty scoop that takes it to the next level of indulgence.

  • Mint Lemonade: This vibrant, zesty drink brings a refreshing kick, cutting through the cake’s sweetness while keeping things playful. The mint elevates the whole meal, providing a cool finish.

  • Chocolate Dipped Strawberries: Steeped in rich chocolate, these treats are the perfect bite-sized indulgence that echoes the flavors of your cake. They add an elegant touch to your dessert tableau!

  • Coconut Whipped Topping: Not only does this alternative topping add a tropical flair, but it echoes the light, fluffy texture of the cake. It’s an easy change-up that delights the taste buds!

  • Pineapple Upside-Down Cake: If you’re craving more fruity desserts, this classic offers a different kind of sweetness and texture that pairs well with your creamy Strawberry Custard Cake.

  • Herbal Iced Tea: A glass of chilled herbal iced tea can beautifully cleanse the palate. Opt for light flavors like chamomile or citrus, enhancing the entire dessert gathering.

  • Chocolate Mousse: A rich yet airy dessert option that contrasts with the fruity layers of your cake. It will create a luscious finish that’s sure to satisfy chocolate lovers!

Chef's Helpful Tips

  • To achieve a perfectly crumbly graham cracker crust for your Strawberry Custard Cake, make sure to crush the crackers finely and mix in the melted butter thoroughly to avoid dry spots.
  • A common mistake is not pressing the crust firmly enough, so use a flat-bottomed glass to pack it tightly and ensure a sturdy base.
  • When combining the fruit ingredients, be careful not to overmix, as this can break down the strawberries and lead to a mushy texture; gently fold in the additions instead.
  • Refrigerate the cake for the full hour to allow it to set properly, as this will enhance the flavor and improve the texture for serving.

Strawberry Custard Cake with Graham Cracker Crust Recipe FAQs

How do I select ripe strawberries?
Absolutely! When choosing strawberries, look for firm berries that are bright red all over, with a shiny appearance. Avoid those with dark spots or mushy areas, as these indicate overripeness. Ideally, fresh strawberries should have a sweet aroma and bright green leaves.

What is the best way to store leftover Strawberry Custard Cake?
To keep your Strawberry Custard Cake fresh, store it in an airtight container in the refrigerator for up to 3 days. If you find that you have more cake than you can eat quickly, sell your extra slice with some friends and family! This way, you can enjoy the flavors without worrying about it going bad.

Can I freeze Strawberry Custard Cake?
Very! You can absolutely freeze your Strawberry Custard Cake, but I recommend doing so before adding the whipped topping. Wrap the unassembled cake tightly in cling film and place it in a freezer-safe container for up to 2 months. When you’re ready to enjoy it, thaw it in the refrigerator overnight, add the whipped topping on the day you plan to serve, and slice into deliciousness!

What should I do if the graham cracker crust is too crumbly?
If you find your crust crumbling too much, it might be a sign of not enough butter or not pressing it firmly enough into the pan. To fix this, mix a tablespoon of melted butter into the crumbs, and use the flat bottom of a glass to press the mixture firmly into the bottom of your baking dish. This should give you a lovely, sturdy crust that holds together beautifully.

Are there any dietary considerations for this Strawberry Custard Cake?
Yes! This delightful Strawberry Custard Cake contains gluten and dairy because of the graham crackers and whipped topping. For a gluten-free option, you can use gluten-free graham crackers. If someone has a dairy allergy, consider using coconut whipped cream as a replacement for the whipped topping. As always, be sure to check product labels for any allergens before serving to guests!

Strawberry Custard Cake with Graham Cracker Crust

Strawberry Custard Cake with Graham Cracker Crust

This Strawberry Custard Cake with Graham Cracker Crust is a delightful dessert perfect for summer gatherings.
Print Recipe Pin Recipe
Prep Time 20 minutes mins
Chilling Time 1 hour hr
Total Time 1 hour hr 20 minutes mins
Servings: 8 slices
Course: DESSERT RECIPES
Cuisine: American
Calories: 250
Ingredients Equipment Method Nutrition Notes

Ingredients
  

For the Crust
  • 12 whole Graham crackers crushed
  • 1/2 cup Butter melted
For the Cake Filling
  • 1 cup Unsweetened crushed pineapple
  • 1 cup Strawberry pie filling
  • 2 cups Frozen unsweetened strawberries thawed and chopped
  • 1 cup Miniature marshmallows
  • 1 cup Frozen whipped topping thawed

Equipment

  • Mixing bowl
  • Baking dish
  • Rolling pin
  • Food processor

Method
 

How to Make Strawberry Custard Cake
  1. Crush the graham crackers using a rolling pin or a food processor until they reach fine crumbs. Mix these crumbs with melted butter until well combined, creating a sandy texture.
  2. Press the mixture firmly into the bottom of a baking dish, spreading it evenly, to form a strong crust.
  3. Combine the crushed pineapple, strawberry pie filling, and chopped thawed strawberries in a large mixing bowl. Stir gently to create a fruity mixture.
  4. Fold in the miniature marshmallows and thawed whipped topping into the strawberry mixture.
  5. Pour the strawberry mixture over the graham cracker crust, smoothing the top to ensure even distribution.
  6. Refrigerate the dessert for at least one hour, allowing the flavors to meld beautifully.

Nutrition

Serving: 1sliceCalories: 250kcalCarbohydrates: 35gProtein: 2gFat: 12gSaturated Fat: 7gPolyunsaturated Fat: 1gMonounsaturated Fat: 3gCholesterol: 30mgSodium: 150mgPotassium: 150mgFiber: 1gSugar: 20gVitamin A: 500IUVitamin C: 25mgCalcium: 40mgIron: 0.5mg

Notes

For a refreshing touch, sprinkle fresh mint leaves on top before serving.

Tried this recipe?

Let us know how it was!

Filed Under: BREAKFAST & BRUNCH

Strawberry Custard Cake with Graham Cracker Crust

December 27, 2025 by JudyWhite Leave a Comment

Every time I open my refrigerator and see fresh strawberries, I can’t help but feel inspired. The sweet, juicy scent fills the kitchen, whispering promises of delightful desserts. That’s how I found myself whipping up this Strawberry Custard Cake with Graham Cracker Crust – a twist on classic flavors that brings nostalgia and excitement in every bite!

This recipe is a true crowd-pleaser, perfect for summer barbecues or a cozy family gathering. The combination of creamy custard, tart strawberries, and a buttery graham cracker crust creates a symphony of textures and tastes that your loved ones won’t forget. Plus, it’s refreshingly easy to make, ensuring that your baking efforts result in a showstopper without the stress. Imagine serving this colorful delight after dinner and watching everyone eagerly dive in!

So, dust off those graham crackers and let’s transform those strawberries into a fresh, creamy masterpiece that will have everyone asking for seconds! Your new favorite dessert is just a few steps away.

Why You'll Love This Strawberry Custard Cake with Graham Cracker Crust

  • This Strawberry Custard Cake with Graham Cracker Crust is incredibly easy to make, perfect even for novice bakers who want to impress.
  • The combination of creamy custard and fresh strawberries delivers a burst of flavor that will liven up any gathering.
  • Its versatility means you can adapt it with different fruits or toppings to suit every occasion.
  • Plus, the visual appeal of this colorful cake will undoubtedly have everyone reaching for their cameras before diving in.

Strawberry Custard Cake Ingredients

For the Crust
• Graham crackers – a crunchy base that adds a delightful sweetness.
• Butter – melted for binding the crust together and adding richness.

For the Cake Filling
• Unsweetened crushed pineapple – brings a tropical essence and natural sweetness.
• Strawberry pie filling – provides a burst of flavor and vibrant color, key to this Strawberry Custard Cake.
• Frozen unsweetened strawberries – thawed and chopped, they add fresh fruit texture.
• Miniature marshmallows – contribute a fluffy lightness to the cake filling.
• Frozen whipped topping – thawed for a smooth, creamy consistency that holds everything together.

This delightful assembly of ingredients is sure to create a memorable dessert that your family will adore!

How to Make Strawberry Custard Cake

  1. Crush the graham crackers using a rolling pin or a food processor until they reach fine crumbs. Mix these crumbs with melted butter until well combined, creating a sandy texture.

  2. Press the mixture firmly into the bottom of a baking dish, spreading it evenly, to form a strong crust. This step is crucial for a sturdy base—aim for a thickness that’s about 1/4 inch.

  3. Combine the crushed pineapple, strawberry pie filling, and chopped thawed strawberries in a large mixing bowl. Stir gently to create a colorful, fruity mixture that’s bright and inviting.

  4. Fold in the miniature marshmallows and thawed whipped topping into the strawberry mixture. Be gentle to keep the lightness of the whip—this adds a fluffy texture that balances perfectly!

  5. Pour the strawberry mixture over the graham cracker crust, smoothing the top to ensure even distribution. This beautiful layer will soon captivate your family’s taste buds!

  6. Refrigerate the dessert for at least one hour, allowing the flavors to meld beautifully. When it’s firm and chilled, it’s ready to serve—just slice and enjoy the delightful layers!

Optional: Add a sprinkle of fresh mint leaves on top for a refreshing touch.

Exact quantities are listed in the recipe card below.

Strawberry Custard Cake Variations

Feel free to let your creativity shine by customizing this delightful dessert!

  • Berry Medley: Substitute strawberries with blueberries or raspberries for a vibrant mix that bursts with flavor. A combination of berries not only adds color but complexity in taste.

  • Nutty Crunch: Add crushed walnuts or pecans to the graham cracker crust for an added crunchy texture. This nutty addition gives a satisfying bite and complements the sweetness of the filling beautifully.

  • Coconut Twist: Incorporate shredded coconut into the filling for a tropical flair. This will introduce a delightful chewiness and enhance the soft flavors of the strawberries.

  • Citrus Zing: Stir in freshly grated lemon or orange zest into the filling for a refreshing citrus kick. The zest elevates the overall flavor profile, brightening every bite with its aromatic essence.

  • Chocolate Drizzle: Top the cake with a luscious chocolate drizzle before serving. The smooth, rich chocolate adds a luxurious layer, creating an elegant finish that’s hard to resist.

  • Vegan-Friendly: Swap the whipped topping with a plant-based alternative and use coconut oil instead of butter for a vegan version. This adaptation ensures everyone can enjoy this treat without compromising flavor or texture.

  • Spicy Kick: Add a pinch of cayenne or a dash of cinnamon to the filling for a surprising hint of spice. Just a small amount transforms the sweetness into a captivating sensation.

  • Gourmet Touch: Enhance with a layer of mascarpone cheese mixed into the whipped topping for a rich and luxurious creaminess. It brings a sophisticated twist that’s perfect for special occasions.

Make Ahead Options

These Strawberry Custard Cake with Graham Cracker Crust is perfect for those busy weeknights when you want a delightful dessert without the last-minute fuss! You can prepare the crust and the fruity filling up to 24 hours in advance, simply crushing the graham crackers and mixing them with melted butter for the crust, and then combining the crushed pineapple, strawberry pie filling, and chopped strawberries for the filling. Store the crust in an airtight container to keep it fresh. When you’re ready to serve, just fold in the marshmallows and whipped topping, pour the mixture over the crust, and refrigerate for at least an hour to set. This way, you’ll have a stunning dessert ready to impress, just as delicious as if you made it the same day!

How to Store and Freeze Strawberry Custard Cake

Fridge: Store the Strawberry Custard Cake in an airtight container in the refrigerator for up to 3 days. This keeps the flavors fresh and the texture intact.

Freezer: If you want to save some for later, freeze the cake before adding the whipped topping, wrapping it tightly in plastic wrap, for up to 2 months. Thaw in the fridge when ready to serve.

Reheating: There’s no need to reheat this cake, as it’s best served chilled straight from the fridge. Just slice and enjoy for a refreshing treat!

What to Serve with Strawberry Custard Delight Cake?

Bringing together flavors with the Strawberry Custard Delight Cake sets the stage for a delightful meal experience.

  • Refreshing Fruit Salad: This bright mix of seasonal fruits adds a fresh touch that complements the cake’s sweetness beautifully. The contrast of textures between the juicy fruit and creamy cake is simply irresistible!

  • Grilled Chicken Skewers: Lightly seasoned and grilled, these provide a savory balance to your sweet dessert. Pairing savory options with your cake will bring a well-rounded dining experience everyone will enjoy.

  • Vanilla Ice Cream: A scoop of creamy vanilla ice cream adds a classic touch and provides a chilled contrast to the cake’s soft layers. Enhance the dessert with a melty scoop that takes it to the next level of indulgence.

  • Mint Lemonade: This vibrant, zesty drink brings a refreshing kick, cutting through the cake’s sweetness while keeping things playful. The mint elevates the whole meal, providing a cool finish.

  • Chocolate Dipped Strawberries: Steeped in rich chocolate, these treats are the perfect bite-sized indulgence that echoes the flavors of your cake. They add an elegant touch to your dessert tableau!

  • Coconut Whipped Topping: Not only does this alternative topping add a tropical flair, but it echoes the light, fluffy texture of the cake. It’s an easy change-up that delights the taste buds!

  • Pineapple Upside-Down Cake: If you’re craving more fruity desserts, this classic offers a different kind of sweetness and texture that pairs well with your creamy Strawberry Custard Cake.

  • Herbal Iced Tea: A glass of chilled herbal iced tea can beautifully cleanse the palate. Opt for light flavors like chamomile or citrus, enhancing the entire dessert gathering.

  • Chocolate Mousse: A rich yet airy dessert option that contrasts with the fruity layers of your cake. It will create a luscious finish that’s sure to satisfy chocolate lovers!

Chef's Helpful Tips

  • To achieve a perfectly crumbly graham cracker crust for your Strawberry Custard Cake, make sure to crush the crackers finely and mix in the melted butter thoroughly to avoid dry spots.
  • A common mistake is not pressing the crust firmly enough, so use a flat-bottomed glass to pack it tightly and ensure a sturdy base.
  • When combining the fruit ingredients, be careful not to overmix, as this can break down the strawberries and lead to a mushy texture; gently fold in the additions instead.
  • Refrigerate the cake for the full hour to allow it to set properly, as this will enhance the flavor and improve the texture for serving.

Strawberry Custard Cake with Graham Cracker Crust Recipe FAQs

How do I select ripe strawberries?
Absolutely! When choosing strawberries, look for firm berries that are bright red all over, with a shiny appearance. Avoid those with dark spots or mushy areas, as these indicate overripeness. Ideally, fresh strawberries should have a sweet aroma and bright green leaves.

What is the best way to store leftover Strawberry Custard Cake?
To keep your Strawberry Custard Cake fresh, store it in an airtight container in the refrigerator for up to 3 days. If you find that you have more cake than you can eat quickly, sell your extra slice with some friends and family! This way, you can enjoy the flavors without worrying about it going bad.

Can I freeze Strawberry Custard Cake?
Very! You can absolutely freeze your Strawberry Custard Cake, but I recommend doing so before adding the whipped topping. Wrap the unassembled cake tightly in cling film and place it in a freezer-safe container for up to 2 months. When you’re ready to enjoy it, thaw it in the refrigerator overnight, add the whipped topping on the day you plan to serve, and slice into deliciousness!

What should I do if the graham cracker crust is too crumbly?
If you find your crust crumbling too much, it might be a sign of not enough butter or not pressing it firmly enough into the pan. To fix this, mix a tablespoon of melted butter into the crumbs, and use the flat bottom of a glass to press the mixture firmly into the bottom of your baking dish. This should give you a lovely, sturdy crust that holds together beautifully.

Are there any dietary considerations for this Strawberry Custard Cake?
Yes! This delightful Strawberry Custard Cake contains gluten and dairy because of the graham crackers and whipped topping. For a gluten-free option, you can use gluten-free graham crackers. If someone has a dairy allergy, consider using coconut whipped cream as a replacement for the whipped topping. As always, be sure to check product labels for any allergens before serving to guests!

Strawberry Custard Cake with Graham Cracker Crust

Strawberry Custard Cake with Graham Cracker Crust

This Strawberry Custard Cake with Graham Cracker Crust is a delightful dessert perfect for summer gatherings.
Print Recipe Pin Recipe
Prep Time 20 minutes mins
Chilling Time 1 hour hr
Total Time 1 hour hr 20 minutes mins
Servings: 8 slices
Course: DESSERT RECIPES
Cuisine: American
Calories: 250
Ingredients Equipment Method Nutrition Notes

Ingredients
  

For the Crust
  • 12 whole Graham crackers crushed
  • 1/2 cup Butter melted
For the Cake Filling
  • 1 cup Unsweetened crushed pineapple
  • 1 cup Strawberry pie filling
  • 2 cups Frozen unsweetened strawberries thawed and chopped
  • 1 cup Miniature marshmallows
  • 1 cup Frozen whipped topping thawed

Equipment

  • Mixing bowl
  • Baking dish
  • Rolling pin
  • Food processor

Method
 

How to Make Strawberry Custard Cake
  1. Crush the graham crackers using a rolling pin or a food processor until they reach fine crumbs. Mix these crumbs with melted butter until well combined, creating a sandy texture.
  2. Press the mixture firmly into the bottom of a baking dish, spreading it evenly, to form a strong crust.
  3. Combine the crushed pineapple, strawberry pie filling, and chopped thawed strawberries in a large mixing bowl. Stir gently to create a fruity mixture.
  4. Fold in the miniature marshmallows and thawed whipped topping into the strawberry mixture.
  5. Pour the strawberry mixture over the graham cracker crust, smoothing the top to ensure even distribution.
  6. Refrigerate the dessert for at least one hour, allowing the flavors to meld beautifully.

Nutrition

Serving: 1sliceCalories: 250kcalCarbohydrates: 35gProtein: 2gFat: 12gSaturated Fat: 7gPolyunsaturated Fat: 1gMonounsaturated Fat: 3gCholesterol: 30mgSodium: 150mgPotassium: 150mgFiber: 1gSugar: 20gVitamin A: 500IUVitamin C: 25mgCalcium: 40mgIron: 0.5mg

Notes

For a refreshing touch, sprinkle fresh mint leaves on top before serving.

Tried this recipe?

Let us know how it was!

Filed Under: BREAKFAST & BRUNCH

Brown Butter Sugar Cookies

December 27, 2025 by JudyWhite Leave a Comment

There’s something delightfully nostalgic about the smell of cookies baking in the oven, and when brown butter is involved, it’s a whole new level of comfort. Picture this: the deep, nutty aroma wafting through your kitchen as the butter transforms into a golden elixir, ready to elevate your favorite treats. That’s exactly what inspired me to create my Brown Butter Sugar Cookies, a treat that’s not just about sweetness but also a luscious depth of flavor.

I found myself longing for a simple yet indulgent dessert that could impress friends and family without spending hours in the kitchen. These cookies offer the perfect solution—a charming blend of chewy and crispy textures, adorned with colorful sprinkles to add a festive touch. Whether it’s a casual gathering or just a cozy night in, these cookies are guaranteed to bring smiles and warm hearts. So grab your mixing bowl and let’s dive into creating these incredibly satisfying Brown Butter Sugar Cookies!

Why You'll Love This Brown Butter Sugar Cookies

  • These Brown Butter Sugar Cookies combine ease and indulgence, making them a go-to treat for any occasion.
  • The rich, nutty flavor of browned butter takes these classic cookies to a whole new level that everyone will adore.
  • They’re incredibly versatile too, perfect for festive gatherings or just a cozy night at home with family.
  • Plus, with their delightful appearance adorned with colorful sprinkles, they are as visually appealing as they are delicious.
  • You won’t believe how quickly they come together, saving you valuable time in the kitchen without compromising on taste.
  • These cookies are sure to be a crowd-pleaser, evoking smiles and nostalgia with every bite.

Brown Butter Sugar Cookies Ingredients

• Here’s everything you need to create your tasty cookies!

For the Cookie Dough

  • Unsalted butter – the star ingredient that transforms into rich, nutty brown butter for an unforgettable flavor.
  • Granulated sugar – adds sweetness and helps create a lovely texture.
  • Light brown sugar – brings warmth and depth, enhancing the caramel notes in the cookies.
  • All-purpose flour – provides the perfect structure for your cookies; you’ll need two cups plus an extra two tablespoons for adjustment.
  • Baking soda – gives the cookies a soft and chewy texture as they rise in the oven.
  • Salt – balances sweetness and enhances all flavors.
  • Large egg – binds everything together, giving the cookies their rich, tender crumb.
  • Pure vanilla extract – infuses a warm, aromatic essence that complements the cookie perfectly.

For Topping

  • Sprinkles – add vibrant color and fun, making these cookies festive for any occasion.
  • Nonpareils – tiny, round candies that provide an extra crunch and delightful visual appeal.

These ingredients come together seamlessly to create the ultimate Brown Butter Sugar Cookies!

How to Make Brown Butter Sugar Cookies

  1. Brown the Butter: In a medium skillet over medium heat, melt the unsalted butter and cook until it turns a rich amber color and emits a nutty aroma, about 5-7 minutes. Stir frequently to prevent burning.

  2. Mix Sugars and Butter: In a spacious mixing bowl, combine the granulated sugar, brown sugar, and the browned butter. Stir until well blended, allowing the sugars to melt slightly into the warm butter for a creamy texture.

  3. Add Egg and Vanilla: Crack the large egg into the mixing bowl alongside the pure vanilla extract. Mix everything together until smooth and fully incorporated, creating a luscious, golden base.

  4. Whisk Dry Ingredients: In a separate bowl, whisk together 2 cups of all-purpose flour, baking soda, and salt. This helps evenly distribute the leavening agent for fluffy cookies.

  5. Combine Wet and Dry Ingredients: Gradually add the dry mixture into the wet ingredients, mixing just until combined. Be careful not to overmix; this will keep your cookies tender and delightful.

  6. Adjust Consistency: If the dough feels too sticky, stir in the additional 2 tablespoons of flour until you reach a dough consistency that’s moldable but not crumbly.

  7. Scoop and Top: Using a cookie scoop or spoon, drop dough onto a lined baking sheet, spacing them about 2 inches apart. Top each cookie with sprinkles and nonpareils for a fun, festive look.

  8. Bake to Perfection: Bake in a preheated oven at 350°F for about 13 minutes or until the edges are set and the tops are lightly golden. Don’t forget to cool them slightly—these beauties are best enjoyed warm!

Optional: For an extra touch, drizzle with melted chocolate after baking.

Exact quantities are listed in the recipe card below.

Brown Butter Sugar Cookies Variations

Feel free to explore these delightful twists, letting your creativity shine as you bake!

  • Gluten-Free: Swap all-purpose flour with a 1:1 gluten-free blend for a deliciously accommodating treat everyone can enjoy.

  • Nutty Addition: Stir in 1/2 cup of chopped nuts, like pecans or walnuts, to add a lovely crunch and rich flavor.

  • Chocolate Chip Twist: Fold in 1 cup of semi-sweet or dark chocolate chips for an indulgent chocolatey kick that pairs beautifully with brown butter.

  • Spiced Cookies: Add a sprinkle of cinnamon (1 teaspoon) or pumpkin spice to the dry ingredients for a warm, autumn-inspired flavor.

  • Citrus Burst: Mix in the zest of one orange or lemon to brighten the cookies with a fresh, zesty aroma that complements the sweetness.

  • Brown Sugar Variation: Replace granulated sugar with an equal amount of dark brown sugar for deeper caramel notes and a chewier texture in your cookies.

  • Dried Fruit: Toss in 1/2 cup of finely chopped dried fruits, such as cranberries or cherries, for a sweet, chewy surprise in every bite.

  • Salted Caramel Drizzle: After baking, drizzle melted salted caramel over the cookies for an extra layer of decadence that will leave everyone craving more.

Make Ahead Options

These Brown Butter Sugar Cookies are perfect for busy home cooks looking to save time! You can prepare the dough up to 24 hours in advance by following these simple steps: after mixing all the ingredients and adjusting the consistency, wrap the dough tightly in plastic wrap and refrigerate it. When you’re ready to bake, simply scoop the chilled dough onto a baking sheet, top with sprinkles and nonpareils, and bake as directed. This method ensures that your cookies remain just as delicious and aromatic while making your baking prep a breeze. Enjoy the satisfaction of homemade cookies without the last-minute rush!

How to Store and Freeze Brown Butter Sugar Cookies

Room Temperature: Keep your cookies in an airtight container at room temperature for up to 3 days. This will help maintain their chewy texture and delicious flavor.

Fridge: If you want them to last longer, store the cookies in the fridge in a sealed container for up to a week. Just let them come to room temperature before enjoying again!

Freezer: For longer storage, freeze the cookies in a single layer in an airtight container for up to 3 months. Thaw in the fridge overnight before savoring.

Reheating: To refresh your Brown Butter Sugar Cookies, simply pop them in a 350°F oven for about 5 minutes. This will bring back their delightful warmth and soft crumb!

What to Serve with Brown Butter Sugar Cookies?

Indulge in delightful pairings that elevate your cookie experience and create the perfect moment of sweetness.

  • Milk: A classic choice, it’s the ultimate partner for cookies, enhancing their rich flavors while adding a creamy finish.

  • Vanilla Ice Cream: The creamy texture and cold contrast to warm cookies create a blissful treat. A scoop on top makes an irresistible sundae!

  • Fresh Berries: Add a burst of freshness with strawberries or raspberries. Their tartness beautifully balances the sweetness of the cookies.

  • Chocolate Sauce: Drizzling warm chocolate sauce over the cookies adds decadence and richness, perfect for chocolate lovers.

  • Coffee: A warm cup complements the nutty flavor of the brown butter perfectly. The bitter notes help to elevate the sweetness of the cookies.

  • Chai Tea: Spiced chai’s warmth and aromatic qualities beautifully enhance the flavors, creating a cozy pairing that’s great for chilly evenings.

  • Fruit Salad: Bright, vibrant bites of seasonal fruits add a refreshing element, making each cookie and fruit bite a delicious contrast.

  • Caramel Drizzle: Sweet and sticky caramel not only looks tempting but adds another layer of richness that makes these cookies shine.

  • Milkshakes: Blend your favorite flavor with ice cream for a thick shake that goes down smoothly with each bite of cookie happiness.

Chef's Helpful Tips

  • When making Brown Butter Sugar Cookies, ensure you monitor the butter closely while browning to prevent it from burning; the ideal color is a rich amber with a nutty fragrance.
  • Avoid overmixing the dough after adding the dry ingredients to maintain the cookies’ tender texture, which can be easily compromised if mixed too long.
  • For a sweeter flavor and richer texture, let your sugars slightly dissolve in the warm brown butter before adding other ingredients.
  • Keep an eye on your cookies while baking; they can go from perfectly baked to overdone in just a minute, so check at the 10-minute mark.

Brown Butter Sugar Cookies Recipe FAQs

What is the best way to select ripe ingredients for these cookies?
Absolutely! For the best flavor, always choose fresh, unsalted butter for browning. Look for butter that is pale yellow without any dark spots. As for eggs, use large, fresh eggs for optimal binding and texture. Fresh eggs have a thicker white and well-rounded yolk, ensuring a perfect cookie.

How should I store Brown Butter Sugar Cookies?
Store your Brown Butter Sugar Cookies in an airtight container at room temperature for up to 3 days. This retains their chewy texture and delicious flavor. If you wish to extend their freshness, they can be kept in the fridge for up to a week; just bring them back to room temperature before enjoying!

Can I freeze Brown Butter Sugar Cookies?
Yes! To freeze, place your cooled cookies in a single layer in an airtight container. You can freeze them for up to 3 months. For the best results, thaw your cookies overnight in the fridge before serving. If you want to enjoy them warm, you can pop them in a 350°F oven for about 5 minutes after thawing.

What should I do if my cookie dough is too sticky?
No worries! If you find your dough is too sticky to handle, you can simply add the extra 2 tablespoons of all-purpose flour gradually until it reaches the desired consistency. The dough should be moldable but not crumbly, allowing for easy scooping onto your baking sheet.

Are these cookies suitable for people with nut allergies?
Very! The Brown Butter Sugar Cookies are inherently nut-free, making them a great option for those with nut allergies. Just be sure to check any sprinkles or toppings you might use, as some brands may contain traces of nuts. Enjoy baking for everyone!

Brown Butter Sugar Cookies

Brown Butter Sugar Cookies

Delightful Brown Butter Sugar Cookies that bring warmth and nostalgia, perfect for any occasion.
Print Recipe Pin Recipe
Prep Time 15 minutes mins
Cook Time 13 minutes mins
Cooling Time 5 minutes mins
Total Time 33 minutes mins
Servings: 24 cookies
Course: DESSERT RECIPES
Cuisine: American
Calories: 150
Ingredients Equipment Method Nutrition Notes

Ingredients
  

For the Cookie Dough
  • 1 cup unsalted butter browned
  • 1 cup granulated sugar
  • 1 cup light brown sugar
  • 2 cups all-purpose flour
  • 2 tablespoons all-purpose flour for adjustment
  • 1 teaspoon baking soda
  • 0.5 teaspoon salt
  • 1 large egg
  • 1 teaspoon pure vanilla extract
For Topping
  • 0.5 cup sprinkles
  • 0.5 cup nonpareils

Equipment

  • Mixing bowl
  • medium skillet
  • cookie scoop
  • Baking sheet
  • Whisk

Method
 

How to Make Brown Butter Sugar Cookies
  1. In a medium skillet over medium heat, melt the unsalted butter and cook until it turns a rich amber color and emits a nutty aroma, about 5-7 minutes. Stir frequently to prevent burning.
  2. In a spacious mixing bowl, combine the granulated sugar, brown sugar, and the browned butter. Stir until well blended.
  3. Crack the egg and add the vanilla extract. Mix everything together until smooth and fully incorporated.
  4. In a separate bowl, whisk together 2 cups of all-purpose flour, baking soda, and salt.
  5. Gradually add the dry mixture into the wet ingredients, mixing just until combined.
  6. If the dough feels too sticky, stir in the additional 2 tablespoons of flour until you reach a moldable consistency.
  7. Using a cookie scoop or spoon, drop dough onto a lined baking sheet, spacing them about 2 inches apart. Top with sprinkles and nonpareils.
  8. Bake in a preheated oven at 350°F for about 13 minutes or until the edges are set and the tops are lightly golden.

Nutrition

Serving: 1cookieCalories: 150kcalCarbohydrates: 20gProtein: 1gFat: 7gSaturated Fat: 4gPolyunsaturated Fat: 1gMonounsaturated Fat: 1gCholesterol: 20mgSodium: 100mgPotassium: 50mgSugar: 10gVitamin A: 5IUCalcium: 20mgIron: 1mg

Notes

These cookies are best enjoyed warm. For an extra touch, drizzle with melted chocolate after baking.

Tried this recipe?

Let us know how it was!

Filed Under: BREAKFAST & BRUNCH

Candy Cane Bagels

December 27, 2025 by JudyWhite Leave a Comment

There’s a special kind of joy that comes from creating something delightfully unexpected in the kitchen. As the winter months kick in and cozy vibes fill the air, I found myself drawn to a unique project: Candy Cane Bagels. Picture this: gorgeous, swirled bagels that are not only visually stunning but also irresistibly delicious! I stumbled upon this whimsical recipe while preparing for a festive gathering, and it’s become a festive favorite in my home.

You may wonder how a bagel can evoke the playful spirit of the season. These vibrant, hand-crafted twists bring a cheerful touch to any breakfast table or brunch spread. Plus, they’re surprisingly simple to make, proving that creativity can flourish even amid busy holiday preparations. This recipe is the perfect antidote to fast food monotony, inviting you to indulge in a warm, homemade treat that’s both fun and flavorful. Let’s dive into how you can whip up a batch of these Candy Cane Bagels that will delight your friends and family!

Why You'll Love This Candy Cane Bagels

  • These Candy Cane Bagels are not only a feast for the eyes but also a delightful way to celebrate the holiday season.
  • They are surprisingly easy to make, allowing anyone, regardless of baking experience, to create these festive treats with minimal effort.
  • The vibrant colors and unique shape make them a guaranteed hit at any gathering, ensuring your guests will be impressed and asking for more.
  • Plus, their warm, homemade flavor adds a comforting touch to chilly mornings, making them the perfect breakfast choice during the winter months.

Candy Cane Bagel Ingredients

• Here’s everything you need for a fun baking adventure!

For the Dough
• 1.5 cups Warm water – helps activate the yeast for that perfect rise.
• 3 tablespoons Granulated Sugar – feeds the yeast, contributing to a delightful flavor.
• 4 teaspoons Active Dry Yeast – the star ingredient that makes our Candy Cane Bagels fluffy and delicious!
• 3.5 cups All Purpose Flour – provides the base for our soft and chewy bagels.
• 2 teaspoons Salt – enhances the overall flavor of the dough.

For the Colors
• Red Gel Food Colouring – adds a festive hue to make your bagels truly pop!
• Green Gel Food Colouring – perfect for bringing that classic holiday vibe to your breakfast spread.
• White Gel Food Colouring – helps achieve that beautiful swirled effect, blending beautifully with the other colors.

Get ready to mix, twist, and bake these delightful Candy Cane Bagels!

How to Make Candy Cane Bagels

  1. Measure warm water into a glass measuring cup or bowl, ensuring it’s warm but not hot. This helps to activate the yeast perfectly, ensuring your bagels rise beautifully.

  2. Stir in the granulated sugar and active dry yeast. Allow this mixture to stand for about 10 minutes until it becomes bubbly and foamy, a sure sign that your yeast is alive!

  3. Combine flour and salt in a large mixing bowl. Pour in the bubbly yeast mixture and stir well until you have a cohesive dough. The mixture should start to come together nicely.

  4. Knead the dough on a floured surface until it’s soft and elastic, about 5-10 minutes. Alternatively, you can use a stand mixer with a dough hook for about 7 minutes until the dough is smooth.

  5. Divide the dough into 3 equal pieces. Set one piece aside for later use, and further split one of the larger pieces into two equal halves.

  6. Mix gel food coloring into each piece: the largest will be white, the next will be red, and the smallest will be green. Knead the colors in until the dough is an even shade, creating a vibrant palette!

  7. Place each colored dough in separate lightly greased bowls. Cover them with plastic wrap and allow them to rise for about 1 hour, or until doubled in size.

  8. Flatten the red dough into a rectangle about 8 x 10 inches wide, and brush the top with water to help layers stick together.

  9. Stack the white dough on top of the red, making sure they’re the same size, and brush again with water. Repeat this with the green dough, ensuring a gorgeous layered effect!

  10. Repeat with the remaining piece of white dough by stacking it on top of the green. Once stacked, use a sharp knife to cut the loaf into 8 equal strips.

  11. Twist each strip of dough into a candy cane-like spiral, rolling it gently to form a smooth log. Secure the ends together to maintain that lovely shape.

  12. Prepare your baking sheets with parchment paper. Place the formed bagels on the sheets and cover them with plastic wrap. Allow them to rise for another 30 minutes.

  13. Preheat your oven to 350°F and bring a large pot of water to a boil. This will be used to boil the bagels for that chewy texture!

  14. Simmer the water, then carefully drop your bagels into the pot, cooking 2 or 3 at a time. Boil for 1 minute, then flip and cook for another minute.

  15. Drain the bagels well after boiling and place them on the prepared baking sheet.

  16. Bake them in the preheated oven for 38-40 minutes until they’re lightly golden brown on top. Your kitchen will smell amazing!

Optional: Drizzle with a light glaze for an extra festive touch.
Exact quantities are listed in the recipe card below.

What to Serve with Candy Cane Bagels?

There’s magic in creating a festive spread that complements these whimsical, colorful bagels, making your mealtime enchanting.

  • Creamy Maple Butter: A luscious spread that adds a sweet, buttery touch, enhancing each bite of your bagels. It pairs perfectly with the festive flavors!

  • Crisp Holiday Salad: Light and refreshing, a salad with pomegranate seeds and mixed greens offers a beautiful contrast, adding freshness to your plate.

  • Hot Chocolate Bar: Set up a cozy station with marshmallows, peppermint sticks, and whipped cream. This delightful drink pairs wonderfully with the sweetness of your bagels.

  • Cheddar Cheese Slices: The sharpness of cheddar cuts through the sweetness, creating a delightful balance. Try it warm for an extra savory twist!

  • Fruit Compote: A warm fruit compote made with apples and cranberries adds a sweet, tangy element, dressing your bagels with seasonal flavors.

  • Peppermint Tea: A gentle cup of peppermint tea provides a soothing, aromatic experience that complements the candy cane vibe of your bagels.

  • Gingerbread Cookies: Bring in a playful dessert that echoes the holiday season. These spiced cookies are a delightful accompaniment alongside your festive breakfast.

  • Yogurt Parfait: Layer yogurt with granola and berries for a creamy, crunchy contrast to the bagels. The freshness and flavor balance the meal perfectly.

  • Vanilla Glaze: Drizzle a light vanilla glaze over the warm bagels, adding a touch of sweetness that feels indulgent—perfect for holiday mornings.

How to Store and Freeze Candy Cane Bagels

Room Temperature: Store bagels at room temperature in an airtight container for up to 3 days to maintain freshness; this prevents them from becoming stale.

Fridge: For longer storage, place the bagels in the fridge, where they will stay fresh for up to a week. Just be sure to wrap them tightly to prevent drying.

Freezer: Freeze your Candy Cane Bagels by wrapping each bagel individually in plastic wrap, then placing them in a freezer-safe bag. They can be stored this way for up to 3 months.

Reheating: To enjoy, thaw slightly before reheating. Warm them in the oven at 350°F for about 10 minutes or toast until heated through.

Make Ahead Options

Candy Cane Bagels are perfect for busy home cooks looking to save time during the festive season! You can prepare the colored dough up to 24 hours in advance. Simply follow the recipe through the first rise, then divide and knead in the gel food coloring. After the dough has colored nicely, place each piece in greased bowls, cover tightly with plastic wrap, and refrigerate. When you’re ready to bake, remove the dough and let it come to room temperature before proceeding with the shaping and second rise (about 30 minutes). This method ensures that your bagels are just as delightful and fresh as when made the same day, making your holiday meal prep a breeze!

Candy Cane Bagel Variations

Get ready to play with flavors and colors—there’s always room for a little personal touch in your kitchen!

  • Whole Wheat: Swap half the all-purpose flour for whole wheat flour for a nuttier and healthier option. These bagels will have a lovely, earthy flavor that compliments the sweetness of the colors.

  • Vegan: Substitute warm water with unsweetened almond milk and use maple syrup instead of granulated sugar. Your bagels will still be flavorful, and everyone can enjoy them!

  • Gluten-Free: Use a gluten-free flour blend to make this recipe suitable for gluten-sensitive guests. The vibrant colors still shine through, making them just as festive for everyone!

  • Pumpkin Spice Twist: Incorporate pumpkin pie spice into the dough for a warm, spiced aroma that elevates your seasonal bagels. Imagine biting into those soft bagels and tasting the fall-spiced goodness.

  • Chocolate Drizzle: After baking, drizzle melted dark chocolate over the cooled bagels for an indulgent treat. The combination of chocolate and sweet dough creates a new level of deliciousness!

  • Spicy Kick: Add a pinch of cayenne pepper or crushed red pepper flakes to the dough for a surprising heat that contrasts beautifully with the sweetness. It’s a bold twist that adventurous eaters will love!

  • Fruit Infusion: Mix in dried cranberries or cherries into the dough for added sweetness and chewiness. Those bursts of flavor pair wonderfully with the delightful swirl.

  • Herbed Cream Cheese: Whip up a batch of herbed cream cheese to spread on your bagels, introducing a savory contrast to their sweet exterior. It’s the perfect finishing touch!

Chef's Helpful Tips

  • When making Candy Cane Bagels, always ensure your water is warm but not too hot to avoid killing the yeast.
  • A common mistake is not allowing the yeast mixture enough time to bubble, so be patient and let it sit for the full 10 minutes.
  • Kneading the dough until it is smooth and elastic is crucial for achieving the right texture, so don’t rush this step.
  • Lastly, keep an eye on your baking time, as ovens can vary; check for a light golden brown color for perfect bagels.

Candy Cane Bagels Recipe FAQs

What type of flour is best for Candy Cane Bagels?
All-purpose flour is perfect for Candy Cane Bagels, as it provides a good balance of structure and chewiness. If you want to experiment, you could also mix in some bread flour for a more elastic texture!

How should I store my Candy Cane Bagels?
Store your bagels at room temperature in an airtight container for up to 3 days. If you want them to last longer, place them in the refrigerator, where they’ll stay fresh for up to a week. Just be sure to wrap them tightly to avoid drying out.

Can I freeze Candy Cane Bagels?
Absolutely! Once they’ve cooled completely, wrap each bagel individually in plastic wrap and place them in a freezer-safe bag. They can be stored in the freezer for up to 3 months. When you’re ready to enjoy them, thaw at room temperature and warm them in the oven at 350°F for about 10 minutes.

How do I know if the yeast is active?
To check if your yeast is alive, mix it with warm water and sugar (as per the instructions) and let it sit for about 10 minutes. If it becomes bubbly and foamy, your yeast is active and ready to use! If it doesn’t foam, it’s best to start over with fresh yeast.

What if my dough is sticky after mixing?
If your dough feels too sticky, you can sprinkle in a little extra flour, one tablespoon at a time, until it reaches a soft, elastic texture. Remember to knead well after adding more flour to develop the gluten which will help the dough hold its shape when twisted into bagels.

Are Candy Cane Bagels suitable for people with allergies?
Candy Cane Bagels contain gluten and sugar, so they are not suitable for individuals with gluten intolerance or diabetes. If you have any specific dietary concerns, I recommend consulting your healthcare provider before indulging in this festive treat!

Candy Cane Bagels

Candy Cane Bagels

These Candy Cane Bagels are a delightful holiday treat that combines whimsical design with delicious flavor.
Print Recipe Pin Recipe
Prep Time 30 minutes mins
Cook Time 40 minutes mins
Rising Time 1 hour hr 30 minutes mins
Total Time 2 hours hrs 40 minutes mins
Servings: 8 bagels
Course: BREAKFAST & BRUNCH
Cuisine: American
Calories: 180
Ingredients Equipment Method Nutrition Notes

Ingredients
  

For the Dough
  • 1.5 cups Warm water helps activate the yeast for that perfect rise.
  • 3 tablespoons Granulated Sugar feeds the yeast, contributing to a delightful flavor.
  • 4 teaspoons Active Dry Yeast the star ingredient that makes our Candy Cane Bagels fluffy and delicious!
  • 3.5 cups All Purpose Flour provides the base for our soft and chewy bagels.
  • 2 teaspoons Salt enhances the overall flavor of the dough.
For the Colors
  • 1 drop Red Gel Food Colouring adds a festive hue to make your bagels truly pop!
  • 1 drop Green Gel Food Colouring perfect for bringing that classic holiday vibe to your breakfast spread.
  • 1 drop White Gel Food Colouring helps achieve that beautiful swirled effect.

Equipment

  • large mixing bowl
  • glass measuring cup
  • stand mixer with dough hook
  • sharp knife
  • baking sheets
  • parchment paper
  • pot for boiling

Method
 

How to Make Candy Cane Bagels
  1. Measure warm water into a glass measuring cup or bowl, ensuring it’s warm but not hot.
  2. Stir in the granulated sugar and active dry yeast. Allow this mixture to stand for about 10 minutes until it becomes bubbly and foamy.
  3. Combine flour and salt in a large mixing bowl. Pour in the bubbly yeast mixture and stir well until you have a cohesive dough.
  4. Knead the dough on a floured surface until it's soft and elastic, about 5-10 minutes.
  5. Divide the dough into 3 equal pieces. Set one piece aside for later use, and split one of the larger pieces into two equal halves.
  6. Mix gel food coloring into each piece: the largest will be white, the next will be red, and the smallest will be green.
  7. Place each colored dough in separate lightly greased bowls. Cover them with plastic wrap and allow them to rise for about 1 hour.
  8. Flatten the red dough into a rectangle about 8 x 10 inches wide, and brush with water.
  9. Stack the white dough on top of the red, brushing with water again. Repeat with the green dough.
  10. Stack the remaining piece of white dough on top of the green and cut the loaf into 8 equal strips.
  11. Twist each strip of dough into a candy cane-like spiral and secure the ends together.
  12. Prepare your baking sheets with parchment paper and place the formed bagels on the sheets.
  13. Preheat your oven to 350°F and bring a large pot of water to a boil.
  14. Simmer the water, then carefully drop your bagels into the pot, cooking 2 or 3 at a time.
  15. Drain the bagels well after boiling and place them on the prepared baking sheet.
  16. Bake them in the preheated oven for 38-40 minutes until lightly golden brown.
  17. Optional: Drizzle with a light glaze for an extra festive touch.

Nutrition

Serving: 1bagelCalories: 180kcalCarbohydrates: 36gProtein: 6gFat: 1gSodium: 210mgPotassium: 80mgFiber: 1gSugar: 4gCalcium: 20mgIron: 1mg

Notes

Ensure your water is warm but not too hot to avoid killing the yeast. Allow the yeast mixture enough time to bubble, and knead the dough until smooth and elastic for the right texture.

Tried this recipe?

Let us know how it was!

Filed Under: BREAKFAST & BRUNCH

Brown Butter Sugar Cookies

December 27, 2025 by JudyWhite Leave a Comment

There’s something delightfully nostalgic about the smell of cookies baking in the oven, and when brown butter is involved, it’s a whole new level of comfort. Picture this: the deep, nutty aroma wafting through your kitchen as the butter transforms into a golden elixir, ready to elevate your favorite treats. That’s exactly what inspired me to create my Brown Butter Sugar Cookies, a treat that’s not just about sweetness but also a luscious depth of flavor.

I found myself longing for a simple yet indulgent dessert that could impress friends and family without spending hours in the kitchen. These cookies offer the perfect solution—a charming blend of chewy and crispy textures, adorned with colorful sprinkles to add a festive touch. Whether it’s a casual gathering or just a cozy night in, these cookies are guaranteed to bring smiles and warm hearts. So grab your mixing bowl and let’s dive into creating these incredibly satisfying Brown Butter Sugar Cookies!

Why You'll Love This Brown Butter Sugar Cookies

  • These Brown Butter Sugar Cookies combine ease and indulgence, making them a go-to treat for any occasion.
  • The rich, nutty flavor of browned butter takes these classic cookies to a whole new level that everyone will adore.
  • They’re incredibly versatile too, perfect for festive gatherings or just a cozy night at home with family.
  • Plus, with their delightful appearance adorned with colorful sprinkles, they are as visually appealing as they are delicious.
  • You won’t believe how quickly they come together, saving you valuable time in the kitchen without compromising on taste.
  • These cookies are sure to be a crowd-pleaser, evoking smiles and nostalgia with every bite.

Brown Butter Sugar Cookies Ingredients

• Here’s everything you need to create your tasty cookies!

For the Cookie Dough

  • Unsalted butter – the star ingredient that transforms into rich, nutty brown butter for an unforgettable flavor.
  • Granulated sugar – adds sweetness and helps create a lovely texture.
  • Light brown sugar – brings warmth and depth, enhancing the caramel notes in the cookies.
  • All-purpose flour – provides the perfect structure for your cookies; you’ll need two cups plus an extra two tablespoons for adjustment.
  • Baking soda – gives the cookies a soft and chewy texture as they rise in the oven.
  • Salt – balances sweetness and enhances all flavors.
  • Large egg – binds everything together, giving the cookies their rich, tender crumb.
  • Pure vanilla extract – infuses a warm, aromatic essence that complements the cookie perfectly.

For Topping

  • Sprinkles – add vibrant color and fun, making these cookies festive for any occasion.
  • Nonpareils – tiny, round candies that provide an extra crunch and delightful visual appeal.

These ingredients come together seamlessly to create the ultimate Brown Butter Sugar Cookies!

How to Make Brown Butter Sugar Cookies

  1. Brown the Butter: In a skillet, melt the unsalted butter over medium heat. Stir frequently until it bubbles and begins to turn a golden brown, releasing a rich nutty aroma (about 5-7 minutes).

  2. Mix Sugars and Butter: In a mixing bowl, combine the granulated sugar, brown sugar, and the browned butter. Mix until well combined, creating a smooth and glossy texture that hints at the deliciousness to come.

  3. Incorporate Egg and Vanilla: Crack the large egg into the sugar mixture along with the vanilla extract. Mix until everything is beautifully blended, creating a luscious batter that’s hard to resist!

  4. Whisk Dry Ingredients: In a separate bowl, whisk together the all-purpose flour, baking soda, and salt. This step ensures your cookies will have the perfect rise and texture.

  5. Combine Wet and Dry: Gradually add the dry ingredients to the wet mixture, stirring gently until just combined. Aim for a soft dough that holds together but don’t overmix to keep your cookies tender.

  6. Adjust Dough Consistency: If the dough feels too soft, stir in the additional flour, one tablespoon at a time, until it reaches a desired consistency that you can easily scoop.

  7. Scoop and Decorate: Using a cookie scoop or spoon, drop dough onto a baking sheet lined with parchment paper. Top each cookie with colorful sprinkles and nonpareils for added flair before baking.

  8. Bake to Perfection: Place in a preheated oven at 350°F and bake until golden brown, about 13 minutes. You’ll know they’re ready when the edges are set, and the centers look slightly soft.

Optional: Drizzle a simple glaze on top for an extra sweet finishing touch.

Exact quantities are listed in the recipe card below.

How to Store and Freeze Brown Butter Sugar Cookies

Room Temperature: Store your Brown Butter Sugar Cookies in an airtight container at room temperature for up to 3 days for optimal freshness.

Fridge: To extend their lifespan, you can refrigerate the cookies in a sealed container for up to 1 week. Allow them to come to room temperature before serving.

Freezer: Freeze the cookies by placing them in a single layer in an airtight container with parchment paper between layers. They will stay fresh for up to 3 months.

Reheating: When ready to enjoy, let frozen cookies thaw at room temperature or microwave for 10-15 seconds to revive their delightful texture.

What to Serve with Brown Butter Sugar Cookies?

Imagine a delightful gathering, where the sweet aroma of freshly baked cookies is complemented by other comforting companions.

  • Rich Hot Chocolate: The creamy warmth of hot chocolate pairs beautifully with the nutty flavor of these cookies, making every bite a cozy indulgence.
  • Chai Tea: With its spiced undertones, chai tea creates a lovely contrast to the sweetness of the cookies—perfect for an evening treat.
  • Vanilla Ice Cream: A scoop of vanilla ice cream melting alongside these cookies creates a heavenly dessert experience; the cold creaminess beautifully balances their warm, chewy texture.
  • Fruit Salad: A vibrant fruit salad adds a refreshing burst of color and tartness, elevating the sweetness of the cookies for a well-rounded snack.
  • Milk: The classic pairing of milk is always a favorite, enhancing the flavors and making these cookies even more irresistible.
  • Coffee: A freshly brewed cup of coffee brings out the rich, nutty notes of the brown butter while adding a delightful aroma to your snack time.
  • Lemon Bars: The tangy zest of lemon bars provides a refreshing counterpart to the sweet richness of these cookies, adding a delightful zesty twist to your dessert spread.
  • Cheese Platter: Include a selection of creamy and sharp cheeses, as they can provide a delightful savory contrast that enhances each bite of the sugary delight.
  • Brownie Sundae: For the ultimate indulgence, pair with a brownie sundae. The combination of textures and flavors is a dream come true for any dessert lover!

Brown Butter Sugar Cookies Variations

Feel free to mix things up and make these cookies truly your own with these fun twists!

  • Nutty Delight: Add 1/2 cup of chopped walnuts or pecans for a delicious crunch that pairs perfectly with the brown butter.

  • Chocolate Chip: Stir in 1 cup of semi-sweet chocolate chips to elevate the sweetness and add a delightful gooeyness.

  • Oatmeal Twist: Substitute 1 cup of flour with rolled oats for a heartier texture and slight chewiness that satisfies.

  • Spiced Up: Incorporate 1 teaspoon of cinnamon or cardamom to add a warm, aromatic spice that dances with the sweetness.

  • Citrus Zing: Grate the zest of one orange or lemon into the dough for a bright, refreshing flavor that balances the richness of the butter.

  • Gluten-Free: Use a gluten-free all-purpose flour blend instead of regular flour, and enjoy the same tender, delightful cookies without gluten.

  • Chili Kick: Mix in a pinch of cayenne pepper for a surprising heat that complements the sweet cookie base.

  • Dried Fruit: Toss in 1/2 cup of dried cranberries or cherries for a tart contrast that enhances each bite.

These variations will spark your creativity and ensure you never have the same cookie twice!

Make Ahead Options

These Brown Butter Sugar Cookies are perfect for busy home cooks looking to save time without sacrificing flavor! You can prepare the cookie dough up to 3 days in advance by mixing all the ingredients and storing the dough in an airtight container in the refrigerator. This not only helps to meld the flavors beautifully but also makes it much easier to whip up fresh cookies on short notice. If you prefer, you can also scoop the dough onto baking sheets, freeze them for up to 24 hours until firm, then transfer to a freezer-safe bag. When you’re ready to bake, just pop them in the oven straight from the freezer, adding an extra minute or two to the baking time for delicious, freshly baked Brown Butter Sugar Cookies.

Chef's Helpful Tips

  • To achieve the best flavor in your Brown Butter Sugar Cookies, make sure to brown the butter over medium heat, stirring constantly until it reaches a deep golden color and smells nutty.
  • Avoid overmixing the dough after adding the dry ingredients, as this can lead to tough cookies; mix just until you no longer see dry flour.
  • If your dough seems too sticky, gradually add the extra flour, a tablespoon at a time, to reach the desired consistency without making the cookies too dry.
  • Bake the cookies until the edges are set and the centers are slightly soft for the perfect chewy texture.

Brown Butter Sugar Cookies Recipe FAQs

How do I select the best butter for making Brown Butter Sugar Cookies?
Absolutely! The key to great brown butter lies in quality. Choose unsalted butter, as it allows you to control the saltiness of your cookies. Look for butters with a higher fat content (around 82% or more) for a richer flavor. When you brown the butter, watch for a deep golden color and a nutty aroma—these are signs that it’s just perfect!

What is the best way to store Brown Butter Sugar Cookies?
To keep your delicious cookies fresh, store them in an airtight container at room temperature for up to 3 days. If you want to prolong their shelf life, pop them in the fridge where they can last about a week. Ensure they are cooled completely before placing them in the container to avoid any moisture build-up.

Can I freeze Brown Butter Sugar Cookies?
Very! Freezing these cookies is a fantastic option. To do this, let the cookies cool completely, then stack them in a single layer in an airtight container. Place parchment paper between layers to prevent sticking, and store for up to 3 months. When you’re ready to enjoy, simply let them thaw at room temperature, or microwave for 10-15 seconds for that freshly-baked taste.

What should I do if my cookie dough is too sticky?
No worries, it happens! If your dough is too sticky, add all-purpose flour in small increments—start with one tablespoon at a time—until it reaches a workable consistency. Keep in mind that overmixing can lead to tough cookies, so mix gently just until the dough holds together.

Are there any dietary considerations for these cookies?
Absolutely! If you’re making Brown Butter Sugar Cookies for someone with allergies, keep in mind they contain gluten and dairy. There are gluten-free flour blends that you can use as a substitute for all-purpose flour. Be cautious with sprinkles or nonpareils, as some brands may contain gluten or dairy, so check the labels. Enjoy baking while keeping everyone’s dietary needs in mind!

Brown Butter Sugar Cookies

Brown Butter Sugar Cookies

Delight in the rich, nutty flavor of Brown Butter Sugar Cookies, perfect for any occasion.
Print Recipe Pin Recipe
Prep Time 15 minutes mins
Cook Time 13 minutes mins
Total Time 28 minutes mins
Servings: 24 cookies
Course: DESSERT RECIPES
Cuisine: American
Calories: 150
Ingredients Equipment Method Nutrition Notes

Ingredients
  

For the Cookie Dough
  • 1 cup Unsalted butter brown
  • 3/4 cup Granulated sugar
  • 3/4 cup Light brown sugar
  • 2 cups All-purpose flour
  • 1 teaspoon Baking soda
  • 1/2 teaspoon Salt
  • 1 large Large egg
  • 1 teaspoon Pure vanilla extract
For the Toppings
  • 1/4 cup Sprinkles
  • 1/4 cup Nonpareils

Equipment

  • Skillet
  • Mixing bowl
  • Whisk
  • cookie scoop
  • Baking sheet
  • parchment paper

Method
 

How to Make Brown Butter Sugar Cookies
  1. In a skillet, melt the unsalted butter over medium heat. Stir frequently until it bubbles and begins to turn a golden brown, releasing a rich nutty aroma (about 5-7 minutes).
  2. In a mixing bowl, combine the granulated sugar, brown sugar, and the browned butter. Mix until well combined, creating a smooth and glossy texture that hints at the deliciousness to come.
  3. Crack the large egg into the sugar mixture along with the vanilla extract. Mix until everything is beautifully blended, creating a luscious batter that’s hard to resist!
  4. In a separate bowl, whisk together the all-purpose flour, baking soda, and salt. This step ensures your cookies will have the perfect rise and texture.
  5. Gradually add the dry ingredients to the wet mixture, stirring gently until just combined. Aim for a soft dough that holds together but don’t overmix to keep your cookies tender.
  6. If the dough feels too soft, stir in the additional flour, one tablespoon at a time, until it reaches a desired consistency that you can easily scoop.
  7. Using a cookie scoop or spoon, drop dough onto a baking sheet lined with parchment paper. Top each cookie with colorful sprinkles and nonpareils for added flair before baking.
  8. Place in a preheated oven at 350°F and bake until golden brown, about 13 minutes. You'll know they're ready when the edges are set, and the centers look slightly soft.

Nutrition

Serving: 1cookieCalories: 150kcalCarbohydrates: 20gProtein: 1gFat: 7gSaturated Fat: 4gPolyunsaturated Fat: 0.5gMonounsaturated Fat: 2gCholesterol: 25mgSodium: 100mgPotassium: 50mgSugar: 10gVitamin A: 200IUCalcium: 10mgIron: 0.5mg

Notes

For an extra sweet finishing touch, drizzle a simple glaze on top.

Tried this recipe?

Let us know how it was!

Filed Under: BREAKFAST & BRUNCH

Cinnamon Apple Fritters Recipe

December 25, 2025 by JudyWhite Leave a Comment

As the leaves begin to turn and the air grows crisp, I find myself craving comforting treats that evoke the essence of autumn. That’s when I discovered the magic of homemade Cinnamon Apple Fritters. Picture this: the subtle warmth of cinnamon wafting through the air as tender apple bits mingle in a golden, crispy batter. It’s the perfect solution for those evenings when takeaway options just won’t cut it.

This delightful recipe is a breeze to whip up, taking only 30 minutes from start to finish, making it an ideal choice for both seasoned chefs and home cooks looking for a new favorite. With just a handful of ingredients, including fresh Pink Lady apples and a drizzle of golden syrup over creamy vanilla ice cream, these fritters deliver a burst of flavor that will impress family and friends alike. Join me as we dive into this comforting treat that brings a touch of homemade warmth to any occasion!

Why You'll Love This Cinnamon Apple Fritters Recipe

  • This Cinnamon Apple Fritters Recipe is incredibly easy to make, taking just 30 minutes from start to finish.
  • The warm spices and sweet apples create an irresistible flavor combination that everyone will adore.
  • These fritters are versatile and can be enjoyed as a dessert or a cozy snack at any time of day.
  • The visual appeal of the golden-brown fritters drizzled with golden syrup and served with vanilla ice cream is sure to impress your guests and elevate any gathering.

Cinnamon Apple Fritters Ingredients

For the Batter

  • 1 cup self-raising flour – essential for achieving that fluffy texture in your fritters.
  • 1/4 tsp bicarbonate of soda – boosts the batter’s rise and creates a light crunch.
  • 1 cup soda water, chilled – the bubbles add a delightful crispiness to the fritters.
  • 1/2 cup caster sugar – offers a subtle sweetness that beautifully complements the apples.
  • 1 tsp ground cinnamon – infuses warmth and spice, making this a true cinnamon apple fritters recipe.

For the Apples

  • 2 large pink lady apples – their sweetness and tartness provide the perfect flavor balance, so peel and core them well!

For Frying

  • Vegetable oil – needed for shallow-frying; make sure it’s hot enough to get that golden finish.

For Serving

  • 4 scoops vanilla ice-cream – adds creaminess that pairs perfectly with warm fritters.
  • 1/3 cup golden syrup – a luscious drizzle to enhance the sweetness and presentation.

How to Make Cinnamon Apple Fritters

  1. Combine Ingredients: In a large bowl, mix together the self-raising flour, bicarbonate of soda, chilled soda water, caster sugar, and ground cinnamon until smooth. This mixture forms the base for your delightful fritters!

  2. Fold in Apples: Dice the peeled and cored Pink Lady apples into small pieces. Gently fold them into the batter, ensuring they’re well-coated for that delicious apple flavor in every bite.

  3. Heat Oil: In a frying pan, heat a generous amount of vegetable oil over medium heat. You’ll know it’s ready when a small drop of batter sizzles immediately upon contact—the perfect temperature for frying.

  4. Fry Fritters: Using a spoon, drop dollops of the batter mixed with apple pieces into the hot oil. Fry each fritter for about 3-4 minutes on each side, or until they turn a lovely golden brown and are crispy on the outside.

  5. Drain Excess Oil: Carefully remove the fritters from the oil and place them on paper towels to absorb any excess oil. This keeps them light and fluffy without extra greasiness.

  6. Serve Warm: Plate the fritters warm, adding scoops of vanilla ice cream on the side. Drizzle the fritters with golden syrup for that extra touch of sweetness.

Optional: Dust with powdered sugar for an elegant finish.
Exact quantities are listed in the recipe card below.

What to Serve with Cinnamon Apple Fritters?

Imagine elevating your homemade fritters into a full meal that delights the senses and warms the heart.

  • Maple Bacon: The crispy, savory richness of bacon contrasts beautifully with the sweet, warm spices of the fritters, creating a balance of flavors. It’s a classic pairing that everyone loves!

  • Caramelized Walnuts: These crunchy pieces offer a delightful nutty flavor that complements the soft, sweet apples in the fritters. Toss them over the top for an extra touch of luxury.

  • Whipped Cream: Light and airy, whipped cream adds a fluffy texture that matches the fritters’ warmth. Drizzle it on top for an indulgent treat.

  • Cinnamon Hot Chocolate: A warm, spiced drink pairs perfectly with the cinnamon undertones of your fritters, making every bite even more comforting. It’s a hug in a mug to accompany your sweet snack.

  • Crisp Green Salad: A refreshing salad with mixed greens, cherry tomatoes, and a light vinaigrette can balance the richness of the fritters. The crunchiness adds a delightful contrast, ensuring a well-rounded meal.

  • Warm Apple Cider: Enjoying a mug of warm apple cider alongside your fritters enhances the cozy feel of your snack. Its spiced notes tie in wonderfully with the cinnamon flavor.

  • Vanilla Ice Cream: A scoop of creamy vanilla ice cream provides a luscious contrast to the warm fritters, making it an irresistible dessert choice. The melt-in-your-mouth texture is simply divine!

Make Ahead Options

These Cinnamon Apple Fritters are perfect for busy home cooks looking to save time! You can prepare the batter and fold in the diced Pink Lady apples up to 24 hours in advance. Simply mix the self-raising flour, bicarbonate of soda, chilled soda water, caster sugar, and ground cinnamon in a bowl, then refrigerate the mixture (covering it tightly to avoid any browning). When you’re ready to serve, just heat the vegetable oil and drop spoonfuls of the chilled batter into the hot oil, frying until golden brown. This prep-ahead tip ensures that your fritters are just as delicious while reducing your cooking time significantly during busy weeknights!

Cinnamon Apple Fritters Variations

Get ready to experience the joy of personalizing your fritters with delightful twists and flavor swaps!

  • Gluten-Free: Substitute the self-raising flour with a gluten-free blend to keep this recipe celiac friendly. Just ensure it has a good rising agent for that fluffy texture!

  • Apple Alternatives: Experiment with different apples like Granny Smith or Honeycrisp for varied sweetness and tartness. Each variety brings out a unique flavor profile that can surprise your taste buds.

  • Spiced Up: Add a pinch of nutmeg or cardamom to the batter for an extra spice kick. The warmth of these spices can elevate your fritters to new heights of deliciousness!

  • Sugar Swap: Use coconut sugar or maple syrup instead of caster sugar for a richer, more earthy sweetness. This can enhance both flavor and nutrition!

  • Dairy-Free: Replace vanilla ice cream with coconut or almond milk ice cream for a creamy, dairy-free option that’s just as satisfying. The coconut flavor pairs beautifully with the fritters.

  • Cheesy Goodness: Incorporate small chunks of cream cheese into the batter before frying for a creamy, delicious surprise in every bite. It adds a delightful tang that makes these fritters even more indulgent.

  • Add Some Heat: Sprinkle in some chopped jalapeños for a spicy touch that balances the sweetness of the apples. This surprising twist can turn your fritters into a flavorful adventure!

  • Dust It Up: Finish with a dusting of powdered sugar or a sprinkle of cinnamon-sugar after frying for an elegant touch that adds a sweet crunch. It makes for a visually stunning presentation that will wow your guests!

How to Store and Freeze Cinnamon Apple Fritters

Room Temperature: Keep any leftover fritters in an airtight container for up to 2 days. Enjoy them warm or at room temperature for a delightful treat!

Fridge: To keep your fritters fresh, store them in the refrigerator in an airtight container for up to 3 days. Reheat in a toaster oven for a tasty warm treat.

Freezer: For longer storage, freeze fritters in a single layer on a baking sheet, then transfer to a freezer bag for up to 3 months. Reheat from frozen in the oven or air fryer for crispiness.

Reheating: Reheat fritters in the oven or air fryer at 350°F (175°C) for about 5-7 minutes to restore their delightful crunch before serving.

Chef's Helpful Tips

  • When preparing your Cinnamon Apple Fritters, ensure your soda water is well-chilled as this will help create a light and airy batter.
  • Be careful not to over-mix the batter once you add the apples, as this can lead to dense fritters instead of fluffy ones.
  • Always test the oil temperature before frying by dropping in a small spoonful of batter; if it sizzles and bubbles, you’re ready to go.
  • Fry the fritters in batches to avoid overcrowding the pan, which can lower the oil temperature and result in uneven cooking.

Cinnamon Apple Fritters Recipe FAQs

How do I know if my apples are ripe enough for this recipe?
Absolutely! For the best flavor, pick apples that are firm and vibrant. Look for Pink Lady apples that have a nice balance between sweet and tart. Avoid apples with dark spots or bruises, as they may not provide the desired taste or texture in your fritters.

What’s the best way to store leftover Cinnamon Apple Fritters?
To keep your fritters fresh, store them in an airtight container at room temperature for up to 2 days. If you want them to last longer, refrigerate them in an airtight container for up to 3 days. Just remember to reheat them in a toaster oven or regular oven to maintain that crispy exterior before enjoying!

Can I freeze my Cinnamon Apple Fritters?
Very! To freeze, first place your fritters in a single layer on a baking sheet to freeze them individually for about 1-2 hours. Once frozen, transfer them to a freezer bag for up to 3 months. When you’re ready to enjoy, reheat from frozen in the oven at 350°F (175°C) for 8-10 minutes, and they will come out wonderfully crispy!

What if my batter turns out too thick or too thin?
No worries! If your batter is too thick, simply add a bit more chilled soda water until you reach the desired consistency—you want it to be pourable but not runny. Conversely, if it’s too thin, sprinkle in a little more flour until it thickens up. It’s all about getting that perfect texture for golden, fluffy fritters.

Are Cinnamon Apple Fritters safe for pets?
While these fritters are delicious for humans, it’s best to avoid sharing them with pets. The sugar and fried ingredients can be harmful to dogs and cats. Stick to offering plain apple slices for your furry friends as a special treat instead!

Cinnamon Apple Fritters Recipe

Cinnamon Apple Fritters Recipe

Deliciously warm and crispy homemade cinnamon apple fritters, perfect for autumn cravings.
Print Recipe Pin Recipe
Prep Time 15 minutes mins
Cook Time 15 minutes mins
Total Time 30 minutes mins
Servings: 4 fritters
Course: DESSERT RECIPES
Cuisine: American
Calories: 250
Ingredients Equipment Method Nutrition Notes

Ingredients
  

For the Batter
  • 1 cup self-raising flour essential for achieving fluffy texture
  • 1/4 tsp bicarbonate of soda boosts rise and creates light crunch
  • 1 cup soda water, chilled bubbles add crispiness
  • 1/2 cup caster sugar adds subtle sweetness
  • 1 tsp ground cinnamon infuses warmth and spice
For the Apples
  • 2 large pink lady apples peeled and cored
For Frying
  • vegetable oil for shallow frying
For Serving
  • 4 scoops vanilla ice-cream pairs perfectly with warm fritters
  • 1/3 cup golden syrup for drizzling

Equipment

  • frying pan
  • Mixing bowl
  • measuring cups
  • measuring spoons
  • paper towels

Method
 

How to Make Cinnamon Apple Fritters
  1. In a large bowl, mix together the self-raising flour, bicarbonate of soda, chilled soda water, caster sugar, and ground cinnamon until smooth.
  2. Dice the peeled and cored Pink Lady apples into small pieces and fold them into the batter.
  3. In a frying pan, heat vegetable oil over medium heat until hot.
  4. Drop dollops of the batter mixed with apple pieces into the hot oil and fry for about 3-4 minutes on each side.
  5. Remove the fritters from the oil and place them on paper towels to drain excess oil.
  6. Plate the fritters warm, add scoops of vanilla ice cream on the side, and drizzle with golden syrup.

Nutrition

Serving: 1fritterCalories: 250kcalCarbohydrates: 35gProtein: 2gFat: 12gSaturated Fat: 1.5gSodium: 200mgPotassium: 100mgFiber: 1gSugar: 10gVitamin A: 100IUVitamin C: 5mgCalcium: 10mgIron: 0.5mg

Notes

Optional: Dust with powdered sugar for an elegant finish.

Tried this recipe?

Let us know how it was!

Filed Under: BREAKFAST & BRUNCH

Vanilla French Beignets

December 25, 2025 by JudyWhite Leave a Comment

The moment you take your first bite of a Vanilla French Beignet, it feels like you’ve been transported to a quaint café on the streets of New Orleans. The way these light, fluffy morsels melt in your mouth as they’re enveloped in a dusting of powdered sugar is pure bliss. I remember the first time I decided to make beignets at home; the sizzle of dough hitting hot oil filled my kitchen with a warm, inviting aroma that made my heart race with excitement.

After a long week of fast food and takeout, these homemade delights are a delightful reprieve that not only feeds the soul but also brings a joyful moment of creativity in the kitchen. Whether you’re gathering friends for brunch or simply indulging in a lazy weekend treat, these Vanilla French Beignets are surprisingly easy to whip up and will have everyone asking for seconds. So, roll up your sleeves and let’s dive into this sweet adventure—it may just become your new favorite baking tradition!

Why You'll Love This Vanilla French Beignets

  • These Vanilla French Beignets are incredibly easy to make, requiring minimal effort and yielding delicious results.
  • The rich vanilla flavor combined with the light, fluffy texture makes each bite a delightful experience.
  • With their captivating golden-brown color and a generous dusting of powdered sugar, these beignets are sure to impress anyone who tries them.
  • They are a versatile treat perfect for brunch gatherings, lazy weekends, or even special occasions, making them a crowd-pleaser for any event.

Vanilla French Beignets Ingredients

For the Dough

  • All-purpose flour – Provides the perfect base for fluffy beignets.
  • Granulated sugar – Adds a touch of sweetness to balance the flavor.
  • Active dry yeast – This is the magic ingredient that helps your dough rise.
  • Salt – Enhances the overall flavor of the beignets.
  • Warm milk – Activates the yeast, making your beignets light and airy.
  • Unsalted butter – Contributes to a rich flavor and soft texture.
  • Pure vanilla extract – Infuses the beignets with a delightful vanilla essence.

For Frying

  • Vegetable oil – Essential for achieving that irresistible golden-brown exterior.

For Dusting

  • Powdered sugar – The finishing touch that adds sweetness and a beautiful appearance.

These ingredients come together to create the dreamy Vanilla French Beignets you’re sure to love!

How to Make Vanilla French Beignets

  1. Combine the dry ingredients in a large bowl. Mix the all-purpose flour, granulated sugar, active dry yeast, and salt until well blended, creating the foundation for your delicious beignets.

  2. Whisk together the wet ingredients in a separate bowl. In this step, blend the warm milk, melted unsalted butter, and pure vanilla extract until smooth and inviting.

  3. Pour the wet ingredients into the dry ingredients gradually. Stir gently as the flour mixture incorporates the milk, forming a soft dough.

  4. Knead the dough on a lightly floured surface. Work it for about 8-10 minutes until it feels smooth and elastic, a satisfying sign of perfect dough consistency.

  5. Let rise the kneaded dough in a greased bowl. Cover it and place it in a warm spot for about 1.5 hours, or until it doubles in size—this is where the magic happens!

  6. Punch down the dough to release air. Roll it out to about 1/4 inch thickness, then cut it into squares measuring 2×2 inches—watch as the beignets come to life!

  7. Heat the vegetable oil in your deep fryer or large pot. Aim for 360°F, the perfect temperature for frying beignets, ensuring they puff up beautifully.

  8. Fry the beignets in batches. Cook them for about 1-2 minutes on each side until they’re golden brown and puffed up, then drain them on paper towels to absorb the excess oil.

  9. Dust generously with powdered sugar. The final touch transforms your beignets into a heavenly treat, best enjoyed while they’re still warm and fresh.

  10. Cool the beignets slightly on a wire rack if not serving immediately. This helps maintain their fluffy texture while you prepare to impress your family or friends!

Optional: Serve with a side of hot chocolate or coffee for a delightful pairing.

Exact quantities are listed in the recipe card below.

Vanilla French Beignets Variations

Customize your beignets to discover exciting flavor profiles and dietary adaptations that everyone will love!

  • Gluten-Free: Substitute all-purpose flour with a gluten-free blend for an equally delightful experience. Just ensure the blend includes xanthan gum for texture.

  • Vegan: Replace milk with almond or oat milk, and use melted coconut oil instead of butter for a compassionate treat. These adjustments keep the essence of beignets while being plant-based friendly.

  • Chocolate-Dipped: Once fried, dip half of each beignet in melted chocolate and let cool. This adds a rich decadence that chocolate lovers will adore.

  • Cinnamon Sugar: Instead of powdered sugar, mix granulated sugar with cinnamon for a cozy twist. The warm, aromatic flavor provides a lovely spin on the traditional beignet.

  • Maple Glaze: Drizzle an easy maple glaze on top made with powdered sugar and maple syrup for a sweet, sticky finish that adds a lovely maple essence.

  • Spiced Delight: Add a pinch of nutmeg or cardamom to the dry ingredients for an aromatic depth that elevates the beignet’s flavor profile beyond vanilla.

  • Savory Beignets: Incorporate shredded cheese or finely chopped herbs into the dough for a savory twist, perfect as an appetizer or snack. These variations will surprise your guests in the best way!

  • Fruit-Filled: Before frying, fill each square of dough with a spoonful of fruit preserves or cream cheese mixture. This lightens the beignet and adds a burst of flavor in every bite.

Experimenting with variations not only makes the beignets uniquely yours but also invites endless creativity in the kitchen!

What to Serve with Vanilla French Beignets?

Indulging in warm, fluffy Vanilla French Beignets sets the stage for a delightful meal that beckons for enticing pairings.

  • Rich Hot Chocolate: A steaming cup of hot chocolate offers a cozy contrast to the beignets’ sweetness, perfect for a chilly day.

  • Fresh Berries: Juicy strawberries or raspberries add a tart note, beautifully balancing the rich vanilla flavor of the beignets.

  • Crisp Bacon: The savory, crispy texture of bacon complements the sweetness, creating a harmonious blend in every bite.

  • Maple Syrup: Drizzling warm maple syrup over the beignets enhances their flavor while adding delightful sweetness and moisture.

  • Café au Lait: A classic French coffee with steamed milk elevates the experience, providing a perfect sipper alongside your beignets.

  • Creamy Vanilla Yogurt: The light tang of yogurt contrasts beautifully with the sweet treat, making for an irresistible pairing.

  • Lemon Zest: A sprinkle of lemon zest brightens the flavor profile, giving a refreshing twist that uplifts each bite.

  • Vanilla Ice Cream: For an extra indulgent touch, serve warm beignets alongside a scoop of vanilla ice cream for a delicious dessert surprise.

Make Ahead Options

These Vanilla French Beignets are perfect for busy home cooks looking to save time! You can prepare the dough up to 24 hours in advance. Simply follow the recipe up to the point of letting the dough rise, then cover it tightly with plastic wrap and refrigerate. When you’re ready to fry, let the dough sit at room temperature for about 30 minutes to activate the yeast again. After that, simply punch down, roll out, and cut into squares before frying as instructed. This method not only saves time but also ensures your beignets are just as delicious as if made fresh, letting you enjoy delightful treats without the stress!

How to Store and Freeze Vanilla French Beignets

  • Room Temperature: Enjoy your Vanilla French Beignets fresh for up to 2 days, storing them in an airtight container to keep them from becoming stale.

  • Fridge: If you have leftovers, store them in the refrigerator for up to 5 days. Place them in a container with a lid to maintain moisture and softness.

  • Freezer: For longer storage, freeze your beignets in a single layer on a baking sheet before transferring them to a freezer-safe bag. They can last up to 3 months while preserving their delightful texture.

  • Reheating: To bring back that fresh-out-of-the-fryer taste, reheat frozen beignets directly from the freezer in a 350°F oven for about 10-12 minutes. Dust with powdered sugar before serving for the full experience!

Chef's Helpful Tips

  • When making Vanilla French Beignets, it’s crucial to knead your dough thoroughly for 8-10 minutes to develop gluten, which will give your beignets their signature light and fluffy texture.
  • Avoid using cold milk in the wet mixture, as warm milk activates the yeast effectively for a better rise.
  • Be careful not to overcrowd the fryer; fry the beignets in small batches to maintain consistent oil temperature for even cooking.
  • Finally, remember to let the oil reach exactly 360°F before frying for that perfect golden-brown color and airy interior.

Vanilla French Beignets Recipe FAQs

What type of flour is best for making Vanilla French Beignets?
For the best results, I recommend using all-purpose flour. It strikes the perfect balance of protein and starch to create that fluffy texture we adore. Avoid using cake flour, as it may lead to less structure and dense beignets.

How should I store leftover beignets?
You can store your Vanilla French Beignets at room temperature for up to 2 days in an airtight container. If you have leftovers beyond that, keep them in the refrigerator for up to 5 days. Just ensure they’re covered to preserve moisture!

Can I freeze Vanilla French Beignets?
Absolutely! To freeze your beignets, place them in a single layer on a baking sheet and freeze until solid. Then transfer them to a freezer-safe bag or airtight container. They can be kept for up to 3 months. Just remember, they’ll taste best if you reheat them properly!

How do I reheat frozen beignets to maintain their fluffy texture?
To revitalize frozen Vanilla French Beignets, preheat your oven to 350°F. Bake them directly from the freezer for about 10-12 minutes. This will help them regain their delightful texture. Dust with powdered sugar before serving to recreate that freshly-fried magic!

What if my dough doesn’t rise properly?
If your dough doesn’t rise, it could be due to inactive yeast. Ensure your yeast is fresh and activated by dissolving it in warm milk (around 110°F), not too hot or too cold. If it’s still not rising, the environment might be too cool. Try placing your bowl in a warm spot, like an oven with just the light on, for a bit more warmth.

Are these beignets suitable for gluten-free diets?
While traditional Vanilla French Beignets are made with all-purpose flour, you can experiment with a gluten-free flour blend. Look for one that has a good structure, and consider adding a binding agent like xanthan gum to help bind the mixture together. Just be aware that the texture may differ slightly from the classic version.

Vanilla French Beignets

Vanilla French Beignets

Experience the bliss of Vanilla French Beignets with their light, fluffy texture and rich vanilla flavor, reminiscent of New Orleans cafés.
Print Recipe Pin Recipe
Prep Time 30 minutes mins
Cook Time 10 minutes mins
Rising Time 1 hour hr 30 minutes mins
Total Time 2 hours hrs 10 minutes mins
Servings: 12 beignets
Course: DESSERT RECIPES
Cuisine: French
Calories: 150
Ingredients Equipment Method Nutrition Notes

Ingredients
  

For the Dough
  • 3 cups All-purpose flour Provides the perfect base for fluffy beignets.
  • 1 tablespoon Granulated sugar Adds a touch of sweetness to balance the flavor.
  • 1 packet Active dry yeast This is the magic ingredient that helps your dough rise.
  • 1 teaspoon Salt Enhances the overall flavor of the beignets.
  • 1 cup Warm milk Activates the yeast, making your beignets light and airy.
  • 2 tablespoons Unsalted butter Contributes to a rich flavor and soft texture.
  • 1 tablespoon Pure vanilla extract Infuses the beignets with a delightful vanilla essence.
For Frying
  • 4 cups Vegetable oil Essential for achieving that irresistible golden-brown exterior.
For Dusting
  • 1 cup Powdered sugar The finishing touch that adds sweetness and a beautiful appearance.

Equipment

  • Deep fryer
  • Mixing bowls
  • Whisk
  • Rolling pin
  • Cutting Board
  • Spatula
  • Wire Rack

Method
 

How to Make Vanilla French Beignets
  1. Combine the dry ingredients in a large bowl. Mix the all-purpose flour, granulated sugar, active dry yeast, and salt until well blended.
  2. Whisk together the wet ingredients in a separate bowl. Blend the warm milk, melted unsalted butter, and pure vanilla extract until smooth.
  3. Pour the wet ingredients into the dry ingredients gradually. Stir gently to form a soft dough.
  4. Knead the dough on a lightly floured surface for about 8-10 minutes until smooth and elastic.
  5. Let rise the kneaded dough in a greased bowl for about 1.5 hours, or until it doubles in size.
  6. Punch down the dough to release air. Roll it out to about 1/4 inch thickness, then cut into 2x2 inch squares.
  7. Heat the vegetable oil in your deep fryer or large pot to 360°F.
  8. Fry the beignets in batches for about 1-2 minutes on each side until golden brown.
  9. Dust generously with powdered sugar before serving.
  10. Cool the beignets slightly on a wire rack if not serving immediately.

Nutrition

Serving: 1beignetCalories: 150kcalCarbohydrates: 20gProtein: 2gFat: 8gSaturated Fat: 5gPolyunsaturated Fat: 1gMonounsaturated Fat: 1gCholesterol: 15mgSodium: 90mgPotassium: 60mgFiber: 1gSugar: 4gVitamin A: 300IUCalcium: 10mgIron: 0.5mg

Notes

Serve with a side of hot chocolate or coffee for a delightful pairing. Enjoy fresh for the best taste!

Tried this recipe?

Let us know how it was!

Filed Under: BREAKFAST & BRUNCH

Toffee Crackers

December 24, 2025 by JudyWhite Leave a Comment

There’s something undeniably delightful about the crunch of a saltine cracker topped with a buttery, caramel-like coating, especially when it’s dressed up with rich chocolate and festive sprinkles. As the holiday season approaches, I find myself drawn to recipes that evoke nostalgia while being incredibly simple to whip up. Enter my Toffee Crackers – a treat I first made with friends during a cozy winter evening that turned into an unexpected tradition.

In just a matter of minutes, you can transform ordinary pantry staples into a spectacular dessert that’s perfect for holiday gatherings or a sweet indulgence at home. The secret lies in the buttery sweetness of the brown sugar toffee paired with that irresistible chocolate-hazelnut drizzle. Not only do these toffee crackers boast an incredible flavor profile, but they also offer endless versatility for topping, making them an absolute crowd-pleaser. So grab your apron and let’s get baking something that’s sure to bring joy to your kitchen and beyond!

Why You'll Love This Toffee Crackers

  • These Toffee Crackers are incredibly easy to make, requiring just a few simple ingredients and minimal prep time.
  • The rich combination of buttery toffee and chocolate creates an irresistible flavor that will leave everyone craving more.
  • They’re incredibly versatile, allowing you to mix and match toppings to suit any occasion or preference.
  • The visual appeal of these festive treats, adorned with sprinkles and chocolate, makes them an eye-catching addition to any dessert table.

Toffee Crackers Ingredients

• Get ready to create a festive treat!

For the Base
• 1 sleeve salted saltine crackers – a perfect crunchy base that adds delightful saltiness.
• 1 cup unsalted butter – provides richness and that signature toffee flavor.
• 1 cup dark brown sugar – packed tightly, it caramelizes for that classic toffee sweetness.
• 1 tsp vanilla extract – a hint of vanilla elevates the flavor beautifully.

For the Toppings
• 2 cups semi-sweet chocolate chips – melt into a luscious layer for a sweet indulgence.
• 1/2 cup chocolate-hazelnut spread – this adds an extra creamy richness, enhancing the toffee crackers.
• 1 cup Christmas sprinkles – festive colors make your toffee crackers pop, perfect for holiday cheer!
• 1/2 cup toasted slivered almonds – adds a lovely crunch and nutty flavor that complements the dish.

These Toffee Crackers are not only easy to prepare but also a delightful way to unleash your creativity with toppings!

How to Make Toffee Crackers

  1. Preheat the oven to 400°F (200°C) and prepare your baking sheet by lining it with parchment paper. This little step ensures that your toffee crackers won’t stick and will come out perfectly crisp!

  2. Arrange the saltine crackers in a single layer on the prepared baking sheet. Cover the entire surface; this will be the delicious base for your sweet topping!

  3. Melt the butter and brown sugar together in a saucepan over medium heat, stirring constantly until it starts to bubble. This caramel-like mixture will become the delightful toffee coating.

  4. Remove from heat and stir in the vanilla extract. The warm vanilla will enhance the overall flavor and bring a fragrant aroma to your kitchen.

  5. Pour the buttery mixture evenly over the crackers, ensuring they’re well coated. Spread it gently with a spatula for an even layer of sweetness!

  6. Bake for 5 minutes, or until the mixture is bubbly and golden. Keep an eye on it—this step enhances the flavor and creates that perfect toffee texture!

  7. Sprinkle the chocolate chips on top right after removing from the oven. Let them sit for a couple of minutes to melt, making it easier to spread later.

  8. Spread the melted chocolate evenly over the crackers using a spatula. Make sure every cracker is generously covered for that heavenly chocolate experience.

  9. Drizzle the chocolate-hazelnut spread over the chocolate layer. This adds an irresistible creaminess that takes your toffee crackers to a new level of yum!

  10. Sprinkle with Christmas sprinkles and toasted slivered almonds, adding both color and crunch. This festive touch makes them even more inviting for your holiday gatherings.

  11. Let cool completely before breaking into pieces—patience really pays off here, as they’ll turn into delightful, crispy bites!

Optional: Serve with a warm cup of cocoa for a cozy treat!
Exact quantities are listed in the recipe card below.

Toffee Crackers Variations

Feel free to unleash your creativity and customize these delightful treats for any occasion!

  • Gluten-Free: Substitute saltine crackers with gluten-free crackers or rice cakes. They’ll still deliver that satisfying crunch!
  • Nut-Free: Omit the toasted slivered almonds and replace with sesame seeds for a nut-free option that still packs a punch.
  • Spicy Twist: Add a sprinkle of cayenne pepper or chili powder to the chocolate layer for a surprising kick that perfectly balances sweetness.
  • Milk Chocolate: Switch the semi-sweet chocolate chips for milk chocolate for a sweeter and creamier flavor profile that kids will love.
  • Toffee Crunch: Add crushed toffee bits to the topping before baking for an extra layer of crunchy, buttery goodness.
  • Fruitful Addition: Toss in some dried fruit like cranberries or cherries as a topping to add a chewy texture and a pop of tartness.
  • Coconut Bliss: Incorporate shredded coconut on top for a tropical twist that adds both flavor and texture.
  • Minty Fresh: Use mint chocolate chips instead of semi-sweet for a refreshing flavor that brings a little holiday spirit to any gathering!

Experiment and enjoy each delicious variation; the possibilities are endless!

How to Store and Freeze Toffee Crackers

Room Temperature: Store your Toffee Crackers in an airtight container at room temperature for up to 5 days to maintain their crunch and flavor.

Fridge: If you prefer, you can refrigerate them for up to 2 weeks. Just ensure they are well-wrapped to prevent moisture.

Freezer: For longer storage, freeze the Toffee Crackers in a single layer in a freezer-safe container for up to 3 months. Thaw in the fridge before enjoying.

Reheating: To refresh the texture, reheat the crackers in an oven at 300°F (150°C) for about 5 minutes to regain their crispiness before serving!

Make Ahead Options

These Toffee Crackers are a fantastic option for meal prep, allowing you to prepare a delightful treat ahead of time! You can make the toffee mixture and coat the crackers up to 24 hours in advance. Simply store the coated crackers in an airtight container in the refrigerator to maintain their crispiness. When you’re ready to serve, just bake them for about 5 minutes to warm them up and melt the chocolate for a few minutes before spreading. Adding the chocolate-hazelnut spread and toppings can also be done right before serving, ensuring they look fresh and festive! This way, you’ll have a delicious, stress-free dessert ready to impress your guests!

What to Serve with Toffee Crackers?

The perfect pairing can elevate your Toffee Crackers from delightful treats to a complete holiday experience.

  • Hot Chocolate: A rich, creamy cup of hot chocolate provides warmth and contrasts beautifully with the sweet crunch of the crackers. Picture cozy sips by the fire, making every bite of your dessert even more comforting.

  • Vanilla Ice Cream: The smooth, cool texture of vanilla ice cream perfectly complements the buttery toffee layered with chocolate. The delightful contrast between warm and cold makes each bite a little celebration for your taste buds!

  • Caramel Sauce: Drizzling a bit more caramel sauce over the top can turn your Toffee Crackers into a river of sweet indulgence. This addition brings an extra layer of richness, just like a warm hug on a chilly day.

  • Fresh Fruit Salad: The tartness of fresh fruits like strawberries or raspberries cuts through the sweetness, creating a lovely balance. This refreshing element adds color and lightness to your snack table, making it visually appealing.

  • Sparkling Cider: A fizzy glass of sparkling cider adds festivity to your gathering, making it the perfect drink alongside your sweet treats. Its crispness pairs well, cleansing the palate between bites.

  • Coffee or Espresso: The strong, bold flavor of coffee brings the perfect contrast to the sweetness of Toffee Crackers. Enjoying a warm cup alongside them creates a delightful afternoon treat while you unwind.

  • Nutty Biscotti: Adding a couple of nutty biscotti can bring extra crunch and variety to your dessert. The flavors harmonize beautifully with the chocolate-hazelnut spread, enhancing the overall experience.

Let your Toffee Crackers shine by pairing them with these delightful options, creating a charming festive feast!

Chef's Helpful Tips

  • For your Toffee Crackers, ensure that the saltine crackers are arranged in a single layer to create a sturdy base that holds everything together.
  • When melting the butter and dark brown sugar, stir constantly to prevent burning and achieve a smooth caramel consistency.
  • Keep a close eye on the baking time; if you notice the mixture bubbling vigorously before the 5 minutes are up, remove it from the oven to avoid overcooking.
  • After adding the chocolate chips, allow them to sit for a few minutes before spreading, as this will help you achieve a nice, even layer of melted chocolate.

Toffee Crackers Recipe FAQs

How do I know if my saltine crackers are fresh enough to use?
Absolutely! Look for saltine crackers that are free from any dark spots or discoloration. If they’re crisp and flaky with a pleasant salty aroma, they’re perfect for this Toffee Crackers recipe!

How should I store my Toffee Crackers to keep them fresh?
For sure! Store your Toffee Crackers in an airtight container at room temperature for up to 5 days. This will help them maintain their delightful crunch. If you want them to last longer, refrigerate for up to 2 weeks, ensuring they’re well-wrapped to prevent moisture.

Can I freeze Toffee Crackers? If so, how?
Very much! To freeze your Toffee Crackers, first lay them in a single layer on a baking sheet and freeze them for about 1-2 hours until hard. Then, transfer them to a freezer-safe container lined with parchment paper to separate layers. They can be frozen for up to 3 months. To enjoy, simply thaw them in the refrigerator before serving!

What if my chocolate chips don’t melt completely?
If your chocolate chips don’t melt after the initial time, no worries! Just pop them back in the oven for an additional 1-2 minutes. Be gentle when spreading the chocolate; using a spatula works best. If they still resist, try heating them in the microwave in 10-second intervals until smooth.

Are there any allergies I should consider with this Toffee Crackers recipe?
Absolutely! Keep in mind that this recipe has dairy and nuts due to the butter and slivered almonds. If you’re making these for a gathering, it’s wise to ask about allergies, especially for guests with nut sensitivities. You can substitute the butter with a dairy-free alternative if needed!

Can I change the toppings for my Toffee Crackers?
The more the merrier! Feel free to get creative with the toppings. You can use crushed pretzels, various nuts, or even dried fruits to suit your taste. Just ensure that whatever you add complements the sweet toffee base. Enjoy customizing this festive dessert!

Toffee Crackers

Toffee Crackers

Toffee Crackers are delightful saltine crackers topped with buttery toffee, rich chocolate, and festive sprinkles for a perfect holiday treat.
Print Recipe Pin Recipe
Prep Time 15 minutes mins
Cook Time 5 minutes mins
Cooling Time 30 minutes mins
Total Time 50 minutes mins
Servings: 12 pieces
Course: DESSERT RECIPES
Cuisine: American
Calories: 150
Ingredients Equipment Method Nutrition Notes

Ingredients
  

Base
  • 1 sleeve salted saltine crackers a perfect crunchy base that adds delightful saltiness
  • 1 cup unsalted butter provides richness and that signature toffee flavor
  • 1 cup dark brown sugar packed tightly for that classic toffee sweetness
  • 1 tsp vanilla extract elevates the flavor beautifully
Toppings
  • 2 cups semi-sweet chocolate chips melt into a luscious layer
  • 1/2 cup chocolate-hazelnut spread adds extra creamy richness
  • 1 cup Christmas sprinkles festive colors for holiday cheer
  • 1/2 cup toasted slivered almonds adds crunch and nutty flavor

Equipment

  • Oven
  • Saucepan
  • Baking sheet
  • parchment paper
  • Spatula

Method
 

Preparation
  1. Preheat the oven to 400°F (200°C) and prepare your baking sheet by lining it with parchment paper.
  2. Arrange the saltine crackers in a single layer on the prepared baking sheet.
  3. Melt the butter and brown sugar together in a saucepan over medium heat, stirring constantly until it starts to bubble.
  4. Remove from heat and stir in the vanilla extract.
  5. Pour the buttery mixture evenly over the crackers.
  6. Bake for 5 minutes, or until the mixture is bubbly and golden.
  7. Sprinkle the chocolate chips on top right after removing from the oven.
  8. Spread the melted chocolate evenly over the crackers using a spatula.
  9. Drizzle the chocolate-hazelnut spread over the chocolate layer.
  10. Sprinkle with Christmas sprinkles and toasted slivered almonds.
  11. Let cool completely before breaking into pieces.

Nutrition

Serving: 1pieceCalories: 150kcalCarbohydrates: 17gProtein: 1gFat: 9gSaturated Fat: 5gPolyunsaturated Fat: 1gMonounsaturated Fat: 2gCholesterol: 30mgSodium: 120mgPotassium: 60mgSugar: 10gVitamin A: 100IUCalcium: 10mgIron: 0.5mg

Notes

Serve with a warm cup of cocoa for a cozy treat.

Tried this recipe?

Let us know how it was!

Filed Under: BREAKFAST & BRUNCH

  • « Previous Page
  • 1
  • …
  • 7
  • 8
  • 9
  • 10
  • 11
  • …
  • 14
  • Next Page »

Recent Posts

  • Crispy Potatoes in Oven
  • Lucky Charms Pancakes
  • Cheeseburger
  • Boiled Corn on the Cob
  • St. Patrick’s Day Dessert Parfaits

Recent Comments

No comments to show.

Footer

  • Contact
  • Privacy Policy
  • About Us
  • Terms
  • ↑ back to top

Copyright © 2024 www.Forkono.com

Table Of Content