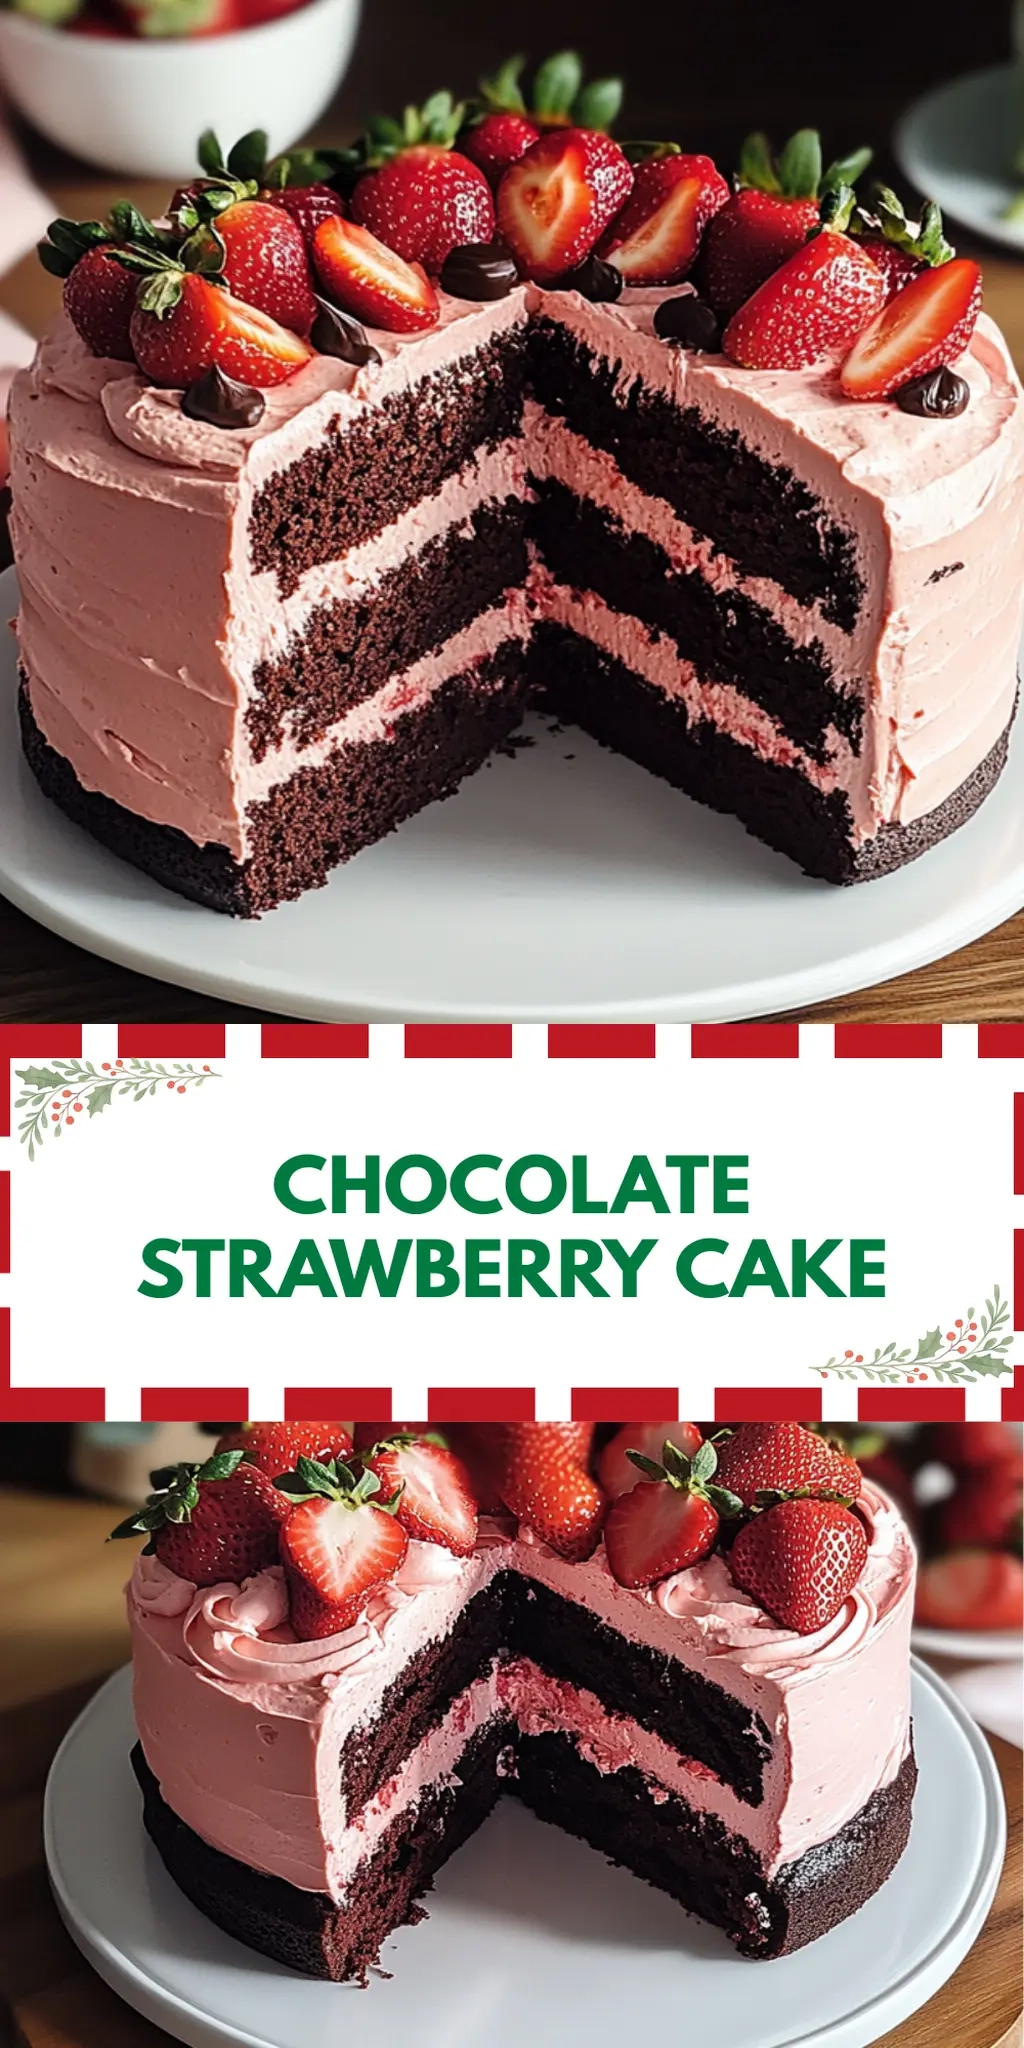
There’s something truly delightful about the combination of luscious chocolate and fresh strawberries that sparks joy in the kitchen. This Chocolate Strawberry Cake has a way of transforming even the simplest of occasions into extraordinary celebrations. I first discovered this gem while hosting a casual get-together with friends, and I was amazed at how quickly it vanished from the table!
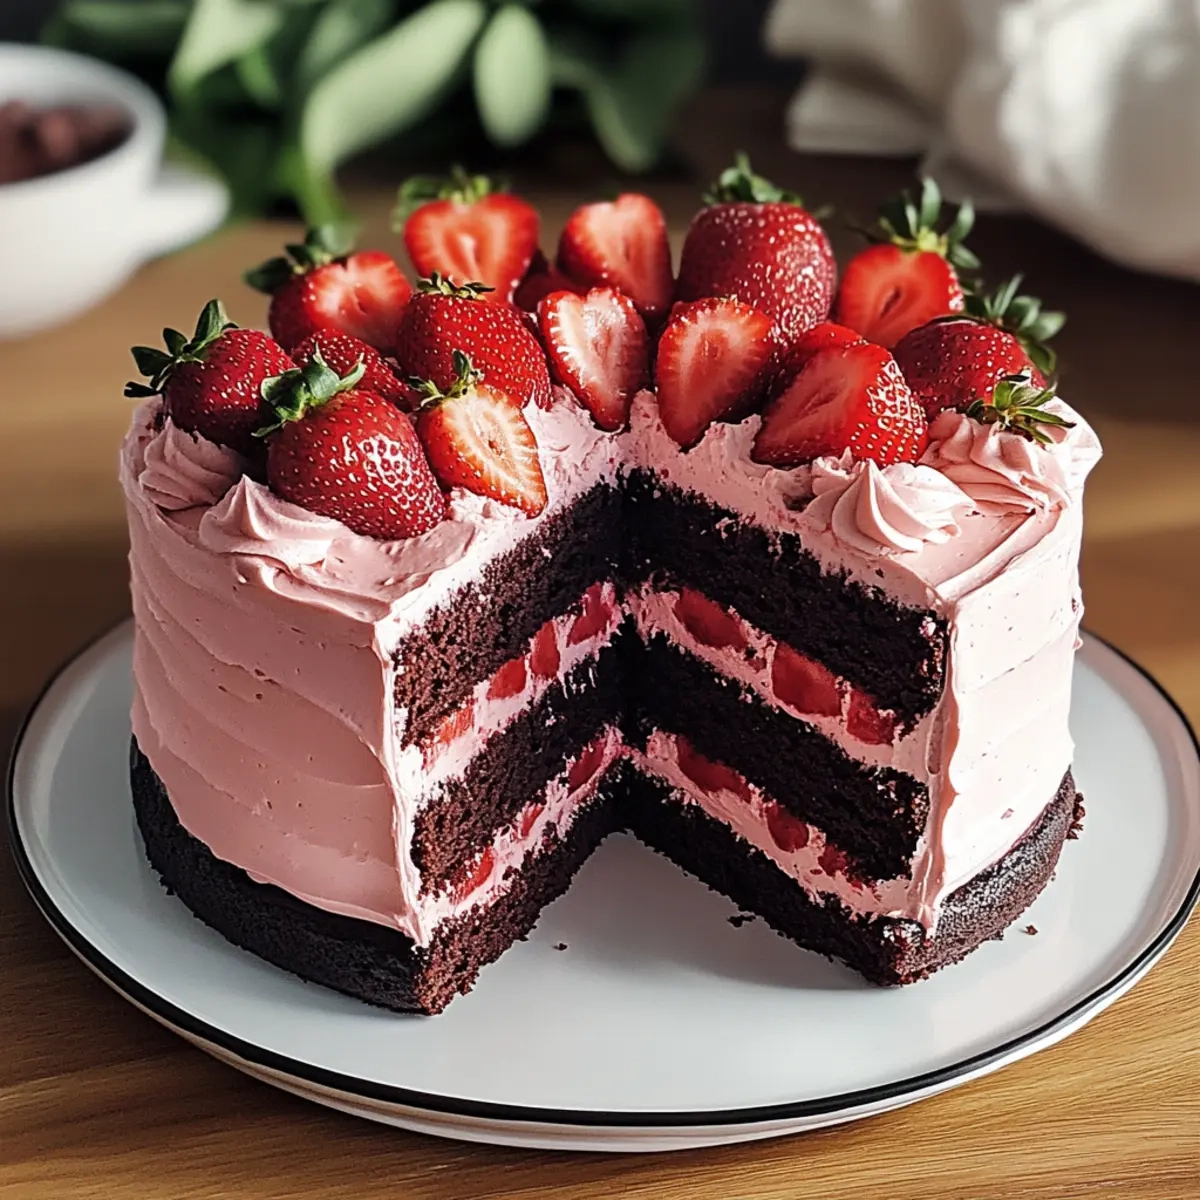
Picture this: a moist, cocoa-rich cake layered with smooth chocolate frosting and topped with vibrant, juicy strawberries. Each bite is a marriage of flavors that feels indulgent yet refreshingly light. As someone who often craves homemade desserts over fast food options, I find this cake to be a perfect solution for satisfying my sweet tooth without the fuss.
Whether you’re celebrating a birthday, enjoying a family gathering, or simply treating yourself, this Chocolate Strawberry Cake will impress without demanding hours in the kitchen. Let’s dive into the magic of this recipe that balances rich chocolate with the bright essence of strawberries!
Why You'll Love This Chocolate Strawberry Cake
- This Chocolate Strawberry Cake is incredibly easy to make, so you won’t spend hours in the kitchen.
- The flavor combination of rich chocolate and fresh strawberries is simply irresistible, creating a dessert that delights every palate.
- Its versatility means it’s perfect for any occasion, from birthdays to casual get-togethers.
- With its beautiful presentation of vibrant strawberries atop a decadent chocolate layer, this cake is sure to impress your guests.
Chocolate Strawberry Cake Ingredients
• Dive into baking bliss with these essentials!
For the Cake
- All-purpose flour – This forms the base for a tender cake that absorbs the flavors beautifully.
- Unsweetened cocoa powder – Choose high-quality cocoa to ensure a rich chocolate flavor that pairs perfectly with strawberries.
- Granulated sugar – Sweetens the cake and balances the cocoa’s bitterness for that perfect harmony in your Chocolate Strawberry Cake.
- Baking powder – This leavening agent helps the cake rise and achieve a light, fluffy texture.
- Salt – A pinch enhances all the flavors, making them pop and adding depth to the cake.
- Large eggs – They provide structure and moisture, contributing to that delightful crumb.
- Whole milk (or almond/oat milk) – Adds moisture and richness; feel free to substitute if you’re looking for dairy-free options.
- Vegetable oil (or melted butter) – Keeps the cake moist and ensures a deliciously rich flavor; melted butter can add a lovely depth.
- Vanilla extract – A splash infuses warmth and enhances the overall flavor profile of the cake.
For the Topping
- Fresh strawberries – Sliced strawberries add a burst of color and sweetness—perfect for topping your cake and elevating it to a whole new level of deliciousness!
This tasty Chocolate Strawberry Cake will become a beloved treat among your family and friends, bringing a delightful twist to your dessert table.
How to Make Chocolate Strawberry Cake
-
Preheat Oven: Start by preheating your oven to 350°F (175°C). Grease two round cake pans to ensure the cake comes out clean and easy to slice!
-
Whisk Dry Ingredients: In a large bowl, whisk together the flour, cocoa powder, sugar, baking powder, and salt. Make sure it’s well mixed for even flavor distribution.
-
Mix Wet Ingredients: In another bowl, beat together the eggs, milk, vegetable oil, and vanilla extract until smooth. This mixture adds moisture and richness to your cake.
-
Combine Ingredients: Pour the wet mixture into the bowl with the dry ingredients. Stir gently until just combined—overmixing can lead to a tough texture, so stop when you see a few lumps!
-
Divide Batter: Carefully divide the batter between the prepared pans, smoothing the tops with a spatula. Bake in the preheated oven for 25-30 minutes, or until a toothpick inserted in the center comes out clean.
-
Cool Cakes: Once baked, cool the cakes in the pans for about 10 minutes. Then transfer them to wire racks to cool completely; this prevents sogginess.
-
Layer with Toppings: After cooling, layer your cake with rich chocolate frosting and fresh, sliced strawberries. The contrast of flavors will create a beautiful and delicious centerpiece.
Optional: Drizzle some chocolate sauce over the top for an extra touch of indulgence!
Exact quantities are listed in the recipe card below.
Make Ahead Options
These Chocolate Strawberry Cakes are perfect for busy home cooks looking to save time! You can prepare the cake layers up to 3 days in advance. Simply bake the cakes as directed, let them cool completely, and then wrap them tightly in plastic wrap; this helps maintain their moist texture. You can also slice the fresh strawberries and refrigerate them in an airtight container for up to 24 hours—this prevents them from browning and ensures they remain fresh. When you’re ready to serve, simply layer the cooled cakes with chocolate frosting and top with the strawberries to create a beautiful, delicious dessert that will impress your guests without the last-minute fuss!
What to Serve with Chocolate Strawberry Cake?
Transform every slice into a delightful experience with perfect pairings that elevate your occasion!
-
Whipped Cream: A dollop of light, airy whipped cream enhances the chocolate flavor, making each bite even creamier and richer.
-
Vanilla Ice Cream: Serve alongside a scoop of vanilla ice cream for a classic contrast that melts beautifully on warm cake, creating a luscious experience.
-
Fresh Mint Leaves: A sprig of fresh mint adds a burst of color and a refreshing taste that complements the sweetness of the strawberries.
-
Chocolate Ganache: Drizzle warm chocolate ganache over the layers for an extra indulgent touch, intensifying the rich chocolate flavor while adding a silky texture.
-
Sparkling Wine: A glass of bubbly sparkling wine pairs splendidly with this dessert, providing a crisp, refreshing contrast that balances the cake’s sweetness.
-
Coffee or Espresso: Serve with a cup of robust coffee or espresso to bring out the cake’s deep chocolate notes, making for a sophisticated finishing touch.
-
Fruit Salad: A light fruit salad featuring fresh berries and citrus harmonizes the flavors, providing brightness and a refreshing counterpoint to the rich cake.
-
Chocolate-Covered Strawberries: Reinforce the strawberry theme by serving some chocolate-covered strawberries on the side, creating a fun and interactive dessert experience.
The right accompaniment can elevate your Chocolate Strawberry Cake into an unforgettable dessert extravaganza!
Chocolate Strawberry Cake Variations
Feel free to get creative with your Chocolate Strawberry Cake; there are so many delightful twists and turns you can take!
-
Dairy-Free: Substitute whole milk with almond or oat milk and use dairy-free chocolate frosting for a guilt-free version. This swap allows everyone to enjoy a taste of sweetness without compromising dietary needs.
-
Gluten-Free: Replace all-purpose flour with a gluten-free blend to cater to gluten sensitivities. This variation ensures everyone can enjoy a slice without worry, keeping the texture surprisingly delightful.
-
Extra Chocolatey: Add chocolate chips or chunks into the batter before baking for a gooey, chocolate explosion in every bite. This twist amps up the chocolate experience for those who can’t get enough!
-
Nutty Flavor: Stir in chopped walnuts or hazelnuts for added crunch and a distinct flavor profile. This variation creates an enjoyable contrast and an irresistible nutty aroma wafting through your kitchen.
-
Spicy Kick: Add a dash of cayenne pepper or cinnamon to the batter for a subtle warmth that enhances the chocolate flavor. This surprising twist will have your taste buds dancing with joy.
-
Fruity Layers: Use a mix of berries, such as raspberries or blueberries, along with strawberries for a medley of fruity flavors. This refreshing variation brightens each slice and adds an eye-catching mosaic of colors.
-
Frosting Alternatives: Swap chocolate frosting for whipped cream or cream cheese frosting for a lighter, tangy touch. Each option transforms the cake into a new dessert experience, perfect for summer gatherings.
-
Lemon Zest: Incorporate lemon zest into the batter for a fresh, zesty flavor that contrasts beautifully with the chocolate and strawberries. This bright note will awaken your senses and add an unexpected twist!
How to Store and Freeze Chocolate Strawberry Cake
Room Temperature: Store the Chocolate Strawberry Cake at room temperature for up to 3 days, covered loosely with plastic wrap to keep it from drying out.
Fridge: If you want to prolong freshness, place it in an airtight container in the fridge for up to a week. This keeps the cake moist and flavorful.
Freezer: For longer storage, freeze the cake for up to 3 months. Wrap individual slices or the whole cake tightly in plastic wrap and aluminum foil before placing it in the freezer.
Reheating: When ready to enjoy, thaw in the refrigerator overnight. You can warm individual slices in the microwave for about 10-15 seconds for a deliciously soft texture.
Chef's Helpful Tips
- When making the Chocolate Strawberry Cake, ensure all ingredients are at room temperature for better mixing and a uniform texture.
- Mixing the wet ingredients separately helps to incorporate air, giving your cake a light and fluffy structure.
- Be careful not to overmix when combining wet and dry ingredients, as this can lead to a dense texture.
- Always check for doneness by inserting a toothpick into the center; it should come out clean or with just a few moist crumbs attached.
Chocolate Strawberry Cake Recipe FAQs
How do I choose ripe strawberries for this cake?
Absolutely! Look for strawberries that are bright red, firm, and have a natural shine. Avoid those with dark spots or a dull appearance, as they may be overripe. If possible, smell the strawberries; a sweet fragrance is a good indicator of ripeness!
How should I store leftover Chocolate Strawberry Cake?
To keep your cake fresh, store it at room temperature for up to 3 days covered loosely with plastic wrap. If you want to extend its life, transfer it to an airtight container and refrigerate it for up to a week, making sure to keep it moist and delicious.
Can I freeze Chocolate Strawberry Cake?
Very! You can freeze the cake for up to 3 months. Wrap individual slices tightly in plastic wrap followed by aluminum foil to prevent freezer burn. For the whole cake, ensure it’s well-wrapped and placed in an airtight container. When ready to enjoy, thaw in the fridge overnight and warm slices in the microwave for about 10-15 seconds.
What should I do if my cake is too dry?
If you find that your Chocolate Strawberry Cake turns out dry, the most common culprits could be overbaking or not enough liquid ingredients. To salvage a dry cake, brush the layers lightly with simple syrup (made of equal parts sugar and water), allowing the moisture to seep in. You can also add a dollop of whipped cream or ice cream when serving to enhance the texture!
Are there any allergies I should be aware of with this recipe?
Yes, when preparing the Chocolate Strawberry Cake, be mindful of common allergens. The cake contains eggs, dairy (if using whole milk), and gluten from all-purpose flour. To cater to those with allergies, you can substitute almond or oat milk for the milk and use gluten-free flour blends. Always check the labels of your ingredients to ensure they meet dietary needs!
Can I use frozen strawberries instead of fresh?
Absolutely! If fresh strawberries aren’t available, you can use frozen ones, but make sure to thaw and drain excess liquid to prevent the cake from becoming soggy. You might want to toss them in a bit of sugar before folding them into the layers for that added sweetness to complement the chocolate.
Chocolate Strawberry Cake
Ingredients
Equipment
Method
- Preheat your oven to 350°F (175°C) and grease two round cake pans.
- In a large bowl, whisk together the flour, cocoa powder, sugar, baking powder, and salt.
- In another bowl, beat together the eggs, milk, vegetable oil, and vanilla extract until smooth.
- Pour the wet mixture into the bowl with the dry ingredients. Stir gently until just combined.
- Carefully divide the batter between the prepared pans and smooth the tops.
- Bake for 25-30 minutes, or until a toothpick inserted comes out clean.
- Cool the cakes in the pans for about 10 minutes, then transfer to wire racks to cool completely.
- Layer the cooled cake with chocolate frosting and fresh strawberries.