Forkono

  • BREAKFAST & BRUNCH
  • DESSERT RECIPES
  • DINNER RECIPES
  • LUNCH RECIPES
  • About uS
  • SNACKS & APPETIZERS
menu icon
go to homepage
  • BREAKFAST & BRUNCH
  • DESSERT RECIPES
  • DINNER RECIPES
  • LUNCH RECIPES
  • About uS
  • SNACKS & APPETIZERS
search icon
Homepage link
  • BREAKFAST & BRUNCH
  • DESSERT RECIPES
  • DINNER RECIPES
  • LUNCH RECIPES
  • About uS
  • SNACKS & APPETIZERS
×

Carrot Ginger Coconut-Free Soup

December 15, 2025 by JudyWhite Leave a Comment

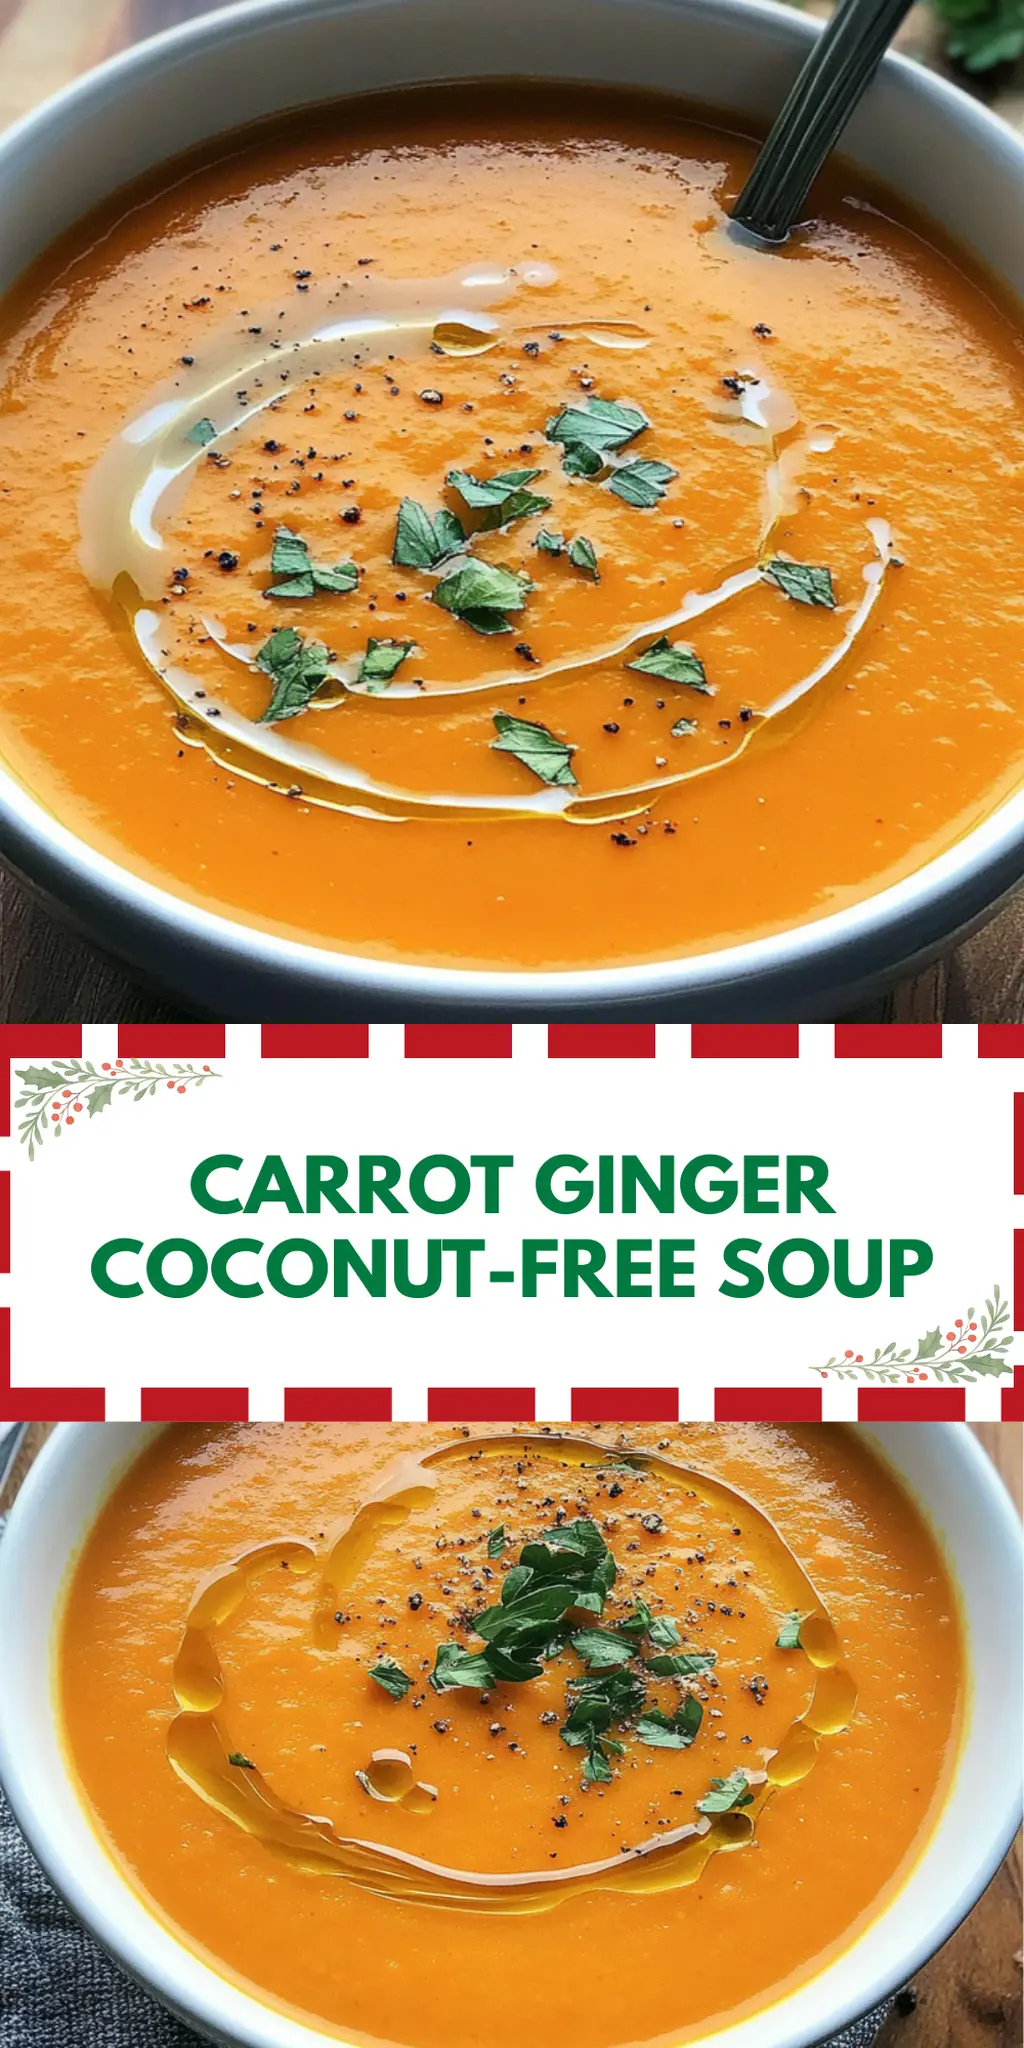
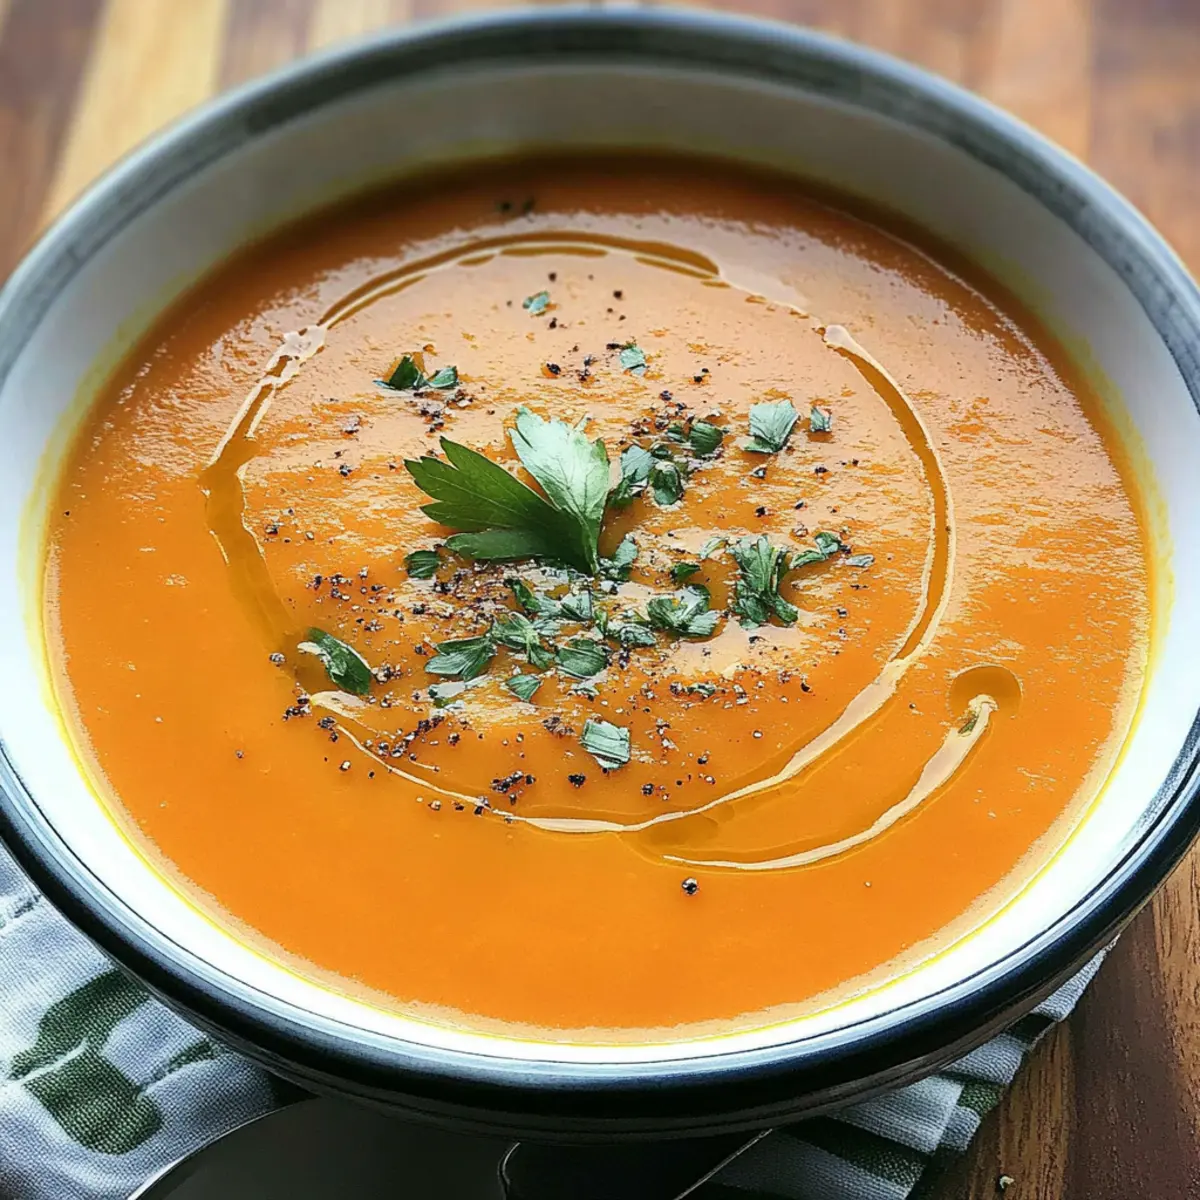
As the crisp air of winter makes its presence felt, there’s nothing quite like warming up with a cozy bowl of soup. One chilly afternoon, while digging through my veggie drawer, I discovered an abundance of vibrant carrots and a piece of ginger begging for attention. That’s when I decided to whip up my Carrot Ginger Coconut-Free Soup—a delightfully simple recipe that packs a punch of flavor while being both wholesome and satisfying.

The creamy texture you’ve always wanted minus the coconut is just a blender away! Not only does this soup warm the soul, but it also brings a delightful sweetness from the carrots and a hint of spice from the ginger. Plus, with just a handful of ingredients and minimal prep time, it’s perfect for those busy evenings when fast food tempts but homemade goodness is the goal. Join me as we journey into this deliciously easy dish that is bound to become a regular feature at your dinner table!

Why You'll Love This Carrot Ginger Coconut-Free Soup

  • This Carrot Ginger Coconut-Free Soup is incredibly easy to make, allowing you to enjoy a homemade meal without spending hours in the kitchen.
  • The delicious blend of sweet carrots and zesty ginger creates a flavor profile that is both comforting and invigorating, making each spoonful a delightful experience.
  • Its versatility means you can serve it as an elegant starter, a hearty main dish, or even a cozy side, perfect for any occasion.
  • Visually, the vibrant orange color of the soup is sure to brighten up your dining table and impress your guests.

Carrot Ginger Coconut-Free Soup Ingredients

For the Soup

  • Carrots – 4 cups, chopped, these root vegetables bring natural sweetness and a beautiful orange hue.
  • Onion – 1 diced, adds a savory depth that enhances the flavor profile.
  • Garlic – 2 cloves, minced, offering a fragrant kick that complements the carrots and ginger.
  • Ginger – 1-inch piece, grated; this spicy root elevates the soup, providing warmth and zest.
  • Vegetable Broth – 4 cups, the base that ties all ingredients together, ensuring a rich and hearty soup.
  • Olive Oil – 1 tablespoon, for sautéing; it adds healthy fats and a lovely flavor to the mix.
  • Salt – to taste, enhances the overall flavors and balances the sweetness of the carrots.
  • Pepper – to taste, a touch of spice to round out the soup’s deliciousness.

This nourishing Carrot Ginger Coconut-Free Soup is not only simple but incredibly satisfying. Get ready to warm your soul with each tasty spoonful!

How to Make Carrot Ginger Coconut-Free Soup

  1. Heat Olive Oil: In a large pot, warm the olive oil over medium heat. You want it shimmering but not smoking—just enough to sauté those aromatic veggies!

  2. Sauté Onions and Garlic: Add the diced onion and minced garlic to the pot. Sauté them for about 3-4 minutes until they become translucent and fragrant, filling your kitchen with a mouth-watering aroma.

  3. Add Carrots and Ginger: Stir in the chopped carrots and grated ginger, letting them cook together for about 5 minutes. This allows the flavors to meld and the carrots to soften slightly.

  4. Pour in Broth: Carefully pour the vegetable broth into the pot, bringing the mixture to a gentle boil. Listen for the bubbling sounds—it’s a cue that your soup is on its way!

  5. Simmer for Tenderness: Reduce the heat to a simmer and let the soup cook for 20 minutes. You’ll know it’s ready when the carrots are fork-tender and the flavors have beautifully developed.

  6. Blend Until Smooth: Using an immersion blender or a regular blender, puree the soup until it reaches a creamy smoothness. You’ll want it velvety—just like a comforting hug in a bowl!

  7. Season to Taste: Once blended, season with salt and pepper to your liking. Don’t be shy—taste as you go to find that perfect balance of flavors!

  8. Serve Hot: Ladle the warm soup into bowls and serve immediately, savoring each luscious bite of your homemade creation.

Optional: Top with a sprinkle of fresh herbs for a vibrant touch.
Exact quantities are listed in the recipe card below.

Make Ahead Options

This Carrot Ginger Coconut-Free Soup is perfect for meal prep enthusiasts looking to save time in the kitchen! You can chop the carrots, onion, and garlic up to 24 hours in advance, storing them in an airtight container in the refrigerator to maintain their freshness. Additionally, the soup itself can be made ahead and refrigerated for up to 3 days. When you’re ready to serve, simply reheat the soup on the stovetop and blend it again for that silky texture. Season with salt and pepper right before serving to keep the flavors vibrant. Enjoy restaurant-quality results with minimal effort, making your busy weeknights a little brighter!

How to Store and Freeze Carrot Ginger Coconut-Free Soup

Fridge: Store in an airtight container for up to 3 days. Be sure to let the soup cool completely before sealing to prevent condensation and sogginess.

Freezer: Freeze in portions using freezer-safe containers or bags for up to 3 months. Allow the soup to cool before packaging to maintain its flavor and texture.

Reheating: Thaw overnight in the fridge before reheating. Gently warm in a saucepan over medium heat, stirring frequently, until heated through. Adjust seasoning as needed.

Serving Tip: For an extra touch, reheat your Carrot Ginger Coconut-Free Soup with a splash of coconut milk or a swirl of olive oil before serving!

Carrot Ginger Coconut-Free Soup Variations

Feel free to embrace your creativity and elevate this comforting soup dish with these fun twists!

  • Spicy Kick: Add a pinch of red pepper flakes during cooking for a subtle heat that warms each spoonful. If you prefer it spicier, include diced jalapeño peppers for a bold flavor upgrade!

  • Creamy Texture: Swap half of the vegetable broth with coconut milk for a luscious creaminess while still keeping the coconut flavor at bay. This will create a richer taste that adds to the overall comfort of the soup.

  • Herb Infusion: Stir in a handful of fresh herbs like thyme or cilantro towards the end of cooking to infuse a fragrant layer of freshness. These herbs brighten the flavor and create a beautiful aromatic experience.

  • Root Veggie Boost: Mix in other root vegetables such as sweet potatoes or parsnips for added depth of flavor and nutrition. They add a lovely sweetness and variation in texture that makes every bite unique.

  • Zesty Citrus: Squeeze in some fresh lemon or lime juice right before serving for a bright, tangy lift. This touch of acidity will enhance all the other flavors in the soup and keep it feeling light.

  • Nutty Crunch: Top with toasted pumpkin seeds or crushed almonds for a delightful crunch and added protein. The nutty flavor complements the sweetness of the carrots and adds a satisfying texture contrast.

  • Creamy Vegan Option: Replace olive oil with avocado oil and blend in some silken tofu for a protein-packed vegan crema. This swap provides a lovely creamy consistency while ensuring all dietary needs are met.

  • Savoury Sauté: Consider sautéing mushrooms along with the onions and garlic for an earthy flavor that adds complexity to the soup. The combination of mushrooms and ginger is truly magical and will entice any mushroom lover!

What to Serve with Carrot Ginger Coconut-Free Soup?

Indulge in a cozy meal that beautifully complements the warm flavors of this delightful soup.

  • Crusty Bread: Perfect for dipping, its texture balances the soup’s creaminess while soaking up all that delicious broth.

  • Fresh Salad: A light, crisp salad with a tangy vinaigrette adds brightness and freshness, contrasting the warmth of the soup.

  • Grilled Cheese Sandwich: The gooey cheese and toasted bread provide a nostalgic comfort, making it a kid-favorite pairing.

  • Roasted Chickpeas: Crunchy and seasoned to perfection, they offer a delightful contrast in texture and are a nutritious addition.

  • Savory Quinoa Bowl: Heap this nutritious grain with your favorite veggies; it adds protein and a hearty base, making your meal complete.

  • Herbal Tea: A warm cup perfumed with hints of chamomile or mint soothes the palate and enhances the overall dining experience.

  • Dark Chocolate Dessert: After the soothing warmth of the soup, a little piece of dark chocolate provides a delightful, sweet finish.

Each of these pairings highlights the comforting nature of your Carrot Ginger Coconut-Free Soup while offering new flavors and textures to enjoy at the table.

Chef's Helpful Tips

  • For the Carrot Ginger Coconut-Free Soup, ensure you cut your carrots evenly to guarantee uniform cooking.
  • When sautéing the onions and garlic, avoid browning them too much as this can add bitterness to the soup.
  • If you prefer a smoother texture, blend the soup in small batches to avoid spillage and achieve a velvety consistency.
  • Remember to taste the soup before serving—it’s crucial for adjusting the seasoning and ensuring perfect flavor balance.

Carrot Ginger Coconut-Free Soup Recipe FAQs

How do I choose the best carrots for the soup?
Absolutely! When selecting carrots, look for firm, smooth ones without any dark spots or blemishes. Ideally, you want vibrant orange carrots, as they are tender and sweet. If possible, visit a local farmer’s market for fresh, in-season produce for the best flavor!

How can I store leftover Carrot Ginger Coconut-Free Soup?
Very easily! Allow the soup to cool completely before transferring it to an airtight container. It can be stored in the refrigerator for up to 3 days. Remember to label the container with the date, so you know when to enjoy it by!

Can I freeze this soup for later use?
Absolutely! To freeze your Carrot Ginger Coconut-Free Soup, first ensure it’s cooled completely. Then, pour it into freezer-safe containers or heavy-duty freezer bags, leaving about an inch of space at the top. It can be stored for up to 3 months. Just remember to defrost it in the fridge before reheating for the best result!

What should I do if my soup turns out too thick?
If your soup is thicker than you’d like, don’t worry! Gradually add more vegetable broth or water until you reach your desired consistency. Stir well and let it simmer for a few minutes to incorporate the added liquid. This can help balance the flavors as well!

Are there any allergy considerations for this recipe?
Good question! This Carrot Ginger Coconut-Free Soup is naturally vegan and gluten-free, making it a great option for many dietary needs. However, if you have specific allergies, always double-check that your vegetable broth doesn’t contain any allergens. Also, if you’re serving it to children or pets, ensure ginger and salt are used in moderation.

Can I adapt this recipe for other dietary preferences?
Absolutely! If you’re looking to make it creamier without using coconut, consider adding a splash of cashew milk or almond milk. For those avoiding alliums, substitute onions and garlic with herbs like thyme or rosemary for a different flavor profile. Feel free to experiment and tweak it to suit everyone’s tastes!

Carrot Ginger Coconut-Free Soup

Carrot Ginger Coconut-Free Soup

This Carrot Ginger Coconut-Free Soup is a warming, flavorful dish perfect for cold days.
Print Recipe Pin Recipe
Prep Time 10 minutes mins
Cook Time 25 minutes mins
Total Time 35 minutes mins
Servings: 4 cups
Course: DINNER RECIPES
Cuisine: American
Calories: 180
Ingredients Equipment Method Nutrition Notes

Ingredients
  

For the Soup
  • 4 cups Carrots chopped
  • 1 Onion diced
  • 2 cloves Garlic minced
  • 1 inch Ginger grated
  • 4 cups Vegetable Broth
  • 1 tablespoon Olive Oil for sautéing
  • Salt to taste
  • Pepper to taste

Equipment

  • Large pot
  • Immersion Blender

Method
 

How to Make Carrot Ginger Coconut-Free Soup
  1. In a large pot, warm the olive oil over medium heat.
  2. Add the diced onion and minced garlic to the pot. Sauté for about 3-4 minutes until translucent and fragrant.
  3. Stir in the chopped carrots and grated ginger, cooking together for about 5 minutes.
  4. Carefully pour in the vegetable broth, bringing the mixture to a gentle boil.
  5. Reduce the heat to a simmer and let the soup cook for 20 minutes.
  6. Using an immersion blender or regular blender, puree the soup until smooth.
  7. Once blended, season with salt and pepper to your liking.
  8. Ladle the warmed soup into bowls and serve immediately.

Nutrition

Serving: 1cupCalories: 180kcalCarbohydrates: 30gProtein: 4gFat: 6gSaturated Fat: 1gPolyunsaturated Fat: 0.5gMonounsaturated Fat: 4gSodium: 400mgPotassium: 800mgFiber: 6gSugar: 8gVitamin A: 12000IUVitamin C: 20mgCalcium: 80mgIron: 1.5mg

Notes

For an extra touch, reheat your soup with a splash of coconut milk or a swirl of olive oil before serving.

Tried this recipe?

Let us know how it was!

Filed Under: DINNER RECIPES

Spicy Moroccan Lentil Soup

December 15, 2025 by JudyWhite Leave a Comment

When the weather starts to cool and the leaves turn, there’s nothing quite like a bowl of warm, hearty soup to brighten up your day. Picture this: the enticing aroma of spices swirling through your kitchen, creating a cozy atmosphere as you prepare a dish that feels like a warm hug. That’s the magic of this Spicy Moroccan Lentil Soup.

I discovered this delightful recipe one afternoon while experimenting with ingredients that had been patiently waiting in my pantry. The combination of tender lentils, vibrant veggies, and zesty spices transports you on a culinary journey straight to Morocco without breaking a sweat.

Not only is this soup a feast for the senses, but it’s also packed with nutrients and can be whipped up in just 40 minutes. Perfect for busy weeknights or a comforting weekend meal, it’s a surefire way to impress family and friends while steering clear of fast food. Let’s dive into how to make this savory delight that’s sure to become a staple in your home!

Why You'll Love This Spicy Moroccan Lentil Soup

  • This Spicy Moroccan Lentil Soup is incredibly easy to make, with just a quick 10-minute prep time that fits perfectly into your busy schedule.
  • The bold and zesty flavors of cumin, coriander, and cayenne pepper will tantalize your taste buds and leave you craving more after each spoonful.
  • It’s a versatile recipe that allows you to add any seasonal vegetables you have on hand, making it perfect for using up pantry staples.
  • With its rich colors and delicious presentation, this soup is not only satisfying but also visually appealing, making it a crowd-pleasing dish for any gathering.

Spicy Moroccan Lentil Soup Ingredients

• Here’s what you need to create this delightful soup!

For the Soup Base

  • Lentils – they provide a hearty texture and are packed with protein.
  • Medium onion, chopped – adds depth and sweetness to the soup.
  • Garlic cloves, minced – brings aromatic flavor that enhances overall taste.
  • Carrot, diced – contributes natural sweetness and vibrant color.
  • Bell pepper, diced – adds crunch and a hint of earthiness.

For the Flavor

  • Olive oil – essential for sautéing and adds richness.
  • Cumin – infuses the soup with a warm, earthy undertone.
  • Coriander – brightens the dish with its citrusy notes.
  • Paprika – delivers a gentle smokiness that enhances the soup’s flavor.
  • Cayenne pepper – adds a spicy kick, just as the name suggests!

For the Liquids

  • Vegetable broth – provides a flavorful base and keeps it vegetarian-friendly.
  • Diced tomatoes – adds acidity and balance to the rich flavors.

To Finish

  • Salt and pepper to taste – enhances all the other flavors beautifully.
  • Fresh cilantro for garnish – adds a burst of freshness and bright color before serving.

How to Make Spicy Moroccan Lentil Soup

  1. Heat the Oil: Begin by heating the olive oil in a large pot over medium heat. The oil should shimmer, signaling it’s ready for the next delicious ingredients.

  2. Sauté the Veggies: Add the chopped onion, minced garlic, diced carrot, and bell pepper to the pot. Sauté these colorful veggies until they soften, about 5-7 minutes, filling your kitchen with wonderful aromas.

  3. Add the Lentils and Spices: Stir in the lentils along with the cumin, coriander, paprika, and cayenne pepper. Mix well to ensure the lentils are completely coated in those fragrant spices, about 2 minutes.

  4. Pour in the Liquids: Carefully pour in the vegetable broth and diced tomatoes. Bring the mixture to a gentle boil, watching as it bubbles and froths with flavor.

  5. Simmer to Perfection: Once boiling, reduce the heat to low and let it simmer uncovered for about 30 minutes, or until the lentils are tender and the soup is thickened to your liking. Stir occasionally for even cooking.

  6. Season to Taste: Once cooked, taste the soup and season it with salt and pepper to your preference. Remember, a little seasoning goes a long way in enhancing those delightful flavors!

  7. Serve and Garnish: Ladle the hot soup into bowls and finish with a sprinkle of fresh cilantro on top. This brightens the dish and adds a touch of freshness that complements the spices beautifully.

Optional: Serve with warm crusty bread for a complete meal.
Exact quantities are listed in the recipe card below.

Spicy Moroccan Lentil Soup Variations

Feel free to mix things up and create your own version of this enticing soup with these delightful ideas!

  • Vegetable Boost: Add extra diced carrots, zucchini, or kale for more nutrition and vibrant color. Double the veggies, double the fun!

  • Creamy Finish: Stir in a splash of coconut milk or a dollop of plain yogurt just before serving. This adds richness and balances the spices beautifully.

  • Protein-Packed: Toss in some cooked chickpeas or diced chicken for added protein. This makes your soup even heartier, perfect for a satisfying meal.

  • Heat It Up: Increase the cayenne pepper or add diced jalapeños for an extra spicy kick. This is for those who love a serious heat challenge!

  • Herb Variations: Swap fresh cilantro for parsley or mint for a different aroma and flavor profile. Each herb brings its unique freshness to the dish.

  • Nutty Addition: Sprinkle in toasted almonds or pine nuts before serving for a delightful crunch. This textural twist takes the soup to the next level.

  • Bulk It Up: Use cooked quinoa or brown rice instead of lentils for a hearty alternative. It creates a different texture and offers a wholesome experience.

  • Smoky Flavor: Mix in a tablespoon of smoked paprika for a deeper, smoky aroma. This gives the soup a unique twist that you’ll absolutely love!

How to Store and Freeze Spicy Moroccan Lentil Soup

Fridge: Store your Spicy Moroccan Lentil Soup in an airtight container in the fridge for up to 3 days. This keeps the flavors vibrant and ready for a quick meal.

Freezer: For longer storage, freeze the soup in individual portions using freezer-safe containers; it will last up to 3 months. Just make sure to leave space for expansion!

Thawing: To reheat, simply thaw overnight in the fridge and warm on the stove over medium heat until heated through. Stir occasionally for even warming.

Reheating: If reheating from frozen, place the soup directly in a pot over medium heat, stirring often until heated thoroughly. Add a splash of water or broth if needed for desired consistency.

Make Ahead Options

These Spicy Moroccan Lentil Soup is perfect for meal prep! You can chop the vegetables (onion, garlic, carrot, and bell pepper) up to 24 hours in advance and store them in an airtight container in the refrigerator to save time on busy weeknights. You can also rinse and soak the lentils, which can help decrease cooking time, though they are fine stored dry as well. When you’re ready to cook, simply heat the olive oil, sauté the prepped veggies, and add the lentils and spices for a quick and comforting meal. This prep will ensure you have a delicious, homemade soup that’s just as hearty and flavorful when you finally serve it!

What to Serve with Spicy Moroccan Lentil Soup?

Warm your heart and home with comforting sides that elevate this spicy, aromatic soup into a full meal experience.

  • Crusty Bread: A must for dipping, it soaks up the rich flavors of the soup and adds a satisfying crunch.
  • Couscous Salad: Light and fluffy, tossed with fresh herbs and lemon juice to balance the soup’s heat.
  • Roasted Vegetables: Caramelized and sweet, they add a delicious contrast to the spicy lentils and showcase earthy flavors.
  • Feta Cheese: Crumbled on top, it provides a creamy, tangy element that beautifully complements the soup’s depth.
  • Greek Yogurt: A dollop of this cool, creamy backdrop rounds out the soup, perfect for balancing heat and adding richness.
  • Hummus with Pita Chips: The velvety texture and nutty taste of hummus make for a delightful contrast alongside the soup.
  • Mint Tea: Its refreshing nature cleanses the palate, creating a perfect beverage pairing with this hearty dish.
  • Cilantro Lime Rice: Bright and zesty, it resonates with the soup’s spices, enhancing each spoonful and balancing flavors harmoniously.
  • Baklava: A sweet finish with flaky layers and honey, it provides the perfect sweet contrast after a spicy meal.

Chef's Helpful Tips

  • To achieve the perfect texture in your Spicy Moroccan Lentil Soup, ensure you rinse the lentils before adding them to the pot to remove any impurities.
  • When sautéing your vegetables, giving them enough time to soften will enhance their flavors, so don’t rush this step.
  • For a more intense flavor, allow the spices to cook with the lentils for a few minutes before adding the liquids, as this helps release their essential oils.
  • Keep an eye on the soup as it simmers; stirring occasionally ensures the lentils cook evenly and prevents them from sticking to the bottom of the pot.

Spicy Moroccan Lentil Soup Recipe FAQs

How do I select the right lentils for this soup?
Absolutely! For this Spicy Moroccan Lentil Soup, I recommend using green or brown lentils as they hold their shape well during cooking. Avoid red lentils if you want a chunkier texture, as they tend to disintegrate and become mushy. When choosing lentils, look for those that are shiny and intact, without any dark spots or debris.

How should I store leftover soup?
Very! To keep your Spicy Moroccan Lentil Soup fresh, store it in an airtight container in the fridge for up to 3 days. This method helps maintain its vibrant flavors and keeps it ready for a quick meal. When reheating, just give it a gentle stir to mix any settled ingredients!

Can I freeze Spicy Moroccan Lentil Soup?
Definitely! For optimal convenience, freeze your soup in individual portions using freezer-safe containers. It can last up to 3 months in the freezer. Be sure to leave some space at the top of your containers to allow for expansion as the soup freezes.

What’s the best way to thaw and reheat the soup?
When you’re ready to enjoy your soup again, simply thaw it overnight in the fridge. To reheat, warm it over medium heat in a pot, stirring occasionally until heated through. If reheating from frozen, you don’t have to thaw first; just place it over medium heat directly from the freezer. Add a splash of water or vegetable broth if the consistency becomes too thick during reheating.

Are there any dietary considerations for this soup?
Absolutely! This Spicy Moroccan Lentil Soup is naturally vegetarian and gluten-free, making it suitable for a variety of diets. If you have allergies, ensure the vegetable broth you use is free from any allergens specific to your needs. Always check ingredient labels, especially for store-bought broth, and be mindful of additional garnishes like cilantro if you have a sensitivity or allergy to herbs.

How can I adjust the spiciness of the soup?
If you prefer a milder flavor, simply reduce or omit the cayenne pepper. For a little extra warmth without overwhelming heat, you can also swap it with a pinch of smoked paprika! The more the merrier; feel free to customize the spice levels according to your taste buds.

Spicy Moroccan Lentil Soup

Spicy Moroccan Lentil Soup

A hearty and nutritious Spicy Moroccan Lentil Soup that tantalizes your taste buds with its vibrant flavors.
Print Recipe Pin Recipe
Prep Time 10 minutes mins
Cook Time 30 minutes mins
Total Time 40 minutes mins
Servings: 4 bowls
Course: DINNER RECIPES
Cuisine: Moroccan
Calories: 250
Ingredients Equipment Method Nutrition Notes

Ingredients
  

Soup Base
  • 1 cup Lentils rinsed
  • 1 medium onion, chopped
  • 2 cloves garlic, minced
  • 1 large carrot, diced
  • 1 medium bell pepper, diced
Flavor
  • 2 tablespoons olive oil
  • 1 teaspoon cumin
  • 1 teaspoon coriander
  • 1 teaspoon paprika
  • 1/2 teaspoon cayenne pepper
Liquids
  • 4 cups vegetable broth
  • 1 can diced tomatoes
To Finish
  • to taste salt
  • to taste pepper
  • 1/4 cup fresh cilantro for garnish

Equipment

  • Large pot

Method
 

Preparation Steps
  1. Heat the olive oil in a large pot over medium heat.
  2. Add the chopped onion, minced garlic, diced carrot, and bell pepper. Sauté until softened, about 5-7 minutes.
  3. Stir in the lentils along with the cumin, coriander, paprika, and cayenne pepper, mixing well.
  4. Pour in the vegetable broth and diced tomatoes. Bring to a gentle boil.
  5. Reduce heat to low and simmer uncovered for about 30 minutes, or until the lentils are tender.
  6. Season with salt and pepper to taste.
  7. Ladle into bowls and garnish with fresh cilantro before serving.

Nutrition

Serving: 1bowlCalories: 250kcalCarbohydrates: 40gProtein: 12gFat: 7gSaturated Fat: 1gPolyunsaturated Fat: 0.5gMonounsaturated Fat: 5gSodium: 500mgPotassium: 700mgFiber: 12gSugar: 4gVitamin A: 5000IUVitamin C: 30mgCalcium: 60mgIron: 3mg

Notes

Serve with warm crusty bread for a more complete meal. Ensure to rinse lentils before adding them to the pot.

Tried this recipe?

Let us know how it was!

Filed Under: DINNER RECIPES

Sweet Potato & Kale Soup

December 15, 2025 by JudyWhite Leave a Comment

As the chilly air settles in, there’s nothing quite like a warm bowl of Sweet Potato & Kale Soup to wrap your hands around and savor. Imagine the enticing aroma of sautéed onions and garlic filling your kitchen—it’s an invitation that beckons you to slow down and relish the moment. I discovered this comforting gem one Sunday afternoon, when a craving for a healthy, hearty meal nudged me into action.

With just a handful of wholesome ingredients, I found not only a dish that warms my soul but also a recipe so effortless that it could become a weekly staple. The natural sweetness of the sweet potatoes pairs beautifully with the earthy, nutritious kale, all brought to life with a dash of cumin and a hint of heat from red pepper flakes. This soup is as versatile as it is delicious—perfect for warming you up on a long day or impressing guests with its rich flavors. Are you ready to reignite your love for homemade meals? Let’s dive into this quick and satisfying recipe!

Why You'll Love This Sweet Potato & Kale Soup

  • This Sweet Potato & Kale Soup is incredibly easy to make, allowing you to whip up a delicious meal in just 45 minutes.
  • The flavor combination of sweet potatoes and kale creates a rich and comforting taste that will leave your taste buds dancing with joy.
  • Not only is it nutritious, but it’s also versatile enough to serve as a cozy dinner or an impressive dish for guests.
  • The vibrant colors and aromatic ingredients make for a visually appealing presentation that is sure to impress everyone at the table.

Sweet Potato & Kale Soup Ingredients

Get ready to gather some wholesome goodies for this delightful dish!

For the Soup

  • Sweet potatoes – a natural sweetness that adds flavor and creaminess to the soup.
  • Onion – provides a savory base that enhances the overall taste.
  • Garlic – infuses the soup with a fragrant punch for a delightful aroma.
  • Vegetable broth – acts as the soul of the soup, adding depth and richness to the flavor.
  • Kale – packs a nutritious punch, making this dish both hearty and healthy.
  • Olive oil – used for sautéing, it adds a touch of healthy fat for richness.
  • Salt – enhances all the natural flavors, bringing the soup to life.
  • Black pepper – adds a gentle warmth without overpowering the other flavors.
  • Cumin – introduces a warm, earthy note, elevating the sweet potato & kale soup’s profile.
  • Red pepper flakes – a hint of heat to make your taste buds tingle!

This comforting bowl is beating the fast-food slump while being loaded with goodness!

How to Make Sweet Potato & Kale Soup

  1. Heat Oil: In a large pot, heat 1 tsp of olive oil over medium heat. This will create a flavorful base for your soup, so let it warm up nicely for a minute.

  2. Sauté Onion: Add the chopped onion to the pot and sauté until it becomes translucent, about 3-4 minutes. The aroma will start to fill your kitchen, making your mouth water!

  3. Add Garlic: Next, introduce 2 minced garlic cloves into the mix and cook for 1 minute. This step adds a fragrant punch that elevates the taste of your soup.

  4. Combine Ingredients: Add the diced sweet potatoes, 4 cups of vegetable broth, 1 tsp salt, 1/2 tsp black pepper, 1/2 tsp cumin, and 1/4 tsp red pepper flakes. Stir them well; the vibrant colors are a feast for the eyes!

  5. Bring to Boil: Increase the heat and bring the mixture to a boil. Once boiling, reduce the heat and let it simmer until the sweet potatoes are tender, roughly 15-20 minutes. You’ll know it’s time when the sweet potatoes are easily pierced with a fork.

  6. Add Kale: Stir in 4 cups of chopped kale and cook for an additional 5 minutes until the kale is tender and bright green. This will give your soup that rich, nourishing quality.

  7. Blend (Optional): If you prefer a smoother texture, use an immersion blender to blend the soup to your desired consistency. It’s a great option if you enjoy a creamy soup!

  8. Serve Hot: Ladle the warm soup into bowls and enjoy it while it’s steaming. This delightful dish is perfect for cozying up on a chilly day!

Optional: Garnish with a sprinkle of fresh black pepper for an extra kick.
Exact quantities are listed in the recipe card below.

Make Ahead Options

These Sweet Potato & Kale Soup ingredients are perfect for meal prep, making your busy weeknights a breeze! You can chop the sweet potatoes, onion, and garlic up to 24 hours ahead and refrigerate them in an airtight container to keep them fresh. Additionally, you can prepare the soup base (steps 1-6) and store it in the fridge for up to 3 days. To maintain quality, cool the soup completely before refrigerating and store the kale separately to prevent it from wilting. When ready to serve, simply reheat the soup on the stove, add the kale, and cook for 5 minutes, offering you a comforting bowl of Sweet Potato & Kale Soup with minimal effort.

Sweet Potato & Kale Soup Variations

Feel free to play around with this recipe and create your own twist on this delightful soup!

  • Spicy Kick: Add diced jalapeños or a few dashes of hot sauce for an extra layer of heat. Spice lovers will rejoice as the warmth dances on their tongues!

  • Creamy Delight: Stir in coconut milk or a splash of cream at the end for a luscious, velvety finish. This variation transforms your soup into a rich and indulgent experience.

  • Herbaceous Boost: Toss in fresh herbs like thyme or rosemary during the cooking process for an aromatic twist. These add a fragrant, earthy complexity that brightens every spoonful.

  • Protein Power: Include white beans or lentils to make the soup more filling and add a protein punch. This hearty addition turns your dish into a satisfying meal that fuels your day.

  • Root Veggie Medley: Swap out half the sweet potatoes with parsnips or carrots for a slightly sweeter flavor profile. This creates a delightful contrast that adds depth to the overall taste.

  • Grainy Goodness: Mix in cooked quinoa or barley to enhance the texture and heartiness of your soup. This twist adds a delightful chewiness that makes each bowl more satisfying.

  • Green Goodness: Replace kale with spinach or Swiss chard for a different leafy green experience. Each option brings its own unique flavor and nutrition, keeping your soup vibrant and delicious.

  • Nutty Flavor: Top with toasted pumpkin or sunflower seeds for a pleasant crunch and nutty flavor. This simple addition provides an irresistible texture contrast that elevates your soup.

How to Store and Freeze Sweet Potato & Kale Soup

Fridge: Store any leftovers in an airtight container for up to 3 days. This keeps your Sweet Potato & Kale Soup fresh and ready to enjoy whenever you need a warm meal.

Freezer: For longer storage, freeze the soup in freezer-safe containers or bags for up to 3 months. Make sure to leave some space for expansion as it freezes.

Reheating: To reheat, thaw overnight in the fridge, then gently warm on the stovetop over low heat, stirring occasionally. Add a splash of vegetable broth to loosen it up if needed. Enjoy your comforting soup!

What to Serve with Sweet Potato & Kale Soup?

As you cozy up with your steaming bowl of sweetness, why not enhance your meal with delightful sides that you’ll savor?

  • Crusty Bread: The perfect match for scooping up that creamy goodness while adding a satisfying crunch to every bite.
    A warm baguette or crunchy artisan loaf will complement the soup’s texture beautifully, transforming your dining experience.

  • Simple Green Salad: A refreshing mix of greens topped with vinaigrette adds brightness to your meal.
    This crisp contrast balances the silky soup, offering a light and invigorating palate cleanser between each comforting spoonful.

  • Roasted Brussels Sprouts: Nutty and caramelized, they elevate the wholesome vibe of your dinner.
    Sprinkle them with a little sea salt or balsamic glaze for an extra zing, making every mouthful a delightful surprise.

  • Quinoa Pilaf: Packed with protein and flavor, this nutty dish pairs wonderfully with the soup.
    The light, fluffy texture of quinoa adds a heartiness that complements the richness of your Sweet Potato & Kale Soup.

  • Apple Crisp: End your meal on a sweet note with this warm dessert.
    The comforting flavors of baked apples and oats create a lovely harmony with the soup, making a perfect seasonal treat.

  • Herbal Tea: A soothing cup of herbal tea pairs elegantly, enhancing the overall comforting experience.
    Choose a flavor like chamomile or peppermint to calm your senses after this nourishing meal.

  • Lemonade: A refreshing glass of lemonade offers a vibrant burst of citrus that brightens your palate between spoonfuls.
    The tangy sweetness beautifully offsets the earthy flavors of the soup, creating a well-balanced meal.

  • Cheese Platter: An assortment of cheeses with different textures and tastes can be a delightful appetizer.
    Add crackers and some dried fruits for a variety that excites the palate before diving into the warm soup you’re about to cherish.

Chef's Helpful Tips

  • When preparing the Sweet Potato & Kale Soup, ensure you cut the sweet potatoes into even-sized pieces for consistent cooking.
  • Avoid adding too much salt at the beginning; you can always adjust the seasoning later for better flavor control.
  • For a more vibrant color and nutrition boost, add the kale towards the end to maintain its bright green hue.
  • Simmer gently to let the flavors meld, but be careful not to overcook the sweet potatoes, as they can become mushy.
  • Incorporating these tips will enhance the overall flavor and texture of your soup.

Sweet Potato & Kale Soup Recipe FAQs

What type of sweet potatoes should I use?
Absolutely! When choosing sweet potatoes, look for ones that are firm, smooth, and free from dark spots or blemishes. The best sweet potatoes for this soup are slightly sweet and tender ones, like the orange-fleshed ones, as they add a lovely creaminess to the soup.

How should I store leftover Sweet Potato & Kale Soup?
Very! Store your delicious leftovers in an airtight container in the fridge for up to 3 days. This way, you can enjoy the comforting flavors again without the hassle of cooking from scratch!

Can I freeze Sweet Potato & Kale Soup?
Definitely! To freeze, pour the cooled soup into freezer-safe containers or bags, ensuring there’s enough space for expansion. It will keep well for up to 3 months. When you’re ready to enjoy it again, simply thaw it overnight in the fridge before reheating.

What if my soup is too thick after cooking?
No worries! If your Sweet Potato & Kale Soup turns out thicker than desired, you can easily fix it. Just add a bit of vegetable broth or water while reheating it on the stovetop until you reach your preferred consistency. Stir well to incorporate!

Is this soup suitable for vegans and those with allergies?
Absolutely! This Sweet Potato & Kale Soup is vegan-friendly, packed with nutritious ingredients. However, always check the labels of your vegetable broth to make sure it’s free from allergens. If you’re allergic to any specific ingredients like garlic, feel free to omit or substitute it with a suitable alternative.

Can I add additional vegetables to the soup?
Very much so! The more the merrier! Feel free to add more vegetables such as carrots, celery, or even bell peppers for additional flavor and nutrients. Just chop them finely and sauté them along with the onion to ensure they cook evenly.

Sweet Potato & Kale Soup

Sweet Potato & Kale Soup

This cozy Sweet Potato & Kale Soup is a wholesome meal perfect for chilly days, combining sweet potatoes and kale in a hearty broth.
Print Recipe Pin Recipe
Prep Time 10 minutes mins
Cook Time 35 minutes mins
Total Time 45 minutes mins
Servings: 4 bowls
Course: DINNER RECIPES
Cuisine: Vegetarian
Calories: 250
Ingredients Equipment Method Nutrition Notes

Ingredients
  

For the Soup
  • 4 cups sweet potatoes diced
  • 1 medium onion chopped
  • 2 cloves garlic minced
  • 4 cups vegetable broth
  • 4 cups kale chopped
  • 1 tbsp olive oil for sautéing
  • 1 tsp salt
  • 1/2 tsp black pepper
  • 1/2 tsp cumin
  • 1/4 tsp red pepper flakes

Equipment

  • Large pot

Method
 

How to Make Sweet Potato & Kale Soup
  1. In a large pot, heat 1 tsp of olive oil over medium heat.
  2. Add the chopped onion to the pot and sauté until it becomes translucent, about 3-4 minutes.
  3. Next, introduce 2 minced garlic cloves into the mix and cook for 1 minute.
  4. Add the diced sweet potatoes, 4 cups of vegetable broth, 1 tsp salt, 1/2 tsp black pepper, 1/2 tsp cumin, and 1/4 tsp red pepper flakes. Stir them well.
  5. Increase the heat and bring the mixture to a boil. Once boiling, reduce the heat and let it simmer until the sweet potatoes are tender, roughly 15-20 minutes.
  6. Stir in 4 cups of chopped kale and cook for an additional 5 minutes until the kale is tender and bright green.
  7. If you prefer a smoother texture, use an immersion blender to blend the soup to your desired consistency.
  8. Ladle the warm soup into bowls and enjoy it while it's steaming.

Nutrition

Serving: 1bowlCalories: 250kcalCarbohydrates: 40gProtein: 6gFat: 8gSaturated Fat: 1gPolyunsaturated Fat: 0.5gMonounsaturated Fat: 5gSodium: 500mgPotassium: 800mgFiber: 8gSugar: 6gVitamin A: 12000IUVitamin C: 45mgCalcium: 150mgIron: 2mg

Notes

Optional: Garnish with a sprinkle of fresh black pepper for an extra kick. Exact quantities are listed in the recipe card below.

Tried this recipe?

Let us know how it was!

Filed Under: DINNER RECIPES

Cranberry-Orange Glazed Turkey

December 14, 2025 by JudyWhite Leave a Comment

As the holiday season approaches, there’s an undeniable excitement in the air—a time when kitchens transform into the heart of the home. Picture this: the rich aroma of herbs mingles with a hint of citrus, while a beautiful turkey basks in a glossy cranberry-orange glaze. This Cranberry-Orange Glazed Turkey isn’t just a dish; it’s an experience that leaves your guests raving and your heart feeling full.

On one particularly cozy November evening, I found myself needing to impress my family with a show-stopping meal. After rummaging through a few tempting recipes, I stumbled upon a combination that had my mouth watering before I’d even taken a single bite. With vibrant cranberries, zesty oranges, and the warmth of rosemary and thyme, this turkey delivers a perfect balance of sweet and savory—not to mention, it’s surprisingly easy to make!

So, if you’re tired of the same old turkey routine or simply want to impress your loved ones, let’s dive into this flavorful adventure that will elevate your dining experience and rekindle the joy of homemade meals. Your next gathering deserves this festive centerpiece!

Why You'll Love This Cranberry-Orange Glazed Turkey

  • This Cranberry-Orange Glazed Turkey is incredibly easy to prepare, making it a stress-free option for your holiday gatherings.
  • The delightful blend of sweet cranberries and zesty oranges creates a flavor explosion that will have your guests coming back for seconds.
  • Its stunning glossy glaze not only enhances the turkey’s appearance but also adds a burst of color to your table.
  • Plus, this dish is sure to impress even the pickiest eaters, making it a true crowd-pleaser that everyone will remember.

Cranberry-Orange Glazed Turkey Ingredients

• Discover the secrets to your perfect turkey!

For the Turkey

  • 12 to 14-pound turkey – Choose the size based on your guest list to ensure everyone gets a delicious serving.
  • Kosher salt – Essential for seasoning, helping to enhance the natural flavors of the turkey.
  • Freshly ground black pepper – Adds a touch of warmth and depth to the turkey’s flavor.

For the Herb Infusion

  • Fresh rosemary – This herb infuses the turkey with a fragrant, aromatic touch.
  • Fresh thyme – Complements the rosemary beautifully, bringing a touch of earthiness.

For the Glaze

  • Unsalted butter – Helps to achieve a golden-brown skin and adds richness to the glaze.
  • Small onion, chopped – Releases sweetness when sautéed, providing a flavorful base for the glaze.
  • Garlic, smashed – Adds an aromatic punch that pairs wonderfully with the sweet and tangy elements.
  • Cranberries – The star of your glaze, bursting with flavor that balances the turkey’s savory notes.
  • Sugar – A key ingredient for sweetness, helping to create that irresistible glossy glaze.
  • Cider vinegar – Adds a tangy kick, balancing the sweetness from the cranberries and sugar.
  • Chipotles in adobo – Introduces a smoky heat that elevates the overall flavor profile.
  • Oranges, zested and juiced – Provides a vibrant citrus flavor that complements the cranberries perfectly.

For The Broth

  • Low-sodium chicken broth – Keeps the turkey moist while roasting and enhances those lovely pan juices.

This Cranberry-Orange Glazed Turkey is not just a meal; it’s the centerpiece of your next celebration!

How to Make Cranberry-Orange Glazed Turkey

  1. Preheat your oven to 325°F (165°C) to ensure an even cook. A well-heated oven creates the perfect environment for roasting your turkey to golden perfection.

  2. Prepare the turkey by rubbing it generously with kosher salt and freshly ground black pepper. This not only seasons the meat but also helps to create a flavorful crust as it roasts.

  3. Stuff the turkey with fresh rosemary and thyme. The herbs will infuse their aromatic goodness into the meat, adding a fragrant depth to every bite.

  4. Melt 5 tablespoons of unsalted butter in a large skillet over medium heat. This will create a luscious base for the glaze, giving it richness and a beautiful color.

  5. Sauté the chopped onion and smashed garlic in the skillet until they become translucent. This typically takes about 3-5 minutes and will fill your kitchen with a delightful aroma.

  6. Stir in cranberries, sugar, cider vinegar, and chipotles in adobo into the skillet. Cook the mixture until you hear the cranberries pop, which should take about 7-10 minutes—watch for that vibrant color!

  7. Thicken the mixture by cooking until it reaches a syrupy consistency. Once it does, remove it from heat and stir in the zest and juice of the oranges to brighten up the glaze with a fresh citrus kick.

  8. Brush the turkey with the remaining melted butter and place it in a roasting pan. This helps the skin become deliciously crisp and golden.

  9. Pour the cranberry-orange glaze over the turkey, generously covering every inch. Aim to spread that flavorful mixture evenly to create a show-stopping presentation.

  10. Add low-sodium chicken broth to the pan as needed to keep the turkey moist during roasting. Start with a cup and adjust based on the size of your pan.

  11. Roast the turkey in the preheated oven for approximately 3 hours, basting occasionally with the pan juices to develop flavor and keep it juicy.

  12. Check the turkey’s internal temperature until it reaches 165°F (75°C) in the thickest part of the breast. This ensures it’s safe to eat and expertly cooked.

  13. Rest the turkey for at least 20 minutes before carving and serving. This allows the juices to redistribute for an incredibly moist result.

Optional: Garnish with additional fresh herbs for a splash of color before serving.

Exact quantities are listed in the recipe card below.

Make Ahead Options

These Cranberry-Orange Glazed Turkey preparations are perfect for busy cooks looking to save time during the holiday rush! You can season and stuff the turkey up to 24 hours in advance, ensuring maximum flavor absorption. Additionally, the cranberry-orange glaze can be made ahead and refrigerated for up to 3 days—just store it in an airtight container to lock in freshness. When you’re ready to roast, simply brush the turkey with melted butter, pour on the chilled glaze, and follow the usual cooking instructions. This way, you’ll enjoy the same delicious taste with minimal effort, transforming your holiday meal into a stress-free celebration!

What to Serve with Cranberry-Orange Glazed Turkey?

Elevate your holiday feast with the perfect complements to this show-stopping turkey.

  • Garlic Mashed Potatoes: Fluffy, buttery potatoes infused with garlic bring comfort and a creamy texture that balances the tart glaze beautifully.

  • Roasted Brussels Sprouts: These caramelized veggies add a delightful crunch and earthy flavor, providing a beautiful contrast to the sweetness of the turkey.

  • Cranberry Sauce: Enhance the flavors with a luxurious homemade cranberry sauce, enriching your meal with more of that beloved tartness.

  • Herbed Stuffing: Savory stuffing packed with herbs pairs perfectly with the turkey, soaking up all those delicious juices and creating a burst of flavor in every bite.

  • Honey-Glazed Carrots: Sweet and tender carrots drizzled with honey offer a juicy, vibrant side that both kids and adults will adore.

  • Apple Pie: Finish your meal on a sweet note with a warm slice of classic apple pie, adding a comforting touch to your festive gathering.

Each of these dishes will harmonize beautifully, creating a memorable dining experience that shines with the spirit of togetherness and joy.

Cranberry-Orange Glazed Turkey Variations

Feel free to customize this turkey to fit your taste and dietary preferences!

  • Herb Swap: Substitute fresh rosemary and thyme with sage or parsley for a completely different flavor profile. The earthiness of sage especially shines in this recipe!

  • Spice it Up: Add extra chipotle peppers or a sprinkle of cayenne for a smoky kick. Adjust the amount based on your heat tolerance; balance is key for maximizing flavor!

  • Fruit Fusion: Incorporate diced apples or pears into the cranberry mixture for a delightful twist. This addition brings natural sweetness and warmth while enhancing each bite’s texture.

  • Vegan Option: Replace the turkey with a large stuffed squash or jackfruit. This creates a similar sweet and savory flavor experience, perfect for plant-based celebrations.

  • Citrus Blend: Use lemon or grapefruit zest and juice instead of orange for a zesty punch. This change adds brightness to the glaze that’s equally refreshing.

  • Nutty Crunch: Fold in toasted pecans or walnuts to the cranberry mixture before glazing. This contrast of textures elevates the dish and adds a delightful crunch.

  • Maple Sweetness: Swap sugar with maple syrup in the glaze for a richer sweetness. It not only complements the tart cranberries but also adds a cozy, autumnal vibe.

  • Low-Carb Alternative: For a keto-friendly version, use erythritol or a sugar substitute in the glaze. You’ll enjoy the same sweet-tart flavor without the carbs.

Embrace your creativity, and let these variations inspire your perfect Cranberry-Orange Glazed Turkey experience!

How to Store and Freeze Cranberry-Orange Glazed Turkey

Room Temperature: Refrigerate leftover turkey within 2 hours of cooking to prevent bacterial growth. Ideally, serve immediately for the best taste and texture.

Fridge: Store leftovers in an airtight container for up to 3 days. If covered well, the turkey will retain its moist texture and flavor, making it great for reheating.

Freezer: If you have more than you can eat, freeze the turkey (sliced or whole) for up to 3 months. Wrap tightly in plastic wrap and foil, or use a vacuum-sealed bag to maintain quality.

Reheating: Thaw frozen turkey overnight in the fridge. Reheat in the oven at 325°F (165°C) covered with foil to retain moisture, warming until the internal temperature reaches 165°F again.

Chef's Helpful Tips

  • To prepare the Cranberry-Orange Glazed Turkey, ensure you rub the turkey generously with kosher salt and black pepper at least an hour before cooking for maximum flavor penetration.
  • Avoid common mistakes by checking the internal temperature with a meat thermometer in the thickest part of the breast to guarantee it’s cooked to 165°F and safe to serve.
  • For an even richer flavor, consider adding more butter to your glaze mixture for a beautifully golden crust.
  • Always let your turkey rest for at least 20 minutes before carving to retain its juices and enhance moisture in each slice.

Cranberry-Orange Glazed Turkey Recipe FAQs

How do I choose the right turkey?
Absolutely! When selecting your turkey, look for one that is between 12 to 14 pounds for the best serving size. Check for fresh ones without any dark spots or bruises, and opt for organic if possible for better flavor and quality.

How long can I store leftovers?
You can store leftover Cranberry-Orange Glazed Turkey in an airtight container in the fridge for up to 3 days. It’s perfect for sandwiches or a quick turkey salad! Just be sure to seal it well to keep the moisture intact.

Can I freeze the turkey after cooking?
Yes, absolutely! To freeze your leftover turkey, slice it or keep it whole, then wrap it tightly in plastic wrap and aluminum foil or use a vacuum-sealed bag. It can be frozen for up to 3 months while maintaining its flavor and texture.

How do I reheat frozen turkey properly?
To reheat your frozen turkey, first, thaw it overnight in the fridge. Once thawed, preheat your oven to 325°F (165°C). Place the turkey in an oven-safe dish, cover it with foil to prevent drying out, and heat it until the internal temperature reaches 165°F again. This should take about 20-30 minutes for sliced turkey.

What should I do if my turkey is dry?
If your turkey happens to be on the dry side, don’t worry—simply slice it and drizzle warm chicken broth over the slices before serving. This helps to add moisture back into the meat, giving it a succulent finish!

Are there any dietary considerations for this recipe?
Definitely! If you’re serving guests with dietary restrictions, be mindful of the chipotles in adobo, as they can be spicy. Also, this recipe contains butter, which may not be suitable for those who are lactose intolerant. You can easily substitute the butter with olive oil or a dairy-free spread for a vegetarian version!

Cranberry-Orange Glazed Turkey

Cranberry-Orange Glazed Turkey

This Cranberry-Orange Glazed Turkey is an experience that captivates your gatherings, featuring a flavorful balance of sweet and savory.
Print Recipe Pin Recipe
Prep Time 20 minutes mins
Cook Time 3 hours hrs
Resting Time 20 minutes mins
Total Time 3 hours hrs 40 minutes mins
Servings: 10 servings
Course: DINNER RECIPES
Cuisine: American
Calories: 350
Ingredients Equipment Method Nutrition Notes

Ingredients
  

For the Turkey
  • 12-14 pounds turkey Choose based on guest list.
  • 2 tablespoons kosher salt Essential for seasoning.
  • 1 teaspoon freshly ground black pepper Adds warmth.
For the Herb Infusion
  • 2 stems fresh rosemary
  • 2 stems fresh thyme
For the Glaze
  • 5 tablespoons unsalted butter For richness.
  • 1 small onion, chopped Releases sweetness when sautéed.
  • 3 cloves garlic, smashed
  • 12 ounces cranberries Star ingredient for the glaze.
  • 1 cup sugar For sweetness.
  • 1/2 cup cider vinegar Adds tang.
  • 1 tablespoon chipotles in adobo For smoky heat.
  • 2 oranges zested and juiced Provides citrus flavor.
For The Broth
  • 1 cup low-sodium chicken broth Keeps turkey moist.

Equipment

  • Oven
  • Roasting pan
  • Skillet
  • meat thermometer

Method
 

How to Make Cranberry-Orange Glazed Turkey
  1. Preheat your oven to 325°F (165°C).
  2. Prepare the turkey by rubbing it generously with kosher salt and freshly ground black pepper.
  3. Stuff the turkey with fresh rosemary and thyme.
  4. Melt 5 tablespoons of unsalted butter in a large skillet over medium heat.
  5. Sauté the chopped onion and smashed garlic until translucent (3-5 minutes).
  6. Stir in cranberries, sugar, cider vinegar, and chipotles in adobo. Cook until cranberries pop (7-10 minutes).
  7. Thicken the mixture to a syrupy consistency, then stir in the zest and juice of oranges.
  8. Brush the turkey with remaining melted butter and place in a roasting pan.
  9. Pour the cranberry-orange glaze over the turkey, covering it evenly.
  10. Add low-sodium chicken broth to the pan as needed.
  11. Roast the turkey for approximately 3 hours, basting occasionally.
  12. Check the internal temperature, aiming for 165°F (75°C).
  13. Rest the turkey for at least 20 minutes before carving and serving.

Nutrition

Serving: 1sliceCalories: 350kcalCarbohydrates: 20gProtein: 40gFat: 15gSaturated Fat: 8gPolyunsaturated Fat: 2gMonounsaturated Fat: 5gCholesterol: 120mgSodium: 800mgPotassium: 600mgFiber: 1gSugar: 5gVitamin A: 400IUVitamin C: 10mgCalcium: 30mgIron: 2mg

Notes

Optional: Garnish with additional fresh herbs before serving.

Tried this recipe?

Let us know how it was!

Filed Under: DINNER RECIPES

Garlic Parmesan Chicken Pasta

December 14, 2025 by JudyWhite Leave a Comment

There’s a certain comfort that comes from a plate of creamy pasta, and when you can add the irresistible flavors of garlic and parmesan to the mix, it’s a game-changer. One evening, after a hectic day, I found myself searching for something special to whip up—something that would feel like a warm embrace after a long week. That’s when I stumbled upon this delightful Garlic Parmesan Chicken Pasta recipe, and it’s been a family favorite ever since.

With juicy chicken coated in savory breadcrumbs and a rich, velvety sauce waiting to envelop tender penne pasta, this dish is both elegant and easy. In just 30 minutes, you can impress friends or satisfy your own craving without any fuss. Say goodbye to lifeless takeout; this homemade meal not only nourishes your body but also lifts your spirits. Let me guide you through each step of creating this delicious masterpiece!

Why You'll Love This Garlic Parmesan Chicken Pasta

  • This Garlic Parmesan Chicken Pasta is an absolute breeze to prepare, taking just 30 minutes from start to finish, making it perfect for busy weeknights.
  • The combination of garlic and parmesan delivers a flavor that is truly irresistible and comfortingly rich.
  • Its versatility allows you to easily customize it with your favorite vegetables or proteins, ensuring that it fits any dining occasion.
  • Plus, the visual appeal of the creamy sauce coating the pasta and the golden chicken on top will impress anyone at your table.

Garlic Parmesan Chicken Pasta Ingredients

Get ready to create a flavorful feast with these scrumptious ingredients!

For the Chicken
• Boneless, skinless chicken breast – the star of your dish; juicy and tender.
• Italian style bread crumbs – adds a crisp, savory coating for that perfect crunch.
• Grated parmesan cheese – for extra flavor boost; a must for this Garlic Parmesan Chicken Pasta.
• Garlic powder – unveils an aromatic layer that enhances the overall taste.
• Salt – essential for amplifying the natural flavors of your ingredients.

For the Pasta
• Penne pasta – its tube-like shape holds onto the creamy sauce beautifully.

For the Sauce
• Butter – provides a luscious base for the sauce, making it rich and velvety.
• Garlic (pressed) – fresh garlic brings a vibrant flavor that elevates the dish.
• Flour – thickens the sauce to a creamy consistency that clings to the pasta.
• Heavy cream – contributes to that indulgently smooth texture everyone loves.
• Chicken broth – infuses the sauce with depth and richness.
• Salt – seasoning to taste; don’t be shy!
• Pepper – adds a subtle warmth and a little kick.

For Garnish
• Chopped parsley (optional) – a splash of color to brighten up your beautiful plate!

How to Make Garlic Parmesan Chicken Pasta

  1. Cook the Pasta: Start by boiling a large pot of salted water. Cook the penne pasta according to the package directions, usually about 10-12 minutes, until al dente. Drain and set aside.

  2. Prepare the Chicken: Slice or pound the chicken breast into thin cutlets for even cooking. In a bowl, combine the bread crumbs, parmesan, garlic powder, and salt to create a flavorful coating.

  3. Coat the Chicken: Generously coat each chicken cutlet in the breadcrumb mixture, ensuring every piece is well-covered for that delightful crunch.

  4. Sear the Chicken: In a large skillet over medium heat, add 2 tablespoons of olive oil. Once hot, add the coated chicken cutlets and let cook for 4-5 minutes without moving them to achieve a golden crust.

  5. Flip and Finish: Carefully flip each cutlet and cook for another 4-5 minutes, until the internal temperature reaches 165˚F. Remove the chicken from the skillet and let it rest on a plate.

  6. Cook in Batches: If needed, cook the chicken in batches to avoid overcrowding the skillet. This ensures each piece gets that perfect sear. Add more olive oil as required to keep it from drying out.

  7. Make the Sauce: With the skillet still warm, add the butter and let it melt. Stir in the pressed garlic and let it cook for about 30 seconds until fragrant.

  8. Thicken the Sauce: Sprinkle in the flour and mix well. Gradually stir in the chicken broth and bring to a simmer, cooking until the sauce thickens—about 60-90 seconds.

  9. Finish the Sauce: Add the remaining salt and pepper, then slowly pour in the heavy cream. Bring the sauce back to a simmer, then stir in the parmesan cheese. Let simmer for 3-5 minutes before tossing in the cooked pasta.

  10. Serve it Up: Plate the pasta in bowls, top with the chicken, and garnish with chopped parsley if desired for a pop of color and freshness.

Optional: Top with extra grated parmesan for an indulgent finish.

Exact quantities are listed in the recipe card below.

Make Ahead Options

These Garlic Parmesan Chicken Pasta ingredients are perfect for meal prep enthusiasts! You can prepare the chicken cutlets by coating them with the breadcrumb mixture up to 24 hours in advance, ensuring they stay flavorful when cooked. Store the coated chicken in the refrigerator to maintain their crispiness. You can also cook the penne pasta ahead and refrigerate it for up to 3 days. When you’re ready to enjoy this dish, simply reheat the pasta and chicken separately for the best texture. Finish by making the creamy sauce, which can be whipped up in about 5 minutes, allowing you to savor a delightful homemade meal with ease.

What to Serve with Garlic Parmesan Chicken Pasta?

Creating the perfect meal isn’t just about one dish; it’s about crafting a harmonious dining experience that delights the senses.

  • Garlic Bread: The crispy, buttery crunch of garlic bread is perfect for dipping into the creamy sauce, enhancing every bite.

  • Caesar Salad: Crisp romaine and a tangy dressing create a refreshing contrast to the richness of the pasta, balancing the meal beautifully.

  • Roasted Vegetables: Seasoned and caramelized, roasted seasonal vegetables add vibrant color and a hint of sweetness to the plate, promoting a wholesome feel.

  • Steamed Asparagus: Tender asparagus spears provide a crisp and bright element that beautifully complements the creamy sauce while adding a nutritional boost.

  • White Wine: A chilled glass of Sauvignon Blanc or Pinot Grigio elevates the dining experience, pairing wonderfully with the savory flavors of garlic and parmesan.

  • Lemon Sorbet: For dessert, the light, refreshing zing of lemon sorbet cleanses the palate after the rich pasta dish, ending your meal on a perfect note.

Storage Tips for Garlic Parmesan Chicken Pasta

Fridge: Store leftover Garlic Parmesan Chicken Pasta in an airtight container for up to 3 days. Be sure to let it cool completely before sealing to preserve freshness.

Freezer: For longer storage, freeze the pasta in a freezer-safe container for up to 2 months. However, avoid freezing if the dish contains cream, as it may separate upon reheating.

Reheating: To reheat, thaw overnight in the fridge and warm gently on the stovetop or microwave. Add a splash of chicken broth or cream to restore the sauce’s smooth texture.

Garlic Parmesan Chicken Pasta Variations

Feel free to spin this recipe to match your taste buds or dietary needs for an even more delightful experience!

  • Gluten-Free: Substitute the penne pasta with gluten-free pasta and use gluten-free bread crumbs for an equally tasty meal.

  • Vegetarian: Replace chicken with sautéed mushrooms or a medley of seasonal veggies, and follow the same coating and cooking process.

  • Creamy Spinach: Stir in fresh spinach during the sauce-making step for a nutritious boost and vibrant color. The spinach wilts beautifully, adding both flavor and elegance.

  • Lemon Zest: Add a teaspoon of lemon zest to the sauce for a refreshing brightness. This simple twist enhances the richness and adds a delightful zing.

  • Extra Protein: For added heartiness, toss in cooked chickpeas or shredded rotisserie chicken, making it a filling dish that’s perfect for any family gathering.

  • Spicy Kick: Incorporate red pepper flakes or a dash of hot sauce into the sauce for a gentle heat that contrasts wonderfully with the creamy texture.

  • Nutty Flavor: Stir in a few tablespoons of toasted pine nuts or walnuts before serving for a satisfying crunch and earthy taste that complements the richness.

  • Herb Infusion: Mix in fresh basil or thyme into the sauce for an aromatic twist, elevating the dish with lush, garden-fresh notes that make every bite memorable.

Let your creativity shine as you customize this comforting dish to create your perfect plate!

Chef's Helpful Tips

  • When making Garlic Parmesan Chicken Pasta, be sure to pound the chicken breast thinly for even cooking and a tender texture.
  • Avoid overcrowding the skillet when searing the chicken to ensure it develops a beautiful golden crust.
  • For a creamier sauce, add the heavy cream gradually and allow it to simmer until thickened, which will help to meld the flavors together.
  • Lastly, remember to cook the pasta al dente so it retains a slight bite, which complements the rich sauce wonderfully.

Garlic Parmesan Chicken Pasta Recipe FAQs

How do I choose the right chicken for my Garlic Parmesan Chicken Pasta?
Absolutely! When selecting chicken breasts, look for those that are plump and have a pinkish hue without any dark spots or a strong odor. Fresh chicken will be firm to the touch. Avoid any packages that seem to have excess liquid, as this can signify the chicken isn’t as fresh. If you have the option, organic or free-range chicken can enhance the flavor and quality of your dish.

How should I store leftover Garlic Parmesan Chicken Pasta?
Very good question! Place any leftovers in an airtight container and refrigerate them within two hours of cooking. This will ensure maximum freshness. The Pasta will stay good for about 3 days. Make sure to let it cool completely before sealing the container for best results!

Can I freeze Garlic Parmesan Chicken Pasta?
Of course! For freezing, I recommend portioning the pasta into freezer-safe containers and storing it for up to 2 months. However, if the dish contains cream, be cautious; it may separate upon thawing. To freeze, first, allow the pasta to cool completely. Then, place it in the containers, leaving a little space at the top for expansion, and seal tightly.

What should I do if my sauce is too thick?
If you encounter a thick sauce, don’t panic! Simply add a little chicken broth or heavy cream to thin it out. Start with a tablespoon at a time, stirring continuously until you reach your desired consistency. This will help keep the flavors balanced while ensuring it clings nicely to the pasta.

Are there any dietary considerations I should be aware of for this recipe?
Yes, indeed! If you’re cooking for someone with dairy sensitivities, you can substitute the heavy cream and parmesan cheese with non-dairy alternatives, like coconut cream and nutritional yeast, respectively. For those with gluten allergies, use gluten-free pasta and gluten-free breadcrumbs. It’s always a good practice to double check ingredient labels for any potential allergens.

What kind of vegetables can I add to the Garlic Parmesan Chicken Pasta?
The more the merrier! You can customize this dish beautifully by adding veggies like sautéed spinach, cherry tomatoes, broccoli, or bell peppers. Just steam or sauté them briefly before mixing them into the pasta. Not only do they add a nutritious boost, but they also elevate the colors and flavors on your plate.

Garlic Parmesan Chicken Pasta

Garlic Parmesan Chicken Pasta

This Garlic Parmesan Chicken Pasta blends creamy pasta with juicy chicken, garlic, and parmesan for a comforting dinner that's ready in just 30 minutes.
Print Recipe Pin Recipe
Prep Time 10 minutes mins
Cook Time 20 minutes mins
Total Time 30 minutes mins
Servings: 4 servings
Course: DINNER RECIPES
Cuisine: Italian
Calories: 600
Ingredients Equipment Method Nutrition Notes

Ingredients
  

For the Chicken
  • 1 pound boneless, skinless chicken breast
  • 1 cup Italian style bread crumbs
  • 1/2 cup grated parmesan cheese
  • 1 teaspoon garlic powder
  • 1 teaspoon salt
For the Pasta
  • 8 ounces penne pasta
For the Sauce
  • 2 tablespoons butter
  • 2 cloves garlic (pressed)
  • 2 tablespoons flour
  • 1 cup heavy cream
  • 1 cup chicken broth
  • 1 teaspoon salt
  • 1/2 teaspoon pepper
For Garnish
  • 1 tablespoon chopped parsley optional

Equipment

  • Large pot
  • Skillet
  • Mixing bowl

Method
 

How to Make Garlic Parmesan Chicken Pasta
  1. Start by boiling a large pot of salted water. Cook the penne pasta according to the package directions, usually about 10-12 minutes, until al dente. Drain and set aside.
  2. Slice or pound the chicken breast into thin cutlets for even cooking. In a bowl, combine the bread crumbs, parmesan, garlic powder, and salt to create a flavorful coating.
  3. Generously coat each chicken cutlet in the breadcrumb mixture, ensuring every piece is well-covered for that delightful crunch.
  4. In a large skillet over medium heat, add 2 tablespoons of olive oil. Once hot, add the coated chicken cutlets and let cook for 4-5 minutes without moving them to achieve a golden crust.
  5. Carefully flip each cutlet and cook for another 4-5 minutes, until the internal temperature reaches 165˚F. Remove the chicken from the skillet and let it rest on a plate.
  6. If needed, cook the chicken in batches to avoid overcrowding the skillet. Add more olive oil as required to keep it from drying out.
  7. With the skillet still warm, add the butter and let it melt. Stir in the pressed garlic and let it cook for about 30 seconds until fragrant.
  8. Sprinkle in the flour and mix well. Gradually stir in the chicken broth and bring to a simmer, cooking until the sauce thickens—about 60-90 seconds.
  9. Add the remaining salt and pepper, then slowly pour in the heavy cream. Bring the sauce back to a simmer, then stir in the parmesan cheese. Let simmer for 3-5 minutes before tossing in the cooked pasta.
  10. Plate the pasta in bowls, top with the chicken, and garnish with chopped parsley if desired for a pop of color and freshness.

Nutrition

Serving: 1servingCalories: 600kcalCarbohydrates: 50gProtein: 35gFat: 35gSaturated Fat: 20gPolyunsaturated Fat: 5gMonounsaturated Fat: 5gCholesterol: 120mgSodium: 900mgPotassium: 600mgFiber: 2gSugar: 2gVitamin A: 15IUVitamin C: 2mgCalcium: 25mgIron: 10mg

Notes

For an indulgent finish, top with extra grated parmesan.

Tried this recipe?

Let us know how it was!

Filed Under: DINNER RECIPES

Monterey Chicken Spaghetti

December 14, 2025 by JudyWhite Leave a Comment

There’s nothing quite like the warmth of a hearty dinner on a chilly evening, is there? Today, I want to share a delightful concoction that has quickly become a family favorite: Monterey Chicken Spaghetti. The first time I prepared this dish, the aroma of creamy cheese mingled with the savory scent of sautéed garlic and bell peppers wafted through my kitchen, drawing everyone in like a siren’s call. What’s truly wonderful about this recipe is how it transforms simple ingredients into a comforting, flavorsome meal that’s ready in just 30 minutes.

Whether you’re looking to impress a crowd or simply want to break away from the monotonous routine of fast food, this Monterey Chicken Spaghetti offers a satisfying solution. With tender pieces of chicken mingling with al dente pasta all enveloped in a rich, creamy sauce, it’s not just a meal—it’s a cozy experience. Get your skillet ready; this dish might just become your new go-to for busy weeknights and memorable gatherings alike!

Why You'll Love This Monterey Chicken Spaghetti

  • This Monterey Chicken Spaghetti is incredibly easy to prepare, making it perfect for busy weeknights.
  • The rich flavors of creamy cheese, tender chicken, and sautéed vegetables create a delightful taste experience that everyone will enjoy.
  • Its versatility allows you to modify the ingredients based on what you have on hand, making it a flexible option for any pantry.
  • Plus, its vibrant colors and cheesy appeal make for a visually stunning dish that’s sure to impress your family and friends.

Monterey Chicken Spaghetti Ingredients

Get ready to create a creamy, flavorful delight!

For the Spaghetti
• 10 oz spaghetti – the star of the dish; cook until al dente for the best texture.

For the Chicken
• 2 cups cooked chicken breast, chopped – using leftovers is a great time-saver, providing a heaping dose of protein.

For the Sauce
• 1 cup shredded Monterey Jack cheese – melts beautifully to create a creamy sauce.
• 3/4 cup heavy cream – adds richness and luscious texture to your Monterey Chicken Spaghetti.
• 1/2 cup chicken broth – enhances the flavor while keeping the sauce juicy.

For the Vegetables
• 1/2 cup chopped bell peppers (mixed colors) – brings vibrant freshness and a crunch to the dish.
• 1/2 small onion, chopped – adds a subtle sweetness that enhances the savory flavors.
• 2 cloves garlic, minced – infuses the dish with an aromatic essence that’s hard to resist.

For Cooking
• 1 tbsp olive oil – perfect for sautéing while adding healthy fats.
• 1 tbsp butter – enriches the dish with flavor and helps to achieve a beautifully browned finish.
• Salt and pepper to taste – essential for enhancing all the flavors in your Monterey Chicken Spaghetti.

For Garnish
• Fresh parsley – provides a pop of color and a fresh herbal note to balance the richness.

How to Make Monterey Chicken Spaghetti

  1. Cook: Bring a large pot of salted water to a boil and cook the spaghetti according to the package instructions until al dente, usually about 8-10 minutes. Drain and set aside.

  2. Heat: In a large skillet, add olive oil and butter over medium heat. Allow them to melt, creating a luscious base for your veggies.

  3. Sauté: Add the onion, garlic, and bell peppers to the skillet. Sauté them until softened and fragrant—this usually takes about 3-5 minutes, making your kitchen smell heavenly.

  4. Combine: Stir in the cooked chicken, heavy cream, and chicken broth. Mix everything well and allow the flavors to marry together, cooking for 2-3 minutes to thicken the sauce slightly.

  5. Mix: Add the cooked spaghetti to the skillet, tossing it gently to combine with the sauce and ingredients evenly. The pasta should be well-coated and vibrant!

  6. Melt: Stir in the Monterey Jack cheese until it’s completely melted and the sauce becomes irresistibly creamy. This is where your dish transforms into a truly comforting meal.

  7. Season: Taste your creation and season it with salt and pepper to your liking. Adjust as necessary to bring out the flavors.

  8. Garnish: Before serving, sprinkle with fresh parsley for a touch of color and a refreshing flavor that cuts through the richness.

Optional: Serve with a sprinkle of chili flakes for a bit of heat!

Exact quantities are listed in the recipe card below.

Make Ahead Options

These Monterey Chicken Spaghetti are perfect for busy home cooks looking to save time during the week! You can cook the spaghetti and prepare the sauce (without the cheese) up to 24 hours in advance; simply refrigerate them separately in airtight containers. Additionally, the chopped vegetables can be prepped ahead and stored in the fridge for up to 3 days. When you’re ready to enjoy this comforting dish, heat the sauce in a skillet, stir in the cooked spaghetti, and then add the cheese until melted. This way, you maintain the creamy texture and flavor, ensuring your meal is just as delicious as if you’d made it fresh!

How to Store and Freeze Monterey Chicken Spaghetti

Fridge: Store leftover Monterey Chicken Spaghetti in an airtight container for up to 3 days. This will keep it fresh and maintain its creamy texture.

Freezer: Freeze individual portions in airtight containers for up to 2 months. Let thaw in the fridge overnight before reheating.

Reheating: Gently reheat in a skillet over medium heat, adding a splash of chicken broth or cream to restore creaminess and avoid drying out.

Room Temperature: Do not leave the spaghetti out at room temperature for more than 2 hours to ensure food safety.

Monterey Chicken Spaghetti Variations

Feel free to put your unique spin on this delicious dish with these fun options!

  • Dairy-Free: Use coconut cream and a dairy-free cheese alternative for a creamy yet lactose-free version. The coconut adds a subtle sweetness that complements the flavors beautifully.

  • Veggie-Packed: Toss in some spinach or kale with the sautéed vegetables for added nutrients and color. Not only will it brighten the dish, but it’ll also help sneak in some healthy greens!

  • Spicy Kick: Add chopped jalapeños or a sprinkle of cayenne pepper to the skillet for an extra layer of heat. This will elevate your dish, making each bite a flavorful adventure.

  • Whole Wheat: Swap out regular spaghetti for whole wheat or gluten-free pasta for a healthier option without sacrificing taste. It brings a nutty flavor and chewy texture that pairs well with the creamy sauce.

  • Pesto Twist: Incorporate a spoonful of pesto into the sauce for a fresh, herbaceous flavor. The vibrant green color will invigorate your dish, while the taste will transport you to Italian gardens.

  • BBQ Chicken: For a smoky flavor, use BBQ sauce mixed in with the cream and broth. This will create a unique blend that reminds you of a summer cookout right in your kitchen.

  • Italian Sausage: Substitute cooked chicken with Italian sausage, removing the casing. The sausage will impart beautiful spices and elevate the dish to a whole new level of savory goodness.

  • Lemon Zest: A teaspoon of fresh lemon zest added before serving can brighten the flavors and cut through the richness of the cheese. It’s a simple touch that makes a big difference!

What to Serve with Monterey Chicken Spaghetti?

Looking to elevate your meal and create a delightful dining experience? Let’s explore some perfect pairings!

  • Garlic Bread: A crunchy, buttery loaf complements the creamy spaghetti while offering a satisfying way to soak up every bit of sauce.

  • Steamed Broccoli: This vibrant, slightly crunchy vegetable adds a fresh, earthy note, balancing the richness of the dish beautifully.

  • Caesar Salad: Crisp romaine adorned with tangy dressing and crunchy croutons offers a refreshing contrast to the warmth of the pasta.

  • Roasted Asparagus: A tender, nutty side that adds elegance, making your meal feel extra special while bringing bright flavors.

  • Wine Pairing – Chardonnay: A chilled glass of oaky Chardonnay enhances the creamy texture of the spaghetti, creating a harmonious balance.

  • Mini Cheesecake Bites: These sweet, creamy treats are a delightful way to round off your meal, leaving a lasting impression of indulgence.

Pair these options with your Monterey Chicken Spaghetti, and watch as your dinner transforms into an unforgettable culinary experience!

Chef's Helpful Tips

  • When preparing Monterey Chicken Spaghetti, always cook your spaghetti until al dente, as it will continue to cook slightly after being added to the sauce.
  • If you have leftover chicken, it saves time and adds great flavor to the dish, making it perfect for a quick weeknight meal.
  • For a creamy sauce, ensure you stir in the Monterey Jack cheese slowly over low heat to prevent it from clumping.
  • Keep an eye on the timing when sautéing the vegetables; they should be soft but not browned to maintain their vibrant color and fresh taste.

Monterey Chicken Spaghetti Recipe FAQs

How do I know if my spaghetti is cooked properly?
Absolutely! The best way to ensure your spaghetti is cooked to perfection is to follow the package instructions closely and test a piece a minute or two before the suggested cooking time. It should be al dente, which means it should have a slight bite but not be hard. If you take a bite and it’s firm but not crunchy, you’re good to go!

Can I store leftovers of Monterey Chicken Spaghetti?
Very! Store any leftover Monterey Chicken Spaghetti in an airtight container in the refrigerator for up to 3 days. To keep that wonderful creamy texture, make sure you seal it tightly before refrigerating. When you’re ready to enjoy it again, just reheat gently!

What’s the best way to freeze Monterey Chicken Spaghetti?
Sure! To freeze this delightful dish, portion it into airtight containers or freezer bags. Make sure to remove as much air as possible to prevent freezer burn. It can be stored for up to 2 months. When you’re ready to indulge again, let it thaw in the refrigerator overnight and reheat gently on the stove, adding a splash of chicken broth to maintain its creaminess.

I’m allergic to dairy; can I modify this recipe?
Of course! If you’re looking to make a dairy-free version of Monterey Chicken Spaghetti, you can substitute the Monterey Jack cheese with a dairy-free cheese alternative that melts well. For the heavy cream, consider using coconut cream or a cashew cream for a luscious thickness. These options allow you to savor the creamy essence while accommodating your dietary needs.

What should I do if my sauce is too thick?
No worries! If you find that your sauce is too thick while cooking, simply add a little more chicken broth or heavy cream, a tablespoon at a time, stirring it in until you reach your desired consistency. Make sure to keep the heat low to allow for even mixing without curdling!

Can I use raw chicken instead of cooked?
Absolutely! If you prefer to use raw chicken breast, you can dice it and add it to the skillet first. Sauté it for about 8-10 minutes until it’s fully cooked before adding the vegetables and continuing with the rest of the recipe. Just make sure the internal temperature reaches 165°F for safe consumption.

Monterey Chicken Spaghetti

Monterey Chicken Spaghetti

Monterey Chicken Spaghetti is a hearty and creamy dish that's perfect for cold evenings, combining chicken, pasta, and a rich cheese sauce.
Print Recipe Pin Recipe
Prep Time 10 minutes mins
Cook Time 20 minutes mins
Total Time 30 minutes mins
Servings: 4 servings
Course: DINNER RECIPES
Cuisine: American
Calories: 550
Ingredients Equipment Method Nutrition Notes

Ingredients
  

For the Spaghetti
  • 10 oz spaghetti cook until al dente
For the Chicken
  • 2 cups cooked chicken breast, chopped using leftovers is a great time-saver
For the Sauce
  • 1 cup shredded Monterey Jack cheese melts beautifully
  • 3/4 cup heavy cream adds richness
  • 1/2 cup chicken broth enhances the flavor
For the Vegetables
  • 1/2 cup chopped bell peppers (mixed colors) brings vibrant freshness
  • 1/2 small onion, chopped adds sweetness
  • 2 cloves garlic, minced infuses aromatic essence
For Cooking
  • 1 tbsp olive oil for sautéing
  • 1 tbsp butter enriches the dish
  • Salt and pepper to taste
For Garnish
  • Fresh parsley for color and fresh flavor

Equipment

  • Large pot
  • Large skillet
  • measuring cups
  • measuring spoons
  • colander

Method
 

How to Make Monterey Chicken Spaghetti
  1. Bring a large pot of salted water to a boil and cook the spaghetti according to the package instructions until al dente, usually about 8-10 minutes. Drain and set aside.
  2. In a large skillet, add olive oil and butter over medium heat. Allow them to melt.
  3. Add the onion, garlic, and bell peppers to the skillet. Sauté until softened and fragrant, about 3-5 minutes.
  4. Stir in the cooked chicken, heavy cream, and chicken broth. Mix well and cook for 2-3 minutes to thicken the sauce slightly.
  5. Add the cooked spaghetti to the skillet, tossing it gently to combine with the sauce and ingredients.
  6. Stir in the Monterey Jack cheese until it's completely melted and the sauce becomes creamy.
  7. Taste and season with salt and pepper to your liking.
  8. Before serving, sprinkle with fresh parsley for a touch of color.

Nutrition

Serving: 1servingCalories: 550kcalCarbohydrates: 45gProtein: 30gFat: 25gSaturated Fat: 15gPolyunsaturated Fat: 2gMonounsaturated Fat: 10gCholesterol: 90mgSodium: 600mgPotassium: 800mgFiber: 3gSugar: 2gVitamin A: 500IUVitamin C: 30mgCalcium: 300mgIron: 2mg

Notes

For a bit of heat, serve with a sprinkle of chili flakes. Store leftovers in an airtight container for up to 3 days in the fridge or freeze for up to 2 months.

Tried this recipe?

Let us know how it was!

Filed Under: DINNER RECIPES

Easy Taco Rice Bowl

December 14, 2025 by JudyWhite Leave a Comment

Picture this: It’s a busy weeknight, and I’m juggling work emails while trying to figure out what to whip up for dinner. As the clock ticks down and my stomach grumbles, I find myself reaching for a pantry staple—rice. Little did I know, this simple ingredient would transform into a flavorful feast that had everyone in my home asking for seconds. Let me introduce you to my Easy Taco Rice Bowl!

This recipe is not just a meal; it’s a vibrant medley of savory ground turkey, fresh greens, and zesty toppings that will make your taste buds dance. With just 20 minutes from prep to plate, you’ll bring a colorful, healthy dish to the table that turns boredom into delicious excitement. Perfect for busy evenings or casual gatherings, this taco rice bowl is adaptable, allowing you to customize it with your favorite toppings or whatever you have on hand. Dive into this delightful dish and say goodbye to fast food cravings—we’ve found a new weeknight hero!

Why You'll Love This Easy Taco Rice Bowl

  • This Easy Taco Rice Bowl is a super quick and convenient recipe that comes together in just 20 minutes, making it the perfect solution for busy weeknights.
  • The explosion of flavors from the savory ground turkey, fresh greens, and zesty toppings will keep your taste buds entertained and satisfied.
  • Its versatility allows you to mix and match toppings based on your preferences or what you have on hand, making each bowl a unique creation.
  • The vibrant colors and fresh ingredients make this dish visually appealing, enticing even the pickiest eaters to dive in.

Easy Taco Rice Bowl Ingredients

Get ready to create a flavorful delight!

For the Base
• Salad greens – A crisp foundation that adds freshness and crunch to your Easy Taco Rice Bowl.
• Ground turkey – A lean protein option that soaks up all the delicious taco seasoning.
• Rice – The hearty base that makes this dish filling and satisfying.

For the Flavor
• Taco seasoning – The secret mix that brings a burst of flavor to your ground turkey and beans.
• Black beans – A protein-packed addition that enhances the dish’s texture and nutrition.

For the Zest
• Lime juice – A splash of tanginess that brightens up the entire bowl.
• Cilantro – Fresh herbs that add a fragrant note and open up the flavors beautifully.

For the Toppings
• Cherry tomatoes – A pop of sweetness to balance the savory components.
• Avocado – Creamy richness that elevates each bite, making the dish even more indulgent.
• Monterey Jack or cheddar cheese – Melted goodness that adds a cheesy comfort to the bowl.
• Greek yogurt taco sauce – A healthy alternative to sour cream that provides the perfect finishing touch.

How to Make Easy Taco Rice Bowl

  1. Cook the Turkey: In a skillet, heat a splash of olive oil over medium heat. Add the ground turkey and cook until browned, about 5-7 minutes, breaking it up as it cooks.

  2. Season and Combine: Sprinkle in the taco seasoning and stir in the black beans. Mix well and cook for another 2-3 minutes until everything is heated through and fragrant.

  3. Layer the Bowls: In serving bowls, start with a generous layer of salad greens. Next, add a scoop of cooked rice and top it off with the turkey mixture.

  4. Add Toppings: Decorate your bowls with cherry tomatoes, sliced avocado, cheese, and chopped cilantro. Feel free to get creative with your topping choices!

  5. Drizzle and Serve: Finally, squeeze fresh lime juice over each bowl and drizzle with Greek yogurt taco sauce. Serve immediately and enjoy your vibrant meal!

Optional: Add a sprinkle of crushed tortilla chips for extra crunch!
Exact quantities are listed in the recipe card below.

Make Ahead Options

These Easy Taco Rice Bowls are perfect for meal prep advocates seeking a delicious, hassle-free dinner option! You can prepare the ground turkey mixture, including the taco seasoning and black beans, up to 3 days in advance. Just refrigerate it in an airtight container. Additionally, cook the rice ahead of time and store it separately for up to 4 days; to keep it fluffy, add a splash of water when reheating. When you’re ready to serve, simply layer your salad greens, reheated rice, and turkey mixture in bowls, then add your fresh toppings, such as avocado and cheese. With this prep, you’ll enjoy a flavorful meal that’s just as delightful as when you first made it—saving you precious time on busy weeknights!

How to Store and Freeze Easy Taco Rice Bowl

Fridge: Store any leftovers in an airtight container for up to 3 days. Keep the toppings separate to maintain freshness and crunch.

Freezer: You can freeze the turkey and rice mixture in a freezer-safe container for up to 2 months. Thaw overnight in the fridge before reheating.

Reheating: Reheat the turkey and rice mixture in the microwave or on the stovetop until heated through, adding a splash of water to keep it moist if needed. Serve with fresh toppings for a delicious meal.

Room Temperature: It’s best to eat your Easy Taco Rice Bowl immediately. If left out, consume within 2 hours to ensure food safety.

Easy Taco Rice Bowl Variations

Feel free to explore these delightful twists on your Easy Taco Rice Bowl to make it your own!

  • Vegetarian: Substitute ground turkey with sautéed mushrooms or lentils for a hearty plant-based option. This swap creates a rich, meaty texture without the meat.

  • Spicy Kick: Add diced jalapeños or a dash of hot sauce to the turkey mixture for those who crave heat. It will send your taste buds on a fiery adventure!

  • Quinoa Swap: Instead of rice, use cooked quinoa for a protein-packed alternative. Its nutty flavor pairs beautifully and adds an extra layer of nutrition.

  • Creamy Avocado Dressing: Blend ripe avocado with lime juice and Greek yogurt for a creamy dressing. Drizzle this over your bowl for added richness and flavor.

  • Extra Crunch: Top your bowl with crushed tortilla chips or seeds for a delightful crunch that contrasts with the creamy avocado and soft filling.

  • Greek Twist: Swap out the taco seasoning for Mediterranean spices like oregano and feta cheese. This will take your bowl on a journey to the shores of Greece!

  • Roasted Veggies: Add roasted peppers and zucchini to your bowl for a touch of smoky flavor and added nutrients. They’ll bring warmth and sweetness, elevating the dish.

  • Cilantro Lime Rice: Mix lime zest and fresh cilantro into the rice while cooking. This flavor-packed base transforms each bite into a vibrant experience.

What to Serve with Easy Taco Rice Bowl?

Bringing your family together for a delicious meal is the heart of home cooking, and this vibrant bowl deserves some perfect partners.

  • Crispy Tortilla Chips: The crunchiness of tortilla chips adds a delightful texture contrast, perfect for scooping up leftover toppings.
  • Zesty Corn Salad: Fresh corn salad, brightened with lime and cilantro, complements the flavors while adding a refreshing burst of sweetness.
  • Guacamole: Creamy guacamole enhances the richness of your taco rice bowl, inviting every bite to be indulgently delicious.
  • Refried Beans: Velvety refried beans provide a velvety, savory side that maximizes the Mexican flavor experience for taco lovers.
  • Margaritas: A chilled margarita balances the zest of the taco seasoning with its tartness, turning your dinner into a festive affair.
  • Mexican Street Corn: Grilled corn on the cob, topped with cheese and spices, brings a smoky and tangy flavor that pairs beautifully.
  • Salsa Verde: A vibrant and zesty salsa verde drizzled on top adds an herby freshness that brightens every component of the bowl.
  • Churros: For dessert, a warm churro with a side of chocolate sauce rounds off the meal with a sweet crunch.
  • Lime Water: Refreshing lime-infused water serves as a light palate cleanser, enhancing the vibrant flavors of your meal while keeping it simple.

Chef's Helpful Tips

  • To achieve a perfectly cooked ground turkey in your Easy Taco Rice Bowl, make sure to break it up into small pieces while browning so it cooks evenly.
  • Avoid overcooking the rice by following the package instructions for the exact water-to-rice ratio and timing to ensure it’s fluffy and not mushy.
  • When mixing in the taco seasoning, consider adding a splash of water to help distribute the flavors more uniformly and prevent the mixture from drying out.
  • For a zesty finish, allow the lime juice to sit on the ingredients for a minute before serving to enhance the overall flavor profile of the bowl.

Easy Taco Rice Bowl Recipe FAQs

What kind of salad greens work best for this recipe?
Absolutely! Fresh greens like romaine, arugula, or spring mix add a delightful crunch and nutritional boost. Choose greens that are crisp and vibrant to enhance the visual appeal and flavor profile of your Easy Taco Rice Bowl.

How should I store leftovers from the Easy Taco Rice Bowl?
Store any leftovers in an airtight container for up to 3 days in the fridge. I recommend keeping the toppings—like avocado and cheese—separate to keep them fresh and avoid sogginess. This way, when you’re ready to enjoy it again, your bowl will be just as vibrant and delicious!

Can I freeze the Easy Taco Rice Bowl?
Yes, you can! For best results, freeze the turkey and rice mixture in a freezer-safe container for up to 2 months. To freeze, let it cool completely, then portion it into containers. When you’re ready to enjoy it, thaw overnight in the fridge, and reheat it on the stovetop or microwave until heated through. Make sure to add a splash of water to keep it moist.

What should I do if my ground turkey is dry?
Very! To prevent dryness, keep an eye on the cooking time and avoid overcooking the turkey. If you find that it does get a bit dry, consider adding a splash of broth or water while cooking to help keep it moist. Mixing in additional sautéed veggies or a little olive oil before serving can also enhance texture and flavor.

Is this recipe suitable for people with dietary restrictions?
Most definitely! If you’re catering to dietary restrictions, you can easily adapt this Easy Taco Rice Bowl for different needs. For gluten-free diets, ensure the taco seasoning is gluten-free. You can swap the turkey for plant-based alternatives or beans for a vegetarian option. Just check with individuals for any specific allergies, especially for the toppings, such as dairy or avocados.

Can I use different grains instead of rice?
Of course! Quinoa, cauliflower rice, or even whole grain options like farro can be excellent substitutes depending on your preference. Each grain brings a unique taste and nutrition profile, making it fun to switch things up in your Easy Taco Rice Bowl!

Easy Taco Rice Bowl

Easy Taco Rice Bowl

This Easy Taco Rice Bowl combines flavorful ground turkey, rice, and fresh toppings for a quick and satisfying dinner.
Print Recipe Pin Recipe
Prep Time 10 minutes mins
Cook Time 10 minutes mins
Total Time 20 minutes mins
Servings: 4 bowls
Course: DINNER RECIPES
Cuisine: Mexican
Calories: 450
Ingredients Equipment Method Nutrition Notes

Ingredients
  

For the Base
  • 4 cups salad greens A crisp foundation for the bowl.
  • 1 lb ground turkey A lean protein option.
  • 2 cups rice The hearty base.
For the Flavor
  • 2 tbsp taco seasoning Secret mix for flavor.
  • 1 can black beans Protein-packed addition.
For the Zest
  • 2 tbsp lime juice Splash of tanginess.
  • 0.25 cup cilantro Fresh herbs for flavor.
For the Toppings
  • 1 cup cherry tomatoes Adds sweetness.
  • 1 avocado sliced Creamy richness.
  • 1 cup Monterey Jack or cheddar cheese Melted goodness.
  • 0.5 cup Greek yogurt taco sauce Healthy alternative to sour cream.

Equipment

  • Skillet

Method
 

How to Make Easy Taco Rice Bowl
  1. In a skillet, heat a splash of olive oil over medium heat. Add the ground turkey and cook until browned, about 5-7 minutes, breaking it up as it cooks.
  2. Sprinkle in the taco seasoning and stir in the black beans. Mix well and cook for another 2-3 minutes until heated through and fragrant.
  3. In serving bowls, layer with salad greens, then add the cooked rice, and top with the turkey mixture.
  4. Decorate with cherry tomatoes, sliced avocado, cheese, and chopped cilantro. Customize as desired.
  5. Squeeze fresh lime juice over each bowl and drizzle with Greek yogurt taco sauce. Serve immediately.

Nutrition

Serving: 1bowlCalories: 450kcalCarbohydrates: 55gProtein: 30gFat: 15gSaturated Fat: 5gPolyunsaturated Fat: 0.5gMonounsaturated Fat: 9gCholesterol: 70mgSodium: 800mgPotassium: 600mgFiber: 8gSugar: 3gVitamin A: 2000IUVitamin C: 25mgCalcium: 200mgIron: 3mg

Notes

For extra crunch, add a sprinkle of crushed tortilla chips!

Tried this recipe?

Let us know how it was!

Filed Under: DINNER RECIPES

Homemade Chick-fil-A Chicken Tortilla Soup

December 14, 2025 by JudyWhite Leave a Comment

The first chill of autumn in the air always calls for cozy meals that warm the soul, and what could be better than slurping up a hearty bowl of Homemade Chick-fil-A Chicken Tortilla Soup? This dish has been my go-to during those busy weeknights when I want something comforting yet quick to prepare. The bold flavors of garlic, cumin, and chili powder blend together in perfect harmony, making every spoonful a delightful adventure.

As I stood by my kitchen counter, chopping fresh vegetables and inhaling the rich aroma of sautéing onions and peppers, I was transported back to fond memories of family dinners. This soup not only satisfies my cravings for something hearty but also showcases the kind of homemade goodness that fast food simply can’t compete with. With just a handful of ingredients and about 88 minutes, you’ll be able to turn your kitchen into a haven of flavor and warmth. Trust me, this recipe is the perfect solution for anyone tired of the same old weeknight meals!

Why You'll Love This Homemade Chick-fil-A Chicken Tortilla Soup

  • This recipe is incredibly easy to make, allowing you to enjoy a flavorful meal without spending all day in the kitchen.
  • The combination of spices creates a depth of flavor that will leave your taste buds dancing with delight.
  • Its versatility means you can easily customize the toppings and ingredients to suit your preferences, making it perfect for any occasion.
  • Plus, its vibrant colors and garnishes make for a visually appealing dish that will impress your family and friends, making it a true crowd-pleaser.

Homemade Chick-fil-A Chicken Tortilla Soup Ingredients

For the Soup Base
• Olive oil – essential for sautéing vegetables, giving a rich base flavor.
• Yellow onion, diced – adds sweetness and depth to your soup.
• Celery, diced – provides a crunchy texture and aromatic quality.
• Red bell pepper, diced – introduces sweetness and vibrant color to the mix.
• Cilantro, minced – freshens up the soup with a burst of herbal flavor.
• Garlic, minced – amplifies the soup’s aromatic profile.
• Coarse kosher salt – enhances all the flavors while balancing spices.
• Chili powder – brings a warm, spicy undertone crucial for a zesty taste.
• Ground cumin – adds an earthy, robust flavor that makes every spoonful comforting.
• Cayenne pepper – a pinch elevates the heat just right for spice lovers!
• Tomato paste – thickens the soup and deepens the flavor profile.

For the Broth & Beans
• Reduced sodium chicken broth – serves as the flavorful liquid base and keeps things lighter.
• Green chilies – adds a kick of heat and flavor that truly makes this homemade chick-fil-A chicken tortilla soup shine.
• Sugar – balances the acidity from the tomatoes and brings out the sweetness of the vegetables.
• Navy beans – provides protein, creaminess, and heartiness to the soup.
• Black beans – adds a different texture and nutritional boost to your meal.
• Yellow corn – brings sweetness and a delightful pop of color to the mix.

For the Creamy Touches
• Shredded chicken – makes this soup filling and packs in protein. You can use leftovers or rotisserie chicken too!
• Fine yellow cornmeal – thickens the soup and gives it a unique texture.
• Heavy cream – adds richness for a luxurious finish that turns your soup into a warm hug.
• Sour cream – introduces a tangy flavor which balances the richness.
• Freshly squeezed lemon juice – brightens the soup, making all the flavors pop.

For the Garnish
• Tortilla strips – offers a crunchy contrast that makes each bite exciting.

How to Make Homemade Chick-fil-A Chicken Tortilla Soup

  1. Heat Oil: Begin by heating the olive oil in a 6-quart heavy-bottomed pot over medium-high heat until shimmering. Add the diced onion, celery, red bell pepper, and minced cilantro, sautéing until soft—about 5 minutes.

  2. Add Aromatics: Stir in the minced garlic along with chili powder, cumin, salt, and cayenne pepper. Keep stirring constantly to release the fragrant aromas for about 1-2 minutes.

  3. Incorporate Tomato Paste: Add the tomato paste, mixing it thoroughly with the spices and aromatics. Cook until the color dulls slightly, which should take around 2 minutes.

  4. Deglaze the Pot: Gradually pour in ¼ to ½ cup of chicken broth, scraping the brown bits off the bottom with a wooden spoon. This adds rich flavor—don’t skip this step!

  5. Combine Ingredients: Pour in the remaining chicken broth, green chilies, sugar, navy beans, black beans, corn, and shredded chicken. Stir well to combine all the ingredients thoroughly.

  6. Thicken the Soup: Create a slurry by whisking together 2 tablespoons of fine cornmeal with 3 tablespoons of warm water. Stir this mixture into the soup, ensuring it’s well incorporated.

  7. Simmer and Adjust: Cover the pot, bring the soup to a boil, and then reduce the heat to medium-low. Allow it to simmer for 30 minutes, tasting and adjusting the seasonings during the last 15 minutes.

  8. Finish the Creamy Base: In a separate bowl, mix a bit of the hot broth into the sour cream to temper it, whisking until smooth. Remove the soup from heat and stir in the heavy cream, tempered sour cream, and lemon juice. Taste and make any final adjustments to spices.

  9. Serve and Garnish: Ladle the hot soup into bowls and sprinkle with crunchy tortilla strips for a delightful contrast.

Optional: Top with fresh cilantro for extra flavor.
Exact quantities are listed in the recipe card below.

What to Serve with Homemade Chick-fil-A Chicken Tortilla Soup?

There’s something magical about pairing this vibrant soup with simple sides that enhance its rich flavors and textures.

  • Cornbread Muffins: These fluffy muffins are slightly sweet and perfect for soaking up every last drop of soup. They add a delightful texture that complements the heartiness of the dish.

  • Fresh Guacamole: Creamy and zesty, guacamole provides a cooling effect against the warm spices in the soup, creating a beautifully balanced bite. Add some crunchy tortilla chips on the side for extra dipping fun!

  • Crisp Garden Salad: A salad with mixed greens, cherry tomatoes, and a citrus vinaigrette brings a refreshing crunch that contrasts the soup’s warmth.

  • Spicy Quesadillas: Cheesy and loaded with your favorite fillings, quesadillas bring an additional layer of flavor and comfort, inviting you to savor each delicious spoonful.

  • Chilled White Wine: A crisp white like Sauvignon Blanc enhances the flavors of the soup while cooling down the spice levels, making for a sophisticated pairing.

  • Sour Cream and Jalapeño Spoonfuls: A dollop of sour cream with slices of jalapeño adds a kick, enhancing the overall flavor experience while echoing the creamy elements of the soup.

Each of these pairings brings a unique twist to your meal, ensuring your Homemade Chick-fil-A Chicken Tortilla Soup truly shines!

Homemade Chick-fil-A Chicken Tortilla Soup Variations

Feel free to explore these creative twists to make your soup uniquely yours!

  • Vegetarian: Substitute the chicken with extra beans and add diced zucchini for a delicious meat-free option.
  • Spicy: Increase the cayenne pepper or add a dash of hot sauce to kick up the heat and add excitement to each spoonful.
  • Creamy Vegan: Swap heavy cream and sour cream with coconut milk and a vegan yogurt for a rich and plant-based touch.
  • Herbaceous: Mix in fresh spinach or kale during the last few minutes of simmering for added greens and a pop of color. Their earthy flavors pair beautifully with the soup’s richness.
  • Cheesy: Top with shredded cheddar or pepper jack cheese before serving to introduce a melty, indulgent layer that complements the spices.
  • Corn-Lime Twist: Add fresh corn off the cob and a splash of lime juice to brighten the flavors while enhancing the sweet taste of corn.
  • Protein Boost: Incorporate extra shredded chicken or add cubed tofu for an additional protein kick, making the soup even heartier.
  • Smoky Flavor: Mix in diced smoked sausage or bacon for a delicious smoky twist that adds depth and richness to every bowl.

Make Ahead Options

These Homemade Chick-fil-A Chicken Tortilla Soup is a perfect meal prep hero that saves you precious time on busy weeknights! You can chop all your vegetables and sauté them (steps 1 and 2) up to 24 hours in advance, storing them in an airtight container in the refrigerator to maintain their fresh flavor. Additionally, you can prepare the soup base (steps 3 to 7) ahead of time and keep it in the fridge for up to 3 days. When you’re ready to enjoy your soup, simply reheat it on the stove, stir in the heavy cream, sour cream, and lemon juice (step 8), and serve with the crunchy tortilla strips for a comforting, delicious meal that’s just as satisfying as when freshly made!

How to Store and Freeze Homemade Chick-fil-A Chicken Tortilla Soup

Fridge: Store leftover soup in an airtight container for up to 3 days. Make sure to let it cool completely before sealing to avoid condensation.

Freezer: To freeze your soup, pour it into freezer-safe containers, leaving some space at the top for expansion. It keeps well for up to 3 months.

Reheating: Thaw frozen soup overnight in the fridge. Reheat on the stove over medium heat, stirring occasionally, until warmed through. Add a splash of chicken broth if it thickens too much.

Topping Storage: For best results, store tortilla strips separately at room temperature to maintain their crunch until you’re ready to serve the homemade Chick-fil-A chicken tortilla soup.

Chef's Helpful Tips

  • When making the Homemade Chick-fil-A Chicken Tortilla Soup, ensure your vegetables are diced evenly for consistent cooking and texture throughout the soup.
  • Common mistakes include not deglazing the pot properly, which can lead to missed flavor from the browned bits at the bottom.
  • Be mindful to incorporate the cornmeal slurry carefully, whisking it thoroughly to avoid clumps in your soup.
  • Simmer the soup at a gentle medium-low heat to allow flavors to meld beautifully without overcooking the chicken.

Homemade Chick-fil-A Chicken Tortilla Soup Recipe FAQs

What should I look for when selecting ingredients?
Absolutely! When choosing vegetables, look for firm and fresh options. For bell peppers, go for ones with shiny skin and no dark spots. Onions should feel heavy and have tight outer layers. Fresh cilantro should be bright green and fragrant.

How should I store leftovers and how long do they last?
Very! Store leftover soup in an airtight container and refrigerate it, where it can stay fresh for up to 3 days. Make sure it cools completely before sealing to prevent condensation, which can make the soup watery.

Can I freeze my Homemade Chick-fil-A Chicken Tortilla Soup?
Absolutely! To freeze, ladle the soup into freezer-safe containers, leaving about an inch at the top for expansion, as liquids can expand when frozen. It’s great for up to 3 months. Just remember to label each container with the date!

How should I reheat the frozen soup?
To reheat, you can thaw the soup overnight in the fridge for even results. Warm it on the stove over medium heat, stirring occasionally. If it becomes too thick, add a splash of chicken broth to bring back that lovely consistency.

Can I make this soup if I have dietary restrictions?
Absolutely! If you’re gluten-sensitive, just ensure to use gluten-free cornmeal and verify that your chicken broth is gluten-free. For vegetarian options, you can substitute the chicken with additional beans or vegetables and use vegetable broth instead. Just keep an eye on any potential allergens in the ingredients you choose!

What do I do if my soup is too thick?
Very! If your soup turns out thicker than desired, simply add a little extra chicken broth or water to reach your preferred consistency. Stir gently to combine, and keep it simmering for a few minutes to heat through. Remember, the creamy touches like heavy cream and sour cream can thicken it, so adjust accordingly!

Homemade Chick-fil-A Chicken Tortilla Soup

Homemade Chick-fil-A Chicken Tortilla Soup

Enjoy a cozy bowl of Homemade Chick-fil-A Chicken Tortilla Soup with bold flavors and comforting goodness.
Print Recipe Pin Recipe
Prep Time 20 minutes mins
Cook Time 1 hour hr 8 minutes mins
Total Time 1 hour hr 28 minutes mins
Servings: 4 bowls
Course: DINNER RECIPES
Cuisine: American
Calories: 450
Ingredients Equipment Method Nutrition Notes

Ingredients
  

For the Soup Base
  • 2 tablespoons Olive oil essential for sautéing vegetables
  • 1 cup Yellow onion, diced adds sweetness and depth
  • 1 cup Celery, diced provides a crunchy texture
  • 1 cup Red bell pepper, diced introduces sweetness
  • 1 cup Cilantro, minced freshens up the soup
  • 4 cloves Garlic, minced amplifies the aromatic profile
  • 1 teaspoon Coarse kosher salt enhances the flavors
  • 1 tablespoon Chili powder brings a warm, spicy undertone
  • 1 teaspoon Ground cumin adds an earthy flavor
  • 1/4 teaspoon Cayenne pepper adds heat for spice lovers
  • 2 tablespoons Tomato paste thickens the soup
For the Broth & Beans
  • 4 cups Reduced sodium chicken broth flavorful liquid base
  • 1 can Green chilies adds heat and flavor
  • 1 teaspoon Sugar balances acidity
  • 1 can Navy beans provides protein and creaminess
  • 1 can Black beans adds texture and nutrition
  • 1 cup Yellow corn adds sweetness
For the Creamy Touches
  • 2 cups Shredded chicken filling and protein-rich
  • 2 tablespoons Fine yellow cornmeal thickens the soup
  • 1 cup Heavy cream adds richness
  • 1/2 cup Sour cream introduces tanginess
  • 2 tablespoons Freshly squeezed lemon juice brightens the soup
For the Garnish
  • 1 cup Tortilla strips offers a crunchy contrast

Equipment

  • 6-quart heavy-bottomed pot

Method
 

Instructions
  1. Begin by heating the olive oil in a 6-quart heavy-bottomed pot over medium-high heat until shimmering. Add the diced onion, celery, red bell pepper, and minced cilantro, sautéing until soft—about 5 minutes.
  2. Stir in the minced garlic along with chili powder, cumin, salt, and cayenne pepper. Keep stirring constantly to release the fragrant aromas for about 1-2 minutes.
  3. Add the tomato paste, mixing it thoroughly with the spices and aromatics. Cook until the color dulls slightly, which should take around 2 minutes.
  4. Gradually pour in ¼ to ½ cup of chicken broth, scraping the brown bits off the bottom with a wooden spoon. This adds rich flavor.
  5. Pour in the remaining chicken broth, green chilies, sugar, navy beans, black beans, corn, and shredded chicken. Stir well to combine all the ingredients thoroughly.
  6. Create a slurry by whisking together 2 tablespoons of fine cornmeal with 3 tablespoons of warm water. Stir this mixture into the soup, ensuring it’s well incorporated.
  7. Cover the pot, bring the soup to a boil, and then reduce the heat to medium-low. Allow it to simmer for 30 minutes, tasting and adjusting the seasonings during the last 15 minutes.
  8. In a separate bowl, mix a bit of the hot broth into the sour cream to temper it, whisking until smooth. Remove the soup from heat and stir in the heavy cream, tempered sour cream, and lemon juice.
  9. Ladle the hot soup into bowls and sprinkle with crunchy tortilla strips for a delightful contrast.

Nutrition

Serving: 1bowlCalories: 450kcalCarbohydrates: 50gProtein: 32gFat: 20gSaturated Fat: 10gPolyunsaturated Fat: 2gMonounsaturated Fat: 8gCholesterol: 90mgSodium: 650mgPotassium: 800mgFiber: 12gSugar: 6gVitamin A: 1500IUVitamin C: 35mgCalcium: 120mgIron: 3mg

Notes

When making the soup, ensure your vegetables are diced evenly for consistent cooking. Be mindful to incorporate the cornmeal slurry carefully to avoid clumps in your soup. Simmer at medium-low heat to allow flavors to meld beautifully.

Tried this recipe?

Let us know how it was!

Filed Under: DINNER RECIPES

Healthy Baked Chicken Quesadilla

December 12, 2025 by JudyWhite Leave a Comment

There’s something incredibly comforting about the crispy exterior of a quesadilla, but when I decided to healthify this classic, I discovered just how flavorful it could still be! This Healthy Baked Chicken Quesadilla recipe came to life on a bustling weeknight when I was stuck in a rut, craving something satisfying that also aligned with my commitment to eating well. The combination of tender, shredded chicken and fresh baby spinach wrapped in warm tortillas, baked to golden perfection, proves that you don’t have to sacrifice taste for nutrition.

Each bite is a delightful blend of spices, from the warmth of cumin to the subtle heat of chili powder, all perfectly enveloped by ooey-gooey melted cheese. And the best part? You’ll make it in just 30 minutes! Whether you’re entertaining friends or simply looking for a quick family dinner after a long day, these quesadillas are a crowd-pleasing solution. Serve them up with a side of guacamole and salsa for a fun, delicious meal that keeps fast food at bay. Let’s get cooking!

Why You'll Love This Healthy Baked Chicken Quesadilla

  • This recipe is incredibly easy to whip up, making it perfect for busy weeknights or last-minute gatherings.
  • The flavors are absolutely delicious, combining spices and fresh ingredients that create a mouthwatering dish.
  • Versatility is key, as you can easily customize the filling to suit your preferences or use up leftovers.
  • Its appealing golden-brown color and melted cheese make it visually enticing, ensuring it will impress anyone at your table.

Healthy Baked Chicken Quesadilla Ingredients

For the Quesadilla Filling
• Flour tortillas – 8 10-inch tortillas provide a hearty base that wraps around all the flavors.
• Cooked shredded chicken – 4 cups create a fulfilling protein-packed filling that’s perfect for family dinners.
• Fresh baby spinach – 8 ounces add a nutritious boost and vibrant color to your quesadillas.
• Sour cream – 1.5 cups offer a creamy richness that complements the spices beautifully.
• Cumin – 1 teaspoon lends a warm, earthy flavor that enhances the overall taste of the quesadilla.
• Garlic powder – 1 teaspoon brings savory depth to the filling, perfect for garlic lovers!
• Sweet paprika – 1 teaspoon adds a gentle smokiness, enhancing the quesadilla’s flavor profile.
• Chili powder – 0.5 teaspoon introduces a subtle kick, making your Healthy Baked Chicken Quesadilla delightfully zesty.
• Salt – to taste helps bring out the flavors of all your ingredients.
• Fresh ground pepper – to taste offers a slight heat, balancing the rich filling.
• Mexican blend cheese – 2 cups, shredded, ensures a gooey, irresistible texture when melted.

For Serving (Optional)
• Guacamole – for an extra creamy touch alongside your quesadilla’s crunch.
• Salsa – fresh salsa adds a zesty flavor that elevates your dish even further.

How to Make Healthy Baked Chicken Quesadilla

  1. Preheat your oven to 400°F.
    Warm up your oven, so it’s ready to crisp those tortillas to golden perfection. This usually takes about 10 minutes.

  2. Mix the filling.
    In a large mixing bowl, combine 4 cups of cooked shredded chicken, 8 ounces of fresh baby spinach, and 1.5 cups of sour cream. Sprinkle in 1 teaspoon each of cumin, garlic powder, and sweet paprika, along with 0.5 teaspoon of chili powder, salt, and fresh ground pepper to taste. Stir until well combined.

  3. Spread the chicken mixture.
    Lay a tortilla on a flat surface and spread a generous portion of the chicken mixture over half of the tortilla. Make sure to leave a little space at the edges to prevent overflow!

  4. Sprinkle cheese.
    Top the chicken mixture with about ¼ cup of shredded Mexican blend cheese. This will melt beautifully and create that delicious gooey texture.

  5. Fold the tortilla.
    Carefully fold the tortilla in half, encasing all those yummy ingredients. Place it seam-side down on a baking sheet.

  6. Repeat for remaining tortillas.
    Continue filling and folding the rest of the tortillas with the remaining mixture, placing each one on the baking sheet.

  7. Bake them.
    Place the baking sheet in the preheated oven and bake for about 15 minutes, or until the tortillas are crispy and the cheese is melted. Keep an eye on them for that golden-brown color!

  8. Serve warm.
    Slice your delicious quesadillas into wedges and serve with guacamole and salsa, if desired, for that extra kick of flavor!

Optional: Add some fresh cilantro on top for a burst of color and flavor!
Exact quantities are listed in the recipe card below.

Healthy Baked Chicken Quesadilla Variations

Feel free to customize this delicious recipe with these creative twists and substitutions!

  • Whole Wheat Tortillas: Swap out flour tortillas for whole wheat to add fiber and a nutty flavor to your quesadillas.

  • Vegetarian Delight: Replace shredded chicken with black beans or grilled veggies like bell peppers and zucchini for a vibrant, plant-based option. Colorful, nutritious, and satisfying!

  • Spicy Kick: Add jalapeños or diced green chilies to the filling to ramp up the heat. This simple addition creates a bold flavor explosion in each bite.

  • Dairy-Free: Use dairy-free sour cream and cheese alternatives to make this quesadilla suitable for those with lactose intolerance. Enjoy the same creamy texture without the dairy!

  • Crispy Crunch: For an extra texture twist, sprinkle crushed tortilla chips inside the quesadilla before baking. This adds delightful crunchiness that contrasts beautifully with the melted cheese.

  • Herb Infusion: Toss in fresh cilantro or parsley into the filling for a burst of freshness. These herbs add brightness and elevate the flavor of the quesadilla.

  • Smoke & Spice: Try smoked paprika instead of sweet paprika for a deeper flavor profile. This will add a hint of smokiness that complements the cumin beautifully.

  • Protein-Packed: Boost the protein content by adding a layer of refried beans along with your chicken. The creamy texture of the beans pairs perfectly with the shredded chicken in a heartier quesadilla!

What to Serve with Healthy Baked Chicken Quesadilla?

Elevate your dining experience with these delightful pairings that bring out the best in your meal.

  • Crispy Corn Salad: A fresh and colorful corn salad adds a crunchy texture and sweet pop that beautifully complements the quesadilla’s richness. Toss corn, cherry tomatoes, and diced bell peppers for a vibrant side.

  • Creamy Guacamole: Creamy homemade guacamole is a must-have dip that enhances each bite of your quesadilla. The smooth avocado pairs perfectly with the crispy tortillas, creating a flavor explosion!

  • Zesty Salsa: Bright and tangy salsa brings a burst of freshness that balances the flavors. Whether store-bought or homemade, this classic accompaniment will add a delicious kick.

  • Mexican Rice: Fluffy, seasoned Mexican rice is a robust side that pairs well with the quesadilla’s filling. Its earthy flavor complements the spices without overpowering the dish.

  • Black Beans: Simple black beans seasoned with cumin and garlic provide a protein-packed side dish that adds both nutrition and heartiness to your meal.

  • Chilled Tequila Sunrise: A refreshing Tequila Sunrise cocktail brings a burst of citrus to the table, offering a lively contrast to the savory quesadilla. The fruity flavors make for a joyful dining experience.

  • Sweet Cornbread: Warm, sweet cornbread adds an unexpected twist, providing a delightful contrast to the savory quesadilla and making for a comforting meal.

These pairings will create a flavorful spread that takes your Healthy Baked Chicken Quesadilla from good to unforgettable!

Make Ahead Options

These Healthy Baked Chicken Quesadillas are perfect for meal prep enthusiasts looking to save time during busy weekdays! You can assemble the quesadillas up to 24 hours in advance, simply prepare the filling and spread it on the tortillas as instructed, then stack them between layers of parchment paper in the fridge to prevent sticking. When you’re ready to eat, just bake them straight from the refrigerator according to the original instructions (adding a few minutes if needed), and they’ll be just as delicious and satisfying. This way, you can enjoy the comforting crunch and cheesy goodness with minimal effort, bringing your homemade meal to the table in no time!

How to Store and Freeze Healthy Baked Chicken Quesadilla

Fridge: Keep leftovers in an airtight container for up to 3 days. This prevents the quesadillas from getting soggy while preserving their delicious flavors.

Freezer: Freeze individual quesadillas wrapped in plastic wrap and then placed in a freezer bag for up to 2 months. This makes it easy to grab and go whenever a craving strikes!

Reheating: To reheat from the fridge, bake in a preheated oven at 350°F for about 10 minutes. If frozen, allow them to thaw in the fridge overnight before reheating. Enjoy your Healthy Baked Chicken Quesadilla just like fresh!

Chef's Helpful Tips

  • When making Healthy Baked Chicken Quesadilla, ensure that your tortillas are fresh to prevent them from tearing during the filling process.
  • Always taste your filling mixture before spreading it on the tortilla so you can adjust the seasoning to your liking.
  • For an even more impressive texture, consider broiling the quesadillas for the last 2 minutes of baking to achieve extra crispiness.
  • Lastly, remember to preheat your oven to 400°F and keep an eye on the quesadillas as they bake, which should take about 15 minutes to reach that perfect golden brown color.

Healthy Baked Chicken Quesadilla Recipe FAQs

What type of chicken should I use for the filling?
Absolutely! For the filling, I recommend using cooked shredded chicken. You can use rotisserie chicken for convenience or grill and shred your own chicken breasts or thighs. Just ensure it’s seasoned well to enhance the quesadilla’s flavor.

How should I store leftovers of Healthy Baked Chicken Quesadilla?
The best way to store your leftovers is to place them in an airtight container in the fridge. They can last for up to 3 days without getting soggy. Just make sure to seal them well to retain that delicious cheesy goodness!

Can I freeze Healthy Baked Chicken Quesadilla?
Yes, you can! To freeze, wrap each quesadilla tightly in plastic wrap and place them in a freezer bag. They’ll keep well for up to 2 months. When you’re ready to enjoy them, simply thaw them overnight in the fridge, and then reheat in the oven at 350°F for about 10 minutes until they’re warm and crispy.

What should I do if my quesadillas are soggy after baking?
Oh no! If your quesadillas come out soggy, it may be due to overfilling them or using too much wet ingredients. I suggest using less sour cream in the filling and ensuring that you don’t pack them too heavily. For crunchier quesadillas, try broiling for the last 2 minutes of baking; that will give them a lovely crisp texture.

Are Healthy Baked Chicken Quesadilla suitable for kids?
Very! These quesadillas are usually a hit with kids because they’re cheesy, flavorful, and fun to eat. Plus, you can sneak in healthy veggies like spinach without them even knowing! Just adjust the spice levels to suit their tastes if needed.

Healthy Baked Chicken Quesadilla

Healthy Baked Chicken Quesadilla

This Healthy Baked Chicken Quesadilla offers a tasty and nutritious twist on a classic dish, featuring flavorful ingredients wrapped in crispy tortillas.
Print Recipe Pin Recipe
Prep Time 15 minutes mins
Cook Time 15 minutes mins
Total Time 30 minutes mins
Servings: 4 quesadillas
Course: DINNER RECIPES
Cuisine: Mexican
Calories: 450
Ingredients Equipment Method Nutrition Notes

Ingredients
  

Quesadilla Filling
  • 8 pieces Flour tortillas 10-inch
  • 4 cups Cooked shredded chicken
  • 8 ounces Fresh baby spinach
  • 1.5 cups Sour cream
  • 1 teaspoon Cumin
  • 1 teaspoon Garlic powder
  • 1 teaspoon Sweet paprika
  • 0.5 teaspoon Chili powder
  • Salt to taste
  • Fresh ground pepper to taste
  • 2 cups Mexican blend cheese shredded
For Serving (Optional)
  • Guacamole
  • Salsa

Equipment

  • Baking sheet
  • large mixing bowl
  • Oven

Method
 

Cooking Directions
  1. Preheat your oven to 400°F.
  2. In a large mixing bowl, combine the cooked shredded chicken, fresh baby spinach, and sour cream. Add cumin, garlic powder, sweet paprika, chili powder, salt, and ground pepper. Stir until well combined.
  3. Lay a tortilla on a flat surface and spread a portion of the chicken mixture over half of the tortilla.
  4. Top the chicken mixture with about ¼ cup of shredded Mexican blend cheese.
  5. Carefully fold the tortilla in half and place it seam-side down on a baking sheet.
  6. Continue filling and folding the remaining tortillas, placing each on the baking sheet.
  7. Place the baking sheet in the preheated oven and bake for about 15 minutes, or until crispy and golden brown.
  8. Slice into wedges and serve with guacamole and salsa.

Nutrition

Serving: 1quesadillaCalories: 450kcalCarbohydrates: 40gProtein: 30gFat: 20gSaturated Fat: 10gPolyunsaturated Fat: 1gMonounsaturated Fat: 6gCholesterol: 70mgSodium: 800mgPotassium: 600mgFiber: 4gSugar: 2gVitamin A: 30IUVitamin C: 15mgCalcium: 30mgIron: 15mg

Notes

Optionally add fresh cilantro on top for added flavor and color.

Tried this recipe?

Let us know how it was!

Filed Under: DINNER RECIPES

Creamy Lobster & Scallop Chowder

December 12, 2025 by JudyWhite Leave a Comment

The rich aroma of simmering seafood blends seamlessly with hints of thyme as the chilly evening air beckons for something warm and comforting. While so many weeknight dinners revolve around quick fixes or takeout, I found myself yearning for a dish that felt both indulgent and homey. Enter my Creamy Lobster & Scallop Chowder—an exquisite balance of buttery lobster and sweet scallops swimming in a velvety broth.

This recipe is not just about the luxurious ingredients; it’s a celebration of flavors that transforms a simple gathering into a culinary event. Perfect for impressing guests or treating yourself after a long day, this chowder is surprisingly easy to whip up. Within just 45 minutes, you can serve a delightful bowl that rivals any upscale restaurant fare.

So, grab your apron and let’s dive into a recipe that promises warmth, richness, and a touch of the ocean in every spoonful.

Why You'll Love This Creamy Lobster & Scallop Chowder

  • This creamy lobster and scallop chowder is incredibly easy to make, allowing you to enjoy a gourmet meal without spending hours in the kitchen.
  • The rich flavors of buttery lobster and sweet scallops combine perfectly in a velvety broth that will leave your taste buds dancing with delight.
  • Not only is this chowder versatile enough to serve at a dinner party or a cozy night in, but its stunning presentation will impress anyone you invite to the table.
  • Plus, in just 45 minutes, you can create a satisfying and indulgent dish that feels like a luxurious treat after a long day.

Creamy Lobster & Scallop Chowder Ingredients

Get ready to dive into the ocean of flavors with these essential ingredients for the Creamy Lobster & Scallop Chowder!

For the Seafood Base
• Fresh lobster meat – a key player, bringing a sweet and buttery taste to your chowder.
• Sea scallops – their delicate sweetness complements the lobster beautifully.

For the Broth
• Seafood stock – enhances the ocean essence and depth of flavor in your chowder.
• Heavy cream – creates the luscious, velvety texture that makes this chowder so indulgent.

For the Vegetables
• Medium onion – adds a savory foundation to the chowder’s flavor profile.
• Garlic – brings aromatic depth; don’t skip this essential ingredient!
• Medium potatoes – they help thicken the chowder while adding heartiness.
• Celery – provides a refreshing crunch and balances the creaminess.

For Seasoning
• Thyme – infuses the dish with earthiness and a hint of herbal brightness.
• Salt and pepper – enhance and round out all the flavors in this elegant chowder.

For Garnish
• Fresh parsley – adds a pop of color and freshness to finish off your bowl!

How to Make Creamy Lobster & Scallop Chowder

  1. Sauté Aromatics: In a large pot, sauté the onion and garlic over medium heat until they become translucent. This should take about 3-4 minutes and will fill your kitchen with a delightful aroma.

  2. Add Vegetables: Next, add the diced potatoes and chopped celery, cooking for an additional 5 minutes. You want them slightly tender but still with a firm bite.

  3. Incorporate Seafood Stock: Pour in the seafood stock and bring the mixture to a boil. The bubbling broth should create a lively symphony, signaling the flavors are melding beautifully.

  4. Simmer Seafood: Reduce the heat and gently stir in the lobster meat and scallops; let them simmer for about 5 minutes. They’ll cook quickly, so keep an eye on their color—perfectly cooked seafood should be opaque.

  5. Add Cream and Seasoning: Carefully stir in the heavy cream and thyme, seasoned with salt and pepper to taste. Watch as the chowder turns a creamy hue, inviting you in for a taste!

  6. Thicken Chowder: Cook for an additional 10-15 minutes, allowing the chowder to thicken. Stir occasionally, and look for a rich, velvety texture that clings to your spoon.

  7. Serve Warm: Finally, serve hot in bowls and garnish with fresh parsley. The burst of color will temper the warm, creamy chowder beautifully, making it all the more inviting.

Optional: Serve with crusty bread on the side for a perfect dipping experience!

Exact quantities are listed in the recipe card below.

Creamy Lobster & Scallop Chowder Variations

Feel free to get creative and give this chowder your personal touch—there’s a world of flavors waiting for you!

  • Dairy-Free: Substitute heavy cream with coconut milk for a lighter, tropical twist that still feels creamy and comforting.

  • Spicy Kick: Add a sprinkle of red pepper flakes or a dash of cayenne pepper during cooking to turn up the heat and excite your taste buds.

  • Vegetable Boost: Incorporate more veggies like corn or diced bell peppers for additional sweetness and texture; they’ll brighten your chowder beautifully.

  • Lobster Alternative: Swap out lobster for tender shrimp or crab if you’re in the mood for a different seafood experience. Both options bring their unique flavors!

  • Smoky Flavor: Introduce a hint of smokiness by using smoked paprika or incorporating some crispy bacon for added depth and a savory crunch.

  • Herb Variations: Experiment with different herbs like dill or parsley to give your chowder a fresh, aromatic lift that dances on your palate.

  • Sweet Potato Twist: Replace regular potatoes with sweet potatoes for a rich sweetness that balances beautifully with the seafood.

  • Texture Variation: For an extra creamy finish, blend a portion of the chowder until smooth before returning it to the pot; this creates a luxurious texture while still leaving chunks of seafood and veggies.

What to Serve with Creamy Lobster & Scallop Chowder?

Imagine a table adorned with dishes that echo the sea, enhancing your chowder experience and delighting every palate.

  • Crusty Bread: Perfect for soaking up every last drop of chowder—warm, inviting, and absolutely essential. Its crusty exterior contrasts beautifully with the chowder’s creamy texture.

  • Fresh Garden Salad: A refreshing mix of greens, tomatoes, and cucumbers, brightening the palate and adding a crisp element alongside your rich chowder. A light vinaigrette ties everything together splendidly.

  • Steamed Asparagus: Tender yet crisp, with a drizzle of lemon to cut through the creaminess of the chowder. The bright green color adds a vibrant touch to your meal.

  • Garlic Butter Shrimp: Elevate your seafood theme! Garlic butter shrimp are fragrant and offer a slightly different texture, making each bite a delightful contrast to the chowder.

  • Sweet Corn Fritters: Light and golden, these fritters provide a sweet burst of flavor that dances harmoniously with the savory chowder. Plus, they are fun to eat!

  • Chardonnay: A crisp, cold glass elevates the experience, complementing the seafood beautifully without overpowering the dish. Its acidity balances the chowder’s richness.

  • Chocolate Mousse: For dessert, nothing like a silky chocolate mousse to end on a light yet indulgent note. Its richness will satisfy any sweet tooth without feeling heavy after the chowder.

Make Ahead Options

These Creamy Lobster & Scallop Chowder preparations are perfect for busy weeknights or if you’re planning a special gathering! You can chop the vegetables (onion, potatoes, celery) and store them in an airtight container in the refrigerator up to 3 days before you cook. The seafood stock can also be prepared in advance and refrigerated for up to 2 days. When you’re ready to enjoy your chowder, simply sauté the aromatics, add the prepped veggies and stock, then stir in the lobster and scallops. Finish by adding the heavy cream just before serving to ensure it remains rich and velvety. This way, you can enjoy a gourmet meal with minimal effort!

How to Store and Freeze Creamy Lobster & Scallop Chowder

Fridge: Store leftover chowder in an airtight container for up to 3 days. Make sure it’s completely cooled before sealing to maintain its creamy texture.

Freezer: Freeze chowder in a freezer-safe container for up to 3 months. To prevent separation, leave a little space at the top for expansion when frozen.

Reheating: Reheat on the stovetop over low heat, stirring gently until warmed through. You may want to add a splash of cream if it thickens too much during storage.

Thawing: For frozen chowder, thaw overnight in the fridge before reheating. This ensures a smoother consistency when it’s time to serve again.

Chef's Helpful Tips

  • When making the Creamy Lobster & Scallop Chowder, ensure your seafood stock is well-seasoned for a flavorful base.
  • Avoid overcooking the scallops and lobster; they only need a few minutes until they turn opaque and tender.
  • For a creamy texture, warm the heavy cream gently before stirring it into the chowder to prevent curdling.
  • Allowing the chowder to simmer for the suggested 10-15 minutes helps to meld the flavors and thicken the soup perfectly without losing the freshness of the seafood.

Creamy Lobster & Scallop Chowder Recipe FAQs

What type of lobster meat should I use for the chowder?
Absolutely! Fresh lobster meat is ideal for this chowder, providing a sweet and buttery flavor. If fresh isn’t available, frozen lobster meat can be used, but make sure it’s fully thawed and drained before adding to the pot.

How long can I store leftover chowder in the fridge?
You can store leftover Creamy Lobster & Scallop Chowder in an airtight container for up to 3 days. Let it cool completely before sealing to help keep that creamy texture intact.

Can I freeze Creamy Lobster & Scallop Chowder?
Yes! This chowder freezes wonderfully. Pour it into a freezer-safe container, leaving a bit of space at the top for expansion. It can be frozen for up to 3 months. Just remember to label it with the date!

How do I reheat frozen chowder without compromising its texture?
To reheat, gently thaw your frozen chowder overnight in the fridge. When you’re ready to enjoy it, warm it on the stovetop over low heat. Stir frequently and add a splash of cream if it seems too thick. This will help restore its rich, velvety texture.

What if I have dietary restrictions, like seafood allergies?
If seafood allergies are a concern, it’s best to skip this recipe altogether. However, for a similar creamy chowder experience, consider using chicken or vegetable stock and swapping in cooked chicken or an alternative protein such as hearty mushrooms or tofu. Always customize recipes to suit your needs!

How can I ensure my chowder doesn’t become too thick or watery?
The key is in the timing! Allow the chowder to simmer for the suggested 10-15 minutes, which helps it naturally thicken. If it ends up too thick, simply add a splash of seafood stock or cream while stirring. If it’s too watery, let it simmer a little longer on low heat to allow excess liquid to cook off.

Creamy Lobster & Scallop Chowder

Creamy Lobster & Scallop Chowder

Indulge in this rich and comforting Creamy Lobster & Scallop Chowder, perfect for impressing guests or a cozy meal.
Print Recipe Pin Recipe
Prep Time 15 minutes mins
Cook Time 30 minutes mins
Total Time 45 minutes mins
Servings: 4 bowls
Course: DINNER RECIPES
Cuisine: Seafood
Calories: 350
Ingredients Equipment Method Nutrition Notes

Ingredients
  

For the Seafood Base
  • 1 cup fresh lobster meat
  • 1 cup sea scallops
For the Broth
  • 4 cups seafood stock
  • 1 cup heavy cream
For the Vegetables
  • 1 medium onion
  • 2 cloves garlic
  • 2 medium potatoes diced
  • 2 stalks celery chopped
For Seasoning
  • 1 teaspoon thyme
  • to taste salt
  • to taste pepper
For Garnish
  • 2 tablespoons fresh parsley chopped

Equipment

  • Large pot

Method
 

Steps
  1. In a large pot, sauté the onion and garlic over medium heat until translucent (about 3-4 minutes).
  2. Add diced potatoes and chopped celery; cook for an additional 5 minutes.
  3. Pour in the seafood stock and bring the mixture to a boil.
  4. Reduce heat and gently stir in lobster meat and scallops; let them simmer for about 5 minutes.
  5. Stir in heavy cream and thyme, seasoned with salt and pepper to taste.
  6. Cook for an additional 10-15 minutes, allowing the chowder to thicken.
  7. Serve hot and garnish with fresh parsley.

Nutrition

Serving: 1bowlCalories: 350kcalCarbohydrates: 25gProtein: 18gFat: 22gSaturated Fat: 13gPolyunsaturated Fat: 1gMonounsaturated Fat: 8gCholesterol: 90mgSodium: 800mgPotassium: 600mgFiber: 3gSugar: 2gVitamin A: 10IUVitamin C: 15mgCalcium: 6mgIron: 10mg

Notes

To enhance flavors, ensure seafood stock is well-seasoned. Avoid overcooking the seafood for the best texture.

Tried this recipe?

Let us know how it was!

Filed Under: DINNER RECIPES

  • « Previous Page
  • 1
  • …
  • 12
  • 13
  • 14
  • 15
  • 16
  • Next Page »

Recent Posts

  • Crispy Potatoes in Oven
  • Lucky Charms Pancakes
  • Cheeseburger
  • Boiled Corn on the Cob
  • St. Patrick’s Day Dessert Parfaits

Recent Comments

No comments to show.

Footer

  • Contact
  • Privacy Policy
  • About Us
  • Terms
  • ↑ back to top

Copyright © 2024 www.Forkono.com

Table Of Content