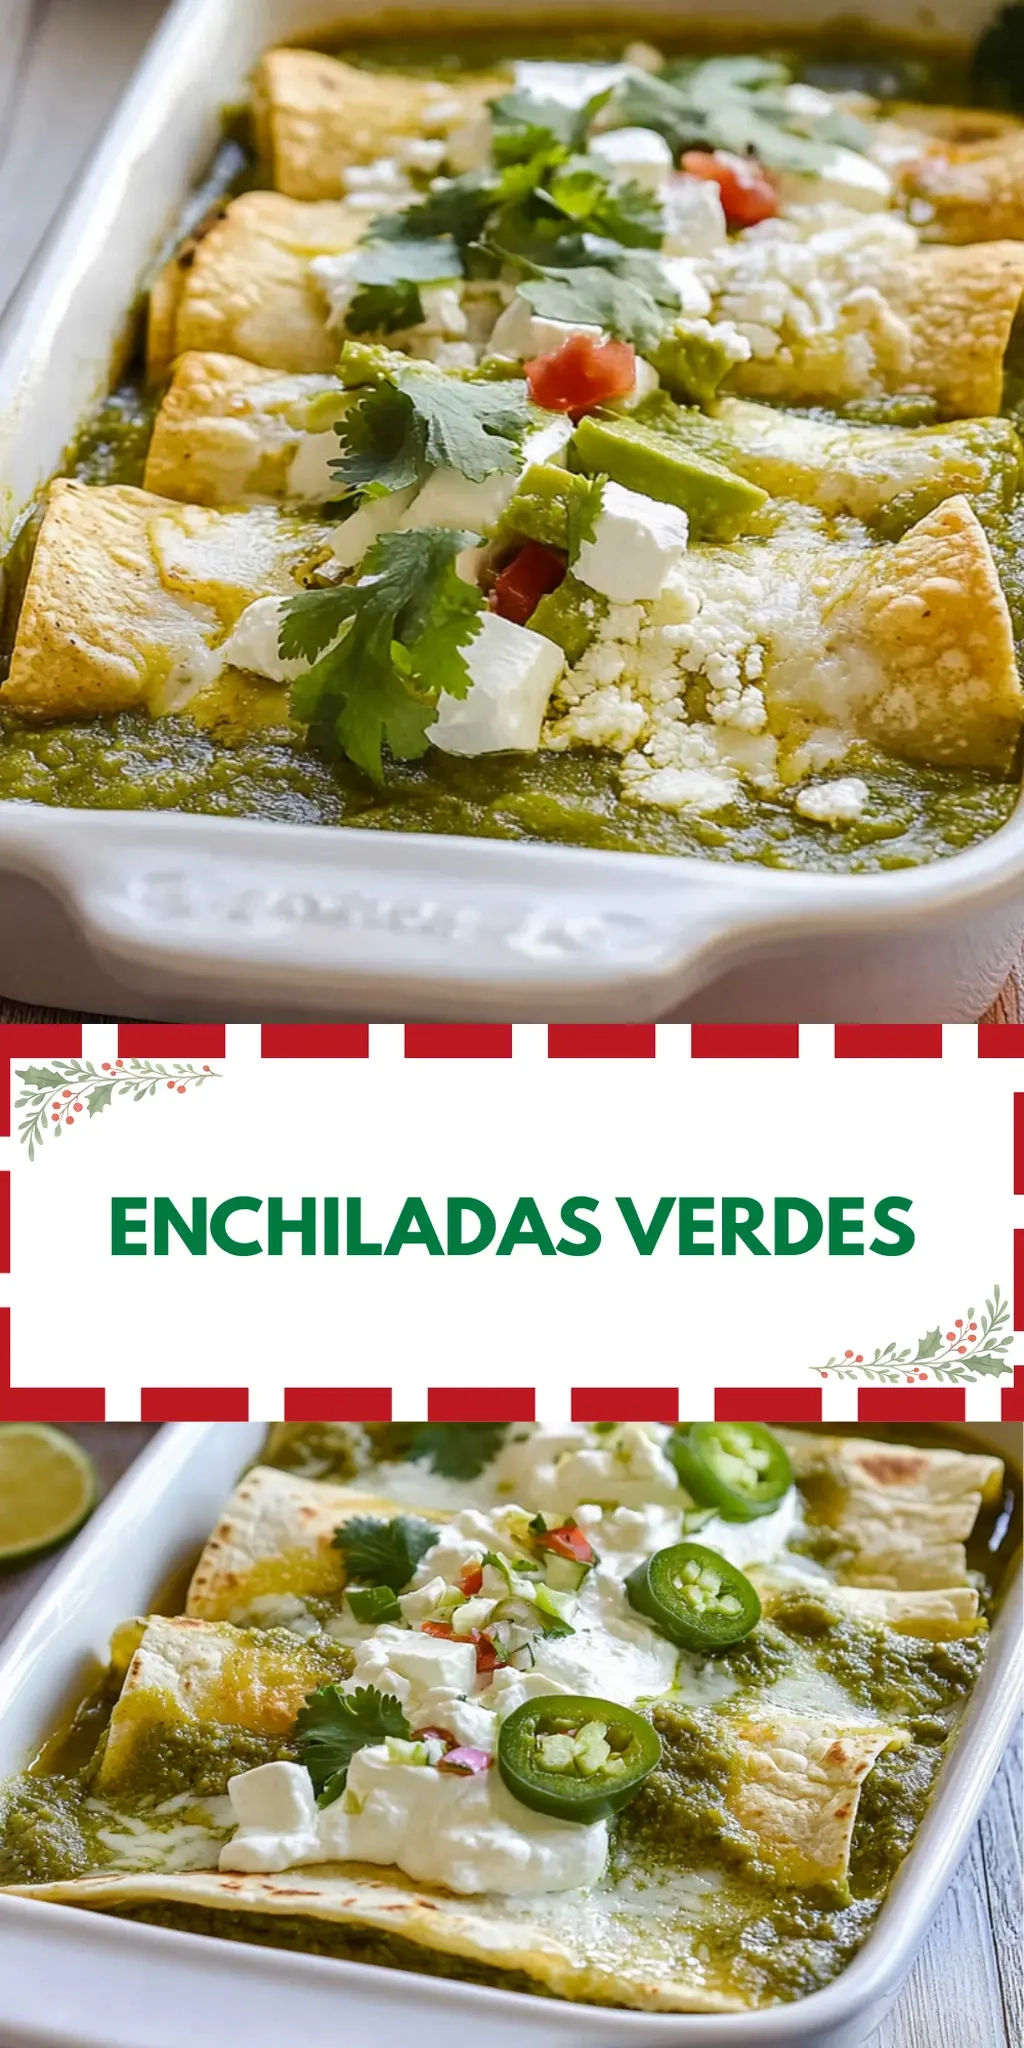
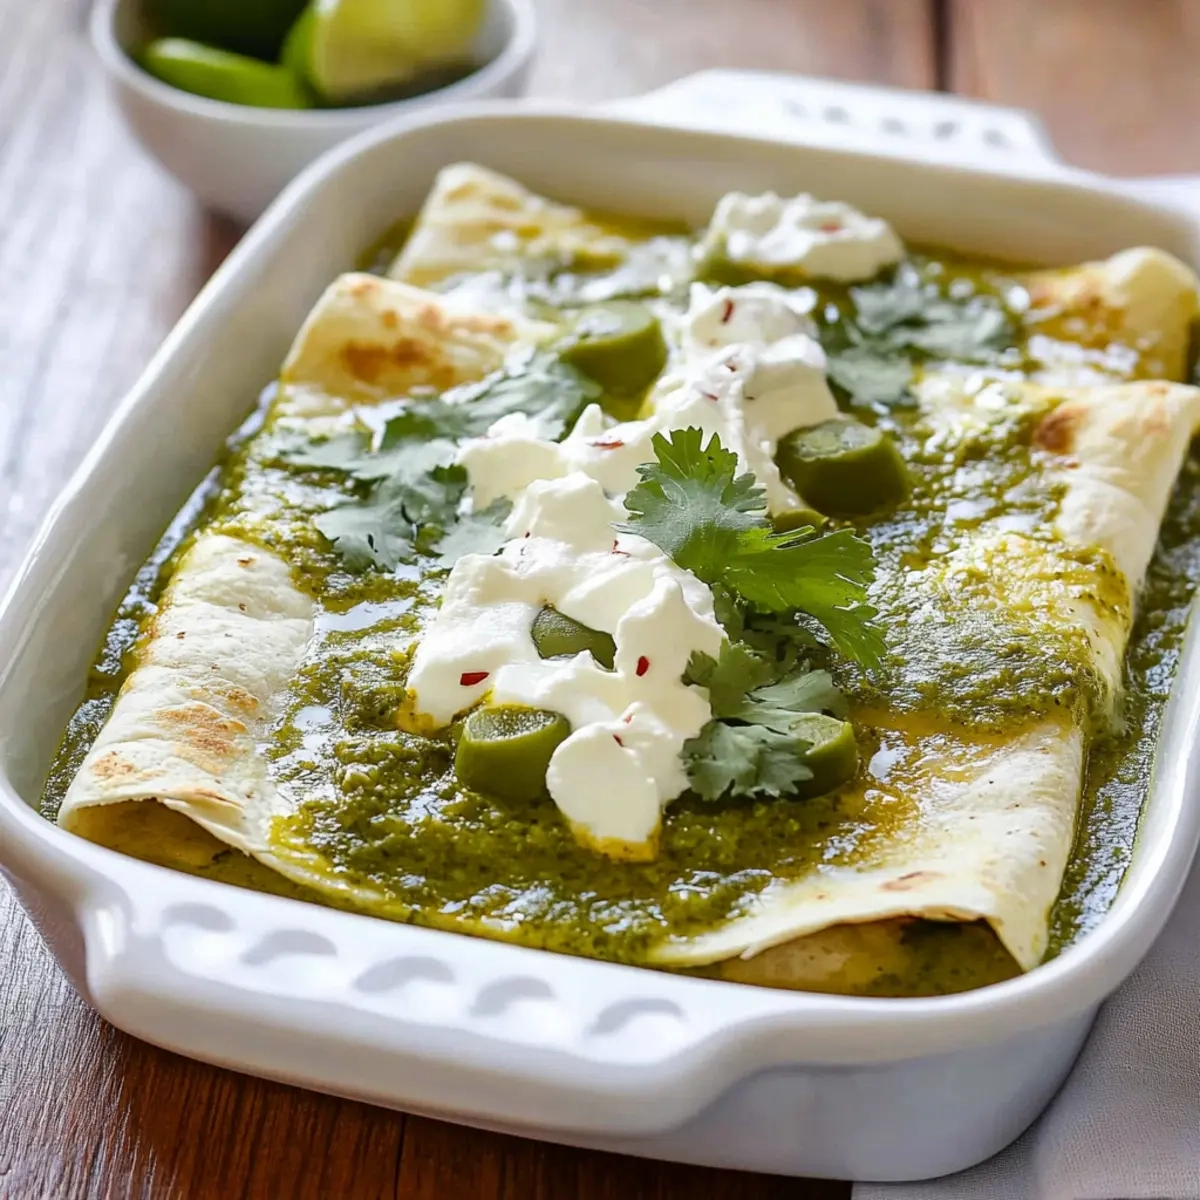
Forkono

  • BREAKFAST & BRUNCH
  • DESSERT RECIPES
  • DINNER RECIPES
  • LUNCH RECIPES
  • About uS
  • SNACKS & APPETIZERS
menu icon
go to homepage
  • BREAKFAST & BRUNCH
  • DESSERT RECIPES
  • DINNER RECIPES
  • LUNCH RECIPES
  • About uS
  • SNACKS & APPETIZERS
search icon
Homepage link
  • BREAKFAST & BRUNCH
  • DESSERT RECIPES
  • DINNER RECIPES
  • LUNCH RECIPES
  • About uS
  • SNACKS & APPETIZERS
×

Autumn Kale Salad with Maple Balsamic Vinaigrette

December 29, 2025 by JudyWhite Leave a Comment

As the leaves start to turn and the crisp autumn air beckons, I find myself craving something vibrant and nourishing. That’s when I first whipped up this Autumn Kale Salad with Maple Balsamic Vinaigrette, a seasonal delight bursting with flavor and color. The earthy kale pairs perfectly with the sweet roasted delicata squash and crunchy pecans, while a sprinkle of raisins adds a touch of chewiness that makes every bite a celebration of fall.

In just 40 minutes, you can transform simple ingredients into a stunning dish that will impress your family or friends, turning even the most mundane weeknight into a cozy gathering. Not only does this salad satisfy the hunger pangs, but it’s also an elegant alternative to takeout that leaves you feeling refreshed and energized. Trust me, as soon as you take that first bite, you’ll wonder why you didn’t make it sooner! Let’s dive in and discover how to create this wholesome salad together.

Why You'll Love This Autumn Kale Salad with Maple Balsamic Vinaigrette

  • This Autumn Kale Salad with Maple Balsamic Vinaigrette is incredibly easy to prepare, taking just 40 minutes from start to finish.
  • Packed with delicious flavors, the sweet roasted delicata squash and tangy dressing will make your taste buds dance with joy.
  • Its vibrant colors make it a stunning centerpiece for any table, guaranteed to wow your guests.
  • This salad is versatile enough to be served as a side dish or a hearty main, making it perfect for any occasion.

Autumn Kale Salad Ingredients

• Get ready for a delicious fall treat!

For the Salad

  • Curly kale – a nutrient-dense base that promises a flavorful crunch.
  • Sea salt – enhances the overall taste, bringing out the kale’s natural sweetness.
  • Delicata squash – adds a touch of sweetness and beautiful color to the dish.
  • Olive oil – helps the squash roast beautifully while imparting a rich flavor.
  • Pepper – for a bit of warmth and spice to balance the sweetness.
  • Pecan halves – provide a satisfying crunch and healthy fats.
  • Cooked brown lentils – offer protein and fiber, making the salad hearty.
  • Large apple – brings a refreshing crispness with just the right amount of sweetness.
  • Raisins – a chewy addition that complements the other flavors beautifully.

For the Dressing

  • Maple balsamic dressing – ties everything together, infusing the salad with a rich, sweet, and tangy flavor.

Enjoy creating this Autumn Kale Salad with Maple Balsamic Vinaigrette, a warm hug in a bowl that celebrates the bounty of the season!

How to Make Autumn Kale Salad with Maple Balsamic Vinaigrette

  1. Wash the curly kale thoroughly under cool running water. Remove the tough stems and tear the leaves into bite-sized pieces. Place them in a large bowl, creating a vibrant base for your salad.

  2. Prepare the delicata squash by cutting it in half and scooping out the seeds. Slice it into half-moons, then toss the pieces with olive oil, a pinch of sea salt, and pepper. Roast in the oven at 400°F for about 25 minutes until tender and caramelized.

  3. Cook the brown lentils in a separate pot according to the package instructions, which usually takes about 20-25 minutes. Once done, drain and set aside to cool.

  4. Dice the large apple into small, crunchy pieces, and gather your prepared raisins. This step will add a delightful sweetness and texture to the salad.

  5. Combine all the roasted squash, kale, lentils, diced apple, pecan halves, and raisins in the large bowl. Gently mix to ensure everything is evenly distributed and colorful.

  6. Drizzle the maple balsamic dressing over the salad. Toss everything well to ensure all the ingredients are coated in that delicious dressing, making every bite truly delightful.

Optional: Top with additional pecans for an extra crunch!
Exact quantities are listed in the recipe card below.

How to Store and Freeze Autumn Kale Salad with Maple Balsamic Vinaigrette

Fridge: Store the prepared salad in an airtight container for up to 3 days. Keep the dressing separate to maintain the kale’s freshness and prevent sogginess.

Freezer: Freezing is not recommended for the assembled salad, as the texture of the kale and other ingredients may suffer. Instead, you can freeze the cooked lentils and roasted squash individually for later use.

Reheating: If you’ve stored leftovers, enjoy the salad cold or at room temperature. For a warm version, gently reheat the roasted squash and lentils in the microwave and mix them back with fresh kale and dressing just before serving.

Preparation Tip: When meal prepping the Autumn Kale Salad, consider keeping the components separate until you’re ready to eat for the best taste and texture!

Make Ahead Options

These Autumn Kale Salad with Maple Balsamic Vinaigrette preparations are perfect for busy cooks seeking time-saving solutions! You can wash and tear the kale, along with prepping the diced apple and raisins, up to 24 hours in advance; just store them in airtight containers in the refrigerator to keep them fresh. The delicata squash can also be roasted a day ahead; simply roast it, let it cool, and refrigerate. When you’re ready to serve, combine all the salad components—squash, lentils, kale, apple, pecans, raisins—and drizzle with the maple balsamic dressing right before enjoying. This way, you’ll have a delicious and vibrant meal ready in minutes, just as tasty as if prepared fresh!

What to Serve with Autumn Kale Salad with Maple Balsamic Vinaigrette?

Cozy up the table with flavors that enhance this delightful autumn salad, creating an inviting meal experience.

  • Rustic Bread: A slice of warm, crusty bread complements the salad’s textures, perfect for soaking up any leftover dressing.

  • Roasted Root Vegetables: The caramelized sweetness of roasted carrots, parsnips, and beets echoes the salad’s flavors, adding even more heartiness.

  • Grilled Chicken: Juicy, seasoned chicken offers a pleasant protein contrast while keeping the meal light and fresh.

  • Quinoa Pilaf: This fluffy grain lends a nutty flavor and chewy texture, enriching the dish with additional protein and fiber.

  • Apple Cider: Sipping on a glass of crisp apple cider enhances the fall ambiance, with flavors harmonizing beautifully with the salad.

  • Pumpkin Pie: For dessert, a slice of creamy pumpkin pie delivers that quintessential autumn sweetness, rounding out the meal perfectly.

With these pairings, you can create a colorful and nourishing spread that celebrates the best of the season!

Autumn Kale Salad Variations

Feel free to tailor this vibrant salad to your taste and cravings for a delicious twist!

  • Vegan: Omit the pecans and replace the maple balsamic dressing with a creamy tahini or cashew dressing for a nut-free option.

  • Grain-Free: Substitute the brown lentils with quinoa or chickpeas for an alternate protein-packed option that adds a delightful texture.

  • Spicy Kick: Sprinkle red pepper flakes or diced jalapeños into the mix for a zesty heat that will awaken your taste buds.

  • Cheesy Addition: Crumbled feta or goat cheese adds a creamy, tangy element that pairs beautifully with the sweetness of the squash and apple.

  • Nut-Free: Swap pecans for sunflower seeds or pumpkin seeds, providing crunch without the nuts, making it perfect for allergy concerns.

  • Fruit Variety: Use a mix of seasonal fruits such as pears or pomegranate seeds instead of apples or raisins for a burst of different flavors and colors.

  • Herb Boost: Toss in fresh herbs like parsley or parsley for an aromatic addition that livens up the dish, enhancing its freshness.

  • Roasted Veggies: Incorporate roasted Brussels sprouts or beets for an earthy twist that will add depth and a pop of color to your salad.

Embrace the essence of autumn with these delightful variations, making each serving unique and satisfying!

Chef's Helpful Tips

  • When preparing the Autumn Kale Salad with Maple Balsamic Vinaigrette, make sure to wash the kale thoroughly to remove any grit and maximize its freshness.
  • A common mistake is not properly removing the tough stems, so be sure to tear the leaves into bite-sized pieces for a more pleasant texture.
  • When roasting the delicata squash, aim for golden-brown edges to enhance its natural sweetness and flavor; check it at the 20-minute mark to avoid overcooking.
  • Lastly, allow the cooked brown lentils to cool before adding them to the salad to prevent wilting the kale and ruining the texture.

Autumn Kale Salad with Maple Balsamic Vinaigrette Recipe FAQs

How do I choose the right kale?
When selecting curly kale for your Autumn Kale Salad, look for vibrant green leaves with a crisp texture. Avoid any bunches with yellowing or dark spots, as these indicate age. The leaves should feel firm and not wilted; fresh kale means a fresher salad!

How should I store the salad leftovers?
Absolutely! To keep your Autumn Kale Salad fresh, store any leftovers in an airtight container in the fridge for up to 3 days. Remember, it’s best to store the salad without the dressing to maintain crunchiness; add the maple balsamic dressing just before serving for optimal flavor and texture.

Can I freeze components of this salad?
Very! While I don’t recommend freezing the assembled salad, you can freeze the cooked brown lentils and roasted delicata squash separately. Place them in freezer-safe containers or bags, sealing tightly to prevent freezer burn. They can be kept in the freezer for up to 3 months. When you’re ready to enjoy them again, simply thaw in the fridge overnight or use the microwave.

What is the best way to prevent the kale from wilting?
Great question! To keep your kale vibrant and crunchy, make sure to add the dressing only when you’re ready to eat the salad. If you’re meal prepping, store the kale, veggies, nuts, and lentils separately, and drizzle the dressing on right before serving. This way, you’ll enjoy that perfect texture with every bite!

Are there any dietary considerations for this salad?
Absolutely! This Autumn Kale Salad is naturally vegan and gluten-free, making it suitable for various dietary preferences. However, if you or your guests have nut allergies, you can replace the pecan halves with seeds, such as pumpkin or sunflower seeds, which will still provide a delightful crunch! Always double-check with your guests about allergies to ensure their safety.

How do I know when the delicata squash is perfectly roasted?
Roasting delicata squash is a delightful process! Aim for a beautiful golden-brown color with slightly caramelized edges. After about 20 minutes in a preheated oven at 400°F, check for tenderness by piercing a piece with a fork; it should be soft yet hold its shape. If you see a rich, golden color and can easily pierce it, you’re ready to add it to your salad!

Autumn Kale Salad with Maple Balsamic Vinaigrette

Autumn Kale Salad with Maple Balsamic Vinaigrette

Enjoy vibrant Autumn Kale Salad with Maple Balsamic Vinaigrette, packed with flavors and colors for a nourishing meal.
Print Recipe Pin Recipe
Prep Time 15 minutes mins
Cook Time 25 minutes mins
Total Time 40 minutes mins
Servings: 4 servings
Course: LUNCH RECIPES
Cuisine: American
Calories: 350
Ingredients Equipment Method Nutrition Notes

Ingredients
  

For the Salad
  • 1 bunch Curly kale Torn into bite-sized pieces
  • 1 teaspoon Sea salt
  • 1 medium Delicata squash Sliced into half-moons
  • 2 tablespoons Olive oil For roasting
  • 1 teaspoon Pepper
  • 1 cup Pecan halves Chopped if desired
  • 1 cup Cooked brown lentils Cooked according to package instructions
  • 1 large Apple Diced
  • 1/2 cup Raisins
For the Dressing
  • 1/4 cup Maple balsamic dressing

Equipment

  • Large Bowl
  • Oven
  • Pot

Method
 

Preparation
  1. Wash the curly kale thoroughly under cool running water. Remove the tough stems and tear the leaves into bite-sized pieces. Place them in a large bowl.
  2. Prepare the delicata squash by cutting it in half and scooping out the seeds. Slice it into half-moons, then toss the pieces with olive oil, sea salt, and pepper. Roast in the oven at 400°F for about 25 minutes until tender and caramelized.
  3. Cook the brown lentils in a separate pot according to the package instructions, usually about 20-25 minutes. Once done, drain and set aside to cool.
  4. Dice the large apple into small pieces and gather your prepared raisins.
  5. Combine all the roasted squash, kale, lentils, diced apple, pecan halves, and raisins in the large bowl. Gently mix to evenly distribute.
  6. Drizzle the maple balsamic dressing over the salad and toss to coat the ingredients well.

Nutrition

Serving: 1bowlCalories: 350kcalCarbohydrates: 45gProtein: 10gFat: 15gSaturated Fat: 2gPolyunsaturated Fat: 4gMonounsaturated Fat: 9gSodium: 250mgPotassium: 500mgFiber: 8gSugar: 10gVitamin A: 2000IUVitamin C: 30mgCalcium: 150mgIron: 3mg

Notes

Store the salad in an airtight container for up to 3 days. Keep the dressing separate until ready to serve.

Tried this recipe?

Let us know how it was!

Filed Under: LUNCH RECIPES

Homemade Mayonnaise

December 29, 2025 by JudyWhite Leave a Comment

There’s something wonderfully satisfying about creating your own condiments from scratch, and homemade mayonnaise is no exception. One sunny afternoon, as I flicked through my pantry, I decided to give traditional mayo a twist. Why settle for store-bought when whipping up a creamy, flavorful batch is just a few simple ingredients away?

With just an egg, Dijon mustard, and a drizzle of oil, I transformed a humble condiment into a culinary delight fit for sandwiches, salads, and dips. The rich, velvety texture combined with a hint of tang is addictive—and the best part? It takes only ten minutes! Perfect for those who have grown weary of fast food and are eager to bring the freshness of homemade flavors into their kitchen.

Join me as I share this incredibly easy homemade mayonnaise recipe that not only elevates your dishes but also sparks joy in every bite. Let’s take a step away from the jar and discover the magic of creating something deliciously unique right in your own home!

Why You'll Love This Homemade Mayonnaise

  • This homemade mayonnaise recipe is incredibly easy, allowing you to whip up a creamy condiment in just ten minutes.
  • The bold flavors of Dijon mustard and fresh lemon juice elevate your dishes to a whole new level of deliciousness.
  • Its versatility means you can use it as a spread, dip, or dressing, making it perfect for any meal.
  • Plus, there’s nothing quite like the satisfaction of making it from scratch, showcasing your cooking skills with a visually appealing, homemade creation.

Homemade Mayonnaise Ingredients

• Discover the simplicity of making homemade mayonnaise with these easy-to-find ingredients.

For the Base

  • Large egg – acts as the emulsifier for a creamy texture.
  • Dijon mustard – adds a delightful tang that enhances flavor.
  • Red or white wine vinegar – provides acidity to balance the richness.
  • Fine sea salt – enhances all the other flavors in your mayo.

For the Oil

  • Safflower oil or vegetable oil – use either for a neutral flavor and silky finish.

Optional Twist

  • Fresh lemon juice – a touch brings brightness and freshness to the homemade mayonnaise.

How to Make Homemade Mayonnaise

  1. Combine the egg, Dijon mustard, red wine vinegar, and sea salt in a mixing bowl. This is the flavorful base of your mayonnaise. Whisk these ingredients together until they’re well blended, creating a vibrant concoction.

  2. Drizzle in the safflower oil slowly while whisking continuously. Watch as the mixture starts to emulsify and thicken—this is the magic moment! Keep whisking vigorously for about 1-2 minutes until you achieve that creamy texture.

  3. Mix in the fresh lemon juice, if using, until fully incorporated. This optional addition gives your homemade mayonnaise a refreshing brightness. Taste it, and enjoy the burst of flavor!

Optional: Add a pinch of garlic powder for an extra kick.

Exact quantities are listed in the recipe card below.

What to Serve with Homemade Mayonnaise?

Elevate your meals with delightful sides and pairings that complement the creamy richness of this homemade condiment.

  • Crispy Sweet Potato Fries: The natural sweetness and crisp texture provide a fantastic contrast to the tanginess of the mayonnaise.

  • Fresh Garden Salad: A medley of vibrant vegetables drizzled with homemade mayonnaise creates a refreshing, crunchy delight that tastes like sunshine.

  • Grilled Chicken Sandwiches: Juicy chicken paired with the rich and creamy mayo brings a luscious element that enhances each bite.

  • Classic Potato Salad: Creamy and tangy, a potato salad dressed with this homemade mayonnaise is a nostalgic favorite perfect for picnics.

  • Zesty Coleslaw: Crunchy cabbage and carrots combined with the mayo create a creamy texture that adds a flavorful pop to any barbecue spread.

  • Savory Tuna Salad: This mayo adds a rich creaminess that perfectly complements flaked tuna, making for a satisfying lunch or snack.

  • Spicy Deviled Eggs: Using homemade mayonnaise instead of store-bought elevates these bite-sized goodies to a whole new level of flavor and texture.

  • Crisp Veggie Platter: Bright, colorful veggies dipped into creamy mayo make for a satisfyingly crunchy and healthy snack.

Whether you’re enjoying a simple meal at home or hosting a gathering, these pairings will surely highlight your wonderful mayonnaise creation!

Make Ahead Options

These homemade mayonnaise preparations are perfect for busy home cooks looking to save time during the week! You can whisk together the egg, Dijon mustard, red wine vinegar, and sea salt up to 24 hours in advance and store the mixture in an airtight container in the refrigerator. This not only ensures flavor meld but also allows for easy emulsification later. When you’re ready to finish your homemade mayonnaise, simply add the safflower oil while whisking, as it will save you the hassle later and ensures a fresh taste. Remember, for the best quality, avoid adding lemon juice until just before serving to keep its vibrant flavor intact. Enjoy the convenience of homemade goodness with minimal effort!

Homemade Mayonnaise Variations

Unleash your creativity in the kitchen by experimenting with these exciting twists and substitutions.

  • Herb-Infused: Add fresh chopped herbs like basil, dill, or chives for a burst of flavor that complements any dish perfectly.
  • Spicy Kick: Mix in a teaspoon of sriracha or your favorite hot sauce to give your mayonnaise a delightful heat that will tantalize your taste buds.
  • Garlic Aioli: Incorporate minced garlic for a classic aioli variant; it adds depth and richness that pairs beautifully with vegetables and seafood.
  • Vegan Version: Substitute the egg with aquafaba (chickpea brine) for a vegan mayo that’s just as creamy and flavorful—no one will know the difference!
  • Tangy Twist: Use apple cider vinegar instead of wine vinegar for a sweeter, fruitier flavor that brings a unique twist to your recipes.
  • Smoky Flavor: Stir in a dash of smoked paprika to introduce a rich, smoky undertone that enhances sandwiches and dips alike.
  • Citrus Zing: Brighten your mayo by adding a teaspoon of orange or lime juice for a refreshing twist that’s perfect for summer dishes.
  • Nutty Taste: Fold in a tablespoon of sesame oil for an Asian-inspired mayonnaise that pairs beautifully with salads and grilled meats.

Let your imagination run wild as you play with these variations, making your homemade mayonnaise as unique and delicious as you desire!

How to Store and Freeze Homemade Mayonnaise

Room Temperature: Homemade mayonnaise is best stored in the fridge, but if left out, it can sit for a maximum of 2 hours. After that, discard it for safety.

Fridge: Keep your homemade mayonnaise in an airtight container for up to 1 week. Ensure the lid is tight to prevent contamination and maintain freshness.

Freezer: While freezing is not recommended for mayonnaise due to its emulsified nature, if necessary, you can freeze it for up to 2 months in a freezer-safe container.

Reheating: If your mayonnaise has separated after freezing, let it thaw in the fridge and then gently whisk to re-emulsify. Enjoy the fresh taste of your homemade mayonnaise!

Chef's Helpful Tips

  • When making Homemade Mayonnaise, ensure your egg is at room temperature to help the emulsification process.
  • A common mistake is adding the oil too quickly; drizzle it slowly while whisking to create that desired creamy texture.
  • Use a whisk or an immersion blender for smoother results, as this can significantly enhance the emulsification.
  • Always taste your mayonnaise after mixing; if it seems too rich, a splash more vinegar or lemon juice can brighten it up perfectly.

Homemade Mayonnaise Recipe FAQs

What kind of egg should I use for homemade mayonnaise?
Absolutely! It’s best to use a large, fresh egg at room temperature. The freshness of the egg acts as a crucial emulsifier and helps achieve that creamy texture. If you’re concerned about using raw eggs, you might consider pasteurized eggs as a safer alternative.

How long can I store homemade mayonnaise in the fridge?
Very good question! You can store your homemade mayonnaise in an airtight container in the fridge for up to 1 week. Be sure to keep it tightly sealed to maintain freshness and prevent contamination.

Can I freeze homemade mayonnaise?
While it’s not typically recommended to freeze mayonnaise due to its unique emulsified nature, you can freeze it for up to 2 months if necessary. Transfer it to a freezer-safe container, leaving a little space for expansion. When ready to use, let it thaw in the fridge and gently whisk to re-emulsify.

What should I do if my homemade mayonnaise doesn’t emulsify?
If you find that your mayonnaise hasn’t thickened, don’t worry! Start by transferring the mixture into a clean bowl. Then, add another egg yolk to the bowl and slowly whisk in the original mixture a little at a time until you achieve that creamy texture. This process should help bring it all together beautifully!

Is homemade mayonnaise safe for people with egg allergies?
For those with egg allergies, traditional homemade mayonnaise may not be suitable. Instead, consider alternatives like aquafaba (the liquid from canned chickpeas) mixed with oil and vinegar. It offers a similar creamy texture without the eggs.

How can I tell if my homemade mayonnaise has gone bad?
Look for visual cues, such as changes in color or an off smell. If you notice signs of separation or dark spots forming, it’s best to discard the mayonnaise. Always trust your senses for food safety!

Homemade Mayonnaise

Homemade Mayonnaise

Make your own Homemade Mayonnaise in just 10 minutes with simple ingredients for delicious sandwiches, salads, and dips.
Print Recipe Pin Recipe
Prep Time 10 minutes mins
Total Time 10 minutes mins
Servings: 4 servings
Course: Snacks & Appetizers
Cuisine: American
Calories: 90
Ingredients Equipment Method Nutrition Notes

Ingredients
  

For the Base
  • 1 large egg acts as the emulsifier for a creamy texture
  • 1 tablespoon Dijon mustard adds a delightful tang that enhances flavor
  • 1 tablespoon red or white wine vinegar provides acidity to balance the richness
  • 1 teaspoon fine sea salt enhances all the other flavors in your mayo
For the Oil
  • 1 cup safflower oil or vegetable oil use either for a neutral flavor and silky finish
Optional Twist
  • 1 tablespoon fresh lemon juice adds brightness and freshness

Equipment

  • Mixing bowl
  • Whisk

Method
 

How to Make Homemade Mayonnaise
  1. Combine the egg, Dijon mustard, red wine vinegar, and sea salt in a mixing bowl. Whisk until well blended.
  2. Drizzle in the safflower oil slowly while whisking continuously until the mixture emulsifies and thickens.
  3. Mix in the fresh lemon juice, if using, until fully incorporated. Taste and adjust flavors as desired.

Nutrition

Serving: 1tablespoonCalories: 90kcalFat: 10gSaturated Fat: 1gSodium: 100mg

Notes

Ensure your egg is at room temperature for better emulsification. Drizzle the oil slowly while whisking to achieve the desired creamy texture.

Tried this recipe?

Let us know how it was!

Filed Under: SNACKS & APPETIZERS

Autumn Kale Salad with Maple Balsamic Vinaigrette

December 29, 2025 by JudyWhite Leave a Comment

As the leaves start to turn and the crisp autumn air beckons, I find myself craving something vibrant and nourishing. That’s when I first whipped up this Autumn Kale Salad with Maple Balsamic Vinaigrette, a seasonal delight bursting with flavor and color. The earthy kale pairs perfectly with the sweet roasted delicata squash and crunchy pecans, while a sprinkle of raisins adds a touch of chewiness that makes every bite a celebration of fall.

In just 40 minutes, you can transform simple ingredients into a stunning dish that will impress your family or friends, turning even the most mundane weeknight into a cozy gathering. Not only does this salad satisfy the hunger pangs, but it’s also an elegant alternative to takeout that leaves you feeling refreshed and energized. Trust me, as soon as you take that first bite, you’ll wonder why you didn’t make it sooner! Let’s dive in and discover how to create this wholesome salad together.

Why You'll Love This Autumn Kale Salad with Maple Balsamic Vinaigrette

  • This Autumn Kale Salad with Maple Balsamic Vinaigrette is incredibly easy to prepare, taking just 40 minutes from start to finish.
  • Packed with delicious flavors, the sweet roasted delicata squash and tangy dressing will make your taste buds dance with joy.
  • Its vibrant colors make it a stunning centerpiece for any table, guaranteed to wow your guests.
  • This salad is versatile enough to be served as a side dish or a hearty main, making it perfect for any occasion.

Autumn Kale Salad Ingredients

• Get ready for a delicious fall treat!

For the Salad

  • Curly kale – a nutrient-dense base that promises a flavorful crunch.
  • Sea salt – enhances the overall taste, bringing out the kale’s natural sweetness.
  • Delicata squash – adds a touch of sweetness and beautiful color to the dish.
  • Olive oil – helps the squash roast beautifully while imparting a rich flavor.
  • Pepper – for a bit of warmth and spice to balance the sweetness.
  • Pecan halves – provide a satisfying crunch and healthy fats.
  • Cooked brown lentils – offer protein and fiber, making the salad hearty.
  • Large apple – brings a refreshing crispness with just the right amount of sweetness.
  • Raisins – a chewy addition that complements the other flavors beautifully.

For the Dressing

  • Maple balsamic dressing – ties everything together, infusing the salad with a rich, sweet, and tangy flavor.

Enjoy creating this Autumn Kale Salad with Maple Balsamic Vinaigrette, a warm hug in a bowl that celebrates the bounty of the season!

How to Make Autumn Kale Salad with Maple Balsamic Vinaigrette

  1. Wash the curly kale thoroughly under cool running water. Remove the tough stems and tear the leaves into bite-sized pieces. Place them in a large bowl, creating a vibrant base for your salad.

  2. Prepare the delicata squash by cutting it in half and scooping out the seeds. Slice it into half-moons, then toss the pieces with olive oil, a pinch of sea salt, and pepper. Roast in the oven at 400°F for about 25 minutes until tender and caramelized.

  3. Cook the brown lentils in a separate pot according to the package instructions, which usually takes about 20-25 minutes. Once done, drain and set aside to cool.

  4. Dice the large apple into small, crunchy pieces, and gather your prepared raisins. This step will add a delightful sweetness and texture to the salad.

  5. Combine all the roasted squash, kale, lentils, diced apple, pecan halves, and raisins in the large bowl. Gently mix to ensure everything is evenly distributed and colorful.

  6. Drizzle the maple balsamic dressing over the salad. Toss everything well to ensure all the ingredients are coated in that delicious dressing, making every bite truly delightful.

Optional: Top with additional pecans for an extra crunch!
Exact quantities are listed in the recipe card below.

Autumn Kale Salad Variations

Feel free to tailor this vibrant salad to your taste and cravings for a delicious twist!

  • Vegan: Omit the pecans and replace the maple balsamic dressing with a creamy tahini or cashew dressing for a nut-free option.

  • Grain-Free: Substitute the brown lentils with quinoa or chickpeas for an alternate protein-packed option that adds a delightful texture.

  • Spicy Kick: Sprinkle red pepper flakes or diced jalapeños into the mix for a zesty heat that will awaken your taste buds.

  • Cheesy Addition: Crumbled feta or goat cheese adds a creamy, tangy element that pairs beautifully with the sweetness of the squash and apple.

  • Nut-Free: Swap pecans for sunflower seeds or pumpkin seeds, providing crunch without the nuts, making it perfect for allergy concerns.

  • Fruit Variety: Use a mix of seasonal fruits such as pears or pomegranate seeds instead of apples or raisins for a burst of different flavors and colors.

  • Herb Boost: Toss in fresh herbs like parsley or parsley for an aromatic addition that livens up the dish, enhancing its freshness.

  • Roasted Veggies: Incorporate roasted Brussels sprouts or beets for an earthy twist that will add depth and a pop of color to your salad.

Embrace the essence of autumn with these delightful variations, making each serving unique and satisfying!

What to Serve with Autumn Kale Salad with Maple Balsamic Vinaigrette?

Cozy up the table with flavors that enhance this delightful autumn salad, creating an inviting meal experience.

  • Rustic Bread: A slice of warm, crusty bread complements the salad’s textures, perfect for soaking up any leftover dressing.

  • Roasted Root Vegetables: The caramelized sweetness of roasted carrots, parsnips, and beets echoes the salad’s flavors, adding even more heartiness.

  • Grilled Chicken: Juicy, seasoned chicken offers a pleasant protein contrast while keeping the meal light and fresh.

  • Quinoa Pilaf: This fluffy grain lends a nutty flavor and chewy texture, enriching the dish with additional protein and fiber.

  • Apple Cider: Sipping on a glass of crisp apple cider enhances the fall ambiance, with flavors harmonizing beautifully with the salad.

  • Pumpkin Pie: For dessert, a slice of creamy pumpkin pie delivers that quintessential autumn sweetness, rounding out the meal perfectly.

With these pairings, you can create a colorful and nourishing spread that celebrates the best of the season!

How to Store and Freeze Autumn Kale Salad with Maple Balsamic Vinaigrette

Fridge: Store the prepared salad in an airtight container for up to 3 days. Keep the dressing separate to maintain the kale’s freshness and prevent sogginess.

Freezer: Freezing is not recommended for the assembled salad, as the texture of the kale and other ingredients may suffer. Instead, you can freeze the cooked lentils and roasted squash individually for later use.

Reheating: If you’ve stored leftovers, enjoy the salad cold or at room temperature. For a warm version, gently reheat the roasted squash and lentils in the microwave and mix them back with fresh kale and dressing just before serving.

Preparation Tip: When meal prepping the Autumn Kale Salad, consider keeping the components separate until you’re ready to eat for the best taste and texture!

Make Ahead Options

These Autumn Kale Salad with Maple Balsamic Vinaigrette preparations are perfect for busy cooks seeking time-saving solutions! You can wash and tear the kale, along with prepping the diced apple and raisins, up to 24 hours in advance; just store them in airtight containers in the refrigerator to keep them fresh. The delicata squash can also be roasted a day ahead; simply roast it, let it cool, and refrigerate. When you’re ready to serve, combine all the salad components—squash, lentils, kale, apple, pecans, raisins—and drizzle with the maple balsamic dressing right before enjoying. This way, you’ll have a delicious and vibrant meal ready in minutes, just as tasty as if prepared fresh!

Chef's Helpful Tips

  • When preparing the Autumn Kale Salad with Maple Balsamic Vinaigrette, make sure to wash the kale thoroughly to remove any grit and maximize its freshness.
  • A common mistake is not properly removing the tough stems, so be sure to tear the leaves into bite-sized pieces for a more pleasant texture.
  • When roasting the delicata squash, aim for golden-brown edges to enhance its natural sweetness and flavor; check it at the 20-minute mark to avoid overcooking.
  • Lastly, allow the cooked brown lentils to cool before adding them to the salad to prevent wilting the kale and ruining the texture.

Autumn Kale Salad with Maple Balsamic Vinaigrette Recipe FAQs

How do I choose the right kale?
When selecting curly kale for your Autumn Kale Salad, look for vibrant green leaves with a crisp texture. Avoid any bunches with yellowing or dark spots, as these indicate age. The leaves should feel firm and not wilted; fresh kale means a fresher salad!

How should I store the salad leftovers?
Absolutely! To keep your Autumn Kale Salad fresh, store any leftovers in an airtight container in the fridge for up to 3 days. Remember, it’s best to store the salad without the dressing to maintain crunchiness; add the maple balsamic dressing just before serving for optimal flavor and texture.

Can I freeze components of this salad?
Very! While I don’t recommend freezing the assembled salad, you can freeze the cooked brown lentils and roasted delicata squash separately. Place them in freezer-safe containers or bags, sealing tightly to prevent freezer burn. They can be kept in the freezer for up to 3 months. When you’re ready to enjoy them again, simply thaw in the fridge overnight or use the microwave.

What is the best way to prevent the kale from wilting?
Great question! To keep your kale vibrant and crunchy, make sure to add the dressing only when you’re ready to eat the salad. If you’re meal prepping, store the kale, veggies, nuts, and lentils separately, and drizzle the dressing on right before serving. This way, you’ll enjoy that perfect texture with every bite!

Are there any dietary considerations for this salad?
Absolutely! This Autumn Kale Salad is naturally vegan and gluten-free, making it suitable for various dietary preferences. However, if you or your guests have nut allergies, you can replace the pecan halves with seeds, such as pumpkin or sunflower seeds, which will still provide a delightful crunch! Always double-check with your guests about allergies to ensure their safety.

How do I know when the delicata squash is perfectly roasted?
Roasting delicata squash is a delightful process! Aim for a beautiful golden-brown color with slightly caramelized edges. After about 20 minutes in a preheated oven at 400°F, check for tenderness by piercing a piece with a fork; it should be soft yet hold its shape. If you see a rich, golden color and can easily pierce it, you’re ready to add it to your salad!

Autumn Kale Salad with Maple Balsamic Vinaigrette

Autumn Kale Salad with Maple Balsamic Vinaigrette

Whip up this vibrant Autumn Kale Salad with Maple Balsamic Vinaigrette for a nourishing fall delight bursting with flavor and color.
Print Recipe Pin Recipe
Prep Time 15 minutes mins
Cook Time 25 minutes mins
Total Time 40 minutes mins
Servings: 4 servings
Course: LUNCH RECIPES
Cuisine: American
Calories: 350
Ingredients Equipment Method Nutrition Notes

Ingredients
  

For the Salad
  • 1 bunch Curly kale torn into bite-sized pieces
  • 1/2 teaspoon Sea salt for seasoning
  • 1 medium Delicata squash sliced into half-moons
  • 2 tablespoons Olive oil for roasting
  • 1/4 teaspoon Pepper to taste
  • 1/2 cup Pecan halves for crunch
  • 1 cup Cooked brown lentils for protein
  • 1 large Apple diced
  • 1/4 cup Raisins for chewiness
For the Dressing
  • 1/4 cup Maple balsamic dressing to coat the salad

Equipment

  • Large Bowl
  • Oven
  • Pot
  • Knife
  • Cutting Board

Method
 

Instructions
  1. Wash the curly kale thoroughly under cool running water. Remove the tough stems and tear the leaves into bite-sized pieces. Place them in a large bowl.
  2. Prepare the delicata squash by cutting it in half and scooping out the seeds. Slice it into half-moons, then toss the pieces with olive oil, a pinch of sea salt, and pepper. Roast in the oven at 400°F for about 25 minutes until tender and caramelized.
  3. Cook the brown lentils in a separate pot according to the package instructions, which usually takes about 20-25 minutes. Once done, drain and set aside to cool.
  4. Dice the large apple into small, crunchy pieces, and gather your prepared raisins.
  5. Combine all the roasted squash, kale, lentils, diced apple, pecan halves, and raisins in the large bowl. Gently mix to ensure everything is evenly distributed.
  6. Drizzle the maple balsamic dressing over the salad and toss everything well to ensure all the ingredients are coated.

Nutrition

Serving: 1servingCalories: 350kcalCarbohydrates: 45gProtein: 9gFat: 15gSaturated Fat: 2gPolyunsaturated Fat: 5gMonounsaturated Fat: 8gSodium: 200mgPotassium: 600mgFiber: 10gSugar: 10gVitamin A: 800IUVitamin C: 30mgCalcium: 100mgIron: 3mg

Notes

Allow cooked lentils to cool before adding to prevent wilting the kale. Store salad in an airtight container for up to 3 days, keeping dressing separate.

Tried this recipe?

Let us know how it was!

Filed Under: LUNCH RECIPES

Christmas Tree Caprese Salad

December 29, 2025 by JudyWhite Leave a Comment

When the holiday season rolls around, our homes are filled with laughter, love, and the enticing aroma of festive dishes. This year, I wanted to add a fun twist to our traditional gatherings, and that’s when I stumbled upon the concept of the Christmas Tree Caprese Salad. Imagine a beautiful arrangement of vibrant reds and greens, resembling a twinkling Christmas tree, all while delivering delightful flavors that even the pickiest eater will enjoy.

Not only is this dish a feast for the eyes, but it’s also incredibly easy to whip up, making it a perfect addition to any potluck or family dinner. With just a handful of fresh ingredients—creamy mozzarella, juicy tomatoes, and fragrant basil—you can create a show-stopping centerpiece that sparks joy and conversation around the table. Plus, the best part? It takes only 20 minutes to prepare! Let’s dive into how you can bring this delightful salad to life and elevate your holiday gatherings!

Why You'll Love This Christmas Tree Caprese Salad

  • This Christmas Tree Caprese Salad is not only visually stunning but also incredibly easy to prepare, making it a stress-free addition to your holiday celebrations.
  • The vibrant colors and festive shape are guaranteed to impress your guests and become a conversation starter around the table.
  • With fresh ingredients like mozzarella, tomatoes, and basil, every bite bursts with delightful flavor that will please even the pickiest of eaters.
  • Plus, this crowd-pleaser can be adapted to suit your personal taste, allowing for endless variations and creativity in your presentation.

Christmas Tree Caprese Salad Ingredients

• This delightful dish requires just a few fresh staples!

For the Salad

  • Medium Sized Mozzarella – 3-4 balls provide that creamy texture and fresh taste, essential for a classic Caprese.
  • Medium Sized Tomatoes – 4-5 pieces add vibrant color and juiciness to your Christmas Tree Caprese Salad.
  • Basil Leaves – A handful of fragrant basil leaves elevate the flavors and add a lovely aromatic touch.

For the Seasoning

  • Salt – Sprinkle to taste, enhancing the natural flavors of the fresh ingredients.
  • Balsamic Glaze – Drizzle to taste; it adds sweetness and acidity that beautifully balances the dish.

How to Make Christmas Tree Caprese Salad

  1. Layer the Ingredients: Start by placing slices of tomato, mozzarella, and basil on your Christmas Tree Charcuterie Board, arranging them in a festive tree shape. Feel free to get creative!
  2. Cut to Fit: If some of your ingredients are too large, carefully cut them in half. This little trick helps them fit perfectly in any corners, ensuring your tree looks beautiful from every angle.
  3. Season it Up: Once everything is layered, sprinkle a pinch of salt over the entire board. This step is key to enhancing the fresh flavors of your Christmas Tree Caprese Salad.
  4. Drizzle the Glaze: Just before serving, lightly drizzle your balsamic glaze over the salad. This keeps the mozzarella fresh and adds a delicious contrasting sweetness.
  5. Serve and Enjoy: Provide toothpicks or small forks for easy picking, and watch your guests enjoy this delightful holiday treat!

Optional: Garnish with extra basil leaves around the base for an added flourish.

Exact quantities are listed in the recipe card below.

What to Serve with Christmas Tree Caprese Salad?

Enjoying a festive day with friends and family is even better when the meal is beautifully complemented by delicious pairings.

  • Crunchy Breadsticks: These provide a delightful crunch that pairs perfectly with the creamy mozzarella and juicy tomatoes.

  • Garlic Herb Flatbread: The warm, aromatic flavor of flatbread enhances the fresh ingredients while inviting more texture to the meal.

  • Olive Tapenade: This savory spread adds a burst of umami that contrasts nicely with the salad’s freshness and is perfect for dipping.

  • Lightly Grilled Chicken: Juicy grilled chicken coated in herbs complements the salad, bringing in a hearty element to delight your guests.

  • Sparkling Water with Lemon: A refreshing, fizzy drink that cleanses the palate and brings out the bold flavors of the Caprese.

  • Chocolate-Dipped Strawberries: End the meal with a sweet touch. Their richness balances the lightness of the salad before indulging in holiday goodness.

Storage Tips for Christmas Tree Caprese Salad

Fridge: Store leftover Christmas Tree Caprese Salad in an airtight container for up to 2 days. This helps maintain the freshness of the ingredients.

Avoid Freezing: It’s best not to freeze this salad, as the mozzarella and tomatoes will become mushy once thawed.

Reheating: There’s no need to reheat; serve it cold to enjoy the refreshing flavors. If stored properly, it can last for a quick snack or side!

Serving Fresh: For the best experience, consider preparing the salad just a few hours before serving to ensure every ingredient stays vibrant and delicious.

Make Ahead Options

The Christmas Tree Caprese Salad is a fantastic choice for meal prep, saving you time during busy holiday gatherings! You can slice the tomatoes and mozzarella balls up to 24 hours in advance, storing them separately in airtight containers in the refrigerator to maintain their freshness. The basil can be prepped ahead as well; simply keep it in a moist paper towel to prevent wilting. On the day of serving, assemble the salad in the festive tree shape, sprinkle with salt, and drizzle with balsamic glaze right before presenting it to your guests. This ensures the mozzarella stays just as delicious and fresh, leaving you with more time to enjoy your celebration!

Christmas Tree Caprese Salad Variations

Get ready to put a personal touch on your festive masterpiece with these delicious twists.

  • Herb Variation: Add chives or parsley to enhance the fresh herb flavor. Simply mix them with the basil for a new aroma. They’ll give your salad a delightful, vibrant twist!

  • Avocado Twist: For creaminess, layer avocado slices between the tomatoes and mozzarella. This addition brings richness that pairs beautifully with the balsamic glaze.

  • Aged Balsamic: Swap regular balsamic glaze for aged balsamic vinegar. The deeper, complex flavors will elevate your salad to new heights!

  • Peppery Kick: Spice things up with a sprinkle of crushed red pepper flakes. This heat provides a lovely contrast to the cool, creamy mozzarella.

  • Fruit Fusion: Add slices of ripe peaches or nectarines for a sweet surprise. This fruity element brings an unexpected burst of flavor that perfectly complements the savory ingredients.

  • Nutty Crunch: Toss in some toasted pine nuts for added crunch. They will enhance both the texture and flavor profile while adding a touch of elegance.

  • Vegan Option: Substitute mozzarella with vegan cheese or marinated tofu. This creates a delightful plant-based version that everyone can enjoy.

  • Colorful Touch: Mix in colorful cherry tomatoes in various hues. Not only does it enhance the visual appeal, but it also adds extra sweetness to the mix.

Experimenting with these variations will make your Christmas Tree Caprese Salad truly unique and memorable!

Chef's Helpful Tips

  • For the Christmas Tree Caprese Salad, always choose ripe tomatoes for the best flavor and texture.
  • When layering your ingredients, make sure to alternate colors to create a visually appealing presentation.
  • If you slice the mozzarella in advance, store it in a bit of water to keep it fresh until ready to use.
  • Remember to drizzle the balsamic glaze just before serving to maintain the integrity of the mozzarella and tomatoes.

Christmas Tree Caprese Salad Recipe FAQs

What type of tomatoes should I use for the Christmas Tree Caprese Salad?
Absolutely! I recommend using ripe, medium-sized tomatoes like Roma or vine-ripened varieties. Look for tomatoes that are firm but give slightly when gently pressed, indicating ripeness. Avoid ones with dark spots or wrinkles, as these could suggest overripeness or spoilage.

How should I store leftover Christmas Tree Caprese Salad?
To maintain its freshness, store any leftovers in an airtight container in the fridge. It should be good for about 2 days. Just remember to keep that delicious balsamic glaze separate until you’re ready to enjoy it again—this keeps your mozzarella from becoming soggy!

Can I freeze the Christmas Tree Caprese Salad?
Very! It’s best not to freeze this salad. The mozzarella will become mushy and the tomatoes lose their texture once thawed, which affects the overall quality. If you do want to use frozen ingredients, consider preparing the salad with fresh components and freezing only the individual ingredients beforehand, like basil, which can last up to 3 months in the freezer.

What do I do if my mozzarella is too soft?
If your mozzarella feels too soft and watery, you can place it in a colander and let it drain for about 30 minutes. Pat it dry with a paper towel to remove excess moisture before assembling your salad. This little step ensures a firmer texture that won’t compromise the presentation or taste!

Are there any dietary considerations I should keep in mind?
Absolutely! This delightful Christmas Tree Caprese Salad is vegetarian and gluten-free, making it suitable for many diets. However, if you are preparing it for guests with lactose intolerance, look for lactose-free mozzarella options. And if you’re worried about allergies, always check the labels, especially for the balsamic glaze, as some can contain sulfites.

How can I make this salad more festive for my holiday gathering?
Certainly! You can elevate your Christmas Tree Caprese Salad by adding some pomegranate seeds for a pop of color and an extra layer of flavor. You might also consider incorporating calamata olives or artichokes as additional garnishes, which add a delightful twist to the traditional flavors. Just make sure to arrange them beautifully for a stunning presentation!

Christmas Tree Caprese Salad

Christmas Tree Caprese Salad

A beautiful and festive Christmas Tree Caprese Salad featuring fresh mozzarella, juicy tomatoes, and fragrant basil, perfect for holiday gatherings.
Print Recipe Pin Recipe
Prep Time 20 minutes mins
Total Time 20 minutes mins
Servings: 6 servings
Course: Snacks & Appetizers
Cuisine: Italian
Calories: 150
Ingredients Equipment Method Nutrition Notes

Ingredients
  

For the Salad
  • 3-4 balls Medium Sized Mozzarella provides creamy texture
  • 4-5 pieces Medium Sized Tomatoes adds color and juiciness
  • a handful Basil Leaves elevates flavor and aroma
For the Seasoning
  • to taste Salt enhances natural flavors
  • to taste Balsamic Glaze adds sweetness and acidity

Equipment

  • charcuterie board

Method
 

How to Make Christmas Tree Caprese Salad
  1. Layer the Ingredients: Start by placing slices of tomato, mozzarella, and basil on your Christmas Tree Charcuterie Board, arranging them in a festive tree shape.
  2. Cut to Fit: If some of your ingredients are too large, carefully cut them in half to ensure they fit perfectly.
  3. Season it Up: Sprinkle a pinch of salt over the entire board to enhance the fresh flavors.
  4. Drizzle the Glaze: Lightly drizzle your balsamic glaze over the salad just before serving.
  5. Serve and Enjoy: Provide toothpicks or small forks for easy picking.

Nutrition

Serving: 1servingCalories: 150kcalCarbohydrates: 6gProtein: 8gFat: 12gSaturated Fat: 4gPolyunsaturated Fat: 1gMonounsaturated Fat: 6gCholesterol: 20mgSodium: 200mgPotassium: 350mgFiber: 1gSugar: 3gVitamin A: 12IUVitamin C: 25mgCalcium: 20mgIron: 6mg

Notes

For the best experience, prepare the salad just a few hours before serving to keep ingredients vibrant.

Tried this recipe?

Let us know how it was!

Filed Under: SNACKS & APPETIZERS

Cheese Danish

December 29, 2025 by JudyWhite Leave a Comment

Imagine the delightful aroma of freshly baked pastries wafting through your kitchen, pulling you into a realm of warmth and sweet indulgence. I recently found myself in the midst of a baking frenzy one evening, craving something both special and easy to whip up. That’s when I stumbled upon this irresistible Valentine’s Day Cheese Danish with Strawberry Hearts—a treat that effortlessly combines elegance and simplicity.

Whether you’re planning a romantic breakfast or simply want to impress your family, these charming danishes will have everyone swooning. With buttery puff pastry cradling a luscious cream cheese filling and vibrant strawberry accents, each heart-shaped delight is a joy to make and devour. Plus, they come together in just 35 minutes, making them the perfect antidote to fast food fatigue. Let’s embark on this delightful journey together and create these scrumptious heart-shaped pastries that are sure to lift spirits and satisfy sweet cravings!

Why You'll Love This Cheese Danish

  • This Cheese Danish is incredibly easy to prepare, making it a perfect choice for both novice and experienced bakers.
  • The delightful combination of creamy cheese and juicy strawberries creates an irresistible flavor that your taste buds will adore.
  • Its charming heart shape adds a beautiful visual appeal that will impress anyone you share it with, making it ideal for romantic occasions or family gatherings.
  • Plus, with a total preparation time of just 35 minutes, you can whip up these treats in no time and leave fast food behind.

Cheese Danish Ingredients

Whether you’re a baking pro or just starting out, gathering these ingredients will set you on the path to creating delightful Cheese Danish!

For the Pastry
• 1 sheet puff pastry – an easy-to-use base that provides a flaky, buttery texture.

For the Cream Cheese Filling
• 4 oz cream cheese – the star of the filling, providing a smooth and creamy contrast to the pastry.
• 2 tbsp white sugar – enhances sweetness and balances the tanginess of cream cheese.
• 1/2 tsp vanilla extract – infuses a warm, fragrant flavor that elevates the entire dish.
• red food coloring – to give your filling a vibrant hue, perfect for those charming strawberry hearts!

For the Strawberry Topping
• 1/2 C diced strawberries – adds a fresh, fruity burst that complements the creamy filling perfectly.

For the Egg Wash
• 1 large egg – provides a golden finish to the pastry.
• 1 tbsp cold water – helps dilute the egg for a smoother application.

Gather these ingredients, and get ready to make this heartwarming Cheese Danish that will leave everyone asking for seconds!

How to Make Cheese Danish

  1. Thaw the puff pastry sheet as per package directions, allowing it to become flexible for easy handling. This typically takes about 20-30 minutes; patience is key for perfect results!

  2. Preheat your oven to 400°F (200°C) and line a large baking sheet with parchment paper. This sets the stage for a beautifully baked Cheese Danish that won’t stick!

  3. Mix cream cheese, sugar, and vanilla together in a medium-sized bowl until light and fluffy. Add in a few drops of red food coloring to achieve that lovely, vibrant hue. Set this aside while we shape the pastry.

  4. Unfold the thawed puff pastry and using a 3-inch heart cookie cutter, cut out 7 hearts. Place them on the prepared baking sheet, ensuring they’re about 1 inch apart for even baking.

  5. Score a border around each heart using a sharp knife or smaller heart-shaped cookie cutter. Ensure it’s about 1/4 inch from the edge, but don’t cut all the way through; this will hold in the filling beautifully!

  6. Spoon about 1/2 tbsp of the cream cheese mixture onto each heart and spread it within the outlined border, creating a luscious filling that sets the tone for each bite.

  7. Divide the diced strawberries evenly among the danishes, sprinkling them on top of the cream cheese while keeping them inside the outlined border. This adds a fresh, fruity flair!

  8. Mix the egg and cold water together in a small bowl to create an egg wash. Gently apply this wash around the outside border of the pastry for a beautiful golden finish upon baking.

  9. Bake for 15-17 minutes, or until the edges start to turn a golden brown and the house fills with the heavenly aroma of baked pastries.

  10. Cool on the pan for 5 minutes before enjoying, allowing the flavors to meld and making them perfect for savoring!

Optional: Dust with powdered sugar before serving for an elegant touch.

Exact quantities are listed in the recipe card below.

How to Store and Freeze Cheese Danish

Room Temperature: Store leftover cheese danishes at room temperature for up to 1 day in an airtight container to maintain their freshness.

Fridge: If you plan to keep them longer, refrigerate the cheese danishes for up to 3 days in an airtight container. Reheat in the oven for 5-10 minutes to restore crispiness.

Freezer: For longer storage, freeze the unbaked cheese danishes for up to 2 months. Bake them directly from the freezer, adding a few extra minutes to the cooking time.

Reheating: To reheat previously baked danishes, place them in a preheated oven at 350°F for 10 minutes, ensuring they stay delicious and fluffy.

Cheese Danish Variations

Feel free to get creative and make this cheese danish your own with these delightful twists!

  • Fruit Medley: Substitute diced strawberries with other fresh fruits like blueberries or raspberries for a colorful and flavorful mix.

  • Chocolate Chip Add-In: Fold in mini chocolate chips into the cream cheese mixture for a decadently sweet surprise that melts in your mouth.

  • Nutty Texture: Add some chopped nuts, like pecans or almonds, to the filling for an added crunch that contrasts beautifully with the softness.

  • Cinnamon Swirl: Sprinkle a bit of cinnamon into the cream cheese mixture for a warm, comforting spice that elevates the overall flavor profile.

  • Maple Sweetness: Use maple syrup instead of white sugar in the cream cheese for a rich, autumn-inspired sweetness that makes every bite cozy.

  • Lemon Zing: Mix the juice and zest of a lemon into the cream cheese for a refreshing, tangy kick that brightens the palate.

  • Savory Variation: Swap out the strawberries with sautéed spinach and feta cheese for a deliciously unexpected savory version that’s perfect any time of day.

  • Heat Up: Add a pinch of cayenne pepper to the cream cheese mixture for a playful kick that’ll have your taste buds dancing!

Each of these variations invites you to explore new flavors and textures, ensuring that your cheese danish is always a delightful adventure!

Make Ahead Options

These delightful Cheese Danish are perfect for busy home cooks looking to save time without compromising on taste! You can prepare the cream cheese filling and cut the puff pastry hearts up to 24 hours in advance. Simply store the filling in an airtight container in the refrigerator to maintain its creamy texture and flavor. When you’re ready to bake, follow the final steps by spooning the filling onto the pastry hearts, adding the strawberry topping, and applying your egg wash. This approach makes it easy to whip up these sweet treats for an impromptu gathering or a cozy family breakfast, delivering delicious results with minimal effort!

What to Serve with Valentine’s Day Cheese Danish with Strawberry Hearts?

Creating a delightful spread around your enchanting danish will amplify the magic of any occasion.

  • Fresh Fruit Salad: A medley of seasonal fruits adds a burst of color and freshness, perfectly complementing the rich cheese filling.

  • Vanilla Yogurt Parfait: Creamy yogurt layered with granola and berries makes for a wholesome breakfast or snack that pairs beautifully with the pastry’s sweetness.

  • Sparkling Water with Lime: The crisp effervescence of sparkling water, brightened with a hint of lime, refreshes the palate between bites.

  • Chocolate-Covered Strawberries: These indulgent treats echo the fruity topping on the danish while offering a luxurious touch that’s ideal for a romantic meal.

  • Whipped Cream Topping: A dollop of freshly whipped cream adds richness and elegance, enhancing the creamy texture of the danish.

  • Coffee or Espresso: The bitter notes of coffee create a lovely contrast to the sweet danish, making it a perfect pairing for brunch or dessert.

  • Raspberry Sauce Drizzle: A tangy raspberry sauce not only adds visual appeal but also gives a tart counterbalance to the sweet cream cheese filling.

With these thoughtfully chosen pairings, your Cheese Danish will shine as the centerpiece of a warm and loving gathering.

Chef's Helpful Tips

  • When making Cheese Danish, always ensure your puff pastry is completely thawed for easier handling and better layering.
  • Avoid overmixing the cream cheese filling; a light and fluffy texture will enhance the overall taste and mouthfeel.
  • Use a sharp knife to score the border gently without cutting all the way through to maximize the filling capacity.
  • Keep a close eye on the baking time; start checking at 15 minutes to ensure a perfectly golden hue without burning the edges.

Valentine’s Day Cheese Danish with Strawberry Hearts Recipe FAQs

What type of strawberries should I use?
Absolutely, using fresh, ripe strawberries is key! Look for berries that are bright red, firm, and plump. Avoid any that have dark spots or appear soft, as they won’t have the optimal sweetness or texture.

How should I store leftover cheese danishes?
You can store leftover cheese danishes at room temperature for up to 1 day in an airtight container. If you’re hoping to keep them for longer, refrigerate them for up to 3 days, and remember to reheat them in the oven for about 5-10 minutes to regain their crispy texture.

Can I freeze the cheese danishes?
Yes, you can freeze them! I recommend freezing the unbaked danishes for up to 2 months. Simply assemble the danishes, place them on a baking sheet, and then freeze individually. Once frozen, transfer them to a zip-top bag. When you’re ready to bake, you can bake them directly from the freezer—just add a few extra minutes to the cooking time.

What if my puff pastry tears while I’m working with it?
Very common! If you find that your puff pastry tears, don’t worry. Simply pluck a small piece of dough from the scraps and gently patch it over the tear. You can use a little water to help adhere it, and the baking process will usually hide any imperfections!

Is this recipe suitable for pets?
I don’t recommend sharing this cheese danish with pets, as ingredients like cream cheese and egg can upset their stomachs. It’s always best to keep human treats away from furry friends.

Can I substitute any ingredients for allergies?
Certainly! If you’re allergic to dairy, you could try using a non-dairy cream cheese alternative. For egg substitutes in the wash, consider using almond milk or a dairy-free yogurt rubbed along the edges, though this may slightly alter the final appearance. Always check packaging labels for potential allergens!

Cheese Danish

Cheese Danish

This Cheese Danish is a delightful blend of flaky pastry and creamy filling, perfect for impressing loved ones.
Print Recipe Pin Recipe
Prep Time 20 minutes mins
Cook Time 15 minutes mins
Cooling Time 5 minutes mins
Total Time 35 minutes mins
Servings: 7 pieces
Course: DESSERT RECIPES
Cuisine: American
Calories: 180
Ingredients Equipment Method Nutrition Notes

Ingredients
  

For the Pastry
  • 1 sheet puff pastry an easy-to-use base that provides a flaky, buttery texture.
For the Cream Cheese Filling
  • 4 oz cream cheese the star of the filling, providing a smooth and creamy contrast to the pastry.
  • 2 tbsp white sugar enhances sweetness and balances the tanginess of cream cheese.
  • 1/2 tsp vanilla extract infuses a warm, fragrant flavor that elevates the entire dish.
  • red food coloring to give your filling a vibrant hue, perfect for those charming strawberry hearts!
For the Strawberry Topping
  • 1/2 cup diced strawberries adds a fresh, fruity burst that complements the creamy filling perfectly.
For the Egg Wash
  • 1 large egg provides a golden finish to the pastry.
  • 1 tbsp cold water helps dilute the egg for a smoother application.

Equipment

  • Oven
  • Baking sheet
  • parchment paper
  • Mixing bowl
  • cookie cutter
  • Knife

Method
 

How to Make Cheese Danish
  1. Thaw the puff pastry sheet according to the package directions, allowing it to become pliable and easy to work with.
  2. Preheat your oven to 400°F and line a large baking sheet with parchment paper to prevent sticking while baking.
  3. Mix cream cheese, white sugar, and vanilla extract in a medium-sized bowl until light and fluffy. Add a few drops of red food coloring for a delightful hue.
  4. Unfold the thawed puff pastry and, using a 3-inch heart cookie cutter, cut out 7 hearts. Place them on the baking sheet about 1 inch apart to allow for rising.
  5. Score a border by gently running a sharp knife or smaller heart-shaped cookie cutter about 1/4 inch from the edge of each heart, creating a frame without cutting all the way through.
  6. Spoon about 1/2 tablespoon of the cream cheese mixture onto each heart, spreading it gently within the scored border for a beautiful filling.
  7. Sprinkle the diced strawberries evenly on top of the cream cheese, ensuring they stay within the outline for an elegant presentation.
  8. Combine the egg and cold water in a small bowl to create an egg wash. Brush this mixture onto the outer border of the pastries for a shiny finish.
  9. Bake for 15-17 minutes, or until the edges turn a lovely golden brown and the pastry becomes beautifully puffed.
  10. Cool on the pan for about 5 minutes before indulging in these delightful treats.

Nutrition

Serving: 1pieceCalories: 180kcalCarbohydrates: 22gProtein: 4gFat: 8gSaturated Fat: 4gPolyunsaturated Fat: 1gMonounsaturated Fat: 3gCholesterol: 45mgSodium: 200mgPotassium: 120mgFiber: 1gSugar: 5gVitamin A: 500IUVitamin C: 3mgCalcium: 50mgIron: 1mg

Notes

Optional: Drizzle with melted chocolate for an extra layer of sweetness.

Tried this recipe?

Let us know how it was!

Filed Under: BREAKFAST & BRUNCH

Chocolate Cupcakes with Cream Cheese Frosting

December 29, 2025 by JudyWhite Leave a Comment

There’s a certain joy that comes from the sound of cupcakes rising in the oven, and it’s even sweeter when you know they’re all yours! While rummaging through my pantry one rainy afternoon, I stumbled upon a treasure trove of baking goodies, and it inspired me to whip up the perfect indulgence: Chocolate Cupcakes with Cream Cheese Frosting.

These delightful little treats aren’t just about satisfying a sweet tooth; they represent the ultimate comfort food that can turn an ordinary day into a celebration. Picture this: a rich, moist chocolate cupcake topped with creamy, luscious frosting that dances on your taste buds. Whether you’re planning a romantic dinner, a birthday bash, or just craving something deliciously homemade, these cupcakes are here to win hearts.

What’s even better? They’re surprisingly easy to make! So grab your apron and let’s dive into a world of chocolatey goodness that will have everyone asking for seconds.

Why You'll Love This Chocolate Cupcakes with Cream Cheese Frosting

  • These Chocolate Cupcakes with Cream Cheese Frosting are incredibly easy to make, allowing even novice bakers to create something impressive.
  • The rich chocolate flavor combined with the creamy frosting is a taste sensation that will delight any chocolate lover.
  • They are versatile enough to be perfect for any occasion, whether it’s a casual get-together or a special celebration.
  • Visually appealing, these cupcakes are sure to make a statement on any dessert table, enticing everyone to indulge.

Chocolate Cupcakes Ingredients

Gather these simple ingredients and get ready to create the most delightful Chocolate Cupcakes with Cream Cheese Frosting!

For the Cupcakes

  • Sugar – 2 cups – this is the magic that sweetens your cupcakes to perfection.
  • All-purpose flour – 1 3/4 cups – gives structure to your cupcakes for that perfect bite.
  • Unsweetened cocoa – 3/4 cup – adds intense chocolate flavor that will make your cupcakes irresistible.
  • Baking powder – 1 1/2 teaspoons – helps your cupcakes rise to fluffy heights.
  • Baking soda – 1 1/2 teaspoons – enhances the leavening process for light and airy cupcakes.
  • Salt – 1 teaspoon – balances the sweetness and enhances cocoa flavor.
  • Whole milk – 1 cup – keeps your cupcakes moist and tender.
  • Vegetable oil – 1/2 cup – adds richness to the batter for a delightful texture.
  • Vanilla extract – 2 teaspoons – infuses warmth and depth of flavor.
  • Boiling water – 1 cup – activates cocoa powder and enriches the chocolate richness.

For the Cream Cheese Frosting

  • Unsalted butter (softened) – 1/2 cup – ensures a creamy, smooth base for your frosting.
  • Cream cheese (softened) – 8 oz – gives that luscious tang that pairs beautifully with the chocolate.
  • Vanilla extract – 1 teaspoon – adds aromatic flavor to the frosting.
  • Unsweetened cocoa – 1/2 cup – enhances the chocolate goodness in your frosting.
  • Powdered confectioners sugar – 4 cups – sweetens and thickens the frosting to a wonderful consistency.
  • Heavy cream – 1 to 4 tablespoons – adjust for desired frosting consistency that spreads easily.

How to Make Chocolate Cupcakes with Cream Cheese Frosting

  1. Prepare the oven: Preheat your oven to 350°F (175°C) and line a muffin tin with paper liners. This ensures even baking and easy removal of your cupcakes.

  2. Mix dry ingredients: In a large mixing bowl, stir together 2 cups of sugar, 1 3/4 cups of flour, 3/4 cup of cocoa, baking powder, baking soda, and salt. This dry mix is the foundation of your rich batter.

  3. Add wet ingredients: Mix in the eggs, 1 cup of whole milk, 1/2 cup of vegetable oil, and 2 teaspoons of vanilla extract. Beat on medium speed for one minute until the mixture is well combined and smooth.

  4. Incorporate boiling water: Carefully stir in 1 cup of boiling water. Don’t worry; the batter will be thin, which is perfect for moist cupcakes!

  5. Fill liners: Pour the batter into the cupcake liners, filling them about 2/3 full. This allows space for the cupcakes to rise without overflowing.

  6. Bake perfectly: Bake in the preheated oven for approximately 18-22 minutes, or until a toothpick inserted into the center comes out clean. They should be fluffy and spring back when lightly pressed.

  7. Cool cupcakes: Once baked, transfer the cupcakes to a wire rack to cool completely before frosting. This step is crucial for avoiding melted frosting!

  8. Prepare the frosting: In a large mixing bowl, beat 1/2 cup of softened unsalted butter until smooth. This will be the creamy base for your scrumptious frosting.

  9. Blend in cream cheese: Add 8 oz of softened cream cheese and mix until fully combined and smooth. The frosting will take on a delightful tanginess.

  10. Add cocoa powder: Mix in 1/2 cup of unsweetened cocoa until just blended. This enhances the chocolatey goodness of your cream cheese frosting.

  11. Sweeten it up: Pour in 4 cups of powdered sugar and 1 teaspoon of vanilla extract. Blend on low speed until incorporated and then increase to medium speed to achieve a fluffy texture.

  12. Achieve the right consistency: Slowly mix in 1 to 4 tablespoons of heavy cream until you reach your desired frosting consistency, allowing you to spread it easily on your cupcakes.

  13. Fluff it up: Beat the frosting until fluffy, about 1 minute. The light texture will complement the dense cupcakes beautifully.

  14. Frost your cupcakes: Use the cream cheese frosting immediately, or refrigerate for later use. It keeps wonderfully if stored correctly!

Optional: Add chocolate shavings or sprinkles on top for a festive touch!

Exact quantities are listed in the recipe card below.

Chocolate Cupcakes Variations

Feel free to get creative and adjust the flavors and textures of your cupcakes to suit your taste!

  • Dairy-Free: Substitute whole milk with almond or oat milk and replace butter with coconut oil for a creamy frosting alternative.

  • Gluten-Free: Use a 1:1 gluten-free flour blend in place of all-purpose flour for delightful results without wheat.

  • Nutty Flavor: Add 1 cup of finely chopped walnuts or pecans into the batter for a rich, nutty crunch that brings an extra bite.

  • Spicy Touch: Incorporate 1 teaspoon of cayenne pepper or espresso powder into the dry ingredients for a surprising kick and depth of flavor.

  • Citrus Zest: Add 1 tablespoon of orange or lemon zest to the batter for a bright, zesty contrast that elevates the chocolate beautifully.

  • Chocolate Chocolate Chip: Fold in 1 cup of chocolate chips into the batter for extra chocolatey goodness and melting pockets of joy in every bite.

  • Fruity Twist: Top with fresh raspberries or strawberries before frosting for a burst of fruity freshness that complements the rich chocolate.

  • Layered Cake: Bake the batter in a 9×13-inch pan instead of cupcake liners for a fluffy sheet cake, then frost generously for a big celebration!

How to Store and Freeze Chocolate Cupcakes with Cream Cheese Frosting

Room Temperature: Store unfrosted cupcakes in an airtight container at room temperature for up to 2 days to maintain their moist texture.

Fridge: If frosted, place your cupcakes in the fridge for up to 5 days. Cover them loosely with plastic wrap to prevent the frosting from hardening.

Freezer: For longer storage, freeze unfrosted cupcakes in a zip-top bag for up to 3 months. Thaw them in the fridge overnight before frosting.

Reheating: To enjoy warm cupcakes, microwave for about 10-15 seconds. Just be sure to keep the cream cheese frosting refrigerated until ready to serve!

What to Serve with Chocolate Valentine’s Day Cupcakes?

These decadent cupcakes will steal the show at any gathering, but pairing them with the right sides can transform dessert into a truly magical experience.

  • Fresh Berries: Juicy strawberries and raspberries add a pop of color and natural sweetness that beautifully balances the rich chocolate.

  • Vanilla Ice Cream: A scoop of creamy vanilla ice cream adds a delightful contrast, making each bite of your cupcakes even more indulgent.

  • Chocolate Fondue: Serve alongside a warm chocolate fondue for a fun and interactive dessert table. Dip fruit, marshmallows, or even mini cupcakes for a chocolaty explosion!

  • Coffee or Espresso: A cup of rich coffee or a shot of espresso enhances the flavors of your chocolate cupcakes, creating a perfect afternoon treat.

  • Chocolate Dipped Pretzels: The salty crunch of pretzels dipped in chocolate complements the sweetness of the cupcakes, offering a delightful mix of flavors and textures.

  • Chocolate Mousse: For an elegant touch, serve a small cup of light and fluffy chocolate mousse. It’s a chocolate lover’s dream that takes indulgence to a whole new level.

  • Red Wine: A glass of smooth red wine, such as a Merlot, pairs beautifully with the chocolate, enhancing the overall experience with its bold flavor.

Let your dessert table shine with these delightful pairings that ensure your Chocolate Cupcakes with Cream Cheese Frosting are the star of the evening!

Make Ahead Options

These Chocolate Cupcakes with Cream Cheese Frosting are fantastic for busy home cooks looking to save time! You can prepare the cupcake batter up to 24 hours in advance, simply mixing and refrigerating it until you’re ready to bake. To do this, cover the mixing bowl tightly with plastic wrap to keep it fresh. The frosted cupcakes can be stored in the refrigerator for up to 3 days, just be sure to cover them well to maintain the texture of the cream cheese frosting. When you’re ready to serve, allow the cupcakes to sit at room temperature for about 30 minutes before enjoying them to restore their delicious soft texture. With these make-ahead tips, you’ll be able to treat your loved ones with delightful homemade desserts without the last-minute rush!

Chef's Helpful Tips

  • When preparing Chocolate Cupcakes with Cream Cheese Frosting, make sure to accurately measure your ingredients for the best results, as even a slight variation can affect texture and flavor.
  • Avoid overmixing the batter after adding the boiling water, as this can lead to dense cupcakes instead of the desired light and fluffy texture.
  • For the cream cheese frosting, ensure your cream cheese and butter are at room temperature to achieve a smooth consistency without lumps.
  • Keep an eye on your cupcakes while baking as oven temperatures can vary; check for doneness at 18 minutes to prevent overbaking and maintain their moistness.

Chocolate Cupcakes with Cream Cheese Frosting Recipe FAQs

How do I choose the right cocoa for my cupcakes?
Absolutely! For the best flavor, I always recommend using high-quality unsweetened cocoa powder. Look for brands that are Dutch-processed, as they provide a richer, smoother chocolate experience. If you notice the cocoa powder is clumping or has an expired date, it’s better to replace it to ensure the best taste in your chocolate cupcakes with cream cheese frosting.

What’s the best way to store my cupcakes?
Great question! Unfrosted cupcakes can be stored at room temperature in an airtight container for up to 2 days. If they’re already topped with that delicious cream cheese frosting, place them in the fridge, loosely covered, for up to 5 days. This keeps them fresh while maintaining the wonderful texture of the frosting!

Can I freeze the cupcakes?
Yes, you can absolutely freeze your cupcakes! To do this, allow your unfrosted cupcakes to cool completely, then place them in a zip-top freezer bag. They can be stored for up to 3 months. When you’re ready to enjoy, simply thaw them in the fridge overnight and frost before serving. If you want a quick treat, you can microwave the thawed cupcakes for about 10-15 seconds to warm them slightly.

What if my cupcakes come out dense?
No worries! This can happen if the batter is overmixed or if there’s too much flour. To prevent this, make sure to mix until just combined after adding the boiling water; a few lumps are perfectly fine. Additionally, ensuring that your leavening agents are fresh helps maintain that fluffy texture. If you still experience density, it’s a good idea to check ingredient ratios when you bake again.

Can my pets eat any part of these cupcakes?
It’s best to keep these cupcakes away from your furry friends! Chocolate can be toxic to pets, especially dogs, as it contains theobromine, which they can’t metabolize properly. As sweet as it may be to share a treat, play it safe and enjoy these cupcakes yourself!

How can I adjust the sweetness of the frosting?
If you find the cream cheese frosting too sweet for your taste, simply reduce the amount of powdered sugar by 1 to 2 cups. You can also enhance the tanginess by adding a touch more cream cheese, which not only lowers the sweetness but also gives you a delightful flavor balance. Adjust gradually and taste as you go for the perfect mount!

Chocolate Cupcakes with Cream Cheese Frosting

Chocolate Cupcakes with Cream Cheese Frosting

Delight in these Chocolate Cupcakes with Cream Cheese Frosting, perfect for any occasion.
Print Recipe Pin Recipe
Prep Time 20 minutes mins
Cook Time 20 minutes mins
Total Time 40 minutes mins
Servings: 12 cupcakes
Course: DESSERT RECIPES
Cuisine: American
Calories: 320
Ingredients Equipment Method Nutrition Notes

Ingredients
  

For the Cupcakes
  • 2 cups sugar this is the magic that sweetens your cupcakes to perfection.
  • 1 3/4 cups all-purpose flour gives structure to your cupcakes for that perfect bite.
  • 3/4 cup unsweetened cocoa adds intense chocolate flavor that will make your cupcakes irresistible.
  • 1 1/2 teaspoons baking powder helps your cupcakes rise to fluffy heights.
  • 1 1/2 teaspoons baking soda enhances the leavening process for light and airy cupcakes.
  • 1 teaspoon salt balances the sweetness and enhances cocoa flavor.
  • 1 cup whole milk keeps your cupcakes moist and tender.
  • 1/2 cup vegetable oil adds richness to the batter for a delightful texture.
  • 2 teaspoons vanilla extract infuses warmth and depth of flavor.
  • 1 cup boiling water activates cocoa powder and enriches the chocolate richness.
For the Cream Cheese Frosting
  • 1/2 cup unsalted butter softened, ensures a creamy, smooth base for your frosting.
  • 8 oz cream cheese softened, gives that luscious tang that pairs beautifully with the chocolate.
  • 1 teaspoon vanilla extract adds aromatic flavor to the frosting.
  • 1/2 cup unsweetened cocoa enhances the chocolate goodness in your frosting.
  • 4 cups powdered confectioners sugar sweetens and thickens the frosting to a wonderful consistency.
  • 1 to 4 tablespoons heavy cream adjust for desired frosting consistency that spreads easily.

Equipment

  • Muffin tin
  • Mixing bowl
  • Electric mixer
  • measuring cups
  • measuring spoons

Method
 

How to Make Chocolate Cupcakes
  1. Preheat your oven to 350°F (175°C) and line a muffin tin with paper liners.
  2. In a large mixing bowl, stir together 2 cups of sugar, 1 3/4 cups of flour, 3/4 cup of cocoa, baking powder, baking soda, and salt.
  3. Mix in the eggs, 1 cup of whole milk, 1/2 cup of vegetable oil, and 2 teaspoons of vanilla extract. Beat on medium speed for one minute until the mixture is well combined and smooth.
  4. Carefully stir in 1 cup of boiling water.
  5. Pour the batter into the cupcake liners, filling them about 2/3 full.
  6. Bake in the preheated oven for approximately 18-22 minutes, or until a toothpick inserted into the center comes out clean.
  7. Once baked, transfer the cupcakes to a wire rack to cool completely before frosting.
  8. In a large mixing bowl, beat 1/2 cup of softened unsalted butter until smooth.
  9. Add 8 oz of softened cream cheese and mix until fully combined and smooth.
  10. Mix in 1/2 cup of unsweetened cocoa until just blended.
  11. Pour in 4 cups of powdered sugar and 1 teaspoon of vanilla extract. Blend on low speed until incorporated.
  12. Slowly mix in 1 to 4 tablespoons of heavy cream until you reach your desired frosting consistency.
  13. Beat the frosting until fluffy, about 1 minute.
  14. Use the cream cheese frosting immediately, or refrigerate for later use.

Nutrition

Serving: 1cupcakeCalories: 320kcalCarbohydrates: 45gProtein: 3gFat: 15gSaturated Fat: 8gPolyunsaturated Fat: 1gMonounsaturated Fat: 5gCholesterol: 40mgSodium: 250mgPotassium: 150mgFiber: 2gSugar: 25gVitamin A: 500IUCalcium: 50mgIron: 1mg

Notes

Optional: Add chocolate shavings or sprinkles on top for a festive touch. Ensure your ingredients are at room temperature for best results.

Tried this recipe?

Let us know how it was!

Filed Under: DESSERT RECIPES

Homemade Mayonnaise

December 29, 2025 by JudyWhite Leave a Comment

There’s something wonderfully satisfying about creating your own condiments from scratch, and homemade mayonnaise is no exception. One sunny afternoon, as I flicked through my pantry, I decided to give traditional mayo a twist. Why settle for store-bought when whipping up a creamy, flavorful batch is just a few simple ingredients away?

With just an egg, Dijon mustard, and a drizzle of oil, I transformed a humble condiment into a culinary delight fit for sandwiches, salads, and dips. The rich, velvety texture combined with a hint of tang is addictive—and the best part? It takes only ten minutes! Perfect for those who have grown weary of fast food and are eager to bring the freshness of homemade flavors into their kitchen.

Join me as I share this incredibly easy homemade mayonnaise recipe that not only elevates your dishes but also sparks joy in every bite. Let’s take a step away from the jar and discover the magic of creating something deliciously unique right in your own home!

Why You'll Love This Homemade Mayonnaise

  • This homemade mayonnaise recipe is incredibly easy, allowing you to whip up a creamy condiment in just ten minutes.
  • The bold flavors of Dijon mustard and fresh lemon juice elevate your dishes to a whole new level of deliciousness.
  • Its versatility means you can use it as a spread, dip, or dressing, making it perfect for any meal.
  • Plus, there’s nothing quite like the satisfaction of making it from scratch, showcasing your cooking skills with a visually appealing, homemade creation.

Homemade Mayonnaise Ingredients

• Discover the simplicity of making homemade mayonnaise with these easy-to-find ingredients.

For the Base

  • Large egg – acts as the emulsifier for a creamy texture.
  • Dijon mustard – adds a delightful tang that enhances flavor.
  • Red or white wine vinegar – provides acidity to balance the richness.
  • Fine sea salt – enhances all the other flavors in your mayo.

For the Oil

  • Safflower oil or vegetable oil – use either for a neutral flavor and silky finish.

Optional Twist

  • Fresh lemon juice – a touch brings brightness and freshness to the homemade mayonnaise.

How to Make Homemade Mayonnaise

  1. Combine the egg, Dijon mustard, red wine vinegar, and sea salt in a mixing bowl. This is the flavorful base of your mayonnaise. Whisk these ingredients together until they’re well blended, creating a vibrant concoction.

  2. Drizzle in the safflower oil slowly while whisking continuously. Watch as the mixture starts to emulsify and thicken—this is the magic moment! Keep whisking vigorously for about 1-2 minutes until you achieve that creamy texture.

  3. Mix in the fresh lemon juice, if using, until fully incorporated. This optional addition gives your homemade mayonnaise a refreshing brightness. Taste it, and enjoy the burst of flavor!

Optional: Add a pinch of garlic powder for an extra kick.

Exact quantities are listed in the recipe card below.

What to Serve with Homemade Mayonnaise?

Elevate your meals with delightful sides and pairings that complement the creamy richness of this homemade condiment.

  • Crispy Sweet Potato Fries: The natural sweetness and crisp texture provide a fantastic contrast to the tanginess of the mayonnaise.

  • Fresh Garden Salad: A medley of vibrant vegetables drizzled with homemade mayonnaise creates a refreshing, crunchy delight that tastes like sunshine.

  • Grilled Chicken Sandwiches: Juicy chicken paired with the rich and creamy mayo brings a luscious element that enhances each bite.

  • Classic Potato Salad: Creamy and tangy, a potato salad dressed with this homemade mayonnaise is a nostalgic favorite perfect for picnics.

  • Zesty Coleslaw: Crunchy cabbage and carrots combined with the mayo create a creamy texture that adds a flavorful pop to any barbecue spread.

  • Savory Tuna Salad: This mayo adds a rich creaminess that perfectly complements flaked tuna, making for a satisfying lunch or snack.

  • Spicy Deviled Eggs: Using homemade mayonnaise instead of store-bought elevates these bite-sized goodies to a whole new level of flavor and texture.

  • Crisp Veggie Platter: Bright, colorful veggies dipped into creamy mayo make for a satisfyingly crunchy and healthy snack.

Whether you’re enjoying a simple meal at home or hosting a gathering, these pairings will surely highlight your wonderful mayonnaise creation!

Homemade Mayonnaise Variations

Unleash your creativity in the kitchen by experimenting with these exciting twists and substitutions.

  • Herb-Infused: Add fresh chopped herbs like basil, dill, or chives for a burst of flavor that complements any dish perfectly.
  • Spicy Kick: Mix in a teaspoon of sriracha or your favorite hot sauce to give your mayonnaise a delightful heat that will tantalize your taste buds.
  • Garlic Aioli: Incorporate minced garlic for a classic aioli variant; it adds depth and richness that pairs beautifully with vegetables and seafood.
  • Vegan Version: Substitute the egg with aquafaba (chickpea brine) for a vegan mayo that’s just as creamy and flavorful—no one will know the difference!
  • Tangy Twist: Use apple cider vinegar instead of wine vinegar for a sweeter, fruitier flavor that brings a unique twist to your recipes.
  • Smoky Flavor: Stir in a dash of smoked paprika to introduce a rich, smoky undertone that enhances sandwiches and dips alike.
  • Citrus Zing: Brighten your mayo by adding a teaspoon of orange or lime juice for a refreshing twist that’s perfect for summer dishes.
  • Nutty Taste: Fold in a tablespoon of sesame oil for an Asian-inspired mayonnaise that pairs beautifully with salads and grilled meats.

Let your imagination run wild as you play with these variations, making your homemade mayonnaise as unique and delicious as you desire!

Make Ahead Options

These homemade mayonnaise preparations are perfect for busy home cooks looking to save time during the week! You can whisk together the egg, Dijon mustard, red wine vinegar, and sea salt up to 24 hours in advance and store the mixture in an airtight container in the refrigerator. This not only ensures flavor meld but also allows for easy emulsification later. When you’re ready to finish your homemade mayonnaise, simply add the safflower oil while whisking, as it will save you the hassle later and ensures a fresh taste. Remember, for the best quality, avoid adding lemon juice until just before serving to keep its vibrant flavor intact. Enjoy the convenience of homemade goodness with minimal effort!

How to Store and Freeze Homemade Mayonnaise

Room Temperature: Homemade mayonnaise is best stored in the fridge, but if left out, it can sit for a maximum of 2 hours. After that, discard it for safety.

Fridge: Keep your homemade mayonnaise in an airtight container for up to 1 week. Ensure the lid is tight to prevent contamination and maintain freshness.

Freezer: While freezing is not recommended for mayonnaise due to its emulsified nature, if necessary, you can freeze it for up to 2 months in a freezer-safe container.

Reheating: If your mayonnaise has separated after freezing, let it thaw in the fridge and then gently whisk to re-emulsify. Enjoy the fresh taste of your homemade mayonnaise!

Chef's Helpful Tips

  • When making Homemade Mayonnaise, ensure your egg is at room temperature to help the emulsification process.
  • A common mistake is adding the oil too quickly; drizzle it slowly while whisking to create that desired creamy texture.
  • Use a whisk or an immersion blender for smoother results, as this can significantly enhance the emulsification.
  • Always taste your mayonnaise after mixing; if it seems too rich, a splash more vinegar or lemon juice can brighten it up perfectly.

Homemade Mayonnaise Recipe FAQs

What kind of egg should I use for homemade mayonnaise?
Absolutely! It’s best to use a large, fresh egg at room temperature. The freshness of the egg is crucial since it’s the primary emulsifier in the mayonnaise. Look for eggs that have no cracks, and if you can, use organic or free-range eggs for better flavor and quality.

How long can I store homemade mayonnaise?
You can store your homemade mayonnaise in an airtight container in the refrigerator for up to 1 week. Make sure to keep it tightly sealed to maintain its freshness and prevent any contamination. Always check for any off-smells or discoloration before using!

Can I freeze homemade mayonnaise?
Yes! You can freeze homemade mayonnaise for up to 2 months, although the texture might change slightly. To freeze, pour it into a freezer-safe container, leaving some space at the top for expansion. When you’re ready to use it, transfer it to the refrigerator overnight to thaw, and whisk gently before using to help restore its original texture.

What can I do if my mayonnaise doesn’t emulsify?
Very! If your mayonnaise doesn’t emulsify, don’t worry—just start over with a fresh egg yolk in a clean bowl, and slowly incorporate your failed attempt a little bit at a time. Whisk continuously as you add it. This method works because the fresh yolk acts as a new emulsifier, helping to bring it all together.

Is homemade mayonnaise safe for my family, including my kids?
Of course! However, keep in mind that homemade mayonnaise uses raw eggs, which can pose a risk of salmonella. If you’re serving it to young children, pregnant women, or anyone with a weakened immune system, consider using pasteurized eggs to ensure safety. It’s an extra layer of protection while enjoying all that creamy goodness!

How can I enjoy homemade mayonnaise outside of just sandwiches?
Ah, the more the merrier! Homemade mayonnaise is a versatile condiment. Use it as a base for creamy salad dressings, blend in herbs for a delicious dip, or even incorporate it into a pasta salad for extra richness. You can even use it in place of sour cream in certain recipes for a delightful twist. The options are endless!

Homemade Mayonnaise

Homemade Mayonnaise

Homemade Mayonnaise made with simple ingredients delivers a creamy, flavorful twist to your dishes.
Print Recipe Pin Recipe
Prep Time 10 minutes mins
Total Time 10 minutes mins
Servings: 1 cup
Course: Snacks & Appetizers
Cuisine: American
Calories: 150
Ingredients Equipment Method Nutrition Notes

Ingredients
  

For the Base
  • 1 large egg acts as the emulsifier for a creamy texture
  • 1 tablespoon Dijon mustard adds a delightful tang that enhances flavor
  • 1 tablespoon red or white wine vinegar provides acidity to balance the richness
  • 1 teaspoon fine sea salt enhances all the other flavors in your mayo
For the Oil
  • 1 cup safflower oil or vegetable oil use either for a neutral flavor and silky finish
Optional Twist
  • 1 tablespoon fresh lemon juice a touch brings brightness and freshness

Equipment

  • Mixing bowl
  • Whisk

Method
 

How to Make Homemade Mayonnaise
  1. Combine the egg, Dijon mustard, red wine vinegar, and sea salt in a mixing bowl. Whisk until well blended.
  2. Drizzle in the safflower oil slowly while whisking continuously until creamy.
  3. Mix in the fresh lemon juice if using, and taste the refreshing burst of flavor!

Nutrition

Serving: 1cupCalories: 150kcalProtein: 1gFat: 16gSaturated Fat: 1gPolyunsaturated Fat: 8gMonounsaturated Fat: 6gCholesterol: 30mgSodium: 250mg

Notes

Ensure your egg is at room temperature. Drizzle oil slowly and whisk vigorously for best results.

Tried this recipe?

Let us know how it was!

Filed Under: SNACKS & APPETIZERS

Homemade Garlic Aioli

December 29, 2025 by JudyWhite Leave a Comment

There’s something incredibly satisfying about creating a culinary masterpiece in just minutes. Picture this: you’re hosting friends, the aroma of garlic fills the air, and with only a handful of ingredients, you’ve transformed the ordinary into something extraordinary. This Homemade Garlic Aioli recipe is a game-changer, blending the rich flavors of olive oil and fresh garlic into a creamy dip that elevates any dish—from roasted veggies to crispy French fries.

Inspired by a spontaneous dinner party where store-bought sauces just wouldn’t cut it, I decided to whip up something that not only tasted better but also showcased a touch of culinary finesse. In less than 10 minutes, you can prepare this versatile condiment that will impress your guests and keep you out of the fast food lane for good. Whether you’re a seasoned chef or just dabbling in home cooking, this aioli is bound to become a staple in your kitchen. Let’s dive into this easy recipe that promises to be a flavor bomb!

Why You'll Love This Homemade Garlic Aioli

  • This Homemade Garlic Aioli is incredibly easy to make, requiring just 10 minutes of your time for a gourmet result.
  • The deep, rich flavors of garlic and olive oil come together to create a deliciously creamy dip that enhances any meal.
  • Its versatility means you can enjoy it with everything from crispy fries to fresh vegetable platters, making it perfect for any occasion.
  • Visually, the aioli boasts a beautiful, creamy texture that will impress your guests and elevate your dining experience.

Homemade Garlic Aioli Ingredients

Get ready to create a culinary delight with these simple ingredients that promise layers of flavor in every bite.

For the Aioli

  • 2 cloves garlic – uses fresh garlic for a robust flavor that will make your taste buds sing.
  • 1/4 teaspoon kosher salt – enhances the overall taste, balancing the flavors beautifully.
  • 1/2 cup extra virgin olive oil – the key to a rich, creamy texture in this homemade garlic aioli.
  • 1 teaspoon fresh lemon juice – adds a bright, zesty note that cuts through the creaminess.

This delightful mix invites you to say goodbye to store-bought sauces and embrace the fresh flavors of homemade garlic aioli!

How to Make Homemade Garlic Aioli

  1. Prepare the setup: Wet a kitchen towel and wring it out until just damp. Shape it into a ring and nestle a medium bowl in the center. This creates a stable workspace as you mix your aioli.

  2. Grate the garlic: Finely grate the garlic into the bowl. Add the kosher salt and egg yolk, whisking briefly to combine all the ingredients. The aroma of garlic will immediately fill your kitchen!

  3. Emulsify the oil: Begin whisking the egg yolk mixture briefly, then slowly add the olive oil a few drops at a time. Keep whisking continuously until the aioli starts to emulsify, then increase the oil to a steady, thin stream while whisking continuously.

  4. Finish the aioli: Once all the oil is incorporated, whisk a few more times to ensure thorough emulsification. Now, whisk in the fresh lemon juice. Taste your creation and adjust the salt if necessary.

Optional: Serve with fresh herbs for an added burst of flavor.

Exact quantities are listed in the recipe card below.

What to Serve with Homemade Garlic Aioli?

Creating a scrumptious meal to accompany your aioli is as easy as spreading a little culinary love.

  • Crispy French Fries: The golden crunch of fries pairs perfectly with the creamy aioli, making every bite a heavenly indulgence.

  • Grilled Vegetables: Marinated veggies, charred to perfection, become even more delightful with a dollop of garlic aioli, adding a rich, savory touch.

  • Savory Roasted Chicken: Juicy, herbed chicken served with aioli can elevate your dinner table, turning a simple meal into a festive occasion. The creaminess of the aioli complements the chicken beautifully.

  • Fresh Veggie Platter: Arrange an array of colorful raw vegetables; the aioli makes each crisp bite irresistible and satisfying, ensuring your guests keep coming back for more.

  • Seafood Delights: Whether shrimp or crispy calamari, garlic aioli is a lively companion that amplifies the oceanic flavors and adds a creamy twist.

  • Artisan Bread: Serve warm, crusty bread with a side of aioli for a fabulous starter, allowing your guests to dip and indulge in this simple yet luxurious treat.

  • Homemade Potato Chips: Crunchy, salty chips dunked in aioli create a wonderful contrast in textures, making them a perfect appetizer for your gathering.

  • Sparkling Citrus Mocktail: A refreshing drink made with sparkling water and a hint of lemon perfectly complements the robust flavors of your garlic aioli.

Feel free to mix and match these ideas to create a memory-filled meal that will leave everyone asking for seconds!

Make Ahead Options

These Homemade Garlic Aioli is perfect for busy home cooks looking to save time without sacrificing flavor! You can prepare the aioli up to 24 hours in advance, allowing the flavors to develop further. Simply complete the whisking steps and store the aioli in an airtight container in the refrigerator. To maintain its creamy texture and prevent it from separating, give it a gentle stir before serving. When you’re ready to enjoy it, simply drizzle in a bit more lemon juice or olive oil for a fresh finish. This makes it a convenient and delicious condiment for your meals throughout the week!

Homemade Garlic Aioli Variations

Feel free to experiment and make this recipe your own, creating delightful twists that cater to your taste buds.

  • Vegan: Replace the egg yolk with aquafaba, the liquid from canned chickpeas, for a plant-based version that’s just as creamy.

  • Spicy: Add a dash of cayenne pepper or a few drops of hot sauce to the mixture for an extra kick that will tantalize your taste buds. This offers a delicious contrast to the mild garlic flavor.

  • Herbed: Mix in finely chopped fresh herbs like dill or basil for a fragrant, vibrant twist that elevates your aioli, making it perfect for summer dishes.

  • Roasted Garlic: Swap out fresh garlic for roasted garlic to create a sweeter, more mellow flavor that adds a lovely depth to your aioli.

  • Lemon Zest: Incorporate a teaspoon of lemon zest to amp up the citrusy brightness, providing a zesty zing that dances on your palate alongside the creamy base.

  • Smoked Paprika: Stir in a teaspoon of smoked paprika for a hint of smokiness that complements the garlic beautifully, transforming your aioli into something truly special.

  • Mustard Kick: Adding a teaspoon of Dijon mustard enhances the flavor profile, bringing a tangy richness that pairs perfectly with all types of dishes.

  • Nutty Twist: Fold in a tablespoon of tahini for a nutty, earthy flavor that adds a unique twist and creaminess, perfect for Mediterranean-inspired meals.

How to Store and Freeze Homemade Garlic Aioli

Room Temperature: Store homemade garlic aioli at room temperature for up to 2 hours to prevent spoilage. It’s best enjoyed fresh right after making!

Fridge: Keep any leftover aioli in an airtight container in the refrigerator for up to 3 days. This helps preserve its creamy texture and bold flavors.

Freezer: If you want to keep your aioli for longer, freeze it in an ice cube tray for easy portioning. It can last up to 2 months in the freezer.

Reheating: Thaw the aioli overnight in the fridge before serving. If separated, whisk it gently to reincorporate the ingredients for that smooth, luscious consistency.

Chef's Helpful Tips

  • For the Homemade Garlic Aioli, using fresh garlic is crucial as it provides a strong, vibrant flavor that store-bought versions can’t match.
  • When emulsifying, be patient and start with just a few drops of oil at a time to ensure the mixture binds properly.
  • If the aioli seems too thick, you can lighten it up by whisking in a teaspoon of warm water to achieve your desired consistency.
  • Remember to taste your aioli before serving and adjust the salt or lemon juice to suit your preferences for a perfectly balanced dip.

Homemade Garlic Aioli Recipe FAQs

What type of garlic is best for making aioli?
Absolutely! Fresh, firm garlic cloves are ideal for making homemade garlic aioli. Look for cloves that are dry and free from dark spots or sprouts. If your garlic has developed any dark spots, it’s a sign of age and might not provide that vibrant flavor you’re after.

How long can I store homemade garlic aioli in the fridge?
Very! You can store your homemade garlic aioli in an airtight container in the refrigerator for up to 3 days. Just make sure to use a clean utensil each time you scoop some out to prevent any contamination. If you notice any separation, simply give it a good whisk before serving!

Can I freeze homemade garlic aioli?
Definitely! If you want to extend the shelf life of your garlic aioli, freeze it in ice cube trays. Once frozen, pop out the cubes and store them in a freezer bag. It will last up to 2 months. When you’re ready to use it, just thaw it overnight in the fridge, and give it a little whisk to return it to its creamy state!

What should I do if my aioli doesn’t emulsify?
Don’t worry, it happens to the best of us! If your aioli isn’t emulsifying, try this: Start again with a new egg yolk in a clean bowl. Whisk it lightly, then slowly drizzle in the failed aioli while whisking continuously. This often helps to reincorporate the mixture and achieve that luscious, creamy texture.

Is homemade garlic aioli safe for kids or people with egg allergies?
It’s important to be cautious! Homemade garlic aioli contains raw egg yolk, which may not be suitable for pregnant women, young children, or anyone with compromised immune systems. If you’re looking for a safer alternative, you can use pasteurized eggs or even replace the egg yolk with 1 tablespoon of mayonnaise for a similar texture without the risk.

Homemade Garlic Aioli

Homemade Garlic Aioli

This Homemade Garlic Aioli is an easy and delicious way to elevate your dish with rich flavors.
Print Recipe Pin Recipe
Prep Time 10 minutes mins
Total Time 10 minutes mins
Servings: 4 servings
Course: Snacks & Appetizers
Cuisine: Mediterranean
Calories: 70
Ingredients Equipment Method Nutrition Notes

Ingredients
  

For the Aioli
  • 2 cloves garlic fresh garlic for robust flavor
  • 1/4 teaspoon kosher salt enhances overall taste
  • 1/2 cup extra virgin olive oil key to rich, creamy texture
  • 1 teaspoon fresh lemon juice adds bright, zesty note

Equipment

  • Mixing bowl
  • Whisk

Method
 

How to Make Homemade Garlic Aioli
  1. Wet a kitchen towel and wring it out until just damp. Shape it into a ring and nestle a medium bowl in the center.
  2. Finely grate the garlic into the bowl. Add the kosher salt and egg yolk, whisking briefly to combine.
  3. Begin whisking the egg yolk mixture briefly, then slowly add the olive oil a few drops at a time.
  4. Once all the oil is incorporated, whisk a few more times to finish the aioli and whisk in the fresh lemon juice.

Nutrition

Serving: 1tablespoonCalories: 70kcalCarbohydrates: 1gFat: 7gSaturated Fat: 1gMonounsaturated Fat: 6gSodium: 80mgPotassium: 20mgVitamin C: 1mg

Notes

Serve with fresh herbs for added flavor. Taste and adjust salt or lemon juice as needed.

Tried this recipe?

Let us know how it was!

Filed Under: SNACKS & APPETIZERS

Christmas Tree Caprese Salad

December 29, 2025 by JudyWhite Leave a Comment

When the holiday season rolls around, our homes are filled with laughter, love, and the enticing aroma of festive dishes. This year, I wanted to add a fun twist to our traditional gatherings, and that’s when I stumbled upon the concept of the Christmas Tree Caprese Salad. Imagine a beautiful arrangement of vibrant reds and greens, resembling a twinkling Christmas tree, all while delivering delightful flavors that even the pickiest eater will enjoy.

Not only is this dish a feast for the eyes, but it’s also incredibly easy to whip up, making it a perfect addition to any potluck or family dinner. With just a handful of fresh ingredients—creamy mozzarella, juicy tomatoes, and fragrant basil—you can create a show-stopping centerpiece that sparks joy and conversation around the table. Plus, the best part? It takes only 20 minutes to prepare! Let’s dive into how you can bring this delightful salad to life and elevate your holiday gatherings!

Why You'll Love This Christmas Tree Caprese Salad

  • This Christmas Tree Caprese Salad is not only visually stunning but also incredibly easy to prepare, making it a stress-free addition to your holiday celebrations.
  • The vibrant colors and festive shape are guaranteed to impress your guests and become a conversation starter around the table.
  • With fresh ingredients like mozzarella, tomatoes, and basil, every bite bursts with delightful flavor that will please even the pickiest of eaters.
  • Plus, this crowd-pleaser can be adapted to suit your personal taste, allowing for endless variations and creativity in your presentation.

Christmas Tree Caprese Salad Ingredients

• This delightful dish requires just a few fresh staples!

For the Salad

  • Medium Sized Mozzarella – 3-4 balls provide that creamy texture and fresh taste, essential for a classic Caprese.
  • Medium Sized Tomatoes – 4-5 pieces add vibrant color and juiciness to your Christmas Tree Caprese Salad.
  • Basil Leaves – A handful of fragrant basil leaves elevate the flavors and add a lovely aromatic touch.

For the Seasoning

  • Salt – Sprinkle to taste, enhancing the natural flavors of the fresh ingredients.
  • Balsamic Glaze – Drizzle to taste; it adds sweetness and acidity that beautifully balances the dish.

How to Make Christmas Tree Caprese Salad

  1. Layer the Ingredients: Start by placing slices of tomato, mozzarella, and basil on your Christmas Tree Charcuterie Board, arranging them in a festive tree shape. Feel free to get creative!
  2. Cut to Fit: If some of your ingredients are too large, carefully cut them in half. This little trick helps them fit perfectly in any corners, ensuring your tree looks beautiful from every angle.
  3. Season it Up: Once everything is layered, sprinkle a pinch of salt over the entire board. This step is key to enhancing the fresh flavors of your Christmas Tree Caprese Salad.
  4. Drizzle the Glaze: Just before serving, lightly drizzle your balsamic glaze over the salad. This keeps the mozzarella fresh and adds a delicious contrasting sweetness.
  5. Serve and Enjoy: Provide toothpicks or small forks for easy picking, and watch your guests enjoy this delightful holiday treat!

Optional: Garnish with extra basil leaves around the base for an added flourish.

Exact quantities are listed in the recipe card below.

Make Ahead Options

These Christmas Tree Caprese Salads are perfect for busy cooks looking to save time during the holiday rush! You can prep the individual components—slicing the mozzarella and tomatoes—up to 24 hours in advance. Simply layer them in your charcuterie board as directed, but hold off on adding the salt and balsamic glaze until just before serving. This ensures the mozzarella stays fresh and prevents the tomatoes from becoming soggy. When you’re ready to wow your guests, simply sprinkle the salt and drizzle the balsamic glaze for restaurant-quality results that are just as delicious as if made fresh that day!

What to Serve with Christmas Tree Caprese Salad?

Enjoying a festive day with friends and family is even better when the meal is beautifully complemented by delicious pairings.

  • Crunchy Breadsticks: These provide a delightful crunch that pairs perfectly with the creamy mozzarella and juicy tomatoes.

  • Garlic Herb Flatbread: The warm, aromatic flavor of flatbread enhances the fresh ingredients while inviting more texture to the meal.

  • Olive Tapenade: This savory spread adds a burst of umami that contrasts nicely with the salad’s freshness and is perfect for dipping.

  • Lightly Grilled Chicken: Juicy grilled chicken coated in herbs complements the salad, bringing in a hearty element to delight your guests.

  • Sparkling Water with Lemon: A refreshing, fizzy drink that cleanses the palate and brings out the bold flavors of the Caprese.

  • Chocolate-Dipped Strawberries: End the meal with a sweet touch. Their richness balances the lightness of the salad before indulging in holiday goodness.

Christmas Tree Caprese Salad Variations

Get ready to put a personal touch on your festive masterpiece with these delicious twists.

  • Herb Variation: Add chives or parsley to enhance the fresh herb flavor. Simply mix them with the basil for a new aroma. They’ll give your salad a delightful, vibrant twist!

  • Avocado Twist: For creaminess, layer avocado slices between the tomatoes and mozzarella. This addition brings richness that pairs beautifully with the balsamic glaze.

  • Aged Balsamic: Swap regular balsamic glaze for aged balsamic vinegar. The deeper, complex flavors will elevate your salad to new heights!

  • Peppery Kick: Spice things up with a sprinkle of crushed red pepper flakes. This heat provides a lovely contrast to the cool, creamy mozzarella.

  • Fruit Fusion: Add slices of ripe peaches or nectarines for a sweet surprise. This fruity element brings an unexpected burst of flavor that perfectly complements the savory ingredients.

  • Nutty Crunch: Toss in some toasted pine nuts for added crunch. They will enhance both the texture and flavor profile while adding a touch of elegance.

  • Vegan Option: Substitute mozzarella with vegan cheese or marinated tofu. This creates a delightful plant-based version that everyone can enjoy.

  • Colorful Touch: Mix in colorful cherry tomatoes in various hues. Not only does it enhance the visual appeal, but it also adds extra sweetness to the mix.

Experimenting with these variations will make your Christmas Tree Caprese Salad truly unique and memorable!

Storage Tips for Christmas Tree Caprese Salad

Fridge: Store leftover Christmas Tree Caprese Salad in an airtight container for up to 2 days. This helps maintain the freshness of the ingredients.

Avoid Freezing: It’s best not to freeze this salad, as the mozzarella and tomatoes will become mushy once thawed.

Reheating: There’s no need to reheat; serve it cold to enjoy the refreshing flavors. If stored properly, it can last for a quick snack or side!

Serving Fresh: For the best experience, consider preparing the salad just a few hours before serving to ensure every ingredient stays vibrant and delicious.

Chef's Helpful Tips

  • For the Christmas Tree Caprese Salad, always choose ripe tomatoes for the best flavor and texture.
  • When layering your ingredients, make sure to alternate colors to create a visually appealing presentation.
  • If you slice the mozzarella in advance, store it in a bit of water to keep it fresh until ready to use.
  • Remember to drizzle the balsamic glaze just before serving to maintain the integrity of the mozzarella and tomatoes.

Christmas Tree Caprese Salad Recipe FAQs

What type of tomatoes work best for this salad?
Absolutely! For your Christmas Tree Caprese Salad, I recommend using ripe medium-sized tomatoes such as Roma or vine-ripened varieties. Look for ones that feel firm yet slightly tender to the touch and have a rich, vibrant color. Avoid any with dark spots or blemishes, as they may affect the freshness of your salad.

How should I store leftovers from my Christmas Tree Caprese Salad?
Very! If you have any leftovers, store them in an airtight container in the refrigerator. They should stay fresh for up to 3 days. It’s best to keep the balsamic glaze separate until you’re ready to enjoy again to maintain the mozzarella’s texture.

Can I freeze the Christmas Tree Caprese Salad?
Not at all! Freezing this salad is not recommended. Fresh ingredients like mozzarella and tomatoes don’t fare well in the freezer and can become mushy. Enjoy the salad fresh, as that’s when it tastes the best!

What if the mozzarella is too soft or watery?
If your mozzarella seems overly soft or watery, try pressing it lightly between paper towels to absorb excess moisture before adding it to your salad. A little patience can help enhance the texture and prevent any sogginess when serving.

Is this salad safe for pets or people with allergies?
It’s important to be cautious! While the ingredients in the Christmas Tree Caprese Salad are generally safe for adults, be mindful of individuals with dairy allergies, as mozzarella contains lactose. And keep in mind that while basil is fine, not all herbs are safe for pets, so it’s best to keep this dish out of reach of dogs or cats.

Can I customize the ingredients in my Christmas Tree Caprese Salad?
Absolutely! This salad is meant to be fun and creative. Feel free to swap out the basil for arugula, or add sliced avocado for a creamy texture. You can even incorporate different cheeses or veggies to reflect your family’s tastes. The more the merrier, right?

Christmas Tree Caprese Salad

Christmas Tree Caprese Salad

A festive and visually stunning Christmas Tree Caprese Salad that delights with fresh mozzarella, juicy tomatoes, and fragrant basil.
Print Recipe Pin Recipe
Prep Time 20 minutes mins
Total Time 20 minutes mins
Servings: 6 servings
Course: Snacks & Appetizers
Cuisine: Italian
Calories: 250
Ingredients Equipment Method Nutrition Notes

Ingredients
  

For the Salad
  • 4 balls Medium Sized Mozzarella provides creamy texture
  • 5 pieces Medium Sized Tomatoes adds color and juiciness
  • 1 handful Basil Leaves elevates flavors
For the Seasoning
  • Salt to taste
  • Balsamic Glaze to taste

Equipment

  • Cutting Board
  • Knife
  • Serving platter

Method
 

Directions
  1. Layer the Ingredients: Start by placing slices of tomato, mozzarella, and basil on your Christmas Tree Charcuterie Board, arranging them in a festive tree shape.
  2. Cut to Fit: If some of your ingredients are too large, carefully cut them in half to fit perfectly.
  3. Season it Up: Sprinkle a pinch of salt over the entire board to enhance flavors.
  4. Drizzle the Glaze: Lightly drizzle the balsamic glaze over the salad just before serving.
  5. Serve and Enjoy: Provide toothpicks or small forks for easy picking, and watch your guests enjoy!

Nutrition

Serving: 1servingCalories: 250kcalCarbohydrates: 10gProtein: 16gFat: 18gSaturated Fat: 8gMonounsaturated Fat: 8gCholesterol: 40mgSodium: 200mgPotassium: 600mgFiber: 2gSugar: 5gVitamin A: 1000IUVitamin C: 15mgCalcium: 300mgIron: 1mg

Notes

Garnish with extra basil leaves around the base for an added flourish. Prepare the salad just a few hours before serving for the best experience.

Tried this recipe?

Let us know how it was!

Filed Under: SNACKS & APPETIZERS

Homemade Garlic Aioli

December 29, 2025 by JudyWhite Leave a Comment

There’s something incredibly satisfying about creating a culinary masterpiece in just minutes. Picture this: you’re hosting friends, the aroma of garlic fills the air, and with only a handful of ingredients, you’ve transformed the ordinary into something extraordinary. This Homemade Garlic Aioli recipe is a game-changer, blending the rich flavors of olive oil and fresh garlic into a creamy dip that elevates any dish—from roasted veggies to crispy French fries.

Inspired by a spontaneous dinner party where store-bought sauces just wouldn’t cut it, I decided to whip up something that not only tasted better but also showcased a touch of culinary finesse. In less than 10 minutes, you can prepare this versatile condiment that will impress your guests and keep you out of the fast food lane for good. Whether you’re a seasoned chef or just dabbling in home cooking, this aioli is bound to become a staple in your kitchen. Let’s dive into this easy recipe that promises to be a flavor bomb!

Why You'll Love This Homemade Garlic Aioli

  • This Homemade Garlic Aioli is incredibly easy to make, requiring just 10 minutes of your time for a gourmet result.
  • The deep, rich flavors of garlic and olive oil come together to create a deliciously creamy dip that enhances any meal.
  • Its versatility means you can enjoy it with everything from crispy fries to fresh vegetable platters, making it perfect for any occasion.
  • Visually, the aioli boasts a beautiful, creamy texture that will impress your guests and elevate your dining experience.

Homemade Garlic Aioli Ingredients

Get ready to create a culinary delight with these simple ingredients that promise layers of flavor in every bite.

For the Aioli

  • 2 cloves garlic – uses fresh garlic for a robust flavor that will make your taste buds sing.
  • 1/4 teaspoon kosher salt – enhances the overall taste, balancing the flavors beautifully.
  • 1/2 cup extra virgin olive oil – the key to a rich, creamy texture in this homemade garlic aioli.
  • 1 teaspoon fresh lemon juice – adds a bright, zesty note that cuts through the creaminess.

This delightful mix invites you to say goodbye to store-bought sauces and embrace the fresh flavors of homemade garlic aioli!

How to Make Homemade Garlic Aioli

  1. Prepare the setup: Wet a kitchen towel and wring it out until just damp. Shape it into a ring and nestle a medium bowl in the center. This creates a stable workspace as you mix your aioli.

  2. Grate the garlic: Finely grate the garlic into the bowl. Add the kosher salt and egg yolk, whisking briefly to combine all the ingredients. The aroma of garlic will immediately fill your kitchen!

  3. Emulsify the oil: Begin whisking the egg yolk mixture briefly, then slowly add the olive oil a few drops at a time. Keep whisking continuously until the aioli starts to emulsify, then increase the oil to a steady, thin stream while whisking continuously.

  4. Finish the aioli: Once all the oil is incorporated, whisk a few more times to ensure thorough emulsification. Now, whisk in the fresh lemon juice. Taste your creation and adjust the salt if necessary.

Optional: Serve with fresh herbs for an added burst of flavor.

Exact quantities are listed in the recipe card below.

Make Ahead Options

These Homemade Garlic Aioli is perfect for busy home cooks looking to save time without sacrificing flavor! You can prepare the aioli up to 24 hours in advance, allowing the flavors to develop further. Simply complete the whisking steps and store the aioli in an airtight container in the refrigerator. To maintain its creamy texture and prevent it from separating, give it a gentle stir before serving. When you’re ready to enjoy it, simply drizzle in a bit more lemon juice or olive oil for a fresh finish. This makes it a convenient and delicious condiment for your meals throughout the week!

How to Store and Freeze Homemade Garlic Aioli

Room Temperature: Store homemade garlic aioli at room temperature for up to 2 hours to prevent spoilage. It’s best enjoyed fresh right after making!

Fridge: Keep any leftover aioli in an airtight container in the refrigerator for up to 3 days. This helps preserve its creamy texture and bold flavors.

Freezer: If you want to keep your aioli for longer, freeze it in an ice cube tray for easy portioning. It can last up to 2 months in the freezer.

Reheating: Thaw the aioli overnight in the fridge before serving. If separated, whisk it gently to reincorporate the ingredients for that smooth, luscious consistency.

Homemade Garlic Aioli Variations

Feel free to experiment and make this recipe your own, creating delightful twists that cater to your taste buds.

  • Vegan: Replace the egg yolk with aquafaba, the liquid from canned chickpeas, for a plant-based version that’s just as creamy.

  • Spicy: Add a dash of cayenne pepper or a few drops of hot sauce to the mixture for an extra kick that will tantalize your taste buds. This offers a delicious contrast to the mild garlic flavor.

  • Herbed: Mix in finely chopped fresh herbs like dill or basil for a fragrant, vibrant twist that elevates your aioli, making it perfect for summer dishes.

  • Roasted Garlic: Swap out fresh garlic for roasted garlic to create a sweeter, more mellow flavor that adds a lovely depth to your aioli.

  • Lemon Zest: Incorporate a teaspoon of lemon zest to amp up the citrusy brightness, providing a zesty zing that dances on your palate alongside the creamy base.

  • Smoked Paprika: Stir in a teaspoon of smoked paprika for a hint of smokiness that complements the garlic beautifully, transforming your aioli into something truly special.

  • Mustard Kick: Adding a teaspoon of Dijon mustard enhances the flavor profile, bringing a tangy richness that pairs perfectly with all types of dishes.

  • Nutty Twist: Fold in a tablespoon of tahini for a nutty, earthy flavor that adds a unique twist and creaminess, perfect for Mediterranean-inspired meals.

What to Serve with Homemade Garlic Aioli?

Creating a scrumptious meal to accompany your aioli is as easy as spreading a little culinary love.

  • Crispy French Fries: The golden crunch of fries pairs perfectly with the creamy aioli, making every bite a heavenly indulgence.

  • Grilled Vegetables: Marinated veggies, charred to perfection, become even more delightful with a dollop of garlic aioli, adding a rich, savory touch.

  • Savory Roasted Chicken: Juicy, herbed chicken served with aioli can elevate your dinner table, turning a simple meal into a festive occasion. The creaminess of the aioli complements the chicken beautifully.

  • Fresh Veggie Platter: Arrange an array of colorful raw vegetables; the aioli makes each crisp bite irresistible and satisfying, ensuring your guests keep coming back for more.

  • Seafood Delights: Whether shrimp or crispy calamari, garlic aioli is a lively companion that amplifies the oceanic flavors and adds a creamy twist.

  • Artisan Bread: Serve warm, crusty bread with a side of aioli for a fabulous starter, allowing your guests to dip and indulge in this simple yet luxurious treat.

  • Homemade Potato Chips: Crunchy, salty chips dunked in aioli create a wonderful contrast in textures, making them a perfect appetizer for your gathering.

  • Sparkling Citrus Mocktail: A refreshing drink made with sparkling water and a hint of lemon perfectly complements the robust flavors of your garlic aioli.

Feel free to mix and match these ideas to create a memory-filled meal that will leave everyone asking for seconds!

Chef's Helpful Tips

  • For the Homemade Garlic Aioli, using fresh garlic is crucial as it provides a strong, vibrant flavor that store-bought versions can’t match.
  • When emulsifying, be patient and start with just a few drops of oil at a time to ensure the mixture binds properly.
  • If the aioli seems too thick, you can lighten it up by whisking in a teaspoon of warm water to achieve your desired consistency.
  • Remember to taste your aioli before serving and adjust the salt or lemon juice to suit your preferences for a perfectly balanced dip.

Homemade Garlic Aioli Recipe FAQs

What type of garlic is best for making aioli?
Absolutely! Fresh, firm garlic cloves are ideal for making homemade garlic aioli. Look for cloves that are dry and free from dark spots or sprouts. If your garlic has developed any dark spots, it’s a sign of age and might not provide that vibrant flavor you’re after.

How long can I store homemade garlic aioli in the fridge?
Very! You can store your homemade garlic aioli in an airtight container in the refrigerator for up to 3 days. Just make sure to use a clean utensil each time you scoop some out to prevent any contamination. If you notice any separation, simply give it a good whisk before serving!

Can I freeze homemade garlic aioli?
Definitely! If you want to extend the shelf life of your garlic aioli, freeze it in ice cube trays. Once frozen, pop out the cubes and store them in a freezer bag. It will last up to 2 months. When you’re ready to use it, just thaw it overnight in the fridge, and give it a little whisk to return it to its creamy state!

What should I do if my aioli doesn’t emulsify?
Don’t worry, it happens to the best of us! If your aioli isn’t emulsifying, try this: Start again with a new egg yolk in a clean bowl. Whisk it lightly, then slowly drizzle in the failed aioli while whisking continuously. This often helps to reincorporate the mixture and achieve that luscious, creamy texture.

Is homemade garlic aioli safe for kids or people with egg allergies?
It’s important to be cautious! Homemade garlic aioli contains raw egg yolk, which may not be suitable for pregnant women, young children, or anyone with compromised immune systems. If you’re looking for a safer alternative, you can use pasteurized eggs or even replace the egg yolk with 1 tablespoon of mayonnaise for a similar texture without the risk.

Homemade Garlic Aioli

Homemade Garlic Aioli

This Homemade Garlic Aioli is an easy and delicious way to elevate your dish with rich flavors.
Print Recipe Pin Recipe
Prep Time 10 minutes mins
Total Time 10 minutes mins
Servings: 4 servings
Course: Snacks & Appetizers
Cuisine: Mediterranean
Calories: 70
Ingredients Equipment Method Nutrition Notes

Ingredients
  

For the Aioli
  • 2 cloves garlic fresh garlic for robust flavor
  • 1/4 teaspoon kosher salt enhances overall taste
  • 1/2 cup extra virgin olive oil key to rich, creamy texture
  • 1 teaspoon fresh lemon juice adds bright, zesty note

Equipment

  • Mixing bowl
  • Whisk

Method
 

How to Make Homemade Garlic Aioli
  1. Wet a kitchen towel and wring it out until just damp. Shape it into a ring and nestle a medium bowl in the center.
  2. Finely grate the garlic into the bowl. Add the kosher salt and egg yolk, whisking briefly to combine.
  3. Begin whisking the egg yolk mixture briefly, then slowly add the olive oil a few drops at a time.
  4. Once all the oil is incorporated, whisk a few more times to finish the aioli and whisk in the fresh lemon juice.

Nutrition

Serving: 1tablespoonCalories: 70kcalCarbohydrates: 1gFat: 7gSaturated Fat: 1gMonounsaturated Fat: 6gSodium: 80mgPotassium: 20mgVitamin C: 1mg

Notes

Serve with fresh herbs for added flavor. Taste and adjust salt or lemon juice as needed.

Tried this recipe?

Let us know how it was!

Filed Under: SNACKS & APPETIZERS

  • « Previous Page
  • 1
  • …
  • 13
  • 14
  • 15
  • 16
  • 17
  • …
  • 37
  • Next Page »

Recent Posts

  • One Pot Cheesy Pasta
  • Steak with Mushroom Sauce
  • St. Patrick’s Day Puppy Chow
  • Salmon with Lemon Butter
  • St. Patrick’s Day Puppy Chow

Recent Comments

No comments to show.

Footer

  • Contact
  • Privacy Policy
  • About Us
  • Terms
  • ↑ back to top

Copyright © 2024 www.Forkono.com

Table Of Content