Forkono

  • BREAKFAST & BRUNCH
  • DESSERT RECIPES
  • DINNER RECIPES
  • LUNCH RECIPES
  • About uS
  • SNACKS & APPETIZERS
menu icon
go to homepage
  • BREAKFAST & BRUNCH
  • DESSERT RECIPES
  • DINNER RECIPES
  • LUNCH RECIPES
  • About uS
  • SNACKS & APPETIZERS
search icon
Homepage link
  • BREAKFAST & BRUNCH
  • DESSERT RECIPES
  • DINNER RECIPES
  • LUNCH RECIPES
  • About uS
  • SNACKS & APPETIZERS
×

Smash Burger Bowl

February 7, 2026 by JudyWhite Leave a Comment

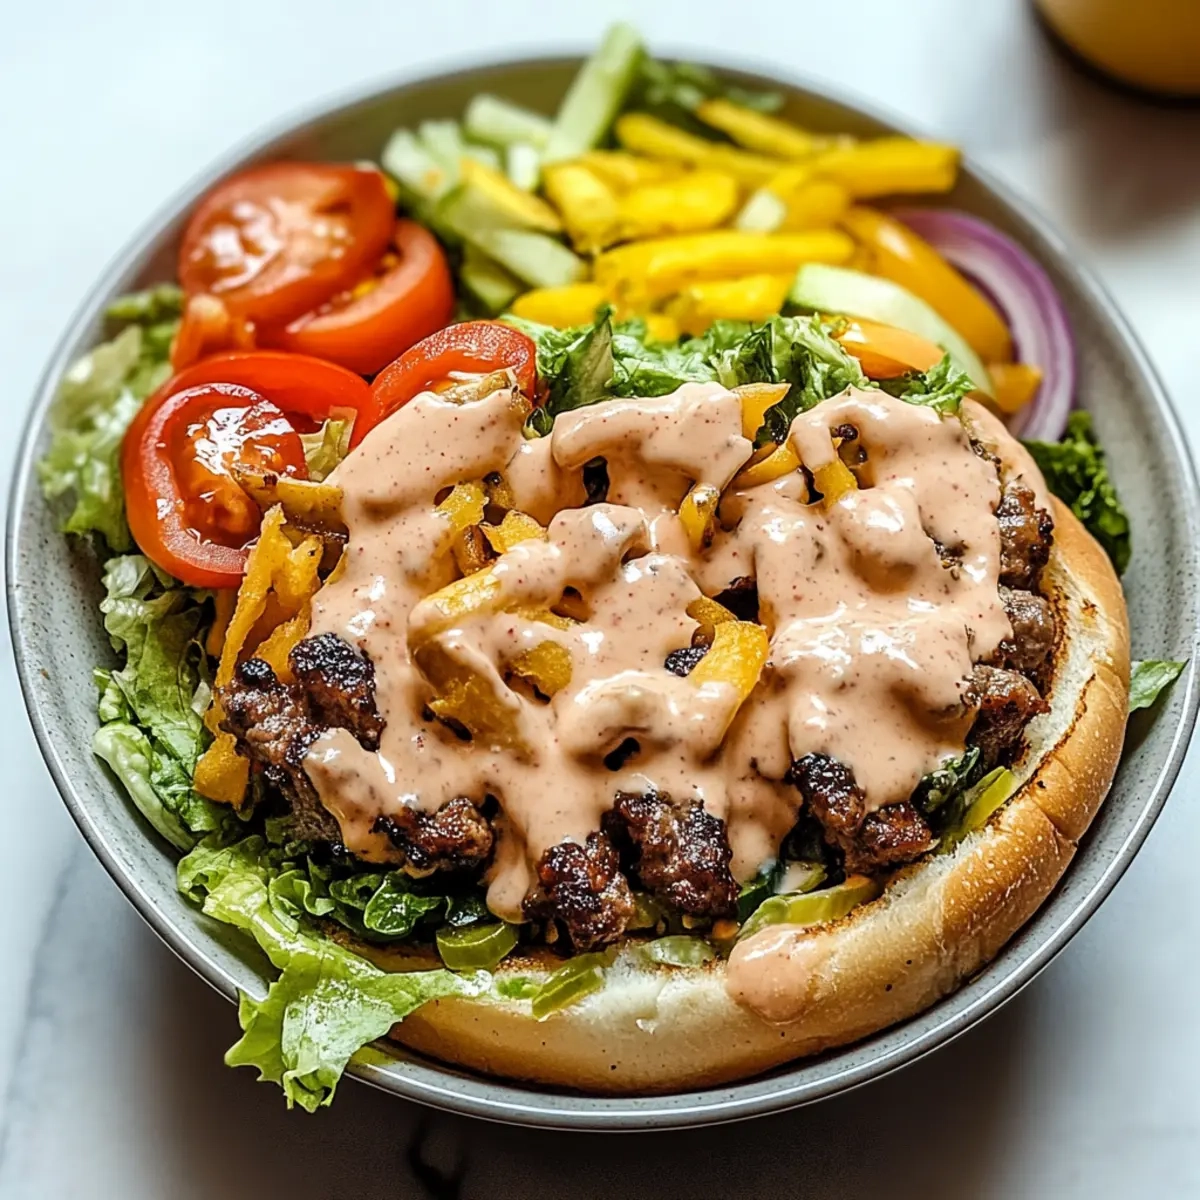
There’s something undeniably satisfying about a fresh meal that combines the flavors of a classic burger while offering a refreshing twist. Picture this: after a long day, I found myself yearning for the comfort of a juicy burger but wanted something lighter and healthier. Enter the Smash Burger Bowl! This recipe is the best of both worlds, combining all the components of a delicious smash burger in a vibrant bowl of greens, tomatoes, and pickles.

What excites me most about this dish isn’t just how easy it is to whip up in 20 minutes, but how it brings everyone to the table. Whether you’re feeding the family or hosting friends, this Smash Burger Bowl is sure to impress with its lively flavors and tempting textures. So grab that ground beef, and let’s transform your next meal into a fun and nutritious feast that is miles away from the fast food drive-thru!

Why You'll Love This Smash Burger Bowl

  • This Smash Burger Bowl is incredibly easy to prepare, allowing you to enjoy a delicious meal in just 20 minutes.
  • The combination of flavors is simply mouthwatering, bringing together the classic taste of a burger with fresh ingredients.
  • Its versatility means you can customize it to fit everyone’s preferences, making it a perfect option for family dinners or gatherings with friends.
  • The vibrant presentation adds visual appeal that makes mealtime feel special, ensuring it is not only tasty but also a feast for the eyes.

Smash Burger Bowl Ingredients

• Elevate your meal with fresh components!

For the Bowl

  • Ground beef (20% fat) – This fat content ensures juicy, flavorful patties that embody the essence of a classic smash burger.
  • Romaine lettuce, chopped – Adds a crunchy base and fresh green goodness to your bowl.
  • Cherry tomatoes, halved – Sweet bursts of flavor that complement the savory beef perfectly.
  • Dill pickles, sliced – A zesty touch that elevates the taste experience with every bite.
  • Onions, grilled or raw – Choose grilled for sweetness or raw for a sharp bite, depending on your preference.

For the Condiments

  • Ketchup – A classic choice that adds a touch of sweetness to balance the savory flavors.
  • Mustard – Brings out the richness of the beef, creating a delightful tanginess to your Smash Burger Bowl.

How to Make a Smash Burger Bowl

  1. Preheat your large skillet over medium-high heat, allowing it to get hot and ready for that sizzle! This ensures a perfectly browned and flavorful crust on your beef patties.

  2. Form the ground beef into 8 small balls, about 2 oz each. This size allows for even cooking and makes the smash process super easy and fun!

  3. Place the beef balls in the skillet and flatten them gently with a spatula. Give them a good press to create that iconic smash burger shape, which helps develop a beautiful crust.

  4. Season with salt and pepper, then cook for about 3 minutes until a delicious crust forms. This is when the magic happens, and the savory aroma fills your kitchen!

  5. Flip the patties and add the onions on top. Cook for an additional 2 minutes until nicely browned. The onions will soak up the flavor from the beef, adding a delightful sweetness.

  6. Assemble the Smash Burger Bowl by layering the chopped lettuce, cooked patties, tomatoes, and pickles in a bowl. Finally, drizzle with ketchup and mustard for that tangy finish!

Optional: Garnish with fresh herbs for an extra pop of color and flavor.

Exact quantities are listed in the recipe card below.

What to Serve with Smash Burger Bowl?

Bring the family together with vibrant sides and delightful beverages that perfectly complement each bite of this flavorful dish.

  • Crispy Sweet Potato Fries: These add a sweet contrast and satisfying crunch, making your meal feel like a special treat.
  • Creamy Coleslaw: The tangy and creamy flavors balance the savory elements in the burger bowl beautifully while adding a delightful crunch.
  • Garlic Butter Corn on the Cob: Sweet, juicy corn slathered in garlic butter brings an irresistible summery vibe to your meal.
  • Refreshing Cucumber Salad: A light and crisp salad with a zingy dressing offers a refreshing contrast that helps cleanse the palate.
  • Classic Potato Salad: This comforting side is creamy and rich, giving a delightful, nostalgic twist that pairs wonderfully with your meal.
  • Bubbly Sparkling Lemonade: A fizzy drink to brighten up your dinner, its citrusy flavor complements the savory notes while offering a refreshing contrast.
  • Decadent Brownies: End on a sweet note with rich, fudgy brownies that spoil you after a savory feast, creating the perfect finish.

Smash Burger Bowl Variations

Feel free to get creative with this recipe and tailor it to your preferences for an even more delightful experience!

  • Turkey: Swap the ground beef for lean ground turkey for a lighter option that still holds onto those savory flavors. Turkey works beautifully when seasoned well to keep it juicy.

  • Veggie: Use black bean patties or lentils for a hearty plant-based version. You can even add spices like cumin and paprika for an extra flavor kick.

  • Spicy: Add a dash of cayenne pepper or your favorite hot sauce to the beef mixture to give your smash burger bowl a little heat. This twist will definitely make your taste buds tingle!

  • Cheesy: Top your patties with cheese during the last minute of cooking for a gooey, melty addition. Cheddar, American, or even blue cheese can take this bowl to a whole new level.

  • Crunchy: Incorporate crispy fried onions or croutons on top for an added layer of delightful crunch. This brings a fantastic texture that contrasts beautifully with the soft toppings.

  • Herb-Infused: Mix fresh herbs like parsley, cilantro, or basil into the beef before cooking for an aromatic twist. The fresher, the better, as they add brightness to the dish.

  • Grilled Veggies: Toss some grilled bell peppers or zucchini into your bowl for added flavor and nutrition. The smoky flavor pairs well with the savory beef, creating a medley of tastes.

  • Sweet-Pickled: Try using pickled jalapeños or sweet pickles for a different tangy bite. This variation adds layers of flavor that truly elevate the whole dish.

The beauty of the Smash Burger Bowl lies in its adaptability; mix and match these variations to create your perfect bowl!

How to Store and Freeze Smash Burger Bowl

Fridge: Keep your assembled Smash Burger Bowl in an airtight container for up to 3 days. The lettuce will soften, so consider storing the ingredients separately for optimal freshness.

Freezer: You can freeze the cooked ground beef patties for up to 3 months. Allow them to cool completely, then wrap tightly in plastic wrap and place in a freezer-safe bag.

Reheating: Thaw patties in the fridge overnight before reheating. Use a skillet over medium heat or microwave for a quick warm-up; serve with fresh ingredients for the best flavor.

Assembly Tips: If you have leftovers, store the components separately. This way, you can recreate that delightful Smash Burger Bowl experience throughout the week!

Make Ahead Options

These Smash Burger Bowls are ideal for meal prep enthusiasts! You can prepare the chopped romaine lettuce, halved cherry tomatoes, and sliced dill pickles up to 3 days in advance, storing them in airtight containers to keep them fresh and crisp. The ground beef patties can also be formed into balls and refrigerated for up to 24 hours, which saves time on busy weeknights. When you’re ready to serve, simply cook the patties as instructed and assemble the bowls with your prepped ingredients. This approach ensures that your Smash Burger Bowl retains its delicious flavors and textures while giving you that well-deserved time back in your week!

Chef's Helpful Tips

  • Use ground beef with 20% fat for juicy and flavorful patties in your Smash Burger Bowl.
  • Avoid overcrowding the skillet by cooking the beef balls in batches if necessary to ensure a proper sear.
  • When flattening the beef balls, apply firm, even pressure to create the optimal crust for enhanced flavor.
  • Keep an eye on cooking times and aim for about 3 minutes per side for the perfect doneness, adjusting as needed for your preferred level of doneness.

Smash Burger Bowl Recipe FAQs

What kind of ground beef should I use for the Smash Burger Bowl?
Absolutely! I recommend using ground beef with about 20% fat. This fat content ensures that your patties remain juicy and flavorful, which is essential for an authentic burger experience.

How should I store leftover Smash Burger Bowls?
Store your assembled Smash Burger Bowl in an airtight container in the fridge for up to 3 days. However, to maintain the freshness of the toppings, consider keeping the ingredients—like lettuce and tomatoes—stored separately and adding them just before serving.

Can I freeze the components of a Smash Burger Bowl?
Yes, you can! I like to freeze the cooked beef patties. Allow them to cool completely, then wrap them tightly in plastic wrap and place them in a freezer-safe bag. They can last up to 3 months in the freezer. For best results, thaw the patties overnight in the fridge before reheating.

What can I do if my burger patties are sticking to the skillet?
If your patties are sticking, it might be that your skillet isn’t hot enough. Ensure you preheat your skillet properly. A good trick is to test it by sprinkling a few drops of water on the surface; they should sizzle and evaporate almost immediately. Also, give the patties some time to form that delicious crust before you try to flip them.

Are there any dietary considerations for the Smash Burger Bowl?
The Smash Burger Bowl is quite versatile! If you’re cooking for someone with allergies, you can easily substitute the beef with turkey or a meat alternative like lentils or veggie patties. For a low-carb version, use lettuce wraps instead of traditional hamburger buns. Always check your condiments for any gluten, dairy, or nut content if allergens are a concern.

Smash Burger Bowl

Smash Burger Bowl

The Smash Burger Bowl combines the flavors of a classic burger in a refreshing, vibrant bowl with greens, tomatoes, and pickles.
Print Recipe Pin Recipe
Prep Time 10 minutes mins
Cook Time 10 minutes mins
Total Time 20 minutes mins
Servings: 4 bowls
Course: DINNER RECIPES
Cuisine: American
Calories: 450
Ingredients Equipment Method Nutrition Notes

Ingredients
  

For the Bowl
  • 1 lb Ground beef (20% fat) This fat content ensures juicy, flavorful patties.
  • 4 cups Romaine lettuce, chopped Adds a crunchy base.
  • 1 cup Cherry tomatoes, halved Sweet bursts of flavor.
  • 1 cup Dill pickles, sliced A zesty touch.
  • 1 cup Onions, grilled or raw Choose grilled for sweetness or raw for a sharp bite.
For the Condiments
  • 1/4 cup Ketchup Adds sweetness.
  • 2 tbsp Mustard Brings out the richness of the beef.

Equipment

  • Large skillet

Method
 

How to Make a Smash Burger Bowl
  1. Preheat your large skillet over medium-high heat.
  2. Form the ground beef into 8 small balls, about 2 oz each.
  3. Place the beef balls in the skillet and flatten them gently with a spatula.
  4. Season with salt and pepper, then cook for about 3 minutes until a crust forms.
  5. Flip the patties and add the onions on top. Cook for an additional 2 minutes.
  6. Assemble the Smash Burger Bowl by layering the chopped lettuce, cooked patties, tomatoes, and pickles, then drizzle with ketchup and mustard.

Nutrition

Serving: 1bowlCalories: 450kcalCarbohydrates: 15gProtein: 30gFat: 30gSaturated Fat: 12gPolyunsaturated Fat: 2gMonounsaturated Fat: 14gCholesterol: 90mgSodium: 600mgPotassium: 800mgFiber: 4gSugar: 4gVitamin A: 200IUVitamin C: 15mgCalcium: 80mgIron: 3mg

Notes

Use ground beef with 20% fat for juicy patties. For best flavor, store components separately if you have leftovers.

Tried this recipe?

Let us know how it was!

Filed Under: DINNER RECIPES

Cottage Cheese Egg Salad

February 7, 2026 by JudyWhite Leave a Comment

The first bite of this Cottage Cheese Egg Salad transports me to sunny picnics and laid-back brunches with friends. The creamy texture of cottage cheese blends beautifully with hard-boiled eggs, creating a delightful salad that’s both nutritious and satisfying. I found myself craving something fresh and flavorful—something that would elevate my lunch from a simple sandwich to a culinary delight.

After a busy week of cooking and catering to everyone else’s cravings, this dish was a refreshing twist that came together with minimal effort. As the chives add a fresh bite and the Dijon mustard gives it a zing, it quickly became a favorite in my kitchen. Whether you’re looking for a light meal to enjoy on its own, as a sandwich filling, or served atop a bed of greens, this salad is a versatile way to enjoy wholesome ingredients without sacrificing flavor. Join me as I share this easy, crowd-pleasing recipe that’s sure to liven up your lunch routine!

Why You'll Love This Cottage Cheese Egg Salad

  • This Cottage Cheese Egg Salad is incredibly easy to make, saving you time in the kitchen while delivering delicious results.
  • Its creamy texture and flavorful ingredients create a taste sensation that will have everyone asking for seconds.
  • This recipe is versatile enough to be served on its own, as a tasty sandwich filling, or on a bed of fresh greens, making it perfect for any meal.
  • With its vibrant colors and inviting presentation, this salad is sure to impress at your next gathering.
  • Enjoy the nutritious benefits without compromising on flavor and bring a delightful dish to your table.

Cottage Cheese Egg Salad Ingredients

• Here’s everything you need for this delicious dish!

For the Salad
• Hard-boiled eggs – A protein powerhouse, they add heartiness to the salad.
• Cottage cheese – Provides a creamy base while being low in fat and high in protein.
• Mayonnaise – Adds a rich creaminess; you can use Greek yogurt as a healthier alternative.
• Dijon mustard – Offers a zesty kick that elevates the flavor profile beautifully.
• Fresh chives – Their mild onion flavor brightens the salad and adds a pop of color.
• Salt and pepper – Essential for enhancing all the wonderful flavors in this cottage cheese egg salad.

Feel free to get creative with the ingredients or add your favorite spices for an extra flavor twist!

How to Make Cottage Cheese Egg Salad

  1. Boil the eggs: Place your 6 eggs in a pot, cover them with water, and bring to a rolling boil. Once bubbling, cover the pot and turn off the heat; let them sit for 12 minutes before transferring to an ice bath for cooling.

  2. Mix the base: In a large mixing bowl, combine 1 cup of cottage cheese, 2 tablespoons of mayonnaise, and 1 teaspoon of Dijon mustard. Stir until the mixture is smooth and creamy, creating a delicious base for your salad.

  3. Chop the eggs: After your eggs have cooled, carefully peel them and chop them into bite-sized pieces. Fold the chopped eggs into your creamy mixture, adding salt and pepper to taste for personalized seasoning.

  4. Add chives: Gently fold in 2 tablespoons of finely chopped fresh chives until they are evenly distributed throughout the salad, bringing a fresh and vibrant flavor to every bite.

  5. Chill: Cover your bowl with plastic wrap and refrigerate for at least 30 minutes. This step allows the flavors to meld beautifully, enhancing the taste before serving.

  6. Serve: Spoon your delightful Cottage Cheese Egg Salad over fresh greens or use it as a flavorful sandwich filling. Enjoy the light and refreshing flavors at any time of day.

Optional: Serve with a sprinkle of paprika for an extra burst of color and flavor.
Exact quantities are listed in the recipe card below.

Cottage Cheese Egg Salad Variations

Get ready to embrace creativity in your kitchen with these exciting twists on a classic favorite!

  • Herbed Delight: Add your favorite fresh herbs like dill or parsley for an aromatic flavor boost that brightens each bite. They’ll infuse the salad with an inviting fragrance.

  • Spicy Kick: Mix in a dash of hot sauce or finely chopped jalapeños for a delightful zing that brings warmth and excitement to your Cottage Cheese Egg Salad!

  • Avocado Creaminess: Swap out some cottage cheese for avocado to add a rich and buttery texture while keeping the flavors light and fresh. This twist offers heart-healthy fats that make every spoonful satisfying.

  • Crunchy Contrast: Fold in diced celery or crunchy bell peppers for an extra layer of texture. This addition not only enhances the salad but also adds a colorful pop that makes it visually appealing.

  • Cheesy Goodness: Stir in crumbled feta or shredded cheddar cheese for a creamy, tangy layer that elevates the taste experience. The cheese brings a lovely richness to the overall flavor profile.

  • Nutty Flavor: Toss in some chopped walnuts or almonds for a nutty crunch that adds depth and richness to your salad. The contrasting textures create a delightful mouthfeel that you’ll love.

  • Fruit Fusion: Add diced apples or grapes for a sweet twist that balances out the savory elements. This surprising combination makes for a refreshing summer dish that sings with vibrancy.

  • Eggless Option: For a vegan-friendly version, substitute eggs with chickpeas for the same protein punch and use a plant-based yogurt instead of cottage cheese. This alternative makes for a deliciously creamy salad that’s completely guilt-free!

Make Ahead Options

These Cottage Cheese Egg Salad preparations are perfect for busy cooks looking to save time during the week! You can boil and chop your hard-boiled eggs and prepare the creamy base (cottage cheese, mayonnaise, and Dijon mustard) up to 24 hours in advance, storing them separately in airtight containers in the refrigerator to maintain freshness. To ensure the salad’s delightful texture, mix the chopped eggs and fresh chives with the base only right before serving. This way, you’ll enjoy the salad just as delicious as when freshly made, with flavors that meld wonderfully after a quick chill. Enjoy a quick, nutritious lunch or snack without the last-minute rush!

What to Serve with Cottage Cheese Egg Salad?

Elevate your meal with delightful sides that balance the creamy and zesty flavors of this egg salad.

  • Crispy Green Salad: Fresh, crunchy greens topped with a light vinaigrette add a refreshing contrast to the creamy texture of the salad.
  • Whole Grain Bread: This nutty bread brings a wholesome touch and makes the perfect base for a sandwich, enhancing your lunch experience.
  • Avocado Slices: Creamy avocado enhances the richness while providing healthy fats and a boost of flavor; it pairs beautifully for a fulfilling meal.
  • Chilled Gazpacho: A vibrant and tangy cold soup refreshes the palate and complements the richness of the egg salad; perfect for a sunny day.
  • Sweet Potato Wedges: Oven-roasted with a sprinkle of salt, their sweetness complements the savory notes of the salad, making every bite delightful.
  • Herbed Quinoa: This fluffy, protein-packed grain is perfect for adding texture and an earthiness that harmonizes with the fresh chives in your dish.
  • Sparkling Lemonade: A refreshing, zesty drink that cleanses the palate between bites; its citrus notes heighten the flavors of the salad beautifully.
  • Fruit Salad: A blend of seasonal fruits provides a sweet and juicy counterpart that adds a burst of color and flavor to your meal.
  • Chocolate Chip Cookies: For dessert, these classic treats add a comforting sweetness to round off your meal, reminding everyone of home-baked love.

How to Store and Freeze Cottage Cheese Egg Salad

Fridge: Store your Cottage Cheese Egg Salad in an airtight container in the refrigerator for up to 3 days. This ensures it stays fresh and flavorful!

Freezer: While it’s best to enjoy this salad fresh, you can freeze it for up to 2 months. Be aware that the texture may change upon thawing, so consider freezing only if necessary.

Reheating: If you enjoy warm dishes, gently reheat your salad in a microwave for 15-20 seconds to soften. However, it’s often best served chilled for maximum enjoyment.

Chef's Helpful Tips

  • Ensure your hard-boiled eggs are perfectly cooked by starting them in cold water and bringing it to a boil before turning off the heat for 12 minutes.
  • For a creamier texture in your Cottage Cheese Egg Salad, try using full-fat cottage cheese instead of low-fat options.
  • When chopping the eggs, aim for uniform pieces to ensure they mix evenly with the other ingredients and provide a consistent taste in every bite.
  • Remember to chill the salad for at least 30 minutes to let the flavors meld together for an enhanced taste experience.

Cottage Cheese Egg Salad Recipe FAQs

What kind of eggs should I use for this Cottage Cheese Egg Salad?
Absolutely! For the best results, use fresh large eggs. Look for eggs with smooth, unblemished shells, and avoid any with dark spots or cracks. Organic or free-range eggs are great choices, as they often have richer flavors.

How long can I store Cottage Cheese Egg Salad in the fridge?
You can store your Cottage Cheese Egg Salad in an airtight container in the refrigerator for up to 3 days. Make sure it is well-sealed to keep the flavors locked in and prevent it from absorbing any odors from the fridge.

Can I freeze Cottage Cheese Egg Salad?
Very! While freezing is possible, the texture may alter slightly upon thawing. To freeze, place the salad in an airtight container, leaving some space for expansion, and store it for up to 2 months. When ready to enjoy, thaw in the refrigerator overnight and stir gently before serving.

What should I do if the eggs are not peeling easily?
If your hard-boiled eggs are sticking to the shells, try using older eggs instead of fresh ones, as they tend to peel more easily. An ice bath helps too—after boiling, submerge the eggs in ice water for at least 10 minutes. This process contracts the egg, making it easier to remove the shell.

Are there any dietary considerations for this recipe?
Absolutely! This Cottage Cheese Egg Salad is a fantastic source of protein, but if you have lactose intolerance or a dairy allergy, you can substitute cottage cheese with a dairy-free version. Additionally, for those watching their sodium intake, consider using low-sodium mayonnaise or Greek yogurt. It’s versatile and can be tailored to different dietary needs!

Can I add other ingredients to my Cottage Cheese Egg Salad?
I often make this salad with added ingredients like diced celery for crunch or a dash of smoked paprika for extra flavor! Feel free to experiment with herbs or spices that you love, such as dill or parsley, to create your perfect version!

Cottage Cheese Egg Salad

Cottage Cheese Egg Salad

This Cottage Cheese Egg Salad is a refreshing, nutritious dish perfect for brunch or lunch.
Print Recipe Pin Recipe
Prep Time 15 minutes mins
Cook Time 12 minutes mins
Chill Time 30 minutes mins
Total Time 57 minutes mins
Servings: 4 servings
Course: LUNCH RECIPES
Calories: 200
Ingredients Equipment Method Nutrition Notes

Ingredients
  

For the Salad
  • 6 eggs Hard-boiled eggs Protein powerhouse
  • 1 cup Cottage cheese Creamy base, low in fat
  • 2 tablespoons Mayonnaise Adds richness, Greek yogurt can be used
  • 1 teaspoon Dijon mustard Zesty kick
  • 2 tablespoons Fresh chives Mild onion flavor
  • to taste Salt
  • to taste Pepper

Equipment

  • Pot
  • Mixing bowl
  • plastic wrap
  • Knife
  • Cutting Board

Method
 

Steps to Make
  1. Boil the eggs: Place your 6 eggs in a pot, cover them with water, and bring to a rolling boil. Once bubbling, cover the pot and turn off the heat; let them sit for 12 minutes before transferring to an ice bath for cooling.
  2. Mix the base: In a large mixing bowl, combine 1 cup of cottage cheese, 2 tablespoons of mayonnaise, and 1 teaspoon of Dijon mustard. Stir until smooth.
  3. Chop the eggs: After cooling, peel and chop the eggs into bite-sized pieces. Fold them into the mixture, adding salt and pepper to taste.
  4. Add chives: Fold in 2 tablespoons of finely chopped fresh chives evenly throughout the salad.
  5. Chill: Cover with plastic wrap and refrigerate for at least 30 minutes.
  6. Serve: Enjoy over fresh greens or as a sandwich filling.

Nutrition

Serving: 1servingCalories: 200kcalCarbohydrates: 5gProtein: 14gFat: 15gSaturated Fat: 3gPolyunsaturated Fat: 1gMonounsaturated Fat: 1gCholesterol: 186mgSodium: 350mgPotassium: 300mgSugar: 3gVitamin A: 400IUVitamin C: 1mgCalcium: 150mgIron: 1mg

Notes

For a creamier texture, use full-fat cottage cheese. Chill for better flavor melding.

Tried this recipe?

Let us know how it was!

Filed Under: LUNCH RECIPES

Stuffed Bell Peppers

February 7, 2026 by JudyWhite Leave a Comment

There’s a certain joy that comes from filling a vibrant bell pepper with deliciousness, transforming a simple vegetable into a hearty meal. I still remember the first time I decided to swap fast food for something homemade—a choice that led me to the colorful world of stuffed bell peppers. Imagine biting into a tender pepper, its insides bursting with savory ground turkey, zesty tomatoes, and a touch of melted cheese. It’s like a cozy hug on a plate!

This recipe is perfect for those evenings when you crave something wholesome yet effortless. With just 15 minutes of prep and about 40 minutes in the oven, you’ll have a colorful feast ready to impress your family or guests. Plus, the versatility of this dish allows you to customize the filling according to what’s in your pantry, making it a winner for both meal planning and last-minute dinners. So, let’s dive into the delightful world of stuffed bell peppers that are as pleasing to the eye as they are to the palate!

Why You'll Love This Stuffed Bell Peppers

  • This recipe is incredibly easy to make, with just 15 minutes of prep time, making it perfect for busy weeknights.
  • The flavors meld beautifully, creating a satisfying meal that your taste buds will adore.
  • Stuffed bell peppers are highly versatile, allowing you to mix and match ingredients based on your preferences or what you have on hand.
  • Not only do these peppers look stunning on the plate, but they also make for a great presentation at dinner parties or family gatherings.

Stuffed Bell Peppers Ingredients

Get ready to create a dish that’s colorful, hearty, and simply delicious!

For the Peppers
• 4 large bell peppers – Choose a mix of red, yellow, or green for a vibrant presentation.

For the Filling
• 1 cup cooked quinoa or rice – This acts as a great base; use quinoa for added protein!
• 1 lb ground turkey or lean beef – Opt for turkey for a leaner choice; it keeps the filling moist.
• 1 cup diced tomatoes – Canned or fresh, they add juicy flavor and a beautiful color to the mix.
• 1 medium onion, chopped – This brings sweetness; sauté until translucent for the best flavor.
• 2 cloves garlic, minced – Fresh garlic infuses the filling with aromatic goodness.
• 1 tsp olive oil – Essential for sautéing; it helps to bring all the flavors together.
• Salt and pepper to taste – Season the filling to enhance all the ingredients.

For Topping
• 1 cup shredded mozzarella or cheddar cheese – This adds a melty, cheesy topping; choose your favorite!
• Fresh herbs (parsley or cilantro) – Sprinkle on top for a pop of freshness before serving.

Dive into this incredible stuffed bell peppers recipe; it’s a delightful way to fill your dinner table with warmth and flavor!

How to Make Stuffed Bell Peppers

  1. Preheat your oven to 375°F (190°C). This initial step ensures that your peppers cook evenly and beautifully.

  2. Prepare the bell peppers by slicing the tops off and removing the seeds. If needed, trim the bottoms slightly to make them stand upright in the dish.

  3. Sauté the onion and garlic in a skillet over medium heat with olive oil until they’re translucent and fragrant. This usually takes about 3-4 minutes.

  4. Add the ground turkey or lean beef to the skillet. Cook it until it’s nicely browned, stirring occasionally to break it apart; this should take about 6-8 minutes.

  5. Combine the cooked quinoa or rice, diced tomatoes, salt, and pepper with the meat mixture. Stir well until everything is fully mixed and heated through.

  6. Stuff each bell pepper generously with the filling mixture, packing it in nicely, and place them upright in a baking dish.

  7. Cover the dish with foil and bake in the preheated oven for 30 minutes. Remove the foil during the last 10 minutes so the cheese can melt and become bubbly.

  8. Garnish with fresh herbs like parsley or cilantro right before serving to add a burst of color and flavor!

Optional: Sprinkle with additional cheese and broil for 2-3 minutes for an extra crispy topping.

Exact quantities are listed in the recipe card below.

Stuffed Bell Peppers Variations

Feel free to get creative with your stuffed bell peppers and make them even more delectable!

  • Vegan Substitute: Use lentils or black beans in place of meat for a hearty, plant-based filling. This twist adds a delightful earthiness.

  • Spice It Up: Add diced jalapeños or red pepper flakes to the filling for a fiery kick that will excite your taste buds.

  • Cheesy Delight: Swap mozzarella for pepper jack cheese for a spicy, melty topping that enhances flavor and adds creaminess.

  • Sweet Twist: Incorporate diced pineapple or raisins into the filling for a sweet contrast that beautifully balances savory ingredients.

  • Herbaceous Freshness: Mix in fresh basil or oregano with your filling for an aromatic addition that elevates the overall dish.

  • Nutty Crunch: Stir in chopped nuts, like walnuts or almonds, for extra texture and a satisfying crunch in every bite.

  • Mediterranean Flair: Add feta cheese, olives, and sun-dried tomatoes to create a Mediterranean-inspired version that transports you to sunny shores.

  • Rice Variations: Experiment with flavored rice—such as Cajun or cilantro-lime rice—to give a unique twist to your filling that reflects your mood.

With these variations, you’ll keep your stuffed bell peppers exciting and fresh every time you make them!

How to Store and Freeze Stuffed Bell Peppers

Fridge: Keep leftover stuffed bell peppers in an airtight container for up to 3 days. Reheat in the microwave for a warm and satisfying meal.

Freezer: You can freeze stuffed bell peppers for up to 3 months. Wrap them tightly in plastic wrap and place in a freezer-safe bag for optimal freshness.

Reheating: When ready to enjoy, thaw overnight in the fridge. Reheat in the oven at 350°F (175°C) for about 20-30 minutes until heated through and cheese is bubbly.

Tip: Always ensure they are cooled completely before freezing to preserve texture and flavor in your stuffed bell peppers.

Make Ahead Options

These Stuffed Bell Peppers are a fantastic meal prep option for busy weeks! You can prepare the filling (ground turkey, quinoa, diced tomatoes, onion, and spices) up to 3 days in advance—simply store it in an airtight container in the refrigerator to keep it fresh. The bell peppers can be prepped by slicing the tops off and deseeding them 24 hours before cooking; this saves you a step when it’s time to bake. When you’re ready to serve, just stuff the peppers with the chilled filling, top with cheese, and bake as directed. This way, you can enjoy a hearty, homemade meal without the fuss of last-minute preparation, ensuring each bite is just as delicious as when freshly made!

What to Serve with Stuffed Bell Peppers?

Creating a vibrant spread around your stuffed bell peppers can elevate your meal from great to unforgettable!

  • Crispy Garlic Bread: This crunchy, buttery delight is perfect for soaking up any flavorful juices from the peppers. It’s a comforting side that pairs beautifully with the hearty filling.

  • Zesty Caesar Salad: With its crisp romaine and tangy dressing, this salad adds a refreshing contrast to the savory stuffed peppers. The crunchy croutons offer a delightful texture.

  • Roasted Vegetables: A colorful medley of seasonal vegetables enhances the dish. Their caramelized sweetness complements the flavors in the filling, creating a harmonious taste experience.

  • Traditional Coleslaw: This crunchy, tangy slaw introduces a delightful crunch that balances the softness of the bell peppers, making each bite even more enjoyable.

  • Creamy Polenta: Silky and rich, creamy polenta serves as a delightful bed for the peppers. Its subtle flavor allows the vibrant stuffing to shine.

  • Sparkling Lemonade: Refreshing and slightly tangy, a pitcher of sparkling lemonade keeps things light while perfectly cutting through the rich flavors of the stuffed peppers.

  • Chocolate Lava Cake: To end on a sweet note, this indulgent dessert brings warmth and decadence, making for a cozy finish to the meal. The contrast of flavors is simply divine!

These pairings create an inviting and balanced dinner experience that your family and friends will cherish. Enjoy the delightful culinary journey!

Chef's Helpful Tips

  • When making stuffed bell peppers, ensure you cut the tops off evenly and remove seeds thoroughly for the best texture and presentation.
  • To prevent the peppers from being too watery, consider using cooked quinoa instead of rice, as it absorbs flavors better.
  • Make sure to cook the ground turkey or beef completely until browned to avoid any raw taste in the filling.
  • Baking at 375°F for the recommended time allows for balanced cooking; remember to uncover during the last 10 minutes to achieve a golden, bubbly cheese topping.

Stuffed Bell Peppers Recipe FAQs

What should I look for when selecting bell peppers?
Choosing the right bell peppers can make a notable difference in your stuffed bell peppers. Look for peppers that are firm to the touch, bright in color, and free from dark spots or blemishes. The skin should be shiny and smooth, which indicates freshness. If you squeeze gently, they should feel solid without any softness.

How should I store leftover stuffed bell peppers?
Absolutely! After enjoying your meal, store leftover stuffed bell peppers in an airtight container in the fridge for up to 3 days. When you’re ready for a second serving, simply reheat them in the microwave or oven until they’re warmed through. I often prefer the oven method as it helps maintain the texture.

Can I freeze stuffed bell peppers?
Yes, you can! To freeze stuffed bell peppers, start by letting them cool completely. Then, wrap each pepper tightly in plastic wrap and place them in a freezer-safe bag. They can be kept in the freezer for up to 3 months. When you’re ready to eat, just thaw them overnight in the fridge and reheat in the oven at 350°F (175°C) for 20-30 minutes until heated all the way through.

What if my stuffed bell peppers are watery after baking?
Very! If your cooked stuffed bell peppers end up watery, it might be due to using too much liquid in your filling or not cooking the peppers enough before stuffing. To prevent this, make sure to drain any excess liquid from tomatoes or other ingredients. You can also bake them uncovered to allow steam to escape. If they still seem watery, consider adding breadcrumbs to the mixture as they can help absorb extra moisture.

Are there any dietary considerations for stuffed bell peppers?
Absolutely! If you or your loved ones have dietary restrictions, stuffed bell peppers can be adapted easily. For gluten-free options, ensure you use certified gluten-free grains like quinoa. If you’re catering to a vegetarian or vegan crowd, simply replace the ground turkey or beef with legumes like black beans or lentils, sautéing them with your onion and garlic for maximum flavor. Don’t forget to check for any allergies regarding specific ingredients!

How can I enhance the flavor of my stuffed bell peppers?
Adding a pinch of spices or seasoning, such as cumin or chili powder, can elevate the flavor profile of your stuffed bell peppers dramatically. You can also incorporate additional veggies like corn or diced zucchini into the filling for extra texture and taste. Mixing in some fresh herbs like basil or oregano right before serving can add a lovely fresh finish. Enjoy experimenting!

Stuffed Bell Peppers

Stuffed Bell Peppers

A vibrant and hearty dish made with bell peppers filled with savory ingredients, perfect for dinner.
Print Recipe Pin Recipe
Prep Time 15 minutes mins
Cook Time 40 minutes mins
Total Time 55 minutes mins
Servings: 4 peppers
Course: DINNER RECIPES
Cuisine: American
Calories: 300
Ingredients Equipment Method Nutrition Notes

Ingredients
  

For the Peppers
  • 4 large bell peppers Choose a mix of red, yellow, or green for a vibrant presentation.
For the Filling
  • 1 cup cooked quinoa or rice Quinoa for added protein.
  • 1 lb ground turkey or lean beef Opt for turkey for a leaner choice.
  • 1 cup diced tomatoes Canned or fresh for flavor.
  • 1 medium onion Chopped.
  • 2 cloves garlic Minced.
  • 1 tsp olive oil For sautéing.
  • salt and pepper To taste.
For Topping
  • 1 cup shredded mozzarella or cheddar cheese Choose your favorite.
  • Fresh herbs Such as parsley or cilantro.

Equipment

  • Skillet
  • Baking dish
  • Oven

Method
 

How to Make Stuffed Bell Peppers
  1. Preheat your oven to 375°F (190°C).
  2. Prepare the bell peppers by slicing the tops off and removing the seeds. If needed, trim the bottoms slightly.
  3. Sauté the onion and garlic in a skillet over medium heat with olive oil until they're translucent and fragrant.
  4. Add the ground turkey or lean beef to the skillet. Cook until browned, about 6-8 minutes.
  5. Combine the cooked quinoa or rice, diced tomatoes, salt, and pepper with the meat mixture. Stir well.
  6. Stuff each bell pepper generously with the filling mixture and place them upright in a baking dish.
  7. Cover the dish with foil and bake for 30 minutes. Remove foil during the last 10 minutes.
  8. Garnish with fresh herbs before serving.

Nutrition

Serving: 1pepperCalories: 300kcalCarbohydrates: 30gProtein: 25gFat: 12gSaturated Fat: 5gPolyunsaturated Fat: 2gMonounsaturated Fat: 3gCholesterol: 80mgSodium: 600mgPotassium: 600mgFiber: 5gSugar: 3gVitamin A: 30IUVitamin C: 150mgCalcium: 15mgIron: 10mg

Notes

To prevent the peppers from being too watery, consider using cooked quinoa instead of rice.

Tried this recipe?

Let us know how it was!

Filed Under: DINNER RECIPES

Coleslaw Dressing

February 7, 2026 by JudyWhite Leave a Comment

As the summer sun warms the backyard and the grill gets fired up, there’s one dish I can always count on to steal the show: coleslaw. But not just any coleslaw—it’s all about the dressing that brings it to life! The crunch of fresh cabbage mingling with a creamy, tangy coleslaw dressing transforms this simple side into a crowd-pleaser at picnics and potlucks. You know the moment when the first bite of that perfectly balanced dressing makes you close your eyes in culinary bliss? Oh, it’s heavenly!

I stumbled onto this delightful recipe during one of my weekend cooking experiments, and it quickly became my go-to solution for elevating everything from BBQs to taco nights. With just ten minutes of prep time, you can whip up a dressing that’s bursting with flavor and ready to impress your family and friends. Say goodbye to bland store-bought options; this homemade coleslaw dressing is about to take your meals to the next level! Ready to dive in? Let’s get mixing!

Why You'll Love This Coleslaw Dressing

  • This coleslaw dressing is incredibly easy to make, taking just ten minutes of prep time to create a flavor-packed addition to any meal.
  • Its creamy and tangy profile elevates simple ingredients like cabbage into a delicious and memorable side dish.
  • You can easily adjust the sweetness and tang to suit your taste, making it a versatile dressing perfect for various occasions.
  • Not only does it look vibrant and inviting, but it’s also a crowd-pleaser that will leave your guests raving about your culinary skills.

Coleslaw Dressing Ingredients

For the Dressing
• 1 cup mayonnaise – this creamy base gives your coleslaw dressing a rich and velvety texture.
• 2 tablespoons apple cider vinegar – adds a tangy kick that balances the richness of the mayo.
• 2 tablespoons granulated sugar – sweetens the dressing to enhance the overall flavor profile.
• 1 tablespoon Dijon mustard – infuses a subtle zing that complements the other ingredients beautifully.
• 1/2 teaspoon sea salt – use to taste; it helps to elevate all the flavors in the dressing.
• 1/4 teaspoon freshly ground black pepper – adds a hint of spice and warmth for depth.

Feel free to customize these ingredients for your perfect coleslaw dressing!

How to Make Coleslaw Dressing

  1. Whisk Together
    In a mixing bowl, whisk together 1 cup of mayonnaise, 2 tablespoons of apple cider vinegar, and 2 tablespoons of granulated sugar until smooth and creamy. This blend is the heart of your dressing!

  2. Add Flavorings
    Stir in 1 tablespoon of Dijon mustard, 1/2 teaspoon of sea salt, and 1/4 teaspoon of freshly ground black pepper. Whisk until everything is well combined and the flavors mingle beautifully.

  3. Taste and Adjust
    Take a moment to taste your dressing! If you need more sweetness or tang, feel free to adjust the seasoning until it’s just perfect for your palate.

  4. Chill and Meld
    Refrigerate the dressing for at least one hour before serving. This step allows all the delightful flavors to meld together, creating a deliciously harmonious sauce.

Optional: Serve with a sprinkle of fresh herbs for an extra burst of flavor!
Exact quantities are listed in the recipe card below.

What to Serve with Coleslaw Dressing?

Crafting a delightful meal means pairing your homemade coleslaw dressing with dishes that enhance its creamy, tangy profile perfectly.

  • Grilled Chicken: The smoky flavors of grilled chicken complement the bright notes of the coleslaw dressing, creating a refreshing balance. It’s a match made in backyard heaven!

  • BBQ Ribs: Rich, tender BBQ ribs soaked in sauce harmonize beautifully with the crispness of coleslaw dressed with your flavorful mixture. The contrast of textures is simply divine.

  • Fish Tacos: Light and flaky fish tacos topped with coleslaw add a crunchy contrast that brightens each bite. The freshness of the dressing elevates the dish while adding a splash of zest.

  • Pulled Pork Sandwiches: Juicy pulled pork paired with a generous scoop of coleslaw dressing provides a delicious creamy crunch that cuts through the richness, transforming an ordinary meal into sheer bliss.

  • Roasted Vegetables: Delight your senses with a side of roasted seasonal vegetables. Their earthy sweetness is beautifully enhanced by the tangy dressing, offering a delightful contrast in flavors.

  • Potato Salad: Creamy potato salad dressed with your coleslaw mix creates a unique twist that adds an extra layer of excitement to this classic dish. Perfect for potlucks!

  • Chilled Sparkling Water: For a refreshing drink, pair your meal with chilled sparkling water. Its effervescence enhances the flavors of the coleslaw dressing while cleansing the palate.

  • Fruit Salad: Finish with a light fruit salad of seasonal fruits. The sweetness of the fruits provides a delightful counterpoint to the dressing’s tangy notes, refreshing your taste buds.

  • Peach Cobbler: For dessert, a warm peach cobbler will round off your meal perfectly. The sweetness contrasts elegantly with the dressing’s sharpness, offering a delightful end to the feast!

Coleslaw Dressing Variations

Feel free to get creative and make this coleslaw dressing your own!

  • Greek Yogurt: Substitute mayonnaise with Greek yogurt for a lighter, tangy twist that packs a protein punch.

  • Vegan Option: Use a plant-based mayo to turn this dressing into a creamy and delicious vegan alternative, perfect for everyone at the table.

  • Spicy Kick: Add a teaspoon of hot sauce or a pinch of cayenne pepper for a zesty kick that enhances the dressing’s flavor.

  • Honey-Mustard: Swap granulated sugar for honey for a natural sweetness and a hint of mustard that brings an exciting depth.

  • Herbed Delight: Mix in fresh herbs such as dill or parsley to brighten the dressing and add a lovely garden flavor that complements the crunch of your coleslaw.

  • Citrus Zing: Incorporate the zest of a lemon or lime for a refreshing citrus hit that makes the dressing pop with vibrancy.

  • Nutty Flavor: Stir in a tablespoon of sesame oil for a nutty, aromatic twist that elevates the dressing into an Asian-inspired delight.

  • Creamy Avocado: Blend in half an avocado for a rich, creamy texture and healthy fats that make your coleslaw even more nutritious.

Make Ahead Options

This coleslaw dressing is a fantastic choice for busy home cooks looking to save time during meal prep! You can easily prepare the dressing up to 3 days in advance, allowing the flavors to develop beautifully while stored in an airtight container in the refrigerator. To do this, simply follow the recipe instructions up to the chilling step, then refrigerate the dressing. Just remember, for the best texture and taste, give it a good stir before serving. If you’re planning a potluck or BBQ, having this coleslaw dressing ready to go means you’ll have one less thing to worry about—and that’s a win for any hectic weeknight!

How to Store and Freeze Coleslaw Dressing

Fridge: Keep your coleslaw dressing in an airtight container for up to 1 week. This ensures it stays fresh and flavorsome for all your summer gatherings.

Freezer: While it’s best fresh, you can freeze coleslaw dressing for up to 2 months. Just thaw it in the fridge overnight before using, and give it a quick whisk to revive its creamy texture.

Reheating: If you’ve stored it in the fridge, simply give it a good stir before serving. If thawed, whisk well to combine any separated ingredients for a smooth consistency.

Extra Tip: Always check for freshness before use, and remember, a little adjusted seasoning may be necessary after freezing to bring back that delightful flavor of your homemade coleslaw dressing!

Chef's Helpful Tips

  • When preparing coleslaw dressing, always start by whisking your mayonnaise and vinegar until fully incorporated for a smooth result.
  • A common mistake is not tasting the dressing; be sure to adjust the seasoning before chilling to ensure the best flavor.
  • If you prefer a tangier dressing, feel free to increase the amount of apple cider vinegar gradually until you reach your desired taste.
  • Remember to refrigerate the dressing for at least one hour to allow the flavors to meld, making your coleslaw dressing even more delicious.

Coleslaw Dressing Recipe FAQs

What kind of mayonnaise should I use for coleslaw dressing?
Absolutely! Using a good-quality mayonnaise is key to achieving a creamy base. I recommend using either a traditional mayonnaise or a homemade version if you have the time; it adds a more personalized touch. Avoid light or low-fat mayo, as they can sometimes affect the texture and flavor.

How long can I store homemade coleslaw dressing?
You can keep your coleslaw dressing in an airtight container in the refrigerator for up to 1 week. Make sure to seal it tightly to prevent it from absorbing any odors from other foods. Enjoy it on salads, sandwiches, or with your favorite grilled dishes!

Can I freeze coleslaw dressing, and how should I do it?
Yes, you can freeze coleslaw dressing for up to 2 months! To freeze, simply pour it into an airtight container or a freezer-safe zip-top bag. When you’re ready to use it, thaw it overnight in the refrigerator. After thawing, whisk the dressing well to re-emulsify any ingredients that may have separated, and it should be good as new!

What should I do if my dressing turns out too tangy?
If you find your coleslaw dressing too tangy, don’t fret! Start by adding a tiny bit more sugar—about a teaspoon at a time—until you reach the desired sweetness. You can also balance the tanginess with a little more mayonnaise to restore creaminess. Remember, tasting along the way is crucial!

Is this coleslaw dressing safe for people with allergies?
Great question! This dressing contains mayonnaise, which may contain eggs; thus, it’s important to check the label if you’re unsure. If you or your guests have allergies, consider using vegan mayo as a substitute. For another crowd-friendly option, I often recommend keeping some simple oil and vinegar dressing handy for those with dietary restrictions.

Coleslaw Dressing

Coleslaw Dressing

This homemade coleslaw dressing is creamy, tangy, and takes just 10 minutes to prepare. Perfect for summer gatherings and elevating your meals.
Print Recipe Pin Recipe
Prep Time 10 minutes mins
Chill Time 1 hour hr
Total Time 1 hour hr 10 minutes mins
Servings: 8 servings
Course: Snacks & Appetizers
Calories: 100
Ingredients Equipment Method Nutrition Notes

Ingredients
  

For the Dressing
  • 1 cup mayonnaise this creamy base gives your coleslaw dressing a rich and velvety texture.
  • 2 tablespoons apple cider vinegar adds a tangy kick that balances the richness of the mayo.
  • 2 tablespoons granulated sugar sweetens the dressing to enhance the overall flavor profile.
  • 1 tablespoon Dijon mustard infuses a subtle zing that complements the other ingredients beautifully.
  • 1/2 teaspoon sea salt use to taste; it helps to elevate all the flavors in the dressing.
  • 1/4 teaspoon freshly ground black pepper adds a hint of spice and warmth for depth.

Equipment

  • Mixing bowl
  • Whisk

Method
 

How to Make Coleslaw Dressing
  1. In a mixing bowl, whisk together 1 cup of mayonnaise, 2 tablespoons of apple cider vinegar, and 2 tablespoons of granulated sugar until smooth and creamy.
  2. Stir in 1 tablespoon of Dijon mustard, 1/2 teaspoon of sea salt, and 1/4 teaspoon of freshly ground black pepper. Whisk until everything is well combined.
  3. Taste your dressing and adjust sweetness or tang as needed.
  4. Refrigerate the dressing for at least one hour before serving.

Nutrition

Serving: 2tablespoonsCalories: 100kcalCarbohydrates: 2gFat: 10gSaturated Fat: 1gPolyunsaturated Fat: 0.5gMonounsaturated Fat: 8gCholesterol: 5mgSodium: 150mgPotassium: 10mgSugar: 1gVitamin A: 100IUVitamin C: 1mgCalcium: 10mg

Notes

Feel free to customize the ingredients to your taste. Always check for freshness before use.

Tried this recipe?

Let us know how it was!

Filed Under: SNACKS & APPETIZERS

Roasted Potato Hearts

February 7, 2026 by JudyWhite Leave a Comment

There’s something truly delightful about turning ordinary ingredients into a fun and flavorful creation. That’s exactly what happened the day I decided to give my red potatoes a playful twist. Inspired by the idea of making mealtime more engaging, I grabbed my trusty cookie cutter and began shaping these humble spuds into charming hearts.

As I tossed the potato hearts in olive oil, garlic powder, and fresh rosemary, the kitchen filled with the inviting aromas of a cozy home-cooked meal. With a quick roast in the oven, they transformed into crispy, golden treasures that are not only visually appealing but also bursting with flavor.

Whether you’re looking for a unique side dish, a snack for your next gathering, or just a way to make weeknight dinners more special, these Roasted Potato Hearts are the answer you didn’t know you were searching for. Join me in this adventure where comfort meets creativity, and let’s make mealtime a little love-filled!

Why You'll Love This Roasted Potato Hearts

  • These Roasted Potato Hearts are incredibly easy to make, taking only 15 minutes of prep time before you pop them in the oven.
  • The delightful blend of olive oil, garlic, and fresh rosemary creates an irresistible flavor that will have everyone coming back for seconds.
  • Their charming heart shape adds a fun and visually appealing twist to any meal, making them perfect for special occasions or just to brighten up a weeknight.
  • Plus, they can easily be customized with your favorite seasonings or served alongside a variety of dishes, making them a truly versatile addition to your recipe collection.

Roasted Potato Hearts Ingredients

• Elevate your dish with these essentials.

For the Potato Hearts
• 1 lb red potatoes – choose small to medium-sized for a perfect heart shape.
• 2 tbsp olive oil – enhances flavor and helps achieve that golden, crispy texture.
• 1 tsp garlic powder – adds a savory depth to your roasted potato hearts.
• ½ tsp salt – essential for bringing out the natural flavors of the potatoes.
• ½ tsp black pepper – adds a subtle warmth that balances the dish.
• 2 tbsp fresh rosemary – its aromatic notes make these roasted potato hearts truly special.

How to Make Roasted Potato Hearts

  1. Preheat your oven to 425°F (220°C). This step ensures a perfectly crisp texture on the outside while keeping the insides tender and fluffy.

  2. Wash and dry the red potatoes thoroughly. Use a cookie cutter or knife to cut them into charming heart shapes—this adds a fun touch to your dish!

  3. Toss the heart-shaped potato slices in a large mixing bowl with olive oil, garlic powder, salt, pepper, and fresh rosemary. Ensure they are evenly coated for maximum flavor absorption.

  4. Spread the potato hearts out in a single layer on a parchment-lined baking sheet. Give them some space to roast evenly, which helps them turn golden and crispy.

  5. Roast in the preheated oven for 25-30 minutes or until they are golden brown and crispy. Be sure to flip them halfway through for even cooking!

  6. Serve immediately, drizzled with additional olive oil or sprinkled with extra rosemary if desired. A little extra touch makes them even more delightful!

Optional: Serve with a dollop of sour cream for added creaminess.
Exact quantities are listed in the recipe card below.

How to Store and Freeze Roasted Potato Hearts

Fridge: Store leftover Roasted Potato Hearts in an airtight container for up to 3 days. This keeps them fresh and ready to reheat.

Freezer: If you want to freeze them, place the cooled potato hearts in a single layer on a baking sheet. After an hour, transfer them to a freezer bag for up to 2 months.

Reheating: To reheat, place them on a baking sheet and heat in a preheated oven at 400°F (200°C) for about 10-15 minutes until warm and crispy again.

Room Temperature: If serving at a gathering, keep the Roasted Potato Hearts out for no longer than 2 hours for food safety. Enjoy with friends and family!

What to Serve with Roasted Potato Hearts?

Elevate your mealtime experience by pairing these delightful potato delights with complementary flavors and textures.

  • Creamy Ranch Dip: The cool, creamy dip offers a tangy contrast to the warm, crispy potato hearts, making each bite irresistible.
  • Garlic Butter Shrimp: Juicy shrimp in a garlic butter sauce bring a touch of elegance that pairs perfectly with the rustic charm of the potatoes.
  • Grilled Chicken Skewers: The smoky, savory notes of grilled chicken skewers enhance the flavor profile of the potato hearts, creating a harmonious meal.
  • Seasoned Green Beans: Bright, fresh green beans provide a crisp texture and a burst of color, balancing the heartiness of the potatoes beautifully.
  • Caesar Salad: A classic Caesar salad with crunchy romaine and creamy dressing complements the potatoes’ crunch, making for a well-rounded plate.
  • Lemon-Infused Quinoa: Light and citrusy, this fluffy quinoa adds a refreshing flavor to your meal while ensuring it stays wholesome and nourishing.
  • Tzatziki Sauce: This refreshing yogurt-based dip is a creamy companion that enhances the flavors of your potatoes and adds a cool twist.
  • Red Wine: A smooth red wine brings depth and warmth to the table, making your mealtime feel even more special.
  • Chocolate Mousse: For a sweet finale, a rich and airy chocolate mousse offers a light yet decadent dessert that rounds out the meal perfectly.

Make Ahead Options

These Roasted Potato Hearts are a fantastic choice for meal prep! You can wash, dry, and cut the red potatoes into heart shapes up to 24 hours in advance. Store the prepared potato hearts in an airtight container in the refrigerator to maintain their freshness. Additionally, you can mix the olive oil, garlic powder, salt, pepper, and rosemary ahead of time (just keep it in a separate bowl). When you’re ready to roast, simply toss the prepped potato hearts in the seasoned oil mixture, spread them on a parchment-lined baking sheet, and roast as directed. This way, you’ll enjoy warm, crispy potato hearts on busy weeknights with minimal effort!

Roasted Potato Hearts Variations

Feel empowered to sprinkle your personality into these Roasted Potato Hearts with these exciting twists and substitutions!

  • Garlic Lovers: Add roasted garlic to the olive oil for a more intense garlic flavor that complements the potatoes wonderfully.

  • Herb Infusion: Substitute fresh rosemary with thyme or oregano for a different herbaceous touch that brings a fresh aroma to your dish.

  • Sweet Potato Hearts: Swap red potatoes for sweet potatoes to create a naturally sweeter version that pairs beautifully with savory spices.

  • Spicy Kick: Toss in a pinch of red pepper flakes or cayenne pepper to add a pleasant heat to your roasted hearts, making them irresistible.

  • Cheesy Delight: Sprinkle grated Parmesan cheese over the potatoes during the last few minutes of roasting for a luscious, cheesy crust.

  • Mediterranean Twist: Add Kalamata olives and sun-dried tomatoes to the roasting pan for a burst of Mediterranean flavors that elevates the entire dish.

  • Vegan Option: Replace olive oil with avocado oil and skip the cheese for a fully plant-based version that still satisfies.

  • Smoky Flavor: Incorporate smoked paprika into your seasoning mix for an added depth and a subtle smokiness that makes each bite unforgettable.

Chef's Helpful Tips

  • When preparing Roasted Potato Hearts, be sure to wash and dry the potatoes thoroughly to achieve the best texture.
  • A common mistake is overcrowding the baking sheet, so make sure to spread the potato hearts in a single layer for even cooking.
  • For a perfect heart shape, use a cookie cutter but ensure the edges are cleanly cut to avoid any tearing.
  • Roast the potatoes at 425°F for 25-30 minutes, flipping them halfway to achieve that golden, crispy finish.

Roasted Potato Hearts Recipe FAQs

How do I choose the best red potatoes?
Absolutely! When selecting red potatoes, look for those that are firm with smooth skin and no dark spots or bruises. Small to medium-sized potatoes are best for ensuring evenly shaped hearts. If they have any soft spots or wrinkles, it’s best to choose different ones as they may be past their prime.

How should I store leftover Roasted Potato Hearts?
To keep your leftovers fresh, store them in an airtight container in the fridge for up to 3 days. Make sure to let them cool completely before sealing them up. This helps retain their crispiness when you go to reheat them!

Can I freeze Roasted Potato Hearts?
Yes, you can freeze them! After the potato hearts have cooled, lay them in a single layer on a baking sheet, and freeze for about an hour. Once frozen, transfer them to a freezer-safe bag, labeling with the date. They can be stored for up to 2 months. When you’re ready to devour them, just reheat in the oven!

What if the potato hearts are not crispy after roasting?
No worries! If your Roasted Potato Hearts turn out soggy, this could be due to overcrowding the baking sheet or not using enough oil. To remedy that next time, make sure to leave enough space between the hearts while roasting and give them a good toss in olive oil to encourage that crispy texture!

Are Roasted Potato Hearts safe for pets?
While potatoes are generally safe for dogs, you should avoid giving them any seasoned or fried versions. Stick with plain, cooked potatoes in small amounts. Always consult your vet before introducing new foods to your pet’s diet to ensure they’re safe!

What are some dietary considerations for Roasted Potato Hearts?
For those with gluten intolerance or allergies, you’re in luck! Roasted Potato Hearts are naturally gluten-free. However, if you have specific dietary restrictions or allergies, make sure to check any seasonings you use, and consider substituting with spices or herbs that suit your needs!

Roasted Potato Hearts

Roasted Potato Hearts

These Roasted Potato Hearts are a fun and flavorful side dish that adds charm to any meal.
Print Recipe Pin Recipe
Prep Time 15 minutes mins
Cook Time 30 minutes mins
Total Time 45 minutes mins
Servings: 4 servings
Course: Snacks & Appetizers
Cuisine: American
Calories: 150
Ingredients Equipment Method Nutrition Notes

Ingredients
  

For the Potato Hearts
  • 1 lb red potatoes choose small to medium-sized for a perfect heart shape
  • 2 tbsp olive oil enhances flavor and helps achieve that golden, crispy texture
  • 1 tsp garlic powder adds a savory depth to your roasted potato hearts
  • ½ tsp salt essential for bringing out the natural flavors of the potatoes
  • ½ tsp black pepper adds a subtle warmth that balances the dish
  • 2 tbsp fresh rosemary its aromatic notes make these roasted potato hearts truly special

Equipment

  • Oven
  • Baking sheet
  • cookie cutter
  • Mixing bowl

Method
 

How to Make Roasted Potato Hearts
  1. Preheat your oven to 425°F (220°C). This step ensures a perfectly crisp texture on the outside while keeping the insides tender and fluffy.
  2. Wash and dry the red potatoes thoroughly. Use a cookie cutter or knife to cut them into charming heart shapes—this adds a fun touch to your dish!
  3. Toss the heart-shaped potato slices in a large mixing bowl with olive oil, garlic powder, salt, pepper, and fresh rosemary. Ensure they are evenly coated for maximum flavor absorption.
  4. Spread the potato hearts out in a single layer on a parchment-lined baking sheet. Give them some space to roast evenly, which helps them turn golden and crispy.
  5. Roast in the preheated oven for 25-30 minutes or until they are golden brown and crispy. Be sure to flip them halfway through for even cooking!
  6. Serve immediately, drizzled with additional olive oil or sprinkled with extra rosemary if desired. A little extra touch makes them even more delightful!

Nutrition

Serving: 1servingCalories: 150kcalCarbohydrates: 30gProtein: 3gFat: 4gSaturated Fat: 1gPolyunsaturated Fat: 1gMonounsaturated Fat: 2gSodium: 200mgPotassium: 600mgFiber: 3gSugar: 1gVitamin C: 15mgCalcium: 2mgIron: 6mg

Notes

Serve with a dollop of sour cream for added creaminess. Store leftovers in an airtight container for up to 3 days.

Tried this recipe?

Let us know how it was!

Filed Under: SNACKS & APPETIZERS

Jam Cookies

February 7, 2026 by JudyWhite Leave a Comment

There’s something undeniably charming about a freshly baked batch of jam cookies, especially when they’re infused with love and a touch of creativity. The moment those buttery morsels come out of the oven, their golden edges beckon you closer, while the sweet, fruity aroma takes over your kitchen. I can’t help but smile, thinking back to the first time I made these delightful treats; they seemed to vanish before I could even offer them to my guests!

As Valentine’s Day approaches, why not whip up a batch of these Valentine’s Day Jam Cookies? Perfect for surprising your loved ones or even as an indulgent treat for yourself, these cookies stand out for their distinct layers of flavor and simple preparation. With just a handful of ingredients and thirty minutes of your time, you can create a heartwarming dessert that’s both elegant and approachable. Let’s dive into the details of this fantastic recipe and turn your kitchen into a sweet sanctuary!

Why You'll Love This Jam Cookies

  • These Jam Cookies are incredibly easy to make, allowing you to whip up a delicious treat in no time at all.
  • The delightful combination of buttery cookies with your favorite jam creates a flavor explosion that will have everyone coming back for more.
  • Not only are they a perfect indulgence for Valentine’s Day, but they can also be enjoyed year-round, making them a versatile addition to your baking repertoire.
  • Visually appealing with their colorful jam centers, these cookies are sure to impress your family and friends at any gathering.

Jam Cookies Ingredients

For the Cookie Dough
• 1 cup unsalted butter – ensures a rich and tender base for your jam cookies.
• 1/2 cup granulated sugar – adds sweetness and contributes to a light texture.
• 1/2 cup brown sugar – enhances the cookie’s flavor with its caramel notes.
• 1 tsp vanilla extract – brings a warm aroma that complements the jam perfectly.
• 2 cups all-purpose flour – forms the structure of your jam cookies for classic texture.
• 1 tsp baking powder – helps cookies rise just right for a soft bite.
• 1/4 tsp salt – balances sweetness and elevates flavors in each treat.

For the Jam Filling
• 3/4 cup your favorite jam – raspberry or strawberry recommended for a fruity burst!

How to Make Jam Cookies

  1. Preheat your oven to 350°F (175°C) and line baking sheets with parchment paper for easy cleanup. This ensures your jam cookies bake evenly and don’t stick!

  2. Cream together the unsalted butter, granulated sugar, and brown sugar in a large bowl until the mixture is light and fluffy, about 3 minutes. This adds air, creating a nice texture.

  3. Blend in the vanilla extract until fully integrated into the buttery mixture, enhancing the aroma and flavor profile of your delightful cookies.

  4. Whisk together the all-purpose flour, baking powder, and salt in another bowl. Gradually fold this dry mix into the creamed butter mixture until just combined, keeping it soft and tender.

  5. Scoop tablespoon-sized portions of the cookie dough onto your prepared baking sheets, creating an indentation in each cookie for the jam. This is where the magic happens!

  6. Fill each indentation with about half a teaspoon of your favorite jam, pressing gently to distribute it evenly, ensuring every bite is packed with flavor.

  7. Bake the cookies for 12-15 minutes until the edges are lightly golden, and the centers are set. Allow them to cool slightly before transferring to wire racks to finish cooling.

Optional: Drizzle with melted chocolate for an extra special touch.
Exact quantities are listed in the recipe card below.

Make Ahead Options

These Jam Cookies are a fantastic option for meal prep, saving you time during the busy days leading up to Valentine’s Day or any special occasion! You can prepare the cookie dough up to 24 hours in advance; simply wrap it tightly in plastic wrap and refrigerate. Additionally, you can pre-fill the cookies with jam and freeze them for up to 3 days—just place the filled cookies on a baking sheet and freeze until firm, then transfer to a resealable bag. When you’re ready to bake, simply pop them straight into the oven from the freezer, adding an extra minute or two to the baking time. This way, you’ll enjoy fresh, delicious Jam Cookies that taste just as delightful, with minimal effort!

Storage Tips for Jam Cookies

Room Temperature: Store your jam cookies in an airtight container at room temperature for up to 3 days. This keeps them soft and delicious while preserving their delightful jam centers.

Fridge: For longer freshness, you can refrigerate jam cookies in an airtight container. They’ll stay fresh for up to 1 week, but may require a short time at room temp to regain their softness.

Freezer: Freeze jam cookies for up to 3 months! Just wrap each cookie separately in plastic wrap, then place them in a freezer bag. To enjoy, thaw at room temperature and enjoy their original flavor.

Reheating: When ready to savor your jam cookies, reheat them in a warm oven (about 300°F/150°C) for 5-10 minutes. This helps revive their freshly baked taste and texture!

What to Serve with Valentine’s Day Jam Cookies?

Indulging in a batch of freshly baked jam cookies can be a moment of pure joy, especially when paired with delightful accompaniments!

  • Fresh Berries: A side of mixed berries complements the fruitiness of the jam, adding a fresh contrast to the sweet cookies. Their natural tartness will elevate each bite.

  • Vanilla Ice Cream: Scoop of creamy vanilla ice cream perfectly balances the sweetness of the jam cookies, creating a dreamy dessert experience that no one can resist.

  • Whipped Cream: Light and airy whipped cream offers a luscious layer on top of your warm jam cookies, making each bite even more delectable and inviting.

  • Coffee or Tea: Pairing your cookies with a hot cup of coffee or your favorite tea can awaken the flavors, providing the ideal warmth on a cozy day.

  • Chocolate Drizzle: A gentle drizzle of melted chocolate over the cookies enhances their appearance while adding a rich chocolatey flavor, turning them into an elegant dessert.

  • Sparkling Lemonade: A refreshing glass of sparkling lemonade serves as a zesty contrast, cutting through the sweetness and revitalizing your palate.

These delightful pairings create a beautiful symphony of flavors and textures that will make your jam cookies truly memorable.

Jam Cookies Variations

Feel free to get creative with these jam cookies; your imagination is the only limit!

  • Fruit Preserve: Swap the jam for your favorite preserve like apricot or blackberry for a unique twist. Each flavor brings its own sweet surprise!

  • Nutty Crunch: Add 1/2 cup of chopped nuts, such as walnuts or pecans, to the cookie dough for a delightful texture contrast. The crunch is a wonderful surprise in every bite.

  • Spiced Up: Mix in 1/2 tsp of cinnamon or nutmeg into the dough for a warm, comforting spice that complements the fruity jam beautifully. It adds a cozy touch to your cookies.

  • Chocolate Bliss: Incorporate 1/2 cup of mini chocolate chips into the dough for a rich chocolate flavor that pairs wonderfully with any jam. The melted chocolate adds to the decadence!

  • Oatmeal Delight: Replace 1/2 cup of flour with oats for a heartier texture. This variation not only changes the consistency but also adds a wholesome touch.

  • Gluten-Free: Substitute all-purpose flour with a gluten-free blend to accommodate gluten sensitivities while keeping the deliciousness intact. It’s perfect for everyone to enjoy!

  • Spicy Kick: Add 1/4 tsp of cayenne pepper into the dough for a surprising heat that contrasts beautifully with the sweetness of the jam. It’s an adventurous take for those who love a little spice!

  • Citrusy Zing: Incorporate the zest of one lemon or orange into the dough for a bright, fresh flavor that uplifts the sweetness of the jam. The citrusy aroma will fill your kitchen with delightful notes!

Chef's Helpful Tips

  • For making perfect Jam Cookies, ensure your butter is at room temperature for easier creaming and a lighter texture.
  • Avoid overmixing the dough after adding the flour, as this can result in tough cookies instead of tender ones.
  • When creating the indentations for the jam, use your thumb gently to prevent the cookies from spreading too much during baking.
  • Keep an eye on the baking time, as ovens may vary; pulling the cookies out when the edges are golden but the centers look slightly underdone will keep them soft and chewy.

Jam Cookies Recipe FAQs

How do I select the right jam for my cookies?
Absolutely! When choosing a jam for your cookies, opt for a high-quality fruit preserve with real fruit pieces if possible. Raspberry and strawberry jams are popular options because they complement the buttery cookie flavor beautifully. Look for jams that don’t have added preservatives or excessive sugar for the best taste and texture.

How should I store my jam cookies?
Very good question! To keep your jam cookies fresh, store them in an airtight container at room temperature for up to 3 days. If you want them to last longer, refrigerate them in the same manner, where they will stay fresh for up to 1 week. However, they might need a bit of time at room temperature to soften up again!

Can I freeze jam cookies, and how?
Absolutely! Freezing jam cookies is a great way to enjoy them later. First, wrap each cookie individually in plastic wrap. Next, place them all in a freezer-safe bag or container. They can be frozen for up to 3 months. When you’re ready to indulge, simply thaw them at room temperature, and they will taste almost as good as fresh!

What should I do if my cookie dough is too wet?
If you find your dough is too wet and sticky, don’t worry! This can sometimes happen. Make sure to gradually add the flour mixture to the creamed butter and sugar. If it’s still too wet after mixing, you can fold in an extra tablespoon or two of flour, but take care not to overmix, as it can toughen your cookies!

Are these cookies safe for kids and people with allergies?
Such an important consideration! While these jam cookies are a hit with kids, always check the ingredients of your chosen jam to ensure it’s free from allergens such as nuts, gluten, or artificial colorings. The recipe uses common ingredients, but be cautious and make substitutions if necessary to accommodate allergies if needed.

Can I use a different type of filling instead of jam?
Very much so! If you’re feeling adventurous, you can definitely swap the jam for a variety of fillings. Consider using nut butter, chocolate spread, or even a homemade fruit compote. Just be mindful of the moisture content, as it can affect the cookie structure. Enjoy experimenting!

Jam Cookies

Jam Cookies

Delightful Jam Cookies infused with love, perfect for Valentine’s Day or any occasion.
Print Recipe Pin Recipe
Prep Time 15 minutes mins
Cook Time 15 minutes mins
Cooling Time 10 minutes mins
Total Time 40 minutes mins
Servings: 24 cookies
Course: DESSERT RECIPES
Cuisine: American
Calories: 150
Ingredients Equipment Method Nutrition Notes

Ingredients
  

For the Cookie Dough
  • 1 cup unsalted butter ensures a rich and tender base for your jam cookies.
  • 1/2 cup granulated sugar adds sweetness and contributes to a light texture.
  • 1/2 cup brown sugar enhances the cookie's flavor with its caramel notes.
  • 1 tsp vanilla extract brings a warm aroma that complements the jam perfectly.
  • 2 cups all-purpose flour forms the structure of your jam cookies for classic texture.
  • 1 tsp baking powder helps cookies rise just right for a soft bite.
  • 1/4 tsp salt balances sweetness and elevates flavors in each treat.
For the Jam Filling
  • 3/4 cup your favorite jam raspberry or strawberry recommended for a fruity burst!

Equipment

  • Oven
  • Mixing bowl
  • Baking sheet
  • parchment paper
  • Whisk
  • Spoon

Method
 

How to Make Jam Cookies
  1. Preheat your oven to 350°F (175°C) and line baking sheets with parchment paper for easy cleanup.
  2. Cream together the unsalted butter, granulated sugar, and brown sugar in a large bowl until light and fluffy, about 3 minutes.
  3. Blend in the vanilla extract until fully integrated into the mixture.
  4. Whisk together the all-purpose flour, baking powder, and salt in another bowl and fold into the creamed butter mixture.
  5. Scoop tablespoon-sized portions onto prepared baking sheets, creating indentations in each cookie for the jam.
  6. Fill each indentation with about half a teaspoon of your favorite jam.
  7. Bake for 12-15 minutes until edges are lightly golden and the centers are set.
  8. Allow to cool slightly before transferring to wire racks.

Nutrition

Serving: 1cookieCalories: 150kcalCarbohydrates: 21gProtein: 1gFat: 7gSaturated Fat: 4gMonounsaturated Fat: 2gCholesterol: 20mgSodium: 60mgPotassium: 30mgSugar: 10gVitamin A: 200IUCalcium: 10mgIron: 0.5mg

Notes

For added indulgence, drizzle with melted chocolate. Store cookies in an airtight container. They can be refrigerated or frozen for longer preservation.

Tried this recipe?

Let us know how it was!

Filed Under: DESSERT RECIPES

M&M Cookies

February 7, 2026 by JudyWhite Leave a Comment

There’s a special joy in the kitchen when treats come together effortlessly, and these M&M cookies embody that blissful experience. Picture this: the soft and buttery dough melds with vibrant pops of color and crunch, creating a delightful contrast that not only pleases the palate but also the eyes. I first had these during a cozy get-together, where everyone gathered around the warm tray, hooked instantly by the sweet aroma wafting through the air.

With just a handful of wholesome ingredients and a mere 27 minutes, you’ll whip up a batch that’s destined to be the star of any occasion—from family gatherings to sweet surprises for your loved ones. Best of all? These cookies are just as versatile as they are crowd-pleasing. Whether topped with seasonal M&Ms for holiday cheer or enjoyed in their classic form, they’re a guaranteed hit.

So, if you’re yearning for a taste of homemade goodness that puts fast food to shame, let’s dive into these mouthwatering M&M cookies that are sure to become a staple in your baking repertoire.

Why You'll Love This M&M Cookies

  • These M&M cookies are incredibly easy to make, requiring just a few simple steps to create a delicious batch in under 30 minutes.
  • The delightful combination of buttery dough and colorful M&Ms provides an irresistible flavor and texture that will have everyone reaching for seconds.
  • They are versatile enough to be customized for any occasion, whether you choose festive M&Ms for holidays or stick with the classic version.
  • With their vibrant colors and warm, inviting aroma, these cookies are sure to impress both family and friends alike, making them a perfect addition to any gathering.

M&M Cookies Ingredients

• Gather everything you need for these delightful treats!

For the Dough

  • Unsalted butter – adds rich flavor and a soft texture to your M&M cookies.
  • Granulated sugar – sweetens the dough for that perfect balance.
  • Brown sugar – contributes moisture and a hint of caramel flavor.
  • Large egg – binds the ingredients together and provides moisture.
  • All-purpose flour – gives structure to the cookies; feel free to use whole wheat for a hearty twist.
  • Baking soda – helps the cookies rise and become delightfully chewy.
  • Salt – enhances the flavors and balances sweetness.

For the Topping

  • M&Ms – their vibrant colors not only make the cookies eye-catching but add a delicious crunch. Use festive varieties for extra flair!
  • Extra M&Ms – pressing these on top guarantees a delightful pop of color and flavor.

How to Make M&M Cookies

  1. Preheat your oven to 350°F (175°C) and prepare two baking sheets with parchment paper. This ensures your cookies bake evenly and don’t stick, giving them a beautiful finish.

  2. Cream together 1 cup of softened unsalted butter, 3/4 cup granulated sugar, and 3/4 cup brown sugar in a large bowl until the mixture is light and fluffy. This step adds air to the dough for a perfect chewy texture.

  3. Beat in 1 large egg until well combined. This will help create a cohesive dough and add richness to your M&M cookies.

  4. Whisk together 2 1/4 cups all-purpose flour, 1 tsp baking soda, and 1/2 tsp salt in another bowl. Gradually add this dry mixture to the wet ingredients until just combined—don’t overmix to keep your cookies tender!

  5. Fold in 1 cup of M&Ms into the dough, saving some for pressing on top before baking. The vibrant colors will make your cookies not just delicious but fun to look at as well.

  6. Scoop tablespoonfuls of dough onto the prepared baking sheets, placing them about two inches apart. Press additional M&Ms on top for an extra touch of sweetness and visual appeal.

  7. Bake for 10-12 minutes until the edges are golden and the centers still feel soft to touch. Let cool slightly before enjoying, as this will allow the cookies to set perfectly!

Optional: Drizzle melted chocolate on top for an extra indulgent treat!

Exact quantities are listed in the recipe card below.

M&M Cookies Variations

Feel free to explore these exciting twists to customize your M&M cookies and elevate your baking experience!

  • Nutty Delight: Add 1/2 cup of chopped nuts like walnuts or pecans for a crunchy texture that pairs beautifully with the chocolate.
    The warmth from roasted nuts will surprise your taste buds and make each bite even more satisfying.

  • Gluten-Free: Substitute all-purpose flour with a gluten-free flour blend to make these cookies accommodating for gluten-sensitive friends.
    The cookies will remain soft and delicious, ensuring everyone can enjoy them!

  • Minty Fresh: Mix in 1/2 teaspoon of peppermint extract for a refreshing mint flavor that dances alongside the chocolate.
    This makes for a festive cookie, perfect for the holiday season.

  • Spicy Kick: Add a pinch of cayenne pepper or chili powder to the dough for a surprising heat that complements the sweetness of the chocolate.
    It’s a delightful twist that will keep friends guessing!

  • Double Chocolate: Replace 1/2 cup of all-purpose flour with cocoa powder for a rich, chocolatey cookie that doubles up on the chocolate flavor.
    The darker flavors will appeal to pure chocolate lovers!

  • Oatmeal Boost: Fold in 1 cup of rolled oats for additional chewiness and fiber, creating a heartier cookie experience.
    This variation will add a wholesome touch while keeping the cookies deliciously soft.

  • Seasonal Themes: Use seasonal M&M varieties (like red and green for Christmas or pastel for Easter) to suit any holiday celebration.
    They’ll not only taste good but look stunning on your dessert table, adding a pop of color to your festivities.

  • Dark Chocolate: Swap regular M&Ms for dark chocolate M&Ms for an indulgent twist that satisfies any chocolate craving.
    The rich, bittersweet flavor will truly elevate your cookies to gourmet status!

What to Serve with M&M Cookies?

Baking M&M cookies is just the beginning of a delightful culinary journey. Imagine pairing these colorful treats with perfectly complementary sides and beverages that elevate your homemade experience.

  • Milk: A classic choice, its creamy, cool texture enhances the sweetness of the cookies and balances the flavors beautifully.

  • Ice Cream: Top your warm cookies with a scoop of vanilla or chocolate ice cream for a decadent dessert that melts deliciously into the cookie crevices.

  • Fruit Salad: A refreshing side filled with juicy, seasonal fruits adds a vibrant contrast to the richness of the cookies, making for a light and cheerful platter.

  • Hot Cocoa: Sipping on rich, warm cocoa while enjoying these cookies creates a cozy, nostalgic atmosphere, perfect for chilly days.

  • Coffee or Tea: A warm cup of your favorite brew complements the cookies beautifully, enhancing their sweet flavor while providing a nice caffeine boost.

  • Chocolate Dipping Sauce: Drizzling some chocolate sauce over the cookies adds an extra indulgent touch, turning these treats into a gourmet experience.

  • Whipped Cream: Light and airy, whipped cream can be served as a topping with fruit or ice cream to create a stunning dessert presentation.

The joy of M&M cookies can be magnified by these delightful pairings, making every bite a celebration!

Make Ahead Options

These M&M cookies are perfect for meal prep enthusiasts looking to save time! You can prepare the dough up to 24 hours in advance and refrigerate it in an airtight container. This not only allows the flavors to meld but also makes handling the dough easier when you’re ready to bake. If you’d like to prep even further, you can also scoop the dough into individual portions and freeze them for up to 3 months; simply place them on a baking sheet to freeze, then transfer to a zip-top bag. When you’re ready to enjoy fresh M&M cookies, just bake from frozen for an extra minute or two, and you’ll have warm, delicious cookies that impress everyone with minimal effort!

How to Store and Freeze M&M Cookies

Room Temperature: Store your M&M cookies in an airtight container at room temperature for up to 3 days for the best flavor and freshness.

Fridge: If you’re looking to extend their life, place the cookies in the fridge for up to 1 week, ensuring they’re wrapped properly to prevent drying out.

Freezer: Freeze M&M cookies in an airtight container or freezer bag for up to 3 months. Ensure to separate layers with parchment paper to keep them from sticking together.

Reheating: When ready to enjoy, simply thaw your cookies at room temperature or warm them in a 350°F (175°C) oven for about 5-7 minutes for that freshly baked feel!

Chef's Helpful Tips

  • For the best M&M cookies, make sure your butter is softened to room temperature for easy creaming with the sugars.
  • Avoid overmixing the dough once you add the flour mixture, as this can lead to tough cookies instead of the tender texture you want.
  • When baking, ensure that your oven is fully preheated to 350°F for even baking, as underbaking can result in gooey centers.
  • Lastly, letting the cookies cool on the baking sheet for a few minutes before transferring them to a wire rack helps them maintain their shape and gives them the perfect soft texture.

M&M Cookies Recipe FAQs

How do I select the best M&Ms for my cookies?
Absolutely! Choose M&Ms that look vibrant and fresh—avoid any that have dark spots or visible damage. You might even consider seasonal varieties, like red and pink for Valentine’s Day, to add a festive touch!

What’s the best way to store M&M cookies?
For optimal freshness, store your M&M cookies in an airtight container at room temperature for up to 3 days. If you want them to last longer, refrigerate them for up to a week, but make sure they’re wrapped well to prevent drying out.

Can I freeze M&M cookies? How should I do it?
Yes, you can freeze M&M cookies! Just place them in an airtight container or a freezer bag, ensuring to separate layers with parchment paper to prevent them from sticking together. They’ll keep well for up to 3 months. When ready to eat, thaw them at room temperature, or warm them in a 350°F oven for 5-7 minutes to restore their freshness.

What should I do if my cookies are too flat?
If your cookies spread too much, there are a few tweaks you can try next time. Make sure your butter isn’t too soft—stick to room temperature, which is about 65°F (18°C). Also, check that you’ve accurately measured the flour; too little can lead to flat cookies. Finally, chilling the dough for 30 minutes before baking can help!

Are these cookies suitable for people with nut allergies?
Yes! The recipe for these M&M cookies is nut-free. However, always check the packaging of your M&Ms for allergen information, as cross-contamination can sometimes occur in manufacturing. It’s always better to be safe, especially for guests or family members with allergies.

How long do M&M cookies stay fresh?
When properly stored in an airtight container at room temperature, M&M cookies can stay fresh for about 3 days. You can extend their shelf life by refrigerating them, where they can last up to a week. If you need to keep them longer, freezing is a great option, as mentioned earlier!

M&M Cookies

M&M Cookies

These M&M cookies combine buttery dough with colorful M&Ms for a delightful treat that's perfect for any occasion.
Print Recipe Pin Recipe
Prep Time 15 minutes mins
Cook Time 12 minutes mins
Total Time 27 minutes mins
Servings: 24 cookies
Course: DESSERT RECIPES
Calories: 150
Ingredients Equipment Method Nutrition Notes

Ingredients
  

For the Dough
  • 1 cup Unsalted butter softened
  • 3/4 cup Granulated sugar
  • 3/4 cup Brown sugar
  • 1 large Egg
  • 2 1/4 cups All-purpose flour
  • 1 tsp Baking soda
  • 1/2 tsp Salt
For the Topping
  • 1 cup M&Ms plus extra for pressing on top

Equipment

  • Mixing bowl
  • baking sheets
  • parchment paper
  • Whisk
  • Spoon

Method
 

How to Make M&M Cookies
  1. Preheat your oven to 350°F (175°C) and prepare two baking sheets with parchment paper.
  2. Cream together 1 cup of softened unsalted butter, 3/4 cup granulated sugar, and 3/4 cup brown sugar in a large bowl until light and fluffy.
  3. Beat in 1 large egg until well combined.
  4. Whisk together 2 1/4 cups all-purpose flour, 1 tsp baking soda, and 1/2 tsp salt in another bowl. Gradually add to the wet ingredients until just combined.
  5. Fold in 1 cup of M&Ms into the dough, saving some for pressing on top.
  6. Scoop tablespoonfuls of dough onto the prepared baking sheets, placing them about two inches apart. Press additional M&Ms on top.
  7. Bake for 10-12 minutes until edges are golden and centers feel soft. Let cool slightly before enjoying.

Nutrition

Serving: 1cookieCalories: 150kcalCarbohydrates: 20gProtein: 1gFat: 7gSaturated Fat: 4gPolyunsaturated Fat: 0.5gMonounsaturated Fat: 2gCholesterol: 20mgSodium: 100mgPotassium: 50mgSugar: 10gVitamin A: 200IUCalcium: 10mgIron: 0.5mg

Notes

For extra indulgence, drizzle melted chocolate on top.

Tried this recipe?

Let us know how it was!

Filed Under: BREAKFAST & BRUNCH

Chewy Valentine Sugar Cookie Bars

February 7, 2026 by JudyWhite Leave a Comment

The moment I took my first bite of these Chewy Valentine Sugar Cookie Bars, I was instantly transported back to my childhood kitchen—where flour clouds danced in the air and frosting was treated as a food group. Inspired by love and a sprinkle of nostalgia, these bars transform ordinary ingredients into a delightful treat that’s not only pleasing to the eye but also to the palate.

Perfect for any gathering or simply a sweet evening at home, they boast a chewy texture that rivals traditional cookies while saving you the hassle of chilling dough. Plus, with their vibrant sprinkles, they’re a festive addition to any occasion, especially when celebrating love.

So, whether you’re whipping them up for a Valentine’s Day celebration or just looking to brighten a weekday afternoon, my easy, foolproof recipe is here to bring joy and smiles into your kitchen. Let’s dive in and create these delicious bars that will have everyone asking for seconds!

Why You'll Love This Chewy Valentine Sugar Cookie Bars

  • You’ll adore how easy these Chewy Valentine Sugar Cookie Bars are to make, coming together in just 15 minutes of prep time.
  • The delightful chewy texture and sweet flavor will make your taste buds dance with joy, making them a true crowd-pleaser.
  • They are incredibly versatile, perfect for Valentine’s Day or any cheerful occasion, and can be customized with your favorite sprinkles.
  • Plus, their vibrant visual appeal will bring smiles to everyone’s faces as they lavish praise on your baking skills.

Chewy Valentine Sugar Cookie Bars Ingredients

For the Dough

  • All-purpose flour – provides the base for these bars, ensuring a delightful chewiness.
  • Granulated sugar – sweetens the batter and helps create that lovely texture.
  • Brown sugar – adds a hint of richness and moisture for extra chewiness.
  • Unsalted butter – softened for easy mixing, enhancing the flavor and tenderness.
  • Large eggs – bind the ingredients together while contributing to the bar’s moisture.
  • Baking powder – gives the bars the perfect rise, keeping them light and fluffy.
  • Vanilla extract – the magic ingredient that brings warmth and depth to sweetness.
  • Salt – a vital element that balances the sweetness and enhances the overall flavor.

For the Topping

  • Colorful sprinkles – not only add a pop of fun but also make these Chewy Valentine Sugar Cookie Bars festive and inviting!
  • More sprinkles for topping – sprinkle on top before baking for an extra cheerful touch.

How to Make Chewy Valentine Sugar Cookie Bars

  1. Preheat your oven to 350°F (175°C), ensuring it’s well-heated for that perfect bake. Grease or line a baking dish with parchment paper; this will make for easy removal later.

  2. Cream together the softened butter, granulated sugar, and brown sugar in a large bowl until it’s light and fluffy. This adds air to your mixture, creating a tender texture! Then, add eggs one at a time, incorporating the vanilla extract for a deliciously sweet aroma.

  3. Whisk together the all-purpose flour, baking powder, and salt in another bowl. Gradually add these dry ingredients to the wet mixture, stirring until just combined—don’t over-mix! This helps maintain the delightful chewiness you desire.

  4. Fold in half of the colorful sprinkles gently into your batter, making sure they’re evenly distributed. Spread the mixture into your prepared dish and top with the remaining sprinkles for an extra festive finish.

  5. Bake for 25-30 minutes, keeping an eye on those edges until they turn golden brown. Once done, let them cool completely in the pan before cutting into squares—patience pays off here!

Optional: Dust with powdered sugar for an extra touch of sweetness before serving.
Exact quantities are listed in the recipe card below.

Chewy Valentine Sugar Cookie Bars Variations

Feel free to sprinkle some creativity into these Chewy Valentine Sugar Cookie Bars and make them uniquely yours!

  • Gluten-Free: Substitute all-purpose flour with a gluten-free blend for a delicious, chewy result everyone can enjoy.
  • Vegan: Swap butter for coconut oil and eggs for flax eggs (1 tbsp flaxseed meal + 2.5 tbsp water) for a plant-based treat.
  • Chocolate Chip Bliss: Incorporate 1 cup of semi-sweet or dark chocolate chips into the batter for a rich, decadent twist.
  • Nutty Upgrade: Add 1/2 cup of chopped walnuts or pecans for an exciting crunch that complements the chewy texture beautifully.
  • Zesty Lemon: Include 1 tablespoon of lemon zest in the dough for a refreshing citrus flavor that brightens up your bars.
  • Sweet Heat: Sprinkle in a pinch of cayenne pepper or chili powder for a subtle kick that beautifully contrasts with the sweetness.
  • Berry Burst: Fold in 1/2 cup of dried cranberries or raspberries for a fruity, tangy punch that brings your bars to life.
  • Caramel Drizzle: Drizzle melted caramel sauce over the cut bars for an irresistible, gooey topping that adds a touch of indulgence.

What to Serve with Chewy Valentine Sugar Cookie Bars?

Indulging in a delightful treat like these bars calls for the perfect accompaniments that enhance their joy and sweetness!

  • Scoops of Vanilla Ice Cream: The creaminess of vanilla ice cream contrasts beautifully with the chewy bars, making each bite a blissful experience. Imagine warm cookies with cold ice cream, a match made in dessert heaven.

  • Fresh Berries: Juicy strawberries or raspberries can add a refreshing touch. Their tartness balances the sweetness of the cookie bars while adding a vibrant pop of color.

  • Chocolate Dipping Sauce: Drizzle a rich chocolate sauce over your bars for an added layer of decadence. This luxurious touch is sure to elevate your dessert table.

  • Whipped Cream: Light and airy, whipped cream complements the cookie bars perfectly—especially if you add a hint of vanilla for an extra flavor boost. It’s like adding clouds of sweetness to your dessert.

  • Milk or Plant-Based Alternatives: A classic pairing with cookies is a nice glass of milk. Whether regular or almond, a chilled drink pairs wonderfully with the chewy texture of these bars.

  • Coffee or Tea: A warm cup of coffee or tea enhances the flavor profile of the cookie bars, making it an excellent choice for a cozy afternoon treat. The slight bitterness of coffee contrasts deliciously with their sweetness.

  • Frosting Dip: For a fun twist, serve these cookie bars alongside a bowl of fluffy vanilla frosting for dipping. It’s like icing on the cake, literally bringing an extra level of sweetness to each bite.

  • Nutty Trail Mix: Mix things up by serving a side of nutty trail mix. The crunchiness and savory flavors create a delightful contrast to the soft, chewy bars that everyone will enjoy.

How to Store and Freeze Chewy Valentine Sugar Cookie Bars

Room Temperature: Keep your Chewy Valentine Sugar Cookie Bars in an airtight container at room temperature for up to 3 days to maintain their chewy texture.

Fridge: For longer freshness, store the bars in an airtight container in the fridge for up to a week—just allow them to come to room temperature before enjoying!

Freezer: You can freeze the cookie bars for up to 3 months. Wrap them tightly in plastic wrap, then place them in a freezer-safe bag to prevent freezer burn.

Reheating: To enjoy your frozen Chewy Valentine Sugar Cookie Bars, thaw overnight in the fridge and warm them gently in the microwave for a few seconds before serving.

Make Ahead Options

These Chewy Valentine Sugar Cookie Bars are perfect for busy home cooks looking to save time in the kitchen! You can prepare the dough up to 24 hours in advance—just mix all your ingredients together and refrigerate it in an airtight container. This not only makes it easier to whip them up right before serving but also enhances the flavors as they chill. When you’re ready to bake, simply spread the chilled dough into your prepared dish, sprinkle with colorful toppings, and pop them in the oven as usual. They’ll come out just as delicious and chewy, making your baking efforts both easy and delightful for any occasion!

Chef's Helpful Tips

  • When making Chewy Valentine Sugar Cookie Bars, ensure your butter is softened but not melted to achieve the perfect creamy texture.
  • Always whisk your dry ingredients separately to avoid lumps and ensure even distribution of the baking powder and salt.
  • Be gentle when folding in the sprinkles to maintain the batter’s integrity and chewiness.
  • Remember to keep an eye on your baking time, as ovens can vary; checking for a golden edge is key to prevent overbaking.

Chewy Valentine Sugar Cookie Bars Recipe FAQs

How do I choose the right ingredients for the Chewy Valentine Sugar Cookie Bars?
When selecting ingredients, ensure your butter is softened but not melted, as this is key to achieving a creamy texture. Look for all-purpose flour that’s fresh for the best results, and always use large eggs for the perfect moisture balance. If you’re using colorful sprinkles, opt for quality ones that don’t bleed color during baking—trust me, it makes a difference!

What’s the best way to store Chewy Valentine Sugar Cookie Bars?
To keep your Chewy Valentine Sugar Cookie Bars fresh, store them in an airtight container at room temperature for up to 3 days. If you want them to last longer, move them to the fridge where they can stay good for up to a week. Just remember to let them come to room temperature before enjoying for that chewy goodness!

Can I freeze Chewy Valentine Sugar Cookie Bars?
Absolutely! To freeze your cookie bars, first cut them into squares and wrap each piece tightly in plastic wrap. Then, place them in a freezer-safe bag or container to prevent freezer burn. They can stay in the freezer for up to 3 months! When you’re ready to enjoy, simply thaw them overnight in the refrigerator and warm them up in the microwave for a few seconds to bring back their delightful chewiness.

What should I do if my Chewy Valentine Sugar Cookie Bars are too dry?
If you find that your cookie bars are coming out dry, it could be due to overbaking or added flour. Ensure you’re measuring your flour correctly—spoon it into the measuring cup rather than scooping it directly from the bag. For your next batch, try reducing the baking time by a few minutes and checking for that golden edge! Patience is key as cooling allows them to soften further.

Are these Chewy Valentine Sugar Cookie Bars safe for my pets or people with allergies?
These cookie bars are suitable for most people, but they’re not pet-friendly due to the sugar content and ingredients like butter. For allergies, always be cautious with the use of sprinkles, as some may contain gluten or other allergens. You could use an alternative like dairy-free butter and gluten-free flour if needed, allowing a wider group to enjoy them without worry!

How can I customize the Chewy Valentine Sugar Cookie Bars for different occasions?
The more, the merrier! You can easily customize these cookie bars for various celebrations by changing up the sprinkles to match the theme—use red and pink for Valentine’s, pastel hues for Easter, or even seasonal colors for holidays like Halloween. You could also add in your favorite mix-ins, such as chocolate chips or chopped nuts, to create your signature version of this delightful treat!

Chewy Valentine Sugar Cookie Bars

Chewy Valentine Sugar Cookie Bars

Delightful Chewy Valentine Sugar Cookie Bars, perfect for any cheerful occasion.
Print Recipe Pin Recipe
Prep Time 15 minutes mins
Cook Time 30 minutes mins
Total Time 45 minutes mins
Servings: 12 bars
Course: DESSERT RECIPES
Calories: 200
Ingredients Equipment Method Nutrition Notes

Ingredients
  

For the Dough
  • 2 cups all-purpose flour
  • 1 cup granulated sugar
  • 1/2 cup brown sugar packed
  • 1/2 cup unsalted butter softened
  • 2 large eggs
  • 1 teaspoon baking powder
  • 2 teaspoons vanilla extract
  • 1/2 teaspoon salt
For the Topping
  • 1/2 cup colorful sprinkles
  • 1/4 cup more sprinkles for topping

Equipment

  • Baking dish
  • Mixing bowls
  • Whisk
  • Spatula

Method
 

How to Make Chewy Valentine Sugar Cookie Bars
  1. Preheat your oven to 350°F (175°C) and grease or line a baking dish with parchment paper.
  2. Cream together the softened butter, granulated sugar, and brown sugar until light and fluffy. Add eggs one at a time and incorporate the vanilla extract.
  3. Whisk together the flour, baking powder, and salt in another bowl. Gradually add these dry ingredients to the wet mixture, stirring until just combined.
  4. Fold in half of the colorful sprinkles gently into your batter, then spread into the prepared dish and top with the remaining sprinkles.
  5. Bake for 25-30 minutes until the edges turn golden brown. Let cool completely before cutting into squares.
  6. Optional: Dust with powdered sugar for an extra touch of sweetness before serving.

Nutrition

Serving: 1barCalories: 200kcalCarbohydrates: 30gProtein: 2gFat: 9gSaturated Fat: 5gCholesterol: 40mgSodium: 150mgPotassium: 80mgSugar: 18gVitamin A: 200IUCalcium: 10mgIron: 0.5mg

Notes

Ensure butter is softened but not melted. Whisk dry ingredients to avoid lumps. Be gentle when folding in sprinkles to maintain texture.

Tried this recipe?

Let us know how it was!

Filed Under: BREAKFAST & BRUNCH

Creamy Mushroom Chicken

February 5, 2026 by JudyWhite Leave a Comment

There’s something undeniably comforting about a plate of Creamy Mushroom Chicken. The moment the chicken hits the skillet, the sizzling sound brings a sense of anticipation. As I watch the golden sear form, I can already imagine the rich flavors mingling with earthy mushrooms and fragrant garlic. This dish isn’t just a meal; it’s a heartfelt invitation to gather around the table and connect.

With just one bite, you’ll understand why this recipe has become a go-to for busy weeknights and special gatherings alike. It strikes the perfect balance between indulgence and simplicity, offering a creamy sauce that envelopes tender chicken while staying easy on your schedule. So, if you’re ready to leave the fast food behind and whip up something that feels both gourmet and homely, let’s dive into this delicious creamy creation. Whether it’s a cozy family dinner or a delightful gathering with friends, I promise this dish will shine at your table.

Why You'll Love This Creamy Mushroom Chicken

  • This Creamy Mushroom Chicken recipe is incredibly easy to make, allowing you to enjoy a gourmet meal in no time.
  • The rich and creamy sauce, combined with the earthy mushrooms and tender chicken, creates a flavor explosion that will leave everyone asking for seconds.
  • Its versatility makes it perfect for both weeknight dinners and special occasions, effortlessly impressing guests while fitting into your busy schedule.
  • Visually, the golden chicken and luscious sauce create an enticing presentation that will have your guests eagerly anticipating each bite.
  • Enjoy the satisfaction of serving a dish that is not only delicious but also a true crowd-pleaser.

Creamy Mushroom Chicken Ingredients

• Here’s what you need to create this comforting dish.

For the Chicken

  • Boneless, skinless chicken breasts – Ideal for a tender texture, ensuring it soaks up the creamy sauce beautifully.

For the Sauce

  • Heavy cream – Provides a luscious, rich base that makes the dish indulgent and creamy.
  • Chicken broth – Adds depth of flavor and helps to balance the richness of the cream.
  • Low-sodium soy sauce – Introduces a subtle umami note that enhances the overall taste.

For the Vegetables

  • Garlic – Fresh garlic infuses a fragrant aroma and enhances the dish’s savory aspects.
  • Button or cremini mushrooms – Either variety works well; they bring earthiness and a lovely texture to the sauce.

For Garnishing

  • Grated Parmesan cheese – Sprinkled on top, it adds a savory finish that melts into the creamy sauce.
  • Salt and pepper – Essential for seasoning to taste, enhancing all the flavors harmoniously.
  • Olive oil – Perfect for sautéing, its rich flavor complements the mushrooms and chicken.

Now, you’re fully equipped with the essential ingredients to whip up some delightful Creamy Mushroom Chicken that will leave everyone at the table craving more!

How to Make Creamy Mushroom Chicken

  1. Preheat the skillet: Begin by heating a large skillet over medium-high heat. This ensures a good sear on the chicken, so take your time getting it hot!

  2. Season and sear: Sprinkle salt and pepper over the chicken breasts, then place them in the skillet. Sear each side for 5-7 minutes until they’re golden brown, then remove them from the skillet and set aside.

  3. Sauté the vegetables: In the same skillet, add the olive oil followed by the sliced mushrooms and minced garlic. Cook for about 5 minutes, stirring until the mushrooms are tender and slightly golden.

  4. Simmer the sauce: Pour in the chicken broth and let it simmer for 2 minutes. Then, add the heavy cream, soy sauce, and grated Parmesan cheese, stirring until thoroughly combined for that creamy consistency.

  5. Return the chicken: Place the seared chicken back into the skillet, submerging it in the luscious sauce. Allow it to cook for an additional 5 minutes, soaking up all the flavors until the chicken is heated through.

  6. Serve hot: Dish out the creamy mushroom chicken onto plates, generously drizzling extra sauce over the top to enhance its mouthwatering appeal.

Optional: Pair with fresh parsley for a pop of color and an added layer of flavor.
Exact quantities are listed in the recipe card below.

What to Serve with Creamy Mushroom Chicken?

Imagine a delightful meal spread that complements the rich flavors of your creamy creation and invites your loved ones to linger at the table.

  • Garlic Bread: The buttery, garlicky goodness of freshly baked bread is perfect for sopping up every bit of that luscious sauce.

  • Herbed Rice: Fluffy rice infused with herbs adds a lightness to the meal while soaking up the creamy sauce beautifully for a satisfying combination.

  • Steamed Asparagus: Crisp-tender asparagus provides a fresh, vibrant crunch, balancing the creamy richness and adding a pop of color to your plate.

  • Classic Caesar Salad: The crunch of romaine lettuce, paired with tangy dressing and croutons, offers a refreshing contrast to the creamy chicken dish.

  • Roasted Potatoes: Crispy on the outside and fluffy on the inside, roasted potatoes deliver a hearty warmth that pairs seamlessly with the succulent chicken.

  • Red Wine: A glass of smooth, velvety red wine enhances the dish’s flavors while making your dinner feel even more special.

  • Chocolate Mousse: End your meal on a sweet note with rich, airy chocolate mousse that perfectly contrasts the savory dish you’ve enjoyed.

With these pairings, your Creamy Mushroom Chicken will take center stage for a dinner that’s not only satisfying but memorable.

Creamy Mushroom Chicken Variations

Feel free to explore these delightful twists, adding your personal touch to this comforting dish!

  • Dairy-Free: Substitute heavy cream with coconut cream and omit Parmesan for a creamy, vegan option that still delights the palate.

  • Gluten-Free: Use tamari instead of soy sauce, ensuring everyone can enjoy this savory dish without worry.

  • Spicy Kick: Add red pepper flakes or a dash of hot sauce to the sauce for a flavorful heat that lifts the entire dish.

  • Herb Infusion: Mix in fresh thyme, rosemary, or sage while sautéing the mushrooms. This aromatic addition beautifully enhances the earthiness.

  • Nutty Flavor: Sprinkle toasted pine nuts or walnuts on top before serving to add a crunchy texture and rich, nutty flavor.

  • Veggie Boost: Toss in spinach or kale just before returning the chicken to the sauce. This adds nutritional value and lovely green color.

  • Lemon Zest: A teaspoon of lemon zest stirred in at the end brightens the creamy sauce, adding an invigorating refreshing note.

  • Mushroom Medley: Use a mix of wild mushrooms such as shiitake, oyster, or portobello for a deeper flavor profile and interesting textures.

How to Store and Freeze Creamy Mushroom Chicken

Fridge: Keep any leftover Creamy Mushroom Chicken in an airtight container for up to 3 days to maintain freshness and flavor.

Freezer: For longer storage, freeze the chicken in a freezer-safe container for up to 3 months. Thaw in the fridge overnight before reheating.

Reheating: To enjoy later, reheat in a skillet over medium-low heat until warmed through, adding a splash of chicken broth or cream to restore creaminess.

Avoiding Separation: If reheating from frozen, do so slowly to prevent the sauce from separating and maintain that rich texture.

Make Ahead Options

These Creamy Mushroom Chicken recipes are a lifesaver for busy home cooks looking to streamline their meal prep. You can season and sear the chicken breasts up to 24 hours in advance. Simply cook them fully, then let them cool before storing in an airtight container in the fridge. Prepare the mushroom sauce separately and cool it before refrigerating for up to 3 days. To reheat, warm the sauce in a skillet and add the chicken back in until heated through. This way, you’ll enjoy just as delicious results with minimal effort on the day of serving!

Chef's Helpful Tips

  • For the Creamy Mushroom Chicken, ensure your skillet is properly preheated to achieve a nice sear on the chicken, which locks in moisture and flavor.
  • Avoid overcrowding the skillet while searing the chicken as this can cause steaming instead of browning; work in batches if needed.
  • When sautéing the mushrooms, let them cook undisturbed for a minute or two to develop golden color and enhance their flavor before stirring.
  • To achieve the creamiest sauce, allow the heavy cream to simmer gently without boiling after adding it, and always taste and adjust seasoning before serving.

Creamy Mushroom Chicken Recipe FAQs

What kind of mushrooms should I use for Creamy Mushroom Chicken?
Absolutely! You can use either button or cremini mushrooms. Both varieties add wonderful earthiness to the dish, but cremini tends to have a deeper flavor. If you’re feeling adventurous, you could even mix in a few shiitake or portobello mushrooms for added depth!

How should I store leftover Creamy Mushroom Chicken?
To keep your delicious Creamy Mushroom Chicken fresh, place any leftovers in an airtight container in the fridge. It will stay good for up to 3 days. When you’re ready to enjoy it again, just reheat gently in a skillet over medium-low heat for the best results.

Can I freeze Creamy Mushroom Chicken? How?
Yes, you can definitely freeze this dish! To freeze, let the chicken cool completely, then transfer it to a freezer-safe container. It should be good for up to 3 months. When you’re ready to eat, just thaw it in the fridge overnight, then reheat in a skillet over low heat. You might want to add a splash of chicken broth or cream to keep the sauce creamy.

What should I do if the sauce separates while reheating?
If your sauce looks like it’s separating, don’t worry! Here’s a simple step-by-step to salvage it:

  1. In a small saucepan, add a bit of cream or chicken broth over low heat.
  2. Stir gently until warmed.
  3. Once it’s heated, gradually whisk in the separated sauce to bring it back together.
  4. Keep stirring until it’s smooth and creamy again, then add it back to your chicken.

Are there any dietary considerations I should be aware of?
Very! If you’re cooking for someone with a dairy allergy, you can swap out the heavy cream for coconut milk or a dairy-free cream substitute, and use nutritional yeast instead of Parmesan for a cheesy flavor. Always double-check ingredient labels to ensure no hidden allergens are included, especially in the soy sauce.

What if my chicken breasts are too thick for even cooking?
If you find your chicken breasts are thick, it’s best to pound them to an even thickness before cooking. Place them between two sheets of plastic wrap or parchment paper and gently pound with a meat mallet or rolling pin until they’re about 1 inch thick. This ensures they cook evenly, providing that juicy texture we all love!

Creamy Mushroom Chicken

Creamy Mushroom Chicken

This Creamy Mushroom Chicken is a comforting dish that blends tender chicken with rich flavors, ideal for busy weeknights and special gatherings.
Print Recipe Pin Recipe
Prep Time 15 minutes mins
Cook Time 25 minutes mins
Total Time 40 minutes mins
Servings: 4 servings
Course: DINNER RECIPES
Cuisine: American
Calories: 450
Ingredients Equipment Method Nutrition Notes

Ingredients
  

For the Chicken
  • 2 pieces Boneless, skinless chicken breasts Ideal for a tender texture.
For the Sauce
  • 1 cup Heavy cream Provides a rich base.
  • 1 cup Chicken broth Adds depth of flavor.
  • 2 tablespoons Low-sodium soy sauce Enhances taste with umami.
For the Vegetables
  • 4 cloves Garlic Fresh for fragrant aroma.
  • 8 ounces Button or cremini mushrooms Adds earthiness and texture.
For Garnishing
  • 1/2 cup Grated Parmesan cheese Savory finish that melts.
  • to taste Salt Essential for seasoning.
  • to taste Pepper Essential for seasoning.
  • 2 tablespoons Olive oil For sautéing.

Equipment

  • Large skillet

Method
 

How to Make Creamy Mushroom Chicken
  1. Preheat a large skillet over medium-high heat.
  2. Season chicken breasts with salt and pepper, sear each side for 5-7 minutes until golden, then set aside.
  3. In the same skillet, add olive oil, then sliced mushrooms and minced garlic. Cook for about 5 minutes until tender.
  4. Pour in chicken broth and let simmer for 2 minutes. Add heavy cream, soy sauce, and Parmesan, stirring until combined.
  5. Return the seared chicken to the skillet, submerge in sauce, and cook for an additional 5 minutes.
  6. Serve hot, drizzling extra sauce over the top.

Nutrition

Serving: 1servingCalories: 450kcalCarbohydrates: 10gProtein: 35gFat: 30gSaturated Fat: 18gPolyunsaturated Fat: 0.5gMonounsaturated Fat: 10gCholesterol: 100mgSodium: 800mgPotassium: 600mgFiber: 1gSugar: 2gVitamin A: 500IUVitamin C: 2mgCalcium: 150mgIron: 2mg

Notes

Optional: Pair with fresh parsley for added flavor and color.

Tried this recipe?

Let us know how it was!

Filed Under: DINNER RECIPES

Big Mac Sauce

February 5, 2026 by JudyWhite Leave a Comment

It was a sunny Saturday afternoon when a craving for something familiar yet exciting struck me—Big Mac Sauce! That deliciously creamy combination of flavors is the secret weapon behind iconic burgers, but why reserve it for takeout? I decided to whip up my own batch to elevate our homemade burgers that night. With just a handful of ingredients, this sauce is not only quick to make but also brimming with flavor that transforms any meal into a gourmet experience.

Imagine your fries dunked in this divine sauce, or a juicy burger slathered with that unmistakable taste. As I mixed the mayonnaise, mustard, and relish in my kitchen, a wave of nostalgia washed over me, reminding me of carefree days spent with friends at the drive-thru. If you’re bored with fast food and ready to impress at your next gathering, you’ve just stumbled upon the perfect recipe. Let’s dive into how you can create your own Big Mac Sauce and make every meal a celebration!

Why You'll Love This Big Mac Sauce

  • This Big Mac Sauce is incredibly easy to make, allowing you to whip it up in just 10 minutes.
  • The flavor is absolutely mouthwatering, combining creamy mayonnaise, zesty mustard, and tangy pickle relish for a taste that elevates any dish.
  • Its versatility means you can use it not only on burgers but also as a delicious dip for fries, making it perfect for any meal or snack.
  • Visually, the inviting golden hue and creamy texture are sure to catch the eye and impress your guests.

Big Mac Sauce Ingredients

For the Sauce

  • Mayonnaise – the creamy base that gives the sauce its luscious texture.
  • Yellow Mustard – adds a zesty kick that perfectly complements the other flavors.
  • Sweet Pickle Relish – provides a sweet and tangy burst, crucial for authentic Big Mac Sauce.
  • White Wine Vinegar – injects a subtle acidity that balances the richness of the mayonnaise.
  • Onion Powder – imparts a gentle onion flavor, enhancing the overall taste.
  • Garlic Powder – brings a delicious depth to the sauce without overwhelming other flavors.
  • Paprika – adds a beautiful color and a hint of smokiness to this delightful sauce.

How to Make Big Mac Sauce

  1. Gather all your ingredients. Start by collecting 1/2 cup mayonnaise, 2 tablespoons yellow mustard, and 3 tablespoons sweet pickle relish. Having everything within reach makes the process smooth and enjoyable!

  2. Combine in a mixing bowl. In a medium mixing bowl, add the mayonnaise, yellow mustard, and sweet pickle relish. Stir gently, allowing the colors to swirl together as they create a creamy base.

  3. Add additional flavors. Toss in 1 tablespoon white wine vinegar, 1 tablespoon onion powder, 1/2 teaspoon garlic powder, and 1/2 teaspoon paprika. Mix until it’s all combined into a smooth, delightful blend that tempts your taste buds.

  4. Taste and adjust. Give your sauce a little taste test! Feel free to tweak the seasonings if you wish—maybe a dash more mustard for tanginess or a hint more relish for sweetness.

  5. Chill the sauce. Once satisfied, cover your bowl and place it in the fridge for at least 30 minutes. This step allows the flavors to meld and intensify, making each dip even more scrumptious.

  6. Serve it up! After chilling, your homemade Big Mac Sauce is ready to shine. Serve it on burgers, as a dip alongside crispy fries, or use it creatively in salads.

Optional: Enhance your sauce with fresh herbs for an extra pop of flavor.

Exact quantities are listed in the recipe card below.

Big Mac Sauce Variations

Feel free to get creative with this delicious Big Mac Sauce, tailoring it to your taste and preferences!

  • Spicy Twist: Add 1-2 teaspoons of sriracha or your favorite hot sauce for a tangy kick that will spice up any burger!

  • Herby Delight: Stir in a tablespoon of finely chopped fresh herbs such as dill or parsley to introduce a fresh pop of flavor that brightens the sauce.

  • Chipotle Version: Incorporate a teaspoon of chipotle in adobo sauce for a smoky, rich flavor that adds depth and an exciting twist.

  • Sugar-Free: Use a sugar-free sweet pickle relish to keep the flavor intact while catering to low-sugar diets without sacrificing taste.

  • Creamy Avocado: Blend in some mashed avocado for a creamy texture and a unique flavor that makes your sauce rich and delightful.

  • Vegan Option: Swap regular mayonnaise for a plant-based alternative, ensuring everyone at the table enjoys this mouthwatering creation.

  • Balsamic Zest: Replace white wine vinegar with balsamic vinegar for a hint of sweetness and a gourmet touch that elevates your sauce.

  • Lemon Burst: Add a squeeze of fresh lemon juice for a bright and zesty tang that beautifully complements the creamy elements of the sauce.

Each variation offers a new experience, inviting you to enjoy this sauce in countless delicious ways. Experiment and find your favorite!

How to Store and Freeze Big Mac Sauce

Fridge: Store your Big Mac Sauce in an airtight container in the fridge for up to 1 week. This will keep the sauce fresh and flavorful for your next meal.

Freezer: While not recommended for long-term storage, you can freeze the sauce in an airtight freezer bag for up to 2 months. Remember to remove excess air before sealing to prevent freezer burn.

Thawing: When you’re ready to use your frozen Big Mac Sauce, simply transfer it to the fridge overnight to thaw. Stir well before serving to re-integrate any separated ingredients.

Reheating: If the sauce thickens after freezing, whisk in a little mayonnaise or a splash of vinegar to return to the desired consistency.

Make Ahead Options

Big Mac Sauce is a fantastic recipe to make ahead, saving you time during busy weeknights! You can prepare this delicious sauce up to 3 days in advance by mixing all the ingredients and storing it in an airtight container in the refrigerator. This not only enhances the flavors as they meld together but also keeps the sauce just as tasty when you’re ready to serve. To ensure maximum freshness, make sure to seal the container tightly and store it away from strong-smelling foods. When it’s time to enjoy your homemade burgers, simply give the sauce a quick stir and serve—it’s a hassle-free way to bring that gourmet taste to your table!

What to Serve with Big Mac Sauce?

Imagine a casual gathering with laughter and delicious bites that everyone adores—Big Mac Sauce elevates those moments like nothing else!

  • Juicy Burgers: The classic pairing! This sauce takes any burger to new heights, blending perfectly with beef, chicken, or veggie patties.

  • Crispy French Fries: A match made in heaven, the creamy and tangy flavors of the sauce make for a delightful dip that enhances crunchy fries.

  • Grilled Vegetable Skewers: The smoky char of grilled veggies contrasts beautifully with the sauce’s creaminess, bringing out fresh flavors in every bite.

  • Salted Pretzel Bites: Serve the sauce as a zesty dip for soft pretzels; the tangy notes complement the saltiness perfectly.

  • Coleslaw: Dress your slaw with Big Mac Sauce for an unexpected twist, adding creaminess to crunchy cabbage and carrots that’s sure to impress.

  • Stuffed Potatoes: As a decadent topping for baked potatoes, this sauce adds richness and flavor that perfectly contrasts with the fluffy potato texture.

  • Tortilla Chips: Transform the everyday nacho experience by using Big Mac Sauce in place of traditional cheese dip for a creamy comfort food combination.

Enjoy these pairings, making your meal unforgettable—all thanks to the iconic flavors of homemade Big Mac Sauce!

Chef's Helpful Tips

  • To ensure your Big Mac Sauce is perfectly creamy, use high-quality mayonnaise as the base for the best texture and flavor.
  • Be cautious not to add too much vinegar at once; start with the recommended amount and adjust for your taste to avoid overpowering the sauce.
  • When mixing, use a whisk instead of a spoon to incorporate air and achieve a smoother consistency.
  • Remember to chill the sauce for at least 30 minutes, as this resting time allows the flavors to meld beautifully and enhances the overall taste.

Big Mac Sauce Recipe FAQs

What type of mayonnaise should I use for Big Mac Sauce?
Absolutely! For the best texture and flavor, I recommend using high-quality mayonnaise like Duke’s or Hellmann’s. These brands have a rich, creamy consistency that will elevate your sauce to perfection.

How long can I store Big Mac Sauce in the fridge?
You can store your Big Mac Sauce in an airtight container in the fridge for up to 1 week. Just make sure it’s well-sealed to preserve its fresh, delightful flavor for every burger or fry dip!

Can I freeze Big Mac Sauce?
Yes! While it’s not typically recommended for long-term storage, you can freeze the sauce for up to 2 months. Simply place it in an airtight freezer bag, ensuring you remove excess air before sealing.

How do I thaw frozen Big Mac Sauce?
When you’re ready to enjoy your frozen sauce, transfer it to the fridge overnight to thaw gently. After thawing, it’s a good idea to stir well before serving to re-integrate any separated ingredients.

What should I do if my Big Mac Sauce is too thick after freezing?
If your sauce thickens after freezing, no worries! Simply whisk in a little additional mayonnaise or a splash of white wine vinegar. This will help restore the desired creamy consistency we all love.

Are there any dietary considerations for Big Mac Sauce?
Very! This sauce contains mayonnaise, which includes eggs, so it’s not suitable for those with egg allergies. For a vegan version, you can use egg-free mayonnaise as a base. Just check your ingredients to ensure they’re aligned with your dietary needs.

Big Mac Sauce

Big Mac Sauce

Big Mac Sauce is a creamy, flavorful blend that elevates burgers and snacks.
Print Recipe Pin Recipe
Prep Time 10 minutes mins
Chilling Time 30 minutes mins
Total Time 40 minutes mins
Servings: 4 servings
Course: Snacks & Appetizers
Cuisine: American
Calories: 90
Ingredients Equipment Method Nutrition Notes

Ingredients
  

Sauce Ingredients
  • 1/2 cup mayonnaise
  • 2 tablespoons yellow mustard
  • 3 tablespoons sweet pickle relish
  • 1 tablespoon white wine vinegar
  • 1 tablespoon onion powder
  • 1/2 teaspoon garlic powder
  • 1/2 teaspoon paprika

Equipment

  • Mixing bowl

Method
 

Steps
  1. Gather all your ingredients.
  2. Combine mayonnaise, yellow mustard, and sweet pickle relish in a mixing bowl.
  3. Add white wine vinegar, onion powder, garlic powder, and paprika. Mix until combined.
  4. Taste and adjust seasonings as desired.
  5. Chill the sauce in the fridge for at least 30 minutes.
  6. Serve the sauce on burgers or as a dip for fries.

Nutrition

Serving: 2tablespoonsCalories: 90kcalCarbohydrates: 2gProtein: 1gFat: 10gSaturated Fat: 1gPolyunsaturated Fat: 0.5gMonounsaturated Fat: 8gCholesterol: 5mgSodium: 150mgPotassium: 10mgSugar: 1gCalcium: 2mg

Notes

Use high-quality mayonnaise for best flavor and texture. Adjust vinegar to taste and whisk for a smoother consistency.

Tried this recipe?

Let us know how it was!

Filed Under: SNACKS & APPETIZERS

  • « Previous Page
  • 1
  • 2
  • 3
  • 4
  • 5
  • …
  • 49
  • Next Page »

Recent Posts

  • Crispy Potatoes in Oven
  • Lucky Charms Pancakes
  • Cheeseburger
  • Boiled Corn on the Cob
  • St. Patrick’s Day Dessert Parfaits

Recent Comments

No comments to show.

Footer

  • Contact
  • Privacy Policy
  • About Us
  • Terms
  • ↑ back to top

Copyright © 2024 www.Forkono.com

Table Of Content