Forkono

  • BREAKFAST & BRUNCH
  • DESSERT RECIPES
  • DINNER RECIPES
  • LUNCH RECIPES
  • About uS
  • SNACKS & APPETIZERS
menu icon
go to homepage
  • BREAKFAST & BRUNCH
  • DESSERT RECIPES
  • DINNER RECIPES
  • LUNCH RECIPES
  • About uS
  • SNACKS & APPETIZERS
search icon
Homepage link
  • BREAKFAST & BRUNCH
  • DESSERT RECIPES
  • DINNER RECIPES
  • LUNCH RECIPES
  • About uS
  • SNACKS & APPETIZERS
×

Pumpkin Whipped Feta Dip

December 12, 2025 by JudyWhite Leave a Comment

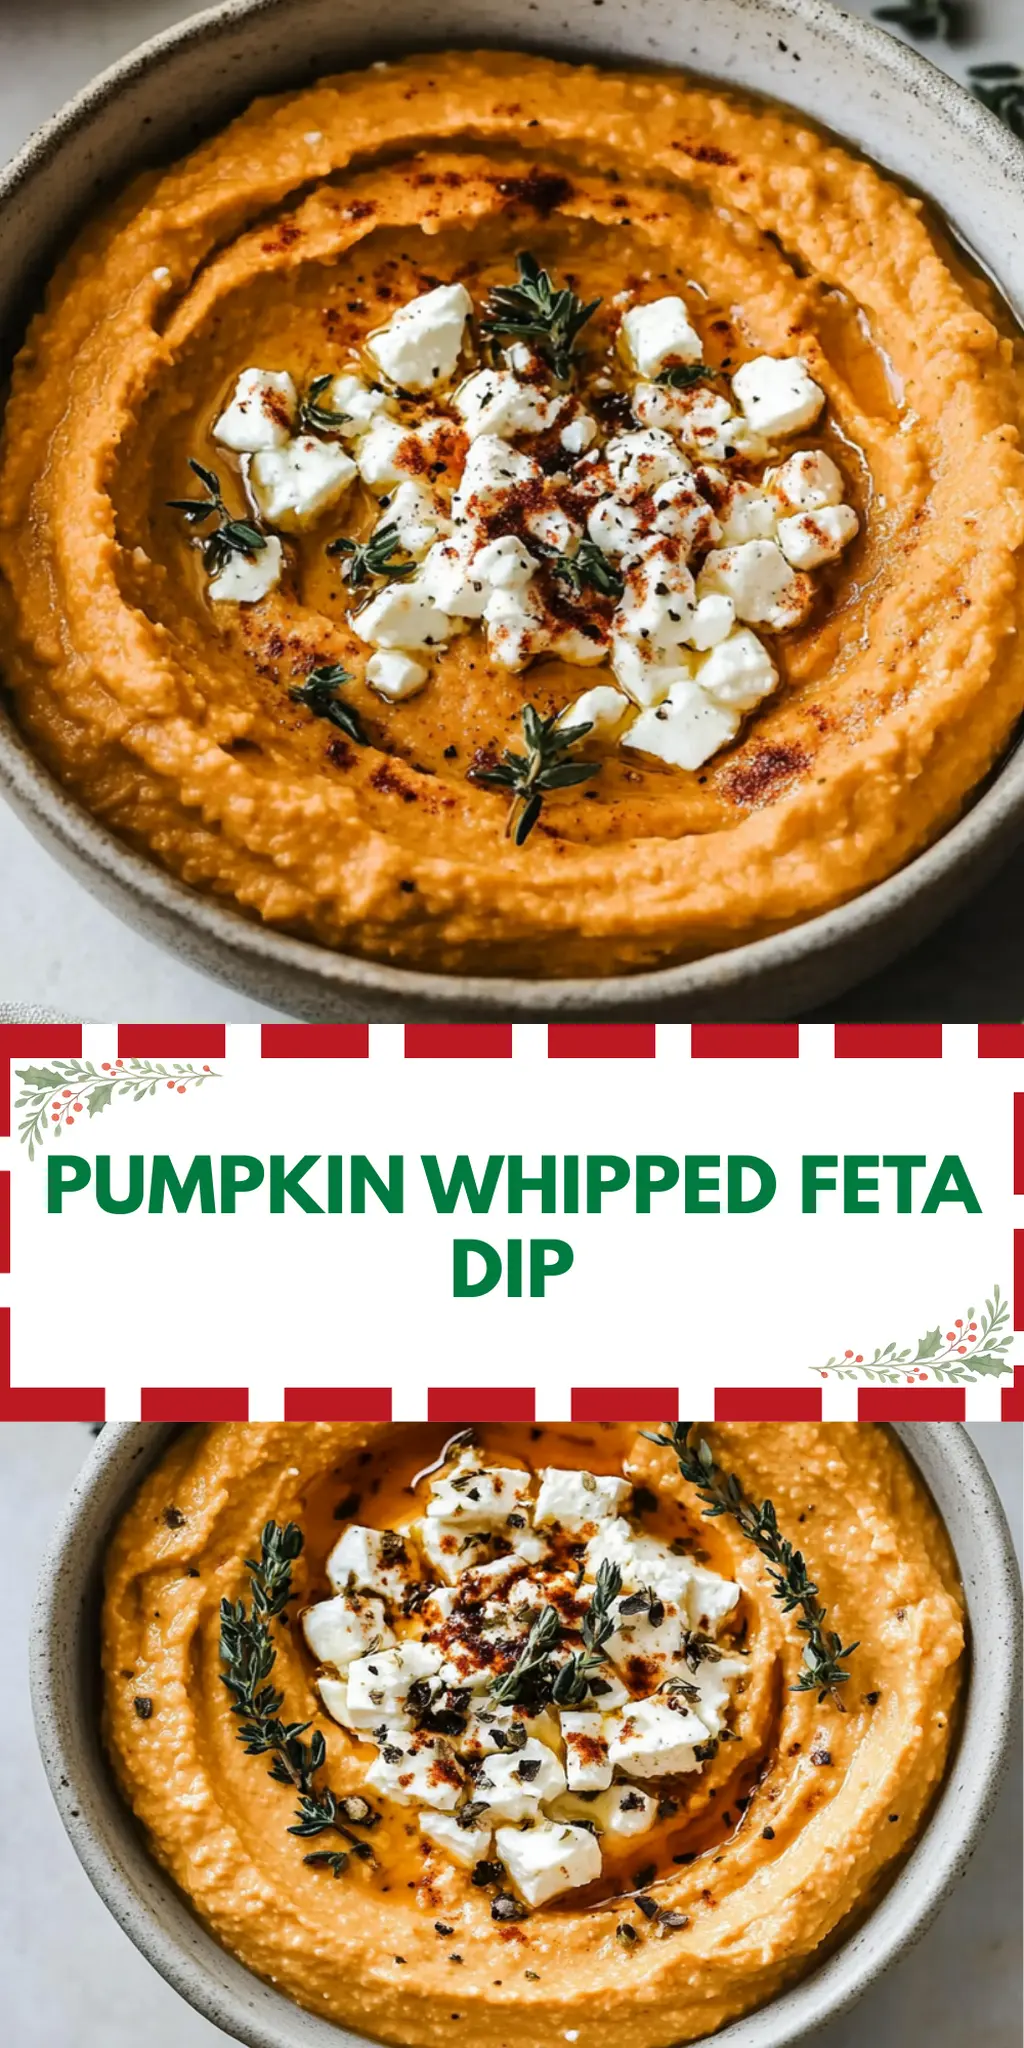
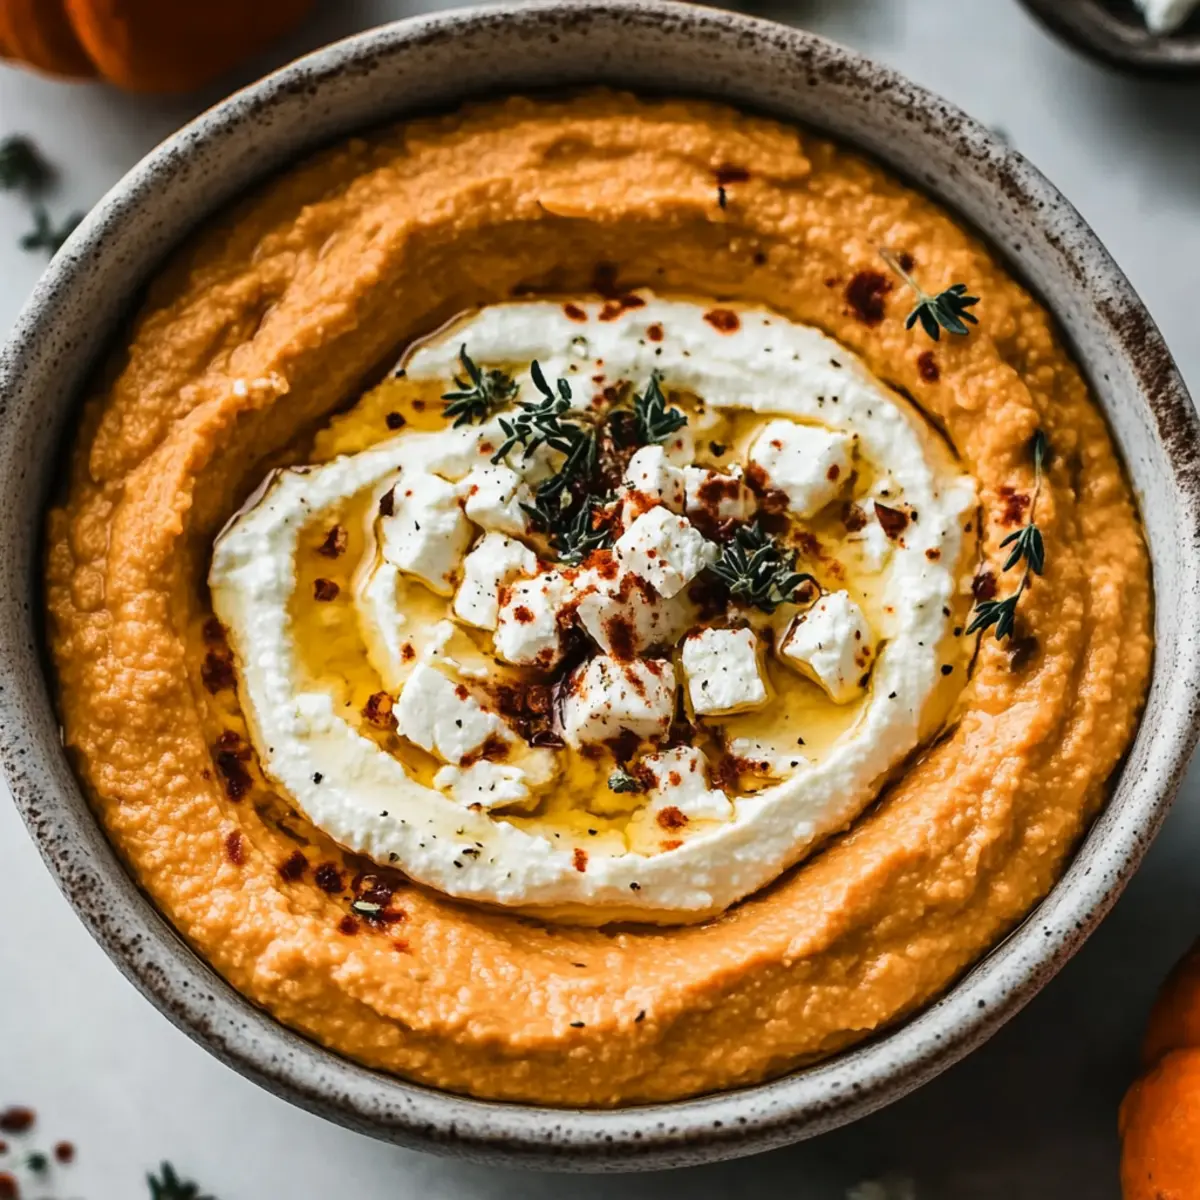
As the leaves turn gold and the air carries a hint of crispness, I can’t help but crave cozy flavors that celebrate the season. This Pumpkin Whipped Feta Dip effortlessly combines the rich, earthy essence of pumpkin with the creamy tang of feta, creating a dip that’s perfect for gatherings or a quiet night in. I first whipped this up while hosting a small get-together; a friend brought over a selection of cheeses and unexpectedly, this vibrant dip stole the show.

Not only is it a delight to the taste buds, but it’s also a breeze to prepare—taking just 15 minutes to blend together. The contrasting flavors of sweet honey and herbaceous thyme elevate this dip, making it a versatile crowd-pleaser, whether served with crackers, veggies, or on a charcuterie board. Add a drizzle of honey on top for a touch of sweetness that effortlessly captures the spirit of autumn! Join me in creating this delightful dish that transforms ordinary snacking into something extraordinary.

Why You'll Love This Pumpkin Whipped Feta Dip

  • This Pumpkin Whipped Feta Dip is incredibly easy to whip up, taking just 15 minutes of your time.
  • The combination of pumpkin and feta creates a mouthwatering flavor that will have everyone coming back for more.
  • Its versatility shines through as it pairs beautifully with crackers, fresh veggies, or even on a charcuterie board.
  • Visually, the vibrant orange hue topped with fresh thyme and a drizzle of honey makes it an eye-catching centerpiece for any gathering.
  • This dip is sure to please a crowd, making it the perfect choice for your next get-together.

Pumpkin Whipped Feta Dip Ingredients

• Get ready to create a creamy delight!

For the Base
• Feta cheese – a block of feta brings a rich, tangy flavor that perfectly balances the sweetness of pumpkin.
• Plain Greek yogurt – adds a smooth, creamy texture while maintaining a delightful tang.
• Canned pumpkin puree – the star ingredient that offers a warm, earthy flavor and vibrant color.

For Sweetening & Seasoning
• Honey – adds a layer of sweetness; start with 1 tablespoon and adjust to taste.
• Dried thyme – either dried or fresh, thyme introduces a lovely herbal note that pairs beautifully with pumpkin.
• Black pepper – freshly cracked for a hint of spice that complements the dip’s creamy texture.

For Garnishing
• Fresh thyme – brighten the dish with a sprinkle of fresh thyme on top just before serving.
• Chopped walnuts – optional but adds a delightful crunch; choose raw or toasted for extra flavor.
• Extra honey drizzle – enhances sweetness and visual appeal, making this Pumpkin Whipped Feta Dip even more irresistible.

How to Make Pumpkin Whipped Feta Dip

  1. Combine Ingredients: In a food processor, add the drained feta cheese, Greek yogurt, pumpkin puree, honey, thyme, and freshly cracked black pepper. This harmonious blend sets the foundation for your creamy dip.

  2. Blend Smoothly: Pulse your mixture until it’s smooth and creamy. Take your time here; this step ensures that all the flavors meld beautifully together, creating a luscious dip.

  3. Taste & Adjust: Give your dip a taste and feel free to adjust the sweetness by adding more honey if desired. Remember, the balance of sweetness and tang is key to making this dip shine!

  4. Transfer & Garnish: Spoon the dip into a serving bowl. If you’re feeling fancy, sprinkle fresh thyme and chopped walnuts on top for added texture and flavor. This will make your dip look as good as it tastes!

  5. Drizzle with Honey: Just before serving, drizzle some extra honey over the top for that gorgeous finishing touch. This adds a visually appealing element while enhancing the dip’s sweetness.

Optional: Serve with a side of crispy pita chips or colorful veggie sticks for a delightful snack experience.

Exact quantities are listed in the recipe card below.

Make Ahead Options

These Pumpkin Whipped Feta Dip is a fantastic choice for meal prep! You can blend all the ingredients together up to 24 hours in advance—just be sure to store it in an airtight container in the refrigerator to maintain its creamy texture and fresh flavor. When you’re ready to serve, simply give the dip a quick stir, taste, and adjust the sweetness with a little extra honey if needed. To prevent moisture loss and maintain quality, cover it tightly with plastic wrap if you’ve mixed it ahead of time. The dip is just as delicious when served cold or at room temperature, making it a convenient and scrumptious option for your busy week!

Pumpkin Whipped Feta Dip Variations

Feel free to put your own spin on this delightful dip; the possibilities are endless!

  • Spicy Kick:
    Add 1-2 teaspoons of chili flakes or hot sauce for a fiery twist. This brings a whole new level of flavor that will excite your taste buds!

  • Herb Infusion:
    Swap thyme for rosemary or basil for a fresh herb twist. These fragrant options will elevate your dip with new aromatic dimensions.

  • Creamy Vegan Option:
    Use vegan cream cheese in place of feta for a plant-based alternative. Creamy and rich, it retains the luscious texture that everyone will love.

  • Maple Sweetness:
    Replace honey with maple syrup for an earthy sweetness. The transition will provide a delightful twist, perfect for those cozy autumn evenings.

  • Nutty Delight:
    Incorporate 1/4 cup of tahini for a nutty depth. It adds a creamy texture along with an additional flavor that will keep everyone guessing.

  • Cheesy Extras:
    Mix in a handful of grated Parmesan for a savory charm. This extra cheesy layer enhances the overall taste, making it irresistibly decadent.

  • Zesty Citrus:
    Add a squeeze of fresh lemon juice for brightening acidity. This zing will balance the flavors brilliantly, making your dip refreshingly vibrant.

  • Smoky Flavor:
    Incorporate a pinch of smoked paprika or chipotle powder for a smoky undertone. It adds a depth of flavor that pairs beautifully with the sweetness of pumpkin.

How to Store and Freeze Pumpkin Whipped Feta Dip

Fridge: Store your Pumpkin Whipped Feta Dip in an airtight container for up to 3 days. Keeping it sealed preserves freshness and flavor.

Freezer: For longer storage, freeze the dip for up to 2 months. Use a freezer-safe container, and leave some space for expansion as it freezes.

Thawing: When ready to enjoy, thaw in the fridge overnight before serving. Stir well, as the texture may change slightly after freezing.

Reheating: If desired, enjoy at room temperature or give it a quick stir and serve. Drizzle with honey just before serving for an extra touch of sweetness!

What to Serve with Pumpkin Whipped Feta Dip?

Create a delightful spread for your next gathering that will charm every guest—think warm and inviting flavors that invoke the season’s essence.

  • Crispy Pita Chips: These provide a satisfying crunch that perfectly contrasts the creamy dip, making each bite unforgettable.

  • Fresh Veggie Sticks: Carrots, celery, and bell peppers offer a refreshing crunch that enhances the flavors, adding a vibrant touch to your platter.

  • Charcuterie Board: Combine with assorted cheeses, cured meats, and fruits for a beautiful centerpiece that encourages mingling and sampling. The dip shines when surrounded by savory options.

  • Toasted Bread Slices: The warm, toasted base is ideal for slathering on the dip, lending a rustic charm and perfect bite.

  • Sweet Apple Slices: Their crisp sweetness pairs beautifully with the tangy feta, creating a delightful balance that’s both refreshing and satisfying.

  • Honey Drizzle: A light drizzle of honey over your dip adds an elegant touch, enhancing sweetness and tying all the flavors together.

  • Sparkling Water: A refreshing drink option, its bubbles cleanse the palate, allowing each dip experience to feel new and exciting.

  • Pumpkin Spiced Cookies: For dessert, these flavors echo the dip, offering a sweet finish to your meal that feels cozy and festive.

These pairings will elevate your Pumpkin Whipped Feta Dip from a simple appetizer to the star of the show!

Chef's Helpful Tips

  • For the best texture in your Pumpkin Whipped Feta Dip, blend the ingredients until smooth and creamy, giving it a couple of extra pulses if necessary.
  • Be cautious not to over-sweeten; start with a tablespoon of honey and adjust based on your taste preference.
  • When selecting your feta cheese, opt for a high-quality block rather than crumbled for a richer flavor experience.
  • Remember to serve the dip chilled or at room temperature for the best taste, and you can prepare it ahead of time for a more convenient gathering.

Pumpkin Whipped Feta Dip Recipe FAQs

What is the best way to choose ripe pumpkin puree?
Absolutely! When selecting canned pumpkin puree, look for options labeled “100% pumpkin.” Avoid those labeled as “pumpkin pie filling,” as they contain added sugars and spices. Ensure the can is undamaged and sealed properly for freshness.

How long can I store Pumpkin Whipped Feta Dip in the fridge?
You can store your Pumpkin Whipped Feta Dip in an airtight container in the fridge for up to 3 days. I recommend giving it a good stir before serving, as sometimes the flavors can separate a bit over time.

Can I freeze Pumpkin Whipped Feta Dip?
Yes! You can freeze Pumpkin Whipped Feta Dip for up to 2 months. To do this, place the dip in a freezer-safe container, leaving about an inch of space at the top for expansion. When you’re ready to enjoy it, thaw overnight in the fridge, then stir well and add an extra drizzle of honey just before serving for that perfect touch!

What if my dip is too sweet after adding honey?
No worries! If your Pumpkin Whipped Feta Dip turns out too sweet, you can balance it out by adding a pinch of salt or a squeeze of lemon juice. This will help cut through the sweetness and bring the flavors back in harmony!

Is this dip safe for pets?
While pumpkin puree is safe for dogs in moderation, feta cheese contains lactose, which can be hard for many pets to digest. I suggest keeping this dip for human enjoyment only—but a little taste of plain pumpkin can be a healthy treat for your furry friends!

How do I make the dip gluten-free?
Very simply! Just ensure you serve the Pumpkin Whipped Feta Dip with gluten-free crackers or veggie sticks instead of traditional bread or pita. This way, everyone can enjoy this delightful dip without worrying about gluten!

Pumpkin Whipped Feta Dip

Pumpkin Whipped Feta Dip

Pumpkin Whipped Feta Dip is a creamy, tangy snack that blends pumpkin and feta, perfect for gatherings.
Print Recipe Pin Recipe
Prep Time 15 minutes mins
Total Time 15 minutes mins
Servings: 6 servings
Course: Snacks & Appetizers
Cuisine: American
Calories: 200
Ingredients Equipment Method Nutrition Notes

Ingredients
  

Base
  • 1 block feta cheese drained
  • 1 cup plain Greek yogurt
  • 1 cup canned pumpkin puree
Sweetening & Seasoning
  • 1 tablespoon honey adjust to taste
  • 1 teaspoon dried thyme or fresh
  • 1 pinch black pepper freshly cracked
Garnishing
  • 1 tablespoon fresh thyme for topping
  • 2 tablespoons chopped walnuts optional
  • 1 tablespoon extra honey drizzle

Equipment

  • Food processor

Method
 

How to Make Pumpkin Whipped Feta Dip
  1. In a food processor, add the drained feta cheese, Greek yogurt, pumpkin puree, honey, thyme, and freshly cracked black pepper.
  2. Pulse your mixture until it’s smooth and creamy.
  3. Give your dip a taste and feel free to adjust the sweetness by adding more honey if desired.
  4. Spoon the dip into a serving bowl and sprinkle fresh thyme and chopped walnuts on top.
  5. Just before serving, drizzle some extra honey over the top.

Nutrition

Serving: 1servingCalories: 200kcalCarbohydrates: 15gProtein: 6gFat: 15gSaturated Fat: 5gPolyunsaturated Fat: 0.5gMonounsaturated Fat: 8gCholesterol: 30mgSodium: 500mgPotassium: 300mgFiber: 2gSugar: 3gVitamin A: 2000IUVitamin C: 2mgCalcium: 150mgIron: 1mg

Notes

Serve with a side of crispy pita chips or colorful veggie sticks for a delightful snack experience.

Tried this recipe?

Let us know how it was!

Filed Under: SNACKS & APPETIZERS

New England Clam Chowder with Fresh Clams

December 12, 2025 by JudyWhite Leave a Comment

There’s nothing quite like the rich, creamy warmth of a comforting bowl of New England Clam Chowder with Fresh Clams. Picture this: the first chill of autumn descends, and the air is filled with earthy scents from your kitchen, a teasing hint of salty ocean waves mingling with the buttery aroma of bacon and hearty potatoes. This dish isn’t just another soup; it’s a feel-good classic that invites memories of family gatherings and cozy evenings.

I discovered this recipe through a spontaneous visit to my local seafood market, where the vibrant displays of freshly caught cherrystone clams caught my eye. My excitement quickly turned into inspiration as I began picturing a cozy dinner with friends, where laughter and stories would blend seamlessly with the delightful flavors of homemade chowder. Trust me, once you savor that first spoonful, you’ll understand why it’s become a beloved staple.

Join me in creating this soul-soothing dish that’ll not only delight your taste buds but impress any guests at your table. Let’s dive into the creamy goodness and make some memories together!

Why You'll Love This New England Clam Chowder with Fresh Clams

  • This New England Clam Chowder with Fresh Clams is incredibly easy to make, allowing you to enjoy a hearty, homemade meal without spending all day in the kitchen.
  • The combination of fresh clams, smoky bacon, and creamy potatoes creates a flavor profile that is both comforting and unforgettable.
  • Its versatility means you can customize ingredients to suit your taste, whether you prefer it with more herbs or a dash of spice.
  • Visually, this chowder is a feast for the eyes, with its creamy texture and vibrant clams making for an appetizing presentation.

New England Clam Chowder Ingredients

• Dive into the deliciousness of New England Clam Chowder with Fresh Clams!

For the Chowder Base

  • 5 pounds live cherrystone clams – ensure they are scrubbed clean for the best flavor.
  • 1 ounce salt pork – adds a savory depth that elevates the chowder.
  • 1.5 ounces bacon – finely diced, it brings a delightful smokiness to the mix.
  • 2 tablespoons butter – enhances the richness of the chowder.
  • 1/4 cup minced celery – adds a subtle crunch and fresh taste.
  • 1 cup onion – chopped for sweetness and depth of flavor.
  • 2 teaspoons fresh garlic – minced garlic provides an aromatic boost.

For the Potatoes

  • 1.25 pounds Russet potatoes – peeled and diced to give the chowder hearty texture.
  • 2 tablespoons flour – helps thicken the chowder, making it luxuriously creamy.

For the Seasoning

  • 3 cups stock from cooking the clams – this flavorful base is essential for authentic taste.
  • 1 teaspoon fresh thyme – or 1/2 teaspoon dried, for an earthy note.
  • 1 leaf bay – adds depth and complexity to the overall flavor.

For the Creaminess

  • 2 cups heavy cream – the key to that rich, velvety finish.
  • Black pepper – to taste, enhancing all the beautiful flavors.

For Serving

  • Butter – for extra richness when serving.
  • Oyster crackers – a delightful crunchy companion to your chowder.

How to Make New England Clam Chowder

  1. Scrub and Cook Clams: Start by scrubbing the cherrystone clams thoroughly. Place them in a pot of water and cook over medium heat until they open. Remember to reserve the cooking liquid—this is your clam stock!

  2. Render Pork and Bacon: In a large pot, add the diced salt pork and bacon. Cook over medium heat until crispy and golden brown, allowing those wonderful smoky flavors to infuse into the pot.

  3. Sauté Veggies: Add the butter, minced celery, chopped onion, and garlic to the pot. Sauté them for about 5-7 minutes until they’re soft and fragrant, filling your kitchen with warmth and flavor.

  4. Add Potatoes and Flour: Toss in the diced Russet potatoes and flour, stirring well for about 3 minutes. This will help to coat the potatoes and prepare them for the broth ahead.

  5. Pour in Clam Stock & Seasoning: Gradually add the reserved clam stock, along with the fresh thyme and bay leaf. Bring the mixture to a gentle simmer, allowing the flavors to meld together beautifully.

  6. Cook Until Tender: Let the chowder simmer for 15-20 minutes, or until the potatoes are tender. You’ll know it’s ready when a fork easily goes through the bits of potato.

  7. Add Cream and Clams: Stir in the heavy cream and the cooked clams. Gently heat everything through, allowing the chowder to thicken and become luxuriously creamy.

  8. Season to Taste: Sprinkle in black pepper as desired, adjusting the seasoning to suit your taste buds. You deserve a hearty flavor in every spoonful!

  9. Serve Warm: Ladle the chowder into bowls, adding a pat of butter to each and a sprinkle of oyster crackers for that delightful crunch when serving.

Optional: A sprinkle of freshly chopped parsley adds a lovely touch of freshness on top!
Exact quantities are listed in the recipe card below.

Make Ahead Options

These New England Clam Chowder with Fresh Clams are perfect for meal prep enthusiasts! You can scrub the clams and cook them up to 24 hours in advance; simply store them in their cooking liquid in the refrigerator to preserve their freshness. You can also sauté the vegetables and bacon a day ahead and refrigerate them. When you’re ready to serve, just combine everything in the pot, add the reserved clam stock, and throw in the clams and cream. This way, you’ll have a rich and hearty chowder that tastes just as delicious as if you made it from scratch that same day! Enjoy a cozy meal without the fuss on busy weeknights.

Storage Tips for New England Clam Chowder

  • Room Temperature: Enjoy your New England Clam Chowder with Fresh Clams right after cooking for the best flavor. If left out, consume within 2 hours to ensure safety.
  • Fridge: Store leftovers in an airtight container in the fridge for up to 3 days. Reheat gently on the stovetop or microwave until warmed through, stirring occasionally.
  • Freezer: For longer storage, freeze the chowder in a freezer-safe container for up to 3 months. Thaw in the fridge overnight before reheating. Avoid freezing if the chowder contains cream, as it may separate.
  • Reheating: When reheating, do so over low heat on the stove, stirring frequently to maintain a creamy texture. Add a splash of cream if it thickens too much during reheating.

New England Clam Chowder Variations

Feel free to tailor this chowder recipe to match your tastes and dietary needs!

  • Vegetarian: Substitute clams with diced mushrooms, adding depth and umami, leaving out the pork and bacon for a lighter version.
  • Creamy & Hearty: Swap heavy cream for coconut milk; this will give the chowder a subtle sweetness and extra creaminess.
  • Spicy Twist: Add a pinch of cayenne pepper or diced jalapeños for a warm kick that dances on your tongue.
  • Herb-Infused: Enhance with fresh dill or basil; a fragrant pop of herbaceousness elevates the chowder to new heights.
  • Smoky Flavor: Introduce smoked paprika or liquid smoke for a flavor profile reminiscent of cozy beach bonfires.
  • Seafood Medley: Toss in shrimp or scallops along with the clams for a delightful seafood mix that satisfies any craving.
  • Corny Goodness: Add sweet corn kernels for a burst of sweetness and texture that brightens up each bowl.
  • Gluten-Free: Switch out regular flour for cornstarch or a gluten-free flour blend to maintain the creamy base without gluten.

Experimenting with these variations will make your chowder uniquely yours and deeply satisfying!

What to Serve with New England Clam Chowder?

Pairing a delicious side or beverage with your rich New England Clam Chowder can elevate your dining experience to a whole new level.

  • Garlic Bread: The crispy, buttery texture of garlic bread perfectly complements the creamy chowder, ideal for dipping.

  • Cornbread Muffins: Sweet and crumbly cornbread offers a delightful contrast to the chowder’s savory, rich flavors. These muffins are great for sopping up every drop!

  • Fresh Side Salad: A light, vibrant salad with mixed greens adds a refreshing crunch and balances the richness of the chowder beautifully. Topped with a zesty vinaigrette, it just sings summer.

  • Steamed Asparagus: Tossed with a touch of lemon and olive oil, steamed asparagus brings a bright, fresh element that pairs wonderfully with the clam flavor.

  • Beer or White Wine: A crisp, cold lager or a glass of chilled Sauvignon Blanc complements the sea-salty essence of the chowder while enhancing the savory depth of the ingredients.

  • Apple Pie: This classic dessert rounds off the meal with its sweet and tart flavors, providing a perfect contrast to the savory chowder experience.

Chef's Helpful Tips

  • When making New England Clam Chowder with Fresh Clams, it’s essential to scrub the clams thoroughly to remove any sand or grit that can affect the chowder’s texture.
  • Always reserve the clam cooking liquid, as this flavorful stock is the backbone of your chowder and enhances its taste.
  • When sautéing the vegetables, cook them until they’re just softened to avoid overcooking and losing their fresh flavors.
  • Finally, be careful not to boil the chowder after adding the cream, as this can cause it to curdle; a gentle heat is key to achieving the perfect creamy consistency.

New England Clam Chowder with Fresh Clams Recipe FAQs

How do I choose the best clams for chowder?
Absolutely! When selecting cherrystone clams, look for ones that are tightly closed and smell like the ocean. Avoid clams with dark spots or cracks in their shells, as these can indicate they are not fresh. If they are open, give them a gentle tap; if they close up, they are alive and safe to cook!

How should I store leftover chowder?
Very good question! You can store your New England Clam Chowder with Fresh Clams in an airtight container in the fridge for up to 3 days. Just ensure it cools down before sealing it. When you reheat, do so gently on the stovetop or microwave—stirring occasionally to keep that creamy texture intact!

Can I freeze clam chowder?
Yes, you can! However, if your chowder contains cream, it’s best to avoid freezing as it can separate when thawed. If you must, freeze it in a freezer-safe container for up to 3 months. To thaw, place it in the fridge overnight. When you’re ready to enjoy it, slowly reheat on low, stirring frequently, and consider adding a splash of cream to revive its creaminess.

What should I do if my chowder is too thick?
Don’t worry; it happens! If your chowder is thicker than you like, simply stir in a bit of clam stock or milk to reach your desired consistency. Heat it gently on the stove while stirring, so it warms through evenly without curdling the cream.

Is this recipe suitable for people with shellfish allergies?
No, unfortunately! This New England Clam Chowder with Fresh Clams is not suitable for anyone with shellfish allergies. Always be cautious and read labels if you’re using any pre-packaged ingredients. If you’re looking for alternatives, consider substituting with vegetables like mushrooms or hearty beans to create a different but delicious chowder!

How long should I cook the potatoes for the ideal texture?
Great question! After adding the potatoes, let the chowder simmer for about 15-20 minutes. Check for doneness by poking a potato cube with a fork—if it slides in easily, then it’s perfect! You want them tender yet not falling apart, ensuring that lovely texture remains in every spoonful.

New England Clam Chowder with Fresh Clams

New England Clam Chowder with Fresh Clams

Enjoy the rich, creamy warmth of New England Clam Chowder with Fresh Clams, a comforting dish perfect for cozy evenings.
Print Recipe Pin Recipe
Prep Time 30 minutes mins
Cook Time 45 minutes mins
Total Time 1 hour hr 15 minutes mins
Servings: 6 cups
Course: DINNER RECIPES
Cuisine: American
Calories: 300
Ingredients Equipment Method Nutrition Notes

Ingredients
  

Chowder Base
  • 5 pounds live cherrystone clams ensure they are scrubbed clean for the best flavor
  • 1 ounce salt pork adds a savory depth that elevates the chowder
  • 1.5 ounces bacon finely diced for smokiness
  • 2 tablespoons butter enhances the richness of the chowder
  • 1/4 cup minced celery adds a subtle crunch and fresh taste
  • 1 cup onion chopped for sweetness and depth of flavor
  • 2 teaspoons fresh garlic minced for aromatic boost
Potatoes
  • 1.25 pounds Russet potatoes peeled and diced for hearty texture
  • 2 tablespoons flour helps thicken the chowder
Seasoning
  • 3 cups stock from cooking the clams essential for authentic taste
  • 1 teaspoon fresh thyme or 1/2 teaspoon dried
  • 1 leaf bay adds depth and complexity
Creaminess
  • 2 cups heavy cream key to rich, velvety finish
  • Black pepper to taste, enhancing flavors
Serving
  • Butter for extra richness when serving
  • Oyster crackers crunchy companion to chowder

Equipment

  • Large pot
  • Saucepan

Method
 

Steps to Make Chowder
  1. Scrub and Cook Clams: Start by scrubbing the cherrystone clams thoroughly. Place them in a pot of water and cook over medium heat until they open. Remember to reserve the cooking liquid—this is your clam stock!
  2. Render Pork and Bacon: In a large pot, add the diced salt pork and bacon. Cook over medium heat until crispy and golden brown, allowing those wonderful smoky flavors to infuse into the pot.
  3. Sauté Veggies: Add the butter, minced celery, chopped onion, and garlic to the pot. Sauté them for about 5-7 minutes until they’re soft and fragrant.
  4. Add Potatoes and Flour: Toss in the diced Russet potatoes and flour, stirring well for about 3 minutes.
  5. Pour in Clam Stock & Seasoning: Gradually add the reserved clam stock, along with the fresh thyme and bay leaf. Bring the mixture to a gentle simmer.
  6. Cook Until Tender: Let the chowder simmer for 15-20 minutes, or until the potatoes are tender.
  7. Add Cream and Clams: Stir in the heavy cream and the cooked clams. Gently heat everything through.
  8. Season to Taste: Sprinkle in black pepper as desired.
  9. Serve Warm: Ladle the chowder into bowls, adding a pat of butter and a sprinkle of oyster crackers.

Nutrition

Serving: 1cupCalories: 300kcalCarbohydrates: 25gProtein: 10gFat: 20gSaturated Fat: 10gPolyunsaturated Fat: 1gMonounsaturated Fat: 5gCholesterol: 60mgSodium: 800mgPotassium: 450mgFiber: 2gSugar: 2gVitamin A: 500IUVitamin C: 3mgCalcium: 50mgIron: 1mg

Notes

For extra freshness, add a sprinkle of freshly chopped parsley on top before serving.

Tried this recipe?

Let us know how it was!

Filed Under: DINNER RECIPES

Cajun Potato Soup with Andouille Sausage

December 12, 2025 by JudyWhite Leave a Comment

There’s something undeniably comforting about a warm bowl of soup simmering on the stove, especially as the evenings grow cooler. I was inspired to perfect my own version of a Cajun classic one chilly evening, where the smoky aroma of andouille sausage mingled with the rich scent of spices, filling my home with a vibrant warmth that beckoned me to the kitchen. This Cajun Potato Soup with Andouille Sausage is a delicious blend of hearty goodness and zesty flavor, making it the perfect antidote to those tired weeknights spent dodging the drive-thru.

Not only does this soup come together with simple, wholesome ingredients, but it also celebrates the versatility of potatoes and the bold flavors of Cajun cooking. Whether you’re cooking for a busy family or hosting a cozy gathering with friends, this recipe is sure to impress and satisfy. Grab a spoon and let’s dive into this delightful dish that promises warmth, comfort, and a touch of culinary adventure!

Why You'll Love This Cajun Potato Soup with Andouille Sausage

  • This Cajun Potato Soup with Andouille Sausage is incredibly easy to make, allowing you to whip up a hearty meal without any fuss.
  • The bold flavors of andouille sausage and Cajun spices create a deliciously rich experience that’s perfect for warming you up on chilly nights.
  • Not only does it taste fantastic, but the vibrant colors of the ingredients make it a visually appealing dish that will impress your guests.
  • It’s also versatile enough to adapt to your pantry staples, making it a great option for any occasion.

Cajun Potato Soup with Andouille Sausage Ingredients

Get ready for a flavorful journey!

For the Soup

  • Vegetable oil – perfect for sautéing, enhancing flavors without overpowering the dish.
  • Andouille sausage – brings a smoky, spicy kick; feel free to substitute with kielbasa for a milder taste.
  • Large onion – adds sweetness and depth; yellow onions work best in this soup.
  • Celery – contributes crunch and freshness; you can swap it for leeks if desired.
  • Red bell pepper – adds a pop of color and sweetness; use any bell pepper if needed.
  • Garlic – infuses the soup with aromatic goodness; fresh garlic is always best for flavor.
  • Cajun seasoning – the star of this dish, adding zest and warmth; adjust the amount based on your spice preference.
  • Kosher salt – enhances all the flavors; keep it to your taste, especially if your broth is salty.
  • Black pepper – adds a mild heat; adjust according to your preference.
  • Paprika – enhances the color and flavor with a subtle smokiness.
  • Cayenne pepper – gives that extra kick; start with a little and add more if you like it spicier.
  • Chicken broth – the base for a hearty soup; vegetable broth can be used for a vegetarian option.
  • Russet potatoes – provide creaminess and body to the soup; Yukon gold works well too.
  • Heavy whipping cream – adds richness and creamy texture; substitute with half-and-half for a lighter option.
  • Mild cheddar cheese – melts beautifully into the soup for extra indulgence; a sprinkle of pepper jack can spice it up!
  • Parsley – for a fresh, vibrant garnish that enhances presentation.

This Cajun Potato Soup with Andouille Sausage recipe is a delightful way to bring warmth and flavor to your table!

How to Make Cajun Potato Soup with Andouille Sausage

  1. Heat Oil: In a large pot over medium heat, pour in the vegetable oil. Once it shimmers, add the sliced andouille sausage and cook, stirring occasionally until browned and fragrant, about 3-4 minutes. Remove the sausage and set aside.

  2. Sauté Vegetables: In the same pot, add the diced onion, celery, and red bell pepper. Sauté until softened and the colors brighten, approximately 5-8 minutes. Stir in the minced garlic and cook for an additional minute.

  3. Simmer Soupy Goodness: Now it’s time to add flavor! Stir in the Cajun seasoning, kosher salt, black pepper, paprika, cayenne pepper, chicken broth, and cubed potatoes. Reduce the heat and let it simmer for 20-25 minutes, until the potatoes are fork-tender.

  4. Mix in Cream and Cheese: Return the browned sausage to the pot, then gently stir in the heavy cream and shredded cheddar cheese. Let everything simmer together for an extra 5 minutes, or until heated through and the cheese melts beautifully.

  5. Garnish and Serve: Finally, garnish with freshly chopped parsley for a pop of color and brightness. Serve the soup warm and enjoy the comforting flavors!

Optional: A sprinkle of extra Cajun seasoning can elevate the flavor even more!

Exact quantities are listed in the recipe card below.

Make Ahead Options

These Cajun Potato Soup with Andouille Sausage preparations are perfect for busy weeknights or meal planning! You can chop the vegetables (onion, celery, and bell pepper) and garlic up to 24 hours in advance, storing them in an airtight container in the refrigerator to keep them fresh. Additionally, you can cook the sausage and store it separately for up to 3 days. When you’re ready to enjoy the soup, simply reheat the sautéed veggies and sausage in a pot, add the chicken broth, potatoes, and spices, and let it simmer. Stir in the heavy cream and cheese just before serving for that creamy, delicious finish. This way, you’ll have a hearty, flavorful meal ready with minimal effort!

How to Store and Freeze Cajun Potato Soup with Andouille Sausage

Fridge: Store leftover Cajun Potato Soup in an airtight container for up to 3 days. The flavors deepen as it rests, making it even more delicious!

Freezer: Freeze the soup in individual portions for up to 3 months. Make sure to leave some space in the container for expansion as it freezes.

Reheating: Thaw overnight in the fridge and reheat on the stovetop over medium heat, stirring occasionally until heated through. You can also microwave it in short intervals.

Serving Suggestions: Consider adding a splash of cream or a sprinkle of cheese when reheating to restore its creamy texture and indulgent flavors.

Cajun Potato Soup with Andouille Sausage Variations

Feel free to explore these exciting twists and substitutions to make this soup uniquely yours!

  • Dairy-Free: Substitute heavy cream with coconut milk and cheese with nutritional yeast for a rich, creamy texture without dairy.

  • Spicy Kick: Add diced jalapeños or a dash more cayenne for an added layer of heat that can ignite your taste buds!

  • Veggie-Lover: Replace andouille sausage with hearty mushrooms or tempeh for a delicious vegetarian option that retains the soup’s robustness.

  • Smoky Flavor: Use smoked paprika instead of regular paprika, creating an irresistible smoky depth that enhances the Cajun flare beautifully.

  • Herb Infusion: Fresh thyme or bay leaves can elevate the dish, providing a fragrant twist that makes every spoonful a comforting delight.

  • Crispy Topping: Top the soup with crispy fried onions or bacon bits for a satisfying crunch that adds a beautiful contrast to the creamy soup.

  • Cheesy Variants: Try goat cheese or a sharper cheddar for a tangy flavor that enhances the soup’s rich profile and brings a delightful twist.

  • Quinoa Boost: Stir in cooked quinoa for added protein and texture, transforming this soup into a filling meal that’s both hearty and nutritious.

What to Serve with Cajun Potato Soup with Andouille Sausage?

Pair your hearty bowl of soup with these delightful sides that elevate the entire meal experience.

  • Crusty Bread: A warm loaf, perfect for dipping, soaks up the leftover flavors of the soup.

  • Homemade Cornbread: Sweet and fluffy, it provides a comforting balance to the spicy Cajun flavors in the soup.

  • Caesar Salad: Crisp romaine and creamy dressing offer freshness and crunch, complementing the velvety soup beautifully. The flavors meld perfectly, creating a satisfying contrast with every bite.

  • Roasted Vegetables: Seasoned garlic and herbs enhance the natural sweetness, bringing a vibrant health boost alongside the rich soup. They add color and a bit of earthiness to the meal.

  • Brewed Iced Tea: The refreshing chill and slight sweetness of the tea is a wonderful match with the bold spices in the soup, providing a delightful contrast.

  • Apple Crisp: A warm dessert with a touch of cinnamon provides a sweet finale to your meal, finishing off the evening with a comforting note. The combination of the soup’s warmth and the crisp’s sweetness creates a cozy atmosphere.

Enjoy these pairings alongside your Cajun Potato Soup with Andouille Sausage for a complete, soul-warming experience!

Chef's Helpful Tips

  • When making Cajun Potato Soup with Andouille Sausage, make sure to cook the sausage until nicely browned to enhance its flavor before adding other ingredients.
  • Avoid overcrowding the pot when sautéing vegetables; give them enough space to soften and caramelize properly for maximum flavor development.
  • For a creamier texture, mash a portion of the potatoes in the soup before stirring in the cream and cheese, ensuring a rich consistency.
  • Always taste and adjust the seasoning towards the end of cooking, especially since the broth can vary in saltiness.
  • Fresh parsley not only adds flavor but also brightens the dish visually, so don’t skip the garnish!

Cajun Potato Soup with Andouille Sausage Recipe FAQs

What type of potatoes are best for this soup?
For the best results, I recommend using russet potatoes as they become wonderfully creamy when cooked. Yukon gold potatoes work well too, providing a slightly different texture if you want to mix things up!

How should I store leftover Cajun Potato Soup?
Absolutely! Store any leftovers in an airtight container in the fridge for up to 3 days. The flavors will develop further, making each spoonful even more delightful. Just remember to let the soup cool to room temperature before sealing it up.

Can I freeze Cajun Potato Soup with Andouille Sausage?
Very much so! Pour the cooled soup into freezer-safe containers or heavy-duty freezer bags. Make sure to leave some space at the top for expansion, and it can be frozen for up to 3 months. When you’re ready to enjoy it again, simply thaw it overnight in the fridge.

What if my soup is too thick?
No worries! If you find the soup to be thicker than you’d like, simply stir in a little extra chicken broth or water while reheating until you reach your desired consistency. It’s a quick fix that keeps everything flavorful and comforting!

Are there any allergies I should be aware of when making this recipe?
Absolutely! This Cajun Potato Soup contains dairy, gluten (in the sausage), and potentially allergens from the andouille sausage. If cooking for someone with dietary restrictions, consider using gluten-free sausage options and substituting the heavy cream for a non-dairy milk to maintain creaminess without the lactose.

Cajun Potato Soup with Andouille Sausage

Cajun Potato Soup with Andouille Sausage

A comforting and flavorful Cajun Potato Soup with Andouille Sausage, perfect for chilly evenings.
Print Recipe Pin Recipe
Prep Time 15 minutes mins
Cook Time 40 minutes mins
Total Time 55 minutes mins
Servings: 6 bowls
Course: DINNER RECIPES
Cuisine: Cajun
Calories: 450
Ingredients Equipment Method Nutrition Notes

Ingredients
  

For the Soup
  • 2 tablespoons vegetable oil perfect for sautéing
  • 12 ounces andouille sausage or kielbasa for a milder taste
  • 1 large onion yellow onions work best
  • 2 stalks celery can be substituted with leeks
  • 1 medium red bell pepper or any bell pepper
  • 3 cloves garlic fresh is best for flavor
  • 2 tablespoons Cajun seasoning adjust based on spice preference
  • 1 teaspoon kosher salt to taste
  • 1 teaspoon black pepper adjust to preference
  • 1 teaspoon paprika adds smokiness
  • 0.5 teaspoon cayenne pepper add more for extra heat
  • 4 cups chicken broth or vegetable broth for vegetarian
  • 3 large russet potatoes or Yukon gold
  • 1 cup heavy whipping cream or half-and-half
  • 1 cup mild cheddar cheese can use pepper jack for spice
  • 0.25 cup parsley for garnish

Equipment

  • Large pot

Method
 

How to Make Cajun Potato Soup with Andouille Sausage
  1. Heat Oil: In a large pot over medium heat, pour in the vegetable oil. Once it shimmers, add the sliced andouille sausage and cook, stirring occasionally until browned and fragrant, about 3-4 minutes. Remove the sausage and set aside.
  2. Sauté Vegetables: In the same pot, add the diced onion, celery, and red bell pepper. Sauté until softened and the colors brighten, approximately 5-8 minutes. Stir in the minced garlic and cook for an additional minute.
  3. Simmer Soupy Goodness: Stir in the Cajun seasoning, kosher salt, black pepper, paprika, cayenne pepper, chicken broth, and cubed potatoes. Reduce the heat and let it simmer for 20-25 minutes, until the potatoes are fork-tender.
  4. Mix in Cream and Cheese: Return the browned sausage to the pot, then gently stir in the heavy cream and shredded cheddar cheese. Let everything simmer together for an extra 5 minutes, or until heated through and the cheese melts beautifully.
  5. Garnish and Serve: Finally, garnish with freshly chopped parsley for a pop of color and brightness. Serve the soup warm and enjoy the comforting flavors!

Nutrition

Serving: 1bowlCalories: 450kcalCarbohydrates: 30gProtein: 20gFat: 30gSaturated Fat: 15gPolyunsaturated Fat: 2gMonounsaturated Fat: 12gCholesterol: 80mgSodium: 1200mgPotassium: 800mgFiber: 3gSugar: 3gVitamin A: 500IUVitamin C: 30mgCalcium: 200mgIron: 2mg

Notes

Ensure to adjust seasonings towards the end of cooking. Fresh parsley adds a bright touch, don't skip it!

Tried this recipe?

Let us know how it was!

Filed Under: DINNER RECIPES

Delicious No Bake Pecan Pie Dip

December 12, 2025 by JudyWhite Leave a Comment

There’s a special kind of joy that comes from gathering around a table with friends and family, sharing laughter and stories over delicious food. One of my favorite ways to spark that joy is with a quick and delightful treat: my Delicious No Bake Pecan Pie Dip. Imagine a creamy blend of cream cheese and whipped topping, sweetened just right and loaded with crunchy pecans. Every spoonful feels like a warm hug, making it perfect for any occasion—be it a cozy night in or a lively gathering.

A few weeks ago, I found myself with unexpected guests and a craving for something sweet. I knew I needed a dessert that would wow everyone without keeping me tied to the kitchen for hours. That’s when this dip saved the day! In just 30 minutes, I whipped up a crowd-pleaser that pairs perfectly with apple slices, graham crackers, or pretzel crisps. Trust me, you’ll want to keep this recipe on hand for those moments when life calls for a little indulgence! Let’s dive into how to create this creamy delight that will leave everyone asking for the recipe.

Why You'll Love This Delicious No Bake Pecan Pie Dip

  • This recipe is incredibly easy to make, allowing you to whip up a delicious treat in just 30 minutes.
  • The rich and creamy flavor, combined with the crunch of pecans, creates a delightful taste sensation that everyone will love.
  • Its versatility means you can serve it with apple slices, pretzel crisps, or graham crackers, catering to different preferences.
  • Plus, its stunning presentation will definitely impress your guests and keep them coming back for more.
  • This dip is a guaranteed crowd-pleaser that will have everyone asking for seconds.

Delicious No Bake Pecan Pie Dip Ingredients

Dive into the sweet, creamy goodness with these fantastic ingredients!

For the Dip
• Cream cheese – adds a rich and creamy base that makes every bite delightful.
• Whipped topping – lightens the texture, making the dip airy and smooth.
• Powdered sugar – sweetens the dip perfectly, ensuring it’s indulgently delicious.
• Brown sugar – adds a hint of caramel flavor, enhancing the pecan pie theme.
• Cold butter – creates a smooth consistency and adds richness to the dip.
• Light corn syrup – gives the dip a glossy finish and helps bind the ingredients.
• Chopped pecans – infuses the dip with crunchy goodness and that unmistakable pecan flavor.
• Large egg – helps to achieve a delightful, creamy consistency when mixed.
• Vanilla extract – enhances the overall flavor, giving it that sweet and fragrant aroma.
• Kosher salt – balances the sweetness, enhancing the flavors in the dip.

For Serving
• Apple slices – provide a refreshing crunch that pairs beautifully with the dip.
• Pretzel crisps – add a salty contrast that elevates the dipping experience.
• Graham crackers – offer a sweet, crunchy texture that complements the rich flavors.

Get ready to indulge in a bowl of this Delicious No Bake Pecan Pie Dip that everyone will be raving about!

How to Make Delicious No Bake Pecan Pie Dip

  1. Combine Ingredients: In a mixing bowl, mix softened cream cheese, whipped topping, powdered sugar, brown sugar, and cold butter pieces until smooth. This should take about 2-3 minutes for a creamy consistency.

  2. Add Flavor & Texture: Stir in the light corn syrup, chopped pecans, egg, vanilla extract, and kosher salt. Mix well until all the ingredients are fully combined, ensuring a delightful texture.

  3. Transfer & Garnish: Carefully transfer the dip to a serving dish. If you’d like, sprinkle additional chopped pecans on top for an extra touch of crunch and visual appeal.

  4. Serve Delightfully: Serve your Delicious No Bake Pecan Pie Dip with apple slices, pretzel crisps, and graham crackers. Each bite will bring a mix of flavors that guests will adore!

Optional: Drizzle with chocolate sauce for an extra indulgence.
Exact quantities are listed in the recipe card below.

Delicious No Bake Pecan Pie Dip Variations

Feel free to get creative and customize this dip to suit your taste and dietary needs!

  • Sugar-Free: Substitute powered and brown sugar with sugar-free alternatives to enjoy a guilt-free version without sacrificing flavor.

  • Nut-Free: Replace pecans with sunflower seeds or pumpkin seeds to keep that crunch without the nuts. Kids and allergies will both cheer!

  • Chocolaty Twist: Stir in a 1/4 cup of mini chocolate chips for a deliciously sweet and chocolaty version that will please any chocolate lover.

  • Spiced Up: Add a pinch of cinnamon or nutmeg for a cozy touch that brings warmth to the flavors. This twist is like a hug in every bite.

  • Creamy Vanilla: Use flavored whipped topping, such as vanilla or caramel, to enhance the sweetness and depth of the dip. This adds a lovely twist that will wow your guests.

  • Fruit Frenzy: Mix in diced apples or pears for a fruity burst that adds freshness and color. This not only elevates the flavor but also adds a fun texture.

  • Vegan Version: Replace cream cheese and whipped topping with vegan alternatives like cashew cream and coconut whipped cream for a plant-based treat that’s just as creamy.

  • Spicy Kick: Add a dash of cayenne pepper for a surprising heat that balances the sweetness. Trust me, this twist will keep everyone guessing!

What to Serve with Delicious No Bake Pecan Pie Dip?

Elevate your gathering with delightful pairings that enhance the creamy sweetness of this irresistible dip.

  • Crispy Apple Slices: The crisp tartness of fresh apples balances the sweetness of the dip, making each bite refreshing and satisfying.

  • Salty Pretzel Crisps: These offer a delightful crunch and a hint of salt, beautifully contrasting the creamy sweetness, adding a new layer to your enjoyment.

  • Graham Crackers: Their sweet, crumbly texture complements the dip perfectly, creating a harmonious flavor profile that everyone loves.

  • Vanilla Ice Cream: For extra indulgence, a scoop of creamy vanilla ice cream pairs wonderfully, allowing the flavors to meld beautifully with each spoonful.

  • Cold Brewed Coffee: A refreshing glass of cold brew adds depth, making it a perfect contrast to the sweet and creamy dessert.

  • Chocolate Drizzle: A drizzle of rich chocolate sauce over the dip elevates it to new heights, creating a decadent treat that will leave your guests raving.

  • Cheese Platter: Add a variety of cheeses for a savory contrast, making your spread more dynamic and enticing for different taste preferences.

  • Berry Medley: Fresh berries like strawberries or blueberries provide a burst of freshness and color, enhancing the look and flavor of your serving table.

How to Store and Freeze Delicious No Bake Pecan Pie Dip

Fridge: Keep the dip stored in an airtight container in the fridge for up to 3 days to maintain its creamy texture and flavor.

Freezer: For longer storage, you can freeze the dip in a freezer-safe container for up to 2 months. Let it thaw in the fridge overnight before serving.

Reheating: While it’s typically enjoyed chilled, if you prefer a slightly warmer dip, gently reheat it in the microwave in 10-second intervals, stirring until just warm.

Serving Recommendations: To enjoy it at its best, pair the stored dip with fresh apple slices, pretzel crisps, or graham crackers right after storage.

Make Ahead Options

These Delicious No Bake Pecan Pie Dip options are perfect for busy home cooks looking to save time! You can prepare the dip up to 24 hours in advance by following the initial steps of mixing the ingredients together. To maintain freshness, cover the dip tightly with plastic wrap and refrigerate it. When you’re ready to serve, simply give it a quick stir and transfer it to your serving dish. For the best texture and flavor, top with additional chopped pecans right before serving. This way, you’ll have more time to enjoy your gathering and less time in the kitchen, making this recipe a true lifesaver for any occasion!

Chef's Helpful Tips

  • To achieve the perfect texture in your Delicious No Bake Pecan Pie Dip, ensure your cream cheese is fully softened before mixing to avoid lumps.
  • A common mistake is overmixing once the pecans are added, as this can make the dip too thick, so stir gently to maintain a nice consistency.
  • For a richer flavor, try toasting the chopped pecans lightly before adding them, which will enhance their nuttiness.
  • Lastly, let the dip chill in the refrigerator for at least 15 minutes before serving to allow the flavors to meld beautifully.

Delicious No Bake Pecan Pie Dip Recipe FAQs

What kind of pecans should I use for the dip?
Absolutely! I recommend using fresh, raw pecans for the best flavor and texture. If you can, try to find pecans that are whole rather than chopped, as this will add a more satisfying crunch when you do chop them at home!

How should I store the No Bake Pecan Pie Dip?
Keep the dip in an airtight container in the refrigerator for up to 3 days. This will help maintain its creamy texture and rich flavor. Make sure to cover it well to prevent it from absorbing any odors from the fridge.

Can I freeze the No Bake Pecan Pie Dip?
Yes, you can! For freezer storage, place the dip in a freezer-safe container and it will last for up to 2 months. When you’re ready to enjoy it, simply let it thaw in the fridge overnight. If you notice a slight change in texture, give it a quick stir to smooth it out!

What should I do if my dip is too thick?
If you find your dip is thicker than you’d like, don’t worry! Start by adding a tablespoon of milk or additional whipped topping to loosen it up, mixing well after each addition until you reach your desired consistency. Be sure to fold in gently to maintain that lovely creamy texture!

Can this dip be made ahead of time?
Very! Making the dip the day before serving is a fantastic idea. Just store it in the refrigerator, and let the flavors meld overnight. This time allows the sweetness and nuttiness to intensify, giving you even more delicious results when you serve it!

Are there any dietary restrictions to consider?
While this dip is delightful, it does contain cream cheese and a large egg which makes it unsuitable for vegans or those with dairy allergies. If you need a dairy-free option, consider using a vegan cream cheese alternative. And for anyone with nut allergies, a different type of cookie or cracker can be used as a vessel for the dip.

Delicious No Bake Pecan Pie Dip

Delicious No Bake Pecan Pie Dip

This Delicious No Bake Pecan Pie Dip is a creamy, sweet indulgence perfect for any occasion.
Print Recipe Pin Recipe
Prep Time 30 minutes mins
Chilling Time 15 minutes mins
Total Time 45 minutes mins
Servings: 8 servings
Course: DESSERT RECIPES
Cuisine: American
Calories: 250
Ingredients Equipment Method Nutrition Notes

Ingredients
  

For the Dip
  • 8 oz cream cheese softened
  • 8 oz whipped topping
  • 1 cup powdered sugar
  • 1/2 cup brown sugar packed
  • 1/4 cup cold butter cut into pieces
  • 1/4 cup light corn syrup
  • 1 cup chopped pecans plus more for garnish
  • 1 large egg beaten
  • 1 tsp vanilla extract
  • 1/4 tsp kosher salt
For Serving
  • 2 cups apple slices
  • 2 cups pretzel crisps
  • 2 cups graham crackers

Equipment

  • Mixing bowl
  • Spoon
  • serving dish

Method
 

How to Make Delicious No Bake Pecan Pie Dip
  1. In a mixing bowl, mix softened cream cheese, whipped topping, powdered sugar, brown sugar, and cold butter pieces until smooth. This should take about 2-3 minutes for a creamy consistency.
  2. Stir in the light corn syrup, chopped pecans, egg, vanilla extract, and kosher salt. Mix well until all the ingredients are fully combined.
  3. Carefully transfer the dip to a serving dish. If you'd like, sprinkle additional chopped pecans on top for an extra touch of crunch.
  4. Serve your Delicious No Bake Pecan Pie Dip with apple slices, pretzel crisps, and graham crackers.

Nutrition

Serving: 1cupCalories: 250kcalCarbohydrates: 30gProtein: 3gFat: 14gSaturated Fat: 8gPolyunsaturated Fat: 1gMonounsaturated Fat: 5gCholesterol: 30mgSodium: 150mgPotassium: 100mgFiber: 1gSugar: 20gVitamin A: 500IUCalcium: 50mgIron: 0.5mg

Notes

To achieve the perfect texture, ensure your cream cheese is fully softened before mixing. For a richer flavor, try toasting the chopped pecans lightly before adding them. Let the dip chill in the refrigerator for at least 15 minutes before serving.

Tried this recipe?

Let us know how it was!

Filed Under: BREAKFAST & BRUNCH

One Pan Garlic Herb Chicken and Veggies

December 12, 2025 by JudyWhite Leave a Comment

Picture this: it’s a busy weeknight, and the last thing you want is to be stuck in the kitchen for hours. I vividly remember the day when I craved something comforting yet effortless, and that’s when I discovered the magic of One Pan Garlic Herb Chicken and Veggies. With just a single baking sheet, this dish becomes a delightful symphony of roasted chicken breasts, tender red potatoes, and vibrant green beans—each bite bursting with the fresh flavor of rosemary, thyme, and garlic.

As I squeezed a lemon over the colorful medley, I felt a wave of relief wash over me; no need for complicated prep or endless cleanup. In just 32 minutes, I had a wholesome, mouthwatering meal that even satisfied my pickiest eaters. It’s perfect for those cozy family dinners or a quick dinner for one after a long day. If you’re ready to revive your weeknight cooking with ease, let’s dive into this recipe that promises deliciousness in every bite!

Why You'll Love This One Pan Garlic Herb Chicken and Veggies

  • This recipe makes dinner a breeze by keeping everything in one pan, saving you time on cleanup.
  • The flavor combination of garlic, rosemary, and thyme infuses the chicken and veggies, creating a meal that is rich and satisfying.
  • Its versatility lets you swap in your favorite seasonal vegetables or adjust the herbs to suit your taste.
  • The vibrant colors of the roasted potatoes and green beans make for an eye-catching presentation that’s sure to impress at the dinner table.
  • Enjoy a comforting dish that not only delights the palate but brings the family together in just over half an hour.

One Pan Garlic Herb Chicken and Veggies Ingredients

Here’s everything you need for this scrumptious, quick meal!

For the Veggies

  • 20 oz petite red potatoes – these tender spuds absorb all the herby goodness!
  • 1 pkg frozen green beans (12 oz) – a convenient option that keeps prep simple and fresh.
  • 1 medium lemon – adds a zesty brightness that enhances all the flavors.

For the Chicken

  • 4 (6 oz) boneless skinless chicken breasts – lean protein that becomes juicy and infused with herbs.

Herbs & Spices

  • 3 tsp chopped fresh rosemary leaves (divided) – this fragrant herb elevates the entire dish.
  • 2 tsp chopped fresh thyme leaves (divided) – offers a subtle earthiness and depth.
  • Salt to taste – essential for bringing out the flavors in your One Pan Garlic Herb Chicken and Veggies.
  • Freshly ground black pepper to taste – adds a gentle kick that rounds out the seasoning.

Richness & Flavor

  • 2 Tbsp butter (divided) – contributes a creamy richness while keeping the chicken moist.
  • 2 Tbsp olive oil (divided) – helps in roasting and adds a light, fruity flavor.
  • 3 cloves garlic (minced) – infuses a delicious aroma and savory taste throughout the dish.

How to Make One Pan Garlic Herb Chicken and Veggies

  1. Preheat your oven to 400°F (200°C) for perfectly cooked chicken and veggies. This initial step sets the stage for roasting perfection!

  2. Cut the petite red potatoes into quarters and arrange them in the center of a large baking sheet. Their golden crust will create a delightful texture.

  3. Add the frozen green beans around the potatoes, creating a vibrant and colorful mix. They’ll cook quickly, soaking up all the delicious flavors!

  4. Squeeze the juice of the lemon over the veggies, then tuck the lemon halves onto the sheet. This zesty addition brightens the entire dish!

  5. Season everything generously with salt, pepper, and 1 1/2 tsp of rosemary and 1 tsp of thyme. This is where the flavor magic truly begins!

  6. Drizzle 1 Tbsp of olive oil over the veggies, tossing to coat them evenly for that irresistible roasted finish.

  7. Mix together the remaining rosemary, thyme, butter, olive oil, garlic, salt, and pepper in a bowl. This aromatic concoction is crucial for flavor!

  8. Rub the mixture over the chicken breasts, ensuring each piece is well-coated in herby goodness, and then place them on the baking sheet.

  9. Bake for 22 minutes or until the chicken is cooked through and the veggies are tender. You want them golden brown and bursting with flavor!

Optional: Garnish with fresh herbs before serving for a pop of color.

Exact quantities are listed in the recipe card below.

Make Ahead Options

These One Pan Garlic Herb Chicken and Veggies are a lifesaver for busy home cooks! You can prep the veggies and seasonings up to 24 hours in advance. Just chop the petite red potatoes and keep them in an airtight container in the refrigerator. Toss the frozen green beans in with the potatoes when you’re ready to cook. Mix your herbs, garlic, and olive oil as directed, then rub it over the chicken breasts and seal them in the fridge to marinate. When it’s time to serve, simply arrange everything on the baking sheet and bake as directed. This way, you’ll have a delicious, wholesome meal ready with minimal effort, just as satisfying as if you made it that night!

What to Serve with One Pan Garlic Herb Chicken and Veggies?

Imagine a table filled with vibrant colors and delightful aromas, all set to complement that luscious chicken and veggie dish you’ve prepared.

  • Creamy Mashed Potatoes: The buttery goodness of mashed potatoes provides a comforting, velvety texture that pairs beautifully with the savory chicken.

  • Garlic Bread: A crisp, golden loaf is perfect for soaking up the juices from the chicken and herbs, adding a delightful crunch to every meal.

  • Fresh Garden Salad: Light, crisp greens dressed with a simple vinaigrette introduce a refreshing contrast to the hearty chicken and potatoes.

  • Roasted Brussels Sprouts: With their slightly nutty flavor and crispy finish, they add an exciting twist that complements the herbaceous notes of your dish.

  • Steamed Asparagus: Tender asparagus drizzled with olive oil brings a subtle elegance and bright green freshness that balances the meal.

  • Zesty Lemonade: A cool glass of lemonade enhances that citrus zing from the dish, providing a refreshing balance to the hearty flavors.

Choose any combination from this list to elevate your dining experience and delight every member of your family.

How to Store and Freeze One Pan Garlic Herb Chicken and Veggies

Fridge: Store leftovers in an airtight container for up to 3 days. This allows you to enjoy the delicious flavors once more without losing freshness.

Freezer: Freeze the chicken and veggies in a freezer-safe container for up to 3 months. Make sure to cool them completely before sealing to avoid freezer burn.

Reheating: When ready to enjoy, reheat in a 350°F (175°C) oven for about 15-20 minutes until warmed through. This will help retain the dish’s tasty texture and flavors.

Meal Prep: Perfect for meal prep! You can section out portions for easy lunches or dinners throughout the week. Just remember, your One Pan Garlic Herb Chicken and Veggies deserves to be enjoyed deliciously fresh!

One Pan Garlic Herb Chicken and Veggies Variations

Feel free to make this dish your own with these delightful twists!

  • Herb Substitutes: Swap rosemary for oregano or basil for a completely different flavor profile. Both herbs bring a vibrant twist that’s equally aromatic.

  • Veggie Mix-Up: Replace green beans with asparagus or broccoli for varied textures and tastes. Each vegetable offers its unique crunch and flavor, making the dish even more enticing.

  • Add Sweetness: Incorporate sweet potatoes in place of red potatoes for a delectable sweetness. Their creamy texture complements the savory chicken beautifully.

  • Spicy Kick: Sprinkle in red pepper flakes or add chopped jalapeños to bring some heat to the dish. A little spice adds a surprising and enjoyable layer of flavor!

  • Cheesy Finish: Top with grated Parmesan or crumbled feta right before serving for a creamy, tangy finish that elevates the entire dish.

  • Lemon Zing: Add lemon zest along with the juice for an extra pop of citrusy flavor. This brightens the dish and enhances those herbal notes.

  • Lean Protein: Use turkey breasts or thighs instead of chicken for a different lean protein option. The flavors work beautifully, and turkey offers a slightly sweet taste.

  • Liquid Gold: Drizzle a balsamic reduction over the finished dish for a tart, sweet glaze that adds an elegant touch to your one-pan meal. This delightful finish will have everyone coming back for seconds!

Chef's Helpful Tips

  • For the One Pan Garlic Herb Chicken and Veggies, make sure to cut the potatoes into uniform sizes to ensure even cooking throughout.
  • Avoid overcrowding the baking sheet as this can cause steaming instead of roasting – give your veggies room to crisp up.
  • When mixing the herb and butter mixture, let it sit for a few minutes to allow the flavors to meld together, enhancing the chicken’s taste.
  • Always check the chicken’s internal temperature with a meat thermometer, which should reach 165°F (74°C) for safe consumption.

One Pan Garlic Herb Chicken and Veggies Recipe FAQs

How do I choose the best potatoes for this recipe?
Absolutely! When selecting petite red potatoes, look for those that are firm, smooth, and free of dark spots or blemishes. Smaller potatoes are ideal as they’ll cook evenly and quickly, giving you that delicious roasted flavor you want in your One Pan Garlic Herb Chicken and Veggies.

Can I store leftovers, and for how long?
Yes, you can! Store your One Pan Garlic Herb Chicken and Veggies in an airtight container in the refrigerator for up to 3 days. Just make sure to let it cool completely before sealing, which helps preserve its delicious flavors when you reheat it!

Can I freeze this dish? If so, how?
Yes, you can freeze it! To freeze, allow your chicken and veggies to cool down completely, then place them in a freezer-safe container. Make sure to label the container with the date; it can be frozen for up to 3 months. When you’re ready to enjoy, simply reheat in a 350°F (175°C) oven for about 15-20 minutes until heated through.

What if my chicken is still raw after baking for 22 minutes?
Very! If your chicken isn’t cooked through, it may be due to varying oven temperatures or thickness of the chicken breasts. I recommend using a meat thermometer to check for an internal temperature of 165°F (74°C). If it’s not there yet, pop it back in the oven and check every 5 minutes until it’s perfect!

Are there any dietary considerations for this recipe?
Certainly! This recipe is naturally gluten-free as it contains no gluten products. If you’re preparing this dish for someone with dietary restrictions like allergies, ensure they aren’t allergic to chicken or any of the herbs used. For a healthier variation, feel free to swap butter with a dairy-free alternative!

Can I use other vegetables in this dish?
Absolutely! The more the merrier! This recipe is versatile, so you can substitute the green beans with broccoli, bell peppers, or snap peas. Just remember to adjust cooking times slightly based on the vegetables you choose to use, ensuring everything comes out tender and delicious!

One Pan Garlic Herb Chicken and Veggies

One Pan Garlic Herb Chicken and Veggies

One Pan Garlic Herb Chicken and Veggies is an effortless weeknight meal featuring roasted chicken, red potatoes, and green beans, infused with garlic and herbs.
Print Recipe Pin Recipe
Prep Time 10 minutes mins
Cook Time 22 minutes mins
Total Time 32 minutes mins
Servings: 4 servings
Course: DINNER RECIPES
Calories: 400
Ingredients Equipment Method Nutrition Notes

Ingredients
  

For the Veggies
  • 20 oz petite red potatoes these tender spuds absorb all the herby goodness!
  • 12 oz frozen green beans a convenient option that keeps prep simple and fresh.
  • 1 medium lemon adds a zesty brightness that enhances all the flavors.
For the Chicken
  • 4 (6 oz) boneless skinless chicken breasts lean protein that becomes juicy and infused with herbs.
Herbs & Spices
  • 3 tsp chopped fresh rosemary leaves this fragrant herb elevates the entire dish.
  • 2 tsp chopped fresh thyme leaves offers a subtle earthiness and depth.
  • Salt to taste
  • Freshly ground black pepper to taste
Richness & Flavor
  • 2 Tbsp butter contributes a creamy richness while keeping the chicken moist.
  • 2 Tbsp olive oil helps in roasting and adds a light, fruity flavor.
  • 3 cloves garlic minced, infuses a delicious aroma and savory taste throughout the dish.

Equipment

  • Baking sheet
  • Mixing bowl
  • meat thermometer

Method
 

How to Make One Pan Garlic Herb Chicken and Veggies
  1. Preheat your oven to 400°F (200°C) for perfectly cooked chicken and veggies. This initial step sets the stage for roasting perfection!
  2. Cut the petite red potatoes into quarters and arrange them in the center of a large baking sheet. Their golden crust will create a delightful texture.
  3. Add the frozen green beans around the potatoes, creating a vibrant and colorful mix. They’ll cook quickly, soaking up all the delicious flavors!
  4. Squeeze the juice of the lemon over the veggies, then tuck the lemon halves onto the sheet. This zesty addition brightens the entire dish!
  5. Season everything generously with salt, pepper, and 1 1/2 tsp of rosemary and 1 tsp of thyme. This is where the flavor magic truly begins!
  6. Drizzle 1 Tbsp of olive oil over the veggies, tossing to coat them evenly for that irresistible roasted finish.
  7. Mix together the remaining rosemary, thyme, butter, olive oil, garlic, salt, and pepper in a bowl. This aromatic concoction is crucial for flavor!
  8. Rub the mixture over the chicken breasts, ensuring each piece is well-coated in herby goodness, and then place them on the baking sheet.
  9. Bake for 22 minutes or until the chicken is cooked through and the veggies are tender. You want them golden brown and bursting with flavor!

Nutrition

Serving: 1plateCalories: 400kcalCarbohydrates: 35gProtein: 30gFat: 15gSaturated Fat: 5gPolyunsaturated Fat: 0.5gMonounsaturated Fat: 9gCholesterol: 80mgSodium: 400mgPotassium: 800mgFiber: 6gSugar: 2gVitamin A: 10IUVitamin C: 30mgCalcium: 4mgIron: 10mg

Notes

Optional: Garnish with fresh herbs before serving for a pop of color. For meal prep, section out portions for easy lunches or dinners throughout the week.

Tried this recipe?

Let us know how it was!

Filed Under: DINNER RECIPES

New England Clam Chowder with Fresh Clams

December 12, 2025 by JudyWhite Leave a Comment

There’s nothing quite like the rich, creamy warmth of a comforting bowl of New England Clam Chowder with Fresh Clams. Picture this: the first chill of autumn descends, and the air is filled with earthy scents from your kitchen, a teasing hint of salty ocean waves mingling with the buttery aroma of bacon and hearty potatoes. This dish isn’t just another soup; it’s a feel-good classic that invites memories of family gatherings and cozy evenings.

I discovered this recipe through a spontaneous visit to my local seafood market, where the vibrant displays of freshly caught cherrystone clams caught my eye. My excitement quickly turned into inspiration as I began picturing a cozy dinner with friends, where laughter and stories would blend seamlessly with the delightful flavors of homemade chowder. Trust me, once you savor that first spoonful, you’ll understand why it’s become a beloved staple.

Join me in creating this soul-soothing dish that’ll not only delight your taste buds but impress any guests at your table. Let’s dive into the creamy goodness and make some memories together!

Why You'll Love This New England Clam Chowder with Fresh Clams

  • This New England Clam Chowder with Fresh Clams is incredibly easy to make, allowing you to enjoy a hearty, homemade meal without spending all day in the kitchen.
  • The combination of fresh clams, smoky bacon, and creamy potatoes creates a flavor profile that is both comforting and unforgettable.
  • Its versatility means you can customize ingredients to suit your taste, whether you prefer it with more herbs or a dash of spice.
  • Visually, this chowder is a feast for the eyes, with its creamy texture and vibrant clams making for an appetizing presentation.

New England Clam Chowder Ingredients

• Here’s everything you need for a delightful New England Clam Chowder with Fresh Clams!

For the Chowder Base

  • Live cherrystone clams – 5 pounds, shells scrubbed; the star ingredient that gives this chowder its vibrant ocean flavor.
  • Salt pork – 1 ounce, diced; adds a savory, rich undertone to the broth.
  • Bacon – 1.5 ounces, diced fine; enriches the dish with smoky goodness.
  • Butter – 2 tablespoons; helps to sauté the vegetables, enhancing flavor.
  • Celery – 1/4 cup, minced; brings a subtle crunch and freshness to the chowder.
  • Onion – 1 cup, chopped; adds sweetness and aroma to the base.
  • Garlic – 2 teaspoons, minced; infuses the chowder with a delicious depth of flavor.

For the Chowder Thickness

  • Russet potatoes – 1.25 pounds, peeled and diced into 1/2-inch pieces; these starches create a creamy, comforting texture.
  • Flour – 2 tablespoons; helps to thicken the broth just right for that perfect mouthfeel.

For the Broth

  • Clam stock – 3 cups, reserved from cooking the clams; infuses the chowder with the ultimate seafood essence.
  • Fresh thyme – 1 teaspoon, or 1/2 teaspoon dried; adds an herbal aroma that balances the dish beautifully.
  • Bay leaf – 1 leaf; enhances the overall flavor profile with its aromatic qualities.

For Serving

  • Heavy cream – 2 cups; gives the chowder its signature creaminess that wraps around your taste buds.
  • Black pepper – to taste; a warm spice that elevates the flavors.
  • Butter – for serving; a touch of luxury when dolloped atop the chowder.
  • Oyster crackers – for serving; perfect for adding a delightful crunch with each spoonful.

How to Make New England Clam Chowder

  1. Scrub and Steam
    Start by scrubbing the live cherrystone clams under cold water. Place them in a pot over medium-high heat and cover until they open, about 5-7 minutes. Reserve the cooking liquid for later!

  2. Render the Meats
    In a large pot, add the diced salt pork and bacon. Cook over medium heat until they’re crisp and golden, about 5-6 minutes. The aroma will be simply irresistible!

  3. Sauté the Vegetables
    Add the butter along with the minced celery, chopped onion, and minced garlic to the pot. Sauté these ingredients until softened, roughly 4-5 minutes, allowing their flavors to meld beautifully.

  4. Add Potatoes and Flour
    Stir in the diced Russet potatoes and flour. Cook for an additional 3-4 minutes, letting the potatoes absorb the savory goodness and prepare for the broth.

  5. Pour in the Stock
    Carefully pour in the reserved clam stock, then add the fresh thyme and bay leaf. Bring everything to a gentle simmer, allowing the flavors to develop for about 15 minutes.

  6. Cook the Potatoes
    Continue simmering until the potatoes are tender, about 10-12 minutes. You’ll know they’re ready when they’re fork tender but still hold their shape.

  7. Finish with Cream and Clams
    Gently stir in the heavy cream and the reserved clams. Heat through for another 3-4 minutes, just until everything is warmed and mingled together.

  8. Season to Perfection
    Taste your chowder and season it with black pepper to your liking. A good sprinkle will make those flavors pop even more!

  9. Serve Warm
    Ladle your delicious chowder into bowls, adding a pat of butter on top and crunchy oyster crackers on the side for that delightful texture contrast.

Optional: Garnish with fresh chopped parsley for a touch of color!

Exact quantities are listed in the recipe card below.

How to Store and Freeze New England Clam Chowder

Fridge: Keep leftover New England Clam Chowder in an airtight container for up to 3 days. Reheat gently over low heat, stirring occasionally to maintain the creamy texture.

Freezer: You can freeze this chowder for up to 3 months. However, it’s best to omit the cream before freezing. Thaw in the fridge overnight, then reheat and add the cream before serving.

Reheating: For the best flavor, reheat on the stovetop over medium-low heat. Stir frequently to prevent sticking, and add a splash of clam stock or water if it’s too thick.

New England Clam Chowder Variations

Feel free to play with flavors and textures in this classic recipe for a personalized touch!

  • Dairy-Free: Substitute coconut milk for the heavy cream for a creamy, yet dairy-free alternative that adds a hint of sweetness.
  • Spicy Kick: Add diced jalapeños or a dash of cayenne pepper to your chowder for a warm and inviting heat that awakens the senses.
  • Herb-Infused: Experiment with fresh herbs like dill or parsley to introduce a garden-fresh taste that brightens up your chowder.
  • Vegetarian: Replace clams with roasted, cubed zucchini or mushrooms for a satisfying twist that still offers an appealing texture, minus the seafood.
  • Smoky Flavor: Use smoked paprika instead of bacon for a smoky undertone, creating depth without meat while remaining vegetarian-friendly.
  • Creamy Cauliflower: Blend cooked cauliflower into the chowder for a velvety texture that boosts nutrition and adds a new flavor dimension.
  • Seafood Medley: Add shrimp or lobster chunks for an extravagant seafood chowder that’ll impress even the most discerning palates.
  • Citrus Zing: A splash of lemon juice right before serving brightens the flavors and adds a delightful zing to each spoonful, enhancing the overall experience.

Make Ahead Options

These New England Clam Chowder with Fresh Clams are perfect for busy home cooks looking to save time during hectic weeknights! You can scrub and steam the clams, and prepare the sautéed base (salt pork, bacon, vegetables) up to 24 hours in advance; store them separately in the refrigerator to keep everything fresh. The diced potatoes can also be soaked in cold water to prevent browning if you prep them ahead of time. When you’re ready to serve, combine your prepped ingredients with the clam stock and cream, allowing it to heat through for a delicious chowder that’s just as comforting and rich without the last-minute chaos.

What to Serve with New England Clam Chowder?

Warm, creamy, and brimming with ocean flavor, you’ll want to create the perfect meal to complement this comforting chowder.

  • Crusty Artisan Bread: Perfect for dipping, the crunchy exterior and soft interior enhance the chowder experience, soaking up every savory spoonful.
  • Garden Salad: A mix of fresh greens, ripe tomatoes, and a zesty vinaigrette provides a refreshing contrast to the rich, creamy chowder.
  • Corn on the Cob: Sweet, juicy corn pairs beautifully with clam chowder, adding a burst of flavor and a satisfying crunch.
  • Steamed Asparagus: Its tender yet crisp texture and bright green color serve as a delightful side that balances the chowder’s richness.
  • Crispy Bacon-Wrapped Scallops: This is an indulgent treat that echoes the chowder’s smoky notes while offering a luxurious seafood touch.
  • Chardonnay: A glass of chilled Chardonnay makes for a perfect pairing, as its fruity notes and crisp acidity elevate the lavish flavors of the chowder.
  • Oyster Crackers: Essential for serving, these little bites add a delightful crunch that contrasts wonderfully with the creamy base.
  • Fresh Fruit Tart: End the meal on a sweet note; the tartness from the fruit balances the savory chowder beautifully.

Chef's Helpful Tips

  • When making New England Clam Chowder with Fresh Clams, always scrub the clams thoroughly to ensure no grit remains before cooking them.
  • Remember to reserve the clam cooking liquid as it adds essential flavor to the chowder, so don’t discard it.
  • To achieve a creamy texture, allow the flour to cook with the potatoes for a few minutes before adding the stock.
  • Make sure to simmer the chowder gently to prevent the cream from curdling, ideally keeping the heat on medium to low during cooking.

New England Clam Chowder with Fresh Clams Recipe FAQs

How do I choose the best clams for my chowder?
Absolutely! When selecting clams, look for live cherrystone clams with tightly closed shells and a fresh ocean scent. Avoid any clams with broken shells or those that are open and do not close when tapped; these may be dead and unsafe to eat.

How long can I store leftover New England Clam Chowder?
Very well! Store your leftover chowder in an airtight container in the fridge for up to 3 days. Just make sure to reheat it gently on low heat, stirring occasionally to keep that rich, creamy texture intact.

Can I freeze New England Clam Chowder?
Yes! You can freeze this chowder for up to 3 months. However, it’s best to leave out the heavy cream before freezing. To freeze, allow the chowder to cool completely, then transfer it to a freezer-safe container. When you’re ready to eat, thaw it in the fridge overnight, reheat on the stovetop, and stir in the cream just before serving.

What if my chowder turns out too thick?
If your chowder is thicker than desired, don’t worry! Simply add a splash of clam stock or water while reheating to thin it out to your preferred consistency. Stir well and warm over medium-low heat, checking frequently until it’s just right.

Are there any dietary considerations with this recipe?
Definitely! This New England Clam Chowder contains seafood and dairy, making it unsuitable for individuals with shellfish allergies or lactose intolerance. For a dairy-free version, swap heavy cream with plant-based alternatives like coconut cream and use vegetable broth instead of clam stock for added flavor.

Can I use canned clams instead of fresh?
The more the merrier! While fresh clams deliver that unique ocean flavor, you can use canned clams in a pinch. If opting for canned clams, I recommend using about 2 to 3 cans (about 10-12 ounces each). Drain the juice and reserve it, adding it to the chowder for a tasty boost, but do remember to skip the steaming step!

New England Clam Chowder with Fresh Clams

New England Clam Chowder with Fresh Clams

Enjoy a creamy and savory New England Clam Chowder with Fresh Clams, perfect for cozy gatherings.
Print Recipe Pin Recipe
Prep Time 20 minutes mins
Cook Time 45 minutes mins
Total Time 1 hour hr 5 minutes mins
Servings: 6 servings
Course: DINNER RECIPES
Cuisine: New England
Calories: 350
Ingredients Equipment Method Nutrition Notes

Ingredients
  

Chowder Base
  • 5 pounds live cherrystone clams shells scrubbed
  • 1 ounce salt pork diced
  • 1.5 ounces bacon diced fine
  • 2 tablespoons butter
  • 1/4 cup celery minced
  • 1 cup onion chopped
  • 2 teaspoons garlic minced
Chowder Thickness
  • 1.25 pounds russet potatoes peeled and diced into 1/2-inch pieces
  • 2 tablespoons flour
Broth
  • 3 cups clam stock reserved from cooking the clams
  • 1 teaspoon fresh thyme or 1/2 teaspoon dried
  • 1 leaf bay leaf
For Serving
  • 2 cups heavy cream
  • black pepper to taste
  • butter for serving
  • oyster crackers for serving

Equipment

  • Large pot
  • Saucepan

Method
 

Preparation
  1. Scrub the live cherrystone clams under cold water. Place them in a pot over medium-high heat and cover until they open, about 5-7 minutes. Reserve the cooking liquid for later!
  2. In a large pot, add the diced salt pork and bacon. Cook over medium heat until they’re crisp and golden, about 5-6 minutes.
  3. Add the butter along with the minced celery, chopped onion, and minced garlic to the pot. Sauté until softened, roughly 4-5 minutes.
  4. Stir in the diced russet potatoes and flour. Cook for an additional 3-4 minutes.
  5. Carefully pour in the reserved clam stock, then add the fresh thyme and bay leaf. Bring to a gentle simmer, allowing flavors to develop for about 15 minutes.
  6. Continue simmering until the potatoes are tender, about 10-12 minutes.
  7. Gently stir in the heavy cream and the reserved clams. Heat through for another 3-4 minutes.
  8. Taste and season with black pepper to your liking.
  9. Ladle your delicious chowder into bowls, adding a pat of butter on top and crunchy oyster crackers on the side.

Nutrition

Serving: 1cupCalories: 350kcalCarbohydrates: 25gProtein: 15gFat: 22gSaturated Fat: 10gPolyunsaturated Fat: 0.5gMonounsaturated Fat: 10gCholesterol: 80mgSodium: 700mgPotassium: 600mgFiber: 3gSugar: 2gVitamin A: 500IUVitamin C: 3mgCalcium: 100mgIron: 2mg

Notes

Scrub the clams thoroughly. Reserve clam cooking liquid for flavor. Simmer gently to prevent cream from curdling.

Tried this recipe?

Let us know how it was!

Filed Under: DINNER RECIPES

Mint Brownie Swirl Fudge

December 11, 2025 by JudyWhite Leave a Comment

Picture this: a cozy afternoon spent in the kitchen, the air filled with the irresistible fragrance of chocolate and mint dancing together. If you’ve ever craved a decadent treat that’s both rich and refreshing, then get ready to indulge in my Mint Brownie Swirl Fudge! This delightful creation is not just a dessert; it’s an experience that will awaken your taste buds and bring a bit of joy to your day.

I remember the first time I decided to combine my love for fudgy brownies with the invigorating essence of mint. It was a game-changer! This recipe effortlessly marries gooey chocolate brownies with a luscious mint fudge topping, making it the perfect go-to for any gathering or a special self-treat. Best of all, it requires minimal effort, so you can enjoy the sweet rewards without spending hours in the kitchen. Ready to take your dessert game to the next level? Let’s dive into this delightful recipe!

Why You'll Love This Mint Brownie Swirl Fudge

  • This Mint Brownie Swirl Fudge is an effortless dessert that comes together quickly, making it perfect for any occasion.
  • The combination of rich chocolate and refreshing mint creates a flavor that will leave everyone craving more.
  • Its stunning layers not only taste amazing but also look fantastic on any dessert table, impressing guests with its visual appeal.
  • Plus, this recipe is incredibly versatile; you can easily adjust the mint flavor or add toppings to customize it to your liking.

Mint Brownie Swirl Fudge Ingredients

For the Brownie Base

• Unsweetened cocoa powder – This is the key ingredient that gives your fudge its rich chocolate flavor.
• Granulated sugar – Adds sweetness to balance the rich cocoa.
• Unsalted butter (melted) – Provides a creamy texture; make sure it’s melted for easy mixing.
• All-purpose flour – Helps to bind the brownies together, creating that perfect fudgy texture.
• Large eggs – These add moisture and structure to the brownie base.

For the Fudge Topping

• Semi-sweet chocolate chips – Melting these with butter gives the topping its luscious richness.
• Sweetened condensed milk (14 oz) – This is the secret to a creamy fudge that sets beautifully and adds sweetness.
• Mint extract – Infuses that refreshing minty flavor into the fudge, elevating this Mint Brownie Swirl Fudge to perfection.

With these simple yet vital ingredients, you’ll be on your way to crafting a dessert that truly delights!

How to Make Mint Brownie Swirl Fudge

  1. Preheat your oven to 350°F (175°C). Prepare an 8×8-inch baking pan by greasing it or lining it with parchment paper for easy removal later.

  2. Mix melted butter, granulated sugar, eggs, and mint extract in a mixing bowl until smooth. The mixture should be glossy and well-combined for that perfect brownie texture.

  3. Fold in the all-purpose flour and cocoa powder gently, ensuring everything is just combined. Avoid overmixing to keep your brownies fudgy.

  4. Pour the brownie batter into the prepared pan and spread it evenly. Bake for 20-25 minutes. It’s ready when a toothpick comes out with moist crumbs. Allow it to cool completely in the pan.

  5. Melt butter and semi-sweet chocolate chips together in a saucepan over low heat. Stir in sweetened condensed milk and mint extract until smooth; then take off the heat for a glossy fudge topping.

  6. Pour the mint fudge mixture over the cooled brownies, spreading it evenly for a delightful finish. Chill in the fridge for at least two hours, allowing it to set completely.

  7. Slice into squares and serve! Enjoy these minty, chocolatey bites with family and friends.

Optional: Garnish with a sprinkle of sea salt for an extra flavor pop.

Exact quantities are listed in the recipe card below.

How to Store and Freeze Mint Brownie Swirl Fudge

Room Temperature: Store the Mint Brownie Swirl Fudge in an airtight container, and it will last for up to 3 days. Enjoy it at room temperature for the best texture!

Fridge: For longer freshness, keep the fudge in the fridge, where it can remain delicious for up to a week. Just make sure it’s well-wrapped to prevent it from drying out.

Freezer: Freeze the fudge for up to 3 months! Cut it into squares, layer with parchment paper, and store in an airtight container. Thaw in the fridge before serving.

Reheating: If you’d like to enjoy warm fudge, microwave individual pieces for about 10-15 seconds. Enjoy the melted chocolatey goodness!

What to Serve with Mint Brownie Swirl Fudge?

Imagine enjoying a heavenly dessert experience that harmonizes perfectly with your Mint Brownie Swirl Fudge!

  • Vanilla Ice Cream: The creamy vanilla balances the rich chocolate and mint, creating a delicious contrast that melts in your mouth.

  • Fresh Berries: A burst of juicy berries adds a refreshing and tangy note, enhancing the overall flavor profile of your sweet treat.

  • Mint Chocolate Chip Cookies: Elevate your dessert spread with these cookies for a delightful minty theme; the textures blend beautifully.

  • Espresso or Coffee: A bold mug of espresso complements the sweet and rich fudge, awakening your taste buds with every delightful bite.

Indulge your palate with a warm cup of cocoa; it offers a cozy embrace to your Mint Brownie Swirl Fudge, making it feel like a hug in a mug.

  • Whipped Cream: Light and fluffy whipped cream brings an airy texture to the dense fudge, making each bite a delightful experience.

  • Chocolate Drizzle: An extra touch of melted chocolate on top invites a luxurious, gooey experience, intensifying the chocolatey goodness.

Make Ahead Options

These Mint Brownie Swirl Fudge treats are a fantastic choice for meal prep and can make your busy weeknights sweeter! You can prepare the brownie base up to 24 hours in advance; simply bake and then let it cool completely before covering it tightly in plastic wrap and refrigerating. The fudge topping can also be made ahead of time; just melt and combine your ingredients, let it cool, and then refrigerate for up to 3 days. When you’re ready to finish, reheat the fudge topping gently if it has thickened, pour it over the brownie base, and let it set in the fridge for a couple of hours. This way, you’ll have delicious, homemade Mint Brownie Swirl Fudge ready to indulge in with minimal effort!

Mint Brownie Swirl Fudge Variations

Feel free to get creative with this recipe and tweak it to suit your taste!

  • Gluten-Free: Substitute all-purpose flour with a 1:1 gluten-free flour blend for a deliciously fudgy treat.

  • Nutty Crunch: Add 1/2 cup of chopped walnuts or pecans to the brownie mix for a delightful crunch and added depth of flavor.

  • Extra Minty: Increase the mint extract to 1.5 teaspoons for a more pronounced mint flavor that will leave your taste buds tingling with joy.

  • Peanut Butter Swirl: Swirl in 1/2 cup of creamy peanut butter into the brownie batter before baking for a deliciously rich twist.

  • Spicy Kick: Mix in a pinch of cayenne pepper or chili powder into the brownie batter for an unexpected yet delightful hint of heat.

  • Sea Salt Caramel: Drizzle your favorite salted caramel sauce over the fudge topping before chilling for a delectable sweet and salty pairing.

  • Dark Chocolate: Swap semi-sweet chocolate chips with dark chocolate chips for a richer and more intense fudge experience.

  • Berry Bliss: Top your fudge with fresh raspberries or chopped strawberries after cutting for a burst of fruity freshness that perfectly complements the chocolatey goodness.

Chef's Helpful Tips

  • To ensure a fudgy texture in your Mint Brownie Swirl Fudge, avoid overmixing when incorporating the flour and cocoa powder.
  • Use room temperature eggs for better emulsification with melted butter, which helps create a smooth batter.
  • When melting the chocolate, keep the heat low and stir constantly to prevent burning.
  • After refrigerating the fudge, let it sit at room temperature for a few minutes before cutting for cleaner edges.

Mint Brownie Swirl Fudge Recipe FAQs

What should I look for when selecting ingredients for the Mint Brownie Swirl Fudge?
Always choose fresh, high-quality ingredients! For cocoa powder, look for one that’s rich and dark. When picking mint extract, opt for pure extract over imitation for the best flavor; a good brand will make a noticeable difference! Also, ensure your butter is unsalted to keep the fudge balanced.

How should I store leftover Mint Brownie Swirl Fudge?
Absolutely! You can store your Mint Brownie Swirl Fudge in an airtight container. At room temperature, it will stay fresh for up to 3 days. If you’d like it to last longer, refrigerate the fudge where it can remain delightful for up to a week, just be sure it’s well-wrapped to prevent it from drying out.

Can I freeze Mint Brownie Swirl Fudge?
Yes, you can! To freeze your fudge, first cut it into squares. Layer these pieces with parchment paper to prevent sticking, and then store them in an airtight container. It can stay in the freezer for up to 3 months. When you’re ready to enjoy some, simply thaw it in the fridge overnight.

What can I do if my fudge topping is too runny?
In case you find your fudge topping too runny, don’t worry! Try placing it back on low heat, stirring continuously, until it thickens. If it’s still too loose, you can add a little more chocolate (melted) and mix it in until you reach your desired consistency. This will help stabilize the fudge while maintaining that delicious minty flavor.

Are there any dietary considerations for Mint Brownie Swirl Fudge?
Yes, indeed! This recipe contains common allergens like eggs and dairy. If you are cooking for someone with allergies or special dietary needs, you can substitute the eggs with flaxseed meal or applesauce. For a dairy-free option, use coconut milk in place of sweetened condensed milk, and opt for dairy-free chocolate chips. Always make sure to check ingredient labels for potential allergens!

How do I know when the brownies are done baking?
To tell if your brownies are perfectly baked, start checking around the 20-minute mark. Insert a toothpick into the center; it should come out with moist crumbs, not wet batter. If it comes out too dry, they may be overbaked, which can lead to a less fudgy consistency. Remember, they will continue to set a bit as they cool in the pan!

Mint Brownie Swirl Fudge

Mint Brownie Swirl Fudge

Indulge in Mint Brownie Swirl Fudge, a rich and refreshing chocolate treat that combines fudgy brownies and luscious mint fudge.
Print Recipe Pin Recipe
Prep Time 15 minutes mins
Cook Time 25 minutes mins
Chilling Time 2 hours hrs
Total Time 2 hours hrs 40 minutes mins
Servings: 16 squares
Course: DESSERT RECIPES
Cuisine: American
Calories: 150
Ingredients Equipment Method Nutrition Notes

Ingredients
  

For the Brownie Base
  • 1 cup Unsweetened cocoa powder Key ingredient for rich flavor
  • 1 cup Granulated sugar Balances the cocoa
  • 1/2 cup Unsalted butter (melted) Provides creamy texture
  • 1 cup All-purpose flour Binds the brownies
  • 2 large Large eggs Adds moisture and structure
For the Fudge Topping
  • 1 cup Semi-sweet chocolate chips Adds richness to the topping
  • 14 oz Sweetened condensed milk Secret to creamy fudge
  • 1 teaspoon Mint extract Infuses refreshing mint flavor

Equipment

  • 8x8-inch baking pan
  • Mixing bowl
  • Saucepan

Method
 

How to Make Mint Brownie Swirl Fudge
  1. Preheat your oven to 350°F (175°C). Prepare an 8×8-inch baking pan by greasing it or lining it with parchment paper.
  2. Mix melted butter, granulated sugar, eggs, and mint extract in a mixing bowl until smooth.
  3. Fold in the all-purpose flour and cocoa powder gently.
  4. Pour the brownie batter into the prepared pan and spread it evenly. Bake for 20-25 minutes.
  5. Melt butter and semi-sweet chocolate chips together in a saucepan over low heat. Stir in sweetened condensed milk and mint extract until smooth.
  6. Pour the mint fudge mixture over the cooled brownies and spread it evenly. Chill in the fridge for at least two hours.
  7. Slice into squares and serve.

Nutrition

Serving: 1squareCalories: 150kcalCarbohydrates: 20gProtein: 2gFat: 7gSaturated Fat: 4gMonounsaturated Fat: 2gCholesterol: 30mgSodium: 50mgPotassium: 90mgFiber: 1gSugar: 15gVitamin A: 100IUCalcium: 20mgIron: 1mg

Notes

Garnish with a sprinkle of sea salt for extra flavor.

Tried this recipe?

Let us know how it was!

Filed Under: DESSERT RECIPES

Delicious Orange Jelly Candy

December 11, 2025 by JudyWhite Leave a Comment

The first time I tasted homemade orange jelly candy, I was transported back to my childhood summers spent under the warm sun, the only sound being the gentle rustle of leaves. This delightful treat captures that essence, combining the tartness of sour oranges with just the right amount of sweetness, resulting in a chewy, zesty candy that is simply irresistible.

When I stumbled upon some forgotten sour oranges in my fridge, I knew I had to put them to good use. The result? A vibrant, flavorful candy that not only satisfies my sweet tooth but also adds a touch of sunshine to any day. This delicious orange jelly candy is the perfect antidote to those mundane fast-food cravings—refreshing, fun to make, and a guaranteed crowd-pleaser for friends and family alike.

If you’re looking for a delightful way to bring nostalgia back into your kitchen, look no further. With just a handful of ingredients and a bit of patience, you’ll be creating these orange-flavored bites of joy in no time. Let’s dive into this simple recipe that will leave you and your loved ones smiling!

Why You'll Love This Delicious Orange Jelly Candy

  • This recipe is incredibly easy to make, requiring just a few simple ingredients and minimal cooking time.
  • The vibrant flavor of sour oranges combined with the sweetness makes each bite a delightful explosion of taste.
  • You’ll love how versatile this candy is, as it can be enjoyed as a snack, a party treat, or even a thoughtful homemade gift.
  • Plus, its eye-catching color and unique shape give it an appealing visual that impresses everyone at the table.

Delicious Orange Jelly Candy Ingredients

• These fantastic ingredients create a delightful treat that’s sure to impress!

For the Jelly Mixture

  • Sour orange juice – this adds a vibrant tartness to balance the sweetness.
  • Sugar – granulated sugar is key for sweetness; you can use coconut sugar for a healthier alternative.
  • Agar agar – a plant-based gelling agent that helps firm up the jelly, making it vegan-friendly.

Optional Coatings

  • Powdered sugar – for sprinkling; it prevents sticking and adds a sweet finish.
  • Food coloring – a few drops can brighten up your jelly candy, making it even more visually appealing.

These ingredients come together to create the delicious orange jelly candy that’s bound to brighten your day!

How to Make Delicious Orange Jelly Candy

  1. Combine Ingredients: In a large saucepan, mix together the sugar, sour orange juice, and agar agar powder. If you’d like, add a few drops of orange or yellow food coloring to enhance the candy’s brightness.

  2. Cook Mixture: Stir the mixture CONSTANTLY over medium-high heat until it reaches a rolling boil. Lower the heat to medium-low and cook for about 4-5 minutes until the mixture thickens and bubbles.

  3. Pour and Chill: Pour the hot mixture into a rimmed 10×10-inch pan lined with parchment paper, making sure it’s evenly distributed. Allow it to chill in the fridge for at least two hours until set.

  4. Prepare for Cutting: Once chilled, take the pan out and cover about 1/2 inch at one edge with new parchment paper. Sprinkle powdered sugar over the remaining jelly surface to prevent sticking.

  5. Cut the Candy: Dip a sharp knife in warm water to loosen the jelly. Carefully slice the jelly into two blocks, running the knife across the middle for even portions.

  6. Roll into Logs: Gently roll each piece into a tight log, ensuring you don’t get powdered sugar on the sticky edge where the parchment paper was; this is crucial for keeping your log intact!

  7. Slice and Serve: Use a sharp knife to cut each log into 1/2-inch pieces. Serve and enjoy these delightful bites of homemade candy!

Optional: Dust the candy pieces with extra powdered sugar for a sweet finish.

Exact quantities are listed in the recipe card below.

How to Store and Freeze Delicious Orange Jelly Candy

Fridge: Keep your delicious orange jelly candy stored in an airtight container in the fridge for up to 1 week. This ensures it remains fresh and chewy.

Freezer: If you want to extend its shelf life, freeze the candy in a single layer on a baking sheet for about 2 hours, then transfer to an airtight bag. It can last up to 3 months.

Reheating: To enjoy the frozen candy, let it thaw in the fridge overnight or at room temperature for a couple of hours. There’s no need to reheat; it’s delightful served cold!

Serving: For best taste, roll the thawed candy in powdered sugar just before serving to bring back that fresh look and texture.

Delicious Orange Jelly Candy Variations

Feel free to let your creativity flow and personalize this delightful treat with these fun, delicious twists!

  • Citrus Medley: Use a blend of lemon and lime juices along with the sour orange juice for an extra tart kick. It adds layers of flavor that will surprise and delight every taste bud.

  • Spicy Kick: Add a pinch of cayenne pepper or chili powder to the mixture for a hint of heat. This unexpected twist can turn your candy into an exciting treat that tantalizes the senses.

  • Herb Infusion: Incorporate a few sprigs of fresh mint or basil while cooking. Strain the mixture before cooling to infuse it with refreshing herbal notes that make it truly unique.

  • Fruit Flavors: Substitute sour orange juice with other citrus juices like grapefruit or tangerine for different taste profiles. Each fruit brings its own character, making it fun to explore new flavors!

  • Colorful Layers: Create a layered candy by dividing the mixture into two bowls, tinting each with different food colorings, and then carefully pouring them in layers. The visual appeal will impress anyone who has the pleasure of enjoying this candy!

  • Nutty Crunch: Mix in finely chopped nuts or seeds, such as pistachios or sesame seeds, before pouring into the pan. This adds a delightful crunch that contrasts beautifully with the chewy candy.

  • Sweet Chocolate Dip: Melt dark or milk chocolate and dip the finished candy pieces for a luxurious touch. The rich chocolate pairs exquisitely with the vibrant orange flavor, creating a decadent treat.

  • Zesty Glaze: Brush finished candy pieces with a light glaze made of orange juice and powdered sugar for a shiny, sweet finish. This not only enhances the look but adds another layer of sweetness that elevates the already delicious candy.

Make Ahead Options

These delicious orange jelly candies are perfect for busy weeknights or last-minute gatherings! You can prep the jelly mixture up to 24 hours in advance by following steps 1 through 3, allowing you to save time when you’re ready to serve. Simply pour the hot mixture into the pan and let it chill in the fridge overnight. When you’re ready to roll and cut the candy, take it out of the fridge and proceed with steps 4 to 7. To maintain quality, ensure that the candy is tightly wrapped in parchment paper before refrigerating, preventing moisture from affecting the texture. Enjoy making the process easier with these make-ahead tips for your delicious orange jelly candy!

What to Serve with Delicious Orange Jelly Candy?

Looking to complement your sweet and zesty orange jelly candy experience? Here are some delightful pairings to elevate your treat!

  • Fresh Fruit Salad: A mix of juicy berries and tart apples enhances the candy’s citrus notes and adds a refreshing crunch.

  • Dark Chocolate Dipping Sauce: Rich, melted chocolate provides a luscious contrast that beautifully balances the candy’s tangy sweetness.

  • Mint Tea: This aromatic herbal tea offers a mild, soothing flavor that cools the palate while highlighting the candy’s brightness.

  • Cheese Platter: A selection of sharp cheeses contrasts well with the sweetness of the jelly, creating a sophisticated flavor combination.

  • Vanilla Ice Cream: Creamy ice cream balances the chewy texture of the candy, creating a delightful and indulgent treat.

  • Sparkling Water with Citrus: The fizz and brightness of citrus-enhanced sparkling water refreshes your taste buds, making each bite of candy even more enjoyable.

These pairings will create a delightful spread that everyone will love to savor alongside your delicious orange jelly candy!

Chef's Helpful Tips

  • To enhance the flavor of your Delicious Orange Jelly Candy, opt for freshly squeezed sour orange juice for a brighter and more complex taste.
  • Be sure to stir your mixture continuously while cooking to prevent the agar agar from clumping, which can lead to uneven texture.
  • For best results, allow your jelly to chill for a full two hours; this ensures it sets properly and can be easily cut.
  • When cutting your jelly, dipping the knife in warm water not only aids in slicing but also helps achieve clean edges, making for a professional-looking finish.

Delicious Orange Jelly Candy Recipe FAQs

How do I choose the right sour orange juice?
Absolutely! For the best flavor, opt for fresh or freshly squeezed sour oranges. Look for oranges that are firm and heavy for their size, with a vibrant color. Avoid any fruit with dark spots or an overly dull appearance, as that can indicate overripeness or spoilage.

What’s the best way to store leftover orange jelly candy?
Very! To keep your delicious orange jelly candy fresh, store it in an airtight container in the fridge. It will remain chewy and tasty for up to 1 week. If you notice any signs of moisture or it’s getting too sticky, simply dust it with a little extra powdered sugar before sealing.

Can I freeze this orange jelly candy?
Indeed! To freeze your jelly candy, first, place it in a single layer on a baking sheet and freeze for about 2 hours. Once frozen, transfer the pieces to an airtight bag, ensuring to remove as much air as possible. It’ll keep well in the freezer for up to 3 months. When you’re ready to enjoy it, thaw it in the fridge overnight or at room temperature for about two hours.

What if my jelly candy doesn’t set properly?
No worries! If your delicious orange jelly candy doesn’t set, it might be due to insufficient cooking time or too little agar agar. First, you can try briefly reheating the mixture until it comes to a rolling boil again, ensuring you stir constantly. If needed, add more agar agar (1/2 teaspoon, dissolved in a little water) and allow it to boil for an extra minute. Pour it back into the mold and chill again. If your jelly sets too hard, you can add a little water and gently reheat, mixing until it reaches your desired texture.

Are there any dietary concerns with this recipe?
Absolutely! This delicious orange jelly candy is naturally vegan, thanks to the agar agar. However, if you or your loved ones have specific allergies, be cautious about the sugar option. Granulated sugar is generally safe but always check labels if you’re using specialty sugars. If you’re making this candy for pets, remember that sugar is not advisable for animal diets, so it’s best for people only!

Delicious Orange Jelly Candy

Delicious Orange Jelly Candy

This delicious orange jelly candy combines the tartness of sour oranges with just the right amount of sweetness for a chewy, zesty treat.
Print Recipe Pin Recipe
Prep Time 10 minutes mins
Cook Time 5 minutes mins
Chilling Time 2 hours hrs
Total Time 2 hours hrs 15 minutes mins
Servings: 12 pieces
Course: DESSERT RECIPES
Cuisine: American
Calories: 50
Ingredients Equipment Method Nutrition Notes

Ingredients
  

Jelly Mixture
  • 1 cup sour orange juice freshly squeezed for best flavor
  • 1 cup sugar granulated or coconut sugar
  • 2 tablespoons agar agar powder form
Optional Coatings
  • 1/4 cup powdered sugar for sprinkling
  • 5 drops food coloring orange or yellow for enhancement

Equipment

  • large saucepan
  • rimmed 10x10 inch pan
  • sharp knife
  • parchment paper

Method
 

Making the Candy
  1. In a large saucepan, mix together the sugar, sour orange juice, and agar agar powder. If you'd like, add a few drops of food coloring.
  2. Stir the mixture CONSTANTLY over medium-high heat until it reaches a rolling boil. Lower the heat to medium-low and cook for about 4-5 minutes until it thickens.
  3. Pour the hot mixture into a lined pan and chill in the fridge for at least two hours until set.
  4. Take the pan out, cover an edge with new parchment paper, and sprinkle powdered sugar over the jelly surface.
  5. Dip a knife in warm water to loosen the jelly. Slice it into two blocks.
  6. Gently roll each piece into a tight log.
  7. Cut each log into 1/2-inch pieces. Serve and enjoy!

Nutrition

Serving: 1pieceCalories: 50kcalCarbohydrates: 13gPotassium: 30mgSugar: 12gVitamin C: 10mg

Notes

For best results, use freshly squeezed sour orange juice and allow the jelly to chill fully before cutting.

Tried this recipe?

Let us know how it was!

Filed Under: DESSERT RECIPES

Healthy Street Corn Pasta Salad

December 11, 2025 by JudyWhite Leave a Comment

When the warm sun starts to set and the air is filled with laughter at backyard gatherings, there’s nothing quite like a vibrant dish that steals the show. Enter my Healthy Street Corn Pasta Salad—a delightful blend of fresh flavors and comforting ingredients that perfectly captures the essence of summer. I first whipped this up for a family picnic when I was trying to break free from our usual fast-food habit. Its colorful mix of gluten-free pasta, sweet corn, and zesty lime made everyone’s taste buds dance!

With just 22 minutes from start to finish, this salad is not only healthy but also ridiculously easy to prepare. Packed with protein, vibrant veggies, and a creamy dressing that brings it all together, it’s the ideal dish for impressing guests or simply enjoying as a light meal on a busy weeknight. So, grab your mixing bowl and let’s get started on a recipe that will not only satisfy your cravings but reignite your love for homemade food!

Why You'll Love This Healthy Street Corn Pasta Salad

  • You’ll love how quick and easy this recipe is, taking just 22 minutes from start to finish.
  • The explosion of flavors from the sweet corn, zesty lime, and creamy dressing will make your taste buds sing with joy.
  • This pasta salad is incredibly versatile, perfect for picnics, barbecues, or even a quick weeknight dinner.
  • Its vibrant colors and textures make it a visually appealing addition to any table, ensuring it stands out and impresses your guests.

Healthy Street Corn Pasta Salad Ingredients

• Dive into the fresh and zesty flavors with this delightful salad!

For the Pasta
• 12 oz gluten-free pasta – Choose your favorite shape for a fun twist!

For the Salad
• 30 oz frozen corn – Sweet corn adds bursts of flavor and nutrition!
• 2 cups cooked shredded chicken – A great source of protein to keep you full.
• 1 cup diced red onion – Adds a nice crunch and a hint of sweetness.
• ⅓ cup chopped cilantro – A fresh herb that brightens the dish.

For the Dressing
• 1 cup cotija cheese – Crumbled cheese lends a deliciously creamy texture.
• ¾ cup plain non-fat Greek yogurt – A healthier alternative that adds creaminess.
• ½ cup avocado oil mayo – A light yet rich option for extra creaminess.
• ¼ cup sour cream – Adds a tangy touch to your dressing.
• ¼ cup lime juice – Fresh lime juice enhances the salad with zesty brightness.

For Seasoning
• 1 tsp chili powder – Adds a warm kick to the overall flavor.
• 1 tsp cumin – Earthy notes that complement the sweetness of the corn.
• 1 tsp paprika – A mild spice for a subtle smoky flavor.
• 1 tsp salt – Essential for bringing all the flavors together.
• Pinch cayenne – Adjust the heat level to your liking!

Enjoy this Healthy Street Corn Pasta Salad as a refreshing, satisfying dish that’s guaranteed to please a crowd!

How to Make Healthy Street Corn Pasta Salad

  1. Cook the gluten-free pasta according to package directions. Boil it in a large pot of salted water until al dente, typically around 8-10 minutes; then, drain and cool slightly.

  2. Combine in a large bowl the cooked pasta, frozen corn, shredded chicken, diced red onion, chopped cilantro, and crumbled cotija cheese. This colorful mix creates the foundation of your salad, bursting with vibrant ingredients.

  3. Mix thoroughly all ingredients together. Stir in the Greek yogurt, avocado oil mayo, sour cream, lime juice, and spices (chili powder, cumin, paprika, salt, and cayenne), ensuring everything is well coated and wonderfully creamy.

  4. Taste and adjust seasoning if necessary. A little extra salt or lime juice can elevate the flavors, so sample and tweak to your liking!

  5. Serve immediately or refrigerate the salad until you’re ready to enjoy. It can be served chilled or at room temperature, making it perfect for any occasion.

Optional: Garnish with extra cilantro or a sprinkle of chili powder for a pop of color and flavor!

Exact quantities are listed in the recipe card below.

Make Ahead Options

These Healthy Street Corn Pasta Salad preparations are perfect for busy home cooks seeking an easy meal prep solution! You can cook the gluten-free pasta and toss it with the frozen corn and shredded chicken up to 24 hours in advance, refrigerating them in an airtight container to keep them fresh. The dressing can also be prepared ahead of time; just mix the Greek yogurt, avocado oil mayo, sour cream, lime juice, and spices, and store it separately in the fridge. When you’re ready to serve, simply combine everything for a delightful burst of flavor, ensuring it’s just as delicious as if you made it fresh! This way, you can enjoy a vibrant and satisfying meal without the rush.

How to Store and Freeze Healthy Street Corn Pasta Salad

Fridge: Keep your Healthy Street Corn Pasta Salad in an airtight container for up to 3 days. The flavors deepen as it chills, creating a delicious cold dish.

Freezer: This salad is best enjoyed fresh, but if you want to freeze leftovers, consider freezing the pasta and chicken separately to maintain texture. Store in airtight containers for up to 2 months.

Reheating: If you’ve frozen the salad, thaw in the fridge overnight and reheat only the pasta and chicken gently in a microwave or on the stove—avoid reheating the dressing.

Serving Suggestions: Garnish with fresh cilantro or additional lime juice just before serving to brighten up flavors after storage!

Healthy Street Corn Pasta Salad Variations

Feel free to make this delightful salad your own with these fun and tasty twists!

  • Vegan: Substitute shredded chicken with grilled zucchini or chickpeas for a hearty plant-based protein option. Enjoy the freshness that these veggies bring!

  • Spicy Kick: Add diced jalapeños or a splash of hot sauce to the mix, elevating the heat level of your salad. Your guests will love the added flavor boost!

  • Cheese Swap: Use feta cheese or a dairy-free alternative in place of cotija for a different savory twist. This small change can surprise your palate in the best way!

  • Herb Infusion: Experiment with fresh herbs like parsley or dill instead of cilantro to create unique flavor profiles. Each herb brings a new delightful aroma.

  • Grain Upgrade: Swap out gluten-free pasta for quinoa or farro for a delightful texture and extra nutty flavor. These hearty grains add a nutritious touch!

  • Citrus Blend: Mix in some orange or grapefruit juice along with lime for a bright, citrusy taste that elevates the entire dish. It’s like summer in a bowl!

  • Nutty Crunch: Toss in toasted sunflower seeds or chopped walnuts for added texture and a healthy crunch. This delightful surprise will please any texture lover!

  • Creamy Avocado: Mashed avocado can replace some of the Greek yogurt or mayo, adding a rich and creamy element while enhancing the dish’s health benefits.

These variations will help you unleash your creativity and make your Healthy Street Corn Pasta Salad uniquely yours!

What to Serve with Healthy Street Corn Pasta Salad?

There’s nothing quite like a vibrant spread of delicious sides to enhance your mealtime experience.

  • Grilled Shrimp Skewers: Juicy shrimp brushed with garlic and lime complement the fresh flavors of the pasta salad perfectly.

  • Cornbread Muffins: These sweet, buttery muffins add a delightful contrast of texture and flavor while celebrating the core ingredient of your salad.

  • Avocado Slices: Creamy avocado offers a smooth texture and healthy fats, creating a sumptuous bite alongside the crisp pasta salad.

  • Cucumber Salad: A refreshing cucumber salad infused with mint and vinegar brightens the palate, balancing the creamy richness of the pasta.

  • Margaritas: Kick back with a zesty margarita that echoes the flavors of lime in your salad—perfect for summer gatherings.

  • Fruit Salad: A cool, colorful fruit salad can serve as a delightful dessert, cleansing the palate with juicy sweetness after your meal.

Serve these alongside your Healthy Street Corn Pasta Salad to create a well-rounded and vibrant dining experience!

Chef's Helpful Tips

  • When making the Healthy Street Corn Pasta Salad, remember to cook the gluten-free pasta just until al dente for optimal texture.
  • Avoid overcooking the pasta, as it can become mushy in the salad.
  • To enhance the flavors, let your salad sit for about 30 minutes after mixing to allow the ingredients to meld.
  • For the best results, use fresh lime juice instead of bottled to truly brighten the dish and complement the sweetness of the corn.

Healthy Street Corn Pasta Salad Recipe FAQs

How do I select the best corn for my salad?
Absolutely! When choosing corn, look for bright, plump kernels without dark spots all over, indicating freshness. Frozen corn is a great convenient option, ensuring you’re using sweet kernels regardless of the season. If fresh corn is available, choose ears that feel heavy and are tightly wrapped in husks.

How should I store my Healthy Street Corn Pasta Salad?
Store your Healthy Street Corn Pasta Salad in an airtight container in the fridge for up to 3 days. It actually improves in flavor as it sits! If you’re worried about the pasta absorbing too much of the dressing, consider adding the dressing right before serving.

Can I freeze the Healthy Street Corn Pasta Salad?
Yes! While the overall salad isn’t ideal for freezing due to the creamy dressing, you can freeze the cooked gluten-free pasta and shredded chicken separately. Place them in airtight containers or freezer bags for up to 2 months. When ready to enjoy, thaw them overnight in the fridge and gently reheat.

What if my salad is too dry after refrigeration?
Very! If you find the salad has dried out after a day in the fridge, simply add a bit more Greek yogurt or mayo to revive the creaminess. You can also squeeze in a bit more lime juice for freshness. Mix well to coat everything evenly.

Are there any dietary considerations for this recipe?
Absolutely! My Healthy Street Corn Pasta Salad is naturally gluten-free thanks to the gluten-free pasta, making it a great option for those with gluten sensitivities. If you have dairy allergies, consider substituting the cotija cheese with a dairy-free version and replacing Greek yogurt with a non-dairy alternative too. Always check ingredient labels when cooking for allergies!

What can I do if I don’t have cotija cheese?
Very! If cotija cheese is not accessible, feel free to use feta cheese for a similar salty, crumbly texture. Alternatively, you can omit the cheese altogether and add more avocado oil mayo or Greek yogurt to maintain creaminess. Your Healthy Street Corn Pasta Salad will still be delicious!

Healthy Street Corn Pasta Salad

Healthy Street Corn Pasta Salad

A quick and vibrant Healthy Street Corn Pasta Salad that embodies the flavors of summer, perfect for gatherings.
Print Recipe Pin Recipe
Prep Time 10 minutes mins
Cook Time 12 minutes mins
Total Time 22 minutes mins
Servings: 6 servings
Course: LUNCH RECIPES
Cuisine: American
Calories: 320
Ingredients Equipment Method Nutrition Notes

Ingredients
  

For the Pasta
  • 12 oz gluten-free pasta Choose your favorite shape for a fun twist!
For the Salad
  • 30 oz frozen corn Sweet corn adds bursts of flavor and nutrition!
  • 2 cups cooked shredded chicken A great source of protein to keep you full.
  • 1 cup diced red onion Adds a nice crunch and a hint of sweetness.
  • ⅓ cup chopped cilantro A fresh herb that brightens the dish.
For the Dressing
  • 1 cup cotija cheese Crumbled cheese lends a deliciously creamy texture.
  • ¾ cup plain non-fat Greek yogurt A healthier alternative that adds creaminess.
  • ½ cup avocado oil mayo A light yet rich option for extra creaminess.
  • ¼ cup sour cream Adds a tangy touch to your dressing.
  • ¼ cup lime juice Fresh lime juice enhances the salad with zesty brightness.
For Seasoning
  • 1 tsp chili powder Adds a warm kick to the overall flavor.
  • 1 tsp cumin Earthy notes that complement the sweetness of the corn.
  • 1 tsp paprika A mild spice for a subtle smoky flavor.
  • 1 tsp salt Essential for bringing all the flavors together.
  • Pinch cayenne Adjust the heat level to your liking!

Equipment

  • Large pot
  • Large Bowl

Method
 

Instructions
  1. Cook the gluten-free pasta according to package directions. Boil it in a large pot of salted water until al dente, typically around 8-10 minutes; then, drain and cool slightly.
  2. Combine in a large bowl the cooked pasta, frozen corn, shredded chicken, diced red onion, chopped cilantro, and crumbled cotija cheese.
  3. Mix thoroughly all ingredients together. Stir in the Greek yogurt, avocado oil mayo, sour cream, lime juice, and spices, ensuring everything is well coated and wonderfully creamy.
  4. Taste and adjust seasoning if necessary. A little extra salt or lime juice can elevate the flavors.
  5. Serve immediately or refrigerate the salad until you're ready to enjoy.

Nutrition

Serving: 1cupCalories: 320kcalCarbohydrates: 30gProtein: 20gFat: 15gSaturated Fat: 4gPolyunsaturated Fat: 2gMonounsaturated Fat: 8gCholesterol: 50mgSodium: 600mgPotassium: 500mgFiber: 5gSugar: 3gVitamin A: 15IUVitamin C: 35mgCalcium: 20mgIron: 10mg

Notes

Let your salad sit for about 30 minutes after mixing to allow the ingredients to meld. For best results, use fresh lime juice instead of bottled.

Tried this recipe?

Let us know how it was!

Filed Under: LUNCH RECIPES

Delicious Orange Jelly Candy

December 11, 2025 by JudyWhite Leave a Comment

The first time I tasted homemade orange jelly candy, I was transported back to my childhood summers spent under the warm sun, the only sound being the gentle rustle of leaves. This delightful treat captures that essence, combining the tartness of sour oranges with just the right amount of sweetness, resulting in a chewy, zesty candy that is simply irresistible.

When I stumbled upon some forgotten sour oranges in my fridge, I knew I had to put them to good use. The result? A vibrant, flavorful candy that not only satisfies my sweet tooth but also adds a touch of sunshine to any day. This delicious orange jelly candy is the perfect antidote to those mundane fast-food cravings—refreshing, fun to make, and a guaranteed crowd-pleaser for friends and family alike.

If you’re looking for a delightful way to bring nostalgia back into your kitchen, look no further. With just a handful of ingredients and a bit of patience, you’ll be creating these orange-flavored bites of joy in no time. Let’s dive into this simple recipe that will leave you and your loved ones smiling!

Why You'll Love This Delicious Orange Jelly Candy

  • This recipe is incredibly easy to make, requiring just a few simple ingredients and minimal cooking time.
  • The vibrant flavor of sour oranges combined with the sweetness makes each bite a delightful explosion of taste.
  • You’ll love how versatile this candy is, as it can be enjoyed as a snack, a party treat, or even a thoughtful homemade gift.
  • Plus, its eye-catching color and unique shape give it an appealing visual that impresses everyone at the table.

Delicious Orange Jelly Candy Ingredients

• These fantastic ingredients create a delightful treat that’s sure to impress!

For the Jelly Mixture

  • Sour orange juice – this adds a vibrant tartness to balance the sweetness.
  • Sugar – granulated sugar is key for sweetness; you can use coconut sugar for a healthier alternative.
  • Agar agar – a plant-based gelling agent that helps firm up the jelly, making it vegan-friendly.

Optional Coatings

  • Powdered sugar – for sprinkling; it prevents sticking and adds a sweet finish.
  • Food coloring – a few drops can brighten up your jelly candy, making it even more visually appealing.

These ingredients come together to create the delicious orange jelly candy that’s bound to brighten your day!

How to Make Delicious Orange Jelly Candy

  1. Combine Ingredients: In a large saucepan, mix together the sugar, sour orange juice, and agar agar powder. If you’d like, add a few drops of orange or yellow food coloring to enhance the candy’s brightness.

  2. Cook Mixture: Stir the mixture CONSTANTLY over medium-high heat until it reaches a rolling boil. Lower the heat to medium-low and cook for about 4-5 minutes until the mixture thickens and bubbles.

  3. Pour and Chill: Pour the hot mixture into a rimmed 10×10-inch pan lined with parchment paper, making sure it’s evenly distributed. Allow it to chill in the fridge for at least two hours until set.

  4. Prepare for Cutting: Once chilled, take the pan out and cover about 1/2 inch at one edge with new parchment paper. Sprinkle powdered sugar over the remaining jelly surface to prevent sticking.

  5. Cut the Candy: Dip a sharp knife in warm water to loosen the jelly. Carefully slice the jelly into two blocks, running the knife across the middle for even portions.

  6. Roll into Logs: Gently roll each piece into a tight log, ensuring you don’t get powdered sugar on the sticky edge where the parchment paper was; this is crucial for keeping your log intact!

  7. Slice and Serve: Use a sharp knife to cut each log into 1/2-inch pieces. Serve and enjoy these delightful bites of homemade candy!

Optional: Dust the candy pieces with extra powdered sugar for a sweet finish.

Exact quantities are listed in the recipe card below.

How to Store and Freeze Delicious Orange Jelly Candy

Fridge: Keep your delicious orange jelly candy stored in an airtight container in the fridge for up to 1 week. This ensures it remains fresh and chewy.

Freezer: If you want to extend its shelf life, freeze the candy in a single layer on a baking sheet for about 2 hours, then transfer to an airtight bag. It can last up to 3 months.

Reheating: To enjoy the frozen candy, let it thaw in the fridge overnight or at room temperature for a couple of hours. There’s no need to reheat; it’s delightful served cold!

Serving: For best taste, roll the thawed candy in powdered sugar just before serving to bring back that fresh look and texture.

What to Serve with Delicious Orange Jelly Candy?

Looking to complement your sweet and zesty orange jelly candy experience? Here are some delightful pairings to elevate your treat!

  • Fresh Fruit Salad: A mix of juicy berries and tart apples enhances the candy’s citrus notes and adds a refreshing crunch.

  • Dark Chocolate Dipping Sauce: Rich, melted chocolate provides a luscious contrast that beautifully balances the candy’s tangy sweetness.

  • Mint Tea: This aromatic herbal tea offers a mild, soothing flavor that cools the palate while highlighting the candy’s brightness.

  • Cheese Platter: A selection of sharp cheeses contrasts well with the sweetness of the jelly, creating a sophisticated flavor combination.

  • Vanilla Ice Cream: Creamy ice cream balances the chewy texture of the candy, creating a delightful and indulgent treat.

  • Sparkling Water with Citrus: The fizz and brightness of citrus-enhanced sparkling water refreshes your taste buds, making each bite of candy even more enjoyable.

These pairings will create a delightful spread that everyone will love to savor alongside your delicious orange jelly candy!

Delicious Orange Jelly Candy Variations

Feel free to let your creativity flow and personalize this delightful treat with these fun, delicious twists!

  • Citrus Medley: Use a blend of lemon and lime juices along with the sour orange juice for an extra tart kick. It adds layers of flavor that will surprise and delight every taste bud.

  • Spicy Kick: Add a pinch of cayenne pepper or chili powder to the mixture for a hint of heat. This unexpected twist can turn your candy into an exciting treat that tantalizes the senses.

  • Herb Infusion: Incorporate a few sprigs of fresh mint or basil while cooking. Strain the mixture before cooling to infuse it with refreshing herbal notes that make it truly unique.

  • Fruit Flavors: Substitute sour orange juice with other citrus juices like grapefruit or tangerine for different taste profiles. Each fruit brings its own character, making it fun to explore new flavors!

  • Colorful Layers: Create a layered candy by dividing the mixture into two bowls, tinting each with different food colorings, and then carefully pouring them in layers. The visual appeal will impress anyone who has the pleasure of enjoying this candy!

  • Nutty Crunch: Mix in finely chopped nuts or seeds, such as pistachios or sesame seeds, before pouring into the pan. This adds a delightful crunch that contrasts beautifully with the chewy candy.

  • Sweet Chocolate Dip: Melt dark or milk chocolate and dip the finished candy pieces for a luxurious touch. The rich chocolate pairs exquisitely with the vibrant orange flavor, creating a decadent treat.

  • Zesty Glaze: Brush finished candy pieces with a light glaze made of orange juice and powdered sugar for a shiny, sweet finish. This not only enhances the look but adds another layer of sweetness that elevates the already delicious candy.

Make Ahead Options

These delicious orange jelly candies are perfect for busy weeknights or last-minute gatherings! You can prep the jelly mixture up to 24 hours in advance by following steps 1 through 3, allowing you to save time when you’re ready to serve. Simply pour the hot mixture into the pan and let it chill in the fridge overnight. When you’re ready to roll and cut the candy, take it out of the fridge and proceed with steps 4 to 7. To maintain quality, ensure that the candy is tightly wrapped in parchment paper before refrigerating, preventing moisture from affecting the texture. Enjoy making the process easier with these make-ahead tips for your delicious orange jelly candy!

Chef's Helpful Tips

  • To enhance the flavor of your Delicious Orange Jelly Candy, opt for freshly squeezed sour orange juice for a brighter and more complex taste.
  • Be sure to stir your mixture continuously while cooking to prevent the agar agar from clumping, which can lead to uneven texture.
  • For best results, allow your jelly to chill for a full two hours; this ensures it sets properly and can be easily cut.
  • When cutting your jelly, dipping the knife in warm water not only aids in slicing but also helps achieve clean edges, making for a professional-looking finish.

Delicious Orange Jelly Candy Recipe FAQs

How do I choose the right sour orange juice?
Absolutely! For the best flavor, opt for fresh or freshly squeezed sour oranges. Look for oranges that are firm and heavy for their size, with a vibrant color. Avoid any fruit with dark spots or an overly dull appearance, as that can indicate overripeness or spoilage.

What’s the best way to store leftover orange jelly candy?
Very! To keep your delicious orange jelly candy fresh, store it in an airtight container in the fridge. It will remain chewy and tasty for up to 1 week. If you notice any signs of moisture or it’s getting too sticky, simply dust it with a little extra powdered sugar before sealing.

Can I freeze this orange jelly candy?
Indeed! To freeze your jelly candy, first, place it in a single layer on a baking sheet and freeze for about 2 hours. Once frozen, transfer the pieces to an airtight bag, ensuring to remove as much air as possible. It’ll keep well in the freezer for up to 3 months. When you’re ready to enjoy it, thaw it in the fridge overnight or at room temperature for about two hours.

What if my jelly candy doesn’t set properly?
No worries! If your delicious orange jelly candy doesn’t set, it might be due to insufficient cooking time or too little agar agar. First, you can try briefly reheating the mixture until it comes to a rolling boil again, ensuring you stir constantly. If needed, add more agar agar (1/2 teaspoon, dissolved in a little water) and allow it to boil for an extra minute. Pour it back into the mold and chill again. If your jelly sets too hard, you can add a little water and gently reheat, mixing until it reaches your desired texture.

Are there any dietary concerns with this recipe?
Absolutely! This delicious orange jelly candy is naturally vegan, thanks to the agar agar. However, if you or your loved ones have specific allergies, be cautious about the sugar option. Granulated sugar is generally safe but always check labels if you’re using specialty sugars. If you’re making this candy for pets, remember that sugar is not advisable for animal diets, so it’s best for people only!

Delicious Orange Jelly Candy

Delicious Orange Jelly Candy

This delicious orange jelly candy combines the tartness of sour oranges with just the right amount of sweetness for a chewy, zesty treat.
Print Recipe Pin Recipe
Prep Time 10 minutes mins
Cook Time 5 minutes mins
Chilling Time 2 hours hrs
Total Time 2 hours hrs 15 minutes mins
Servings: 12 pieces
Course: DESSERT RECIPES
Cuisine: American
Calories: 50
Ingredients Equipment Method Nutrition Notes

Ingredients
  

Jelly Mixture
  • 1 cup sour orange juice freshly squeezed for best flavor
  • 1 cup sugar granulated or coconut sugar
  • 2 tablespoons agar agar powder form
Optional Coatings
  • 1/4 cup powdered sugar for sprinkling
  • 5 drops food coloring orange or yellow for enhancement

Equipment

  • large saucepan
  • rimmed 10x10 inch pan
  • sharp knife
  • parchment paper

Method
 

Making the Candy
  1. In a large saucepan, mix together the sugar, sour orange juice, and agar agar powder. If you'd like, add a few drops of food coloring.
  2. Stir the mixture CONSTANTLY over medium-high heat until it reaches a rolling boil. Lower the heat to medium-low and cook for about 4-5 minutes until it thickens.
  3. Pour the hot mixture into a lined pan and chill in the fridge for at least two hours until set.
  4. Take the pan out, cover an edge with new parchment paper, and sprinkle powdered sugar over the jelly surface.
  5. Dip a knife in warm water to loosen the jelly. Slice it into two blocks.
  6. Gently roll each piece into a tight log.
  7. Cut each log into 1/2-inch pieces. Serve and enjoy!

Nutrition

Serving: 1pieceCalories: 50kcalCarbohydrates: 13gPotassium: 30mgSugar: 12gVitamin C: 10mg

Notes

For best results, use freshly squeezed sour orange juice and allow the jelly to chill fully before cutting.

Tried this recipe?

Let us know how it was!

Filed Under: DESSERT RECIPES

  • « Previous Page
  • 1
  • …
  • 42
  • 43
  • 44
  • 45
  • 46
  • …
  • 49
  • Next Page »

Recent Posts

  • Crispy Potatoes in Oven
  • Lucky Charms Pancakes
  • Cheeseburger
  • Boiled Corn on the Cob
  • St. Patrick’s Day Dessert Parfaits

Recent Comments

No comments to show.

Footer

  • Contact
  • Privacy Policy
  • About Us
  • Terms
  • ↑ back to top

Copyright © 2024 www.Forkono.com

Table Of Content