Forkono

  • BREAKFAST & BRUNCH
  • DESSERT RECIPES
  • DINNER RECIPES
  • LUNCH RECIPES
  • About uS
  • SNACKS & APPETIZERS
menu icon
go to homepage
  • BREAKFAST & BRUNCH
  • DESSERT RECIPES
  • DINNER RECIPES
  • LUNCH RECIPES
  • About uS
  • SNACKS & APPETIZERS
search icon
Homepage link
  • BREAKFAST & BRUNCH
  • DESSERT RECIPES
  • DINNER RECIPES
  • LUNCH RECIPES
  • About uS
  • SNACKS & APPETIZERS
×

Cheeseburger

February 18, 2026 by JudyWhite Leave a Comment

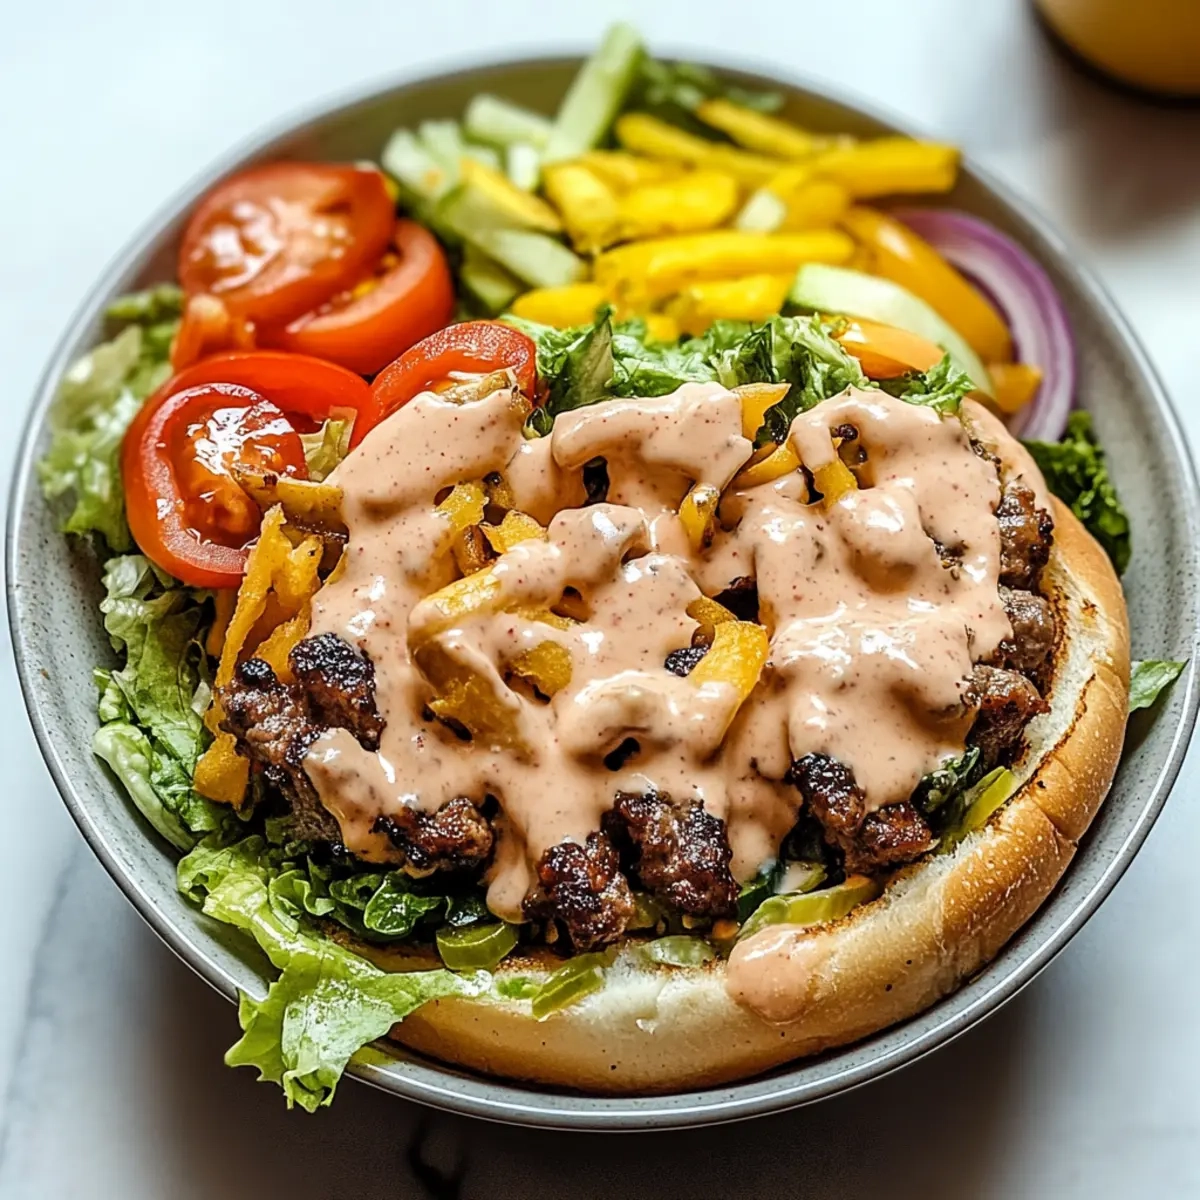
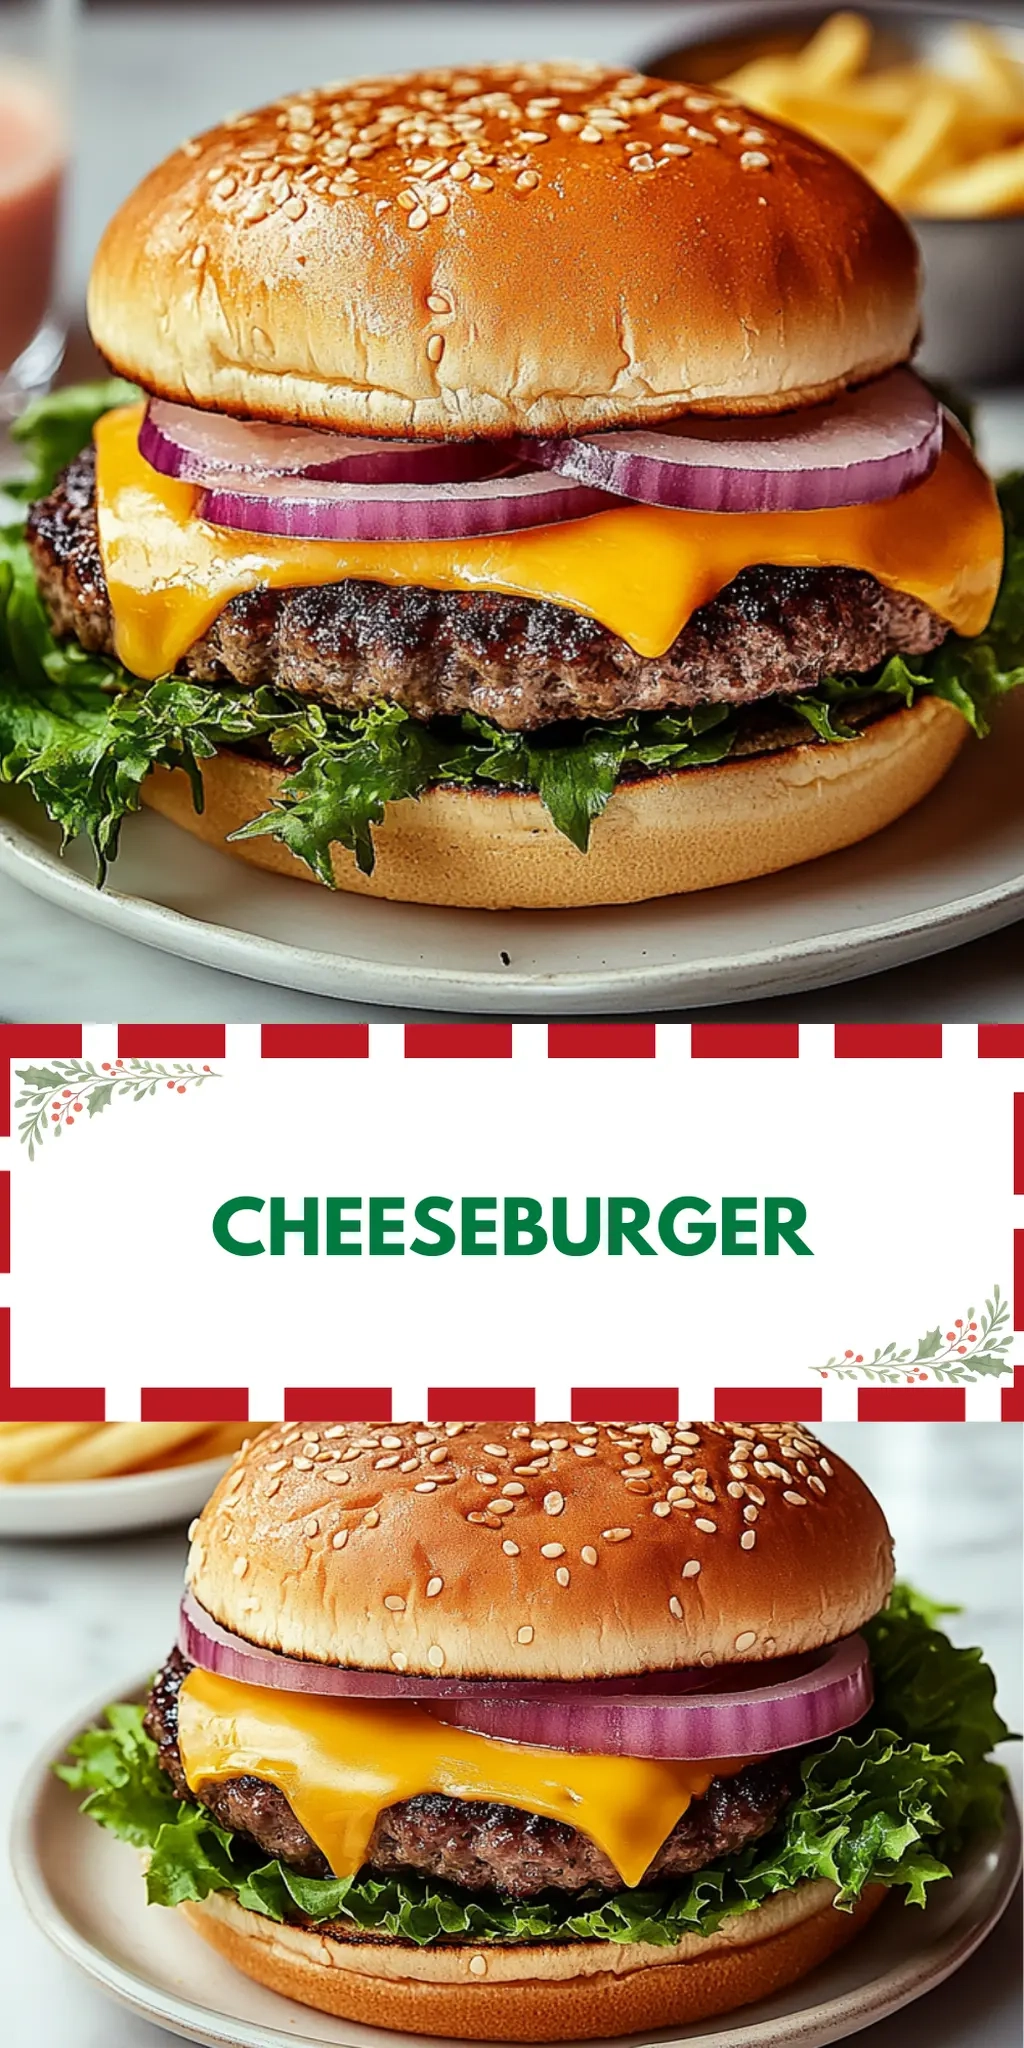
There’s nothing quite like the sound of sizzling patties hitting the grill to kick off a perfect summer evening. As I stood on my patio, the enticing aroma of juicy ground beef mingling with the sharp scent of melting cheddar filled the air, and I couldn’t help but feel a wave of nostalgia wash over me. This cheeseburger recipe isn’t just a meal; it’s a delicious experience that transforms simple ingredients into an unforgettable feast for family and friends.

After a long week of fast food and takeout, I craved something homemade that would truly satisfy my burger cravings. With just 25 minutes, I put together these scrumptious cheeseburgers with tender brioche buns, fresh lettuce, and vine-ripened tomatoes. These burgers not only deliver mouthwatering flavor but also evoke a sense of warmth and comfort, making them the ideal centerpiece for any casual gathering. Whether you’re a seasoned chef or just someone looking for a break from the drive-thru, this recipe is your ticket to burger bliss! So, fire up your grill, and let’s create a meal that will leave everyone raving.

Why You'll Love This Cheeseburger

  • This cheeseburger recipe is incredibly easy to make, allowing you to whip up a delicious meal in just 25 minutes.
  • The combination of juicy ground beef and sharp cheddar cheese delivers an unbeatable flavor that will have everyone coming back for seconds.
  • Its versatility means you can customize each burger to suit your guests’ preferences, from different toppings to optional sauces.
  • Additionally, the visual appeal of a perfectly assembled burger makes for an impressive presentation at any gathering.

Cheeseburger Ingredients

• Get ready to create a mouthwatering classic!

For the Patty

  • Ground beef – the foundation of your cheeseburger; opt for 80/20 for the best balance of flavor and juiciness.
  • Salt and pepper – essential seasonings that enhance the natural flavors of the beef.

For the Cheese

  • Sharp cheddar cheese – melts beautifully and adds a robust flavor; feel free to experiment with other cheese types for a unique twist.

For the Buns

  • Brioche buns – their soft, buttery texture elevates your cheeseburger while providing a perfect balance to the savory toppings.

For the Toppings

  • Romaine lettuce, shredded – adds a refreshing crunch; you can substitute with leaf lettuce for a different texture.
  • Large tomato, sliced – juicy slices bring a burst of freshness; opt for vine-ripened tomatoes for the best flavor.
  • Red onion, thinly sliced – adds a sharp bite to your burger; soak in water for a milder taste if preferred.
  • Dill pickle slices – the perfect tangy complement to the richness of the beef.

For the Sauces

  • Ketchup – a classic choice that balances the savory flavors; try gourmet options for a twist.
  • Mustard – adds a tangy zip; consider yellow, Dijon, or honey mustard based on your taste.
  • Mayonnaise (optional) – creamy and smooth, it brings everything together; if you want an extra kick, try mixing in a bit of sriracha!

With these cheeseburger ingredients, you’re set to craft an unforgettable meal that will please everyone at the table!

How to Make a Cheeseburger

  1. Preheat your grill to medium-high heat, around 375°F (190°C). This perfect temperature will ensure your patties cook evenly and develop a delightful, smoky flavor.

  2. Season the ground beef in a bowl with salt and pepper. Form it into four 1-inch thick patties, making a small indent in the center of each to prevent bulging while cooking.

  3. Grill the patties for about 4 minutes on one side. When flipping, add the sharp cheddar cheese on top to melt during the last minute of grilling for gooey perfection.

  4. Toast your brioche buns cut-side down on the grill until they turn a beautiful golden brown. This adds a lovely crunch and enhances the overall flavor profile.

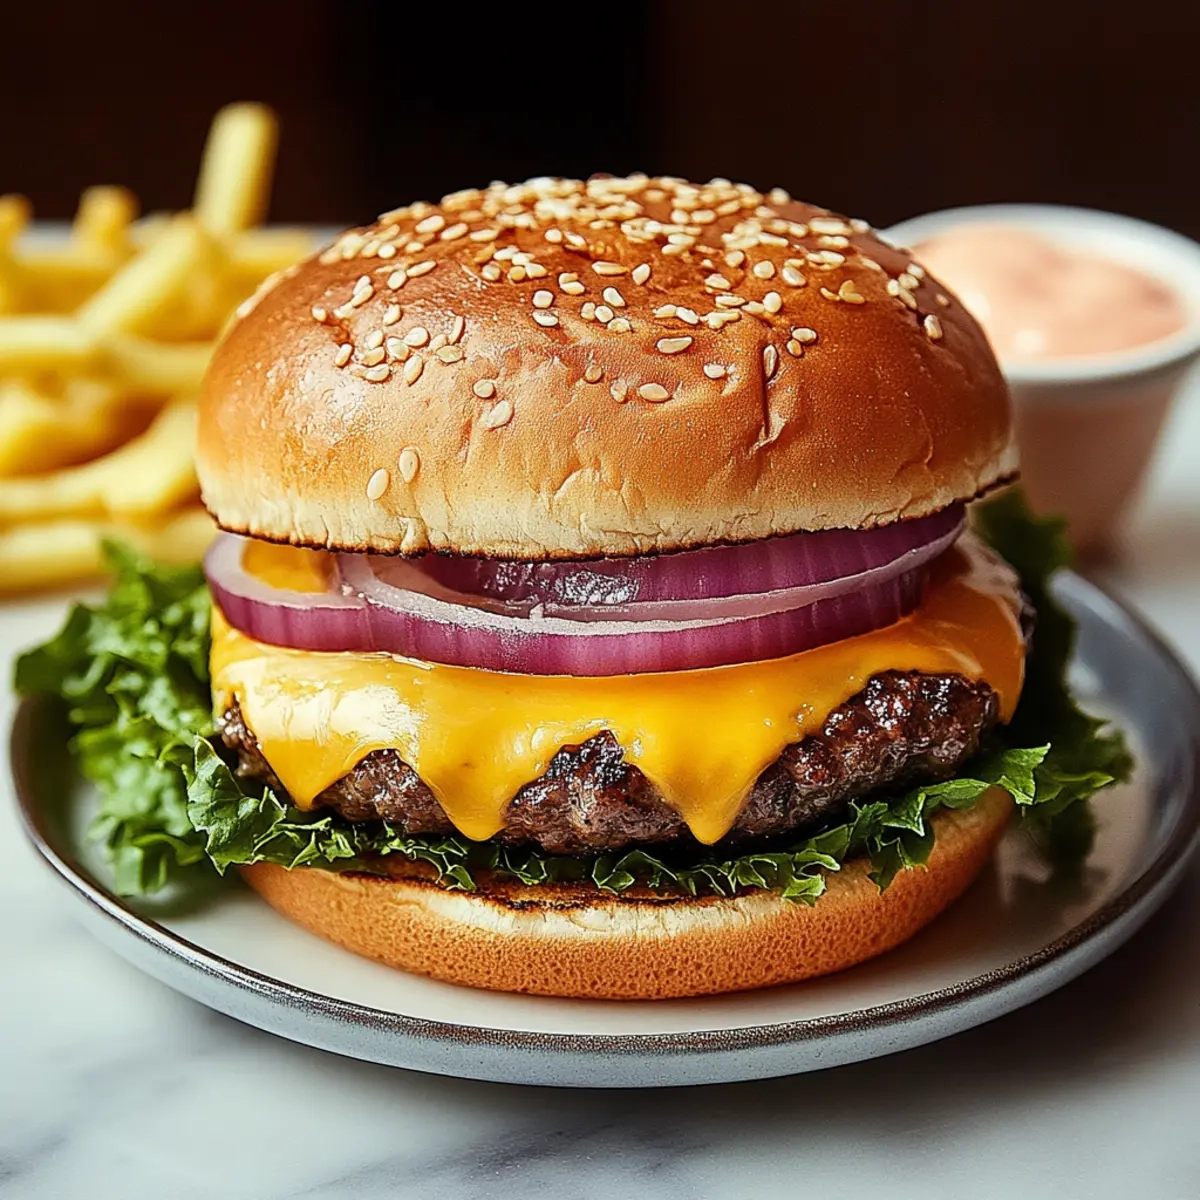
  5. Assemble your burgers. Start by spreading mayonnaise (if using) on the bottom buns, then layer on the shredded lettuce, tomato slices, the cheese-topped patty, red onion, dill pickles, ketchup, and mustard. Finish it off with the top half of the bun.

  6. Serve your cheeseburgers immediately while they’re hot and the cheese is still gooey. Watch everyone dive in with delight!

Optional: Add crispy bacon for an extra layer of flavor!
Exact quantities are listed in the recipe card below.

How to Store and Freeze Cheeseburger

Fridge: Store any leftover cheeseburgers in an airtight container for up to 3 days. Reheat in the microwave or on a skillet for best results.

Freezer: For longer storage, wrap individual cheeseburgers tightly in foil or plastic wrap and freeze for up to 3 months. Thaw in the refrigerator before reheating.

Reheating: When ready to enjoy again, reheat your cheeseburger in an oven at 350°F (175°C) for about 10-15 minutes, or until heated through. This helps maintain the patty’s juicy texture.

What to Serve with Cheeseburger?

Elevate your burger night experience with delightful sides that balance flavor and texture, making every bite irresistible.

  • Crispy French Fries: Their salty crunch pairs perfectly with the juicy cheeseburger, satisfying that craving for classic comfort food.

  • Creamy Coleslaw: This refreshing side offers a tangy crunch, which beautifully contrasts the richness of the cheeseburger, adding a light touch to the meal.

  • Grilled Corn on the Cob: Sweet, smoky corn brings a delightful sweetness that complements the savory flavors of the burger. It’s an unstoppable summer classic!

  • Potato Salad: Creamy and flavorful, potato salad provides a hearty pairing that enhances the meal, while its coolness is a lovely balance to the hot burger.

  • Sweet Potato Fries: Their natural sweetness makes for a deliciously different take alongside your cheeseburger, adding an unexpected twist that guests will love.

  • Beverages: A classic cold beer or an iced tea refreshment beautifully pairs with cheeseburgers, enhancing the overall chill vibe of your meal.

  • Cherry Pie: End your delightful meal with a slice of homemade cherry pie. Its sweet tartness makes it a nostalgic dessert that lingers pleasantly on the palate.

These pairings will not only enhance your cheeseburger experience but also create lasting memories around the dining table. Enjoy every bite!

Cheeseburger Variations

Feel free to make this cheeseburger your own with these delightful twists that cater to every taste!

  • Dairy-Free: Use a dairy-free cheese alternative to keep the cheesy goodness while accommodating lactose intolerance.

  • Spicy Kick: Add jalapeño slices or a drizzle of hot sauce for a fiery burst that elevates each bite into bold territory. Don’t be shy—heat can transform your burger into an experience!

  • Turkey Substitute: Swap ground beef for lean ground turkey. Season well to avoid dryness; the lighter flavor pairs wonderfully with fresh toppings.

  • Whole Wheat Buns: Choose whole wheat or gluten-free buns for a healthier touch without sacrificing deliciousness. Your burger will still shine through with the right toppings!

  • Veggie Burgers: Dig into a black bean or chickpea patty for a hearty vegetarian option that satisfies meat lovers too. Layer it with the same tantalizing toppings for an unexpected twist.

  • BBQ Glaze: Brush some BBQ sauce on the patties while grilling for a caramelized, tangy flavor that gives your burger a sweet yet smoky finish. It’s more than just a topping; it’s a flavor enhancement!

  • Fried Egg Topping: Top your melted cheese with a sunny-side-up egg for a rich, satisfying experience that combines textures and flavors uniquely. It introduces breakfast vibes to dinnertime!

  • Herb-Infused Patties: Mix chopped fresh herbs like basil or parsley into the ground beef before shaping the patties for an aromatic boost that enhances every bite. Cooking should feel like an art, and this twist feels like a masterpiece!

Make Ahead Options

These cheeseburgers are perfect for busy weeknights! You can prepare the ground beef patties in advance by seasoning and forming them into patties (up to 24 hours ahead of time) and storing them in the refrigerator. Also, you can slice the veggies—like tomatoes and onions—and store them in an airtight container for up to 3 days. To maintain their freshness, keep the lettuce separate until assembly. When it’s time to cook, simply grill the prepped patties as directed and toast the brioche buns while assembling the toppings. With these make-ahead tips, you’ll enjoy delicious, homemade cheeseburgers with minimal effort, saving time without sacrificing flavor!

Chef's Helpful Tips

  • For the best flavor and juiciness in your cheeseburger, use 80/20 ground beef as it strikes the perfect balance between fat and meat.
  • Always make a small indent in the center of the patties to prevent them from puffing up while grilling, ensuring a nice, even cook.
  • When grilling, remember to flip the patties only once to achieve a proper sear and retain juices, and add cheese during the last minute for ultimate melty goodness.
  • Lastly, to toast your brioche buns perfectly, keep an eye on them as they can turn golden brown quickly, providing a delightful crunch to your delicious cheeseburger experience.

Cheeseburger Recipe FAQs

How do I choose the right ground beef for my cheeseburger?
Absolutely! For the juiciest cheeseburger, I recommend using 80/20 ground beef, which is 80% lean meat and 20% fat. This blend strikes the perfect balance between flavor and juiciness, ensuring your patties are both tender and full of taste. Avoid leaner options as they can lead to dry burgers.

What’s the best way to store leftover cheeseburgers?
Very! Once your feast is over, store any leftover cheeseburgers in an airtight container in the fridge for up to 3 days. You can reheat them in the microwave, but I suggest using a skillet to keep their juicy texture intact. Just heat them on medium-low to avoid drying them out.

Can I freeze cheeseburgers, and if so, how?
Definitely! To freeze your cheeseburgers, wrap each one tightly in aluminum foil or plastic wrap to prevent freezer burn. They’ll hold up well for up to 3 months. When you’re ready to enjoy them again, just let them thaw in the refrigerator overnight before reheating.

What if my patties puff up while cooking?
No trouble! To prevent your patties from puffing up, make a small indent in the center before grilling. This technique ensures they cook evenly and won’t bulge while on the grill. Also, remember to flip them only once for a proper sear and to maintain their juicy goodness.

Are cheeseburgers safe for pets?
Not really! While plain ground beef is safe for dogs, avoid sharing cheeseburgers with your furry friends, especially with toppings like onions and condiments. These ingredients can be harmful to pets. Always check with your veterinarian if you’re unsure about sharing human food.

Can I customize the toppings for my cheeseburger?
Absolutely! The cheeseburger is highly customizable. You can switch up the cheese, add avocado, jalapeños, bacon, or even sautéed mushrooms for extra flavor. The more, the merrier! Tailor your toppings to suit your guests’ tastes, making each burger a personal creation.

Cheeseburger

Cheeseburger

Enjoy a mouthwatering cheeseburger with juicy ground beef and sharp cheddar, perfect for summer evenings.
Print Recipe Pin Recipe
Prep Time 10 minutes mins
Cook Time 15 minutes mins
Total Time 25 minutes mins
Servings: 4 burgers
Course: DINNER RECIPES
Cuisine: American
Calories: 550
Ingredients Equipment Method Nutrition Notes

Ingredients
  

For the Patty
  • 1 pound ground beef 80/20 for best flavor and juiciness
  • 1 teaspoon salt
  • 1 teaspoon pepper
For the Cheese
  • 4 slices sharp cheddar cheese
For the Buns
  • 4 buns brioche buns
For the Toppings
  • 1 cup romaine lettuce, shredded can substitute with leaf lettuce
  • 1 large tomato, sliced vine-ripened for best flavor
  • 1 small red onion, thinly sliced soak in water for milder taste if preferred
  • 1 cup dill pickle slices
For the Sauces
  • 4 tablespoons ketchup gourmet options for a twist
  • 4 teaspoons mustard yellow, Dijon, or honey mustard
  • 4 tablespoons mayonnaise optional; mix in sriracha for extra kick

Equipment

  • Grill
  • Mixing bowl
  • Spatula

Method
 

How to Make a Cheeseburger
  1. Preheat your grill to medium-high heat, around 375°F (190°C).
  2. Season the ground beef in a bowl with salt and pepper. Form it into four 1-inch thick patties, making a small indent in the center of each to prevent bulging.
  3. Grill the patties for about 4 minutes on one side. When flipping, add the sharp cheddar cheese on top to melt during the last minute.
  4. Toast brioche buns cut-side down on the grill until golden brown.
  5. Assemble your burgers. Spread mayonnaise on the bottom buns, layer on lettuce, tomato slices, cheese-topped patty, red onion, dill pickles, ketchup, and mustard. Finish with the top bun.
  6. Serve immediately while hot and cheese is gooey.

Nutrition

Serving: 1burgerCalories: 550kcalCarbohydrates: 36gProtein: 27gFat: 34gSaturated Fat: 15gPolyunsaturated Fat: 1gMonounsaturated Fat: 7gTrans Fat: 1gCholesterol: 80mgSodium: 900mgPotassium: 600mgFiber: 1gSugar: 4gVitamin A: 10IUVitamin C: 10mgCalcium: 20mgIron: 15mg

Notes

Optional: Add crispy bacon for extra flavor.

Tried this recipe?

Let us know how it was!

Filed Under: DINNER RECIPES

Carbonara Pasta

February 18, 2026 by JudyWhite Leave a Comment

The first time I tried Carbonara Pasta, I fell in love with its rich, creamy texture and the satisfying crunch of crispy pancetta. It was a chilly evening, and I wanted something comforting yet simple—this dish was the perfect solution. Using just a few basic ingredients like spaghetti, eggs, and Parmesan, I unlocked a culinary treasure that felt downright luxurious.

Fast forward to now, and this recipe has become my go-to offering for friends and family, whether it’s a cozy weeknight dinner or an impromptu gathering. The beauty of Carbonara lies in its ease—it comes together in just 25 minutes! You can whip it up without breaking a sweat, impressing everyone at the table without all the fuss. Trust me, once you master these steps, you’ll never look at fast food the same way again. Let’s dive in and learn how to bring this Italian classic to your kitchen!

Why You'll Love This Carbonara Pasta

  • This Carbonara Pasta is incredibly easy to make, allowing you to enjoy a gourmet meal without spending hours in the kitchen.
  • The rich, creamy flavors of the sauce combined with the crispy pancetta create a dish that is sure to impress your family and friends.
  • Its versatility means you can customize it by adding vegetables or different types of cheese to suit your taste.
  • Plus, with total preparation and cooking time under 25 minutes, this recipe is a great time-saver for busy weeknights or last-minute gatherings.

Carbonara Pasta Ingredients

• Get ready for the deliciousness!

For the Pasta

  • Spaghetti – 200g of this classic noodle creates the perfect base for your Carbonara.

For the Sauce

  • Pancetta or Guanciale – 100g of diced meat adds a savory richness; you can substitute with bacon if needed.
  • Large Eggs – 2 eggs help create that creamy texture that makes Carbonara so irresistible.
  • Parmesan Cheese – 50g, grated for a salty, nutty flavor that perfectly complements the dish.
  • Garlic – 2 cloves, minced for an aromatic depth that enhances the whole experience.

For Seasoning

  • Salt – To taste; remember, the cheese and pancetta are already salty, so use it sparingly.
  • Freshly Cracked Black Pepper – To taste; it adds a delightful kick and is essential for authentic Carbonara.

How to Make Carbonara Pasta

  1. Boil the Pasta: Bring a large pot of salted water to a rolling boil. Add your spaghetti and cook until al dente, about 8-10 minutes. Don’t forget to reserve 1 cup of that flavorful pasta water before draining!

  2. Sauté the Pancetta: In a skillet over medium heat, toss in the diced pancetta or guanciale. Sauté for about 4-5 minutes until it’s golden and crispy, releasing those delicious flavors.

  3. Whisk the Sauce: While the pancetta is cooking, crack the large eggs into a bowl. Add the grated Parmesan cheese and a generous amount of black pepper. Whisk until it’s smooth and creamy.

  4. Combine Ingredients: Once the pasta is drained, quickly add it to the skillet with the hot pancetta, but remove from heat first! Pour the egg and cheese mixture over the pasta, tossing quickly to combine and prevent scrambling.

  5. Adjust Consistency: If the sauce seems thick, gradually add a little of the reserved pasta water, mixing until you achieve that luscious, creamy consistency everyone craves.

  6. Serve and Garnish: Plate your carbonara immediately and sprinkle with extra Parmesan and freshly cracked black pepper for an inviting presentation that’s almost too good to eat!

Optional: Add a sprinkle of fresh parsley on top for a pop of color.

Exact quantities are listed in the recipe card below.

How to Store and Freeze Carbonara Pasta

Fridge: Store leftover Carbonara Pasta in an airtight container for up to 3 days. Reheat gently on the stove, adding a splash of water or cream for creaminess.

Freezer: While not ideal, you can freeze Carbonara Pasta. Use an airtight container and it will last up to 2 months. Thaw overnight in the fridge before reheating.

Reheating: When reheating, use a skillet over low heat, adding reserved pasta water or a bit of cream to help reintroduce that silky texture.

Carbonara Pasta Variations

Feel free to play around and personalize this recipe to make it truly your own!

  • Vegetarian: Substitute pancetta with sautéed mushrooms for a hearty, umami-packed alternative that still satisfies.

  • Spicy: Add a pinch of red pepper flakes to the egg mixture for a delightful kick that warms up your Carbonara experience.

  • Gluten-Free: Use gluten-free spaghetti or your favorite alternative pasta to accommodate any dietary needs without sacrificing flavor.

  • Herby: Toss in fresh herbs like basil or parsley at the end. Their freshness will elevate the dish with vibrant notes and color.

  • Creamy: For an indulgent twist, add a splash of heavy cream to the egg and cheese mixture, creating an ultra-luxurious, velvety sauce.

  • Smoky: Use smoked pancetta or add a dash of liquid smoke for a deeper, richer flavor profile that brings a new dimension to your Carbonara.

  • Nutty: Swap the Parmesan for pecorino Romano cheese for a bolder, saltier profile that’s authentically Italian and absolutely divine.

  • Veggie-Loaded: Mix in your favorite sautéed vegetables like spinach, peas, or zucchini for added nutrition and color, making this dish not just tasty, but wholesome too.

Make Ahead Options

These Carbonara Pasta is perfect for meal prep enthusiasts! You can cook the spaghetti and pancetta up to 3 days in advance, ensuring your busy weeknight dinners are a breeze. Simply store the pasta and pancetta separately in airtight containers in the refrigerator to maintain quality. When you’re ready to enjoy your meal, quickly reheat the pancetta in a skillet and add the cooked spaghetti. Then whisk together the eggs and Parmesan, and follow the remaining steps to bring the dish together—the final result will be just as delicious as if you made it fresh! This way, you can savor that rich, creamy goodness without any extra fuss.

What to Serve with Carbonara Pasta?

Transform your delightful Carbonara Pasta into a feast that tantalizes the senses and warms the heart.

  • Garlic Bread: The crunch of garlic buttered bread perfectly contrasts the creamy pasta while soaking up every last bit of sauce.

  • Roasted Asparagus: Tender, slightly charred asparagus balances the richness, adding a vibrant color and a fresh flavor to your plate.

  • Caesar Salad: Crisp romaine topped with zesty dressing complements the creamy and savory notes, providing a refreshing crunch with each bite.

  • Grilled Shrimp: Juicy grilled shrimp marinated in lemon and herbs brings a delectable hint of seafood that pairs wonderfully with the pasta’s texture.

  • Bruschetta: Fresh tomatoes, basil, and mozzarella on toasted bread make a vibrant starter that preps your palate for the rich Carbonara.

  • White Wine: A chilled glass of Pinot Grigio or Sauvignon Blanc cuts through the richness with its acidity, making each bite even more enjoyable.

  • Tiramisu: End on a sweet note with this classic Italian dessert. Its coffee flavor and creamy texture create a delightful contrast to your hearty meal.

Chef's Helpful Tips

  • For the perfect Carbonara Pasta, always remember to reserve some pasta water as it will help achieve the ideal creamy consistency.
  • When sautéing the pancetta or guanciale, ensure the heat is medium to avoid burning while allowing the fat to render properly.
  • Mixing the egg and cheese mixture with the hot pasta off the heat will help prevent scrambling and ensure a silky sauce.
  • Lastly, be mindful of salting your pasta water; with the salty cheese and pancetta, a little goes a long way.

Carbonara Pasta Recipe FAQs

What type of spaghetti should I use for Carbonara Pasta?
For Carbonara Pasta, I highly recommend using traditional spaghetti for the best texture and flavor. However, you can also use bucatini or fettuccine if you prefer. Look for high-quality pasta made from durum wheat for that perfect al dente bite!

How can I tell if my eggs are fresh enough for Carbonara?
Absolutely! A simple test is to place the eggs in a bowl of water. Fresh eggs will sink and lay flat on the bottom, while older eggs will stand upright or float. Using fresh eggs is particularly important in Carbonara due to their role in creating a creamy sauce!

How should I store leftovers of Carbonara Pasta?
Store any leftover Carbonara Pasta in an airtight container in the fridge for up to 3 days. To reheat, warm it gently on the stove on low heat and add a little reserved pasta water or cream as needed to restore its creamy consistency. This keeps it enjoyable and flavorful!

Can I freeze Carbonara Pasta?
Very! If you want to freeze Carbonara Pasta, transfer it to an airtight container, ensuring it’s cooled completely first. It can last up to 2 months. When you’re ready to enjoy it again, thaw it overnight in the fridge. Reheat in a skillet on low heat, adding some reserved pasta water or a splash of cream to help regain its silky texture.

What if my Carbonara sauce is too thick?
If your Carbonara sauce ends up too thick, don’t worry! You can easily fix it by adding a little of that reserved pasta water — just a tablespoon at a time, mixing until you achieve the desired creaminess. The starchy pasta water is your best friend for that luscious finish.

Is Carbonara Pasta safe for pets or those with egg allergies?
It’s best to steer clear of giving Carbonara Pasta to pets, as garlic and certain seasoning can be harmful to them. For those with egg allergies, consider trying a modified recipe using a plant-based egg substitute or silken tofu blended until smooth – while it won’t be traditional, it can provide a creamy element for your dish!

Carbonara Pasta

Carbonara Pasta

This Carbonara Pasta features a rich, creamy sauce with crispy pancetta, making it a comforting and luxurious dish.
Print Recipe Pin Recipe
Prep Time 10 minutes mins
Cook Time 15 minutes mins
Total Time 25 minutes mins
Servings: 4 servings
Course: DINNER RECIPES
Cuisine: Italian
Calories: 450
Ingredients Equipment Method Nutrition Notes

Ingredients
  

For the Pasta
  • 200 g Spaghetti this classic noodle creates the perfect base for your Carbonara
For the Sauce
  • 100 g Pancetta or Guanciale diced meat adds savory richness; can substitute with bacon
  • 2 large Eggs helps create that creamy texture
  • 50 g Parmesan Cheese grated for salty, nutty flavor
  • 2 cloves Garlic minced for aromatic depth
For Seasoning
  • Salt to taste; use sparingly due to salty cheese and pancetta
  • Freshly Cracked Black Pepper to taste; essential for authentic Carbonara

Equipment

  • Large pot
  • Skillet
  • Mixing bowl
  • Whisk

Method
 

How to Make Carbonara Pasta
  1. Boil the Pasta: Bring a large pot of salted water to a rolling boil. Add your spaghetti and cook until al dente, about 8-10 minutes. Don’t forget to reserve 1 cup of that flavorful pasta water before draining!
  2. Sauté the Pancetta: In a skillet over medium heat, toss in the diced pancetta or guanciale. Sauté for about 4-5 minutes until it’s golden and crispy.
  3. Whisk the Sauce: While the pancetta is cooking, crack the large eggs into a bowl. Add the grated Parmesan cheese and a generous amount of black pepper. Whisk until it’s smooth and creamy.
  4. Combine Ingredients: Once the pasta is drained, quickly add it to the skillet with the hot pancetta (remove from heat first). Pour the egg and cheese mixture over the pasta, tossing quickly to combine and prevent scrambling.
  5. Adjust Consistency: If the sauce seems thick, gradually add a little of the reserved pasta water, mixing until you achieve that luscious, creamy consistency.
  6. Serve and Garnish: Plate your carbonara immediately and sprinkle with extra Parmesan and freshly cracked black pepper.

Nutrition

Serving: 1servingCalories: 450kcalCarbohydrates: 50gProtein: 20gFat: 20gSaturated Fat: 8gPolyunsaturated Fat: 1gMonounsaturated Fat: 5gCholesterol: 200mgSodium: 800mgPotassium: 350mgFiber: 2gSugar: 2gVitamin A: 500IUCalcium: 150mgIron: 2mg

Notes

For the perfect Carbonara, always reserve some pasta water for achieving ideal creamy consistency.

Tried this recipe?

Let us know how it was!

Filed Under: DINNER RECIPES

One Pot Taco Pasta

February 18, 2026 by JudyWhite Leave a Comment

There’s nothing quite like the comforting embrace of a hearty one-pot meal after a long day. Picture this: the enticing aroma of sizzling ground beef mingling with vibrant bell peppers fills your kitchen, instantly lifting your spirits. While I was experimenting with pantry staples one rainy evening, I discovered the magic of One Pot Taco Pasta—a dish that brings bold flavors and ultimate convenience right to your dinner table.

This crowd-pleasing recipe combines all the elements of taco night with the ease of a pasta dish, all cooked in a single pot. Who knew that in just 30 minutes, you could create such a delightful feast for your family or friends? The best part? The leftovers are just as good—if they last that long! Whether you’re a busy professional, a devoted chef, or someone looking to spice up your weeknight dinners, this One Pot Taco Pasta is here to rescue you from the monotony of fast food. Let’s dive in and transform those simple ingredients into a meal bursting with flavor!

Why You'll Love This One Pot Taco Pasta

  • This One Pot Taco Pasta is incredibly easy to make, allowing you to enjoy a delicious meal without spending hours in the kitchen.
  • The flavors are rich and vibrant, bringing your favorite taco ingredients together in a satisfying and comforting dish.
  • Its versatility means you can easily customize it with your preferred proteins, vegetables, or toppings to suit any taste.
  • Plus, the visual appeal of this colorful pasta dish makes it irresistible and sure to impress any guest at your table.

One Pot Taco Pasta Ingredients

• To make this dish even more delightful, gather these fresh ingredients!

For the Pasta

  • 8 oz short pasta – penne or rotini works beautifully for this One Pot Taco Pasta.

For the Protein

  • 1 lb lean ground beef or turkey – choose either for a healthier or heartier option.

For the Vegetables

  • 1 medium yellow onion – adds depth and sweetness when sautéed.
  • 1 cup bell peppers – any color you love will brighten the dish!

For the Flavor

  • 2 tbsp taco seasoning – brings all the classic taco spices together perfectly.

For the Base

  • 14.5 oz can diced tomatoes – don’t drain them, as the juice adds flavor!
  • 2 cups low-sodium chicken broth – for a savory depth of flavor without excess salt.

For the Topping

  • 1 cup shredded cheddar cheese – melts beautifully over the warm pasta for a cheesy finish.

How to Make One Pot Taco Pasta

  1. Brown the Meat: In a large pot over medium heat, brown the ground beef or turkey for about 5-7 minutes, making sure to drain any excess fat for a leaner dish.

  2. Sauté the Veggies: Add the chopped onion and bell peppers to the pot, sautéing until softened, about 3-4 minutes. The colors should brighten, making your kitchen smell delectable.

  3. Mix in the Seasoning: Stir in the taco seasoning, cooking for another minute. This step really wakes up the flavors, making every bite a burst of taco delight!

  4. Cook the Pasta: Add the uncooked pasta, diced tomatoes (with juice), and low-sodium chicken broth. Bring this mixture to a boil, then reduce heat and cover for 10-12 minutes. Cook until the pasta is al dente and absorbs all those tasty flavors.

  5. Melt the Cheese: Gently stir in the shredded cheddar cheese until melted and creamy. Serve hot, and don’t forget to top it with fresh cilantro and a squeeze of lime juice for that extra zing!

Optional: Garnish with sliced avocado for a creamy touch.

Exact quantities are listed in the recipe card below.

One Pot Taco Pasta Variations

Feel free to personalize your One Pot Taco Pasta with these tasty twists that will delight your senses!

  • Vegetarian: Swap the ground meat for 1 can of black beans and add in corn for a hearty, plant-based option. You’ll still enjoy that satisfying texture!

  • Spicy Kick: Add diced jalapeños or a teaspoon of cayenne pepper to the mix. This will give your dish some fiery heat that’ll wake up your taste buds!

  • Cheesy Delight: Experiment with different cheeses like pepper jack or a Mexican blend for more flavor complexity. If you’re feeling wild, stir in some cream cheese for a creamy twist!

  • Gluten-Free: Replace the short pasta with gluten-free pasta or zoodles (zucchini noodles) for a lightened-up version that perfectly absorbs the flavors.

  • One-Pot Chili Pasta: Incorporate kidney beans and chili powder for a chili-style take on this dish. This variation pairs beautifully with cornbread on the side.

  • Greek Twist: Substitute the taco seasoning with Italian herbs and add diced olives and feta cheese. This delivers a Mediterranean vibe that is simply delightful!

  • Extra Veggies: Toss in spinach or kale near the end of cooking for added nutrition. The greens wilt beautifully and add a vibrant splash of color!

  • Smoky Flavor: Drizzle in some chipotle sauce or use smoked paprika in the seasoning to create a smoky depth in flavor that will have everyone asking for seconds.

Enjoy crafting your unique One Pot Taco Pasta experience, and watch as each twist brings smiles to your table!

What to Serve with One Pot Taco Pasta?

Elevate your dining experience with delightful side dishes that complement the bold flavors of this hearty one-pot meal.

  • Zesty Garden Salad: A refreshing mix of greens, tomatoes, and cucumbers drizzled with a tangy vinaigrette balances the richness of the pasta. The crunch of fresh veggies adds a satisfying contrast to each bite.

  • Creamy Guacamole: This avocado dip provides a smooth, cool complement that enhances the taco flavors. Serve with tortilla chips for a fun and interactive experience!

  • Mexican Street Corn: Grilled corn on the cob slathered in mayo, cheese, and chili powder brings a sweet and spicy element that pairs perfectly with the savory pasta.

  • Spicy Black Beans: Simple yet full of flavor, black beans add protein and a kick of spice. Their creaminess makes for a delicious side that rounds out your meal beautifully.

  • Cilantro Lime Rice: Fluffy rice with a hint of lime and fresh cilantro is a great sidekick, soaking up any delicious sauce left on your plate. It’s a classic pairing for that extra zest!

  • Margaritas: For a festive touch, serve refreshing margaritas. Their citrusy brightness against the savory pasta makes for a fun dining experience.

  • Churros: End your meal on a sweet note with these crispy, cinnamon-dusted pastries. Their warm and sugary goodness adds a delightful contrast to the savory main dish.

Storage Tips for One Pot Taco Pasta

  • Fridge: Store the One Pot Taco Pasta in an airtight container for up to 3 days. This keeps it fresh while preventing odors from mingling with other foods.

  • Freezer: To freeze, allow the pasta to cool completely before transferring it to a freezer-safe container. It can be frozen for up to 3 months, ensuring that you have a delicious meal ready whenever you need it.

  • Reheating: When ready to enjoy, thaw in the fridge overnight and reheat on the stove over medium-low heat, adding a splash of broth if needed to restore creaminess.

  • Leftovers: This dish makes fantastic leftovers! Just remember, if you notice any separation or if the pasta absorbs too much liquid, a quick reheat will bring back the dreamy texture.

Make Ahead Options

These One Pot Taco Pasta components are perfect for meal prep enthusiasts! You can chop the vegetables (onion and bell peppers) and store them in an airtight container in the refrigerator for up to 3 days. The taco seasoning can be blended and kept ready to use, allowing you to save time when it’s cooking time. If you want to take it a step further, you can brown the meat in advance and refrigerate it for up to 24 hours. When you’re ready to enjoy this delicious dish, just follow the cooking instructions, adding in the pasta, diced tomatoes, and broth with the prepped ingredients, then finish by mixing in the cheddar cheese for that creamy, cheesy goodness—just as delightful and comforting!

Chef's Helpful Tips

  • When making One Pot Taco Pasta, ensure you brown the meat properly to develop rich flavors and a nice texture.
  • Avoid overcooking the vegetables; they should be softened but still vibrant to maintain their nutritional value.
  • For a creamier finish, add the cheese gradually and stir continuously to ensure even melting.
  • Keep an eye on your pasta while it cooks; it should be al dente to prevent it from becoming mushy and losing its structure.

One Pot Taco Pasta Recipe FAQs

What type of pasta works best for this One Pot Taco Pasta?
Short pasta varieties such as penne or rotini are ideal for this recipe. Their shape allows for the sauce and flavors to cling beautifully, ensuring every bite is packed with taste. I’ve found that rotini is especially good at holding the flavor!

How should I store leftover One Pot Taco Pasta?
Store any leftover One Pot Taco Pasta in an airtight container in the refrigerator for up to 3 days. I recommend making sure it’s cooled down a bit before sealing it to maintain the right texture and prevent condensation.

Can I freeze One Pot Taco Pasta?
Absolutely! To freeze, let the pasta cool completely after cooking. Transfer it to a freezer-safe container and it will keep well for up to 3 months. When you’re ready to enjoy it, simply thaw it in the refrigerator overnight and reheat gently on the stove, adding a splash of chicken broth to regain its creamy consistency.

What if my pasta is overcooked?
If you find that your pasta has become mushy, don’t worry! You can rescue it by turning it into a bake. Spread the overcooked pasta in a baking dish, sprinkle with extra cheese, and bake at 350°F (175°C) for about 15-20 minutes until golden and bubbly. It transforms into a cheesy pasta bake that’s just as delightful!

Is this recipe suitable for those with allergies?
If you’re catering to dietary restrictions, it’s easy to adapt this One Pot Taco Pasta! For gluten-free needs, simply substitute the short pasta with a gluten-free option. If you have a dairy allergy, consider using a dairy-free cheese alternative to create a deliciously hearty meal without the dairy.

What should I do if I want to make this dish vegetarian?
For a vegetarian twist, swap the ground beef or turkey for a plant-based protein such as lentils or extra beans. You can still follow the same cooking process, which will keep all those delicious flavors intact. Feel free to add extra veggies for more color and texture, too!

One Pot Taco Pasta

One Pot Taco Pasta

Experience the bold flavors of One Pot Taco Pasta, a quick and comforting meal that combines your favorite taco ingredients with pasta, all in one dish.
Print Recipe Pin Recipe
Prep Time 10 minutes mins
Cook Time 20 minutes mins
Total Time 30 minutes mins
Servings: 4 servings
Course: DINNER RECIPES
Cuisine: American
Calories: 480
Ingredients Equipment Method Nutrition Notes

Ingredients
  

For the Pasta
  • 8 oz short pasta penne or rotini works beautifully
For the Protein
  • 1 lb lean ground beef or turkey for a healthier or heartier option
For the Vegetables
  • 1 medium yellow onion adds depth and sweetness when sautéed
  • 1 cup bell peppers any color you love will brighten the dish
For the Flavor
  • 2 tbsp taco seasoning brings all the classic taco spices together perfectly
For the Base
  • 14.5 oz can diced tomatoes do not drain, as the juice adds flavor
  • 2 cups low-sodium chicken broth for a savory depth of flavor
For the Topping
  • 1 cup shredded cheddar cheese melts beautifully over the warm pasta

Equipment

  • Large pot

Method
 

Instructions
  1. In a large pot over medium heat, brown the ground beef or turkey for about 5-7 minutes, draining any excess fat.
  2. Add the chopped onion and bell peppers to the pot, sautéing until softened, about 3-4 minutes.
  3. Stir in the taco seasoning, cooking for another minute to awaken the flavors.
  4. Add the uncooked pasta, diced tomatoes (with juice), and low-sodium chicken broth. Bring to a boil, then reduce heat and cover for 10-12 minutes, cooking until the pasta is al dente.
  5. Gently stir in the shredded cheddar cheese until melted and creamy. Serve hot, optionally topping with fresh cilantro and lime juice.

Nutrition

Serving: 1servingCalories: 480kcalCarbohydrates: 54gProtein: 30gFat: 18gSaturated Fat: 8gPolyunsaturated Fat: 0.5gMonounsaturated Fat: 6gCholesterol: 85mgSodium: 600mgPotassium: 800mgFiber: 3gSugar: 4gVitamin A: 15IUVitamin C: 35mgCalcium: 200mgIron: 3mg

Notes

Optional: Garnish with sliced avocado for a creamy touch. Store in an airtight container for up to 3 days in the fridge or up to 3 months in the freezer.

Tried this recipe?

Let us know how it was!

Filed Under: DINNER RECIPES

Crispy Baked Parmesan Chicken Wings

February 13, 2026 by JudyWhite Leave a Comment

There’s nothing quite like the first crunch of a perfectly baked chicken wing, especially when it’s infused with the rich flavor of Parmesan. Imagine pulling a tray of Crispy Baked Parmesan Chicken Wings from the oven, the golden hue beckoning you closer as the heavenly scent envelops your kitchen. One bite transports you to a game day celebration or a cozy movie night, bringing joy to any gathering with friends or family.

I discovered this recipe when I was longing for a satisfying alternative to the deep-fried options we often grab on busy nights. The best part? These wings deliver that irresistible crunch without the guilt of deep frying. They’re loaded with flavor, thanks to the earthy garlic, zesty oregano, and a hint of smoky paprika, all topped off with a generous sprinkle of freshly grated Parmesan. This dish is not just a crowd-pleaser; it’s an easy yet impressive way to elevate your weeknight dinners. Let’s dive into how you can whip up these delicious wings in no time!

Why You'll Love This Crispy Baked Parmesan Chicken Wings

  • This recipe is a game changer for anyone looking for an easy yet delicious alternative to traditional chicken wings.
  • You will love how these wings deliver a satisfying crunch while being baked instead of fried, saving you time and hassle in the kitchen.
  • The combination of savory Parmesan and aromatic spices creates a flavor explosion that will leave your taste buds begging for more.
  • With their golden color and crispy texture, these wings are sure to impress at any gathering and quickly become a favorite among friends and family.

Crispy Baked Parmesan Chicken Wings Ingredients

• Let’s gather the essentials for your crispy, flavorful wings!

For the Wings

  • 2 lbs chicken wings – a great source of protein, ensuring a hearty meal for everyone.
  • 2 tbsp olive oil – helps achieve that perfect crispy texture while adding healthy fats.

For the Seasoning

  • 1 tsp garlic powder – infuses a wonderful savory depth to the wings.
  • 1 tsp dried oregano – brings a delightful herbal note to balance the flavors.
  • 1 tsp smoked paprika – adds a subtle smoky essence that elevates the overall taste.
  • ½ tsp salt – enhances all the flavors, making each bite more satisfying.
  • ½ tsp pepper – gives a gentle kick to round out the seasoning.

For the Coating

  • 1 cup freshly grated Parmesan cheese – provides a rich, nutty flavor and a deliciously crispy crust.

Get ready to create a charming dish that makes any night feel special with these Crispy Baked Parmesan Chicken Wings!

How to Make Crispy Baked Parmesan Chicken Wings

  1. Preheat your oven to 400°F (200°C). This step is vital for ensuring your wings become perfectly crispy and golden brown.

  2. Pat dry the chicken wings thoroughly using paper towels. This helps achieve that coveted crunch. Place them in a large mixing bowl.

  3. Drizzle the wings with olive oil, ensuring each piece gets a light coating. This not only aids in crispiness but also infuses some flavor.

  4. Season the wings with garlic powder, oregano, smoked paprika, salt, and pepper. Toss everything together until the wings are evenly coated with spices for a burst of flavor in every bite.

  5. Add the freshly grated Parmesan cheese to the wings. Toss again until the wings are well coated in cheesy goodness. The cheese will create a delicious, crispy crust.

  6. Arrange the wings in a single layer on a parchment-lined baking sheet. This helps with even cooking and prevents sticking, making cleanup easier.

  7. Bake for 40-45 minutes, flipping the wings halfway through baking for an even golden color. They’re done when crispy and irresistible!

Optional: Serve with your favorite dipping sauce for an extra layer of flavor.
Exact quantities are listed in the recipe card below.

Make Ahead Options

These Crispy Baked Parmesan Chicken Wings are perfect for meal prep enthusiasts! You can season the wings up to 24 hours in advance by following steps 2 through 5. Simply pat them dry, drizzle with olive oil, and season them with garlic powder, oregano, smoked paprika, salt, and pepper. Toss to coat, then add the Parmesan cheese and mix well. To maintain their quality, store the seasoned wings in an airtight container in the refrigerator. When you’re ready to bake, simply arrange the wings on a parchment-lined baking sheet and bake at 400°F (200°C) for 40-45 minutes, flipping halfway through. With this prep, you’ll enjoy the same delicious crunch and flavor with minimal effort on busy weeknights!

How to Store and Freeze Crispy Baked Parmesan Chicken Wings

Fridge: Keep your leftover Crispy Baked Parmesan Chicken Wings in an airtight container for up to 3 days. This helps maintain their flavor and prevents them from drying out.

Freezer: For longer storage, freeze the wings in a single layer on a baking sheet before transferring them to a freezer-safe bag. They can be stored for up to 2 months.

Reheating: To reheat, place the wings on a baking sheet and warm them in the oven at 350°F (175°C) for about 15-20 minutes, ensuring they regain their crispy texture.

Serving Suggestion: If you’re ready to serve your wings straight from the freezer, simply bake them from frozen for 45-50 minutes at 400°F (200°C) to bring back that delightful crispiness!

What to Serve with Crispy Baked Parmesan Chicken Wings?

Creating a delightful meal around these irresistible chicken wings is the perfect way to please your guests and family alike.

  • Tangy Coleslaw: This crunchy side adds a refreshing contrast to the salty wings, balancing flavors beautifully with its cool, creamy dressing.

  • Garlic Bread Sticks: Soft and buttery, garlic bread sticks provide a comforting element that pairs perfectly with the savory richness of the wings.

  • Roasted Vegetables: A medley of seasonal veggies lightly seasoned and roasted complements the wings’ crunch while adding vibrant colors and nutrients.

  • Classic Caesar Salad: The crisp romaine and creamy dressing offer a delightful texture contrast, creating a well-rounded meal that’s both fresh and satisfying.

  • Spicy Buffalo Sauce: A side of zesty dipping sauce elevates the wings’ flavor profile, making each bite an adventurous experience for the heat-seekers among you.

  • Craft Beer: A cold craft beer with a hoppy, citrusy undertone enhances the flavor of your wings, making it a wonderful pairing for a casual gathering.

  • Chocolate Chip Cookies: End your meal on a sweet note! These warm, gooey cookies are a comforting dessert that beautifully rounds off your chicken wing feast.

Crispy Baked Parmesan Chicken Wings Variations

Feel free to get creative and make these crispy wings your own with these fun variations!

  • Gluten-Free: Use a gluten-free flour mix instead of traditional flour for a tasty gluten-free spin.

  • Spicy Kick: Add 1-2 teaspoons of cayenne pepper or hot sauce to the seasoning mix for a fiery flavor that elevates these wings!

  • Herb Lovers: Experiment with fresh herbs! Try fresh rosemary or thyme; just keep the quantity in check to avoid overpowering flavors.

  • Cheesy Twist: Swap Parmesan for Pecorino Romano or a mix of cheddar for a different cheesy profile. Enjoy the new depth of flavor!

  • Lemon Zest Boost: Throw in some freshly grated lemon zest for a refreshing zing that complements the savory spices beautifully.

  • BBQ Glaze: Brush the wings with your favorite BBQ sauce during the last 10 minutes of cooking for a sticky-sweet finish.

  • Crispy Cornmeal Coating: For extra crunch, toss the wings in cornmeal after the seasoning. This adds a delightful texture that amplifies the crispiness.

  • Asian-Inspired: Use soy sauce in place of olive oil and add sesame seeds and green onions for an Asian twist that’s full of rich flavors.

Chef's Helpful Tips

  • Always pat your chicken wings dry before seasoning to ensure a crispy texture in your Crispy Baked Parmesan Chicken Wings.
  • Make sure to toss the wings in olive oil thoroughly, as this helps the seasoning adhere better and enhances the flavor.
  • For maximum flavor, consider marinating your wings in the seasoning for at least 30 minutes before baking.
  • Remember to flip the wings halfway through the cooking time to promote even browning and crispiness.

Crispy Baked Parmesan Chicken Wings Recipe FAQs

How do I choose the right chicken wings?
Absolutely! When selecting chicken wings, look for ones that are plump and have a nice sheen. Avoid those with dark spots or an off odor, as these can indicate spoilage. Always aim for wings that feel fresh to the touch!

How should I store leftover wings?
To keep your Crispy Baked Parmesan Chicken Wings fresh, place them in an airtight container in the fridge. They will stay good for up to 3 days. If you notice any changes in texture or smell, it’s best to discard them.

Can I freeze my leftover wings?
Yes, very much! Start by laying the baked wings in a single layer on a baking sheet lined with parchment paper. Freeze them for about an hour until they’re firm, then transfer them to a freezer-safe bag. They can be stored for up to 2 months. When you’re ready, bake them directly from the freezer at 400°F (200°C) for about 45-50 minutes to regain that fabulous crunch.

What should I do if my wings aren’t crispy enough?
If your wings are turning out less crispy than desired, here are some handy troubleshooting tips: Ensure you dry them thoroughly before seasoning, as moisture can hinder crispness. Try increasing the baking time by a few minutes, making sure to flip them halfway through. Additionally, you can broil them for the last 2-3 minutes for an extra crispy finish—just watch closely to prevent burning!

Are there any dietary considerations for this recipe?
Absolutely! If you have guests with dietary restrictions, consider using gluten-free breadcrumbs as a replacement for the Parmesan cheese to cater to gluten sensitivities. Also, always check the packaging of your spices for allergens, especially if you’re serving those with nut allergies. If you have pets, it’s worth noting that while chicken is safe for dogs in small amounts, the seasoning could be harmful, so it’s best to keep these tasty wings out of their reach!

Crispy Baked Parmesan Chicken Wings

Crispy Baked Parmesan Chicken Wings

Discover the joy of Crispy Baked Parmesan Chicken Wings, delivering crunch and flavor without the guilt of frying.
Print Recipe Pin Recipe
Prep Time 10 minutes mins
Cook Time 45 minutes mins
Total Time 55 minutes mins
Servings: 4 wings
Course: DINNER RECIPES
Cuisine: American
Calories: 320
Ingredients Equipment Method Nutrition Notes

Ingredients
  

For the Wings
  • 2 lbs chicken wings a great source of protein
  • 2 tbsp olive oil helps achieve crispy texture
For the Seasoning
  • 1 tsp garlic powder infuses savory depth
  • 1 tsp dried oregano brings a delightful herbal note
  • 1 tsp smoked paprika adds a subtle smoky essence
  • ½ tsp salt enhances flavors
  • ½ tsp pepper gives a gentle kick
For the Coating
  • 1 cup freshly grated Parmesan cheese provides a rich, nutty flavor

Equipment

  • Oven
  • Baking sheet
  • Mixing bowl
  • paper towels

Method
 

Basic Instructions
  1. Preheat your oven to 400°F (200°C).
  2. Pat dry the chicken wings thoroughly using paper towels and place them in a large mixing bowl.
  3. Drizzle the wings with olive oil, ensuring each piece gets a light coating.
  4. Season the wings with garlic powder, oregano, smoked paprika, salt, and pepper. Toss until evenly coated.
  5. Add the freshly grated Parmesan cheese to the wings and toss until well coated.
  6. Arrange the wings in a single layer on a parchment-lined baking sheet.
  7. Bake for 40-45 minutes, flipping halfway through, until crispy and golden brown.

Nutrition

Serving: 4wingsCalories: 320kcalCarbohydrates: 2gProtein: 30gFat: 21gSaturated Fat: 8gPolyunsaturated Fat: 3gMonounsaturated Fat: 8gCholesterol: 85mgSodium: 600mgPotassium: 380mgCalcium: 10mgIron: 6mg

Notes

Optional: Serve with your favorite dipping sauce for an extra layer of flavor.

Tried this recipe?

Let us know how it was!

Filed Under: DINNER RECIPES

Chicken Pot Pie Orzo

February 13, 2026 by JudyWhite Leave a Comment

When the weather turns chilly, there’s nothing quite like the warming embrace of a hearty meal. That’s what led me to create this Chicken Pot Pie Orzo—a dish that combines the comforting essence of a classic pot pie with the delightful twist of orzo pasta. One evening, while seeking refuge from the mundane cycle of takeout dinners, I uncovered the magic of this recipe.

Imagine the savory aroma of garlic and thyme mingling with tender chicken and fresh veggies, simmering away in a rich, velvety broth. This is not just another weeknight meal; it’s a cozy bowl of nostalgia that brings a smile to your face.

With just 35 minutes from prep to table, this Chicken Pot Pie Orzo is perfect for busy evenings or whenever you’re craving something warm and fulfilling. Easy to make yet packed with flavors, it’s sure to become a crowd favorite in your home, setting the stage for wonderful conversations around the dinner table. Let’s dive into this delightful recipe that promises to banish boring dinners for good!

Why You'll Love This Chicken Pot Pie Orzo

  • You’ll love how easy it is to make this dish, coming together in just 35 minutes from prep to table.
  • The rich flavors of garlic, thyme, and creamy broth create a comforting experience that warms your soul.
  • This recipe is incredibly versatile, allowing you to customize it with any seasonal vegetables or spices you have on hand.
  • Its inviting and hearty presentation makes it not only delicious but visually appealing, perfect for sharing with family and friends.

Chicken Pot Pie Orzo Ingredients

For the Filling
• Boneless, skinless chicken breasts – A lean protein base that absorbs all the delightful flavors!
• Fresh garlic – Minced for an aromatic kick, enhancing the entire dish beautifully.
• Medium onion – Adds a sweet and savory depth once sautéed until translucent.
• Medium carrots – Diced for a touch of natural sweetness and vibrant color.
• Celery stalks – Chopped to provide crunch and a fresh flavor profile.

For the Broth
• Low-sodium chicken broth – Keeps the dish balanced in flavor while allowing you to control the salt.

For the Pasta
• Uncooked orzo pasta – The star ingredient, soaking up the rich broth and adding heartiness to the dish.

For the Creaminess
• Sour cream – Adds a luscious creaminess that ties all the elements together in this Chicken Pot Pie Orzo.

For Seasoning
• Dried thyme – Brings that beloved pot pie flavor, enhancing the overall taste.
• Salt and pepper – Essential for bringing out the best in all the ingredients.

For Cooking
• Olive oil – A perfect medium for sautéing the veggies and chicken, adding flavor while keeping things healthy.

How to Make Chicken Pot Pie Orzo

  1. Dice Chicken: Begin by cutting the boneless, skinless chicken breasts into bite-sized pieces. This ensures they’re cooked evenly and absorb all the yummy flavors of the broth!

  2. Chop Veggies: Next, chop the medium onion, dice the carrots, and chop the celery. Having these handy will make your cooking process smooth and enjoyable!

  3. Sauté Vegetables: Heat olive oil in a large skillet over medium heat. Sauté the onions until they become translucent, then invite the garlic, carrots, and celery to the party. Cook these until softened, about 4-5 minutes.

  4. Cook Chicken: Add the diced chicken to the skillet and season generously with salt and pepper. Cook until no longer pink, about 6 minutes. You want that beautiful golden color to develop!

  5. Simmer: Stir in the low-sodium chicken broth along with the uncooked orzo. Bring everything to a gentle boil, then reduce the heat and let it simmer for about 10 minutes until the orzo is tender and feels just right.

  6. Combine Creaminess: Mix in the sour cream and dried thyme until everything is well combined. This step creates that rich and creamy texture everyone loves in Chicken Pot Pie Orzo!

  7. Serve Hot: Finally, serve your delicious Chicken Pot Pie Orzo hot! Feel free to garnish with fresh herbs if desired—this adds a lovely touch and burst of color to the dish.

Optional: Sprinkle with fresh parsley for an extra pop of flavor!

Exact quantities are listed in the recipe card below.

Make Ahead Options

These Chicken Pot Pie Orzo preparations are perfect for busy weeknights! You can chop the vegetables (onions, carrots, and celery) and cut the chicken into bite-sized pieces up to 24 hours in advance. Just store them in airtight containers in the refrigerator to maintain freshness. Additionally, you can cook the entire dish and refrigerate it for up to 3 days; just hold off on adding the sour cream until you are ready to reheat. When it’s time to serve, simply heat the mixture in a pot over medium heat, adding a splash of chicken broth if needed, and stir in the sour cream for that creamy texture. This way, you can enjoy a comforting meal without the last-minute rush!

What to Serve with Chicken Pot Pie Orzo?

When it comes to creating the perfect dining experience, pairing your chicken pot pie orzo with complementary sides can elevate your meal to new heights.

  • Garlic Bread: The soft, buttery texture of garlic bread is perfect for soaking up the creamy broth, making every bite feel indulgent.
  • Steamed Green Beans: Bright green beans offer a crunchy contrast, adding freshness that balances the rich flavors of the orzo.
  • Simple Side Salad: A mix of mixed greens with a light vinaigrette provides a crisp, refreshing component to your meal. The acidity cuts through the richness of the orzo beautifully.
  • Roasted Brussels Sprouts: Their caramelized edges add a deep and savory flavor, ensuring you enjoy a delightful variety of tastes.
  • Creamy Coleslaw: A cool, creamy coleslaw provides a refreshing crunch, brightening your plate while complementing the warmth of the dish.
  • Crispy Potato Wedges: Seasoned potato wedges deliver a satisfying crunch, adding heartiness to the meal while playing off the comforting texture of the orzo.
  • Sparkling Lemonade: This bubbly drink awakens your palate and contrasts wonderfully against the creamy backdrop of the dish.
  • Chocolate Chip Cookies: For dessert, these warm, gooey treats round out your meal with a nostalgic sweetness that everyone will adore.

Storage Tips for Chicken Pot Pie Orzo

Fridge: Store any leftover Chicken Pot Pie Orzo in an airtight container for up to 3 days. Reheat in the microwave or on the stovetop until warmed through.

Freezer: For longer storage, freeze the dish in freezer-safe containers for up to 3 months. When ready to enjoy, thaw overnight in the fridge before reheating.

Reheating: To reheat, add a splash of chicken broth during microwaving or stovetop cooking to restore creaminess and prevent it from drying out.

Room Temperature: Avoid leaving Chicken Pot Pie Orzo out for more than 2 hours at room temperature to maintain food safety.

Chicken Pot Pie Orzo Variations

Feel free to explore these creative twists and substitutions to make your Chicken Pot Pie Orzo truly your own!

  • Gluten-Free: Substitute orzo with gluten-free pasta or quinoa for a suitable, hearty alternative without sacrificing texture.

  • Vegetable-Loaded: Add extra vegetables like peas, green beans, or bell peppers to boost nutrients and flavors, making it even more colorful and delightful.

  • Creamy Vegan: Swap sour cream for a plant-based alternative like coconut cream or cashew cream for a rich, non-dairy version that’s just as delicious.

  • Spicy Kick: Add a pinch of red pepper flakes or diced jalapeños to the mix to turn up the heat and invigorate the flavor profile.

  • Herb Infusion: Experiment with different herbs like rosemary, parsley, or dill for a fragrant twist that complements the chicken beautifully.

  • Cheesy Delight: Stir in a handful of shredded cheese—like cheddar or mozzarella—just before serving for a creamy, cheesy finish that will delight every palate.

  • Lemon Zest: A splash of fresh lemon juice or a sprinkle of lemon zest at the end brightens the dish, adding a refreshing zing that elevates the flavors.

  • Coconut Broth: For a distinctively rich flavor, replace chicken broth with coconut milk or broth, giving it a creamy, tropical vibe that’s simply irresistible.

Chef's Helpful Tips

  • When preparing Chicken Pot Pie Orzo, ensure that chicken is cut into even bite-sized pieces to promote uniform cooking and flavor absorption.
  • Be careful not to overcook the vegetables during sautéing, as they should retain some texture for the best eating experience.
  • To enhance the creaminess of the dish, allow the sour cream to come to room temperature before mixing it in, as this helps it blend more smoothly.
  • Remember to check the orzo for doneness a minute or two before the suggested cooking time to achieve the perfect al dente texture.

Chicken Pot Pie Orzo Recipe FAQs

What type of chicken should I use for Chicken Pot Pie Orzo?
Absolutely! I recommend using boneless, skinless chicken breasts as they provide a lean protein base and absorb the flavors beautifully. Just make sure they are fresh and free from any dark spots or discoloration when purchasing.

How should I store leftover Chicken Pot Pie Orzo?
For optimal freshness, store any leftovers in an airtight container and keep them in the fridge for up to 3 days. When reheating, a splash of chicken broth helps bring back that creamy texture and flavor.

Can I freeze Chicken Pot Pie Orzo?
Yes, you can! To freeze, let the dish cool completely, then transfer it to freezer-safe containers. It will keep well for up to 3 months. When you’re ready to enjoy, thaw it overnight in the fridge and reheat gently on the stove with a bit of chicken broth for added creaminess.

What if my Chicken Pot Pie Orzo is too thick?
Very! If your orzo turns out thicker than you’d like, simply add a bit of warm chicken broth or water, stirring until you reach your desired consistency. This is an easy fix that keeps the dish creamy and enjoyable!

Are there any dietary considerations with Chicken Pot Pie Orzo?
If you’re serving this dish to kids or those with allergies, it’s important to check for sensitivities to ingredients like sour cream or chicken broth that may contain gluten. You can easily substitute with dairy-free sour cream or low-sodium vegetable broth to accommodate different dietary needs.

How do I know if my veggies are fresh enough to use?
For the best results in your Chicken Pot Pie Orzo, choose vegetables that are firm and vibrant in color. Avoid any with dark spots or a wilted appearance. The fresher the ingredients, the more delightful your dish will be!

Chicken Pot Pie Orzo

Chicken Pot Pie Orzo

A comforting Chicken Pot Pie Orzo recipe that blends classic pot pie flavors with orzo pasta, perfect for chilly evenings.
Print Recipe Pin Recipe
Prep Time 10 minutes mins
Cook Time 25 minutes mins
Total Time 35 minutes mins
Servings: 4 servings
Course: DINNER RECIPES
Cuisine: American
Calories: 450
Ingredients Equipment Method Nutrition Notes

Ingredients
  

For the Filling
  • 2 pieces Boneless, skinless chicken breasts
  • 3 cloves Fresh garlic minced
  • 1 medium Medium onion
  • 2 medium Medium carrots diced
  • 2 stalks Celery stalks chopped
For the Broth
  • 4 cups Low-sodium chicken broth
For the Pasta
  • 1 cup Uncooked orzo pasta
For the Creaminess
  • 1 cup Sour cream adds creaminess
For Seasoning
  • 1 teaspoon Dried thyme
  • to taste Salt
  • to taste Pepper
For Cooking
  • 2 tablespoons Olive oil

Equipment

  • Large skillet

Method
 

How to Make Chicken Pot Pie Orzo
  1. Dice Chicken: Begin by cutting the boneless, skinless chicken breasts into bite-sized pieces.
  2. Chop Veggies: Next, chop the medium onion, dice the carrots, and chop the celery.
  3. Sauté Vegetables: Heat olive oil in a large skillet over medium heat. Sauté the onions until they become translucent, then invite the garlic, carrots, and celery to the party. Cook these until softened, about 4-5 minutes.
  4. Cook Chicken: Add the diced chicken to the skillet and season generously with salt and pepper. Cook until no longer pink, about 6 minutes.
  5. Simmer: Stir in the low-sodium chicken broth along with the uncooked orzo. Bring everything to a gentle boil, then reduce the heat and let it simmer for about 10 minutes.
  6. Combine Creaminess: Mix in the sour cream and dried thyme until everything is well combined.
  7. Serve Hot: Finally, serve your delicious Chicken Pot Pie Orzo hot!

Nutrition

Serving: 1bowlCalories: 450kcalCarbohydrates: 60gProtein: 30gFat: 10gSaturated Fat: 3gPolyunsaturated Fat: 1gMonounsaturated Fat: 6gCholesterol: 80mgSodium: 600mgPotassium: 800mgFiber: 4gSugar: 3gVitamin A: 3000IUVitamin C: 15mgCalcium: 50mgIron: 2mg

Notes

Optional: Sprinkle with fresh parsley for an extra pop of flavor.

Tried this recipe?

Let us know how it was!

Filed Under: DINNER RECIPES

Smash Burger Bowl

February 7, 2026 by JudyWhite Leave a Comment

There’s something undeniably satisfying about a fresh meal that combines the flavors of a classic burger while offering a refreshing twist. Picture this: after a long day, I found myself yearning for the comfort of a juicy burger but wanted something lighter and healthier. Enter the Smash Burger Bowl! This recipe is the best of both worlds, combining all the components of a delicious smash burger in a vibrant bowl of greens, tomatoes, and pickles.

What excites me most about this dish isn’t just how easy it is to whip up in 20 minutes, but how it brings everyone to the table. Whether you’re feeding the family or hosting friends, this Smash Burger Bowl is sure to impress with its lively flavors and tempting textures. So grab that ground beef, and let’s transform your next meal into a fun and nutritious feast that is miles away from the fast food drive-thru!

Why You'll Love This Smash Burger Bowl

  • This Smash Burger Bowl is incredibly easy to prepare, allowing you to enjoy a delicious meal in just 20 minutes.
  • The combination of flavors is simply mouthwatering, bringing together the classic taste of a burger with fresh ingredients.
  • Its versatility means you can customize it to fit everyone’s preferences, making it a perfect option for family dinners or gatherings with friends.
  • The vibrant presentation adds visual appeal that makes mealtime feel special, ensuring it is not only tasty but also a feast for the eyes.

Smash Burger Bowl Ingredients

• Elevate your meal with fresh components!

For the Bowl

  • Ground beef (20% fat) – This fat content ensures juicy, flavorful patties that embody the essence of a classic smash burger.
  • Romaine lettuce, chopped – Adds a crunchy base and fresh green goodness to your bowl.
  • Cherry tomatoes, halved – Sweet bursts of flavor that complement the savory beef perfectly.
  • Dill pickles, sliced – A zesty touch that elevates the taste experience with every bite.
  • Onions, grilled or raw – Choose grilled for sweetness or raw for a sharp bite, depending on your preference.

For the Condiments

  • Ketchup – A classic choice that adds a touch of sweetness to balance the savory flavors.
  • Mustard – Brings out the richness of the beef, creating a delightful tanginess to your Smash Burger Bowl.

How to Make a Smash Burger Bowl

  1. Preheat your large skillet over medium-high heat, allowing it to get hot and ready for that sizzle! This ensures a perfectly browned and flavorful crust on your beef patties.

  2. Form the ground beef into 8 small balls, about 2 oz each. This size allows for even cooking and makes the smash process super easy and fun!

  3. Place the beef balls in the skillet and flatten them gently with a spatula. Give them a good press to create that iconic smash burger shape, which helps develop a beautiful crust.

  4. Season with salt and pepper, then cook for about 3 minutes until a delicious crust forms. This is when the magic happens, and the savory aroma fills your kitchen!

  5. Flip the patties and add the onions on top. Cook for an additional 2 minutes until nicely browned. The onions will soak up the flavor from the beef, adding a delightful sweetness.

  6. Assemble the Smash Burger Bowl by layering the chopped lettuce, cooked patties, tomatoes, and pickles in a bowl. Finally, drizzle with ketchup and mustard for that tangy finish!

Optional: Garnish with fresh herbs for an extra pop of color and flavor.

Exact quantities are listed in the recipe card below.

What to Serve with Smash Burger Bowl?

Bring the family together with vibrant sides and delightful beverages that perfectly complement each bite of this flavorful dish.

  • Crispy Sweet Potato Fries: These add a sweet contrast and satisfying crunch, making your meal feel like a special treat.
  • Creamy Coleslaw: The tangy and creamy flavors balance the savory elements in the burger bowl beautifully while adding a delightful crunch.
  • Garlic Butter Corn on the Cob: Sweet, juicy corn slathered in garlic butter brings an irresistible summery vibe to your meal.
  • Refreshing Cucumber Salad: A light and crisp salad with a zingy dressing offers a refreshing contrast that helps cleanse the palate.
  • Classic Potato Salad: This comforting side is creamy and rich, giving a delightful, nostalgic twist that pairs wonderfully with your meal.
  • Bubbly Sparkling Lemonade: A fizzy drink to brighten up your dinner, its citrusy flavor complements the savory notes while offering a refreshing contrast.
  • Decadent Brownies: End on a sweet note with rich, fudgy brownies that spoil you after a savory feast, creating the perfect finish.

Smash Burger Bowl Variations

Feel free to get creative with this recipe and tailor it to your preferences for an even more delightful experience!

  • Turkey: Swap the ground beef for lean ground turkey for a lighter option that still holds onto those savory flavors. Turkey works beautifully when seasoned well to keep it juicy.

  • Veggie: Use black bean patties or lentils for a hearty plant-based version. You can even add spices like cumin and paprika for an extra flavor kick.

  • Spicy: Add a dash of cayenne pepper or your favorite hot sauce to the beef mixture to give your smash burger bowl a little heat. This twist will definitely make your taste buds tingle!

  • Cheesy: Top your patties with cheese during the last minute of cooking for a gooey, melty addition. Cheddar, American, or even blue cheese can take this bowl to a whole new level.

  • Crunchy: Incorporate crispy fried onions or croutons on top for an added layer of delightful crunch. This brings a fantastic texture that contrasts beautifully with the soft toppings.

  • Herb-Infused: Mix fresh herbs like parsley, cilantro, or basil into the beef before cooking for an aromatic twist. The fresher, the better, as they add brightness to the dish.

  • Grilled Veggies: Toss some grilled bell peppers or zucchini into your bowl for added flavor and nutrition. The smoky flavor pairs well with the savory beef, creating a medley of tastes.

  • Sweet-Pickled: Try using pickled jalapeños or sweet pickles for a different tangy bite. This variation adds layers of flavor that truly elevate the whole dish.

The beauty of the Smash Burger Bowl lies in its adaptability; mix and match these variations to create your perfect bowl!

How to Store and Freeze Smash Burger Bowl

Fridge: Keep your assembled Smash Burger Bowl in an airtight container for up to 3 days. The lettuce will soften, so consider storing the ingredients separately for optimal freshness.

Freezer: You can freeze the cooked ground beef patties for up to 3 months. Allow them to cool completely, then wrap tightly in plastic wrap and place in a freezer-safe bag.

Reheating: Thaw patties in the fridge overnight before reheating. Use a skillet over medium heat or microwave for a quick warm-up; serve with fresh ingredients for the best flavor.

Assembly Tips: If you have leftovers, store the components separately. This way, you can recreate that delightful Smash Burger Bowl experience throughout the week!

Make Ahead Options

These Smash Burger Bowls are ideal for meal prep enthusiasts! You can prepare the chopped romaine lettuce, halved cherry tomatoes, and sliced dill pickles up to 3 days in advance, storing them in airtight containers to keep them fresh and crisp. The ground beef patties can also be formed into balls and refrigerated for up to 24 hours, which saves time on busy weeknights. When you’re ready to serve, simply cook the patties as instructed and assemble the bowls with your prepped ingredients. This approach ensures that your Smash Burger Bowl retains its delicious flavors and textures while giving you that well-deserved time back in your week!

Chef's Helpful Tips

  • Use ground beef with 20% fat for juicy and flavorful patties in your Smash Burger Bowl.
  • Avoid overcrowding the skillet by cooking the beef balls in batches if necessary to ensure a proper sear.
  • When flattening the beef balls, apply firm, even pressure to create the optimal crust for enhanced flavor.
  • Keep an eye on cooking times and aim for about 3 minutes per side for the perfect doneness, adjusting as needed for your preferred level of doneness.

Smash Burger Bowl Recipe FAQs

What kind of ground beef should I use for the Smash Burger Bowl?
Absolutely! I recommend using ground beef with about 20% fat. This fat content ensures that your patties remain juicy and flavorful, which is essential for an authentic burger experience.

How should I store leftover Smash Burger Bowls?
Store your assembled Smash Burger Bowl in an airtight container in the fridge for up to 3 days. However, to maintain the freshness of the toppings, consider keeping the ingredients—like lettuce and tomatoes—stored separately and adding them just before serving.

Can I freeze the components of a Smash Burger Bowl?
Yes, you can! I like to freeze the cooked beef patties. Allow them to cool completely, then wrap them tightly in plastic wrap and place them in a freezer-safe bag. They can last up to 3 months in the freezer. For best results, thaw the patties overnight in the fridge before reheating.

What can I do if my burger patties are sticking to the skillet?
If your patties are sticking, it might be that your skillet isn’t hot enough. Ensure you preheat your skillet properly. A good trick is to test it by sprinkling a few drops of water on the surface; they should sizzle and evaporate almost immediately. Also, give the patties some time to form that delicious crust before you try to flip them.

Are there any dietary considerations for the Smash Burger Bowl?
The Smash Burger Bowl is quite versatile! If you’re cooking for someone with allergies, you can easily substitute the beef with turkey or a meat alternative like lentils or veggie patties. For a low-carb version, use lettuce wraps instead of traditional hamburger buns. Always check your condiments for any gluten, dairy, or nut content if allergens are a concern.

Smash Burger Bowl

Smash Burger Bowl

The Smash Burger Bowl combines the flavors of a classic burger in a refreshing, vibrant bowl with greens, tomatoes, and pickles.
Print Recipe Pin Recipe
Prep Time 10 minutes mins
Cook Time 10 minutes mins
Total Time 20 minutes mins
Servings: 4 bowls
Course: DINNER RECIPES
Cuisine: American
Calories: 450
Ingredients Equipment Method Nutrition Notes

Ingredients
  

For the Bowl
  • 1 lb Ground beef (20% fat) This fat content ensures juicy, flavorful patties.
  • 4 cups Romaine lettuce, chopped Adds a crunchy base.
  • 1 cup Cherry tomatoes, halved Sweet bursts of flavor.
  • 1 cup Dill pickles, sliced A zesty touch.
  • 1 cup Onions, grilled or raw Choose grilled for sweetness or raw for a sharp bite.
For the Condiments
  • 1/4 cup Ketchup Adds sweetness.
  • 2 tbsp Mustard Brings out the richness of the beef.

Equipment

  • Large skillet

Method
 

How to Make a Smash Burger Bowl
  1. Preheat your large skillet over medium-high heat.
  2. Form the ground beef into 8 small balls, about 2 oz each.
  3. Place the beef balls in the skillet and flatten them gently with a spatula.
  4. Season with salt and pepper, then cook for about 3 minutes until a crust forms.
  5. Flip the patties and add the onions on top. Cook for an additional 2 minutes.
  6. Assemble the Smash Burger Bowl by layering the chopped lettuce, cooked patties, tomatoes, and pickles, then drizzle with ketchup and mustard.

Nutrition

Serving: 1bowlCalories: 450kcalCarbohydrates: 15gProtein: 30gFat: 30gSaturated Fat: 12gPolyunsaturated Fat: 2gMonounsaturated Fat: 14gCholesterol: 90mgSodium: 600mgPotassium: 800mgFiber: 4gSugar: 4gVitamin A: 200IUVitamin C: 15mgCalcium: 80mgIron: 3mg

Notes

Use ground beef with 20% fat for juicy patties. For best flavor, store components separately if you have leftovers.

Tried this recipe?

Let us know how it was!

Filed Under: DINNER RECIPES

Stuffed Bell Peppers

February 7, 2026 by JudyWhite Leave a Comment

There’s a certain joy that comes from filling a vibrant bell pepper with deliciousness, transforming a simple vegetable into a hearty meal. I still remember the first time I decided to swap fast food for something homemade—a choice that led me to the colorful world of stuffed bell peppers. Imagine biting into a tender pepper, its insides bursting with savory ground turkey, zesty tomatoes, and a touch of melted cheese. It’s like a cozy hug on a plate!

This recipe is perfect for those evenings when you crave something wholesome yet effortless. With just 15 minutes of prep and about 40 minutes in the oven, you’ll have a colorful feast ready to impress your family or guests. Plus, the versatility of this dish allows you to customize the filling according to what’s in your pantry, making it a winner for both meal planning and last-minute dinners. So, let’s dive into the delightful world of stuffed bell peppers that are as pleasing to the eye as they are to the palate!

Why You'll Love This Stuffed Bell Peppers

  • This recipe is incredibly easy to make, with just 15 minutes of prep time, making it perfect for busy weeknights.
  • The flavors meld beautifully, creating a satisfying meal that your taste buds will adore.
  • Stuffed bell peppers are highly versatile, allowing you to mix and match ingredients based on your preferences or what you have on hand.
  • Not only do these peppers look stunning on the plate, but they also make for a great presentation at dinner parties or family gatherings.

Stuffed Bell Peppers Ingredients

Get ready to create a dish that’s colorful, hearty, and simply delicious!

For the Peppers
• 4 large bell peppers – Choose a mix of red, yellow, or green for a vibrant presentation.

For the Filling
• 1 cup cooked quinoa or rice – This acts as a great base; use quinoa for added protein!
• 1 lb ground turkey or lean beef – Opt for turkey for a leaner choice; it keeps the filling moist.
• 1 cup diced tomatoes – Canned or fresh, they add juicy flavor and a beautiful color to the mix.
• 1 medium onion, chopped – This brings sweetness; sauté until translucent for the best flavor.
• 2 cloves garlic, minced – Fresh garlic infuses the filling with aromatic goodness.
• 1 tsp olive oil – Essential for sautéing; it helps to bring all the flavors together.
• Salt and pepper to taste – Season the filling to enhance all the ingredients.

For Topping
• 1 cup shredded mozzarella or cheddar cheese – This adds a melty, cheesy topping; choose your favorite!
• Fresh herbs (parsley or cilantro) – Sprinkle on top for a pop of freshness before serving.

Dive into this incredible stuffed bell peppers recipe; it’s a delightful way to fill your dinner table with warmth and flavor!

How to Make Stuffed Bell Peppers

  1. Preheat your oven to 375°F (190°C). This initial step ensures that your peppers cook evenly and beautifully.

  2. Prepare the bell peppers by slicing the tops off and removing the seeds. If needed, trim the bottoms slightly to make them stand upright in the dish.

  3. Sauté the onion and garlic in a skillet over medium heat with olive oil until they’re translucent and fragrant. This usually takes about 3-4 minutes.

  4. Add the ground turkey or lean beef to the skillet. Cook it until it’s nicely browned, stirring occasionally to break it apart; this should take about 6-8 minutes.

  5. Combine the cooked quinoa or rice, diced tomatoes, salt, and pepper with the meat mixture. Stir well until everything is fully mixed and heated through.

  6. Stuff each bell pepper generously with the filling mixture, packing it in nicely, and place them upright in a baking dish.

  7. Cover the dish with foil and bake in the preheated oven for 30 minutes. Remove the foil during the last 10 minutes so the cheese can melt and become bubbly.

  8. Garnish with fresh herbs like parsley or cilantro right before serving to add a burst of color and flavor!

Optional: Sprinkle with additional cheese and broil for 2-3 minutes for an extra crispy topping.

Exact quantities are listed in the recipe card below.

Stuffed Bell Peppers Variations

Feel free to get creative with your stuffed bell peppers and make them even more delectable!

  • Vegan Substitute: Use lentils or black beans in place of meat for a hearty, plant-based filling. This twist adds a delightful earthiness.

  • Spice It Up: Add diced jalapeños or red pepper flakes to the filling for a fiery kick that will excite your taste buds.

  • Cheesy Delight: Swap mozzarella for pepper jack cheese for a spicy, melty topping that enhances flavor and adds creaminess.

  • Sweet Twist: Incorporate diced pineapple or raisins into the filling for a sweet contrast that beautifully balances savory ingredients.

  • Herbaceous Freshness: Mix in fresh basil or oregano with your filling for an aromatic addition that elevates the overall dish.

  • Nutty Crunch: Stir in chopped nuts, like walnuts or almonds, for extra texture and a satisfying crunch in every bite.

  • Mediterranean Flair: Add feta cheese, olives, and sun-dried tomatoes to create a Mediterranean-inspired version that transports you to sunny shores.

  • Rice Variations: Experiment with flavored rice—such as Cajun or cilantro-lime rice—to give a unique twist to your filling that reflects your mood.

With these variations, you’ll keep your stuffed bell peppers exciting and fresh every time you make them!

How to Store and Freeze Stuffed Bell Peppers

Fridge: Keep leftover stuffed bell peppers in an airtight container for up to 3 days. Reheat in the microwave for a warm and satisfying meal.

Freezer: You can freeze stuffed bell peppers for up to 3 months. Wrap them tightly in plastic wrap and place in a freezer-safe bag for optimal freshness.

Reheating: When ready to enjoy, thaw overnight in the fridge. Reheat in the oven at 350°F (175°C) for about 20-30 minutes until heated through and cheese is bubbly.

Tip: Always ensure they are cooled completely before freezing to preserve texture and flavor in your stuffed bell peppers.

Make Ahead Options

These Stuffed Bell Peppers are a fantastic meal prep option for busy weeks! You can prepare the filling (ground turkey, quinoa, diced tomatoes, onion, and spices) up to 3 days in advance—simply store it in an airtight container in the refrigerator to keep it fresh. The bell peppers can be prepped by slicing the tops off and deseeding them 24 hours before cooking; this saves you a step when it’s time to bake. When you’re ready to serve, just stuff the peppers with the chilled filling, top with cheese, and bake as directed. This way, you can enjoy a hearty, homemade meal without the fuss of last-minute preparation, ensuring each bite is just as delicious as when freshly made!

What to Serve with Stuffed Bell Peppers?

Creating a vibrant spread around your stuffed bell peppers can elevate your meal from great to unforgettable!

  • Crispy Garlic Bread: This crunchy, buttery delight is perfect for soaking up any flavorful juices from the peppers. It’s a comforting side that pairs beautifully with the hearty filling.

  • Zesty Caesar Salad: With its crisp romaine and tangy dressing, this salad adds a refreshing contrast to the savory stuffed peppers. The crunchy croutons offer a delightful texture.

  • Roasted Vegetables: A colorful medley of seasonal vegetables enhances the dish. Their caramelized sweetness complements the flavors in the filling, creating a harmonious taste experience.

  • Traditional Coleslaw: This crunchy, tangy slaw introduces a delightful crunch that balances the softness of the bell peppers, making each bite even more enjoyable.

  • Creamy Polenta: Silky and rich, creamy polenta serves as a delightful bed for the peppers. Its subtle flavor allows the vibrant stuffing to shine.

  • Sparkling Lemonade: Refreshing and slightly tangy, a pitcher of sparkling lemonade keeps things light while perfectly cutting through the rich flavors of the stuffed peppers.

  • Chocolate Lava Cake: To end on a sweet note, this indulgent dessert brings warmth and decadence, making for a cozy finish to the meal. The contrast of flavors is simply divine!

These pairings create an inviting and balanced dinner experience that your family and friends will cherish. Enjoy the delightful culinary journey!

Chef's Helpful Tips

  • When making stuffed bell peppers, ensure you cut the tops off evenly and remove seeds thoroughly for the best texture and presentation.
  • To prevent the peppers from being too watery, consider using cooked quinoa instead of rice, as it absorbs flavors better.
  • Make sure to cook the ground turkey or beef completely until browned to avoid any raw taste in the filling.
  • Baking at 375°F for the recommended time allows for balanced cooking; remember to uncover during the last 10 minutes to achieve a golden, bubbly cheese topping.

Stuffed Bell Peppers Recipe FAQs

What should I look for when selecting bell peppers?
Choosing the right bell peppers can make a notable difference in your stuffed bell peppers. Look for peppers that are firm to the touch, bright in color, and free from dark spots or blemishes. The skin should be shiny and smooth, which indicates freshness. If you squeeze gently, they should feel solid without any softness.

How should I store leftover stuffed bell peppers?
Absolutely! After enjoying your meal, store leftover stuffed bell peppers in an airtight container in the fridge for up to 3 days. When you’re ready for a second serving, simply reheat them in the microwave or oven until they’re warmed through. I often prefer the oven method as it helps maintain the texture.

Can I freeze stuffed bell peppers?
Yes, you can! To freeze stuffed bell peppers, start by letting them cool completely. Then, wrap each pepper tightly in plastic wrap and place them in a freezer-safe bag. They can be kept in the freezer for up to 3 months. When you’re ready to eat, just thaw them overnight in the fridge and reheat in the oven at 350°F (175°C) for 20-30 minutes until heated all the way through.

What if my stuffed bell peppers are watery after baking?
Very! If your cooked stuffed bell peppers end up watery, it might be due to using too much liquid in your filling or not cooking the peppers enough before stuffing. To prevent this, make sure to drain any excess liquid from tomatoes or other ingredients. You can also bake them uncovered to allow steam to escape. If they still seem watery, consider adding breadcrumbs to the mixture as they can help absorb extra moisture.

Are there any dietary considerations for stuffed bell peppers?
Absolutely! If you or your loved ones have dietary restrictions, stuffed bell peppers can be adapted easily. For gluten-free options, ensure you use certified gluten-free grains like quinoa. If you’re catering to a vegetarian or vegan crowd, simply replace the ground turkey or beef with legumes like black beans or lentils, sautéing them with your onion and garlic for maximum flavor. Don’t forget to check for any allergies regarding specific ingredients!

How can I enhance the flavor of my stuffed bell peppers?
Adding a pinch of spices or seasoning, such as cumin or chili powder, can elevate the flavor profile of your stuffed bell peppers dramatically. You can also incorporate additional veggies like corn or diced zucchini into the filling for extra texture and taste. Mixing in some fresh herbs like basil or oregano right before serving can add a lovely fresh finish. Enjoy experimenting!

Stuffed Bell Peppers

Stuffed Bell Peppers

A vibrant and hearty dish made with bell peppers filled with savory ingredients, perfect for dinner.
Print Recipe Pin Recipe
Prep Time 15 minutes mins
Cook Time 40 minutes mins
Total Time 55 minutes mins
Servings: 4 peppers
Course: DINNER RECIPES
Cuisine: American
Calories: 300
Ingredients Equipment Method Nutrition Notes

Ingredients
  

For the Peppers
  • 4 large bell peppers Choose a mix of red, yellow, or green for a vibrant presentation.
For the Filling
  • 1 cup cooked quinoa or rice Quinoa for added protein.
  • 1 lb ground turkey or lean beef Opt for turkey for a leaner choice.
  • 1 cup diced tomatoes Canned or fresh for flavor.
  • 1 medium onion Chopped.
  • 2 cloves garlic Minced.
  • 1 tsp olive oil For sautéing.
  • salt and pepper To taste.
For Topping
  • 1 cup shredded mozzarella or cheddar cheese Choose your favorite.
  • Fresh herbs Such as parsley or cilantro.

Equipment

  • Skillet
  • Baking dish
  • Oven

Method
 

How to Make Stuffed Bell Peppers
  1. Preheat your oven to 375°F (190°C).
  2. Prepare the bell peppers by slicing the tops off and removing the seeds. If needed, trim the bottoms slightly.
  3. Sauté the onion and garlic in a skillet over medium heat with olive oil until they're translucent and fragrant.
  4. Add the ground turkey or lean beef to the skillet. Cook until browned, about 6-8 minutes.
  5. Combine the cooked quinoa or rice, diced tomatoes, salt, and pepper with the meat mixture. Stir well.
  6. Stuff each bell pepper generously with the filling mixture and place them upright in a baking dish.
  7. Cover the dish with foil and bake for 30 minutes. Remove foil during the last 10 minutes.
  8. Garnish with fresh herbs before serving.

Nutrition

Serving: 1pepperCalories: 300kcalCarbohydrates: 30gProtein: 25gFat: 12gSaturated Fat: 5gPolyunsaturated Fat: 2gMonounsaturated Fat: 3gCholesterol: 80mgSodium: 600mgPotassium: 600mgFiber: 5gSugar: 3gVitamin A: 30IUVitamin C: 150mgCalcium: 15mgIron: 10mg

Notes

To prevent the peppers from being too watery, consider using cooked quinoa instead of rice.

Tried this recipe?

Let us know how it was!

Filed Under: DINNER RECIPES

Creamy Mushroom Chicken

February 5, 2026 by JudyWhite Leave a Comment

There’s something undeniably comforting about a plate of Creamy Mushroom Chicken. The moment the chicken hits the skillet, the sizzling sound brings a sense of anticipation. As I watch the golden sear form, I can already imagine the rich flavors mingling with earthy mushrooms and fragrant garlic. This dish isn’t just a meal; it’s a heartfelt invitation to gather around the table and connect.

With just one bite, you’ll understand why this recipe has become a go-to for busy weeknights and special gatherings alike. It strikes the perfect balance between indulgence and simplicity, offering a creamy sauce that envelopes tender chicken while staying easy on your schedule. So, if you’re ready to leave the fast food behind and whip up something that feels both gourmet and homely, let’s dive into this delicious creamy creation. Whether it’s a cozy family dinner or a delightful gathering with friends, I promise this dish will shine at your table.

Why You'll Love This Creamy Mushroom Chicken

  • This Creamy Mushroom Chicken recipe is incredibly easy to make, allowing you to enjoy a gourmet meal in no time.
  • The rich and creamy sauce, combined with the earthy mushrooms and tender chicken, creates a flavor explosion that will leave everyone asking for seconds.
  • Its versatility makes it perfect for both weeknight dinners and special occasions, effortlessly impressing guests while fitting into your busy schedule.
  • Visually, the golden chicken and luscious sauce create an enticing presentation that will have your guests eagerly anticipating each bite.
  • Enjoy the satisfaction of serving a dish that is not only delicious but also a true crowd-pleaser.

Creamy Mushroom Chicken Ingredients

• Here’s what you need to create this comforting dish.

For the Chicken

  • Boneless, skinless chicken breasts – Ideal for a tender texture, ensuring it soaks up the creamy sauce beautifully.

For the Sauce

  • Heavy cream – Provides a luscious, rich base that makes the dish indulgent and creamy.
  • Chicken broth – Adds depth of flavor and helps to balance the richness of the cream.
  • Low-sodium soy sauce – Introduces a subtle umami note that enhances the overall taste.

For the Vegetables

  • Garlic – Fresh garlic infuses a fragrant aroma and enhances the dish’s savory aspects.
  • Button or cremini mushrooms – Either variety works well; they bring earthiness and a lovely texture to the sauce.

For Garnishing

  • Grated Parmesan cheese – Sprinkled on top, it adds a savory finish that melts into the creamy sauce.
  • Salt and pepper – Essential for seasoning to taste, enhancing all the flavors harmoniously.
  • Olive oil – Perfect for sautéing, its rich flavor complements the mushrooms and chicken.

Now, you’re fully equipped with the essential ingredients to whip up some delightful Creamy Mushroom Chicken that will leave everyone at the table craving more!

How to Make Creamy Mushroom Chicken

  1. Preheat the skillet: Begin by heating a large skillet over medium-high heat. This ensures a good sear on the chicken, so take your time getting it hot!

  2. Season and sear: Sprinkle salt and pepper over the chicken breasts, then place them in the skillet. Sear each side for 5-7 minutes until they’re golden brown, then remove them from the skillet and set aside.

  3. Sauté the vegetables: In the same skillet, add the olive oil followed by the sliced mushrooms and minced garlic. Cook for about 5 minutes, stirring until the mushrooms are tender and slightly golden.

  4. Simmer the sauce: Pour in the chicken broth and let it simmer for 2 minutes. Then, add the heavy cream, soy sauce, and grated Parmesan cheese, stirring until thoroughly combined for that creamy consistency.

  5. Return the chicken: Place the seared chicken back into the skillet, submerging it in the luscious sauce. Allow it to cook for an additional 5 minutes, soaking up all the flavors until the chicken is heated through.

  6. Serve hot: Dish out the creamy mushroom chicken onto plates, generously drizzling extra sauce over the top to enhance its mouthwatering appeal.

Optional: Pair with fresh parsley for a pop of color and an added layer of flavor.
Exact quantities are listed in the recipe card below.

What to Serve with Creamy Mushroom Chicken?

Imagine a delightful meal spread that complements the rich flavors of your creamy creation and invites your loved ones to linger at the table.

  • Garlic Bread: The buttery, garlicky goodness of freshly baked bread is perfect for sopping up every bit of that luscious sauce.

  • Herbed Rice: Fluffy rice infused with herbs adds a lightness to the meal while soaking up the creamy sauce beautifully for a satisfying combination.

  • Steamed Asparagus: Crisp-tender asparagus provides a fresh, vibrant crunch, balancing the creamy richness and adding a pop of color to your plate.

  • Classic Caesar Salad: The crunch of romaine lettuce, paired with tangy dressing and croutons, offers a refreshing contrast to the creamy chicken dish.

  • Roasted Potatoes: Crispy on the outside and fluffy on the inside, roasted potatoes deliver a hearty warmth that pairs seamlessly with the succulent chicken.

  • Red Wine: A glass of smooth, velvety red wine enhances the dish’s flavors while making your dinner feel even more special.

  • Chocolate Mousse: End your meal on a sweet note with rich, airy chocolate mousse that perfectly contrasts the savory dish you’ve enjoyed.

With these pairings, your Creamy Mushroom Chicken will take center stage for a dinner that’s not only satisfying but memorable.

Creamy Mushroom Chicken Variations

Feel free to explore these delightful twists, adding your personal touch to this comforting dish!

  • Dairy-Free: Substitute heavy cream with coconut cream and omit Parmesan for a creamy, vegan option that still delights the palate.

  • Gluten-Free: Use tamari instead of soy sauce, ensuring everyone can enjoy this savory dish without worry.

  • Spicy Kick: Add red pepper flakes or a dash of hot sauce to the sauce for a flavorful heat that lifts the entire dish.

  • Herb Infusion: Mix in fresh thyme, rosemary, or sage while sautéing the mushrooms. This aromatic addition beautifully enhances the earthiness.

  • Nutty Flavor: Sprinkle toasted pine nuts or walnuts on top before serving to add a crunchy texture and rich, nutty flavor.

  • Veggie Boost: Toss in spinach or kale just before returning the chicken to the sauce. This adds nutritional value and lovely green color.

  • Lemon Zest: A teaspoon of lemon zest stirred in at the end brightens the creamy sauce, adding an invigorating refreshing note.

  • Mushroom Medley: Use a mix of wild mushrooms such as shiitake, oyster, or portobello for a deeper flavor profile and interesting textures.

How to Store and Freeze Creamy Mushroom Chicken

Fridge: Keep any leftover Creamy Mushroom Chicken in an airtight container for up to 3 days to maintain freshness and flavor.

Freezer: For longer storage, freeze the chicken in a freezer-safe container for up to 3 months. Thaw in the fridge overnight before reheating.

Reheating: To enjoy later, reheat in a skillet over medium-low heat until warmed through, adding a splash of chicken broth or cream to restore creaminess.

Avoiding Separation: If reheating from frozen, do so slowly to prevent the sauce from separating and maintain that rich texture.

Make Ahead Options

These Creamy Mushroom Chicken recipes are a lifesaver for busy home cooks looking to streamline their meal prep. You can season and sear the chicken breasts up to 24 hours in advance. Simply cook them fully, then let them cool before storing in an airtight container in the fridge. Prepare the mushroom sauce separately and cool it before refrigerating for up to 3 days. To reheat, warm the sauce in a skillet and add the chicken back in until heated through. This way, you’ll enjoy just as delicious results with minimal effort on the day of serving!

Chef's Helpful Tips

  • For the Creamy Mushroom Chicken, ensure your skillet is properly preheated to achieve a nice sear on the chicken, which locks in moisture and flavor.
  • Avoid overcrowding the skillet while searing the chicken as this can cause steaming instead of browning; work in batches if needed.
  • When sautéing the mushrooms, let them cook undisturbed for a minute or two to develop golden color and enhance their flavor before stirring.
  • To achieve the creamiest sauce, allow the heavy cream to simmer gently without boiling after adding it, and always taste and adjust seasoning before serving.

Creamy Mushroom Chicken Recipe FAQs

What kind of mushrooms should I use for Creamy Mushroom Chicken?
Absolutely! You can use either button or cremini mushrooms. Both varieties add wonderful earthiness to the dish, but cremini tends to have a deeper flavor. If you’re feeling adventurous, you could even mix in a few shiitake or portobello mushrooms for added depth!

How should I store leftover Creamy Mushroom Chicken?
To keep your delicious Creamy Mushroom Chicken fresh, place any leftovers in an airtight container in the fridge. It will stay good for up to 3 days. When you’re ready to enjoy it again, just reheat gently in a skillet over medium-low heat for the best results.

Can I freeze Creamy Mushroom Chicken? How?
Yes, you can definitely freeze this dish! To freeze, let the chicken cool completely, then transfer it to a freezer-safe container. It should be good for up to 3 months. When you’re ready to eat, just thaw it in the fridge overnight, then reheat in a skillet over low heat. You might want to add a splash of chicken broth or cream to keep the sauce creamy.

What should I do if the sauce separates while reheating?
If your sauce looks like it’s separating, don’t worry! Here’s a simple step-by-step to salvage it:

  1. In a small saucepan, add a bit of cream or chicken broth over low heat.
  2. Stir gently until warmed.
  3. Once it’s heated, gradually whisk in the separated sauce to bring it back together.
  4. Keep stirring until it’s smooth and creamy again, then add it back to your chicken.

Are there any dietary considerations I should be aware of?
Very! If you’re cooking for someone with a dairy allergy, you can swap out the heavy cream for coconut milk or a dairy-free cream substitute, and use nutritional yeast instead of Parmesan for a cheesy flavor. Always double-check ingredient labels to ensure no hidden allergens are included, especially in the soy sauce.

What if my chicken breasts are too thick for even cooking?
If you find your chicken breasts are thick, it’s best to pound them to an even thickness before cooking. Place them between two sheets of plastic wrap or parchment paper and gently pound with a meat mallet or rolling pin until they’re about 1 inch thick. This ensures they cook evenly, providing that juicy texture we all love!

Creamy Mushroom Chicken

Creamy Mushroom Chicken

This Creamy Mushroom Chicken is a comforting dish that blends tender chicken with rich flavors, ideal for busy weeknights and special gatherings.
Print Recipe Pin Recipe
Prep Time 15 minutes mins
Cook Time 25 minutes mins
Total Time 40 minutes mins
Servings: 4 servings
Course: DINNER RECIPES
Cuisine: American
Calories: 450
Ingredients Equipment Method Nutrition Notes

Ingredients
  

For the Chicken
  • 2 pieces Boneless, skinless chicken breasts Ideal for a tender texture.
For the Sauce
  • 1 cup Heavy cream Provides a rich base.
  • 1 cup Chicken broth Adds depth of flavor.
  • 2 tablespoons Low-sodium soy sauce Enhances taste with umami.
For the Vegetables
  • 4 cloves Garlic Fresh for fragrant aroma.
  • 8 ounces Button or cremini mushrooms Adds earthiness and texture.
For Garnishing
  • 1/2 cup Grated Parmesan cheese Savory finish that melts.
  • to taste Salt Essential for seasoning.
  • to taste Pepper Essential for seasoning.
  • 2 tablespoons Olive oil For sautéing.

Equipment

  • Large skillet

Method
 

How to Make Creamy Mushroom Chicken
  1. Preheat a large skillet over medium-high heat.
  2. Season chicken breasts with salt and pepper, sear each side for 5-7 minutes until golden, then set aside.
  3. In the same skillet, add olive oil, then sliced mushrooms and minced garlic. Cook for about 5 minutes until tender.
  4. Pour in chicken broth and let simmer for 2 minutes. Add heavy cream, soy sauce, and Parmesan, stirring until combined.
  5. Return the seared chicken to the skillet, submerge in sauce, and cook for an additional 5 minutes.
  6. Serve hot, drizzling extra sauce over the top.

Nutrition

Serving: 1servingCalories: 450kcalCarbohydrates: 10gProtein: 35gFat: 30gSaturated Fat: 18gPolyunsaturated Fat: 0.5gMonounsaturated Fat: 10gCholesterol: 100mgSodium: 800mgPotassium: 600mgFiber: 1gSugar: 2gVitamin A: 500IUVitamin C: 2mgCalcium: 150mgIron: 2mg

Notes

Optional: Pair with fresh parsley for added flavor and color.

Tried this recipe?

Let us know how it was!

Filed Under: DINNER RECIPES

Crispy Chicken Tenders

February 5, 2026 by JudyWhite Leave a Comment

There’s an undeniable joy that comes with a perfectly crispy chicken tender, isn’t there? That satisfying crunch as you take a bite into the golden coating unleashes a rush of nostalgia—reminding me of family gatherings and casual dinners that always ended in laughter. Perfectly seasoned and impossibly tender on the inside, these crispy chicken tenders have become a beloved staple in my kitchen, especially when I’m craving something hearty but simple to make.

After a week of fast food fatigue, I decided to whip up a batch of these homemade delights, and trust me, they completely delivered. Whether you choose to fry them for that extra crunch or bake them for a healthier twist, you’re in for a treat. I love how versatile they are, too—these tenders can be dressed up with your favorite dipping sauces or thrown into wraps and salads. It’s a dish that caters to everyone in the family, and it comes together in just 35 minutes!

Let’s roll up our sleeves and dive into the deliciousness of crafting your very own crispy chicken tenders.

Why You'll Love This Crispy Chicken Tenders

  • These crispy chicken tenders are incredibly easy to make, allowing you to whip up a tasty meal in just 35 minutes.
  • The flavor is absolutely irresistible, with a perfectly seasoned crunchy coating that everyone will adore.
  • Their versatility shines through as you can enjoy them with a variety of dipping sauces or incorporate them into salads and wraps.
  • Plus, the visual appeal of these golden, crispy tenders is sure to impress family and friends alike.

Crispy Chicken Tenders Ingredients

• Gather your pantry staples for these delightful crispy chicken tenders!

For the Chicken

  • 3 boneless, skinless chicken breasts – cut them into strips for the perfect size and texture.

For the Breading

  • 1 cup all-purpose flour – this helps create that essential crispiness.
  • 2 large eggs – these act as a binder for the breadcrumbs.
  • 1 cup seasoned breadcrumbs – for a flavorful, crunchy coating.

For Seasoning

  • 1 tsp salt – enhances the overall flavor of the tenders.
  • 1/2 tsp black pepper – adds a little kick to your crispy chicken tenders!

For Frying

  • 1/2 cup vegetable oil – necessary for frying to achieve that golden brown perfection.

How to Make Crispy Chicken Tenders

  1. Preheat your oven to 400°F (200°C) if you opt for baking. This ensures even cooking and helps achieve that delightful golden color.

  2. Slice the chicken breasts into strips about 1 inch wide. This size is perfect for ensuring they cook evenly and are easy to handle for dipping!

  3. Arrange a breading station with three separate bowls: one for flour mixed with salt and pepper, one for the beaten eggs, and another for the seasoned breadcrumbs. This setup makes the process seamless and fun!

  4. Coat each chicken strip by first dipping it into the seasoned flour, then into the beaten eggs, and finally into the breadcrumbs for a crispy finish. Make sure each piece is well-coated for maximum crunch!

  5. Fry in a skillet: Heat the vegetable oil over medium heat, then fry each piece until they’re golden brown—about 3-4 minutes per side. If baking, place the strips on a lined baking sheet, spray lightly with cooking spray, and bake for 20-25 minutes until cooked through and beautifully golden.

Optional: Serve with your favorite dipping sauces for an extra flavor boost!

Exact quantities are listed in the recipe card below.

What to Serve with Crispy Chicken Tenders?

Nothing transforms a dish into a delightful feast quite like the perfect pairings alongside it.

  • Creamy Mashed Potatoes: The buttery, smooth texture of mashed potatoes offers a comforting counterpart to the crispy tenders. It’s a classic pairing that pleases palates of all ages!

  • Fresh Garden Salad: A crisp, refreshing salad brimming with colorful vegetables adds a bright balance to the hearty chicken. Think of it as a cool contrast to the warm tenders.

  • Honey Mustard Dipping Sauce: A sweet and tangy sauce that elevates the chicken tenders to new levels. The flavors meld beautifully, creating an irresistible bite that keeps you coming back for more.

  • Sweet Potato Fries: The slight sweetness and crunchy texture of fries complement the salty, savory chicken perfectly. This combination brings a delightful crunch to every bite.

  • Coleslaw: A crunchy, tangy slaw provides a zesty kick that pairs wonderfully with the chicken. It adds great texture and flavor, making every mouthful a perfectly balanced experience.

  • Garlic Bread: The crispy, buttery goodness of garlic bread is great for mopping up any leftover sauce from your tenders. Plus, who doesn’t love a slice of garlic bread with a hearty meal?

  • Sparkling Lemonade: A refreshing drink like sparkling lemonade cuts through the richness of the chicken, cleansing your palate with each sip. It adds a burst of citrus that brightens the entire meal!

  • Chocolate Chip Cookies: Finish off your meal on a sweet note with warm chocolate chip cookies. The combination of the crispy chicken and soft cookies creates a comforting, nostalgic finish to your dining experience.

Make Ahead Options

These Crispy Chicken Tenders are a fantastic option for meal prep enthusiasts! You can prepare the chicken strips and coat them with the flour, egg, and breadcrumb mixture up to 24 hours in advance, keeping them covered in the refrigerator until you’re ready to cook. Just make sure to store them in a single layer to maintain that delightful crunch. When you’re ready to serve, simply heat your oil if frying or preheat your oven if baking, then cook them directly from the fridge—no need to thaw! This way, you’ll enjoy the same deliciousness with minimal effort, perfect for those busy weeknights when you crave homemade comfort.

How to Store and Freeze Crispy Chicken Tenders

Room Temperature: Keep crispy chicken tenders out for no more than 2 hours to prevent spoilage.

Fridge: Store leftovers in an airtight container for up to 3 days. Reheat in the oven for the best texture.

Freezer: For longer storage, freeze cooked chicken tenders in a single layer for up to 3 months. Use freezer-safe bags to prevent freezer burn.

Reheating: Reheat from frozen by baking at 400°F (200°C) for about 20-25 minutes or until heated through to maintain crispiness.

Crispy Chicken Tenders Variations

Feel free to mix and match ingredients to create your perfect version of these delicious crispy chicken tenders!

  • Gluten-Free: Substitute all-purpose flour with gluten-free flour and use gluten-free breadcrumbs for the same satisfying crunch.

  • Spicy: Add 1-2 tsp of cayenne pepper or hot paprika to the flour for a fiery kick that lingers with each bite. The heat elevates the dish and tantalizes the taste buds!

  • Herb-Infused: Mix dried herbs like oregano, thyme, or rosemary into the breadcrumbs for a fresh and aromatic twist. This herb addition enchants every mouthful with a burst of flavor!

  • Parmesan Cheese: Blend grated Parmesan cheese into your breadcrumbs for an extra cheesy crust that boasts a rich, savory note. This cheese infusion takes the crunchiness to new heights!

  • Air-Fryer: For a healthier option, coat your chicken tenders in the same way and place them in an air fryer set to 400°F (200°C) for about 10-12 minutes, flipping halfway. They’ll still be crispy without the extra oil.

  • Asian Flair: Incorporate sesame seeds into the breadcrumb coating and serve with a soy dipping sauce for a fun twist on traditional tender flavors. This unique pairing makes for a delightful culinary adventure!

  • Buttermilk Soak: Soak chicken strips in buttermilk for a few hours before breading to enhance tenderness and flavor. This simple step ensures a moist and succulent bite.

  • Zesty Citrus: Add lemon or lime zest to the breadcrumbs for a refreshing citrusy zing that brightens the overall flavor profile. This unexpected twist will surprise and delight your family and friends!

Chef's Helpful Tips

  • When preparing the Crispy Chicken Tenders, ensure that the oil is hot enough before frying to achieve the perfect golden brown color and prevent the tenders from becoming soggy.
  • Avoid overcrowding the skillet while frying, as this can lower the oil temperature and result in uneven cooking.
  • For extra crunch, consider double-breading the chicken strips by repeating the flour, egg, and breadcrumb process.
  • If baking, remember to flip the tenders halfway through cooking to ensure they brown evenly and get crispy on both sides.

Crispy Chicken Tenders Recipe FAQs

How do I know if my chicken is ripe and ready to use?
Absolutely! When selecting chicken, look for a fresh, pink color without dark spots or a foul smell. The skin should be moist but not slimy, and avoid any packages with excess liquid. Always check the sell-by date too!

How should I store leftover crispy chicken tenders?
Very! Store any leftover crispy chicken tenders in an airtight container in the fridge for up to 3 days. Make sure they are completely cooled down before sealing them. When it’s time to enjoy them again, reheating in the oven is best to restore their crispy texture.

Can I freeze crispy chicken tenders? If so, how?
Absolutely! To freeze, allow the cooked chicken tenders to cool completely. Then, place them in a single layer on a baking sheet to freeze for about 1 hour. Once frozen, transfer them to freezer-safe bags and seal tightly to prevent freezer burn. They can be stored for up to 3 months. When you’re ready to enjoy them, bake straight from frozen!

What can I do if my chicken tenders aren’t crispy?
No worries! If your crispy chicken tenders turn out soggy instead of crispy, it likely means the oil wasn’t hot enough when frying, or they were overcrowded in the pan. Make sure the oil reaches around 350°F (175°C) before adding the chicken, and avoid overcrowding to ensure each piece cooks evenly. If baking, turn them halfway through to promote an even crisp.

Are there any dietary considerations I should keep in mind for this recipe?
Of course! If you’re catering to specific dietary restrictions, consider using gluten-free breadcrumbs and flour for a gluten-free version. Also, ensure your chicken is sourced from a trusted supplier to avoid any allergens. Always check for allergies before serving, especially with those who may have sensitivities to eggs or gluten.

Crispy Chicken Tenders

Crispy Chicken Tenders

Enjoy these Crispy Chicken Tenders with a perfectly seasoned crunchy coating, great for family gatherings or casual dinners.
Print Recipe Pin Recipe
Prep Time 10 minutes mins
Cook Time 25 minutes mins
Total Time 35 minutes mins
Servings: 4 tenders
Course: DINNER RECIPES
Cuisine: American
Calories: 350
Ingredients Equipment Method Nutrition Notes

Ingredients
  

For the Chicken
  • 3 pieces boneless, skinless chicken breasts cut into strips
For the Breading
  • 1 cup all-purpose flour creates essential crispiness
  • 2 large eggs acts as a binder
  • 1 cup seasoned breadcrumbs for crunchy coating
For Seasoning
  • 1 tsp salt enhances flavor
  • 1/2 tsp black pepper adds a little kick
For Frying
  • 1/2 cup vegetable oil for frying

Equipment

  • Skillet
  • Baking sheet
  • bowls

Method
 

How to Make Crispy Chicken Tenders
  1. Preheat your oven to 400°F (200°C) if you opt for baking.
  2. Slice the chicken breasts into strips about 1 inch wide.
  3. Arrange a breading station with one bowl for flour mixed with salt and pepper, one for beaten eggs, and another for seasoned breadcrumbs.
  4. Coat each chicken strip by first dipping it into the seasoned flour, then into the beaten eggs, and finally into the breadcrumbs.
  5. Fry in a skillet over medium heat until golden brown—about 3-4 minutes per side or bake for 20-25 minutes.

Nutrition

Serving: 1tenderCalories: 350kcalCarbohydrates: 20gProtein: 25gFat: 20gSaturated Fat: 3gPolyunsaturated Fat: 2gMonounsaturated Fat: 8gCholesterol: 80mgSodium: 600mgPotassium: 300mgFiber: 1gSugar: 1gVitamin A: 5IUVitamin C: 2mgCalcium: 2mgIron: 8mg

Notes

Serve with your favorite dipping sauces for an extra flavor boost.

Tried this recipe?

Let us know how it was!

Filed Under: DINNER RECIPES

Garlicky Mississippi Pot Roast

February 3, 2026 by JudyWhite Leave a Comment

There’s something truly comforting about the smell of a hearty roast slowly cooking away in the oven, and this Garlicky Mississippi Pot Roast is no exception. As the tantalizing aroma fills your kitchen, it transports you back to childhood family dinners, where every bite seemed to melt away the day’s worries. I discovered this fantastic recipe during a particularly chilly evening, when nothing felt more satisfying than indulging in a rich, savory meal that could be shared with loved ones.

With only a handful of simple ingredients—juicy chuck roast, aromatic garlic, and your favorite ranch dressing mix—this dish is as stress-free as it is delicious. What I love most about this pot roast is how effortlessly it transforms an everyday dinner into a special occasion. Perfect for impressing friends or simply treating yourself to a cozy night in, just set it in the oven and let the magic happen while you unwind!

Why You'll Love This Garlicky Mississippi Pot Roast

  • This recipe is incredibly easy to prepare, requiring just a few simple steps that anyone can follow.
  • The flavors come together in a way that creates a mouthwatering dish that your family and friends will rave about.
  • It’s versatile enough to serve on a busy weeknight or as the centerpiece of a special gathering, making it perfect for any occasion.
  • The visual appeal of the tender roast surrounded by vibrant carrots and onions will surely impress anyone at the dining table.

Garlicky Mississippi Pot Roast Ingredients

• A delightful array of flavors awaits!

For the Roast

  • Chuck roast – This tender cut is perfect for pot roasting, ensuring a juicy outcome.
  • Fresh garlic – Minced for optimal flavor, adding a robust aroma to your Garlicky Mississippi Pot Roast.

For the Seasoning

  • Ranch dressing mix – A key ingredient that imparts a savory depth and rich flavor.
  • Au jus gravy mix – Enhances the sauce and keeps the roast moist while cooking.

For Cooking

  • Unsalted butter – It adds richness to the dish and helps brown the roast beautifully.

For the Veggies

  • Baby carrots – Sweet and tender, they provide a lovely contrast to the savory meat.
  • Yellow onion – Sliced to infuse sweetness and depth, making for a deliciously aromatic base.

How to Make Garlicky Mississippi Pot Roast

  1. Preheat Oven: Start by preheating your oven to 275°F (135°C). This low heat will allow your roast to become tender and flavorful as it cooks.

  2. Season Roast: Generously season both sides of the chuck roast with salt and pepper. This simple step enhances the overall flavor and makes every bite delicious.

  3. Sear Meat: In a skillet over medium-high heat, melt 1 tablespoon of unsalted butter. Sear the roast until it’s browned on all sides, roughly 3 minutes per side. This adds a lovely crust and depth of flavor.

  4. Transfer and Assemble: Carefully transfer the seared roast to a Dutch oven or slow cooker. Surround it with the sliced onions and baby carrots for a beautiful presentation.

  5. Add Seasonings: Sprinkle the ranch dressing mix and au jus gravy mix evenly over the roast. This delightful combination is what makes your Garlicky Mississippi Pot Roast unforgettable.

  6. Top with Garlic and Butter: Add the minced garlic on top, followed by the remaining tablespoon of butter. This will melt into the roast, providing rich and savory tones during cooking.

  7. Cover and Bake: Cover the Dutch oven or slow cooker and let it bake in the oven for approximately 4 hours, or until the meat is fork-tender and falls apart beautifully.

Optional: Serve with crusty bread to soak up the delicious juices!

Exact quantities are listed in the recipe card below.

Garlicky Mississippi Pot Roast Variations

Feel free to play around with this recipe to suit your taste buds and dietary preferences!

  • Spicy Kick: Add 1-2 diced jalapeños or a few dashes of hot sauce to the roast for a fiery twist. The heat will harmonize beautifully with the savory flavors.

  • Herb-Infused: Toss in a few sprigs of fresh thyme or rosemary for an aromatic touch that elevates the dish. The herbal notes offer a delightful nuance to every bite.

  • Vegetarian Option: Swap the chuck roast for a hearty portobello mushroom cap and replace the au jus mix with vegetable broth for a plant-based version. It’s hearty and satisfying!

  • Root Vegetable Medley: Include parsnips or sweet potatoes along with the carrots for added depth and sweetness in flavor. They’ll complement the dish beautifully and create a colorful presentation.

  • Onion Variation: Use caramelized onions instead of raw for a sweet and rich layer of flavor. The sweetness of the caramelized onions balances the savory elements perfectly.

  • Wine Boost: Deglaze the skillet used to sear the roast with a splash of red wine before adding it to the pot. This adds immense depth and complexity to the overall flavor.

  • Creamy Touch: Stir in a splash of heavy cream or sour cream into the juices just before serving for a rich and creamy sauce. It enhances the dish’s comfort factor!

  • Sweet & Savory: Add a tablespoon of brown sugar to the seasoning mix for a hint of sweetness that balances the savory garlic and ranch flavors.

How to Store and Freeze Garlicky Mississippi Pot Roast

  • Fridge: Store any leftover Garlicky Mississippi Pot Roast in an airtight container in the fridge for up to 3 days. This keeps the roast moist and flavorful for your next meal.
  • Freezer: For longer storage, freeze portions of the pot roast in freezer-safe bags or containers for up to 2 months. Make sure to label with the date for easy referencing.
  • Thawing: When ready to enjoy again, thaw in the fridge overnight or use the microwave for a quick option.
  • Reheating: Reheat the roast gently in a covered skillet over low heat, or in the microwave, to prevent drying out. Add a splash of beef broth if needed for moisture.

Make Ahead Options

These Garlicky Mississippi Pot Roast preparations are perfect for busy weeknights! You can season and sear the chuck roast up to 24 hours in advance, and then refrigerate it (to preserve its juiciness). Additionally, slice the onions and chop the carrots ahead of time, keeping them stored in an airtight container in the fridge for up to 3 days. When you’re ready to cook, simply transfer the prepared roast to your Dutch oven, add the vegetables, sprinkle the seasoning mixes, and finish with garlic and butter. Cover and bake as directed for a comforting meal that tastes just as delicious as if it were made fresh!

What to Serve with Garlicky Mississippi Pot Roast?

The tantalizing aroma of Garlicky Mississippi Pot Roast deserves some delightful companions to create a memorable meal.

  • Creamy Mashed Potatoes: These buttery, smooth potatoes provide a perfect vehicle for soaking up the savory juices from the pot roast.

  • Honey Glazed Carrots: The sweetness of honey glazed carrots beautifully balances the rich flavors of the roast, offering a satisfying crunch.

  • Roasted Green Beans: Sautéed or roasted, green beans add a fresh, vibrant contrast to the hearty pot roast, making each bite sing.

  • Crusty Bread: A loaf of fresh, warm bread is ideal for mopping up those delicious juices, enhancing the comfort food experience.

  • Coleslaw: A tangy and crisp coleslaw introduces a refreshing crunch that complements the savory richness of the roast, creating wonderful texture.

  • Red Wine: A glass of full-bodied red wine enhances the meal’s savoriness, elevating the entire dining experience.

Don’t forget dessert! A slice of warm apple pie would be the perfect sweet ending to this comforting feast. Enjoy!

Chef's Helpful Tips

  • To ensure your Garlicky Mississippi Pot Roast is perfectly tender, always use a meat thermometer to check for doneness, aiming for an internal temperature of around 190°F (88°C) for optimal tenderness.
  • Avoid overcrowding the pot by evenly distributing the onions and carrots for even cooking and flavor absorption.
  • When searing the roast, let it sit undisturbed for the full 3 minutes per side for a nice crust to form, enhancing the dish’s flavor profile.
  • Finally, always cover the Dutch oven tightly to retain moisture during the long cooking process, allowing the roast to braise beautifully.

Garlicky Mississippi Pot Roast Recipe FAQs

How do I select the best chuck roast for this recipe?
Absolutely! Look for a chuck roast that has good marbling, which ensures tenderness and flavor. The best cuts will have specks of fat interspersed throughout the meat, giving it a juicy result. A roast that feels slightly firm yet has a bit of give when pressed is ideal.

How should I store leftover Garlicky Mississippi Pot Roast?
To keep your Garlicky Mississippi Pot Roast fresh, store any leftovers in an airtight container in the fridge for up to 3 days. Make sure it’s cooled before sealing to maintain its moisture. This way, every bite can remind you of that comforting meal!

Can I freeze my Garlicky Mississippi Pot Roast?
Very! Freezing is a fantastic option if you want to keep it longer. To freeze, portion the pot roast into freezer-safe bags or containers, ensuring you remove excess air. Label with the date, and it can last for up to 2 months. When you’re ready, just thaw it in the fridge overnight or use the microwave.

What’s the best way to reheat the pot roast without drying it out?
I often recommend reheating on the stove over low heat to maintain moisture. Place the roast in a covered skillet, and consider adding a splash of beef broth to keep it juicy. If using a microwave, heat it in short bursts and cover to retain moisture.

Can I make this recipe if I have dietary restrictions?
Absolutely! For gluten-free needs, look for gluten-free versions of the ranch dressing and au jus mixes. If you have allergies to garlic, you can skip it, but you may want to enhance flavor with fresh herbs like thyme or rosemary instead. When serving to pets, remember that onions and garlic can be harmful for them, so keep their portions separate.

Garlicky Mississippi Pot Roast

Garlicky Mississippi Pot Roast

This Garlicky Mississippi Pot Roast is a comforting dish filled with rich flavors, perfect for family dinners.
Print Recipe Pin Recipe
Prep Time 15 minutes mins
Cook Time 4 hours hrs
Total Time 4 hours hrs 15 minutes mins
Servings: 6 servings
Course: DINNER RECIPES
Cuisine: American
Calories: 350
Ingredients Equipment Method Nutrition Notes

Ingredients
  

For the Roast
  • 1 piece Chuck roast
  • 4 cloves Fresh garlic, minced
For the Seasoning
  • 1 packet Ranch dressing mix
  • 1 packet Au jus gravy mix
For Cooking
  • 2 tablespoons Unsalted butter
For the Veggies
  • 2 cups Baby carrots
  • 1 large Yellow onion, sliced

Equipment

  • Dutch oven
  • Skillet

Method
 

Instructions
  1. Preheat your oven to 275°F (135°C).
  2. Generously season both sides of the chuck roast with salt and pepper.
  3. Melt 1 tablespoon of unsalted butter in a skillet over medium-high heat and sear the roast until browned on all sides, about 3 minutes per side.
  4. Carefully transfer the seared roast to a Dutch oven or slow cooker. Surround it with the sliced onions and baby carrots.
  5. Sprinkle the ranch dressing mix and au jus gravy mix evenly over the roast.
  6. Add the minced garlic on top, followed by the remaining tablespoon of butter.
  7. Cover and bake in the oven for approximately 4 hours, or until the meat is fork-tender.

Nutrition

Serving: 1servingCalories: 350kcalCarbohydrates: 15gProtein: 45gFat: 15gSaturated Fat: 6gPolyunsaturated Fat: 1gMonounsaturated Fat: 5gCholesterol: 120mgSodium: 900mgPotassium: 1000mgFiber: 2gSugar: 3gVitamin A: 5000IUVitamin C: 5mgCalcium: 50mgIron: 3mg

Notes

Serve with crusty bread to soak up the delicious juices.

Tried this recipe?

Let us know how it was!

Filed Under: DINNER RECIPES

  • 1
  • 2
  • 3
  • …
  • 16
  • Next Page »

Recent Posts

  • Crispy Potatoes in Oven
  • Lucky Charms Pancakes
  • Cheeseburger
  • Boiled Corn on the Cob
  • St. Patrick’s Day Dessert Parfaits

Recent Comments

No comments to show.

Footer

  • Contact
  • Privacy Policy
  • About Us
  • Terms
  • ↑ back to top

Copyright © 2024 www.Forkono.com

Table Of Content