Forkono

  • BREAKFAST & BRUNCH
  • DESSERT RECIPES
  • DINNER RECIPES
  • LUNCH RECIPES
  • About uS
  • SNACKS & APPETIZERS
menu icon
go to homepage
  • BREAKFAST & BRUNCH
  • DESSERT RECIPES
  • DINNER RECIPES
  • LUNCH RECIPES
  • About uS
  • SNACKS & APPETIZERS
search icon
Homepage link
  • BREAKFAST & BRUNCH
  • DESSERT RECIPES
  • DINNER RECIPES
  • LUNCH RECIPES
  • About uS
  • SNACKS & APPETIZERS
×

Chicken Pot Pie Casserole

December 22, 2025 by JudyWhite Leave a Comment

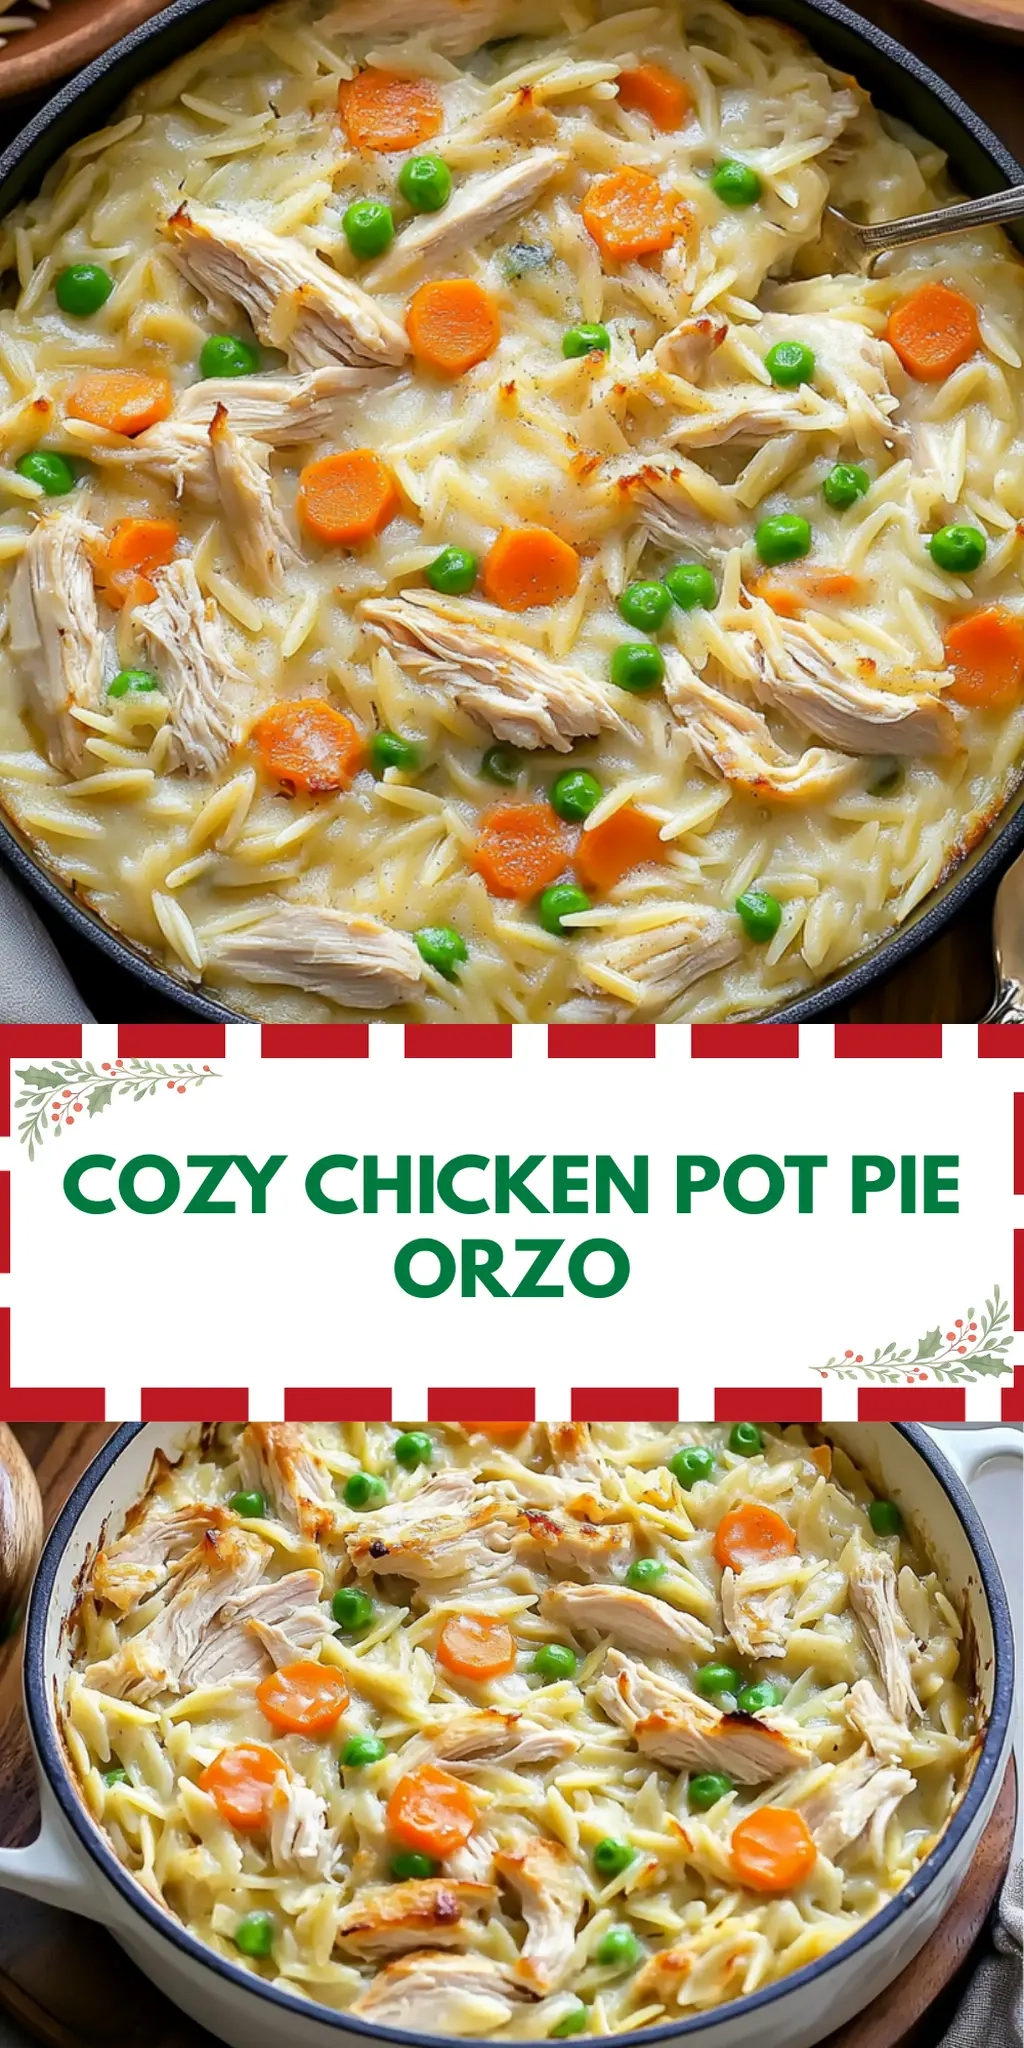
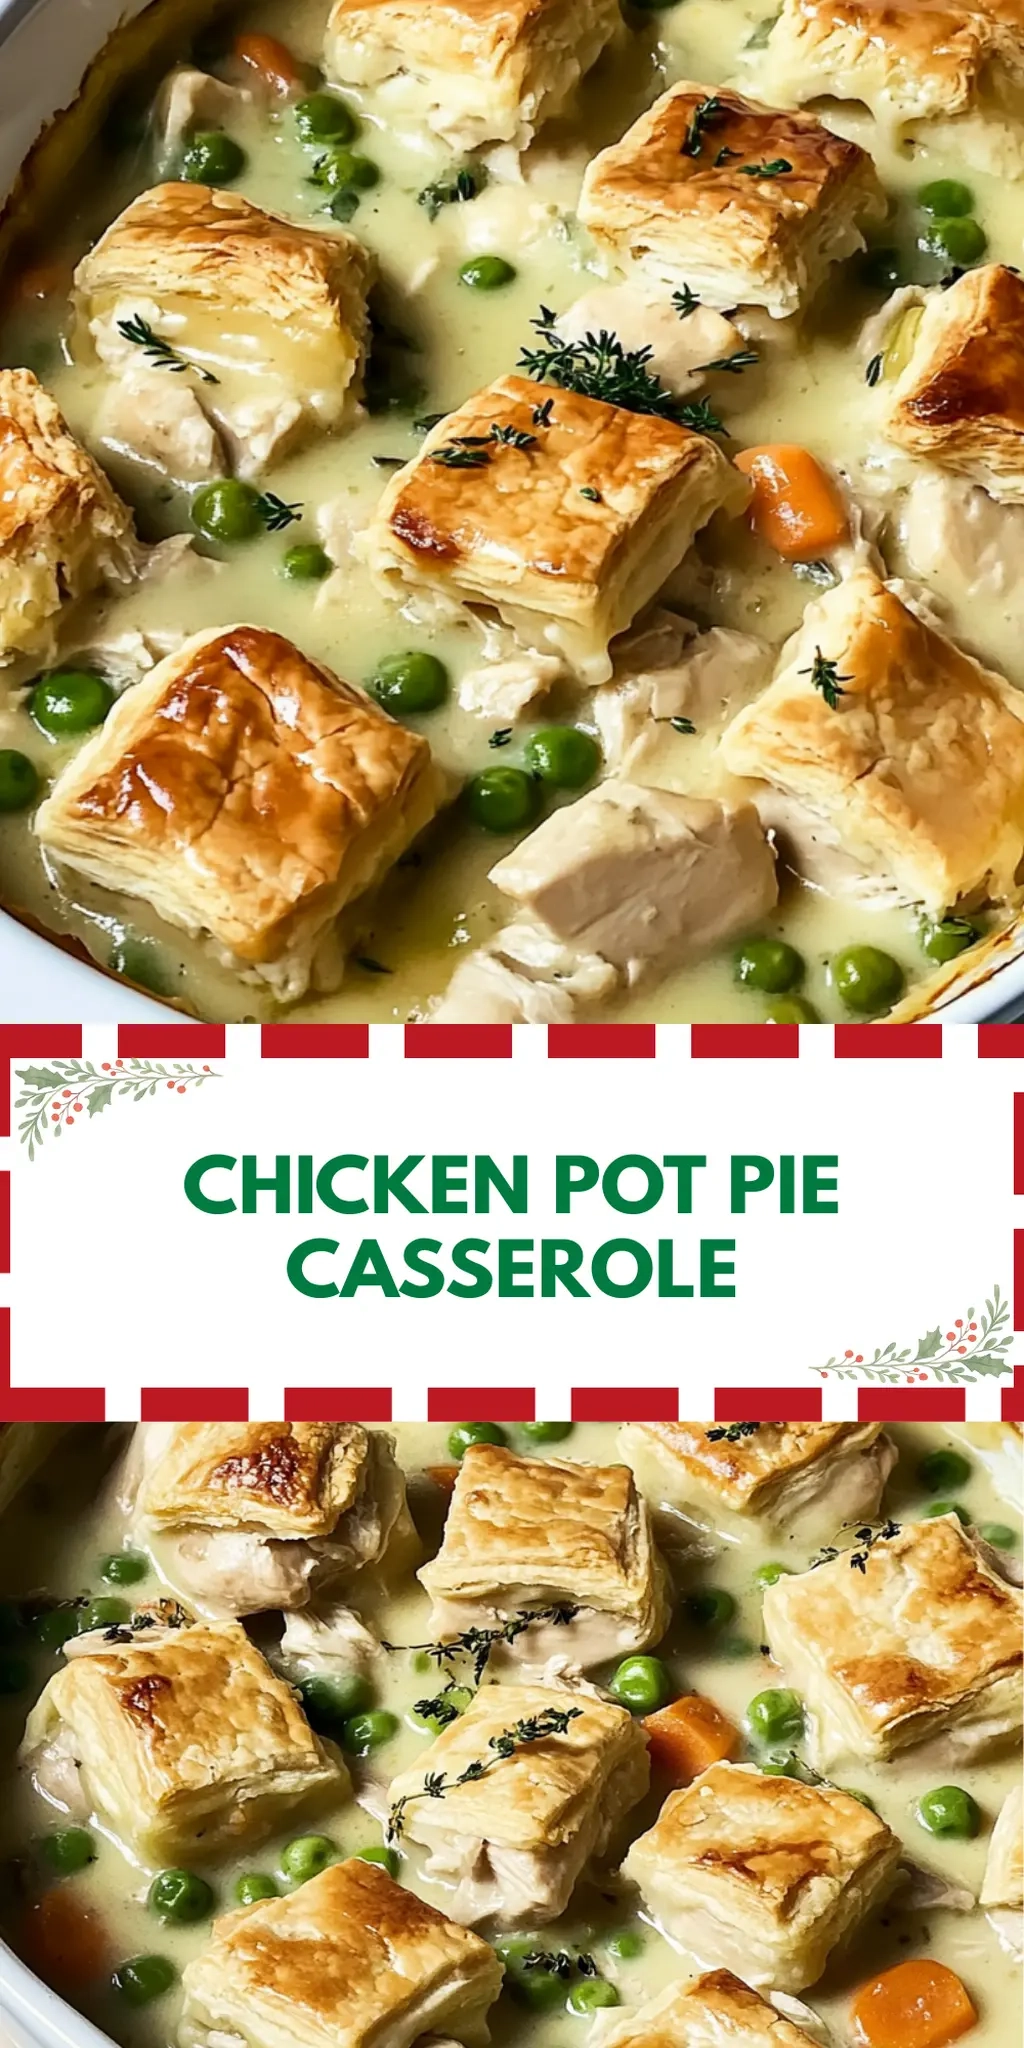
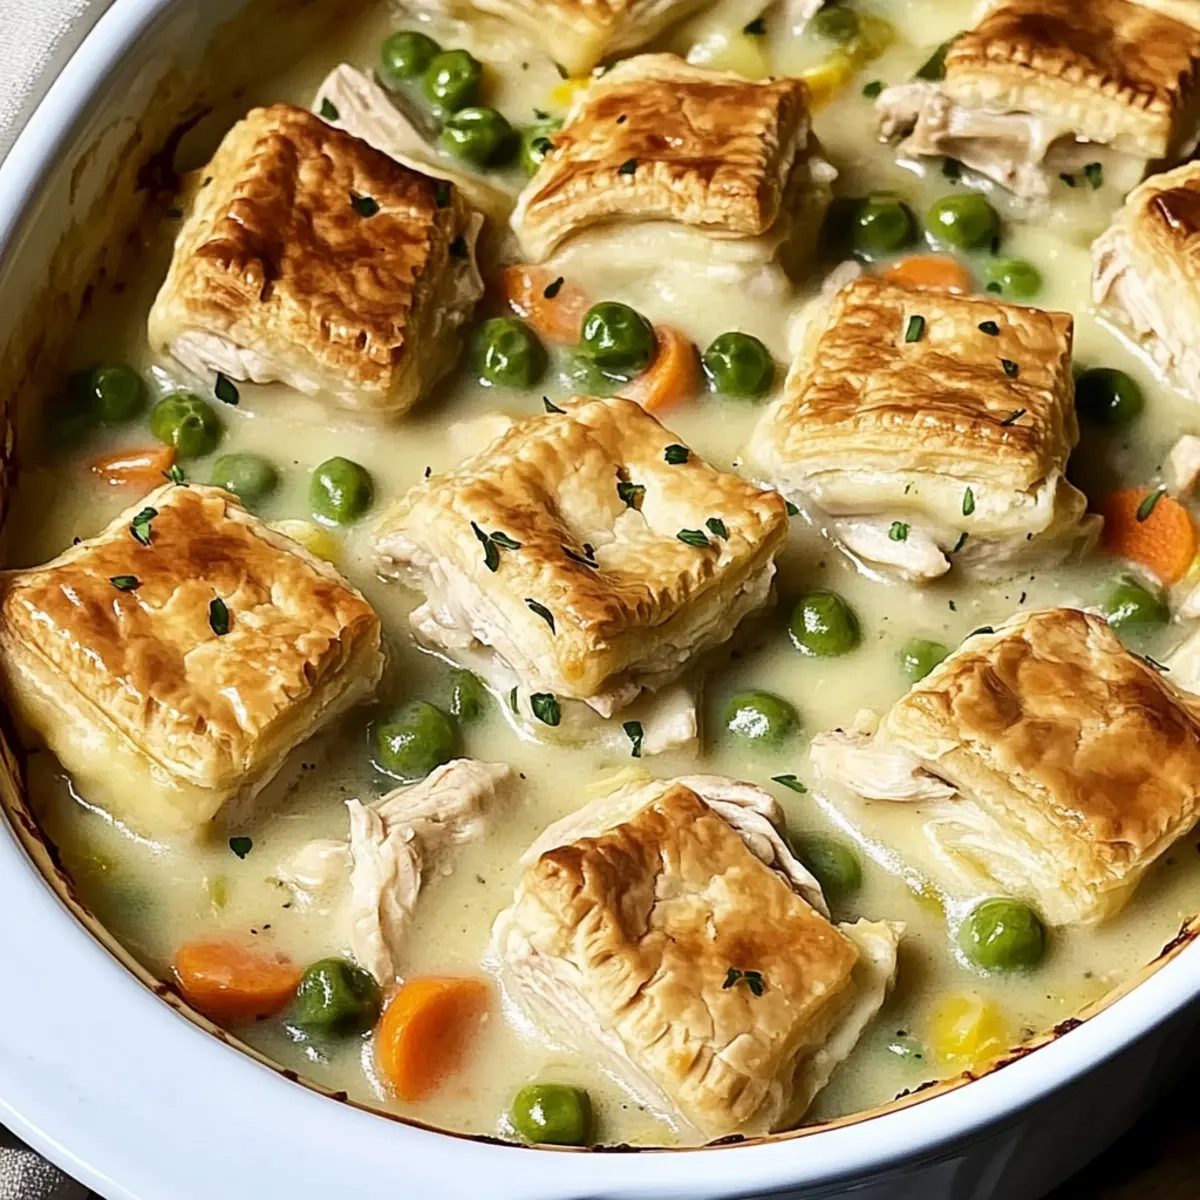
There’s a certain comfort that comes with a warm, homemade meal, especially when it’s a Chicken Pot Pie Casserole emerging from the oven, golden biscuits beckoning to be devoured. The moment you break open those flaky layers, the rich aroma of seasoned chicken, fresh veggies, and savory thyme wafts through the kitchen, wrapping you in its cozy embrace. It’s the kind of dish that turns any evening into a special occasion, reminding you of family gatherings and cherished moments shared at the dinner table.

After a week of diving into takeout menus and craving a home-cooked meal, I knew it was time to whip up something hearty yet effortless. This Chicken Pot Pie Casserole requires just 15 minutes of prep, transforming staples like frozen peas and leftover chicken into a culinary masterpiece that’ll have everyone asking for seconds. If you’ve found yourself yearning for wholesome comfort food that’s as pleasing to the eye as it is to the palate, then you’re in for a treat! Get ready to impress your guests or simply satisfy your cravings with this delightful recipe that proves homemade can be both easy and extraordinary.

Why You'll Love This Chicken Pot Pie Casserole

  • This Chicken Pot Pie Casserole is a breeze to prepare, requiring just 15 minutes of your time before it goes into the oven.
  • The combination of tender chicken, fresh vegetables, and buttery biscuits creates a flavor explosion that will delight your taste buds.
  • It’s incredibly versatile, allowing you to use any leftover chicken and your favorite seasonal vegetables for a dish that’s uniquely yours.
  • Plus, the golden, flaky biscuits make for a stunning visual presentation that will impress your family and friends.
  • This crowd-pleasing recipe is perfect for family gatherings or cozy weeknight dinners, ensuring everyone leaves the table satisfied.

Chicken Pot Pie Casserole Ingredients

Nestled in this cozy dish, each ingredient plays a vital role in creating a heartwarming meal.

For the Filling

  • Medium yellow onion – adds a sweet and savory base flavor to the casserole.
  • Medium carrots – provide sweetness and a pop of color, enhancing both taste and visual appeal.
  • Medium stalks celery – brings a satisfying crunch and aromatic depth to the pot.
  • Cloves garlic – infuses the dish with a rich and fragrant essence.
  • Fresh thyme (or dried thyme) – a must-have herb that elevates the flavor profile of the chicken pot pie casserole.
  • Unsalted butter – helps to sauté the vegetables and adds a rich creaminess to the filling.
  • Kosher salt – essential for bringing out the natural flavors of all the ingredients.
  • Freshly ground black pepper – imparts a mild heat and enhances overall seasoning.
  • All-purpose flour – thickens the filling, giving it that comforting, creamy texture.

For the Sauce

  • Low-sodium chicken broth – provides a savory liquid base; opt for low-sodium to control salt content.
  • Whole or 2% milk – creates a creamy sauce that melds together the filling beautifully.

For the Topping

  • Cooked boneless chicken – the star of the dish, giving protein and heartiness (use leftovers for convenience).
  • Frozen peas – add sweetness, color, and texture; there’s no need to thaw them before adding!
  • Refrigerated jumbo- or grand-size biscuits – create a golden, flaky topping that makes this meal unforgettable.

Embrace the homestyle flavors of this chicken pot pie casserole, and watch your loved ones light up with every savory bite!

How to Make Chicken Pot Pie Casserole

  1. Preheat the oven to 375°F (190°C). This step is crucial for achieving golden, flaky biscuits and perfectly cooked filling.

  2. Melt 3 tablespoons of butter in a large skillet over medium heat. Once melted, add the diced onion, carrots, celery, and minced garlic; cook until the vegetables are softened, about 5-7 minutes.

  3. Stir in the fresh thyme, kosher salt, and black pepper. Then, sprinkle the flour over the vegetable mixture and stir to combine. This helps create a flavorful base for your filling.

  4. Gradually add the chicken broth and milk, stirring constantly. Keep this up until the mixture thickens, around 3-5 minutes. You want a creamy texture that clings to your filling.

  5. Mix in the cooked boneless chicken and frozen peas, combining everything well. The chicken makes this casserole hearty while the peas add a lovely pop of color!

  6. Transfer the mixture to a greased casserole dish. Spread it evenly for consistent baking, ensuring each helping is just as delicious as the last.

  7. Place the biscuits on top of the chicken mixture, spreading them out to cover as much surface area as possible. They’ll bake into delightful, golden puffs!

  8. Brush the remaining 3 tablespoons of melted butter over the biscuits. This creates an irresistible, golden-brown topping.

  9. Bake for 25-30 minutes, or until the biscuits are golden brown and cooked through. You’ll know it’s ready when the aroma fills your kitchen, inviting everyone to the table!

Optional: Garnish with fresh thyme or parsley for an added pop of color.

Exact quantities are listed in the recipe card below.

What to Serve with Chicken Pot Pie Casserole?

There’s nothing quite like the feeling of sharing a comforting meal with family and friends, bringing warmth and joy to your table.

  • Crispy Green Salad: A refreshing mix of greens, cucumbers, and a tangy vinaigrette balances the richness of the casserole, adding a delightful crunch to each bite.

  • Garlic Breadsticks: Soft, buttery breadsticks, brushed with garlic and herbs, are perfect for soaking up the creamy goodness from your casserole. They can’t be resisted!

  • Roasted Brussels Sprouts: These savory, caramelized bites of Brussels sprouts provide a delicious contrast to the creamy filling, adding depth and flavor to your meal.

  • Cheesy Mashed Potatoes: Creamy and cheesy, these mashed potatoes add comforting familiarity and can be enjoyed alongside the casserole for an extra hearty dish.

  • Sweet Apple Crisp: A warm, spiced dessert that complements the savory pie while offering a sweet ending, making dinner feel extra special.

  • Cranberry Juice: A refreshing and tart drink that cleanses the palate, perfectly balancing the flavors of the casserole and bringing a sweet touch to the meal.

How to Store and Freeze Chicken Pot Pie Casserole

Room Temperature: Keep leftovers at room temperature for no more than 2 hours to ensure food safety and freshness.

Fridge: Store covered Chicken Pot Pie Casserole in the refrigerator for up to 3 days. Use an airtight container or tightly wrap it to maintain moisture.

Freezer: For longer storage, freeze the casserole for up to 3 months. Allow it to cool completely before transferring to a freezer-safe container or wrap tightly with foil.

Reheating: To enjoy, thaw in the fridge overnight and reheat in the oven at 350°F (175°C) for about 25-30 minutes, until warmed through.

Make Ahead Options

These Chicken Pot Pie Casserole meals are perfect for busy home cooks looking to save time during hectic weekdays! You can prepare the filling (steps 1-6) up to 24 hours in advance; simply refrigerate it in an airtight container. This way, the flavors can meld together beautifully overnight! The biscuits can be added just before baking, ensuring they stay fresh and flaky. When you’re ready to serve, pour the filling into your greased casserole dish, top with biscuits, brush on melted butter, and bake as directed. By prepping in advance, you’ll have a home-cooked meal that’s just as delicious and comforting, ready to bring joy to your family’s dining table!

Chicken Pot Pie Casserole Variations

Feel free to get creative with this comforting dish and delight your palate with exciting twists!

  • Dairy-Free: Substitute milk with almond or oat milk and use dairy-free butter for a delicious plant-based option. The flavors will remain comforting and satisfying.

  • Vegetarian: Replace chicken with chickpeas or roasted vegetables for a hearty, meatless meal that still boasts delicious flavors. This variation is great for plant-based eaters!

  • Spicy Kick: Add diced jalapeños or a sprinkle of red pepper flakes to the filling for a warm heat that tantalizes the taste buds. This makes each spoonful an unexpected adventure!

  • Herb Explosion: Experiment with other herbs, like rosemary or sage, to give your filling a unique taste profile that reflects your favorite flavors. It’s fun to play around!

  • Cheesy Delight: Mix in shredded cheddar or mozzarella cheese just before topping with biscuits to create a creamy, cheesy filling that elevates this classic dish. Who doesn’t love gooey cheese?

  • Whole Wheat Biscuits: Opt for whole wheat biscuits to add a nutty flavor and extra fiber, contributing a healthy twist to your comforting casserole. It’s a simple change that packs a nutritional punch.

  • Curry Infusion: Add a tablespoon of curry powder to the filling for a delightful, aromatic twist that introduces an exotic flare to your comfort food. It’s a wonderful way to reinvent classic flavors!

  • Zucchini Boost: Incorporate diced zucchini or other seasonal veggies to increase nutrition and texture, giving your casserole a fresh, garden-inspired touch. Sneaking in more vegetables has never been so easy!

Chef's Helpful Tips

  • For the Chicken Pot Pie Casserole, always cut your vegetables uniformly to ensure even cooking and texture.
  • A common mistake is overcooking the vegetables; aim for a tender but still crisp texture to enhance your dish.
  • When adding the chicken broth and milk, do so gradually while stirring to avoid lumps and achieve a smooth sauce.
  • Finally, make sure to bake your casserole at 375°F until the biscuits are golden brown, which typically takes about 25-30 minutes.

Chicken Pot Pie Casserole Recipe FAQs

How do I choose the best vegetables for the filling?
Absolutely! When selecting vegetables like carrots and celery, opt for fresh produce that feels firm to the touch and has vibrant colors. Look for carrots without dark spots and celery that’s crisp, as these will provide the best flavor and texture in your Chicken Pot Pie Casserole.

How should I store leftovers of Chicken Pot Pie Casserole?
For sure! After dinner, let your leftovers cool slightly, then transfer them to an airtight container. You can store them in the fridge for up to 3 days. Be sure to cover the casserole tightly with plastic wrap or a lid to keep it from drying out or taking on other fridge odors.

Can I freeze Chicken Pot Pie Casserole? If so, how?
Very much! For freezing, let the casserole cool completely after baking. Then, transfer it to a freezer-safe container or wrap tightly with aluminum foil or plastic wrap. You can safely freeze it for up to 3 months. When you’re ready to enjoy it again, thaw it overnight in the refrigerator, then reheat in the oven at 350°F (175°C) for about 25-30 minutes until heated through. This method helps maintain its delicious flavors!

What if my filling is too thick or too thin?
No problem! If your filling turns out too thick, add a splash of chicken broth or milk while stirring gently over low heat until it reaches your desired consistency. Conversely, if it’s too thin, sprinkle in a little more flour or cornstarch mixed with a bit of water to thicken it up, allowing it to cook briefly for the flour to incorporate and thicken.

Can I make this dish gluten-free?
Absolutely! You can easily adapt this Chicken Pot Pie Casserole to be gluten-free. Use gluten-free all-purpose flour in place of regular flour, and ensure that your biscuits are gluten-free as well. Most grocery stores offer quality gluten-free biscuit options that can be used for a delicious and hearty casserole!

Is it safe for my pets?
Generally, most of the ingredients in Chicken Pot Pie Casserole are not suitable for pets, especially onions and garlic which can be toxic to dogs. If you have a furry friend around, I recommend preparing a pet-friendly version of the casserole just for them, using safe ingredients like plain cooked chicken and vegetables without any seasoning!

Chicken Pot Pie Casserole

Chicken Pot Pie Casserole

A comforting Chicken Pot Pie Casserole made with tender chicken, fresh vegetables, and flaky biscuits, perfect for family dinners.
Print Recipe Pin Recipe
Prep Time 15 minutes mins
Cook Time 30 minutes mins
Total Time 45 minutes mins
Servings: 6 servings
Course: DINNER RECIPES
Cuisine: American
Calories: 400
Ingredients Equipment Method Nutrition Notes

Ingredients
  

For the Filling
  • 1 medium yellow onion
  • 2 medium carrots
  • 2 medium stalks celery
  • 3 cloves garlic minced
  • 1 teaspoon fresh thyme or dried thyme
  • 6 tablespoons unsalted butter
  • 1 teaspoon kosher salt
  • 1/2 teaspoon freshly ground black pepper
  • 1/3 cup all-purpose flour
For the Sauce
  • 1 cup low-sodium chicken broth
  • 1 cup whole or 2% milk
For the Topping
  • 2 cups cooked boneless chicken use leftovers for convenience
  • 1 cup frozen peas no need to thaw
  • 1 package refrigerated jumbo or grand-size biscuits

Equipment

  • Large skillet
  • casserole dish

Method
 

Cooking Instructions
  1. Preheat the oven to 375°F (190°C).
  2. Melt 3 tablespoons of butter in a large skillet over medium heat. Add the diced onion, carrots, celery, and minced garlic; cook until softened, about 5-7 minutes.
  3. Stir in fresh thyme, kosher salt, and black pepper. Sprinkle the flour over mixture and stir to combine.
  4. Gradually add chicken broth and milk, stirring constantly until the mixture thickens, around 3-5 minutes.
  5. Mix in cooked chicken and frozen peas, combining everything well.
  6. Transfer the mixture to a greased casserole dish, spreading it evenly.
  7. Place the biscuits on top of the chicken mixture, spreading them to cover as much surface area as possible.
  8. Brush the remaining melted butter over the biscuits.
  9. Bake for 25-30 minutes until the biscuits are golden brown and cooked through.

Nutrition

Serving: 1servingCalories: 400kcalCarbohydrates: 40gProtein: 25gFat: 15gSaturated Fat: 8gPolyunsaturated Fat: 2gMonounsaturated Fat: 5gCholesterol: 60mgSodium: 600mgPotassium: 800mgFiber: 3gSugar: 5gVitamin A: 1500IUVitamin C: 8mgCalcium: 150mgIron: 2mg

Notes

Garnish with fresh thyme or parsley for added color.

Tried this recipe?

Let us know how it was!

Filed Under: DINNER RECIPES

Cozy Chicken Pot Pie Orzo

December 22, 2025 by JudyWhite Leave a Comment

There’s something incredibly comforting about a one-pot meal that feels like a warm hug on a chilly day. When I first created this Cozy Chicken Pot Pie Orzo, I was rummaging through my pantry, searching for a way to blend classic pot pie flavors with a twist that would reduce cleanup time. The combination of creamy orzo pasta, tender rotisserie chicken, and vibrant veggies is not only a feast for the eyes but also a soul-soothing harmony of flavors.

I can still picture the moment my family gathered around the table, eyes lighting up as I served this dish. It’s a recipe that’s super simple yet incredibly satisfying—perfect for dinner nights when you want more than takeout, but less fuss than a gourmet meal. Plus, it only takes 35 minutes from start to finish! Let’s dive into this delightful blend of comfort and convenience that will make your taste buds rejoice.

Why You'll Love This Cozy Chicken Pot Pie Orzo

  • This Cozy Chicken Pot Pie Orzo is a breeze to prepare, allowing you to serve up a delicious meal in just 35 minutes.
  • The delightful blend of creamy orzo, tender chicken, and colorful vegetables creates a flavor explosion that will have everyone coming back for seconds.
  • Its one-pot simplicity means less cleanup, making it perfect for busy weeknight dinners.
  • Visually stunning and loaded with comfort, this dish is sure to become a family favorite that pleases even the pickiest of eaters.

Cozy Chicken Pot Pie Orzo Ingredients

For the Base

  • Unsalted butter – 3 tablespoons to add a rich, creamy flavor.
  • Large yellow onion – 1, diced, to create a sweet base that enhances the dish’s aroma.
  • Rib celery – 1, finely diced, for a crunchy texture that balances the creaminess.
  • Frozen peas and diced carrots blend – 1 cup, thawed, for vibrant color and essential nutrients.
  • Garlic – 1 teaspoon, minced, to infuse warmth and depth into every bite.

For the Orzo

  • Orzo pasta – 1.5 cups, uncooked, serving as the perfect cozy base that takes on all the flavors.
  • Chicken broth – 3 cups, providing a savory essence that ties all the ingredients together.

For the Creamy Filling

  • Rotisserie chicken – 2 cups, shredded, making it a convenient and tasty protein option.
  • Heavy whipping cream – 1 cup, for luxurious creaminess that elevates the dish.
  • Parmesan cheese – 1 cup, grated, to add a salty, nutty flavor that coats the orzo beautifully.

For Seasoning

  • Kosher salt – 0.5 teaspoon, to enhance the overall flavor without overpowering.
  • Black pepper – 0.25 teaspoon, for a touch of warmth.
  • Dried thyme – 0.25 teaspoon, echoing the classic pot pie essence with earthy notes.
  • Red pepper flakes – 0.25 teaspoon (optional), for a hint of spice to awaken your taste buds.

For Garnish

  • Chopped parsley – to taste, adding freshness and a pop of color to your dish.
  • Grated parmesan – sprinkled on top, enhancing both flavor and presentation for serving.

This Cozy Chicken Pot Pie Orzo is sure to impress and become a staple in your home-cooked repertoire!

How to Make Cozy Chicken Pot Pie Orzo

  1. Melt Butter: In a large heavy-bottomed pot or Dutch oven, melt 1 tablespoon of butter over medium heat. Toss in the diced onion and celery. Cook for 4 to 5 minutes until they are softened and fragrant.

  2. Add Vegetables: Stir in the thawed peas and carrots, cooking for 2 to 3 more minutes until they’re warmed through. Add the minced garlic and give it another minute to bloom its flavor.

  3. Toast Orzo: Mix in the remaining 2 tablespoons of butter along with the uncooked orzo. Stir well to coat and lightly toast the orzo until it starts turning golden, about 2–3 minutes.

  4. Simmer: Pour in the chicken broth and bring the mixture to a gentle simmer. After it starts bubbling, cover the pot, reduce the heat to low, and let it cook for 10 to 12 minutes, stirring occasionally to keep it from sticking. The orzo should be mostly tender and have absorbed most of the liquid.

  5. Combine Chicken and Cream: Add the shredded rotisserie chicken and heavy cream to the pot, cover again, and cook for an additional 3 to 4 minutes until everything is heated through and the orzo is perfectly cooked.

  6. Season and Thicken: Remove from heat. Stir in the grated parmesan cheese, kosher salt, black pepper, thyme, and red pepper flakes (if using). If it seems too loose, let it sit uncovered for 2–3 minutes to thicken. If it’s too thick, add a splash of warm broth or cream to loosen.

  7. Serve: Scoop generous portions into bowls and garnish with fresh chopped parsley and extra parmesan for a delicious finishing touch.

Optional: Drizzle with a bit of olive oil for extra richness.

Exact quantities are listed in the recipe card below.

Make Ahead Options

These delightful Cozy Chicken Pot Pie Orzo servings are perfect for meal prep enthusiasts! You can prepare the flavorful base (the sautéed onion, celery, and vegetables) up to 3 days in advance, storing it in an airtight container in the refrigerator to preserve freshness. Simply cook the orzo and combine it with the chicken, cream, and seasonings when you’re ready to serve. For best results, reheat gently on the stove, adding a splash of chicken broth to maintain the creamy consistency. By prepping ahead, you’ll save valuable time on busy weeknights while still enjoying a comforting, hearty meal that feels just as delightful as it does fresh!

Cozy Chicken Pot Pie Orzo Variations

Feel free to elevate this dish with your preferred flavors and textures—it’s all about personalizing your cozy experience!

  • Gluten-Free: Substitute orzo with gluten-free pasta or rice for a similar comforting base without the gluten.
  • Vegan: Replace chicken with chickpeas and use cashew cream instead of heavy cream, creating a rich and creamy delight.
  • Herb-Infused: Add fresh herbs like rosemary or sage instead of thyme for an aromatic twist that brightens the dish.
  • Spicy Kick: Toss in some diced jalapeños or cayenne pepper for a fiery addition that’ll warm your soul.
  • Extra Veggies: Mixed bell peppers and spinach can add a colorful flair and nutritional boost; just toss them in with the garlic.
  • Cheesy Varieties: Use a blend of cheeses, such as goat cheese or feta, for a tangy, creamy surprise that takes each bite to the next level.
  • Coconut Cream: Swap the heavy cream for full-fat coconut milk for a tropical twist that offers a hint of sweetness and creaminess.
  • Slow Cooker Version: Use a slow cooker to make this dish with minimal effort—just set it and forget it for an effortlessly hearty meal!

With these variations, you can make this Cozy Chicken Pot Pie Orzo uniquely yours while keeping the comforting essence intact!

Storage Tips for Cozy Chicken Pot Pie Orzo

Fridge: Store leftover Cozy Chicken Pot Pie Orzo in an airtight container for up to 3 days. Reheat gently on the stove or in the microwave, adding a splash of broth to restore creaminess.

Freezer: This dish can be frozen for up to 2 months. Freeze in a well-sealed container or freezer bag, leaving some space for expansion.

Reheating: To reheat from frozen, thaw in the fridge overnight, then warm in a pot over medium heat, stirring occasionally. If it’s too thick, add a little warm broth or cream.

Best Practices: Ensure the pot pie orzo is cooled completely before storage to prevent moisture buildup. Reheating small portions can be easier and prevent leftovers from drying out.

What to Serve with Cozy Chicken Pot Pie Orzo?

Indulging in a comforting bowl of orzo is just the beginning of crafting a delightful meal experience.

  • Garlic Bread: This golden, crusty treat is perfect for sopping up any remaining creamy goodness, enhancing the meal’s heartiness.

  • Steamed Green Beans: Lightly salted and crisp, they add a fresh, vibrant contrast that balances the richness of the orzo.

  • Caesar Salad: With its crisp romaine and tangy dressing, this classic salad brings a refreshing zest to your dinner plate, offering a delightful crunch.

  • Buttery Corn on the Cob: The sweetness of fresh corn complements the savory notes of the pot pie orzo, creating a well-rounded flavor profile.

  • Roasted Brussels Sprouts: The caramelized edges of these sprouts not only add a crispy texture but also a nutty flavor that beautifully contrasts with the creamy dish.

  • Chardonnay: A chilled glass of Chardonnay, with its crisp acidity, will elevate your dining experience, cutting through the richness of the orzo.

  • Chocolate Pudding Cake: End your meal on a sweet note. The velvety texture of the cake pairs perfectly with the heartiness of the main dish, leaving everyone satisfied.

Creating a full meal around the Cozy Chicken Pot Pie Orzo opens up a world of flavors and textures that everyone will love!

Chef's Helpful Tips

  • When making Cozy Chicken Pot Pie Orzo, be sure to toast the orzo for a few minutes to enhance its nutty flavor.
  • Avoid overcooking the vegetables in step two, as they should remain vibrant and retain some texture.
  • For a creamy texture, stir the heavy cream in gradually and ensure the pot is removed from heat to prevent curdling.
  • Keep an eye on the orzo as it cooks, stirring occasionally to prevent it from sticking to the bottom of the pot.

Cozy Chicken Pot Pie Orzo Recipe FAQs

What type of orzo should I use for this recipe?
Absolutely! I recommend using regular uncooked orzo pasta for a perfect texture. Whole wheat or gluten-free alternatives can also work, but cooking times may vary—follow the package instructions for best results.

How should I store leftover Cozy Chicken Pot Pie Orzo?
Store any leftovers in an airtight container in the fridge for up to 3 days. When you’re ready to enjoy it again, reheat gently on the stove or in the microwave, adding a splash of broth or cream to restore its creamy consistency.

Can I freeze Cozy Chicken Pot Pie Orzo?
Yes! You can freeze this dish for up to 2 months. Just transfer cooled orzo into a well-sealed container or freezer bag—remember to leave some space for expansion. Thaw it overnight in the fridge before reheating, and if it seems too thick, add a bit of warm broth or cream to loosen it.

What should I do if the orzo becomes too sticky while cooking?
Very! If your orzo sticks to the pot, it’s likely due to insufficient stirring. During the 10-12 minute cooking time, make sure to stir occasionally to prevent sticking. If it does stick, add a little more broth and reduce the heat—this should help loosen it up.

Are there any dietary considerations I should know about?
Great question! This Cozy Chicken Pot Pie Orzo contains dairy and gluten, so if you’re cooking for someone with allergies, consider substituting heavy cream with a dairy-free alternative and using gluten-free orzo. Always check the ingredient labels to ensure safety for anyone with specific dietary restrictions.

What if I want to add more vegetables?
The more the merrier! You can absolutely add more veggies like diced bell peppers, mushrooms, or spinach for added flavor and nutrition. Just make sure to sauté them until tender along with the onion and celery for the best results!

Cozy Chicken Pot Pie Orzo

Cozy Chicken Pot Pie Orzo

Cozy Chicken Pot Pie Orzo blends classic pot pie flavors into a one-pot meal that’s comforting and satisfying.
Print Recipe Pin Recipe
Prep Time 10 minutes mins
Cook Time 25 minutes mins
Total Time 35 minutes mins
Servings: 4 servings
Course: DINNER RECIPES
Cuisine: American
Calories: 480
Ingredients Equipment Method Nutrition Notes

Ingredients
  

For the Base
  • 3 tablespoons Unsalted butter to add a rich, creamy flavor
  • 1 large yellow onion diced to create a sweet base
  • 1 rib celery finely diced for a crunchy texture
  • 1 cup frozen peas and diced carrots blend thawed for vibrant color
  • 1 teaspoon garlic minced for warmth and depth
For the Orzo
  • 1.5 cups orzo pasta uncooked, serving as the cozy base
  • 3 cups chicken broth providing a savory essence
For the Creamy Filling
  • 2 cups rotisserie chicken shredded for convenience
  • 1 cup heavy whipping cream for luxurious creaminess
  • 1 cup Parmesan cheese grated for salty, nutty flavor
For Seasoning
  • 0.5 teaspoon kosher salt to enhance overall flavor
  • 0.25 teaspoon black pepper for a touch of warmth
  • 0.25 teaspoon dried thyme echoes classic pot pie essence
  • 0.25 teaspoon red pepper flakes optional, for a hint of spice
For Garnish
  • chopped parsley to taste, for freshness
  • grated parmesan sprinkled on top for flavor

Equipment

  • large heavy-bottomed pot or Dutch oven

Method
 

Directions
  1. Melt 1 tablespoon of butter in a large pot over medium heat. Toss in the diced onion and celery, cooking for 4-5 minutes until softened.
  2. Stir in the thawed peas and carrots, cooking for 2-3 more minutes. Add minced garlic and cook for another minute.
  3. Mix in the remaining 2 tablespoons of butter with the uncooked orzo, stirring well to coat and lightly toast for 2-3 minutes.
  4. Pour in the chicken broth and bring to a gentle simmer. Cover, reduce heat to low, and let cook for 10-12 minutes, stirring occasionally.
  5. Add shredded rotisserie chicken and heavy cream, cover, and cook for 3-4 minutes until heated through.
  6. Stir in grated parmesan, kosher salt, black pepper, thyme, and red pepper flakes. Let sit uncovered for 2-3 minutes to thicken if necessary.
  7. Scoop portions into bowls and garnish with fresh chopped parsley and extra parmesan before serving.

Nutrition

Serving: 1servingCalories: 480kcalCarbohydrates: 50gProtein: 25gFat: 20gSaturated Fat: 10gPolyunsaturated Fat: 1gMonounsaturated Fat: 8gCholesterol: 80mgSodium: 600mgPotassium: 700mgFiber: 5gSugar: 4gVitamin A: 900IUVitamin C: 10mgCalcium: 300mgIron: 2mg

Notes

Optional: Drizzle with olive oil for extra richness. Exact quantities are listed in the recipe card above.

Tried this recipe?

Let us know how it was!

Filed Under: DINNER RECIPES

Authentic Jamaican Curry Chicken

December 22, 2025 by JudyWhite Leave a Comment

There’s nothing quite like the comforting aroma of spices wafting through my kitchen, especially when I’m preparing my Authentic Jamaican Curry Chicken. The vibrant colors and rich flavors of this dish have a way of turning an ordinary night into a culinary adventure. Just the thought of tender chicken bathing in creamy coconut milk, accented by the heat of scotch bonnet peppers, gets my taste buds dancing.

I originally discovered this amazing recipe during a trip to Jamaica, where the locals shared their passion for hearty, homemade meals bursting with flavor. It quickly became a staple in my own kitchen—a solution to those evenings when I crave a break from the fast-food routine. The beauty of this dish lies in its simplicity; loaded with fresh vegetables and a medley of spices, it’s both easy to cook and wonderfully satisfying.

So, whether you’re impressing guests or just treating yourself to something special, join me as we create a vibrant bowl of Authentic Jamaican Curry Chicken that’s sure to spice up your dinner table!

Why You'll Love This Authentic Jamaican Curry Chicken

  • This recipe is a breeze to prepare, allowing you to create a delicious meal without spending hours in the kitchen.
  • The bold and vibrant flavors will transport your taste buds straight to the Caribbean with every bite.
  • Versatile enough to serve on various occasions, this dish can easily impress both family and friends or be enjoyed as a comforting weeknight dinner.
  • Plus, the stunning visual appeal of the colorful ingredients makes it as delightful to look at as it is to eat.

Authentic Jamaican Curry Chicken Ingredients

For the Chicken
• Organic chicken – 3-4 lbs. skin removed for a lean, flavorful base.
• Browning (optional) – 1-2 Tbsps add rich color and depth to the dish.
• Jamaican Green Seasoning – 2-3 Tbsps for a burst of Caribbean flavor.
• Jamaican curry powder – 2 Tbsps to give the dish its signature taste.
• On Everything All-Purpose Blend – 2 tsps enhance the overall flavor profile.
• Sea salt – 1 teaspoon for essential seasoning.
• Smoked paprika – ½ teaspoon for a hint of smokiness.
• Extra virgin olive oil – 4 Tbsps helps to sauté the chicken perfectly.

For the Sauce and Vegetables
• Organic brown sugar – 2 Tbsps to balance the heat from the peppers.
• Coconut milk – 1 can (14 oz.) for creaminess and richness.
• Russet potatoes – 2 medium, peeled and cubed to add heartiness.
• Carrots – 2 medium, peeled and chopped for a touch of sweetness.
• Bell pepper – 1 medium, cored and chopped for color and crunch.
• Garlic – 3 cloves, minced to infuse robust flavor.
• Fresh ginger – 2 tsps minced to brighten up the dish.
• Scotch bonnet peppers – 1-3 pieces, adjust to taste for heat!
• Green onions – 2 pieces, lightly crushed or chopped for freshness.
• Fresh thyme – 2 sprigs to add an aromatic touch.
• Organic chicken stock – 1 cup, low-sodium to keep it healthy.
• Jamaican pepper sauce – 1 tablespoon for an extra kick.
• Ground allspice – 1 teaspoon for warm, complex flavors.
• Sea salt + black pepper – to taste for final seasoning.

Now that you’ve gathered your ingredients, you’re one step closer to delighting your family with this Authentic Jamaican Curry Chicken that captures the essence of sunshine and warmth. Get ready to enjoy a culinary journey right in your own kitchen!

How to Make Authentic Jamaican Curry Chicken

  1. Combine Ingredients: In a large bowl, toss the organic chicken with browning, Jamaican green seasoning, Jamaican curry powder, On Everything All-Purpose Blend, sea salt, smoked paprika, and olive oil. Ensure each piece is evenly coated for maximum flavor.

  2. Sear Chicken: Heat a large pot over medium heat and add the seasoned chicken. Cook it until uniformly browned on all sides, about 5-7 minutes, which will lock in those delicious flavors.

  3. Add Veggies and Sauce: Stir in organic brown sugar, coconut milk, cubed potatoes, chopped carrots, bell pepper, minced garlic, ginger, scotch bonnet peppers, green onions, fresh thyme, and chicken stock. The pot should be bubbling with colorful ingredients!

  4. Simmer: Bring the mixture to a boil, then reduce the heat to low. Let it simmer for 30-35 minutes, stirring occasionally, until the chicken is tender and the vegetables are soft. You’ll know it’s ready when the chicken falls off the bone!

  5. Adjust and Serve: Taste the curry and adjust the seasoning with additional salt and pepper if needed. Serve hot to enjoy a warming, aromatic dish that brings a taste of Jamaica to your table.

Optional: Serve with fluffy rice or warm naan for a complete meal.

Exact quantities are listed in the recipe card below.

Storage Tips for Authentic Jamaican Curry Chicken

Fridge: Store leftover Authentic Jamaican Curry Chicken in an airtight container for up to 3 days to keep it fresh and flavorful.

Freezer: For longer storage, freeze your curry in a freezer-safe container for up to 3 months. Make sure to cool it completely before freezing.

Reheating: When ready to enjoy, thaw overnight in the fridge and reheat gently on the stove over low heat, adding a splash of coconut milk if needed to revive the creamy texture.

Avoid Room Temperature: Don’t leave the curry out at room temperature for more than 2 hours to prevent spoilage.

Make Ahead Options

Preparing your Authentic Jamaican Curry Chicken in advance is a fantastic way to save time during busy weeknights! You can marinate the chicken with the browning, Jamaican green seasoning, curry powder, and spices up to 24 hours in advance, allowing those vibrant flavors to infuse deeply. Additionally, you can chop the vegetables (potatoes, carrots, and bell pepper) and store them in an airtight container in the refrigerator for up to 3 days. When you’re ready to cook, simply bring the marinated chicken to room temperature, combine with the vegetables and remaining ingredients in the pot, and follow the simmering instructions. This make-ahead approach ensures your meal is just as delicious while significantly cutting down on cooking time!

What to Serve with Authentic Jamaican Curry Chicken?

Transform your meal into a Caribbean feast with delightful pairings that complement the rich, spicy flavors of this dish.

  • Fluffy White Rice: Perfect for soaking up the creamy coconut curry, providing a blank canvas for the vibrant flavors.
  • Fried Plantains: Sweet and caramelized, these add a delicious contrast to the savory heat of the curry.
  • Rasta Pasta: A colorful, savory pasta dish, this brings a playful twist to your table while enhancing the meal’s overall flavor profile.

Serve with a side of stewed greens, allowing the earthy and slightly bitter notes to balance the bold spices beautifully.

  • Coleslaw: The crunch and tang of a fresh coleslaw can refresh your palate and provide a crisp texture that’s wonderful with the creamy curry.
  • Mango Chutney: A sweet and zesty chutney adds a delightful contrast, amplifying the dish’s tropical essence while cutting through the richness.
  • Pineapple Juice: A refreshing drink that balances the heat, it adds a sweet twist that echoes the Caribbean vibe.
  • Coconut Cream Pie: Finish with a light dessert that echoes the creamy flavors of the curry, offering a soothing end to your delightful meal.

Authentic Jamaican Curry Chicken Variations

Feel free to get creative with this dish and make it even more delectable to suit your family’s tastes!

  • Spicy Twist: Add 1-2 more scotch bonnet peppers for an extra kick, or use fresh jalapeños for a milder heat. Spice lovers will rejoice at this fiery upgrade!

  • Vegetable-Loaded: Toss in additional veggies like green beans or cauliflower for a nutrient boost, giving you more color and crunch. The more, the merrier in your curry pot!

  • Sweet Alternative: Substitute the organic brown sugar with honey or maple syrup for a natural sweetness that complements the spices beautifully. It’s a delightful twist that may surprise your palate.

  • Coconut-Free: For a lighter version, replace full-fat coconut milk with almond milk or chicken broth, but add a dollop of Greek yogurt before serving for creaminess. A change of pace that doesn’t skimp on flavor!

  • Herb Infusion: Experiment with different herbs like cilantro or parsley instead of thyme for a fresh flavor profile. It’s a simple swap that can refresh this classic dish!

  • Quinoa Base: Serve over a bed of fluffy quinoa instead of rice for a nutritious twist that adds a nutty texture. Your curry will become a superfood feast!

  • Protein Variations: Use chickpeas or lentils for a vegetarian version, or swap chicken for shrimp that cooks quickly and absorbs the spices beautifully. A win-win for non-meat eaters!

  • Slow-Cooked: Allow the ingredients to simmer in a slow cooker instead for a hands-off approach that results in fall-apart tender chicken. Just set it and forget it for a super convenient meal!

These variations will inspire you to craft a personalized version of Authentic Jamaican Curry Chicken that fits your family’s cravings. Enjoy the adventure of flavors!

Chef's Helpful Tips

  • When preparing Authentic Jamaican Curry Chicken, ensure to marinate the chicken for at least an hour, allowing the flavors to penetrate deeply.
  • A common mistake is not browning the chicken thoroughly; taking an extra 2-3 minutes can enhance the flavor significantly.
  • For a richer sauce, you can use full-fat coconut milk instead of lite to achieve a creamier texture.
  • Remember that simmering the curry for 30-35 minutes will not only tenderize the chicken but also meld the flavors beautifully, so resist the urge to rush this step.

Authentic Jamaican Curry Chicken Recipe FAQs

How do I choose the right chicken for this recipe?
Absolutely! For the best results, opt for organic chicken, ideally bone-in and skinless. This type adds extra flavor. Look for chicken that is firm and not discolored. If you can, choose pieces that have a fresh, pleasant smell.

What’s the best way to store leftover Authentic Jamaican Curry Chicken?
Store your leftover curry in an airtight container in the refrigerator for up to 3 days. Make sure it cools completely before sealing it; this keeps the flavors intact and prevents any sogginess.

Can I freeze Authentic Jamaican Curry Chicken?
Very! To freeze, allow the curry to cool completely. Portion it into freezer-safe containers or heavy-duty freezer bags. This keeps it fresh for up to 3 months. When you’re ready to enjoy it again, just thaw it overnight in the refrigerator before reheating gently on the stove.

What’s the best way to reheat the curry?
I often reheat my curry by slowly warming it on the stove over low heat. You may want to add a splash of coconut milk to bring back that creamy consistency. Stir occasionally until heated through, which usually takes around 5-10 minutes.

Are there dietary considerations with this recipe?
Certainly! This Authentic Jamaican Curry Chicken is gluten-free, but if you’re allergic to specific spices or ingredients like scotch bonnet peppers, you can substitute them or adjust the amount. Additionally, always verify your chicken stock and seasoning blends to ensure they meet your dietary needs.

What should I do if the curry is too spicy?
If your curry turns out to be a bit too spicy, don’t worry! You can add a little more coconut milk or stir in some sugar, which balances the heat. Alternatively, serve it over rice or with bread to help mellow out the spiciness.

Authentic Jamaican Curry Chicken

Authentic Jamaican Curry Chicken

This Authentic Jamaican Curry Chicken is a flavorful, comforting dish made with chicken, spices, and coconut milk.
Print Recipe Pin Recipe
Prep Time 15 minutes mins
Cook Time 35 minutes mins
Total Time 50 minutes mins
Servings: 4 servings
Course: DINNER RECIPES
Cuisine: Jamaican
Calories: 400
Ingredients Equipment Method Nutrition Notes

Ingredients
  

For the Chicken
  • 3-4 lbs Organic chicken skin removed
  • 1-2 Tbsps Browning optional
  • 2-3 Tbsps Jamaican Green Seasoning
  • 2 Tbsps Jamaican curry powder
  • 2 tsps On Everything All-Purpose Blend
  • 1 teaspoon Sea salt
  • 1/2 teaspoon Smoked paprika
  • 4 Tbsps Extra virgin olive oil
For the Sauce and Vegetables
  • 2 Tbsps Organic brown sugar
  • 1 can (14 oz) Coconut milk
  • 2 medium Russet potatoes peeled and cubed
  • 2 medium Carrots peeled and chopped
  • 1 medium Bell pepper cored and chopped
  • 3 cloves Garlic minced
  • 2 tsps Fresh ginger minced
  • 1-3 pieces Scotch bonnet peppers adjust to taste
  • 2 pieces Green onions lightly crushed or chopped
  • 2 sprigs Fresh thyme
  • 1 cup Organic chicken stock low-sodium
  • 1 tablespoon Jamaican pepper sauce
  • 1 teaspoon Ground allspice
  • Sea salt + black pepper to taste

Equipment

  • Large Bowl
  • Large pot

Method
 

Cooking Instructions
  1. In a large bowl, toss the organic chicken with browning, Jamaican green seasoning, Jamaican curry powder, On Everything All-Purpose Blend, sea salt, smoked paprika, and olive oil. Ensure each piece is evenly coated for maximum flavor.
  2. Heat a large pot over medium heat and add the seasoned chicken. Cook it until uniformly browned on all sides, about 5-7 minutes.
  3. Stir in organic brown sugar, coconut milk, cubed potatoes, chopped carrots, bell pepper, minced garlic, ginger, scotch bonnet peppers, green onions, fresh thyme, and chicken stock.
  4. Bring the mixture to a boil, then reduce the heat to low. Let it simmer for 30-35 minutes, stirring occasionally.
  5. Taste the curry and adjust the seasoning with additional salt and pepper if needed. Serve hot.

Nutrition

Serving: 1servingCalories: 400kcalCarbohydrates: 40gProtein: 30gFat: 20gSaturated Fat: 10gPolyunsaturated Fat: 3gMonounsaturated Fat: 5gCholesterol: 70mgSodium: 600mgPotassium: 800mgFiber: 4gSugar: 6gVitamin A: 500IUVitamin C: 40mgCalcium: 50mgIron: 2mg

Notes

Serve with fluffy rice or warm naan for a complete meal. Allow marination for at least an hour for enhanced flavor.

Tried this recipe?

Let us know how it was!

Filed Under: DINNER RECIPES

Crispy Hot Honey Feta Chicken

December 21, 2025 by JudyWhite Leave a Comment

There’s a joyous crunch that fills the air as the Crispy Hot Honey Feta Chicken bakes in the oven, making it impossible not to feel excited about dinner. Picture this: golden chicken coated in panko breadcrumbs, transforming into a crispy delight while a warm, spicy honey glaze bubbles enticingly on top. It’s a dish that invites you to elevate your typical weeknight meal with just a handful of pantry staples.

I discovered this recipe on a particularly hectic evening when I craved something comforting yet special—a culinary antidote to my fast-food fatigue. With just 40 minutes from prep to plate, this fantastic creation promises mouthwatering flavors without the fuss. It’s the kind of meal that draws everyone to the table, leaving friends and family raving about the perfect balance of sweet and heat. Whether you’re a seasoned chef or new to the kitchen, get ready to impress with this crispy, crowd-pleasing dish that might just become a weeknight staple!

Why You'll Love This Crispy Hot Honey Feta Chicken

  • This recipe is incredibly easy to make, allowing you to whip up a delightful meal in just 40 minutes.
  • The combination of crispy panko crumbs and the sweet-and-spicy honey glaze creates a flavor explosion that’s sure to please your taste buds.
  • Not only is this dish versatile enough to pair with various sides, but its stunning presentation will impress any dinner guest.
  • Plus, it’s a guaranteed crowd-pleaser, making it perfect for family meals or entertaining friends.

Crispy Hot Honey Feta Chicken Ingredients

For the Chicken

  • Boneless skinless chicken breasts – the star of this dish, tender and juicy.
  • All-purpose flour – provides a lovely base coating for extra crunch.
  • Large eggs – essential for binding the panko to the chicken, ensuring every bite is crispy.
  • Panko breadcrumbs – light and airy, they create that perfect crispy texture.

For the Seasoning

  • Garlic powder – adds a savory depth that complements the honey glaze.
  • Onion powder – brings a hint of sweetness and balances the flavors beautifully.
  • Paprika – introduces a mild smokiness that enhances the overall taste.
  • Salt – to taste, amplifying all the delicious flavors.
  • Pepper – a dash will add great warmth to the chickens’ coating.

For the Sweet and Spicy Glaze

  • Honey – the star of this glaze for that irresistible sweetness in the Crispy Hot Honey Feta Chicken.
  • Hot sauce – adjust to your desired spice level for the perfect kick.
  • Apple cider vinegar – adds a tang that cuts through the sweetness, creating a balanced flavor profile.

How to Make Crispy Hot Honey Feta Chicken

  1. Preheat the oven to 400°F (200°C) to ensure a crispy finish on your chicken. It’s important to have it hot and ready when the chicken is prepared!

  2. Prepare three bowls: one with all-purpose flour, another with beaten eggs, and the last with panko breadcrumbs mixed with garlic powder, onion powder, paprika, salt, and pepper. This setup makes coating easy and organized.

  3. Dredge each chicken breast first in the flour to create a base layer, then dip it in the egg for binding, and finally coat thoroughly in the seasoned panko breadcrumbs. This three-step process guarantees a delightful crunch.

  4. Arrange the coated chicken breasts on a baking sheet lined with parchment paper. Spacing them out allows for even baking and crispiness, so they don’t steam!

  5. Mix in a small bowl the honey, hot sauce, and apple cider vinegar until well combined. This glaze will add an irresistible sweet and spicy kick to your chicken.

  6. Drizzle the honey mixture generously over the chicken before baking. Be sure to cover each piece for that flavor contrast between the crispy coating and the sweet glaze.

  7. Bake in the preheated oven for about 25 minutes or until the chicken is golden brown and cooked through. Look for a crispy exterior and an internal temperature of 165°F (75°C).

Optional: Serve with a sprinkle of feta cheese on top for extra flavor.

Exact quantities are listed in the recipe card below.

How to Store and Freeze Crispy Hot Honey Feta Chicken

Fridge: Store any leftover Crispy Hot Honey Feta Chicken in an airtight container for up to 3 days. This keeps the chicken moist while preserving that delicious crispy coating.

Freezer: For longer storage, freeze the chicken in a single layer wrapped tightly in plastic wrap, then transfer to a freezer bag. It can last up to 3 months in the freezer.

Reheating: When you’re ready to enjoy the leftovers, reheat in the oven at 350°F (175°C) for about 10-15 minutes until warmed through and crispy again.

Tip: Avoid reheating in the microwave, as this can make the coating soggy.

Make Ahead Options

These Crispy Hot Honey Feta Chicken breasts are perfect for meal prep enthusiasts! You can prepare the chicken up to 24 hours in advance by following the coating steps, then layering the flour, egg, and panko breadcrumbs on the chicken. To maintain that delightful crunch, store the coated chicken in the refrigerator, covered tightly with plastic wrap. When ready to serve, drizzle the honey mixture over each piece and bake as directed—no need for thawing! This approach allows busy cooks to enjoy a delicious, hassle-free dinner while still maintaining all the flavors and textures that make this dish so special.

Crispy Hot Honey Feta Chicken Variations

Get ready to take your Crispy Hot Honey Feta Chicken to new heights with these fun and flavorful twists!

  • Gluten-Free: Use a gluten-free flour blend and panko to make this dish suitable for gluten-sensitive eaters. The crunchy texture will remain delightful!

  • Feta Cheese: Crumble feta cheese on top before baking to enhance the savory flavor of the chicken and add an extra layer of creaminess.

  • Crispy Baked Tofu: For a plant-based alternative, replace chicken with firm tofu sliced into steaks, following the same coating method for a satisfying crispy bite.

  • Zesty Lemon: Adding a sprinkle of fresh lemon zest to the honey glaze lends a refreshing tang that beautifully brightens the flavors.

  • Herbed Panko: Mix in fresh herbs like parsley or thyme with the panko breadcrumbs for an aromatic twist that’s bursting with flavor.

  • Buffalo Style: Swap out the hot sauce for your favorite buffalo sauce for a spicy, tangy kick that’s perfect for those who love heat.

  • Nuts for Crunch: Coarsely ground nuts, like almonds or pistachios, in the breadcrumb mixture can create a unique crunch and a nutty flavor profile.

  • Sweet & Spicy Peppers: Add finely chopped roasted red peppers or jalapeños to the honey glaze for an added touch of sweet and spicy goodness.

Each of these variations opens up a world of flavor possibilities and ensures that your dinner table will never feel boring again. Happy cooking!

What to Serve with Crispy Hot Honey Feta Chicken?

Your dinner table is about to transform into a cozy gathering spot, where the aromatic warmth of Honey Feta Chicken invites laughter and conversation.

  • Creamy Mashed Potatoes: The rich, buttery texture is a perfect vehicle for soaking up the honey glaze dripped from the chicken, creating a harmony of flavors.

  • Garlic Roasted Broccoli: This vibrant green side brings a delightful crunch and earthy flavor, balancing the sweetness of the chicken beautifully.

  • Crispy Brussels Sprouts: With their tender centers and crispy edges, these savory bites provide a robust contrast to the sweet and spicy chicken.

  • Coleslaw: A zesty, crunchy coleslaw adds a refreshing crunch and tang that brightens up every bite of the dish. The acidity cuts through the richness deliciously.

  • Citrusy Quinoa Salad: A light and refreshing salad with zesty citrus notes gives a burst of flavor that complements the warm spices of the chicken.

  • Honey-Glazed Carrots: Sweet and tender, these carrots mirror the honey theme while adding a lovely colorful pop to your plate.

  • Chilled Wine Spritzer: A refreshing spritzer with bubbles pairs perfectly with the dish, enhancing the sweet and spicy notes of the chicken with every sip.

  • Chocolate Chip Cookies: For dessert, these classic treats create a sweet finale to your meal, serving as a comforting reminder of home.

Chef's Helpful Tips

  • Ensure your oven is preheated to 400°F to achieve that crispy texture on your Crispy Hot Honey Feta Chicken.
  • When dredging the chicken, make sure to thoroughly coat it in flour before dipping it in the egg to create a solid base for the panko breadcrumbs.
  • Avoid overcrowding the baking sheet to prevent steam and ensure even browning; give each chicken breast some space.
  • For a variation in flavor, consider adjusting the hot sauce in the glaze to match your desired spiciness, and remember to check the chicken’s internal temperature to verify it’s cooked through at 165°F.

Crispy Hot Honey Feta Chicken Recipe FAQs

Which types of chicken are best for this recipe?
I highly recommend using boneless skinless chicken breasts for this Crispy Hot Honey Feta Chicken. They cook evenly and retain juicy tenderness while the exterior becomes beautifully crunchy. If you want something different, you can also use chicken thighs—just adjust the cooking time to ensure they reach 165°F (75°C).

How should I store leftover Crispy Hot Honey Feta Chicken?
Make sure to store any leftover chicken in an airtight container in the refrigerator for up to 3 days. This method helps maintain its moisture while keeping that delicious crispy coating intact. Just remember to let it cool completely before sealing to avoid condensation.

Can I freeze the cooked chicken?
Absolutely! To freeze your Crispy Hot Honey Feta Chicken, first wrap each piece tightly in plastic wrap, ensuring no air remains. Then, place the wrapped chicken in a labeled freezer bag for clarity. It will stay fresh for up to 3 months. When you’re ready to eat, simply thaw overnight in the fridge and reheat in the oven for the best texture.

What if my coating is soggy after baking?
Oh no! If you find your coating turns out soggy, it could be due to overcrowding on the baking sheet or not enough heat. Make sure to give each chicken breast enough space on the tray to avoid steaming. Also, ensure your oven is preheated properly to 400°F (200°C) before baking! If you encounter this problem, a quick fix is to pop the chicken back in the oven for a few extra minutes to crisp up the coating.

Can I use a gluten-free option for this recipe?
Certainly! You can substitute the all-purpose flour with a gluten-free flour blend and choose gluten-free panko breadcrumbs for the coating. The result will still bring that delightful crunch and incredible flavors to your plate. Just be sure to check all labels to avoid any hidden gluten.

Is this dish safe for pets?
While the Crispy Hot Honey Feta Chicken is safe for humans, it’s best to avoid sharing with pets due to the honey and hot sauce. These ingredients can be harmful to them, so it’s always wise to keep the spiciness and sweetness for yourself!

Crispy Hot Honey Feta Chicken

Crispy Hot Honey Feta Chicken

Crispy Hot Honey Feta Chicken combines golden chicken coated in panko with a warm honey glaze for a mouthwatering delight.
Print Recipe Pin Recipe
Prep Time 15 minutes mins
Cook Time 25 minutes mins
Total Time 40 minutes mins
Servings: 4 pieces
Course: DINNER RECIPES
Cuisine: American
Calories: 360
Ingredients Equipment Method Nutrition Notes

Ingredients
  

For the Chicken
  • 4 pieces Boneless skinless chicken breasts the star of this dish, tender and juicy
  • 1 cup All-purpose flour provides a lovely base coating for extra crunch
  • 2 large eggs essential for binding the panko to the chicken
  • 1 cup Panko breadcrumbs light and airy for perfect crispy texture
For the Seasoning
  • 1 teaspoon Garlic powder adds savory depth
  • 1 teaspoon Onion powder brings hint of sweetness
  • 1 teaspoon Paprika introduces mild smokiness
  • to taste Salt amplifying all the flavors
  • to taste Pepper adds warmth to the coating
For the Sweet and Spicy Glaze
  • 1/2 cup Honey the star of the glaze
  • 2 tablespoons Hot sauce adjust to desired spice level
  • 1 tablespoon Apple cider vinegar adds tang

Equipment

  • Oven
  • Baking sheet
  • Mixing bowls
  • Whisk

Method
 

How to Make Crispy Hot Honey Feta Chicken
  1. Preheat the oven to 400°F (200°C) to ensure a crispy finish on your chicken.
  2. Prepare three bowls: one with all-purpose flour, another with beaten eggs, and the last with panko breadcrumbs mixed with garlic powder, onion powder, paprika, salt, and pepper.
  3. Dredge each chicken breast first in the flour, then dip it in the egg, and finally coat thoroughly in the seasoned panko breadcrumbs.
  4. Arrange the coated chicken breasts on a baking sheet lined with parchment paper.
  5. Mix in a small bowl the honey, hot sauce, and apple cider vinegar until well combined.
  6. Drizzle the honey mixture generously over the chicken before baking.
  7. Bake in the preheated oven for about 25 minutes or until the chicken is golden brown and cooked through.

Nutrition

Serving: 1pieceCalories: 360kcalCarbohydrates: 40gProtein: 30gFat: 15gSaturated Fat: 2.5gPolyunsaturated Fat: 0.5gMonounsaturated Fat: 4gCholesterol: 100mgSodium: 600mgPotassium: 500mgFiber: 1gSugar: 10gVitamin A: 200IUCalcium: 20mgIron: 1.5mg

Notes

Optional: Serve with a sprinkle of feta cheese on top for extra flavor.

Tried this recipe?

Let us know how it was!

Filed Under: DINNER RECIPES

Marry Me Butter Beans

December 21, 2025 by JudyWhite Leave a Comment

There’s something truly delightful about inviting a bit of romance into your weeknight meals, and this Marry Me Butter Beans recipe does just that. Picture this: the moment you sauté shallots and garlic in rich olive oil, your kitchen fills with an irresistible aroma, teasing your taste buds long before the first bite. This dish not only bursts with flavor but also offers a unique blend of creamy butter beans, vibrant greens, and the tanginess of fresh lemon.

As someone who often craves hearty, homemade meals instead of the usual fast-food fare, I’ve found this recipe to be a game-changer. It’s quick to prepare, assuming just 35 minutes of your time, yet it feels luxurious enough to serve at any gathering or cozy dinner for two. With layers of flavor from sundried tomatoes and a kick from Calabrian chili paste, you’ll be surprised at how effortlessly impressive this dish becomes. Get ready to marry your taste buds with a delightful bowl of buttery goodness that’s sure to steal hearts!

Why You'll Love This Marry Me Butter Beans

  • This Marry Me Butter Beans recipe is incredibly easy to whip up, making it perfect for busy weeknights or last-minute gatherings.
  • You’ll adore the rich and comforting flavors that come together in just 35 minutes, keeping you satisfied without spending hours in the kitchen.
  • Its versatility allows you to enjoy it as a main dish or a side, and you can easily customize it with your favorite greens or spices.
  • The vibrant colors and enticing aromas will captivate your guests, making this dish a true crowd-pleaser that never fails to impress.

Marry Me Butter Beans Ingredients

Unlock the secrets to this romantic dish!

For the Base
• Olive oil or vegan butter – A rich foundation that enhances all flavors.
• Calabrian chili paste (optional) – Adds a delightful kick; adjust to your heat preference.
• Shallots or small onion – Finely diced for a sweet and aromatic base.
• Garlic – Minced to bring an irresistible fragrance to your dish.

For the Flavor
• Paprika – Offers a smoky undertone that deepens the flavor profile.
• Sundried tomatoes – Their concentrated sweetness elevates the dish considerably.
• Tomato paste – Adds depth and richness, making the butter beans shine.
• Vegetable broth – Provides moisture and balances the dish while keeping it plant-based.
• Italian seasoning – A fragrant blend that ties all the flavors together.

For the Goodness
• Butter beans – Creamy texture and protein-rich; definitely the star of Marry Me Butter Beans!
• Kale or spinach – A handful boosts the nutrition and color of your dish.
• Cashew cream – Creamy richness that makes each bite heavenly.
• Vegan parmesan – Adds a cheesy texture and flavor without the dairy.
• Fresh basil – Chopped for brightening up the dish and adding freshness.
• Lemon juice – A squeeze brings out the flavors, balancing the creaminess perfectly.

How to Make Marry Me Butter Beans

  1. Heat olive oil or vegan butter in a pan over medium heat. This sets the stage for the delicious flavors to come, creating a warm and inviting base for your dish.

  2. Sauté the diced shallots or small onion until translucent. Allow about 3-4 minutes for them to soften and release their natural sweetness, making your kitchen smell heavenly!

  3. Stir in the minced garlic and cook for about 1 minute until fragrant. This is your aromatic boost, transforming your dish with a delightful garlicky aroma.

  4. Add paprika, chopped sundried tomatoes, and tomato paste; cook for another 2 minutes. This step intensifies the flavors, giving your dish a beautiful depth and color.

  5. Pour in the vegetable broth and stir well. This adds moisture and creates a lovely base for your creamy beans to absorb all the deliciousness.

  6. Mix in the Italian seasoning and butter beans; combine gently. You’re aiming for a cozy, integrated texture that harmonizes all the wonderful flavors.

  7. Fold in the sliced kale or spinach and cook until wilted, about 2-3 minutes. Watch for that vibrant green color; it means your dish is packed with nutrition!

  8. Stir in the cashew cream and cook until heated through, about 3 minutes. This step brings creaminess and indulgence into every single bite.

  9. Remove from heat and mix in shredded vegan parmesan, chopped basil, and lemon juice. This final touch elevates the dish, bringing freshness and an irresistible zing.

Optional: Serve with crusty bread for a delightful meal experience!
Exact quantities are listed in the recipe card below.

Make Ahead Options

These Marry Me Butter Beans are a splendid choice for meal prep enthusiasts! You can sauté the shallots, garlic, and spices up to 24 hours in advance and store them in an airtight container in the fridge. Additionally, mix the cooked butter beans, kale (or spinach), and cashew cream, refrigerating them separately for freshness. When you’re ready to enjoy your dish, simply heat the sautéed mixture in a pan, stir in the prepped components, and cook until warm, about 5-7 minutes. This ensures the flavors meld beautifully while keeping your meal just as delicious as when freshly made. Enjoy the ease of having a hearty, homemade meal ready in minutes!

How to Store and Freeze Marry Me Butter Beans

Fridge: Store leftover Marry Me Butter Beans in an airtight container for up to 3 days. Reheat gently on the stovetop or in the microwave, adding a splash of vegetable broth if needed.

Freezer: This dish freezes wonderfully! Transfer cooled Marry Me Butter Beans to a freezer-safe container and freeze for up to 3 months. Thaw overnight in the fridge before reheating.

Reheating: When ready to enjoy, reheat in a saucepan over low heat, stirring occasionally, until warmed through. You may want to add a little extra cashew cream or broth for creaminess.

Serving Suggestions: Pair reheated beans with fresh basil or a squeeze of lemon juice for an extra zing just before serving.

Marry Me Butter Beans Variations

Feel free to customize your Marry Me Butter Beans to match your taste and dietary needs!

  • Spicy Kick: Increase the Calabrian chili paste for a fiery version that warms the soul.

  • Creamy Dream: Substitute cashew cream with coconut cream for a tropical twist that enhances creaminess.

  • Herbal Delight: Swap basil for fresh cilantro or parsley, adding a new dimension of freshness to the dish.

  • Protein Boost: Add cooked lentils or chickpeas for extra protein and heartiness, making the meal even more satisfying.

  • Nut-Free Option: Omit cashew cream and replace it with silken tofu blended until smooth for a nut-free alternative.

  • Smoky Flavor: Incorporate a dash of liquid smoke or smoked paprika to bring a delightful smokiness to this dish.

  • Zesty Twist: Add some lime juice instead of lemon for a vibrant fresh taste that’s perfect for summer dining.

  • Whole Grain Goodness: Serve over a bed of quinoa or farro instead of just on its own, adding texture and nutritional value.

Each variation invites you to play with flavors and make this dish uniquely yours!

What to Serve with Marry Me Butter Beans?

Imagine a dinner that delights all your senses and leaves you savoring every bite, perfectly complementing this creamy dish.

  • Crusty Bread: A warm, crunchy loaf is perfect for soaking up every luscious drop of butter bean goodness. It creates a satisfying, hearty meal that warms the soul.

  • Simple Green Salad: A refreshing mix of greens, cucumbers, and a tangy vinaigrette adds a bright contrast to the creamy beans. This pairing not only balances the meal but also introduces a crisp texture that harmonizes beautifully.

  • Roasted Vegetables: Caramelized veggies like zucchini, bell peppers, or carrots bring out natural sweetness and add vibrant color to your plate. Their earthy flavors and slight sweetness perfectly offset the richness of the beans.

  • Quinoa Pilaf: Nutty quinoa tossed with herbs and citrus makes for a nutritious and textured side dish. Its lightness contrasts nicely with the creaminess of the butter beans, creating a delightful medley of flavors.

  • Stuffed Bell Peppers: These make an impressive side, filled with rice, beans, and spices. The smoky taste and tender texture will elevate your meal and offer a unique twist alongside Marry Me Butter Beans.

  • Sparkling Lemonade: Refreshing and bubbly, this drink complements the dish’s flavors while offering a kick of citrus that enhances the creaminess of the beans. It’s a delightful sip to accompany your delicious meal.

  • Chocolate Avocado Mousse: For dessert, this creamy, decadent treat is a surprise finish. The rich, fudgy texture will leave you and your loved ones craving more, making your romantic meal truly unforgettable.

Chef's Helpful Tips

  • When making Marry Me Butter Beans, ensure to finely dice your shallots to achieve a sweet and aromatic base that cooks evenly.
  • Avoid overcooking the garlic as it can turn bitter; just cook until fragrant to keep its wonderful flavor intact.
  • When folding in the kale or spinach, keep an eye on the heat to prevent overcooking, as you want the greens to remain vibrant and nutritious.
  • Finally, letting the cashew cream heat gently ensures it blends seamlessly into the dish without curdling or separating.

Marry Me Butter Beans Recipe FAQs

What type of butter beans should I use?
I recommend using canned butter beans for convenience, but if you’re feeling adventurous, dried butter beans work too! Just soak them overnight and cook until tender before adding them to your recipe.

How do I know when the shallots are ready?
Sauté your diced shallots or onion until they’re translucent, which typically takes about 3-4 minutes over medium heat. They should look soft but not browned, as this will continue the sweet and aromatic base of your Marry Me Butter Beans.

How long can I store Marry Me Butter Beans in the refrigerator?
You can store the leftovers in an airtight container in the fridge for up to 3 days. When reheating, if you find they’ve thickened up, just add a splash of vegetable broth to bring back that creamy consistency!

Can I freeze Marry Me Butter Beans? How should I do it?
Absolutely! To freeze, let your Marry Me Butter Beans cool completely first. Then, transfer them to a freezer-safe container, ensuring an airtight seal. They’ll keep well for up to 3 months. When you’re ready to enjoy, simply thaw overnight in the fridge and reheat gently on the stove.

Are there any dietary considerations I should be aware of?
This dish is plant-based and suitable for vegans, but if you have nut allergies, you might want to substitute the cashew cream with coconut cream or a soy-based alternative. Always feel free to adjust the seasoning to fit your dietary preferences!

What happens if I overcook the garlic or greens?
If garlic is overcooked, it can develop a bitter taste, while overcooked greens will lose their vibrant color and nutritional value. Cook the garlic until it’s fragrant (about 1 minute) and add the kale or spinach, cooking them just until wilted (about 2-3 minutes) for the best flavor and texture.

Marry Me Butter Beans

Marry Me Butter Beans

This Marry Me Butter Beans recipe offers a creamy blend of butter beans, vibrant greens, and tangy lemon, perfect for a romantic weeknight meal.
Print Recipe Pin Recipe
Prep Time 10 minutes mins
Cook Time 25 minutes mins
Total Time 35 minutes mins
Servings: 4 servings
Course: DINNER RECIPES
Cuisine: Italian
Calories: 350
Ingredients Equipment Method Nutrition Notes

Ingredients
  

For the Base
  • 2 tablespoons Olive oil or vegan butter
  • 1 tablespoon Calabrian chili paste optional
  • 1 medium Shallots or small onion finely diced
  • 3 cloves Garlic minced
For the Flavor
  • 1 teaspoon Paprika
  • 1/2 cup Sundried tomatoes chopped
  • 2 tablespoons Tomato paste
  • 1 cup Vegetable broth
  • 1 teaspoon Italian seasoning
For the Goodness
  • 2 cups Butter beans
  • 1 cup Kale or spinach sliced
  • 1/2 cup Cashew cream
  • 1/4 cup Vegan parmesan shredded
  • 1/4 cup Fresh basil chopped
  • 1 tablespoon Lemon juice

Equipment

  • pan

Method
 

How to Make Marry Me Butter Beans
  1. Heat olive oil or vegan butter in a pan over medium heat.
  2. Sauté the diced shallots or small onion until translucent for about 3-4 minutes.
  3. Stir in the minced garlic and cook for about 1 minute until fragrant.
  4. Add paprika, chopped sundried tomatoes, and tomato paste; cook for another 2 minutes.
  5. Pour in the vegetable broth and stir well.
  6. Mix in the Italian seasoning and butter beans; combine gently.
  7. Fold in the sliced kale or spinach and cook until wilted, about 2-3 minutes.
  8. Stir in the cashew cream and cook until heated through, about 3 minutes.
  9. Remove from heat and mix in shredded vegan parmesan, chopped basil, and lemon juice.

Nutrition

Serving: 1bowlCalories: 350kcalCarbohydrates: 45gProtein: 12gFat: 15gSaturated Fat: 4gPolyunsaturated Fat: 1gMonounsaturated Fat: 9gSodium: 500mgPotassium: 800mgFiber: 10gSugar: 3gVitamin A: 500IUVitamin C: 30mgCalcium: 80mgIron: 3mg

Notes

Serve with crusty bread for a delightful meal experience.

Tried this recipe?

Let us know how it was!

Filed Under: DINNER RECIPES

Baked Feta Pasta

December 21, 2025 by JudyWhite Leave a Comment

The kitchen is my favorite place to unwind, and nothing brings me more joy than discovering an easy, crowd-pleasing dish like Baked Feta Pasta. Picture this: fresh grape tomatoes bursting with sweetness, mingling with fragrant garlic, all smothered in creamy, golden feta cheese. The best part? It all comes together with minimal fuss. As the aroma wafts through my home, everyone gathers in anticipation, eager to dig into this comforting meal.

I stumbled upon this recipe during one of those evenings when I wanted something delicious but didn’t want to spend hours in the kitchen. With a few kitchen staples and some vibrant greens, I crafted a pasta dish that boasts wonderful layers of flavor and texture. This Baked Feta Pasta is the perfect answer to the monotonous takeout cycle. Whether you’re hosting a cozy dinner party or just craving a feel-good meal at home, this dish is sure to impress and satisfy. Ready to let your oven do the work? Let’s dive into the recipe!

Why You'll Love This Baked Feta Pasta

  • This Baked Feta Pasta is incredibly easy to make, requiring just a few simple ingredients and minimal preparation time.
  • The rich and creamy feta mingles perfectly with the sweet roasted tomatoes, creating a delicious sauce that everyone will rave about.
  • Its versatility allows you to customize it with any vegetables or pasta shapes you have on hand, while still maintaining its comforting appeal.
  • Visually, the vibrant colors of the tomatoes and greens create a stunning dish that will delight your guests and family alike.

Baked Feta Pasta Ingredients

For the Base

  • 20 oz grape tomatoes – these juicy gems burst with sweetness when baked, elevating the dish.
  • 5 cloves garlic (peeled and halved) – roasting garlic adds a rich, aromatic depth that complements the feta beautifully.
  • 1/2 cup extra-virgin olive oil – a must for drizzling, it enriches the sauce while roasting the veggies.
  • Salt and freshly ground black pepper – season to taste to enhance all the flavors of the baked feta pasta.

For the Pasta

  • 7-8 oz feta cheese (drained) – this creamy cheese transforms into a luscious sauce when baked, bringing everything together.
  • 10 oz dry pasta (such as campanelle, rigatoni, rotini, penne, bow tie, or cavatappi) – choose your favorite shape for delightful bites.

For the Greens

  • 8 oz spinach (roughly chopped) – a wonderful way to sneak in some greens; it wilts beautifully into the pasta.
  • 1/4 cup fresh basil (thinly sliced) – adds a burst of freshness and an aromatic lift to your meal.
  • 2 Tbsp fresh parsley (minced) – enhances flavor and adds a lovely pop of green.

For the Heat

  • 1/4 tsp crushed red pepper flakes (or more to taste) – a pinch adds just the right amount of warmth to balance the dish.

For the Sauce

  • 1/2 cup reserved pasta water – use it to adjust the sauce consistency, making it creamy and delicious for your baked feta pasta.

How to Make Baked Feta Pasta

  1. Preheat the oven to 400°F (200°C).
    This step ensures your tomatoes and feta get beautifully roasted and meld together with rich flavors.

  2. Combine grape tomatoes and garlic in a baking dish, then drizzle with olive oil and season with salt and pepper.
    Toss everything together to make sure the tomatoes and garlic are coated evenly, creating a delicious base.

  3. Center the feta cheese in the dish with the tomatoes and garlic.
    This will allow the feta to soak up all the flavors while it cooks, becoming wonderfully creamy and decadent.

  4. Bake in the preheated oven for about 30 minutes, or until the tomatoes have burst and the feta is golden.
    You’ll know it’s done when the kitchen fills with an irresistible aroma!

  5. Cook the dry pasta according to package instructions until al dente.
    Remember to reserve 1/2 cup of the pasta water before draining; this is key for your sauce!

  6. Remove the baking dish from the oven, then add the cooked pasta, spinach, basil, parsley, and crushed red pepper flakes.
    Toss everything together, adding reserved pasta water as needed to create a creamy sauce that coats every bite.

  7. Serve warm, and enjoy the delightful combination of flavors!
    This dish is best enjoyed fresh, with everyone gathering around the table!

Optional: Sprinkle with additional crushed red pepper for extra heat!
Exact quantities are listed in the recipe card below.

Make Ahead Options

These Baked Feta Pasta ingredients are fantastic for meal prep! You can assemble the grape tomatoes, garlic, and feta in the baking dish and store it in the refrigerator for up to 24 hours before baking. This ensures all the flavors meld together beautifully. You can also cook the pasta ahead of time; just toss it with a touch of olive oil to prevent sticking, and refrigerate for up to 3 days. When ready to enjoy, simply bake the prepared dish according to the recipe, then combine with the cooked pasta, spinach, and herbs, adding reserved pasta water as needed. Following these tips, your Baked Feta Pasta will be just as delicious, saving you precious time on busy evenings!

How to Store and Freeze Baked Feta Pasta

Room Temperature: Allow Baked Feta Pasta to cool to room temperature before storing, but it’s best consumed fresh to enjoy its delightful flavors.

Fridge: Store leftovers in an airtight container in the fridge for up to 3 days. Reheat gently on the stove or microwave, adding a splash of pasta water to restore creaminess.

Freezer: You can freeze Baked Feta Pasta for up to 2 months. Portion it into airtight containers, letting it cool completely first. Thaw in the fridge overnight before reheating.

Reheating: To reheat, use the stove or microwave, adding reserved pasta water as needed to bring the sauce back to life for a creamy finish!

What to Serve with Baked Feta Pasta?

As the comforting aroma of baked feta fills the kitchen, it’s time to consider what delightful sides and accompaniments will elevate this glorious meal.

  • Garlicky Bruschetta: Topped with fresh tomatoes and basil, this vibrant appetizer lightens the palate and adds a fresh zing.

  • Herbed Garlic Bread: Crispy and buttery, it’s perfect for savoring every last bit of that creamy feta sauce.

  • Mixed Green Salad: A simple tossed salad with a tangy vinaigrette adds a refreshing crunch, balancing the richness of the pasta.

  • Oven-Roasted Vegetables: Seasoned with herbs and olive oil, these bring depth and contrast, perfectly complementing the dish’s flavors.

  • Crispy Roasted Chickpeas: Crunchy and packed with flavor, these make a delightful snack or side, adding a fun texture to your meal.

  • Chilled White Wine: A glass of Sauvignon Blanc or Pinot Grigio pairs perfectly, enhancing the meal’s freshness and cut through the creaminess.

  • Creamy Polenta: Comforting and versatile, it offers a creamy base that pairs exquisitely with the baked feta pasta.

  • Lemon Sorbet: To cleanse the palate, a refreshing dessert like this will leave everyone feeling delightful after a hearty meal.

Baked Feta Pasta Variations

Feel free to play around with these variations to make the dish your own and delight your taste buds!

  • Vegetarian Delight: Add more vegetables like zucchini or bell peppers for a colorful twist that packs a nutritious punch.
  • Herb-Infused: Swap in fresh oregano or thyme for a fragrant flavor profile that will transport you to the Mediterranean.
  • Creamy Ricotta: Substitute ricotta for feta for a rich and creamy texture that adds a subtle sweetness to every bite.
  • Pasta Choices: Experiment with gluten-free pasta or whole-grain options to cater to dietary needs while maintaining taste.
  • Zesty Lemon: Squeeze fresh lemon juice before serving for a bright, tangy finish that elevates the flavors beautifully.
  • Spicy Kick: Add chopped jalapeños or a dash of hot sauce for those who like their pasta with a bit of heat.
  • Nutty Crunch: Toss in some toasted pine nuts or walnuts for an unexpected crunch that adds depth to the dish.
  • Pesto Perk: Mix in a spoonful of basil pesto to the sauce for an herby, garlicky boost that will impress your guests.

Chef's Helpful Tips

  • Always use good quality extra-virgin olive oil in your Baked Feta Pasta for the best flavor enhanced by roasting.
  • To prevent the tomatoes from burning, make sure they are well-coated with oil and tossed in the dish before baking.
  • If you’re using different pasta shapes, keep in mind that cooking times may vary, so check the package instructions closely.
  • For a creamier sauce, gradually add your reserved pasta water a little at a time until you achieve the desired consistency.

Baked Feta Pasta Recipe FAQs

What kind of tomatoes should I use for Baked Feta Pasta?
Absolutely stick with grape tomatoes for this recipe! Their sweetness intensifies when roasted, creating a delicious burst of flavor. If you can’t find grape tomatoes, feel free to substitute with cherry tomatoes, as they offer similar sweetness and juiciness.

How should I store leftover Baked Feta Pasta?
Store any leftovers in an airtight container in the refrigerator for up to 3 days. It’s best when enjoyed fresh, but if you have extras, just reheat gently on the stove or in the microwave, adding a splash of reserved pasta water to revive the creamy texture.

Can I freeze Baked Feta Pasta?
Yes, you can freeze Baked Feta Pasta for up to 2 months. Portion it into airtight containers, making sure it’s completely cooled before freezing. When you’re ready to enjoy it again, thaw it in the fridge overnight and reheat on the stove, adding reserved pasta water as needed to bring back the creaminess.

What if my sauce is too thick after cooking?
If you find your sauce is thicker than desired, don’t worry! Just add a little of the reserved pasta water in small increments while gently stirring. This will help create a luscious, creamy sauce that coats the pasta beautifully. Always incorporate the water gradually to reach your preferred consistency without making it too watery.

Are there any dietary considerations for Baked Feta Pasta?
If you’re accommodating dietary restrictions, you might want to substitute feta cheese with a non-dairy alternative to cater to vegan diets. Always check labels for allergens if you’re cooking for someone with allergies, especially to dairy or gluten, as different pasta shapes may contain wheat.

How do I choose the right pasta for Baked Feta Pasta?
The more the merrier when it comes to pasta shapes! You can use campanelle, rigatoni, rotini, penne, bow tie, or cavatappi. Just make sure to follow the cooking instructions on the pasta package for perfect al dente results. If you opt for a whole wheat or gluten-free pasta, adjust the cooking time as necessary.

Baked Feta Pasta

Baked Feta Pasta

Baked Feta Pasta is a delicious, crowd-pleasing dish featuring roasted tomatoes and creamy feta, perfect for a cozy dinner.
Print Recipe Pin Recipe
Prep Time 10 minutes mins
Cook Time 30 minutes mins
Total Time 40 minutes mins
Servings: 4 servings
Course: DINNER RECIPES
Cuisine: Italian
Calories: 350
Ingredients Equipment Method Nutrition Notes

Ingredients
  

For the Base
  • 20 oz grape tomatoes these juicy gems burst with sweetness when baked
  • 5 cloves garlic peeled and halved
  • 1/2 cup extra-virgin olive oil for drizzling
  • Salt to taste
  • freshly ground black pepper to taste
For the Pasta
  • 7-8 oz feta cheese drained
  • 10 oz dry pasta such as campanelle, rigatoni, rotini, penne, bow tie, or cavatappi
For the Greens
  • 8 oz spinach roughly chopped
  • 1/4 cup fresh basil thinly sliced
  • 2 Tbsp fresh parsley minced
For the Heat
  • 1/4 tsp crushed red pepper flakes or more to taste
For the Sauce
  • 1/2 cup reserved pasta water

Equipment

  • Baking dish
  • Pot

Method
 

Directions
  1. Preheat the oven to 400°F (200°C).
  2. Combine grape tomatoes and garlic in a baking dish, then drizzle with olive oil and season with salt and pepper.
  3. Center the feta cheese in the dish with the tomatoes and garlic.
  4. Bake in the preheated oven for about 30 minutes, or until the tomatoes have burst and the feta is golden.
  5. Cook the dry pasta according to package instructions until al dente, reserving 1/2 cup of the pasta water before draining.
  6. Remove the baking dish from the oven, then add the cooked pasta, spinach, basil, parsley, and crushed red pepper flakes.
  7. Toss everything together, adding reserved pasta water as needed to create a creamy sauce that coats every bite.
  8. Serve warm, and enjoy the delightful combination of flavors!

Nutrition

Serving: 1servingCalories: 350kcalCarbohydrates: 50gProtein: 12gFat: 15gSaturated Fat: 5gPolyunsaturated Fat: 2gMonounsaturated Fat: 8gCholesterol: 30mgSodium: 500mgPotassium: 800mgFiber: 3gSugar: 5gVitamin A: 5000IUVitamin C: 20mgCalcium: 200mgIron: 2mg

Notes

Best enjoyed fresh, with everyone gathering around the table! Sprinkle with additional crushed red pepper for extra heat if desired.

Tried this recipe?

Let us know how it was!

Filed Under: DINNER RECIPES

Chicken Enchilada Soup

December 21, 2025 by JudyWhite Leave a Comment

The moment the first chill of autumn arrives, I crave something warm, comforting, and bursting with flavor. That’s when my Chicken Enchilada Soup becomes my go-to recipe, a dish that has truly elevated my weeknight meals. The sizzle of the onion and jalapeño mingling in a pot creates a symphony of scents that can lift anyone’s spirits, transforming my kitchen into a cozy oasis.

This soul-warming soup isn’t just good for the soul—it’s also a breeze to make! With just 10 minutes of prep and a total cooking time of 35 minutes, I can whip up a hearty meal that feeds the whole family. Each spoonful is a delightful marriage of zesty enchilada sauce, creamy cheeses, and tender pieces of chicken. Trust me, it’s a dish that has turned my friends into soup enthusiasts, captivating even the pickiest eaters among us. So let’s dive in and transform your dinner routine with this simple yet irresistible Chicken Enchilada Soup!

Why You'll Love This Chicken Enchilada Soup

  • This Chicken Enchilada Soup is incredibly easy to make, allowing you to enjoy a delicious meal without spending hours in the kitchen.
  • The bold flavors will excite your taste buds, combining rich enchilada sauce with creamy cheeses for a truly satisfying experience.
  • It’s versatile enough to suit various dietary preferences by adding or substituting ingredients as needed.
  • Plus, the vibrant colors and inviting aroma make it a visually stunning dish that is sure to impress your family and friends.

Chicken Enchilada Soup Ingredients

• Get ready for a flavor-packed experience!

For the Spices

  • Chili powder – adds depth and warmth to your soup.
  • Mustard powder – provides a subtle tang that enhances the flavor profile.
  • Garlic powder – boosts the savory notes in the chicken enchilada soup.
  • Onion powder – complements the fresh onion for an extra layer of taste.
  • Cumin – a key ingredient that imparts a comforting earthiness.
  • Cinnamon – a pinch brings a surprising hint of sweetness.
  • Cayenne pepper – adjust this for your desired spice level; a little goes a long way.

For the Base

  • Butter – adds richness and depth to the soup’s flavor.
  • Olive oil – helps in sautéing the vegetables for a delightful aroma.
  • Yellow onion, diced – a classic base for flavor in many dishes; it caramelizes beautifully.
  • Jalapeno pepper, diced – brings a kick of heat; remove seeds for less spice.
  • Garlic, minced – essential for a robust, aromatic foundation.

For the Soup

  • Red enchilada sauce – the star of the dish, lending vibrant flavor.
  • Diced tomatoes with green chilies – adds freshness and a zesty punch; do not drain.
  • Black beans – provides protein and texture; rinse to reduce sodium content.
  • Canned whole kernel corn – sweet pops of corn balance the spices; drain before adding.
  • Hot sauce (optional) – customize the heat to your taste preference.
  • Chicken broth – forms the comforting liquid base of your soup.
  • Boneless skinless chicken breast – ensures tender meat that shreds beautifully.

For the Creaminess

  • Cream cheese, cubed and softened – results in a rich and creamy texture.
  • Cheddar cheese, shredded – melty goodness that adds sharpness to the soup.
  • Monterey Jack cheese, shredded – provides a smooth and creamy finish.

How to Make Chicken Enchilada Soup

  1. Combine spices: Gather all the seasoning ingredients like chili powder and cumin, mixing them well in a small bowl. Set aside and let the cream cheese soften at room temperature for easier incorporation.

  2. Sauté vegetables: Heat the butter and olive oil in a large soup pot over medium heat. Add the diced onions and jalapeño pepper, cooking for about 4 minutes until soft. Stir in the minced garlic for an additional minute until fragrant.

  3. Add chicken and ingredients: Pat chicken dry and season both sides with salt and pepper. Place it into the soup pot along with the red enchilada sauce, diced tomatoes (with juices), drained black beans, drained corn, chicken broth, and any hot sauce if desired.

  4. Cook chicken: Bring the soup to a gentle boil and let it simmer for about 15-20 minutes, allowing the chicken to cook through. Once done, remove the chicken and shred it using two forks, then return the shredded chicken to the pot.

  5. Incorporate cheese: Reduce heat to low and stir in the softened cream cheese until it’s fully blended. Next, add in the shredded cheddar and Monterey Jack cheeses, mixing until melted and creamy.

  6. Season and serve: Taste the soup and adjust seasoning if needed. Serve your creamy Chicken Enchilada Soup warm, and enjoy all the flavors!

Optional: Garnish with fresh cilantro or a dollop of sour cream for extra flair.

Exact quantities are listed in the recipe card below.

Chicken Enchilada Soup Variations

Feel free to personalize your Chicken Enchilada Soup with these fun twists and swaps that enhance flavor and suit your preferences!

  • Vegetarian: Substitute chicken with diced tofu or additional beans for a protein-packed, meat-free option. The robust flavors of the enchilada sauce will still shine through!

  • Spicy Kick: Add in more diced jalapeños or a few diced chipotle peppers in adobo sauce. This will give your soup a smoky, fiery depth, perfect for those who love the heat.

  • Dairy-Free: Use cashew cream instead of cream cheese and skip the cheese or use a dairy-free alternative. You can still achieve a rich texture without the dairy!

  • Corn Chowder Style: Toss in some diced potatoes for extra heartiness. These will soak up the delicious soup flavors while adding a comforting, creamy feel.

  • Roasted Veggies: Amp up your nutrient intake by adding roasted bell peppers, zucchini, or corn throughout the cooking process. Not only do they contribute vibrant colors, but they also enhance the flavor.

  • Herb Infusion: Fresh cilantro or lime juice stirred in just before serving brightens the soup and adds a fresh, zesty finish. Plus, a sprinkle of green onion offers an additional crunch!

  • Coconut Cream Twist: For a unique flavor profile, replace cream cheese with coconut cream. It adds a subtle sweetness and creaminess that beautifully contrasts the spices.

  • Quinoa Boost: Stir in cooked quinoa just before serving, elevating the nutritional content. This twist provides a delightful texture and ensures the soup remains hearty and filling.

How to Store and Freeze Chicken Enchilada Soup

Fridge: Store your Chicken Enchilada Soup in an airtight container for up to 3 days. Make sure it cools completely before sealing to maintain freshness.

Freezer: Portion the soup into freezer-safe containers to keep it for up to 3 months. Be sure to leave some space at the top, as the soup will expand when frozen.

Reheating: When ready to enjoy, thaw the soup overnight in the fridge, and reheat gently on the stove over medium-low heat until warmed through. Add a splash of chicken broth if needed for consistency.

Airtight Container: Always use a good-quality airtight container to preserve the rich flavors and creamy texture of your Chicken Enchilada Soup.

Make Ahead Options

These Chicken Enchilada Soup preparations are perfect for busy weeknights and meal prep! You can chop the onions, jalapeños, and garlic, and combine the spices up to 24 hours in advance. Simply store them in airtight containers in the refrigerator. The shredded chicken can also be cooked and stored in the soup to keep it flavorful; just refrigerate the soup for up to 3 days. When you’re ready to enjoy, reheat the soup gently on the stove over low heat, then stir in the cream cheese and shredded cheeses just before serving to ensure they melt beautifully, giving you that deliciously creamy texture. With a little prep, you’ll have a comforting meal ready in no time!

What to Serve with Chicken Enchilada Soup?

Elevate your cozy dinner experience with these delightful side dishes that perfectly complement the rich and zesty soup.

  • Crispy Tortilla Chips: Ideal for dipping, these crunchy bites add texture and enhance the flavor of the soup. A sprinkle of salt elevates the taste even further!

  • Fresh Guacamole: Smooth and creamy, guacamole provides a refreshing contrast to the hearty flavors of the enchilada soup. Scoop some up with tortilla chips for a perfect pairing.

  • Mexican Street Corn Salad: The sweetness of corn, combined with tangy lime and creamy cheese, creates a vibrant side that brightens the entire meal. It’s a colorful addition that’s sure to impress!

  • Avocado Salad: A light salad with ripe avocados, cherry tomatoes, and a squeeze of lime offers a fresh and zesty balance to the richness of the soup. It adds a burst of freshness to each bite.

  • Pineapple Jasmine Rice: Delicately sweet, this fragrant rice dish brings a tropical note, wonderfully complementing the robust flavors of the soup while providing a comforting side.

  • Chilled Watermelon Slices: Refreshing watermelon slices are perfect for cooling down the heat of your enchilada soup. Their juiciness offers a playful contrast and is a delightful surprise to the taste buds.

  • Classic Margaritas: For a festive touch, pair the dish with zesty margaritas to elevate the entire dining experience. The tangy lime complements the richness of the soup, creating an unbeatable combination.

Chef's Helpful Tips

  • When preparing Chicken Enchilada Soup, make sure to properly season the chicken before adding it to the pot for enhanced flavor.
  • Avoid rushing the sautéing process; allowing the onions and jalapeño to soften thoroughly builds a flavorful base.
  • For a creamier texture, ensure the cream cheese is fully softened at room temperature before mixing it into the soup.
  • Remember to keep an eye on the soup once it starts to boil, as simmering too aggressively can overcook the chicken and alter its tenderness.

Chicken Enchilada Soup Recipe FAQs

How do I select ripe ingredients for my Chicken Enchilada Soup?
Absolutely! For optimal flavor, choose fresh ingredients. Look for firm, vibrant jalapeños without dark spots and onions that are solid and dry. When selecting canned goods, avoid dented cans, and ensure your red enchilada sauce has a vibrant color without any separation.

How should I store leftover Chicken Enchilada Soup?
Store your Chicken Enchilada Soup in an airtight container in the fridge for up to 3 days. Make sure it cools to room temperature before sealing to preserve the flavor and prevent spoilage. You can easily enjoy it again by reheating!

Can I freeze Chicken Enchilada Soup?
Yes! Portion the soup into freezer-safe containers, leaving about an inch of space at the top because the soup expands as it freezes. It will stay fresh for up to 3 months. To thaw, simply transfer the container to the refrigerator overnight and reheat gently on the stove when you’re ready to enjoy!

What should I do if my soup is too thick?
If your Chicken Enchilada Soup turns out too thick, no worries! Gradually stir in a little chicken broth or water until you reach your desired consistency. This will help restore the creaminess while ensuring all those delicious flavors shine through!

Are there any dietary concerns I should keep in mind?
If you’re cooking for someone with dietary restrictions, be careful about allergies! This recipe contains dairy and can be high in sodium. Opt for low-sodium chicken broth and use dairy-free cream cheese alternatives if needed. Additionally, if your guests have a gluten sensitivity, check that your enchilada sauce is gluten-free!

Can I add more vegetables to my Chicken Enchilada Soup?
Very much so! The more the merrier! Incorporating vegetables like bell peppers, zucchini, or even spinach can add vibrant colors and extra nutrients. Just sauté them alongside the onion and jalapeño for a delicious twist on the classic recipe.

Chicken Enchilada Soup

Chicken Enchilada Soup

A comforting Chicken Enchilada Soup that warms you up with zesty flavors and creamy textures.
Print Recipe Pin Recipe
Prep Time 10 minutes mins
Cook Time 35 minutes mins
Total Time 45 minutes mins
Servings: 6 cups
Course: DINNER RECIPES
Cuisine: Mexican
Calories: 350
Ingredients Equipment Method Nutrition Notes

Ingredients
  

Spices
  • 2 tbsp chili powder
  • 1 tbsp mustard powder
  • 1 tbsp garlic powder
  • 1 tbsp onion powder
  • 2 tsp cumin
  • 1 pinch cinnamon
  • 1 tsp cayenne pepper adjust to taste
Base
  • 2 tbsp butter
  • 2 tbsp olive oil
  • 1 cup yellow onion, diced
  • 1 medium jalapeño pepper, diced remove seeds to reduce spice
  • 3 cloves garlic, minced
Soup
  • 2 cups red enchilada sauce
  • 1 can diced tomatoes with green chilies do not drain
  • 1 can black beans rinsed and drained
  • 1 can canned whole kernel corn drained
  • 1 tbsp hot sauce optional
  • 4 cups chicken broth
  • 1 lb boneless skinless chicken breast
Creaminess
  • 8 oz cream cheese, cubed and softened
  • 1 cup cheddar cheese, shredded
  • 1 cup Monterey Jack cheese, shredded

Equipment

  • large soup pot

Method
 

Preparation
  1. Combine spices: Gather all the seasoning ingredients like chili powder and cumin, mixing them well in a small bowl. Set aside and let the cream cheese soften at room temperature for easier incorporation.
  2. Sauté vegetables: Heat the butter and olive oil in a large soup pot over medium heat. Add the diced onions and jalapeño pepper, cooking for about 4 minutes until soft. Stir in the minced garlic for an additional minute until fragrant.
  3. Add chicken and ingredients: Pat chicken dry and season both sides with salt and pepper. Place it into the soup pot along with the red enchilada sauce, diced tomatoes (with juices), drained black beans, drained corn, chicken broth, and any hot sauce if desired.
  4. Cook chicken: Bring the soup to a gentle boil and let it simmer for about 15-20 minutes, allowing the chicken to cook through. Once done, remove the chicken and shred it using two forks, then return the shredded chicken to the pot.
  5. Incorporate cheese: Reduce heat to low and stir in the softened cream cheese until it's fully blended. Next, add in the shredded cheddar and Monterey Jack cheeses, mixing until melted and creamy.
  6. Season and serve: Taste the soup and adjust seasoning if needed. Serve your creamy Chicken Enchilada Soup warm, and enjoy all the flavors!

Nutrition

Serving: 1cupCalories: 350kcalCarbohydrates: 35gProtein: 25gFat: 15gSaturated Fat: 8gPolyunsaturated Fat: 1gMonounsaturated Fat: 6gCholesterol: 70mgSodium: 800mgPotassium: 600mgFiber: 6gSugar: 5gVitamin A: 15IUVitamin C: 25mgCalcium: 20mgIron: 15mg

Notes

Optional: Garnish with fresh cilantro or a dollop of sour cream for extra flair.

Tried this recipe?

Let us know how it was!

Filed Under: DINNER RECIPES

Slow Cooker Lemon Herb Chicken and Rice

December 21, 2025 by JudyWhite Leave a Comment

There’s something truly comforting about the vibrant, zesty aroma of a lemon-infused dish filling the kitchen. When I first experimented with Slow Cooker Lemon Herb Chicken and Rice, I couldn’t believe how effortlessly it captivated my family’s taste buds. This recipe transforms simple ingredients into a hearty meal that makes weeknight dinners feel special, even when the clock is ticking.

I often find myself rushing home after a long day, wishing for a flavorful dinner without the hassle of elaborate preparation. Enter this culinary gem! With only five minutes of prep time, I can toss everything into the slow cooker and let it work its magic. The chicken becomes tender, soaking up all those delightful flavors while the Jasmine rice completes the dish with a fluffy texture.

Join me in discovering how this easy yet impressive meal can brighten up your dinner table and banish bland meals for good!

Why You'll Love This Slow Cooker Lemon Herb Chicken and Rice

  • This recipe is a true time-saver, requiring only five minutes of prep before you can let the slow cooker do the work.
  • The vibrant flavors of lemon and herbs come together to create a dish that is both zesty and comforting, making it a favorite for family dinners.
  • With its tender chicken and fluffy Jasmine rice, this meal is visually appealing and sure to impress any guest at your table.
  • Plus, its versatility allows you to customize the spices to fit your taste, making it perfect for any occasion.

Slow Cooker Lemon Herb Chicken and Rice Ingredients

Transforming your dinner in just a few minutes!

For the Chicken
• Boneless chicken thighs – tender and juicy, they absorb the lemony goodness beautifully.
• Chicken broth – enhances the savory depth of flavor; use low-sodium for a healthier option.

For the Seasoning
• Lemon zest and juice – adds a bright, zesty kick to the dish; fresh is best for maximum flavor.
• Salt – essential for bringing out the flavors; adjust to taste.
• Pepper – a staple seasoning that complements the other ingredients perfectly.
• Garlic powder – provides a rich aromatic quality; great for a quick flavor boost.
• Onion powder – rounds out the savory profile with its mild sweetness.
• Crushed red pepper flakes – adds a gentle heat; omit if you prefer a milder dish.
• Paprika – contribute both flavor and a lovely color to the chicken.
• Italian seasoning – a blend of herbs that enhances the overall taste profile.
• Fresh garlic (or minced) – for an extra layer of flavor; fresh garlic has a more vibrant taste.

For the Rice
• Jasmine rice – this long-grain rice cooks beautifully and has a subtle floral aroma; it’s perfect in this dish.
• Water – helps the rice cook properly; be sure to follow the rice-to-liquid ratio for the best results.

With these carefully selected ingredients, your Slow Cooker Lemon Herb Chicken and Rice will turn into a delightful meal that your family will love!

How to Make Slow Cooker Lemon Herb Chicken and Rice

  1. Prepare the Chicken: Place the boneless chicken thighs in the slow cooker. This ensures that they absorb all those delicious flavors while cooking to tender perfection.

  2. Mix the Ingredients: Add the chicken broth, lemon zest and juice, salt, pepper, garlic powder, onion powder, crushed red pepper flakes, paprika, Italian seasoning, and minced garlic. Stir well to combine, letting those vibrant flavors meld together.

  3. Incorporate the Rice: Add the uncooked Jasmine rice and water to the mixture. Give it another gentle stir to ensure everything is evenly distributed for optimal cooking.

  4. Set the Cooker: Cover the slow cooker and set it to low. Let it cook for 3 hours, or 180 minutes, allowing the chicken to become tender and the rice to fluff deliciously.

  5. Fluff and Serve: After cooking, use a fork to fluff the rice. This step enhances the texture, making it light and airy before serving.

Optional: Garnish with fresh parsley for a pop of color and extra flavor.

Exact quantities are listed in the recipe card below.

Slow Cooker Lemon Herb Chicken and Rice Variations

Feel free to add your personal twist to this delightful dish, making it even more special for your family!

  • Herb-Infused: Swap Italian seasoning for fresh herbs like rosemary or thyme for an aromatic upgrade. The fragrance will envelop your kitchen, adding an inviting touch.

  • Citrus Burst: For a zestier flavor, add orange zest along with the lemon. This vibrant mix will brighten the dish and excite your taste buds.

  • Vegetable Medley: Toss in chopped vegetables like bell peppers, carrots, or spinach for a nutrient boost and colorful presentation. They’ll cook perfectly alongside the chicken, adding heartiness.

  • Spicy Kick: Increase the crushed red pepper flakes or add diced jalapeños for a fiery twist. This heat will awaken your palate and keep dinner exciting!

  • Creamy Finish: Stir in a spoonful of cream cheese or sour cream after cooking for a rich, creamy texture that enhances the flavors beautifully.

  • Grain Swap: Swap Jasmine rice for quinoa or brown rice for a healthier whole grain option. This will alter the texture slightly but keep the heartiness of the dish intact.

  • Honey Glaze: Drizzle some honey over the chicken before serving for a touch of sweetness that beautifully balances the savory flavors.

  • Stock Variation: Use vegetable or mushroom broth instead of chicken broth for a lighter, vegetarian-friendly alternative that still packs in plenty of flavor.

These variations not only customize your meal but also allow you to tailor it to your family’s tastes and dietary needs! Enjoy experimenting!

What to Serve with Slow Cooker Lemon Herb Chicken and Rice?

Elevate your meal with delightful sides that compliment the zesty, comforting flavors of this dish.

  • Steamed Green Beans: Their crispness balances the tenderness of the chicken and rice, adding a fresh touch to your plate.

  • Garlic Roasted Broccoli: The nutty flavor of roasted broccoli pairs beautifully with lemony chicken, creating a vibrant and healthy side.

  • Citrus Salad: A refreshing mix of oranges and arugula can brighten your meal, adding a refreshing contrast to the savory dish.

  • Creamy Mashed Potatoes: These fluffy potatoes provide a comforting, rich base, perfect for soaking up any leftover lemony sauce.

  • Herb-Infused Quinoa: Unique and nutty, quinoa adds an excellent texture and health boost, enhancing the dish’s wholesome appeal.

  • Chilled White Wine: A crisp Sauvignon Blanc with citrus notes will enhance the lemony flavors of your chicken, making every bite delightful.

  • Lemon Sorbet: As a light dessert, it cleanses the palate after the savory meal and leaves a refreshing finish.

Enjoy this medley of flavors and textures that harmonize with your Slow Cooker Lemon Herb Chicken and Rice, creating memorable meals that nourish your family!

Make Ahead Options

These Slow Cooker Lemon Herb Chicken and Rice are perfect for busy weeknights, allowing you to enjoy a homemade meal with minimal hassle. You can prep the chicken with all the seasonings and chicken broth up to 24 hours in advance, ensuring that all those delightful flavors infuse the meat perfectly. Simply combine the chicken thighs, broth, lemon zest and juice, and spices in your slow cooker and refrigerate overnight. On the day you plan to serve, all you need to do is add the uncooked Jasmine rice and water before covering and cooking on low for 3 hours. This way, you can have a comforting, flavorful dinner ready with just a glance at your kitchen clock!

How to Store and Freeze Slow Cooker Lemon Herb Chicken and Rice

Fridge: Store leftovers in an airtight container for up to 3 days. Make sure to let it cool completely before sealing to preserve freshness.

Freezer: For longer storage, you can freeze portions in freezer-safe bags for up to 3 months. Remember to remove as much air as possible to prevent freezer burn.

Reheating: When ready to enjoy, thaw in the fridge overnight and reheat in the microwave or on the stovetop until warmed through. Add a splash of chicken broth for moisture if needed.

Room Temperature: Do not leave this dish out for more than 2 hours if not refrigerated to avoid food safety issues.

Chef's Helpful Tips

  • For the Slow Cooker Lemon Herb Chicken and Rice, ensure you add the lemon zest and juice at the beginning, as it intensifies the flavor throughout the cooking process.
  • A common mistake is not stirring the ingredients enough, which can lead to uneven cooking; make sure all elements are well combined before starting the slow cooker.
  • When adding rice, use Jasmine for its unique texture and aroma, and remember to adjust the liquid accordingly based on the type of rice used.
  • Cooking on low for a full three hours allows the flavors to develop fully while keeping the chicken tender, so avoid the temptation to lift the lid during this time to ensure perfect results.

Slow Cooker Lemon Herb Chicken and Rice Recipe FAQs

What type of chicken is best for this recipe?
I recommend using boneless chicken thighs for their tenderness and ability to absorb the lemon and herb flavors beautifully. If you’re a fan of white meat, you can substitute with boneless chicken breasts, but note that they may not be as juicy.

How should I store leftovers?
Store any leftover Slow Cooker Lemon Herb Chicken and Rice in an airtight container in the fridge for up to 3 days. It’s best to let the dish cool completely before sealing to keep it fresh and flavorful.

Can I freeze this dish?
Absolutely! To freeze, portion the chicken and rice into freezer-safe bags or containers, ensuring you remove as much air as possible to prevent freezer burn. It can stay in the freezer for up to 3 months. When you’re ready to enjoy it, simply thaw it overnight in the fridge and reheat as needed.

What can I do if the rice is too sticky?
If you find your rice is sticky after cooking, it could be due to insufficient stirring before cooking or using too much liquid. Next time, ensure to mix your ingredients thoroughly before setting the slow cooker. If this happens during serving, fluff the rice gently with a fork to separate the grains.

Are there any dietary considerations for this dish?
While this Slow Cooker Lemon Herb Chicken and Rice is great for many diets, it’s important to consider any allergies. It contains chicken and garlic, which some may be allergic to. For gluten-free diners, all ingredients should be gluten-free, but always double-check labels. If you have pets, avoid sharing this dish, especially due to the potential onion and garlic content.

How can I adjust the spice levels?
If you prefer a milder dish, simply reduce or eliminate the crushed red pepper flakes and paprika. Conversely, feel free to amp up the spices or add your favorite ones to cater to your taste buds! Remember: the more, the merrier when it comes to flavor!

Slow Cooker Lemon Herb Chicken and Rice

Slow Cooker Lemon Herb Chicken and Rice

Slow Cooker Lemon Herb Chicken and Rice is a comforting dish filled with zesty flavors that will impress your family at dinner time.
Print Recipe Pin Recipe
Prep Time 5 minutes mins
Cook Time 3 hours hrs
Total Time 3 hours hrs 5 minutes mins
Servings: 4 servings
Course: DINNER RECIPES
Cuisine: American
Calories: 380
Ingredients Equipment Method Nutrition Notes

Ingredients
  

For the Chicken
  • 1 pound Boneless chicken thighs tender and juicy
  • 2 cups Chicken broth use low-sodium for a healthier option
For the Seasoning
  • 1 tablespoon Lemon zest fresh is best
  • 1 tablespoon Lemon juice fresh is best
  • 1 teaspoon Salt adjust to taste
  • 1 teaspoon Pepper to taste
  • 1 teaspoon Garlic powder provides aromatic quality
  • 1 teaspoon Onion powder adds mild sweetness
  • 1/2 teaspoon Crushed red pepper flakes omit for milder dish
  • 1 teaspoon Paprika adds flavor and color
  • 1 teaspoon Italian seasoning herb blend
  • 2 cloves Fresh garlic or minced
For the Rice
  • 1 cup Jasmine rice long-grain rice
  • 2 cups Water for cooking rice

Equipment

  • Slow Cooker

Method
 

How to Make Slow Cooker Lemon Herb Chicken and Rice
  1. Prepare the Chicken: Place the boneless chicken thighs in the slow cooker.
  2. Mix the Ingredients: Add the chicken broth, lemon zest and juice, salt, pepper, garlic powder, onion powder, crushed red pepper flakes, paprika, Italian seasoning, and minced garlic. Stir well to combine.
  3. Incorporate the Rice: Add the uncooked Jasmine rice and water; stir gently to ensure even distribution.
  4. Set the Cooker: Cover the slow cooker and set to low for 3 hours, allowing flavors to develop.
  5. Fluff and Serve: After cooking, fluff the rice with a fork before serving.

Nutrition

Serving: 1servingCalories: 380kcalCarbohydrates: 40gProtein: 30gFat: 10gSaturated Fat: 2gPolyunsaturated Fat: 1gMonounsaturated Fat: 2gCholesterol: 90mgSodium: 500mgPotassium: 600mgFiber: 2gSugar: 1gVitamin A: 500IUVitamin C: 10mgCalcium: 20mgIron: 3mg

Notes

Garnish with fresh parsley for added flavor and color.

Tried this recipe?

Let us know how it was!

Filed Under: DINNER RECIPES

Sicilian Chicken Soup

December 20, 2025 by JudyWhite Leave a Comment

There’s nothing quite like the enveloping warmth of a homemade soup on a chilly evening, and this Sicilian Chicken Soup is the ultimate comfort food. The moment you start chopping vegetables, the fresh, vibrant scents will transport you to a cozy Italian kitchen, where hearty dishes come to life. I stumbled upon this recipe during one of my weekend cooking marathons, yearning for something flavorful yet uncomplicated.

With bone-in chicken thighs simmering alongside a colorful medley of veggies, every spoonful bursts with rich flavors and nutrition. Perfect for those looking to escape the monotonous fast-food routine, this soup is easily customizable; throw in whatever seasonal veggies you have on hand.

In just under an hour, you’ll be cradling a warm bowl of Sicilian goodness, ready to share with family or savor quietly on your own. Get ready to impress your taste buds without breaking a sweat!

Why You'll Love This Sicilian Chicken Soup

  • This Sicilian Chicken Soup is incredibly easy to make, allowing you to whip up a delicious meal without spending hours in the kitchen.
  • The blend of vibrant vegetables and tender chicken creates a flavor explosion that will have everyone coming back for seconds.
  • Its versatility means you can easily adapt it to include your favorite seasonal ingredients or whatever you have on hand.
  • Visually appealing with its colorful array of veggies and hearty noodles, this soup is not only nourishing but also a feast for the eyes.

Sicilian Chicken Soup Ingredients

• Here’s everything you need for a heartwarming bowl!

For the Soup Base

  • Bone-in, skin-on chicken thighs – provide rich flavor and moisture as they simmer.
  • Medium onion, chopped – adds a savory base that enhances the overall taste.
  • Celery, chopped – lends a refreshing crunch and aromatic quality to the broth.
  • Carrots, chopped – they not only sweeten the soup but also brighten up the color.
  • Large yellow bell pepper, chopped – brings sweetness and a pop of color to the dish.
  • Russet potatoes, peeled and cubed – add heartiness and act as a natural thickener.
  • Garlic, chopped – offers a robust flavor that complements the chicken beautifully.
  • No-salt diced tomatoes – bring acidity and brighten the overall flavor profile.
  • Dry bay leaves – infuse the soup with a subtle and fragrant earthiness.
  • Kosher salt – enhances all the other flavors; adjust to taste.

For the Stock

  • Low-sodium chicken stock – allows you to control the saltiness while providing depth.
  • Water or additional chicken stock – helps reach your desired soup consistency.

For the Pasta

  • Dry ditalini pasta – tiny pasta shapes that soak up the flavorful broth perfectly.

For the Finish

  • Fresh chopped Italian parsley – adds a burst of freshness right before serving.
  • Fresh black pepper – season to taste for that final touch of warmth and flavor.

Now that you have all the ingredients ready, you’re just a step away from making this delightful Sicilian Chicken Soup!

How to Make Sicilian Chicken Soup

  1. Combine ingredients: In a large soup pot, bring together the chicken, onion, celery, carrots, bell pepper, potatoes, garlic, diced tomatoes, bay leaves, and salt. This hearty mixture sets the foundation for your comforting soup.

  2. Add liquids: Pour in the chicken stock and water, then season with black pepper to taste. Cover the pot and bring to a boil; then reduce the heat to low. Let it simmer for 30 minutes until the chicken is tender and easily falling off the bones.

  3. Incorporate pasta: Remove the chicken using tongs, then add the ditalini pasta to the pot. Cook for an additional 13-15 minutes, partially covered, stirring occasionally to prevent sticking. The pasta should be tender but not mushy.

  4. Shred chicken: Once cool, use two forks to shred the chicken, discarding the skin and bones. Stir the shredded chicken back into the pot and check the vegetables—especially the potatoes—to ensure they’re cooked to perfection.

  5. Serve the soup: Discard the bay leaves and stir in the fresh parsley. Ladle the warm soup into bowls and enjoy the comforting aroma as you serve!

Optional: Garnish with a sprinkle of extra parsley for added color and freshness.

Exact quantities are listed in the recipe card below.

How to Store and Freeze Sicilian Chicken Soup

Fridge: Store leftover Sicilian Chicken Soup in an airtight container for up to 3 days. Make sure the soup cools completely before sealing to maintain freshness.

Freezer: For longer storage, freeze the soup in portion-sized containers for up to 3 months. Leave some space at the top of the container for expansion.

Reheating: When ready to enjoy, thaw frozen soup overnight in the fridge. Reheat on the stovetop over medium heat, stirring occasionally, until heated through—adding a splash of water or stock if needed.

Room Temperature: Avoid leaving the soup out for more than 2 hours to prevent bacterial growth. Always refrigerate promptly after serving to keep it safe.

What to Serve with Sicilian Chicken Soup?

There’s nothing quite like the satisfaction of creating a cozy meal that complements the heartwarming flavors of your homemade soup.

  • Garlic Bread: This classic side is perfect for soaking up every last drop of the savory broth. Crispy on the outside and soft inside, it’s a comforting companion.

  • Mixed Greens Salad: A refreshing salad with crunchy greens and a light vinaigrette cleanses your palate, balancing the richness of the soup and adding a burst of freshness.

  • Parmesan Crisps: These savory bites offer a delightful crunch and cheesy goodness, enhancing the experience while echoing the Italian essence of your soup.

  • Roasted Vegetables: Seasonal veggies roasted in olive oil bring earthiness and depth, perfectly harmonizing with the vibrant ingredients in the soup. A splash of balsamic can elevate the flavors even more.

  • Herbed Couscous: Light and fluffy, herbed couscous is a wonderful textural contrast. Each bite absorbs the delicious soup broth, creating a fusion of flavors.

  • Lemonade or Iced Tea: A glass of refreshing lemonade or chilled iced tea balances the warmth of the soup with a cool zing, making for a delightful meal experience.

  • Tiramisu: For dessert, this classic Italian treat rounds out your meal beautifully. Its creamy layers and coffee notes are a decadent finish to your Italian-inspired dinner.

Sicilian Chicken Soup Variations

Feel free to let your creativity shine and adapt this comforting soup to suit your taste buds!

  • Gluten-Free: Substitute ditalini pasta with gluten-free pasta or rice. You’ll enjoy the same heartiness without the gluten.

  • Vegetable Boost: Add your favorite seasonal veggies, like zucchini or spinach. They’ll not only enhance the flavor but also increase the nutritional value.

  • Spicy Kick: For a touch of heat, include red pepper flakes or diced jalapeños. Your taste buds will awaken with every spicy spoonful!

  • Herb Infusion: Experiment with fresh thyme or oregano for a fragrant twist. These herbs will elevate the soup’s aroma and depth of flavor beautifully.

  • Creamy Version: Stir in a splash of heavy cream or coconut milk before serving for a richer, creamier texture. It makes each bowl irresistibly indulgent.

  • Lemon Zest: Add a teaspoon of lemon zest or a splash of lemon juice before serving. This brightens the flavors and introduces a refreshing zing.

  • Shredded Cheese: Top servings with shredded parmesan or mozzarella for extra richness. Melted cheese adds a deliciously comforting layer to your soup.

  • Chickpea Addition: Toss in canned chickpeas for a hearty protein boost. They enhance the texture and make the soup even more filling!

Make Ahead Options

Perfect for busy weeknights, you can prepare your Sicilian Chicken Soup in advance to save time and enjoy deliciousness at a moment’s notice! Start by chopping all the vegetables (onions, celery, carrots, bell pepper, and potatoes) up to 24 hours in advance, storing them in an airtight container in the refrigerator to maintain freshness and prevent browning. You can also cook the chicken and add it back to the pot up to 3 days ahead. When you’re ready to serve, simply reheat the soup on the stove and stir in the pasta to cook during the last 15 minutes. This ensures the flavors meld beautifully, making your homemade soup just as delightful as when freshly made!

Chef's Helpful Tips

  • When preparing Sicilian Chicken Soup, ensure that you properly brown the chicken thighs before adding other ingredients; this step enhances the overall flavor of the broth.
  • Be mindful not to overcook the pasta; check for doneness a couple of minutes before the suggested cook time to achieve the perfect texture.
  • For an even richer broth, consider roasting the vegetables first to deepen their flavors before adding them to the soup pot.
  • Lastly, let the soup sit for a few minutes after cooking to allow the flavors to meld before serving for the best taste experience.

Sicilian Chicken Soup Recipe FAQs

What type of chicken should I use for this soup?
I recommend using bone-in, skin-on chicken thighs for the richest flavor and moisture. These cuts stand up well to the simmering process and yield tender, fall-off-the-bone meat!

How should I store leftovers of Sicilian Chicken Soup?
Store the leftover Sicilian Chicken Soup in an airtight container in the refrigerator for up to 3 days. Ensure it cools completely before sealing, as this helps maintain freshness and flavor.

Can I freeze Sicilian Chicken Soup?
Absolutely! For freezing, ladle the soup into portion-sized, freezer-safe containers, leaving about an inch of space at the top for expansion. It will maintain its best quality for up to 3 months. When you’re ready to enjoy it, thaw it in the refrigerator overnight.

What should I do if my pasta gets mushy in the soup?
If your pasta ends up mushy, don’t worry! For next time, cook the pasta separately and add it in just before serving. This way, you can fully control its texture and keep it al dente.

Are there any dietary considerations for Sicilian Chicken Soup?
Yes! For a gluten-free option, substitute the ditalini with gluten-free pasta. Always check the labels of canned ingredients if you’re concerned about allergens. And if you share your kitchen with furry friends, remember that onions and garlic are toxic to dogs, so keep the soup out of reach!

How can I customize the vegetables in the soup?
The more the merrier! Feel free to throw in seasonal veggies like zucchini, green beans, or spinach. Just chop them into similar sizes and add them during the last 10-15 minutes of cooking to ensure they stay vibrant and tender-crisp.

Sicilian Chicken Soup

Sicilian Chicken Soup

Sicilian Chicken Soup offers comforting warmth and rich flavors, making it perfect for chilly evenings.
Print Recipe Pin Recipe
Prep Time 15 minutes mins
Cook Time 30 minutes mins
Pasta Cooking Time 15 minutes mins
Total Time 1 hour hr
Servings: 4 bowls
Course: DINNER RECIPES
Cuisine: Italian
Calories: 350
Ingredients Equipment Method Nutrition Notes

Ingredients
  

For the Soup Base
  • 4 pieces bone-in, skin-on chicken thighs provide rich flavor and moisture as they simmer
  • 1 medium onion, chopped adds a savory base
  • 2 stalks celery, chopped lends a refreshing crunch
  • 2 pieces carrots, chopped sweeten the soup
  • 1 large yellow bell pepper, chopped brings sweetness and color
  • 2 medium russet potatoes, peeled and cubed add heartiness
  • 3 cloves garlic, chopped offers robust flavor
  • 1 can no-salt diced tomatoes bring acidity
  • 2 leaves dry bay leaves infuse the soup
  • to taste kosher salt enhances flavors
For the Stock
  • 6 cups low-sodium chicken stock provides depth
  • 2 cups water or additional chicken stock helps reach desired consistency
For the Pasta
  • 1 cup dry ditalini pasta soak up the flavorful broth
For the Finish
  • 1/4 cup fresh chopped Italian parsley adds burst of freshness
  • to taste fresh black pepper season to taste

Equipment

  • large soup pot

Method
 

Preparation
  1. In a large soup pot, combine the chicken, onion, celery, carrots, bell pepper, potatoes, garlic, diced tomatoes, bay leaves, and salt.
  2. Pour in the chicken stock and water, then season with black pepper to taste. Cover and bring to a boil, then reduce heat to low and simmer for 30 minutes.
  3. Remove the chicken using tongs, then add the ditalini pasta to the pot. Cook for an additional 13-15 minutes, partially covered, stirring occasionally.
  4. Once cool, shred the chicken, discarding skin and bones. Stir shredded chicken back into the pot and check the vegetables.
  5. Discard the bay leaves, stir in the fresh parsley, and ladle the soup into bowls.

Nutrition

Serving: 1bowlCalories: 350kcalCarbohydrates: 35gProtein: 25gFat: 12gSaturated Fat: 3gPolyunsaturated Fat: 2gMonounsaturated Fat: 5gCholesterol: 70mgSodium: 800mgPotassium: 800mgFiber: 5gSugar: 4gVitamin A: 600IUVitamin C: 20mgCalcium: 50mgIron: 2mg

Notes

Allow the flavors to meld by letting the soup sit for a few minutes before serving.

Tried this recipe?

Let us know how it was!

Filed Under: DINNER RECIPES

Crockpot Thai Coconut Chicken Soup

December 20, 2025 by JudyWhite Leave a Comment

As I reached for the fresh ingredients lined up on my kitchen counter, the promise of a warm, comforting meal inspired me to whip up my favorite weeknight dish. There’s something truly special about the way the rich aroma of coconut and spicy red curry fill the air, instantly transporting me to a tropical getaway with every whiff. This Crockpot Thai Coconut Chicken Soup has become my go-to recipe for those evenings when I crave bold flavors without sacrificing time.

With just 15 minutes of prep, I can toss everything into the crockpot and let it do the heavy lifting for me. The result? A creamy, hearty soup that ditches bland fast food for a vibrant feast that’s both satisfying and nutritious. Whenever I serve it up, I see smiles all around; the combination of tender chicken, crisp vegetables, and a hint of peanut makes it a crowd-pleaser! So, let’s dive into this delightful recipe that promises to bring comfort and joy to your dinner table.

Why You'll Love This Crockpot Thai Coconut Chicken Soup

  • This recipe is incredibly easy to prepare, requiring just 15 minutes of hands-on time before the crockpot takes over.
  • The flavor profile is rich and vibrant, with a perfect balance of coconut, curry, and peanut notes that will transport your taste buds to Thailand.
  • Its versatility allows you to customize the vegetables and spice level to suit your family’s preferences, making it a meal everyone can enjoy.
  • The visual appeal of this soup, adorned with fresh cilantro and chopped peanuts, creates an inviting dish that will impress your guests.

Crockpot Thai Coconut Chicken Soup Ingredients

For the Soup
• Boneless, skinless chicken breasts – a tender protein base that becomes flavorful as it cooks.
• Full-fat coconut milk – adds creaminess and richness, creating that signature Thai flavor.
• Chicken broth – provides a savory foundation that enhances the soup’s taste.
• Natural peanut butter – brings a dreamy, nutty flavor that works beautifully with the spices.
• Red curry paste – customize the amount to adjust the heat level and ensure a bold flavor.
• Fish sauce – a little goes a long way in introducing a layer of umami depth.
• Low-sodium soy sauce – balances the flavors without overwhelming saltiness.
• Brown sugar – offsets the spiciness for a well-rounded taste experience.
• Garlic – infuses the dish with aromatic goodness, enhancing every spoonful.
• Freshly grated ginger – adds a zesty kick that complements the other flavors beautifully.
• Red pepper flakes (optional) – sprinkle in for an extra punch of heat, if desired.

For the Vegetables
• Yellow onion, diced – brings sweetness and enhances the overall aroma of the soup.
• Red bell pepper, sliced – adds color and a subtle sweetness to every bite.
• Carrots, diagonally sliced – provide a crunchy texture and natural sweetness.
• Mushrooms, sliced – add an earthiness that harmonizes with the tropical flavors.
• Broccoli, cut into florets – contributes vibrant greens and a hearty texture.

For Finishing
• Lime juice – a splash at the end brightens up the flavors remarkably.
• Salt – season to taste for the perfect flavor balance.
• Chopped fresh cilantro – garnishes the soup beautifully and adds a burst of freshness.
• Chopped peanuts – sprinkle on top for added crunch and nutty flavor.
• Cooked brown rice or rice noodles – ideal for serving, making this dish hearty and filling.

Each of these Crockpot Thai Coconut Chicken Soup ingredients plays a crucial role in creating a warming, flavorful dish that’s better than any fast food night!

How to Make Crockpot Thai Coconut Chicken Soup

  1. Add Chicken: Place the boneless, skinless chicken breasts directly in the crockpot, ensuring they’re evenly spread out for even cooking. This will be the heart of your delicious soup!

  2. Combine Ingredients: Pour in both cans of full-fat coconut milk and the chicken broth. Then, add the natural peanut butter, red curry paste, fish sauce, soy sauce, brown sugar, minced garlic, grated ginger, and red pepper flakes, if using.

  3. Incorporate Vegetables: Gently stir in the diced yellow onion, sliced red bell pepper, diagonally sliced carrots, sliced mushrooms, and broccoli florets. This colorful medley will bring vibrancy and nutrition to your soup!

  4. Cover and Cook: Secure the lid on your crockpot and set it to cook on low for 4 hours. The cooking time allows all the flavors to meld beautifully, developing that rich, aromatic broth.

  5. Finish with Lime: When the cooking time is up, open the lid and stir in the freshly squeezed lime juice, followed by a sprinkle of salt to taste. This will elevate the flavors to a whole new level!

  6. Serve and Garnish: Ladle the hot soup into bowls over a bed of cooked brown rice or rice noodles. Top with chopped fresh cilantro and chopped peanuts for a delightful crunch and fresh pop!

Optional: Add a squeeze of extra lime juice just before serving for an added zing!

Exact quantities are listed in the recipe card below.

Crockpot Thai Coconut Chicken Soup Variations

Feel free to put your spin on this comforting classic and make it your own with these creative adaptations!

  • Dairy-Free: Swap full-fat coconut milk for unsweetened almond or oat milk for a lighter option.

  • Vegetarian: Replace chicken with diced tofu or chickpeas for a delightful plant-based version that’s equally satisfying. Add some additional vegetables for extra nutrition!

  • Spicy Kick: Increase the red curry paste or add fresh sliced jalapeños for further heat that will awaken your taste buds.

  • Crunchy Toppings: Experiment with various nuts like cashews or slivered almonds to provide visual appeal and a different texture on top.

  • Zesty Twist: Stir in fresh basil or mint at the end for a herbal freshness that complements the richness of the soup perfectly.

  • Extra Veggies: Enhance the nutritional profile by including baby spinach or kale; they’ll wilt beautifully in the hot soup, adding vibrant color and added nutrients.

  • Peanut-Free: Replace peanut butter with sunflower seed butter for a nut-free alternative that maintains the creamy texture.

  • Coconut Flour: For a delightful texture twist, whisk in a tablespoon of coconut flour to thicken the soup and amplify the coconut flavor.

Each variation allows you to explore new flavors while keeping the essence of this delightful Crockpot Thai Coconut Chicken Soup intact!

What to Serve with Crockpot Thai Coconut Chicken Soup?

Inviting friends and family over for a comforting meal? Here are some delightful pairings that will elevate your dining experience.

  • Brown Rice: A perfect base that soaks up the creamy, flavorful broth, making every bite even more satisfying.

  • Rice Noodles: Light and chewy, they offer a wonderful texture that compliments the rich soup while providing a fun slurp factor.

  • Thai Spring Rolls: Fresh and crunchy, these veggie-filled rolls provide a refreshing contrast to the warm soup, adding a delightful crunch with each bite.

  • Crispy Wontons: Serve these crunchy little bites alongside your soup for a satisfying texture that pairs beautifully with the creamy flavors.

  • Sliced Avocado: Creamy avocado slices add a luxurious touch and a subtle richness, enhancing the overall flavor experience.

  • Chili Lime Popcorn: For an adventurous snack, serve this zesty popcorn on the side; the crunch and spice balance the richness beautifully.

  • Coconut Milk Smoothie: A cool, refreshing drink made with coconut milk and tropical fruits like pineapple or mango will complement the soup’s flavors perfectly.

  • Mango Sticky Rice: This sweet treat is a delightful way to end your meal; the creamy, sweet notes echo the soup’s tropical inspirations.

  • Limeade or Thai Iced Tea: Both beverages will add a refreshing touch and a hint of sweetness, perfectly harmonizing with the soup’s savory profile.

Make Ahead Options

These delicious Crockpot Thai Coconut Chicken Soup components are perfect for busy cooks looking to save time during the week! You can pre-chop vegetables such as onions, bell peppers, carrots, and broccoli up to 3 days in advance. Store them in airtight containers in the refrigerator to keep them fresh. You can also mix the coconut milk, chicken broth, peanut butter, and spices ahead of time, allowing flavors to meld even before cooking—just refrigerate the mixture for up to 24 hours. When you’re ready to serve, simply place the chicken and prepared ingredients in the crockpot and cook as directed. You’ll enjoy the same comforting, rich flavors with minimal effort!

How to Store and Freeze Crockpot Thai Coconut Chicken Soup

Fridge: Store leftover soup in an airtight container for up to 3 days. Make sure it’s completely cooled before sealing to maintain freshness.

Freezer: For longer storage, freeze the soup in portioned airtight containers for up to 3 months. Remember to leave some space at the top, as it will expand when frozen.

Reheating: Thaw overnight in the fridge before reheating. Warm gently on the stovetop or in the microwave, adding a splash of broth or water if desired for consistency.

Garnishes: Keep garnishes like cilantro and chopped peanuts separate until ready to serve to maintain their freshness and crunch.

Chef's Helpful Tips

  • When making Crockpot Thai Coconut Chicken Soup, ensure that the chicken is evenly spaced in the pot to promote even cooking and tenderness.
  • One common mistake is not stirring the ingredients well before cooking; take the time to mix all the elements thoroughly for a well-integrated flavor.
  • To enhance the richness of the soup, consider using full-fat coconut milk as it provides a creamier texture compared to light varieties.
  • Keep an eye on the cooking time and avoid opening the lid too often, as this can extend the cooking time and disrupt the flavor development of your delicious soup.

Crockpot Thai Coconut Chicken Soup Recipe FAQs

How do I choose ripe vegetables for this soup?
Absolutely! Look for vibrant, firm vegetables. For bell peppers, pick ones with smooth skin and no blemishes. Carrots should be bright orange and crispy; broccoli florets should be green and tightly bunched without yellowing.

What is the best way to store leftover Crockpot Thai Coconut Chicken Soup?
I recommend storing leftover soup in an airtight container in the fridge for up to 3 days. Ensure it has cooled completely before sealing it, as this helps maintain that delicious freshness. If you know you won’t eat it all within that timeframe, freezing is a great option!

Can I freeze Crockpot Thai Coconut Chicken Soup?
Yes, you can! Simply pour the cooled soup into portioned, airtight containers, leaving some space at the top for expansion. It should last in the freezer for up to 3 months. Just remember to label the containers with the date, so you can enjoy it at its best!

What should I do if my soup ends up too thick?
No worries! If you find your soup thicker than desired, simply add a splash of chicken broth or water while reheating. Stir it in gently until you reach your preferred consistency. This will ensure you can enjoy that luscious soup without any stress!

Are there any dietary considerations I should be aware of?
Very! If you’re cooking for someone with allergies, it’s essential to note that this recipe contains peanut butter and soy sauce. You can substitute the peanut butter with sunflower seed butter for nut allergies and use gluten-free soy sauce for a gluten-free variation. Always check the labels to ensure safety.

How can I adjust the spice level in the soup?
The more the merrier! To adjust the spice level, you can start with a smaller amount of red curry paste; taste the soup before adding more. Additionally, if you want to tone down the heat, skip the red pepper flakes or choose non-spicy varieties of curry paste. Tailor it to your taste!

Crockpot Thai Coconut Chicken Soup

Crockpot Thai Coconut Chicken Soup

A creamy, hearty Crockpot Thai Coconut Chicken Soup with bold flavors and comforting ingredients.
Print Recipe Pin Recipe
Prep Time 15 minutes mins
Cook Time 4 hours hrs
Total Time 4 hours hrs 15 minutes mins
Servings: 6 servings
Course: DINNER RECIPES
Cuisine: Thai
Calories: 450
Ingredients Equipment Method Nutrition Notes

Ingredients
  

For the Soup
  • 2 pounds boneless, skinless chicken breasts
  • 2 cans full-fat coconut milk
  • 4 cups chicken broth
  • 1/2 cup natural peanut butter
  • 2 tablespoons red curry paste customize amount to adjust heat level
  • 1 tablespoon fish sauce
  • 2 tablespoons low-sodium soy sauce
  • 1 tablespoon brown sugar
  • 4 cloves garlic minced
  • 1 tablespoon freshly grated ginger
  • 1/2 teaspoon red pepper flakes optional
For the Vegetables
  • 1 large yellow onion diced
  • 1 large red bell pepper sliced
  • 2 medium carrots diagonally sliced
  • 8 ounces mushrooms sliced
  • 2 cups broccoli cut into florets
For Finishing
  • 2 tablespoons lime juice
  • to taste salt
  • 1/4 cup chopped fresh cilantro
  • 1/4 cup chopped peanuts
  • 4 cups cooked brown rice or rice noodles for serving

Equipment

  • Crockpot

Method
 

How to Make Crockpot Thai Coconut Chicken Soup
  1. Place the boneless, skinless chicken breasts directly in the crockpot, ensuring they're evenly spread out for even cooking.
  2. Pour in both cans of full-fat coconut milk and the chicken broth. Then, add the natural peanut butter, red curry paste, fish sauce, soy sauce, brown sugar, minced garlic, grated ginger, and red pepper flakes, if using.
  3. Gently stir in the diced yellow onion, sliced red bell pepper, diagonally sliced carrots, sliced mushrooms, and broccoli florets.
  4. Secure the lid on your crockpot and set it to cook on low for 4 hours.
  5. When the cooking time is up, open the lid and stir in the freshly squeezed lime juice, followed by a sprinkle of salt to taste.
  6. Ladle the hot soup into bowls over a bed of cooked brown rice or rice noodles. Top with chopped fresh cilantro and chopped peanuts.

Nutrition

Serving: 1bowlCalories: 450kcalCarbohydrates: 40gProtein: 25gFat: 25gSaturated Fat: 15gPolyunsaturated Fat: 2gMonounsaturated Fat: 10gCholesterol: 70mgSodium: 800mgPotassium: 800mgFiber: 5gSugar: 6gVitamin A: 30IUVitamin C: 80mgCalcium: 8mgIron: 15mg

Notes

Ensure that the chicken is evenly spaced in the pot for even cooking, and stir the ingredients well before cooking for a well-integrated flavor.

Tried this recipe?

Let us know how it was!

Filed Under: DINNER RECIPES

  • « Previous Page
  • 1
  • …
  • 9
  • 10
  • 11
  • 12
  • 13
  • …
  • 16
  • Next Page »

Recent Posts

  • Crispy Potatoes in Oven
  • Lucky Charms Pancakes
  • Cheeseburger
  • Boiled Corn on the Cob
  • St. Patrick’s Day Dessert Parfaits

Recent Comments

No comments to show.

Footer

  • Contact
  • Privacy Policy
  • About Us
  • Terms
  • ↑ back to top

Copyright © 2024 www.Forkono.com

Table Of Content