Forkono

  • BREAKFAST & BRUNCH
  • DESSERT RECIPES
  • DINNER RECIPES
  • LUNCH RECIPES
  • About uS
  • SNACKS & APPETIZERS
menu icon
go to homepage
  • BREAKFAST & BRUNCH
  • DESSERT RECIPES
  • DINNER RECIPES
  • LUNCH RECIPES
  • About uS
  • SNACKS & APPETIZERS
search icon
Homepage link
  • BREAKFAST & BRUNCH
  • DESSERT RECIPES
  • DINNER RECIPES
  • LUNCH RECIPES
  • About uS
  • SNACKS & APPETIZERS
×

Salmon Sushi Bake

January 7, 2026 by JudyWhite Leave a Comment

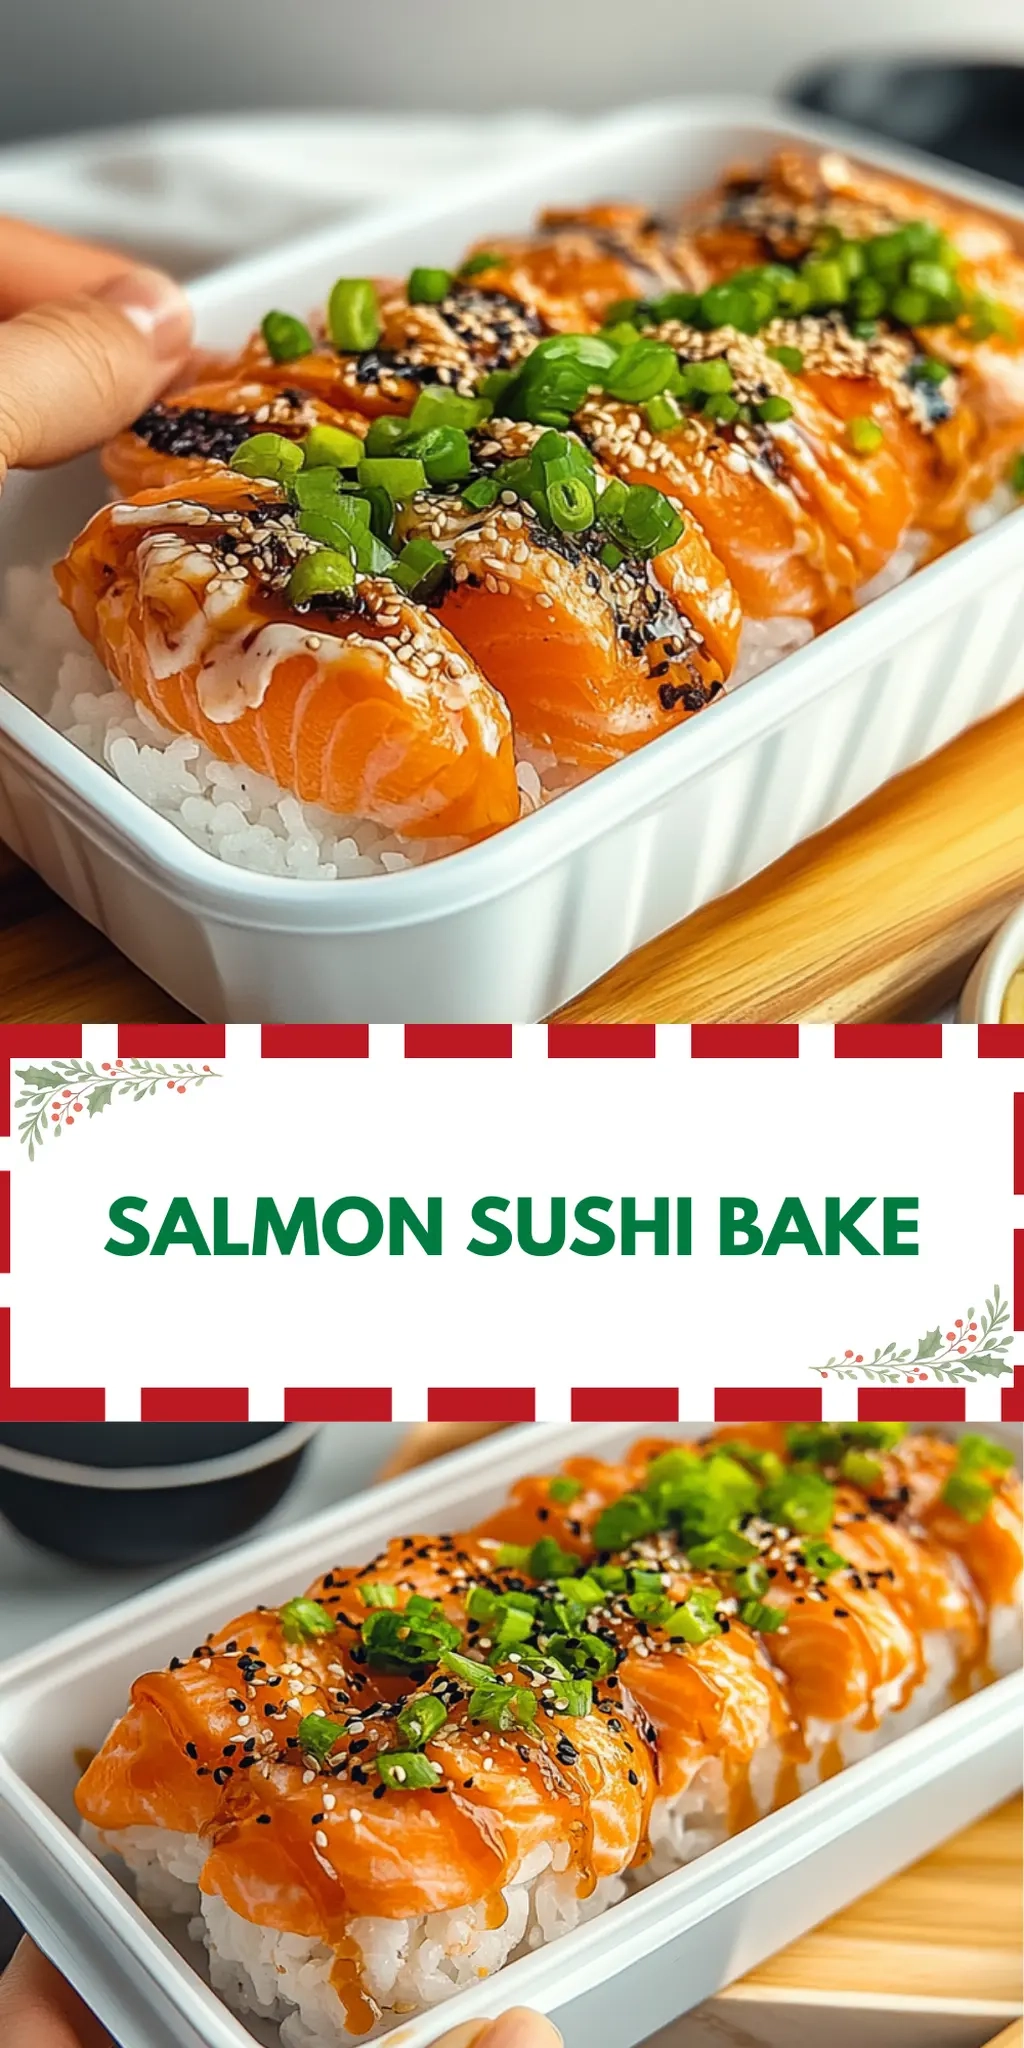
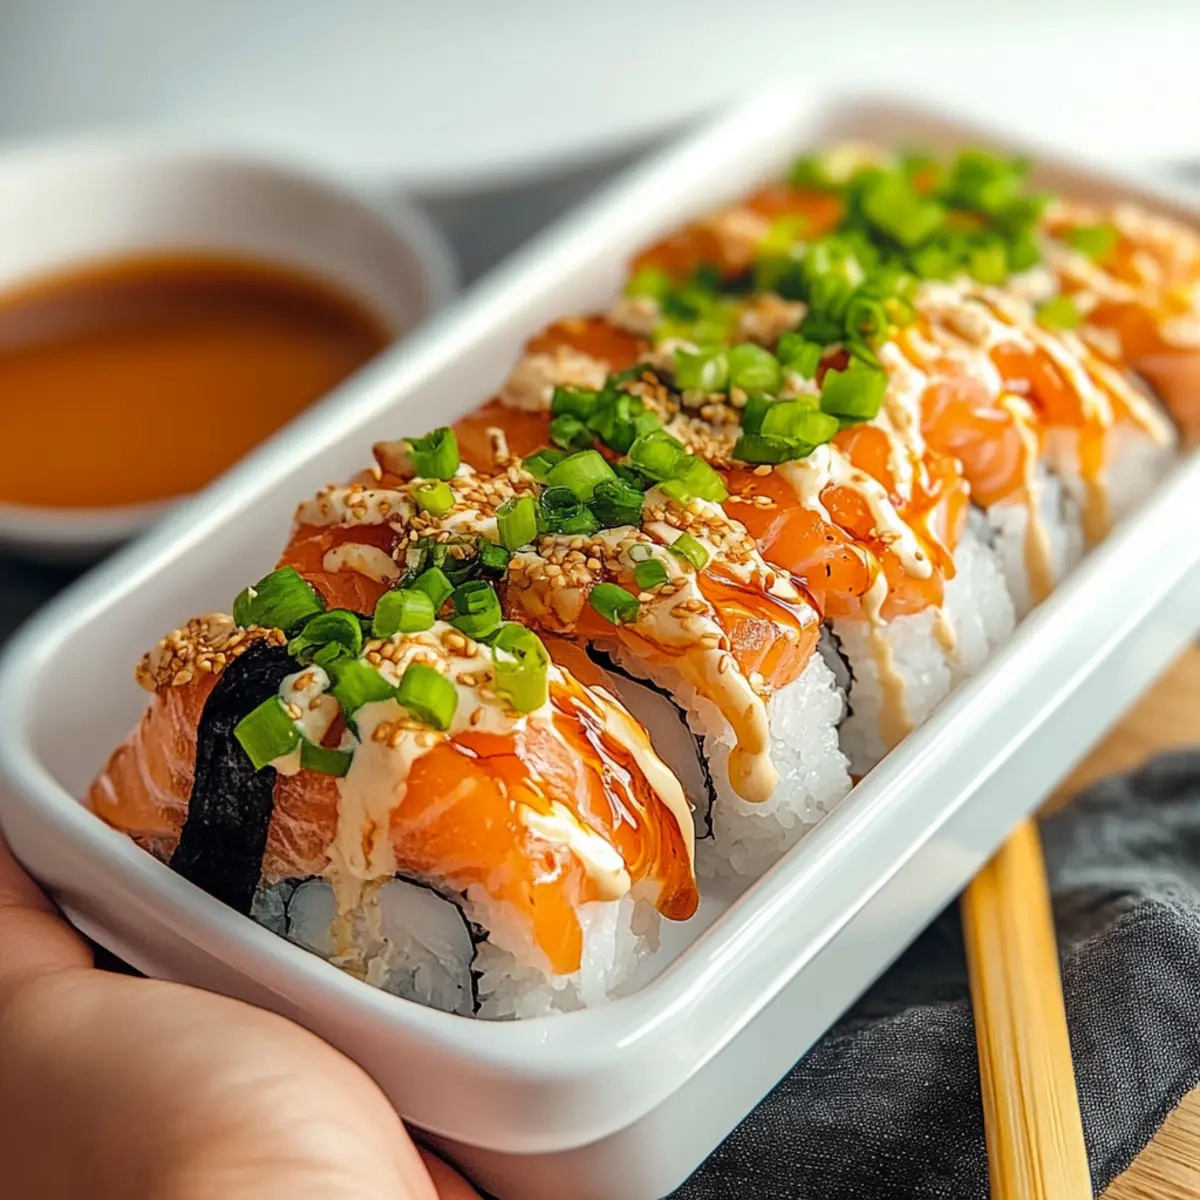
When the craving for sushi strikes, but you’re short on time and energy, I have just the culinary delight to satisfy your appetite: Salmon Sushi Bake. Imagine the mouthwatering combination of fresh salmon, creamy cheese, and perfectly cooked sushi rice—all baked to golden perfection. It’s a dish that beautifully balances convenience and flavor, making it one of my go-to meals for busy weeknights or cozy gatherings with friends.

With just a handful of ingredients and minimal prep time, this recipe transforms the sushi experience into a warm, comforting bake that everyone will love. It brings all the exciting elements of traditional sushi into a more accessible format, so you can enjoy the delightful umami flavors without the fuss of rolling sushi. Whether you’re looking to impress your loved ones or simply want a satisfying meal at home, this Salmon Sushi Bake is the perfect solution to spice up your dinner routine. Get ready to dig into a bowl of yum!

Why You'll Love This Salmon Sushi Bake

  • This Salmon Sushi Bake is incredibly easy to prepare, making it a perfect weeknight meal even for the busiest of cooks.
  • The flavor combination of fresh salmon and creamy cheese creates a deliciously rich dish that satisfies your sushi cravings without the challenge of rolling.
  • It’s also highly versatile, allowing you to customize toppings or add your favorite ingredients for a personalized touch.
  • Visually, it’s a showstopper with its golden-brown top and vibrant colors, making it a fantastic centerpiece for any gathering.

Salmon Sushi Bake Ingredients

For the Rice Layer
• Cooked sushi rice – This forms the hearty base, perfectly absorbing all the flavors.
• Low-sodium soy sauce – Adds essential umami without too much salt; use tamari as a gluten-free option.

For the Salmon Mixture
• Skinless fresh salmon fillets – Fresh salmon is key to a flavorful dish; canned salmon can be a quick substitute if needed.
• Cream cheese – Gives a rich, creamy texture; try sour cream for a tangy twist.
• Chopped green onions – Offers a fresh crunch; scallions also work nicely here.

For the Topping
• Panko breadcrumbs – Creates a delightful, crispy layer; you can use crushed crackers in a pinch.
• Nori (seaweed) – Provides that classic sushi flavor; keep it handy for garnish or a side.

Now you’ve got everything you need for your delicious Salmon Sushi Bake! Let’s bring this dish to life with love and laughter!

How to Make Salmon Sushi Bake

  1. Preheat your oven to 375°F (190°C) and give your baking dish a nice coating of nonstick spray. This ensures your tasty creation releases easily after baking!

  2. Combine the cooked sushi rice with 2 tablespoons of low-sodium soy sauce in a bowl. Spread this mixture evenly in the greased baking dish for a flavorful base.

  3. Mix the cream cheese, remaining 2 tablespoons of soy sauce, chopped green onions, and diced fresh salmon in another bowl. Stir until well combined; it should look creamy and inviting!

  4. Spread the salmon mixture generously over the rice layer. Make sure every inch is covered for that perfect blend of flavors in every bite.

  5. Top evenly with panko breadcrumbs. This will create a delightful, crispy layer that contrasts beautifully with the creamy salmon underneath.

  6. Bake for 25-30 minutes until the top is golden brown and the kitchen smells heavenly. Let it cool slightly before serving, and consider garnishing with nori for an extra touch.

Optional: Serve with a drizzle of sriracha or spicy mayo for an extra kick!
Exact quantities are listed in the recipe card below.

Storage Tips for Salmon Sushi Bake

Fridge: Store leftover Salmon Sushi Bake in an airtight container for up to 3 days. Reheat in the oven to maintain its crispy topping.

Freezer: You can freeze the baked dish for up to 2 months. Wrap it tightly with plastic wrap before placing it in a freezer-safe bag.

Reheating: When ready to enjoy, thaw overnight in the fridge and reheat in the oven at 350°F (175°C) until heated through, approximately 20 minutes.

Serving: Garnish with nori and serve fresh after reheating for the best flavor experience.

Make Ahead Options

These Salmon Sushi Bake ingredients are perfect for meal prep enthusiasts! You can prepare the rice layer and salmon mixture up to 24 hours in advance, storing each component separately in airtight containers in the refrigerator. To maintain quality and prevent the rice from drying out, add a splash of water before covering it. When you’re ready to enjoy, simply spread the salmon mixture over the rice, top with panko breadcrumbs, and bake as directed—there’s no sacrifice on flavor; it’ll be just as delicious as fresh! This way, you save time for those busy weeknights while still enjoying a comforting and delightful meal.

Salmon Sushi Bake Variations

Feel free to explore these tasty twists and substitutions to personalize your Salmon Sushi Bake experience!

  • Gluten-Free: Substitute panko breadcrumbs with crushed rice cereal or gluten-free breadcrumbs for a light and crispy topping.

  • Creamy Avocado: Replace cream cheese with ripe avocado for a fresh, creamy base that adds a touch of buttery flavor.

  • Spicy Kick: Mix in jalapeños or sriracha to the salmon mixture for an exciting heat that will wake up your taste buds!

  • Veggie Boost: Add finely chopped bell peppers or shredded carrots to the salmon mixture for extra color, crunch, and nutrition.

  • Citrus Zing: Incorporate lemon or lime zest into the salmon mixture for a refreshing burst of flavor that brightens the dish.

  • Herb Infusion: Blend in fresh herbs like dill or cilantro to the cream cheese mixture for an aromatic twist that brings an added layer of freshness.

  • Cheesy Delight: Swap the cream cheese for a blend of cheeses like sour cream and cheddar for a cheesy delight that’s comforting and rich.

  • Smoked Salmon: For a gourmet touch, use smoked salmon instead of fresh; this will infuse the dish with a wonderfully complex flavor profile.

What to Serve with Salmon Sushi Bake?

Imagine enjoying a cozy night in with friends or family, savoring a warm and flavorful meal that delights every palate.

  • Crispy Seaweed Salad: Light and crunchy, this salad complements the richness of the sushi bake with its fresh, briny flavors. The slight tang from the dressing balances beautifully against the warm, creamy baking dish.

  • Miso Soup: A warm bowl of miso soup with tofu and seaweed can accentuate the umami flavors of the sushi bake, creating a comforting experience that feels like a hug in a bowl.

  • Edamame with Sea Salt: These vibrant green soybeans add a fun, chewy texture; they’re a light, protein-packed side that complements the rich, creamy bake without overwhelming it.

  • Pickled Ginger: The bright and zesty notes of pickled ginger offer a refreshing palate cleanser between bites, enhancing the flavor experience of the rich salmon and cream cheese.

  • Sushi-Style Cucumber Rolls: Chill out with these easy rolls, filled with fresh vegetables. They introduce a refreshing crunch that contrasts nicely with the warm bake.

  • Sake or Green Tea: A delicate glass of sake will elevate your dining experience, harmonizing with the dish’s flavors. Alternatively, a warm cup of green tea can provide a soothing finish to your meal.

Enjoy crafting a delightful dining experience that turns your Salmon Sushi Bake into a memorable feast!

Chef's Helpful Tips

  • When making your Salmon Sushi Bake, ensure your sushi rice is well-cooked and sticky for the perfect texture as the base.
  • Avoid overmixing the salmon mixture; gently combine the ingredients for a delightful flavor and creamy consistency.
  • When spreading the salmon mixture, create an even layer so that every bite is packed with flavor.
  • Keep an eye on the baking time and take it out when the panko is golden brown to achieve that crispy topping without burning.
  • Using fresh salmon is crucial for the best taste, but if you have to substitute with canned salmon, drain it well to avoid excess moisture.

Salmon Sushi Bake Recipe FAQs

What type of salmon is best for the Salmon Sushi Bake?
Absolutely! Fresh skinless salmon fillets are optimal for the best flavor and texture. If you’re in a pinch, canned salmon can work as a quick substitute; just make sure to drain it well to avoid excess moisture.

How should I store leftovers of the Salmon Sushi Bake?
Store any leftover Salmon Sushi Bake in an airtight container in the refrigerator for up to 3 days. When reheating, the oven is your best friend; just pop it in at 350°F (175°C) for about 20 minutes to keep that delightful crispy topping!

Can I freeze the Salmon Sushi Bake?
Yes, you can freeze this lovely dish for up to 2 months! Make sure to wrap it tightly with plastic wrap, then place it in a freezer-safe bag to prevent freezer burn. It’s an excellent make-ahead option for busy weeknights.

How do I reheat the Salmon Sushi Bake?
To reheat, simply thaw the frozen Salmon Sushi Bake overnight in the fridge. Preheat your oven to 350°F (175°C) and place the dish inside for about 20 minutes, or until warmed through. This method helps maintain its delightful textures—so nothing goes soggy!

What can I do if my sushi rice isn’t sticky enough?
If your sushi rice isn’t holding together well, it may need more moisture or could be overcooked. I recommend adding a teaspoon of water and giving it a gentle mix before pressing it into the baking dish. If all else fails, a splash of rice vinegar can enhance stickiness and flavor!

Are there any dietary considerations I should be aware of?
Absolutely! If you’re serving anyone with allergies, be mindful that this recipe contains fish and dairy from the cream cheese. For a dairy-free option, you can substitute cream cheese with a dairy-free alternative. Additionally, always check the labels for your soy sauce to ensure it meets dietary needs, especially for gluten-free diets.

Salmon Sushi Bake

Salmon Sushi Bake

Enjoy a comforting Salmon Sushi Bake that combines fresh salmon, creamy cheese, and sushi rice for a quick, delicious meal.
Print Recipe Pin Recipe
Prep Time 15 minutes mins
Cook Time 30 minutes mins
Total Time 45 minutes mins
Servings: 4 servings
Course: DINNER RECIPES
Cuisine: Japanese
Calories: 350
Ingredients Equipment Method Nutrition Notes

Ingredients
  

For the Rice Layer
  • 2 cups cooked sushi rice
  • 2 tablespoons low-sodium soy sauce can use tamari for gluten-free
For the Salmon Mixture
  • 1 pound skinless fresh salmon fillets or canned salmon as substitute
  • 8 ounces cream cheese or sour cream for a tangy twist
  • 4 tablespoons chopped green onions or scallions
For the Topping
  • 1 cup panko breadcrumbs or crushed crackers
  • n/a n/a nori (seaweed) for garnish

Equipment

  • Baking dish
  • Mixing bowls
  • Oven

Method
 

Preparation
  1. Preheat your oven to 375°F (190°C) and coat your baking dish with nonstick spray.
  2. Combine the cooked sushi rice with 2 tablespoons of low-sodium soy sauce in a bowl and spread evenly in the baking dish.
  3. Mix the cream cheese, remaining 2 tablespoons of soy sauce, chopped green onions, and salmon in another bowl until well combined.
  4. Spread the salmon mixture over the rice layer evenly.
  5. Top with panko breadcrumbs evenly.
  6. Bake for 25-30 minutes until the top is golden brown and fragrant. Let cool slightly before serving.
  7. Optional: Garnish with nori and serve with a drizzle of sriracha or spicy mayo if desired.

Nutrition

Serving: 1servingCalories: 350kcalCarbohydrates: 45gProtein: 25gFat: 10gCholesterol: 60mgSodium: 500mgPotassium: 800mgFiber: 2gSugar: 1gVitamin A: 500IUVitamin C: 2mgCalcium: 100mgIron: 2mg

Notes

For best results, ensure your sushi rice is sticky and avoid overmixing the salmon mixture. Keep an eye on the baking time to achieve a crispy topping without burning.

Tried this recipe?

Let us know how it was!

Filed Under: DINNER RECIPES

Chicken Noodle Soup

January 7, 2026 by JudyWhite Leave a Comment

There’s nothing quite like the soothing warmth of a steaming bowl of Chicken Noodle Soup on a chilly evening. Just hearing the gentle simmer of chicken broth mingling with fresh garlic and crispy veggies transports me to my childhood kitchen, where comforting flavors came alive. This recipe has become my go-to for those busy days when I crave something hearty yet uncomplicated. After all, who doesn’t benefit from a recipe that brings together tender chicken, vibrant carrots, and egg noodles in one pot?

Often, the best meals are crafted from simple ingredients you may already have in your pantry—like the ones listed here. I can’t tell you how many times this chicken soup has turned a “meh” weekday dinner into a family favorite with just one rich, savory bite. Whether you’re coming home from a long day or simply needing a little cozy moment, this Chicken Noodle Soup promises to deliver. Let’s dive into how to make this delightful dish that warms your heart as much as it fills your belly.

Why You'll Love This Chicken Noodle Soup

  • This Chicken Noodle Soup is incredibly easy to prepare, making it a perfect weeknight dinner solution.
  • The rich, savory flavor of the broth combined with tender chicken and fresh veggies will have everyone at the table begging for seconds.
  • Its versatility means you can customize it with any vegetables or noodles you have on hand to suit your family’s tastes.
  • Not only is this soup visually appealing with its vibrant colors, but it also provides a warm, comforting embrace that makes it an instant crowd-pleaser.

Chicken Noodle Soup Ingredients

Discover the simple components that make this classic dish irresistible!

For the Soup Base
• Boneless, skinless chicken breasts – cubed for tender bites that enrich your Chicken Noodle Soup.
• Olive oil – a healthy fat that enhances the flavors of your vegetables.
• Fresh garlic – minced to infuse fragrant depth into the broth.
• Medium carrots – sliced for sweetness and a pop of color.
• Celery stalks – chopped to add a crunchy texture and earthy flavor.
• Low-sodium chicken broth – the heart of your soup; it’s vital for a savory base that isn’t too salty.

For the Noodles
• Egg noodles – these will cook beautifully, soaking up the flavors of the broth.

For the Finishing Touch
• Fresh parsley – chopped, it adds a vibrant splash of color and a fresh herbal note just before serving.

How to Make Chicken Noodle Soup

  1. Prepare your ingredients. Start by chopping the garlic, slicing the carrots and celery, and cubing the chicken. This will ensure everything cooks evenly and makes the process smooth.

  2. Sauté aromatics. In a large pot over medium heat, add olive oil. Add the minced garlic, chopped celery, and sliced carrots, sautéing until fragrant, about 3 minutes. Your kitchen will smell heavenly!

  3. Cook chicken. Add the cubed chicken to the pot, cooking until no longer pink, which should take about 5 minutes. Stir occasionally to ensure even cooking.

  4. Add broth. Pour in the low-sodium chicken broth and bring the mixture to a gentle boil. Reduce the heat and let it simmer for about 10 minutes, allowing the flavors to meld beautifully.

  5. Incorporate noodles. Stir in the egg noodles, cooking according to package instructions (usually 6-8 minutes) until they’re al dente. Keep an eye on the texture, you want them just right!

  6. Finish with parsley. Remove the soup from heat and stir in the chopped parsley just before serving. This adds a fresh pop of color and flavor!

Optional: Add a squeeze of lemon for a bright finish.

Exact quantities are listed in the recipe card below.

Make Ahead Options

These Chicken Noodle Soup preparations are a lifesaver for busy weeknights! You can chop the garlic, slice the carrots and celery, and cube the chicken up to 24 hours in advance, storing them in airtight containers in the refrigerator to maintain freshness. Additionally, you can make the soup base (steps 1-4) up to 3 days ahead—just refrigerate the broth and veggies, then reheat for an easy finish. When ready to serve, simply cook the egg noodles separately according to package instructions and stir them into the warmed soup, adding chopped parsley right before serving for that fresh touch. This meal prep strategy ensures your Chicken Noodle Soup is just as delicious and comforting when you need it most!

How to Store and Freeze Chicken Noodle Soup

Fridge: Keep uneaten Chicken Noodle Soup in an airtight container for up to 3 days. Make sure it’s cooled before sealing to maintain freshness.

Freezer: Freeze portions of the soup in freezer-safe containers for up to 3 months. Leave some space in the container as the soup will expand when frozen.

Reheating: Thaw frozen soup overnight in the fridge. Reheat on the stove over medium heat or in the microwave until piping hot. Add a bit of chicken broth if it thickens too much.

Leftovers: Store any leftovers in the fridge and enjoy warm the next day, but consider adding fresh noodles if reheating after a few days for that homemade touch!

Chicken Noodle Soup Variations

Explore delightful options to personalize your Chicken Noodle Soup and make it truly yours!

  • Vegetable-Packed: Add additional vegetables like spinach, peas, or corn for extra nutrition and flavor. The vibrant colors will make your soup even more inviting!

  • Spicy Kick: Toss in a teaspoon of red pepper flakes or diced jalapeños to bring a fiery twist to your broth. A little heat can elevate the entire experience!

  • Whole-Grain Noodles: Swap egg noodles for whole-grain pasta to boost fiber and add a nutty flavor. Your soup will still be comforting, but with a wholesome twist.

  • Herb Infusion: Experiment with different herbs like thyme, rosemary, or dill for a unique aroma and taste. Each herb brings its own charm, transforming the classic into something extraordinary.

  • Creamy Comfort: Stir in a splash of heavy cream or coconut milk for a rich and creamy texture that soothes the soul. This variation is perfect for those seeking an indulgent experience.

  • Savory Lemon Zest: Grate a little lemon zest into the soup before serving to brighten the flavors. The citrusy note will refresh and enhance the overall taste.

  • Protein Boost: For a heartier soup, add in beans or lentils alongside the chicken. This variation is a fantastic way to increase the protein content while making it even more filling.

  • Gluten-Free Option: Substitute egg noodles with gluten-free pasta to cater to different dietary needs while still enjoying the flavors you love. Your family won’t even notice the difference!

What to Serve with Chicken Noodle Soup?

Elevate your cozy meal experience by pairing your steaming bowl of Chicken Noodle Soup with these delightful side dishes and beverages.

  • Garlic Bread: Crispy on the outside and soft inside, it’s perfect for dipping into your savory broth.
  • Mixed Green Salad: A fresh salad with tangy vinaigrette offers a bright contrast to the comforting flavors of the soup.
  • Homemade Croutons: Adding crunchy, buttery croutons brings an exciting texture that pairs beautifully with each spoonful of soup.
  • Steamed Broccoli: This dish complements your soup with its wholesome green hue and adds a nutritious element to your meal.
  • Crisp Apple Slices: Fresh, sweet apple slices provide a refreshing palate cleanser between each warm bite of your chicken noodle delight.
  • Herbal Tea: An aromatic herbal tea matches the soothing qualities of your soup, creating a harmonious warm experience.
  • Chocolate Chip Cookies: For a sweet ending, these classic cookies bring a delightful touch of nostalgia to your cozy dinner.
  • Spiced Cider: Warm spiced cider can warm you from the inside out, enhancing the overall comforting theme of your meal.

Chef's Helpful Tips

  • For the best Chicken Noodle Soup, ensure your chicken is cut into uniform cubes for even cooking.
  • Avoid overcooking the egg noodles by checking them a minute or two before the package instructions say they should be done.
  • When sautéing your vegetables, let them cook until they are just tender to maximize their flavor without losing texture.
  • Always taste your broth and adjust the seasoning as needed before adding the egg noodles for a perfectly balanced soup.

Chicken Noodle Soup Recipe FAQs

What is the best choice for chicken in this recipe?
Absolutely! I recommend using boneless, skinless chicken breasts for this Chicken Noodle Soup. They cook quickly and remain tender, enhancing the soup’s richness. If you prefer, thighs can add more flavor and juiciness, so don’t hesitate to mix it up based on your family’s preferences!

How should I store leftover Chicken Noodle Soup?
After enjoying your delicious soup, store any leftovers in an airtight container in the fridge. It will stay fresh for up to 3 days. Ensure it has cooled down to room temperature before sealing to lock in the flavor and maintain texture. Simply reheat when you’re ready to savor it again!

Can I freeze Chicken Noodle Soup?
Absolutely! To freeze your Chicken Noodle Soup, ladle portions into freezer-safe containers, leaving about an inch at the top for expansion. Properly sealed, it can last for up to 3 months. When you’re ready to enjoy, thaw it overnight in the fridge and reheat over medium heat, adding a little extra broth if it thickens too much.

What if the noodles are overcooked?
Very common! If you find that you’ve overcooked the noodles, don’t fret! Just add more broth to the soup as you reheat it, and perhaps toss in fresh noodles when serving to revive that perfect texture. This will make it feel like a fresh pot of Chicken Noodle Soup again!

Can I make this soup gluten-free?
Yes! To make a gluten-free version of Chicken Noodle Soup, simply substitute the regular egg noodles with gluten-free pasta. There are plenty of delicious options available now that hold up beautifully in broth. Just keep an eye on the cooking time, as gluten-free noodles may have different cooking needs.

Is it safe for pets?
While Chicken Noodle Soup is a delightful treat for humans, it’s best to avoid giving it to your pets. Ingredients like garlic can be harmful to dogs and cats, so stick with pet-safe food when sharing your kitchen creations with your furry friends!

Chicken Noodle Soup

Chicken Noodle Soup

Savor the warmth of Chicken Noodle Soup, an easy weeknight dinner that comforts with tender chicken, vibrant veggies, and egg noodles.
Print Recipe Pin Recipe
Prep Time 15 minutes mins
Cook Time 25 minutes mins
Total Time 40 minutes mins
Servings: 4 bowls
Course: DINNER RECIPES
Cuisine: American
Calories: 320
Ingredients Equipment Method Nutrition Notes

Ingredients
  

For the Soup Base
  • 1 pound boneless, skinless chicken breasts cubed
  • 2 tablespoons olive oil for sautéing
  • 3 cloves fresh garlic minced
  • 2 medium carrots sliced
  • 2 stalks celery chopped
  • 6 cups low-sodium chicken broth
For the Noodles
  • 2 cups egg noodles
For the Finishing Touch
  • 1/4 cup fresh parsley chopped

Equipment

  • Large pot

Method
 

Prep and Cook
  1. Prepare your ingredients. Start by chopping the garlic, slicing the carrots and celery, and cubing the chicken.
  2. In a large pot over medium heat, add olive oil. Add the minced garlic, chopped celery, and sliced carrots, sautéing until fragrant, about 3 minutes.
  3. Add the cubed chicken to the pot, cooking until no longer pink, about 5 minutes.
  4. Pour in the low-sodium chicken broth and bring the mixture to a gentle boil. Reduce the heat and let it simmer for about 10 minutes.
  5. Stir in the egg noodles, cooking according to package instructions until they're al dente.
  6. Remove the soup from heat and stir in the chopped parsley just before serving.

Nutrition

Serving: 1bowlCalories: 320kcalCarbohydrates: 35gProtein: 25gFat: 10gSaturated Fat: 1.5gPolyunsaturated Fat: 0.5gMonounsaturated Fat: 3gCholesterol: 70mgSodium: 700mgPotassium: 600mgFiber: 2gSugar: 3gVitamin A: 500IUVitamin C: 7mgCalcium: 30mgIron: 2mg

Notes

For the best flavor, taste the broth and adjust seasoning as needed before adding the noodles.

Tried this recipe?

Let us know how it was!

Filed Under: DINNER RECIPES

Anna Paul’s Turkish Pasta

January 7, 2026 by JudyWhite Leave a Comment

There’s nothing quite like the warmth of home-cooked meals, especially when you can savor flavors from far-off places. When I first tried Anna Paul’s Turkish Pasta, I found myself captivated by its tantalizing mix of spices and hearty ingredients that transform a simple weeknight dinner into a culinary adventure. The moment I sautéed the garlic and onions, the heavenly aroma filled my kitchen, transporting me right to a bustling market in Turkey.

With just a handful of ingredients like ground lamb or beef, fresh tomatoes, and fragrant cumin, this dish offers bold flavors without the fuss. It’s a game-changer for anyone tired of the same takeout routine! Perfect for a cozy family dinner, this recipe not only serves up comfort but also impresses friends during gatherings. Join me as we whip up this delightful, nourishing meal that’s sure to become a staple in your home.

Why You'll Love This Anna Paul’s Turkish Pasta

  • This recipe is a breeze to prepare, making it perfect for busy weeknights when you want something delicious without the hassle.
  • The rich combination of spices and savory meat creates an explosion of flavor that will leave your taste buds dancing.
  • Its versatility allows you to easily swap ingredients based on your preferences, whether you choose lamb, beef, or even a vegetarian option.
  • Plus, the vibrant presentation garnished with fresh parsley not only looks stunning but also makes it a crowd-pleaser that will impress your family and friends.

Anna Paul’s Turkish Pasta Ingredients

• Get ready to dive into a flavor-packed culinary journey!

For the Pasta
• 8 oz pasta – choose your favorite type, like penne or fusilli, for the perfect texture.

For the Meat Sauce
• 1 lb ground lamb or beef – opt for lamb for an authentic taste, or use beef for a milder flavor.
• 1 medium onion, diced – adds sweetness and depth to the sauce.
• 4 cloves garlic, minced – infuses the dish with aromatic goodness.
• 14 oz diced tomatoes – brings acidity and moisture, balancing the richness of the meat.
• 2 tsp cumin – imparts that earthy warmth characteristic of Turkish cuisine.
• 2 tsp paprika – provides a subtle smokiness and vibrant color.

For Seasoning
• Salt and pepper to taste – essential for enhancing all those delicious flavors.

For Garnishing
• Fresh parsley, chopped – brightens up the dish and adds a pop of color with every bite!

This Anna Paul’s Turkish Pasta is a delightful blend of comforting ingredients that transforms your dinner into an exotic experience!

How to Make Anna Paul’s Turkish Pasta

  1. Cook the pasta according to package instructions until al dente, about 8-10 minutes. Drain and set aside, letting it rest so it retains its firm texture for the sauce.

  2. Brown the ground meat in a large skillet over medium heat. Cook until fully browned, approximately 5-7 minutes, and drain any excess fat if necessary. This will keep your dish from becoming greasy.

  3. Sauté the diced onion in the same skillet until translucent, about 3-4 minutes. This adds a sweet depth, then stir in the minced garlic and cook for an additional minute until fragrant.

  4. Stir in the diced tomatoes, cumin, and paprika; mix well and allow the mixture to simmer for about 10 minutes. The spices will bloom beautifully, creating a tantalizing aroma.

  5. Combine the cooked pasta with the sauce in the skillet, gently tossing until all the noodles are well coated with the rich, savory sauce. This is where the flavors unite!

  6. Serve garnished with fresh parsley for a vibrant finish that brings a lovely touch to your meal. Enjoy every bite of this flavorful dish!

Optional: Add a sprinkle of crushed red pepper for an extra kick!
Exact quantities are listed in the recipe card below.

What to Serve with Anna Paul’s Turkish Pasta?

Elevate your meal with delightful sides that enhance the rich, savory flavors of this dish.

  • Tzatziki Sauce: A refreshing yogurt and cucumber dip that complements the spices beautifully, adding a cool contrast.

  • Garlic Bread: Crunchy and buttery, it’s perfect for soaking up the delicious sauce left on your plate, leaving nothing behind.

  • Roasted Vegetables: Caramelized seasonal veggies add a sweet earthiness, balancing the hearty pasta and meat with colorful flair.

  • Couscous Salad: A light yet filling side with fresh herbs and vinaigrette to brighten up the meal, bringing a Mediterranean vibe.

  • Olive Oil Drizzled Hummus: Creamy hummus with warm pita adds a nice dip to start your meal, offering a touch of creaminess that pairs perfectly.

  • Pomegranate Molasses: Drizzle over the pasta for an unexpected sweet-tart contrast that elevates the whole dish to new heights.

For drinks, consider a glass of red wine to enhance the rich flavors or a light lemonade to cleanse the palate, making every bite of Anna Paul’s Turkish Pasta an experience to savor!

Make Ahead Options

These Anna Paul’s Turkish Pasta are perfect for meal prep aficionados! You can cook the pasta and meat sauce up to 3 days in advance, allowing for seamless weeknight dinners. Simply prepare the pasta as directed and cool it before storing it in an airtight container in the refrigerator to prevent sticking. Additionally, the meat sauce can be made and refrigerated; just make sure it cools before sealing it tightly. When you’re ready to enjoy, simply reheat the sauce on the stove over low heat while you warm the pasta in hot water for a few minutes. This method ensures that your meal retains its quality, flavor, and comfort, making dinner a breeze during busy nights!

Anna Paul’s Turkish Pasta Variations

Feel free to personalize this delightful dish and let your creativity shine through!

  • Veggie-Loaded: Add your favorite vegetables like spinach, bell peppers, or zucchini for a nutrient boost and vibrant color. These additions not only enhance the nutrition but also bring wonderful texture and freshness to the meal.

  • Spicy Kick: Sprinkle in some crushed red pepper flakes or diced jalapeños to kick up the heat. A little spice can transform the dish into something truly exciting, making each bite a delightful surprise!

  • Herb Infusion: Substitute fresh parsley with fresh mint or dill for a refreshing twist. These herbs will infuse your dish with a unique flavor profile that dances on your palate and brightens the meal.

  • Cheesy Goodness: Mix in a handful of crumbled feta or shredded mozzarella for a creamy finish. The melting cheese adds a luxurious texture that pairs beautifully with the hearty sauce.

  • Whole Grain: Swap out regular pasta for whole grain or chickpea pasta for added fiber and protein. This simple change can elevate the health factor while providing a satisfying chew.

  • Lentil Option: Use cooked lentils in place of ground meat for a fabulous vegetarian twist. This swap brings a hearty texture and earthy flavor while keeping your meal fulfilling.

  • Coconut Cream: Stir in a splash of coconut cream for a rich, tropical flair. The creamy sweetness complements the spices to create a truly comforting dish that’s both unique and delicious.

  • Mediterranean Flair: Add olives or artichoke hearts to embrace Mediterranean flavors. The briny notes can elevate the dish with an exciting burst of flavor, taking your taste buds on a journey.

Enjoy exploring these variations, and make this recipe your very own masterpiece!

How to Store and Freeze Anna Paul’s Turkish Pasta

  • Fridge: Store leftover Anna Paul’s Turkish Pasta in an airtight container for up to 3 days. Reheat gently on the stove or in the microwave, adding a splash of water to maintain moisture.
  • Freezer: For longer storage, freeze the pasta in a freezer-safe container for up to 2 months. Thaw in the fridge overnight before reheating.
  • Reheating: To reheat, warm on low heat in a pan, stirring occasionally, or microwave in 1-minute intervals until heated through. Enjoy the comfort of this delightful dish again!

Chef's Helpful Tips

  • When preparing Anna Paul’s Turkish Pasta, ensure your pasta is cooked al dente to prevent it from becoming mushy when mixed with the sauce.
  • A common mistake is not draining excess fat from the browned meat, which can make your dish greasy, so drain it well after cooking.
  • To maximize flavor, let the diced tomatoes and spices simmer long enough to allow the spices to bloom and meld together, enhancing the overall taste.
  • Finally, toss the pasta with the sauce gently, allowing it to absorb those delicious flavors without breaking the noodles.

Anna Paul’s Turkish Pasta Recipe FAQs

How do I choose the right pasta for Anna Paul’s Turkish Pasta?
Absolutely! You can choose any pasta shape you love, but I recommend using shapes like penne or fusilli as they hold the sauce beautifully. Make sure to look for pasta that’s firm and has no dark spots or visible cracks for the best cooking results.

How should I store leftover Anna Paul’s Turkish Pasta?
Very simply! Store any leftovers in an airtight container in the fridge for up to 3 days. Just reheat gently on the stove or in the microwave, adding a splash of water to keep it moist and delicious.

Can I freeze Anna Paul’s Turkish Pasta for later?
Of course! To freeze, transfer the pasta to a freezer-safe container and store it for up to 2 months. When you’re ready to enjoy it again, thaw it in the fridge overnight, then reheat on low heat, stirring occasionally, or microwave in 1-minute intervals until warmed through.

What if my sauce seems too thin while cooking?
No worries! If your sauce feels too runny, simply let it simmer uncovered for a bit longer, around 5-10 minutes, until it thickens to your desired consistency. If you like, you can also add a little more diced tomatoes which will not only help thicken but contribute more flavor!

Are there any dietary considerations I should keep in mind?
Definitely! If cooking for people with specific dietary needs, you can easily swap the ground lamb or beef for a plant-based alternative like lentils or a meat substitute to make it vegetarian or vegan. Just ensure that any substitutes are cooked appropriately. Also, check for allergies with ingredients like tomatoes and spices.

Anna Paul’s Turkish Pasta

Anna Paul’s Turkish Pasta

Experience the delightful flavors of Anna Paul’s Turkish Pasta, a savory dish filled with spices and hearty ingredients.
Print Recipe Pin Recipe
Prep Time 10 minutes mins
Cook Time 30 minutes mins
Total Time 40 minutes mins
Servings: 4 servings
Course: DINNER RECIPES
Cuisine: Turkish
Calories: 450
Ingredients Equipment Method Nutrition Notes

Ingredients
  

For the Pasta
  • 8 oz pasta choose your favorite type, like penne or fusilli
For the Meat Sauce
  • 1 lb ground lamb or beef lamb for authentic taste or beef for milder flavor
  • 1 medium onion, diced adds sweetness and depth
  • 4 cloves garlic, minced for aromatic goodness
  • 14 oz diced tomatoes brings acidity and moisture
  • 2 tsp cumin imparts earthy warmth
  • 2 tsp paprika provides smokiness and color
For Seasoning
  • Salt and pepper to taste
For Garnishing
  • Fresh parsley, chopped to brighten the dish

Equipment

  • Large skillet
  • Pot
  • measuring cups
  • Knife
  • Cutting Board

Method
 

Cooking Instructions
  1. Cook the pasta according to package instructions until al dente, about 8-10 minutes. Drain and set aside.
  2. Brown the ground meat in a large skillet over medium heat for about 5-7 minutes, then drain any excess fat.
  3. Sauté the diced onion until translucent for about 3-4 minutes, then stir in the minced garlic and cook for an additional minute.
  4. Stir in the diced tomatoes, cumin, and paprika; mix well and let the mixture simmer for about 10 minutes.
  5. Combine the cooked pasta with the sauce in the skillet, gently tossing until well coated.
  6. Serve garnished with fresh parsley for a vibrant finish.

Nutrition

Serving: 1servingCalories: 450kcalCarbohydrates: 45gProtein: 30gFat: 15gSaturated Fat: 6gPolyunsaturated Fat: 1gMonounsaturated Fat: 4gCholesterol: 80mgSodium: 650mgPotassium: 600mgFiber: 3gSugar: 5gVitamin A: 500IUVitamin C: 15mgCalcium: 40mgIron: 3mg

Notes

Optional: Add a sprinkle of crushed red pepper for an extra kick. Ensure pasta is finished al dente, and drain excess fat from meat to avoid greasiness.

Tried this recipe?

Let us know how it was!

Filed Under: DINNER RECIPES

Slow Cooker Greek Chicken

January 6, 2026 by JudyWhite Leave a Comment

There’s something truly enchanting about the combination of tender chicken and bold Mediterranean flavors, all simmering away in your slow cooker. As I tossed together the ingredients for this Slow Cooker Greek Chicken, I could already imagine the burst of zest from lemon juice mingling with the aromatic allure of garlic and oregano. It’s the kind of dish that not only warms the soul but also brings a bit of sunshine into your kitchen, no matter the season.

After a busy day juggling work and family, the last thing I want is to fuss over dinner. This recipe is perfect for those hectic evenings, allowing the slow cooker to do the heavy lifting while I focus on other things. With each convincing bite of juicy chicken, tangy feta, and fresh tomatoes, you’ll find yourself transported straight to coastal Greece. Trust me, this dish will impress both your family and guests, without causing any stress. So grab your slow cooker and let’s make a meal that perfectly balances ease and flavor!

Why You'll Love This Slow Cooker Greek Chicken

  • This recipe shines in its simplicity, allowing you to enjoy a delicious meal with minimal effort.
  • The combination of tender chicken and bold Mediterranean flavors guarantees a fantastic experience for your taste buds.
  • Its versatility means you can easily serve it over rice, in a wrap, or alongside a fresh salad to suit any occasion.
  • The visually appealing presentation topped with crumbled feta and fresh herbs makes it perfect for impressing guests at dinner parties.

Slow Cooker Greek Chicken Ingredients

Let’s get you started with the essential ingredients for your Slow Cooker Greek Chicken!

For the Chicken
• Boneless, skinless chicken breasts – about 1.5 lbs is perfect for juicy, tender meat.
• Salt and pepper – essential for seasoning the chicken to perfection.

For the Flavor Base
• Fresh garlic – 3 cloves, minced for a fragrant kick that elevates the dish.
• Extra-virgin olive oil – 2 tbsp, which adds richness and helps the garlic sauté beautifully.
• Dried oregano – 2 tsp, a staple in Greek cuisine that infuses a lovely herbal note.
• Fresh lemon juice – 2 tbsp allows a zesty brightness that complements the dish.

For the Sauce
• Diced tomatoes – 1 can (14.5 oz) with no added sugar or salt helps keep flavors clean and vibrant.

For the Topping
• Crumbled feta cheese – 4 oz adds a creamy and salty finish that takes this dish over the top!

Dive into these ingredients, and you’ll find the heart of your Slow Cooker Greek Chicken waiting for you!

How to Make Slow Cooker Greek Chicken

  1. Dry and Season: Pat chicken breasts dry to remove moisture, then season generously with salt and pepper. This step is crucial for enhancing the flavor of your Slow Cooker Greek Chicken!

  2. Sauté Garlic: Heat olive oil in a skillet over medium heat. Add minced garlic and sauté until fragrant, about 1 minute. The fragrant aroma will tantalize your senses and lay the foundation for a delicious meal.

  3. Layer Ingredients: In your slow cooker, layer the seasoned chicken breasts. Top them with the sautéed garlic, dried oregano, freshly squeezed lemon juice, diced tomatoes, and crumbled feta cheese. This creates a beautiful mosaic of flavors.

  4. Cook Slowly: Cover the slow cooker and cook on low for 6-8 hours or on high for 3-4 hours. The chicken will become incredibly tender as it absorbs all those wonderful Mediterranean flavors.

  5. Shred Chicken: Once cooked, use two forks to shred the chicken in the slow cooker. Mix everything to combine the ingredients thoroughly; the dish will become a deliciously unified masterpiece.

  6. Serve and Garnish: Serve your Slow Cooker Greek Chicken drizzled with extra olive oil or a splash of lemon juice for added brightness. If you love feta, garnish with more for a delightful finish!

Optional: Serve with fresh parsley or basil for extra color and aroma.
Exact quantities are listed in the recipe card below.

How to Store and Freeze Slow Cooker Greek Chicken

Fridge: Store leftovers in an airtight container for up to 3 days. Make sure to let the Slow Cooker Greek Chicken cool before sealing to maintain freshness.

Freezer: For longer storage, freeze the chicken in airtight bags or containers for up to 3 months. Consider portioning for easy reheating later!

Reheating: Thaw frozen chicken overnight in the fridge. Reheat gently on the stove or in the microwave until heated through, adding a splash of broth or water if needed to keep it moist.

Serving Suggestions: Enjoy the Slow Cooker Greek Chicken warm over rice, in a wrap, or alongside a fresh salad for a delightful meal that feels like a warm embrace!

Slow Cooker Greek Chicken Variations

Feel free to mix and match these variations for a personalized twist on your Slow Cooker Greek Chicken!

  • Spicy Kick: Add 1-2 tsp of red pepper flakes to the slow cooker for a delightful heat that elevates each bite.

  • Herb Mix: Swap oregano for a blend of dried thyme and rosemary for a fresh herbaceous flavor, reminiscent of a Mediterranean garden.

  • Veggie Boost: Throw in a handful of chopped bell peppers or zucchini in the last hour of cooking for extra color and nutrition. The added veggies will soak up those delicious flavors!

  • Mediterranean Twist: Consider adding black olives or sun-dried tomatoes for a tangy bite that enhances the overall Mediterranean vibe of the dish.

  • Creamy Addition: Incorporate a few tablespoons of plain Greek yogurt just before serving for a creamy texture that beautifully complements the feta.

  • Citrus Variation: Experiment with different citrus juices, like orange or lime, to switch things up and create a delightful citrusy flair that will brighten the dish.

  • Noodle Alternative: Serve the shredded chicken mixture over cooked orzo, or nest it into warm pita pockets for a fun, filling meal that’s perfect for a picnic!

  • Slow Cooker Stew: Add a cup of chicken broth and diced potatoes or carrots at the beginning to create a hearty stew that’s perfect for cozy nights.

Make Ahead Options

These Slow Cooker Greek Chicken preparations are a fantastic time-saver for busy weeknights! You can season and layer the chicken along with the garlic, oregano, lemon juice, diced tomatoes, and feta cheese up to 24 hours in advance. Simply cover and refrigerate the assembled ingredients, ensuring they stay fresh. When you’re ready to enjoy, just pop the slow cooker on low for 6-8 hours or high for 3-4 hours. This method not only saves you time but also allows the flavors to meld beautifully, ensuring your meal is just as delicious as if you had cooked it on the spot. Finish by shredding the chicken in the slow cooker before serving, and you’ll have a Mediterranean feast with minimal effort!

What to Serve with Slow Cooker Greek Chicken?

Transform your dinner table into a captivating Mediterranean feast with flavorful accompaniments that enhance each bite.

  • Fluffy Couscous: The light, grainy texture of couscous soaks up the savory juices of the chicken, creating a perfect harmony on your plate. Pairing it with a touch of olive oil and lemon gives it a refreshing kick!

  • Tzatziki Sauce: This creamy cucumber-yogurt sauce adds a cool, tangy contrast, brightening each forkful of chicken and adding a delightful freshness that dances on your palate.

  • Greek Salad: Crisp cucumbers, juicy tomatoes, and tangy olives complement the rich flavors of the chicken, providing a refreshing crunch. Toss with a simple lemon-olive oil dressing for an extra zing!

  • Garlic Bread: Golden, toasted bread with garlic butter is just begging to be slathered with the slow-cooked juices of the chicken. It’s perfect for mopping up every last drop of flavor!

  • Lemon Orzo: The zesty, buttery delight of lemon-infused orzo adds a delightful twist, creating a comforting bed for your succulent chicken while tying in the recipe’s bright Mediterranean essence.

  • Grilled Vegetables: Charred bell peppers, zucchini, and eggplant add a smoky depth that enhances the flavors of the chicken, making each bite a festival of textures and tastes.

  • Refreshing White Wine: A chilled glass of Sauvignon Blanc or Pinot Grigio enhances the Mediterranean flavors, offering a crisp, fruity companion that balances the savory richness of the dish.

  • Baklava: Finish with this sweet, nutty pastry for a delightful contrast. The honey and spice flavors of baklava create a perfect ending to your Greek-inspired meal!

Chef's Helpful Tips

  • For your Slow Cooker Greek Chicken, ensure you pat the chicken breasts dry before seasoning them as this helps the spices adhere better.
  • Avoid overcrowding the slow cooker, as this can lead to uneven cooking; if necessary, cook in batches.
  • When sautéing the garlic, be careful not to overcook it as burnt garlic can impart a bitter flavor to the dish.
  • For the best results, cook on low for the full duration of 6-8 hours to achieve perfectly tender chicken that easily shreds.

Slow Cooker Greek Chicken Recipe FAQs

What type of chicken should I use?
Absolutely! I recommend using boneless, skinless chicken breasts for this Slow Cooker Greek Chicken. They cook evenly and become tender as they absorb the delicious flavors from the sauce. If you prefer dark meat, chicken thighs also work beautifully!

How should I store leftover Slow Cooker Greek Chicken?
Store any leftovers in an airtight container in the fridge for up to 3 days. It’s important to let the chicken cool completely before sealing it to maintain its freshness. You can easily enjoy these leftovers for quick lunches or dinners!

Can I freeze Slow Cooker Greek Chicken?
Yes, you can! To freeze, let the chicken cool and then transfer it to airtight freezer bags or containers. Make sure to label them with the date; it will keep well for up to 3 months. Just remember to thaw it overnight in the fridge before reheating.

How can I reheat this dish without drying it out?
To reheat your Slow Cooker Greek Chicken, gently warm it on the stove over low heat, adding a splash of chicken broth or water to maintain moisture. You can also pop it in the microwave, covered, checking every minute until heated through. This will keep it juicy and flavorful!

Are there any dietary considerations with this recipe?
Definitely! This dish is naturally gluten-free, making it suitable for those with gluten sensitivities. However, keep an eye on the feta cheese if you’re managing specific dietary restrictions, as it contains dairy. If you have a dairy allergy, you can substitute the feta with dairy-free cheese or leave it out altogether for a lighter version!

Slow Cooker Greek Chicken

Slow Cooker Greek Chicken

Enjoy a delightful Slow Cooker Greek Chicken with tender chicken and bold Mediterranean flavors, perfectly easy for busy evenings.
Print Recipe Pin Recipe
Prep Time 15 minutes mins
Cook Time 6 hours hrs
Total Time 6 hours hrs 15 minutes mins
Servings: 4 servings
Course: DINNER RECIPES
Cuisine: Mediterranean
Calories: 320
Ingredients Equipment Method Nutrition Notes

Ingredients
  

For the Chicken
  • 1.5 lbs boneless, skinless chicken breasts
  • to taste salt
  • to taste pepper
For the Flavor Base
  • 3 cloves fresh garlic, minced
  • 2 tbsp extra-virgin olive oil
  • 2 tsp dried oregano
  • 2 tbsp fresh lemon juice
For the Sauce
  • 1 can (14.5 oz) diced tomatoes, with no added sugar or salt
For the Topping
  • 4 oz crumbled feta cheese

Equipment

  • Slow Cooker
  • Skillet

Method
 

Directions
  1. Pat chicken breasts dry to remove moisture and season generously with salt and pepper.
  2. Heat olive oil in a skillet over medium heat. Add minced garlic and sauté until fragrant, about 1 minute.
  3. In your slow cooker, layer the seasoned chicken breasts. Top with sautéed garlic, dried oregano, lemon juice, diced tomatoes, and crumbled feta cheese.
  4. Cover the slow cooker and cook on low for 6-8 hours or on high for 3-4 hours.
  5. Once cooked, use two forks to shred the chicken in the slow cooker, mixing everything thoroughly.
  6. Serve drizzled with extra olive oil or a splash of lemon juice, and garnish with more feta if desired.

Nutrition

Serving: 1servingCalories: 320kcalCarbohydrates: 5gProtein: 34gFat: 18gSaturated Fat: 6gPolyunsaturated Fat: 2gMonounsaturated Fat: 8gCholesterol: 90mgSodium: 500mgPotassium: 700mgFiber: 1gSugar: 3gVitamin A: 500IUVitamin C: 10mgCalcium: 200mgIron: 1mg

Notes

Serve with fresh parsley or basil for extra color and aroma. Store leftovers in an airtight container for up to 3 days.

Tried this recipe?

Let us know how it was!

Filed Under: DINNER RECIPES

Crockpot Chicken

January 6, 2026 by JudyWhite Leave a Comment

There’s something incredibly soothing about coming home to the delightful aroma of Crockpot Chicken wafting through the air. Just thinking about it transports me to cozy dinners and warm gatherings with loved ones. I stumbled upon this recipe during one of those whirlwind weeks when fast food seemed like the only option, and I desperately craved something wholesome and satisfying.

The beauty of this dish lies not only in its remarkable flavor but also in its effortless preparation—just ten minutes of hands-on time, and your slow cooker does the rest! With tender chicken marinated in a rich blend of honey, soy sauce, and garlic, it’s a sweet-and-savory delight that the whole family will adore. Whether you serve it over rice, toss it into tacos, or enjoy it on its own, this versatile meal promises to delight your taste buds while alleviating the stress of dinner prep. Let’s dive into this culinary journey and reclaim home-cooked meals with this comforting slow-cooked chicken recipe!

Why You'll Love This Crockpot Chicken

  • This Crockpot Chicken is incredibly easy to make, requiring just ten minutes of prep time so you can enjoy a delicious meal without the fuss.
  • The flavor is absolutely unforgettable, combining sweet honey and savory soy sauce with tender garlic-infused chicken that will keep everyone coming back for seconds.
  • Its versatility allows you to serve it in various ways, whether over rice, in tacos, or on its own, making it perfect for any occasion.
  • Finally, the appealing aroma and rich colors will impress your family and friends, turning an ordinary dinner into an extraordinary experience.

Crockpot Chicken Ingredients

• Get ready for a flavorful adventure in your kitchen!

For the Chicken

  • Boneless, skinless chicken breasts – Choose high-quality chicken for the best texture and flavor in your Crockpot Chicken.

For the Sauce

  • Garlic – Freshly minced garlic adds an aromatic kick to your dish.
  • Low-sodium soy sauce – This keeps the overall sodium content in check while enhancing the savory depth of the sauce.
  • Honey – The perfect balance of sweetness that beautifully complements the savory soy sauce.
  • Low-sodium chicken broth – This adds moisture and richness to your Crockpot Chicken without excess salt.

How to Make Crockpot Chicken

  1. Pat chicken breasts dry with paper towels. This simple step helps the chicken absorb the flavors of the sauce, ensuring every bite is juicy and delicious.

  2. Whisk together soy sauce, honey, minced garlic, and chicken broth in a bowl until well combined. This rich mixture is the heart of your Crockpot Chicken, balancing sweet and savory flavors beautifully.

  3. Place chicken breasts in the crockpot and pour the sauce over them. Ensure the chicken is evenly coated, allowing those enticing flavors to seep in as it cooks.

  4. Cover and cook on low for 6-8 hours or high for 3-4 hours until the internal temperature reaches at least 165°F (75°C). The low-and-slow method helps your chicken become incredibly tender and flavorful.

  5. Shred the chicken in the pot using two forks. Allow it to soak up the remaining sauce for an extra burst of flavor, then serve with an additional drizzle over the top.

Optional: Serve with steamed rice or crunchy tacos for a delightful meal.
Exact quantities are listed in the recipe card below.

Storage Tips for Crockpot Chicken

Fridge: Store leftover Crockpot Chicken in an airtight container for up to 3 days. This keeps it fresh while preserving its delicious flavor.

Freezer: If you plan to keep it longer, freeze the shredded chicken in a freezer-safe bag for up to 3 months. Label the bag with the date to keep track of freshness.

Reheating: Thaw frozen chicken overnight in the fridge before reheating. Warm it in the microwave or on the stovetop, adding a splash of chicken broth for moisture if needed.

Room Temperature: Avoid leaving out leftover Crockpot Chicken at room temperature for more than 2 hours to maintain safety and quality.

What to Serve with Crockpot Chicken?

The comforting flavors of slow-cooked chicken invite a delightful ensemble to accompany your meal.

  • Steamed Jasmine Rice: This fragrant rice is the perfect canvas to soak up the delicious sauce, enhancing every bite of chicken.

  • Garlic Green Beans: Crunchy green beans sautéed in garlic add a fresh, vibrant touch that balances the richness of the chicken.

  • Creamy Coleslaw: The cool creaminess of coleslaw provides a refreshing contrast, adding texture and crunch to your plate.

  • Roasted Vegetables: Seasonal veggies roasted until tender and caramelized bring a sweet earthiness that complements the savory notes of the chicken.

  • Crispy Tacos: Scoop up shredded Crockpot Chicken into corn or flour tortillas for a fun, hands-on meal that’s bursting with flavor.

  • Cilantro Lime Quinoa: This light and zesty quinoa is nourishing and adds a bright pop of flavor, perfectly harmonizing with the sweet-and-savory chicken.

  • Mango Salsa: A refreshing mango salsa drizzled atop your chicken offers a citrusy brightness, introducing a delightful twist to each mouthful.

  • Sweet Tea: Enjoy a classic sweet tea alongside your meal for a cooling sip that complements the flavors beautifully.

  • Chocolate Chip Cookies: Wrap up the evening with warm, gooey cookies—these sweet treats are a delightful way to finish your comfort food experience.

Crockpot Chicken Variations

Feel free to explore and make this recipe your own with delightful twists and substitutions!

  • Spicy Kick: Add a tablespoon of sriracha or your favorite hot sauce for a spicy flavor boost that ignites your taste buds. The heat beautifully contrasts the sweetness of the honey, creating a delicious balance.

  • Herb Infusion: Toss in fresh herbs like rosemary or thyme to the sauce for an aromatic element that elevates the chicken to an herbaceous delight. Their fragrant notes add depth and complexity to each bite.

  • Citrus Zing: Replace honey with orange or lemon juice for a fresh twist that brightens the dish with zesty notes. This tangy alternative will awaken your palate and add a lovely brightness to the overall flavor profile.

  • Pineapple Paradise: Mix in diced pineapple for a tropical sweetness that pairs wonderfully with soy sauce and chicken. The juicy chunks will create a delightful contrast in texture while adding a sweet richness.

  • Vegetarian Option: Swap chicken breasts for cubed tofu or tempeh, and follow the same cooking method for a satisfying plant-based version. This change maintains the savory sauce’s essence while offering a completely new texture.

  • Nutty Flare: Toss in a handful of toasted sesame seeds just before serving to introduce a delightful crunch and nutty flavor. This simple step will add an exciting texture that enhances every bite.

  • Mushroom Medley: Add sliced mushrooms to the crockpot for an earthy depth that complements the chicken beautifully. Their umami flavor enhances the savory sauce, making for a hearty and satisfying meal.

  • Low-Carb Twist: Swap out honey for a sugar substitute, and serve the chicken over cauliflower rice for a delicious low-carb option. This keeps all the flavors intact while catering to keto or low-carb diets.

Make Ahead Options

These Crockpot Chicken preparations are a game-changer for busy home cooks! You can marinate the chicken with the sauce (soy sauce, honey, garlic, and chicken broth) up to 24 hours in advance. Simply combine everything in a resealable bag, ensuring the chicken is well-coated, and refrigerate it overnight. This allows the flavors to deepen, making each bite even more delicious. When you’re ready to cook, just pour the entire mixture into the crockpot and follow the cooking instructions. By taking these simple steps, you’ll have the convenience of an effortless and flavorful meal waiting for you any night of the week!

Chef's Helpful Tips

  • Always pat your chicken breasts dry before cooking to help them absorb flavors better and prevent excess moisture.
  • Consider marinating the chicken in the sauce for a few hours or overnight for a more intense flavor profile in your Crockpot Chicken.
  • When shredding the chicken, do it while it’s still warm for easier results and to allow it to soak in the sauce.
  • Make sure to check the internal temperature with a meat thermometer to guarantee that it reaches at least 165°F for safe consumption.

Crockpot Chicken Recipe FAQs

How do I select the best chicken breasts for this recipe?
Absolutely! When choosing chicken breasts, look for those that are plump and have a uniform color. Avoid any with dark spots or a slimy texture, as these can indicate spoilage. High-quality chicken will enhance the flavor and texture of your Crockpot Chicken.

How should I store leftover Crockpot Chicken?
Very simply! Store leftover Crockpot Chicken in an airtight container in the fridge for up to 3 days. This keeps your meal fresh and flavorful. You can also freeze it in a freezer-safe bag for up to 3 months. Just make sure to label the bag with the date so you keep track of freshness!

Can I freeze Crockpot Chicken?
Absolutely! To freeze, let the chicken cool completely, then transfer the shredded chicken into a freezer-safe bag, removing as much air as possible to prevent freezer burn. Lay the bag flat to save space. It will keep well for up to 3 months. When ready to use, simply thaw it overnight in the fridge and reheat gently with a splash of chicken broth for moisture.

What should I do if my chicken is dry after cooking?
No worries, this can happen! If your Crockpot Chicken ends up a bit dry, it might be due to overcooking. For next time, use a meat thermometer to ensure it reaches just 165°F (75°C). If you’ve already cooked it, try shredding the chicken and mixing it back into the sauce to moisten it. You can also add a little more chicken broth while reheating to help restore moisture.

Is this recipe suitable for special dietary needs?
Absolutely, you can adjust this dish to fit various dietary needs! To make it gluten-free, simply swap the soy sauce for a gluten-free alternative. Additionally, if you’re cooking for pets, it’s best not to share with them due to the honey and soy sauce. Always check for allergies related to soy or garlic and substitute these ingredients as needed, perhaps using coconut aminos or avoiding the garlic altogether.

Crockpot Chicken

Crockpot Chicken

Enjoy tender Crockpot Chicken marinated in a savory sauce, perfect for cozy dinners.
Print Recipe Pin Recipe
Prep Time 10 minutes mins
Cook Time 6 hours hrs
Total Time 6 hours hrs 10 minutes mins
Servings: 4 servings
Course: DINNER RECIPES
Cuisine: American
Calories: 250
Ingredients Equipment Method Nutrition Notes

Ingredients
  

For the Chicken
  • 4 pieces Boneless, skinless chicken breasts Choose high-quality chicken for the best texture and flavor.
For the Sauce
  • 3 cloves Garlic Freshly minced for added flavor.
  • 1/2 cup Low-sodium soy sauce Enhances flavor without excess sodium.
  • 1/4 cup Honey Adds balance of sweetness.
  • 1/2 cup Low-sodium chicken broth Adds moisture and richness.

Equipment

  • Crockpot

Method
 

Preparation
  1. Pat chicken breasts dry with paper towels.
  2. Whisk together soy sauce, honey, minced garlic, and chicken broth in a bowl until well combined.
  3. Place chicken breasts in the crockpot and pour the sauce over them.
  4. Cover and cook on low for 6-8 hours or high for 3-4 hours until the internal temperature reaches at least 165°F.
  5. Shred the chicken in the pot and allow it to soak up the remaining sauce.

Nutrition

Serving: 1servingCalories: 250kcalCarbohydrates: 10gProtein: 30gFat: 5gSaturated Fat: 1gPolyunsaturated Fat: 1gMonounsaturated Fat: 2gCholesterol: 75mgSodium: 600mgPotassium: 800mgSugar: 6g

Notes

Optional: Serve with steamed rice or crunchy tacos for a delightful meal.

Tried this recipe?

Let us know how it was!

Filed Under: DINNER RECIPES

Slow Cooker Buffalo Chicken Chili

January 6, 2026 by JudyWhite Leave a Comment

After a long day, there’s nothing quite like the comforting scent of a simmering meal wafting through the house. That’s exactly what I experienced the first time I made Slow Cooker Buffalo Chicken Chili. As the flavors melded, the anticipation grew—could dinner be this easy and delicious? This recipe transformed a standard weeknight into an exciting culinary adventure, bursting with zesty buffalo sauce, tender chicken, and hearty veggies.

I love how this dish caters to everyone’s cravings while being entirely hassle-free. Just layer your ingredients in the slow cooker, and it works its magic while you go about your day! Whether you need a satisfying meal for your family or want something to impress your friends at game night, this chili delivers. Packed with protein and full of flavor, it’s a perfect choice for those who want to swap out fast food for something home-cooked and wholesome. With just a touch of heat and a lot of comfort, let’s dive into this easy-to-follow recipe that makes weeknight cooking a breeze!

Why You'll Love This Slow Cooker Buffalo Chicken Chili

  • This Slow Cooker Buffalo Chicken Chili is incredibly easy to make, allowing you to simply layer the ingredients and let the slow cooker do all the work while you enjoy your day.
  • Packed with bold flavors from the zesty buffalo sauce and tender chicken, this dish will awaken your taste buds and leave you craving more.
  • Its versatility shines through as you can easily customize it with your favorite toppings or serve it with various sides to suit any occasion.
  • Visually appealing with vibrant colors from the fresh vegetables and spices, this chili is not only delicious but also a feast for the eyes that will impress your guests.
  • Whether it’s game night or a cozy family dinner, this crowd-pleaser guarantees a meal that everyone will love.

Slow Cooker Buffalo Chicken Chili Ingredients

Discover the delightful components that make this dish a standout!

For the Chili
• Boneless, skinless chicken breasts – a lean protein base that stays juicy and tender while it cooks.
• Fresh garlic – adds aromatic depth and zest; feel free to adjust based on your preference.
• Medium onion – diced for sweetness; yellow or white onions work beautifully.
• Bell peppers – choose any color for a pop of color and sweetness in your chili.
• Fire-roasted diced tomatoes – infuse your chili with a smoky flavor that complements the buffalo sauce.
• Buffalo sauce – the star ingredient that delivers the perfect heat and tang to this slow cooker buffalo chicken chili.
• Kidney beans – packed with protein and fiber; rinsing them helps to reduce sodium.
• Corn – fresh or frozen adds a touch of sweetness and texture to balance the heat.

This Slow Cooker Buffalo Chicken Chili is bound to become a family favorite!

How to Make Slow Cooker Buffalo Chicken Chili

  1. Prep Ingredients: Start by dicing the onion and bell peppers, and mincing the garlic. This aromatic trio will form the foundation of your chili. The fresh flavors will really shine through!

  2. Layer Chicken: Place the boneless, skinless chicken breasts at the bottom of your slow cooker. This ensures they get all the delicious juices from the cooking process.

  3. Add Vegetables: Gently layer in the fire-roasted diced tomatoes, kidney beans, corn, onion, bell peppers, and garlic. These vibrant veggies will not only taste amazing but also create a colorful dish!

  4. Pour Sauce: Drizzle the zesty buffalo sauce over all the ingredients and give a gentle stir to combine. This is where the magic happens, mixing flavors and aromas.

  5. Cook: Cover your slow cooker and choose to cook on low for 6 hours or high for 3 hours. Your home will soon be filled with mouthwatering scents as everything simmers to perfection.

  6. Shred Chicken: Once done, shred the chicken right in the pot using two forks. This allows the chicken to soak up all the wonderful spices and flavors before serving.

Optional: Serve with diced avocado or a dollop of sour cream for extra creaminess!

Exact quantities are listed in the recipe card below.

Make Ahead Options

These Slow Cooker Buffalo Chicken Chili preparations are perfect for busy home cooks looking to save time during the week! You can chop the onion, bell peppers, and garlic and refrigerate them in an airtight container up to 3 days before cooking. Additionally, you can layer all the ingredients—chicken, tomatoes, beans, corn, and sauce—into the slow cooker insert and refrigerate it overnight. When you’re ready to enjoy your meal, simply set the slow cooker on low for 6 hours (or high for 3 hours) and shred the chicken right before serving. With these make-ahead options, your dinner will be just as delicious with minimal effort!

Slow Cooker Buffalo Chicken Chili Variations

Feel free to make this chili your own with these delightful swaps and enhancements!

  • Spicy Kick: Add sliced jalapeños or a dash of cayenne pepper for an extra layer of heat that will tingle your taste buds.

  • Vegetarian Delight: Substitute chicken with chickpeas or lentils and use vegetable broth instead of buffalo sauce for a hearty, meat-free version.

  • Creamy Twist: Stir in a bit of cream cheese or Greek yogurt before serving to create a smooth, rich texture that balances the spices beautifully.

  • Extra Veggies: Boost the nutrition by including zucchini, carrots, or spinach; these add color and enhance the chili’s heartiness.

  • Beans Variety: Swap kidney beans with black beans or pinto beans for a different taste or texture; try mixing beans for complexity.

  • Cilantro Lime: Finish with fresh cilantro and a squeeze of lime for a refreshing brightness that cuts through the rich flavors.

  • Smoky Flavor: Use smoked paprika or chipotle sauce to infuse a comforting smokiness that pairs perfectly with the buffalo sauce.

  • Balsamic Glaze: Add a swirl of balsamic glaze just before serving for a sweet tang that elevates each bowl—it’s a delightful surprise!

How to Store and Freeze Slow Cooker Buffalo Chicken Chili

Fridge: Store leftovers in an airtight container for up to 3 days to maintain freshness and flavor while keeping the chili nice and juicy.

Freezer: Freeze your Slow Cooker Buffalo Chicken Chili in a freezer-safe container for up to 3 months. Make sure to leave some space at the top, as it may expand when frozen.

Reheating: Thaw overnight in the fridge, then reheat on the stove or in the microwave until warmed through. Stir occasionally to ensure even heating!

Serving Suggestions: Consider pairing the reheated chili with fresh toppings like diced onions, cilantro, or shredded cheese for an extra flavor boost.

What to Serve with Slow Cooker Buffalo Chicken Chili?

Gather around the table and experience a flavorful feast that complements warm hugs and hearty laughs.

  • Crispy Tortilla Chips: Perfect for scooping up the chili, these add a satisfying crunch to each delicious bite.
  • Creamy Avocado Salad: This refreshing salad balances the spice with cool creaminess and brings in a fresh burst of flavor.
  • Savory Cornbread Muffins: Their slight sweetness and soft texture are the ideal partners to the bold flavors of the chili.
  • Cheddar Cheese: Sprinkle on top for melty goodness, enhancing both taste and presentation with a rich creaminess.
  • Zesty Coleslaw: A tangy coleslaw adds a crisp and refreshing contrast that elevates the excitement of every spoonful.
  • Beer: Pair with a refreshing lager or IPA, which can accentuate the spicy notes and cleanse the palate beautifully.
  • Homemade Garlic Bread: This becomes a delightful addition to dip into the chili while providing a comforting side kick.
  • Chili Dogs: For a fun twist, serve the chili over hot dogs, creating a deliciously unique and casual meal.
  • Chili Lime Rice: Lightly seasoned rice can soak up the leftover chili broth, creating a satisfying and flavorful bite.

Chef's Helpful Tips

  • Start by ensuring your chicken breasts are thawed completely for even cooking in the Slow Cooker Buffalo Chicken Chili.
  • To enhance the flavors, consider sautéing the onions and garlic in a bit of olive oil before adding them to the slow cooker; this step deepens their taste and aroma.
  • Remember to rinse your kidney beans thoroughly to remove excess sodium and improve the overall flavor of the dish.
  • Lastly, if you’re in a time crunch, you can use cooked rotisserie chicken instead of raw; just add it in during the last hour of cooking for a quick meal.

Slow Cooker Buffalo Chicken Chili Recipe FAQs

What kind of chicken should I use for this recipe?
Absolutely! I recommend boneless, skinless chicken breasts for this Slow Cooker Buffalo Chicken Chili. They stay juicy and tender as they cook down, absorbing all those wonderful flavors from the other ingredients. If you prefer dark meat, boneless, skinless chicken thighs work just as well, adding a slightly different flavor profile.

How should I store my leftovers?
For optimal freshness, store your Slow Cooker Buffalo Chicken Chili in an airtight container in the refrigerator for up to 3 days. Make sure it’s completely cooled before sealing the container to prevent condensation, which can dilute the flavors. When reheating, I often suggest adding a splash of broth or water if it seems a bit thick.

Can I freeze Slow Cooker Buffalo Chicken Chili?
Very! To freeze, first let the chili cool completely, then transfer it to a freezer-safe container or zip-top bag, leaving some space at the top for expansion (about an inch). It’s best used within 3 months for optimal flavor. When you’re ready to enjoy it again, thaw overnight in the refrigerator and then reheat on the stove or in the microwave until piping hot.

What if my chili is too spicy for my taste?
If your chili turns out spicier than you’d like, don’t worry! You can mitigate the heat by adding a dollop of sour cream or Greek yogurt when serving. This not only cools it down but also adds a delicious creaminess. Alternatively, stirring in some extra kidney beans or corn can help balance the spice, making it more palatable.

Are there any dietary considerations I should keep in mind?
If you’re cooking for those with allergies or dietary restrictions, this Slow Cooker Buffalo Chicken Chili is great because it can be easily modified. For a gluten-free version, just ensure your buffalo sauce is gluten-free. If anyone has a chicken allergy, you can substitute with firm tofu or a mix of vegetables. Always check labels for hidden allergens, and feel free to get creative with the ingredients while keeping everyone’s health concerns in mind!

Slow Cooker Buffalo Chicken Chili

Slow Cooker Buffalo Chicken Chili

This Slow Cooker Buffalo Chicken Chili is a comforting dish, easy to prepare, packed with zesty buffalo flavor and hearty ingredients.
Print Recipe Pin Recipe
Prep Time 15 minutes mins
Cook Time 6 hours hrs
Total Time 6 hours hrs 15 minutes mins
Servings: 6 servings
Course: DINNER RECIPES
Cuisine: American
Calories: 350
Ingredients Equipment Method Nutrition Notes

Ingredients
  

For the Chili
  • 1 pound boneless, skinless chicken breasts
  • 3 cloves fresh garlic minced
  • 1 medium onion diced
  • 2 cups bell peppers diced
  • 1 can fire-roasted diced tomatoes
  • 1 cup buffalo sauce
  • 1 can kidney beans rinsed
  • 1 cup corn fresh or frozen

Equipment

  • Slow Cooker

Method
 

Steps to Prepare
  1. Start by dicing the onion and bell peppers, and mincing the garlic.
  2. Place the boneless, skinless chicken breasts at the bottom of your slow cooker.
  3. Gently layer in the fire-roasted diced tomatoes, kidney beans, corn, onion, bell peppers, and garlic.
  4. Drizzle the zesty buffalo sauce over all the ingredients and give a gentle stir to combine.
  5. Cover your slow cooker and choose to cook on low for 6 hours or high for 3 hours.
  6. Once done, shred the chicken right in the pot using two forks.

Nutrition

Serving: 1cupCalories: 350kcalCarbohydrates: 30gProtein: 30gFat: 10gSaturated Fat: 2gCholesterol: 75mgSodium: 800mgPotassium: 800mgFiber: 8gSugar: 5gVitamin A: 300IUVitamin C: 50mgCalcium: 80mgIron: 4mg

Notes

Optional: Serve with diced avocado or a dollop of sour cream for extra creaminess.

Tried this recipe?

Let us know how it was!

Filed Under: DINNER RECIPES

Chicken Pot Pie

January 6, 2026 by JudyWhite Leave a Comment

There’s something incredibly comforting about a freshly baked Chicken Pot Pie, especially when the chill of autumn settles in. Picture this: as I rolled out the flaky crust, the warm aromas of garlic and thyme filled my kitchen, instantly whisking me back to my grandmother’s cheerful home where Sunday dinners were a feast for the senses. This beloved classic not only warms the heart but also brings everyone to the table — it’s the meal I crave after a long day or the dish that makes a chilly evening feel special.

I discovered this recipe during one of my late-night, hunger-fueled searches for something hearty and satisfying. It’s been a crowd-pleaser ever since, with its tender chicken, colorful vegetables, and creamy sauce enveloped in a golden crust. Best of all, this Chicken Pot Pie is deceptively easy to prepare, making it the perfect solution for those mundane weeknight dinners or cozy family gatherings. Join me in creating this delightful dish that celebrates homemade goodness and leaves fast food in the dust!

Why You'll Love This Chicken Pot Pie

  • This Chicken Pot Pie is an absolute breeze to prepare, allowing you to whip up a delicious meal in under an hour.
  • The flavor is so rich and satisfying with tender chicken, vibrant veggies, and a creamy sauce that will have everyone asking for seconds.
  • Its versatility means you can easily customize the filling with your favorite ingredients, making it a perfect dish for whatever you have on hand.
  • Plus, the golden flaky crust and colorful filling create a stunning presentation that will impress any crowd and make your dinner table shine.

Chicken Pot Pie Ingredients

For the Filling
• Boneless, skinless chicken breasts – diced for tenderness and a hearty base.
• Fresh garlic – minced to enhance the savory aroma of the dish.
• Medium carrots – diced for a touch of sweetness and color in your Chicken Pot Pie.
• Frozen peas – add a pop of freshness and vibrant green to the filling.
• Yukon Gold potatoes – diced to create a comforting, creamy texture.
• Low-sodium chicken broth – use for depth of flavor without excess salt.
• Heavy cream – lends a rich, velvety texture to the filling.
• Dried thyme – a must for its earthy aroma that complements the chicken beautifully.
• Salt and pepper – to taste, enhancing all the lovely flavors in your pot pie.

For the Crust
• Pie crust – store-bought for convenience or homemade for a personal touch, providing that essential flaky layer.

How to Make Chicken Pot Pie

  1. Preheat your oven to 400°F (200°C) and lightly spray a baking dish with nonstick cooking spray. This ensures that your Chicken Pot Pie bakes evenly and doesn’t stick to the dish.

  2. Cook the diced chicken in a large skillet over medium heat for about 8-10 minutes, until it turns golden brown. Be sure to season with salt and pepper to enhance its delicious flavor.

  3. Sauté the minced garlic and diced carrots in the skillet for about five minutes. This will add wonderful aromas and a splash of color to your filling.

  4. Combine the chicken broth and heavy cream in the skillet, and stir in the dried thyme. Allow the mixture to simmer for five minutes until it thickens slightly; it should look creamy and inviting.

  5. Transfer the chicken mixture into your prepared baking dish, and layer the diced potatoes and frozen peas on top. This colorful layer not only looks great but also adds texture to your pot pie.

  6. Cover the filling with the pie crust, trimming any excess. Don’t forget to cut slits for ventilation, allowing steam to escape. Bake for 30-35 minutes until the crust is golden brown and the filling is bubbling.

Optional: Serve with a sprinkle of fresh parsley for added color and flavor!

Exact quantities are listed in the recipe card below.

Chicken Pot Pie Variations

Feel free to make this Chicken Pot Pie your own with these creative twists and substitutions that inspire deliciousness!

  • Dairy-Free: Use coconut milk or almond milk instead of heavy cream for a lighter, creamy base that remains indulgent.

  • Vegetarian: Swap the chicken for hearty mushrooms and chickpeas, adding a variety of colorful vegetables for texture and flavor.

  • Herb Enchantment: Experiment with fresh herbs like rosemary or parsley instead of thyme for a fragrant and vibrant twist on the classic flavors.

  • Spicy Kick: Add diced jalapeños or a sprinkle of cayenne pepper to the filling for a delightful level of heat that warms the soul.

  • Crust Alternatives: Try using phyllo dough or a biscuit topping for a different texture that still captures the comforting spirit of pot pie.

  • Root Veggie Boost: Incorporate diced rutabaga or butternut squash in place of potatoes for a unique flavor twist and even more nutrition.

  • Savory Cheese: Mix in cheddar or gruyère cheese into the filling for an extra layer of richness that perfectly complements the savory ingredients.

  • Mini Pies: Portion the filling into ramekins and top each with individual crusts for charming, personal-sized pot pies that are perfect for gatherings.

Let these variations inspire creativity in your kitchen as you make this cozy classic truly yours!

What to Serve with Chicken Pot Pie?

There’s nothing quite like gathering around a warm table with comforting sides that elevate your meal experience.

  • Simple Green Salad: A mix of crisp greens and vibrant vegetables adds freshness and balances the creaminess of the pot pie.
  • Garlic Bread: Crunchy and buttery, a piece of garlic bread is perfect for sopping up any leftover creamy filling on your plate.
  • Roasted Vegetables: Seasonal roasted veggies bring a smoky flavor and slight sweetness, complementing the rich textures of your pot pie beautifully.
  • Creamy Mashed Potatoes: Fluffy mashed potatoes make a delightful pairing, offering an extra layer of comfort while soaking up the savory gravy.
  • Savory Cornbread: Sweet, buttery cornbread enhances the meal’s warmth and provides a lovely contrast to the rich fillings of your Chicken Pot Pie.
  • Apple Crisp: Finish your dinner on a sweet note with a warm, spiced apple crisp that adds a delightful contrast to the savory taste.

Each of these sides brings a unique taste and texture to the table, transforming a simple dinner into a heartwarming feast that everyone will cherish.

Make Ahead Options

These Chicken Pot Pies are perfect for busy weeknights, allowing you to save precious time without sacrificing flavor! You can prepare the filling up to 24 hours in advance by cooking the chicken and veggie mixture, then letting it cool completely before transferring it to an airtight container in the refrigerator. Just before serving, layer the filling into your pie crust, add the diced potatoes and peas, cover with the crust, and bake according to the recipe instructions. To maintain quality, refrain from covering the pie until you’re ready to bake to prevent sogginess; it will still be just as delicious and comforting!

How to Store and Freeze Chicken Pot Pie

Room Temperature: Allow Chicken Pot Pie to cool for about 30 minutes before serving. It can be left out for up to 2 hours, but any leftovers should be refrigerated promptly.

Fridge: Store leftover Chicken Pot Pie in an airtight container in the fridge for up to 3 days. Reheat portions in the microwave or oven until heated through.

Freezer: For longer storage, wrap the pie tightly in plastic wrap and aluminum foil; it can be frozen for up to 2 months. Thaw overnight in the fridge before reheating.

Reheating: To reheat, bake the thawed Chicken Pot Pie in a preheated oven at 350°F (175°C) for about 25-30 minutes, or until the crust is golden and filling is hot.

Chef's Helpful Tips

  • When preparing Chicken Pot Pie, ensure your chicken is evenly diced for consistent cooking and tenderness.
  • Avoid overcrowding the skillet when browning the chicken; this helps achieve a nice golden color and crisp texture.
  • For extra flavor, sauté your garlic until fragrant but not browned to prevent bitterness.
  • Keep an eye on your pot pie as it bakes, and if the crust starts to brown too quickly, cover the edges with foil to prevent burning while the filling cooks through.

Chicken Pot Pie Recipe FAQs

How do I choose the right chicken for my Chicken Pot Pie?
Absolutely! Choose boneless, skinless chicken breasts for this recipe as they cook evenly and result in tender meat. Look for chicken that is pink and moist, with no dark spots. If possible, try to select chicken that is organic or free-range for the best flavor.

How should I store leftover Chicken Pot Pie?
Very good question! After it cools for about 30 minutes, store leftover Chicken Pot Pie in an airtight container in the refrigerator for up to 3 days. Just make sure it’s completely covered to prevent drying out, and reheat portions in a microwave or oven until heated through.

Can I freeze Chicken Pot Pie?
Absolutely! To freeze, wrap the Chicken Pot Pie tightly in plastic wrap, then cover it with aluminum foil to protect it from freezer burn. It can be frozen for up to 2 months. When you’re ready to enjoy it again, thaw it overnight in the fridge before baking.

What if my chicken pot pie filling is too runny?
If you find that your filling is too runny, don’t worry! You can thicken it by either adding a cornstarch slurry (mix 2 tablespoons cornstarch with 2 tablespoons cold water) and heating it gently, or by simmering it for a few more minutes until some liquid evaporates. Just be sure to stir constantly to avoid lumps.

Can I make Chicken Pot Pie in advance?
Yes! You can prepare the filling and assemble the Chicken Pot Pie one day ahead. Just store the assembled pie covered in the fridge. When you’re ready to bake, remove it from the fridge, allow it to come to room temperature for about 15-20 minutes, and then follow the baking instructions. This makes it easier for those busy weeknight dinners!

Is this recipe suitable for those with allergies?
Great point! This Chicken Pot Pie contains chicken, dairy, and possible gluten from the crust. For dietary restrictions, consider using a gluten-free pie crust and plant-based cream alternatives. Always check labels for allergens, and consult with a medical professional if you have specific concerns regarding food allergies.

Chicken Pot Pie

Chicken Pot Pie

This Chicken Pot Pie is a comforting classic that combines tender chicken, vegetables, and a creamy sauce in a flaky crust.
Print Recipe Pin Recipe
Prep Time 15 minutes mins
Cook Time 35 minutes mins
Total Time 50 minutes mins
Servings: 6 slices
Course: DINNER RECIPES
Cuisine: American
Calories: 450
Ingredients Equipment Method Nutrition Notes

Ingredients
  

Filling
  • 2 cups diced boneless, skinless chicken breasts for tenderness
  • 3 cloves fresh garlic minced
  • 2 medium carrots diced
  • 1 cup frozen peas
  • 2 cups Yukon Gold potatoes diced
  • 2 cups low-sodium chicken broth
  • 1 cup heavy cream
  • 1 teaspoon dried thyme
  • to taste salt
  • to taste pepper
Crust
  • 1 package pie crust store-bought or homemade

Equipment

  • Skillet
  • Baking dish
  • Oven

Method
 

Preparation
  1. Preheat your oven to 400°F (200°C) and lightly spray a baking dish with nonstick cooking spray.
  2. Cook the diced chicken in a large skillet over medium heat for about 8-10 minutes, until golden brown. Season with salt and pepper.
  3. Sauté the minced garlic and diced carrots in the skillet for about five minutes.
  4. Combine the chicken broth and heavy cream in the skillet, and stir in the dried thyme. Simmer for five minutes until thickened.
  5. Transfer the chicken mixture into your prepared baking dish, and layer the diced potatoes and frozen peas on top.
  6. Cover the filling with the pie crust, trimming any excess and cutting slits for ventilation. Bake for 30-35 minutes until golden brown.

Nutrition

Serving: 1sliceCalories: 450kcalCarbohydrates: 40gProtein: 25gFat: 25gSaturated Fat: 10gPolyunsaturated Fat: 5gMonounsaturated Fat: 10gCholesterol: 80mgSodium: 600mgPotassium: 600mgFiber: 4gSugar: 2gVitamin A: 2000IUVitamin C: 15mgCalcium: 30mgIron: 2mg

Notes

Optional: Serve with a sprinkle of fresh parsley for added color and flavor.

Tried this recipe?

Let us know how it was!

Filed Under: DINNER RECIPES

Chicken Pot Pie

January 6, 2026 by JudyWhite Leave a Comment

There’s something incredibly comforting about a freshly baked Chicken Pot Pie, especially when the chill of autumn settles in. Picture this: as I rolled out the flaky crust, the warm aromas of garlic and thyme filled my kitchen, instantly whisking me back to my grandmother’s cheerful home where Sunday dinners were a feast for the senses. This beloved classic not only warms the heart but also brings everyone to the table — it’s the meal I crave after a long day or the dish that makes a chilly evening feel special.

I discovered this recipe during one of my late-night, hunger-fueled searches for something hearty and satisfying. It’s been a crowd-pleaser ever since, with its tender chicken, colorful vegetables, and creamy sauce enveloped in a golden crust. Best of all, this Chicken Pot Pie is deceptively easy to prepare, making it the perfect solution for those mundane weeknight dinners or cozy family gatherings. Join me in creating this delightful dish that celebrates homemade goodness and leaves fast food in the dust!

Why You'll Love This Chicken Pot Pie

  • This Chicken Pot Pie is an absolute breeze to prepare, allowing you to whip up a delicious meal in under an hour.
  • The flavor is so rich and satisfying with tender chicken, vibrant veggies, and a creamy sauce that will have everyone asking for seconds.
  • Its versatility means you can easily customize the filling with your favorite ingredients, making it a perfect dish for whatever you have on hand.
  • Plus, the golden flaky crust and colorful filling create a stunning presentation that will impress any crowd and make your dinner table shine.

Chicken Pot Pie Ingredients

For the Filling
• Boneless, skinless chicken breasts – diced for tenderness and a hearty base.
• Fresh garlic – minced to enhance the savory aroma of the dish.
• Medium carrots – diced for a touch of sweetness and color in your Chicken Pot Pie.
• Frozen peas – add a pop of freshness and vibrant green to the filling.
• Yukon Gold potatoes – diced to create a comforting, creamy texture.
• Low-sodium chicken broth – use for depth of flavor without excess salt.
• Heavy cream – lends a rich, velvety texture to the filling.
• Dried thyme – a must for its earthy aroma that complements the chicken beautifully.
• Salt and pepper – to taste, enhancing all the lovely flavors in your pot pie.

For the Crust
• Pie crust – store-bought for convenience or homemade for a personal touch, providing that essential flaky layer.

How to Make Chicken Pot Pie

  1. Preheat your oven to 400°F (200°C) and lightly spray a baking dish with nonstick cooking spray. This ensures that your Chicken Pot Pie bakes evenly and doesn’t stick to the dish.

  2. Cook the diced chicken in a large skillet over medium heat for about 8-10 minutes, until it turns golden brown. Be sure to season with salt and pepper to enhance its delicious flavor.

  3. Sauté the minced garlic and diced carrots in the skillet for about five minutes. This will add wonderful aromas and a splash of color to your filling.

  4. Combine the chicken broth and heavy cream in the skillet, and stir in the dried thyme. Allow the mixture to simmer for five minutes until it thickens slightly; it should look creamy and inviting.

  5. Transfer the chicken mixture into your prepared baking dish, and layer the diced potatoes and frozen peas on top. This colorful layer not only looks great but also adds texture to your pot pie.

  6. Cover the filling with the pie crust, trimming any excess. Don’t forget to cut slits for ventilation, allowing steam to escape. Bake for 30-35 minutes until the crust is golden brown and the filling is bubbling.

Optional: Serve with a sprinkle of fresh parsley for added color and flavor!

Exact quantities are listed in the recipe card below.

What to Serve with Chicken Pot Pie?

There’s nothing quite like gathering around a warm table with comforting sides that elevate your meal experience.

  • Simple Green Salad: A mix of crisp greens and vibrant vegetables adds freshness and balances the creaminess of the pot pie.
  • Garlic Bread: Crunchy and buttery, a piece of garlic bread is perfect for sopping up any leftover creamy filling on your plate.
  • Roasted Vegetables: Seasonal roasted veggies bring a smoky flavor and slight sweetness, complementing the rich textures of your pot pie beautifully.
  • Creamy Mashed Potatoes: Fluffy mashed potatoes make a delightful pairing, offering an extra layer of comfort while soaking up the savory gravy.
  • Savory Cornbread: Sweet, buttery cornbread enhances the meal’s warmth and provides a lovely contrast to the rich fillings of your Chicken Pot Pie.
  • Apple Crisp: Finish your dinner on a sweet note with a warm, spiced apple crisp that adds a delightful contrast to the savory taste.

Each of these sides brings a unique taste and texture to the table, transforming a simple dinner into a heartwarming feast that everyone will cherish.

Make Ahead Options

These Chicken Pot Pies are perfect for busy weeknights, allowing you to save precious time without sacrificing flavor! You can prepare the filling up to 24 hours in advance by cooking the chicken and veggie mixture, then letting it cool completely before transferring it to an airtight container in the refrigerator. Just before serving, layer the filling into your pie crust, add the diced potatoes and peas, cover with the crust, and bake according to the recipe instructions. To maintain quality, refrain from covering the pie until you’re ready to bake to prevent sogginess; it will still be just as delicious and comforting!

Chicken Pot Pie Variations

Feel free to make this Chicken Pot Pie your own with these creative twists and substitutions that inspire deliciousness!

  • Dairy-Free: Use coconut milk or almond milk instead of heavy cream for a lighter, creamy base that remains indulgent.

  • Vegetarian: Swap the chicken for hearty mushrooms and chickpeas, adding a variety of colorful vegetables for texture and flavor.

  • Herb Enchantment: Experiment with fresh herbs like rosemary or parsley instead of thyme for a fragrant and vibrant twist on the classic flavors.

  • Spicy Kick: Add diced jalapeños or a sprinkle of cayenne pepper to the filling for a delightful level of heat that warms the soul.

  • Crust Alternatives: Try using phyllo dough or a biscuit topping for a different texture that still captures the comforting spirit of pot pie.

  • Root Veggie Boost: Incorporate diced rutabaga or butternut squash in place of potatoes for a unique flavor twist and even more nutrition.

  • Savory Cheese: Mix in cheddar or gruyère cheese into the filling for an extra layer of richness that perfectly complements the savory ingredients.

  • Mini Pies: Portion the filling into ramekins and top each with individual crusts for charming, personal-sized pot pies that are perfect for gatherings.

Let these variations inspire creativity in your kitchen as you make this cozy classic truly yours!

How to Store and Freeze Chicken Pot Pie

Room Temperature: Allow Chicken Pot Pie to cool for about 30 minutes before serving. It can be left out for up to 2 hours, but any leftovers should be refrigerated promptly.

Fridge: Store leftover Chicken Pot Pie in an airtight container in the fridge for up to 3 days. Reheat portions in the microwave or oven until heated through.

Freezer: For longer storage, wrap the pie tightly in plastic wrap and aluminum foil; it can be frozen for up to 2 months. Thaw overnight in the fridge before reheating.

Reheating: To reheat, bake the thawed Chicken Pot Pie in a preheated oven at 350°F (175°C) for about 25-30 minutes, or until the crust is golden and filling is hot.

Chef's Helpful Tips

  • When preparing Chicken Pot Pie, ensure your chicken is evenly diced for consistent cooking and tenderness.
  • Avoid overcrowding the skillet when browning the chicken; this helps achieve a nice golden color and crisp texture.
  • For extra flavor, sauté your garlic until fragrant but not browned to prevent bitterness.
  • Keep an eye on your pot pie as it bakes, and if the crust starts to brown too quickly, cover the edges with foil to prevent burning while the filling cooks through.

Chicken Pot Pie Recipe FAQs

How do I choose the right chicken for my Chicken Pot Pie?
Absolutely! Choose boneless, skinless chicken breasts for this recipe as they cook evenly and result in tender meat. Look for chicken that is pink and moist, with no dark spots. If possible, try to select chicken that is organic or free-range for the best flavor.

How should I store leftover Chicken Pot Pie?
Very good question! After it cools for about 30 minutes, store leftover Chicken Pot Pie in an airtight container in the refrigerator for up to 3 days. Just make sure it’s completely covered to prevent drying out, and reheat portions in a microwave or oven until heated through.

Can I freeze Chicken Pot Pie?
Absolutely! To freeze, wrap the Chicken Pot Pie tightly in plastic wrap, then cover it with aluminum foil to protect it from freezer burn. It can be frozen for up to 2 months. When you’re ready to enjoy it again, thaw it overnight in the fridge before baking.

What if my chicken pot pie filling is too runny?
If you find that your filling is too runny, don’t worry! You can thicken it by either adding a cornstarch slurry (mix 2 tablespoons cornstarch with 2 tablespoons cold water) and heating it gently, or by simmering it for a few more minutes until some liquid evaporates. Just be sure to stir constantly to avoid lumps.

Can I make Chicken Pot Pie in advance?
Yes! You can prepare the filling and assemble the Chicken Pot Pie one day ahead. Just store the assembled pie covered in the fridge. When you’re ready to bake, remove it from the fridge, allow it to come to room temperature for about 15-20 minutes, and then follow the baking instructions. This makes it easier for those busy weeknight dinners!

Is this recipe suitable for those with allergies?
Great point! This Chicken Pot Pie contains chicken, dairy, and possible gluten from the crust. For dietary restrictions, consider using a gluten-free pie crust and plant-based cream alternatives. Always check labels for allergens, and consult with a medical professional if you have specific concerns regarding food allergies.

Chicken Pot Pie

Chicken Pot Pie

This Chicken Pot Pie is a comforting classic that combines tender chicken, vegetables, and a creamy sauce in a flaky crust.
Print Recipe Pin Recipe
Prep Time 15 minutes mins
Cook Time 35 minutes mins
Total Time 50 minutes mins
Servings: 6 slices
Course: DINNER RECIPES
Cuisine: American
Calories: 450
Ingredients Equipment Method Nutrition Notes

Ingredients
  

Filling
  • 2 cups diced boneless, skinless chicken breasts for tenderness
  • 3 cloves fresh garlic minced
  • 2 medium carrots diced
  • 1 cup frozen peas
  • 2 cups Yukon Gold potatoes diced
  • 2 cups low-sodium chicken broth
  • 1 cup heavy cream
  • 1 teaspoon dried thyme
  • to taste salt
  • to taste pepper
Crust
  • 1 package pie crust store-bought or homemade

Equipment

  • Skillet
  • Baking dish
  • Oven

Method
 

Preparation
  1. Preheat your oven to 400°F (200°C) and lightly spray a baking dish with nonstick cooking spray.
  2. Cook the diced chicken in a large skillet over medium heat for about 8-10 minutes, until golden brown. Season with salt and pepper.
  3. Sauté the minced garlic and diced carrots in the skillet for about five minutes.
  4. Combine the chicken broth and heavy cream in the skillet, and stir in the dried thyme. Simmer for five minutes until thickened.
  5. Transfer the chicken mixture into your prepared baking dish, and layer the diced potatoes and frozen peas on top.
  6. Cover the filling with the pie crust, trimming any excess and cutting slits for ventilation. Bake for 30-35 minutes until golden brown.

Nutrition

Serving: 1sliceCalories: 450kcalCarbohydrates: 40gProtein: 25gFat: 25gSaturated Fat: 10gPolyunsaturated Fat: 5gMonounsaturated Fat: 10gCholesterol: 80mgSodium: 600mgPotassium: 600mgFiber: 4gSugar: 2gVitamin A: 2000IUVitamin C: 15mgCalcium: 30mgIron: 2mg

Notes

Optional: Serve with a sprinkle of fresh parsley for added color and flavor.

Tried this recipe?

Let us know how it was!

Filed Under: DINNER RECIPES

Roasted Lamb Shoulder Mandi

January 3, 2026 by JudyWhite Leave a Comment

When the first hints of spring arrive, I can’t help but imagine gathering around a table filled with aromatic delights. One dish that never fails to make every mouth water is my Roasted Lamb Shoulder Mandi. The moment you take it out of the oven, the tantalizing scent of spices clings to the air, making it impossible to resist. This Arabic classic offers an incredible fusion of flavors—tender, juicy lamb paired with fluffy saffron-infused rice creates a meal that can transform any gathering into a feast.

This recipe is a celebration in itself. While it may sound elaborate, the process is surprisingly straightforward. It’s the perfect antidote to the mundane fast-food routine, and I promise you, it will leave even the pickiest eaters begging for more. Whether you’re trying to impress guests, enjoy a cozy night in, or just explore new culinary terrains, this dish delivers on every front. Grab your apron, and let’s elevate your home-cooked meals to a whole new level!

Why You'll Love This Roasted Lamb Shoulder Mandi

  • This Roasted Lamb Shoulder Mandi is incredibly easy to prepare, making it an ideal choice for both novice and experienced cooks alike.
  • The rich, aromatic flavors will tantalize your taste buds and leave everyone asking for seconds.
  • Its versatility means it can be served at lavish gatherings or cozy family dinners, fitting perfectly into any occasion.
  • The stunning presentation of juicy lamb alongside fluffy saffron-infused rice is sure to impress your guests and elevate your dining experience.

Roasted Lamb Shoulder Mandi Ingredients

To create this flavorful dish, gather these essential ingredients:

For the Lamb
• Whole lamb shoulder – a beautifully marbled cut that becomes tender during cooking.
• Salt and pepper powder – simple seasonings that enhance the lamb’s rich flavors.
• Garlic paste – infuses a warm, savory depth into the meat.
• Ginger paste – adds brightness and a kick of spice.
• Arabian Mandi spice – the secret to authentic flavor; don’t skip this!

For the Cooking Base
• Oil – for browning and adding richness; you can use olive or vegetable oil.
• Sliced onions – creates a sweet and savory base when sautéed until golden.
• Bay leaves – impart a subtle aromatic essence.
• Stick cinnamon – offers warm, sweet notes perfect for braising.
• Whole cumin – brings an earthy aroma that complements the lamb.
• Cloves – a hint of warmth and sweetness in every bite.
• Peppercorn – adds a touch of heat to balance the flavors.
• Coriander seeds – enhance the dish with citrusy undertones.
• Green cardamom – infuses a fragrant sweetness that’s unmistakable.
• Black cardamoms – contributes a smoky depth that pairs perfectly with lamb.
• Green chilies – adjust the heat to your preference!
• Dried lime – a unique ingredient that adds a tangy kick.
• Water – enough to cover the lamb and ensure it stays juicy.

For the Rice
• Rice – use long-grain rice for the perfect fluffy texture.
• Reserved meat broth – ensures the rice is rich and flavorful.
• Saffron strands – adds luxurious color and a distinct taste.
• Fresh lemon juice – brightens the overall dish with its zing.
• Orange color – for that stunning saffron-like hue.

For Garnish
• Fresh coriander – adds a burst of freshness once served.
• Full-fat yogurt – a creamy, tangy topping that balances the dish.
• Mayonnaise – optional, but creates a delightful creamy contrast.
• Chopped onion, carrot, and garlic – sautéed together to add flavor to the rice.

Optional
• Saffron concoction – from earlier preparation for an extra touch of luxury.

Gather these ingredients, and let the cooking adventure begin! This Roasted Lamb Shoulder Mandi is sure to transform your kitchen into a feast of aromas and flavors.

How to Make Roasted Lamb Shoulder Mandi

  1. Prepare the Lamb: Season the whole lamb shoulder with salt and pepper powder, garlic paste, ginger paste, and Arabian Mandi spice. This will infuse the meat with unforgettable flavors as it cooks.

  2. Sauté Onions: In a large pot, heat oil and sauté sliced onions until they turn golden brown. This aromatic base will bring warmth and depth to your dish.

  3. Brown the Lamb: Add the seasoned lamb shoulder to the pot and brown it on all sides. This step is essential for retaining moisture and flavor, creating a rich crust.

  4. Add Spices and Water: Stir in bay leaves, cinnamon stick, whole cumin, cloves, peppercorn, coriander seeds, green cardamom, black cardamoms, green chilies, and dried lime. Pour in enough water to cover the lamb completely.

  5. Simmer Slowly: Cover the pot and let it simmer for approximately 170 minutes until the lamb is tender. The long cooking time will ensure that every bite melts in your mouth.

  6. Set Aside the Lamb: Once the lamb is cooked, carefully remove it from the pot and set it aside. This resting time allows the juices to redistribute and keep the meat succulent.

  7. Strain the Broth: Strain the broth used for cooking the lamb, reserving 6 cups for the rice. This flavorful broth will be the key to perfectly cooked rice.

  8. Sauté Vegetables: In a separate pot, heat 2 tbsp of oil and sauté chopped onion, carrot, and garlic until soft. This will create a tasty foundation for the rice.

  9. Add Rice: Stir in the 3 cups of rice and sauté with the vegetables for a couple of minutes to coat the grains with flavor.

  10. Cook the Rice: Pour in the reserved meat broth, along with the saffron strands, fresh lemon juice, and orange color. Bring the mixture to a boil, then cover and reduce heat to low. Cook for about 20 minutes until the rice is fluffy and fully absorbed.

  11. Serve: Serve the roasted lamb shoulder atop the saffron-infused rice, garnished with fresh coriander, a dollop of yogurt, and a drizzle of mayonnaise to enhance the flavors.

Optional: Add toasted pine nuts for an extra crunchy texture.

Exact quantities are listed in the recipe card below.

Make Ahead Options

These Roasted Lamb Shoulder Mandi are perfect for busy weeknights and meal prep enthusiasts! You can season the lamb shoulder up to 24 hours in advance, allowing the spices to deeply penetrate the meat for unforgettable flavor. Additionally, you can prepare the broth and sauté the onions, carrots, and garlic a day before, storing them separately in the refrigerator. When you’re ready to serve, simply reheat the broth, add your rice to the sautéed vegetables, and let it cook as instructed. This way, you’ll enjoy restaurant-quality results with minimal effort, and your dish will be just as delicious as if made fresh!

Storage Tips for Roasted Lamb Shoulder Mandi

Room Temperature: Serve your Roasted Lamb Shoulder Mandi immediately for the best flavor. If leftovers are not consumed within 2 hours, refrigerate to maintain freshness.

Fridge: Store leftover lamb and rice in airtight containers in the fridge for up to 3 days. Reheat gently using the stovetop or microwave, adding a splash of broth to keep the rice moist.

Freezer: For longer storage, freeze portions in airtight containers for up to 2 months. Thaw in the fridge overnight before reheating for a wonderfully satisfying meal on a busy day.

Reheating: When ready to enjoy leftovers, heat the lamb and rice on the stovetop with a bit of broth or water until warmed through, ensuring the flavors shine as they did fresh.

Roasted Lamb Shoulder Mandi Variations

Feel free to make this delightful dish your own by exploring these fun and flavorful variations!

  • Herb-Infused: Add fresh rosemary or thyme while simmering for added depth of flavor. These herbs will enhance the aroma and make it even more comforting.

  • Spice Heat: Use red pepper flakes or jalapeños instead of green chilies for an extra kick. Adjusting the spice level can elevate the dish to new heights, perfect for heat lovers!

  • Vegetarian Adaptation: Swap lamb for jackfruit or cauliflower for a hearty vegetarian option. The texture will still give you that comforting feel, making it a great family-friendly meal.

  • Coconut Twist: Incorporate coconut milk into the broth for a creamy, tropical flavor. This adds a rich sweetness that complements the spices beautifully.

  • Nutty Crunch: Top your finished dish with toasted almonds or pine nuts for added texture. This simple addition will elevate your presentation and add a delicious crunch.

  • Citrus Spark: Add orange or lime zest during the cooking process for a subtle citrusy lift. This brightness can brighten the dish and make it more refreshing, especially in warmer months.

  • Dried Fruit: Incorporate raisins or apricots into the rice for delightful bursts of sweetness. The contrast between savory and sweet makes each bite exciting!

  • Quinoa Substitute: Use quinoa instead of rice for a nutritious twist. This swap not only boosts protein content but also brings a nutty flavor that pairs well with the lamb.

What to Serve with Roasted Lamb Shoulder Mandi?

Elevate your dining experience by pairing delightful sides that balance flavors with every tender morsel of lamb.

  • Crispy Roasted Vegetables: A medley of seasonal vegetables, roasted to perfection, adds vibrant color and a touch of sweetness. Their natural char complements the savory richness of the lamb beautifully.

  • Hummus Platter: Creamy, flavorful hummus served with warm pita bread brings a touch of Middle Eastern charm, enhancing the meal’s cultural essence. It’s perfect for sharing and adds a rich, nutty layer.

  • Tabbouleh Salad: This refreshing parsley and bulgur salad, bright with lemon and mint, cuts through the dish’s richness while adding a refreshing crunch. The zesty flavors awaken the palate with each bite.

  • Mint Yogurt Sauce: Light and creamy, this sauce offers a cooling contrast to the warm spices of the lamb. It’s a delightful dip that invites everyone to dig in and savor their meal.

  • Stuffed Grape Leaves: Known as Dolmas, these provide a delightful tang and a unique flavor experience. Their herby filling pairs wonderfully with roasted lamb for a traditional touch.

  • Pine Nut Rice: Elevate your rice game by toasting pine nuts and mixing them in. This adds a crunchy texture that harmonizes with the fluffy saffron rice beneath the succulent lamb.

  • Fresh Pomegranate Seeds: Generously sprinkled over the dish, they add a burst of sweetness and color, elevating the aesthetic and taste of your dining experience.

  • Rose Mint Lemonade: A refreshing drink, the floral notes of rose complement the rich lamb, while the mint adds freshness to keep you cool. Perfect for rinsing your palate!

These delightful pairings will create a symphony of flavors around your Roasted Lamb Shoulder Mandi, making every gathering an unforgettable feast!

Chef's Helpful Tips

  • When making Roasted Lamb Shoulder Mandi, ensure you give the lamb plenty of time to marinate with the seasonings for deeper flavor penetration.
  • A common mistake is not browning the meat properly, which locks in moisture and enhances the taste, so take your time with this step.
  • Always use a meat thermometer to check for doneness; the lamb should reach an internal temperature of at least 160 degrees Fahrenheit for optimal tenderness.
  • Lastly, let the rice rest for a few minutes after cooking to absorb any remaining liquid for perfect fluffiness.

Roasted Lamb Shoulder Mandi Recipe FAQs

How do I choose the right lamb shoulder?
Absolutely! When selecting a lamb shoulder, look for meat that is well-marbled with creamy white fat. The fat will melt during cooking, keeping the meat juicy and flavorful. Fresh lamb should have a bright red color without any dark spots or unpleasant odors.

What’s the best way to store leftover Roasted Lamb Shoulder Mandi?
Very! You can store leftover lamb and rice in airtight containers in the fridge for up to 3 days. It’s best to reheat them gently, either on the stovetop or in the microwave, with a splash of broth added to keep the rice moist and prevent it from drying out.

Can I freeze Roasted Lamb Shoulder Mandi?
Absolutely! To freeze your Roasted Lamb Shoulder Mandi, portion it into airtight containers or freezer bags for up to 2 months. Ensure as much air as possible is removed before sealing. When you’re ready to enjoy it again, thaw the container in the fridge overnight, then reheat on the stovetop with a bit of broth to bring back the flavors.

What if my lamb shoulder is tough after cooking?
A common troubleshooting tip is to ensure the meat was cooked long enough; lamb shoulder benefits from low and slow cooking, around 170 minutes in this recipe. If it’s still tough, let it simmer longer, checking every 20 minutes until tender—this way, you’ll be sure the flavors have blossomed beautifully.

Are there any dietary considerations with this dish?
The more the merrier! If you’re serving guests with dietary restrictions, you can easily adapt this recipe. For example, if anyone has allergies, make sure to check any pre-made spices or sauces for hidden ingredients. This dish contains dairy from the yogurt and mayonnaise, so consider offering coconut yogurt or leaving these out for a dairy-free version. If making vegetarian options, substitute the lamb with hearty mushrooms or jackfruit and use vegetable broth.

How can I ensure my rice turns out perfectly fluffy?
Absolutely! When preparing the rice, after adding in the reserved meat broth and saffron, bring it to a boil before covering and reducing the heat to low. Cooking for about 20 minutes should yield fluffy rice, but let it rest off the heat for about 5 minutes after cooking. Fluff with a fork before serving for that extra lightness!

Roasted Lamb Shoulder Mandi

Roasted Lamb Shoulder Mandi

Enjoy the rich flavors of Roasted Lamb Shoulder Mandi, an Arabic classic that's a true feast for the senses.
Print Recipe Pin Recipe
Prep Time 30 minutes mins
Cook Time 2 hours hrs 50 minutes mins
Total Time 3 hours hrs 20 minutes mins
Servings: 6 servings
Course: DINNER RECIPES
Cuisine: Arabic
Calories: 800
Ingredients Equipment Method Nutrition Notes

Ingredients
  

For the Lamb
  • 1 whole lamb shoulder a beautifully marbled cut
  • to taste salt powder
  • to taste pepper powder
  • 2 tbsp garlic paste
  • 2 tbsp ginger paste
  • 3 tbsp Arabian Mandi spice the secret to authentic flavor
For the Cooking Base
  • 4 tbsp oil olive or vegetable oil
  • 2 medium sliced onions sauté until golden
  • 2 bay leaves
  • 1 stick cinnamon for braising
  • 1 tbsp whole cumin
  • 6-8 cloves
  • 6-8 peppercorn
  • 1 tbsp coriander seeds
  • 6 green cardamom
  • 2 black cardamoms
  • 2 green chilies adjust for heat
  • 1 dried lime adds tangy kick
  • 6 cups water enough to cover the lamb
For the Rice
  • 3 cups rice long-grain rice
  • 6 cups reserved meat broth from cooking the lamb
  • 1 tbsp saffron strands
  • 2 tbsp fresh lemon juice
  • 1 tbsp orange color for saffron-like hue
For Garnish
  • 1/4 cup fresh coriander added when served
  • 1 cup full-fat yogurt for a creamy topping
  • to taste mayonnaise optional
  • 1 chopped onion for sautéing
  • 1 chopped carrot for sautéing
  • 2 cloves garlic for sautéing
Optional
  • to taste saffron concoction for an extra touch of luxury

Equipment

  • Large pot
  • separate pot

Method
 

Cooking Instructions
  1. Season the whole lamb shoulder with salt and pepper powder, garlic paste, ginger paste, and Arabian Mandi spice.
  2. In a large pot, heat oil and sauté sliced onions until they turn golden brown.
  3. Add the seasoned lamb shoulder to the pot and brown it on all sides.
  4. Stir in bay leaves, cinnamon stick, whole cumin, cloves, peppercorn, coriander seeds, green cardamom, black cardamoms, green chilies, and dried lime. Pour in enough water to cover the lamb completely.
  5. Cover the pot and let it simmer for approximately 170 minutes until the lamb is tender.
  6. Once the lamb is cooked, carefully remove it from the pot and set aside.
  7. Strain the broth used for cooking the lamb, reserving 6 cups for the rice.
  8. In a separate pot, heat 2 tbsp of oil and sauté chopped onion, carrot, and garlic until soft.
  9. Stir in the rice and sauté with the vegetables for a couple of minutes.
  10. Pour in the reserved meat broth, along with the saffron strands, fresh lemon juice, and orange color. Bring to a boil, then cover and reduce heat to low. Cook for about 20 minutes.
  11. Serve the roasted lamb shoulder atop the saffron-infused rice, garnished with fresh coriander, yogurt, and mayonnaise.

Nutrition

Serving: 1servingCalories: 800kcalCarbohydrates: 75gProtein: 35gFat: 40gSaturated Fat: 15gPolyunsaturated Fat: 4gMonounsaturated Fat: 14gCholesterol: 120mgSodium: 800mgPotassium: 600mgFiber: 3gSugar: 2gVitamin A: 10IUVitamin C: 5mgCalcium: 80mgIron: 5mg

Notes

Ensure to marinate the lamb well and check the internal temperature for optimal tenderness.

Tried this recipe?

Let us know how it was!

Filed Under: DINNER RECIPES

Greek Stuffed Onions

January 2, 2026 by JudyWhite Leave a Comment

When I first encountered Greek Stuffed Onions, it was during a delightful summer afternoon filled with laughter and the sizzle of home cooking wafting in the air. Sitting at a friend’s dinner table, I was introduced to this remarkable dish that promised comfort and warmth with every bite. The moment you sink your fork into tender onions bursting with a savory filling of rich ground chuck, aromatic herbs, and creamy feta, you understand why this recipe has crossed borders to warm hearts.

Perfect for those looking to break free from the monotony of fast food, this dish is not only easy to whip up but also a true showstopper for your gatherings. Whether it’s a cozy weeknight dinner or a festive celebration, these stuffed onions will impress friends and family alike, making them feel like they’ve stepped into a sun-drenched Greek tavern. Let’s dive into this recipe and infuse your kitchen with a little Mediterranean magic!

Why You'll Love This Greek Stuffed Onions

  • This Greek Stuffed Onions recipe is incredibly easy to prepare, making it perfect for both novice cooks and seasoned chefs.
  • The explosion of flavors from the savory filling, fresh herbs, and creamy feta will have everyone at the table asking for seconds.
  • Its versatility shines through as it can be served as a hearty main dish or a side, fitting seamlessly into any meal.
  • Visually, the stuffed onions create a stunning presentation that will impress your guests and elevate your dining experience.

Greek Stuffed Onions Ingredients

For the Stuffed Onions
• 6 large onions – these are perfect for hollowing and stuffing.
• 1 large onion – finely diced, adds great flavor to the filling.
• 5 cloves garlic – minced, for that aromatic punch.

For the Filling
• 1.5 pounds ground chuck – provides rich, savory flavor that’ll keep everyone coming back for more.
• 1 teaspoon fine sea salt – enhances all the delightful flavors in your Greek stuffed onions.
• 0.5 teaspoon black pepper – for a gentle kick that balances the dish.
• 1 14-ounce can crushed plum tomatoes – adds depth and moisture to the filling.
• 1 cup arborio rice – this short-grain rice cooks beautifully and absorbs the flavors.
• 0.25 cup flat-leaf Italian parsley – fresh and aromatic, it brings a burst of color and freshness.
• 0.25 cup fresh mint – adds a refreshing note that complements the dish beautifully.
• 2 teaspoons dried oregano – a classic herb that captures the essence of Mediterranean cuisine.
• 0.5 cup crumbled feta cheese – for that creamy, tangy finish that ties everything together.
• 1 6-ounce can tomato paste – thickens and intensifies the tomato flavor in the filling.
• 1 cup boiled onion centers – finely diced, these add sweetness and texture to the mix.

For Cooking
• 4 tablespoons extra virgin olive oil – enriches the filling and adds healthy fats.
• 3 cups saved onion broth – provides moisture while baking, enhancing the dish’s overall flavor.
• Salt & pepper – to taste, ensuring your dish is seasoned perfectly.

How to Make Greek Stuffed Onions

  1. Preheat the oven to 350°F (175°C). Prepare a baking dish by lightly greasing it with olive oil. This will ensure your onions don’t stick and will help them roast beautifully.

  2. Cut the tops off the large onions and carefully hollow them out, making sure to save the centers for later use. This step transforms the robust onions into cozy vessels for your delicious filling!

  3. Heat the olive oil in a skillet over medium heat. Once hot, add the finely diced onion and minced garlic. Sauté for about 5 minutes until softened and fragrant; you want them to be translucent and inviting!

  4. Brown the ground chuck in the skillet, cooking it until it’s nicely browned. Break it up as it cooks, about 8-10 minutes, allowing all those savory flavors to develop fully.

  5. Combine the salt, black pepper, crushed tomatoes, arborio rice, parsley, mint, dried oregano, feta cheese, tomato paste, and the finely diced onion centers into the skillet. Stir everything together until it’s well-mixed, creating a hearty filling!

  6. Stuff the hollowed-out onions with the flavorful mixture, packing it tightly to ensure no deliciousness escapes during baking. Each onion should be a treasure chest of flavor!

  7. Arrange the stuffed onions upright in the baking dish, then pour the saved onion broth around them. This will keep the onions moist as they roast, enhancing their tenderness.

  8. Cover the baking dish tightly with foil and bake in the preheated oven for 2 hours. The dish is done when the rice is tender, and the onions are beautifully cooked through.

  9. Cool the onions for just a few minutes out of the oven before serving. This way, they’ll hold together better when you take that first mouthwatering bite!

Optional: Garnish with extra parsley or mint before serving for a fresh pop of color.

Exact quantities are listed in the recipe card below.

Greek Stuffed Onions Variations

Feel free to get creative with this recipe and make it your own; the possibilities are simply delightful!

  • Vegetarian: Substitute ground chuck with a mix of lentils and mushrooms for a hearty, plant-based twist. You won’t miss the meat, and the earthy flavors will shine.

  • Spicy: Add a diced jalapeño or red pepper flakes to the filling for a zesty kick that jazzes up the savory flavors beautifully. The heat enhances the dish in such a tempting way!

  • Cheesy: Mix in different cheeses like mozzarella or Gouda instead of feta for a creamy, gooey texture that’s irresistibly delicious. The cheesy goodness will have everyone raving!

  • Gluten-Free: Swap arborio rice for quinoa or cauliflower rice, allowing everyone to enjoy this dish without worry. Both options provide wonderful texture and complement the stuffing perfectly.

  • Herbal Twist: Experiment with fresh herbs like dill or cilantro alongside parsley and mint for a unique flavor profile. Each herb brings its special character, adding layers of freshness to every bite!

  • Savory & Sweet: Incorporate some raisins or dried apricots into the filling to add a subtle sweetness that balances out the savory elements. This delightful contrast is sure to surprise your taste buds!

  • Roasted Garlic: Roast whole garlic cloves and mash them into the filling for a rich, mellow garlic flavor. It elevates the dish, making the aroma even more enticing as it bakes.

  • Nutty Crunch: Fold in toasted pine nuts or walnuts for an added texture that enhances the overall experience. The nutty crunch creates a delightful surprise in every mouthful!

Embrace your culinary spirit and try these variations to create a dish that resonates with your family’s preferences!

How to Store and Freeze Greek Stuffed Onions

Fridge: Store any leftover Greek Stuffed Onions in an airtight container for up to 3 days. This way, you’ll have delicious comfort food ready for your next meal!

Freezer: For long-term storage, freeze the stuffed onions in a single layer on a baking sheet. Once solid, transfer them into a freezer-safe bag for up to 3 months.

Reheating: To reheat, thaw overnight in the fridge. Bake at 350°F (175°C) for about 25-30 minutes, or until heated through, ensuring the flavors remain vibrant.

Wrapping: If freezing already cooked onions, ensure they’re fully cooled before wrapping them tightly to prevent freezer burn and retain their tasty filling!

What to Serve with Greek Stuffed Onions?

Creating a full and satisfying meal around your stuffed onions elevates your dining experience and makes it truly memorable.

  • Herbed Quinoa: A fluffy side of quinoa seasoned with lemon and herbs adds a nourishing, nutty contrast to the rich stuffed onions.
  • Roasted Vegetables: Colorful medleys of roasted seasonal veggies will not only provide vibrant colors but also a delightful caramelized sweetness to complement the savory filling.
  • Greek Salad: Crisp cucumbers, juicy tomatoes, and tangy olives tossed in olive oil and feta create a refreshing balance against the hearty flavors of your main dish.
  • Tzatziki Sauce: Cool and creamy, this yogurt dip made with cucumber and garlic enhances the Greek flavors, providing a perfect tangy contrast.
  • Pita Bread: Soft, warm pita served on the side is ideal for scooping up any remaining filling, ensuring nothing goes to waste!
  • Chilled White Wine: A light, crisp white wine like Sauvignon Blanc will cleanse the palate and further enhance the fresh flavors of your meal, making it even more enjoyable.
  • Baklava: For dessert, this honey-soaked pastry adds a touch of sweet warmth to your meal, blending beautifully with the Mediterranean theme.
  • Lemon Sorbet: A refreshing sorbet serves as a perfect palate cleanser after your hearty main course, leaving a light, sweet finish.

Make Ahead Options

These Greek Stuffed Onions are a fabulous option for meal prep, saving you time during the week! You can prepare the filling (ground chuck, rice, herbs, and spices) up to 3 days in advance. Simply mix everything in a bowl and store it in an airtight container in the refrigerator. The hollowed onions themselves can also be prepared the night before and kept in water (to prevent browning) in the fridge. When you’re ready to serve, just stuff the onions with the filling, pour the broth around them, and bake as directed. This way, your meal can be just as delicious while reducing last-minute stress!

Chef's Helpful Tips

  • When making Greek Stuffed Onions, ensure that you hollow the onions carefully to avoid breaking them, as this will help hold the filling securely.
  • A common mistake is not rinsing the arborio rice, so remember to rinse it until the water runs clear to remove excess starch for better texture.
  • To enhance the flavor, consider sautéing the diced onion and garlic until they are translucent and fragrant, which will create a wonderful aroma in the filling.
  • Bake the stuffed onions covered for 2 hours at 350°F, and for extra tenderness, you can check the progress at the 1-hour mark to ensure the onions are cooking properly.

Greek Stuffed Onions Recipe FAQs

How do I choose the best onions for stuffing?
Absolutely! Look for large, firm onions without any soft spots or dark blemishes. Ideally, they should be heavy for their size to ensure they’re juicy and full of flavor. Sweet onions, like Vidalia or Walla Walla, are excellent choices due to their milder taste, but any large onions will work beautifully.

How should I store leftover Greek Stuffed Onions?
Very easy! Store any leftovers in an airtight container in the fridge for up to 3 days. Let them cool completely before placing them in the container to avoid excess moisture, which can lead to spoilage. Enjoy them as a quick and comforting meal for lunch or dinner!

Can I freeze Greek Stuffed Onions?
Yes, you can! For freezing, place the stuffed onions in a single layer on a baking sheet and freeze them until solid, about 1-2 hours. Then, transfer them to a freezer-safe bag or container. They can be frozen for up to 3 months. Thaw overnight in the fridge before reheating to enjoy their deliciousness again.

What should I do if my stuffed onions are undercooked after baking?
No need to worry! If they seem undercooked after the recommended baking time, simply cover the dish with foil and return them to the oven. Bake for an additional 30 minutes, checking regularly for tenderness. The goal is for the onions to be soft enough to pierce easily with a fork and for the rice to be fully cooked.

Are Greek Stuffed Onions suitable for people with gluten allergies?
Yes, indeed! This recipe is naturally gluten-free, as it primarily uses rice and does not include any wheat products. Always check the labels on your canned tomatoes and tomato paste to ensure they’re gluten-free, and you’re good to go!

Can my pet eat Greek Stuffed Onions?
No! Onions are toxic to dogs and cats. It’s essential to keep these delightful stuffed onions away from your furry friends. If you want to share some special treats with them, consider cooking up a simple dish without onions and other harmful seasonings.

Greek Stuffed Onions

Greek Stuffed Onions

Discover the heartwarming flavors of Greek Stuffed Onions, a dish filled with savory ingredients that brings comfort and Mediterranean magic to your table.
Print Recipe Pin Recipe
Prep Time 30 minutes mins
Cook Time 2 hours hrs
Cooling Time 10 minutes mins
Total Time 2 hours hrs 40 minutes mins
Servings: 6 onions
Course: DINNER RECIPES
Cuisine: Greek
Calories: 350
Ingredients Equipment Method Nutrition Notes

Ingredients
  

For the Stuffed Onions
  • 6 large onions these are perfect for hollowing and stuffing.
  • 1 large onion finely diced
  • 5 cloves garlic minced
For the Filling
  • 1.5 pounds ground chuck provides rich, savory flavor
  • 1 teaspoon fine sea salt enhances flavors
  • 0.5 teaspoon black pepper balances the dish
  • 1 14-ounce can crushed plum tomatoes adds depth and moisture
  • 1 cup arborio rice cooks beautifully
  • 0.25 cup flat-leaf Italian parsley fresh and aromatic
  • 0.25 cup fresh mint adds refreshing note
  • 2 teaspoons dried oregano captures Mediterranean essence
  • 0.5 cup crumbled feta cheese creamy, tangy finish
  • 1 6-ounce can tomato paste thickens the filling
  • 1 cup boiled onion centers adds sweetness and texture
For Cooking
  • 4 tablespoons extra virgin olive oil enriches the filling
  • 3 cups saved onion broth provides moisture while baking
  • Salt & pepper to taste

Equipment

  • Baking dish
  • Skillet

Method
 

How to Make Greek Stuffed Onions
  1. Preheat the oven to 350°F (175°C). Prepare a baking dish by lightly greasing it with olive oil.
  2. Cut the tops off the large onions and carefully hollow them out, making sure to save the centers for later use.
  3. Heat the olive oil in a skillet over medium heat. Add the finely diced onion and minced garlic. Sauté for about 5 minutes until softened.
  4. Brown the ground chuck in the skillet, cooking it until it’s nicely browned, about 8-10 minutes.
  5. Combine the salt, black pepper, crushed tomatoes, arborio rice, parsley, mint, dried oregano, feta cheese, tomato paste, and finely diced onion centers into the skillet. Stir together.
  6. Stuff the hollowed-out onions with the filling, packing it tightly.
  7. Arrange the stuffed onions upright in the baking dish, then pour the saved onion broth around them.
  8. Cover the baking dish tightly with foil and bake for 2 hours.
  9. Cool the onions for a few minutes out of the oven before serving. Garnish with extra parsley or mint if desired.

Nutrition

Serving: 1onionCalories: 350kcalCarbohydrates: 35gProtein: 22gFat: 15gSaturated Fat: 5gPolyunsaturated Fat: 2gMonounsaturated Fat: 8gCholesterol: 70mgSodium: 500mgPotassium: 600mgFiber: 3gSugar: 5gVitamin A: 400IUVitamin C: 10mgCalcium: 150mgIron: 3mg

Notes

Ensure that you hollow the onions carefully to avoid breaking them. Rinse the arborio rice until the water runs clear for better texture.

Tried this recipe?

Let us know how it was!

Filed Under: DINNER RECIPES

  • « Previous Page
  • 1
  • …
  • 6
  • 7
  • 8
  • 9
  • 10
  • …
  • 16
  • Next Page »

Recent Posts

  • Crispy Potatoes in Oven
  • Lucky Charms Pancakes
  • Cheeseburger
  • Boiled Corn on the Cob
  • St. Patrick’s Day Dessert Parfaits

Recent Comments

No comments to show.

Footer

  • Contact
  • Privacy Policy
  • About Us
  • Terms
  • ↑ back to top

Copyright © 2024 www.Forkono.com

Table Of Content