Forkono

  • BREAKFAST & BRUNCH
  • DESSERT RECIPES
  • DINNER RECIPES
  • LUNCH RECIPES
  • About uS
  • SNACKS & APPETIZERS
menu icon
go to homepage
  • BREAKFAST & BRUNCH
  • DESSERT RECIPES
  • DINNER RECIPES
  • LUNCH RECIPES
  • About uS
  • SNACKS & APPETIZERS
search icon
Homepage link
  • BREAKFAST & BRUNCH
  • DESSERT RECIPES
  • DINNER RECIPES
  • LUNCH RECIPES
  • About uS
  • SNACKS & APPETIZERS
×

High Protein Southwest Chicken Salad

December 14, 2025 by JudyWhite Leave a Comment

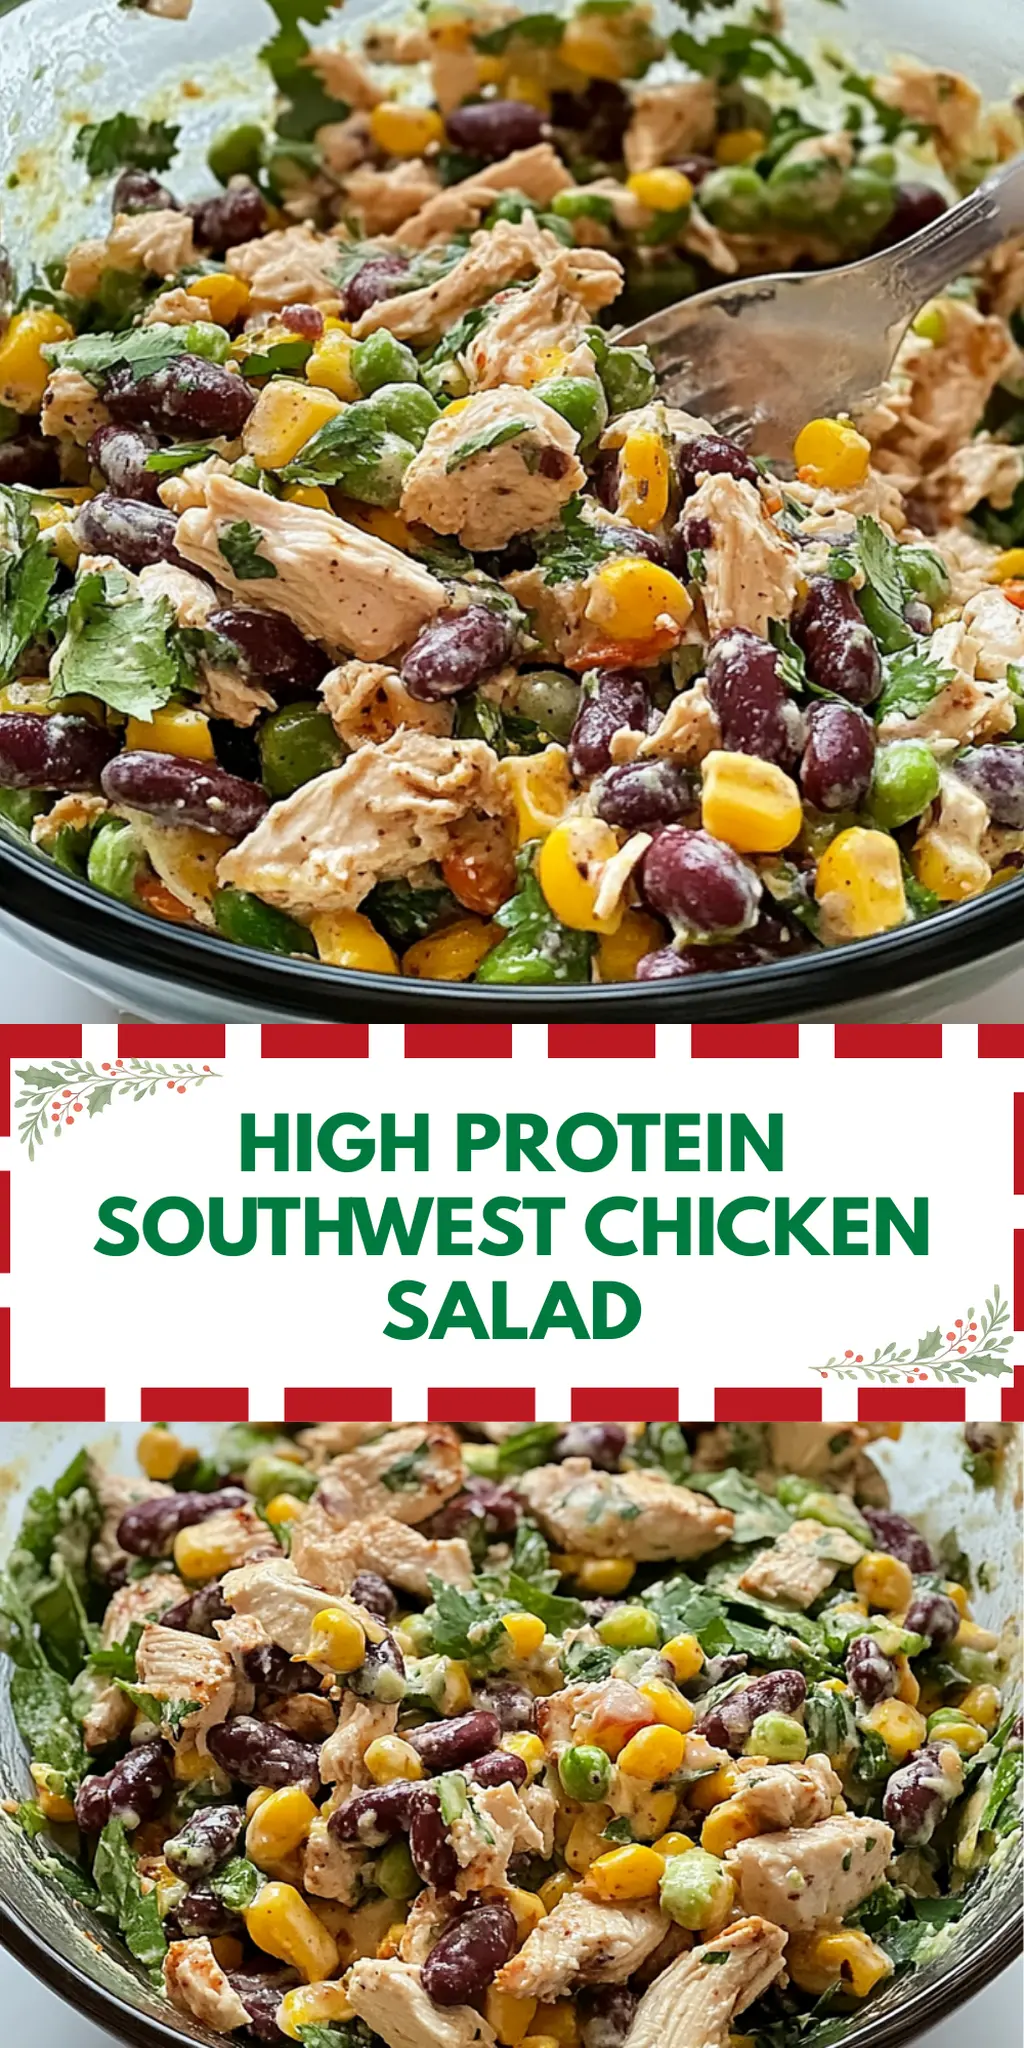
There’s something refreshing about a vibrant salad that makes you feel energized and nourished, especially when it’s packed with protein like my High Protein Southwest Chicken Salad. On a particularly sunny afternoon, while staring at a fridge filled with leftover ingredients, I had an epiphany. Why not throw together a bowl bursting with flavor and health? With just a handful of simple ingredients—roasted corn, zesty lime, creamy avocado, and tender chicken—this salad was born.

Not only is it quick to prepare in a mere five minutes, but it also delivers a delightful explosion of flavors that rivals any takeout meal. Perfect for a busy weeknight or a picnic with friends, this dish caters to both the health-conscious and those simply craving something delicious. Plus, with its customizable nature, you can easily add your favorite toppings or modify the recipe to fit what you have on hand. Dive into this crowd-pleaser that’s both satisfying and guilt-free—you won’t be disappointed!

Why You'll Love This High Protein Southwest Chicken Salad

  • This High Protein Southwest Chicken Salad is incredibly easy to whip up, taking just five minutes of your time.
  • The burst of flavors from the roasted corn, zesty lime, and creamy avocado creates a mouthwatering experience that will leave you craving more.
  • Its versatility allows you to customize the ingredients based on what you have, making it a flexible choice for any meal.
  • Visually appealing with its vibrant colors, this salad is sure to impress at any gathering and is a fantastic way to enjoy a guilt-free, protein-packed dish.

High Protein Southwest Chicken Salad Ingredients

• Get ready to create a flavor-packed dish!

For the Salad
• Roasted corn – adds a sweet, smoky flavor that brightens the salad.
• Red onion – ensures a crispy texture and aromatic bite.
• Black beans – provide essential protein and heartiness to each serving.
• Taco seasoning – elevates the flavor profile with its zesty blend of spices.
• Shredded chicken – delivers a protein boost and satisfying substance.
• Greek yogurt – serves as a creamy, healthy substitute for traditional dressings.
• Cilantro – brings a fresh, herbaceous note that ties everything together.
• Avocado – adds a rich, buttery texture while packing healthy fats.
• Lime – compliments the dish with a burst of acidity that enhances all flavors.
• Salt – crucial for balancing and enhancing the natural flavors of the ingredients.

This high protein southwest chicken salad is a fantastic option for a quick, nourishing meal!

How to Make High Protein Southwest Chicken Salad

  1. Roast the Corn: Start by roasting 1 cup of corn in a skillet with a drizzle of olive oil and a dash of chili powder until it’s golden brown and slightly caramelized, about 5-7 minutes.

  2. Dice the Onions: While the corn is roasting, finely dice 1/4 cup of red onion, ensuring the pieces are small enough to blend seamlessly into the salad.

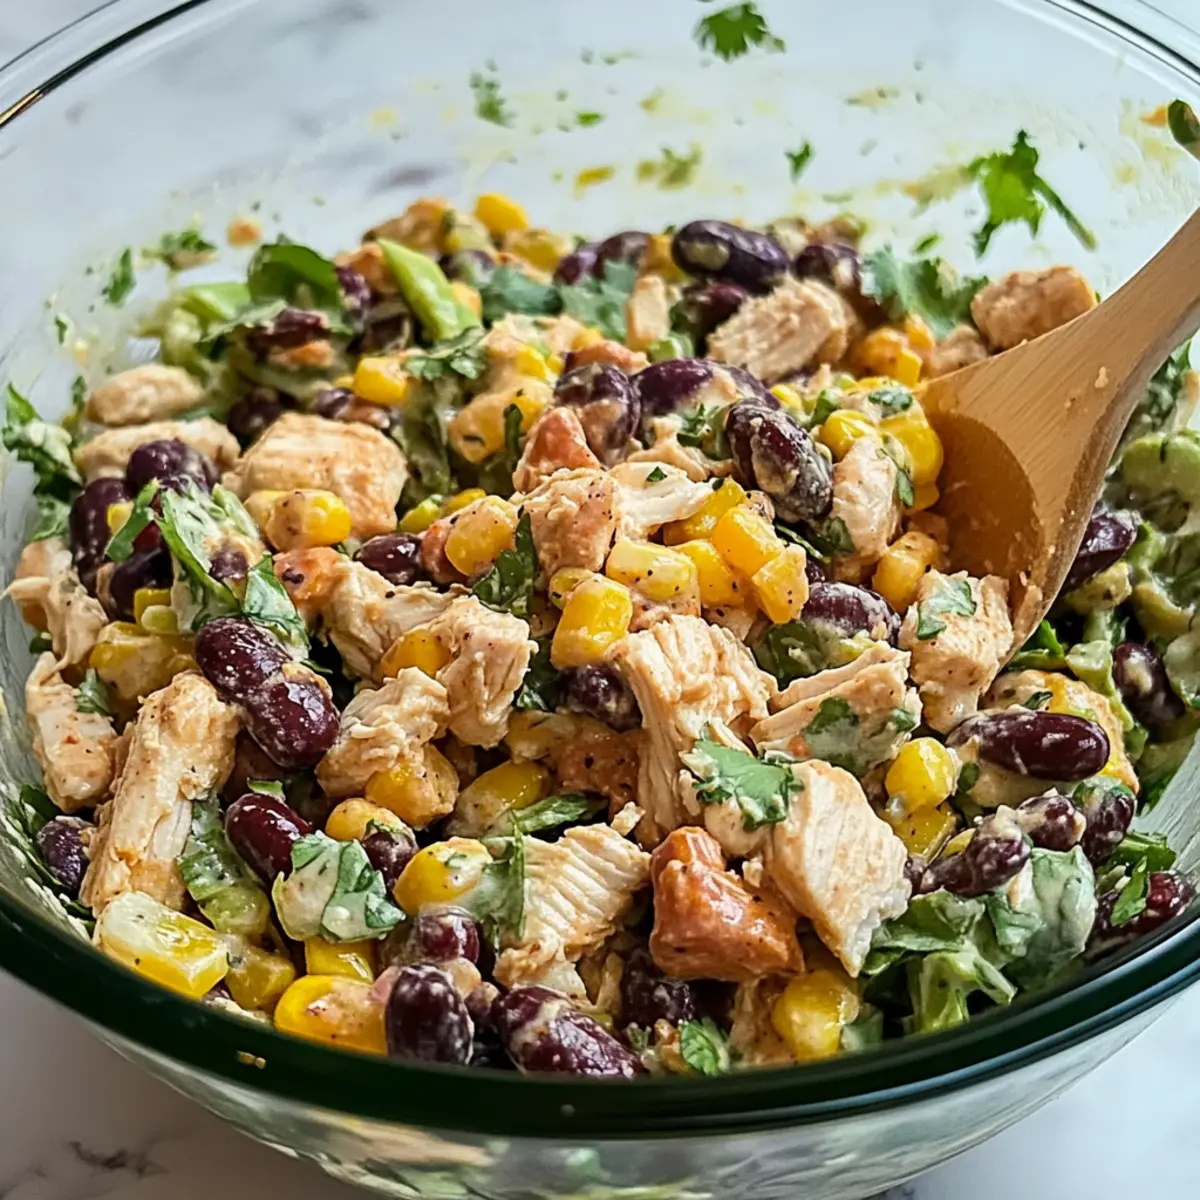
  3. Combine Ingredients: In a large mixing bowl, combine the roasted corn, diced red onion, 1 cup of black beans, 1 tablespoon of taco seasoning, 3 cups of shredded chicken, 1/2 cup of Greek yogurt, 1/3 cup of finely chopped cilantro, 1 whole diced avocado, the juice of 1 squeezed lime, and 1 teaspoon of salt.

  4. Mix Well: Gently mix all the ingredients together until everything is evenly coated and the flavors meld, creating a colorful and appetizing salad.

Optional: Serve with tortilla chips for a delightful crunch!

Exact quantities are listed in the recipe card below.

Storage Tips for High Protein Southwest Chicken Salad

Fridge: Store leftover salad in an airtight container in the fridge for up to 3 days. Avoid adding avocado until serving to prevent browning.

Freezer: It’s best not to freeze this salad as the texture of ingredients like avocado and Greek yogurt may change once thawed.

Reheating: If you’ve got leftovers with no avocado, simply mix in a bit more Greek yogurt or fresh lime juice for extra freshness before enjoying.

Room Temperature: Serve the salad at room temperature for the best flavor experience, especially if it’s just come out of the fridge.

Make Ahead Options

These High Protein Southwest Chicken Salads are perfect for meal prep aficionados! You can roast the corn and dice the red onion up to 24 hours in advance to save valuable prep time. Simply store the roasted corn and red onion in airtight containers in the refrigerator to maintain their freshness. Additionally, you can mix all the other ingredients—black beans, taco seasoning, shredded chicken, Greek yogurt, cilantro, and lime juice—up to 3 days ahead of time. Keep the diced avocado separate until just before serving to avoid browning. When you’re ready to enjoy your salad, combine everything in a bowl, and you’ll have a delicious, vibrant dish ready in minutes—perfect for busy weeknights!

What to Serve with High Protein Southwest Chicken Salad?

Elevate your lunch or dinner with delicious sides that perfectly complement this vibrant, protein-packed dish.

  • Crispy Tortilla Chips: These add a delightful crunch, perfect for scooping up the creamy salad and enhancing the southwest flavors.
  • Quinoa Pilaf: This nutty, fluffy side dish brings a hearty bite, balancing the salad’s freshness with a lovely texture.
  • Grilled Vegetables: A medley of zucchini, bell peppers, and onions adds a smoky flavor that pairs perfectly with the salad’s zesty profile while providing a satisfying contrast in textures.
  • Cornbread Muffins: Sweet and tender, these muffins create an inviting combination of flavors—ideal for soaking up any extra dressing from the salad.
  • Avocado Cilantro Rice: The creamy rice, flavored with avocado and fragrant cilantro, offers a light yet fulfilling side, tying in the salad’s ingredients seamlessly.
  • Mango Salsa: Fresh and fruity, this adds a burst of sweetness and brightness, enhancing the overall experience with a tropical twist.
  • Lemonade or Iced Tea: A refreshing drink that complements the spiciness of the salad while keeping the meal light and enjoyable.
  • Chilled Fruit Salad: A vibrant mix of seasonal fruits provides a sweet finish to the meal, balancing flavors beautifully.

High Protein Southwest Chicken Salad Variations

Feel free to get creative with your salad and make it truly yours!

  • Spicy Kick: Add diced jalapeños for a fresh, fiery flavor that elevates the taste and gives it a zesty bite.
    If you love heat, this is a fantastic way to spice things up!

  • Quinoa Boost: Substitute black beans with cooked quinoa for added protein and a delightful nutty flavor that complements the other ingredients beautifully.

  • Vegan Delight: Replace shredded chicken with chickpeas and Greek yogurt with cashew cream for a satisfying vegan option without sacrificing flavor.
    This swap makes it a hearty meal that’s perfect for plant-based eaters!

  • Crispy Crunch: Toss in some crushed tortilla chips right before serving for that satisfying crunch that adds both texture and flavor.

  • Seasonal Swaps: Incorporate seasonal vegetables like bell peppers or zucchini to keep the salad fresh and exciting, using what you have available for a burst of color and taste.

  • Herbs Galore: Swap cilantro with fresh parsley or add fresh mint for a refreshing twist that brightens the salad while infusing new flavors.

  • Creamy Avocado Alternative: Use a dollop of guacamole instead of diced avocado for a richer flavor that also enhances the creamy texture of the dish.

  • Fruit Fusion: Add diced mango or pineapple for a sweet and tropical flair that contrasts beautifully with the savory elements of the salad.
    This delightful addition brings a fresh twist that will surprise and delight your taste buds!

Chef's Helpful Tips

  • To enhance the flavor of your High Protein Southwest Chicken Salad, always roast the corn until it’s golden brown to bring out its natural sweetness.
  • Make sure to finely dice the red onion to ensure it integrates well without overpowering the other ingredients.
  • When mixing the salad, gently fold in the Greek yogurt to maintain a creamy texture without breaking apart the avocado.
  • For optimal flavor, let the salad sit for about 10 minutes after mixing to allow the ingredients to marinate and meld together.

High Protein Southwest Chicken Salad Recipe FAQs

How do I choose ripe avocados for the salad?
Absolutely! To select the perfect avocado, look for ones that feel slightly soft when gently squeezed but aren’t too mushy. The skin should be dark and bumpy rather than green and smooth. You can also ripen any underripe avocados at room temperature, which takes about 3-5 days.

How should I store leftovers of the High Protein Southwest Chicken Salad?
For optimal freshness, store the salad in an airtight container in the fridge for up to 3 days. It’s best to keep the diced avocado separate until serving to prevent it from browning. If stored properly, the salad remains flavorful and crisp!

Can I freeze my High Protein Southwest Chicken Salad?
I recommend avoiding freezing this salad, as ingredients like avocado and Greek yogurt change texture once thawed. If you want to preserve the chicken and beans, you can freeze those separately for up to 3 months. Just remember to add fresh ingredients like avocado and cilantro when you thaw and assemble your salad.

What should I do if my salad seems too dry?
If your salad turns out a bit dry, don’t worry! Simply add an extra dollop of Greek yogurt, a splash of lime juice, or a tablespoon of olive oil to moisten it up. Mix well to achieve that creamy consistency you crave.

Are there any dietary considerations I should be aware of?
Very! This salad is a delicious option for many; however, if catering to specific dietary needs, be mindful of allergies to common ingredients like black beans and Greek yogurt, which contains dairy. For a dairy-free alternative, consider using a plant-based yogurt substitute—this keeps the salad creamy while accommodating different dietary preferences.

How can I customize my High Protein Southwest Chicken Salad?
The more, the merrier! You can easily tailor this salad to your liking. Feel free to add ingredients such as diced bell peppers for crunch, jalapeños for heat, or substitute quinoa for black beans for a different protein source. Mix and match based on what you have at home and enjoy your personalized creation!

High Protein Southwest Chicken Salad

High Protein Southwest Chicken Salad

A refreshing and protein-packed salad bursting with flavor, featuring roasted corn, zesty lime, creamy avocado, and tender chicken.
Print Recipe Pin Recipe
Prep Time 5 minutes mins
Cook Time 7 minutes mins
Total Time 12 minutes mins
Servings: 4 servings
Course: LUNCH RECIPES
Cuisine: Southwest
Calories: 350
Ingredients Equipment Method Nutrition Notes

Ingredients
  

For the Salad
  • 1 cup roasted corn adds a sweet, smoky flavor
  • 1/4 cup red onion ensures a crispy texture
  • 1 cup black beans provides essential protein
  • 1 tablespoon taco seasoning elevates flavor profile
  • 3 cups shredded chicken delivers protein boost
  • 1/2 cup Greek yogurt serves as a creamy dressing
  • 1/3 cup cilantro fresh herbaceous note
  • 1 whole avocado adds healthy fats
  • 1 whole lime burst of acidity
  • 1 teaspoon salt balances flavors

Equipment

  • Skillet
  • Mixing bowl

Method
 

How to Make High Protein Southwest Chicken Salad
  1. Start by roasting 1 cup of corn in a skillet with a drizzle of olive oil and a dash of chili powder until it’s golden brown and slightly caramelized, about 5-7 minutes.
  2. While the corn is roasting, finely dice 1/4 cup of red onion.
  3. In a large mixing bowl, combine the roasted corn, diced red onion, 1 cup of black beans, 1 tablespoon of taco seasoning, 3 cups of shredded chicken, 1/2 cup of Greek yogurt, 1/3 cup of finely chopped cilantro, 1 whole diced avocado, the juice of 1 squeezed lime, and 1 teaspoon of salt.
  4. Gently mix all the ingredients together until evenly coated.

Nutrition

Serving: 1servingCalories: 350kcalCarbohydrates: 30gProtein: 30gFat: 15gSaturated Fat: 3gPolyunsaturated Fat: 1gMonounsaturated Fat: 8gCholesterol: 70mgSodium: 600mgPotassium: 800mgFiber: 10gSugar: 3gVitamin A: 500IUVitamin C: 20mgCalcium: 100mgIron: 3mg

Notes

Store leftover salad in an airtight container in the fridge for up to 3 days. Avoid adding avocado until serving to prevent browning.

Tried this recipe?

Let us know how it was!

Filed Under: LUNCH RECIPES

Cranberry Pecan Spinach Salad with Feta and Apples

December 14, 2025 by JudyWhite Leave a Comment

I couldn’t believe my luck when I stumbled upon the perfect balance of flavors tucked away in my fridge the other day. There’s something undeniably uplifting about a salad that combines tart cranberries, crunchy pecans, and crisp apples—all drizzled with a zesty homemade dressing. This Cranberry Pecan Spinach Salad with Feta and Apples was born from that delightful moment, and it has quickly become a staple in my home.

Whether you’re looking to shake up your meal prep routine or impress guests at your next dinner, this salad ticks all the boxes—it’s vibrant, satisfying, and oh-so-easy to make! With just 15 minutes needed from start to finish, you’ll find yourself returning to this recipe again and again. Packed with fresh ingredients and a delightful medley of textures, this salad not only nourishes but also warms the heart. Let’s dive into this culinary gem that promises to elevate your meal experience to new heights!

Why You'll Love This Cranberry Pecan Spinach Salad with Feta and Apples

  • This salad is incredibly easy to prepare, taking just 15 minutes from start to finish, making it perfect for busy days.
  • The combination of sweet apples, tangy cranberries, and creamy feta creates a flavor explosion that will leave your taste buds dancing.
  • Its vibrant colors and fresh ingredients make it an eye-catching addition to any table, impressing your guests with its visual appeal.
  • Plus, it’s versatile enough to serve as a main dish or a side, making it a crowd-pleaser for any occasion.

Cranberry Pecan Spinach Salad Ingredients

A fresh blend for vibrant flavor!

For the Dressing

  • Extra virgin olive oil – adds a rich, fruity flavor that’s perfect for the salad.
  • Red wine vinegar – brings a tangy brightness that balances the sweetness of the apples.
  • Pure maple syrup – enhances the dressing with a touch of natural sweetness.
  • Dijon mustard – introduces a subtle kick and helps emulsify the dressing.
  • Sea salt – elevates the flavors of the dressing without overpowering them.
  • Black pepper – fresh ground adds a hint of warm spice.

For the Salad

  • Fresh baby spinach – a nutritional powerhouse, providing a tender, leafy base.
  • Honey crisp apple – delivers a crunchy texture and natural sweetness that pairs beautifully with the salad.
  • Dried cranberries – adds chewy sweetness and a pop of color, making this salad unforgettable.
  • Crumbled feta – brings a creamy, salty element that complements the other flavors.
  • Chopped candied pecans – introduces a delightful crunch and sweetness, enhancing the salad’s overall appeal.

How to Make Cranberry Pecan Spinach Salad with Feta and Apples

  1. Whisk together the dressing: In a medium bowl, combine the extra virgin olive oil, red wine vinegar, pure maple syrup, dijon mustard, sea salt, and black pepper. Whisk until smooth and well blended.

  2. Combine the salad ingredients: In a large bowl, add the fresh baby spinach, diced honey crisp apple, dried cranberries, crumbled feta, and chopped candied pecans. Gently mix to combine all the ingredients, allowing the colors to shine through.

  3. Dress the salad: Drizzle the prepared dressing over the salad mixture. Toss gently to combine, making sure all the ingredients are coated without bruising the spinach leaves.

Optional: Garnish with additional cranberries or pecans for extra flair.

Exact quantities are listed in the recipe card below.

What to Serve with Cranberry Pecan Spinach Salad with Feta and Apples?

Elevate your dining experience by creating a delightful spread that complements the refreshing flavors of this vibrant salad.

  • Herb-Roasted Chicken: Juicy, tender chicken infused with aromatic herbs pairs perfectly with the salad’s fruity sweetness, adding a savory contrast. Each bite of chicken serves to balance the refreshing ingredients of the salad.

  • Quinoa Pilaf: A warm, nutty quinoa pilaf enhances the salad’s textures and rounds out your meal with wholesome grains. The lightness of the quinoa beautifully complements the salad’s crispness without overshadowing its vibrant flavors.

  • Garlic Breadsticks: Soft and buttery breadsticks with a hint of garlic provide a delightful crunch and a comforting touch alongside the fresh salad. They’re perfect for sopping up any leftover dressing, making them a must-have addition.

  • Roasted Root Vegetables: A medley of caramelized carrots, sweet potatoes, and beets brings a warm earthiness to the table that contrasts delightfully with the bright notes of the salad. Their sweet and savory flavors harmonize beautifully, creating a satisfying balance.

  • Creamy Pasta Salad: A rich pasta salad with seasonal vegetables adds a creamy element that complements the crunch of the salad. It’s a filling yet delightful addition that keeps the meal light and fresh.

  • Chilled Sparkling Lemonade: A refreshing glass of sparkling lemonade provides a zesty kick that enhances the fruitiness of the salad and cleanses the palate between bites.

  • Chocolate Covered Strawberries: End your meal on a sweet note with these indulgent treats, offering a fresh and fruity contrast to the hearty salad and rounding off your dining experience deliciously.

This meal combination will surely enchant both your taste buds and your guests, creating a feast that is as enjoyable as it is memorable!

How to Store and Freeze Cranberry Pecan Spinach Salad with Feta and Apples

Fridge: Store the salad in an airtight container in the refrigerator for up to 2 days. However, be aware that the spinach may become soggy over time.

Dressing: Keep any leftover dressing separate in the fridge for up to 1 week to maintain the fresh flavors.

Freezer: It’s not recommended to freeze the assembled salad, as the spinach and fresh ingredients won’t thaw well.

Reheating: Since this salad is served cold, no reheating is necessary. Just enjoy it straight from the fridge!

Make Ahead Options

Preparing your Cranberry Pecan Spinach Salad with Feta and Apples in advance is a game changer for busy weeknights! The dressing can be made up to 3 days ahead; just store it in an airtight container in the refrigerator to keep it fresh and flavorful. You can also chop the honey crisp apple and toss it in a little lemon juice to prevent browning; it will stay crisp when prepared 24 hours in advance. When it’s time to serve, simply add all the salad ingredients to a large bowl, drizzle the dressing over, and toss gently to combine. This way, you can enjoy a fresh and vibrant salad with minimal effort!

Cranberry Pecan Spinach Salad Variations

Feel free to unleash your creativity and customize this delightful salad to suit your taste!

  • Nuts Swap: Replace candied pecans with toasted walnuts or almonds for a different crunch and flavor profile.

  • Cheese Alternatives: Substitute feta with goat cheese for a tangy twist or sharp cheddar for a heartier taste. The choice of cheese can really shift the salad’s mood.

  • Fruit Upgrades: Swap honey crisp apples for juicy pears or add fresh berries for a burst of sweetness. These fruits can add exciting new textures and flavors.

  • Vegan Option: Use maple syrup instead of honey in the dressing and eliminate cheese for a delicious plant-based version. This adaptation still delivers on flavor without compromising nutrition.

  • Spice It Up: Add a pinch of red pepper flakes to the dressing for a subtle hint of heat, perfectly balancing the sweetness of the cranberries and syrup.

  • Herb Infusion: Incorporate fresh herbs like basil or cilantro for an aromatic touch that enhances the salad’s freshness and scent.

  • Grain Boost: Stir in some cooked quinoa or farro for added protein and a satisfying chewiness, making this salad a more filling main dish.

  • Dressing Variations: Experiment with different vinegars, like apple cider or balsamic, for a distinct flavor twist that complements the sweetness of the salad. A change in dressing can reinvent the entire dish!

Chef's Helpful Tips

  • For the Cranberry Pecan Spinach Salad with Feta and Apples, ensure you use fresh baby spinach for the best texture and flavor.
  • Avoid over-tossing the salad to prevent bruising the delicate spinach leaves, which can make the salad look less appealing.
  • Chill the dressing for at least 30 minutes before serving to allow the flavors to meld and enhance the overall taste.
  • When preparing the honey crisp apple, slice it just before serving to maintain its crunch and prevent browning.

Cranberry Pecan Spinach Salad with Feta and Apples Recipe FAQs

How do I choose ripe ingredients for this salad?
Absolutely! When selecting apples, choose honey crisp varieties that are firm with a smooth skin and free of dark spots. For fresh spinach, look for leaves that are vibrant green and crisp, avoiding any that appear wilted or have brown edges.

How should I store leftovers of this salad?
Very! To store, place the salad in an airtight container and keep it in the refrigerator for up to 2 days. Just keep in mind that while the flavors will still be delightful, the spinach might lose its fresh crispness and become a bit soggy over time.

Can I freeze the Cranberry Pecan Spinach Salad with Feta and Apples?
I often recommend against freezing this salad due to its delicate ingredients. Freezing can cause the spinach to wilt and the apple to turn mushy when thawed. If you have leftover dressing, it can be stored in the refrigerator for up to 1 week, but the salad should ideally be consumed fresh.

What if I have allergies or dietary restrictions?
Of course! If you’re concerned about dairy, you can substitute the feta with a dairy-free cheese alternative or simply skip it altogether. Those with nut allergies might want to replace the candied pecans with sunflower seeds or pumpkin seeds for a crunchy element without the nuts. Always verify that all other ingredients you use are allergy-friendly.

What can I do if my salad dressing is too thick or too tangy?
If you find the dressing is too thick, simply whisk in a tablespoon of water or an extra splash of olive oil to achieve your desired consistency. If it’s too tangy, add a touch more maple syrup to balance out the acidity. Taste as you go to ensure it fits your preference!

How long does the homemade dressing last?
The homemade dressing can be refrigerated separately for up to 1 week. Store it in an airtight container, and remember to shake it well before using, as the ingredients may separate over time. Having a delicious homemade dressing ready to go makes meal prep so much easier!

Cranberry Pecan Spinach Salad with Feta and Apples

Cranberry Pecan Spinach Salad with Feta and Apples

Enjoy the delightful flavors of Cranberry Pecan Spinach Salad with Feta and Apples—fresh, vibrant, and perfect for any occasion.
Print Recipe Pin Recipe
Prep Time 15 minutes mins
Total Time 15 minutes mins
Servings: 4 servings
Course: LUNCH RECIPES
Calories: 250
Ingredients Equipment Method Nutrition Notes

Ingredients
  

Dressing
  • 1/4 cup extra virgin olive oil adds a rich, fruity flavor
  • 2 tablespoons red wine vinegar balances the sweetness of the apples
  • 1 tablespoon pure maple syrup adds natural sweetness
  • 1 teaspoon Dijon mustard introduces a subtle kick
  • 1/2 teaspoon sea salt elevates the flavors
  • 1/4 teaspoon black pepper adds a hint of warm spice
Salad
  • 6 cups fresh baby spinach provides a tender, leafy base
  • 1 medium honey crisp apple offers crunchy texture and sweetness
  • 1/2 cup dried cranberries adds chewy sweetness and color
  • 1/2 cup crumbled feta brings a creamy, salty element
  • 1/2 cup chopped candied pecans introduces crunch and sweetness

Equipment

  • Mixing bowl
  • Whisk
  • Knife
  • Cutting Board

Method
 

Making the Salad
  1. In a medium bowl, combine the extra virgin olive oil, red wine vinegar, pure maple syrup, Dijon mustard, sea salt, and black pepper. Whisk until smooth and well blended.
  2. In a large bowl, add the fresh baby spinach, diced honey crisp apple, dried cranberries, crumbled feta, and chopped candied pecans. Gently mix to combine.
  3. Drizzle the prepared dressing over the salad mixture. Toss gently to combine, ensuring all ingredients are coated without bruising the spinach leaves.

Nutrition

Serving: 1servingCalories: 250kcalCarbohydrates: 20gProtein: 4gFat: 18gSaturated Fat: 3gPolyunsaturated Fat: 1gMonounsaturated Fat: 14gCholesterol: 10mgSodium: 250mgPotassium: 300mgFiber: 4gSugar: 8gVitamin A: 3600IUVitamin C: 15mgCalcium: 150mgIron: 2mg

Notes

For the best texture and flavor, use fresh baby spinach and avoid over-tossing. Chill the dressing for at least 30 minutes before serving to meld the flavors. Slice the honey crisp apple just before serving to maintain its crunch.

Tried this recipe?

Let us know how it was!

Filed Under: LUNCH RECIPES

Healthy Baked Chicken Quesadilla

December 12, 2025 by JudyWhite Leave a Comment

There’s something incredibly comforting about the crispy exterior of a quesadilla, but when I decided to healthify this classic, I discovered just how flavorful it could still be! This Healthy Baked Chicken Quesadilla recipe came to life on a bustling weeknight when I was stuck in a rut, craving something satisfying that also aligned with my commitment to eating well. The combination of tender, shredded chicken and fresh baby spinach wrapped in warm tortillas, baked to golden perfection, proves that you don’t have to sacrifice taste for nutrition.

Each bite is a delightful blend of spices, from the warmth of cumin to the subtle heat of chili powder, all perfectly enveloped by ooey-gooey melted cheese. And the best part? You’ll make it in just 30 minutes! Whether you’re entertaining friends or simply looking for a quick family dinner after a long day, these quesadillas are a crowd-pleasing solution. Serve them up with a side of guacamole and salsa for a fun, delicious meal that keeps fast food at bay. Let’s get cooking!

Why You'll Love This Healthy Baked Chicken Quesadilla

  • This recipe is incredibly easy to whip up, making it perfect for busy weeknights or last-minute gatherings.
  • The flavors are absolutely delicious, combining spices and fresh ingredients that create a mouthwatering dish.
  • Versatility is key, as you can easily customize the filling to suit your preferences or use up leftovers.
  • Its appealing golden-brown color and melted cheese make it visually enticing, ensuring it will impress anyone at your table.

Healthy Baked Chicken Quesadilla Ingredients

For the Quesadilla Filling
• Flour tortillas – 8 10-inch tortillas provide a hearty base that wraps around all the flavors.
• Cooked shredded chicken – 4 cups create a fulfilling protein-packed filling that’s perfect for family dinners.
• Fresh baby spinach – 8 ounces add a nutritious boost and vibrant color to your quesadillas.
• Sour cream – 1.5 cups offer a creamy richness that complements the spices beautifully.
• Cumin – 1 teaspoon lends a warm, earthy flavor that enhances the overall taste of the quesadilla.
• Garlic powder – 1 teaspoon brings savory depth to the filling, perfect for garlic lovers!
• Sweet paprika – 1 teaspoon adds a gentle smokiness, enhancing the quesadilla’s flavor profile.
• Chili powder – 0.5 teaspoon introduces a subtle kick, making your Healthy Baked Chicken Quesadilla delightfully zesty.
• Salt – to taste helps bring out the flavors of all your ingredients.
• Fresh ground pepper – to taste offers a slight heat, balancing the rich filling.
• Mexican blend cheese – 2 cups, shredded, ensures a gooey, irresistible texture when melted.

For Serving (Optional)
• Guacamole – for an extra creamy touch alongside your quesadilla’s crunch.
• Salsa – fresh salsa adds a zesty flavor that elevates your dish even further.

How to Make Healthy Baked Chicken Quesadilla

  1. Preheat your oven to 400°F.
    Warm up your oven, so it’s ready to crisp those tortillas to golden perfection. This usually takes about 10 minutes.

  2. Mix the filling.
    In a large mixing bowl, combine 4 cups of cooked shredded chicken, 8 ounces of fresh baby spinach, and 1.5 cups of sour cream. Sprinkle in 1 teaspoon each of cumin, garlic powder, and sweet paprika, along with 0.5 teaspoon of chili powder, salt, and fresh ground pepper to taste. Stir until well combined.

  3. Spread the chicken mixture.
    Lay a tortilla on a flat surface and spread a generous portion of the chicken mixture over half of the tortilla. Make sure to leave a little space at the edges to prevent overflow!

  4. Sprinkle cheese.
    Top the chicken mixture with about ¼ cup of shredded Mexican blend cheese. This will melt beautifully and create that delicious gooey texture.

  5. Fold the tortilla.
    Carefully fold the tortilla in half, encasing all those yummy ingredients. Place it seam-side down on a baking sheet.

  6. Repeat for remaining tortillas.
    Continue filling and folding the rest of the tortillas with the remaining mixture, placing each one on the baking sheet.

  7. Bake them.
    Place the baking sheet in the preheated oven and bake for about 15 minutes, or until the tortillas are crispy and the cheese is melted. Keep an eye on them for that golden-brown color!

  8. Serve warm.
    Slice your delicious quesadillas into wedges and serve with guacamole and salsa, if desired, for that extra kick of flavor!

Optional: Add some fresh cilantro on top for a burst of color and flavor!
Exact quantities are listed in the recipe card below.

Healthy Baked Chicken Quesadilla Variations

Feel free to customize this delicious recipe with these creative twists and substitutions!

  • Whole Wheat Tortillas: Swap out flour tortillas for whole wheat to add fiber and a nutty flavor to your quesadillas.

  • Vegetarian Delight: Replace shredded chicken with black beans or grilled veggies like bell peppers and zucchini for a vibrant, plant-based option. Colorful, nutritious, and satisfying!

  • Spicy Kick: Add jalapeños or diced green chilies to the filling to ramp up the heat. This simple addition creates a bold flavor explosion in each bite.

  • Dairy-Free: Use dairy-free sour cream and cheese alternatives to make this quesadilla suitable for those with lactose intolerance. Enjoy the same creamy texture without the dairy!

  • Crispy Crunch: For an extra texture twist, sprinkle crushed tortilla chips inside the quesadilla before baking. This adds delightful crunchiness that contrasts beautifully with the melted cheese.

  • Herb Infusion: Toss in fresh cilantro or parsley into the filling for a burst of freshness. These herbs add brightness and elevate the flavor of the quesadilla.

  • Smoke & Spice: Try smoked paprika instead of sweet paprika for a deeper flavor profile. This will add a hint of smokiness that complements the cumin beautifully.

  • Protein-Packed: Boost the protein content by adding a layer of refried beans along with your chicken. The creamy texture of the beans pairs perfectly with the shredded chicken in a heartier quesadilla!

What to Serve with Healthy Baked Chicken Quesadilla?

Elevate your dining experience with these delightful pairings that bring out the best in your meal.

  • Crispy Corn Salad: A fresh and colorful corn salad adds a crunchy texture and sweet pop that beautifully complements the quesadilla’s richness. Toss corn, cherry tomatoes, and diced bell peppers for a vibrant side.

  • Creamy Guacamole: Creamy homemade guacamole is a must-have dip that enhances each bite of your quesadilla. The smooth avocado pairs perfectly with the crispy tortillas, creating a flavor explosion!

  • Zesty Salsa: Bright and tangy salsa brings a burst of freshness that balances the flavors. Whether store-bought or homemade, this classic accompaniment will add a delicious kick.

  • Mexican Rice: Fluffy, seasoned Mexican rice is a robust side that pairs well with the quesadilla’s filling. Its earthy flavor complements the spices without overpowering the dish.

  • Black Beans: Simple black beans seasoned with cumin and garlic provide a protein-packed side dish that adds both nutrition and heartiness to your meal.

  • Chilled Tequila Sunrise: A refreshing Tequila Sunrise cocktail brings a burst of citrus to the table, offering a lively contrast to the savory quesadilla. The fruity flavors make for a joyful dining experience.

  • Sweet Cornbread: Warm, sweet cornbread adds an unexpected twist, providing a delightful contrast to the savory quesadilla and making for a comforting meal.

These pairings will create a flavorful spread that takes your Healthy Baked Chicken Quesadilla from good to unforgettable!

Make Ahead Options

These Healthy Baked Chicken Quesadillas are perfect for meal prep enthusiasts looking to save time during busy weekdays! You can assemble the quesadillas up to 24 hours in advance, simply prepare the filling and spread it on the tortillas as instructed, then stack them between layers of parchment paper in the fridge to prevent sticking. When you’re ready to eat, just bake them straight from the refrigerator according to the original instructions (adding a few minutes if needed), and they’ll be just as delicious and satisfying. This way, you can enjoy the comforting crunch and cheesy goodness with minimal effort, bringing your homemade meal to the table in no time!

How to Store and Freeze Healthy Baked Chicken Quesadilla

Fridge: Keep leftovers in an airtight container for up to 3 days. This prevents the quesadillas from getting soggy while preserving their delicious flavors.

Freezer: Freeze individual quesadillas wrapped in plastic wrap and then placed in a freezer bag for up to 2 months. This makes it easy to grab and go whenever a craving strikes!

Reheating: To reheat from the fridge, bake in a preheated oven at 350°F for about 10 minutes. If frozen, allow them to thaw in the fridge overnight before reheating. Enjoy your Healthy Baked Chicken Quesadilla just like fresh!

Chef's Helpful Tips

  • When making Healthy Baked Chicken Quesadilla, ensure that your tortillas are fresh to prevent them from tearing during the filling process.
  • Always taste your filling mixture before spreading it on the tortilla so you can adjust the seasoning to your liking.
  • For an even more impressive texture, consider broiling the quesadillas for the last 2 minutes of baking to achieve extra crispiness.
  • Lastly, remember to preheat your oven to 400°F and keep an eye on the quesadillas as they bake, which should take about 15 minutes to reach that perfect golden brown color.

Healthy Baked Chicken Quesadilla Recipe FAQs

What type of chicken should I use for the filling?
Absolutely! For the filling, I recommend using cooked shredded chicken. You can use rotisserie chicken for convenience or grill and shred your own chicken breasts or thighs. Just ensure it’s seasoned well to enhance the quesadilla’s flavor.

How should I store leftovers of Healthy Baked Chicken Quesadilla?
The best way to store your leftovers is to place them in an airtight container in the fridge. They can last for up to 3 days without getting soggy. Just make sure to seal them well to retain that delicious cheesy goodness!

Can I freeze Healthy Baked Chicken Quesadilla?
Yes, you can! To freeze, wrap each quesadilla tightly in plastic wrap and place them in a freezer bag. They’ll keep well for up to 2 months. When you’re ready to enjoy them, simply thaw them overnight in the fridge, and then reheat in the oven at 350°F for about 10 minutes until they’re warm and crispy.

What should I do if my quesadillas are soggy after baking?
Oh no! If your quesadillas come out soggy, it may be due to overfilling them or using too much wet ingredients. I suggest using less sour cream in the filling and ensuring that you don’t pack them too heavily. For crunchier quesadillas, try broiling for the last 2 minutes of baking; that will give them a lovely crisp texture.

Are Healthy Baked Chicken Quesadilla suitable for kids?
Very! These quesadillas are usually a hit with kids because they’re cheesy, flavorful, and fun to eat. Plus, you can sneak in healthy veggies like spinach without them even knowing! Just adjust the spice levels to suit their tastes if needed.

Healthy Baked Chicken Quesadilla

Healthy Baked Chicken Quesadilla

This Healthy Baked Chicken Quesadilla offers a tasty and nutritious twist on a classic dish, featuring flavorful ingredients wrapped in crispy tortillas.
Print Recipe Pin Recipe
Prep Time 15 minutes mins
Cook Time 15 minutes mins
Total Time 30 minutes mins
Servings: 4 quesadillas
Course: DINNER RECIPES
Cuisine: Mexican
Calories: 450
Ingredients Equipment Method Nutrition Notes

Ingredients
  

Quesadilla Filling
  • 8 pieces Flour tortillas 10-inch
  • 4 cups Cooked shredded chicken
  • 8 ounces Fresh baby spinach
  • 1.5 cups Sour cream
  • 1 teaspoon Cumin
  • 1 teaspoon Garlic powder
  • 1 teaspoon Sweet paprika
  • 0.5 teaspoon Chili powder
  • Salt to taste
  • Fresh ground pepper to taste
  • 2 cups Mexican blend cheese shredded
For Serving (Optional)
  • Guacamole
  • Salsa

Equipment

  • Baking sheet
  • large mixing bowl
  • Oven

Method
 

Cooking Directions
  1. Preheat your oven to 400°F.
  2. In a large mixing bowl, combine the cooked shredded chicken, fresh baby spinach, and sour cream. Add cumin, garlic powder, sweet paprika, chili powder, salt, and ground pepper. Stir until well combined.
  3. Lay a tortilla on a flat surface and spread a portion of the chicken mixture over half of the tortilla.
  4. Top the chicken mixture with about ¼ cup of shredded Mexican blend cheese.
  5. Carefully fold the tortilla in half and place it seam-side down on a baking sheet.
  6. Continue filling and folding the remaining tortillas, placing each on the baking sheet.
  7. Place the baking sheet in the preheated oven and bake for about 15 minutes, or until crispy and golden brown.
  8. Slice into wedges and serve with guacamole and salsa.

Nutrition

Serving: 1quesadillaCalories: 450kcalCarbohydrates: 40gProtein: 30gFat: 20gSaturated Fat: 10gPolyunsaturated Fat: 1gMonounsaturated Fat: 6gCholesterol: 70mgSodium: 800mgPotassium: 600mgFiber: 4gSugar: 2gVitamin A: 30IUVitamin C: 15mgCalcium: 30mgIron: 15mg

Notes

Optionally add fresh cilantro on top for added flavor and color.

Tried this recipe?

Let us know how it was!

Filed Under: DINNER RECIPES

Chocolate Caramel Pretzels

December 12, 2025 by JudyWhite Leave a Comment

There’s something truly delightful about the combination of sweet and salty, and my latest obsession—Chocolate Caramel Pretzels—captures this magic perfectly. Picture this: the irresistible crunch of mini pretzels topped with silky caramel, smothered in luscious chocolate, and finished off with a sprinkle of flaky sea salt. It’s a symphony of flavors that effortlessly transforms a simple snack into a gourmet treat.

I stumbled upon this delightful recipe during a quiet afternoon in my kitchen, searching for something to satisfy my sweet tooth while also bringing a touch of fun to my usual snack routine. These pretzels are not only incredibly easy to whip up—taking just 35 minutes from start to finish—but they also offer a crowd-pleasing appeal that makes them perfect for parties, movie nights, or even a cozy afternoon indulgence.

Join me as I share how this simple yet indulgent treat can elevate your snacking experience, and trust me, you won’t be able to stop at just one!

Why You'll Love This Chocolate Caramel Pretzels

  • You’ll love how easy this recipe is, coming together in just 35 minutes for a delicious treat.
  • The delightful combination of sweet caramel and rich chocolate perfectly complements the salty crunch of the pretzels, making every bite utterly irresistible.
  • These pretzels are incredibly versatile, perfect for any occasion from parties to cozy nights in.
  • Plus, their stunning presentation and shimmering sea salt topping make them a visually appealing treat that will impress your guests.

Chocolate Caramel Pretzel Ingredients

• Here’s what you need to create these delightful treats!

For the Pretzels

  • 16 ounce mini pretzels – The perfect crunchy base to hold all that sweetness without getting soggy.

For the Caramel

  • 1 cup caramel sauce – Drizzling this sweet goodness over the pretzels adds a luscious layer of flavor.

For the Chocolate

  • 14 ounces dark or milk chocolate chips – Choose your favorite for a rich coating that enhances the chocolate caramel pretzels experience.

For the Finish

  • Flaky sea salt – A light sprinkle balances the sweetness and elevates the overall flavor profile.

How to Make Chocolate Caramel Pretzels

  1. Prepare the Baking Sheets: Line 2 baking sheets with parchment paper. Spread out the mini pretzels in a single layer on the sheets, leaving a little space between each pretzel for the caramel to drip.

  2. Heat the Caramel: In a microwave-safe bowl, heat the caramel sauce for 10 seconds. This makes it easier to drizzle. Pour the melted caramel over the pretzels and allow them to sit for 5 minutes until the caramel is set.

  3. Melt the Chocolate: In another bowl, add the chocolate chips and microwave them in 20-second intervals, stirring until smooth. Aim for a silky texture that will coat the pretzels beautifully.

  4. Top the Pretzels: Drizzle the melted chocolate generously over the caramel-coated pretzels. Before the chocolate firms up, sprinkle them with flaky sea salt for that perfect sweet-salty harmony.

  5. Chill to Set: Place the baking sheets in the refrigerator for 15 minutes, allowing the chocolate to set completely. This step is essential for the perfect bite.

  6. Enjoy! Once the pretzels are set, remove them from the fridge and indulge in this delightful treat that’s sure to satisfy your cravings!

Optional: Serve with a drizzle of extra caramel on top for an indulgent touch.
Exact quantities are listed in the recipe card below.

How to Store and Freeze Chocolate Caramel Pretzels

Room Temperature: Store in an airtight container for up to 3 days. This keeps the pretzels crunchy and delicious.

Fridge: If you prefer a chilled treat, keep the pretzels in the refrigerator for up to a week. Just make sure they’re in a tight container to avoid moisture.

Freezer: For longer storage, freeze the chocolate caramel pretzels in a single layer within an airtight bag for up to 1 month. Thaw before serving for the best taste experience.

Reheating: If you prefer them warm, microwave in short bursts of 5 seconds to revive the deliciousness without melting the chocolate completely.

What to Serve with Chocolate Caramel Pretzels?

Elevate your snacking experience with delightful pairings that complement the sweet and salty flavors of these treats.

  • Creamy Milkshake: A rich, velvety milkshake balances the pretzels’ sweetness, making for a fun and indulgent pairing.

  • Fresh Fruit Skewers: Bright, juicy fruits add freshness and a pop of color to your dessert table, offering a refreshing contrast.

  • Cheese Platter: Salty cheeses like gouda or aged cheddar provide a savory backdrop that enhances the flavors of the sweet pretzels.

  • Caramel Sauce Drizzle: For those who can never have too much caramel, serve extra for dipping, creating a decadent experience.

  • Chocolate-Covered Strawberries: The combination of chocolate and fruit echoes the flavors while adding an elegant touch to your spread.

  • Cozy Hot Chocolate: This warm beverage mirrors the richness of your pretzels and makes for a comforting match on chilly evenings.

  • Coffee or Espresso: A bold cup of coffee enhances the chocolate notes, inviting rich flavors that make each bite more satisfying.

  • Vanilla Ice Cream: Soft and creamy, a scoop of vanilla ice cream lends a classic dessert touch that balances the texture of the pretzels nicely.

These pairings not only complement the Chocolate Caramel Pretzels but also create a joyful atmosphere for sharing with loved ones!

Chocolate Caramel Pretzel Variations

Feel free to customize your Chocolate Caramel Pretzels with these delightful twists that enhance flavor and cater to different tastes!

  • Nutty Addition: Sprinkle crushed nuts like pecans or almonds for a crunchy texture that adds an irresistible nutty flavor.

  • Spicy Salt: Use chili-lime seasoning or spicy salt to add a kick, creating a sweet-and-spicy combination that will tantalize your taste buds.

  • Drizzle Swirl: Instead of just chocolate, top with a white chocolate drizzle for a visually stunning contrast and a hint of sweetness.

  • Vegan Option: Swap chocolate chips for dairy-free chocolate and use coconut cream-based caramel for an indulgent vegan treat.

  • Seasonal Flavors: Add a pinch of cinnamon or pumpkin spice to the chocolate for a festive twist during the holidays or fall.

  • Sweetened Coconut: Toss shredded sweetened coconut on top before the chocolate sets for a tropical flair that enhances the flavor depth.

  • Fruit Infusion: Mix in small dried fruits like cranberries or cherries to complement the sweet and salty balance with a fruity punch.

  • Chocolate Variance: Experiment with different types of chocolate, such as white, milk, or even flavored varieties for a personalized touch.

With these variations, you can create a unique batch of Chocolate Caramel Pretzels that cater to your and your guests’ flavor preferences!

Make Ahead Options

These Chocolate Caramel Pretzels are fantastic for meal prep and can save you precious time on busy days! You can prepare the pretzels and drizzle them with caramel up to 24 hours in advance. Simply follow the initial steps of lining the baking sheets and drizzling the caramel, then cover the pretzels with plastic wrap and refrigerate them. This keeps the pretzels fresh and the caramel perfectly set. When you’re ready to enjoy, melt your chocolate and drizzle it over the chilled pretzels, topping with flaky sea salt as you go. This way, you’ll have delicious, ready-to-serve treats in no time, perfect for unexpected guests or cozy movie nights!

Chef's Helpful Tips

  • For the Chocolate Caramel Pretzels, ensure your pretzels are spaced out on the baking sheets to prevent them from sticking together.
  • When heating the caramel sauce, start with short intervals to avoid overheating it, which can lead to a thick consistency that is difficult to drizzle.
  • To achieve a smooth melted chocolate, frequently stir between intervals instead of just heating continuously, as this helps to prevent burning.
  • After chilling the pretzels, allow them to sit at room temperature for a few minutes before serving to enhance the flavors and make them easier to bite into.

Chocolate Caramel Pretzels Recipe FAQs

What kind of pretzels should I use?
I recommend using mini pretzels for the best combination of crunch and coverage. Their smaller size allows for perfect caramel and chocolate adherence, creating an enjoyable bite-sized treat!

How should I store Chocolate Caramel Pretzels?
To store them at room temperature, place the pretzels in an airtight container for up to 3 days. This keeps them fresh and crunchy. If you prefer a chilled snack, you can store them in the refrigerator for up to a week in a sealed container to prevent moisture.

Can I freeze Chocolate Caramel Pretzels?
Absolutely! To freeze, lay the pretzels in a single layer in an airtight freezer bag, making sure to remove as much air as possible to prevent freezer burn. They can last for up to 1 month. When you’re ready to enjoy, simply thaw them in the fridge or at room temperature.

What should I do if my chocolate isn’t melting smoothly?
If your chocolate isn’t melting well, it may be overheating. Instead of microwaving continuously, heat it in 20-second intervals and stir in between until it’s completely smooth. This method helps prevent burning and ensures you achieve a lovely melted consistency for drizzling over your pretzels.

Are there any dietary considerations for Chocolate Caramel Pretzels?
Yes, if you’re cooking for someone with dietary restrictions, be aware that chocolate chips may contain allergens like dairy or nuts. For a nut-free option, check the brands before purchasing. Vegan chocolate chips can be used for dairy-free versions, and always ensure the caramel sauce aligns with the dietary needs of your guests.

How can I enhance the flavor of Chocolate Caramel Pretzels?
You can elevate the taste by adding a sprinkle of crushed nuts or colorful sprinkles before that chocolate sets, or switch the sea salt for a flavored variety to introduce an unexpected twist. A touch of espresso powder in your chocolate also brings a delightful depth to the sweetness of the caramel!

Chocolate Caramel Pretzels

Chocolate Caramel Pretzels

Delight in the combination of sweet and salty with these irresistible Chocolate Caramel Pretzels.
Print Recipe Pin Recipe
Prep Time 15 minutes mins
Cook Time 20 minutes mins
Total Time 35 minutes mins
Servings: 10 pretzels
Course: DESSERT RECIPES
Cuisine: American
Calories: 150
Ingredients Equipment Method Nutrition Notes

Ingredients
  

For the Pretzels
  • 16 ounces mini pretzels The perfect crunchy base to hold all that sweetness without getting soggy.
For the Caramel
  • 1 cup caramel sauce Drizzling this sweet goodness over the pretzels adds a luscious layer of flavor.
For the Chocolate
  • 14 ounces dark or milk chocolate chips Choose your favorite for a rich coating that enhances the treat.
For the Finish
  • flaky sea salt A light sprinkle balances the sweetness and elevates the overall flavor profile.

Equipment

  • baking sheets
  • parchment paper
  • Microwave-safe bowls

Method
 

Steps to Make Chocolate Caramel Pretzels
  1. Prepare the Baking Sheets: Line 2 baking sheets with parchment paper. Spread out the mini pretzels in a single layer on the sheets, leaving a little space between each pretzel for the caramel to drip.
  2. Heat the Caramel: In a microwave-safe bowl, heat the caramel sauce for 10 seconds. This makes it easier to drizzle. Pour the melted caramel over the pretzels and allow them to sit for 5 minutes until the caramel is set.
  3. Melt the Chocolate: In another bowl, add the chocolate chips and microwave them in 20-second intervals, stirring until smooth. Aim for a silky texture that will coat the pretzels beautifully.
  4. Top the Pretzels: Drizzle the melted chocolate generously over the caramel-coated pretzels. Before the chocolate firms up, sprinkle them with flaky sea salt.
  5. Chill to Set: Place the baking sheets in the refrigerator for 15 minutes, allowing the chocolate to set completely.
  6. Enjoy! Enjoy your delightful treat that’s sure to satisfy your cravings!

Nutrition

Serving: 1pretzelCalories: 150kcalCarbohydrates: 20gProtein: 2gFat: 7gSaturated Fat: 4gMonounsaturated Fat: 3gCholesterol: 5mgSodium: 150mgPotassium: 50mgFiber: 1gSugar: 10gCalcium: 2mgIron: 4mg

Notes

For extra indulgence, serve with a drizzle of extra caramel on top.

Tried this recipe?

Let us know how it was!

Filed Under: BREAKFAST & BRUNCH

Gingerbread Simple Syrup Cocktail

December 12, 2025 by JudyWhite Leave a Comment

There’s something irresistibly comforting about the combination of ginger, cinnamon, and cloves that instantly transports me to cozy winter evenings by the fireplace. When the holiday season rolls around, I find myself craving flavors that evoke warmth and nostalgia, and that’s exactly what this Gingerbread Simple Syrup Cocktail delivers. Imagine the rich aroma wafting through your kitchen as those spices simmer gently on the stove, creating a simple syrup that’s not only sweet but bursting with festive flair.

I first stumbled upon this cocktail during a gathering when I decided to switch up my usual drink offerings. It was a delightful surprise! The blend of Baileys, vodka, and sweet gingerbread flavors made for an unforgettable concoction that quickly became the star of the evening. Perfect for entertaining or to simply treat yourself after a long day, this luxurious cocktail is surprisingly easy to whip up. So, if you’re looking for a delicious way to impress your guests or just need a little holiday cheer in a glass, let’s dive into this delightful recipe together!

Why You'll Love This Gingerbread Simple Syrup Cocktail

  • This Gingerbread Simple Syrup Cocktail is incredibly easy to make, taking just 40 minutes from start to finish.
  • The delightful blend of flavors, featuring ginger, cinnamon, and creamy liqueurs, creates a taste that feels like a warm hug in a glass.
  • Its versatility means you can serve it at holiday parties, cozy nights in, or as a special treat any time of year.
  • The stunning presentation topped with whipped cream and gingerbread people will wow your guests and make it the highlight of any gathering.

Gingerbread Simple Syrup Cocktail Ingredients

Indulge your senses with this warm and festive drink!

For the Syrup

  • Coarsely grated peeled ginger – adds a fresh, zesty kick that complements the sweetness.
  • Cinnamon sticks – infuses lovely, warm spice notes throughout the syrup.
  • Whole cloves – bring depth and a subtle earthiness to the mixture.
  • Granulated sugar – sweetens the syrup and helps create that luscious texture.

For the Cocktail

  • Crushed gingerbread cookies – enhance the flavor and provide a delightful texture.
  • Vanilla ice cream – creates a creamy layer that balances the spices.
  • Baileys Irish Cream – adds a rich, velvety sweetness that elevates each sip.
  • Vodka – provides a smooth base that allows the other flavors to shine.
  • Kahlúa – brings a hint of coffee that rounds out the cocktail beautifully.

For Serving

  • Whipped cream – adds a luxurious and airy touch on top.
  • Ground cinnamon – sprinkle for an extra flavor burst and eye-catching presentation.
  • Gingerbread people – a fun and festive garnish that delights both kids and adults!

Get ready to savor your homemade Gingerbread Simple Syrup Cocktail, perfect for cozy gatherings!

How to Make Gingerbread Simple Syrup Cocktail

  1. Combine ingredients: In a saucepan, mix coarsely grated ginger, cinnamon sticks, whole cloves, and granulated sugar. This delightful blend sets the foundation for your warm, spicy syrup.

  2. Add water: Pour in 1 cup of water, then bring the mixture to a gentle boil over medium heat. Keep stirring until the sugar fully dissolves, creating a sweet, fragrant base.

  3. Simmer: Reduce the heat and let your syrup simmer for 20 minutes. During this time, your kitchen will smell heavenly as the spices infuse the syrup with rich flavors.

  4. Strain the mixture: After simmering, carefully remove the saucepan from the heat. Strain the mixture into a bowl to catch all the spice solids, leaving behind a fragrant syrup.

  5. Stir in gingerbread cookies: Add crushed gingerbread cookies to the warm syrup, mixing until well combined. This will enhance the gingerbread flavor and add a delightful texture.

  6. Layer the cocktail: In a glass, start with a scoop of vanilla ice cream, followed by your homemade gingerbread syrup. Then, pour in the Baileys Irish Cream, vodka, and Kahlúa, treating your taste buds to a holiday-inspired delight.

  7. Top and serve: Finish off your cocktail with a generous dollop of whipped cream, a sprinkle of ground cinnamon, and adorn with playful gingerbread people. It’s now ready to impress!

Optional: For a festive twist, add a drizzle of chocolate syrup on top!

Exact quantities are listed in the recipe card below.

Gingerbread Simple Syrup Cocktail Variations

Feel free to let your creativity shine as you customize this festive cocktail to suit your taste!

  • Spiced Rum: Swap vodka for spiced rum to add a rich depth with warm, aromatic notes.

  • Non-Alcoholic: Omit the alcohol and use extra gingerbread syrup and ginger beer for a cozy, festive mocktail.

  • Creamy Coconut: Replace Baileys with coconut cream for a tropical twist that still delivers that creamy texture.

  • Extra Heat: Add a pinch of cayenne pepper to your mixture for a surprising kick that complements the spice.

  • Different Spirits: Try swapping Kahlúa with amaretto or hazelnut liqueur for a nutty, sweet flavor.

  • Chocolate Infusion: Drizzle chocolate syrup into the glass for a delightful fusion of flavors that enhances the richness.

  • Nut Milk: Use almond or oat milk instead of ice cream for a dairy-free option that stays creamy.

  • Herbal Twist: Fresh mint leaves can be muddled into the drink for a refreshing contrast to the warming spices.

Remember that the best part of this cocktail is the joy of experimenting, so have fun and find your favorite variation!

How to Store and Freeze Gingerbread Simple Syrup Cocktail

Fridge: Store any leftover gingerbread syrup in an airtight container for up to 1 week. Keep it chilled to maintain its delicious flavor.

Freezer: For longer storage, pour the syrup into ice cube trays and freeze. Once frozen, transfer the cubes to a sealed bag for up to 3 months. Perfect for future cocktails!

Reheating: If you prefer your syrup warm, simply heat it gently on the stove or in the microwave, being careful not to boil. This will bring back that cozy aroma!

Cocktail Assembly: It’s best to assemble your Gingerbread Simple Syrup Cocktail fresh. Layer the ingredients right before serving for the ultimate creamy texture and flavor explosion.

What to Serve with Gingerbread Simple Syrup Cocktail?

Elevate your cozy gatherings with delicious pairings that harmonize beautifully with this festive drink.

  • Spiced Apple Pie: A warm slice of spiced apple pie offers a delightful contrast to the cocktail’s creamy sweetness and spices. The comforting aroma and flavors make it an ideal comfort food.

  • Cheese Platter: A variety of cheeses, including sharp cheddar and creamy brie, provide a perfect savory counterpart. The creamy cocktails and tangy cheese will set off delightful bursts on your palate.

  • Gingerbread Cookies: Nothing complements this drink better than classic gingerbread cookies! Their flavors echo the cocktail, making every sip and bite a seamless experience of holiday bliss.

  • Pecan Pie: This rich, nutty dessert enhances the warm notes of cinnamon and ginger in the cocktail. Each bite offers that nostalgic sweet finish, perfect for indulgent moments.

  • Hot Chocolate: A warm cup of rich hot chocolate with a sprinkle of cinnamon rounds out the experience. Its luxurious texture and sweetness beautifully complement the cocktail’s creamy character.

  • Creamy Pumpkin Soup: A bowl of creamy pumpkin soup adds a savory, smooth texture and a spicy touch that pairs excellently with the ginger and cinnamon flavors in your drink. It’s comfort in a bowl!

  • Mulled Wine: This festive beverage offers warm spices and fruity notes to match the ginger and cloves of the cocktail. Sip them together for a cozy gathering vibe.

  • Chocolate-Dipped Strawberries: The sweetness of ripe strawberries dipped in chocolate adds a refreshing, fruity element that balances the rich flavors of the cocktail. Their contrast is simply heavenly!

Serve these delightful pairings alongside your Gingerbread Simple Syrup Cocktail for a memorable holiday experience that warms the heart and soul.

Make Ahead Options

This Gingerbread Simple Syrup Cocktail is perfect for those busy nights when you want a festive drink ready to go! You can prepare the gingerbread simple syrup up to 3 days in advance—just follow the first five steps of the recipe and refrigerate the syrup in an airtight container. This ensures that the flavors develop beautifully while maintaining quality. When you’re ready to serve, simply layer the vanilla ice cream, gingerbread syrup, Baileys Irish Cream, vodka, and Kahlúa in a glass. Finish with whipped cream, ground cinnamon, and gingerbread people for a crowd-pleasing presentation. Enjoy delightful sips of this indulgent cocktail with minimal effort!

Chef's Helpful Tips

  • When making the Gingerbread Simple Syrup Cocktail, make sure to grate your ginger finely to release its essential oils and flavor more effectively.
  • Avoid letting the syrup boil too vigorously, as this can result in a caramelized sugar taste rather than a sweet, spicy infusion.
  • For the crushed gingerbread cookies, pulse them in a food processor for a finer texture that will blend more seamlessly into your syrup.
  • Remember to serve the cocktail immediately after layering to keep the ice cream from melting too quickly and losing its creamy texture.

Gingerbread Simple Syrup Cocktail Recipe FAQs

How do I choose the right ginger for my Gingerbread Simple Syrup Cocktail?
When selecting ginger, look for firm roots with smooth skin and a fresh aroma. Avoid any that have dark spots or wrinkles, as these indicate age or spoilage. Choosing fresh, vibrant ginger will ensure your cocktail has that zingy kick!

What is the best way to store leftover gingerbread syrup?
Store any leftover gingerbread syrup in an airtight container in the refrigerator for up to 1 week. Make sure it’s sealed tightly to maintain its delightful flavor and aroma. If you notice any separation, just give it a little stir, and it will be as good as new!

Can I freeze the gingerbread syrup for future use?
Absolutely! To freeze, pour the syrup into ice cube trays and place them in the freezer. Once the syrup is frozen solid, transfer the cubes to a sealed freezer bag. The gingerbread syrup can be stored this way for up to 3 months. This makes it super easy to whip up a Gingerbread Simple Syrup Cocktail whenever you crave a festive treat!

What should I do if my syrup is too thick?
If your syrup turns out thicker than you’d like, simply add a bit of warm water, a tablespoon at a time, while stirring. This will help achieve your desired consistency. Remember, the more ginger and spices you infuse, the thicker it could become, so adjusting to your taste is totally fine!

Is there a way to make this Gingerbread Simple Syrup Cocktail dairy-free?
Absolutely! You can easily swap the vanilla ice cream for a dairy-free alternative, like coconut or almond milk ice cream. Additionally, check that your Baileys Irish Cream is non-dairy, or consider using a dairy-free cream liqueur to keep the rich flavor without dairy. Your cocktail will still be creamy and delicious!

Gingerbread Simple Syrup Cocktail

Gingerbread Simple Syrup Cocktail

Indulge in the festive flavors of Gingerbread Simple Syrup Cocktail, a warm and sweet holiday delight.
Print Recipe Pin Recipe
Prep Time 10 minutes mins
Cook Time 30 minutes mins
Total Time 40 minutes mins
Servings: 1 cocktail
Course: DESSERT RECIPES
Cuisine: American
Calories: 300
Ingredients Equipment Method Nutrition Notes

Ingredients
  

For the Syrup
  • 1 cup coarsely grated peeled ginger adds a fresh, zesty kick
  • 2 sticks cinnamon sticks infuses lovely, warm spice notes
  • 6 whole cloves bring depth and earthiness
  • 1 cup granulated sugar sweetens the syrup
For the Cocktail
  • 2 cookies crushed gingerbread cookies enhance flavor and provide texture
  • 1 scoop vanilla ice cream creates a creamy layer
  • 2 oz Baileys Irish Cream adds rich sweetness
  • 1 oz vodka provides a smooth base
  • 1 oz Kahlúa adds a hint of coffee
For Serving
  • 1 dollop whipped cream adds luxurious touch
  • 1 pinch ground cinnamon for extra flavor burst
  • 2 pieces gingerbread people festive garnish

Equipment

  • Saucepan
  • mixing glass
  • strainer
  • Food processor

Method
 

Making the Syrup
  1. In a saucepan, mix coarsely grated ginger, cinnamon sticks, whole cloves, and granulated sugar.
  2. Pour in 1 cup of water, then bring to a gentle boil over medium heat, stirring until sugar dissolves.
  3. Reduce heat and let syrup simmer for 20 minutes until flavors infuse.
  4. Strain the mixture into a bowl to catch spice solids, leaving fragrant syrup.
  5. Add crushed gingerbread cookies to warm syrup, mixing until well combined.
Assembling the Cocktail
  1. In a glass, start with a scoop of vanilla ice cream, add gingerbread syrup, Baileys, vodka, and Kahlúa.
  2. Top with whipped cream, a sprinkle of ground cinnamon, and gingerbread people.

Nutrition

Serving: 1cocktailCalories: 300kcalCarbohydrates: 35gProtein: 4gFat: 15gSaturated Fat: 8gCholesterol: 40mgSodium: 50mgPotassium: 190mgFiber: 1gSugar: 20gVitamin A: 200IUVitamin C: 1mgCalcium: 100mgIron: 1mg

Notes

Serve immediately to maintain creamy texture of the ice cream. Optional: add a drizzle of chocolate syrup on top for extra indulgence.

Tried this recipe?

Let us know how it was!

Filed Under: DESSERT RECIPES

Creamy Lobster & Scallop Chowder

December 12, 2025 by JudyWhite Leave a Comment

The rich aroma of simmering seafood blends seamlessly with hints of thyme as the chilly evening air beckons for something warm and comforting. While so many weeknight dinners revolve around quick fixes or takeout, I found myself yearning for a dish that felt both indulgent and homey. Enter my Creamy Lobster & Scallop Chowder—an exquisite balance of buttery lobster and sweet scallops swimming in a velvety broth.

This recipe is not just about the luxurious ingredients; it’s a celebration of flavors that transforms a simple gathering into a culinary event. Perfect for impressing guests or treating yourself after a long day, this chowder is surprisingly easy to whip up. Within just 45 minutes, you can serve a delightful bowl that rivals any upscale restaurant fare.

So, grab your apron and let’s dive into a recipe that promises warmth, richness, and a touch of the ocean in every spoonful.

Why You'll Love This Creamy Lobster & Scallop Chowder

  • This creamy lobster and scallop chowder is incredibly easy to make, allowing you to enjoy a gourmet meal without spending hours in the kitchen.
  • The rich flavors of buttery lobster and sweet scallops combine perfectly in a velvety broth that will leave your taste buds dancing with delight.
  • Not only is this chowder versatile enough to serve at a dinner party or a cozy night in, but its stunning presentation will impress anyone you invite to the table.
  • Plus, in just 45 minutes, you can create a satisfying and indulgent dish that feels like a luxurious treat after a long day.

Creamy Lobster & Scallop Chowder Ingredients

Get ready to dive into the ocean of flavors with these essential ingredients for the Creamy Lobster & Scallop Chowder!

For the Seafood Base
• Fresh lobster meat – a key player, bringing a sweet and buttery taste to your chowder.
• Sea scallops – their delicate sweetness complements the lobster beautifully.

For the Broth
• Seafood stock – enhances the ocean essence and depth of flavor in your chowder.
• Heavy cream – creates the luscious, velvety texture that makes this chowder so indulgent.

For the Vegetables
• Medium onion – adds a savory foundation to the chowder’s flavor profile.
• Garlic – brings aromatic depth; don’t skip this essential ingredient!
• Medium potatoes – they help thicken the chowder while adding heartiness.
• Celery – provides a refreshing crunch and balances the creaminess.

For Seasoning
• Thyme – infuses the dish with earthiness and a hint of herbal brightness.
• Salt and pepper – enhance and round out all the flavors in this elegant chowder.

For Garnish
• Fresh parsley – adds a pop of color and freshness to finish off your bowl!

How to Make Creamy Lobster & Scallop Chowder

  1. Sauté Aromatics: In a large pot, sauté the onion and garlic over medium heat until they become translucent. This should take about 3-4 minutes and will fill your kitchen with a delightful aroma.

  2. Add Vegetables: Next, add the diced potatoes and chopped celery, cooking for an additional 5 minutes. You want them slightly tender but still with a firm bite.

  3. Incorporate Seafood Stock: Pour in the seafood stock and bring the mixture to a boil. The bubbling broth should create a lively symphony, signaling the flavors are melding beautifully.

  4. Simmer Seafood: Reduce the heat and gently stir in the lobster meat and scallops; let them simmer for about 5 minutes. They’ll cook quickly, so keep an eye on their color—perfectly cooked seafood should be opaque.

  5. Add Cream and Seasoning: Carefully stir in the heavy cream and thyme, seasoned with salt and pepper to taste. Watch as the chowder turns a creamy hue, inviting you in for a taste!

  6. Thicken Chowder: Cook for an additional 10-15 minutes, allowing the chowder to thicken. Stir occasionally, and look for a rich, velvety texture that clings to your spoon.

  7. Serve Warm: Finally, serve hot in bowls and garnish with fresh parsley. The burst of color will temper the warm, creamy chowder beautifully, making it all the more inviting.

Optional: Serve with crusty bread on the side for a perfect dipping experience!

Exact quantities are listed in the recipe card below.

Creamy Lobster & Scallop Chowder Variations

Feel free to get creative and give this chowder your personal touch—there’s a world of flavors waiting for you!

  • Dairy-Free: Substitute heavy cream with coconut milk for a lighter, tropical twist that still feels creamy and comforting.

  • Spicy Kick: Add a sprinkle of red pepper flakes or a dash of cayenne pepper during cooking to turn up the heat and excite your taste buds.

  • Vegetable Boost: Incorporate more veggies like corn or diced bell peppers for additional sweetness and texture; they’ll brighten your chowder beautifully.

  • Lobster Alternative: Swap out lobster for tender shrimp or crab if you’re in the mood for a different seafood experience. Both options bring their unique flavors!

  • Smoky Flavor: Introduce a hint of smokiness by using smoked paprika or incorporating some crispy bacon for added depth and a savory crunch.

  • Herb Variations: Experiment with different herbs like dill or parsley to give your chowder a fresh, aromatic lift that dances on your palate.

  • Sweet Potato Twist: Replace regular potatoes with sweet potatoes for a rich sweetness that balances beautifully with the seafood.

  • Texture Variation: For an extra creamy finish, blend a portion of the chowder until smooth before returning it to the pot; this creates a luxurious texture while still leaving chunks of seafood and veggies.

What to Serve with Creamy Lobster & Scallop Chowder?

Imagine a table adorned with dishes that echo the sea, enhancing your chowder experience and delighting every palate.

  • Crusty Bread: Perfect for soaking up every last drop of chowder—warm, inviting, and absolutely essential. Its crusty exterior contrasts beautifully with the chowder’s creamy texture.

  • Fresh Garden Salad: A refreshing mix of greens, tomatoes, and cucumbers, brightening the palate and adding a crisp element alongside your rich chowder. A light vinaigrette ties everything together splendidly.

  • Steamed Asparagus: Tender yet crisp, with a drizzle of lemon to cut through the creaminess of the chowder. The bright green color adds a vibrant touch to your meal.

  • Garlic Butter Shrimp: Elevate your seafood theme! Garlic butter shrimp are fragrant and offer a slightly different texture, making each bite a delightful contrast to the chowder.

  • Sweet Corn Fritters: Light and golden, these fritters provide a sweet burst of flavor that dances harmoniously with the savory chowder. Plus, they are fun to eat!

  • Chardonnay: A crisp, cold glass elevates the experience, complementing the seafood beautifully without overpowering the dish. Its acidity balances the chowder’s richness.

  • Chocolate Mousse: For dessert, nothing like a silky chocolate mousse to end on a light yet indulgent note. Its richness will satisfy any sweet tooth without feeling heavy after the chowder.

Make Ahead Options

These Creamy Lobster & Scallop Chowder preparations are perfect for busy weeknights or if you’re planning a special gathering! You can chop the vegetables (onion, potatoes, celery) and store them in an airtight container in the refrigerator up to 3 days before you cook. The seafood stock can also be prepared in advance and refrigerated for up to 2 days. When you’re ready to enjoy your chowder, simply sauté the aromatics, add the prepped veggies and stock, then stir in the lobster and scallops. Finish by adding the heavy cream just before serving to ensure it remains rich and velvety. This way, you can enjoy a gourmet meal with minimal effort!

How to Store and Freeze Creamy Lobster & Scallop Chowder

Fridge: Store leftover chowder in an airtight container for up to 3 days. Make sure it’s completely cooled before sealing to maintain its creamy texture.

Freezer: Freeze chowder in a freezer-safe container for up to 3 months. To prevent separation, leave a little space at the top for expansion when frozen.

Reheating: Reheat on the stovetop over low heat, stirring gently until warmed through. You may want to add a splash of cream if it thickens too much during storage.

Thawing: For frozen chowder, thaw overnight in the fridge before reheating. This ensures a smoother consistency when it’s time to serve again.

Chef's Helpful Tips

  • When making the Creamy Lobster & Scallop Chowder, ensure your seafood stock is well-seasoned for a flavorful base.
  • Avoid overcooking the scallops and lobster; they only need a few minutes until they turn opaque and tender.
  • For a creamy texture, warm the heavy cream gently before stirring it into the chowder to prevent curdling.
  • Allowing the chowder to simmer for the suggested 10-15 minutes helps to meld the flavors and thicken the soup perfectly without losing the freshness of the seafood.

Creamy Lobster & Scallop Chowder Recipe FAQs

What type of lobster meat should I use for the chowder?
Absolutely! Fresh lobster meat is ideal for this chowder, providing a sweet and buttery flavor. If fresh isn’t available, frozen lobster meat can be used, but make sure it’s fully thawed and drained before adding to the pot.

How long can I store leftover chowder in the fridge?
You can store leftover Creamy Lobster & Scallop Chowder in an airtight container for up to 3 days. Let it cool completely before sealing to help keep that creamy texture intact.

Can I freeze Creamy Lobster & Scallop Chowder?
Yes! This chowder freezes wonderfully. Pour it into a freezer-safe container, leaving a bit of space at the top for expansion. It can be frozen for up to 3 months. Just remember to label it with the date!

How do I reheat frozen chowder without compromising its texture?
To reheat, gently thaw your frozen chowder overnight in the fridge. When you’re ready to enjoy it, warm it on the stovetop over low heat. Stir frequently and add a splash of cream if it seems too thick. This will help restore its rich, velvety texture.

What if I have dietary restrictions, like seafood allergies?
If seafood allergies are a concern, it’s best to skip this recipe altogether. However, for a similar creamy chowder experience, consider using chicken or vegetable stock and swapping in cooked chicken or an alternative protein such as hearty mushrooms or tofu. Always customize recipes to suit your needs!

How can I ensure my chowder doesn’t become too thick or watery?
The key is in the timing! Allow the chowder to simmer for the suggested 10-15 minutes, which helps it naturally thicken. If it ends up too thick, simply add a splash of seafood stock or cream while stirring. If it’s too watery, let it simmer a little longer on low heat to allow excess liquid to cook off.

Creamy Lobster & Scallop Chowder

Creamy Lobster & Scallop Chowder

Indulge in this rich and comforting Creamy Lobster & Scallop Chowder, perfect for impressing guests or a cozy meal.
Print Recipe Pin Recipe
Prep Time 15 minutes mins
Cook Time 30 minutes mins
Total Time 45 minutes mins
Servings: 4 bowls
Course: DINNER RECIPES
Cuisine: Seafood
Calories: 350
Ingredients Equipment Method Nutrition Notes

Ingredients
  

For the Seafood Base
  • 1 cup fresh lobster meat
  • 1 cup sea scallops
For the Broth
  • 4 cups seafood stock
  • 1 cup heavy cream
For the Vegetables
  • 1 medium onion
  • 2 cloves garlic
  • 2 medium potatoes diced
  • 2 stalks celery chopped
For Seasoning
  • 1 teaspoon thyme
  • to taste salt
  • to taste pepper
For Garnish
  • 2 tablespoons fresh parsley chopped

Equipment

  • Large pot

Method
 

Steps
  1. In a large pot, sauté the onion and garlic over medium heat until translucent (about 3-4 minutes).
  2. Add diced potatoes and chopped celery; cook for an additional 5 minutes.
  3. Pour in the seafood stock and bring the mixture to a boil.
  4. Reduce heat and gently stir in lobster meat and scallops; let them simmer for about 5 minutes.
  5. Stir in heavy cream and thyme, seasoned with salt and pepper to taste.
  6. Cook for an additional 10-15 minutes, allowing the chowder to thicken.
  7. Serve hot and garnish with fresh parsley.

Nutrition

Serving: 1bowlCalories: 350kcalCarbohydrates: 25gProtein: 18gFat: 22gSaturated Fat: 13gPolyunsaturated Fat: 1gMonounsaturated Fat: 8gCholesterol: 90mgSodium: 800mgPotassium: 600mgFiber: 3gSugar: 2gVitamin A: 10IUVitamin C: 15mgCalcium: 6mgIron: 10mg

Notes

To enhance flavors, ensure seafood stock is well-seasoned. Avoid overcooking the seafood for the best texture.

Tried this recipe?

Let us know how it was!

Filed Under: DINNER RECIPES

Peanut Butter Balls with Rice Krispies

December 12, 2025 by JudyWhite Leave a Comment

There’s nothing quite like the delightful crunch of Rice Krispies mingling with rich, creamy peanut butter in a treat that’s as nostalgic as it is satisfying. In the hustle and bustle of everyday life, I found myself yearning for something simple yet indulgent, something that would remind me of childhood snacks. That’s when I decided to whip up a batch of Peanut Butter Balls with Rice Krispies.

This recipe not only brings me back to those carefree days but is also incredibly easy to prepare—perfect for when you want to impress guests without spending hours in the kitchen. With just a handful of ingredients and minimal effort, you can create a crowd-pleasing dessert that satisfies sweet cravings while delivering delightful textures. Plus, what’s better than a treat that you can store for later?

Join me in creating these irresistibly crunchy and chocolatey bites. Let’s dive into the details of how to make these scrumptious Peanut Butter Balls that will surely become a favorite in your home!

Why You'll Love This Peanut Butter Balls with Rice Krispies

  • This recipe is incredibly easy to make, requiring just a few simple ingredients and minimal effort.
  • The combination of creamy peanut butter and crunchy Rice Krispies delivers a flavor and texture that is hard to resist.
  • These peanut butter balls are versatile enough to serve as a dessert, snack, or even a party treat that everyone will love.
  • Not only can you whip them up quickly, but you can also make a large batch and store them for a later indulgence.

Peanut Butter Balls with Rice Krispies Ingredients

• Here’s everything you need to make these delightful bites!

For the Peanut Butter Mixture

  • Creamy no stir peanut butter – a smooth base that adds rich flavor and texture.
  • Salted butter (melted) – enhances the creamy texture; for a dairy-free option, use coconut oil instead.
  • Powdered sugar – adds sweetness and helps bind the mixture together; sift for a smoother finish.

For the Crunch

  • Rice Krispies cereal – provides that signature crunch and lightness in every bite; feel free to substitute with a gluten-free version if needed.

For the Coating

  • Semi-sweet chocolate chips or chocolate melting wafers – gives a bold chocolate shell; choose dark chocolate for a richer flavor.

These Peanut Butter Balls with Rice Krispies are sure to be a hit at any gathering!

How to Make Peanut Butter Balls with Rice Krispies

  1. Mix Together: Start by using a mixer to blend the creamy peanut butter and melted butter. Mix until they are well combined and smooth, creating a luscious base for your treats.

  2. Incorporate Crunch: Gently fold in the Rice Krispies until they are evenly coated in the peanut butter mixture. You want to achieve that distinctive crunch, so be careful not to crush them!

  3. Add Sweetness: Gradually add the powdered sugar to the mix. Continue blending until all ingredients are combined, forming a slightly sticky dough that holds together well.

  4. Finish Mixing: When it becomes too stiff for the mixer, switch to a rubber spatula. This will help you combine everything without overworking the mixture.

  5. Prep the Sheet: Line a baking sheet with parchment paper, making it easier to remove the Peanut Butter Balls later without sticking.

  6. Scoop and Shape: Use a cookie scoop to drop generous portions of the peanut butter mixture onto the prepared baking sheet.

  7. Chill to Firm: Roll each scoop into a ball using your hands and place them in the fridge for at least 30 minutes. This chilling time will help them firm up for easier dipping.

  8. Melt Chocolate: In the microwave, melt the chocolate until it’s smooth and creamy. Stir it well to ensure all lumps are gone and it has a glossy finish.

  9. Dip to Coat: Carefully dip each peanut butter ball into the melted chocolate, ensuring it’s fully covered. Place them back onto the parchment-lined baking sheet.

  10. Chill Again: Return the baking sheet to the fridge and chill the coated balls until the chocolate has completely set and they are firm to the touch.

  11. Store Leftovers: If you have any leftovers, store them in an airtight container for several days or pop them in the freezer for a delightful treat later on!

Optional: Drizzle extra melted chocolate on top for a fun touch!

Exact quantities are listed in the recipe card below.

Peanut Butter Balls with Rice Krispies Variations

Feel free to get creative and make these peanut butter balls your own, transforming them into unique treats that satisfy your cravings.

  • Nutty Twist: Add 1/2 cup of chopped nuts (like almonds or walnuts) for a crunchy texture and a wholesome boost.

  • Coconut Delight: Incorporate 1/2 cup of shredded coconut into the mixture for a tropical flair that pairs beautifully with the peanut butter.

  • Protein Boost: Substitute half of the peanut butter with your favorite protein powder; it’s a tasty, energy-packed version.

  • Spice it Up: Mix in a pinch of cinnamon or cayenne pepper for a subtle kick that will surprise your taste buds!

  • Fruit Fusion: Fold in dried fruits like cranberries or raisins for a chewy contrast that adds bursts of flavor to every bite.

  • Vegan Variation: Use a plant-based butter instead of regular butter and replace the chocolate with vegan chocolate chips for a completely cruelty-free treat.

  • Cookie Dough Style: Add mini chocolate chips to the peanut butter mixture to mimic cookie dough flavors; a real winner among chocolate lovers.

  • Minty Fresh: Mix in a few drops of peppermint extract for a refreshing minty twist that makes these treats perfect for the holidays!

Embrace the creativity in your kitchen and enjoy these reinvented bites!

Make Ahead Options

These Peanut Butter Balls with Rice Krispies are perfect for meal prep, making your life a little easier! You can prepare the peanut butter mixture and shape the balls up to 24 hours in advance. Simply store the uncoated balls in an airtight container in the refrigerator; this helps maintain their delicious texture and prevents them from becoming too soft. When you’re ready to enjoy a sweet treat, just melt the chocolate, dip each ball, and chill them again until firm. This way, you’ll have delectable bites ready to impress your family or guests, all while saving time during your busy week!

How to Store and Freeze Peanut Butter Balls with Rice Krispies

Airtight Container: Store your peanut butter balls in an airtight container at room temperature for up to 3 days to maintain their freshness and crunchiness.

Fridge: For longer storage, keep the peanut butter balls in the refrigerator for up to 1 week. This helps to retain the chocolate coating and prevents any melting.

Freezer: Freeze the peanut butter balls for up to 3 months. Wrap them individually in plastic wrap and place them in a freezer-safe bag for optimal preservation.

Reheating: To enjoy them after freezing, simply let them thaw in the fridge overnight or at room temperature for a couple of hours before indulging.

What to Serve with Peanut Butter Balls with Rice Krispies?

Create a delightful spread that complements these sweet snacks with some perfect pairings.

  • Fresh Fruit Salad: A colorful medley of juicy fruits balances the richness of the peanut butter balls, adding a refreshing element to your dessert table.
  • Chocolate Milkshake: Creamy and indulgent, a thick chocolate milkshake enhances the chocolatey flavor while providing a fun, nostalgic pairing with every bite.

For a more intriguing option, consider serving them alongside a light and zesty lemon sorbet. The tartness of the sorbet cuts through the sweetness, making for a refreshing contrast that will keep everyone coming back for more!

  • Spiced Nuts: Roasted spiced nuts add a savory crunch, offering a delightful contrast to the sweet, soft texture of the peanut butter balls.
  • Mini Cupcakes: Bite-sized cupcakes in flavors like vanilla or chocolate provide another sweet treat that pairs beautifully with the rich peanut butter flavor.
  • Coffee or Tea: A warm cup of coffee or tea perfectly complements the sweet and salty notes of the peanut butter balls, creating a cozy finish to any gathering.
  • Ice Cream: A scoop of vanilla or salted caramel ice cream adds an extra layer of richness and pairs delightfully with the crunchy bites.

Try experimenting with these pairings for a memorable dessert experience that brings warmth and nostalgia to your table!

Chef's Helpful Tips

  • For the Peanut Butter Balls with Rice Krispies, ensure your peanut butter is at room temperature for easy mixing.
  • When adding powdered sugar, sift it to prevent clumps and achieve a smoother texture in your dough.
  • To keep the Rice Krispies crunchy, mix them in gently without crushing them during incorporation.
  • Allow the peanut butter balls to chill for at least 30 minutes to help maintain their shape during the chocolate dipping process.

Peanut Butter Balls with Rice Krispies Recipe FAQs

How ripe should my peanut butter be?
Absolutely! A creamy no stir peanut butter is best for this recipe, and it should be at room temperature for easy mixing. This ensures a smooth batter that combines well with the other ingredients. If your peanut butter is too cold, it may be difficult to mix and could result in a thicker texture.

How long can I store leftover peanut butter balls?
You can store your peanut butter balls in an airtight container at room temperature for up to 3 days. If you want to keep them fresher for longer, they can be stored in the refrigerator for up to 1 week. Just remember, refrigeration helps preserve the chocolate coating!

Can I freeze peanut butter balls with Rice Krispies?
Yes, you can! To freeze them, wrap each peanut butter ball individually in plastic wrap. Then, place them in a freezer-safe bag to prevent freezer burn. They can be kept frozen for up to 3 months. When you’re ready to enjoy them, simply let them thaw overnight in the fridge or at room temperature for a couple of hours.

What should I do if the mixture is too dry or crumbly?
No worries! If your mixture is too dry, it might be due to too much powdered sugar or not enough peanut butter. To fix it, add a tablespoon of melted butter or a splash of milk to help bind the ingredients together better. Mix thoroughly until you achieve the desired consistency.

Are there any allergies I need to consider?
Definitely! These Peanut Butter Balls contain peanuts, dairy from the butter, and may also contain gluten if you use regular Rice Krispies. For those with nut allergies, sunflower seed butter can be a great substitute. If you’re making them for guests with dietary restrictions, always check the labels on your ingredients!

What’s the best way to melt chocolate for dipping?
To melt chocolate smoothly, place it in a microwave-safe bowl. Heat it in short bursts of 20-30 seconds, stirring in between until it’s completely melted and creamy. Make sure to avoid overheating, as this can cause the chocolate to seize. If you find it’s still too thick for dipping, add a teaspoon of coconut oil to achieve the perfect dipping consistency!

Enjoy making these delightful bites!

Peanut Butter Balls with Rice Krispies

Peanut Butter Balls with Rice Krispies

A nostalgic and satisfying treat combining crunchy Rice Krispies and creamy peanut butter.
Print Recipe Pin Recipe
Prep Time 15 minutes mins
Chilling Time 30 minutes mins
Total Time 45 minutes mins
Servings: 24 balls
Course: Snacks & Appetizers
Cuisine: American
Calories: 120
Ingredients Equipment Method Nutrition Notes

Ingredients
  

Peanut Butter Mixture
  • 1 cup Creamy no stir peanut butter smooth base for flavor
  • 1/2 cup Salted butter melted; use coconut oil for dairy-free
  • 2 cups Powdered sugar sift for a smoother finish
Crunch
  • 3 cups Rice Krispies cereal can use gluten-free version
Coating
  • 2 cups Semi-sweet chocolate chips or chocolate melting wafers for coating

Equipment

  • mixer
  • Baking sheet
  • parchment paper
  • cookie scoop
  • Microwave

Method
 

  1. Mix together creamy peanut butter and melted butter until smooth.
  2. Gently fold in the Rice Krispies until evenly coated.
  3. Gradually add the powdered sugar and blend until combined.
  4. Switch to a rubber spatula to mix when it's too stiff for the mixer.
  5. Line a baking sheet with parchment paper.
  6. Use a cookie scoop to drop the mixture onto the sheet.
  7. Roll into balls and chill in the fridge for at least 30 minutes.
  8. Melt the chocolate in the microwave until smooth.
  9. Dip each ball into the melted chocolate and place on the baking sheet.
  10. Chill again until chocolate sets.
  11. Store leftovers in an airtight container.

Nutrition

Serving: 1ballCalories: 120kcalCarbohydrates: 15gProtein: 2gFat: 7gSaturated Fat: 4gPolyunsaturated Fat: 1gMonounsaturated Fat: 3gCholesterol: 10mgSodium: 50mgPotassium: 60mgSugar: 10gVitamin A: 200IUCalcium: 10mgIron: 0.5mg

Notes

For best results, use room temperature peanut butter and sift powdered sugar to prevent clumping.

Tried this recipe?

Let us know how it was!

Filed Under: SNACKS & APPETIZERS

The Best Ever Shrimp Etouffee

December 12, 2025 by JudyWhite Leave a Comment

There’s nothing quite like the warmth of a homemade dish that wraps you in comfort, and that’s exactly what I felt when I first tasted this incredible shrimp étouffée. The vibrant aroma of sautéed garlic mingling with the rich spices instantly transported me to the heart of New Orleans, where flavors dance, and good times abound.

Imagine a bustling kitchen, the sound of laughter filling the air as friends gather around a steaming pot. This dish perfectly captures those social moments—its inviting spiciness is sure to create memories over good food and great company. Best of all, this is not just a meal for special occasions: it’s quick, easy, and achievable on a busy weeknight, requiring only 28 minutes from prep to plate!

Whether you’re trying to impress dinner guests or simply craving a comforting bowl of goodness, my version of “The Best Ever Shrimp Étouffée” promises to be a crowd-pleaser. So, roll up your sleeves and let’s dive into the deliciousness!

Why You'll Love This The Best Ever Shrimp Etouffee

  • This recipe is incredibly easy to follow, making it perfect for busy weeknights.
  • With bold flavors from Cajun spices and fresh ingredients, each bite is a taste of New Orleans that you won’t forget.
  • Its versatility allows you to serve it as a comforting meal or an impressive dish for entertaining guests.
  • Visually appealing with vibrant colors, this shrimp étouffée will surely catch the eye and delight the taste buds of everyone at your table.

The Best Ever Shrimp Etouffee Ingredients

Elevate your dinner with these essentials!

For the Base
• Olive oil – adds richness and depth to the dish.
• Onion – infuses a sweet, aromatic base while sautéing.
• Garlic – brings a bold flavor that complements the shrimp beautifully.
• Celery – adds a crunchy textural contrast with a hint of freshness.
• Green bell pepper – contributes brightness and color to the mix.

For the Flavor
• Ghee or butter – enriches the sauce for a creamy texture; substitute with coconut oil for dairy-free.
• Arrowroot powder – thickens the sauce; use cornstarch if unavailable.
• Cajun seasoning – provides a spicy kick, integral to achieving the best ever shrimp étouffée.
• Diced tomatoes – add tangy sweetness that balances the spices.

For the Shrimp
• Peeled shrimp – the star protein of the dish; fresh or frozen work well, but thawed shrimp is essential for even cooking.

For Garnish
• Chopped parsley or green onions – brighten the dish with fresh herbs right before serving.

For Seasoning
• Paprika – gives a smoky depth; consider smoked paprika for extra flavor.
• Garlic powder & onion powder – enhance the dish without overwhelming with fresh ingredients.
• Oregano, thyme, salt, black pepper, and cayenne pepper – create a harmonious blend of flavors, adjusting the cayenne to control heat levels.

With these ingredients, you’re just a few steps away from the comfort of a heartfelt homemade meal!

How to Make The Best Ever Shrimp Etouffee

  1. Heat the oil: In a large pan, heat 1/2 tablespoon of olive oil over medium heat to create a rich foundation for your dish.

  2. Sauté the veggies: Add in 1 finely diced onion, 4 minced garlic cloves, 1 cup of finely diced celery, and 1 finely diced green bell pepper. Sauté until softened and fragrant, about 5-7 minutes.

  3. Mix the spices: Stir in 2 tablespoons of arrowroot powder and follow with 2 tablespoons of Cajun seasoning, 2 teaspoons of paprika, 2 teaspoons of garlic powder, 1 teaspoon of onion powder, 1 teaspoon of oregano, 1 teaspoon of salt, 1/2 teaspoon of black pepper, 1/2 teaspoon of cayenne pepper, and 1/2 teaspoon of thyme. This will create a vibrant flavor profile.

  4. Add tomatoes and stock: Pour in 1 cup of diced tomatoes and 1 1/2 cups of chicken stock. Bring the mixture to a simmer, allowing the flavors to meld together for about 5 minutes.

  5. Cook the shrimp: Add 1 pound of peeled shrimp to the sauce and gently stir. Cook until the shrimp turn pink and opaque, typically about 3-5 minutes.

  6. Garnish and serve: Before serving, sprinkle 1 tablespoon of chopped parsley or green onions on top for a fresh touch, enhancing the dish’s appeal.

Optional: Serve with crusty bread for a delightful dipping experience.

Exact quantities are listed in the recipe card below.

What to Serve with The Best Ever Shrimp Etouffee?

There’s nothing quite like the excitement of pairing delightful sides with a comforting bowl of this New Orleans classic.

  • Crusty French Bread: Perfect for sopping up the rich sauce, the bread offers a satisfying crunch that complements the creamy texture beautifully.

  • Steamed Rice: A classic accompaniment, fluffy rice absorbs the flavors and adds a wholesome balance to every bite of shrimp étouffée.

  • Garlic Green Beans: Crisp-tender green beans sautéed with garlic bring a fresh, vibrant crunch that contrasts nicely with the dish’s warmth.

  • Coleslaw: A tangy, creamy slaw adds brightness to your plate, creating an exciting contrast with the spicy richness of the shrimp stew.

  • Cornbread: Sweet, moist cornbread is a comforting touch that resonates with southern flavors, making it a delightful partner for shrimp étouffée.

  • Cajun Spiced Sweet Potato Fries: With their sweetness and a hint of spice, these fries not only make a scrumptious side but also tie in perfectly with the dish’s flavor profile.

Elevate your mealtime experience by crafting a spread that mirrors the joy and warmth of this heartwarming dish!

How to Store and Freeze The Best Ever Shrimp Etouffee

Room Temperature: Keep the shrimp étouffée at room temperature for no longer than 2 hours after cooking. If left out longer, bacteria may develop.

Fridge: Store leftovers in an airtight container in the fridge for up to 3 days. Reheat gently on the stove over low heat until warmed through, adding a splash of chicken stock if needed.

Freezer: Freeze the shrimp étouffée in a freezer-safe container for up to 3 months. Thaw in the fridge overnight before reheating, following the same instructions for stovetop warming.

Reheating: For best results, reheat the shrimp étouffée on the stove rather than in the microwave to maintain the dish’s creamy texture and flavor.

The Best Ever Shrimp Etouffee Variations

Feel free to get creative and make this recipe your own with these delightful twists and swaps!

  • Dairy-Free: Use coconut oil instead of ghee or butter for a dairy-free version that’s just as rich and flavorful.

  • Vegetable-Packed: Add chopped mushrooms or zucchini to the sauté for extra veggies and texture, making it even heartier.

  • Spicy Kick: Increase the cayenne pepper or add sliced jalapeños for a prominent heat level that spice lovers will adore.

  • Seafood Medley: Mix in scallops or crab meat along with the shrimp for an oceanic delight that elevates the dish to a new level.

  • Quinoa Base: Serve the étouffée over fluffy quinoa instead of rice for a protein-packed grain that’s equally satisfying.

  • Slow-Cooked: Transform the recipe into a slow cooker dish; let it simmer on low for a few hours for deeply infused flavors.

  • Creamy Variation: Stir in a splash of heavy cream or coconut milk at the end for a luscious, creamy sauce that envelops each shrimp.

  • Herb Swap: Experiment with fresh herbs like cilantro or basil instead of parsley or green onions for earthy flair and a fresh twist.

Make Ahead Options

These make ahead options for The Best Ever Shrimp Etouffee are a game changer for busy weeknights! You can prep the base by sautéing the vegetables (onions, garlic, celery, and green bell pepper) and mixing in the spices up to 24 hours in advance; just refrigerate them in an airtight container. When you’re ready to serve, simply heat the veggie and spice mix in a pan, add the diced tomatoes and chicken stock, then cook the shrimp until they turn pink. This method ensures your meal is just as delicious and saves you valuable time at dinner! Enjoy the convenience of a comforting, homemade dish with minimal effort!

Chef's Helpful Tips

  • When making The Best Ever Shrimp Etouffee, be sure to sauté your vegetables until they are tender and fragrant, as this builds a robust flavor base.
  • One common mistake is to add the shrimp too early; cook them just until they turn pink to avoid overcooking.
  • For an extra depth of flavor, use smoked paprika instead of regular paprika, enhancing the dish’s smokiness.
  • Finally, allow the sauce to simmer for at least 5 minutes to ensure all the spices and flavors properly meld together before adding the shrimp.

The Best Ever Shrimp Etouffee Recipe FAQs

What type of shrimp should I use for shrimp étouffée?
Absolutely! You can use fresh or frozen peeled shrimp for this recipe. If using frozen shrimp, be sure to thaw them completely before adding to the dish to ensure even cooking.

How should I store leftovers of shrimp étouffée?
Store your shrimp étouffée in an airtight container in the refrigerator for up to 3 days. To reheat, gently warm it on the stove over low heat, adding a splash of chicken stock if it seems too thick.

Can shrimp étouffée be frozen?
Yes, you can freeze shrimp étouffée! Let it cool completely, then transfer it to a freezer-safe container. It can be stored in the freezer for up to 3 months. To reheat, thaw it overnight in the refrigerator and gently reheat it on the stove to preserve its creamy consistency.

How do I know if my shrimp are overcooked?
Overcooked shrimp will be rubbery and have a dull color rather than the bright pink you want. When cooking, keep an eye on them—they only need about 3-5 minutes until they turn pink and opaque!

What can I substitute for ghee if I want a dairy-free version?
If you’re looking to keep this dish dairy-free, coconut oil is a fantastic substitute for ghee or butter. It adds a subtle sweetness without overshadowing the rich flavors of the étouffée.

Are there any dietary considerations for shrimp étouffée?
Definitely! If anyone at your table has shellfish allergies, be sure to substitute the shrimp with a plant-based protein like chickpeas or tofu. Additionally, always check your Cajun seasoning for allergens, as some blends may contain gluten or other additives.

The Best Ever Shrimp Etouffee

The Best Ever Shrimp Etouffee

A comforting and flavorful dish that embodies the essence of New Orleans, perfect for busy weeknights.
Print Recipe Pin Recipe
Prep Time 15 minutes mins
Cook Time 13 minutes mins
Total Time 28 minutes mins
Servings: 4 servings
Course: DINNER RECIPES
Cuisine: Cajun, Louisiana
Calories: 320
Ingredients Equipment Method Nutrition Notes

Ingredients
  

For the Base
  • 1/2 tablespoon olive oil
  • 1 onion finely diced
  • 4 cloves garlic minced
  • 1 cup celery finely diced
  • 1 green bell pepper finely diced
For the Flavor
  • 2 tablespoons arrowroot powder or cornstarch if unavailable
  • 2 tablespoons Cajun seasoning
  • 1 cup diced tomatoes
For the Shrimp
  • 1 pound peeled shrimp fresh or thawed frozen
For Garnish
  • 1 tablespoon chopped parsley or green onions for serving
For Seasoning
  • 2 teaspoons paprika smoked paprika recommended
  • 2 teaspoons garlic powder
  • 1 teaspoon onion powder
  • 1 teaspoon oregano
  • 1 teaspoon salt
  • 1/2 teaspoon black pepper
  • 1/2 teaspoon cayenne pepper adjust for heat
  • 1/2 teaspoon thyme

Equipment

  • large pan

Method
 

How to Make The Best Ever Shrimp Etouffee
  1. In a large pan, heat olive oil over medium heat.
  2. Add onion, garlic, celery, and green bell pepper. Sauté until softened, about 5-7 minutes.
  3. Stir in arrowroot powder, Cajun seasoning, paprika, garlic powder, onion powder, oregano, salt, black pepper, cayenne, and thyme.
  4. Pour in diced tomatoes and chicken stock. Bring to a simmer for about 5 minutes.
  5. Add peeled shrimp and cook until pink and opaque, about 3-5 minutes.
  6. Garnish with chopped parsley or green onions before serving.

Nutrition

Serving: 1bowlCalories: 320kcalCarbohydrates: 25gProtein: 25gFat: 15gSaturated Fat: 5gCholesterol: 200mgSodium: 800mgPotassium: 550mgFiber: 3gSugar: 5gVitamin A: 10IUVitamin C: 30mgCalcium: 5mgIron: 15mg

Notes

Serve with crusty bread for a delightful dipping experience.

Tried this recipe?

Let us know how it was!

Filed Under: DINNER RECIPES

Rustic Seafood Soup Zuppa di Pesce

December 12, 2025 by JudyWhite Leave a Comment

The moment I walked into the kitchen, the scent of sautéed garlic and fennel enveloped me like a warm hug. It was during one of those cozy evenings when the sun sets early, and all I could think about was a comforting bowl of Rustic Seafood Soup, or Zuppa di Pesce, to warm my soul. This dish represents the perfect blend of vibrant flavors, showcasing the ocean’s treasures, and it’s surprisingly easy to make!

Bored with the usual fast food options? Let me show you how you can turn your kitchen into a seafood haven without feeling overwhelmed. With a rich base of tomatoes, white wine, and a variety of fresh seafood, each spoonful transports you directly to a seaside Italian trattoria. Best of all, this recipe offers a delightful return to home-cooked goodness that’ll impress your family and friends. Grab your apron, and let’s dive into this delightful seafood adventure!

Why You'll Love This Rustic Seafood Soup Zuppa di Pesce

  • This Rustic Seafood Soup Zuppa di Pesce is incredibly easy to prepare, making it a perfect weeknight meal or a special occasion dish.
  • The rich and vibrant flavors of fresh seafood, tomatoes, and white wine will tantalize your taste buds and leave you craving more.
  • Its versatility means you can easily customize it with your favorite seafood or whatever is fresh at the market.
  • Visually stunning with its colorful array of seafood, this soup also makes an impressive centerpiece for gatherings, ensuring it will be a crowd-pleaser at your dinner table.
  • Enjoy a comforting, hearty meal that is both wholesome and satisfying, all in under an hour!

Rustic Seafood Soup Zuppa di Pesce Ingredients

• Get ready to elevate your dinner game with these fresh ingredients!

For the Base

  • Extra virgin olive oil – a must for that rich, flavorful foundation.
  • Medium shallots (diced) – sweet and aromatic, they add depth to your soup.
  • Medium fennel bulb (sliced) – brings a lovely anise flavor that complements the seafood.
  • Garlic (sliced) – because everything is better with garlic, it fills your kitchen with a welcoming aroma.
  • Crushed hot red pepper flakes – add a pinch for a spicy kick, or leave it out for a milder soup.
  • Dry white wine – enhances flavors and gives a touch of elegance to your Rustic Seafood Soup.
  • Plum tomatoes – either pulsed or hand crushed, they’ll create the luscious tomato base.
  • Clam juice – an essential for that authentic seafood taste, it intensifies the soup’s flavor.

For the Seafood

  • Calamari – tender and quick-cooking, they’ll soak up all the delicious broth.
  • Cod or other meaty white fish (cut into chunks) – adds heartiness and a delightful texture.
  • Little neck clams (scrubbed) – these beauties seal in the briny ocean flavor, just perfect for a seafood soup.
  • Mussels (scrubbed & beards removed) – essential for a true Zuppa di Pesce, they add a rich taste and elevate the dish.
  • Extra large shrimp – juicy and plump, they’re a real treat in this bowl of goodness.

For Garnish

  • Salt and pepper – simple yet crucial for balancing flavors.
  • Minced flat-leaf Italian parsley – brings a fresh, herbal finish to brighten up your soup.

Gather these ingredients and get ready to bring the ocean into your kitchen!

How to Make Rustic Seafood Soup Zuppa di Pesce

  1. Heat a large Dutch oven or heavy pot over medium-low heat. Add the shallots and fennel to the olive oil, sautéing for about 5 minutes until they soften and become fragrant.

  2. Add the garlic to the pot and cook for an additional 2 minutes. You’ll know it’s ready when the garlic releases its enticing aroma.

  3. Sprinkle in the crushed red pepper flakes and sauté for 30 seconds, allowing the flavors to meld and create a slight kick.

  4. Pour in the dry white wine, turning the heat to medium-high. Scrape the bottom of the pot to lift any brown bits, cooking the wine for 90 seconds.

  5. Combine the pulsed or crushed tomatoes with the clam juice, and then reduce the heat to medium. Allow the sauce to simmer moderately for 10 minutes, letting flavors develop before adding the seafood.

  6. Incorporate the calamari into the simmering sauce, and cook for 15 minutes until tender.

  7. Add the chunks of cod or your chosen white fish, cooking for an additional 5 minutes to ensure it’s just cooked through.

  8. Introduce the cleaned little neck clams to the pot, covering it with a lid. Cook for 5-7 minutes, or until the clams just begin to open.

  9. Stir in the mussels and shrimp, covering once more. Cook until the shrimp turn pink and the mussels open (about 5-7 minutes).

  10. Discard any clams or mussels that remain closed after cooking, as they’re no longer safe to eat.

  11. Taste the broth and season with salt and pepper as needed. Turn off the heat and gently fold in the minced parsley. Serve warm in bowls alongside toasted Italian bread rubbed with garlic and a drizzle of olive oil.

Optional: Serve with a squeeze of lemon for a zestier flavor!
Exact quantities are listed in the recipe card below.

What to Serve with Rustic Seafood Soup Zuppa di Pesce?

Warm up your dinner table with a seafood feast that will leave everyone craving more.

  • Toasted Italian Bread: Great for soaking up the delicious broth, this classic pairing elevates the dining experience. Rub with garlic for an extra flavorful touch.

  • Crispy Garlic Fries: The crunch of fries adds texture contrast, while the garlic echoes the flavors in the soup. Perfect for those who love a little indulgence!

  • Mixed Green Salad: A light and fresh salad adds a vibrant contrast and balances the richness of the soup with a burst of citrus dressing.

  • Grilled Vegetable Platter: Seasonal veggies enhance your meal with smoky flavors, providing a colorful array of textures and freshness alongside the hearty soup.

  • Lemon Sorbet: A refreshing finish that cleanses the palate, this light dessert is ideal after the rich seafood delight. It offers a zesty twist that’s perfect for any season.

  • Chardonnay: This white wine complements the soup’s flavors beautifully, enhancing the seafood and adding a touch of elegance to your meal.

Each of these pairings brings out the best in your Rustic Seafood Soup, creating a delightful culinary adventure for you and your loved ones!

Rustic Seafood Soup Zuppa di Pesce Variations

Feel free to get creative with this delicious recipe and make it your own. You’ll discover a world of flavors waiting to be explored!

  • Spicy Kick: Add fresh jalapeños or a diced habanero for an exciting heat that lingers and enhances the overall flavor.
    The spice will dance on your palate, providing a bold twist that can make the soup even more irresistible.

  • Creamy Addition: Stir in a splash of heavy cream at the end for a luxurious, velvety texture that complements the seafood beautifully.
    This creamy variation transforms your soup into a rich masterpiece, delighting all who take a sip.

  • Veggie Boost: Toss in diced zucchini or bell peppers for extra nutrition and vibrant colors to brighten the dish.
    These fresh veggies add not only texture but also a beautiful splash of color that makes the soup visually appealing.

  • Citrus Twist: Incorporate some zest from lemon or orange to brighten the flavors, balancing the richness of the seafood.
    A hint of citrus creates a refreshing contrast, elevating every spoonful and making your taste buds sing.

  • Herb Infusion: Experiment with other herbs like dill or basil alongside the parsley for extra layers of flavor that sing in harmony.
    Each herb adds its own unique aroma, weaving a tapestry of tastes that will keep everyone guessing.

  • Seafood Mix-Up: Swap out the seafood for your favorites like scallops or lobster when they’re in season for an indulgent upgrade.
    There’s something special about choosing your own seafood; it turns a comforting meal into a luxurious feast.

  • Savory Broth: Use fish stock instead of clam juice for an even richer seafood base that amplifies the flavors in your soup.
    This adjustment creates an intense depth that transports you straight to the seaside.

  • Grains Galore: Add cooked rice or orzo pasta for a heartier, more filling version that transforms your soup into a complete meal.
    As the grains soak up the broth, you’ll find each bowl to be a warm, satisfying hug on a chilly day.

Make Ahead Options

Planning ahead with this Rustic Seafood Soup Zuppa di Pesce can save you precious time on busy weeknights! You can prepare the base of the soup up to 24 hours in advance by sautéing the shallots, fennel, and garlic, then adding the wine, tomatoes, and clam juice. Allow the mixture to cool, transfer to an airtight container, and refrigerate. When you’re ready to serve, just reheat the base on the stove, then add the calamari, fish, clams, mussels, and shrimp, cooking until fully heated through. This way, you ensure the seafood stays fresh and just as delicious, meaning a comforting meal is only minutes away from your dinner table!

How to Store and Freeze Rustic Seafood Soup Zuppa di Pesce

  • Room Temperature: Serve hot and enjoy immediately. Do not leave out for more than 2 hours to prevent spoilage.
  • Fridge: Store leftover Rustic Seafood Soup in an airtight container for up to 3 days. Reheat on the stove over medium heat, stirring occasionally.
  • Freezer: For longer storage, freeze the soup for up to 3 months. Use a freezer-safe container, leaving some space for expansion. Thaw overnight in the fridge before reheating.
  • Reheating: Gently reheat on the stove to preserve seafood texture, adding a splash of water or broth if it appears too thick. Enjoy the flavors just as vibrant as the first serving!

Chef's Helpful Tips

  • When making Rustic Seafood Soup Zuppa di Pesce, be sure to sauté the shallots and fennel slowly to bring out their natural sweetness and flavor.
  • Avoid overcrowding the pot when adding the seafood, as this can lead to uneven cooking and rubbery texture.
  • Allow the soup to simmer gently after adding the tomatoes and clam juice to fully develop the rich base before introducing the seafood.
  • Remember to check for doneness on the clams and mussels, discarding any that do not open to ensure safety.

Rustic Seafood Soup Zuppa di Pesce Recipe FAQs

How do I choose the best seafood for my Rustic Seafood Soup?
Absolutely! Freshness is key to an unforgettable Zuppa di Pesce. Look for seafood that’s firm with a clean ocean scent. For shrimp, they should be bright and translucent, while fish fillets ought to be moist and not smell fishy. Calamari should appear opaque and slightly glossy. If you must use frozen seafood, make sure it’s well-sealed and not freezer-burned.

What’s the best way to store leftover Rustic Seafood Soup?
Very! Store your soup in an airtight container in the fridge for up to 3 days. Make sure it cools down completely before sealing to avoid temperature fluctuations that can lead to spoilage. When you’re ready to reheat, simply warm it on the stove over medium heat, stirring occasionally to ensure even warming!

Can I freeze Rustic Seafood Soup Zuppa di Pesce?
Certainly! Freezing is a great option to extend the life of this soup. Pour the cooled soup into a freezer-safe container and leave about an inch of space at the top for expansion. It can be frozen for up to 3 months. When you’re ready to enjoy it again, thaw the soup overnight in the fridge, then gently reheat on the stove over low heat, adding some broth or water to loosen it if needed.

What should I do if my clams or mussels don’t open while cooking?
Good question! If you find any clams or mussels that remain closed after cooking, it’s essential to discard them. This indicates that they were not fresh or safe to eat. To avoid this, always buy seafood from reputable sources and give your shellfish a good scrub before cooking. They’re the stars of the dish, and it’s critical to make sure they’re safe!

Can I make this soup gluten-free or dairy-free?
Absolutely! The Rustic Seafood Soup Zuppa di Pesce is naturally gluten-free and dairy-free, as it consists of wholesome ingredients without any hidden gluten or dairy products. Just ensure the white wine used is gluten-free, and avoid adding any bread if you’re adhering strictly to a gluten-free diet. For dietary restrictions or preferences, feel free to swap ingredients while keeping the core flavors intact!

Rustic Seafood Soup Zuppa di Pesce

Rustic Seafood Soup Zuppa di Pesce

Experience the comforting flavors of Rustic Seafood Soup Zuppa di Pesce with vibrant seafood and rich tomatoes, perfect for any occasion.
Print Recipe Pin Recipe
Prep Time 15 minutes mins
Cook Time 30 minutes mins
Total Time 45 minutes mins
Servings: 4 bowls
Course: DINNER RECIPES
Cuisine: Italian
Calories: 360
Ingredients Equipment Method Nutrition Notes

Ingredients
  

For the Base
  • 2 tablespoons extra virgin olive oil
  • 2 medium shallots (diced)
  • 1 medium fennel bulb (sliced)
  • 4 cloves garlic (sliced)
  • 1/4 teaspoon crushed hot red pepper flakes adjust to taste
  • 1 cup dry white wine
  • 28 ounces plum tomatoes pulsed or hand crushed
  • 1 cup clam juice
For the Seafood
  • 1 pound calamari
  • 1 pound cod or other meaty white fish (cut into chunks)
  • 1 pound little neck clams (scrubbed)
  • 1 pound mussels (scrubbed & beards removed)
  • 1 pound extra large shrimp
For Garnish
  • to taste salt
  • to taste pepper
  • 1/4 cup minced flat-leaf Italian parsley

Equipment

  • large Dutch oven or heavy pot

Method
 

Cooking Steps
  1. Heat a large Dutch oven or heavy pot over medium-low heat. Add the shallots and fennel to the olive oil, sautéing for about 5 minutes until they soften and become fragrant.
  2. Add the garlic to the pot and cook for an additional 2 minutes.
  3. Sprinkle in the crushed red pepper flakes and sauté for 30 seconds.
  4. Pour in the dry white wine, turning the heat to medium-high. Scrape the bottom of the pot to lift any brown bits, cooking the wine for 90 seconds.
  5. Combine the pulsed or crushed tomatoes with the clam juice, and then reduce the heat to medium. Allow the sauce to simmer moderately for 10 minutes.
  6. Incorporate the calamari into the simmering sauce, and cook for 15 minutes until tender.
  7. Add the chunks of cod or your chosen white fish, cooking for an additional 5 minutes.
  8. Introduce the cleaned little neck clams to the pot, covering it with a lid. Cook for 5-7 minutes, or until the clams just begin to open.
  9. Stir in the mussels and shrimp, covering once more. Cook until the shrimp turn pink and the mussels open (about 5-7 minutes).
  10. Discard any clams or mussels that remain closed after cooking.
  11. Taste the broth and season with salt and pepper as needed. Turn off the heat and fold in the minced parsley. Serve warm.

Nutrition

Serving: 1bowlCalories: 360kcalCarbohydrates: 35gProtein: 30gFat: 12gSaturated Fat: 2gPolyunsaturated Fat: 1gMonounsaturated Fat: 4gCholesterol: 150mgSodium: 600mgPotassium: 800mgFiber: 4gSugar: 5gVitamin A: 400IUVitamin C: 20mgCalcium: 80mgIron: 4mg

Notes

Serve alongside toasted Italian bread rubbed with garlic and a drizzle of olive oil. Optional: Add a squeeze of lemon for zest.

Tried this recipe?

Let us know how it was!

Filed Under: DINNER RECIPES

Christmas Drink Idea

December 12, 2025 by JudyWhite Leave a Comment

As the holiday season approaches, I find myself daydreaming about the playful sparkle of festive gatherings. There’s something undeniably enchanting about the clinking of glasses filled with vibrant, refreshing drinks that elevate any celebration. This year, I stumbled upon a delightful Christmas drink idea that has become the highlight of my holiday entertaining – Festive Punch!

Imagine the burst of flavors from juicy oranges, tart cranberries, and a hint of sweet pomegranate, all harmoniously blended to create a blissful concoction. It’s the perfect way to lift spirits and usher in joy without the fuss of elaborate cocktail mixing. Plus, with just five minutes of prep, you can whip up this crowd-pleaser while still enjoying quality time with loved ones.

Whether you’re hosting a long-anticipated holiday party or simply want a refreshing beverage to enjoy by the fire, this punch checks all the boxes: vibrant color, delicious taste, and festive flair. Let’s dive into the recipe that will make your festivities shine!

Why You'll Love This Festive Punch

  • This Festive Punch is incredibly easy to make, requiring just five minutes of prep time so you can focus on enjoying the celebration.
  • The combination of flavors from oranges, cranberries, and pomegranate creates a refreshing and lively drink that will brighten up any gathering.
  • Its vibrant colors and beautiful garnishes make it visually stunning and an eye-catching centerpiece for your holiday table.
  • Plus, this crowd-pleasing recipe serves eight, making it perfect for sharing with family and friends during those cheerful holiday moments.

Christmas Drink Idea Ingredients

• Get ready for a festive flavor explosion!

For the Punch

  • Whole orange – sliced, it adds a zesty brightness to your Christmas drink idea.
  • Cranberries – their tartness balances sweetness and makes for a gorgeous presentation.
  • Pomegranate seeds – these ruby gems bring a pop of sweetness and color to the mix.
  • Cranberry juice – this fruity base enhances the flavors while keeping things refreshing.
  • Orange juice – fresh-squeezed, if possible, for an extra layer of citrus delight.
  • Pomegranate juice – adds depth and richness to the overall punch profile.
  • Lemon-lime soda – brings bubbles and a sweet fizz, perfect for festive gatherings.
  • White rum (optional) – for those wanting an adult twist to their holiday cheer.
  • Ice – essential for keeping your punch cool and refreshing.

For Garnish

  • Fresh rosemary sprigs – their aromatic fragrance enhances the holiday spirit.
  • Additional orange slices – for a beautiful and colorful garnish.
  • Extra cranberries – for a touch of a festive flair in your punch bowl.

How to Make Festive Punch

  1. Slice the whole orange carefully and set aside a few slices for garnish. These will add a charming touch when serving!

  2. Combine cranberries, pomegranate seeds, cranberry juice, orange juice, pomegranate juice, and lemon-lime soda in a large punch bowl. Stir gently until well mixed.

  3. Add white rum, if desired, to the punch. This step is perfect for those looking to elevate the festive cheer with a bit of a kick!

  4. Fill the punch bowl with ice. Give everything a gentle stir to keep your drink nicely chilled and refreshing!

  5. Garnish with additional orange slices, cranberries, and fresh rosemary sprigs for that eye-catching finish. It’s all about making your punch beautiful and inviting!

Optional: Add a splash of extra pomegranate juice for an even richer flavor.

Exact quantities are listed in the recipe card below.

Christmas Drink Idea Variations

Feel free to put your own spin on this festive punch and create a version that’s uniquely yours!

  • Non-Alcoholic: Omit the white rum and replace it with extra lemon-lime soda for a refreshing mocktail. Everyone can enjoy the celebration!

  • Spicy Twist: Add a pinch of cayenne pepper or sliced jalapeños to give your punch a kick. It’s a surprising but delightful flavor explosion.

  • Herb-Infused: Incorporate fresh mint leaves along with rosemary for a refreshing aromatic twist. The combination will elevate your festive punch to new heights!

  • Berry Medley: Swap out cranberries for a mix of strawberries and blueberries for a vibrant berry explosion. This variation adds a colorful touch to your punch.

  • Citrus Boost: Toss in a sliced lemon or lime for an extra zing. The added brightness will awaken your taste buds and amplify the colorful presentation.

  • Sparkling Water: Substitute regular lemon-lime soda with flavored sparkling water for a lighter, less sweet version. It’s a great option for health-conscious guests.

  • Chilled Tea: Use chilled hibiscus tea instead of pomegranate juice for a unique flavor profile that adds a beautiful deep crimson hue. It’s a refreshing herbal alternative!

  • Frozen Fruits: Freeze the extra cranberries and orange slices as ice cubes. This not only keeps the punch chilled but also looks stunning as they float in your bowl.

Make Ahead Options

The Festive Punch is a fantastic Christmas drink idea that can save you precious time during your holiday preparations! You can prepare the punch mixture (excluding the soda and ice) up to 24 hours in advance. Simply combine the cranberries, pomegranate seeds, cranberry juice, orange juice, and pomegranate juice in your punch bowl and refrigerate. To preserve the freshness of your ingredients, wait to add the lemon-lime soda and ice until just before serving, as this will maintain the drink’s effervescence. When ready to impress your guests, simply stir in the soda and finish with the optional white rum and garnishes – ensuring that your punch is just as vibrant and delicious as when it was first made!

What to Serve with Festive Punch?

As you prepare to celebrate the season, consider what delightful dishes will pair beautifully with this lively drink.

  • Savory Cheese Platter: A selection of your favorite cheeses will enhance the fruity notes, creating a nice contrast to the punch’s sweetness. Offer a mix of sharp, creamy, and tangy varieties for depth.

  • Spicy Meatballs: The robust flavors of sweet and spicy meatballs create a thrilling balance with the punch, making every sip and bite unforgettable.

  • Cranberry Brie Bites: These delightful bites echo the punch’s ingredients and add a warm, melty texture that guests will love. A timeless festive favorite!

  • Roasted Veggie Medley: Roasted carrots, sweet potatoes, and Brussels sprouts bring earthy flavors that align perfectly with the punch’s bright citrusy tones. They’re colorful, too!

  • Chocolate-Dipped Strawberries: These sweet gems will satisfy your guests’ cravings and pair beautifully with the sweet notes in the punch, providing a lovely touch of indulgence.

  • Sparkling Water: For a refreshing non-alcoholic option, serve sparkling water with fresh lemon or lime slices. It enhances the drink’s festivity while keeping the vibe light!

With these pairings, your gathering will be filled with laughter, shared memories, and delectable delights, all sparkling with holiday cheer!

How to Store and Freeze Festive Punch

Fridge: Keep leftover Festive Punch in an airtight container for up to 3 days. This ensures freshness while maintaining its delightful flavors.

Freezer: You can freeze the punch in ice cube trays or freezer-safe containers. It can last for up to 3 months; just thaw in the fridge before serving.

Reheating: If you’ve added white rum, avoid reheating the punch. Instead, serve it chilled over ice for a refreshing experience.

Garnish Storage: Store any unused garnishes like orange slices and rosemary sprigs in the fridge in a sealed container to keep them fresh for your next celebration.

Chef's Helpful Tips

  • When making festive punch, ensure to slice the orange evenly to enhance the visual appeal and flavor distribution.
  • To avoid overly sweet punch, balance your juice ratios by adjusting the amount of cranberry and pomegranate juices according to your taste.
  • Stir gently to prevent the carbonation from lemon-lime soda from dissipating, which keeps your drink bubbly and festive.
  • Chill your punch for at least an hour before serving to allow the flavors to meld beautifully and keep it refreshing.<br />

Christmas Drink Idea Festive Punch Recipe FAQs

What type of orange should I use for this punch?
Absolutely! A navel orange is perfect for this recipe since it’s sweet and has fewer seeds. Look for ones that are firm and vibrant in color, as this indicates ripeness. Avoid any oranges with dark spots or blemishes, as these can indicate overripeness.

How should I store leftover Festive Punch?
After the festivities, keep any leftover Festive Punch in an airtight container in the fridge. It will stay fresh for up to 3 days. Make sure to stir it gently before serving again to revive the bubbles from the lemon-lime soda!

Can I freeze Festive Punch?
Very! To freeze the punch, pour it into ice cube trays or freezer-safe containers. It can last for up to 3 months in the freezer. When you’re ready to enjoy it again, simply thaw it in the fridge overnight. Using the ice cubes can add a nice chill to future drinks, and you can always mix them with a little additional soda!

What if my punch is too sweet?
If you find your Festive Punch to be sweeter than you’d like, try balancing it out with some extra lemon-lime soda or even a splash of club soda. This adds a refreshing fizz without too much sweetness. You could also add more cranberry juice to give it a tart contrast!

Is this punch suitable for children?
Absolutely! You can easily make this punch kid-friendly by omitting the white rum. The fruity flavors and bubbly soda will delight children and adults alike. If you’re serving at a festive gathering, the colorful ingredients make it a fun and exciting drink for everyone!

Can pets have any of the ingredients in this punch?
It’s best to keep this punch away from pets. Ingredients like cranberries are safe in small amounts for dogs, but the sugar from juices and soda, as well as the potential for alcohol, can pose risks. Always consult your vet regarding your pet’s diet.

Christmas Drink Idea

Christmas Drink Idea

This Christmas Drink Idea is a vibrant and refreshing Festive Punch perfect for holiday gatherings.
Print Recipe Pin Recipe
Prep Time 5 minutes mins
Total Time 5 minutes mins
Servings: 8 cups
Course: Snacks & Appetizers
Cuisine: Festive
Calories: 150
Ingredients Equipment Method Nutrition Notes

Ingredients
  

For the Punch
  • 1 whole orange sliced
  • 1 cup cranberries
  • 1 cup pomegranate seeds
  • 4 cups cranberry juice
  • 1 cup orange juice fresh-squeezed, if possible
  • 1 cup pomegranate juice
  • 2 cups lemon-lime soda
  • 1 cup white rum optional
  • ice Ice
For Garnish
  • 3 sprigs fresh rosemary for garnish
  • 2 slices orange extra for garnish
  • 1 cup cranberries extra for garnish

Equipment

  • large punch bowl

Method
 

Steps to Make Festive Punch
  1. Slice the whole orange carefully and set aside a few slices for garnish.
  2. Combine cranberries, pomegranate seeds, cranberry juice, orange juice, pomegranate juice, and lemon-lime soda in a large punch bowl. Stir gently until well mixed.
  3. Add white rum, if desired, to the punch.
  4. Fill the punch bowl with ice and stir gently to keep the drink chilled.
  5. Garnish with additional orange slices, cranberries, and fresh rosemary sprigs.

Nutrition

Serving: 1cupCalories: 150kcalCarbohydrates: 35gSodium: 5mgPotassium: 200mgFiber: 1gSugar: 30gVitamin C: 35mgCalcium: 1mgIron: 2mg

Notes

Can add a splash of extra pomegranate juice for richer flavor. Chill your punch before serving.

Tried this recipe?

Let us know how it was!

Filed Under: SNACKS & APPETIZERS

  • « Previous Page
  • 1
  • …
  • 41
  • 42
  • 43
  • 44
  • 45
  • …
  • 49
  • Next Page »

Recent Posts

  • Crispy Potatoes in Oven
  • Lucky Charms Pancakes
  • Cheeseburger
  • Boiled Corn on the Cob
  • St. Patrick’s Day Dessert Parfaits

Recent Comments

No comments to show.

Footer

  • Contact
  • Privacy Policy
  • About Us
  • Terms
  • ↑ back to top

Copyright © 2024 www.Forkono.com

Table Of Content