Forkono

  • BREAKFAST & BRUNCH
  • DESSERT RECIPES
  • DINNER RECIPES
  • LUNCH RECIPES
  • About uS
  • SNACKS & APPETIZERS
menu icon
go to homepage
  • BREAKFAST & BRUNCH
  • DESSERT RECIPES
  • DINNER RECIPES
  • LUNCH RECIPES
  • About uS
  • SNACKS & APPETIZERS
search icon
Homepage link
  • BREAKFAST & BRUNCH
  • DESSERT RECIPES
  • DINNER RECIPES
  • LUNCH RECIPES
  • About uS
  • SNACKS & APPETIZERS
×

Caramelized Onion Pasta

January 25, 2026 by JudyWhite Leave a Comment

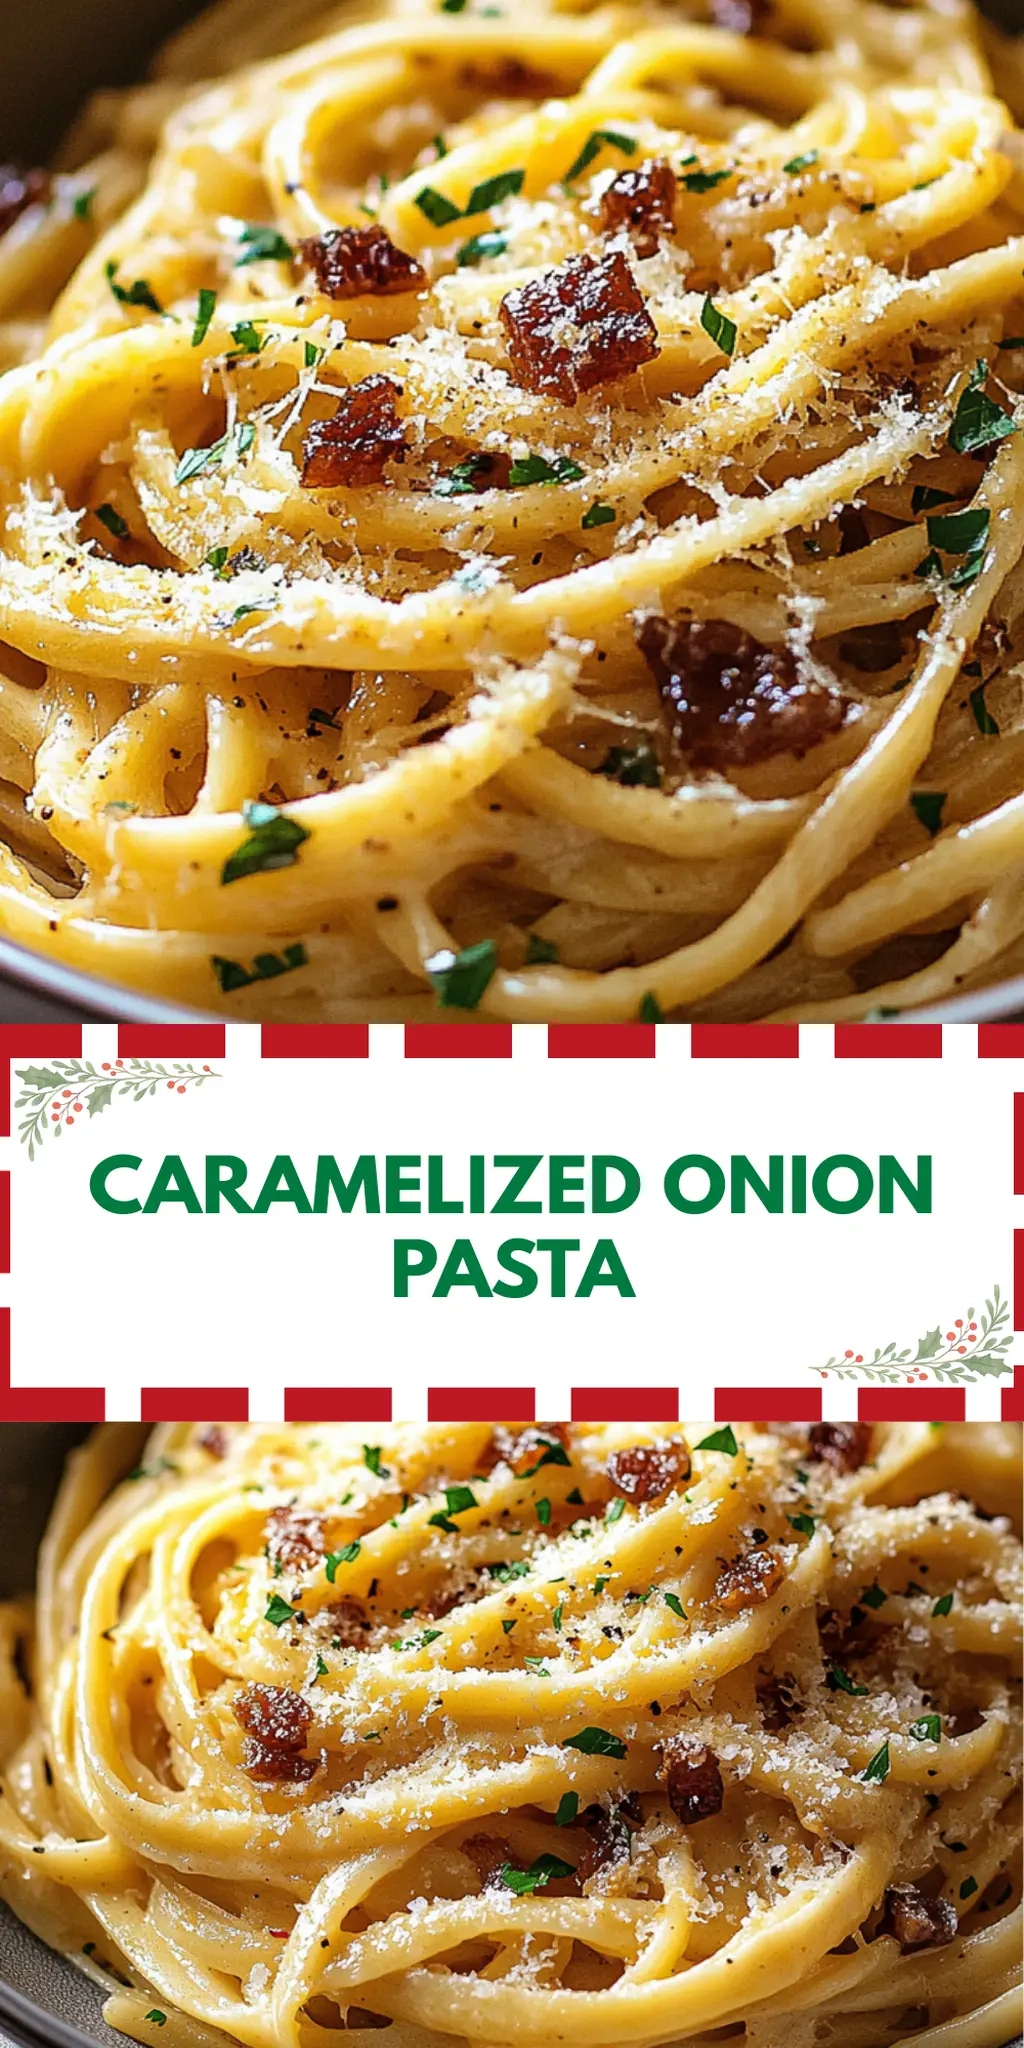
On a chilly evening when takeout just wouldn’t cut it, I craved something warm and comforting that would wrap around me like a cozy hug. That’s when I stumbled upon my favorite go-to recipe: Caramelized Onion Pasta with Chili Oil. It’s incredible how the sweet, rich scent of caramelized onions slowly fills the kitchen—each stir of the skillet setting the stage for a delightful meal.

I love how simple ingredients can be transformed into something truly special, and it’s no surprise that this dish has become a staple in my home. With just a handful of pantry staples like spaghetti, garlic, and a drizzle of chili oil, you can whip up a plate of pasta that exudes warmth and flavor, perfect for a relaxed dinner or a special gathering with friends. So let’s dive into this culinary adventure that not only satisfies your cravings but also keeps your evenings stress-free and delicious!

Why You'll Love This Caramelized Onion Pasta

  • This Caramelized Onion Pasta is a breeze to make, allowing you to create a comforting meal with minimal effort.
  • The rich flavors of the caramelized onions paired with the kick of chili oil create a delightful taste experience that will have you coming back for more.
  • Its versatility makes it perfect for any occasion, whether it’s a cozy night in or impressing guests at a dinner party.
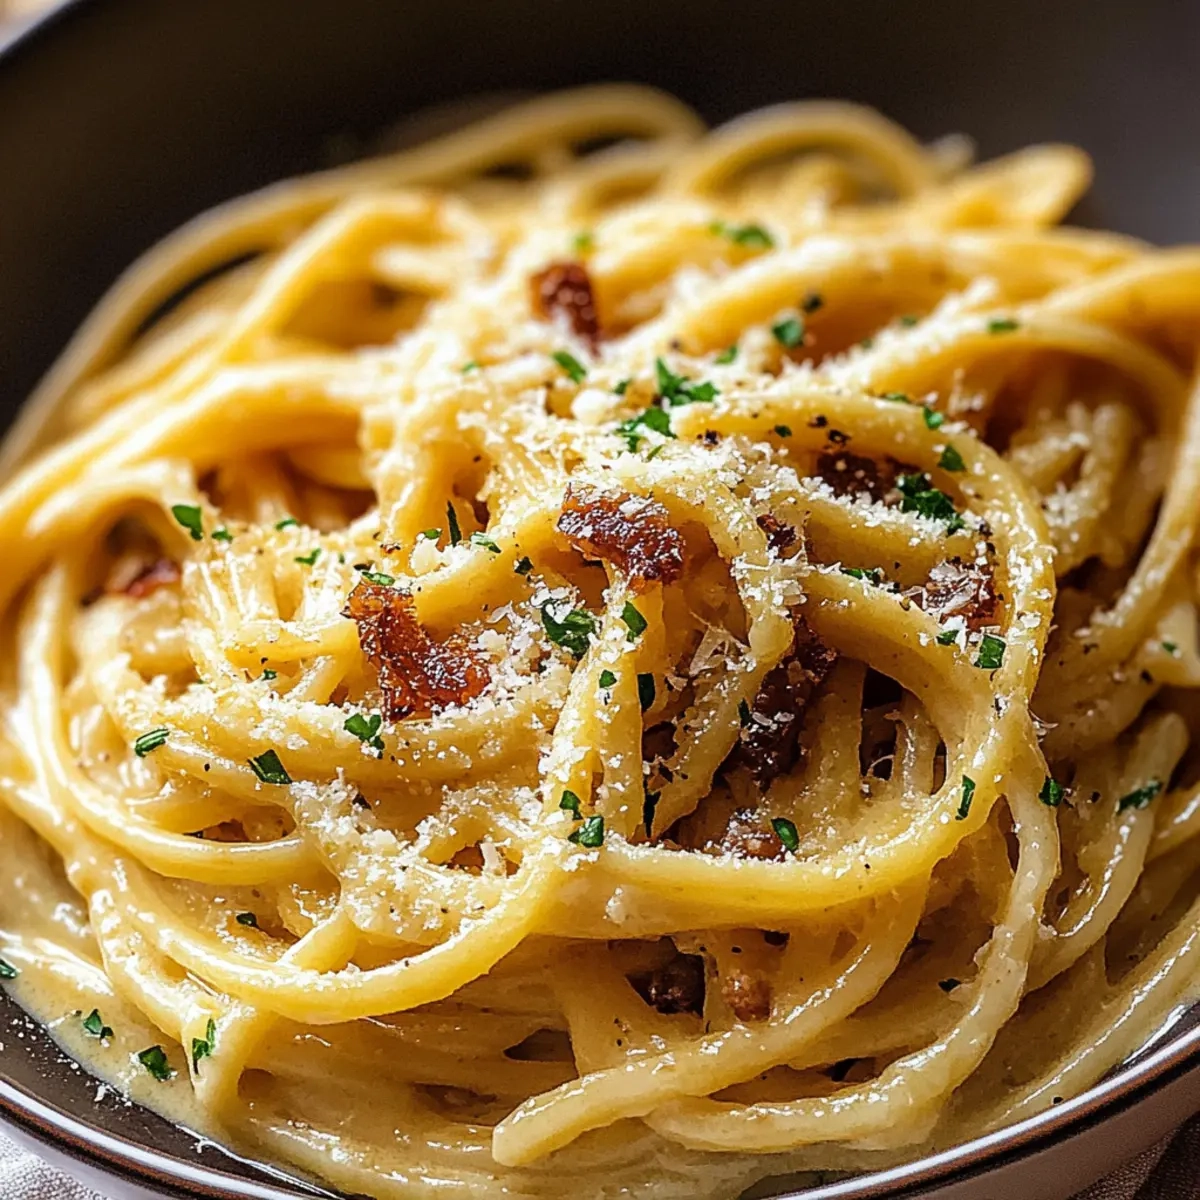
  • Visually, the golden brown onions and vibrant chili oil make for an appealing dish that looks as good as it tastes.

Caramelized Onion Pasta Ingredients

• Simple yet flavorful, let’s gather what you need!

For the Pasta
• 8 oz spaghetti – a classic choice that perfectly absorbs the rich sauce.

For the Caramelized Onions
• 2 medium yellow onions, sliced – the stars of the dish; their sweetness becomes more pronounced when cooked slowly.
• 3 tbsp extra virgin olive oil – adds a luscious base and enhances the caramelization process.
• 3 cloves garlic, minced – a fragrant addition that brings depth to the dish.

For the Kick
• 2-3 tbsp chili oil (to taste) – adjust to your preference for spice; it elevates the entire flavor profile of the caramelized onion pasta!

For Serving
• 1/2 cup grated Parmesan cheese – a must-have topping that adds a delightful creaminess to the finished dish.

How to Make Caramelized Onion Pasta

  1. Slice and Mince: Start by slicing your onions and mincing the garlic. This is a great time to let the enticing aroma of fresh ingredients waft through your kitchen!

  2. Caramelize the Onions: In a large skillet over medium heat, add your extra virgin olive oil along with the sliced onions. Cook them for about 20-30 minutes, stirring occasionally until they turn a luscious golden brown and become beautifully caramelized.

  3. Add Garlic: Once the onions are caramelized, add the minced garlic to the skillet. Cook for an additional minute until it becomes fragrant and infuses your kitchen with mouthwatering scents.

  4. Cook the Spaghetti: While your onions are working their magic, boil water in a pot. Cook the spaghetti according to the package instructions, remembering to reserve a bit of pasta water before draining—this is key for the sauce!

  5. Combine the Ingredients: Toss the cooked spaghetti into the skillet with the caramelized onion mixture. Drizzle with chili oil, mixing everything well. Adjust the consistency with the reserved pasta water as needed to create a delightfully coating sauce.

  6. Serve and Enjoy: Plate your pasta, topping it with grated Parmesan cheese and an extra drizzle of chili oil for that perfect finishing touch!

Optional: Add freshly cracked black pepper for an additional punch of flavor.

Exact quantities are listed in the recipe card below.

What to Serve with Caramelized Onion Pasta?

Complement your delicious pasta dish with these tasty additions that bring balance and flavor to create a memorable meal.

  • Garlic Bread: A classic pairing, the buttery crunch of garlic bread perfectly soaks up the savory sauce of the pasta. It’s the ultimate vessel for those delicious caramelized onion bites.

  • Fresh Arugula Salad: The peppery notes of arugula provide a refreshing contrast to the rich flavors, while a tangy vinaigrette brightens the entire meal, making each bite feel lighter.

  • Roasted Vegetables: Oven-roasted seasonal vegetables add a touch of sweetness and earthy notes, enhancing the overall depth of the dish. Think zucchini, bell peppers, or carrots—colors and flavors that will make your plate pop!

  • Red Wine: Enjoy a glass of bold red wine, like a Chianti or Merlot, which complements the caramelized sweetness and richness of the pasta wonderfully.

  • Cheesy Focaccia: Soft, fluffy focaccia topped with melted cheese has a delightful texture that pairs beautifully with the creamy Parmesan of the pasta dish.

  • Lemon Sorbet: For dessert, a light and tangy lemon sorbet refreshes the palate after the rich pasta, providing a perfect sweet ending to a cozy meal.

  • Balsamic Glazed Brussels Sprouts: These tender sprouts bring a delightful tang and slight bitterness that contrast beautifully with the sweetness of the caramelized onions.

  • Sparkling Water: Refreshing sparkling water with a twist of lemon or lime keeps things light and gives a fizzy lift that balances the heavy pasta.

Every element you bring to the table elevates your dining experience, transforming a simple meal into a feast of flavors!

Make Ahead Options

These Caramelized Onion Pasta components are perfect for meal prep, making your busy weeknights easier! You can caramelize your onions and garlic up to 3 days ahead. Just store them in an airtight container in the refrigerator to maintain their rich flavor. When you’re ready to enjoy your pasta, simply reheat the onion mixture in a skillet, cook your spaghetti fresh, and combine them with a drizzle of chili oil. This not only saves you time but ensures the dish tastes just as delicious on the day of serving! Adjust the chili oil to your taste at the final step for a perfect finish.

How to Store and Freeze Caramelized Onion Pasta

Fridge: Store leftover Caramelized Onion Pasta in an airtight container for up to 3 days. This keeps the flavors intact while preventing any unwanted moisture.

Freezer: You can freeze the pasta for up to 2 months. Ensure it’s in a freezer-safe container and, if possible, separate the pasta from the sauce to maintain texture.

Reheating: To reheat, thaw in the fridge overnight and gently heat in a skillet over low heat, adding a splash of reserved pasta water to restore creaminess and warmth.

Room Temperature: Always keep the pasta at room temperature for no more than 2 hours to prevent any food safety issues.

Caramelized Onion Pasta Variations

Feel free to explore these delightful twists to make this dish uniquely yours!

  • Vegan: Swap the Parmesan cheese for nutritional yeast or a vegan cheese alternative to make it plant-based without losing flavor.

  • Gluten-Free: Use gluten-free pasta for a delicious, dietary-friendly option that everyone can enjoy without sacrificing taste.

  • Herb Infusion: Stir in fresh herbs like thyme or basil towards the end for an aromatic touch that elevates the dish experience.

  • Spicy Kick: Add red pepper flakes or sliced jalapeños along with the garlic for an extra hit of heat that will linger on your palate.

  • Creamy Delight: Incorporate a splash of heavy cream or a dollop of ricotta cheese to create a rich, luxurious sauce that pairs perfectly with the sweetness of the onions.

  • Vegetable Boost: Toss in sautéed mushrooms, spinach, or cherry tomatoes for added color and nutrition—these ingredients harmonize beautifully with the caramelized onions.

  • Nutty Aroma: Sprinkle toasted pine nuts or walnuts on top for a delightful crunch that contrasts with the smooth pasta, adding an unexpected twist.

  • Citrus Zest: Add a bright note by incorporating freshly grated lemon or orange zest right before serving to enhance the dish’s overall flavor profile.

Chef's Helpful Tips

  • When making Caramelized Onion Pasta, take your time with the onions; the longer they cook, the sweeter and more flavorful they become.
  • Avoid high heat, as this can cause the onions to burn instead of caramelize; medium heat is ideal for achieving that golden perfection.
  • Incorporating the reserved pasta water helps emulsify the sauce, resulting in a silky texture that clings to the spaghetti beautifully.
  • Lastly, taste as you go when adding chili oil to ensure it matches your preferred spice level without overpowering the dish.

Caramelized Onion Pasta Recipe FAQs

How do I choose the right onions for this pasta?
Absolutely! For the best flavor, opt for medium yellow onions—they’re perfect for caramelizing due to their natural sweetness. Look for onions that are firm, with no dark spots or soft spots on the surface. The sweeter the onion, the richer your Caramelized Onion Pasta will taste!

How should I store leftover Caramelized Onion Pasta?
You can store any leftovers in an airtight container in the fridge for up to 3 days. This keeps the pasta fresh and tasty! Just make sure to let it cool completely before sealing to avoid condensation that can make your pasta soggy.

Can I freeze Caramelized Onion Pasta?
Yes! You can freeze your Caramelized Onion Pasta for up to 2 months. To maintain the best texture, I recommend freezing the pasta and sauce separately. Place the pasta in a freezer-safe container, and once it’s cooled, store the caramelized onions in another one. This way, when you’re ready to enjoy it again, you can thaw and reheat without compromising the dish’s quality.

What should I do if my onions are browning too fast?
Oh no! If you notice your onions browning too quickly, simply reduce the heat to low. This will help them caramelize gradually, enhancing their natural sweetness without burning. Stir them frequently to ensure even cooking. If they have already burnt, it’s best to start over for that rich flavor.

Can I make this recipe vegetarian-friendly?
Absolutely! This Caramelized Onion Pasta is vegetarian as it is. Just double-check the chili oil you use, as some brands may contain animal products. For a vegan option, you can simply omit the Parmesan or use a plant-based cheese or nutritional yeast for that cheesy flavor!

What’s the best way to reheat the pasta?
To reheat your Caramelized Onion Pasta, simply thaw it overnight in the fridge if frozen. Then, in a skillet over low heat, add a splash of reserved pasta water or olive oil to add moisture and warmth while gently stirring until heated through. This helps keep the sauce silky and delicious!

Caramelized Onion Pasta

Caramelized Onion Pasta

Enjoy the delightful flavors of Caramelized Onion Pasta, a comforting dish perfect for any occasion.
Print Recipe Pin Recipe
Prep Time 10 minutes mins
Cook Time 30 minutes mins
Total Time 40 minutes mins
Servings: 4 servings
Course: DINNER RECIPES
Cuisine: Italian
Calories: 350
Ingredients Equipment Method Nutrition Notes

Ingredients
  

For the Pasta
  • 8 oz spaghetti a classic choice that perfectly absorbs the rich sauce
For the Caramelized Onions
  • 2 medium yellow onions, sliced the stars of the dish; their sweetness becomes more pronounced when cooked slowly
  • 3 tbsp extra virgin olive oil adds a luscious base and enhances the caramelization process
  • 3 cloves garlic, minced a fragrant addition that brings depth to the dish
For the Kick
  • 2-3 tbsp chili oil adjust to your preference for spice; it elevates the entire flavor profile
For Serving
  • 1/2 cup grated Parmesan cheese a must-have topping that adds a delightful creaminess to the finished dish

Equipment

  • Large skillet
  • pot for boiling pasta

Method
 

How to Make Caramelized Onion Pasta
  1. Slice and mince the onions and garlic.
  2. In a large skillet over medium heat, add olive oil and sliced onions. Cook for 20-30 minutes, stirring until golden brown.
  3. Add minced garlic to the skillet and cook for an additional minute until fragrant.
  4. Boil water in a pot and cook spaghetti according to package instructions, reserving a bit of pasta water.
  5. Toss the spaghetti with the caramelized onion mixture in the skillet, drizzle with chili oil, and mix well.
  6. Plate the pasta, top with grated Parmesan cheese, and drizzle with more chili oil.

Nutrition

Serving: 1servingCalories: 350kcalCarbohydrates: 45gProtein: 10gFat: 15gSaturated Fat: 2gMonounsaturated Fat: 12gCholesterol: 10mgSodium: 320mgPotassium: 250mgFiber: 3gSugar: 4gVitamin A: 80IUVitamin C: 5mgCalcium: 150mgIron: 1.5mg

Notes

Optional: Add freshly cracked black pepper for an additional punch of flavor.

Tried this recipe?

Let us know how it was!

Filed Under: DINNER RECIPES

Creamy Sausage and Potatoes

January 25, 2026 by JudyWhite Leave a Comment

After a long day of juggling work and family, nothing feels more rewarding than creating a comforting meal that warms the soul. That’s where my Creamy Sausage and Potatoes recipe shines. The moment you start browning the sausage, an irresistible aroma wafts through your kitchen, promising a dish that’s both hearty and satisfying. Imagine tender Yukon Gold potatoes nestled in a luscious cream sauce, mingling with savory sausage – it’s pure comfort in a bowl!

This dish is not just quick to whip up, taking about 40 minutes from start to finish; it’s a delicious option for any weeknight dinner or a cozy gathering. With minimal ingredients like garlic, onion, and thyme, you’ll discover that sometimes, simplicity reigns supreme in the culinary world. So, if you’re tired of the monotonous fast food routine and ready for a delightful homemade experience, grab your skillet and let’s dive into this creamy adventure!

Why You'll Love This Creamy Sausage and Potatoes

  • This Creamy Sausage and Potatoes recipe is incredibly easy to prepare, making it perfect for busy weeknights.
  • The rich flavors of the sausage combined with the creamy sauce will have everyone at the table asking for seconds.
  • Not only is it versatile enough to customize with your favorite vegetables, but its inviting presentation makes it a crowd-pleaser at any gathering.
  • Plus, with a total cooking time of just 40 minutes, you can enjoy a homemade meal without spending hours in the kitchen.

Creamy Sausage and Potatoes Ingredients

• Let’s gather everything you need!

For the Main Dish

  • 1 lb sausage – Italian or breakfast sausage adds a savory kick that’s perfect for this dish.
  • 2 cups diced Yukon Gold or Russet potatoes – These creamy potatoes hold up beautifully in the sauce.
  • 1 cup heavy cream – The star ingredient, giving the dish its luscious and velvety texture.
  • 1 medium onion – Diced for a sweet and aromatic flavor that enhances the overall dish.
  • 3 cloves garlic – Minced for that rich, robust flavor that pairs perfectly with sausage.
  • 1 cup low-sodium chicken broth – Use this to build a deep, comforting flavor without too much salt.
  • 1 tsp dried thyme – This herb adds a lovely earthiness that complements the creamy sauce beautifully.

Feel free to make this Creamy Sausage and Potatoes dish your own by throwing in extra veggies like spinach or bell peppers!

How to Make Creamy Sausage and Potatoes

  1. Sauté the sausage in a large skillet over medium heat until browned and delicious, about 5-7 minutes. Remove it from the skillet and set aside, letting those flavors linger.
  2. Add the onion and garlic to the same skillet, sautéing until fragrant and soft, approximately 4 minutes. You’ll know it’s ready when the aroma fills your kitchen!
  3. Stir in the potatoes and thyme, then pour in the chicken broth until the potatoes are partially covered. This will create a delightful base for your creamy sauce.
  4. Cover and simmer on low heat for 15-20 minutes, until the potatoes are tender. Give it a gentle stir occasionally to ensure even cooking and tenderness.
  5. Add the heavy cream and return the sausage to the skillet; cook until everything is heated through and wonderfully creamy, about 3-5 minutes.
  6. Serve warm, garnished with fresh herbs if desired, for an extra touch of color and flavor. Enjoy every bite of this comforting meal!

Optional: For added freshness, sprinkle with chopped parsley before serving.
Exact quantities are listed in the recipe card below.

Creamy Sausage and Potatoes Variations

Feel free to let your creativity flow and customize this recipe to suit your tastes and dietary needs!

  • Dairy-Free: Substitute heavy cream with coconut milk or cashew cream for a lush, dairy-free alternative. This twist adds a hint of sweetness.

  • Spicy Kick: Add 1/2 teaspoon of red pepper flakes to the skillet along with the sausage for a nice pop of heat. It’ll bring a different dimension to every bite!

  • Vegetable Boost: Toss in diced bell peppers or spinach during the onion sauté for extra nutrition and color. These veggies not only enhance the dish but also add delightful crunch.

  • Herb Swap: Experiment with fresh herbs instead of dried thyme, like rosemary or parsley, for a fragrant twist. Fresh herbs can elevate the flavor profile beautifully.

  • Smoky Flavor: Incorporate smoked sausage or bacon for an extra layer of flavor that’s irresistibly rich and comforting. The smokiness makes every bite even more satisfying.

  • Cheesy Goodness: Mix in a cup of shredded cheese like cheddar or Parmesan when adding the cream for a luxurious cheesy sauce. Who can say no to gooey, cheesy comfort?

  • Gluten-Free: Ensure that the chicken broth is gluten-free, and enjoy this dish without worries. This simple swap ensures everyone can relish the meal guilt-free.

  • Veggie Creaminess: Blend in some pureed cauliflower with the cream for a silky-smooth texture that makes the dish even heartier without extra calories. It’s a sneaky way to add veggies!

How to Store and Freeze Creamy Sausage and Potatoes

Fridge: Store leftovers in an airtight container for up to 3 days. Reheat gently on the stovetop or microwave until warmed through, adding a splash of broth if needed.

Freezer: If you want to save it longer, freeze in a freezer-safe container for up to 3 months. Thaw overnight in the fridge before reheating.

Reheating: When reheating, add a bit of heavy cream or broth to retain the creamy texture. Heat on low heat, stirring occasionally to prevent separation.

Serving Suggestions: For a complete meal, consider pairing this Creamy Sausage and Potatoes with a light salad or some crusty bread to soak up that delicious sauce!

What to Serve with Creamy Sausage and Potatoes?

A hearty dish like this deserves sides that enhance its flavors and textures beautifully.

  • Steamed Broccoli: The crispness of broccoli adds a refreshing contrast to the creamy potatoes, making every bite delightful.

  • Garlic Bread: Warm, crispy garlic bread is perfect for soaking up the rich sauce, creating a comforting experience with every morsel.

  • Simple Garden Salad: A fresh mix of greens with a tangy vinaigrette brightens the meal, balancing the richness of the sausage dish.

  • Roasted Brussels Sprouts: These add a nutty flavor and slight crunch, enhancing the overall meal experience.

  • Mashed Cauliflower: Creamy yet lighter than traditional mashed potatoes, it pairs well without overwhelming your taste buds.

  • Crispy Chicken Wings: For those who love a true feast, flavorful wings can add an indulgent touch to your table spread.

Savor this comforting meal with these delightful pairings for a complete and satisfying dining experience!

Make Ahead Options

These Creamy Sausage and Potatoes are ideal for busy home cooks wanting to simplify mealtime! You can prepare the sausage, onions, and garlic up to 24 hours in advance; just refrigerate them in an airtight container. Additionally, you can chop the potatoes and place them in cold water to prevent browning, which allows for easy assembly later. When you’re ready to serve, simply reheat the sausage mixture, add the drained potatoes and chicken broth, and simmer until the potatoes are tender. Finish off by stirring in the heavy cream and letting it warm through for a comfort dish that’s just as delicious, saving you precious time on hectic weeknights!

Chef's Helpful Tips

  • When making Creamy Sausage and Potatoes, ensure your skillet is properly preheated to achieve a nice browning on the sausage, which enhances the flavor of the dish.
  • One common mistake is overcooking the garlic, so add it to the skillet after the onions to prevent bitterness.
  • For a creamier texture, let the heavy cream warm up slightly before adding it to the skillet to prevent curdling.
  • Finally, keep an eye on the simmering potatoes and stir occasionally to ensure they cook evenly and achieve that perfect tenderness.

Creamy Sausage and Potatoes Recipe FAQs

What type of sausage should I use?
Absolutely! You can use either Italian sausage for a bit of spice or breakfast sausage for a milder flavor. Both options provide a hearty base for this Creamy Sausage and Potatoes recipe. If you’re feeling adventurous, try a blend of different sausages for added complexity!

How do I store leftovers of Creamy Sausage and Potatoes?
Very simply! Store any leftovers in an airtight container in the fridge for up to 3 days. When you’re ready to enjoy them again, gently reheat them on the stovetop or in the microwave until warmed through. Adding a splash of chicken broth or heavy cream can help restore the delicious creamy texture.

Can I freeze Creamy Sausage and Potatoes?
Of course! To freeze, let the dish cool completely, then transfer it to a freezer-safe container. It will keep well for up to 3 months. When you’re ready to enjoy it, simply thaw it overnight in the fridge, then reheat on low until heated through. Don’t forget to stir occasionally for even warming!

What should I do if my sauce is too thick?
No worries at all! If your creamy sauce turns out too thick, simply add a little more chicken broth or heavy cream while stirring on the stove. Heat gently over low until the desired consistency is reached. If you ever find yourself in this situation, just remember: adjusting is all a part of the cooking adventure!

Can I include additional vegetables?
Absolutely! This recipe is wonderfully versatile. You can throw in extra veggies like spinach, bell peppers, or even mushrooms to give it more texture and flavor. Just make sure to sauté them along with the onion and garlic for the best results.

Are there any dietary considerations I should keep in mind?
Great question! If you’re cooking for someone with allergies or specific dietary needs, make sure to check the sausage packaging for allergens such as dairy or gluten. For a dairy-free option, try using coconut milk as a substitute for heavy cream. Always customize the dish to fit your family’s health requirements and preferences!

Creamy Sausage and Potatoes

Creamy Sausage and Potatoes

This Creamy Sausage and Potatoes recipe provides a comforting dish that warms the soul, perfect for any weeknight dinner.
Print Recipe Pin Recipe
Prep Time 10 minutes mins
Cook Time 30 minutes mins
Total Time 40 minutes mins
Servings: 4 servings
Course: DINNER RECIPES
Cuisine: American
Calories: 500
Ingredients Equipment Method Nutrition Notes

Ingredients
  

Main Ingredients
  • 1 lb sausage Italian or breakfast sausage adds a savory kick that's perfect for this dish.
  • 2 cups diced Yukon Gold or Russet potatoes These creamy potatoes hold up beautifully in the sauce.
  • 1 cup heavy cream The star ingredient, giving the dish its luscious and velvety texture.
  • 1 medium onion Diced for a sweet and aromatic flavor that enhances the overall dish.
  • 3 cloves garlic Minced for that rich, robust flavor that pairs perfectly with sausage.
  • 1 cup low-sodium chicken broth Use this to build a deep, comforting flavor without too much salt.
  • 1 tsp dried thyme This herb adds a lovely earthiness that complements the creamy sauce beautifully.

Equipment

  • Skillet

Method
 

Cooking Instructions
  1. Sauté the sausage in a large skillet over medium heat until browned and delicious, about 5-7 minutes. Remove it from the skillet and set aside.
  2. Add the onion and garlic to the same skillet, sautéing until fragrant and soft, approximately 4 minutes.
  3. Stir in the potatoes and thyme, then pour in the chicken broth until the potatoes are partially covered.
  4. Cover and simmer on low heat for 15-20 minutes, until the potatoes are tender. Stir occasionally.
  5. Add the heavy cream and return the sausage to the skillet; cook until everything is heated through and wonderfully creamy, about 3-5 minutes.
  6. Serve warm, garnished with fresh herbs if desired.

Nutrition

Serving: 1servingCalories: 500kcalCarbohydrates: 30gProtein: 25gFat: 35gSaturated Fat: 18gCholesterol: 100mgSodium: 600mgPotassium: 800mgFiber: 3gSugar: 2gVitamin A: 500IUVitamin C: 10mgCalcium: 50mgIron: 2mg

Notes

Store leftovers in an airtight container for up to 3 days. Reheat gently on the stovetop or microwave until warmed through, adding a splash of broth if needed.

Tried this recipe?

Let us know how it was!

Filed Under: DINNER RECIPES

Crack Chicken Sliders

January 25, 2026 by JudyWhite Leave a Comment

The moment the rich, savory aroma of garlic and ranch envelops my kitchen, I know I’ve stumbled upon something truly special: Crack Chicken Sliders. These little delights are a game-changer for gatherings, yet they’re simple enough for a cozy weeknight dinner. When I first whipped them up on a whim, I marveled at how a handful of pantry staples could transform into such a mouthwatering dish.

Picture this: juicy, shredded chicken smothered in a creamy sauce, nestled in soft slider buns, and topped with melty cheddar cheese. It’s comfort food at its finest, perfect for those evenings when fast food just won’t cut it. Whether you’re hosting a game night or trying to impress family during Sunday dinner, these sliders tick all the boxes—flavorful, easy to make, and totally crowd-pleasing. Ready to dive into a recipe that will become a staple in your kitchen? Let’s get cooking!

Why You'll Love This Crack Chicken Sliders

  • These Crack Chicken Sliders are incredibly easy to make, requiring just a few simple ingredients and minimal prep time.
  • The rich flavors of garlic, ranch, and cheddar blend perfectly to create a mouthwatering dish that everyone will rave about.
  • They are versatile enough to serve at any gathering, whether it’s a casual weeknight dinner or a festive celebration with friends.
  • With their irresistible taste and comforting texture, these sliders are guaranteed to please a crowd and leave your guests asking for seconds.

Crack Chicken Sliders Ingredients

Get ready to craft some flavor-packed sliders!

For the Chicken
• Boneless, skinless chicken breasts – perfect for shredding; 1.5 to 2 lbs will serve around 12 sliders.
• Fresh garlic, minced – adds a depth of savory goodness; don’t skip the garlic!
• Low-sodium soy sauce – adds umami and saltiness; feel free to use tamari for a gluten-free option.
• Ranch dressing – the creamy base that binds all the flavors together; homemade ranch can be a great substitute.

For the Sliders
• Slider buns – choose soft, fluffy buns to complement the tender chicken nicely; mini brioche buns work wonderfully.
• Shredded cheddar cheese – adds a rich, melty finish; you can swap for pepper jack if you like a kick!

How to Make Crack Chicken Sliders

  1. Preheat the Oven: Start by preheating your oven to 400°F (200°C). This step is crucial for cooking the chicken evenly and ensuring it remains juicy throughout the process.

  2. Prepare Chicken: Season the boneless, skinless chicken breasts with a sprinkle of salt and pepper. Next, gently place them in a prepared baking dish that you’ve sprayed with nonstick spray.

  3. Mix the Sauce: In a mixing bowl, whisk together the low-sodium soy sauce, ranch dressing, and minced garlic. This creamy concoction is what will bring those delightful flavors to life when poured over the chicken!

  4. Bake the Chicken: Pour the sauce mixture over the seasoned chicken, ensuring it’s well-coated. Cover the dish with foil and bake for 25-30 minutes, or until the chicken is cooked through and reaches an internal temperature of 165°F (75°C).

  5. Shred the Chicken: Once your chicken is finished baking, remove it from the oven. Using two forks, shred the chicken directly in the baking dish, allowing it to soak up any leftover sauce for an extra burst of flavor.

  6. Assemble Sliders: Time to build your sliders! Take your soft slider buns and fill them generously with the shredded chicken. Top each slider with a sprinkle of shredded cheddar cheese for that melty goodness.

Optional: Add sliced jalapeños for a spicy kick!

Exact quantities are listed in the recipe card below.

Make Ahead Options

These Crack Chicken Sliders are perfect for busy home cooks looking to save time during the week! You can prepare the shredded chicken mixture up to 3 days in advance—simply cook and shred the chicken as directed, then store it in an airtight container in the refrigerator. To maintain that mouthwatering flavor, keep the sauce separate until ready to serve. When you’re ready to enjoy, reheat the chicken in a skillet over medium heat for about 5-7 minutes until warmed through, then assemble the sliders with cheese and buns. This way, you’ll have delicious, homemade sliders on the table with minimal effort and just as tantalizing as when they were freshly made!

What to Serve with Crack Chicken Sliders?

Get ready to create a delightful meal that perfectly complements the creamy, savory flavors of your sliders!

  • Crunchy Coleslaw: This refreshing side adds a crisp texture and bright flavor, balancing the richness of the sliders beautifully.

  • Baked Sweet Potato Fries: Crispy on the outside and tender on the inside, these sweet fries provide a hint of sweetness that pairs perfectly with the savory chicken.

  • Garlic Breadsticks: Soft, buttery breadsticks are the ideal vessel for mopping up any leftover ranch sauce. Plus, who can resist warm, garlicky goodness?

  • Grilled Veggie Skewers: Colorful and charred, a mix of zucchini, bell peppers, and mushrooms brings a vibrant and healthy touch to your meal.

  • Buffalo Cauliflower Bites: For a spicy twist, these crispy bites are a fantastic addition that echoes the flavors of classic game day food.

  • Ice-Cold Lemonade: Pair your sliders with a refreshing glass of lemonade, as its tartness will cut through the creaminess and provide a zingy contrast.

  • Chocolate Chip Cookies: End the meal on a sweet note with warm, gooey cookies. It’s a comforting dessert that everyone will love!

With these delightful sides and drinks, your Crack Chicken Sliders will shine as the star of the meal!

How to Store and Freeze Crack Chicken Sliders

Fridge: Store leftover Crack Chicken Sliders in an airtight container for up to 3 days. This keeps the sliders fresh and prevents drying out.

Freezer: For longer storage, place the shredded chicken in a freezer-safe bag or container for up to 3 months. Just be sure to remove excess air to prevent freezer burn.

Reheating: Thaw frozen chicken in the fridge overnight. Reheat in the microwave or oven until warmed through, adding a splash of ranch dressing if you prefer it extra creamy!

Assembly: For the best texture, consider storing the chicken and slider buns separately. Assemble sliders just before serving to maintain the perfect bun softness.

Crack Chicken Sliders Variations

Feel free to make these sliders your own with a few simple tweaks!

  • Dairy-Free: Substitute the ranch dressing with a dairy-free alternative and choose a dairy-free cheese to maintain creaminess.
  • Spicy Kick: Add diced jalapeños or a drizzle of hot sauce to the chicken mixture before baking for a fiery surprise.
  • BBQ Flavor: Swap soy sauce with your favorite BBQ sauce for a sweet and tangy twist that will delight your taste buds.
  • Herb Infusion: Mix in fresh herbs such as rosemary or thyme into the sauce for an aromatic touch that elevates the flavor profile.
  • Whole Wheat Buns: Choose whole wheat or grain slider buns for a healthier option that doesn’t compromise on taste and texture.
  • Crunchy Topping: Add crispy fried onions on top of the assembled sliders for an extra crunch and burst of flavor with each bite.
  • Sweet & Spicy: Incorporate a spoonful of honey or brown sugar into the sauce to sweeten the deal while balancing out spicy elements.
  • Vegetarian Option: Replace chicken with chickpeas or shredded jackfruit, mixing the same sauce to create a delicious plant-based slider alternative.

Chef's Helpful Tips

  • When making Crack Chicken Sliders, be sure to season your chicken well with salt and pepper before cooking to enhance the flavor.
  • Avoid overcooking the chicken; using a meat thermometer to check that it reaches 165°F ensures juicy, tender meat.
  • For a creamier texture, consider mixing in a bit of cream cheese with the ranch dressing before pouring it over the chicken.
  • When assembling your sliders, don’t forget to warm the slider buns slightly to prevent them from becoming soggy from the filling.

Crack Chicken Sliders Recipe FAQs

How do I choose the right chicken for Crack Chicken Sliders?
Absolutely! Look for boneless, skinless chicken breasts that are firm and have a pinkish hue. Avoid breasts that have dark spots or are excessively slimy, as these may not be fresh. If you can find organic chicken, it’s a fantastic option, but conventional will work just fine too!

What’s the best way to store leftover Crack Chicken Sliders?
Very! Store your leftovers in an airtight container in the fridge for up to 3 days. Make sure they are tightly sealed to prevent drying out. When reheating, I often add a splash of ranch dressing for added creaminess and flavor.

Can I freeze Crack Chicken Sliders?
Of course! For freezing, place the shredded chicken in a freezer-safe bag or container. Remember to push out as much air as possible to prevent freezer burn. It will stay good for up to 3 months. When you’re ready to enjoy, thaw it in the fridge overnight, then warm it up before serving.

What if my chicken is dry after baking?
If you find that your chicken comes out dry, it could be due to overcooking. Always check for doneness using a meat thermometer; it should reach 165°F (75°C). If it’s already cooked and seems dry, shredding and mixing it with a little additional ranch dressing can help moisten and revive the flavors.

Are there any dietary considerations I should keep in mind for Crack Chicken Sliders?
Absolutely! If you’re cooking for guests, be mindful of food allergies; ranch dressing often contains dairy, and soy sauce has gluten. You can find gluten-free ranch alternatives or even make your own. Additionally, if you’re serving this to pets, keep in mind that while chicken is great for them, ranch and soy sauce are not suitable!

Can I customize the toppings for these sliders?
Very! Feel free to add toppings such as sliced jalapeños, pickles, or even coleslaw for a delightful crunch. The more the merrier with flavors! Mix it up according to your guests’ preferences for that personalized touch!

Crack Chicken Sliders

Crack Chicken Sliders

Crack Chicken Sliders are savory, tender sliders filled with shredded chicken and a creamy ranch sauce, perfect for any gathering.
Print Recipe Pin Recipe
Prep Time 10 minutes mins
Cook Time 30 minutes mins
Total Time 40 minutes mins
Servings: 12 sliders
Course: LUNCH RECIPES
Cuisine: American
Calories: 300
Ingredients Equipment Method Nutrition Notes

Ingredients
  

For the Chicken
  • 1.5-2 lbs Boneless, skinless chicken breasts perfect for shredding
  • 3 cloves Fresh garlic, minced adds savory goodness
  • 1/4 cups Low-sodium soy sauce or tamari for gluten-free option
  • 1 cups Ranch dressing homemade ranch can be a substitute
For the Sliders
  • 12 pieces Slider buns mini brioche buns work well
  • 1 cups Shredded cheddar cheese can substitute with pepper jack

Equipment

  • Oven
  • Baking dish
  • Mixing bowl
  • Fork

Method
 

Cooking Instructions
  1. Preheat your oven to 400°F (200°C).
  2. Season the chicken breasts with salt and pepper, and place them in a prepared baking dish.
  3. In a mixing bowl, whisk together soy sauce, ranch dressing, and minced garlic.
  4. Pour the sauce over the chicken, cover with foil, and bake for 25-30 minutes.
  5. Once baked, shred the chicken in the dish to soak up the sauce.
  6. Assemble sliders with shredded chicken and top with cheese.

Nutrition

Serving: 1sliderCalories: 300kcalCarbohydrates: 20gProtein: 25gFat: 15gSaturated Fat: 7gPolyunsaturated Fat: 2gMonounsaturated Fat: 6gCholesterol: 70mgSodium: 800mgPotassium: 300mgFiber: 1gSugar: 2gVitamin A: 200IUVitamin C: 2mgCalcium: 200mgIron: 1.5mg

Notes

For a creamier texture, mix cream cheese with ranch dressing. Assemble sliders just before serving to maintain bun softness.

Tried this recipe?

Let us know how it was!

Filed Under: LUNCH RECIPES

Caramelized Onion Pasta

January 25, 2026 by JudyWhite Leave a Comment

There’s something truly comforting about the warm, inviting smell of caramelized onions sizzling in a skillet. It reminds me of cozy evenings spent cooking in my kitchen, where the simplest of ingredients transform into something extraordinary. This Caramelized Onion Pasta with Chili Oil is the epitome of that magic.

After a long day, I often find myself yearning for a meal that’s both satisfying and quick to prepare, and this dish is a game-changer. With just a handful of ingredients – spaghetti, onions, garlic, and a punch of chili oil – I’m able to whip up a flavor-packed, restaurant-quality meal in under 40 minutes. The luscious sweetness of the onions perfectly complements the heat of the chili oil, creating a delightful contrast that’s sure to please anyone at your table.

Perfect for those busy weeknights when you crave something homemade yet dazzling, this pasta dish is as versatile as it is delicious. So grab your skillet, get ready to indulge in the rich flavors, and let’s dive into this scrumptious recipe!

Why You'll Love This Caramelized Onion Pasta

  • This Caramelized Onion Pasta is incredibly easy to make, allowing you to whip up a delicious meal even on your busiest nights.
  • The rich, sweet flavor of caramelized onions combined with the spicy kick of chili oil will elevate your dinner experience and leave your taste buds craving more.
  • Its versatility means you can customize it with additional ingredients or sides to suit any occasion or preference.
  • Plus, with just 40 minutes from start to finish, this dish is perfect for satisfying hunger without spending hours in the kitchen.

Caramelized Onion Pasta Ingredients

For the Pasta
• 8 oz spaghetti – a classic choice that perfectly holds onto the sauce.

For the Caramelized Onions
• 2 medium yellow onions, sliced – they develop a rich sweetness when caramelized, adding depth to your dish.
• 3 tbsp extra virgin olive oil – this enhances flavor and helps achieve that gorgeous golden color.

For Flavor
• 2-3 tbsp chili oil (to taste) – drizzle more for an extra kick, making your Caramelized Onion Pasta uniquely yours.
• 3 cloves garlic, minced – garlic elevates the dish with its aromatic essence.

For Serving
• 1/2 cup grated Parmesan cheese – a nutty finish that complements the sweetness of the onions and the spice of the chili oil.

How to Make Caramelized Onion Pasta

  1. Slice the onions and mince the garlic.
    Begin with peeling the onions and cutting them into thin slices. Also, mince your garlic cloves, as they will add a lovely aroma to our dish.

  2. Cook the onions.
    In a large skillet over medium heat, add the extra virgin olive oil and the sliced onions. Sauté them for about 20-30 minutes until they turn a rich golden brown and become wonderfully caramelized, stirring occasionally.

  3. Add garlic to the skillet.
    Once your onions are caramelized, toss in the minced garlic and sauté for an additional minute. The garlic should be fragrant but not burnt, so keep a close eye on it!

  4. Boil water and cook the spaghetti.
    In a separate pot, bring water to a boil. Cook your spaghetti according to the package instructions. Remember to reserve some pasta water before draining to adjust your sauce’s consistency later!

  5. Combine spaghetti and the onion mixture.
    Add the cooked spaghetti to the skillet with the caramelized onions and garlic. Drizzle the chili oil over the pasta, tossing all ingredients together. Use the reserved pasta water as needed to create a silky sauce that clings to the noodles.

  6. Serve your pasta.
    Plate your delicious Caramelized Onion Pasta and top it with freshly grated Parmesan cheese. For an extra kick, consider adding an additional drizzle of chili oil on top before serving!

Optional: Garnish with fresh herbs like parsley for a pop of color.
Exact quantities are listed in the recipe card below.

How to Store and Freeze Caramelized Onion Pasta

Fridge: Store leftover Caramelized Onion Pasta in an airtight container for up to 3 days. To keep flavors fresh, reheat gently in a skillet over low heat with a splash of olive oil.

Freezer: For longer storage, freeze the pasta for up to 2 months. Before freezing, ensure it cools completely, then transfer to a freezer-safe container.

Reheating: When ready to enjoy, thaw overnight in the fridge and reheat in a skillet or microwave. Add a bit of reserved pasta water to revive the sauce’s consistency.

Room Temperature: It’s best to avoid keeping the pasta at room temperature for more than 2 hours to prevent spoilage.

Make Ahead Options

Making Caramelized Onion Pasta in advance is a delightful way to save time on busy weeknights! You can caramelize the onions and garlic up to 3 days ahead, allowing their lovely flavors to develop. Simply store them in an airtight container in the refrigerator. When you’re ready to enjoy your pasta, cook the spaghetti fresh and combine it with the prepped caramelized mixture and chili oil. To maintain the rich taste, avoid reheating the onions in the microwave; instead, warm them gently in a skillet over low heat before mixing with the cooked pasta. This ensures your Caramelized Onion Pasta remains just as delicious as if you made it fresh!

Caramelized Onion Pasta Variations

Feel free to get creative with this recipe and make it your own with these delightful twists!

  • Gluten-Free: Substitute spaghetti with gluten-free pasta of your choice for a deliciously inclusive meal without sacrificing flavor.

  • Creamy Addition: Stir in a splash of heavy cream or a dollop of cream cheese for a luscious, creamy sauce that coats each noodle beautifully.

  • Vegetable Boost: Toss in cooked spinach or roasted bell peppers for added nutrition and vibrant color; they pair perfectly with the sweetness of the onions.

  • Vegan Delight: Swap Parmesan cheese with nutritional yeast or a dairy-free alternative to enjoy a rich flavor while keeping it plant-based.

  • Heat Level: Want more spice? Add red pepper flakes or toss in some sliced jalapeños for an extra kick that will ignite your taste buds.

  • Herb Infusion: Stir in some fresh herbs like basil or thyme towards the end of cooking, adding a fragrant touch that elevates the entire dish.

  • Nutty Crunch: Top with toasted pine nuts or walnuts for a delightful crunch and a nutty flavor that contrasts beautifully with the creamy pasta.

  • Zesty Upgrade: Squeeze fresh lemon juice over the pasta just before serving for a bright and zesty finish that brings all the flavors together beautifully.

What to Serve with Caramelized Onion Pasta?

Imagine a beautifully set table, where each dish complements the rich, sweet notes of your pasta, creating a delightful dining experience.

  • Crispy Garlic Bread: Its crunchiness and buttery flavor provide a lovely textural contrast to the silky pasta.
  • Simple Green Salad: A fresh mix of greens with a light vinaigrette will balance the richness of the caramelized onions, making each bite refreshing.
  • Roasted Vegetables: Seasonal veggies roasted to perfection add color and a hint of earthiness that pairs beautifully with the sweet and spicy flavors.
  • Chilled White Wine: A glass of Sauvignon Blanc or Pinot Grigio will elevate your meal, enhancing the flavors and providing a refreshing sip between bites.
  • Grilled Chicken: Juicy, herb-marinated chicken adds protein and a savory touch to your pasta, making the meal even heartier.
  • Zesty Lemon Sorbet: For dessert, this refreshing treat is the ideal palate cleanser after the rich pasta, leaving you with a sweet citrus finish.
  • Olive Tapenade: A spread of tapenade on crusty bread makes for an excellent appetizer that sets the stage for your flavorful pasta dish.
  • Sautéed Spinach: Lightly sautéed spinach with garlic complements the flavors beautifully, adding a nutritious element to your meal.
  • Honeyed Carrots: Sweet and savory glazed carrots can bring a delightful sweetness that harmonizes with the caramelized notes in your pasta.

Chef's Helpful Tips

  • To achieve perfectly caramelized onions for your Caramelized Onion Pasta, cook them slowly over medium heat, allowing about 20-30 minutes for them to brown and develop sweetness.
  • Stirring occasionally helps prevent them from burning, which can lead to a bitter taste.
  • For added depth, consider using a mix of yellow and red onions when caramelizing.
  • When cooking the spaghetti, be sure to add a generous amount of salt to the boiling water to enhance the pasta’s flavor, and remember to reserve some pasta water to adjust the sauce’s consistency before serving.

Caramelized Onion Pasta Recipe FAQs

How do I choose ripe onions for my Caramelized Onion Pasta?
When selecting onions, look for firm, heavy ones without any dark spots or blemishes. They should have a smooth, dry outer skin. For the sweetest flavor, yellow onions are ideal, as they caramelize beautifully when cooked.

What is the best way to store leftover Caramelized Onion Pasta?
Store any leftovers in an airtight container in the refrigerator for up to 3 days. To maintain the delicious flavors, reheat gently in a skillet over low heat with a splash of olive oil to refresh the dish without drying it out.

Can I freeze my Caramelized Onion Pasta?
Absolutely! To freeze, allow the pasta to cool completely after cooking. Transfer it to a freezer-safe container, making sure to label it with the date. It can be stored for up to 2 months. When you’re ready to enjoy it, thaw it overnight in the refrigerator, then reheat in a skillet or microwave, adding reserved pasta water as needed to achieve the desired consistency.

What can I do if my onions are burning instead of caramelizing?
If you find your onions starting to burn, reduce the heat immediately. They should cook over medium heat, stirring occasionally to ensure even cooking. If they seem to brown too quickly, add a splash of water or broth to deglaze the pan, scraping up any browned bits for added flavor without burning.

Are there any dietary considerations I should keep in mind?
Yes! If preparing this Caramelized Onion Pasta for someone with dietary restrictions, note that this recipe contains gluten from spaghetti and dairy from Parmesan cheese. For gluten-free options, swap in gluten-free pasta. Nutritional yeast can be used for a dairy-free alternative to Parmesan, providing a similar flavor without the cheese.

Caramelized Onion Pasta

Caramelized Onion Pasta

This Caramelized Onion Pasta combines the sweetness of caramelized onions with chili oil for a quick and satisfying meal.
Print Recipe Pin Recipe
Prep Time 10 minutes mins
Cook Time 30 minutes mins
Total Time 40 minutes mins
Servings: 2 servings
Course: DINNER RECIPES
Cuisine: Italian
Calories: 550
Ingredients Equipment Method Nutrition Notes

Ingredients
  

For the Pasta
  • 8 oz spaghetti a classic choice that perfectly holds onto the sauce.
For the Caramelized Onions
  • 2 medium yellow onions, sliced they develop a rich sweetness when caramelized.
  • 3 tbsp extra virgin olive oil this enhances flavor and achieves a gorgeous golden color.
For Flavor
  • 2-3 tbsp chili oil drizzle more for an extra kick.
  • 3 cloves garlic, minced garlic elevates the dish with its aromatic essence.
For Serving
  • 1/2 cup grated Parmesan cheese a nutty finish that complements the dish.

Equipment

  • Large skillet
  • Pot

Method
 

How to Make Caramelized Onion Pasta
  1. Slice the onions and mince the garlic.
  2. In a large skillet over medium heat, add the extra virgin olive oil and the sliced onions. Sauté them for about 20-30 minutes until they turn a rich golden brown.
  3. Once your onions are caramelized, toss in the minced garlic and sauté for an additional minute.
  4. In a separate pot, bring water to a boil. Cook your spaghetti according to the package instructions.
  5. Add the cooked spaghetti to the skillet with the caramelized onions and garlic. Drizzle the chili oil over the pasta, tossing all ingredients together.
  6. Plate your delicious Caramelized Onion Pasta and top it with freshly grated Parmesan cheese.

Nutrition

Serving: 1servingCalories: 550kcalCarbohydrates: 75gProtein: 15gFat: 20gSaturated Fat: 4gPolyunsaturated Fat: 1gMonounsaturated Fat: 14gCholesterol: 10mgSodium: 600mgPotassium: 300mgFiber: 4gSugar: 5gVitamin A: 300IUVitamin C: 10mgCalcium: 200mgIron: 2mg

Notes

Optional: Garnish with fresh herbs like parsley for color.

Tried this recipe?

Let us know how it was!

Filed Under: DINNER RECIPES

Creamy Sausage and Potatoes

January 25, 2026 by JudyWhite Leave a Comment

There’s nothing quite like the comfort of a hearty meal wafting through the house, and my recent culinary adventure with Creamy Sausage and Potatoes has become my go-to dish for those cozy evenings. Picture this: the moment the sizzling sausage hits the pan, the rich aroma mingles with garlic and onions, inviting everyone to gather around the table.

With just a handful of simple ingredients, this creamy creation transforms even the humblest potatoes into a luxurious delight. Whether you’re preparing a quick weeknight dinner or impressing friends at a gathering, the blend of savory sausage and velvety cream will leave you wanting more. Plus, it all comes together in just 40 minutes, making it the perfect solution for those busy days when fast food just won’t cut it.

Join me in this satisfying culinary journey where comfort food meets ease and flavor, and prepare to fall in love with this creamy delight!

Why You'll Love This Creamy Sausage and Potatoes

  • This recipe is a breeze to prepare, taking just 40 minutes from start to finish, perfect for busy weeknights.
  • You’ll be captivated by the incredible depth of flavor that comes from the combination of savory sausage, creamy sauce, and tender potatoes.
  • The versatility of this dish allows you to easily incorporate seasonal vegetables or even switch up the sausage type for a whole new experience.
  • Visually, the vibrant colors and creamy texture make it a stunning centerpiece for any meal, delighting both the eyes and the palate.

Creamy Sausage and Potatoes Ingredients

• Get ready to create a cozy masterpiece!

For the Sausage

  • Sausage – 1 lb of Italian or breakfast sausage brings savory depth to the dish.

For the Potatoes

  • Diced Yukon Gold or Russet potatoes – 2 cups provide a creamy and tender base that perfectly complements the sausage.

For the Creamy Sauce

  • Heavy cream – 1 cup adds a rich, velvety texture that elevates the entire dish.

For Flavor

  • Medium onion – 1, diced, lends sweetness and depth when sautéed.
  • Garlic – 3 cloves, minced, contribute aromatic goodness that enhances the flavor profile.
  • Low-sodium chicken broth – 1 cup keeps the dish flavorful without excess salt, allowing the creamy sauce to shine.
  • Dried thyme – 1 tsp offers an earthy note that rounds out the taste beautifully.

Each ingredient in this Creamy Sausage and Potatoes recipe plays a vital role in achieving a comforting, hearty meal that’s sure to become a family favorite!

How to Make Creamy Sausage and Potatoes

  1. Sauté the Sausage: Start by heating a large skillet over medium heat. Add the sausage and cook until browned—this should take about 5-7 minutes. Once done, remove the sausage from the skillet and set aside.

  2. Cook the Aromatics: In the same skillet, toss in the diced onion and minced garlic. Sauté for about 4 minutes until they become fragrant and the onion is translucent. This will build a wonderful foundation for your dish.

  3. Add the Potatoes: Stir in the diced potatoes along with the dried thyme. Pour in chicken broth until the potatoes are partially covered. This will create a flavorful base for your creamy sauce.

  4. Simmer to Tenderness: Cover the skillet and let it simmer on low heat for 15-20 minutes. You want the potatoes to be tender; check them by piercing with a fork.

  5. Incorporate the Cream: Add the heavy cream back into the skillet, then return the cooked sausage to join the mix. Stir everything together and cook until warmed through, giving the dish a luscious, creamy texture.

  6. Serve and Enjoy: Once ready, serve the Creamy Sausage and Potatoes warm. If desired, garnish with fresh herbs for an extra pop of flavor and color.

Optional: Add a sprinkle of freshly grated Parmesan for added richness.

Exact quantities are listed in the recipe card below.

Creamy Sausage and Potatoes Variations

Feel free to put your unique spin on this dish and delight your taste buds with these creative ideas!

  • Spicy Kick: Add a dash of red pepper flakes or diced jalapeños for a flavor explosion. The heat will tantalize your palate while complementing the creaminess of the dish.

  • Veggie Boost: Toss in some chopped spinach or kale during the last few minutes of cooking. This adds vibrant color and nutrients, effortlessly enriching the meal.

  • Cheesy Goodness: Stir in ½ cup of shredded cheddar or Parmesan cheese right after adding the cream. The melty cheese creates an even richer and more indulgent sauce.

  • Herb Infusion: Experiment with fresh herbs like basil or parsley for a fresh twist. Adding fresh aromatics just before serving brightens up the dish beautifully.

  • Sweet Potato Swap: Substitute regular potatoes with sweet potatoes for a sweeter flavor and added nutrition. They bring a delightful earthiness that pairs perfectly with the sausage.

  • Mushroom Medley: Include sautéed mushrooms for an earthy, umami-rich flavor. Their meaty texture complements the sausage wonderfully while elevating the overall dish.

  • Broccoli Florets: Fold in some steamed broccoli in the last few minutes of cooking. This adds a pop of color and crunch that enhances both presentation and nutrition.

  • Cream Alternatives: Use coconut milk or cashew cream as a dairy-free alternative to heavy cream. These substitutes will provide a creamy consistency while catering to dietary needs.

How to Store and Freeze Creamy Sausage and Potatoes

  • Fridge: Store any leftovers in an airtight container for up to 3 days. Reheat on the stovetop over low heat, adding a splash of broth for creaminess.
  • Freezer: For longer storage, freeze in individual portions for up to 3 months. Use freezer-safe containers and thaw in the fridge overnight before reheating.
  • Reheating: When ready to enjoy, reheat your Creamy Sausage and Potatoes on the stovetop, stirring gently to restore its creamy texture. Add a little extra cream or broth if needed.

What to Serve with Creamy Sausage and Potatoes?

There’s something undeniably warming about creating a complete meal that evokes comfort and satisfaction for your loved ones.

  • Garlic Bread: A crunchy, buttery side that mops up every bit of creamy sauce, leaving no flavor behind. The toasty garlic notes beautifully complement the rich sausage.

  • Roasted Asparagus: Adding a touch of bright green goodness, asparagus brings a crunchy texture and earthy flavor that balances the creaminess of the dish.

  • Mixed Green Salad: A fresh salad with crisp greens and a tangy vinaigrette provides a refreshing contrast, cleansing the palate between bites of indulgent sausage and potatoes.

  • Creamy Coleslaw: The cool, creamy crunch of coleslaw is a delightful pairing; it adds a zingy component that elevates the overall meal experience.

  • Honey Glazed Carrots: The natural sweetness of carrots caramelized in honey pairs harmoniously with the savory richness of the sausage, creating a perfect flavor balance.

  • White Wine: A chilled glass of Sauvignon Blanc enhances the meal brilliantly, complementing the creaminess while cutting through the richness of the sausage.

Embrace these delightful pairings to transform your Creamy Sausage and Potatoes into a memorable feast for family and friends!

Make Ahead Options

These Creamy Sausage and Potatoes are perfect for busy weeknights and can be prepped in advance to save you precious time. You can cook the sausage and sauté the onion and garlic up to 24 hours ahead; simply refrigerate them in an airtight container. Additionally, you can dice the potatoes and store them submerged in water to prevent browning. When you’re ready to serve, just follow the final steps: add the potatoes to a pot with chicken broth, simmer until tender, stir in the heavy cream, and return the sausage to heat through. With these make-ahead tips, your meal can be just as delicious and ready in no time!

Chef's Helpful Tips

  • Always cook the sausage until it’s deeply browned to enhance flavor throughout the Creamy Sausage and Potatoes dish.To prevent the potatoes from becoming mushy, stir them gently and check for tenderness with a fork towards the end of the simmering time.When sautéing the onion and garlic, keep an eye on them to avoid burning; they should be fragrant but not browned.For best results, allow the cream to warm slightly before adding it to the skillet to maintain a rich, velvety consistency in your sauce.

Creamy Sausage and Potatoes Recipe FAQs

How do I choose the best sausage for this recipe?
Absolutely! Choosing between Italian or breakfast sausage depends on your flavor preference. If you enjoy a spicy kick, Italian sausage is the way to go. For a milder, sweeter taste, opt for breakfast sausage. Look for sausages without artificial additives for the best flavor.

What’s the best way to store leftover Creamy Sausage and Potatoes?
Store any leftovers in an airtight container in the refrigerator for up to 3 days. When you’re ready for a repeat, just reheat it gently on the stovetop over low heat, and consider adding a splash of chicken broth or cream to help restore the dish’s original creamy texture.

Can I freeze Creamy Sausage and Potatoes?
Most certainly! To freeze, allow the dish to cool completely, then divide it into portions and transfer to freezer-safe containers or bags. You can freeze it for up to 3 months. When you’re ready to enjoy, simply thaw overnight in the fridge and reheat gently on the stovetop, stirring occasionally. You might want to add some cream or broth to bring back its creamy goodness.

What if my potatoes are mushy after cooking?
Very! If your potatoes turn out mushy, try using Yukon Gold or Russet potatoes, as they hold their shape better. Additionally, when you add them to the skillet with the broth, make sure to check for tenderness toward the end of the simmering time—test with a fork to ensure you achieve that perfect balance of softness without turning mushy. If they do happen to get soft, you can still enjoy them as part of a comforting mash!

Are there any dietary considerations I should keep in mind?
Absolutely! If you’re serving this dish to those with dietary restrictions, you can easily swap out the heavy cream for a dairy-free alternative like coconut cream or cashew cream for lactose intolerance. For gluten-free options, ensure the sausage and broth are gluten-free. Just double-check ingredients to keep your dish safe for all guests, including furry ones—avoid feeding them any seasoned or cooked sausages!

Can I add vegetables to this recipe?
Yes! The more the merrier! Feel free to add seasonal vegetables like bell peppers, spinach, or even peas for extra nutrition and color. Just remember to sauté them along with the onion and garlic so they meld beautifully into the creamy sauce. Enjoy experimenting with different combinations to make it your own!

Creamy Sausage and Potatoes

Creamy Sausage and Potatoes

Discover the comfort of Creamy Sausage and Potatoes, a hearty meal perfect for cozy evenings.
Print Recipe Pin Recipe
Prep Time 10 minutes mins
Cook Time 30 minutes mins
Total Time 40 minutes mins
Servings: 4 servings
Course: DINNER RECIPES
Cuisine: American
Calories: 500
Ingredients Equipment Method Nutrition Notes

Ingredients
  

For the Sausage
  • 1 lb Italian or breakfast sausage brings savory depth to the dish
For the Potatoes
  • 2 cups Diced Yukon Gold or Russet potatoes provide a creamy and tender base
For the Creamy Sauce
  • 1 cup Heavy cream adds a rich, velvety texture
For Flavor
  • 1 Medium onion diced, lends sweetness and depth
  • 3 cloves Garlic minced, contributes aromatic goodness
  • 1 cup Low-sodium chicken broth keeps the dish flavorful
  • 1 tsp Dried thyme offers an earthy note

Equipment

  • Large skillet

Method
 

Cooking Instructions
  1. Start by heating a large skillet over medium heat. Add the sausage and cook until browned—this should take about 5-7 minutes. Once done, remove the sausage from the skillet and set aside.
  2. In the same skillet, toss in the diced onion and minced garlic. Sauté for about 4 minutes until they become fragrant and the onion is translucent.
  3. Stir in the diced potatoes along with the dried thyme. Pour in chicken broth until the potatoes are partially covered.
  4. Cover the skillet and let it simmer on low heat for 15-20 minutes until the potatoes are tender.
  5. Add the heavy cream back into the skillet, then return the cooked sausage. Stir everything together and cook until warmed through.
  6. Serve the Creamy Sausage and Potatoes warm, garnished with fresh herbs if desired.

Nutrition

Serving: 1servingCalories: 500kcalCarbohydrates: 35gProtein: 20gFat: 30gSaturated Fat: 15gCholesterol: 70mgSodium: 600mgPotassium: 800mgFiber: 3gSugar: 2gVitamin A: 10IUVitamin C: 15mgCalcium: 4mgIron: 8mg

Notes

Optional: Add a sprinkle of freshly grated Parmesan for added richness.

Tried this recipe?

Let us know how it was!

Filed Under: DINNER RECIPES

Cheeseburger Sliders

January 25, 2026 by JudyWhite Leave a Comment

There’s a special thrill in crafting a meal that brings smiles to faces of all ages, and my go-to recipe for cheeseburger sliders does just that. The first time I pulled these golden-browned bites from the oven, I was greeted by a symphony of melted cheese and sizzling beef that filled my kitchen with an irresistible aroma. Who knew that such a crowd-pleaser could be so simple to whip up?

Perfect for game nights or casual gatherings, these sliders offer a delightful twist on the classic cheeseburger, all packed into cute, manageable portions. With just a handful of ingredients and a quick 30-minute preparation, you can create a feast that turns any mundane night into a celebration. The best part? From the savory flavor of onion powder to the satisfying crunch of pickles, every bite delivers a taste of comfort that even fast food can’t compete with. Let’s dive into this recipe and elevate your next meal at home!

Why You'll Love This Cheeseburger Sliders

  • These cheeseburger sliders are incredibly easy to make, allowing you to whip up a fantastic meal in just 30 minutes.
  • The delicious combination of melted cheese, savory beef, and tangy toppings creates a flavor explosion that will have everyone coming back for seconds.
  • Their adorable size makes these sliders perfect for any occasion, whether it’s a game night, family dinner, or a casual get-together.
  • Plus, with minimal ingredients required, this recipe is super versatile, letting you customize it to your taste with various toppings or sauces.
  • The visual appeal of these golden-brown sliders will impress your guests and make everyone eager to dig in.
  • You’ll certainly find that these sliders are a guaranteed crowd-pleaser and the ultimate comfort food.

Cheeseburger Sliders Ingredients

For the Sliders
• 1 lb ground beef – Choose lean ground beef for a juicier flavor in your cheeseburger sliders.
• 8 slider buns – Opt for soft, fresh buns to perfectly cradle those tasty patties.
• 8 slices American cheese – This cheesy goodness melts beautifully, enhancing each slider’s flavor.
• 2 tbsp ketchup – A classic condiment that adds a sweet and tangy touch to your sliders.
• 2 tbsp yellow mustard – A must-have for that zesty twist; feel free to substitute with Dijon for an upscale version.
• 1 cup sliced pickles – Adds a satisfying crunch and tang that beautifully contrasts the beef.

For seasoning
• 1 tsp onion powder – This key ingredient elevates the meat’s flavor; fresh onion can be used instead if desired.
• 1 tsp salt – Enhances the overall taste of your cheeseburger sliders.
• 1/2 tsp black pepper – Adds a subtle kick; blackened or smoked pepper can introduce an interesting twist!

How to Make Cheeseburger Sliders

  1. Preheat your oven
    Begin by preheating your oven to 350°F (175°C). This will ensure your cheeseburger sliders bake evenly and come out perfectly melty and warm.

  2. Mix the beef
    In a spacious bowl, combine the ground beef with onion powder, salt, and black pepper. Use your hands to mix until everything is well incorporated, ensuring every bite is flavorful.

  3. Shape the patties
    Take small portions of the mixed beef and shape them into patties, around 2 ounces each. Aim for uniformity to ensure they cook evenly and fit perfectly on your slider buns.

  4. Cook the patties
    Heat a skillet over medium-high heat and place your patties in. Sear each side for about 3 minutes until they develop a beautiful brown color and are cooked through.

  5. Assemble the sliders
    In a baking dish, lay half of the slider buns. Place the cooked patties on top, add slices of cheese, and layer on the pickles, ketchup, and mustard. Cap them with the remaining buns.

  6. Bake to perfection
    Cover the baking dish with foil and bake for 10 minutes. This will give your sliders enough time to heat through while allowing the cheese to melt, creating a gooey, delightful finish.

Optional: Add a sprinkle of sesame seeds on the buns before baking for an extra touch of flavor and crunch.

Exact quantities are listed in the recipe card below.

How to Store and Freeze Cheeseburger Sliders

Fridge: Store cheeseburger sliders in an airtight container for up to 3 days. This ensures they remain moist and flavorful for easy reheating.

Freezer: If you have leftovers, wrap the sliders tightly in plastic wrap or foil and freeze for up to 2 months. When ready to enjoy, thaw in the fridge overnight before reheating.

Reheating: To reheat, place the sliders in a preheated oven at 350°F (175°C) for about 10–15 minutes or until heated through. You can cover them with foil to prevent drying out.

Room Temperature: Avoid leaving cheeseburger sliders out at room temperature for more than 2 hours to ensure food safety. Enjoy them fresh for the best taste!

What to Serve with Cheeseburger Sliders?

Creating a memorable meal around these delightful cheeseburger sliders is easy with the perfect pairings.

  • Crispy French Fries: A classic companion, these golden fries add a satisfying crunch and are perfect for dipping in ketchup.
  • Coleslaw: This cool and creamy side provides a refreshing contrast, balancing the sliders’ richness with its tangy crunch.
  • Baked Beans: Hearty and slightly sweet, they offer a lovely warmth and are an excellent match for the flavors of the beef.
  • Potato Salad: Creamy and comforting, this dish enhances the sliders with its rich texture and fun taste variations.
  • Grilled Corn on the Cob: Sweet and smoky, this seasonal favorite brightens up the plate and brings a taste of summer to your meal.
  • Garden Salad: A vibrant mix of fresh greens and veggies, it adds a refreshing and healthy component to your meal.
  • Milkshakes: Creamy and indulgent, a chocolate or vanilla milkshake can be a dreamy drink pairing, elevating your slider experience.
  • Fruit Salad: This light and sweet side brings a burst of freshness that complements the savory flavors in the sliders beautifully.
  • Apple Pie: Cap off your meal with this homey dessert, as warm spices and sweet apples complete the comfort food theme perfectly.

Cheeseburger Sliders Variations

Feel free to make these delightful sliders your own with simple twists and substitutions that amplify flavor and cater to your preferences.

  • Gluten-Free: Use gluten-free slider buns or lettuce wraps for a carb-friendly version that doesn’t skimp on taste. A crisp lettuce wrap provides a refreshing crunch!

  • Cheese Swap: Try pepper jack or cheddar cheese for a spicier or sharper flavor. Each cheese lends a unique character that can elevate your sliders!

  • Spicy Kick: Add diced jalapeños into the beef mixture or as a topping for an extra layer of heat. Those fiery bites will thrill anyone who loves a touch of spice.

  • Veggie Delight: Substitute the beef with black beans or lentils for a delicious vegetarian slider. With the same spices, you’ll get all the flavor without meat!

  • Smoky Flavor: Incorporate smoked paprika into the beef for a deeper, smoky profile that will make your sliders unforgettable. It’s like a little flavor adventure in every bite!

  • Bacon Lover’s: Include crispy bacon bits in the beef mixture or as a topping. Nothing complements cheese quite like the rich, savory crunch of bacon!

  • Pickle Relish: Swap sliced pickles with sweet pickle relish for a hint of sweetness that perfectly contrasts the savory elements. It’s a nostalgic twist reminiscent of summer barbecues.

  • Herb Infusion: Toss in some chopped fresh herbs, like parsley or chives, into the meat mix for a fresh and vibrant flavor boost. The herbs lighten up the dish and add a pop of color!

Make Ahead Options

These Cheeseburger Sliders are perfect for busy weeknights and make meal prep a breeze! You can prepare the patties up to 24 hours in advance by mixing the ground beef with onion powder, salt, and pepper, then shaping them into patties. Store them tightly wrapped in the refrigerator to maintain freshness. Additionally, you can assemble the sliders (with cheese and condiments) up to 3 days ahead; just cover the baking dish with foil. When you’re ready to bake, remove the foil and heat in the oven at 350°F (175°C) for about 15 minutes to ensure they’re just as delicious as when freshly made. Enjoy the convenience without sacrificing flavor!

Chef's Helpful Tips

  • For your cheeseburger sliders, using lean ground beef will provide a juicier flavor while keeping the sliders from being too greasy.
  • Pay attention to the size of your patties; uniformity ensures even cooking and perfect fitting on the slider buns.
  • When searing the patties, resist the urge to press down on them with a spatula, as this can squeeze out valuable juices and lead to drier sliders.
  • Finally, keep an eye on the baking duration; once the cheese is melted and the sliders are heated through, you can remove them from the oven to prevent overcooking.

Cheeseburger Sliders Recipe FAQs

How do I choose the best ground beef for my sliders?
Absolutely! When selecting ground beef for cheeseburger sliders, I recommend going for 80/20 lean-to-fat ratio. This balance ensures that your sliders will be juicy and flavorful, without being overly greasy. Freshness is crucial too, so look for meat with a bright red color and minimal dark spots.

How should I store leftover cheeseburger sliders?
Very good question! You can store cheeseburger sliders in an airtight container in the fridge for up to 3 days. To keep them as moist and flavorful as possible, make sure to let them cool to room temperature before sealing them up. If you’re not planning to eat them within that timeframe, consider freezing them instead!

Can I freeze cheeseburger sliders? How?
Certainly! To freeze cheeseburger sliders, wrap each slider tightly in plastic wrap or foil, ensuring no air is trapped to prevent freezer burn. Place the wrapped sliders in a freezer bag or airtight container and freeze for up to 2 months. When you’re ready to enjoy them, simply thaw them in the fridge overnight before reheating in the oven—it’s super easy!

What should I do if my sliders turn out dry?
Ah, nobody wants that! If you find your sliders are dry, ensure you’re mixing the ground beef just until combined; over-mixing can lead to tougher patties. Additionally, try cooking them to an internal temperature of 160°F (71°C), as cooking them longer may dry them out. Adding moist toppings, like a slice of tomato or extra pickles, can also help!

Are there any dietary considerations for cheeseburger sliders?
Yes! If you or your guests have dietary restrictions, there are plenty of alternatives. For gluten-free options, use gluten-free slider buns. If you’re looking to reduce calories or fat, consider using ground turkey or plant-based meat substitutes. Also, if someone has a dairy allergy, you can replace American cheese with a dairy-free cheese alternative. The more the merrier, right?

Can I prepare the patties ahead of time?
Absolutely! You can prepare the patties a day in advance. Just chill them in the refrigerator until you’re ready to cook. This not only saves time on busy days but also lets the flavors meld beautifully. When you’re ready, just sear and assemble as usual—they’ll taste delicious!

Cheeseburger Sliders

Cheeseburger Sliders

These delicious cheeseburger sliders are a crowd-pleaser, perfect for gatherings and easy to make in just 30 minutes.
Print Recipe Pin Recipe
Prep Time 30 minutes mins
Cook Time 10 minutes mins
Total Time 40 minutes mins
Servings: 8 sliders
Course: Snacks & Appetizers
Cuisine: American
Calories: 250
Ingredients Equipment Method Nutrition Notes

Ingredients
  

For the Sliders
  • 1 lb ground beef Choose lean ground beef for a juicier flavor.
  • 8 pieces slider buns Opt for soft, fresh buns.
  • 8 slices American cheese This cheese melts beautifully.
  • 2 tbsp ketchup A classic condiment.
  • 2 tbsp yellow mustard Can be substituted with Dijon.
  • 1 cup sliced pickles Adds crunch and tang.
For seasoning
  • 1 tsp onion powder Elevates the meat's flavor.
  • 1 tsp salt Enhances overall taste.
  • 1/2 tsp black pepper Adds a subtle kick.

Equipment

  • Baking dish
  • Skillet
  • Mixing bowl

Method
 

How to Make Cheeseburger Sliders
  1. Preheat your oven to 350°F (175°C).
  2. In a bowl, combine ground beef with onion powder, salt, and black pepper.
  3. Shape the beef mixture into patties, about 2 ounces each.
  4. Heat a skillet over medium-high heat and cook the patties for about 3 minutes per side.
  5. In a baking dish, layer half of the slider buns, then add patties, cheese, pickles, ketchup, and mustard. Top with remaining buns.
  6. Cover with foil and bake for 10 minutes until the cheese melts.

Nutrition

Serving: 1sliderCalories: 250kcalCarbohydrates: 20gProtein: 15gFat: 12gSaturated Fat: 6gPolyunsaturated Fat: 1gMonounsaturated Fat: 4gCholesterol: 40mgSodium: 700mgPotassium: 250mgFiber: 1gSugar: 2gVitamin A: 5IUVitamin C: 1mgCalcium: 10mgIron: 8mg

Notes

Optional: Add sesame seeds on the buns before baking for added flavor and crunch.

Tried this recipe?

Let us know how it was!

Filed Under: SNACKS & APPETIZERS

Crack Chicken Sliders

January 25, 2026 by JudyWhite Leave a Comment

Every time I hear the sizzle of garlic melting into a savory blend, my kitchen transforms into a culinary sanctuary. One of my recent triumphs is the irresistibly good Crack Chicken Sliders—a dish that instantly puts me in a good mood. Picture this: warm, tender chicken smothered in a creamy ranch dressing, all nestled inside fluffy slider buns. It’s comfort food elevated, ready to delight family and friends without hours in the kitchen.

I discovered this gem during one particularly busy week when I craved a delicious home-cooked meal but didn’t want to spend hours cleaning up. With just a handful of ingredients and minimal prep, these sliders quickly became a go-to recipe in my home. They’re perfect for relaxed weeknight dinners or entertaining guests. Trust me, your taste buds will thank you, and you might just find yourself making them on repeat! Ready to dive into this flavor-packed experience? Let’s get cooking!

Why You'll Love This Crack Chicken Sliders

  • This recipe is a breeze to make, requiring just 10 minutes of prep time, so you can have a delicious meal ready in no time.
  • The flavor combination of garlic, ranch dressing, and cheddar cheese creates an irresistible taste that will have everyone coming back for seconds.
  • These sliders are incredibly versatile; you can easily customize the toppings or side dishes to suit any occasion or preference.
  • Plus, their visually appealing presentation makes them perfect for entertaining, ensuring your guests will be impressed at first glance.

Crack Chicken Sliders Ingredients

For the Chicken
• Boneless, skinless chicken breasts – 1.5 to 2 lbs will yield tender shredded chicken that absorbs all the delicious flavors.
• Fresh garlic – 4 cloves minced add aromatic depth and a punch of flavor, essential for that savory base.
• Low-sodium soy sauce – 1/4 cup gives a subtle umami kick without overwhelming saltiness.
• Ranch dressing – 1 cup lends creamy goodness and flavor balance, making these Crack Chicken Sliders truly irresistible.

For the Sliders
• Slider buns – 12 soft buns serve as the perfect vessel for your flavorful filling, adding just the right amount of chew.
• Shredded cheddar cheese – 1 cup provides a melty, gooey topping that will delight cheese lovers and enhance the overall flavor.

Feel free to experiment with your favorite toppings or sides to make these sliders your own!

How to Make Crack Chicken Sliders

  1. Preheat your oven to 400°F (200°C) and give your baking dish a light spray with nonstick cooking spray. This ensures an easy cleanup after the deliciousness is gone!

  2. Season the chicken breasts with salt and pepper, placing them gently in the prepared baking dish. This simple step enhances the flavor of your chicken as it cooks.

  3. Mix together the soy sauce, ranch dressing, and minced garlic in a bowl. Pour this heavenly mixture over the seasoned chicken, ensuring every piece is well-coated for maximum flavor.

  4. Cover the dish snugly with foil and bake for 25-30 minutes. You’ll know it’s done when the chicken is cooked through and tender—easy to shred!

  5. Shred the chicken right in the baking dish using two forks. This method keeps all those delicious juices from the sauce intact, contributing to the sliders’ fantastic flavor.

  6. Assemble the sliders by placing a generous amount of shredded chicken onto each slider bun. Crown each one with a sprinkle of shredded cheddar cheese, allowing it to melt into a gooey delight.

Optional: Serve with pickles or fresh herbs for an extra burst of flavor!

Exact quantities are listed in the recipe card below.

What to Serve with Crack Chicken Sliders?

Transform your meal into an unforgettable experience by pairing these sliders with delightful sides that complement their flavors.

  • Crispy Sweet Potato Fries: The natural sweetness and crunchy exterior of sweet potato fries offer a lovely contrast to the savory sliders.

  • Coleslaw: A creamy, tangy coleslaw adds a refreshing crunch to the table, balancing the richness of the chicken.

  • Garlic Bread: The buttery, garlic-infused bread brings an irresistible aroma and texture, perfect for mopping up any leftover sauce.

  • Grilled Corn on the Cob: The charred sweetness from grilled corn enhances the comfort food vibe while adding a pop of color to your plate.

  • Baked Beans: Smoky and sweet baked beans provide a hearty side that pairs wonderfully with the savory notes of the sliders.

  • Pickle Platter: A mix of dill and bread-and-butter pickles adds a zesty crunch, cutting through the creamy richness of the ranch dressing.

  • Sparkling Lemonade: This refreshing drink provides a bright citrus twist that complements the savory flavors without overwhelming them.

  • Chocolate Chip Cookies: For dessert, soft, warm cookies serve as the perfect sweet ending to a savory meal, delighting both kids and adults alike.

How to Store and Freeze Crack Chicken Sliders

Fridge: Store leftover Crack Chicken Sliders in an airtight container for up to 3 days. Reheat gently in the microwave or oven to retain moisture.

Freezer: For longer storage, freeze the shredded chicken mixture (without buns) in a freezer-safe bag for up to 2 months. Thaw overnight in the fridge before reheating.

Airtight Packing: Make sure to wrap sliders tightly in plastic wrap or aluminum foil if storing them as assembled for optimal freshness, lasting up to 1 month in the freezer.

Reheating: When ready to enjoy, reheat the frozen chicken sliders in the oven at 350°F (175°C) until warmed through, about 15-20 minutes.

Make Ahead Options

These Crack Chicken Sliders are perfect for meal prep enthusiasts! You can prepare the chicken by seasoning and covering it with the soy sauce, ranch dressing, and minced garlic up to 24 hours in advance—just refrigerate it in the baking dish for best results. This way, the flavors infuse deeply, enhancing the taste. On the day you plan to serve, simply bake the chicken as directed, shred it, and assemble the sliders with cheese. If you want, you can even assemble the sliders fully and store them for up to 3 days in the fridge; just keep the buns separate until you’re ready to heat them. This method ensures you enjoy delicious, homemade flavors with minimal last-minute effort!

Crack Chicken Sliders Variations

Feel free to mix and match these ideas to create your perfect version of these delightful sliders!

  • Spicy Kick: Add diced jalapeños to the chicken mixture for a fiery kick that brings the heat to each bite.
  • BBQ Flavor: Swap ranch dressing for your favorite BBQ sauce, giving your sliders a sweet and smoky twist.
  • Herbaceous Delight: Mix in fresh herbs like parsley or dill with the chicken for a refreshing, zesty flavor boost.
  • Creamy Spin: Substitute plain Greek yogurt for ranch dressing to lighten things up while maintaining creaminess.
  • Cheesy Heaven: Experiment with different cheeses such as pepper jack or gouda for a unique melt-in-your-mouth experience.
  • Veggie-Packed: Add sautéed bell peppers and onions to the shredded chicken for extra flavor and nutritious goodness.

The beauty of these sliders lies in their versatility, making every batch a new adventure through flavor!

Chef's Helpful Tips

  • When making Crack Chicken Sliders, ensure you season your chicken breasts generously with salt and pepper for enhanced flavor.
  • Avoid overcooking the chicken; check for doneness at the 25-minute mark to ensure it’s juicy and easy to shred.
  • Shredding the chicken directly in the baking dish helps retain the flavorful juices, resulting in a more delicious filling.
  • For a perfect melt, add the shredded cheese on top of the chicken right after removing it from the oven, allowing it to become gooey as you assemble your sliders.

Crack Chicken Sliders Recipe FAQs

What type of chicken should I use for Crack Chicken Sliders?
Absolutely use boneless, skinless chicken breasts! They ensure tender meat that shreds beautifully and absorbs all the delicious flavors from the marinade. Look for fresh chicken breasts that feel firm and are pinkish in color, avoiding any that have dark spots or a foul odor.

How should I store leftover Crack Chicken Sliders?
For optimal freshness, store leftover Crack Chicken Sliders in an airtight container in the fridge. They’ll last up to 3 days. When you’re ready to enjoy them again, you can gently reheat them in the microwave for a quick fix or pop them in the oven to keep them crispy.

Can I freeze Crack Chicken Sliders?
Yes! For freezing, I recommend freezing the shredded chicken mixture (without the buns) in a freezer-safe bag for up to 2 months. To freeze, just let the mixture cool, then transfer it to the bag, pushing out any excess air. When you’re ready to eat, move it to the fridge to thaw overnight and then reheat before assembling the sliders.

What if my chicken doesn’t shred easily?
If your chicken isn’t shredding easily, it might need a little more time in the oven. Ensure it reaches an internal temperature of 165°F (75°C). If time isn’t on your side, try cutting it into smaller chunks before putting it back in the oven for an additional 5-10 minutes. That will help break it down!

Are there any dietary considerations for Crack Chicken Sliders?
Very! If you’re making these for guests, be mindful that ranch dressing can contain dairy—an important consideration for those with lactose intolerance or dairy allergies. A dairy-free ranch dressing alternative works well for different diets, plus, ensure any toppings you add align with guests’ dietary needs.

How do I maximize flavor when making Crack Chicken Sliders?
To enhance the flavor, consider marinating your chicken breasts for at least 30 minutes in the soy sauce, garlic, and ranch dressing mix before baking. This extra step allows all those wonderful flavors to penetrate the chicken deeply. Plus, always top your sliders with freshly shredded cheese right after they come out of the oven to get that lovely, gooey texture that everyone loves!

Crack Chicken Sliders

Crack Chicken Sliders

Delicious Crack Chicken Sliders made with tender chicken and creamy ranch, perfect for lunch or entertaining guests.
Print Recipe Pin Recipe
Prep Time 10 minutes mins
Cook Time 30 minutes mins
Total Time 40 minutes mins
Servings: 12 sliders
Course: LUNCH RECIPES
Calories: 345
Ingredients Equipment Method Nutrition Notes

Ingredients
  

For the Chicken
  • 1.5-2 lbs boneless, skinless chicken breasts tender shredded chicken
  • 4 cloves fresh garlic minced
  • 1/4 cup low-sodium soy sauce adds umami flavor
  • 1 cup ranch dressing for creamy goodness
For the Sliders
  • 12 sliders slider buns soft buns for filling
  • 1 cup shredded cheddar cheese for topping

Equipment

  • Baking dish
  • nonstick cooking spray
  • Mixing bowl

Method
 

Cooking Instructions
  1. Preheat your oven to 400°F (200°C) and spray your baking dish with nonstick cooking spray.
  2. Season the chicken breasts with salt and pepper, placing them in the prepared dish.
  3. Mix the soy sauce, ranch dressing, and minced garlic in a bowl, then pour it over the chicken.
  4. Cover the dish with foil and bake for 25-30 minutes until the chicken is tender.
  5. Shred the chicken in the baking dish using two forks.
  6. Assemble sliders with shredded chicken on each bun, topping with shredded cheddar cheese.

Nutrition

Serving: 1sliderCalories: 345kcalCarbohydrates: 24gProtein: 23gFat: 17gSaturated Fat: 10gPolyunsaturated Fat: 1gMonounsaturated Fat: 5gCholesterol: 75mgSodium: 830mgPotassium: 480mgFiber: 1gSugar: 2gVitamin A: 500IUVitamin C: 1mgCalcium: 220mgIron: 2mg

Notes

Serve with optional pickles or fresh herbs for added flavor.

Tried this recipe?

Let us know how it was!

Filed Under: LUNCH RECIPES

Cheeseburger Sliders

January 25, 2026 by JudyWhite Leave a Comment

There’s a special thrill in crafting a meal that brings smiles to faces of all ages, and my go-to recipe for cheeseburger sliders does just that. The first time I pulled these golden-browned bites from the oven, I was greeted by a symphony of melted cheese and sizzling beef that filled my kitchen with an irresistible aroma. Who knew that such a crowd-pleaser could be so simple to whip up?

Perfect for game nights or casual gatherings, these sliders offer a delightful twist on the classic cheeseburger, all packed into cute, manageable portions. With just a handful of ingredients and a quick 30-minute preparation, you can create a feast that turns any mundane night into a celebration. The best part? From the savory flavor of onion powder to the satisfying crunch of pickles, every bite delivers a taste of comfort that even fast food can’t compete with. Let’s dive into this recipe and elevate your next meal at home!

Why You'll Love This Cheeseburger Sliders

  • These cheeseburger sliders are incredibly easy to make, allowing you to whip up a fantastic meal in just 30 minutes.
  • The delicious combination of melted cheese, savory beef, and tangy toppings creates a flavor explosion that will have everyone coming back for seconds.
  • Their adorable size makes these sliders perfect for any occasion, whether it’s a game night, family dinner, or a casual get-together.
  • Plus, with minimal ingredients required, this recipe is super versatile, letting you customize it to your taste with various toppings or sauces.
  • The visual appeal of these golden-brown sliders will impress your guests and make everyone eager to dig in.
  • You’ll certainly find that these sliders are a guaranteed crowd-pleaser and the ultimate comfort food.

Cheeseburger Sliders Ingredients

For the Sliders
• 1 lb ground beef – Choose lean ground beef for a juicier flavor in your cheeseburger sliders.
• 8 slider buns – Opt for soft, fresh buns to perfectly cradle those tasty patties.
• 8 slices American cheese – This cheesy goodness melts beautifully, enhancing each slider’s flavor.
• 2 tbsp ketchup – A classic condiment that adds a sweet and tangy touch to your sliders.
• 2 tbsp yellow mustard – A must-have for that zesty twist; feel free to substitute with Dijon for an upscale version.
• 1 cup sliced pickles – Adds a satisfying crunch and tang that beautifully contrasts the beef.

For seasoning
• 1 tsp onion powder – This key ingredient elevates the meat’s flavor; fresh onion can be used instead if desired.
• 1 tsp salt – Enhances the overall taste of your cheeseburger sliders.
• 1/2 tsp black pepper – Adds a subtle kick; blackened or smoked pepper can introduce an interesting twist!

How to Make Cheeseburger Sliders

  1. Preheat your oven
    Begin by preheating your oven to 350°F (175°C). This will ensure your cheeseburger sliders bake evenly and come out perfectly melty and warm.

  2. Mix the beef
    In a spacious bowl, combine the ground beef with onion powder, salt, and black pepper. Use your hands to mix until everything is well incorporated, ensuring every bite is flavorful.

  3. Shape the patties
    Take small portions of the mixed beef and shape them into patties, around 2 ounces each. Aim for uniformity to ensure they cook evenly and fit perfectly on your slider buns.

  4. Cook the patties
    Heat a skillet over medium-high heat and place your patties in. Sear each side for about 3 minutes until they develop a beautiful brown color and are cooked through.

  5. Assemble the sliders
    In a baking dish, lay half of the slider buns. Place the cooked patties on top, add slices of cheese, and layer on the pickles, ketchup, and mustard. Cap them with the remaining buns.

  6. Bake to perfection
    Cover the baking dish with foil and bake for 10 minutes. This will give your sliders enough time to heat through while allowing the cheese to melt, creating a gooey, delightful finish.

Optional: Add a sprinkle of sesame seeds on the buns before baking for an extra touch of flavor and crunch.

Exact quantities are listed in the recipe card below.

Cheeseburger Sliders Variations

Feel free to explore these tasty twists that will make your cheeseburger sliders even more exciting!

  • Turkey Swap: Use ground turkey instead of beef for a leaner option. The mild flavor lets spices shine through beautifully.

  • Cheese Variety: Try different cheeses like pepper jack for a spicy kick or cheddar for a sharper taste. Mix and match for a flavor adventure.

  • Gluten-Free Buns: Substitute regular slider buns with gluten-free options to accommodate dietary preferences. Everyone deserves a delicious bite!

  • Veggie Patties: For a vegetarian-friendly option, use store-bought veggie patties or create your own using black beans and quinoa, packed with flavor and nutrients.

  • Onion Boost: Add caramelized onions to your slider assembly for a sweet, rich flavor that complements the savory beef perfectly. It elevates each bite!

  • Spicy Kick: Incorporate jalapeños or a splash of hot sauce into the beef mixture for those who crave heat. It adds an exciting, fiery layer to your sliders.

  • Herbed Freshness: Mix fresh herbs like parsley or cilantro into the beef. This infusion adds a refreshing twist that brightens every slider.

  • Bacon Bliss: Top each slider with crispy bacon for that smoky crunch. A little indulgence turns an ordinary slider into an unforgettable treat!

How to Store and Freeze Cheeseburger Sliders

Fridge: Store cheeseburger sliders in an airtight container for up to 3 days. This ensures they remain moist and flavorful for easy reheating.

Freezer: If you have leftovers, wrap the sliders tightly in plastic wrap or foil and freeze for up to 2 months. When ready to enjoy, thaw in the fridge overnight before reheating.

Reheating: To reheat, place the sliders in a preheated oven at 350°F (175°C) for about 10–15 minutes or until heated through. You can cover them with foil to prevent drying out.

Room Temperature: Avoid leaving cheeseburger sliders out at room temperature for more than 2 hours to ensure food safety. Enjoy them fresh for the best taste!

Make Ahead Options

These delicious cheeseburger sliders are perfect for busy weeknights, as many components can be prepped in advance! You can mix the ground beef with spices and form the patties up to 24 hours ahead; simply cover them with plastic wrap and refrigerate. Additionally, you can slice the pickles and prepare your toppings in advance. When ready to serve, cook the patties and assemble the sliders. Just remember to bake the assembled sliders covered in foil, as this helps maintain the gooey melted cheese while keeping everything warm and delicious. Your guests will love these time-saving cheeseburger sliders, just as if they were made fresh!

What to Serve with Cheeseburger Sliders?

Creating a memorable meal around these delightful cheeseburger sliders is easy with the perfect pairings.

  • Crispy French Fries: A classic companion, these golden fries add a satisfying crunch and are perfect for dipping in ketchup.
  • Coleslaw: This cool and creamy side provides a refreshing contrast, balancing the sliders’ richness with its tangy crunch.
  • Baked Beans: Hearty and slightly sweet, they offer a lovely warmth and are an excellent match for the flavors of the beef.
  • Potato Salad: Creamy and comforting, this dish enhances the sliders with its rich texture and fun taste variations.
  • Grilled Corn on the Cob: Sweet and smoky, this seasonal favorite brightens up the plate and brings a taste of summer to your meal.
  • Garden Salad: A vibrant mix of fresh greens and veggies, it adds a refreshing and healthy component to your meal.
  • Milkshakes: Creamy and indulgent, a chocolate or vanilla milkshake can be a dreamy drink pairing, elevating your slider experience.
  • Fruit Salad: This light and sweet side brings a burst of freshness that complements the savory flavors in the sliders beautifully.
  • Apple Pie: Cap off your meal with this homey dessert, as warm spices and sweet apples complete the comfort food theme perfectly.

Chef's Helpful Tips

  • For your cheeseburger sliders, using lean ground beef will provide a juicier flavor while keeping the sliders from being too greasy.
  • Pay attention to the size of your patties; uniformity ensures even cooking and perfect fitting on the slider buns.
  • When searing the patties, resist the urge to press down on them with a spatula, as this can squeeze out valuable juices and lead to drier sliders.
  • Finally, keep an eye on the baking duration; once the cheese is melted and the sliders are heated through, you can remove them from the oven to prevent overcooking.

Cheeseburger Sliders Recipe FAQs

How do I know which ground beef to use for cheeseburger sliders?
Absolutely! For cheeseburger sliders, I recommend using ground beef with a fat content of around 80/20. This balanced mix ensures juicy, flavorful patties. If you’re looking for a healthier option, ground turkey or chicken can be substituted, but expect a different flavor and texture.

How should I store leftover cheeseburger sliders?
Very simply! After enjoying your sliders, place any leftovers in an airtight container and store them in the fridge. They will stay fresh for up to 3 days! Just make sure they’re wrapped well to keep them from drying out.

Can I freeze cheeseburger sliders, and what’s the best way to do it?
Absolutely! To freeze cheeseburger sliders, wrap each slider individually in plastic wrap, followed by a layer of foil. This helps protect their texture and flavor while stored in the freezer for up to 3 months. When you’re ready to enjoy them again, simply thaw them in the fridge overnight before reheating.

What if my cheeseburger sliders aren’t browning properly?
If your sliders aren’t browning as expected, don’t worry! This can happen if the skillet is overcrowded, which prevents proper searing. Try cooking in smaller batches and ensure the skillet is hot enough before adding the patties. You can also check that you’re using enough fat in the pan, as this helps achieve that lovely golden crust.

Are cheeseburger sliders safe for pets?
It’s best to avoid giving cheeseburger sliders to your pets. While small amounts of cooked ground beef are generally safe, the spices, condiments, and especially processed cheese can upset their stomachs or be harmful. Stick to pet-safe treats to keep your furry friends happy!

Can I make cheeseburger sliders gluten-free?
Yes indeed! To make cheeseburger sliders gluten-free, simply use gluten-free slider buns. Just ensure your condiments are also gluten-free, and you’re set to enjoy these delicious sliders without compromise!

Cheeseburger Sliders

Cheeseburger Sliders

Enjoy these delicious cheeseburger sliders, a simple yet crowd-pleasing snack perfect for gatherings.
Print Recipe Pin Recipe
Prep Time 30 minutes mins
Cook Time 10 minutes mins
Total Time 40 minutes mins
Servings: 8 sliders
Course: Snacks & Appetizers
Cuisine: American
Calories: 250
Ingredients Equipment Method Nutrition Notes

Ingredients
  

For the Sliders
  • 1 lb ground beef Choose lean ground beef for juiciness
  • 8 pieces slider buns Opt for soft, fresh buns
  • 8 slices American cheese Melts beautifully
  • 2 tbsp ketchup Adds a sweet and tangy touch
  • 2 tbsp yellow mustard For a zesty twist
  • 1 cup sliced pickles Adds crunch and tang
For seasoning
  • 1 tsp onion powder Elevates beef flavor
  • 1 tsp salt Enhances overall taste
  • 1/2 tsp black pepper Adds a subtle kick

Equipment

  • Oven
  • Skillet
  • Baking dish
  • Mixing bowl

Method
 

  1. Preheat your oven to 350°F (175°C).
  2. In a spacious bowl, combine the ground beef with onion powder, salt, and black pepper. Mix until well incorporated.
  3. Shape the mixture into patties, around 2 ounces each.
  4. Heat a skillet over medium-high heat and sear each patty for about 3 minutes per side.
  5. In a baking dish, lay half of the slider buns, place patties on top, layer on cheese, pickles, ketchup, and mustard, and cap with the remaining buns.
  6. Cover with foil and bake for 10 minutes until heated through and cheese is melted.

Nutrition

Serving: 1sliderCalories: 250kcalCarbohydrates: 18gProtein: 15gFat: 14gSaturated Fat: 7gPolyunsaturated Fat: 0.5gMonounsaturated Fat: 6gCholesterol: 50mgSodium: 500mgPotassium: 300mgFiber: 1gSugar: 2gVitamin A: 200IUCalcium: 200mgIron: 2mg

Notes

For an extra touch of flavor, add sesame seeds on the buns before baking.

Tried this recipe?

Let us know how it was!

Filed Under: SNACKS & APPETIZERS

Salsa Verde Chicken

January 25, 2026 by JudyWhite Leave a Comment

When the vibrant colors of herbs and spices come together, magic happens in the kitchen. One evening, craving a burst of flavor yet yearning for something simple, I found myself reaching for a jar of salsa verde on the shelf. Little did I know this would lead to the creation of my new favorite dish: Salsa Verde Chicken.

This easy-to-make recipe transforms modest chicken breasts into a zesty sensation that pleases even the pickiest eaters. With just a handful of ingredients, including the bright kick of lime and the fresh taste of salsa verde, this dish brings life to weeknight dinners without any fuss. Whether you’re cooking for family, friends, or even just yourself, this vibrant chicken will turn any meal into a delight while keeping the focus on homemade goodness.

Prepare for compliments, because the mouthwatering aroma from your oven will have everyone wondering what your secret is! Let’s dive into this flavorful journey and get cooking!

Why You'll Love This Salsa Verde Chicken

  • This Salsa Verde Chicken is incredibly easy to make, requiring just a handful of ingredients and minimal prep time, making it perfect for busy weeknights.
  • The vibrant flavors of the salsa verde and fresh lime juice create a deliciously zesty chicken that is sure to impress your family and friends.
  • Its versatility shines through as you can serve it with rice, tortillas, or even on top of salads, ensuring there’s something for everyone.
  • Plus, the visual appeal of the bright green sauce draping over the chicken makes for an inviting and mouthwatering presentation on your dinner table.

Salsa Verde Chicken Ingredients

Transform your chicken dinner into a flavor fiesta with these simple ingredients!

For the Chicken

  • Boneless, skinless chicken breasts – about 1.5 lbs; they cook evenly and soak up the salsa verde’s delightful flavors.
  • Salsa verde – 1 cup; this green sauce is the star ingredient, providing that zesty kick!

For the Marinade

  • Fresh lime juice – 1/4 cup, about 2 limes; the acidity brightens the dish and complements the salsa verde.
  • Olive oil – 2 tbsp; helps to keep the chicken moist while roasting.
  • Garlic powder – 1 tsp; adds an aromatic depth that enhances the overall taste.
  • Cumin – 1 tsp; introduces a warm, earthy flavor that balances the tartness.
  • Salt and pepper – to taste; essential for enhancing the flavor of your Salsa Verde Chicken perfectly.

How to Make Salsa Verde Chicken

  1. Preheat your oven to 375°F (190°C). A hot oven will help cook the chicken evenly and achieve that beautiful golden crust.

  2. Drizzle olive oil over the chicken breasts and season with garlic powder, cumin, salt, and pepper. Mix well to coat every piece, ensuring maximum flavor absorption.

  3. Place the seasoned chicken in a baking dish and generously pour salsa verde over each piece. This vibrant green sauce is what makes your chicken burst with flavor!

  4. Cover with foil and bake for about 25 minutes. This helps to keep the chicken juicy. Remove the foil and continue baking for an additional 10-15 minutes until the chicken is cooked through and lightly browned.

  5. Let it rest for five minutes before slicing. This resting period allows the juices to redistribute, making every bite deliciously tender. Serve with rice or tortillas, drizzled with the remaining sauce for added zest.

Optional: Garnish with fresh cilantro for a delightful pop of color and flavor.

Exact quantities are listed in the recipe card below.

Make Ahead Options

These Salsa Verde Chicken preparations are perfect for busy home cooks looking to save time during the week. You can marinate the chicken breasts in salsa verde, olive oil, lime juice, and spices up to 24 hours in advance, allowing the flavors to develop beautifully. Just place the marinated chicken in an airtight container in the refrigerator. On the day of serving, simply preheat your oven as instructed, place the chicken in a baking dish, cover, and bake as directed. This method ensures your chicken remains just as tender and flavorful while giving you a delicious, hassle-free meal ready to enjoy after a busy day!

Storage Tips for Salsa Verde Chicken

Fridge: Store any leftover Salsa Verde Chicken in an airtight container for up to 3 days. This keeps it fresh and ready for quick meals.

Freezer: If you want to savor it later, freeze the chicken for up to 2 months. Make sure to wrap it tightly in plastic wrap or use freezer bags to prevent freezer burn.

Reheating: When you’re ready to enjoy, thaw in the fridge overnight. Reheat in the oven at 350°F (175°C) for about 15-20 minutes, or until warmed through.

What to Serve with Salsa Verde Chicken?

Turn your flavorful creation into a complete feast with these delightful pairings that complement every bite.

  • Cilantro Lime Rice: This fragrant rice dish adds a zesty touch that pairs beautifully with the vibrant flavors of the chicken.

  • Crispy Tortilla Chips: Perfect for scooping up your salsa verde, these provide a satisfyingly crunchy contrast to the tender chicken.

  • Grilled Vegetables: The smokiness of vegetables like zucchini and bell peppers enhances the bright notes of the salsa verde while delivering a burst of color.

  • Black Bean Salad: A fresh mix of black beans, corn, and diced tomatoes introduces a wholesome, earthy element that balances the dish perfectly. Toss in some lime juice for an extra zing!

  • Avocado Slices: Creamy avocado complements the spices in the chicken, adding richness that will have everyone reaching for seconds.

  • Margaritas: A refreshing margarita pairs ideally with this dish, accentuating the lime flavors while adding a festive spirit to your meal.

  • Flan: For dessert, creamy flan creates a sweet ending that contrasts beautifully with the zesty chicken, leaving everyone with a smile.

Every pairing aims to elevate your cooking experience, creating a meal that feels warm, inviting, and utterly delicious!

Salsa Verde Chicken Variations

Feel free to get creative and put your own spin on this delicious dish!

  • Spicy Kick: Add chopped jalapeños or a dash of hot sauce to the salsa verde for heat. This creates a lively pop that will excite your taste buds.

  • Herb-Infused: Mix in fresh herbs like cilantro or parsley into the salsa verde before topping the chicken. The bright, herbal notes elevate the flavor profile beautifully.

  • Citrus Twist: Use orange or grapefruit juice instead of lime for a sweeter citrus blend. This twist adds an unexpected yet delightful flavor that surprises and delights.

  • Zesty Greens: For added nutrition, mix in chopped spinach or kale with the salsa verde. This adds a lovely color and boosts the dish’s health factor without compromising flavor.

  • Cheesy Delight: Sprinkle shredded cheese over the chicken during the last 5 minutes of baking. The melty goodness offers a rich, comforting layer that takes your dish to the next level.

  • Smoky Flavor: Substitute cumin with smoked paprika for a deep, smoky depth. This substitution adds warmth to your chicken and enhances the overall savory experience.

  • Sweet & Sour: Toss in a bit of honey or agave syrup to the salsa verde for a sweet balance against the tanginess. This will bring a delightful contrast that leaves everyone wanting more.

  • Coconut Creole: Replace olive oil with coconut oil and add some coconut milk to the salsa for a tropical twist. This change delivers an exotic flavor that transports you to a sunny beach with each bite.

Chef's Helpful Tips

  • For Salsa Verde Chicken, always allow your chicken breasts to sit at room temperature for about 15 minutes before cooking to promote even cooking.
  • When seasoning, make sure to evenly coat the chicken for maximum flavor absorption from the spices and salsa verde.
  • To ensure the chicken remains juicy, cover it with foil during the first part of baking and only uncover it when you’re ready to achieve that golden crust.
  • Finally, always use a meat thermometer to check for a safe internal temperature of 165°F (75°C) for perfectly cooked chicken every time.

Salsa Verde Chicken Recipe FAQs

How do I choose the best chicken breasts for this recipe?
Absolutely! Look for chicken breasts that are plump and have a consistent color, avoiding any with dark spots or discoloration, which can indicate spoilage. Fresh chicken should feel moist but not slimy, and have a mild smell. For optimal flavor, choose organic or free-range chicken if possible.

How should I store leftover Salsa Verde Chicken?
Yes, storing leftovers is easy! Keep the Salsa Verde Chicken in an airtight container in the fridge, and it will stay fresh for up to 3 days. If you have more than you can eat, freeze it for later enjoyment!

Can I freeze Salsa Verde Chicken, and if so, how?
Very! If you’d like to make this ahead, wrap your Salsa Verde Chicken tightly in plastic wrap or place it in freezer bags to avoid freezer burn. It can be frozen for up to 2 months. When you’re ready to enjoy it, thaw in the refrigerator overnight. Reheat in the oven at 350°F (175°C) for 15-20 minutes until piping hot.

What should I do if my chicken is dry after baking?
Oh no! Dry chicken can sometimes happen. If this occurs, make sure you cover the dish with foil during the initial baking stage, which helps retain moisture. Also, consider using a meat thermometer to check the chicken’s internal temperature—165°F (75°C) is ideal. For extra tenderness next time, marinating the chicken for an hour before cooking can also enhance moisture retention.

Are there any dietary considerations for Salsa Verde Chicken?
Absolutely! If you have any food allergies, be sure to check the salsa verde for ingredients that may not suit your needs, as some brands might contain allergens. This recipe is inherently gluten-free, but always confirm that the ingredients used are certified gluten-free to avoid cross-contamination. If you have pets, be cautious about leftovers, as spices like garlic and onion can be harmful to them.

Salsa Verde Chicken

Salsa Verde Chicken

Delightful Salsa Verde Chicken made with zesty salsa verde and fresh lime juice for a flavorful dinner experience.
Print Recipe Pin Recipe
Prep Time 15 minutes mins
Cook Time 40 minutes mins
Resting Time 5 minutes mins
Total Time 1 hour hr
Servings: 4 servings
Course: DINNER RECIPES
Cuisine: Mexican
Calories: 350
Ingredients Equipment Method Nutrition Notes

Ingredients
  

For the Chicken
  • 1.5 lbs boneless, skinless chicken breasts
  • 1 cup salsa verde
For the Marinade
  • 0.25 cup fresh lime juice about 2 limes
  • 2 tbsp olive oil
  • 1 tsp garlic powder
  • 1 tsp cumin
  • salt and pepper to taste

Equipment

  • Baking dish

Method
 

How to Make Salsa Verde Chicken
  1. Preheat your oven to 375°F (190°C). A hot oven will help cook the chicken evenly and achieve that beautiful golden crust.
  2. Drizzle olive oil over the chicken breasts and season with garlic powder, cumin, salt, and pepper. Mix well to coat every piece, ensuring maximum flavor absorption.
  3. Place the seasoned chicken in a baking dish and generously pour salsa verde over each piece.
  4. Cover with foil and bake for about 25 minutes. Remove the foil and continue baking for an additional 10-15 minutes until the chicken is cooked through and lightly browned.
  5. Let it rest for five minutes before slicing. Serve with rice or tortillas, drizzled with the remaining sauce.

Nutrition

Serving: 1servingCalories: 350kcalCarbohydrates: 6gProtein: 32gFat: 20gSaturated Fat: 3gPolyunsaturated Fat: 1.5gMonounsaturated Fat: 15gCholesterol: 120mgSodium: 600mgPotassium: 700mgFiber: 1gSugar: 1gVitamin A: 500IUVitamin C: 20mgCalcium: 30mgIron: 2mg

Notes

Optional: Garnish with fresh cilantro for a delightful pop of color and flavor.

Tried this recipe?

Let us know how it was!

Filed Under: DINNER RECIPES

Homemade Italian Sausage

January 25, 2026 by JudyWhite Leave a Comment

There’s nothing quite like the satisfying scent of savory spices dancing through the kitchen as you prepare a homemade meal. One evening, eager to escape the predictable fast-food routine, I decided to channel my inner chef and whip up a batch of Homemade Italian Sausage. The moment I minced the garlic and mixed in fragrant oregano and fennel, I could already envision the blissful delight this dish would bring to family meals and weekend barbecues alike.

This recipe is a delightful blend of flavors and an invitation to unleash your creativity in the kitchen. From the well-marbled pork to the spicy kick of red pepper flakes, each ingredient plays a crucial role in creating a sausage that’s bursting with personality. Whether you choose to grill them for a summer cookout or serve them on soft Italian rolls for a comforting dinner, these sausages are sure to win hearts and tummies over. Let’s dive in and transform simple ingredients into a mouthwatering masterpiece that will make your taste buds sing!

Why You'll Love This Homemade Italian Sausage

  • This recipe is incredibly easy and quick to make, with a total time of just 25 minutes from start to finish.
  • The bold flavors of garlic, oregano, and fennel come together to create a delicious sausage that is sure to impress.
  • You can customize the spice levels to suit your personal taste, making it versatile for any occasion.
  • Plus, these homemade sausages look wonderful when served, adding a touch of homemade charm to your meals.

Homemade Italian Sausage Ingredients

For the Sausage
• Pork shoulder – 2 lbs, well-marbled for juicy and flavorful sausages.
• Garlic – 6 cloves, minced; the aromatic base that adds depth to your homemade Italian sausage.
• Dried oregano – 2 tsp, a classic herb that brings a hint of Italy to every bite.
• Fennel seeds – 1 tsp, adding a subtle anise flavor that elevates your sausage.
• Crushed red pepper flakes – 1 tsp, for that perfect spicy kick tailored to your taste preferences.
• Salt – 2 tsp, essential for enhancing all the incredible flavors in the sausage.
• Black pepper – 1 tsp, adds a little warmth and balance to the spice blend.

For Serving
• Italian rolls – Soft and fluffy, perfect for holding your delicious sausages and all your favorite toppings!

How to Make Homemade Italian Sausage

  1. Gather all ingredients on a clean countertop. It’s essential to have everything within reach, so you can focus on mixing and crafting the perfect homemade Italian sausage without interruption.

  2. Cut the pork shoulder into smaller chunks for easier blending. This step not only helps with processing but ensures an even texture in your sausage, making every bite just as delicious as the last.

  3. Mix in a bowl the minced garlic, oregano, fennel seeds, red pepper flakes, salt, and black pepper until combined. The fragrant aromas will fill your kitchen, igniting your culinary passion as you prepare this flavorful blend!

  4. Place the pork chunks in a large mixing bowl and sprinkle the spice mixture over them. Use your hands to mix thoroughly until well combined; this ensures every piece of pork is coated with your vibrant spice blend for ultimate flavor.

  5. Shape the mixture into patties or stuff it into casings if preferred. Remember, whether you go for patties or links, the love you put into shaping will truly shine through when cooked.

  6. Heat a skillet over medium heat with a splash of oil. Cook the sausages until they are browned on all sides and cooked through, about 8-10 minutes. Watch for a lovely golden brown color and savor the delightful sizzle!

Optional: Serve with sautéed peppers and onions for an added touch of flavor.

Exact quantities are listed in the recipe card below.

Make Ahead Options

These Homemade Italian Sausages are perfect for busy weeknights and can be prepped ahead to save you time during the hustle and bustle of life! You can mix the pork, spices, and garlic up to 24 hours in advance. Simply follow the recipe up until shaping the mixture into patties or stuffing it into casings, then cover and refrigerate. To maintain quality and prevent drying out, make sure they are tightly wrapped or stored in an airtight container. When you’re ready to enjoy, just cook them as directed in the original recipe, and you’ll have delicious, homemade sausages ready to impress your family without the last-minute rush!

What to Serve with Homemade Italian Sausage?

Elevate your meal with dazzling sides that harmonize with the rich, savory flavors of this homemade delight.

  • Italian Rolls: Soft and fluffy, these rolls cradle the sausages perfectly, ready to soak up all the delicious juices.
  • Sautéed Peppers and Onions: The sweetness of caramelized onions and colorful bell peppers adds a vibrant touch, enhancing the unctuousness of the sausage.
  • Garlic Mashed Potatoes: Creamy and buttery, these mashed potatoes provide a comforting balance to the sausage’s bold spices, perfect for a hearty plate.
  • Caprese Salad: The freshness of tomatoes and mozzarella, drizzled with balsamic glaze, provides a light and refreshing contrast to the richness of the sausage.
  • Pasta with Marinara Sauce: A classic pairing, the tangy marinara complements the savory notes of your Italian sausage, creating a delightful Italian-inspired feast.
  • Grilled Corn on the Cob: Sweet grilled corn adds a smoky flavor and a bit of crunch, creating a joyful, summertime vibe at your table.
  • Crispy Brussels Sprouts: Roasted to perfection, these earthy greens with a sprinkle of Parmesan offer a delightful crunch and a healthful twist alongside your sausages.
  • Red Wine: A glass of robust red wine, like Chianti, will beautifully complement the flavors of your homemade Italian sausage, enhancing your meal experience.
  • Tiramisu: For dessert, indulge in creamy tiramisu; its coffee and cocoa notes offer a satisfying end to your Italian affair.

How to Store and Freeze Homemade Italian Sausage

Room Temperature: Keep homemade Italian sausage out for no more than 2 hours after cooking to prevent bacterial growth.

Fridge: Store cooked sausages in an airtight container in the refrigerator for up to 3 days. Make sure they’re fully cooled before sealing to maintain freshness.

Freezer: For longer storage, freeze uncooked sausages or leftovers in freezer-safe bags for up to 3 months. Squeeze out excess air to prevent freezer burn.

Reheating: Thaw frozen sausages in the refrigerator overnight before reheating. Warm them in a skillet over medium heat for about 5-7 minutes, or until heated through, to enjoy the full flavors.

Homemade Italian Sausage Variations

Feel free to explore these exciting twists and substitutions that will make your homemade Italian sausage uniquely yours!

  • Lean Meat: Swap out pork shoulder for ground turkey or chicken to create a lighter version. It’ll still be flavorful but with fewer calories.

  • Herb Boost: Add fresh herbs like basil or parsley for an additional burst of flavor. They’ll tie in beautifully with the other spices, creating a vibrant taste.

  • Spicy Kick: Increase the crushed red pepper flakes to suit your heat preference. Just a pinch more can transform your sausage into a fiery delight!

  • Vegan/Veggie Option: Use textured vegetable protein (TVP) or mushrooms blended with your spice mix for a plant-based alternative. This swap is not only hearty but also rich in umami goodness.

  • Cheese Lover’s Delight: Incorporate shredded parmesan or provolone cheese into the sausage mixture for a creamy, savory treat. The melting cheese adds a wonderful richness to every bite.

  • Smoky Flavor: Mix in smoked paprika or chipotle powder to add a deep, smoky flavor that enhances the sausages. This variation adds complexity and an irresistible aroma.

  • Extra Texture: Fold in some diced bell peppers or onions into your mixture. This addition gives a delightful crunch and fresh flavor, making each bite more interesting.

  • Herbal Infusion: Try adding aromatic herbs like thyme or rosemary for a distinctly different flavor profile. They provide an earthy tone that complements the sausage beautifully.

Chef's Helpful Tips

  • Always choose a well-marbled pork shoulder to ensure your homemade Italian sausage is juicy and flavorful.
  • When mixing the spice blend with the pork, use your hands to thoroughly combine everything for an even distribution of flavor.
  • Avoid overcrowding the skillet when cooking; this allows the sausages to brown properly and develop that beautiful crust.
  • Finally, remember to let the sausages rest for a few minutes after cooking to retain their moisture before serving.

Homemade Italian Sausage Recipe FAQs

How do I know if my pork shoulder is fresh enough?
Absolutely! Look for a well-marbled pork shoulder with a bright red color and a slightly glossy surface. Avoid meat that has dark spots or an off smell—fresh pork should smell clean and slightly sweet.

What is the best way to store homemade Italian sausage?
For sure! Store cooked sausages in an airtight container in the fridge for up to 3 days. Make sure they’re fully cooled before sealing to maintain their freshness and flavor. You can also wrap them tightly in foil for extra protection.

Can I freeze homemade Italian sausage, and how do I do it?
Yes, indeed! For freezing, place uncooked sausages or leftovers in freezer-safe bags for up to 3 months. Squeeze out all excess air before sealing to prevent freezer burn. If you’ve made patties, lay them flat between layers of parchment paper before storing to keep them from sticking together!

What if my sausages are too salty?
Don’t worry! If you’ve oversalted your sausage blend, try adding some additional ground pork or another meat to balance the flavor, mixing it well. You can also add extra spices to complement the existing flavors and dilute the saltiness.

Are there any dietary considerations I should know about?
Very much so! This homemade Italian sausage is made with simple ingredients, but if you’re worried about gluten, ensure your seasonings are gluten-free. For allergies, it’s wise to double-check that none of your spices contain additives or allergens. If you have pets, it’s best to keep them away from any seasoned meat, especially garlic and onion, as they’re harmful to dogs and cats.

What’s the best way to serve homemade Italian sausage?
Absolutely! Serve these sausages hot on soft Italian rolls with sautéed peppers and onions, or enjoy them alongside a hearty pasta dish. The more the merrier, as you can customize toppings with cheese, sauces, or your favorite condiments!

Homemade Italian Sausage

Homemade Italian Sausage

Homemade Italian Sausage is a flavorful blend of spices and pork, perfect for family meals and backyard cookouts.
Print Recipe Pin Recipe
Prep Time 15 minutes mins
Cook Time 10 minutes mins
Total Time 25 minutes mins
Servings: 4 sausages
Course: DINNER RECIPES
Cuisine: Italian
Calories: 300
Ingredients Equipment Method Nutrition Notes

Ingredients
  

For the Sausage
  • 2 lbs Pork shoulder well-marbled for juicy and flavorful sausages
  • 6 cloves Garlic minced; the aromatic base
  • 2 tsp Dried oregano a classic herb that brings a hint of Italy
  • 1 tsp Fennel seeds adds a subtle anise flavor
  • 1 tsp Crushed red pepper flakes for a spicy kick
  • 2 tsp Salt essential for enhancing flavors
  • 1 tsp Black pepper adds warmth and balance
For Serving
  • 4 rolls Italian rolls soft and fluffy, perfect for holding sausages

Equipment

  • Mixing bowl
  • Skillet
  • Knife
  • Cutting Board

Method
 

How to Make Homemade Italian Sausage
  1. Gather all ingredients on a clean countertop.
  2. Cut the pork shoulder into smaller chunks for easier blending.
  3. Mix in a bowl the minced garlic, oregano, fennel seeds, red pepper flakes, salt, and black pepper until combined.
  4. Place the pork chunks in a large mixing bowl and sprinkle the spice mixture over them. Mix thoroughly.
  5. Shape the mixture into patties or stuff it into casings if preferred.
  6. Heat a skillet over medium heat with a splash of oil. Cook the sausages until browned, about 8-10 minutes.

Nutrition

Serving: 1sausageCalories: 300kcalCarbohydrates: 2gProtein: 22gFat: 24gSaturated Fat: 8gPolyunsaturated Fat: 1gMonounsaturated Fat: 12gCholesterol: 80mgSodium: 600mgPotassium: 350mgCalcium: 2mgIron: 8mg

Notes

Serve with sautéed peppers and onions for an extra touch of flavor.

Tried this recipe?

Let us know how it was!

Filed Under: DINNER RECIPES

  • « Previous Page
  • 1
  • …
  • 6
  • 7
  • 8
  • 9
  • 10
  • …
  • 49
  • Next Page »

Recent Posts

  • Crispy Potatoes in Oven
  • Lucky Charms Pancakes
  • Cheeseburger
  • Boiled Corn on the Cob
  • St. Patrick’s Day Dessert Parfaits

Recent Comments

No comments to show.

Footer

  • Contact
  • Privacy Policy
  • About Us
  • Terms
  • ↑ back to top

Copyright © 2024 www.Forkono.com

Table Of Content