Forkono

  • BREAKFAST & BRUNCH
  • DESSERT RECIPES
  • DINNER RECIPES
  • LUNCH RECIPES
  • About uS
  • SNACKS & APPETIZERS
menu icon
go to homepage
  • BREAKFAST & BRUNCH
  • DESSERT RECIPES
  • DINNER RECIPES
  • LUNCH RECIPES
  • About uS
  • SNACKS & APPETIZERS
search icon
Homepage link
  • BREAKFAST & BRUNCH
  • DESSERT RECIPES
  • DINNER RECIPES
  • LUNCH RECIPES
  • About uS
  • SNACKS & APPETIZERS
×

Tomato Basil Vegetable Soup

December 15, 2025 by JudyWhite Leave a Comment

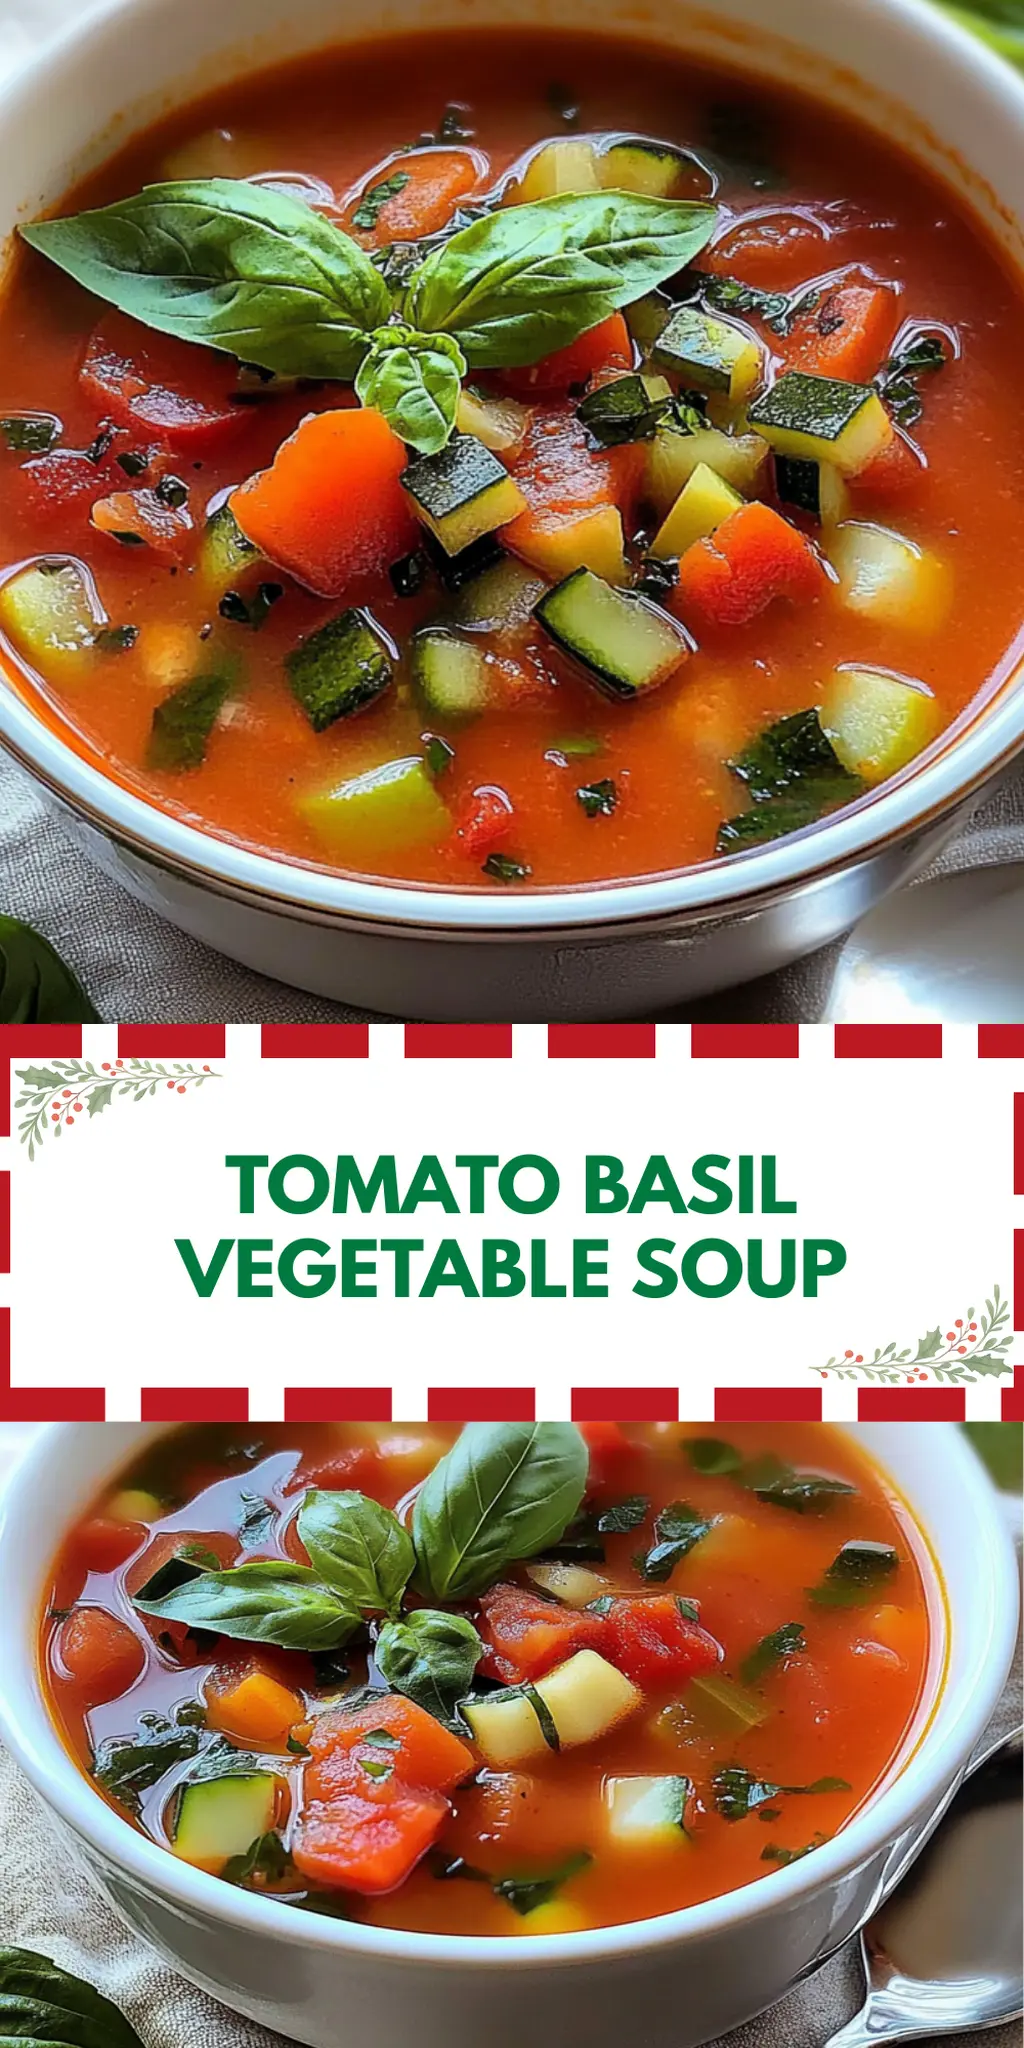
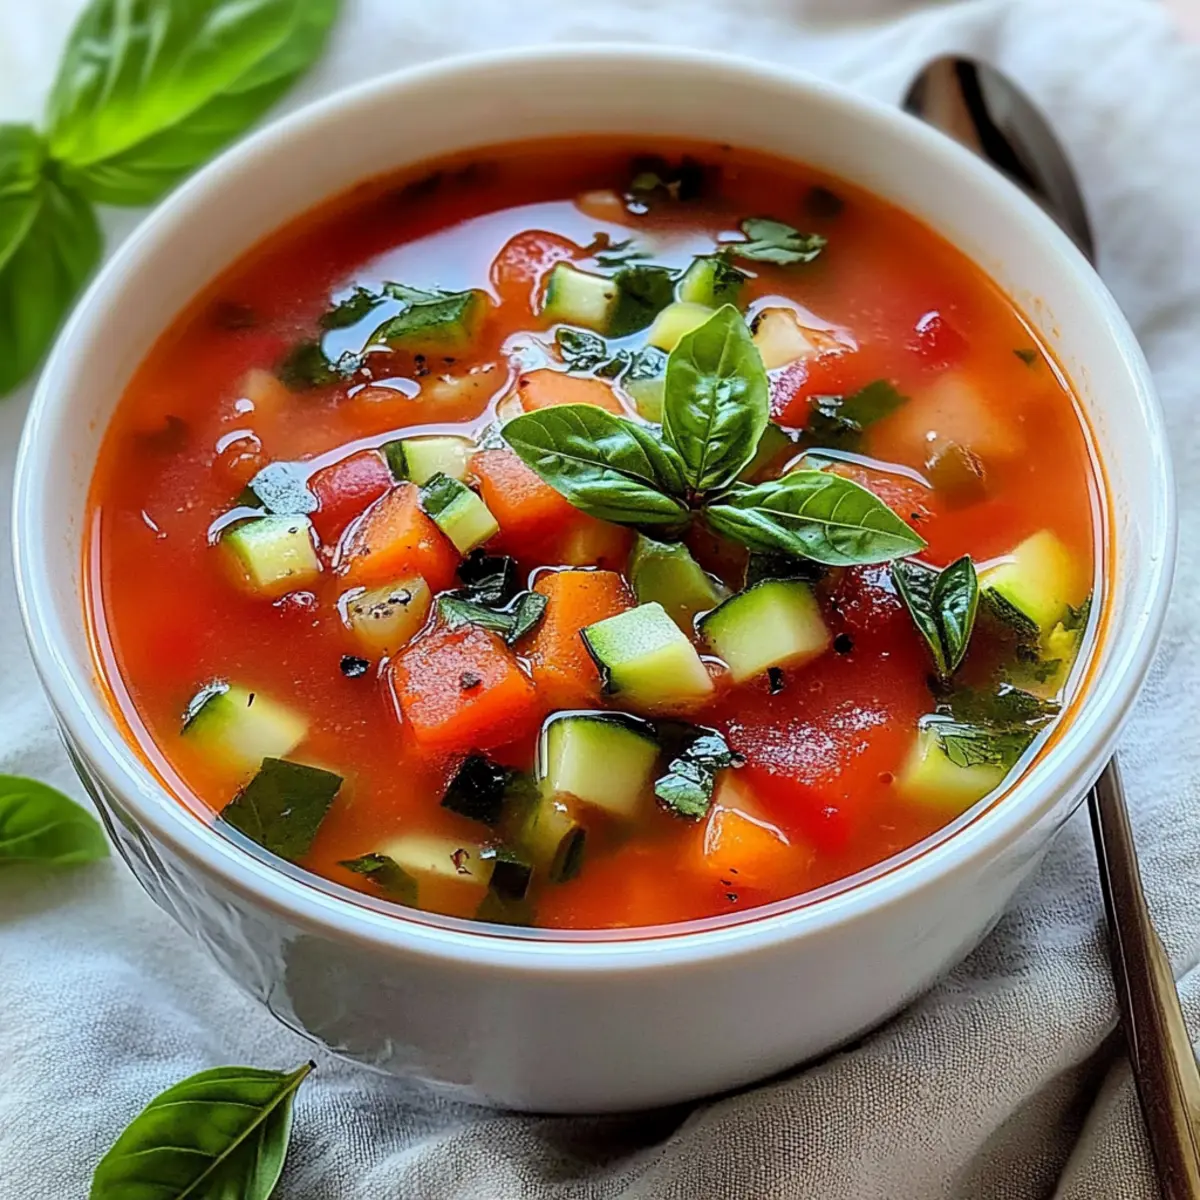
As the cooler days of autumn approach, there’s nothing quite as comforting as a warm bowl of Tomato Basil Vegetable Soup. I first discovered this recipe during one of those cozy evenings when the wind whipped leaves across my yard, and I craved something hearty yet healthy. The fresh aroma of sautéed onions and garlic instantly filled my kitchen, bringing back memories of family dinners spent gathered around the table.

This soup isn’t just a bowl of vegetables; it’s rich in vibrant flavors and nourishment, making it the perfect remedy for those fast-food blues. With just a handful of ingredients—like juicy tomatoes, aromatic basil, and crisp veggies—you can whip up a meal that’s not only easy but also impressively delicious. Each spoonful warms the soul, and it’s versatile enough to adapt to whatever veggies you have on hand. Ready to dive into a comforting bowl of homemade goodness? Let’s get started!

Why You'll Love This Tomato Basil Vegetable Soup

  • This Tomato Basil Vegetable Soup is incredibly easy to make, requiring just a handful of fresh ingredients and minimal prep time.
  • The delightful combination of tomatoes and basil creates a deliciously rich flavor profile that will satisfy your taste buds.
  • Its versatility allows you to customize the soup with whatever vegetables you have on hand, making it a perfect dish for any season.
  • Not only is it visually appealing with its vibrant colors, but it also serves as a comforting and healthy option that is sure to please both family and friends.

Tomato Basil Vegetable Soup Ingredients

• Here’s what you need to create a flavorful Tomato Basil Vegetable Soup.

For the Base

  • Olive oil – A splash of healthy fat for sautéing and flavor.
  • Onion – Adds a savory foundation and sweetness as it cooks.
  • Garlic – Infuses the soup with aromatic depth and richness.

For the Vegetables

  • Vegetable broth – Serves as the savory liquid base of the soup.
  • Canned diced tomatoes – Adds acidity and sweetness; opt for low-sodium for a healthier choice.
  • Fresh tomatoes – Enhance freshness and bring vibrant flavor to the mix.
  • Carrots – Provide natural sweetness and a pop of color.
  • Celery – Contributes crunch and a slight earthiness.
  • Zucchini – Adds a mild flavor and tender texture to the soup.

For Seasoning

  • Dried basil – Intensifies the aromatic blend of flavors.
  • Salt – Essential for enhancing all the delicious tastes.
  • Pepper – Adds a hint of warmth and spice.

For Garnish

  • Fresh basil leaves – A fragrant finishing touch that brightens up the dish.

How to Make Tomato Basil Vegetable Soup

  1. Heat a large pot and pour in the olive oil over medium heat. Allow the oil to warm for about 1-2 minutes until it shimmers, preparing it for the delicious aroma to come.

  2. Sauté the diced onion and minced garlic in the heated oil, stirring frequently. Cook for about 3-5 minutes until the onion becomes translucent and aromatic, setting the stage for deeper flavors.

  3. Pour in the vegetable broth and add the canned diced tomatoes. Stir gently and bring this savory mixture to a lively boil, releasing a delightful aroma into your kitchen.

  4. Add the carrots, celery, and zucchini to the pot, ensuring an even distribution. Allow the soup to return to a boil for about 2 minutes, inviting those vibrant colors to blend.

  5. Stir in the dried basil, along with salt and pepper to taste. The basil’s earthy sweetness will enhance the soup’s overall flavor profile beautifully!

  6. Reduce the heat to low and let the soup simmer for 20 minutes. This slow cooking will soften the vegetables and elevate the flavors, filling your home with irresistible scents.

  7. Remove the pot from heat once the time is up and stir in the fresh basil leaves for a burst of freshness. The vibrant green will add a lovely touch to your soup!

  8. Serve the soup hot in bowls, and don’t forget to savor each warming spoonful. It’s the perfect way to unwind whether alone or with loved ones.

Optional: Pair with crusty bread for a heartier meal.
Exact quantities are listed in the recipe card below.

What to Serve with Tomato Basil Vegetable Soup?

As you dip into this vibrant bowl of warmth, consider these mouthwatering pairings to create a delightful meal experience.

  • Crusty Bread:
    A hearty slice of crusty bread is the perfect companion, ideal for soaking up every last drop of the savory soup.

  • Grilled Cheese Sandwich:
    This classic pairing adds a gooey, melty texture that complements the fresh flavors of the soup, making each bite irresistible!

  • Mixed Green Salad:
    A light salad of fresh greens with a tangy vinaigrette offers a refreshing contrast to the hearty soup, balancing the meal beautifully.

  • Garlic Breadsticks:
    Crunchy and buttery, these breadsticks not only enhance the soup’s flavor but also invite you to enjoy a more filling dining experience.

  • Roasted Veggies:
    Seasoned and caramelized vegetables on the side add both vibrant colors and a delightful additional layer of flavor to your meal.

  • White Wine:
    A crisp white wine, such as Sauvignon Blanc, elevates your dining experience, perfectly complementing the herbs and tomatoes in the soup.

  • Fruit Sorbet:
    For dessert, a scoop of light fruit sorbet can cleanse the palate and end the meal on a refreshing note, making it a sweet conclusion to your comforting evening.

How to Store and Freeze Tomato Basil Vegetable Soup

Fridge: Store the soup in an airtight container for up to 3 days. Make sure to let it cool completely before sealing to maintain freshness.

Freezer: Tomato Basil Vegetable Soup can be frozen for up to 3 months. Portion it into freezer-safe bags or containers, leaving some space for expansion.

Reheating: To reheat, thaw overnight in the fridge, then gently warm on the stovetop over medium heat, stirring occasionally until heated through. Enjoy the comforting flavors again!

Tomato Basil Vegetable Soup Variations

Feel free to experiment and transform this comforting recipe into something uniquely your own.

  • Dairy-Free: Swap out vegetable broth for coconut milk for a creamy texture and tropical twist.
    Enhance the flavors by adding a squeeze of lime just before serving for a refreshing zing!

  • Spicy Kick: Toss in some red pepper flakes or diced jalapeños to bring the heat.
    This adds a layer of warmth that dances on your palate, making the soup even more exciting!

  • Herb Explosion: Use fresh herbs like thyme or oregano in addition to basil for a fragrant blend.
    These aromatic herbs elevate the soup’s complexity, making each sip feel like a garden-fresh delight.

  • Protein Boost: Stir in cooked lentils or chickpeas to turn your soup into a hearty meal option.
    Not only does this enhance the nutrition, but it also adds variety to each spoonful.

  • Roasted Veggies: Roast your vegetables before adding them to the pot for deeper flavors.
    This little tweak creates a wonderful caramelization that transforms your soup into a comforting hug.

  • Creamy Version: Incorporate a splash of heavy cream or cashew cream toward the end of cooking.
    This creates a luscious texture that wraps around the veggies like a warm embrace.

  • Seasonal Veggies: Substitute or add in seasonal vegetables like squash, bell peppers, or sweet potatoes.
    This customization celebrates the bounty of each season, keeping your soup fresh and exciting all year long.

Each variation invites you to play with flavors and textures, ensuring that every bowl is a delightful surprise!

Make Ahead Options

Preparing your Tomato Basil Vegetable Soup ahead of time is a wonderful way to save time during busy weeknights! You can chop all the vegetables (onion, carrots, celery, zucchini) and store them in an airtight container in the refrigerator for up to 3 days. This allows you to simply sauté them on the day you plan to make the soup. Additionally, you can also cook and cool the soup up to 24 hours in advance—just refrigerate it in a covered pot. When you’re ready to serve, reheat it slowly on the stove over low heat, adding fresh basil just before serving to maintain its vibrant flavor and aroma. With these make-ahead options, you’ll enjoy all the delightful warmth of homemade soup with minimal effort!

Chef's Helpful Tips

  • When making Tomato Basil Vegetable Soup, always ensure your vegetables are diced uniformly for even cooking and a pleasing presentation.
  • Avoid overcooking the garlic by adding it to the pan just after the onions become translucent to prevent bitterness.
  • For a richer flavor, consider roasting your fresh tomatoes before adding them to the soup to intensify their sweetness.
  • Remember to simmer the soup for the full 20 minutes to allow the flavors to meld beautifully before serving.

Tomato Basil Vegetable Soup Recipe FAQs

How do I choose ripe tomatoes for this soup?
Absolutely! When selecting tomatoes, look for those that are firm yet slightly yielding to the touch, with vibrant color and no dark spots all over. The perfect tomatoes will enhance the freshness of your soup, giving it a delicious and tangy flavor!

How long can I store Tomato Basil Vegetable Soup in the fridge?
You can keep your Tomato Basil Vegetable Soup in an airtight container in the fridge for up to 3 days. Allow the soup to cool completely before sealing it, which helps maintain its fresh taste and aroma.

Can I freeze Tomato Basil Vegetable Soup, and how?
Very! You can freeze Tomato Basil Vegetable Soup for up to 3 months. To do this, portion the soup into freezer-safe bags or containers, leaving some space for expansion. It’s best to let it cool entirely before freezing. When you’re ready to enjoy it again, simply thaw it overnight in the fridge and reheat on the stovetop until warmed through.

What should I do if my soup tastes too acidic?
If your soup is leaning towards the acidic side, don’t worry! You can balance the flavors by adding a pinch of sugar or honey; this will mellow out the acidity beautifully. Alternatively, adding a bit more vegetable broth can dilute the flavors while keeping it delicious.

Can my pets enjoy Tomato Basil Vegetable Soup?
While it’s tempting to share, it’s best to keep the soup away from pets. Ingredients like onions and garlic can be harmful to dogs and cats. If you want to make a pet-friendly version, consider making a separate batch without any seasoning.

What’s the best way to reheat frozen Tomato Basil Vegetable Soup?
To reheat, start by transferring the frozen soup to the fridge and allow it to thaw overnight. Once thawed, gently heat it on the stovetop over medium heat, stirring occasionally until heated through. If you’re in a hurry, you can warm it in the microwave, just be sure to stir it often for even heating. Enjoy those comforting flavors again!

Tomato Basil Vegetable Soup

Tomato Basil Vegetable Soup

Enjoy a comforting bowl of Tomato Basil Vegetable Soup, perfect for cooler days and rich in vibrant flavors.
Print Recipe Pin Recipe
Prep Time 10 minutes mins
Cook Time 30 minutes mins
Total Time 40 minutes mins
Servings: 4 bowls
Course: LUNCH RECIPES
Cuisine: American
Calories: 150
Ingredients Equipment Method Nutrition Notes

Ingredients
  

For the Base
  • 2 tablespoons Olive oil A splash of healthy fat for sautéing and flavor.
  • 1 medium Onion Adds savory foundation and sweetness.
  • 3 cloves Garlic Infuses the soup with aromatic depth.
For the Vegetables
  • 4 cups Vegetable broth Savory liquid base.
  • 1 can Canned diced tomatoes Low-sodium for healthier choice.
  • 2 medium Fresh tomatoes Enhance freshness and flavor.
  • 2 medium Carrots Provides natural sweetness.
  • 2 stalks Celery Contributes crunch.
  • 1 medium Zucchini Adds mild flavor and texture.
For Seasoning
  • 1 tablespoon Dried basil Intensifies flavor.
  • 1 teaspoon Salt Enhances taste.
  • 1/2 teaspoon Pepper Adds warmth.
For Garnish
  • 1/4 cup Fresh basil leaves A fragrant finishing touch.

Equipment

  • Large pot

Method
 

How to Make Tomato Basil Vegetable Soup
  1. Heat a large pot and pour in the olive oil over medium heat for 1-2 minutes until it shimmers.
  2. Sauté the diced onion and minced garlic in the heated oil for 3-5 minutes until the onion is translucent.
  3. Pour in the vegetable broth and add the canned diced tomatoes. Stir and bring to a boil.
  4. Add the carrots, celery, and zucchini to the pot. Return to a boil for about 2 minutes.
  5. Stir in the dried basil, along with salt and pepper to taste.
  6. Reduce the heat to low and let the soup simmer for 20 minutes.
  7. Remove from heat and stir in the fresh basil leaves.
  8. Serve the soup hot in bowls and enjoy.

Nutrition

Serving: 1bowlCalories: 150kcalCarbohydrates: 20gProtein: 3gFat: 7gSaturated Fat: 1gMonounsaturated Fat: 6gSodium: 600mgPotassium: 600mgFiber: 4gSugar: 4gVitamin A: 4500IUVitamin C: 20mgCalcium: 40mgIron: 1mg

Notes

Optional: Pair with crusty bread for a heartier meal.

Tried this recipe?

Let us know how it was!

Filed Under: LUNCH RECIPES

Moroccan Chickpea Carrot Salad

December 15, 2025 by JudyWhite Leave a Comment

There’s a certain joy that comes with assembling a vibrant, colorful salad, and my Moroccan Chickpea Carrot Salad is no exception. Picture this: fresh, crunchy carrots paired with nutty chickpeas, all tossed in a zesty dressing that will awaken your taste buds. I stumbled upon this delightful combination after a summer gathering, where vibrant flavors and refreshing textures kept reappearing on my plate, igniting my culinary curiosity.

With just a handful of pantry staples and a mere 15 minutes of prep time, this salad proves to be as easy as it is delicious. Perfect for warding off the allure of fast food, it’s not only healthy but also incredibly versatile, making it an ideal companion for lunch, dinner, or as a potluck showstopper. So, if you’re ready to bring a taste of Morocco into your kitchen, let’s dive into this colorful bowl of goodness that promises to brighten your day!

Why You'll Love This Moroccan Chickpea Carrot Salad

  • This Moroccan Chickpea Carrot Salad is incredibly easy to make, with just 15 minutes of prep time.
  • The combination of crunchy carrots and nutty chickpeas delivers a burst of flavor in every bite.
  • It is a versatile dish that can be served as a main course, side dish, or a potluck favorite, catering to various occasions.
  • Visually, this salad is a feast for the eyes, with vibrant colors that make it a standout on any table.

Moroccan Chickpea Carrot Salad Ingredients

• Get ready to create a fresh and colorful delight!

For the Salad

  • Chickpeas – drained and rinsed for a nutty flavor and protein boost.
  • Carrots – grated for a crunchy, sweet addition that adds vibrant color.
  • Red Onion – finely chopped to bring a zesty bite that complements the other flavors.
  • Fresh Parsley – chopped to add a refreshing herbal note and brighten up the salad.

For the Dressing

  • Olive Oil – extra virgin is best for a rich, flavorful base in the dressing.
  • Lemon Juice – freshly squeezed brings a zesty brightness that elevates the Moroccan Chickpea Carrot Salad.
  • Cumin – adds an earthy warmth that ties all the flavors together.
  • Salt and Pepper – to taste, enhancing the overall flavor profile and balance.

How to Make Moroccan Chickpea Carrot Salad

  1. Combine Ingredients: In a large bowl, bring together the neatly drained chickpeas, freshly grated carrots, finely chopped red onion, and vibrant parsley. This mix should look colorful and inviting!

  2. Whisk Dressing: In a separate bowl, whisk together the extra virgin olive oil, fresh lemon juice, cumin, salt, and pepper until well combined. The dressing should be smooth and aromatic.

  3. Toss Together: Pour the zesty dressing over your salad mix. Gently toss everything together until all ingredients are beautifully coated in the dressing. A spoonful of joy in every bite!

  4. Chill Out: Allow the salad to chill in the refrigerator for at least 30 minutes. This step will enhance the flavors and give the salad a refreshing taste.

Optional: Garnish with additional parsley before serving for a fresh touch.
Exact quantities are listed in the recipe card below.

What to Serve with Moroccan Chickpea Carrot Salad?

Elevate your meal with delightful pairings that enhance the fresh, zesty flavors of this vibrant salad.

  • Warm Pita Bread: Soft and fluffy, it’s perfect for scooping up the salad, adding a comforting element to your meal.

  • Tzatziki Sauce: Creamy and cool, this tangy yogurt dip complements the spices in the salad beautifully and adds a refreshing bite.

  • Quinoa: Nutty and filling, quinoa not only provides a nutritious base but also beautifully balances the crispness of the carrots.

  • Grilled Chicken Skewers: Marinated in spices for an extra kick, they make for a satisfying protein addition that pairs perfectly with the salad’s earthy cumin.

For a sweet finish, consider a light dessert.

  • Minted Yogurt Parfait: Layers of yogurt, honey, and fresh mint will cleanse your palate after the zesty salad and keep the Moroccan theme alive.

  • Citrus Sorbet: A refreshing and light treat that echoes the bright flavors of lemon in the salad, making it a delightful end to your meal.

How to Store and Freeze Moroccan Chickpea Carrot Salad

Fridge: Store the Moroccan Chickpea Carrot Salad in an airtight container in the refrigerator for up to 3 days. This keeps it fresh and ready for a quick grab-and-go meal.

Freezer: It’s best not to freeze the salad due to the crispy texture of the carrots, which may become mushy upon thawing.

Reheating: If you enjoy it warm, you can lightly sauté the salad for a few minutes over low heat, but be mindful not to overcook the vegetables.

Serving: The flavors will deepen if left to chill, so enjoy it cold after 30 minutes in the fridge!

Make Ahead Options

These Moroccan Chickpea Carrot Salad components are perfect for meal prep, helping you save valuable time during your busy week! You can prepare the salad base—chickpeas, grated carrots, chopped red onion, and parsley—up to 3 days in advance. Simply store these ingredients in an airtight container in the refrigerator. To keep the salad fresh and vibrant, hold off on adding the dressing until you’re ready to serve; this prevents the vegetables from becoming soggy. When it’s time to enjoy, just whisk together the olive oil, lemon juice, cumin, and seasonings, toss with the prepped ingredients, and let it chill for 30 minutes before serving for the best flavor.

Moroccan Chickpea Carrot Salad Variations

Feel free to explore these delightful twists that will take your Moroccan Chickpea Carrot Salad to new heights.

  • Spicy Kick: Add a pinch of cayenne pepper or red chili flakes for a warm, spicy finish. This heat lifts the dish and adds excitement to every bite.

  • Herb Medley: Swap parsley for fresh mint or cilantro for a different herbal twist. Their unique freshness will transport you straight to the vibrant streets of Morocco!

  • Nutty Crunch: Toss in chopped walnuts or toasted almonds for an exhilarating crunch and rich nutty flavor. This addition not only heightens the texture but creates a delightful flavor contrast.

  • Citrusy Boost: Incorporate orange segments or zest to bring a sweet and tangy note to the salad. This burst of citrus will awaken your senses and brighten the dish.

  • Roasted Veggies: For added depth, roast the carrots and chickpeas before mixing them into the salad. The caramelization enhances sweetness and provides a wonderful texture.

  • Dried Fruits: Mix in raisins or chopped apricots for a sweet surprise that balances the savory elements beautifully. They add a whimsical touch that will surely delight!

  • Creamy Element: Incorporate a dollop of Greek yogurt or a vegan alternative for a creamy texture. This luxurious addition creates a harmonious contrast with the crisp salad.

  • Grain Power: Enhance the dish by mixing in cooked quinoa or couscous for a heartier salad. This twist will transform it into a satisfying meal that’s perfect for lunch or dinner.

Chef's Helpful Tips

  • When making Moroccan Chickpea Carrot Salad, ensure your chickpeas are thoroughly drained and rinsed to remove any excess salt.
  • For a balanced flavor, adjust the salt and pepper in the dressing according to your taste preference after whisking it together.
  • To enhance the salad’s crunch, grate the carrots just before mixing, as this will keep them crisp.
  • Remember to let the salad chill for at least 30 minutes to allow the flavors to meld beautifully before serving.

Moroccan Chickpea Carrot Salad Recipe FAQs

How do I choose ripe carrots for the salad?
Absolutely! Look for firm carrots that have vibrant color and smooth skin. Avoid those with soft spots or dark blemishes, as these may indicate they’re past their prime. Freshly harvested carrots often have a sweeter taste, which I highly recommend!

How long can I store Moroccan Chickpea Carrot Salad in the fridge?
You can store the salad in an airtight container in the refrigerator for up to 3 days. Just be sure to keep it well-sealed to retain its freshness and crunch. I often make extra to enjoy throughout the week!

Can I freeze Moroccan Chickpea Carrot Salad?
It’s best not to freeze this salad. The crunchy texture of the carrots may become mushy after thawing. If you want to make it ahead of time, I suggest preparing the chickpeas and dressing separately, combining them with fresh carrots just before serving.

What should I do if the salad is too salty?
If you find the salad a bit too salty, try adding an extra squeeze of lemon juice or a little more grated carrot to balance it out. This will enhance the other flavors while toning down the saltiness. Remember, adjusting seasonings is all about finding that perfect balance!

Is this salad suitable for those with food allergies?
This Moroccan Chickpea Carrot Salad is naturally gluten-free and vegetarian. However, it does contain chickpeas, which are a legume and may not be suitable for everyone. Always check for specific allergies, and feel free to substitute any ingredients you cannot consume. For a nutty flavor, consider adding toasted seeds instead!

Moroccan Chickpea Carrot Salad

Moroccan Chickpea Carrot Salad

This Moroccan Chickpea Carrot Salad blends crunchy carrots and nutty chickpeas for a quick, vibrant dish.
Print Recipe Pin Recipe
Prep Time 15 minutes mins
Chill Time 30 minutes mins
Total Time 45 minutes mins
Servings: 4 servings
Course: LUNCH RECIPES
Cuisine: Moroccan
Calories: 180
Ingredients Equipment Method Nutrition Notes

Ingredients
  

For the Salad
  • 1 can Chickpeas drained and rinsed
  • 2 medium Carrots grated
  • 1 small Red Onion finely chopped
  • 1/2 cup Fresh Parsley chopped
For the Dressing
  • 1/4 cup Olive Oil extra virgin
  • 2 tablespoons Lemon Juice freshly squeezed
  • 1 teaspoon Cumin
  • Salt to taste
  • Pepper to taste

Equipment

  • Large Bowl
  • Whisk

Method
 

Preparation
  1. In a large bowl, combine chickpeas, grated carrots, chopped red onion, and parsley.
  2. In a separate bowl, whisk together olive oil, lemon juice, cumin, salt, and pepper until well combined.
  3. Pour the dressing over the salad mix and toss until coated.
  4. Chill the salad in the refrigerator for at least 30 minutes before serving.

Nutrition

Serving: 1servingCalories: 180kcalCarbohydrates: 24gProtein: 6gFat: 8gSaturated Fat: 1gPolyunsaturated Fat: 2gMonounsaturated Fat: 4gSodium: 200mgPotassium: 300mgFiber: 6gSugar: 3gVitamin A: 5000IUVitamin C: 15mgCalcium: 60mgIron: 2mg

Notes

Garnish with additional parsley before serving for a fresh touch. Adjust salt and pepper according to taste preference.

Tried this recipe?

Let us know how it was!

Filed Under: LUNCH RECIPES

Sweet Potato Arugula Salad

December 15, 2025 by JudyWhite Leave a Comment

When the sweet scent of roasted sweet potatoes fills the air, I can’t help but feel a little giddy. This Sweet Potato Arugula Salad is one of those dishes that perfectly balances comfort and delight—ideal for a cozy night in or a vibrant picnic. I first whipped it up during a weekend gathering, and it quickly became the star of the table, surprising everyone with its heartiness and refreshing twist.

Imagine a medley of tender, caramelized sweet potatoes mingling with peppery arugula, tangy feta, and crunchy walnuts, all drizzled with the rich notes of balsamic vinegar. It’s a salad that transforms healthy eating from a chore into a celebration. Best of all? It takes just 45 minutes to prepare, making it an easy go-to for busy days when you crave something full of flavor but light on hassle.

Join me as we dive into this simple yet stunning creation that promises to satisfy your taste buds while keeping your meal prep stress-free!

Why You'll Love This Sweet Potato Arugula Salad

  • This Sweet Potato Arugula Salad is incredibly simple to prepare, making it perfect for both weeknight dinners and festive gatherings.
  • The combination of roasted sweet potatoes and fresh arugula creates a delightful explosion of flavor that will have your taste buds dancing.
  • Its versatility means you can serve it as a side or as a main dish, and it pairs beautifully with any protein.
  • Not to mention, the vibrant colors and textures make it an eye-catching centerpiece for your table, sure to impress your guests.

Sweet Potato Arugula Salad Ingredients

• To create this delightful Sweet Potato Arugula Salad, gather the following ingredients:

For the Salad

  • Sweet potatoes – rich in vitamins, they add natural sweetness and creaminess when roasted.
  • Arugula – its peppery flavor contrasts beautifully with the sweet potatoes and feta.
  • Feta cheese – crumbled for a tangy, creamy touch that enhances the salad’s richness.
  • Walnuts – chopped to provide a satisfying crunch and a boost of healthy fats.

For the Dressing

  • Olive oil – a good quality oil enriches the salad with a silky texture and healthy monounsaturated fats.
  • Balsamic vinegar – adds a tangy depth and helps to balance the sweetness of the sweet potatoes.
  • Salt and pepper – adjust to taste for optimal flavor enhancement in your Sweet Potato Arugula Salad.

How to Make Sweet Potato Arugula Salad

  1. Preheat the oven to 425°F (220°C). This high temperature helps the sweet potatoes roast nicely, creating a delicious caramelization that enhances their natural sweetness.

  2. Toss the diced sweet potatoes in a mixing bowl with olive oil, salt, and pepper. Make sure every piece is well-coated to achieve that perfect roasted flavor.

  3. Spread the sweet potatoes evenly on a baking sheet. Roast them for 25-30 minutes, turning halfway, until they are tender and golden brown. The smell will be divine!

  4. Combine arugula, feta cheese, and walnuts in a large salad bowl. Toss them gently, allowing the vibrant colors to mix, making the salad as appealing to the eyes as it is to the palate.

  5. Add the roasted sweet potatoes to your salad bowl. Their warmth will slightly wilt the arugula, bringing all the flavors together in perfect harmony.

  6. Drizzle with balsamic vinegar and toss gently to combine. This dressing will tie everything together, providing a delightful tang with every bite.

  7. Serve immediately, enjoying it while the sweet potatoes are still warm. This ensures you experience the full range of textures and flavors!

Optional: Garnish with fresh herbs for an added burst of flavor.

Exact quantities are listed in the recipe card below.

Storage Tips for Sweet Potato Arugula Salad

Fridge: Store any leftover Sweet Potato Arugula Salad in an airtight container in the refrigerator for up to 3 days.

Freezer: It’s best to freeze the roasted sweet potatoes separately for optimal texture. They can last in the freezer for up to 3 months.

Reheating: To enjoy leftovers, reheat roasted sweet potatoes in the oven at 350°F (175°C) until warmed through. Add fresh arugula and dressing just before serving for best flavor.

Assembly: If preparing ahead, keep the salad components separate. Combine just before serving to maintain freshness and crunch.

Sweet Potato Arugula Salad Variations

Feel free to explore these delicious twists and substitutions to make this Sweet Potato Arugula Salad your own!

  • Vegan: Substitute feta with crumbled tofu or a nut-based cheese for a creamy, plant-based version.
  • Nut-Free: Replace walnuts with sunflower seeds or pumpkin seeds for a crunchy addition without the nuts.
  • Spicy: Add a pinch of red pepper flakes to the roasted sweet potatoes for a gentle heat that enhances the salad’s flavor.
  • Grains Boost: Toss in some cooked quinoa or farro for added texture and protein, making the salad more filling.
  • Fruit Addition: Mix in diced apples or pears for a sweet crunch that complements the dish beautifully.
  • Herb Infusion: Experiment with fresh herbs like basil or mint, which can elevate the freshness of the salad.
  • Dressing Swap: Try a lemon vinaigrette instead of balsamic for a zesty twist that brightens the entire dish.
  • Cheese Variety: Swap feta with goat cheese or blue cheese for a different flavor profile, each bringing its own richness to the salad.

Make Ahead Options

These Sweet Potato Arugula Salad components are perfect for meal prep, making your busy weeknights much easier! You can roast the sweet potatoes up to 3 days in advance; just store them in an airtight container in the fridge to maintain their texture and flavor. Prepare the salad base (arugula, feta cheese, and walnuts) a day ahead, mixing them together and refrigerating separately to keep everything fresh and crisp. When you’re ready to serve, simply toss the roasted sweet potatoes with the salad and drizzle with balsamic vinegar. This means you can enjoy a delightful, ready-to-eat meal with minimal effort, ensuring it tastes just as delicious as if you made it fresh!

What to Serve with Sweet Potato Arugula Salad?

Looking to craft a delightful meal around this vibrant salad? Let’s explore some delicious pairings that will elevate your dining experience.

  • Grilled Chicken: Tender, juicy grilled chicken perfectly complements the salad’s flavors, adding a satisfying protein boost.

  • Rustic Bread: A warm slice of crusty bread can soak up the savory dressing, providing a delightful textural contrast.

  • Roasted Brussels Sprouts: Their crispy edges and nutty flavor balance well with the sweetness of the roasted sweet potatoes.

  • Quinoa: A fluffy side of quinoa adds a nutritious touch, making it a filling option that blends seamlessly with the salad.

  • Lemon Garlic Hummus: Serve alongside a bowl of creamy hummus for a refreshing dip that enhances the earthy flavors of the dish.

  • Pinot Grigio: This light, zesty white wine brings out the tanginess of the feta and balsamic, making each bite even more enjoyable.

  • Chocolate Mousse: End your meal on a sweet note with silky chocolate mousse, its richness providing a perfect contrast to the salad’s freshness.

Chef's Helpful Tips

  • When preparing your Sweet Potato Arugula Salad, make sure to cut the sweet potatoes into uniform sizes for even roasting.
  • Avoid overcrowding the baking sheet, as this can lead to steaming instead of roasting, preventing that delicious caramelization.
  • For an extra flavor boost, consider adding a pinch of smoked paprika to the sweet potatoes before roasting to enhance their sweetness with a hint of smokiness.
  • Always check for doneness around the 25-minute mark to ensure the sweet potatoes are perfectly tender without becoming mushy.

Sweet Potato Arugula Salad Recipe FAQs

What type of sweet potatoes should I choose for the salad?
Absolutely! For this Sweet Potato Arugula Salad, opt for firm sweet potatoes without any dark spots or blemishes. Look for those with a smooth skin, which usually indicates they’re fresh. Choose medium-sized sweet potatoes so they can roast evenly and add that lovely sweetness to your dish.

How should I store leftover Sweet Potato Arugula Salad?
After enjoying your Sweet Potato Arugula Salad, store any leftovers in an airtight container in the refrigerator. It will stay fresh for up to 3 days. To retain the salad’s texture, I recommend keeping the sweet potatoes separate from the arugula, dressing, and other ingredients if possible.

Can I freeze roasted sweet potatoes for later use in the salad?
Yes, you can freeze the roasted sweet potatoes! To do this, let them cool completely, then spread them in a single layer on a baking sheet and freeze them until solid. Once frozen, transfer them to an airtight freezer bag and they will stay good for up to 3 months. This way, whenever you’re ready for a quick salad, you can just pull them out and reheat!

What should I do if my sweet potatoes get mushy while roasting?
If your sweet potatoes turn out mushy, it might be due to overcrowding on the baking sheet or cutting them into uneven sizes. To prevent this in the future, ensure they are cut uniformly into about 1-inch pieces and spread them in a single layer. A good practice is to leave some space between the pieces, allowing for proper roasting instead of steaming.

Is this salad suitable for people with nut allergies?
Very! If anyone has nut allergies, you can either leave out the walnuts completely or substitute them with sunflower seeds or pumpkin seeds for a delightful crunch and additional nutrition without compromising taste. Always double-check the ingredient list with those you are serving, as it’s essential to ensure everyone can enjoy this delicious Sweet Potato Arugula Salad!

Sweet Potato Arugula Salad

Sweet Potato Arugula Salad

This Sweet Potato Arugula Salad blends comfort and delight with roasted sweet potatoes, peppery arugula, tangy feta, and crunchy walnuts.
Print Recipe Pin Recipe
Prep Time 15 minutes mins
Cook Time 30 minutes mins
Total Time 45 minutes mins
Servings: 4 servings
Course: LUNCH RECIPES
Cuisine: American
Calories: 320
Ingredients Equipment Method Nutrition Notes

Ingredients
  

For the Salad
  • 2 medium Sweet potatoes diced
  • 4 cups Arugula
  • 1 cup Feta cheese crumbled
  • 1/2 cup Walnuts chopped
For the Dressing
  • 3 tablespoons Olive oil good quality
  • 2 tablespoons Balsamic vinegar
  • Salt to taste
  • Pepper to taste

Equipment

  • Oven
  • Mixing bowl
  • Baking sheet
  • Salad Bowl

Method
 

How to Make Sweet Potato Arugula Salad
  1. Preheat the oven to 425°F (220°C).
  2. Toss the diced sweet potatoes in a mixing bowl with olive oil, salt, and pepper.
  3. Spread the sweet potatoes evenly on a baking sheet. Roast them for 25-30 minutes.
  4. Combine arugula, feta cheese, and walnuts in a large salad bowl.
  5. Add the roasted sweet potatoes to your salad bowl.
  6. Drizzle with balsamic vinegar and toss gently to combine.
  7. Serve immediately while the sweet potatoes are still warm.

Nutrition

Serving: 1servingCalories: 320kcalCarbohydrates: 30gProtein: 8gFat: 20gSaturated Fat: 3gPolyunsaturated Fat: 2gMonounsaturated Fat: 15gCholesterol: 10mgSodium: 300mgPotassium: 600mgFiber: 6gSugar: 5gVitamin A: 15000IUVitamin C: 30mgCalcium: 200mgIron: 2mg

Notes

For added flavor, consider adding a pinch of smoked paprika to the sweet potatoes before roasting.

Tried this recipe?

Let us know how it was!

Filed Under: LUNCH RECIPES

Fresh Herb Tabbouleh

December 15, 2025 by JudyWhite Leave a Comment

There’s nothing quite like the bright, refreshing taste of a homemade salad to revive your spirits, especially after a long day. I discovered this Fresh Herb Tabbouleh recipe one sunny afternoon while rummaging through my herb garden. The scent of fresh parsley and mint filled the air, urging me to create a dish bursting with flavor and color. This tabbouleh is not just any salad; it’s a celebration of vibrant ingredients that promise a delightful crunch in every bite.

What I love most about this recipe is its versatility—you can enjoy it as a light lunch, a side dish at a summer barbecue, or even as a refreshing appetizer for a dinner party. With just a handful of wholesome ingredients, including nutty bulgur wheat and juicy tomatoes, you can whip up a dish that’s equal parts nourishing and satisfying. Best of all, it takes just 15 minutes of prep time, making it the perfect antidote to the monotony of fast food. Get ready to elevate your dining experience with this exquisite bowl of goodness!

Why You'll Love This Fresh Herb Tabbouleh

  • This Fresh Herb Tabbouleh is incredibly easy to make, requiring just 15 minutes of prep time, which means you can enjoy a delicious meal without spending hours in the kitchen.
  • The blend of fresh herbs and vibrant vegetables creates an explosion of flavor that will tantalize your taste buds and leave you craving more.
  • This recipe is also highly versatile; you can serve it as a light lunch, a side dish, or an appetizer, making it perfect for any occasion.
  • Its colorful appearance makes it visually appealing, ensuring it will be the star of your dining table and impress your guests.

Fresh Herb Tabbouleh Ingredients

• Fresh ingredients make all the difference!

For the Salad

  • Bulgur wheat – a hearty base, offering a nutty flavor and chewy texture.
  • Parsley – packed with vitamins, it adds a fresh kick to your Tabbouleh.
  • Mint – provides a refreshing touch, making each bite burst with flavor.
  • Tomatoes – juicy and sweet, they bring color and moisture to the salad.
  • Cucumber – crunchy and crisp, they add a nice texture contrast.
  • Green onions – bringing a subtle onion flavor without overwhelming the dish.

For the Dressing

  • Olive oil – helps to bind the ingredients together and enhances the flavor.
  • Lemon juice – a splash of acidity that brightens up the entire dish.
  • Salt – season to taste, enhancing all the delicious flavors.

How to Make Fresh Herb Tabbouleh

  1. Combine bulgur wheat in a large bowl. Pour in 2 cups of boiling water. This will help the bulgur soften and fluff up perfectly, so cover the bowl with a lid or wrap it tightly with plastic wrap.

  2. Wait for 30 minutes. This is a crucial resting time for the bulgur to absorb the water fully and swell up, resulting in a tender texture that will be the base of your Tabbouleh.

  3. Fluff the bulgur with a fork. Once the bulgur has absorbed all the water, use a fork to gently fluff it up—this is what makes it light and airy!

  4. Add the fresh herbs and vegetables. Stir in the chopped parsley, mint, diced tomatoes, cucumber, and green onions, creating a rainbow of colors and flavors that are sure to excite your palate.

  5. Mix the dressing in a separate bowl. Combine the olive oil, lemon juice, and salt. This step is important as it ensures that all the flavors are well incorporated before dressing the salad.

  6. Pour the dressing over the salad. Gently toss everything together until all the ingredients are well-coated in the dressing, allowing you to enjoy the lovely blend of tastes in each bite.

  7. Chill the Tabbouleh before serving. Pop it in the refrigerator for about 15-30 minutes to let the flavors meld together—it’ll taste even better!

Optional: Garnish with extra mint leaves for a refreshing pop!
Exact quantities are listed in the recipe card below.

Fresh Herb Tabbouleh Variations

Feel free to explore these delightful twists that will make your tabbouleh even more exciting and tailored to your taste!

  • Quinoa Swap: Replace bulgur with quinoa for a gluten-free option; it provides a nutty flavor and a delightful texture.

  • Spicy Kick: Add a pinch of cayenne pepper or diced jalapeño for a zesty heat that awakens your taste buds in every bite.

  • Mediterranean Flair: Incorporate feta cheese cubes for a creamy, tangy addition that elevates the flavor profile beautifully.

  • Nutty Crunch: Toss in a handful of chopped almonds or walnuts for added crunch and a satisfying contrast to the soft veggies.

  • Fruit Fusion: Add diced fruits like pomegranate seeds or mango for a sweetness that perfectly complements the savory herbs.

  • Herb Medley: Experiment with different herbs like cilantro or basil for a unique flavor twist; each herb brings its personality to the dish.

  • Vegan Dressing: Swap olive oil for avocado oil and use apple cider vinegar instead of lemon juice for a vegan-friendly dressing with a slightly different taste.

  • Cucumber Ribbons: Use a vegetable peeler to create cucumbers ribbons for a fun, textural change that looks gorgeous and tastes refreshing!

How to Store and Freeze Fresh Herb Tabbouleh

Fridge: Store your Fresh Herb Tabbouleh in an airtight container for up to 3 days. This keeps the salad crisp and the flavors vibrant.

Freezer: While it’s best to enjoy Tabbouleh fresh, you can freeze it for up to 2 months. Keep in mind, the texture of the vegetables may change after thawing.

Reheating: If you served your Tabbouleh chilled, simply take it out of the fridge and enjoy it cold. For leftover salad, allow it to sit at room temperature for a few minutes before serving.

Tip: If you’re planning to store leftovers, consider keeping the dressing separate until ready to serve—this helps maintain the salad’s freshness!

What to Serve with Fresh Herb Tabbouleh?

As you revel in the delightful freshness of this salad, let’s explore the perfect pairings to elevate your meal experience.

  • Grilled Chicken Skewers: Juicy and smoky, these skewers provide a protein-packed complement that balances Tabbouleh’s brightness.

  • Hummus Platter: Creamy and savory, a selection of hummus flavors adds depth and pairs beautifully with the crispness of the salad.

  • Pita Bread: Soft and warm, pita makes for a delightful way to scoop up Tabbouleh, creating a comforting Mediterranean experience.

  • Roasted Vegetables: Earthy and caramelized, these veggies enhance the salad’s fresh flavors while adding a satisfying texture contrast.

  • Feta Cheese Crumbles: Salty and tangy, they bring an indulgent creaminess that enhances the herbaceous notes of the Tabbouleh.

  • Chilled White Wine: A crisp Sauvignon Blanc or a zesty Pinot Grigio will complement the salad’s lemony brightness beautifully.

  • Fruit Sorbet: Light and refreshing, this dessert cleanses the palate after enjoying your savory dishes and rounds off your meal perfectly.

  • Mediterranean Quinoa: This nutty, protein-rich dish brings wholesome grains and fresh herbs, echoing Tabbouleh’s own refreshing qualities.

  • Cucumber Mint Water: Infused with the same vibrant flavors, this refreshing beverage keeps you hydrated and echoes the essence of your meal.

Make Ahead Options

These Fresh Herb Tabbouleh are a fantastic option for meal prep enthusiasts! You can prepare the bulgur wheat by soaking it in boiling water up to 24 hours in advance, allowing it to fully absorb the water and fluff up perfectly. The chopped herbs and vegetables can also be prepped ahead—just store them separately in airtight containers in the refrigerator for up to 3 days. When you’re ready to serve, simply combine the prepped ingredients, mix in your dressing, and toss everything together. A quick chill in the fridge for about 15-30 minutes before serving allows the flavors to meld, ensuring your Tabbouleh is just as delicious and refreshing. This way, you’ll enjoy a vibrant, homemade salad with minimal effort on busy weeknights!

Chef's Helpful Tips

  • Always ensure your bulgur wheat is fully covered with boiling water and tightly sealed to achieve optimal fluffiness for your Fresh Herb Tabbouleh.
  • When chopping herbs, use a sharp knife to avoid bruising and preserve their vibrant flavors.
  • For added texture, consider using a mix of heirloom tomatoes to infuse various colors and tastes into the salad.
  • Remember to chill the Tabbouleh for at least 15 minutes before serving to allow the flavors to develop beautifully.

Fresh Herb Tabbouleh Recipe FAQs

What type of bulgur wheat should I use for Fresh Herb Tabbouleh?
Absolutely! I recommend using fine bulgur wheat for this recipe. It absorbs water quickly and creates a lovely chewy texture that complements the fresh herbs and vegetables beautifully.

How can I tell if my herbs are fresh enough?
Very! When selecting parsley and mint, look for vibrant green leaves with no dark spots or wilting. The leaves should feel firm and fragrant, ensuring a burst of flavor in your Tabbouleh.

How long can I store leftovers of Fresh Herb Tabbouleh?
You can store your Fresh Herb Tabbouleh in an airtight container in the fridge for up to 3 days. To keep the salad crisp, consider storing the dressing separately and adding it just before serving.

Can I freeze Fresh Herb Tabbouleh?
Yes, you can freeze it! For the best results, place the Tabbouleh in a freezer-safe container or bag, removing as much air as possible before sealing. It will stay fresh for up to 2 months. When ready to eat, thaw it in the refrigerator overnight and allow it to sit at room temperature for about 30 minutes before enjoying.

What do I do if my Tabbouleh is too dry?
If your Tabbouleh feels dry after it’s prepared, don’t worry! Simply drizzle in a little more olive oil or lemon juice and toss gently until you reach your desired moisture level. This will help revitalize the flavors and give it a lovely finish.

Is this recipe suitable for vegetarians or vegans?
Very much so! This Fresh Herb Tabbouleh recipe is naturally vegetarian and vegan-friendly. It’s a delightful option for anyone looking to enjoy a light, nutritious meal that’s packed with flavor. Enjoy every bite!

Fresh Herb Tabbouleh

Fresh Herb Tabbouleh

This Fresh Herb Tabbouleh is a vibrant salad that delivers refreshment with every bite, perfect for a light lunch or side dish.
Print Recipe Pin Recipe
Prep Time 15 minutes mins
Resting Time 30 minutes mins
Total Time 45 minutes mins
Servings: 4 servings
Course: LUNCH RECIPES
Cuisine: Middle Eastern
Calories: 180
Ingredients Equipment Method Nutrition Notes

Ingredients
  

For the Salad
  • 1 cup bulgur wheat a hearty base, offering a nutty flavor and chewy texture
  • 1 bunch parsley packed with vitamins, adds a fresh kick
  • 1 bunch mint provides a refreshing touch
  • 2 medium tomatoes juicy and sweet, brings color and moisture
  • 1 medium cucumber crunchy and crisp, adds texture
  • 3 stalks green onions brings a subtle onion flavor
For the Dressing
  • 1/4 cup olive oil helps to bind the ingredients and enhances flavor
  • 1/4 cup lemon juice adds splash of acidity
  • to taste teaspoon salt season to enhance flavors

Equipment

  • Large Bowl
  • plastic wrap
  • Fork

Method
 

Preparation
  1. Combine bulgur wheat in a large bowl. Pour in 2 cups of boiling water and cover tightly.
  2. Wait for 30 minutes to allow bulgur to absorb water fully.
  3. Fluff the bulgur with a fork once absorbed.
  4. Add chopped parsley, mint, diced tomatoes, cucumber, and green onions.
  5. Mix dressing ingredients in a separate bowl.
  6. Pour dressing over salad and toss gently.
  7. Chill in the refrigerator for 15-30 minutes before serving.

Nutrition

Serving: 1servingCalories: 180kcalCarbohydrates: 30gProtein: 5gFat: 7gSaturated Fat: 1gPolyunsaturated Fat: 2gMonounsaturated Fat: 4gSodium: 200mgPotassium: 400mgFiber: 6gSugar: 3gVitamin A: 30IUVitamin C: 50mgCalcium: 4mgIron: 10mg

Notes

Consider garnishing with extra mint leaves for a refreshing touch. Store leftovers in an airtight container for up to 3 days.

Tried this recipe?

Let us know how it was!

Filed Under: LUNCH RECIPES

Black Bean Corn Cilantro Salad

December 15, 2025 by JudyWhite Leave a Comment

As the warm weather rolls in, I find myself drawn to lighter, fresher dishes that burst with vibrant flavors. One of my absolute favorites is a quick and delightful Black Bean Corn Cilantro Salad. This dish is not only a feast for the eyes with its colorful ingredients, but it also offers a satisfying crunch that rivals any fast food option. Imagine the sweetness of corn mingling with the earthy black beans, while the zesty lime juice and fragrant cilantro bring everything to life in just 15 minutes!

I stumbled upon this recipe during a sunny afternoon picnic, where I needed something effortless to share with friends. Little did I know that this simple blend of pantry staples would quickly become a go-to for easy weeknight dinners and potlucks alike. Whether enjoyed as a refreshing side or a hearty main, this salad brings a taste of summer to your table, no matter the season. Ready to dive into a bowl of healthy goodness? Let’s get started!

Why You'll Love This Black Bean Corn Cilantro Salad

  • This recipe is incredibly easy to whip up, taking just 15 minutes from start to finish.
  • The combination of flavors is absolutely divine, with the sweetness of corn beautifully balancing the heartiness of black beans and the fresh kick of lime and cilantro.
  • It’s versatile enough to be served as a refreshing side dish or as a satisfying main course, making it perfect for any occasion.
  • The vibrant colors of the ingredients make it a visually appealing addition to your table that everyone will enjoy.
  • Additionally, it’s a crowd-pleaser that will impress guests at potlucks or summer gatherings, ensuring you can feed a group without breaking a sweat.

Black Bean Corn Cilantro Salad Ingredients

For the Salad
• 1 can black beans – rinsed and drained for a hearty protein punch.
• 1 cup corn – sweet, fresh corn can elevate the flavor.
• 1/2 cup fresh cilantro, chopped – adds a vibrant herbal note to the salad.
• 1 red bell pepper, diced – provides a sweet crunch and vivid color.
• 1/4 cup red onion, diced – gives a slight bite that complements the salad beautifully.

For the Dressing
• 2 tablespoons olive oil – enriches the salad with healthy fats.
• 2 tablespoons lime juice – brightens the flavors and adds zesty goodness.
• Salt and pepper to taste – enhances all the flavors and balances the dish.

This Black Bean Corn Cilantro Salad is a colorful and easy-to-make dish that brings freshness and joy to your table!

How to Make Black Bean Corn Cilantro Salad

  1. Combine Ingredients: In a large mixing bowl, toss together the rinsed black beans, sweet corn, chopped cilantro, diced red bell pepper, and red onion. This colorful mix sets the stage for a delicious salad!

  2. Whisk Dressing: In a separate small bowl, whisk together olive oil, lime juice, salt, and pepper until well combined. This dressing will give a zesty kick to your salad.

  3. Dress the Salad: Pour the freshly whisked dressing over the salad mixture, ensuring all components are lightly coated. This step brings out the vibrant flavors of each ingredient perfectly.

  4. Toss Gently: With a gentle hand, toss the ingredients to combine everything evenly. You want a lovely blend without mashing the vegetables!

  5. Serve or Chill: Enjoy immediately for a fresh crunch or allow the salad to chill in the refrigerator for 30 minutes. Chilling helps the flavors meld beautifully for a refreshing bite.

Optional: Garnish with extra cilantro before serving for a pop of color and flavor.
Exact quantities are listed in the recipe card below.

What to Serve with Black Bean Corn Cilantro Salad?

Elevate your meal with vibrant pairings that complement the fresh flavors of this salad delightfully.

  • Grilled Chicken: Juicy, herb-marinated chicken adds a savory element, perfect for balancing the salad’s freshness.
  • Quinoa Tabouli: This Mediterranean staple offers a herby twist that harmonizes with the cilantro and lime in the salad.
  • Avocado Toast: Creamy avocado on toasted bread provides a decadent contrast, ideal for scooping up the salad’s crunchy texture.
  • Tacos: Pair with soft or hard shell tacos filled with your favorite fillings for a fun, colorful meal experience!

For a light option, consider serving the salad with Spanish Rice: This dish brings a warm, comforting flavor that complements the salad’s coolness. The richness of rice paired with the brightness of the salad creates a delightful contrast in every bite.

  • Watermelon Feta Salad: This sweet and salty combination is perfect for summer, cleansing the palate while enhancing the meal.
  • Limeade or Iced Tea: Refreshing beverages that echo the salad’s zesty flavors, offering a thirst-quenching touch to the dining experience.
  • Chocolate Mousse: Wrap up your meal with a light, airy dessert that will leave everyone feeling satisfied without being overly heavy.

How to Store and Freeze Black Bean Corn Cilantro Salad

Fridge: Keep any leftovers in an airtight container in the refrigerator for up to 3 days. This ensures the salad stays fresh and flavorful.

Freezer: For longer storage, freeze the salad without the dressing for up to 2 months. Thaw in the fridge before adding the dressing and serving.

Reheating: Since this salad is best served cold, there’s no need to reheat. Just give it a good toss after thawing and enjoy!

Serving Tip: If you’re prepping ahead, consider storing the dressing separately and adding it just before serving to maintain the crispness of the vegetables.

Make Ahead Options

This Black Bean Corn Cilantro Salad is a fantastic choice for meal prep, allowing you to enjoy its fresh flavors all week long! You can prep the black beans, corn, diced red bell pepper, and chopped cilantro up to 3 days in advance. Store them in an airtight container in the refrigerator to maintain their crunch and flavor. As for the dressing, whisk together the olive oil, lime juice, salt, and pepper and keep it separate until you’re ready to serve, preventing the salad from becoming soggy. When it’s time to enjoy your salad, simply combine the prepped ingredients, drizzle with the fresh dressing, and toss gently for a vibrant dish ready in minutes—a perfect solution for busy weeknights!

Black Bean Corn Cilantro Salad Variations

Feel free to customize this delightful salad to suit your taste and cravings!

  • Spicy Kick: Add diced jalapeños for a zesty heat that brings life to every bite. A little spice can elevate the entire dish!
  • Cheesy Twist: Sprinkle in crumbled feta or cotija cheese for a creamy, salty addition that complements the flavors beautifully. It adds a rich texture that’s hard to resist.
  • Quinoa Boost: Mix in cooked quinoa for added protein and a delightful texture that transforms this salad into a complete meal. The nutty flavor of quinoa pairs perfectly with the ingredients.
  • Sweet Fruit: Toss in diced mango or avocado for a refreshing sweetness and creaminess that contrast wonderfully with the crunch of the vegetables. This twist will make it feel more indulgent!
  • Herb Swap: Experiment with fresh herbs like parsley or basil if cilantro isn’t your favorite. Each herb brings a unique flavor that can enhance the overall experience.
  • Lime Zest: Grate some lime zest over the salad before serving for an extra zing that amplifies the freshness of the dressing. It’s a simple trick that packs a flavorful punch!
  • Nutty Addition: Incorporate toasted pumpkin seeds or chopped walnuts for a delightful crunch and a dose of healthy fats that make every bite satisfying. The nuttiness complements the salad’s sweetness perfectly!
  • Veggie Variety: Get creative with additional veggies like diced cucumber or grated carrots for extra crunch and a pop of color. This allows you to tailor the salad based on what’s in your fridge!

Chef's Helpful Tips

  • For the Black Bean Corn Cilantro Salad, always rinse and drain the black beans before adding them to enhance their flavor and remove excess sodium.
  • If using fresh corn, consider grilling or charring it briefly for a smoky sweetness that elevates the dish.
  • When whisking the dressing, ensure the olive oil and lime juice are well emulsified for better flavor distribution.
  • Allowing the salad to chill for at least 30 minutes not only melds the flavors but also enhances the overall freshness.

Black Bean Corn Cilantro Salad Recipe FAQs

How do I select ripe ingredients for my Black Bean Corn Cilantro Salad?
Absolutely! When selecting your ingredients, opt for firm, vibrant red bell peppers, as they’ll bring color and sweetness. Fresh cilantro should be bright green with no wilting. For the corn, frozen corn works great, but if using fresh, make sure it’s sweet and crisp, ideally just picked or from the farmer’s market.

How long can I store leftover Black Bean Corn Cilantro Salad?
You can keep any leftovers in an airtight container in the refrigerator for up to 3 days. To ensure the best taste, store the salad without the dressing if you know you’ll have leftovers. Just remember: if you see any dark spots or limp veggies, it’s time to toss it!

Can I freeze Black Bean Corn Cilantro Salad?
Absolutely! For longer storage, prepare the salad without the dressing and freeze it in an airtight container for up to 2 months. When you’re ready to enjoy, thaw it in the refrigerator overnight, and then toss in the dressing just before serving for the freshest flavors.

What if my salad seems a bit bland?
Very! If your Black Bean Corn Cilantro Salad isn’t bursting with flavor, try adding a pinch more salt or a squeeze of extra lime juice. You can also mix in some diced jalapeño for heat or additional herbs to enhance that fresh taste. The key is to taste as you go!

Is this salad suitable for those with allergies or dietary restrictions?
This salad is quite versatile! It’s naturally gluten-free and vegetarian. However, if anyone has bean allergies, you can substitute black beans with cooked quinoa or chickpeas instead. Also, for those with nut allergies, ensure your olive oil is safe. Always double-check labels for packaged products like canned beans and corn.

Can I prepare the Black Bean Corn Cilantro Salad ahead of time?
Yes! Prepare the salad a few hours in advance for best results. Just remember to store the dressing separately until you’re ready to serve, as this will keep the vegetables crisp and fresh. About 30 minutes before serving, toss everything together for the ultimate refreshing taste experience.

Black Bean Corn Cilantro Salad

Black Bean Corn Cilantro Salad

This Black Bean Corn Cilantro Salad is a vibrant and refreshing dish perfect for warm weather, combining black beans, corn, and cilantro in a zesty dressing.
Print Recipe Pin Recipe
Prep Time 15 minutes mins
Total Time 15 minutes mins
Servings: 4 servings
Course: LUNCH RECIPES
Cuisine: American
Calories: 200
Ingredients Equipment Method Nutrition Notes

Ingredients
  

For the Salad
  • 1 can black beans rinsed and drained
  • 1 cup corn sweet, fresh
  • 1/2 cup fresh cilantro chopped
  • 1 unit red bell pepper diced
  • 1/4 cup red onion diced
For the Dressing
  • 2 tablespoons olive oil
  • 2 tablespoons lime juice
  • salt to taste
  • pepper to taste

Equipment

  • Mixing bowl
  • Small bowl
  • Whisk

Method
 

How to Make Black Bean Corn Cilantro Salad
  1. In a large mixing bowl, toss together the rinsed black beans, sweet corn, chopped cilantro, diced red bell pepper, and red onion.
  2. In a separate small bowl, whisk together olive oil, lime juice, salt, and pepper until well combined.
  3. Pour the freshly whisked dressing over the salad mixture, ensuring all components are lightly coated.
  4. With a gentle hand, toss the ingredients to combine everything evenly.
  5. Enjoy immediately or allow the salad to chill in the refrigerator for 30 minutes.

Nutrition

Serving: 1servingCalories: 200kcalCarbohydrates: 35gProtein: 8gFat: 7gSaturated Fat: 1gPolyunsaturated Fat: 2gMonounsaturated Fat: 4gSodium: 150mgPotassium: 400mgFiber: 10gSugar: 2gVitamin A: 15IUVitamin C: 30mgCalcium: 5mgIron: 10mg

Notes

Optional: Garnish with extra cilantro before serving for a pop of color and flavor.

Tried this recipe?

Let us know how it was!

Filed Under: LUNCH RECIPES

Rainbow Veggie Crunch Salad

December 15, 2025 by JudyWhite Leave a Comment

As the sun peeks through my kitchen window, I can’t help but feel inspired by the vibrant colors of fresh produce at my local market. It’s a beautiful day, and there’s something incredibly refreshing about embracing a lighter meal. That’s when I decided to whip up my Rainbow Veggie Crunch Salad—a delightful explosion of flavors that brightens any table. Combining crisp greens with juicy cherry tomatoes, sweet bell peppers, and a sprinkle of feta, this salad not only offers a feast for the eyes but also for the palate.

In a world where fast food often reigns supreme, discovering a dish as simple as this feels like striking gold. It takes just 15 minutes to prepare and is packed with nutrients, making it the perfect go-to recipe for those busy weeknights or relaxing weekends. Plus, it’s incredibly versatile—swap in your favorite veggies or add proteins like grilled chicken or chickpeas for a heartier meal. Let’s dive into the recipe that will ensure you leave behind the mundane and embrace the rainbow!

Why You'll Love This Rainbow Veggie Crunch Salad

  • This Rainbow Veggie Crunch Salad is a breeze to prepare, taking just 15 minutes to whip up, making it perfect for busy weeknights.
  • Your taste buds will rejoice as you experience the explosion of fresh flavors from the vibrant ingredients.
  • This salad is incredibly versatile; feel free to customize it with your choice of vegetables or proteins for added heartiness.
  • Its stunning presentation makes it a captivating centerpiece for any table, ensuring it pleases a crowd while being nutritious and light.

Rainbow Veggie Crunch Salad Ingredients

For the Salad
• Mixed greens – a colorful base that adds freshness and crunch.
• Cherry tomatoes – their juicy sweetness brightens every bite.
• Bell peppers – add a pop of crunch and can be used in various colors for visual appeal.
• Cucumber – its refreshing crispness complements the other veggies beautifully.
• Carrots – shredded for extra texture and a hint of sweetness.
• Red cabbage – introduces a vibrant color and a satisfying crunch.
• Red onion – adds a mild sharpness that balances the sweetness of the other ingredients.
• Feta cheese – crumbled for creaminess and a tangy flavor punch.
• Olives – sliced for a briny kick; feel free to choose your favorite variety!

For the Dressing
• Olive oil – the base of the dressing, that adds richness while helping to coat the veggies.
• Vinegar – choose a light vinegar, like red wine or apple cider, to add that zesty touch.
• Salt and pepper – season to taste; start with a pinch and adjust as desired!

How to Make Rainbow Veggie Crunch Salad

  1. Wash all your veggies thoroughly under cold water. This step is key to ensuring a fresh and healthy salad. Make sure to dry them well with a clean towel before chopping!

  2. Chop your fresh ingredients. In a large bowl, combine the mixed greens, cherry tomatoes, bell peppers, cucumber, carrots, red cabbage, and red onion. Toss gently to mix the colors and textures.

  3. Add the feta cheese and olives to the bowl. Their creamy and briny flavors will add an extra punch, making your Rainbow Veggie Crunch Salad truly delightful.

  4. Whisk together the dressing in a small bowl. Use a whisk or fork to mix the olive oil, vinegar, salt, and pepper until well combined. This blend brings everything together beautifully.

  5. Pour the dressing over the salad mixture. Toss gently until every veggie is evenly coated in this delicious dressing, ensuring a burst of flavor in every bite.

  6. Serve your salad immediately for the freshest experience, or let it chill in the fridge for about 30 minutes to meld the flavors even more. Trust me, it’s a refreshing treat!

Optional: Garnish with extra feta or a sprinkle of nuts for added crunch.

Exact quantities are listed in the recipe card below.

Rainbow Veggie Crunch Salad Variations

Customize your Rainbow Veggie Crunch Salad with delightful twists and substitutions to match your taste and dietary needs!

  • Dairy-Free: Omit feta cheese or use a dairy-free alternative like almond or cashew feta to keep it creamy and delicious.

  • Protein Boost: Add cooked quinoa, grilled chicken, or chickpeas for a heartier salad that’s loaded with protein and sustenance.

  • Zesty Kick: Incorporate sliced jalapeños or a sprinkle of red pepper flakes for a spicy twist that will awaken your taste buds.

  • Nutty Crunch: Toss in a handful of toasted nuts or seeds like almonds, walnuts, or sunflower seeds for extra crunch and flavor depth.

  • Whole Grain Goodness: Serve with a side of whole grain pita or a quinoa salad to elevate the fiber content and make your meal more filling.

  • Sweet Addition: Try adding sliced strawberries or diced apples for a sweet touch that complements the tanginess of the feta and olives beautifully.

  • Herb-Infused: Add fresh herbs like basil, dill, or parsley to enhance the salad with vibrant flavors and aromatic notes.

  • Citrus Twist: Squeeze fresh lemon or lime juice over the salad to amplify the freshness and add a zesty zing that lifts the entire dish.

With these variations, your Rainbow Veggie Crunch Salad can be a unique and exciting dish time after time!

What to Serve with Rainbow Veggie Crunch Salad?

Creating a beautiful meal becomes easy when you pair this vibrant salad with delightful sides and drinks that enhance every bite.

  • Grilled Chicken: Juicy and tender, it adds a satisfying protein kick, making the salad a complete meal.
  • Quinoa Pilaf: Nutty and fluffy, quinoa brings a wholesome texture that complements the crispness of the crunchy salad.
  • Garlic Bread: This warm, buttery side contrasts beautifully with the chilled salad while providing a comforting touch.
  • Crispy Roasted Potatoes: Golden and seasoned perfection, their crispy texture invites a delightful contrast to your fresh vegetables.
  • Fruit-Infused Water: Refreshing with hints of citrus or berries, it cleanses your palate between bites of this colorful dish.
  • Chocolate Mousse: For dessert, the velvety smoothness of chocolate mousse provides the perfect sweet ending to your meal!

In honor of nourishing meals that uplift both the heart and taste buds, these pairings will surely delight everyone at your table.

Make Ahead Options

Making your Rainbow Veggie Crunch Salad ahead of time is a fantastic way to save precious minutes on busy weeknights! You can wash and chop all your vegetables and store them in an airtight container in the fridge for up to 3 days. To maintain quality, keep the dressing separate until you’re ready to serve to prevent sogginess. When it’s time to enjoy, simply combine the veggies, add the feta and olives, and pour on the dressing. Toss gently, and you’ve got a vibrant, delicious salad that’s just as fresh as when you first made it, ready to impress your family or guests with minimal effort!

How to Store and Freeze Rainbow Veggie Crunch Salad

Fridge: Store any leftover Rainbow Veggie Crunch Salad in an airtight container in the fridge for up to 3 days. Keep the dressing separate to maintain freshness.

Freezer: This salad is best enjoyed fresh and is not recommended for freezing. The veggies may become mushy upon thawing.

Reheating: If you’ve added proteins such as grilled chicken, you can reheat those separately in the microwave or on the stovetop before adding to the salad. Serve chilled for the best flavor!

Preparation Tip: Always wash and dry your vegetables thoroughly before storing to prolong their freshness and crunch.

Chef's Helpful Tips

  • When preparing your Rainbow Veggie Crunch Salad, ensure all vegetables are thoroughly washed and dried to remove any dirt, which enhances the freshness of your salad.
  • Be mindful not to over-toss the salad after adding the dressing, as this can bruise the delicate greens and make them soggy.
  • For even cutting, use a sharp knife to slice your vegetables; this will help maintain their crispness and give a professional look to your salad.
  • If time allows, chilling the salad for 30 minutes before serving will allow the flavors to meld together beautifully.

Rainbow Veggie Crunch Salad Recipe FAQs

How do I choose the best ingredients for my Rainbow Veggie Crunch Salad?
Absolutely! When selecting your vegetables, aim for freshness and vibrant colors. Look for mixed greens that are crisp and not wilting. Cherry tomatoes should be firm with smooth skins, while bell peppers should be shiny and without dark spots. For cucumbers, select ones that are firm to the touch, and remember that a rich purple hue indicates fresh red cabbage. Always enjoy seasonal produce for the best taste and nutrient profile!

How should I store leftovers from the Rainbow Veggie Crunch Salad?
Very important! Store any leftover salad in an airtight container in the fridge and enjoy it within 3 days for optimal freshness. To keep the salad’s crunch intact, it’s wise to store the dressing separately and only add it just before serving. This way, your vibrant veggies stay crisp and delightful!

Can I freeze Rainbow Veggie Crunch Salad?
Not recommended! Freezing the Rainbow Veggie Crunch Salad can lead to a soggy mess after thawing, as fresh veggies do not hold up well once frozen. If you have additional proteins like grilled chicken, you can freeze those separately for later use. Just reheat them before adding to your salad!

What should I do if my salad seems too soggy or bland?
No worries, I’ve got you covered! If your salad feels soggy, it might be due to excess water or over-dressing. To fix it, try laying the salad out on a clean kitchen towel to absorb excess moisture or add a pinch more greens to balance things out. For added flavor, consider sprinkling a little more salt or using a stronger vinegar in your dressing! Gently incorporate these adjustments, and you’ll have a delightful dish again.

Are there any dietary considerations for this Rainbow Veggie Crunch Salad?
Definitely! The salad is naturally vegetarian, making it a great option for a variety of diets. If you’re concerned about allergies, it’s wise to check the feta cheese and olives for any potential allergens. For those who are dairy-free, substitute the feta with nutritional yeast or a dairy-free cheese alternative. Feel free to enhance this salad with grilled chicken or chickpeas for added protein, ensuring it fits nicely into your dietary needs while still being flavorful and filling!

Rainbow Veggie Crunch Salad

Rainbow Veggie Crunch Salad

A refreshing Rainbow Veggie Crunch Salad combining crisp greens, juicy cherry tomatoes, and feta for a delightful meal.
Print Recipe Pin Recipe
Prep Time 15 minutes mins
Chilling Time 30 minutes mins
Total Time 45 minutes mins
Servings: 4 servings
Course: LUNCH RECIPES
Cuisine: Global
Calories: 150
Ingredients Equipment Method Nutrition Notes

Ingredients
  

For the Salad
  • 4 cups mixed greens
  • 1 cup cherry tomatoes halved
  • 1 cup bell peppers sliced
  • 1 cup cucumber sliced
  • 1 cup carrots shredded
  • 1 cup red cabbage shredded
  • 1/2 medium red onion sliced
  • 1/2 cup feta cheese crumbled
  • 1/3 cup olives sliced
For the Dressing
  • 1/4 cup olive oil
  • 2 tablespoons vinegar red wine or apple cider
  • to taste salt
  • to taste pepper

Equipment

  • Large Bowl
  • Small bowl
  • Whisk

Method
 

How to Make Rainbow Veggie Crunch Salad
  1. Wash all your veggies thoroughly under cold water. Make sure to dry them well with a clean towel before chopping!
  2. Chop your fresh ingredients. In a large bowl, combine the mixed greens, cherry tomatoes, bell peppers, cucumber, carrots, red cabbage, and red onion. Toss gently to mix the colors and textures.
  3. Add the feta cheese and olives to the bowl.
  4. Whisk together the dressing in a small bowl. Mix the olive oil, vinegar, salt, and pepper until well combined.
  5. Pour the dressing over the salad mixture. Toss gently until every veggie is evenly coated.
  6. Serve your salad immediately for the freshest experience, or let it chill in the fridge for about 30 minutes.

Nutrition

Serving: 1servingCalories: 150kcalCarbohydrates: 10gProtein: 3gFat: 12gSaturated Fat: 3gPolyunsaturated Fat: 1gMonounsaturated Fat: 8gCholesterol: 10mgSodium: 300mgPotassium: 400mgFiber: 4gSugar: 2gVitamin A: 1500IUVitamin C: 30mgCalcium: 150mgIron: 1mg

Notes

Optional: Garnish with extra feta or a sprinkle of nuts for added crunch.

Tried this recipe?

Let us know how it was!

Filed Under: LUNCH RECIPES

Lentil & Parsley Protein Salad

December 15, 2025 by JudyWhite Leave a Comment

The vibrant colors and fresh aromas wafting through my kitchen always signal a new adventure, and this Lentil & Parsley Protein Salad is no exception. When I decided to whip up something nutritious and satisfying one sunny afternoon, I found myself combing through my pantry and garden, and what emerged was this delightful salad.

Imagine the tender lentils mingling with the crispness of cucumber and the herbaceous pop of parsley. Each bite offers a refreshing contrast that not only bursts with flavor but also packs a nutritional punch. Whether you’re looking for a crowd-pleasing dish for a potluck or simply want a satisfying meal prep for the week, this salad checks every box.

In just 15 minutes, you can create a wholesome, colorful, and protein-rich salad that proves homemade food can be both easy and delicious. Get ready to impress your taste buds and nourish your body with this quick and delightful recipe!

Why You'll Love This Lentil & Parsley Protein Salad

  • This Lentil & Parsley Protein Salad is incredibly easy to prepare, taking just 15 minutes from start to finish.
  • The combination of fresh ingredients not only provides vibrant colors but also delivers a burst of flavor with each bite.
  • Its versatility means you can enjoy it as a light meal, a side dish, or even a potluck favorite that will please any crowd.
  • With its healthy protein content, you can feel good about nourishing your body while savoring something so delicious.

Lentil & Parsley Protein Salad Ingredients

• Here’s everything you need to whip up this vibrant deli!

For the Salad

  • Cooked lentils – a great source of plant-based protein, providing a hearty base.
  • Chopped fresh parsley – adds a refreshing, aromatic note alongside the other ingredients.
  • Diced cucumber – supplies a crisp texture and helps keep the salad light.
  • Diced tomatoes – contribute juiciness and a touch of sweetness to balance the flavors.
  • Red onion, finely chopped – imparts a bit of sharpness that enhances the overall taste.

For the Dressing

  • Olive oil – enriches the salad with healthy fats and helps to blend the flavors beautifully.
  • Lemon juice – adds a zesty kick that brightens the dish and compliments the lentils.
  • Salt and pepper – essential seasonings to heighten the natural flavors of your salad.

This Lentil & Parsley Protein Salad is not just a meal; it’s an experience waiting to happen! Enjoy the process as much as the delicious outcome.

How to Make Lentil & Parsley Protein Salad

  1. Combine Ingredients: In a large bowl, mix together the cooked lentils, chopped parsley, diced cucumber, diced tomatoes, and finely chopped red onion. The colors should blend harmoniously, creating a delightful medley.

  2. Whisk Dressing: In a small bowl, whisk together the olive oil, lemon juice, salt, and pepper until well combined. This dressing will elevate the salad, bringing all the flavors together beautifully.

  3. Toss Salad: Pour the dressing over the salad mixture and gently toss everything to combine. Ensure that each ingredient is coated with the tangy dressing for a burst of flavor in every bite!

  4. Chill or Serve: Allow the salad to sit for a few minutes or refrigerate for a refreshing chill. It can be served chilled or at room temperature, depending on your preference.

Optional: Add some crumbled feta cheese on top for a creamy finish.

Exact quantities are listed in the recipe card below.

Make Ahead Options

These Lentil & Parsley Protein Salads are a fantastic choice for busy home cooks looking to save time during meal prep! You can prepare the salad components—such as the cooked lentils, chopped parsley, diced cucumber, and diced tomatoes—up to 3 days in advance. Just keep them refrigerated in an airtight container to maintain freshness. On the day you plan to serve, simply mix all the ingredients and drizzle the dressing over them. Toss gently to combine, and voilà! You’ll have a delicious, protein-packed salad ready to enjoy without any hassle. This make-ahead option ensures each bite is just as flavorful and fresh as if you made it the same day!

What to Serve with Lentil & Parsley Protein Salad?

This delightful protein-packed dish is a canvas of flavors waiting for the perfect companions!

  • Quinoa Pilaf: Adds a nutty taste and fluffy texture that beautifully complements the salad’s freshness.

  • Grilled Chicken Skewers: Juicy, flavorful chicken enhances the protein aspect and pairs wonderfully with the zesty salad.

  • Hummus and Pita Chips: Creamy hummus brings a rich, savory element while the crispy pita offers delightful crunch.

  • Roasted Vegetables: Warm, caramelized veggies provide a comforting warmth contrasting with the salad’s refreshing elements.

  • Feta Cheese Crumbles: A sprinkle of salty feta adds a creamy layer that balances the salad’s bright flavors.

  • Zesty Lemonade: This refreshing drink complements the lemon notes in the salad, making for a bright, cohesive meal.

  • Fruit Salad: A mix of ripe, juicy fruits provides a sweet, refreshing counterpoint to the savory notes of the protein salad.

  • Olive Tapenade on Crostini: This savory spread brings bold, briny flavors that contrast brilliantly with the freshness of the salad.

How to Store and Freeze Lentil & Parsley Protein Salad

Fridge: Store in an airtight container in the fridge for up to 3 days. The flavors will develop further, making it even more delicious!

Freezer: If you want to freeze it, do so before adding the dressing. It can last for up to 3 months. Thaw in the fridge overnight before serving.

Reheating: This salad is best enjoyed cold or at room temperature, so no reheating is necessary—just give it a quick toss and enjoy!

Serving Suggestions: For a fresh experience, consider adding fresh herbs or veggies just before serving the Lentil & Parsley Protein Salad to keep the textures vibrant.

Lentil & Parsley Protein Salad Variations

Feel free to get creative and customize this salad to match your taste and dietary needs.

  • Citrus Twist: Substitute lemon juice with lime juice for a zesty, tropical flavor that brightens the salad even more.

  • Herb Infusion: Add chopped fresh mint or dill alongside parsley for an unexpected aromatic layer that complements the lentils beautifully.

  • Vegan Protein: Replace the olive oil with tahini for a creamier texture and an extra punch of plant-based protein that adds richness.

  • Heat Factor: Stir in diced jalapeños or a sprinkle of red pepper flakes for a spicy kick that awakens your taste buds.

  • Crunchy Boost: Toss in roasted nuts or seeds, like almonds or sunflower seeds, for added crunch and heart-healthy fats that will elevate the texture.

  • Cheesy Delight: Crumble feta or goat cheese on top just before serving for a delightful tanginess that pairs perfectly with the fresh vegetables.

  • Grains Galore: Mix in quinoa or farro for extra heartiness, transforming your salad into a fulfilling meal that will keep you satisfied.

  • Classic Mediterranean: Incorporate kalamata olives and artichoke hearts for an Italian-inspired twist, giving your salad a taste of the Mediterranean!

Chef's Helpful Tips

  • Ensure that the cooked lentils are not overcooked to maintain their texture in the Lentil & Parsley Protein Salad.
  • When chopping vegetables, aim for uniform sizes for an appealing presentation and even flavor distribution.
  • Make sure to whisk the dressing thoroughly to emulsify the olive oil and lemon juice properly, resulting in a well-blended flavor.
  • For the best taste, allow the salad to chill for at least 30 minutes before serving to let the flavors meld together.

Lentil & Parsley Protein Salad Recipe FAQs

What kind of lentils should I use for this salad?
Absolutely! I recommend using green or brown lentils for their firm texture and nutty flavor. Avoid red lentils as they tend to become mushy when cooked. Make sure they are cooked until tender but still slightly al dente for the perfect bite in your Lentil & Parsley Protein Salad!

How should I store leftovers?
To keep your salad fresh, store it in an airtight container in the fridge. It will stay delicious for up to 3 days. As the flavors meld together in the refrigerator, this salad often tastes even better the next day—so don’t hesitate to enjoy those leftovers!

Can I freeze Lentil & Parsley Protein Salad?
Yes, you can freeze it, but it’s best to do so before adding the dressing. Place the salad in a freezer-safe container, and it will last for up to 3 months. When you’re ready to enjoy it, simply thaw it in the fridge overnight, then toss it with the dressing before serving.

What if I have a nut allergy?
Not a problem! This salad is naturally nut-free. However, always double-check the labels of any prepackaged ingredients, like lentils or dressings, to ensure they are free from cross-contamination. For added flavor, consider using sunflower seeds or pumpkin seeds instead of any nuts.

What are some good substitutions for the vegetables?
The great news is that this salad is very versatile! If you don’t have cucumber or tomatoes, feel free to replace them with diced bell peppers, shredded carrots, or even some grated zucchini. You can really mix and match according to what you have on hand or your personal preferences.

What is the best way to ensure my vegetables are fresh?
When selecting vegetables, look for vibrant colors and firm textures. For instance, tomatoes should be slightly ripe but not mushy, while cucumbers should be crisp with no dark spots. Fresh parsley should be bright green and fragrant. This attention to detail will elevate your Lentil & Parsley Protein Salad!

Lentil & Parsley Protein Salad

Lentil & Parsley Protein Salad

This Lentil & Parsley Protein Salad is a vibrant and nutritious dish that offers a delightful blend of flavors in just 15 minutes.
Print Recipe Pin Recipe
Prep Time 15 minutes mins
Total Time 15 minutes mins
Servings: 4 servings
Course: LUNCH RECIPES
Calories: 230
Ingredients Equipment Method Nutrition Notes

Ingredients
  

For the Salad
  • 2 cups cooked lentils a great source of plant-based protein
  • 1 cup chopped fresh parsley adds a refreshing note
  • 1 cup diced cucumber supplies a crisp texture
  • 1 cup diced tomatoes contribute juiciness and sweetness
  • 1/2 cup finely chopped red onion imparts sharpness
For the Dressing
  • 1/4 cup olive oil enriches the salad
  • 2 tablespoons lemon juice adds a zesty kick
  • 1 teaspoon salt essential seasoning
  • 1/2 teaspoon black pepper essential seasoning

Equipment

  • Large Bowl
  • Small bowl
  • Whisk

Method
 

How to Make Lentil & Parsley Protein Salad
  1. In a large bowl, mix together the cooked lentils, chopped parsley, diced cucumber, diced tomatoes, and finely chopped red onion.
  2. In a small bowl, whisk together the olive oil, lemon juice, salt, and pepper until well combined.
  3. Pour the dressing over the salad mixture and gently toss everything to combine.
  4. Allow the salad to sit for a few minutes or refrigerate before serving.

Nutrition

Serving: 1cupCalories: 230kcalCarbohydrates: 35gProtein: 10gFat: 8gSaturated Fat: 1gPolyunsaturated Fat: 2gMonounsaturated Fat: 5gSodium: 320mgPotassium: 500mgFiber: 8gSugar: 3gVitamin A: 15IUVitamin C: 30mgCalcium: 6mgIron: 15mg

Notes

Optional: Add crumbled feta cheese on top for a creamy finish. Ensure that the lentils are not overcooked to maintain texture.

Tried this recipe?

Let us know how it was!

Filed Under: LUNCH RECIPES

Carrot Ginger Ribbon Salad

December 15, 2025 by JudyWhite Leave a Comment

Every now and then, while rummaging through my fridge, I discover ingredients that spark a delicious idea. Recently, as I pulled out a bunch of vibrant carrots and a nub of fresh ginger, I felt inspired to create something lively and refreshing. Enter the Carrot Ginger Ribbon Salad—a delightful mix that perfectly balances sweetness and spice.

This salad is the kind of dish that brightens up any table. With its cheerful colors and crisp textures, it not only sings of health but also brings a burst of flavor that’s hard to resist. Plus, it comes together in just 15 minutes, making it an ideal addition for those busy weeknights or when you’re simply craving something homemade, yet quick.

Imagine the crunch of the carrot ribbons lightly coated in a tangy dressing, enhanced by the warmth of ginger. Whether you’re looking to impress guests or want a satisfying side to elevate your meals, this Carrot Ginger Ribbon Salad fits the bill. So, grab your peeler and let’s turn those simple ingredients into a stunning dish!

Why You'll Love This Carrot Ginger Ribbon Salad

  • This Carrot Ginger Ribbon Salad is an absolute breeze to make, requiring just 15 minutes from prep to plate.
  • The vibrant flavors of fresh carrots combined with zesty ginger create a deliciously refreshing dish that will wake up your taste buds.
  • Its versatile nature means you can serve it as a side, a light lunch, or even a standout dish at your next gathering.
  • Plus, its stunning visual appeal with bright colors and beautiful ribbons makes it a feast for the eyes as much as it is for the palate.

Carrot Ginger Ribbon Salad Ingredients

• Discover what makes this salad shine.

For the Salad
• 4 large carrots – these vibrant veggies create the delightful ribbons that form the salad’s base.
• 1 tablespoon fresh ginger – adds a warm, zesty kick that elevates the flavors beautifully.

For the Dressing
• 2 tablespoons olive oil – provides a rich, smooth coating that enhances the salad’s texture.
• 1 tablespoon apple cider vinegar – brings a tangy zip that balances the sweetness of the carrots.
• 1 teaspoon honey – sweetens the dressing perfectly, tying together the flavors.
• Salt to taste – enhances all the ingredients, making them sing.
• Pepper to taste – adds a touch of warmth and depth to the dressing.

For Garnish
• Fresh parsley – a pop of color that not only looks appealing but adds a fresh herbal note.

How to Make Carrot Ginger Ribbon Salad

  1. Peel the carrots carefully using a vegetable peeler, revealing their bright orange exterior. Next, slice them into thin ribbons using a mandoline or a sharp knife. Aim for a beautiful, even thickness to ensure even texture.

  2. Grate the fresh ginger using a microplane or a fine grater. Remember, fresh ginger has a wonderful aroma, so breathe it in as you work! You’ll need about 1 tablespoon for that zesty kick.

  3. Whisk together the olive oil, apple cider vinegar, honey, salt, and pepper in a bowl. Mix until the dressing is well blended and slightly emulsified. This step is where the magic begins, bringing all your flavors together!

  4. Combine the carrot ribbons and grated ginger in a large bowl. Pour the dressing over the vegetables, ensuring that every ribbon gets a little love. This is the moment when colors come to life and scents fill your kitchen.

  5. Toss everything gently but thoroughly until all the ingredients are well coated. Look for a delightful shine on the carrots. This should take about a minute—just enough time to ensure that each bite is bursting with flavor!

  6. Garnish your salad with fresh parsley right before serving. Not only does it elevate the visual appeal, but it also adds a fresh herbaceous note that complements the sweet and spicy flavors beautifully.

Optional: Serve chilled for an extra refreshing bite!

Exact quantities are listed in the recipe card below.

How to Store and Freeze Carrot Ginger Ribbon Salad

Fridge: Store any leftover Carrot Ginger Ribbon Salad in an airtight container in the refrigerator for up to 3 days. This keeps the salad fresh and crispy.

Freezer: It’s best not to freeze this salad due to the delicate texture of the carrot ribbons. Freezing alters the crunch, making them mushy when thawed.

Reheating: If you prepare the dressing in advance, keep it separate until ready to serve. This ensures the carrots remain crunchy and flavorful.

Serving Suggestions: For added freshness, consider making a small batch of the salad right before serving, especially for gatherings!

Carrot Ginger Ribbon Salad Variations

Feel free to explore these delightful twists that enhance the freshness and flavor of your salad!

  • Spicy Kick: Add a pinch of red pepper flakes for a subtle heat that perfectly contrasts the sweetness of the carrots.

  • Citrusy Burst: Squeeze in fresh lemon or orange juice for a zesty twist that brightens the salad and adds a refreshing layer of flavor.

  • Nutty Crunch: Toss in a handful of toasted walnuts or pecans for an added crunch and an earthy richness that complements the carrots.

  • Herbal Upgrade: Try fresh mint or cilantro in place of parsley for a fragrant herbal note that adds a vibrant twist to your salad experience.

  • Creamy Delight: Incorporate a dollop of Greek yogurt or avocado for a creamy texture that beautifully balances the crispness of the carrot ribbons.

  • Sweetness Boost: Substitute agave syrup or maple syrup for honey to create a completely different sweetness profile, promoting a new taste adventure.

  • Colorful Additions: Mix in thinly sliced bell peppers or radishes for additional color and crunch, creating a more dynamic and visually appealing dish.

  • Savory Touch: Grate in a bit of parmesan cheese or crumbled feta just before serving for a delightful savory contrast that adds depth to every bite.

Make Ahead Options

This Carrot Ginger Ribbon Salad is a fantastic choice for meal prep, saving you precious time during busy weeknights! You can prepare the carrot ribbons and grated ginger up to 24 hours in advance. Simply store them in an airtight container in the refrigerator to maintain their crispness. The dressing can also be whisked together and stored separately for up to 3 days, ensuring it stays fresh and flavorful. When you’re ready to serve, just toss the prepped ingredients with the dressing, garnish with fresh parsley, and enjoy a delicious, vibrant salad with minimal effort. This way, you can have a healthy homemade dish ready to go at a moment’s notice!

What to Serve with Carrot Ginger Ribbon Salad?

This vibrant salad pairs beautifully with a variety of dishes to create a wholesome meal that delights the senses.

  • Grilled Chicken: The smoky flavors of grilled chicken provide a savory contrast, balancing the salad’s sweetness.
  • Quinoa Pilaf: Nutty and satisfying, quinoa pilaf adds a hearty texture that complements the fresh crunch of the ribbons.
  • Tofu Stir-Fry: For a vegetarian option, a savory tofu stir-fry with colorful veggies enhances the meal’s nutrition and flavor profile.
  • Crusty Bread: A slice of warm, crusty bread offers a comforting side that blends perfectly with the brightness of the salad.
  • Spicy Hummus: Serve with spicy hummus for a creamy, zesty dip that adds a kick to your plate.
  • Sparkling Lemonade: A refreshing drink like sparkling lemonade adds a touch of sweetness and fizz, perfectly complementing the salad’s flavor.

Pair any of these with the Carrot Ginger Ribbon Salad and watch your meal transform into a vibrant feast!

Chef's Helpful Tips

  • When making Carrot Ginger Ribbon Salad, be sure to peel the carrots thoroughly to enhance their vibrant color and sweetness.
  • A mandoline is great for creating uniform ribbons, which will not only improve the presentation but also ensure even coating with the dressing.
  • Fresh ginger can be strong, so adjust the amount based on your taste preference to avoid overwhelming the salad’s delicate flavors.
  • Toss the salad just before serving to maintain the crunchiness of the carrot ribbons and avoid sogginess from the dressing.

Carrot Ginger Ribbon Salad Recipe FAQs

How do I select ripe ingredients for my Carrot Ginger Ribbon Salad?
Absolutely! When choosing carrots, look for firm, smooth ones without any dark spots or blemishes. Fresh ginger should be firm and have a spicy aroma. If the ginger feels soft or looks shriveled, it’s best to pass on it.

How should I store leftover Carrot Ginger Ribbon Salad?
Very effectively! Place the leftover salad in an airtight container and store it in the fridge. It will stay fresh and crunchy for up to 3 days. Just remember to keep any dressing separate until you’re ready to eat to maintain that delicious crispness!

Can I freeze Carrot Ginger Ribbon Salad?
I recommend not freezing this salad. When frozen, the delicate carrot ribbons can become mushy and lose their crunch once thawed. Instead, enjoy it fresh! If you want to save time, consider prepping the carrot ribbons and ginger in advance and just toss them together when you’re ready to serve.

What should I do if my ginger is too strong in the salad?
If you find the flavor of ginger is overpowering, don’t worry! Simply add additional carrots to balance the taste. Consider also adding a bit more honey to sweeten the salad and tone down the ginger’s spice. You can always start with a smaller amount of ginger next time and add more if needed.

Are there any dietary considerations for the Carrot Ginger Ribbon Salad?
Absolutely! This salad is gluten-free and very healthy, making it a great option for many diets. However, if you have allergies, be cautious of the honey—consider using maple syrup as a vegan alternative. If you plan to share this salad with pets, it’s always best to keep it to human consumption only, as some ingredients like honey could be harmful to pets in large amounts.

How do I keep the salad from getting soggy before serving?
The key to a perfect Carrot Ginger Ribbon Salad is to toss it just before serving! Prepare the salad components and dressing separately, then combine them right before you’re ready to dig in. This way, the carrot ribbons maintain their delightful crunch, making each bite as fresh as the first!

Carrot Ginger Ribbon Salad

Carrot Ginger Ribbon Salad

Enjoy the vibrant flavors of Carrot Ginger Ribbon Salad, a perfect mix of crunchy carrots and zesty ginger.
Print Recipe Pin Recipe
Prep Time 15 minutes mins
Total Time 15 minutes mins
Servings: 4 servings
Course: LUNCH RECIPES
Calories: 150
Ingredients Equipment Method Nutrition Notes

Ingredients
  

For the Salad
  • 4 large carrots these vibrant veggies create the delightful ribbons that form the salad's base.
  • 1 tablespoon fresh ginger adds a warm, zesty kick that elevates the flavors beautifully.
For the Dressing
  • 2 tablespoons olive oil provides a rich, smooth coating that enhances the salad's texture.
  • 1 tablespoon apple cider vinegar brings a tangy zip that balances the sweetness of the carrots.
  • 1 teaspoon honey sweetens the dressing perfectly, tying together the flavors.
  • Salt to taste, enhances all the ingredients.
  • Pepper to taste, adds warmth and depth to the dressing.
For Garnish
  • fresh parsley a pop of color that adds a fresh herbal note.

Equipment

  • vegetable peeler
  • mandoline
  • Mixing bowl

Method
 

How to Make Carrot Ginger Ribbon Salad
  1. Peel the carrots carefully using a vegetable peeler, revealing their bright orange exterior. Slice them into thin ribbons using a mandoline or a sharp knife.
  2. Grate the fresh ginger using a microplane or a fine grater. You'll need about 1 tablespoon for that zesty kick.
  3. Whisk together the olive oil, apple cider vinegar, honey, salt, and pepper in a bowl until the dressing is well blended and slightly emulsified.
  4. Combine the carrot ribbons and grated ginger in a large bowl. Pour the dressing over the vegetables, ensuring that every ribbon gets coated.
  5. Toss everything gently but thoroughly until all the ingredients are well coated.
  6. Garnish your salad with fresh parsley right before serving.

Nutrition

Serving: 1servingCalories: 150kcalCarbohydrates: 15gProtein: 2gFat: 10gSaturated Fat: 1.5gPolyunsaturated Fat: 1gMonounsaturated Fat: 8gSodium: 50mgPotassium: 300mgFiber: 3gSugar: 5gVitamin A: 15000IUVitamin C: 15mgCalcium: 30mgIron: 0.5mg

Notes

For added freshness, consider making a small batch of the salad right before serving, especially for gatherings.

Tried this recipe?

Let us know how it was!

Filed Under: LUNCH RECIPES

Avocado Chickpea Bowl

December 15, 2025 by JudyWhite Leave a Comment

Picture this: a vibrant bowl filled with creamy avocado, hearty chickpeas, and crisp vegetables, all bursting with flavor and nutrition. When I first whipped up this Avocado Chickpea Bowl on a busy weekday, I was immediately taken by the incredible simplicity of it all. With just a handful of fresh ingredients, this delightful dish transforms any mealtime into a celebration of taste.

As someone who often finds themselves gazing longingly at fast food options, I can assure you that this bowl not only satisfies cravings but also lifts your spirits. The combination of textures and flavors makes it a perfect light lunch or a side dish for dinner. In just 15 minutes, you can create something that looks and feels gourmet without the fuss. Trust me; this recipe will not only invigorate your dinner table but soon become your go-to for quick, satisfying meals. Let’s dive into this deliciously simple recipe that’s sure to impress!

Why You'll Love This Avocado Chickpea Bowl

  • This Avocado Chickpea Bowl is incredibly easy to make, requiring only 15 minutes from start to finish.
  • The vibrant flavors and creamy textures create a delightful dish that will tantalize your taste buds.
  • Its versatility allows you to customize ingredients based on what you have on hand or to suit your preferences.
  • Not only does it look stunning on the plate, but it’s also a crowd-pleaser that everyone will enjoy at the table.

Avocado Chickpea Bowl Ingredients

• Whip up this vibrant dish with ease!

For the Base
• 1 ripe avocado – adds a creamy texture and rich flavor to the bowl.
• 1 can chickpeas – provides a hearty, protein-packed foundation, perfect for an Avocado Chickpea Bowl.
• 1 cup cherry tomatoes – bursts with sweetness and color.
• 1/2 cucumber – introduces a refreshing crunch to balance the creaminess.
• 1/4 red onion – adds a sharp bite that enhances the overall flavor.

For the Dressing
• 2 tablespoons olive oil – ensures moisture and a touch of healthy fat.
• 1 tablespoon lemon juice – brightens the dish and adds a zesty kick.
• Salt and pepper – essential for elevating the dish’s flavors to perfection.

For Garnish
• Fresh parsley – a simple yet aromatic touch that brings the whole bowl together.

How to Make Avocado Chickpea Bowl

  1. Slice the Avocado: Carefully cut the ripe avocado in half, twist to separate, and gently remove the pit. Scoop the creamy flesh into a bowl, keeping it in large chunks for a beautiful presentation.

  2. Combine the Veggies: In a separate mixing bowl, combine the drained chickpeas, halved cherry tomatoes, diced cucumber, and diced red onion. Stir gently until well mixed, keeping everything vibrant and fresh.

  3. Drizzle with Dressing: Pour in the olive oil and lemon juice over the veggie mix. This dressing will elevate the flavors, so toss everything together to ensure every ingredient gets coated.

  4. Season it Up: Sprinkle salt and pepper to taste, giving it a good mix to enhance the natural flavors of the vegetables and chickpeas.

  5. Incorporate the Avocado: Smoothly scoop the avocado chunks into the bowl with the other ingredients. Mix carefully, ensuring not to mash the avocado, so you keep its lovely creamy texture.

  6. Garnish and Serve: Top your bowl with freshly chopped parsley for a pop of color and aroma. Serve right away for the best flavor experience; it’s as beautiful as it is nutritious!

Optional: Serve with extra lemon wedges for an added zing.

Exact quantities are listed in the recipe card below.

How to Store and Freeze Avocado Chickpea Bowl

Fridge: Store any leftovers in an airtight container for up to 3 days. The flavors will meld beautifully, making it a satisfying option for lunch or a quick snack.

Freezer: While it’s best enjoyed fresh, you can freeze the chickpea mixture (minus avocado) for up to 1 month. Just thaw in the fridge overnight before serving.

Reheating: For best results, reheat the chickpea mixture gently in the microwave. Add freshly diced avocado after reheating to maintain its creamy texture in your Avocado Chickpea Bowl.

Prep Ahead: If you’re short on time, chop veggies and store them in the fridge separately for easy assembly on busy days!

Avocado Chickpea Bowl Variations

Feel free to get creative with this recipe! Customize your bowl to suit your taste buds or use whatever ingredients you have on hand.

  • Spicy Twist: Add diced jalapeños to the veggie mix for a kick that’ll warm your soul and perk up your palate.
    With each spicy bite, you’ll feel the vibrant flavors exploding!

  • Herb Mix: Swap fresh parsley for cilantro or basil for a fragrant twist that adds depth and freshness to your bowl.
    A little change in herbs can transform the entire dish!

  • Grain Boost: Serve the bowl over quinoa or brown rice for extra fiber and a satisfying base, giving it a hearty touch.
    It turns a light dish into a more filling, wholesome meal.

  • Feta Cheese: Crumble feta cheese on top for a creamy, tangy flavor that beautifully contrasts the other ingredients.
    Each creamy bite adds a delightful richness that’s hard to resist!

  • Roasted Chickpeas: Toss the chickpeas in the oven with your favorite spices until crispy for an enjoyable crunch that adds texture.
    This adds an element of surprise that elevates the dish even further.

  • Creamy Dressing: Swap olive oil and lemon juice for a creamy tahini or yogurt dressing for a luscious finish.
    The creaminess will wrap around every ingredient, making each bite indulgent.

  • Sweet Corn: Mix in some sweet corn for a burst of natural sweetness and a pop of color that livens up your bowl.
    This addition makes the dish not only attractive but also adds a delightful crunch.

  • Avocado Alternative: Use silken tofu or hummus instead of avocado for a different creaminess, especially if you’re looking for a change.
    This alternative keeps the bowl plant-based while offering a unique texture twist!

Make Ahead Options

These Avocado Chickpea Bowls are a fantastic choice for meal prep enthusiasts looking to save time during busy weekdays! You can prep your chickpea and vegetable mixture (chickpeas, cherry tomatoes, cucumber, and red onion) up to 3 days in advance, storing it in an airtight container in the refrigerator. To maintain the bright colors and textures, keep the avocado separate until just before serving, as it tends to brown. When you’re ready to enjoy your bowl, simply scoop in the avocado, drizzle with olive oil and lemon juice, season, and give it a gentle mix. You’ll have a delicious, filling meal that feels fresh and ready in no time!

What to Serve with Avocado Chickpea Bowl?

Imagine vibrant colors and fresh flavors coming together to create a complete meal that’s as delightful to eat as it is to look at.

  • Crispy Quinoa Cakes: These add a satisfying crunch and nutty flavor that complements the creamy avocado wonderfully.

  • Garlic Roasted Vegetables: Roasting brings out natural sweetness, creating a rich contrast to the refreshing elements of the bowl.

  • Mediterranean Flatbreads: Soft and warm, flatbreads are perfect for scooping up the bowl’s delightful mixture, adding a lovely chewy texture.

  • Lemon Feta Salad: This tangy salad elevates the dish with its bright flavors and creamy cheese, enhancing the overall dining experience.

  • Grilled Shrimp Skewers: The juicy shrimp infused with a smoky char are a protein boost, making the bowl heartier and more satisfying.

  • Cucumber Mint Yogurt Sauce: A refreshing dip that cools down the dish, adding complexity and a burst of herby flavor.

  • Sparkling Water with Lemon: The fizz and citrus refresh your palate, pairing perfectly with the rich, creamy elements in your avocado chickpea bowl.

  • Dark Chocolate Mousse: For a sweet finish, this indulgent dessert offers a rich contrast, leaving the meal with a satisfying finale.

Chef's Helpful Tips

  • When making your Avocado Chickpea Bowl, ensure your avocado is perfectly ripe for the creamiest texture; it should yield slightly to gentle pressure.
  • To enhance the flavor of your chickpeas, consider roasting them in the oven with a sprinkle of olive oil, salt, and your favorite spices for added crunch.
  • To keep your avocado from browning, you can gently toss it with lemon juice right after cutting it.
  • Serve the bowl immediately after mixing to enjoy the freshest flavors and textures, as the ingredients can wilt if left too long.

Avocado Chickpea Bowl Recipe FAQs

How do I choose the right avocado?
Absolutely! Look for an avocado that’s slightly soft to the touch but not mushy—this indicates it’s ripe and ready to enjoy. If you find a firm avocado, you can let it ripen at room temperature for a few days until it yields slightly when pressed.

How long can I store leftovers of the Avocado Chickpea Bowl?
Leftovers can be stored in an airtight container in the fridge for up to 3 days. Just a tip: to keep the avocado from browning, you can sprinkle a bit more lemon juice over it before sealing the container.

Can I freeze the Avocado Chickpea Bowl?
Yes, you can freeze the chickpea mixture (without the avocado) for up to 1 month. To do this, place the mixed chickpeas, tomatoes, cucumber, and onion in a freezer-safe bag and remove as much air as possible. When you’re ready to enjoy it, simply thaw it overnight in the fridge! Add freshly diced avocado after heating for the best texture.

What should I do if my chickpeas are mushy?
If your chickpeas are overly soft, they might have been cooked too long or stored for too long. For future recipes, always check the can’s expiration date if using canned chickpeas, and remember that dried chickpeas should be soaked properly before cooking. If you find yourself with mushy chickpeas, consider turning it into a salad, where the other ingredients can help mask the texture!

Are there any dietary considerations with this recipe?
Very! This Avocado Chickpea Bowl is naturally vegan and gluten-free, catering to a variety of dietary needs. However, if you have nut allergies, it’s crucial to check that the olive oil isn’t processed in a facility that handles nuts. You can also swap out the chickpeas for your favorite beans if you’re looking for something different or if you want to mix things up.

Avocado Chickpea Bowl

Avocado Chickpea Bowl

This Avocado Chickpea Bowl is a vibrant dish that bursts with flavor and nutrition, perfect for a light lunch or side dish.
Print Recipe Pin Recipe
Prep Time 15 minutes mins
Total Time 15 minutes mins
Servings: 2 bowls
Course: LUNCH RECIPES
Cuisine: Mediterranean
Calories: 300
Ingredients Equipment Method Nutrition Notes

Ingredients
  

For the Base
  • 1 whole ripe avocado adds a creamy texture and rich flavor
  • 1 can chickpeas provides a hearty, protein-packed foundation
  • 1 cup cherry tomatoes bursts with sweetness and color
  • 1/2 cup cucumber introduces a refreshing crunch
  • 1/4 cup red onion adds a sharp bite
For the Dressing
  • 2 tablespoons olive oil ensures moisture
  • 1 tablespoon lemon juice adds a zesty kick
  • Salt to taste
  • Pepper to taste
For Garnish
  • Fresh parsley for a simple aromatic touch

Equipment

  • Mixing bowl
  • Cutting Board
  • Knife

Method
 

Preparation Steps
  1. Carefully cut the ripe avocado in half, twist to separate, and gently remove the pit.
  2. Scoop the creamy flesh into a bowl, keeping it in large chunks for a beautiful presentation.
  3. In a separate mixing bowl, combine the drained chickpeas, halved cherry tomatoes, diced cucumber, and diced red onion.
  4. Stir gently until well mixed.
  5. Pour in the olive oil and lemon juice over the veggie mix, then toss everything together.
  6. Sprinkle salt and pepper to taste and mix to enhance the flavors.
  7. Smoothly scoop the avocado chunks into the bowl with the other ingredients.
  8. Garnish with freshly chopped parsley and serve right away.

Nutrition

Serving: 1bowlCalories: 300kcalCarbohydrates: 40gProtein: 10gFat: 15gSaturated Fat: 2gPolyunsaturated Fat: 2gMonounsaturated Fat: 10gSodium: 200mgPotassium: 600mgFiber: 12gSugar: 5gVitamin A: 500IUVitamin C: 20mgCalcium: 40mgIron: 2mg

Notes

Serve immediately for the best flavor experience. Optional: Serve with extra lemon wedges for added zing.

Tried this recipe?

Let us know how it was!

Filed Under: LUNCH RECIPES

Quinoa & Roasted Veggie Salad

December 15, 2025 by JudyWhite Leave a Comment

The colors of fresh vegetables glistening in the sunlight have a way of brightening any kitchen—a burst of joy that welcomes you home after a long day. One day, while searching for a light yet satisfying dish to break the monotony of fast food, I stumbled upon the magic of combining wholesome quinoa with beautifully roasted veggies. This Quinoa & Roasted Veggie Salad is not only a feast for the eyes but also a celebration of flavors and textures that come together effortlessly.

With vibrant bell peppers, crisp zucchini, and juicy cherry tomatoes, this salad bursts with seasonal goodness and a refreshing zing from lemon juice. It’s perfect for meal prep or a quick weeknight dinner, easily serving as a crowd-pleaser for family or gatherings. Whether you’re looking to impress your friends or simply want to nourish your body, this recipe promises satisfaction and a hug in a bowl. Let’s dive into the steps to create a dish that’ll have you ditching fast food for good!

Why You'll Love This Quinoa & Roasted Veggie Salad

  • This Quinoa & Roasted Veggie Salad is incredibly easy to prepare, making it perfect for busy weeknights or meal prep sessions.
  • The delightful blend of roasted vegetables and quinoa creates a burst of flavor that will excite your taste buds and leave you wanting more.
  • Its versatility allows you to mix and match seasonal veggies or add your favorite proteins for a personalized touch.
  • Not only is it visually appealing with its vibrant colors, but it also serves as a healthy, satisfying dish that even your guests will adore.

Quinoa & Roasted Veggie Salad Ingredients

For the Salad
• 1 cup quinoa – a gluten-free grain that provides a hearty base full of protein.
• 2 cups water – necessary for cooking the quinoa and ensuring it’s fluffy.
• 1 red bell pepper, diced – adds sweetness and a pop of color to your dish.
• 1 zucchini, diced – brings a lovely texture and is low in calories.
• 1 yellow squash, diced – complements the zucchini with its mild flavor.
• 1 cup cherry tomatoes, halved – juicy bursts of flavor that enhance freshness.
• Salt to taste – elevates the flavors of the salad.
• Pepper to taste – adds a little kick to the overall dish.
• 1/4 cup fresh parsley, chopped – for a fresh herbal note that brightens up the salad.
• 2 tablespoons lemon juice – gives a zesty zing that balances the richness of the veggies.

Enjoy crafting this delightful Quinoa & Roasted Veggie Salad!

How to Make Quinoa & Roasted Veggie Salad

  1. Preheat the oven to 400°F (200°C). Get your cooking space ready for roasting! This temperature helps caramelize the veggies, bringing out their natural sweetness.

  2. Rinse quinoa under cold water. This step removes bitterness and ensures a nutty flavor. Rinse it thoroughly for about 2-3 minutes.

  3. Combine quinoa and water in a pot. Bring to a boil over medium-high heat, then reduce to a simmer. Let it cook for 15 minutes until fluffy.

  4. Toss the diced vegetables with olive oil, salt, and pepper on a baking sheet. Spread them evenly for perfect roasting, ensuring they get that lovely golden color.

  5. Roast the vegetables in the oven for 20-25 minutes. They should be tender and slightly charred—this adds incredible depth to your salad’s flavor!

  6. Fluff the cooked quinoa with a fork and let it cool for a few minutes. This lightens the texture and prepares it to mingle with the roasted veggies.

  7. Combine quinoa, roasted vegetables, chopped parsley, and lemon juice in a large bowl. Stir everything together gently for an even distribution of flavors and colors.

  8. Serve the Quinoa & Roasted Veggie Salad warm or at room temperature. It’s versatile and delightful either way!

Optional: Garnish with extra parsley for a fresh touch.

Exact quantities are listed in the recipe card below.

Quinoa & Roasted Veggie Salad Variations

Feel free to get creative and tailor this salad to your taste buds, embracing new flavors and textures!

  • Mediterranean Twist: Add crumbled feta and olives for a salty, briny kick that perfectly complements the fresh veggies.
    Let the vibrant flavors transport you to a warm Mediterranean beach.

  • Spicy Kick: Mix in diced jalapeños or a sprinkle of crushed red pepper flakes to give your salad a zesty heat.
    A little spice can awaken your palate and add excitement to each bite!

  • Herb Infusion: Swap parsley for fresh basil or cilantro for a different herbal flair that brings an aromatic twist.
    These herbs can elevate the freshness and transform the entire vibe of your dish.

  • Grains Galore: Substitute quinoa with farro, barley, or bulgur for a chewy texture and unique nutty flavor profile.
    Exploring different grains can take your salad experience to a whole new level.

  • Nutty Crunch: Toss in some toasted nuts or seeds like almonds, walnuts, or sunflower seeds for added texture and health benefits.
    This delightful crunch can turn a simple salad into a satisfying meal.

  • Creamy Addition: Drizzle in a creamy dressing like tahini or avocado for a rich finish that adds depth to the salad.
    This twist will not only enhance the flavors but also add a luxurious mouthfeel.

  • Roasted Garlic: Toss some whole garlic cloves in with your veggies to roast, infusing a sweet, mellow garlic flavor throughout the dish.
    There’s something comforting about roasted garlic that wraps you in a warm embrace!

  • Protein Boost: Add grilled chicken, chickpeas, or black beans to transform the salad into a hearty meal.
    This adds a satisfying, protein-packed element that keeps you fueled throughout the day!

Make Ahead Options

These Quinoa & Roasted Veggie Salad ingredients are perfect for meal prep enthusiasts! You can cook the quinoa and roast the vegetables up to 3 days in advance. Simply store the prepared quinoa in an airtight container in the refrigerator and roast the veggies on a baking sheet, allowing them to cool before transferring them to a separate container. This method will maintain their flavor and texture for when you’re ready to enjoy your salad. When it’s time to serve, combine the quinoa, roasted veggies, chopped parsley, and lemon juice, and give it a good toss. Voilà! You’ll have a delicious salad ready in no time, making busy weeknights a breeze.

How to Store and Freeze Quinoa & Roasted Veggie Salad

Fridge: Store any leftover Quinoa & Roasted Veggie Salad in an airtight container for up to 3 days. This keeps the flavors fresh and retains the texture.

Freezer: If you’d like to freeze it, place the salad in a freezer-safe container, separating the quinoa from the veggies. It can last up to 2 months for the best flavor.

Thawing: To enjoy frozen salad, transfer it to the fridge overnight to thaw. Gently reheat in the microwave or enjoy it cold, tossing in a splash of lemon juice to refresh flavors.

Reheating: When reheating, do it in short intervals in the microwave to avoid making the quinoa soggy. Aim for gentle heat to maintain its fluffy texture.

What to Serve with Quinoa & Roasted Veggie Salad?

Creating the perfect meal is about balance and harmony, and this vibrant salad is just the beginning of a delicious spread.

  • Creamy Avocado Toast: A smooth, rich avocado spread on toasted bread adds a delightful creaminess that complements the salad’s crisp veggies.

  • Lemon Herb Grilled Chicken: Juicy chicken seasoned with fresh herbs mirrors the refreshing notes of the salad, enhancing your palate with a succulent bite.

  • Balsamic Roasted Brussels Sprouts: Their sweet, caramelized flavor brings a deeper earthy contrast to the salad, creating an irresistible clash of textures.

  • Chilled White Wine: A glass of chilled Sauvignon Blanc brightens the meal with its zesty notes, making every bite of the salad even more refreshing.

  • Herbed Quinoa: For a seamless texture blend, serve the salad alongside a fluffy quinoa dish infused with herbs, tying the whole meal together beautifully.

  • Hummus and Veggie Platter: Crunchy veggies and creamy hummus bring a fun, interactive element, inviting guests to snack while enjoying the salad.

Make your dining experience unforgettable by mixing and matching these delightful pairings with your Quinoa & Roasted Veggie Salad!

Chef's Helpful Tips

  • For the Quinoa & Roasted Veggie Salad, make sure to rinse the quinoa thoroughly to remove any bitterness and enhance its nutty flavor.
  • When roasting the vegetables, cut them into similar sizes to ensure they cook evenly and achieve that beautiful caramelization.
  • If you’re looking for extra flavor, consider adding minced garlic or a sprinkle of your favorite herbs to the vegetable mix before roasting.
  • Keep an eye on the quinoa while it cooks, as overcooking can make it mushy; ideally, you want a fluffy texture.

Quinoa & Roasted Veggie Salad Recipe FAQs

What is the best way to select ripe vegetables for this salad?
Absolutely! When choosing bell peppers, look for ones that are firm and have shiny skin. A ripe zucchini should feel slightly heavy for its size and have a vibrant color without dark spots. Cherry tomatoes should be plump and bright, indicating they’re juicy and fresh. When in doubt, always go for the ones that excite your eyes—freshness is key!

How should I store leftover Quinoa & Roasted Veggie Salad?
You can store leftovers in an airtight container in the fridge for up to 3 days. Make sure to avoid adding dressing until you’re ready to serve, as it can make the salad soggy. If you prefer, you can keep the veggies and quinoa in separate containers to help retain their freshness for a little longer.

Can I freeze Quinoa & Roasted Veggie Salad?
Certainly! To freeze, place the salad in a freezer-safe container. It’s advisable to separate the quinoa and veggies for optimal texture; the quinoa can become mushy if frozen with the roasted veggies. This salad can last up to 2 months in the freezer! When you’re ready to enjoy it, thaw in the fridge overnight and gently reheat in the microwave or eat it cold with a splash of lemon juice for a refreshing taste.

What if my quinoa turns out mushy?
Very! If your quinoa ends up mushy, it might have been overcooked or cooked with too much water. To prevent this next time, remember that a 1:2 quinoa-to-water ratio is essential. After it’s cooked, allow it to “sit” for a few minutes off the heat before fluffing with a fork. This helps the water escape and keeps it light. Should you find yourself with mushy quinoa despite your efforts, consider turning it into a quinoa bowl or bake, adding some cheese or herbs for extra flavor.

Are there any dietary considerations for this salad?
Definitely! This Quinoa & Roasted Veggie Salad is naturally gluten-free and vegan, making it suitable for various dietary preferences. If you’re cooking for someone with allergies, it’s recommended to check for specific veggies or seasonings that may cause reactions. If you’re serving it to pets, do avoid adding any salt or lemon juice; plain cooked quinoa can be a lovely treat for them!

Can I add proteins to make it more filling?
The more the merrier! Feel free to add grilled chicken, chickpeas, or even feta cheese to ramp up the protein content of this Quinoa & Roasted Veggie Salad. For a vegan option, try adding some roasted nuts or seeds for extra crunch and nutrition. Don’t be shy to mix and match your favorites!

Quinoa & Roasted Veggie Salad

Quinoa & Roasted Veggie Salad

This Quinoa & Roasted Veggie Salad is a vibrant and satisfying dish, perfect for lunch, featuring wholesome quinoa and seasonal roasted vegetables.
Print Recipe Pin Recipe
Prep Time 10 minutes mins
Cook Time 25 minutes mins
Cooling Time 5 minutes mins
Total Time 40 minutes mins
Servings: 4 servings
Course: LUNCH RECIPES
Cuisine: American
Calories: 250
Ingredients Equipment Method Nutrition Notes

Ingredients
  

For the Salad
  • 1 cup quinoa a gluten-free grain that provides a hearty base full of protein.
  • 2 cups water necessary for cooking the quinoa and ensuring it's fluffy.
  • 1 red bell pepper, diced adds sweetness and a pop of color to your dish.
  • 1 zucchini, diced brings a lovely texture and is low in calories.
  • 1 yellow squash, diced complements the zucchini with its mild flavor.
  • 1 cup cherry tomatoes, halved juicy bursts of flavor that enhance freshness.
  • Salt to taste elevates the flavors of the salad.
  • Pepper to taste adds a little kick to the overall dish.
  • 1/4 cup fresh parsley, chopped for a fresh herbal note that brightens up the salad.
  • 2 tablespoons lemon juice gives a zesty zing that balances the richness of the veggies.

Equipment

  • Oven
  • Pot
  • Baking sheet
  • Mixing bowl

Method
 

How to Make Quinoa & Roasted Veggie Salad
  1. Preheat the oven to 400°F (200°C). Get your cooking space ready for roasting! This temperature helps caramelize the veggies, bringing out their natural sweetness.
  2. Rinse quinoa under cold water. This step removes bitterness and ensures a nutty flavor. Rinse it thoroughly for about 2-3 minutes.
  3. Combine quinoa and water in a pot. Bring to a boil over medium-high heat, then reduce to a simmer. Let it cook for 15 minutes until fluffy.
  4. Toss the diced vegetables with olive oil, salt, and pepper on a baking sheet. Spread them evenly for perfect roasting, ensuring they get that lovely golden color.
  5. Roast the vegetables in the oven for 20-25 minutes. They should be tender and slightly charred—this adds incredible depth to your salad's flavor!
  6. Fluff the cooked quinoa with a fork and let it cool for a few minutes. This lightens the texture and prepares it to mingle with the roasted veggies.
  7. Combine quinoa, roasted vegetables, chopped parsley, and lemon juice in a large bowl. Stir everything together gently for an even distribution of flavors and colors.
  8. Serve the Quinoa & Roasted Veggie Salad warm or at room temperature. It’s versatile and delightful either way!

Nutrition

Serving: 1bowlCalories: 250kcalCarbohydrates: 40gProtein: 8gFat: 6gSaturated Fat: 1gPolyunsaturated Fat: 2gMonounsaturated Fat: 3gSodium: 150mgPotassium: 500mgFiber: 6gSugar: 5gVitamin A: 20IUVitamin C: 60mgCalcium: 4mgIron: 10mg

Notes

Enjoy crafting this delightful Quinoa & Roasted Veggie Salad!

Tried this recipe?

Let us know how it was!

Filed Under: LUNCH RECIPES

  • « Previous Page
  • 1
  • …
  • 4
  • 5
  • 6
  • 7
  • Next Page »

Recent Posts

  • Crispy Potatoes in Oven
  • Lucky Charms Pancakes
  • Cheeseburger
  • Boiled Corn on the Cob
  • St. Patrick’s Day Dessert Parfaits

Recent Comments

No comments to show.

Footer

  • Contact
  • Privacy Policy
  • About Us
  • Terms
  • ↑ back to top

Copyright © 2024 www.Forkono.com

Table Of Content