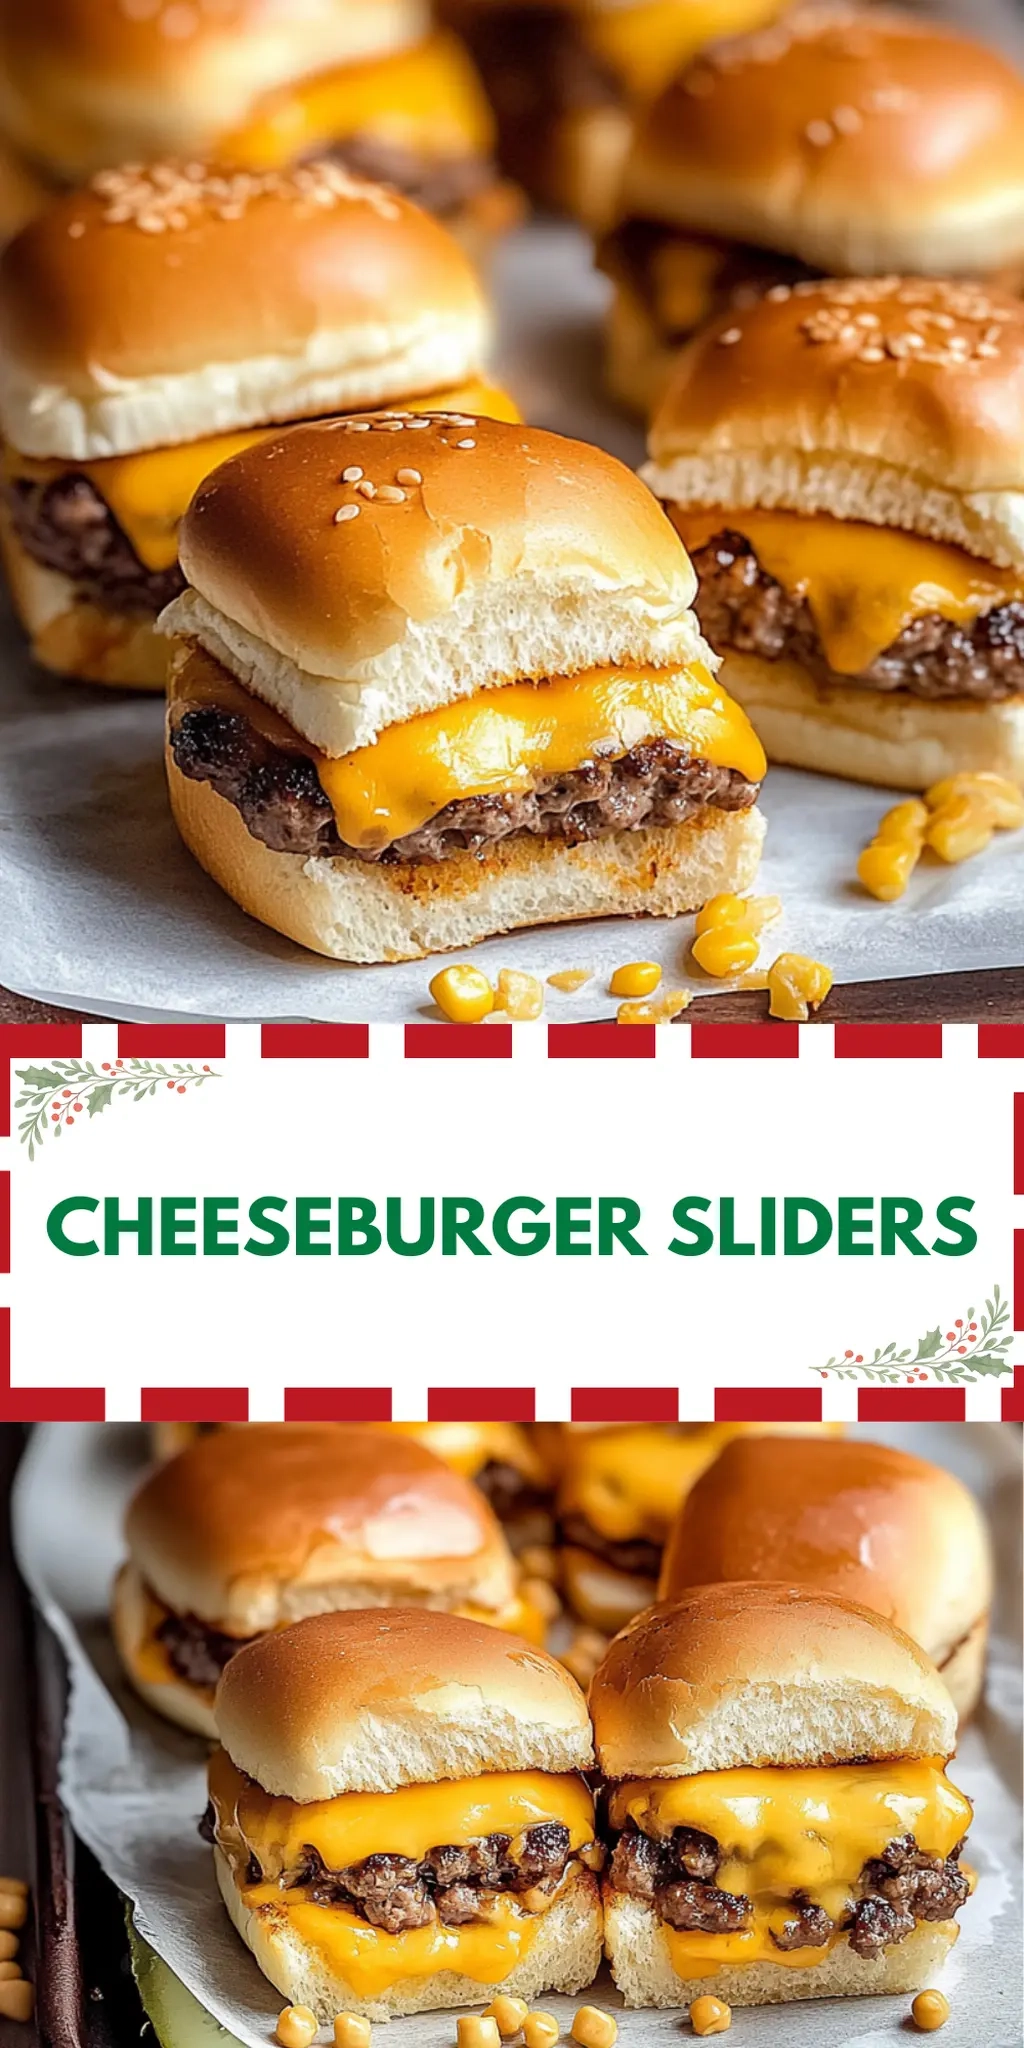
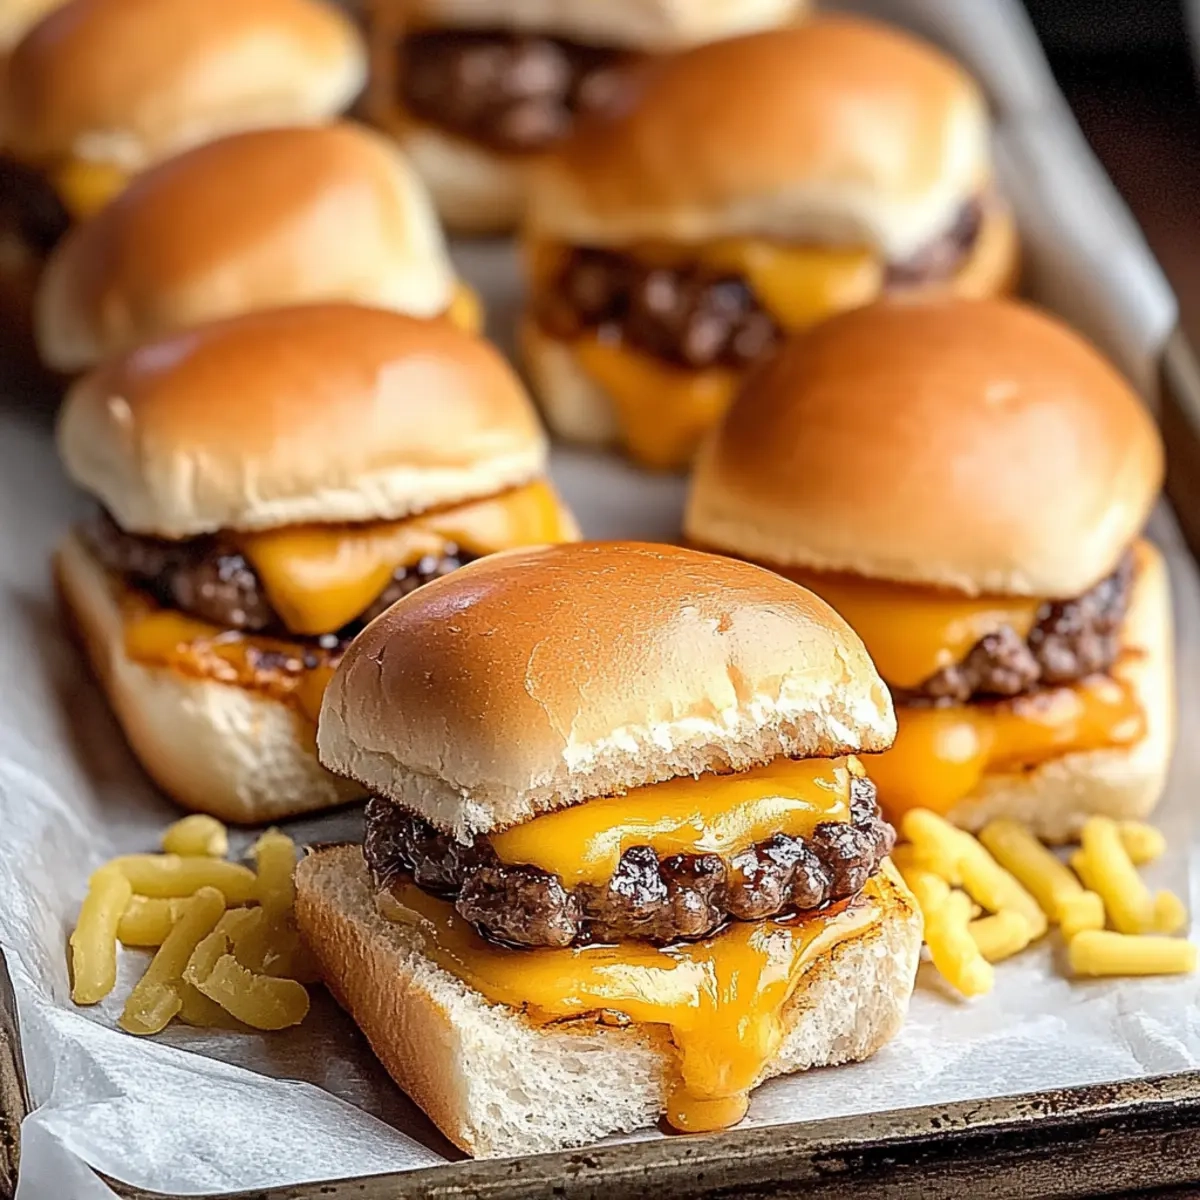
Forkono

  • BREAKFAST & BRUNCH
  • DESSERT RECIPES
  • DINNER RECIPES
  • LUNCH RECIPES
  • About uS
  • SNACKS & APPETIZERS
menu icon
go to homepage
  • BREAKFAST & BRUNCH
  • DESSERT RECIPES
  • DINNER RECIPES
  • LUNCH RECIPES
  • About uS
  • SNACKS & APPETIZERS
search icon
Homepage link
  • BREAKFAST & BRUNCH
  • DESSERT RECIPES
  • DINNER RECIPES
  • LUNCH RECIPES
  • About uS
  • SNACKS & APPETIZERS
×

Healthy Oatmeal Protein Cookies

January 1, 2026 by JudyWhite Leave a Comment

The first bite of a warm cookie should feel like a cozy hug, and that’s exactly what these Healthy Oatmeal Protein Cookies deliver! Picture this: the rich aroma of peanut butter mingling with sweet banana and a hint of cinnamon fills your kitchen as they bake, igniting memories of childhood treats with a nutritious twist.

I originally concocted this recipe out of sheer curiosity while attempting to create a guilt-free indulgence that wouldn’t derail my healthy eating goals. With just a handful of wholesome ingredients—like ripe bananas, rolled oats, and protein-packed whey powder—these cookies not only satisfy your sweet tooth but also double as a post-workout snack.

Ideal for anyone tired of the same old fast food routine, they’re a delightful way to nourish your body without sacrificing flavor. Trust me, whether you’re a busy parent, a health enthusiast, or just someone who loves delicious homemade snacks, these cookies will have you coming back for more. Let’s dive into how you can whip up this scrumptious treat in no time!

Why You'll Love This Healthy Oatmeal Protein Cookies

  • These Healthy Oatmeal Protein Cookies are incredibly easy to make, allowing you to whip up a batch in just 20 minutes.
  • Packed with flavor from ripe bananas and rich peanut butter, these cookies are a delicious guilt-free treat that satisfies your cravings.
  • Their versatility means you can easily swap in your favorite mix-ins, making them perfect for everyone in the family.
  • With their irresistible aroma and delightful texture, these cookies are sure to impress anyone who takes a bite.

Healthy Oatmeal Protein Cookies Ingredients

Get ready to bake up a storm with these nutritious cookies!

For the Batter
• 2 large ripe bananas – the key to natural sweetness and moisture in your cookies.
• ⅓ cup natural peanut butter – adds creaminess and a protein boost to each bite.
• 2 cups rolled oats – the wholesome base that gives these cookies their chewy texture.
• 2 scoops Naked Whey Protein Powder – elevates the protein content, making them a perfect post-workout snack.
• 1 tablespoon chia seeds – a fantastic source of omega-3s and helps bind the batter.
• ⅛ cup coconut oil – enhances richness and is great for healthy fats.
• ⅛ cup honey – naturally sweetens the cookies while keeping them moist.
• ¼ cup chocolate chips – for a delightful indulgence that your taste buds will love.
• ¼ cup raisins – adds a fruity sweetness that balances the richness of peanut butter.
• 1 teaspoon vanilla extract – elevates flavors with a warm, aromatic touch.
• ½ teaspoon ground cinnamon – brings a cozy spice that complements the bananas beautifully.
• ¼ teaspoon sea salt – enhances all the flavors for a more rounded taste.

Enjoy making these Healthy Oatmeal Protein Cookies—they’re not just delicious, they’re a guilt-free treat everyone will adore!

How to Make Healthy Oatmeal Protein Cookies

  1. Preheat the oven to 325°F/160°C. Line a large cookie sheet with parchment paper or a silicone baking mat. This ensures easy cleanup and perfect cookies every time!

  2. Mash the ripe bananas in a large bowl until very smooth. Their natural sweetness will keep the cookies moist and flavorful, so take your time here.

  3. Add the peanut butter, rolled oats, and protein powder to the mashed bananas. Mix well to combine everything into a thick batter, ensuring that the oats and protein powder are fully incorporated.

  4. Stir in the chia seeds, melted coconut oil, honey, chocolate chips, raisins, vanilla extract, cinnamon, and salt. Mix everything together until well combined, creating a rich and aromatic dough.

  5. Shape the mixture into 20 cookies and place them on the prepared baking sheet. Flatten each cookie to about ½ inch thick for a perfect texture, giving them a little space to expand as they bake.

  6. Bake the cookies for about 10-12 minutes, or until they are set and the bottoms start to brown. You’ll know they’re ready when the kitchen fills with their inviting aroma!

  7. Cool the cookies completely on a wire rack before transferring them to an airtight container. This step is essential for maintaining their delightful chewy texture.

Optional: Drizzle with melted dark chocolate for an extra indulgent touch.

Exact quantities are listed in the recipe card below.

Make Ahead Options

These Healthy Oatmeal Protein Cookies are perfect for meal prep enthusiasts! You can mash the ripe bananas and combine them with the peanut butter, rolled oats, and protein powder up to 24 hours in advance, storing the mixture in an airtight container in the refrigerator to keep it fresh. Additionally, you can measure and whisk together the dry ingredients (chia seeds, coconut oil, honey, chocolate chips, raisins, vanilla extract, cinnamon, and salt) a day ahead, ensuring convenience when you’re ready to bake. When it’s time to enjoy, simply form the batter into cookies, bake, and allow them to cool completely for that irresistible chewy texture—resulting in delicious cookies with minimal last-minute effort!

Healthy Oatmeal Protein Cookies Variations

Feel free to put your own spin on these delightful cookies and create a unique treat your family will adore!

  • Nut-Free: Substitute peanut butter with sunflower seed butter for a safe, nut-free alternative that maintains creaminess. You’ll still enjoy that satisfying texture and taste!

  • Vegan: Swap honey for maple syrup and coconut oil for a plant-based butter to make these cookies vegan-friendly. They will still be irresistibly delicious!

  • Dairy-Free: Use dairy-free chocolate chips instead of regular ones for a wholesome option that everyone can enjoy. Your cookies will still shine with mouthwatering flavor!

  • Oat-Free: Replace rolled oats with almond flour for a gluten-free version. This swap offers a different texture while keeping the cookies scrumptious.

  • Add Extra Fiber: Throw in ¼ cup of shredded carrots or zucchini to sneak in some veggies for extra moisture and fiber. It’s a delightful surprise in each bite!

  • Choco-Mint: Add ¼ teaspoon of peppermint extract along with chocolate chips for a refreshing minty twist. The combination will bring you a nostalgic flavor experience!

  • Spicy Kick: Incorporate a dash of cayenne pepper or chili powder for those who love a little heat. This unexpected zest will awaken your taste buds.

  • Fruit Fusion: Instead of raisins, try adding chopped dried apricots or cranberries for a fruity burst that elevates the flavor profile to new heights.

With these variations, you can keep your Healthy Oatmeal Protein Cookies fresh and exciting every time you bake!

What to Serve with Healthy Oatmeal Protein Cookies?

The perfect accompaniment to these scrumptious cookies can elevate your snack time to a whole new level.

  • Fresh Fruit Salad: A vibrant mix of seasonal fruits brings brightness and a refreshing contrast to the cookies’ rich flavors. The natural sweetness of fruits pairs wonderfully, making every bite satisfying.

  • Greek Yogurt Parfait: Layering yogurt with granola and berries offers creamy textures and tangy flavors, complementing the hearty cookies. This hearty treat doubles as a delectable breakfast or an afternoon snack.

  • Nutty Trail Mix: A handful of trail mix adds crunch and a variety of textures to your snack spread. Choose a mix with nuts, seeds, and dried fruits for an extra nutrient boost, creating a satisfying contrast to the cookies.

  • Dark Chocolate Dipped Strawberries: The rich notes of dark chocolate and sweet strawberries create a sophisticated pairing. This delightful treat adds a touch of indulgence and romance to your healthy cookie experience.

  • Chai Spiced Tea: A warm cup of chai infused with spices brings a cozy, aromatic element. The spiciness of the tea complements the cinnamon in your cookies for a beautifully rounded flavor profile.

  • Almond Milk: Cool and creamy almond milk perfectly balances the dense cookies. This dairy-free option is refreshing and light, making it a lovely accompaniment for any time of the day.

  • Peanut Butter Smoothie: Blend up a delicious peanut butter smoothie for a creamy, protein-packed drink. It enhances the flavors of your cookies and provides an energy boost for your busy day.

Enjoy these delightful pairings with your Healthy Oatmeal Protein Cookies, and transform snack time into a feast of flavors!

How to Store and Freeze Healthy Oatmeal Protein Cookies

Room Temperature: Store cooled cookies in an airtight container at room temperature for up to 3 days to maintain their chewy texture.

Fridge: For longer freshness, keep your Healthy Oatmeal Protein Cookies in the fridge, where they can last up to a week. Just be sure to seal them tightly!

Freezer: Freeze cookies in a single layer on a baking sheet, then transfer to a freezer bag for up to 3 months. Thaw them at room temperature when ready to enjoy!

Reheating: To warm your cookies, place them in the microwave for 10-15 seconds or in the oven at 350°F for 5-7 minutes until heated through.

Chef's Helpful Tips

  • When making Healthy Oatmeal Protein Cookies, ensure the bananas are really ripe for maximum sweetness and moisture in the dough.
  • Pay attention to mixing; overmixing can lead to tough cookies, so combine the ingredients until just incorporated.
  • Use a cookie scoop for uniform size to ensure even baking throughout the batch.
  • For the best results, keep an eye on the cookies during the last few minutes of baking, as they can quickly go from perfect to overbaked.

Healthy Oatmeal Protein Cookies Recipe FAQs

What kind of bananas are best for this recipe?
Absolutely, you’ll want to use large, ripe bananas for the best results. They should have a few brown spots, which indicates that they’re sweet and soft. The riper the bananas, the more moisture and sweetness they will provide to your cookies!

How should I store leftover cookies?
For optimal freshness, store your Healthy Oatmeal Protein Cookies in an airtight container at room temperature for up to 3 days. If you want to extend their life a bit, keep them in the fridge for up to a week. Just make sure they’re tightly sealed to preserve their delightful chewy texture!

Can I freeze these cookies?
Of course! Freezing is a great way to save some for later. Start by placing the shaped, unbaked cookies on a baking sheet in a single layer. Once frozen, transfer them to a freezer bag for up to 3 months. When you’re ready to enjoy, let them thaw at room temperature for about an hour before baking them at 325°F/160°C for 10-12 minutes.

Why are my cookies turning out dry or crumbly?
Oh no, nobody wants that! If your cookies come out dry, it could be due to overmixing the batter, which can lead to tough cookies. Be sure to mix just until everything is combined. Also, make sure your bananas are truly ripe and have enough moisture to keep the cookies chewy.

Can I use alternatives for allergens?
Very! If you’re dealing with allergies or dietary restrictions, consider swapping peanut butter for almond or sunflower seed butter. For a vegan option, you can replace honey with maple syrup. Just be mindful that these changes might slightly alter the final taste and texture.

How can I enhance the flavor of my cookies?
I often recommend adding a pinch of nutmeg or substituting some of the chocolate chips with dried fruit or nuts to give your Healthy Oatmeal Protein Cookies an exciting twist. The more the merrier when it comes to flavor!

Healthy Oatmeal Protein Cookies

Healthy Oatmeal Protein Cookies

These Healthy Oatmeal Protein Cookies offer a delicious guilt-free treat packed with protein and natural sweetness from bananas and peanut butter.
Print Recipe Pin Recipe
Prep Time 10 minutes mins
Cook Time 12 minutes mins
Cooling Time 10 minutes mins
Total Time 32 minutes mins
Servings: 20 cookies
Course: Snacks & Appetizers
Calories: 150
Ingredients Equipment Method Nutrition Notes

Ingredients
  

For the Batter
  • 2 large ripe bananas the key to natural sweetness and moisture in your cookies
  • ⅓ cup natural peanut butter adds creaminess and a protein boost
  • 2 cups rolled oats the wholesome base for chewy texture
  • 2 scoops Naked Whey Protein Powder elevates protein content
  • 1 tablespoon chia seeds source of omega-3s and helps bind the batter
  • ⅛ cup coconut oil enhances richness
  • ⅛ cup honey naturally sweetens the cookies
  • ¼ cup chocolate chips for delightful indulgence
  • ¼ cup raisins adds fruity sweetness
  • 1 teaspoon vanilla extract elevates flavors
  • ½ teaspoon ground cinnamon brings cozy spice
  • ¼ teaspoon sea salt enhances flavors

Equipment

  • Baking sheet
  • Mixing bowl
  • parchment paper
  • cookie scoop

Method
 

How to Make Healthy Oatmeal Protein Cookies
  1. Preheat the oven to 325°F/160°C. Line a large cookie sheet with parchment paper or a silicone baking mat.
  2. Mash the ripe bananas in a large bowl until very smooth.
  3. Add the peanut butter, rolled oats, and protein powder to the mashed bananas. Mix well to combine.
  4. Stir in the chia seeds, melted coconut oil, honey, chocolate chips, raisins, vanilla extract, cinnamon, and salt. Mix everything together until well combined.
  5. Shape the mixture into 20 cookies and place them on the prepared baking sheet.
  6. Bake the cookies for about 10-12 minutes, or until they are set and the bottoms start to brown.
  7. Cool the cookies completely on a wire rack before transferring them to an airtight container.

Nutrition

Serving: 1cookieCalories: 150kcalCarbohydrates: 18gProtein: 5gFat: 7gSaturated Fat: 2gPolyunsaturated Fat: 1gMonounsaturated Fat: 3gSodium: 50mgPotassium: 150mgFiber: 2gSugar: 5gVitamin C: 2mgCalcium: 2mgIron: 4mg

Notes

Drizzle with melted dark chocolate for an extra indulgent touch. Use ripe bananas for maximum sweetness and moisture. Avoid overmixing to keep cookies tender.

Tried this recipe?

Let us know how it was!

Filed Under: SNACKS & APPETIZERS

Pumpkin Protein Balls

January 1, 2026 by JudyWhite Leave a Comment

When the crisp autumn air first whispers through my window, my thoughts inevitably turn to cozy flavors and warm comforts. Pumpkin spice and the idea of a quick, energizing treat combine in my mind, leading me to create these delightful Pumpkin Protein Balls. Not only do they embrace the essence of the season, but they also add a wholesome twist to snack time. Imagine biting into a soft, chewy ball packed with nutritious oats, chia seeds, and just the right amount of vegan chocolate chips—a perfect blend of health and indulgence!

I was initially skeptical about how energy bites could fill the void of my usual sweet cravings. However, one taste of these protein-packed gems, and I was convinced. Perfectly portable for those hectic days or as a post-workout snack, they’re so simple to whip up that you’ll find yourself making them again and again. Who knew something so delicious could be this easy? Let’s dive into this satisfying recipe that’s destined to become a favorite in your homemade snack repertoire!

Why You'll Love This Pumpkin Protein Balls

  • These Pumpkin Protein Balls are incredibly easy to make, requiring just 10 minutes of prep time.
  • Packed with wholesome ingredients, each bite bursts with delightful pumpkin spice flavor and a hint of sweetness from the maple syrup.
  • Their versatility allows you to enjoy them as a nutritious snack, a post-workout boost, or even a quick breakfast on the go.
  • With their vibrant color and appealing texture, these bites are sure to impress friends and family at any gathering.
  • They are a time-saving treat that can be prepped ahead and enjoyed throughout the week.
  • You will absolutely love how these protein-packed goodies turn snacking into a guilt-free indulgence!

Pumpkin Protein Balls Ingredients

• Dive into a flavorful experience with these nutritious bites!

For the Base

  • Old fashioned or rolled quick oats – These provide a hearty texture and serve as the main energy source in your Pumpkin Protein Balls.
  • Fine sea salt – Just a pinch enhances the sweetness and balances all the flavors beautifully.
  • Pumpkin spice – This warming spice blend infuses each bite with comforting autumn vibes.
  • Chia seeds – Packed with omega-3s, they add crunch and boost the health quotient of your snack.
  • Pumpkin puree – This ingredient not only adds moisture but is also rich in vitamins and a key component in your Pumpkin Protein Balls.

For the Sweetness

  • Organic peanut butter – A creamy delight that binds everything together while adding protein and healthy fats.
  • Maple syrup – This natural sweetener complements the pumpkin flavor and provides a touch of indulgence.

For a Sweet Finish

  • Vegan chocolate chips – These little morsels of joy add a decadent twist to your energy bites, making them irresistible!

How to Make Pumpkin Protein Balls

  1. Grind the Oats:
    In a food processor, grind the oats for about 1 minute until they’re almost a fine powder. This creates a great base for your Pumpkin Protein Balls.

  2. Combine Ingredients:
    Add in the pumpkin puree, chia seeds, peanut butter, maple syrup, salt, and pumpkin spice. Mix everything together until incorporated, creating a sticky and thick dough.

  3. Incorporate Chocolate Chips:
    Toss in the vegan chocolate chips and pulse the mixture about 15 times. This ensures that the chips are chopped smaller and mixed evenly throughout the dough.

  4. Shape the Bites:
    Using a tablespoon measurer, scoop out the mixture and roll it into round balls. Aim to create about 20-22 bites, ensuring they’re uniform in size.

  5. Chill and Enjoy:
    Place your rolled Pumpkin Protein Balls in the fridge for at least an hour to set. Once chilled, they’re ready to be enjoyed!

Optional: Drizzle with a little extra maple syrup for added sweetness!
Exact quantities are listed in the recipe card below.

What to Serve with Pumpkin Protein Balls?

When creating a wholesome snack experience, consider delightful pairings that enhance the earthy sweetness of your protein balls.

  • Chai Tea: A warming, spiced drink that complements pumpkin flavors beautifully, providing a cozy yet invigorating sip.
  • Greek Yogurt: The creaminess of yogurt adds a tangy contrast, perfect for dipping or spreading on the side.
  • Apple Slices: Crisp and fresh, the juicy sweetness of apples balances the rich notes of the protein balls, making for a vibrant snack option.
  • Carrot Sticks: Crunchy and refreshing, they offer a garden-fresh element, making your snack time feel balanced and wholesome.
  • Nuts and Seeds Mix: A crunchy trail mix with almonds, walnuts, and pumpkin seeds can elevate the texture profile while adding a nutritious boost.
  • Coconut Water: Hydrating and subtly sweet, this natural beverage refreshes your palate, enhancing the overall snacking experience.
  • Dark Chocolate Squares: Rich dark chocolate pairs perfectly with the sweetness of pumpkin and chocolate chips, satisfying any sweet tooth.
  • Trail Mix Bars: A chewy, energy-packed option that echoes the flavors of your Pumpkin Protein Balls for a cohesive snacking theme.

Make Ahead Options

These Pumpkin Protein Balls are perfect for meal prep enthusiasts! You can prepare the dough and roll it into balls up to 24 hours in advance. To do this, follow all the steps until rolling the mixture into bites, then place them on a parchment-lined baking sheet and refrigerate. Cover the tray with plastic wrap to ensure they stay fresh. On the day you plan to enjoy them, simply take them out of the fridge and let them sit for a few minutes at room temperature before devouring. This makes for a quick and nutritious snack that’s just as delicious, offering you delightful pumpkin spice flavors with minimal effort when you have a busy week ahead!

Pumpkin Protein Balls Variations

Feel free to let your creative side shine as you adapt this recipe to suit your preferences and the season!

  • Nut-Free: Substitute organic peanut butter with sun butter or tahini for a nut-free option.

  • Gluten-Free: Use certified gluten-free oats to make your Pumpkin Protein Balls safe for gluten-sensitive eaters.

  • Sweetener Swap: Replace maple syrup with agave nectar or honey for an alternative sweetness that changes the flavor profile slightly.

  • Flavor Boost: Add 1/2 teaspoon of vanilla extract to the mixture to enhance the overall flavor with a warm touch.

  • Protein Punch: Incorporate protein powder (vanilla or unflavored) into the base for an extra protein boost—perfect for pre- or post-workout snacks.

  • Add-Ins: Toss in some dried cranberries, coconut flakes, or nuts for additional texture and flavor dimensions; these additions will make each bite even more delightful!

  • Spice It Up: Experiment by adding a pinch of cayenne pepper for a surprising kick that balances with the sweetness of the pumpkin.

  • Chocolate Lovers: Swap in dark chocolate chips or white chocolate chunks instead of vegan chocolate chips for a different sweet twist.

How to Store and Freeze Pumpkin Protein Balls

Fridge: Store your Pumpkin Protein Balls in an airtight container for up to 1 week. This keeps them fresh and ready for snacking anytime!

Freezer: For longer storage, place the protein balls in a single layer on a baking sheet, freeze until solid, then transfer to a freezer bag. They’ll last up to 3 months.

Reheating: When you’re ready to enjoy, thaw in the fridge overnight or simply let sit at room temperature for about 30 minutes before savoring.

Tip: You can grab them straight from the fridge or freezer for a quick, on-the-go snack without any waiting!

Chef's Helpful Tips

  • When preparing Pumpkin Protein Balls, ensure that you grind the oats just to the right consistency for a smoother texture—too coarse will lead to a grainy bite.
  • While mixing the ingredients, don’t rush this step; allowing the mixture to become thoroughly sticky is key in shaping the balls later.
  • If you prefer a more subtle sweetness, you can reduce the amount of maple syrup without sacrificing the flavor profile of your Pumpkin Protein Balls.
  • Lastly, chilling the bites for a full hour is recommended as it helps them firm up perfectly for easy handling and enhanced flavor.

Pumpkin Protein Balls Recipe FAQs

How should I select pumpkin puree for my Pumpkin Protein Balls?
Look for pure pumpkin puree in your grocery store, not pumpkin pie filling, as the latter contains added sugars and spices. A good rule of thumb is to choose a brand that lists “100% pumpkin” on the label. It should have a bright orange color and a smooth consistency, avoiding any that appear watery or have dark spots.

How do I store Pumpkin Protein Balls, and how long do they last?
Store your Pumpkin Protein Balls in an airtight container in the refrigerator for up to 1 week. Make sure they’re separated by parchment paper if you stack them to prevent sticking. They taste wonderful chilled and are perfect for a quick snack anytime!

Can I freeze Pumpkin Protein Balls, and how do I do that?
Absolutely! To freeze your Pumpkin Protein Balls, place them in a single layer on a baking sheet and freeze until they are solid, which usually takes about 1-2 hours. Once frozen, transfer them to a resealable freezer bag, removing as much air as possible. They can last up to 3 months in the freezer. When you’re ready to enjoy them, simply thaw them in the fridge overnight or let them sit at room temperature for about 30 minutes.

What should I do if my Pumpkin Protein Balls are too sticky?
If your mixture feels too sticky to mold into balls, this might be due to the peanut butter or pumpkin puree. You can add a tablespoon of oats or a sprinkle of chia seeds to absorb excess moisture, making it easier to roll. If the mix is still too sticky, place it in the refrigerator for about 15-30 minutes to firm up before shaping them into balls.

Are Pumpkin Protein Balls suitable for those with nut allergies?
If you’re looking for a nut-free alternative, simply substitute the organic peanut butter with sunflower seed butter or tahini. These options maintain the creamy texture and binding properties without the nuts, so everyone can enjoy these protein-packed treats!

Can I make other flavor variations of Pumpkin Protein Balls?
Absolutely! For a twist on the classic Pumpkin Protein Balls, try swapping the pumpkin spice with cinnamon and adding chopped nuts or seeds for extra crunch. You could also experiment by using almond butter in place of peanut butter or adding dried fruit like cranberries or raisins for a hint of tartness!

Pumpkin Protein Balls

Pumpkin Protein Balls

Delightful Pumpkin Protein Balls combine oats, chia seeds, and vegan chocolate chips for a nutritious autumn snack.
Print Recipe Pin Recipe
Prep Time 10 minutes mins
Chilling Time 1 hour hr
Total Time 1 hour hr 10 minutes mins
Servings: 22 balls
Course: Snacks & Appetizers
Cuisine: American
Calories: 100
Ingredients Equipment Method Nutrition Notes

Ingredients
  

For the Base
  • 2 cups old fashioned or rolled quick oats
  • 1/4 teaspoon fine sea salt
  • 1 tablespoon pumpkin spice
  • 1/4 cup chia seeds
  • 1 cup pumpkin puree
For the Sweetness
  • 1/2 cup organic peanut butter
  • 1/4 cup maple syrup
For a Sweet Finish
  • 1/2 cup vegan chocolate chips

Equipment

  • Food processor

Method
 

Directions
  1. Grind the oats in a food processor for about 1 minute until they’re almost a fine powder.
  2. Add in the pumpkin puree, chia seeds, peanut butter, maple syrup, salt, and pumpkin spice. Mix until incorporated, creating a sticky thick dough.
  3. Toss in the vegan chocolate chips and pulse the mixture about 15 times for even distribution.
  4. Using a tablespoon measurer, scoop and roll the mixture into round balls, aiming for about 20-22 bites.
  5. Place the rolled Pumpkin Protein Balls in the fridge for at least an hour to set before enjoying.

Nutrition

Serving: 1ballCalories: 100kcalCarbohydrates: 12gProtein: 3gFat: 5gSaturated Fat: 1gPolyunsaturated Fat: 2gMonounsaturated Fat: 2gSodium: 50mgPotassium: 100mgFiber: 2gSugar: 3gVitamin A: 500IUVitamin C: 2mgCalcium: 30mgIron: 0.5mg

Notes

Optional: Drizzle with a little extra maple syrup for added sweetness.

Tried this recipe?

Let us know how it was!

Filed Under: SNACKS & APPETIZERS

Healthy Oatmeal Protein Cookies

January 1, 2026 by JudyWhite Leave a Comment

The first bite of a warm cookie should feel like a cozy hug, and that’s exactly what these Healthy Oatmeal Protein Cookies deliver! Picture this: the rich aroma of peanut butter mingling with sweet banana and a hint of cinnamon fills your kitchen as they bake, igniting memories of childhood treats with a nutritious twist.

I originally concocted this recipe out of sheer curiosity while attempting to create a guilt-free indulgence that wouldn’t derail my healthy eating goals. With just a handful of wholesome ingredients—like ripe bananas, rolled oats, and protein-packed whey powder—these cookies not only satisfy your sweet tooth but also double as a post-workout snack.

Ideal for anyone tired of the same old fast food routine, they’re a delightful way to nourish your body without sacrificing flavor. Trust me, whether you’re a busy parent, a health enthusiast, or just someone who loves delicious homemade snacks, these cookies will have you coming back for more. Let’s dive into how you can whip up this scrumptious treat in no time!

Why You'll Love This Healthy Oatmeal Protein Cookies

  • These Healthy Oatmeal Protein Cookies are incredibly easy to make, allowing you to whip up a batch in just 20 minutes.
  • Packed with flavor from ripe bananas and rich peanut butter, these cookies are a delicious guilt-free treat that satisfies your cravings.
  • Their versatility means you can easily swap in your favorite mix-ins, making them perfect for everyone in the family.
  • With their irresistible aroma and delightful texture, these cookies are sure to impress anyone who takes a bite.

Healthy Oatmeal Protein Cookies Ingredients

Get ready to bake up a storm with these nutritious cookies!

For the Batter
• 2 large ripe bananas – the key to natural sweetness and moisture in your cookies.
• ⅓ cup natural peanut butter – adds creaminess and a protein boost to each bite.
• 2 cups rolled oats – the wholesome base that gives these cookies their chewy texture.
• 2 scoops Naked Whey Protein Powder – elevates the protein content, making them a perfect post-workout snack.
• 1 tablespoon chia seeds – a fantastic source of omega-3s and helps bind the batter.
• ⅛ cup coconut oil – enhances richness and is great for healthy fats.
• ⅛ cup honey – naturally sweetens the cookies while keeping them moist.
• ¼ cup chocolate chips – for a delightful indulgence that your taste buds will love.
• ¼ cup raisins – adds a fruity sweetness that balances the richness of peanut butter.
• 1 teaspoon vanilla extract – elevates flavors with a warm, aromatic touch.
• ½ teaspoon ground cinnamon – brings a cozy spice that complements the bananas beautifully.
• ¼ teaspoon sea salt – enhances all the flavors for a more rounded taste.

Enjoy making these Healthy Oatmeal Protein Cookies—they’re not just delicious, they’re a guilt-free treat everyone will adore!

How to Make Healthy Oatmeal Protein Cookies

  1. Preheat the oven to 325°F/160°C. Line a large cookie sheet with parchment paper or a silicone baking mat. This ensures easy cleanup and perfect cookies every time!

  2. Mash the ripe bananas in a large bowl until very smooth. Their natural sweetness will keep the cookies moist and flavorful, so take your time here.

  3. Add the peanut butter, rolled oats, and protein powder to the mashed bananas. Mix well to combine everything into a thick batter, ensuring that the oats and protein powder are fully incorporated.

  4. Stir in the chia seeds, melted coconut oil, honey, chocolate chips, raisins, vanilla extract, cinnamon, and salt. Mix everything together until well combined, creating a rich and aromatic dough.

  5. Shape the mixture into 20 cookies and place them on the prepared baking sheet. Flatten each cookie to about ½ inch thick for a perfect texture, giving them a little space to expand as they bake.

  6. Bake the cookies for about 10-12 minutes, or until they are set and the bottoms start to brown. You’ll know they’re ready when the kitchen fills with their inviting aroma!

  7. Cool the cookies completely on a wire rack before transferring them to an airtight container. This step is essential for maintaining their delightful chewy texture.

Optional: Drizzle with melted dark chocolate for an extra indulgent touch.

Exact quantities are listed in the recipe card below.

How to Store and Freeze Healthy Oatmeal Protein Cookies

Room Temperature: Store cooled cookies in an airtight container at room temperature for up to 3 days to maintain their chewy texture.

Fridge: For longer freshness, keep your Healthy Oatmeal Protein Cookies in the fridge, where they can last up to a week. Just be sure to seal them tightly!

Freezer: Freeze cookies in a single layer on a baking sheet, then transfer to a freezer bag for up to 3 months. Thaw them at room temperature when ready to enjoy!

Reheating: To warm your cookies, place them in the microwave for 10-15 seconds or in the oven at 350°F for 5-7 minutes until heated through.

Healthy Oatmeal Protein Cookies Variations

Feel free to put your own spin on these delightful cookies and create a unique treat your family will adore!

  • Nut-Free: Substitute peanut butter with sunflower seed butter for a safe, nut-free alternative that maintains creaminess. You’ll still enjoy that satisfying texture and taste!

  • Vegan: Swap honey for maple syrup and coconut oil for a plant-based butter to make these cookies vegan-friendly. They will still be irresistibly delicious!

  • Dairy-Free: Use dairy-free chocolate chips instead of regular ones for a wholesome option that everyone can enjoy. Your cookies will still shine with mouthwatering flavor!

  • Oat-Free: Replace rolled oats with almond flour for a gluten-free version. This swap offers a different texture while keeping the cookies scrumptious.

  • Add Extra Fiber: Throw in ¼ cup of shredded carrots or zucchini to sneak in some veggies for extra moisture and fiber. It’s a delightful surprise in each bite!

  • Choco-Mint: Add ¼ teaspoon of peppermint extract along with chocolate chips for a refreshing minty twist. The combination will bring you a nostalgic flavor experience!

  • Spicy Kick: Incorporate a dash of cayenne pepper or chili powder for those who love a little heat. This unexpected zest will awaken your taste buds.

  • Fruit Fusion: Instead of raisins, try adding chopped dried apricots or cranberries for a fruity burst that elevates the flavor profile to new heights.

With these variations, you can keep your Healthy Oatmeal Protein Cookies fresh and exciting every time you bake!

What to Serve with Healthy Oatmeal Protein Cookies?

The perfect accompaniment to these scrumptious cookies can elevate your snack time to a whole new level.

  • Fresh Fruit Salad: A vibrant mix of seasonal fruits brings brightness and a refreshing contrast to the cookies’ rich flavors. The natural sweetness of fruits pairs wonderfully, making every bite satisfying.

  • Greek Yogurt Parfait: Layering yogurt with granola and berries offers creamy textures and tangy flavors, complementing the hearty cookies. This hearty treat doubles as a delectable breakfast or an afternoon snack.

  • Nutty Trail Mix: A handful of trail mix adds crunch and a variety of textures to your snack spread. Choose a mix with nuts, seeds, and dried fruits for an extra nutrient boost, creating a satisfying contrast to the cookies.

  • Dark Chocolate Dipped Strawberries: The rich notes of dark chocolate and sweet strawberries create a sophisticated pairing. This delightful treat adds a touch of indulgence and romance to your healthy cookie experience.

  • Chai Spiced Tea: A warm cup of chai infused with spices brings a cozy, aromatic element. The spiciness of the tea complements the cinnamon in your cookies for a beautifully rounded flavor profile.

  • Almond Milk: Cool and creamy almond milk perfectly balances the dense cookies. This dairy-free option is refreshing and light, making it a lovely accompaniment for any time of the day.

  • Peanut Butter Smoothie: Blend up a delicious peanut butter smoothie for a creamy, protein-packed drink. It enhances the flavors of your cookies and provides an energy boost for your busy day.

Enjoy these delightful pairings with your Healthy Oatmeal Protein Cookies, and transform snack time into a feast of flavors!

Make Ahead Options

These Healthy Oatmeal Protein Cookies are perfect for meal prep enthusiasts! You can mash the ripe bananas and combine them with the peanut butter, rolled oats, and protein powder up to 24 hours in advance, storing the mixture in an airtight container in the refrigerator to keep it fresh. Additionally, you can measure and whisk together the dry ingredients (chia seeds, coconut oil, honey, chocolate chips, raisins, vanilla extract, cinnamon, and salt) a day ahead, ensuring convenience when you’re ready to bake. When it’s time to enjoy, simply form the batter into cookies, bake, and allow them to cool completely for that irresistible chewy texture—resulting in delicious cookies with minimal last-minute effort!

Chef's Helpful Tips

  • When making Healthy Oatmeal Protein Cookies, ensure the bananas are really ripe for maximum sweetness and moisture in the dough.
  • Pay attention to mixing; overmixing can lead to tough cookies, so combine the ingredients until just incorporated.
  • Use a cookie scoop for uniform size to ensure even baking throughout the batch.
  • For the best results, keep an eye on the cookies during the last few minutes of baking, as they can quickly go from perfect to overbaked.

Healthy Oatmeal Protein Cookies Recipe FAQs

How do I choose ripe bananas for this recipe?
Absolutely! Look for bananas that are heavily speckled with brown spots; this indicates maximum sweetness and ripeness. Avoid green or hard bananas, as they won’t provide the necessary moisture or flavor for your cookies.

How long can I store the Healthy Oatmeal Protein Cookies?
Very! You can keep these cookies at room temperature in an airtight container for up to 3 days. For a longer shelf life, store them in the refrigerator for up to a week. Just make sure they’re in a sealed container to prevent them from drying out!

Can I freeze Healthy Oatmeal Protein Cookies?
Of course! To freeze, place the cookies in a single layer in an airtight container, making sure to separate the layers with parchment paper for easy access. They can be stored in the freezer for up to 3 months. When you’re ready to enjoy them, just thaw in the fridge overnight or microwave them for about 10-15 seconds until warm.

What should I do if my cookies come out too dry?
If your cookies feel dry, it could be due to overmixing or overbaking. Ensure you mix until just combined and keep an eye on the baking time—every oven is different. If they still seem dry after baking, consider adding a splash more coconut oil or a couple of extra chocolate chips in your next batch for added moisture.

Are these cookies suitable for people with nut allergies?
Very! If nut allergies are a concern, you can substitute the peanut butter with sunbutter or any seed butter of your choice. Just keep in mind that this will alter the flavor slightly, but you’ll still have a delicious, protein-packed cookie! Always double-check your other ingredients to ensure they’re nut-free as well.

Healthy Oatmeal Protein Cookies

Healthy Oatmeal Protein Cookies

Healthy Oatmeal Protein Cookies are delicious guilt-free treats packed with protein, making them perfect for any snack time.
Print Recipe Pin Recipe
Prep Time 10 minutes mins
Cook Time 12 minutes mins
Total Time 22 minutes mins
Servings: 20 cookies
Course: Snacks & Appetizers
Cuisine: American
Calories: 120
Ingredients Equipment Method Nutrition Notes

Ingredients
  

For the Batter
  • 2 large ripe bananas the key to natural sweetness and moisture
  • ⅓ cup natural peanut butter adds creaminess and protein boost
  • 2 cups rolled oats the wholesome base for chewy texture
  • 2 scoops Naked Whey Protein Powder elevates protein content
  • 1 tablespoon chia seeds source of omega-3s and helps bind
  • ⅛ cup coconut oil enhances richness and healthy fats
  • ⅛ cup honey naturally sweetens and keeps moist
  • ¼ cup chocolate chips for delightful indulgence
  • ¼ cup raisins adds fruity sweetness
  • 1 teaspoon vanilla extract elevates flavors
  • ½ teaspoon ground cinnamon cozy spice
  • ¼ teaspoon sea salt enhances all flavors

Equipment

  • Baking sheet
  • parchment paper
  • Mixing bowl
  • Spatula

Method
 

How to Make Healthy Oatmeal Protein Cookies
  1. Preheat the oven to 325°F/160°C. Line a large cookie sheet with parchment paper or a silicone baking mat.
  2. Mash the ripe bananas in a large bowl until very smooth.
  3. Add the peanut butter, rolled oats, and protein powder to the mashed bananas. Mix well.
  4. Stir in the chia seeds, melted coconut oil, honey, chocolate chips, raisins, vanilla extract, cinnamon, and salt. Mix until well combined.
  5. Shape the mixture into 20 cookies and place them on the prepared baking sheet.
  6. Bake the cookies for about 10-12 minutes, or until they are set and the bottoms start to brown.
  7. Cool the cookies completely on a wire rack before transferring to an airtight container.

Nutrition

Serving: 1cookieCalories: 120kcalCarbohydrates: 15gProtein: 4gFat: 5gSaturated Fat: 2gPolyunsaturated Fat: 0.5gMonounsaturated Fat: 3gSodium: 80mgPotassium: 150mgFiber: 2gSugar: 5gVitamin C: 2mgCalcium: 2mgIron: 4mg

Notes

For an extra indulgent touch, drizzle with melted dark chocolate.

Tried this recipe?

Let us know how it was!

Filed Under: SNACKS & APPETIZERS

Pumpkin Protein Balls

January 1, 2026 by JudyWhite Leave a Comment

When the crisp autumn air first whispers through my window, my thoughts inevitably turn to cozy flavors and warm comforts. Pumpkin spice and the idea of a quick, energizing treat combine in my mind, leading me to create these delightful Pumpkin Protein Balls. Not only do they embrace the essence of the season, but they also add a wholesome twist to snack time. Imagine biting into a soft, chewy ball packed with nutritious oats, chia seeds, and just the right amount of vegan chocolate chips—a perfect blend of health and indulgence!

I was initially skeptical about how energy bites could fill the void of my usual sweet cravings. However, one taste of these protein-packed gems, and I was convinced. Perfectly portable for those hectic days or as a post-workout snack, they’re so simple to whip up that you’ll find yourself making them again and again. Who knew something so delicious could be this easy? Let’s dive into this satisfying recipe that’s destined to become a favorite in your homemade snack repertoire!

Why You'll Love This Pumpkin Protein Balls

  • These Pumpkin Protein Balls are incredibly easy to make, requiring just 10 minutes of prep time.
  • Packed with wholesome ingredients, each bite bursts with delightful pumpkin spice flavor and a hint of sweetness from the maple syrup.
  • Their versatility allows you to enjoy them as a nutritious snack, a post-workout boost, or even a quick breakfast on the go.
  • With their vibrant color and appealing texture, these bites are sure to impress friends and family at any gathering.
  • They are a time-saving treat that can be prepped ahead and enjoyed throughout the week.
  • You will absolutely love how these protein-packed goodies turn snacking into a guilt-free indulgence!

Pumpkin Protein Balls Ingredients

• Dive into a flavorful experience with these nutritious bites!

For the Base

  • Old fashioned or rolled quick oats – These provide a hearty texture and serve as the main energy source in your Pumpkin Protein Balls.
  • Fine sea salt – Just a pinch enhances the sweetness and balances all the flavors beautifully.
  • Pumpkin spice – This warming spice blend infuses each bite with comforting autumn vibes.
  • Chia seeds – Packed with omega-3s, they add crunch and boost the health quotient of your snack.
  • Pumpkin puree – This ingredient not only adds moisture but is also rich in vitamins and a key component in your Pumpkin Protein Balls.

For the Sweetness

  • Organic peanut butter – A creamy delight that binds everything together while adding protein and healthy fats.
  • Maple syrup – This natural sweetener complements the pumpkin flavor and provides a touch of indulgence.

For a Sweet Finish

  • Vegan chocolate chips – These little morsels of joy add a decadent twist to your energy bites, making them irresistible!

How to Make Pumpkin Protein Balls

  1. Grind the Oats:
    In a food processor, grind the oats for about 1 minute until they’re almost a fine powder. This creates a great base for your Pumpkin Protein Balls.

  2. Combine Ingredients:
    Add in the pumpkin puree, chia seeds, peanut butter, maple syrup, salt, and pumpkin spice. Mix everything together until incorporated, creating a sticky and thick dough.

  3. Incorporate Chocolate Chips:
    Toss in the vegan chocolate chips and pulse the mixture about 15 times. This ensures that the chips are chopped smaller and mixed evenly throughout the dough.

  4. Shape the Bites:
    Using a tablespoon measurer, scoop out the mixture and roll it into round balls. Aim to create about 20-22 bites, ensuring they’re uniform in size.

  5. Chill and Enjoy:
    Place your rolled Pumpkin Protein Balls in the fridge for at least an hour to set. Once chilled, they’re ready to be enjoyed!

Optional: Drizzle with a little extra maple syrup for added sweetness!
Exact quantities are listed in the recipe card below.

Pumpkin Protein Balls Variations

Feel free to make these delightful bites your own and surprise your taste buds with various twists!

  • Nut-Free: Replace peanut butter with sunflower seed butter for a nut-free option that still packs plenty of flavor.

  • Sweetener Swap: Use agave syrup instead of maple syrup for a lighter sweetness that complements the pumpkin.

  • Protein Boost: Mix in a scoop of your favorite protein powder to supercharge these snacks and make them even more satisfying.

  • Spicy Kick: Add a pinch of cayenne pepper to the mixture for a warm, spicy twist that will make these protein balls stand out.

  • Autumn Medley: Incorporate chopped pecans or walnuts to give your bites an extra crunchy texture and a delightful nutty flavor that evokes cozy autumn vibes.

  • Dried Fruit: Toss in some chopped dried cranberries or apricots for a chewy surprise that adds a burst of sweetness in each bite.

  • Chocolate Lovers: Swap regular chocolate chips for dark chocolate chunks for a richer, more intense chocolate experience.

  • Flavor Extracts: A splash of vanilla or almond extract can elevate the flavor profile, giving these bites a delightful aromatic quality that enhances the overall taste.

Explore these variations and let your creativity shine, adapting the recipe to fit your preferences and cravings!

Make Ahead Options

These Pumpkin Protein Balls are perfect for meal prep and make life much easier during busy weeknights! You can mix and shape the energy bites up to 24 hours in advance. Just follow the recipe instructions through rolling the balls, then store them in an airtight container in the refrigerator. This helps maintain their freshness and prevents them from becoming too sticky. When you’re ready to enjoy them, simply pull out the desired portion and let them sit at room temperature for a few minutes for the best texture. With this make-ahead option, you’ll have nutritious snacks ready at a moment’s notice, keeping your cravings at bay while saving you precious time during the week!

How to Store and Freeze Pumpkin Protein Balls

Fridge: Store your Pumpkin Protein Balls in an airtight container for up to 1 week. This keeps them fresh and ready for snacking anytime!

Freezer: For longer storage, place the protein balls in a single layer on a baking sheet, freeze until solid, then transfer to a freezer bag. They’ll last up to 3 months.

Reheating: When you’re ready to enjoy, thaw in the fridge overnight or simply let sit at room temperature for about 30 minutes before savoring.

Tip: You can grab them straight from the fridge or freezer for a quick, on-the-go snack without any waiting!

What to Serve with Pumpkin Protein Balls?

When creating a wholesome snack experience, consider delightful pairings that enhance the earthy sweetness of your protein balls.

  • Chai Tea: A warming, spiced drink that complements pumpkin flavors beautifully, providing a cozy yet invigorating sip.
  • Greek Yogurt: The creaminess of yogurt adds a tangy contrast, perfect for dipping or spreading on the side.
  • Apple Slices: Crisp and fresh, the juicy sweetness of apples balances the rich notes of the protein balls, making for a vibrant snack option.
  • Carrot Sticks: Crunchy and refreshing, they offer a garden-fresh element, making your snack time feel balanced and wholesome.
  • Nuts and Seeds Mix: A crunchy trail mix with almonds, walnuts, and pumpkin seeds can elevate the texture profile while adding a nutritious boost.
  • Coconut Water: Hydrating and subtly sweet, this natural beverage refreshes your palate, enhancing the overall snacking experience.
  • Dark Chocolate Squares: Rich dark chocolate pairs perfectly with the sweetness of pumpkin and chocolate chips, satisfying any sweet tooth.
  • Trail Mix Bars: A chewy, energy-packed option that echoes the flavors of your Pumpkin Protein Balls for a cohesive snacking theme.

Chef's Helpful Tips

  • When preparing Pumpkin Protein Balls, ensure that you grind the oats just to the right consistency for a smoother texture—too coarse will lead to a grainy bite.
  • While mixing the ingredients, don’t rush this step; allowing the mixture to become thoroughly sticky is key in shaping the balls later.
  • If you prefer a more subtle sweetness, you can reduce the amount of maple syrup without sacrificing the flavor profile of your Pumpkin Protein Balls.
  • Lastly, chilling the bites for a full hour is recommended as it helps them firm up perfectly for easy handling and enhanced flavor.

Pumpkin Protein Balls Recipe FAQs

How do I choose the right pumpkin puree for my Pumpkin Protein Balls?
Absolutely! When selecting pumpkin puree, look for 100% pure pumpkin without any added sugar or spices. Canned options are usually convenient and consistent, but you can also roast and puree fresh pumpkin if you prefer a homemade touch. Just ensure it’s well-pureed and free of excess water for the best results.

What’s the best way to store Pumpkin Protein Balls?
For sure! Keep your Pumpkin Protein Balls stored in an airtight container in the fridge, where they’ll stay fresh for up to 1 week. If you want to enjoy them longer, freeze them in a single layer on a baking sheet until firm. Transfer them into a freezer-safe container for up to 3 months. Just remember to label it for easy access!

Can I freeze my Pumpkin Protein Balls? How?
Yes, you can definitely freeze your Pumpkin Protein Balls! Here’s how:

  1. Place the rolled balls in a single layer on a baking sheet.
  2. Pop them in the freezer for about 1-2 hours or until firm.
  3. Once frozen, transfer them to a freezer-safe container or a zip-lock bag and store for up to 3 months.
  4. When you’re ready to enjoy, just thaw them in the fridge overnight or at room temperature for a couple of hours. Easy peasy!

What if my mixture is too dry when making Pumpkin Protein Balls?
No worries! If your mixture feels too dry, you can add more moisture by incorporating a little extra pumpkin puree or peanut butter, one tablespoon at a time. Mix well and check the texture after each addition until it reaches that slightly sticky and thick consistency that you want for your balls.

Are there any dietary considerations to keep in mind?
Very! These Pumpkin Protein Balls are vegan-friendly, thanks to the use of plant-based ingredients. If you’re concerned about allergies, check for peanut allergies if using peanut butter and opt for a sunflower seed butter instead. Additionally, if you want to make them gluten-free, use certified gluten-free oats. Always double-check ingredient labels to ensure they align with dietary needs.

Pumpkin Protein Balls

Pumpkin Protein Balls

These Pumpkin Protein Balls are a quick, healthy snack filled with wholesome ingredients and delightful flavors.
Print Recipe Pin Recipe
Prep Time 10 minutes mins
Chilling Time 1 hour hr
Total Time 1 hour hr 10 minutes mins
Servings: 22 balls
Course: Snacks & Appetizers
Calories: 100
Ingredients Equipment Method Nutrition Notes

Ingredients
  

For the Base
  • 2 cups Old fashioned or rolled quick oats
  • 1/4 teaspoon Fine sea salt
  • 2 teaspoons Pumpkin spice
  • 1/4 cup Chia seeds
  • 1 cup Pumpkin puree
For the Sweetness
  • 1/2 cup Organic peanut butter
  • 1/4 cup Maple syrup
For a Sweet Finish
  • 1/2 cup Vegan chocolate chips

Equipment

  • Food processor

Method
 

How to Make Pumpkin Protein Balls
  1. In a food processor, grind the oats for about 1 minute until they’re almost a fine powder.
  2. Add in the pumpkin puree, chia seeds, peanut butter, maple syrup, salt, and pumpkin spice. Mix everything together until incorporated, creating a sticky and thick dough.
  3. Toss in the vegan chocolate chips and pulse the mixture about 15 times.
  4. Using a tablespoon measurer, scoop out the mixture and roll it into round balls, aiming for about 20-22 bites.
  5. Place your rolled Pumpkin Protein Balls in the fridge for at least an hour to set.

Nutrition

Serving: 1ballCalories: 100kcalCarbohydrates: 15gProtein: 4gFat: 4gSaturated Fat: 1gPolyunsaturated Fat: 1gMonounsaturated Fat: 2gSodium: 50mgPotassium: 200mgFiber: 3gSugar: 5gVitamin A: 1000IUCalcium: 30mgIron: 1mg

Notes

Optional: Drizzle with a little extra maple syrup for added sweetness. Can be stored in an airtight container for up to 1 week in the fridge or frozen for up to 3 months.

Tried this recipe?

Let us know how it was!

Filed Under: SNACKS & APPETIZERS

Classic Ranch Dressing

December 31, 2025 by JudyWhite Leave a Comment

The moment I whisk together creaminess with the tang of buttermilk, I’m transported back to backyard barbecues and family gatherings where salads were always drenched in homemade goodness. There’s something satisfying about preparing a dressing that elevates even the simplest dish into a crowd-pleaser.

When boredom starts to creep in from fast food runs, it’s the homemade sauces that bring joy back to the table. Cue Classic Ranch Dressing — a versatile and beloved staple, perfect for salads, dunking veggies, or simply bringing your favorite dishes to life. In just five quick minutes, you can whip up this creamy delight using ingredients you probably already have on hand.

So, if you’re ready to swap store-bought bottles for a richer, fresher flavor, let’s dive into this easy recipe that’s bound to impress both family and friends alike. Trust me, once you taste this Classic Ranch Dressing, you’ll never go back!

Why You'll Love This Classic Ranch Dressing

  • This Classic Ranch Dressing is incredibly easy to make, taking just five minutes to whip up.
  • The flavor is rich and tangy, adding a delicious twist to salads and veggies.
  • Its versatility allows you to use it not only in salads but also as a dip or drizzle over your favorite dishes.
  • The visual appeal of this creamy dressing makes everything on your plate look more inviting and appetizing.

Classic Ranch Dressing Ingredients

For the Base

  • Buttermilk or regular milk – adds a creamy texture; buttermilk gives extra tangy flavor.
  • Sour cream – contributes to the rich creaminess and complements the tang of the dressing.
  • Mayonnaise – enhances the creaminess and helps to bind all flavors together.

For the Herbs and Spices

  • Fresh dill weed – infuses a fresh, earthy flavor; dried dill can replace if fresh isn’t handy.
  • Fresh parsley – adds a pop of freshness and color; dried parsley is a good substitute in a pinch.
  • Fresh chives – offers a subtle onion flavor; you can use onion powder for a sharper taste.
  • Garlic powder – provides a punch of flavor without the hassle of fresh garlic.
  • Fine sea salt – enhances all the flavors; adjust to your taste preference.
  • Onion powder – adds depth to the dressing’s flavor profile.
  • Ground black pepper – provides a touch of heat to balance the creaminess.

For the Acidity

  • Lemon juice – adds brightness and acidity that elevate the entire flavor of the Classic Ranch Dressing.

With these ingredients on hand, you’ll be well on your way to creating a delightful dressing that transforms any meal into a culinary celebration!

How to Make Classic Ranch Dressing

  1. Gather Ingredients: Collect all your ingredients in a mixing bowl. This ensures you have everything at your fingertips, making the process smoother and more enjoyable.

  2. Whisk Together: Using a whisk, blend the buttermilk, sour cream, mayonnaise, and all the spices until the mixture is completely smooth and well combined. Aim for a creamy texture; it should look luscious and inviting!

  3. Adjust Consistency: If you prefer a thinner dressing for salads, simply stir in a little extra buttermilk, regular milk, or even a splash of water until you reach your desired consistency.

  4. Taste and Adjust: Give your dressing a quick taste. If you think it needs a little more zing, add an extra dash of lemon juice or salt to enhance the flavor. Adjust according to your personal preference!

  5. Chill (Optional): For the best flavor, allow the dressing to chill in the fridge for about 30 minutes before serving. This lets the flavors meld beautifully.

Optional: Serve with a sprinkle of fresh herbs on top for added color and appeal!

Exact quantities are listed in the recipe card below.

What to Serve with Classic Ranch Dressing?

Elevate your meal experience with a delightful spread that complements the creamy flavor of your homemade ranch.

  • Crispy Chicken Wings: The rich ranch dressing is the perfect dip for these flavorful wings, balancing their savory, smoky notes.

  • Fresh Veggie Platter: A rainbow of fresh vegetables paired with ranch provides a crunchy, refreshing bite that revitalizes your taste buds.

  • Loaded Baked Potatoes: Generously drizzle ranch over baked potatoes for a creamy addition that enhances the rich toppings for an indulgent treat.

  • Classic Garden Salad: Toss your favorite greens with ranch for a vibrant salad, transforming simple ingredients into a beautiful, flavorsome dish.

  • Deviled Eggs: Pipe a bit of ranch into deviled eggs for an unexpected twist that adds creaminess and a light herby flavor.

  • Grilled Cheese Sandwich: Serve ranch alongside this melty staple as a dip, offering a delightful contrast of textures and flavors.

  • Roasted Vegetables: Drizzle your cooked favorites with ranch for an extra layer of flavor, transforming everyday veggies into a scrumptious side.

  • Beer or Cider: Pair your meal with a light, crisp beer or fruity cider to enhance the flavors of your ranch dressing perfectly.

  • Chocolate Chip Cookies: For dessert, a sweet finish pairs beautifully with savory dishes, creating a lovely balance to end your meal on a high note.

Classic Ranch Dressing Variations

Feel free to put your own spin on this Classic Ranch Dressing for a delicious twist that suits your taste buds!

  • Greek Yogurt: Substitute sour cream with Greek yogurt for a tangy twist and added protein. It maintains that creamy texture while keeping things lighter.

  • Vegan: Swap the mayonnaise with avocado and use plant-based milk instead of buttermilk for an entirely vegan delight. This offers a rich, creamy flavor that everyone will love!

  • Spicy: Add a teaspoon of hot sauce or a pinch of cayenne pepper for a kick of heat. This simple addition brings an exciting zing that elevates your ranch experience.

  • Herbed: Experiment with fresh herbs like basil or cilantro instead of dill and parsley. This leads you to a garden-fresh flavor that is perfect for summer salads.

  • Smoky: Incorporate smoked paprika or bacon bits for a smokey depth. This variation transforms the dressing into a flavorful accompaniment to grilled meats.

  • Sweet: Mix in a drizzle of honey or maple syrup to balance out the tanginess. This sweet twist creates a delightful contrast that’s wonderful with crispy veggies.

  • Zesty Citrus: Swap lemon juice with lime juice for a zesty note, or try adding a touch of orange zest for a refreshing burst of flavor. This twist will brighten up your salads!

  • Creamy Avocado: Blend in half a ripe avocado for a richer and thicker dressing. This not only boosts creaminess but also adds a lovely green color that’s appealing and healthy.

Make Ahead Options

These Classic Ranch Dressing preparations are perfect for meal prep enthusiasts looking to save time on busy weeknights! You can whip up the dressing and refrigerate it for up to 3 days in advance, allowing the flavors to develop beautifully. Simply whisk together all the ingredients as per the recipe and store it in an airtight container in the fridge. If you find the dressing has thickened upon chilling, stir in a tablespoon of buttermilk or regular milk before serving to achieve that creamy consistency once again. By prepping this Classic Ranch Dressing ahead of time, you’ll have a delicious homemade condiment ready to elevate your meals with minimal effort!

How to Store and Freeze Classic Ranch Dressing

Fridge: Keep your Classic Ranch Dressing in an airtight container for up to 1 week. This ensures it stays fresh and retains its delightful flavors.

Freezer: While ranch dressing can be frozen, it’s best to do so for up to 2 months. Store in small, airtight containers to make thawing easier.

Reheating: If you froze it, thaw in the fridge overnight before use. Give it a good stir after thawing to bring back its creamy texture.

Note: If the dressing thickens after refrigeration, simply stir in a little milk or buttermilk to achieve your desired consistency.

Chef's Helpful Tips

  • When making Classic Ranch Dressing, ensure all your ingredients are at room temperature for easier blending and better emulsification.
  • A common mistake is not whisking thoroughly, which can result in a lumpy texture; whisk until completely smooth for the best results.
  • If using dried herbs instead of fresh, remember that dried herbs are more concentrated, so use about one-third the amount.
  • For optimal flavor, let your dressing chill in the fridge for at least 30 minutes before serving to allow the flavors to blend.

Classic Ranch Dressing Recipe FAQs

How do I choose ripe ingredients for Classic Ranch Dressing?
Absolutely! For the best flavor in your Classic Ranch Dressing, select fresh herbs. Look for vibrant green colors in your dill, parsley, and chives, avoiding any with dark spots or wilting. If you’re opting for buttermilk, check the expiration date to ensure it’s still fresh for that delightful tang!

How should I store my Classic Ranch Dressing?
Very simple! Keep your Classic Ranch Dressing in an airtight container in the fridge. It will stay fresh for about 1 week. Make sure to label it with the date, so you always know when it was made, and enjoy its deliciousness while it’s at its best!

Can I freeze Classic Ranch Dressing?
Yes, you can! To freeze your dressing, pour it into small, airtight containers or ice cube trays for easy portioning. It can be frozen for up to 2 months. When you’re ready to use it, thaw it in the fridge overnight and stir it well before serving to restore its creamy texture.

What should I do if my dressing is too thick?
If your Classic Ranch Dressing turns out thicker than expected, don’t worry! Just add a splash of buttermilk or regular milk, stirring gradually until you reach your desired consistency. This will bring it back to that luscious, pourable texture we all love.

Can my pets consume Classic Ranch Dressing?
No, it’s not safe for pets. While ranch dressing may be delicious for us, the garlic and onion powder in the recipe can be harmful to pets, especially dogs. Always stick to pet-safe sauces and treats, and keep this homemade delight just for yourself!

What if I have allergies to certain ingredients?
If you have dietary restrictions, feel free to customize! You can substitute sour cream with Greek yogurt for a lighter option, or mayonnaise with an egg-free alternative if you’re vegan. Just ensure to check all ingredient labels to avoid allergens. Enjoy creating your perfect version of Classic Ranch Dressing!

Classic Ranch Dressing

Classic Ranch Dressing

Classic Ranch Dressing is a creamy, tangy dressing perfect for salads and dipping.
Print Recipe Pin Recipe
Prep Time 5 minutes mins
Chilling Time 30 minutes mins
Total Time 35 minutes mins
Servings: 4 servings
Course: Snacks & Appetizers
Calories: 70
Ingredients Equipment Method Nutrition Notes

Ingredients
  

For the Base
  • 1 cup buttermilk or regular milk
  • 1/2 cup sour cream
  • 1/2 cup mayonnaise
For the Herbs and Spices
  • 1 tablespoon fresh dill weed or dried dill
  • 1 tablespoon fresh parsley or dried parsley
  • 1 tablespoon fresh chives or onion powder
  • 1 teaspoon garlic powder
  • 1/2 teaspoon fine sea salt
  • 1/2 teaspoon onion powder
  • 1/4 teaspoon ground black pepper
For the Acidity
  • 2 tablespoons lemon juice

Equipment

  • Mixing bowl
  • Whisk

Method
 

Instructions
  1. Gather all ingredients in a mixing bowl.
  2. Whisk together buttermilk, sour cream, mayonnaise, and all the spices until smooth.
  3. Adjust consistency by stirring in extra buttermilk or water if desired.
  4. Taste and adjust flavor with extra lemon juice or salt.
  5. Chill in the fridge for about 30 minutes before serving.

Nutrition

Serving: 2tablespoonsCalories: 70kcalCarbohydrates: 1gProtein: 1gFat: 7gSaturated Fat: 2gMonounsaturated Fat: 4gCholesterol: 10mgSodium: 160mgPotassium: 20mgSugar: 1gVitamin A: 100IUVitamin C: 1mgCalcium: 30mg

Notes

For optimal flavor, let the dressing chill in the fridge for at least 30 minutes. Stir in milk or buttermilk if the dressing thickens after refrigeration.

Tried this recipe?

Let us know how it was!

Filed Under: SNACKS & APPETIZERS

Crispy Vegan Bang Bang Cauliflower Wings Recipe

December 31, 2025 by JudyWhite Leave a Comment

The first time I bit into a crispy cauliflower wing, I was pleasantly surprised by the explosion of flavors and satisfying crunch. Who knew something so simple could rival even my favorite deep-fried treats? This Crispy Vegan Bang Bang Cauliflower Wings Recipe is a delightful way to bring a little excitement to your dinner table, especially when you’re craving a vibrant alternative to fast food.

Picture this: a cozy evening with friends, laughter filling the air, and the spicy aroma of sambal oelek and maple syrup wafting from the oven. These cauliflower wings not only impress with their golden-brown perfection but also pack a punch of flavor that even the most ardent meat-lover won’t be able to resist. Whether it’s game night or a casual family dinner, this dish comes together in just 35 minutes, making it an effortless showstopper. Trust me, you’ll want to keep this recipe in your back pocket for when that snack craving hits!

Why You'll Love This Crispy Vegan Bang Bang Cauliflower Wings Recipe

  • These wings are incredibly easy to prepare, making them perfect for a quick snack or a fun meal.
  • The explosion of flavors from the sambal oelek and maple syrup creates a mouthwatering experience that everyone will enjoy.
  • Their versatility allows them to shine as an appetizer or main dish at any gathering.
  • With just 35 minutes from start to finish, you’ll satisfy your cravings without spending all day in the kitchen.

Crispy Vegan Bang Bang Cauliflower Wings Ingredients

For the Sauce
• Vegan mayonnaise – adds a creamy base for the perfect tangy flavor.
• Sambal oelek – this chili paste gives a spicy kick; feel free to substitute with your favorite hot sauce.
• Maple syrup – balances the heat with a touch of sweetness; agave nectar works as a great substitute.

For the Cauliflower Wings
• Cauliflower – the star of the dish, chopped into florets for that perfect wing shape.
• All-purpose flour – provides a light coating for the batter; for gluten-free, try using chickpea flour.
• Cornstarch – helps achieve the ultimate crispiness; don’t skip this ingredient!
• Almond milk – keeps the batter smooth and dairy-free; any plant-based milk can do the trick.
• Lemon juice – adds a zesty brightness; apple cider vinegar is a fine substitute.
• Sea salt – enhances all the flavors; use Himalayan salt for an extra touch.
• Ground black pepper – adds depth to the flavor profile.
• Garlic powder – infuses the batter with savory goodness.
• Onion powder – mellows the garlic flavor and rounds out the spices.
• Crispy Panko breadcrumbs – provides a satisfying crunch; season them with salt, pepper, onion powder, and garlic powder for extra flavor.

These Crispy Vegan Bang Bang Cauliflower Wings Recipe will be your new go-to for a fun and flavorful meal!

How to Make Crispy Vegan Bang Bang Cauliflower Wings

  1. Preheat the oven to 425°F (220°C) to ensure that your wings will bake up crispy and golden brown. This is a crucial step that gets the cooking started right!

  2. Whisk together the vegan mayonnaise, sambal oelek, and maple syrup or agave nectar in a mixing bowl until the mixture is smooth and well combined. This zesty sauce will elevate your wings to new flavorful heights.

  3. Combine the all-purpose flour, cornstarch, almond milk, lemon juice, sea salt, ground black pepper, garlic powder, and onion powder in a separate bowl. Stir until you achieve a smooth batter—this consistency is key for coating.

  4. Dip each cauliflower floret into the batter, ensuring it is fully coated. Then, roll it in the crispy Panko breadcrumbs, pressing lightly to help the crumbs adhere. This double-coating will give your wings a glorious crunch!

  5. Arrange the coated cauliflower on a baking sheet lined with parchment paper. Bake for 15 minutes or until they turn a beautiful golden brown and are nice and crispy. Halfway through, check and turn them for even baking!

  6. Serve your crispy cauliflower wings with the sauce from step 2 for dipping. Enjoy the explosion of flavors with every crunchy bite!

Optional: Sprinkle with fresh herbs or serve with lime wedges for an extra splash of freshness.

Exact quantities are listed in the recipe card below.

What to Serve with Crispy Vegan Bang Bang Cauliflower Wings?

Elevate your dining experience with delightful pairings that complement the bold flavors of your crispy, crunchy creation.

  • Zesty Coleslaw: A crunchy, tangy coleslaw made with cabbage and a hint of lime adds a refreshing contrast to the spicy wings.

  • Sweet Potato Fries: The sweetness and soft texture of sweet potato fries create an irresistible balance with the crispy cauliflower. Perfect for dipping!

  • Creamy Avocado Dip: A smooth avocado dip brings a rich creaminess that perfectly soothes the heat of sambal oelek in the wings.

  • Chilled Cucumber Salad: This light salad with a vinegar dressing provides a cooling refreshment that complements the savory textures of the cauliflower wings.

  • Garlic Noodles: Serve with buttery garlic noodles; their rich flavor pairs beautifully with the spice of the wings, creating a comforting bite.

  • Lemonade or Iced Tea: A tangy lemonade or refreshing iced tea balances the bold flavors while keeping things light and enjoyable.

Unleash the joy of these pairings and watch your dinner transform into a feast that everyone will remember!

Make Ahead Options

These Crispy Vegan Bang Bang Cauliflower Wings are perfect for meal prep enthusiasts! You can chop the cauliflower florets and prepare the sauce up to 24 hours in advance. Simply store the cauliflower in an airtight container in the refrigerator to keep it fresh. The sauce can also be blended and refrigerated until you’re ready to cook. When you’re ready to enjoy your wings, just whip up the batter, dip the cauliflower, and coat it with Panko breadcrumbs before baking. This way, you can serve up delicious, restaurant-quality results with minimal effort, making your busy weeknights a little brighter!

How to Store and Freeze Crispy Vegan Bang Bang Cauliflower Wings

Fridge: Store any leftover wings in an airtight container for up to 3 days. Reheat them in the oven to restore their crispiness.

Freezer: Freeze the baked cauliflower wings in a single layer on a baking sheet. Once frozen, transfer them to a zip-top bag for up to 3 months.

Reheating: To enjoy your frozen Crispy Vegan Bang Bang Cauliflower Wings, bake them at 400°F (200°C) for about 15 minutes or until heated through and crispy.

Crispy Vegan Bang Bang Cauliflower Wings Variations

Feel free to get creative and make this recipe your own, bringing out different flavors and textures to enjoy!

  • Gluten-Free: Substitute all-purpose flour with gluten-free all-purpose flour or chickpea flour for a deliciously crisp coating.

  • Spicy Kick: Add extra sambal oelek or your favorite hot sauce directly into the batter for a fiery flavor boost. The more heat, the merrier!

  • Smoky Flavor: Incorporate smoked paprika into the batter for a delightful smoky twist that complements the flavors perfectly.

  • Herb-Infused: Add fresh herbs like chopped cilantro or parsley to the Panko breadcrumbs for a fragrant and vibrant crunch. It adds a lovely freshness with every bite!

  • Tender Texture: For more tender wings, steam the cauliflower florets for just a few minutes before the battering step. They’ll still crisp up nicely in the oven!

  • Sweet and Savory: Replace maple syrup with coconut nectar or honey for an alternative sweetness that pairs wonderfully with the spicy sauce.

  • Nut-Free: Use oat milk instead of almond milk to keep it nut-free while still maintaining a creamy texture in the batter.

  • Baked or Fried: For a different texture, consider frying the coated cauliflower in a small pan of oil until golden brown instead of baking. Just watch closely for that perfect crispiness!

Chef's Helpful Tips

  • For your Crispy Vegan Bang Bang Cauliflower Wings, preheating your oven to the right temperature ensures they become perfectly crispy and golden.
  • Avoid common mistakes by fully coating the cauliflower florets in the batter before rolling them in Panko breadcrumbs for the best crunch.
  • Consider using chickpea flour as a gluten-free alternative to all-purpose flour without compromising texture.
  • Remember to flip your cauliflower wings halfway through baking to achieve even crispness on all sides.

Crispy Vegan Bang Bang Cauliflower Wings Recipe FAQs

How do I select the best cauliflower for this recipe?
Absolutely! Look for a head of cauliflower that feels firm and has a bright, white color. Avoid any florets with dark spots or browning; they indicate age. Fresh cauliflower should also have tight, compact florets and a nice green stem.

What is the best way to store leftovers?
Leftover Crispy Vegan Bang Bang Cauliflower Wings can be stored in an airtight container in the fridge for up to 3 days. When ready to reheat, place them in a preheated oven at 375°F (190°C) for about 10 minutes to regain their crispiness. You can also microwave them, but they won’t be as crunchy.

Can I freeze these cauliflower wings?
Very much so! To freeze, bake the wings first, allow them to cool completely, then arrange them in a single layer on a baking sheet. Freeze for about 2 hours, then transfer the wings to a zip-top freezer bag. They’ll be good for up to 3 months! When you’re ready to eat, bake them at 400°F (200°C) for about 15 minutes, or until heated through and crispy.

What if my batter is too thick or too thin?
Not to worry! If your batter is too thick, add a little more almond milk, one tablespoon at a time, until you reach a smooth, pourable consistency. Conversely, if it’s too thin, add a bit more flour or cornstarch to thicken it up. The right consistency should coat the cauliflower without dripping excessively.

Can my pets have any of these ingredients?
It’s wise to check! The main ingredients in this recipe are safe for dogs (like cauliflower), but sauces with spices could upset their stomach. If you have a dog, feel free to give them plain, unseasoned cauliflower as a treat. Always consult your veterinarian for concerns about specific ingredients and your pet’s dietary needs.

Are these wings gluten-free?
Yes, they can be! Simply substitute the all-purpose flour with chickpea flour or any gluten-free flour blend. Ensure your Panko breadcrumbs are also gluten-free or opt for certified gluten-free breadcrumbs. Your wings will not only be delicious but accommodating for all your guests!

Crispy Vegan Bang Bang Cauliflower Wings Recipe

Crispy Vegan Bang Bang Cauliflower Wings Recipe

This Crispy Vegan Bang Bang Cauliflower Wings Recipe offers a delightful alternative to fast food with vibrant flavors and satisfying crunch.
Print Recipe Pin Recipe
Prep Time 10 minutes mins
Cook Time 25 minutes mins
Total Time 35 minutes mins
Servings: 4 wings
Course: Snacks & Appetizers
Cuisine: Vegan
Calories: 180
Ingredients Equipment Method Nutrition Notes

Ingredients
  

For the Sauce
  • 1 cup Vegan mayonnaise
  • 2 tbsp Sambal oelek or your favorite hot sauce
  • 2 tbsp Maple syrup or agave nectar
For the Cauliflower Wings
  • 1 head Cauliflower chopped into florets
  • 1 cup All-purpose flour or chickpea flour for gluten-free
  • 1/2 cup Cornstarch
  • 1 cup Almond milk or any plant-based milk
  • 2 tbsp Lemon juice or apple cider vinegar
  • 1 tsp Sea salt or Himalayan salt
  • 1 tsp Ground black pepper
  • 1 tsp Garlic powder
  • 1 tsp Onion powder
  • 1 cup Crispy Panko breadcrumbs seasoned with salt, pepper, onion powder, and garlic powder

Equipment

  • Mixing bowls
  • Baking sheet
  • Whisk
  • parchment paper

Method
 

Instructions
  1. Preheat the oven to 425°F (220°C) to ensure that your wings will bake up crispy and golden brown.
  2. Whisk together the vegan mayonnaise, sambal oelek, and maple syrup or agave nectar until smooth and well combined.
  3. Combine the all-purpose flour, cornstarch, almond milk, lemon juice, sea salt, ground black pepper, garlic powder, and onion powder in a bowl. Stir until you achieve a smooth batter.
  4. Dip each cauliflower floret into the batter, ensuring it is fully coated, then roll it in the crispy Panko breadcrumbs.
  5. Arrange the coated cauliflower on a baking sheet lined with parchment paper. Bake for 15 minutes or until golden brown and crispy.
  6. Serve your crispy cauliflower wings with the sauce for dipping. Enjoy!

Nutrition

Serving: 1wingCalories: 180kcalCarbohydrates: 20gProtein: 3gFat: 9gSaturated Fat: 1gPolyunsaturated Fat: 1gMonounsaturated Fat: 7gSodium: 300mgPotassium: 250mgFiber: 2gSugar: 3gVitamin C: 40mgCalcium: 4mgIron: 6mg

Notes

Optional: Sprinkle with fresh herbs or serve with lime wedges for an extra splash of freshness.

Tried this recipe?

Let us know how it was!

Filed Under: SNACKS & APPETIZERS

Texas Roadhouse-Style Ranch Dressing Recipe

December 31, 2025 by JudyWhite Leave a Comment

There’s something incredibly satisfying about creating your own sauces at home, especially when they rival those from your favorite restaurants. I first encountered the beloved Texas Roadhouse-style ranch dressing during a celebratory family dinner, where it boldly stole the spotlight from the ribeye and rolls. The rich, creamy blend and zesty kick had me hooked, but the best part? I learned I could whip it up in just ten minutes, right in my own kitchen!

As the aroma of garlic mingled with fresh herbs filled the air, I realized that this dressing is not just a dip for veggies or a dressing for salads; it’s a versatile companion for everything from drizzling on tacos to slathering on burgers. Plus, you can adjust the spice level to suit your taste, whether you’re in the mood for a mild treat or a bit more heat. Let’s dive into this homemade Texas Roadhouse-Style Ranch Dressing recipe that will elevate any meal and make your kitchen feel like a five-star eatery!

Why You'll Love This Texas Roadhouse-Style Ranch Dressing

  • This Texas Roadhouse-Style Ranch Dressing is incredibly easy to make, taking just ten minutes from start to finish.
  • The rich and creamy flavor will have your taste buds dancing, making it a perfect accompaniment to any meal.
  • Its versatility allows you to use it as a dressing, dip, or even a spread, adapting to whatever dish you have in mind.
  • Plus, with the option to adjust the spice level, you can tailor it to suit your preferences, making it a crowd-pleaser for everyone at your table.
  • The vibrant colors and fresh ingredients make it visually appealing, adding a touch of homemade charm to your meals.
  • This dressing will not only elevate your dishes but also impress your family and friends, making mealtime a truly delightful experience.

Texas Roadhouse-Style Ranch Dressing Ingredients

• Get ready to whip up a delicious homemade delight!

For the Dressing
• Mayonnaise – This creamy base brings richness that’s essential to the ranch flavor.
• Sour Cream – Adds tanginess and smooth texture, perfect for balancing the flavors.
• Garlic (minced) – Fresh garlic infuses a robust flavor that brightens up the dressing.
• Dill (chopped fresh or dried) – This herb brings a refreshing, aromatic touch that complements the creamy elements.
• Fresh Parsley (chopped) – Adds a vibrant color and mild herbal flavor, making your ranch dressing pop.
• Buttermilk – The secret to achieving that perfect drizzle or dip texture; you can substitute with regular milk if needed.
• Lemon Juice – A splash of acidity brightens the dressing, enhancing all the flavors beautifully.
• Black Pepper – A pinch adds warmth; you can adjust it based on your spice preference.
• Salt – Essential for elevating the overall flavor profile; use to taste.
• Cayenne Pepper (optional) – For those who like a little heat, add it to taste for a spicy kick!
• Paprika (optional) – Adds a subtle smokiness and beautiful color without too much heat.

How to Make Texas Roadhouse-Style Ranch Dressing

  1. Mince and Chop: Begin by finely mincing the garlic and chopping the parsley and dill. Set them aside, allowing their flavors to come together beautifully in the dressing.

  2. Mix Creamy Base: In a mixing bowl, combine the mayonnaise and sour cream. Stir thoroughly until well-blended; this creamy mixture will be the foundation of your ranch dressing.

  3. Add Buttermilk: Gradually incorporate the buttermilk, adding it a little at a time. Mix until you achieve your desired consistency—smooth and pourable without being too runny.

  4. Combine Ingredients: Next, add the minced garlic, fresh herbs, lemon juice, black pepper, and salt. Whisk everything together until fully combined, creating that signature ranch flavor.

  5. Adjust Spices: Taste your mixture and adjust seasoning as needed. Feel free to sprinkle in some cayenne or paprika for an extra flavor boost if you’re feeling adventurous!

  6. Store: Transfer your homemade ranch dressing into an airtight jar and store it in the refrigerator. If it thickens over time, simply thin it out with a splash more buttermilk before serving.

Optional: Drizzle with extra olive oil for a richer flavor.

Exact quantities are listed in the recipe card below.

How to Store and Freeze Texas Roadhouse-Style Ranch Dressing

Fridge: Store your ranch dressing in an airtight jar in the refrigerator for up to 1 week. Make sure the lid is tightly sealed to maintain freshness.

Freezer: If you want to keep it longer, you can freeze the ranch dressing for up to 3 months. Use an airtight container, leaving some space for expansion.

Thawing: When ready to use, thaw the ranch dressing in the fridge overnight. Whisk vigorously to re-emulsify; add a splash of buttermilk if it seems too thick.

Reheating: This dressing is ideally enjoyed cold, so there’s no need to heat it! Just give it a good stir before serving again.

What to Serve with Texas Roadhouse-Style Ranch Dressing?

Ranch dressing is a delightful addition that enhances countless dishes, turning any meal into a flavorful experience.

  • Crispy Chicken Tenders: The crunch of fried chicken paired with creamy ranch is a classic combo that takes comfort food to the next level.
  • Fresh Veggie Platter: Crisp, colorful veggies like carrots, celery, and bell peppers bring freshness, balancing the rich notes of the dressing beautifully.
  • Garden Salad: A crisp garden salad topped with ranch brings together vibrant flavors and textures, making your greens much more exciting.
  • Buffalo Wings: The spicy kick of buffalo wings meets its match with a cooling ranch dip, creating a perfect contrast that keeps you coming back for more.
  • Loaded Baked Potatoes: Drizzle this ranch over a fluffy baked potato topped with cheese and bacon, adding a creamy punch and elevating a simple dish.
  • Taco Bar: Use ranch as a unique topping alongside ground beef, veggies, and all your favorite taco fixings for a twist on a classic.
  • Homemade Quesadillas: A cheesy quesadilla dipped in ranch creates a mouthwatering experience that satisfies your savory cravings.
  • Grilled Steak: A side of ranch dressing with steak brings a creamy herbal note that elevates the rich and smoky flavors of the meat.
  • Sweet Potato Fries: These crispy fries sprinkled with a touch of salt are irresistible with a zesty ranch dip, enhancing their naturally sweet flavor perfectly.
  • Apple Pie: For an unexpected dessert pairing, drizzle a little ranch over warm apple pie—its creamy texture surprisingly complements the dessert’s spices.

Texas Roadhouse-Style Ranch Dressing Variations

Feel free to play around and add your personal touch to this ranch dressing, creating a flavor experience all your own!

  • Herb Boost: Swap out the parsley and dill for chives, cilantro, or basil to create a unique herbal layer in your dressing. Fresh herbs add vibrancy and excitement, making every bite special.

  • Greek Yogurt: Use Greek yogurt instead of sour cream for a tangier and healthier option while still keeping the creaminess intact. It’s a fantastic way to up the protein without sacrificing flavor.

  • Spicy Kick: Mix in extra cayenne pepper or a dash of hot sauce to spice things up for those who love heat; just be cautious, as a little goes a long way! This variation packs a punch that heat lovers won’t forget.

  • Smoky Flavor: Add a teaspoon of smoked paprika for a delightful smoky twist. This small adjustment can transport your ranch dressing to a whole new level, perfect for BBQ dishes.

  • Avocado Cream: Blend in ripe avocado for an ultra-creamy and nutritious twist, making your ranch dressing both wholesome and incredibly smooth. The subtle avocado flavor brings richness you’ll adore.

  • Vegan Delight: Substitute mayonnaise and sour cream with vegan mayo and silken tofu for a dairy-free version. This transformation means everyone can enjoy the creamy goodness while keeping it plant-based.

  • Zesty Citrus: Incorporate lime juice or zest along with the lemon juice for an added citrus punch that brightens the dressing beautifully. This zesty twist can revive your salads and snacks in a delightful way!

  • Creamy Avocado Dressing: Puree ripe avocados into the mix for a smooth, nutrient-rich dressing that adds a delightful creamy texture. It’ll not only enhance the flavors but also impress your family and friends with its freshness!

Make Ahead Options

These Texas Roadhouse-Style Ranch Dressing recipes are perfect for busy home cooks looking to save time during hectic weeknights! You can prepare the dressing up to 3 days in advance by following the initial mixing steps—combine the mayonnaise, sour cream, garlic, dill, parsley, and buttermilk. Then, store the preparation in an airtight container in the refrigerator to maintain freshness. To enhance the flavors, it’s best to mix in the lemon juice, black pepper, and any optional spices just before serving. This way, your dressing stays flavorful and creamy, ready to elevate your salads, sandwiches, or veggies while freeing up your schedule for the week ahead!

Chef's Helpful Tips

  • When making Texas Roadhouse-Style Ranch Dressing, always ensure your garlic is minced finely to avoid large chunks in the dressing.
  • Instead of adding all the buttermilk at once, incorporate it gradually to control the dressing’s thickness to your liking.
  • For a more pronounced herb flavor, let the dressing sit in the refrigerator for at least an hour before serving to allow the flavors to meld.
  • Keep an eye on the temperature of the dressing when serving—it’s best enjoyed chilled for a refreshing taste experience.

Texas Roadhouse-Style Ranch Dressing Recipe FAQs

How do I select the best garlic for this recipe?
Absolutely! When choosing garlic, look for firm, unblemished bulbs with no dark spots or mold. Fresh garlic will have a strong aroma and should be easy to peel. Avoid any that feels soft or has begun to sprout, as this indicates it’s past its prime.

How long can I store Texas Roadhouse-Style Ranch Dressing in the fridge?
You can store your ranch dressing in an airtight jar in the refrigerator for up to 1 week. Just make sure the lid is tightly sealed to keep it fresh and creamy.

Can I freeze this ranch dressing?
Yes, indeed! You can freeze your homemade ranch dressing for up to 3 months. To do this, transfer it into an airtight container, leaving a little space at the top for expansion during freezing. When you’re ready to use it, simply thaw it in the fridge overnight. If it looks a bit separated after thawing, whisk it vigorously and add a splash of buttermilk to re-emulsify.

What if my ranch dressing is too thick or too thin?
Very good question! If your dressing turns out too thick, gradually add a bit more buttermilk, stirring until you get the desired consistency. For a dressing that’s too thin, you can mix in a little more mayonnaise or sour cream to thicken it up. Remember, it should be smooth and pourable, but not runny!

Is there any concern for allergies or dietary restrictions?
Definitely! If anyone at your table has dairy allergies, you can substitute the sour cream and buttermilk with dairy-free alternatives like cashew cream or a non-dairy yogurt. Just be sure to check the labels for any other allergens. For those watching their sodium intake, feel free to reduce the amount of salt or use low-sodium alternatives without compromising too much on flavor.

Can my pets eat Texas Roadhouse-Style Ranch Dressing?
Not at all! While this dressing is delicious for humans, it contains ingredients such as garlic and onion, which can be harmful to pets. It’s always best to keep human food separate from pet food, ensuring your furry friends stick to their specific diets.

Texas Roadhouse-Style Ranch Dressing Recipe

Texas Roadhouse-Style Ranch Dressing Recipe

This Texas Roadhouse-Style Ranch Dressing is a creamy and zesty homemade delight that enhances any meal.
Print Recipe Pin Recipe
Prep Time 10 minutes mins
Total Time 10 minutes mins
Servings: 6 servings
Course: Snacks & Appetizers
Cuisine: American
Calories: 100
Ingredients Equipment Method Nutrition Notes

Ingredients
  

For the Dressing
  • 1 cup Mayonnaise Creamy base for richness
  • 1/2 cup Sour Cream Adds tanginess and smooth texture
  • 2 cloves Garlic (minced) Infuses robust flavor
  • 2 tablespoons Dill (chopped fresh or dried) Aromatic touch
  • 2 tablespoons Fresh Parsley (chopped) Vibrant color and mild flavor
  • 1/2 cup Buttermilk For a perfect drizzle texture
  • 1 tablespoon Lemon Juice Brightens the dressing
  • 1/4 teaspoon Black Pepper Adjust to preference
  • 1/2 teaspoon Salt Use to taste
  • 1/4 teaspoon Cayenne Pepper (optional) For a spicy kick
  • 1/4 teaspoon Paprika (optional) Adds subtle smokiness

Equipment

  • Mixing bowl
  • Whisk
  • Airtight jar

Method
 

How to Make Texas Roadhouse-Style Ranch Dressing
  1. Begin by finely mincing the garlic and chopping the parsley and dill. Set them aside.
  2. In a mixing bowl, combine the mayonnaise and sour cream. Stir thoroughly until well-blended.
  3. Gradually incorporate the buttermilk, adding it a little at a time until desired consistency.
  4. Add minced garlic, fresh herbs, lemon juice, black pepper, and salt. Whisk until fully combined.
  5. Taste the mixture and adjust seasonings. Sprinkle in cayenne or paprika for an extra flavor boost if desired.
  6. Transfer to an airtight jar and store in the refrigerator. If it thickens, thin it with a splash of buttermilk before serving.

Nutrition

Serving: 2tablespoonsCalories: 100kcalCarbohydrates: 2gProtein: 1gFat: 10gSaturated Fat: 2gCholesterol: 15mgSodium: 300mgPotassium: 30mgVitamin A: 5IUCalcium: 1mg

Notes

For a richer flavor, drizzle with extra olive oil before serving. Best enjoyed chilled.

Tried this recipe?

Let us know how it was!

Filed Under: SNACKS & APPETIZERS

Painici à l’ail et beurre

December 31, 2025 by JudyWhite Leave a Comment

The moment I first spread a warm layer of garlic butter over freshly baked bread, it felt like a delicious secret had been unveiled. Painici à l’ail et beurre is not just a dish; it’s a glorious experience that elevates any meal with its perfect blend of flavors. The creamy richness of softened butter, combined with the savory punch of garlic and the freshness of parsley, creates a comforting aroma that beckons everyone to the kitchen.

Whether you’re hosting a gathering, enjoying a cozy night in, or simply looking to transform your weeknight dinner, this recipe is a game-changer. Plus, it’s wonderfully versatile—you can pair it with pasta, soups, or serve it as a standout appetizer. In just 25 minutes, you’ll have a golden, crispy delight that is incredibly easy to prepare and impossible to resist. Let’s dive into this simple yet indulgent recipe that will undoubtedly become a favorite in your home!

Why You'll Love This Painici à l’ail et beurre

  • This Painici à l’ail et beurre is incredibly easy to prepare, taking just 25 minutes from start to finish.
  • The delightful combination of garlic and butter creates a rich flavor that complements any meal beautifully.
  • Not only is it versatile enough to accompany pasta or soups, but it also serves perfectly as an appetizer at gatherings.
  • Its golden, crispy appearance makes it visually appealing and sure to impress your guests.
  • Get ready to indulge in a crowd-pleasing dish that will leave everyone asking for seconds.

Painici à l’ail et beurre Ingredients

For the Garlic Butter
• Butter – softened for a creamy blend that spreads easily.
• Garlic – pressed for maximum flavor and aroma in the mixture.
• Parsley – chopped to add a fresh, vibrant touch.
• Lemon – use the zest to enhance the overall flavor profile of the dish.
• Salt – season to taste and bring all the flavors together.

For the Bread
• Italian Bread – this is ideal, but feel free to substitute with baguette or ciabatta for a different texture.

How to Make Painici à l’ail et beurre

  1. Combine Ingredients: In a bowl, blend the softened butter, pressed garlic, chopped parsley, and lemon zest. Mix until everything is well incorporated, creating a smooth and aromatic garlic butter spread.

  2. Season: Taste your garlic butter mixture and add salt as needed. This step helps to enhance the flavors, ensuring your Painici à l’ail et beurre is rich and delicious.

  3. Prepare the Bread: Slice the Italian bread in half lengthwise. Generously spread the garlic butter mixture over each half, making sure to cover every inch for maximum flavor.

  4. Bake: Place the prepared bread on a baking sheet and pop it into a preheated oven at 190°C (375°F). Bake for about 10 minutes or until the bread is golden brown and the edges are crispy.

  5. Serve Warm: Once baked, remove the bread from the oven. Slice into pieces and serve warm, allowing everyone to enjoy the delightful aroma and flavor.

Optional: Garnish with extra chopped parsley for a fresh touch before serving.

Exact quantities are listed in the recipe card below.

Painici à l’ail et beurre Variations

Feel free to experiment and make this garlic butter bread your own—there are so many delightful twists to try!

  • Herb-Infused: Swap the parsley for fresh basil or thyme to introduce a different herbaceous note.

  • Cheesy Delight: Add grated Parmesan or mozzarella to the garlic butter for a gooey, cheesy experience.

  • Spicy Kick: Mix in a pinch of red pepper flakes or a drizzle of hot sauce for some exciting heat.

  • Nutritional Boost: Incorporate chopped spinach into the butter mixture for added nutrients and a pop of color.

  • Citrus Twist: Substitute lemon zest with orange or lime zest for a refreshing, fruity aroma.

  • Whole Wheat: Use whole wheat or sourdough bread instead of Italian for added fiber and a tangy flavor.

  • Vegan Option: Replace butter with vegan margarine and ensure your bread is dairy-free for a plant-based alternative.

  • Caramelized Onions: Fold in sautéed onions for a sweet, savory layer that enhances the richness of the spread.

These variations can transform a classic dish into so much more, making every bite a new adventure!

Storage Tips for Painici à l’ail et beurre

Room Temperature: Enjoy your Painici à l’ail et beurre fresh for the best flavor. If you have leftovers, let them cool and store in an airtight container for up to 1 day.

Fridge: If you need to store it longer, place the garlic butter spread in an airtight container in the fridge for up to 3 days. Just remember to reheat before spreading!

Freezer: For extended storage, wrap the sliced bread well in plastic wrap and then aluminum foil, or place it in a freezer-safe bag. Enjoy within 1 month for best quality.

Reheating: To reheat, simply pop the frozen bread in a preheated oven at 190°C (375°F) for about 10 minutes until heated through and crispy again.

What to Serve with Painici à l’ail et beurre?

Imagine the warm, buttery aroma wafting through your kitchen, perfectly complementing a cozy meal.

  • Classic Tomato Soup: The acidic brightness of tomato soup pairs beautifully with the rich, garlicky bread, creating a delicious contrast.
  • Simple Green Salad: A fresh salad with mixed greens and a light vinaigrette enhances the dish’s flavors while providing a satisfying crunch.
  • Pasta Primavera: Bright vegetables tossed with pasta elevate the garlic butter’s flavor while maintaining a wholesome essence that keeps it light.
  • Bruschetta Toppings: Serve the bread with various toppings like diced tomatoes and basil or artichoke spread to create a delightful appetizer platter.
  • Cheesy Garlic Pasta: For those seeking comfort, this creamy dish is a match made in heaven alongside the garlic bread.
  • Grilled Chicken: The savory, buttery notes of the bread nicely complement the grilled flavors, making every bite a satisfying experience.
  • Chardonnay or Sauvignon Blanc: A glass of crisp white wine accentuates the garlic and butter’s richness, bringing a touch of elegance to the meal.
  • Lemon Sorbet: As a refreshing dessert, this zesty treat cleanses the palate after the indulgent bread, leaving you feeling satisfied yet light.

Make Ahead Options

These Painici à l’ail et beurre are a fantastic choice for meal prep, saving you precious time during busy weeknights! You can prepare the garlic butter mixture up to 3 days in advance; simply cover it well and refrigerate to maintain its delightful freshness. The next day, you can slice your Italian bread and apply the garlic butter mixture just before baking to ensure the bread remains fresh and crispy. When you’re ready to serve, bake the prepared bread in a preheated oven at 190°C (375°F) for about 10 minutes until golden brown. This way, your Painici à l’ail et beurre will be just as delicious, allowing you to impress any family or guests with minimal effort!

Chef's Helpful Tips

  • To make your Painici à l’ail et beurre extra flavorful, consider using fresh garlic instead of pre-minced for a more vibrant taste.
  • Remember to mix the butter and garlic thoroughly to ensure an even distribution of flavors throughout the spread.
  • For a unique twist, try adding a pinch of red pepper flakes to the garlic butter for a subtle heat.
  • Keep an eye on the bread while baking as different ovens can vary in temperature, and you want that perfect golden brown without burning the edges.

Painici à l’ail et beurre Recipe FAQs

How do I select the best garlic for this recipe?
Absolutely! Choose fresh garlic bulbs that are firm and free from dark spots or sprouting. The cloves should be plump and have a papery husk. Fresh cloves will provide the best flavor for your Painici à l’ail et beurre!

How should I store leftover Painici à l’ail et beurre?
For short-term storage, let your Painici à l’ail et beurre cool completely and place it in an airtight container at room temperature for up to 1 day. If you plan to keep it longer, store the garlic butter mixture in the fridge for up to 3 days. Just remember to reheat before spreading!

Can I freeze Painici à l’ail et beurre?
Yes, you can! To freeze, wrap the sliced bread tightly in plastic wrap, then in aluminum foil or place it in a freezer-safe bag. It’s best enjoyed within 1 month. When you’re ready to eat, reheat in a preheated oven at 190°C (375°F) for about 10 minutes until crispy.

What if my garlic butter mixture is too salty or too thick?
If your garlic butter is too salty, add a touch of softened butter to balance the flavor, mixing it thoroughly until combined. If it’s too thick, you can blend in a small amount of lemon juice or softened butter until you reach your desired consistency.

Are there any dietary considerations for this recipe?
Definitely! This Painici à l’ail et beurre contains dairy, so be cautious if anyone is lactose intolerant or allergic to dairy. You can swap the butter with a plant-based alternative like vegan butter to accommodate dietary needs. Also, you can adjust the garlic according to your preference for flavor sensitivity.

How do I know when the bread is done baking?
Look for a beautiful golden brown color on the edges, and enjoy the mouth-watering aroma wafting through your kitchen! If you’re unsure, you can also check for a crispy texture on the outside and a soft center. Depending on your oven, this usually takes about 10 minutes at 190°C (375°F).

Painici à l’ail et beurre

Painici à l’ail et beurre

Painici à l’ail et beurre is a delicious garlic butter bread experience that enhances any meal.
Print Recipe Pin Recipe
Prep Time 15 minutes mins
Cook Time 10 minutes mins
Total Time 25 minutes mins
Servings: 4 slices
Course: Snacks & Appetizers
Cuisine: French
Calories: 250
Ingredients Equipment Method Nutrition Notes

Ingredients
  

Garlic Butter
  • 1 cup Butter softened
  • 3 cloves Garlic pressed
  • 2 tablespoons Parsley chopped
  • 1 teaspoon Lemon zest
  • to taste Salt
Bread
  • 1 loaf Italian Bread or baguette/ciabatta

Equipment

  • Baking sheet
  • Mixing bowl
  • Oven

Method
 

Making Painici à l’ail et beurre
  1. In a bowl, blend the softened butter, pressed garlic, chopped parsley, and lemon zest until well incorporated.
  2. Taste the garlic butter mixture and add salt as needed.
  3. Slice the Italian bread in half lengthwise and spread the garlic butter mixture over each half.
  4. Place on a baking sheet and bake in a preheated oven at 190°C (375°F) for about 10 minutes until golden brown.
  5. Remove from the oven, slice into pieces, and serve warm.

Nutrition

Serving: 1sliceCalories: 250kcalCarbohydrates: 30gProtein: 2gFat: 12gSaturated Fat: 7gMonounsaturated Fat: 4gCholesterol: 30mgSodium: 300mgPotassium: 100mgFiber: 1gSugar: 1gVitamin A: 400IUVitamin C: 2mgCalcium: 10mgIron: 0.5mg

Notes

Optionally garnish with extra chopped parsley before serving.

Tried this recipe?

Let us know how it was!

Filed Under: SNACKS & APPETIZERS

Classic Creamy Garlic Sauce Recipe

December 29, 2025 by JudyWhite Leave a Comment

There’s a certain comfort that fills the kitchen when the scent of garlic starts to dance in the air. This Classic Creamy Garlic Sauce is a delightful creation that came together in one of those serendipitous moments; I was staring at a mound of garlic and dreaming up a way to elevate a simple weeknight dinner. In just 10 minutes, you can transform any ordinary dish into something special, whether it’s drizzling over grilled chicken or tossing with al dente pasta.

This recipe requires just a handful of ingredients, yet the flavor it packs is nothing short of spectacular. Picture creamy richness leaping on your taste buds, all while being easy enough for busy weeknights. If you think making a gourmet sauce is beyond your skills, think again! This recipe is not just about convenience; it’s about creating moments in the kitchen that feel rewarding—perfect for anyone seeking to swap out fast food for vibrant, homemade charm. Let’s dive into the simple steps that make this sauce a true kitchen superhero!

Why You'll Love This Classic Creamy Garlic Sauce Recipe

  • This sauce is incredibly easy to make, taking just 10 minutes from start to finish.
  • The rich and creamy flavor will elevate any dish, making it a fantastic addition to pasta, chicken, or veggies.
  • It’s a versatile recipe that allows you to customize it with your favorite herbs or spices, ensuring it fits perfectly with your meal.
  • With minimal ingredients and simple steps, you’ll feel like a culinary expert in no time, impressing your family and friends with this delicious homemade sauce.

Classic Creamy Garlic Sauce Ingredients

For the Sauce
• Unsalted butter – adds a rich, creamy base that enhances flavor.
• Garlic – the star of the show; use freshly grated for the best aroma and taste.
• Flour – helps thicken the sauce; all-purpose flour works perfectly.
• Half and half – brings a luscious creaminess; you can substitute with heavy cream for extra richness.
• Chicken stock – contributes depth; swap for vegetable stock or water if you prefer a vegetarian option.
• Fresh parsley – adds a burst of color and freshness to your sauce; feel free to use other herbs for variation.
• Kosher salt – season to taste for balanced flavor.
• Fresh black pepper – a pinch adds warmth and spice; adjust according to your liking.

This Classic Creamy Garlic Sauce recipe is your ticket to elevated home-cooked meals!

How to Make Classic Creamy Garlic Sauce

  1. Melt the butter in a large skillet over medium heat, allowing it to foam slightly. This should take about a minute. The moment it melts, you’ll be greeted by that irresistible buttery aroma.

  2. Add the minced garlic to the skillet and cook until fragrant, about 30 seconds. Be cautious not to burn it; you want it golden and fragrant, not brown!

  3. Stir in the flour, mixing thoroughly until lightly golden, which should take 1-2 minutes. This will create the roux that gives our sauce its lovely thickness.

  4. Whisk in the half and half and chicken stock slowly, ensuring there are no lumps. Allow it to gently simmer for about 1-2 minutes, until the sauce thickens beautifully and coats the back of a spoon.

  5. Incorporate the minced parsley, stirring well, and season with kosher salt and freshly ground black pepper to taste. This last step adds a fresh burst of flavor and brightens the sauce.

Optional: Serve over your favorite pasta for a decadent meal.
Exact quantities are listed in the recipe card below.

How to Store and Freeze Classic Creamy Garlic Sauce

Fridge: Store your sauce in an airtight container for up to 3 days. Reheat gently on the stovetop or in the microwave until warmed through.

Freezer: If you have leftovers, freeze the sauce in a freezer-safe container for up to 2 months. Thaw in the fridge overnight before reheating.

Reheating: For the best texture, reheat over low heat, stirring frequently to bring back its creamy consistency. Add a splash of half and half if it seems too thick.

Avoid Separation: To prevent separation when storing, allow the sauce to cool completely before sealing. This helps maintain its creamy texture and flavor.

Make Ahead Options

This Classic Creamy Garlic Sauce recipe is fantastic for meal prep enthusiasts! You can prepare the sauce up to 24 hours in advance, allowing the flavors to meld beautifully. Just follow the steps to make the sauce, and once cooled, refrigerate it in an airtight container. To maintain the creamy texture, reheat gently over low heat and add a splash of half and half or chicken stock to loosen it up just before serving. This way, you’ll have a delicious, homemade sauce ready to elevate your meals during busy weeknights, cutting your cooking time significantly and ensuring you don’t reach for fast food!

Classic Creamy Garlic Sauce Variations

Feel free to get creative and make this delightful sauce your own with these fun and easy variations!

  • Dairy-Free: Substitute half and half with coconut milk for a creamy vegan twist that’s just as tasty.

  • Herb Infusion: Experiment with fresh herbs like basil or thyme instead of parsley; it adds a unique flavor profile that delights your palate.

  • Spicy Kick: Incorporate red pepper flakes or a dash of hot sauce to turn up the heat; you’ll get an exciting flavor boost!

  • Extra Garlic: For true garlic lovers, add a few more cloves or use roasted garlic; it deepens the richness and enhances the overall taste.

  • Cheesy Delight: Stir in some grated Parmesan cheese at the end for a cheesy, umami layer that will have everyone asking for seconds. The melted cheese creates a creamy velvety addition!

  • Lemon Zest: Brighten the sauce with a teaspoon of lemon zest; it adds a burst of freshness that perfectly complements the garlic flavor.

  • Flavorful Stock: Swap chicken stock for homemade vegetable broth to deepen flavors and cater to vegetarian or vegan preferences. It’s a warm embrace for your taste buds.

  • Mushroom Medley: Mix in sautéed mushrooms for added depth and texture; they lend a savory earthiness that pairs beautifully with pasta or drizzled over chicken.

What to Serve with Classic Creamy Garlic Sauce?

Transform your meal into a culinary delight with these perfect pairings to complement your creamy, garlicky creation.

  • Grilled Chicken: Juicy, tender chicken is a classic choice that soaks up the sauce, creating a heavenly combination. Drizzle over for a restaurant-quality dish that’s simple yet impressive.

  • Al Dente Pasta: Whether it’s fettuccine or penne, pasta is a match made in heaven with this Classic Creamy Garlic Sauce. Toss to make each strand or bite luxuriously coated and satisfying.

  • Steamed Vegetables: Bright, seasonal veggies like broccoli or asparagus add a pop of color and freshness, balancing the rich sauce beautifully. The crispness of fresh veggies will revitalize every bite.

  • Crusty Bread: Serve with a side of warm crusty bread to soak up every last drop of the garlicky goodness. There’s something satisfying about wiping your plate clean after every meal.

  • Parmesan Cheese: A sprinkle of freshly grated Parmesan not only adds a burst of flavor but also melts delightfully into the warm sauce. The nutty, salty tones elevate the dish remarkably.

  • Roasted Potatoes: Golden, crispy roasted potatoes provide a hearty complement, making every forkful satisfying. The sauce amplifies the comforting quality of this beloved comfort food.

  • Crisp Garden Salad: A light salad with mixed greens and a tangy vinaigrette adds refreshing contrast to the creamy sauce, ensuring your meal feels balanced and bright.

  • Chardonnay: A glass of chilled Chardonnay mirrors the creamy textures and elevates your dining experience, accentuating the garlic and buttery richness of the sauce seamlessly.

  • Berry Tart: For dessert, a light berry tart serves as a sweet contrast to the meal, with its crisp crust and tangy fruit. It’s the perfect way to end on a fresh note, leaving you satisfied yet eager for the next meal.

Chef's Helpful Tips

  • To enhance the flavor of your Classic Creamy Garlic Sauce, always use freshly grated garlic for the best aroma and taste.
  • Avoid burning the garlic by keeping a close eye on it while cooking; you want it fragrant and golden, not browned.
  • When whisking in the half and half and chicken stock, do so slowly to prevent lumps and ensure a smooth sauce.
  • For the best texture, allow the sauce to simmer gently until it thickens enough to coat the back of a spoon, which typically takes 1-2 minutes.

Classic Creamy Garlic Sauce Recipe FAQs

What type of garlic is best for this recipe?
Absolutely! Fresh garlic is the star ingredient in this sauce. I recommend using large, firm cloves without dark spots or blemishes for the best flavor. If you’re planning to store your garlic, keep it in a cool, dark place with good ventilation to maintain its quality!

How long can I store the Classic Creamy Garlic Sauce in the fridge?
You can store your Classic Creamy Garlic Sauce in an airtight container in the fridge for up to 3 days. When you’re ready to enjoy it again, simply reheat it gently on the stovetop or in the microwave, stirring occasionally to ensure even heating.

Can I freeze this sauce, and how do I do it?
Very! Freezing is a fantastic option for this sauce. Pour the cooled sauce into a freezer-safe container or ice cube trays for smaller portions. It can be frozen for up to 2 months. To thaw, move it to the fridge overnight, then reheat gently over low heat, adding a splash of half and half as needed to restore creaminess.

Why is my sauce too thick, and how can I fix it?
If your sauce turns out too thick, don’t worry! Simply whisk in a bit more chicken stock or half and half over low heat until you reach the desired consistency. This way, you can achieve that lovely, creamy texture without compromising on flavor.

Is this sauce suitable for people with dietary restrictions?
Great question! This sauce contains dairy and gluten due to the butter, half and half, and flour. If you’re looking for a dairy-free or gluten-free option, consider using almond milk or any non-dairy creamer combined with cornstarch instead of flour. Always check specific ingredient labels to ensure they meet your dietary needs!

How can I add a different flavor profile to the Classic Creamy Garlic Sauce?
You can easily customize this delicious sauce! Try adding ingredients like crushed red pepper flakes for heat, or sautéed mushrooms for an earthy note. Herbs like thyme or basil can also add interesting twists. Just incorporate your chosen extras while cooking the garlic and flour for a flavorful enhancement!

Classic Creamy Garlic Sauce Recipe

Classic Creamy Garlic Sauce Recipe

This Classic Creamy Garlic Sauce is a quick and delicious way to elevate any meal, filled with fresh garlic and creamy goodness.
Print Recipe Pin Recipe
Prep Time 5 minutes mins
Cook Time 5 minutes mins
Total Time 10 minutes mins
Servings: 4 servings
Course: Snacks & Appetizers
Calories: 200
Ingredients Equipment Method Nutrition Notes

Ingredients
  

For the Sauce
  • 4 tablespoons Unsalted butter adds a rich, creamy base
  • 4 cloves Garlic freshly grated
  • 2 tablespoons Flour all-purpose flour
  • 1 cup Half and half can substitute with heavy cream
  • 1 cup Chicken stock can substitute with vegetable stock
  • 2 tablespoons Fresh parsley chopped
  • to taste Kosher salt
  • to taste Fresh black pepper

Equipment

  • Large skillet

Method
 

How to Make Classic Creamy Garlic Sauce
  1. Melt the butter in a large skillet over medium heat for about a minute.
  2. Add the minced garlic and cook until fragrant, about 30 seconds.
  3. Stir in the flour until lightly golden, about 1-2 minutes.
  4. Whisk in the half and half and chicken stock slowly, simmer until thickened for 1-2 minutes.
  5. Incorporate the minced parsley and season with salt and pepper to taste.

Nutrition

Serving: 1servingCalories: 200kcalCarbohydrates: 10gProtein: 2gFat: 18gSaturated Fat: 11gPolyunsaturated Fat: 1gMonounsaturated Fat: 5gCholesterol: 40mgSodium: 300mgPotassium: 200mgVitamin A: 500IUVitamin C: 2mgCalcium: 50mgIron: 0.5mg

Notes

Serve over pasta for a decadent meal.

Tried this recipe?

Let us know how it was!

Filed Under: SNACKS & APPETIZERS

Homemade Mayonnaise

December 29, 2025 by JudyWhite Leave a Comment

There’s something wonderfully satisfying about creating your own condiments from scratch, and homemade mayonnaise is no exception. One sunny afternoon, as I flicked through my pantry, I decided to give traditional mayo a twist. Why settle for store-bought when whipping up a creamy, flavorful batch is just a few simple ingredients away?

With just an egg, Dijon mustard, and a drizzle of oil, I transformed a humble condiment into a culinary delight fit for sandwiches, salads, and dips. The rich, velvety texture combined with a hint of tang is addictive—and the best part? It takes only ten minutes! Perfect for those who have grown weary of fast food and are eager to bring the freshness of homemade flavors into their kitchen.

Join me as I share this incredibly easy homemade mayonnaise recipe that not only elevates your dishes but also sparks joy in every bite. Let’s take a step away from the jar and discover the magic of creating something deliciously unique right in your own home!

Why You'll Love This Homemade Mayonnaise

  • This homemade mayonnaise recipe is incredibly easy, allowing you to whip up a creamy condiment in just ten minutes.
  • The bold flavors of Dijon mustard and fresh lemon juice elevate your dishes to a whole new level of deliciousness.
  • Its versatility means you can use it as a spread, dip, or dressing, making it perfect for any meal.
  • Plus, there’s nothing quite like the satisfaction of making it from scratch, showcasing your cooking skills with a visually appealing, homemade creation.

Homemade Mayonnaise Ingredients

• Discover the simplicity of making homemade mayonnaise with these easy-to-find ingredients.

For the Base

  • Large egg – acts as the emulsifier for a creamy texture.
  • Dijon mustard – adds a delightful tang that enhances flavor.
  • Red or white wine vinegar – provides acidity to balance the richness.
  • Fine sea salt – enhances all the other flavors in your mayo.

For the Oil

  • Safflower oil or vegetable oil – use either for a neutral flavor and silky finish.

Optional Twist

  • Fresh lemon juice – a touch brings brightness and freshness to the homemade mayonnaise.

How to Make Homemade Mayonnaise

  1. Combine the egg, Dijon mustard, red wine vinegar, and sea salt in a mixing bowl. This is the flavorful base of your mayonnaise. Whisk these ingredients together until they’re well blended, creating a vibrant concoction.

  2. Drizzle in the safflower oil slowly while whisking continuously. Watch as the mixture starts to emulsify and thicken—this is the magic moment! Keep whisking vigorously for about 1-2 minutes until you achieve that creamy texture.

  3. Mix in the fresh lemon juice, if using, until fully incorporated. This optional addition gives your homemade mayonnaise a refreshing brightness. Taste it, and enjoy the burst of flavor!

Optional: Add a pinch of garlic powder for an extra kick.

Exact quantities are listed in the recipe card below.

What to Serve with Homemade Mayonnaise?

Elevate your meals with delightful sides and pairings that complement the creamy richness of this homemade condiment.

  • Crispy Sweet Potato Fries: The natural sweetness and crisp texture provide a fantastic contrast to the tanginess of the mayonnaise.

  • Fresh Garden Salad: A medley of vibrant vegetables drizzled with homemade mayonnaise creates a refreshing, crunchy delight that tastes like sunshine.

  • Grilled Chicken Sandwiches: Juicy chicken paired with the rich and creamy mayo brings a luscious element that enhances each bite.

  • Classic Potato Salad: Creamy and tangy, a potato salad dressed with this homemade mayonnaise is a nostalgic favorite perfect for picnics.

  • Zesty Coleslaw: Crunchy cabbage and carrots combined with the mayo create a creamy texture that adds a flavorful pop to any barbecue spread.

  • Savory Tuna Salad: This mayo adds a rich creaminess that perfectly complements flaked tuna, making for a satisfying lunch or snack.

  • Spicy Deviled Eggs: Using homemade mayonnaise instead of store-bought elevates these bite-sized goodies to a whole new level of flavor and texture.

  • Crisp Veggie Platter: Bright, colorful veggies dipped into creamy mayo make for a satisfyingly crunchy and healthy snack.

Whether you’re enjoying a simple meal at home or hosting a gathering, these pairings will surely highlight your wonderful mayonnaise creation!

Make Ahead Options

These homemade mayonnaise preparations are perfect for busy home cooks looking to save time during the week! You can whisk together the egg, Dijon mustard, red wine vinegar, and sea salt up to 24 hours in advance and store the mixture in an airtight container in the refrigerator. This not only ensures flavor meld but also allows for easy emulsification later. When you’re ready to finish your homemade mayonnaise, simply add the safflower oil while whisking, as it will save you the hassle later and ensures a fresh taste. Remember, for the best quality, avoid adding lemon juice until just before serving to keep its vibrant flavor intact. Enjoy the convenience of homemade goodness with minimal effort!

Homemade Mayonnaise Variations

Unleash your creativity in the kitchen by experimenting with these exciting twists and substitutions.

  • Herb-Infused: Add fresh chopped herbs like basil, dill, or chives for a burst of flavor that complements any dish perfectly.
  • Spicy Kick: Mix in a teaspoon of sriracha or your favorite hot sauce to give your mayonnaise a delightful heat that will tantalize your taste buds.
  • Garlic Aioli: Incorporate minced garlic for a classic aioli variant; it adds depth and richness that pairs beautifully with vegetables and seafood.
  • Vegan Version: Substitute the egg with aquafaba (chickpea brine) for a vegan mayo that’s just as creamy and flavorful—no one will know the difference!
  • Tangy Twist: Use apple cider vinegar instead of wine vinegar for a sweeter, fruitier flavor that brings a unique twist to your recipes.
  • Smoky Flavor: Stir in a dash of smoked paprika to introduce a rich, smoky undertone that enhances sandwiches and dips alike.
  • Citrus Zing: Brighten your mayo by adding a teaspoon of orange or lime juice for a refreshing twist that’s perfect for summer dishes.
  • Nutty Taste: Fold in a tablespoon of sesame oil for an Asian-inspired mayonnaise that pairs beautifully with salads and grilled meats.

Let your imagination run wild as you play with these variations, making your homemade mayonnaise as unique and delicious as you desire!

How to Store and Freeze Homemade Mayonnaise

Room Temperature: Homemade mayonnaise is best stored in the fridge, but if left out, it can sit for a maximum of 2 hours. After that, discard it for safety.

Fridge: Keep your homemade mayonnaise in an airtight container for up to 1 week. Ensure the lid is tight to prevent contamination and maintain freshness.

Freezer: While freezing is not recommended for mayonnaise due to its emulsified nature, if necessary, you can freeze it for up to 2 months in a freezer-safe container.

Reheating: If your mayonnaise has separated after freezing, let it thaw in the fridge and then gently whisk to re-emulsify. Enjoy the fresh taste of your homemade mayonnaise!

Chef's Helpful Tips

  • When making Homemade Mayonnaise, ensure your egg is at room temperature to help the emulsification process.
  • A common mistake is adding the oil too quickly; drizzle it slowly while whisking to create that desired creamy texture.
  • Use a whisk or an immersion blender for smoother results, as this can significantly enhance the emulsification.
  • Always taste your mayonnaise after mixing; if it seems too rich, a splash more vinegar or lemon juice can brighten it up perfectly.

Homemade Mayonnaise Recipe FAQs

What kind of egg should I use for homemade mayonnaise?
Absolutely! It’s best to use a large, fresh egg at room temperature. The freshness of the egg acts as a crucial emulsifier and helps achieve that creamy texture. If you’re concerned about using raw eggs, you might consider pasteurized eggs as a safer alternative.

How long can I store homemade mayonnaise in the fridge?
Very good question! You can store your homemade mayonnaise in an airtight container in the fridge for up to 1 week. Be sure to keep it tightly sealed to maintain freshness and prevent contamination.

Can I freeze homemade mayonnaise?
While it’s not typically recommended to freeze mayonnaise due to its unique emulsified nature, you can freeze it for up to 2 months if necessary. Transfer it to a freezer-safe container, leaving a little space for expansion. When ready to use, let it thaw in the fridge and gently whisk to re-emulsify.

What should I do if my homemade mayonnaise doesn’t emulsify?
If you find that your mayonnaise hasn’t thickened, don’t worry! Start by transferring the mixture into a clean bowl. Then, add another egg yolk to the bowl and slowly whisk in the original mixture a little at a time until you achieve that creamy texture. This process should help bring it all together beautifully!

Is homemade mayonnaise safe for people with egg allergies?
For those with egg allergies, traditional homemade mayonnaise may not be suitable. Instead, consider alternatives like aquafaba (the liquid from canned chickpeas) mixed with oil and vinegar. It offers a similar creamy texture without the eggs.

How can I tell if my homemade mayonnaise has gone bad?
Look for visual cues, such as changes in color or an off smell. If you notice signs of separation or dark spots forming, it’s best to discard the mayonnaise. Always trust your senses for food safety!

Homemade Mayonnaise

Homemade Mayonnaise

Make your own Homemade Mayonnaise in just 10 minutes with simple ingredients for delicious sandwiches, salads, and dips.
Print Recipe Pin Recipe
Prep Time 10 minutes mins
Total Time 10 minutes mins
Servings: 4 servings
Course: Snacks & Appetizers
Cuisine: American
Calories: 90
Ingredients Equipment Method Nutrition Notes

Ingredients
  

For the Base
  • 1 large egg acts as the emulsifier for a creamy texture
  • 1 tablespoon Dijon mustard adds a delightful tang that enhances flavor
  • 1 tablespoon red or white wine vinegar provides acidity to balance the richness
  • 1 teaspoon fine sea salt enhances all the other flavors in your mayo
For the Oil
  • 1 cup safflower oil or vegetable oil use either for a neutral flavor and silky finish
Optional Twist
  • 1 tablespoon fresh lemon juice adds brightness and freshness

Equipment

  • Mixing bowl
  • Whisk

Method
 

How to Make Homemade Mayonnaise
  1. Combine the egg, Dijon mustard, red wine vinegar, and sea salt in a mixing bowl. Whisk until well blended.
  2. Drizzle in the safflower oil slowly while whisking continuously until the mixture emulsifies and thickens.
  3. Mix in the fresh lemon juice, if using, until fully incorporated. Taste and adjust flavors as desired.

Nutrition

Serving: 1tablespoonCalories: 90kcalFat: 10gSaturated Fat: 1gSodium: 100mg

Notes

Ensure your egg is at room temperature for better emulsification. Drizzle the oil slowly while whisking to achieve the desired creamy texture.

Tried this recipe?

Let us know how it was!

Filed Under: SNACKS & APPETIZERS

  • « Previous Page
  • 1
  • 2
  • 3
  • 4
  • …
  • 6
  • Next Page »

Recent Posts

  • One Pot Cheesy Pasta
  • Steak with Mushroom Sauce
  • St. Patrick’s Day Puppy Chow
  • Salmon with Lemon Butter
  • St. Patrick’s Day Puppy Chow

Recent Comments

No comments to show.

Footer

  • Contact
  • Privacy Policy
  • About Us
  • Terms
  • ↑ back to top

Copyright © 2024 www.Forkono.com

Table Of Content