Forkono

  • BREAKFAST & BRUNCH
  • DESSERT RECIPES
  • DINNER RECIPES
  • LUNCH RECIPES
  • About uS
  • SNACKS & APPETIZERS
menu icon
go to homepage
  • BREAKFAST & BRUNCH
  • DESSERT RECIPES
  • DINNER RECIPES
  • LUNCH RECIPES
  • About uS
  • SNACKS & APPETIZERS
search icon
Homepage link
  • BREAKFAST & BRUNCH
  • DESSERT RECIPES
  • DINNER RECIPES
  • LUNCH RECIPES
  • About uS
  • SNACKS & APPETIZERS
×

Buffalo Chicken Dip

January 16, 2026 by JudyWhite Leave a Comment

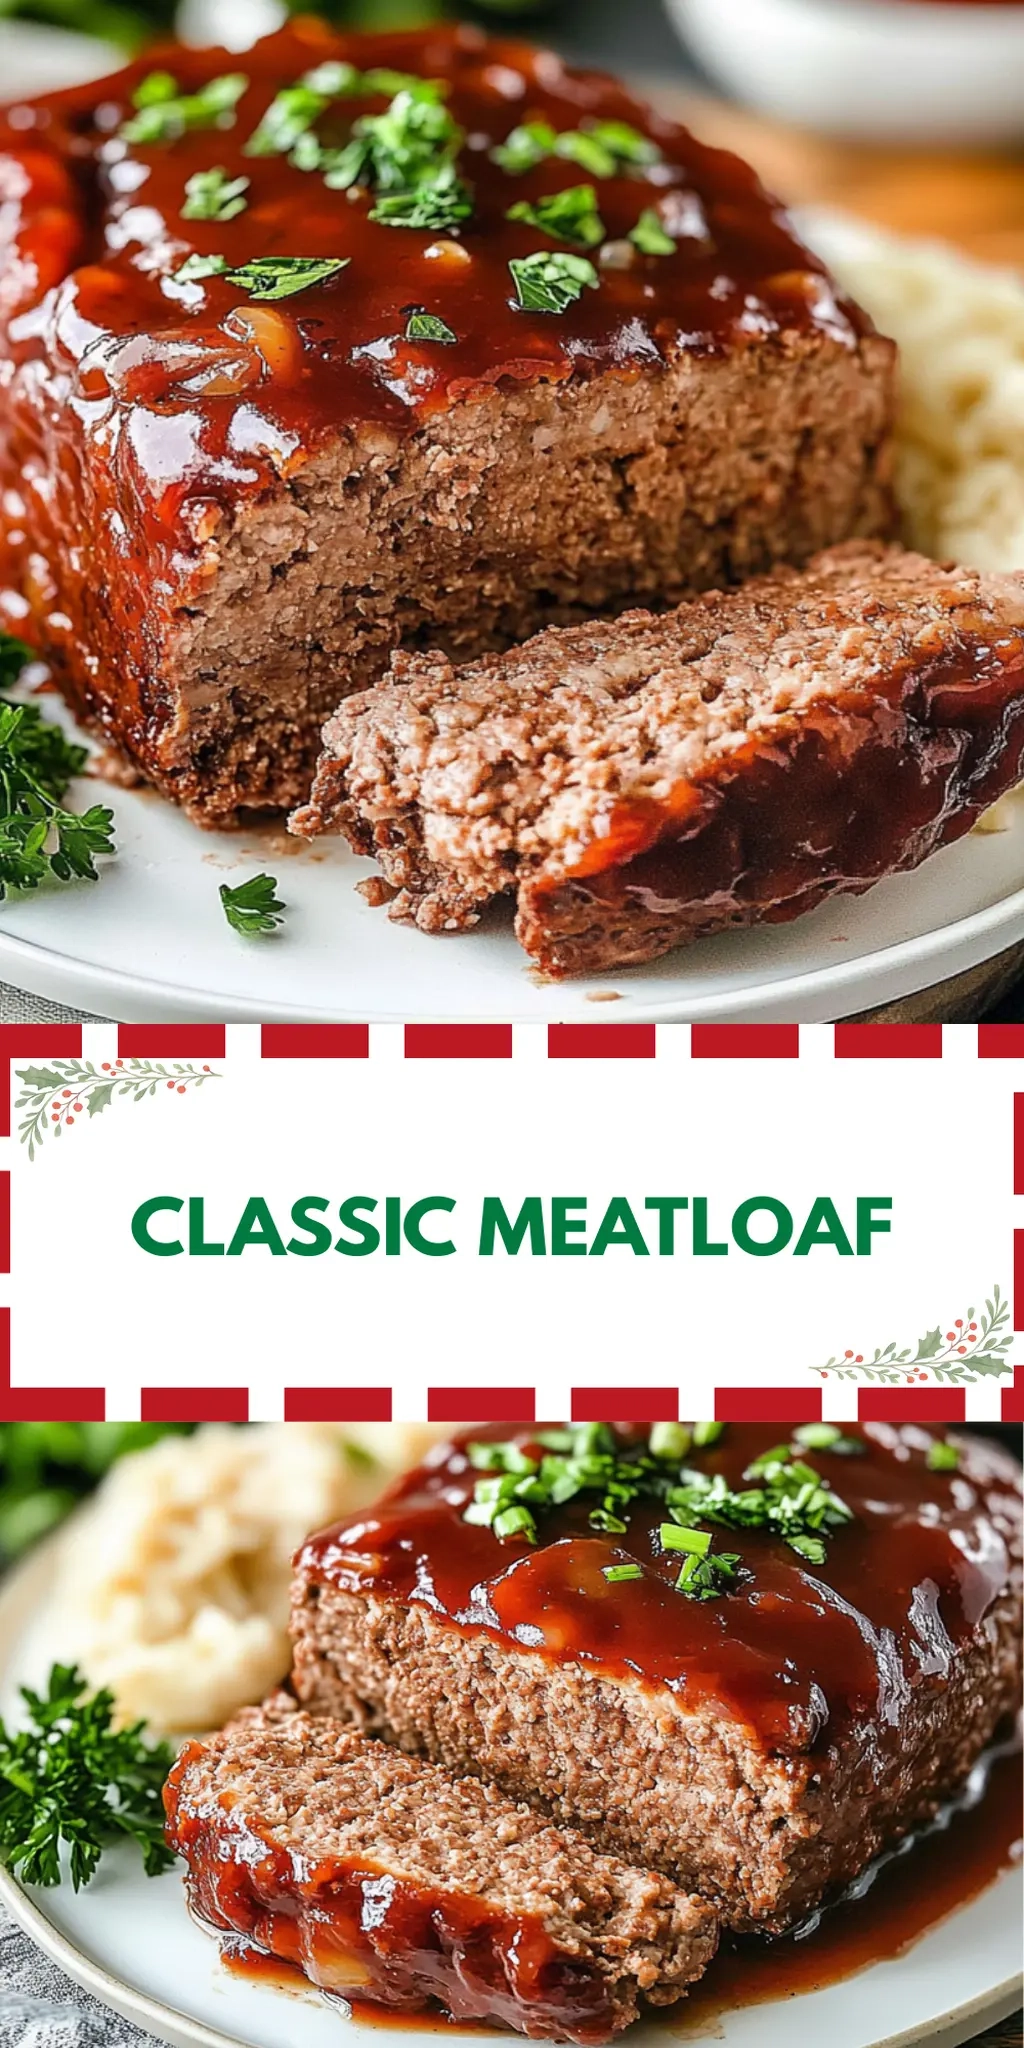
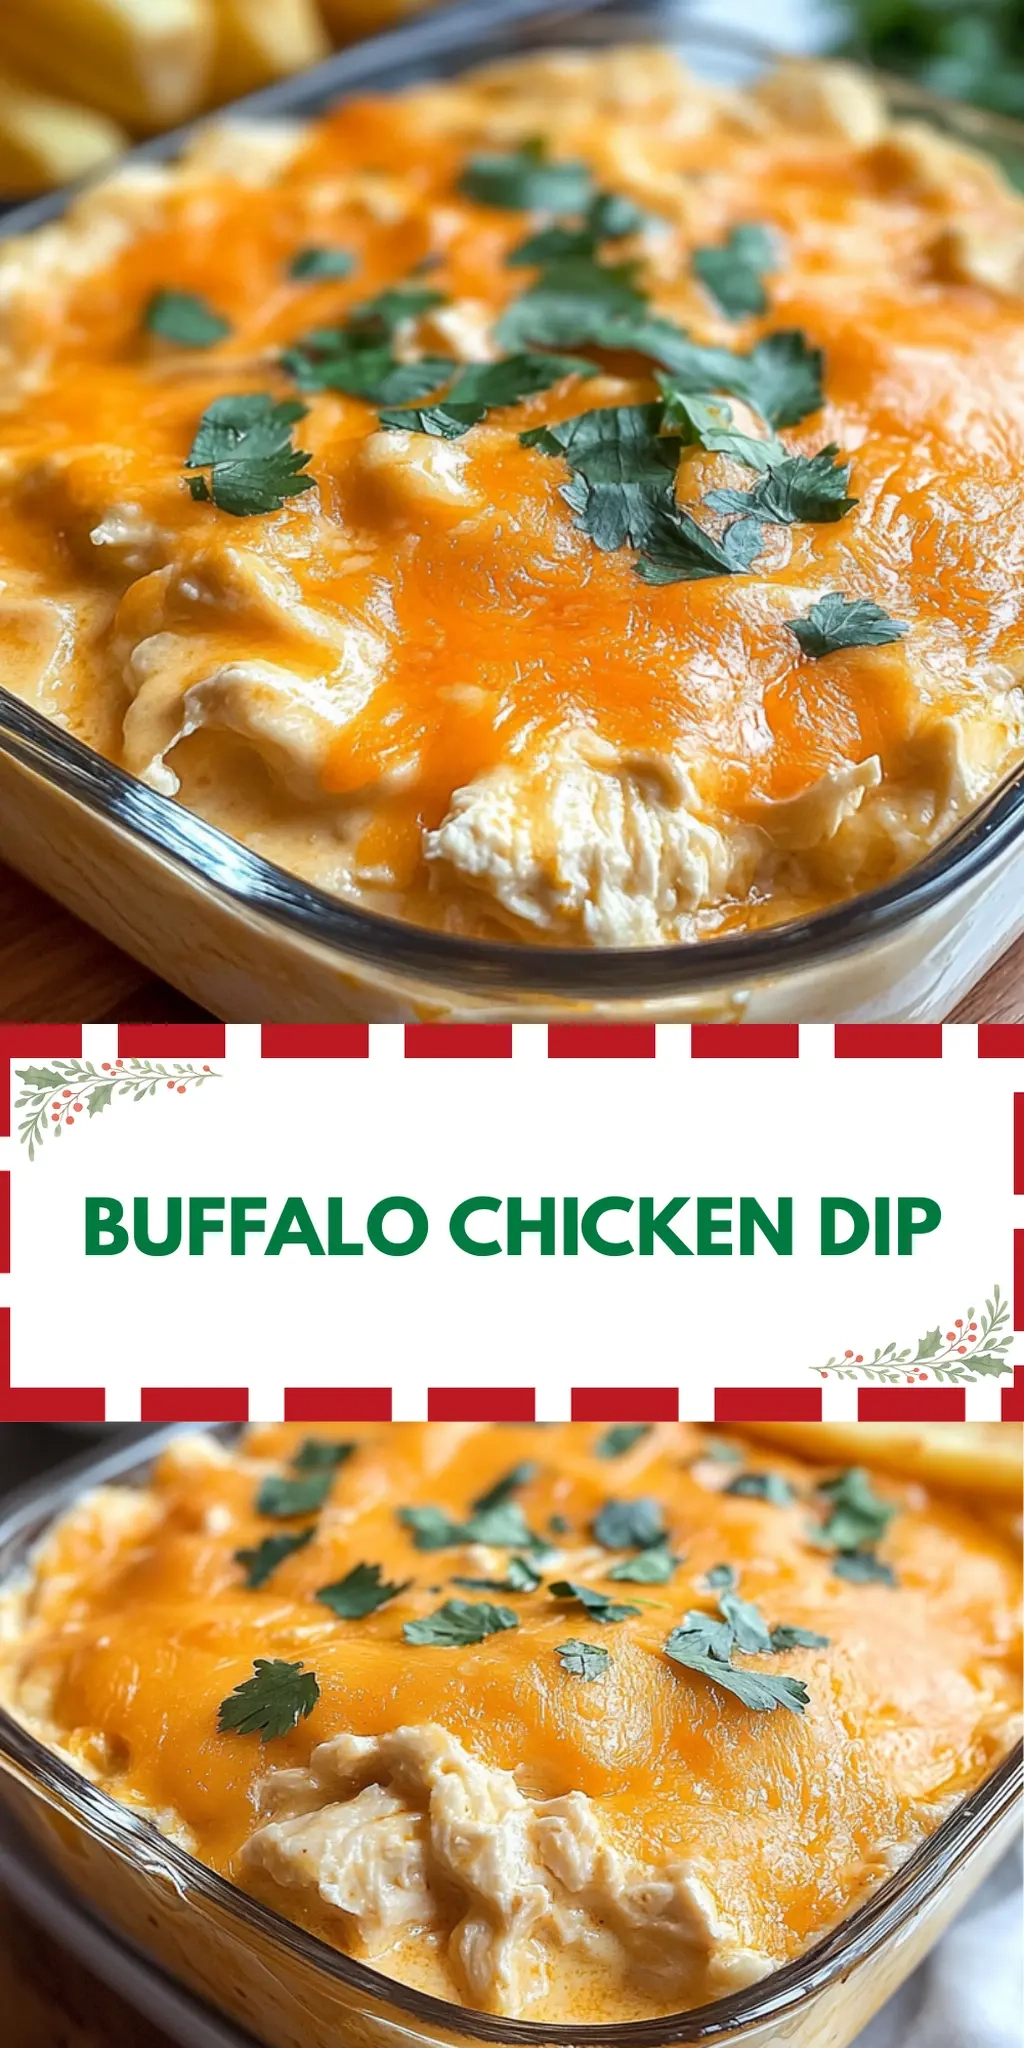
There’s something undeniably satisfying about the way a dish can bring friends and family together, and this Buffalo Chicken Dip does just that. Imagine the warmth of your kitchen filled with the spicy aroma of buffalo sauce mingling with creamy cheese, enticing everyone to gather around. Whether you’re hosting game night or just need a go-to appetizer for a cozy get-together, this dip is a delightful solution.

With just a handful of ingredients, including easy-to-use canned chicken, this recipe transforms humble elements into something truly crave-worthy. It’s rich, tangy, and oh-so-indulgent—yet ready in just 35 minutes! I stumbled upon this gem during a busy week when I craved comfort food without the lengthy preparation, and it quickly became a family favorite. Join me in whipping up this velvety, spicy dip that pairs perfectly with tortilla chips or veggies, making it an ideal snack for any occasion.

Why You'll Love This Buffalo Chicken Dip

  • This Buffalo Chicken Dip is incredibly easy to make, requiring just a few simple ingredients and quick prep time.
  • The flavors are utterly delicious, combining the perfect amount of spice from the buffalo sauce with the creaminess of cheeses and dressing.
  • Its versatility makes it perfect for any occasion, whether it’s game day, a party, or a cozy night in.
  • With its mouthwatering aroma and vibrant presentation, this dip is sure to impress your guests and become a go-to appetizer in your recipe repertoire.

Buffalo Chicken Dip Ingredients

• Ready to whip up a crowd-pleaser?

For the Dip
• Canned chicken – a convenient option that’s protein-packed and ready to use.
• Cream cheese – adds a rich, creamy texture that balances the spices.
• Buffalo sauce – gives that signature tangy heat; adjust to your spice preference!
• Ranch dressing – brings a cool, creamy contrast to the dip.
• Sour cream – enhances the creaminess while mellowing out the spice.
• Shredded cheddar cheese – melts beautifully; be sure to reserve half for topping!

For Garnish
• Green onions – adds a fresh, crisp finish that brightens up the dish.

How to Make Buffalo Chicken Dip

  1. Preheat your oven to 350°F (175°C). Make sure to spray an oven-safe dish with nonstick cooking spray to prevent the dip from sticking. This will help ensure easy serving later!

  2. Combine the canned chicken, cream cheese, buffalo sauce, ranch dressing, sour cream, and half of the cheddar cheese in a mixing bowl. Use a spatula to mix until well blended, making sure all the ingredients are incorporated into a creamy, flavorful mixture.

  3. Spread the mixture evenly in the prepared baking dish. Make sure to get it into the corners and edges for an even bake. Top it with the remaining cheddar cheese to create a deliciously cheesy crust!

  4. Bake for 20-25 minutes, or until bubbly and golden brown. You’ll know it’s ready when the cheese is melted and a little toasty on top, filling your kitchen with a mouthwatering aroma.

  5. Garnish with the chopped green onions once it’s out of the oven. Serve hot with tortilla chips or veggie sticks for a deliciously fun dip experience!

Optional: Serve with celery sticks for an extra crisp bite.

Exact quantities are listed in the recipe card below.

How to Store and Freeze Buffalo Chicken Dip

Fridge: Store leftover Buffalo Chicken Dip in an airtight container in the fridge for up to 3 days. Reheat in the microwave or oven until warmed through.

Freezer: You can freeze Buffalo Chicken Dip for up to 2 months. Place it in a freezer-safe container, ensuring it is well-sealed to prevent freezer burn.

Reheating: When ready to enjoy, thaw in the fridge overnight and reheat in the oven at 350°F (175°C) for about 20 minutes, or until heated through and bubbly.

Room Temperature: It’s best to avoid leaving the dip out at room temperature for more than 2 hours for food safety reasons.

What to Serve with Buffalo Chicken Dip?

When you’re diving into a bowl of rich and spicy Buffalo Chicken Dip, it’s essential to have the perfect accompaniments to elevate your snacking experience.

  • Tortilla Chips: The classic pairing! Crunchy and salty, they beautifully complement the creamy richness of the dip.

  • Veggie Sticks: Carrots, celery, and bell peppers add a fresh, crisp contrast. They keep the experience lively and are a great way to sneak in some veggies!

  • Baked Potatoes: A comforting option, fluffy baked potatoes are perfect for slathering on the dip, creating a warm and hearty bite.

  • Cheesy Garlic Bread: This indulgent side combines the best of both worlds – buttery garlic flavors with chewy melted cheese, making it irresistible alongside the dip.

  • Mixed Greens Salad: Light and refreshing, a zesty salad balances out the spiciness of the dip, bringing a wonderful crunch to your spread.

  • Pilsner or Lager: These light beers make a fantastic drink pairing, cutting through the richness while accentuating the flavors of the buffalo sauce.

  • Chocolate Brownies: For dessert, fudgy brownies offer a sweet contrast after savoring the spicy dip, completing your meal on a deliciously decadent note.

Make Ahead Options

These Buffalo Chicken Dip preparations are perfect for busy home cooks looking to save time! You can easily mix the dip (chicken, cream cheese, buffalo sauce, ranch dressing, sour cream, and half of the cheddar cheese) up to 24 hours in advance, storing it tightly covered in the refrigerator. This not only enhances the flavors but also allows for quick assembly later. When you’re ready to bake, just spread the mixture in your prepared dish, top with the remaining cheddar, and pop it in the oven for 20-25 minutes until bubbly. Trust me, it’ll be just as delicious, giving you a hassle-free appetizer that’s sure to impress!

Buffalo Chicken Dip Variations

Feel free to get creative with this Buffalo Chicken Dip, enhancing flavors and textures to suit your taste!

  • Spicy Kick: Add 1-2 teaspoons of chili flakes or diced jalapeños to give your dip an extra layer of heat. Can you handle the spice?

  • Cheesy Delight: Swap half of the cheddar cheese for pepper jack for a zesty twist. The creamy melt will satisfy any cheese lover.

  • Greek Yogurt: Replace sour cream with Greek yogurt for a healthier option that still delivers creaminess. It adds a nice tang without sacrificing flavor!

  • Vegetarian Style: Use canned chickpeas or lentils instead of chicken for a savory vegetarian alternative. Trust me; you’ll still get that rich flavor!

  • Buffalo Ranch Fusion: Incorporate a tablespoon of ranch seasoning for an amplified ranch flavor. The new depth will keep your guests coming back for more!

  • Herbed Enhancement: Stir in fresh chopped herbs like parsley or cilantro for a refreshing touch. It’s a burst of color and flavor that elevates each bite!

  • Vegetable Medley: Mix in chopped bell peppers or spinach for added nutrition and a bit of crunch. This variation creates a delightful textural contrast in each scoop.

  • Smoky Flavor: Try adding smoked paprika for a subtle smokiness that complements the buffalo sauce beautifully. This twist adds complexity you’ll adore!

Chef's Helpful Tips

  • When making Buffalo Chicken Dip, it’s important to ensure your cream cheese is fully softened for a smooth consistency; this will help the ingredients blend more easily.
  • Avoid overmixing the dip as it can lead to a dense texture; just mix until everything is combined.
  • Baking at the right temperature is crucial, so ensure your oven is fully preheated to 350°F to achieve that perfect bubbly and golden top.
  • Keep an eye on the dip during the last few minutes of baking, as it can quickly go from golden to burnt, especially if your oven tends to run hot.

Buffalo Chicken Dip Recipe FAQs

What type of canned chicken should I use?
Absolutely! Using regular canned chicken is perfect for this Buffalo Chicken Dip. Just make sure to choose a brand that’s low in sodium if you’re watching your salt intake. The texture of the chicken is already shredded, making it super easy to incorporate into the dip.

How should I store leftover Buffalo Chicken Dip?
To keep your Buffalo Chicken Dip fresh, simply transfer any leftovers into an airtight container. It will stay good in the fridge for up to 3 days! Just reheat it in the microwave or oven until warmed through, and you’re ready to enjoy that creamy goodness again.

Can I freeze Buffalo Chicken Dip for later?
Yes, definitely! You can freeze Buffalo Chicken Dip for up to 2 months. For best results, place the dip in a freezer-safe container or a heavy-duty freezer bag, making sure to remove as much air as possible to prevent freezer burn. When you’re ready to enjoy, thaw it in the fridge overnight and reheat it in the oven at 350°F (175°C) for about 20 minutes, or until bubbly. Just like a warm hug in a dish!

What if my dip is too thick or too spicy?
If you find your Buffalo Chicken Dip to be too thick, you can gently stir in a little more ranch dressing or sour cream to lighten it up. This will also help mellow the flavors. If the spice gets too intense, consider adding a splash of cream or extra sour cream to tone it down. Remember, the goal is for it to be creamy and enjoyable for everyone!

Can pets eat Buffalo Chicken Dip?
It’s best to avoid sharing Buffalo Chicken Dip with your pets. The ingredients, especially buffalo sauce and ranch dressing, can be harmful to dogs and cats due to their high sodium and potential spice content. It’s always a good idea to keep a close eye on what your furry friends munch on!

What is the best way to serve Buffalo Chicken Dip?
The more the merrier! This dip is fantastic served with crispy tortilla chips, crunchy veggie sticks like carrots and celery, or even hearty pita chips. For a fun twist, you could pair it with soft pretzels or toast slices. Just make sure to have plenty of dippers on hand to soak up all that deliciousness!

Buffalo Chicken Dip

Buffalo Chicken Dip

This Buffalo Chicken Dip is a crowd-pleaser, perfect for snacks and appetizers, combining tangy buffalo sauce and creamy cheese.
Print Recipe Pin Recipe
Prep Time 10 minutes mins
Cook Time 25 minutes mins
Total Time 35 minutes mins
Servings: 8 servings
Course: Snacks & Appetizers
Cuisine: American
Calories: 250
Ingredients Equipment Method Nutrition Notes

Ingredients
  

For the Dip
  • 1 can canned chicken
  • 8 oz cream cheese softened
  • 1 cup buffalo sauce adjust to taste
  • 1 cup ranch dressing
  • 1 cup sour cream
  • 2 cups shredded cheddar cheese reserve half for topping
For Garnish
  • 2 stalks green onions chopped

Equipment

  • Oven
  • Mixing bowl
  • Baking dish
  • Spatula

Method
 

How to Make Buffalo Chicken Dip
  1. Preheat your oven to 350°F (175°C) and spray an oven-safe dish with nonstick cooking spray.
  2. Combine the canned chicken, cream cheese, buffalo sauce, ranch dressing, sour cream, and half of the cheddar cheese in a mixing bowl and mix until well blended.
  3. Spread the mixture evenly in the prepared baking dish and top with the remaining cheddar cheese.
  4. Bake for 20-25 minutes, or until bubbly and golden brown.
  5. Garnish with chopped green onions and serve hot with tortilla chips or veggie sticks.

Nutrition

Serving: 1servingCalories: 250kcalCarbohydrates: 10gProtein: 15gFat: 18gSaturated Fat: 10gPolyunsaturated Fat: 1gMonounsaturated Fat: 6gCholesterol: 50mgSodium: 700mgPotassium: 200mgFiber: 1gSugar: 2gVitamin A: 800IUVitamin C: 2mgCalcium: 300mgIron: 1mg

Notes

Store leftovers in an airtight container for up to 3 days or freeze for up to 2 months. Reheat before serving.

Tried this recipe?

Let us know how it was!

Filed Under: SNACKS & APPETIZERS

Corned Beef Hash

January 16, 2026 by JudyWhite Leave a Comment

There’s something utterly comforting about a sizzling skillet of corned beef hash that transports me back to weekend brunches spent with family. The way the golden-brown potatoes, savory corned beef, and colorful bell peppers mingle together creates a delightful melody of flavors and textures. I can almost hear the laughter floating through the kitchen as I create this hearty dish that never fails to bring smiles to the table.

Recently, I found myself craving that nostalgic dish after a long week filled with the same old takeout routines. With just a few simple ingredients, I whipped up this corned beef hash, and let me tell you, it exceeded my expectations—dare I say, it might just be my new favorite way to enjoy a cozy meal! Whether you’re cooking for yourself or feeding a crowd, this is one recipe that promises to reinvent your weeknight dinners. Ready to indulge in some delicious comfort food? Let’s dive into this easy and satisfying recipe!

Why You'll Love This Corned Beef Hash

  • This corned beef hash is incredibly easy to make, requiring just a handful of simple ingredients and minimal prep time.
  • The combination of savory corned beef, crispy potatoes, and vibrant bell peppers creates a flavor explosion that everyone will love.
  • It’s a versatile dish that can be served for breakfast, lunch, or dinner, making it perfect for any occasion.
  • Visually appealing with its beautiful colors and textures, this dish is sure to impress your family and friends.

Corned Beef Hash Ingredients

For the Hash
• Cooked corned beef – Dice it for optimal mixing and flavor distribution.
• Yukon Gold potatoes – Creamy and buttery, these potatoes are perfect for a hearty texture.
• Medium onion – Sauté to add sweetness that balances the savory corned beef.
• Bell peppers – Use colorful varieties for both a vibrant presentation and a fresh taste.
• Olive oil – This healthy fat is great for sautéing until everything is beautifully golden.
• Salt and pepper – Essential for seasoning; adjust to enhance the flavor of your corned beef hash.
• Eggs (optional) – Fried or poached, they add a rich and delightful topping to your dish.

How to Make Corned Beef Hash

  1. Dice Ingredients: Start by dicing the cooked corned beef, Yukon Gold potatoes, onion, and bell peppers into bite-sized pieces. This helps everything cook evenly and blend beautifully.

  2. Sauté Potatoes: Heat the olive oil in a large skillet over medium heat. Add the diced potatoes, seasoning them with salt and pepper. Sauté until they’re golden brown and fork-tender, about 10-15 minutes.

  3. Add Onions and Peppers: Toss the diced onions and bell peppers into the skillet. Continue cooking for an additional 5-7 minutes until the veggies have softened and are fragrant.

  4. Incorporate Corned Beef: Stir in the diced corned beef, allowing it to heat through for about 5 minutes. You want it warmed up, mixing with those wonderful veggie flavors.

  5. Prepare Optional Eggs: If you’re adding eggs, use a separate pan to fry or poach them to your desired doneness. Soft or runny yolks add a wonderful richness to the dish.

  6. Serve and Garnish: Plate your corned beef hash, topping it with the perfect egg and a sprinkle of fresh herbs for an extra pop of flavor and color.

Optional: Add a dash of hot sauce for a delightful kick!
Exact quantities are listed in the recipe card below.

Corned Beef Hash Variations

Customize your corned beef hash to suit your taste buds and dietary needs with these exciting twists and swaps!

  • Vegetarian: Swap corned beef for sautéed mushrooms or crumbled tofu for a plant-based delight that still packs flavor.

  • Sweet Potato: Use sweet potatoes instead of Yukon Gold for a delightful sweetness and added nutritional benefits, creating a vibrant dish.

  • Spicy Kick: Add diced jalapeños or crushed red pepper flakes to the skillet for a zesty heat that awakens the palate.

  • Herbal Boost: Toss in fresh herbs like thyme or parsley near the end of cooking to introduce a burst of freshness and aromatic appeal.

  • Cheesy Goodness: Mix in shredded cheese such as cheddar or pepper jack while the hash is still warm for an irresistible creamy texture.

  • Mexican Twist: Incorporate black beans and corn, finishing with a sprinkle of queso fresco for a fun south-of-the-border flavor profile.

  • Breakfast Style: Add more eggs by scrambling them directly into the hash as it cooks for a heartier breakfast option that everyone will love.

  • Smoky Flavor: Stir in a touch of smoked paprika or add diced smoked sausage for a deep, savory flavor that enhances the dish beautifully.

How to Store and Freeze Corned Beef Hash

Fridge: Store leftover corned beef hash in an airtight container for up to 3 days. Reheat in a skillet over medium heat for best results.

Freezer: Freeze corned beef hash in a freezer-safe container for up to 2 months. Thaw it overnight in the fridge before reheating.

Reheating: Ensure the hash is heated to an internal temperature of 165°F. You can reheat it in the microwave or on the stove until thoroughly warmed.

Serving Tip: Consider frying fresh eggs to serve alongside your reheated corned beef hash for a comforting meal!

What to Serve with Corned Beef Hash?

There’s nothing quite like the comforting aroma of a skillet-loaded corned beef hash, and a complete meal can make it even more delightful!

  • Fresh Garden Salad: Crisp greens and vibrant veggies add a refreshing crunch, balancing the richness of the hash beautifully. Toss with a light vinaigrette for an extra zing.

  • Buttery Toast: A slice of warm, buttered bread complements the hearty hash perfectly. Use it to soak up any runny yolk from your eggs, creating a delightful bite.

  • Homemade Applesauce: The sweet and tangy flavors of applesauce offer a lovely contrast to the savory corned beef, cleansing your palate with each spoonful.

  • Crispy Bacon: A side of crispy bacon brings an irresistible crunch that enhances the savory elements of the dish. The smoky flavors really elevate the star of the meal.

  • Roasted Brussels Sprouts: These tender, caramelized bites provide an earthy kick to the meal, while their slight bitterness balances the richness of the corned beef.

  • Sweet Potato Hash: For a fun twist, serve a side of sweet potato hash. The sweetness perfectly complements the savory components of your main dish.

  • Mimosas: To elevate your brunch experience, pair your meal with a refreshing mimosa. The citrusy brightness adds a cheerful touch to the occasion.

  • Chocolate Chip Cookies: End your meal on a sweet note with warm, gooey chocolate chip cookies. They create a lovely contrast to the hearty main course and are simply irresistible.

Make Ahead Options

These Corned Beef Hash components are perfect for busy home cooks looking to save time during the week! You can dice the cooked corned beef, Yukon Gold potatoes, onion, and bell peppers up to 24 hours in advance, storing them in airtight containers in the refrigerator to maintain freshness. Additionally, you can sauté the potatoes and vegetables up to 3 days ahead; just reheat them in the skillet before stirring in the corned beef. When you’re ready to serve, simply warm everything through and top with fried or poached eggs for a delicious, comforting meal that feels just as satisfying as when freshly made.

Chef's Helpful Tips

  • When making corned beef hash, ensure your diced potatoes are uniform in size for even cooking and a consistent texture.
  • To enhance the flavor, consider using a mix of different colored bell peppers which not only add visual appeal but also varying levels of sweetness.
  • When sautéing the potatoes, let them sit for a while in the skillet without stirring too frequently to achieve a nice golden crust.
  • Always taste and adjust the seasoning towards the end of cooking, as the saltiness of the corned beef can vary and may need more or less salt.

Corned Beef Hash Recipe FAQs

How do I choose the best corned beef for hash?
Absolutely! When selecting corned beef, look for one that is moist and has a good balance of meat and fat. Ideally, it should be cooked and pre-packaged for your convenience. If you’re feeling adventurous, you can also use homemade corned beef that you’ve slow-cooked with your favorite spices and brine.

How long can I store corned beef hash in the fridge?
Very! Store your leftover corned beef hash in an airtight container for up to 3 days. Make sure it cools down completely before sealing it up to prevent condensation from making it soggy. When reheating, a skillet works best to regain that delicious crispy texture!

Can corned beef hash be frozen?
Yes, indeed! To freeze corned beef hash, let it cool completely, then transfer it to a freezer-safe container or sealable bags. Make sure to squeeze out excess air to prevent freezer burn. It can last for up to 2 months. When you’re ready to enjoy it again, thaw it overnight in the fridge before reheating.

What should I do if my hash gets too dry while cooking?
Don’t worry! If you notice your corned beef hash drying out, just stir in a tablespoon or two of water or broth. This will help add moisture and bring everything back together. You can also cover the skillet for a minute to trap steam which helps soften the mixture.

Are there any dietary considerations for corned beef hash?
Absolutely! If you’re serving with eggs, be mindful of any egg allergies. For a lighter version, consider swapping out the potatoes for sweet potatoes or even cauliflower. If cooking for pets, avoid sharing any corned beef hash since it often contains seasonings and ingredients that might not be safe for them.

How can I make corned beef hash healthier?
Great question! To ensure a healthier version, you might substitute some of the potatoes with vegetables like zucchini or spinach for added nutrition. You can also use less olive oil or switch to an oil spray to cut down on calories, while still enjoying a comforting and flavorful dish!

Corned Beef Hash

Corned Beef Hash

This corned beef hash transports you back to comforting weekend brunches with its golden-brown potatoes and savory flavors.
Print Recipe Pin Recipe
Prep Time 10 minutes mins
Cook Time 25 minutes mins
Total Time 35 minutes mins
Servings: 4 servings
Course: BREAKFAST & BRUNCH
Cuisine: American
Calories: 450
Ingredients Equipment Method Nutrition Notes

Ingredients
  

For the Hash
  • 2 cups cooked corned beef Diced for optimal mixing.
  • 3 medium Yukon Gold potatoes Diced.
  • 1 medium onion Sautéed.
  • 1 cup bell peppers Colorful varieties recommended.
  • 2 tablespoons olive oil For sautéing.
  • 1 teaspoon salt Adjust to taste.
  • 1 teaspoon pepper Adjust to taste.
  • 4 large eggs Optional, fried or poached.

Equipment

  • Skillet

Method
 

How to Make Corned Beef Hash
  1. Start by dicing the cooked corned beef, Yukon Gold potatoes, onion, and bell peppers into bite-sized pieces.
  2. Heat the olive oil in a large skillet over medium heat. Add the diced potatoes, seasoning them with salt and pepper. Sauté until they’re golden brown and fork-tender, about 10-15 minutes.
  3. Toss the diced onions and bell peppers into the skillet. Continue cooking for an additional 5-7 minutes until the veggies have softened and are fragrant.
  4. Stir in the diced corned beef, allowing it to heat through for about 5 minutes.
  5. If you're adding eggs, use a separate pan to fry or poach them to your desired doneness.
  6. Plate your corned beef hash, topping it with the perfect egg and a sprinkle of fresh herbs.

Nutrition

Serving: 1servingCalories: 450kcalCarbohydrates: 30gProtein: 25gFat: 25gSaturated Fat: 7gPolyunsaturated Fat: 2gMonounsaturated Fat: 15gCholesterol: 200mgSodium: 950mgPotassium: 800mgFiber: 4gSugar: 3gVitamin A: 100IUVitamin C: 30mgCalcium: 50mgIron: 3mg

Notes

Consider adding a dash of hot sauce for a delightful kick! Store leftovers in an airtight container for up to 3 days.

Tried this recipe?

Let us know how it was!

Filed Under: BREAKFAST & BRUNCH

Lucky Charms Cookies

January 16, 2026 by JudyWhite Leave a Comment

There’s something truly whimsical about a cookie that brings back childhood memories of brightly colored cereal. The crunchy, sweet bursts of Lucky Charms, paired with gooey, buttery dough, create a delightful treat that feels like a warm hug. Whether you’re experiencing a rainy day at home or need a fun dessert to lift spirits during the workweek, these Lucky Charms Cookies are just the ticket.

I stumbled upon this recipe during a late-night binge of nostalgic snacks, and I couldn’t resist putting my own spin on it. Not only are these cookies quick and easy to make—ready in under 30 minutes—but they are also incredibly versatile, allowing for added chocolate chips for that extra indulgent touch! Perfect for gatherings or simply enjoying with a cup of coffee, this cookie recipe will transform your kitchen into a world of colorful delight. Let’s get baking!

Why You'll Love This Lucky Charms Cookies

  • These Lucky Charms Cookies are a breeze to make, requiring just under 30 minutes from start to finish which is perfect for those busy days.
  • The delightful combination of crunchy cereal and buttery dough delivers a flavor explosion that is both nostalgic and indulgent.
  • Their vibrant colors and whimsical shapes make them a visually appealing treat that will catch anyone’s eye.
  • Plus, these cookies are incredibly versatile, allowing you to customize them with mini chocolate chips or even your favorite mix-ins for a unique twist.

Lucky Charms Cookies Ingredients

For the Cookie Dough

  • All-purpose flour – a key ingredient for the perfect cookie texture that binds everything together.
  • Baking soda – adds the necessary lift for a chewy cookie.
  • Salt – enhances the flavors and balances the sweetness.
  • Unsalted butter – ensures a rich, buttery flavor; make sure it’s softened for easy mixing.
  • Brown sugar – introduces moisture and a delightful caramel taste to the cookies.
  • Granulated sugar – contributes to the sweetness and crispness of your Lucky Charms Cookies.
  • Vanilla extract – adds a warm, familiar flavor that brings all the ingredients together.
  • Large eggs – bind the ingredients and provide moisture; make sure they are at room temperature for better incorporation.

For the Mix-ins

  • Lucky Charms cereal – the star of the show, offering that signature crunch and sweetness in each bite.
  • Mini chocolate chips (optional) – for a decadent twist, as the chocolate pairs wonderfully with the Lucky Charms.

Happy baking, and enjoy the colorful magic of these delicious Lucky Charms Cookies!

How to Make Lucky Charms Cookies

  1. Preheat your oven to 350°F (175°C). This ensures the perfect baking environment for your cookies, setting the stage for a delightful treat. Don’t forget to line two baking sheets with parchment paper!

  2. Whisk together the flour, baking soda, and salt in a bowl. This step is important to evenly distribute the dry ingredients, ensuring each cookie has that perfect texture. Set this mixture aside for now.

  3. Beat the softened unsalted butter, brown sugar, and granulated sugar in a large mixing bowl until fluffy. This will create a light and airy base for your cookies, so give it a good mix for about 2-3 minutes.

  4. Add the eggs one at a time along with the vanilla extract. Mix well after each addition until everything is fully incorporated. This combination adds richness and depth to your dough.

  5. Gradually combine the dry mixture with the wet mixture. Stir just until everything is mixed; overmixing can lead to tough cookies. You want a soft, slightly sticky dough—just right for folding in those goodies!

  6. Fold in the Lucky Charms cereal and mini chocolate chips (if using). Be gentle to preserve the cereal’s crunchiness, ensuring those colorful charms are well-distributed throughout the dough.

  7. Scoop heaping tablespoons of dough onto your prepared baking sheets. Bake them in the preheated oven for 10-12 minutes or until they’re golden around the edges. Let them cool slightly before transferring to wire racks to finish cooling.

Optional: Drizzle with melted chocolate for extra sweetness!

Exact quantities are listed in the recipe card below.

Lucky Charms Cookies Variations

Feel free to get creative and put your unique stamp on these delightful cookies!

  • Gluten-Free: Substitute all-purpose flour with a 1:1 gluten-free baking blend for a celiac-friendly version. The cookies will still be deliciously chewy and crunchy.

  • Nutty Addition: Add 1/2 cup of chopped nuts (like walnuts or pecans) to enhance flavor and texture. The combination of nuts with the cereal creates a delightful contrast.

  • Coconut Twist: Mix in 1/2 cup of shredded coconut for a tropical flair. This will add a chewy texture and a hint of island sweetness that pairs beautifully with the Lucky Charms.

  • White Chocolate Delight: Swap mini chocolate chips for white chocolate chips, or use half of each. The creamy sweetness of white chocolate complements the cereal wonderfully.

  • Spicy Kick: Add a pinch of cinnamon or cayenne pepper to the dough for a warm, spicy note. This unexpected twist adds depth to the sweetness of the cookies.

  • Oatmeal Boost: Incorporate 1 cup of oats to the dough for a heartier cookie. The oats provide a satisfying chewiness that perfectly balances the crunch of the Lucky Charms.

  • Fruit Infusion: Toss in a handful of dried fruit (like cranberries or cherries) for a burst of tartness. The fruity addition brings a lovely contrast to the sweet cookie base.

  • Maple Flavor: Replace granulated sugar with maple sugar or add 2 tablespoons of maple syrup to the mix. This adds a rich, caramelized flavor that elevates the classic taste.

Make Ahead Options

These Lucky Charms Cookies are perfect for meal prep enthusiasts! You can prepare the cookie dough up to 24 hours in advance by mixing all the wet and dry ingredients together and then refrigerating the dough in an airtight container. This not only saves you time on busy weeknights but also enhances the flavors as they meld together overnight. Additionally, you can also scoop the dough onto baking sheets and freeze them for up to three months—just bake from frozen for an extra couple of minutes when you’re ready to enjoy fresh cookies. When you’re ready to bake, simply preheat your oven, place the dough on a baking sheet, and watch these delightful treats come to life just as deliciously as if made on the spot!

How to Store and Freeze Lucky Charms Cookies

Room Temperature: Store the cookies in an airtight container at room temperature for up to 3 days to maintain their freshness and chewy texture.

Fridge: For longer-lasting cookies, keep them in the fridge in a sealed container for up to 1 week. Let them come to room temperature before enjoying.

Freezer: You can freeze Lucky Charms Cookies for up to 3 months. Place them in a single layer on a baking sheet to freeze individually before transferring to a freezer-safe bag.

Reheating: To enjoy a warm cookie, reheat in the microwave for about 10-15 seconds, or in a preheated oven at 350°F (175°C) for a couple of minutes until warmed through.

What to Serve with Lucky Charms Cookies?

Imagine a colorful spread that complements the whimsical delight of your cookies and transforms any snack time into a festive gathering.

  • Milkshakes: A creamy, sweet milkshake echoes the nostalgic vibes of Lucky Charms, making every bite even more delightful.
  • Ice Cream Sundaes: Top vanilla or chocolate ice cream with Lucky Charms pieces for a playful dessert that’s as fun as it is indulgent.
  • Fresh Fruit Salad: The refreshing, juicy flavors of seasonal fruits provide a lovely contrast to the sweetness of the cookies, balancing the palate.
  • Chocolate Dipped Strawberries: These fruity treats add a touch of elegance and pair beautifully with the cookie’s chewy texture and sweetness.
  • Coffee or Hot Chocolate: A warm cup enhances the cozy feelings these cookies evoke, perfect for a rainy afternoon snack.
  • Fruit Smoothies: Blend berries or bananas into a creamy smoothie for a fruity, wholesome side that complements the cookie’s sweetness.

Serve these Lucky Charms Cookies with one or all of these options, and watch your snack time turn into a joyous celebration!

Chef's Helpful Tips

  • When making Lucky Charms Cookies, be sure to use softened butter to achieve a light and fluffy texture in your dough.
  • One common mistake is overmixing the dough after adding the dry ingredients, which can result in tough cookies, so mix just until combined.
  • For the best flavor, use pure vanilla extract instead of imitation to enhance the sweetness of your cookies.
  • Keep an eye on them while baking and remove them from the oven as soon as the edges are golden to ensure they stay soft and chewy inside.

Lucky Charms Cookies Recipe FAQs

How do I choose the best Lucky Charms cereal for cookies?
Absolutely! When selecting your Lucky Charms cereal, look for boxes with vibrant colors and minimal broken pieces. Fresh cereal not only tastes better but also adds that delightful crunch. If you notice the cereal box has been open for a while, check for any stale odors or loss of color—opt for the freshest box available for the best results!

What is the best way to store Lucky Charms Cookies?
For optimal freshness, store these Lucky Charms Cookies in an airtight container at room temperature for up to 3 days. This keeps them soft and delightful. If you want them to last longer, you can refrigerate them for up to 1 week—simply allow them to reach room temperature before enjoying.

Can I freeze Lucky Charms Cookies?
Very! Freezing Lucky Charms Cookies is a great way to save some for later. Here’s how: First, place the cookies in a single layer on a baking sheet and freeze until solid, about 2 hours. Once frozen, transfer them to a freezer-safe bag or container. They can be stored in the freezer for up to 3 months. To enjoy, simply thaw at room temperature or reheat in the microwave for about 10-15 seconds!

Why are my Lucky Charms Cookies spreading too much?
A common issue you might face is cookies spreading too much during baking. This can happen if the butter is too warm or melted when mixed into the dough. I recommend using room temperature butter that’s soft enough to easily mix but not melted. Also, make sure to chill your dough for about 30 minutes before scooping it onto the baking sheets to help control the spread.

Are Lucky Charms Cookies safe for pets or individuals with allergies?
When it comes to sharing these cookies, be cautious! The ingredients include sugar and chocolate, which are not suitable for pets, particularly dogs. As for allergies, these cookies contain gluten from the flour and dairy from the butter. If you’re baking for someone with allergies, consider using gluten-free flour and dairy alternatives. Always read labels and adjust based on individual dietary needs to ensure safety!

Lucky Charms Cookies

Lucky Charms Cookies

These Lucky Charms Cookies are a nostalgic treat combining colorful cereal with buttery dough, perfect for any occasion.
Print Recipe Pin Recipe
Prep Time 15 minutes mins
Cook Time 12 minutes mins
Total Time 27 minutes mins
Servings: 12 cookies
Course: DESSERT RECIPES
Calories: 150
Ingredients Equipment Method Nutrition Notes

Ingredients
  

For the Cookie Dough
  • 2 cups all-purpose flour a key ingredient for the perfect cookie texture
  • 1 teaspoon baking soda adds lift for a chewy cookie
  • 1/2 teaspoon salt enhances flavors and balances sweetness
  • 1 cup unsalted butter ensure it's softened for easy mixing
  • 1 cup brown sugar introduces moisture and caramel taste
  • 1/2 cup granulated sugar contributes to sweetness and crispness
  • 2 teaspoons vanilla extract adds a warm flavor
  • 2 large eggs bind ingredients and provide moisture
For the Mix-ins
  • 2 cups Lucky Charms cereal the star of the show
  • 1 cup mini chocolate chips optional for a decadent twist

Equipment

  • Mixing bowl
  • baking sheets
  • parchment paper
  • Whisk
  • scooper

Method
 

How to Make Lucky Charms Cookies
  1. Preheat your oven to 350°F (175°C) and line two baking sheets with parchment paper.
  2. Whisk together the flour, baking soda, and salt in a bowl; set aside.
  3. Beat the softened butter, brown sugar, and granulated sugar until fluffy for about 2-3 minutes.
  4. Add the eggs one at a time along with the vanilla extract, mixing well after each addition.
  5. Gradually combine the dry ingredients with the wet mixture, stirring just until mixed.
  6. Fold in the Lucky Charms cereal and mini chocolate chips if using.
  7. Scoop heaping tablespoons of dough onto prepared baking sheets and bake for 10-12 minutes.
  8. Let cookies cool slightly before transferring to wire racks to finish cooling.

Nutrition

Serving: 1cookieCalories: 150kcalCarbohydrates: 20gProtein: 2gFat: 7gSaturated Fat: 4gPolyunsaturated Fat: 1gMonounsaturated Fat: 2gCholesterol: 30mgSodium: 90mgPotassium: 50mgSugar: 10gVitamin A: 2IUCalcium: 1mgIron: 3mg

Notes

Optional: Drizzle with melted chocolate for extra sweetness. Use softened butter for the best texture and avoid overmixing the dough.

Tried this recipe?

Let us know how it was!

Filed Under: BREAKFAST & BRUNCH

St. Patrick’s Day Dipped Rice Krispie Treats

January 16, 2026 by JudyWhite Leave a Comment

As the calendar inches closer to St. Patrick’s Day, I can’t help but feel the pull of festive treats that bring a little luck to our tables. While searching for the perfect way to celebrate, I stumbled upon a delicious idea that combines nostalgia and holiday spirit—St. Patrick’s Day Dipped Rice Krispie Treats! The rich gooeyness of melted marshmallows, paired with the crunch of Rice Krispies, is a classic that can charm any crowd.

Dipping these delightful squares in vibrant green candy melts not only elevates their look but also brings a cheerful burst of color to your celebrations. Plus, with only a handful of ingredients and minimal fuss, they come together in just 30 minutes! Whether you’re hosting a festive gathering, sending a sweet surprise to a friend, or simply indulging in homemade goodness, these treats are sure to become an instant favorite. Come join me in making this easy yet delightful recipe that’s perfect for embracing the spirit of the season!

Why You'll Love This St. Patrick’s Day Dipped Rice Krispie Treats

  • These St.
  • Patrick’s Day Dipped Rice Krispie Treats are incredibly easy to make, allowing you to whip up a festive dessert in just 30 minutes.
  • The delightful combination of gooey marshmallows and crispy rice creates a flavor that everyone adores.
  • Their vibrant green color and fun sprinkles make them a visually stunning addition to your holiday celebrations.
  • Plus, they are a surefire crowd-pleaser, making them perfect for parties, gatherings, or simply as a sweet treat for loved ones.

St. Patrick’s Day Dipped Rice Krispie Treats Ingredients

Get ready to whip up some festive fun!

For the Treats

  • Rice Krispies cereal – 6 cups – a classic ingredient that gives the treats their signature crunch.
  • Mini marshmallows – 4 cups – these add that delightful gooey sweetness that binds everything together.
  • Unsalted butter – 1/2 cup – melting this with marshmallows creates the perfect creamy base.

For the Decoration

  • Green candy melts – 12 oz – these vibrant melts not only enhance the festive look but are easy to dip and set beautifully.
  • Green and gold sprinkles – 1/2 cup – sprinkle these on top for that extra touch of St. Patrick’s Day magic and texture!

Dive into the joy of making these St. Patrick’s Day Dipped Rice Krispie Treats, and let their cheerful energy fill your home!

How to Make St. Patrick’s Day Dipped Rice Krispie Treats

  1. Grease a 9×13-inch baking pan using butter or non-stick spray. This will ensure your delicious treats come out easily and stay intact!

  2. Melt the butter in a large saucepan over medium heat. Add the mini marshmallows, stirring until they melt and combine into a gooey mixture that’s pure magic.

  3. Mix in the Rice Krispies cereal until every piece is fully coated. This step is vital for achieving the perfect crunch in every bite—watch for that fluffy consistency!

  4. Press the mixture into the prepared pan, using parchment paper to flatten it evenly. Allow it to cool for about 30 minutes, so it sets nicely for easy cutting later.

  5. Melt the green candy melts according to the package instructions until smooth. Dip each square treat halfway into the melted chocolate, letting any excess drip off.

  6. Sprinkle with festive green and gold decorations while the chocolate is still wet. This will create a beautiful, eye-catching finish—let them set before serving!

Optional: Drizzle some extra melted candy for a decorative touch.
Exact quantities are listed in the recipe card below.

Storage Tips for St. Patrick’s Day Dipped Rice Krispie Treats

Room Temperature: Keep the treats in an airtight container for up to 3 days at room temperature. This will help maintain their delightful texture and flavor.

Fridge: If you need them to last longer, you can store them in the fridge for up to a week. Just be sure to wrap them in plastic wrap to prevent them from drying out.

Freezer: For longer storage, freeze the treats for up to 3 months. Place layers of wax paper between them in an airtight freezer bag to avoid sticking.

Reheating: If you prefer them warm, reheat individual squares in the microwave for about 10-15 seconds for a gooey, fresh taste.

What to Serve with St. Patrick’s Day Dipped Rice Krispie Treats?

Bring your festive celebration to life with delightful pairings that enhance the joy of these sweet treats.

  • Minty Fresh Fruit Salad: A vibrant mix of fresh fruits like strawberries, kiwis, and pineapple adds a refreshing contrast to the sweetness of your treats.

  • Chocolate-Covered Pretzels: The saltiness of pretzels meets rich chocolate—a perfect bite to balance the sugar high and add a fun crunch.

  • Irish Cream Hot Chocolate: This rich, creamy drink complements the treats beautifully while keeping the festive spirit alive in every sip.

  • Vanilla Ice Cream: A scoop of creamy vanilla ice cream provides a cooling, sumptuous contrast that perfectly balances the chewy texture of the Rice Krispie squares.

  • Green Smoothies: Blend spinach with bananas and a touch of honey for a nutrient-packed, colorful drink that’s both delicious and festive.

  • Leprechaun Lemonade: This fizzy drink made with lemon and a splash of green food coloring brings a fun and zesty flair that pairs nicely with sweet treats.

  • Pistachio Cake: The nutty flavor and moist texture of pistachio cake create a delicious harmony with the crispy bites of your Rice Krispie treats.

  • Decorative Cupcakes: Frosted cupcakes in vibrant colors can add a fun, festive element to your table and provide an extra sweet bite for guests.

  • Coffee or Tea: A warm cup of coffee or herbal tea complements the sugary delights while offering a cozy break amidst the festivities.

Make Ahead Options

These St. Patrick’s Day Dipped Rice Krispie Treats are a fantastic treat to make ahead, saving you valuable time during your festive preparations! You can prepare the basic Rice Krispie mixture up to 24 hours in advance by following steps 1 through 4, allowing it to cool and set in the pan. Once cooled, cover it tightly with plastic wrap and refrigerate to prevent any drying out. When you’re ready to impress your guests, simply melt the green candy melts and dip each square treat, finishing with your sprinkles right before serving. This way, you’ll enjoy the delightful flavors and textures of the treats as if they were freshly made, with minimal effort on the day of the celebration!

St. Patrick’s Day Dipped Rice Krispie Treats Variations

Feel free to get creative and customize these treats to your heart’s content!

  • Chocolate Drizzle: Drizzle melted chocolate over the dipped treats for an extra layer of decadence that everyone will love. The rich chocolate adds a delightful contrast to the sweet candy melts.

  • Nutty Crunch: Stir in chopped nuts like pecans or almonds before pressing the mixture into the pan. The added crunch brings an exciting new texture and flavor.

  • Marshmallow Swirl: Instead of using mini marshmallows, try mixing in flavored marshmallows such as strawberry or s’mores for a sweeter twist in flavor.

  • Saturated Colors: Use other colored candy melts besides green, such as purple or orange, to create a vibrant rainbow theme for St. Patrick’s Day—perfect for a festive touch!

  • Spice it Up: Add a sprinkle of cinnamon or nutmeg into the marshmallow mixture for a warm, cozy flavor that gives your treats a unique kick.

  • Coconut Flakes: Fold in sweetened shredded coconut into the Rice Krispies mixture for a tropical flair that complements the sweetness of the marshmallows.

  • Personalized Sprinkles: Use themed sprinkles or edible glitter to match specific celebrations or preferences, bringing an extra touch of customization to your treats.

  • Lazy Cake: Layer the Rice Krispies mixture in a cake pan, then cover it in the melted candy melts for a delightful and easy twist on presentation. Enjoy the fun of slicing cake-like squares!

Chef's Helpful Tips

  • When making St.
  • Patrick’s Day Dipped Rice Krispie Treats, ensure your butter is fully melted before adding the mini marshmallows for a smoother texture.
  • Avoid the common mistake of over-mixing the Rice Krispies; a gentle fold ensures they maintain their signature crunch.
  • Utilize parchment paper not only for pressing but also for easy cleanup after dipping; it prevents sticking to the surface.
  • Allow adequate cooling time of at least 30 minutes to achieve the best texture when cutting your treats.

St. Patrick’s Day Dipped Rice Krispie Treats Recipe FAQs

What kind of Rice Krispies should I use?
Absolutely go for classic Rice Krispies cereal! They provide that signature crispy texture that’s vital for the best St. Patrick’s Day Dipped Rice Krispie Treats.

How should I store the Rice Krispie treats?
Keep them in an airtight container at room temperature for up to 3 days. If you’d like to extend their life, you can wrap them in plastic wrap and refrigerate for up to a week.

Can I freeze the St. Patrick’s Day Dipped Rice Krispie Treats?
Yes, you can freeze them! To do this, layer the treats with wax paper in an airtight freezer bag and they’ll last up to 3 months. When you’re ready to indulge, simply let them thaw at room temperature or warm them slightly in the microwave.

What can I do if the mixture is too sticky?
If your mixture turns out too sticky, it might be that the marshmallows didn’t melt enough. Make sure to melt the butter and marshmallows over medium heat until they’re a smooth, cohesive mixture. If it’s still too messy, try adding a bit more Rice Krispies, a half cup at a time, until you reach your desired consistency.

What if I have allergies to any of the ingredients?
If you have allergies, you can modify the recipe to suit your needs! For example, use dairy-free butter and ensure the candy melts are free from allergens like soy or gluten. If you’re concerned about cross-contamination, check the labels closely.

What can I substitute for green candy melts?
If green candy melts aren’t available, you can use white chocolate and dye it with food coloring for an equally festive effect! Melt the white chocolate as per the package instructions, add a few drops of green food coloring until you reach your desired shade, and dip your treats just the same.

St. Patrick’s Day Dipped Rice Krispie Treats

St. Patrick’s Day Dipped Rice Krispie Treats

Celebrate St. Patrick's Day with these festive Dipped Rice Krispie Treats, combining gooey marshmallows and crispy rice for a delightful treat.
Print Recipe Pin Recipe
Prep Time 15 minutes mins
Cook Time 15 minutes mins
Cooling Time 30 minutes mins
Total Time 1 hour hr
Servings: 12 treats
Course: DESSERT RECIPES
Calories: 150
Ingredients Equipment Method Nutrition Notes

Ingredients
  

For the Treats
  • 6 cups Rice Krispies cereal a classic ingredient that gives the treats their signature crunch.
  • 4 cups Mini marshmallows these add that delightful gooey sweetness that binds everything together.
  • 1/2 cup Unsalted butter melting this with marshmallows creates the perfect creamy base.
For the Decoration
  • 12 oz Green candy melts these vibrant melts not only enhance the festive look but are easy to dip and set beautifully.
  • 1/2 cup Green and gold sprinkles sprinkle these on top for that extra touch of St. Patrick's Day magic and texture!

Equipment

  • 9x13 inch baking pan
  • large saucepan
  • Spatula
  • parchment paper

Method
 

How to Make St. Patrick’s Day Dipped Rice Krispie Treats
  1. Grease a 9×13-inch baking pan using butter or non-stick spray.
  2. Melt the butter in a large saucepan over medium heat. Add the mini marshmallows, stirring until they melt and combine.
  3. Mix in the Rice Krispies cereal until every piece is fully coated.
  4. Press the mixture into the prepared pan, using parchment paper to flatten it evenly. Allow it to cool for about 30 minutes.
  5. Melt the green candy melts according to the package instructions until smooth. Dip each square treat halfway into the melted chocolate.
  6. Sprinkle with festive green and gold decorations while the chocolate is still wet.
  7. Allow adequate cooling time before serving to achieve the best texture.

Nutrition

Serving: 1treatCalories: 150kcalCarbohydrates: 22gProtein: 1gFat: 6gSaturated Fat: 4gCholesterol: 15mgSodium: 100mgPotassium: 20mgSugar: 10gCalcium: 1mgIron: 1mg

Notes

For best results, ensure butter is melted fully before adding marshmallows and avoid over-mixing the Rice Krispies to maintain their crunch.

Tried this recipe?

Let us know how it was!

Filed Under: BREAKFAST & BRUNCH

Strawberry Quinoa Salad

January 16, 2026 by JudyWhite Leave a Comment

There’s nothing quite like the refreshing burst of flavor that comes with a beautifully crafted Strawberry Quinoa Salad. Picture this: the sweet scent of ripe strawberries mingling with the earthy aroma of quinoa, creating a delightful harmony on your plate. I first made this salad one sunny afternoon when I was looking to break free from the usual dinner routine. The vibrant colors alone were enough to lift my mood, but the combination of crunchy cucumber and creamy feta takes it to a whole new level.

This recipe embraces freshness and versatility, making it perfect for a light lunch, as a side dish at your next barbecue, or even as a stunning centerpiece for a spring gathering. Plus, it’s so quick and easy to whip up! With just a handful of wholesome ingredients, you can impress your family and friends while treating yourself to a nourishing meal packed with flavor. Let’s dive into this delicious adventure that promises to add a touch of joy to your kitchen!

Why You'll Love This Strawberry Quinoa Salad

  • This Strawberry Quinoa Salad is incredibly easy to prepare, making it a fantastic choice for busy weeknights or last-minute gatherings.
  • The refreshing combination of sweet strawberries and crunchy cucumbers creates a burst of flavor that is sure to please your palate.
  • Its versatility shines through as it can be served as a light lunch, side dish, or a vibrant centerpiece for any occasion.
  • Not only is it visually appealing with its bright colors, but it’s also a nutritious option that will leave everyone feeling satisfied and happy.

Strawberry Quinoa Salad Ingredients

• Perfect for a delightful summer dish!

For the Salad

  • Quinoa – a nutritious base that adds protein and fiber.
  • Ripe strawberries – sweet and juicy; they bring a refreshing taste to the dish.
  • Cucumber – crisp and hydrating, it balances the sweetness of strawberries.
  • Red onion – adds a bit of zing and color to the salad.
  • Feta cheese – creamy and salty, it enhances the flavor profile beautifully.

For the Dressing

  • Extra virgin olive oil – provides a rich, fruity flavor while keeping it healthy.
  • Balsamic vinegar – adds a tangy depth that complements the salad perfectly.
  • Honey – a touch of sweetness that harmonizes the dressing; you can use maple syrup for a vegan twist.
  • Salt and pepper – essential for bringing all the flavors together, adjusting to taste.

How to Make Strawberry Quinoa Salad

  1. Rinse the Quinoa: Start by rinsing 1 cup of quinoa under cold water. In a saucepan, combine the rinsed quinoa and 2 cups of water; bring to a boil. Reduce heat, cover, and simmer for about 15 minutes until all the water is absorbed and the quinoa is fluffy. Let it cool for a bit.

  2. Chop the Veggies: While the quinoa cools, chop 2 cups of ripe strawberries, 1 medium cucumber, and 1/2 small red onion into bite-sized pieces. The colorful mix is already looking beautiful!

  3. Make the Dressing: In a small bowl, whisk together 3 tablespoons of extra virgin olive oil, 2 tablespoons of balsamic vinegar, 1 tablespoon of honey, and a pinch of salt and pepper. This zesty dressing will elevate your salad!

  4. Combine Ingredients: In a large bowl, mix the cooled quinoa with the chopped strawberries, cucumber, red onion slices, and 1/2 cup of crumbled feta cheese. Drizzle the dressing over the top, ensuring every bite is flavorful.

  5. Toss Gently: Carefully toss the ingredients together, being cautious not to crush the strawberries. You want to keep that delightful sweetness intact!

  6. Chill Before Serving: Chill the salad in the fridge for at least 30 minutes before serving. This allows the flavors to meld beautifully.

Optional: Garnish with extra feta or fresh mint for an additional pop of flavor.

Exact quantities are listed in the recipe card below.

Strawberry Quinoa Salad Variations

Feel free to get creative and make this salad your own with these fun twists!

  • Dairy-Free: Omit the feta cheese or substitute with a vegan cheese for a deliciously creamy texture without dairy.

  • Nutty Crunch: Add a handful of toasted almonds or walnuts for a delightful crunch that complements the soft strawberries.

  • Herb Infusion: Stir in fresh herbs like mint or basil to elevate the flavor profile, adding an aromatic lift to each bite.

  • Citrus Zing: Squeeze some fresh lemon or lime juice over the salad for a bright, zesty contrast that enhances the sweetness.

  • Spicy Kick: Introduce diced jalapeños or a sprinkle of red pepper flakes to embolden your salad with a little heat that surprises the palate.

  • Grain Swap: Replace quinoa with farro or bulgur for a chewier texture that gives an interesting twist while maintaining a healthy foundation.

  • Berry Medley: Mix in blueberries or raspberries for a vibrant berry blend that brings additional flavors and colors to the dish.

  • Maple-Sweetened: If you’re opting for a different sweetener, swap honey for maple syrup for a unique flavor that enhances the natural sweetness of the strawberries.

Let your imagination roam and enjoy the delightful variations of this Strawberry Quinoa Salad!

How to Store and Freeze Strawberry Quinoa Salad

Fridge: Store the Strawberry Quinoa Salad in an airtight container for up to 3 days. This keeps the ingredients fresh while allowing the flavors to develop.

Freezer: It’s best not to freeze this salad as the strawberries and cucumbers can become mushy upon thawing, compromising texture and flavor.

Reheating: If you have leftover quinoa that’s plain, you can reheat it on the stovetop with a splash of water. Just avoid reheating the salad itself to preserve its freshness.

Serving Suggestions: For optimal taste, serve chilled. Refresh the salad by adding a few more strawberries or a sprinkle of feta right before serving.

What to Serve with Strawberry Quinoa Salad?

The vibrant flavors in this salad create a delightful culinary experience that pairs beautifully with a range of dishes.

  • Grilled Chicken: Juicy and smoky, grilled chicken adds a hearty protein that balances the lightness of the salad perfectly.

  • Roasted Vegetables: Seasoned, caramelized veggies introduce a comforting, earthy element, enhancing the fresh flavors in the salad.

  • Hummus and Pita Bread: Creamy hummus and warm pita provide a satisfying dipper, adding a Mediterranean flair to your meal.

  • Sparkling Lemonade: The zesty fizz of sparkling lemonade offers a refreshing contrast, making each sip a joyful complement to the meal.

  • Fruit Sorbet: A light and refreshing dessert, fruit sorbet echoes the sweetness of the strawberries, making for a perfect finish.

  • Cheese Platter: A selection of cheeses, including creamy brie and sharp cheddar, brings rich flavors that harmonize with the salad’s freshness.

This exquisite combination of tastes and textures will elevate your dining experience, ensuring your table is a joyful place for family and friends!

Make Ahead Options

These Strawberry Quinoa Salad make-ahead tips are perfect for busy home cooks looking to simplify meal prep! You can prepare the quinoa up to 3 days in advance; just cook and cool it as instructed, then store it in an airtight container in the refrigerator. Additionally, you can chop the strawberries, cucumber, and red onion, then refrigerate them for up to 24 hours to keep them fresh and crisp. When you’re ready to serve, simply combine the quinoa with the prepped veggies and crumbled feta cheese, then drizzle with the dressing just before tossing. This way, you’ll maintain the vibrant flavors and textures, making your salad just as delicious and refreshing as when it’s freshly made!

Chef's Helpful Tips

  • When making Strawberry Quinoa Salad, be sure to rinse the quinoa thoroughly to remove any bitterness.
  • Always check the doneness of your quinoa to ensure it is fluffy and not overcooked, which can result in a mushy texture.
  • Use a sharp knife to chop your strawberries, cucumber, and red onion to maintain clean cuts and enhance the salad’s presentation.
  • For the dressing, whisk together the ingredients until smooth, and taste before adding additional salt or honey to achieve your desired flavor balance.

Strawberry Quinoa Salad Recipe FAQs

How do I select ripe strawberries for the salad?
Absolutely! When selecting strawberries, look for ones that are bright red, firm to the touch, and have a sweet aroma. Avoid any with dark spots or bruises, as these indicate overripeness or spoilage. Ideally, choose strawberries that are fully ripe, as they will be sweeter and juicier in your salad.

How should I store leftover Strawberry Quinoa Salad?
Very simply! Store any leftover Strawberry Quinoa Salad in an airtight container in the fridge for up to 3 days. This method keeps your salad fresh while allowing the flavors to meld. Just be sure to give it a gentle stir before serving to recombine the ingredients if any have settled.

Can I freeze the Strawberry Quinoa Salad?
Unfortunately, I wouldn’t recommend freezing this salad. Freezing can lead to a mushy texture once thawed, especially with the strawberries and cucumbers. Instead, if you have plain leftover quinoa, you can freeze it in a sealed container for up to 3 months and use it in other recipes.

What if my quinoa is overcooked?
No worries at all! If you’ve accidentally overcooked your quinoa and it’s mushy, try to salvage it by spreading it out on a baking sheet to cool quickly. This can help firm it up a bit. You can also use it in soups or as a thickening agent in other dishes! But for this salad, perfectly fluffy quinoa is what you want for texture.

Are there any dietary considerations for this recipe?
Indeed! For those with lactose intolerance or dairy allergies, you can easily adapt this recipe by omitting the feta cheese or substituting it with a dairy-free cheese alternative. Just be sure to taste your dressing as you go, adjusting the sweetness and tang to your preference. This makes the salad enjoyable for everyone, even your vegan friends!

Can I use other fruits instead of strawberries?
Absolutely! If you’re feeling adventurous, feel free to swap strawberries with other fruits like blueberries, diced apples, or even peaches! Each fruit will bring its unique flavor and textural contrast to the salad, keeping your meals exciting and delicious. Just remember to adjust the sweetness of the dressing if needed!

Strawberry Quinoa Salad

Strawberry Quinoa Salad

Enjoy a refreshing Strawberry Quinoa Salad packed with flavor, combining sweet strawberries with nutritious quinoa for a delightful light meal.
Print Recipe Pin Recipe
Prep Time 10 minutes mins
Cook Time 15 minutes mins
Chill Time 30 minutes mins
Total Time 55 minutes mins
Servings: 4 servings
Course: LUNCH RECIPES
Calories: 250
Ingredients Equipment Method Nutrition Notes

Ingredients
  

For the Salad
  • 1 cup quinoa rinsed
  • 2 cups water
  • 2 cups ripe strawberries chopped
  • 1 medium cucumber chopped
  • 0.5 small red onion chopped
  • 0.5 cup feta cheese crumbled
For the Dressing
  • 3 tablespoons extra virgin olive oil
  • 2 tablespoons balsamic vinegar
  • 1 tablespoon honey or maple syrup for vegan
  • to taste salt
  • to taste pepper

Equipment

  • Saucepan
  • Large Bowl
  • Small bowl
  • Whisk
  • Knife

Method
 

How to Make Strawberry Quinoa Salad
  1. Rinse 1 cup of quinoa under cold water. In a saucepan, combine the rinsed quinoa and 2 cups of water; bring to a boil. Reduce heat, cover, and simmer for about 15 minutes until all the water is absorbed and the quinoa is fluffy. Let it cool for a bit.
  2. While the quinoa cools, chop 2 cups of ripe strawberries, 1 medium cucumber, and 1/2 small red onion into bite-sized pieces.
  3. In a small bowl, whisk together 3 tablespoons of extra virgin olive oil, 2 tablespoons of balsamic vinegar, 1 tablespoon of honey, and a pinch of salt and pepper.
  4. In a large bowl, mix the cooled quinoa with the chopped strawberries, cucumber, red onion slices, and 1/2 cup of crumbled feta cheese. Drizzle the dressing over the top.
  5. Carefully toss the ingredients together, being cautious not to crush the strawberries.
  6. Chill the salad in the fridge for at least 30 minutes before serving.

Nutrition

Serving: 1servingCalories: 250kcalCarbohydrates: 30gProtein: 8gFat: 12gSaturated Fat: 2gPolyunsaturated Fat: 1gMonounsaturated Fat: 8gCholesterol: 10mgSodium: 150mgPotassium: 300mgFiber: 5gSugar: 6gVitamin A: 20IUVitamin C: 50mgCalcium: 150mgIron: 1mg

Notes

Optional: Garnish with extra feta or fresh mint before serving. Store in an airtight container for up to 3 days. Avoid freezing the salad to preserve texture.

Tried this recipe?

Let us know how it was!

Filed Under: LUNCH RECIPES

Classic Meatloaf

January 14, 2026 by JudyWhite Leave a Comment

As I was rummaging through my kitchen for a comforting meal, the thought struck me—nothing beats a nostalgic Classic Meatloaf! The rich aroma of ground beef mingling with the sweetness of ketchup fills my home with warmth, reminiscent of cozy family dinners and laughter around the table. What I love most about this dish is its simple ingredients and the ease with which it comes together.

No need for fancy techniques or extensive prep work; just a few delightful ingredients and about an hour in the oven will yield a mouthwatering centerpiece that impresses everyone. Plus, it’s versatile enough to accommodate different tastes—feel free to add your favorite herbs or spices! This meatloaf isn’t just a meal; it’s a slice of home that brings back memories of love and satisfaction, making it perfect for those who crave homemade goodness over fast food chaos. Join me as I walk you through this classic recipe that promises to be a hit with family and friends alike!

Why You'll Love This Classic Meatloaf

  • This Classic Meatloaf is incredibly easy to make, allowing you to whip up a hearty meal with minimal effort.
  • The robust flavors of ground beef and tangy ketchup come together beautifully, creating a dish that is both satisfying and delicious.
  • Its versatility means you can customize it to suit any taste preference, whether adding extra spices or incorporating veggies.
  • Not only is it visually appealing with its inviting glaze, but it also saves time with a simple prep and cook process, making it perfect for busy weeknights.
  • Finally, this crowd-pleaser brings everyone together, turning mealtime into a cherished experience.

Classic Meatloaf Ingredients

• Gather these simple ingredients to create your delicious classic meatloaf!

For the Meatloaf

  • Ground beef (80/20) – the perfect fat-to-lean ratio keeps the meatloaf juicy and flavorful.
  • Plain breadcrumbs – act as a binder while adding a nice texture to the meatloaf.
  • Large eggs – help hold the ingredients together, so your meatloaf doesn’t fall apart.
  • Medium onion, finely chopped – introduces a subtle sweetness and depth of flavor.
  • Ketchup – brings moisture and a deliciously sweet glaze to the top, plus an extra dollop gives it that classic touch!
  • Garlic powder – adds a hint of savory goodness, enhancing the overall flavor profile.
  • Soy sauce – contributes a rich umami flavor that deepens the taste experience.
  • Salt and pepper – essential for bringing out the rich flavors of the meatloaf.

This classic meatloaf is sure to become a family favorite!

How to Make Classic Meatloaf

  1. Preheat your oven to 350°F (175°C). This step is essential to ensure your meatloaf cooks evenly and becomes beautifully golden on the outside.

  2. Combine all the ingredients in a large bowl. Gently mix together ground beef, breadcrumbs, chopped onion, ketchup (reserve some for topping), garlic powder, soy sauce, eggs, salt, and pepper until just combined. Avoid over-mixing to keep it tender.

  3. Shape the mixture. Transfer the meat blend to a lined baking sheet or loaf pan and mold it into a loaf shape, ensuring even thickness for consistent cooking.

  4. Spread reserved ketchup over the top. This simple glaze will caramelize beautifully in the oven, adding a sweet and tangy finish to your Classic Meatloaf.

  5. Bake for about 60 minutes. Keep an eye on it until the internal temperature reaches 160°F (70°C). The loft will be firm and slightly browned on top when ready.

  6. Rest for 10 minutes before slicing. This step is important as it allows the juices to redistribute, ensuring each slice is moist and packed with flavor.

Optional: Garnish with fresh parsley for a pop of color and added freshness!

Exact quantities are listed in the recipe card below.

What to Serve with Classic Meatloaf?

Imagine the warmth of your kitchen filled with the nostalgic aroma of classic comfort food, waiting to be complemented by delightful sides.

  • Creamy Mashed Potatoes: Their buttery texture and creamy richness are the perfect contrast to the hearty meatloaf.
  • Garlic Butter Green Beans: Bright, fresh, and slightly crisp, they add a wonderful crunch and absorb the meatloaf’s savory juices beautifully.
  • Roasted Brussels Sprouts: The caramelized edges and earthy flavor of sprout perfectly balance the meatloaf’s richness and add a gourmet touch.
  • Homestyle Macaroni and Cheese: This cheesy classic offers comfort in every bite, making it a fun and indulgent pairing that kids and adults adore.
  • Sweet Corn on the Cob: The natural sweetness and juicy kernels provide a delightful counterpoint to the savory depth of the meatloaf.
  • Tangy Cucumber Salad: A refreshing cucumber salad with a zingy dressing can brighten your plate, cutting through the richness of the meatloaf.
  • Dinner Rolls: Soft and fluffy, they’re perfect for mopping up any remaining glaze or gravy, adding a comforting touch to your meal.
  • Red Wine: A bold red like Cabernet Sauvignon enhances the flavors of the loaf, bringing out the savory profiles of the meat and sauce.
  • Chocolate Cake: For dessert, a moist chocolate cake can bring the meal to a luxurious close, offering a sweet final note to the savory feast.

Classic Meatloaf Variations

Get ready to personalize your Classic Meatloaf and explore delicious twists that delight your taste buds!

  • Turkey Substitute: Swap ground beef for lean ground turkey for a lighter option that’s just as flavorful.
  • Vegetable Boost: Add finely chopped bell peppers or carrots to the mix for extra nutrition and a hint of natural sweetness. These colorful additions brighten the loaf while enhancing its texture!
  • Spicy Kick: Incorporate diced jalapeños or a dash of hot sauce for a fiery twist that spices up the traditional flavor. Just remember to balance the heat with a touch of honey or brown sugar.
  • Herb Infusion: Mix in fresh herbs like parsley, thyme, or oregano to elevate the dish with herby freshness. The aromatic blend brings brightness, transforming your meatloaf into a garden delight!
  • Gluten-Free: Replace breadcrumbs with ground oats or gluten-free breadcrumbs to create a deliciously moist meatloaf that everyone can enjoy. Don’t forget to check your ketchup for gluten-free approval!
  • Cheesy Surprise: Fold in shredded cheese like cheddar or mozzarella into the meat mixture for a ooey-gooey delight that melts in your mouth. Cheese lovers will appreciate this gooey twist!
  • BBQ Flavor: Replace ketchup with your favorite barbecue sauce for a smoky sweetness and a tangy glaze that adds a bit of pizzazz. Your meatloaf will shine with this exciting flavor upgrade!
  • Italian Style: Add dried Italian herbs and swap ketchup for marinara sauce to create a Mediterranean flair. The warm scents of basil and oregano will transport you straight to Italy!

Make Ahead Options

These Classic Meatloaf preparations are perfect for busy weeknights! You can mix the meatloaf ingredients and shape it into a loaf up to 24 hours in advance, then simply cover it tightly with plastic wrap or foil before refrigerating. This not only saves you time but also allows the flavors to meld beautifully. For ultimate freshness, keep the ketchup topping separate and add it right before baking. When you’re ready to serve, just pop it in the oven straight from the refrigerator—no need to change the cooking time. Enjoy a delicious homemade meal with minimal effort, as it will be just as flavorful and comforting!

How to Store and Freeze Classic Meatloaf

Fridge: Store any leftover Classic Meatloaf in an airtight container for up to 3 days. Reheat slices in the microwave or oven until warmed through.

Freezer: Wrap the cooled meatloaf tightly in plastic wrap and then aluminum foil. It can be frozen for up to 3 months. Thaw in the fridge before reheating.

Reheating: For best results, reheat in the oven at 350°F (175°C) until heated through, ensuring it stays moist and delicious.

Serving: If you plan to serve your Classic Meatloaf later, consider slicing it before storing; this makes reheating easier for individual portions.

Chef's Helpful Tips

  • For the Classic Meatloaf, make sure to use ground beef with an 80/20 fat-to-lean ratio to keep your meatloaf juicy and flavorful.
  • When mixing the ingredients, combine them gently to avoid overworking the meat, which can lead to a dense loaf.
  • To ensure even cooking, shape your meatloaf uniformly and avoid any thick areas.
  • Always let the meatloaf rest for about 10 minutes before slicing, as this helps the juices redistribute and keeps your slices moist and tender.

Classic Meatloaf Recipe FAQs

How do I choose the right ground beef for classic meatloaf?
Absolutely! When selecting ground beef for your Classic Meatloaf, look for an 80/20 ratio, which means 80% lean meat and 20% fat. This balance is perfect for maintaining moisture and flavor during cooking. If you’re looking for a leaner option, you can use ground turkey or chicken, but keep in mind these leaner choices may require additional ingredients like breadcrumbs or moisture.

How should I store leftover classic meatloaf?
Very! Store any leftover Classic Meatloaf in an airtight container in the fridge for up to 3 days. I often cut it into slices before refrigerating to make reheating easier. Just pop those slices in the microwave or back into the oven until heated through!

Can I freeze classic meatloaf?
Yes, you can! To freeze your Classic Meatloaf, first, let it cool completely after baking. Then, wrap it tightly in plastic wrap, followed by a layer of aluminum foil. This prevents freezer burn, and it will keep well for up to 3 months. When you’re ready to enjoy it, transfer the wrapped meatloaf to the fridge to thaw overnight, and reheat it back in the oven at 350°F (175°C) until warmed through.

What should I do if my classic meatloaf is too dry?
If your Classic Meatloaf turns out dry, don’t fret! There are a few things you can try. First, make sure you’re not overcooking it; always check for an internal temperature of 160°F (70°C). For future batches, you can add a bit more ketchup or even some beef broth to the mixture before baking. This extra moisture helps keep the dish tender. You can also mix in some finely chopped veggies, like bell peppers or zucchini, for added moisture and flavor!

Is there a way to make classic meatloaf healthier?
Definitely! To lighten up your Classic Meatloaf, consider using lean ground turkey or chicken instead of beef. You can also substitute whole wheat breadcrumbs for plain ones or add oats to the mix for additional nutrients. Incorporate chopped vegetables like carrots or spinach for an extra boost of vitamins and minerals. Just remember to adjust the baking time based on the leaner meat choice!

Can pets eat classic meatloaf?
It’s important to be cautious! While the ingredients in Classic Meatloaf like beef, eggs, and veggies are often safe for pets, you should avoid letting them have the part that contains ketchup, soy sauce, and extra seasonings, as these can be harmful to them. If you want to share, consider making a pet-friendly version without any harmful additives!

Classic Meatloaf

Classic Meatloaf

This Classic Meatloaf combines ground beef and tangy ketchup for a comforting, home-cooked meal.
Print Recipe Pin Recipe
Prep Time 15 minutes mins
Cook Time 1 hour hr
Resting Time 10 minutes mins
Total Time 1 hour hr 25 minutes mins
Servings: 6 slices
Course: DINNER RECIPES
Cuisine: American
Calories: 250
Ingredients Equipment Method Nutrition Notes

Ingredients
  

For the Meatloaf
  • 2 lbs Ground beef (80/20) the perfect fat-to-lean ratio keeps the meatloaf juicy and flavorful.
  • 1 cup Plain breadcrumbs act as a binder while adding a nice texture to the meatloaf.
  • 2 large Eggs help hold the ingredients together.
  • 1 medium Onion, finely chopped introduces a subtle sweetness and depth of flavor.
  • 1 cup Ketchup brings moisture and a deliciously sweet glaze to the top.
  • 1 tbsp Garlic powder adds a hint of savory goodness.
  • 2 tbsp Soy sauce contributes a rich umami flavor.
  • 1 tsp Salt essential for bringing out the rich flavors.
  • 1 tsp Pepper essential for bringing out the rich flavors.

Equipment

  • Mixing bowl
  • Baking sheet
  • loaf pan
  • Oven

Method
 

How to Make Classic Meatloaf
  1. Preheat your oven to 350°F (175°C).
  2. Combine all the ingredients in a large bowl and gently mix until just combined.
  3. Shape the mixture into a loaf on a lined baking sheet or loaf pan.
  4. Spread reserved ketchup over the top.
  5. Bake for about 60 minutes until the internal temperature reaches 160°F (70°C).
  6. Rest for 10 minutes before slicing.

Nutrition

Serving: 1sliceCalories: 250kcalCarbohydrates: 15gProtein: 20gFat: 15gSaturated Fat: 6gPolyunsaturated Fat: 1gMonounsaturated Fat: 8gCholesterol: 100mgSodium: 600mgPotassium: 400mgFiber: 1gSugar: 5gVitamin A: 500IUVitamin C: 2mgCalcium: 20mgIron: 3mg

Notes

Garnish with fresh parsley for added freshness!

Tried this recipe?

Let us know how it was!

Filed Under: DINNER RECIPES

Cheesy Breadsticks

January 14, 2026 by JudyWhite Leave a Comment

If there’s anything that can instantly elevate a cozy night in, it’s the warm, cheesy aroma of freshly baked breadsticks wafting through the kitchen. Picture this: you’ve just come home after a long day, and the idea of preparing dinner feels overwhelming. That’s where my Cheesy Breadsticks come to the rescue! Bursting with gooey cheese and a hint of garlic, these delightful snacks are not only easy to make, but they also make the perfect side to any meal or even a delicious standalone treat.

I stumbled upon this recipe during a weekend baking spree, and it quickly turned into a go-to favorite for my family. The best part? They require just a handful of pantry staples and about 35 minutes from start to finish. Give them a dip in marinara sauce, or enjoy them on their own; either way, these cheesy delights are sure to become a staple in your home. Let’s dive into how to whip up these scrumptious breadsticks!

Why You'll Love This Cheesy Breadsticks

  • These Cheesy Breadsticks are incredibly easy to make, allowing you to whip up a delicious snack or side dish in just 35 minutes.
  • With the irresistible combination of gooey cheese and flavorful seasonings, each bite is a delightful explosion of taste.
  • Their versatility means they can be paired with almost any meal or enjoyed alone, making them perfect for any occasion.
  • Plus, their golden-brown visual appeal makes them a gorgeous addition to your dinner table or a crowd-pleasing treat for gatherings.

Cheesy Breadsticks Ingredients

For the Dough
• All-purpose flour – this forms the base for your Cheesy Breadsticks, giving them structure.
• Active dry yeast – ensures your breadsticks rise beautifully; make sure it’s fresh for the best results.
• Warm water – helps activate the yeast; ensure it’s warm but not too hot to touch, around 110°F/43°C.
• Olive oil – adds a rich flavor and makes the dough tender.
• Salt – enhances the overall flavor of the breadsticks.

For the Topping
• Shredded mozzarella cheese – the star ingredient for melty goodness, feel free to substitute with other cheeses for variation.
• Garlic powder – infuses a savory aroma; fresh minced garlic can be used for a stronger flavor.
• Dried oregano – adds an Italian twist, enhancing the overall flavor profile of your cheesy treats.

These simple ingredients combined will lead you to the delightful creation of Cheesy Breadsticks that will surely please your family and friends!

How to Make Cheesy Breadsticks

  1. Combine warm water and yeast in a mixing bowl; let it sit for 5 minutes until frothy. This step is essential to activate the yeast, ensuring your breadsticks rise perfectly.

  2. Mix in flour, salt, and olive oil; stir until you have a shaggy dough. The mixture should start coming together, resembling a messy, doughy blob.

  3. Knead the dough by hand for about 5 minutes until it reaches a smooth, elastic texture. Cover it with a cloth and let it rise in a warm place for 1 hour, or until doubled in size.

  4. Punch down the dough gently to release any air, then roll it out on a floured surface to about half an inch thick. Use a knife or pizza cutter to cut into strips for that iconic breadstick shape.

  5. Place the strips on a parchment-lined baking sheet, sprinkling with shredded mozzarella and seasonings. Feel free to add extra cheese for an indulgent treat!

  6. Preheat your oven to 400°F (200°C) and bake the breadsticks for 15-20 minutes until they are golden brown. Keep an eye on them to achieve that irresistible crunchy texture on the outside.

Optional: Serve with marinara sauce or your favorite dip for an extra layer of flavor!

Exact quantities are listed in the recipe card below.

How to Store and Freeze Cheesy Breadsticks

Room Temperature: Store leftover Cheesy Breadsticks in an airtight container for up to 2 days. To keep them fresh, avoid exposing them to moisture.

Fridge: If you need to keep them longer, refrigerate in an airtight container for up to 5 days. Reheat them in the oven to restore some crispiness.

Freezer: For longer storage, freeze the breadsticks individually wrapped in plastic wrap and then in a freezer bag for up to 3 months.

Reheating: To reheat, place frozen or refrigerated breadsticks on a baking sheet and warm at 350°F (175°C) for about 10 minutes or until heated through. Enjoy them fresh!

Make Ahead Options

These Cheesy Breadsticks are perfect for meal prep, allowing you to enjoy delicious, warm snacks from the comfort of your home! You can prepare the dough up to 24 hours in advance by making it through step 3, then covering it tightly with plastic wrap and refrigerating to slow down the rising process. For even more convenience, you can roll out the dough and cut it into strips, storing them in an airtight container for up to 3 days; just make sure to separate them with parchment paper to prevent sticking. When it’s time to bake, simply add your cheese and seasoning, then pop them in the oven as directed. They will come out just as delicious, saving you valuable time on busy weeknights!

What to Serve with Cheesy Breadsticks?

Picture a cozy evening with the delightful aroma of baked breadsticks wafting through your home, inviting everyone to gather around the dinner table.

  • Garlic Marinara Sauce: This classic dip adds a robust, tangy flavor that perfectly complements the cheesy goodness of the breadsticks. It’s a match made in heaven!

  • Caesar Salad: Crisp romaine, creamy dressing, and crunchy croutons bring a refreshing contrast to the warm, cheesy breadsticks. This combo is both satisfying and wholesome.

  • Spicy Buffalo Chicken Wings: For a bit of a kick, these zesty wings are an exciting pairing that balances the mildness of the cheesy bread. Perfect for game nights!

  • Creamy Tomato Soup: A bowl of savory tomato soup creates a comforting duo. Dip the breadsticks into the warm soup for a cozy, satisfying meal.

  • Stuffed Mushrooms: Earthy flavors from the mushrooms offer a delightful textural contrast to your breadsticks. Their burst of flavors make your meal memorable.

  • Sweet Corn Salad: The sweetness of fresh corn with zesty lime juice brings a bright side that elevates your cheesy treats to a whole new level.

  • Garlic Butter Dipping Sauce: Melted butter with garlic is the ultimate indulgence. Drizzle it over the breadsticks for an added richness that no one can resist.

  • Red Wine: A glass of light red wine enhances the overall flavor experience by offering a balance to the savory breadsticks while making any dinner feel more special.

  • Chocolate Chip Cookies: End your meal on a sweet note! The warm, gooey cookies pair delightfully with the cheesiness and are a comforting finish.

Each of these pairings adds a unique touch, enhancing the experience of your Cheesy Breadsticks and turning any meal into a delightful feast!

Cheesy Breadsticks Variations

Feel free to get creative and tailor these Cheesy Breadsticks to suit your taste or dietary needs!

  • Whole Wheat: Swap half of the all-purpose flour with whole wheat flour for a nuttier flavor and added fiber.

  • Herb-Infused: Mix fresh herbs like rosemary or thyme into the dough for a fragrant twist that dances through every bite.

  • Spicy: Add red pepper flakes or a sprinkle of cayenne pepper to the dough for a delightful kick that awakens the senses!

  • Cheese Medley: Instead of just mozzarella, blend different cheeses like cheddar, parmesan, or gouda for an exciting flavor profile that’s undeniably cheesy.

  • Sweet Twist: Brush the baked breadsticks with melted butter and sprinkle with cinnamon and sugar for a delightful dessert version that’s great for snacking!

  • Vegan Alternative: Use almond or coconut milk in place of warm water and replace cheese with dairy-free cheese for a delicious vegan treat.

  • Garlic Lover’s Delight: Enhance the garlic flavor by mixing fresh minced garlic directly into the dough for an aromatic experience.

  • Stuffed Breadsticks: Roll the dough around cheese sticks or pepperoni slices to create cheesy, savory-filled delights that are sure to impress everyone!

Let your imagination run wild and enjoy these delightful variations with every batch of Cheesy Breadsticks you make!

Chef's Helpful Tips

  • When making Cheesy Breadsticks, always ensure your warm water is the right temperature at around 110°F to activate the yeast effectively.
  • A common mistake is not kneading the dough enough, so aim for a smooth and elastic texture to achieve the best results.
  • Make sure to roll the dough out evenly to half an inch thick for consistent cooking, as uneven thickness can lead to some breadsticks being undercooked.
  • Bake the breadsticks at 400°F for the recommended 15-20 minutes, but watch closely in the last few minutes to achieve that perfect golden brown finish.

Cheesy Breadsticks Recipe FAQs

What type of flour should I use for Cheesy Breadsticks?
For Cheesy Breadsticks, I recommend using all-purpose flour. It provides the perfect structure for the breadsticks, ensuring they rise nicely and maintain a soft interior. You can experiment with whole wheat flour for a healthier option, but keep in mind it may alter the texture slightly.

How should I store leftover Cheesy Breadsticks?
Store leftover Cheesy Breadsticks in an airtight container at room temperature for up to 2 days. If you want to keep them fresher for longer, refrigerate them in an airtight container for up to 5 days, reheating in the oven for a crispy texture.

Can I freeze Cheesy Breadsticks?
Absolutely! To freeze Cheesy Breadsticks, ensure they are completely cooled. Individually wrap each breadstick in plastic wrap, and then place them in a freezer bag for up to 3 months. This method helps maintain their delicious flavor and texture.

How do I reheat frozen Cheesy Breadsticks?
Reheating frozen Cheesy Breadsticks is simple! Preheat your oven to 350°F (175°C). Arrange the frozen breadsticks on a baking sheet and heat them for about 10 minutes, or until they are warmed through. This brings back their delightful crunch while keeping the interior soft and cheesy.

What should I do if my dough doesn’t rise?
If your dough doesn’t rise, it could be due to inactive yeast. Always check the expiration date on your yeast packet—fresh yeast is key! Additionally, make sure the water temperature is around 110°F (43°C), as water that’s too hot can kill the yeast. If your dough isn’t rising after the first hour, try placing it in a warmer area, like near a sunny window or inside a turned-off oven with the light on, for better results.

Are Cheesy Breadsticks suitable for people with gluten allergies?
Unfortunately, traditional Cheesy Breadsticks are not gluten-free, as they are made with all-purpose flour. However, you can use a gluten-free all-purpose flour blend designed for baking, ensuring it contains a binding agent, like xanthan gum or psyllium husk, to help mimic the texture of regular dough. Always double-check the ingredients to avoid gluten contamination!

Cheesy Breadsticks

Cheesy Breadsticks

These Cheesy Breadsticks are warm, gooey, and bursting with flavor, perfect as a snack or side dish.
Print Recipe Pin Recipe
Prep Time 15 minutes mins
Cook Time 20 minutes mins
Rising Time 1 hour hr
Total Time 1 hour hr 35 minutes mins
Servings: 4 breadsticks
Course: Snacks & Appetizers
Cuisine: Italian
Calories: 150
Ingredients Equipment Method Nutrition Notes

Ingredients
  

Dough Ingredients
  • 2 cups all-purpose flour
  • 1 packet active dry yeast
  • 1 cup warm water around 110°F/43°C
  • 2 tablespoons olive oil
  • 1 teaspoon salt
Topping Ingredients
  • 1 cup shredded mozzarella cheese or other cheeses for variation
  • 1 teaspoon garlic powder or fresh minced garlic
  • 1 teaspoon dried oregano

Equipment

  • Mixing bowl
  • Baking sheet
  • knife or pizza cutter
  • Oven

Method
 

Making Breadsticks
  1. Combine warm water and yeast in a mixing bowl; let it sit for 5 minutes until frothy.
  2. Mix in flour, salt, and olive oil; stir until you have a shaggy dough.
  3. Knead the dough by hand for about 5 minutes until it reaches a smooth, elastic texture.
  4. Cover it with a cloth and let it rise in a warm place for 1 hour, or until doubled in size.
  5. Punch down the dough gently, then roll it out on a floured surface to about half an inch thick.
  6. Cut into strips for the iconic breadstick shape.
  7. Place on a parchment-lined baking sheet, sprinkle with cheese and seasonings.
  8. Preheat the oven to 400°F and bake for 15-20 minutes until golden brown.

Nutrition

Serving: 1breadstickCalories: 150kcalCarbohydrates: 20gProtein: 5gFat: 6gSaturated Fat: 2gMonounsaturated Fat: 4gCholesterol: 5mgSodium: 250mgPotassium: 100mgFiber: 1gVitamin A: 150IUCalcium: 200mgIron: 1mg

Notes

Serve with marinara sauce or your favorite dip for extra flavor.

Tried this recipe?

Let us know how it was!

Filed Under: SNACKS & APPETIZERS

Ham & Swiss Panini

January 14, 2026 by JudyWhite Leave a Comment

There’s nothing quite like the crunch of perfectly toasted ciabatta giving way to warm, melty cheese and savory ham. Imagine standing in your kitchen, the tantalizing scent of butter mingling with the richness of Swiss and the piquant hint of Dijon mustard wafting through the air, drawing you in like a cozy embrace on a chilly afternoon. This Ham & Swiss Panini isn’t just a sandwich; it’s a delightful escape from the mundane meals we often find ourselves stuck with.

After a long day of juggling responsibilities, coming home to whip up this simple yet satisfying dish feels almost like a well-deserved reward. With just a handful of ingredients and about 15 minutes of your time, you can create a meal that transforms the ordinary into something extraordinary. Whether you’re cooking for yourself or impressing a friend, this panini is sure to bring smiles and a sense of home-cooked comfort. So grab your ciabatta and let’s dive into this scrumptious recipe that’s just waiting to become a favorite in your kitchen!

Why You'll Love This Ham & Swiss Panini

  • This Ham & Swiss Panini is incredibly easy to make, allowing you to enjoy a delicious meal in just 15 minutes.
  • The combination of savory ham, rich Swiss cheese, and zesty Dijon mustard creates a flavor explosion that will leave your taste buds dancing.
  • Its versatility makes it perfect for any occasion, whether it’s a quick lunch or a satisfying dinner.
  • Plus, the golden crust and melty filling make for an irresistible visual appeal that will impress anyone you serve it to.

Ham & Swiss Panini Ingredients

Get ready to indulge in this flavorful delight!

For the Sandwich

  • 2 slices ciabatta bread – perfect for achieving that crispy texture while holding all the cheesy goodness.
  • 4 oz sliced ham – use your favorite variety for an added layer of flavor.
  • 2 oz Swiss cheese – its creamy melt makes this the star of the Ham & Swiss Panini.
  • 1 tbsp Dijon mustard – adds a zesty kick that complements the savory ham beautifully.
  • 1 tbsp butter – helps create a golden, crispy crust for that satisfying crunch.

Enjoy crafting this delightful panini that will quickly become a staple in your kitchen!

How to Make Ham & Swiss Panini

  1. Preheat your cooking equipment by getting your panini press or skillet nice and hot over medium heat, creating the perfect environment for crispy bread and melty cheese.

  2. Spread Dijon mustard generously on one side of each slice of ciabatta, setting the stage for that zesty flavor that works wonders with the savory ham.

  3. Layer the sliced ham and Swiss cheese on the mustard side of one bread slice, ensuring they are evenly distributed before placing the other slice on top.

  4. Butter the outer sides of both ciabatta slices generously, as this step is crucial for achieving that irresistibly golden and crunchy crust you crave.

  5. Place the sandwich in your preheated panini press or skillet. If you’re using a skillet, gently press down for even cooking, allowing the flavors to meld beautifully.

  6. Cook for 3-5 minutes, keeping an eye out for that perfect golden-brown color and the moment the cheese begins to ooze out. If using a skillet, remember to flip halfway through!

  7. Remove your delightful creation from heat, slice it diagonally for an appetizing presentation, and serve it hot for an instant pick-me-up that warms the soul.

Optional: Serve with a side of crisp pickles for a refreshing contrast!

Exact quantities are listed in the recipe card below.

How to Store and Freeze Ham & Swiss Panini

Room Temperature: Store your Ham & Swiss Panini at room temperature for up to 2 hours if not consumed immediately. Place it in a paper towel to keep the crust crispy.

Fridge: Keep leftover panini in an airtight container in the fridge for up to 3 days. Wrap it tightly in foil or plastic wrap to maintain its freshness and flavor.

Freezer: For longer storage, freeze the panini wrapped in plastic wrap and then in aluminum foil for up to 2 months. To reheat, thaw in the fridge overnight before warming it up.

Reheating: Reheat the panini in a panini press or skillet over medium heat for about 5-7 minutes until heated through and the cheese is melty again. This will help revive its deliciousness!

Ham & Swiss Panini Variations

Customize your panini adventure with these delightful twists and surprises that promise to tickle your taste buds!

  • Smoky:
    Add smoked ham for a deeper flavor profile that brings an irresistible touch of barbecue essence to each bite.

  • Spicy:
    Incorporate pepper jack cheese or sliced jalapeños to give your panini a zesty kick that’ll leave your taste buds tingling with excitement.

  • Herbed:
    Mix fresh herbs like basil or chives into the butter spread before grilling for a fragrant, garden-fresh twist with every savory mouthful.

  • Vegetarian:
    Switch out the ham for grilled veggies such as zucchini, bell peppers, and mushrooms smothered in Swiss cheese for a deliciously vibrant option.

  • Sweet & Savory:
    Add thin slices of apples or pears between the ham and cheese; their natural sweetness balances perfectly with the savory components.

  • Garlic Butter:
    Substitute standard butter with garlic-infused butter for an aromatic layer of flavor; it’s like a flavor hug as every bite melts in your mouth.

  • Asian Influence:
    Try teriyaki-glazed chicken instead of ham, paired with Swiss cheese; the sweet and savory notes will amaze your palate with unexpected delight.

  • Crunchy Additions:
    Add a handful of crispy fried onions for an extra layer of crunch that adds texture and a burst of flavor to your classic panini.

What to Serve with Ham & Swiss Panini?

Elevate your Ham & Swiss Panini experience with delightful sides and pairings that tantalize the taste buds and turn your meal into a feast.

  • Crispy Sweet Potato Fries: The natural sweetness of crispy fries contrasts perfectly with the savory filling, adding an exciting crunch. Serve them with a hint of sea salt.

  • Garlic Butter Green Beans: These tender beans are a fragrant complement to your panini, balancing rich flavors with a burst of freshness that brightens the meal.

  • Classic Caesar Salad: Crisp romaine, creamy dressing, and crunchy croutons create a refreshing bite that rounds out the richness of your panini delightfully.

Pair your panini with a side salad, and you’ll find a balance of textures that enhances each bite.

  • Apple Slices with Cheddar: A wholesome, sweet, and savory pairing, the tartness of apples with the sharpness of cheddar offers a delightful taste contrast.

  • Butternut Squash Soup: Warm and velvety, this soup provides a cozy complement, with its earthy flavors beautifully marrying with the ham and cheese.

  • Lemonade or Iced Tea: A refreshing beverage choice that cleanses the palate between bites, making every mouthful of your Ham & Swiss Panini even more enjoyable.

Make Ahead Options

These Ham & Swiss Panini are perfect for meal prep enthusiasts! You can assemble the sandwiches up to 24 hours in advance by spreading Dijon mustard on one side of each slice of ciabatta and layering the ham and Swiss cheese on top. To maintain quality, wrap them tightly in plastic wrap and refrigerate; this helps prevent the bread from getting soggy. When you’re ready to enjoy your panini, simply butter the outer sides and cook them in your panini press or skillet. In just 3-5 minutes, you’ll have a delicious meal that tastes just as fresh as if you made it from scratch!

Chef's Helpful Tips

  • For your Ham & Swiss Panini, always preheat your panini press or skillet thoroughly to ensure even cooking and a crispy exterior.
  • When spreading the Dijon mustard, don’t skimp on the amount; it enhances the sandwich’s flavor and helps the cheese adhere better.
  • Make sure to evenly distribute the ham and cheese for balanced bites, as uneven layering can lead to some bites lacking flavor.
  • Cooking at medium heat is key; too high, and you’ll burn the bread before the cheese melts properly.

Ham & Swiss Panini Recipe FAQs

How do I choose the best ciabatta bread for my Ham & Swiss Panini?
Absolutely! Look for ciabatta that feels slightly crispy on the outside but soft and airy on the inside. Choose loaves without dark spots or visible mold, and make sure they are fresh. You can also ask your local baker for recommendations if you want to elevate your panini experience!

What is the best way to store leftover Ham & Swiss Panini?
I recommend storing your leftover Ham & Swiss Panini in an airtight container in the fridge for up to 3 days. Wrap it tightly in foil or plastic wrap before placing it in the container to keep it fresh. If you have more than one, separating them with parchment paper can help prevent them from sticking together!

Can I freeze my Ham & Swiss Panini?
Very! To freeze, wrap the panini tightly in plastic wrap, then place it in a freezer-safe bag or wrap it again in aluminum foil. This helps prevent freezer burn and keeps it delicious for up to 2 months. When you’re ready to enjoy it again, thaw the panini in the fridge overnight before reheating for that fresh-baked taste!

What should I do if my panini ends up soggy?
If your Ham & Swiss Panini turns out soggy, don’t worry! This can happen if the bread wasn’t toasted long enough or if too much mustard was used. Next time, try lightly toasting the ciabatta before assembling, which adds an extra crunch and absorbs moisture. Also, using Dijon mustard sparingly on one side should prevent excess moisture and enhance the flavor without making it soggy.

Are there any dietary considerations I should keep in mind?
Definitely! If you have dietary restrictions, feel free to customize the fillings. For a vegetarian twist, swap out the ham for roasted veggies or a plant-based deli meat. And if you have allergies, check labels for any hidden allergens in your bread and cheese. Always opt for gluten-free ciabatta bread if gluten is a concern, making this panini accessible for various diets!

Can I make this panini ahead of time?
Yes, you can prepare the Ham & Swiss Panini ahead of time! Assemble your sandwich completely, but avoid applying butter until you are ready to cook. Store it in the refrigerator in foil to keep it fresh. When you’re ready to enjoy, just add the butter and cook in a preheated pan or press for a delightful and quick meal!

Ham & Swiss Panini

Ham & Swiss Panini

Enjoy the delightful Ham & Swiss Panini with crispy ciabatta, melty Swiss cheese, and savory ham in just 15 minutes.
Print Recipe Pin Recipe
Prep Time 5 minutes mins
Cook Time 10 minutes mins
Total Time 15 minutes mins
Servings: 1 sandwiches
Course: LUNCH RECIPES
Cuisine: American
Calories: 450
Ingredients Equipment Method Nutrition Notes

Ingredients
  

For the Sandwich
  • 2 slices ciabatta bread perfect for achieving that crispy texture
  • 4 oz sliced ham use your favorite variety
  • 2 oz Swiss cheese its creamy melt makes it the star
  • 1 tbsp Dijon mustard adds a zesty kick
  • 1 tbsp butter helps create a golden, crispy crust

Equipment

  • panini press
  • Skillet

Method
 

  1. Preheat your panini press or skillet over medium heat.
  2. Spread Dijon mustard generously on one side of each slice of ciabatta.
  3. Layer the sliced ham and Swiss cheese on the mustard side of one bread slice.
  4. Butter the outer sides of both ciabatta slices generously.
  5. Place the sandwich in your preheated panini press or skillet and press down.
  6. Cook for 3-5 minutes until golden-brown and the cheese begins to ooze out.
  7. Remove from heat, slice diagonally, and serve hot.

Nutrition

Serving: 1sandwichCalories: 450kcalCarbohydrates: 40gProtein: 25gFat: 25gSaturated Fat: 12gPolyunsaturated Fat: 1gMonounsaturated Fat: 8gCholesterol: 60mgSodium: 1200mgPotassium: 500mgFiber: 2gSugar: 1gVitamin A: 400IUCalcium: 300mgIron: 2mg

Notes

Serve with a side of crisp pickles for a refreshing contrast.

Tried this recipe?

Let us know how it was!

Filed Under: LUNCH RECIPES

Omelette

January 14, 2026 by JudyWhite Leave a Comment

After a long day filled with the hustle and bustle of life, there’s nothing quite like the comforting simplicity of a homemade omelette. The sound of eggs sizzling in a hot skillet, accompanied by the vibrant colors of fresh veggies and the tempting aroma of melting cheese, instantly lifts my spirits. It’s a dish that marries ease and elegance, perfect for those evenings when all you crave is something nourishing yet fulfilling.

I still remember the first time I tossed together an omelette, thinking it would be a quick meal, only to discover how much creativity I could unleash in just 10 minutes. Whether I’m using luscious bell peppers and sharp cheddar or opting for zesty feta paired with spinach, the possibilities are endless. With only a handful of ingredients and simple steps, it’s my go-to recipe that never fails to impress, whether I’m cooking for myself or entertaining friends. Ready to whip up your own perfect omelette? Let’s get cracking!

Why You'll Love This Omelette

  • This omelette recipe is incredibly easy to make, taking just 10 minutes from prep to plate, making it perfect for busy mornings or quick dinners.
  • You’ll love the burst of flavor from fresh ingredients like colorful vegetables and rich cheese, creating a savory delight in every bite.
  • Its versatility allows you to customize your omelette with whatever fillings you have on hand, ensuring there’s always a delicious option available.
  • Finally, the visual appeal of a perfectly cooked omelette, with its vibrant colors and enticing aroma, is sure to impress everyone at your table.

Omelette Ingredients

• Discover the delicious simplicity of omelettes with these key ingredients.

For the Eggs

  • 3 large eggs – the foundation of your omelette; free-range eggs add rich flavor.
  • 1/4 tsp salt – enhances the overall taste, ensuring every bite is savory.
  • 1/4 tsp freshly cracked black pepper – adds a hint of spice to elevate your dish.

For the Filling

  • 1/4 cup grated cheese (cheddar or feta) – choose your favorite type for a creamy, flavorful surprise.
  • 1/2 cup chopped vegetables (bell peppers, onions, spinach) – use seasonal veggies for freshness and vibrant colors.

For Cooking

  • 1 tbsp butter or oil – butter offers a rich taste, while oil is perfect for a lighter option.

Feel free to mix and match these ingredients, making it easy to create your ideal omelette each time!

How to Make Omelette

  1. Chop your vegetables into small pieces and set them aside. This step ensures that they cook evenly and blend beautifully into your omelette. Feel free to get creative with your veggie choices!

  2. Whisk together the eggs, salt, and black pepper in a bowl. Mix until frothy, which helps incorporate air into the eggs, ensuring a fluffy texture when cooked.

  3. Melt the butter or heat the oil in a non-stick skillet over medium heat until it shimmers. This indicates that it’s hot enough to cook your omelette without sticking.

  4. Pour the egg mixture into the pan, swirling gently to cover the base evenly. This helps achieve an even cook and a lovely, rounded shape.

  5. Sprinkle the cheese and chopped vegetables on one half of the omelette once the edges begin to set. Fold the other half over the filling, creating a beautiful crescent shape.

  6. Cook for another minute, ensuring the cheese melts and the vegetables warm through. Your omelette should be slightly golden and fluffy. Serve immediately for the best experience!

Optional: Garnish with fresh herbs for an added pop of flavor.

Exact quantities are listed in the recipe card below.

What to Serve with Omelette?

Create a delightful meal by rounding out your omelette with these complementary dishes that tantalize the taste buds.

  • Crispy Hash Browns: These golden-brown potatoes add a crunchy texture that beautifully contrasts the softness of your omelette. A sprinkle of fresh herbs will elevate this dish to a breakfast classic.

  • Fresh Mixed Salad: A light salad with mixed greens, tomatoes, and a tangy vinaigrette provides a refreshing counterbalance to the rich flavors of the omelette. The crunch and acidity enliven every bite.

  • Bacon or Sausage Links: The savory, smoky flavor of bacon or sausage adds a hearty element that pairs wonderfully with the fluffiness of the omelette. The combination creates a truly satisfying breakfast experience.

  • Toasted Sourdough Bread: Serve your omelette alongside a slice of warm, buttery sourdough. Its chewy texture and mild tang complement the egg’s richness beautifully.

  • Steamed Asparagus: Tender asparagus drizzled with olive oil and lemon offers a hint of brightness to your plate. Its crispness also creates an appealing textural contrast.

  • Fruit Platter: A vibrant assortment of seasonal fruits adds natural sweetness and freshness, providing a delightful end note to your meal. Think bright berries or slices of juicy melons for maximum appeal.

  • Coffee or Herbal Tea: Pair your meal with a steaming cup of coffee or a soothing herbal tea. This choice enhances the relaxing vibe of brunch, ending your meal on a comforting note.

Mix and match these options, and watch how they transform your omelette into a full-fledged feast!

Omelette Variations

Customization is the key to creating your own omelette masterpiece, so let your culinary imagination run wild!

  • Herbs Galore: Add fresh herbs like basil or parsley for a burst of aromatic freshness. They elevate the flavor profile beautifully and make your dish visually stunning.

  • Spicy Kick: Toss in a pinch of red pepper flakes or diced jalapeños for some heat. This twist adds excitement and a warming depth to each bite.

  • Meaty Addition: Include cooked bacon, ham, or sausage to create a heartier omelette. The savory flavor of the meat enhances the overall richness, making it a satisfying breakfast or brunch option.

  • Vegan-Friendly: Swap out the eggs for a mixture of silken tofu and nutritional yeast. Blend until creamy for a delicious plant-based alternative without sacrificing flavor.

  • Creamy Delight: Incorporate a dollop of cream cheese or sour cream into the filling for a rich and velvety texture. It will melt beautifully and create a luxurious mouthfeel.

  • Savory Sweet: Top your omelette with caramelized onions or roasted sweet potatoes for a lovely sweet-savory contrast. This combination adds both warmth and complexity to your meal.

  • Cheese Lovers Unite: Experiment with different cheeses such as Gruyere or smoked mozzarella to create unique flavor profiles. Each type offers something deliciously distinct and inviting.

  • Mediterranean Twist: Use olives, sun-dried tomatoes, and a sprinkle of oregano to transport your taste buds to the Mediterranean. This combination brings bright and vibrant flavors that are absolutely delightful.

How to Store and Freeze Omelette

Fridge: Store any leftover omelette in an airtight container for up to 3 days. To retain flavor and texture, reheat gently in a skillet or microwave, adding a splash of water to create steam.

Freezer: You can freeze your omelette for up to 2 months. Wrap it tightly in plastic wrap and then aluminum foil to prevent freezer burn. Thaw overnight in the refrigerator before reheating.

Reheating: When ready to enjoy, reheat your omelette in a skillet over low heat or in the microwave until heated through. This will help maintain its fluffy texture and rich flavor.

Room Temperature: Avoid leaving the omelette out at room temperature for more than 2 hours to ensure food safety. Enjoy your omelette fresh for the best taste!

Make Ahead Options

These omelettes are not only delicious but also perfect for meal prep enthusiasts! You can chop your vegetables and cheese and store them in airtight containers in the refrigerator for up to 3 days in advance. This not only saves you time but also ensures you have fresh ingredients ready to go. When you’re ready to enjoy your omelette, simply whisk the eggs with salt and pepper, pour them into a heated skillet, and add your prepped fillings. For the best quality, avoid pre-cooking the omelette itself, as it’s best served fresh and fluffy. With these quick prep steps, you’ll have a hearty meal in minutes, making your busy mornings a lot easier!

Chef's Helpful Tips

  • When making an omelette, be sure to whisk your eggs thoroughly to incorporate air, which will result in a light and fluffy texture.
  • Avoid overcooking the omelette by keeping an eye on the edges; once they start to set, it’s time to add your fillings.
  • For best results, use fresh, high-quality ingredients, especially free-range eggs, as they contribute superior flavor.
  • Cooking over medium heat is essential to prevent burning while allowing the interior to cook through beautifully.

Omelette Recipe FAQs

How do I select the best eggs for my omelette?
Absolutely! When choosing eggs, look for ones that are labeled as free-range or organic for a fuller flavor. Fresh eggs will have a bright yellow yolk and should feel heavy for their size. If you crack an egg and the yolk stands high and the white is thick, you’ve got a quality egg on your hands.

How should I store leftover omelette?
Very simple! Store any leftover omelette in an airtight container in the fridge for up to 3 days. To keep the flavor intact, gently reheat it in a skillet over low heat or in the microwave with a splash of water to create steam—this helps revive its fluffy texture.

Can I freeze my omelette?
Absolutely, you can freeze your omelette! To do so, wrap it tightly in plastic wrap, followed by aluminum foil to prevent freezer burn. You can freeze it for up to 2 months. When you’re ready to eat it, simply transfer the omelette to the refrigerator to thaw overnight before reheating.

What should I do if my omelette isn’t cooking evenly?
If your omelette isn’t cooking evenly, ensure you’re using the right heat—medium is key! It’s important not to rush it. You can gently lift the edges with a spatula to let any uncooked egg flow underneath. If it’s taking longer than expected, consider turning down the heat so the outside doesn’t overcook while the inside remains runny.

Are there any dietary considerations for my omelette?
Definitely! If you’re accommodating for allergies, be sure to check that any cheese or vegetables you use are safe for those with allergies. For a dairy-free option, you can simply omit the cheese or swap it for a plant-based alternative. Additionally, keep in mind that if your omelette includes ingredients like onions or garlic, they may not sit well with some pets.

How can I tell when my omelette is done?
By all means! An ideal omelette should be slightly golden and fluffy on the outside while still being soft on the inside. Look for the edges to be set and the fillings to be warm; when you cook it for an additional minute after folding, that’ll help everything meld beautifully. The aroma of melting cheese is a wonderful indicator, too!

Omelette

Omelette

Enjoy a comforting homemade omelette with fresh veggies and cheese in just 10 minutes.
Print Recipe Pin Recipe
Prep Time 5 minutes mins
Cook Time 5 minutes mins
Total Time 10 minutes mins
Servings: 1 omelette
Course: BREAKFAST & BRUNCH
Cuisine: American
Calories: 320
Ingredients Equipment Method Nutrition Notes

Ingredients
  

For the Eggs
  • 3 large eggs free-range adds rich flavor
  • 1/4 tsp salt enhances overall taste
  • 1/4 tsp freshly cracked black pepper adds a hint of spice
For the Filling
  • 1/4 cup grated cheese (cheddar or feta) choose your favorite type
  • 1/2 cup chopped vegetables (bell peppers, onions, spinach) use seasonal veggies
For Cooking
  • 1 tbsp butter or oil butter for richness, oil for lighter option

Equipment

  • non-stick skillet
  • Mixing bowl
  • Whisk

Method
 

How to Make Omelette
  1. Chop your vegetables into small pieces and set them aside.
  2. Whisk together the eggs, salt, and black pepper in a bowl until frothy.
  3. Melt the butter or heat the oil in a non-stick skillet over medium heat.
  4. Pour the egg mixture into the pan, swirling gently to cover the base evenly.
  5. Sprinkle the cheese and chopped vegetables on one half of the omelette, then fold the other half over.
  6. Cook for another minute until the cheese melts and the omelette is slightly golden.

Nutrition

Serving: 1omeletteCalories: 320kcalCarbohydrates: 5gProtein: 20gFat: 25gSaturated Fat: 10gPolyunsaturated Fat: 2gMonounsaturated Fat: 5gCholesterol: 370mgSodium: 450mgPotassium: 300mgFiber: 1gSugar: 1gVitamin A: 600IUVitamin C: 15mgCalcium: 200mgIron: 1.5mg

Notes

For a pop of flavor, garnish with fresh herbs before serving.

Tried this recipe?

Let us know how it was!

Filed Under: BREAKFAST & BRUNCH

Vanilla Chai Latte

January 14, 2026 by JudyWhite Leave a Comment

As the cool breeze of autumn wraps around me, there’s nothing quite like the comfort of a freshly brewed Vanilla Chai Latte to warm the soul. Picture this: fragrant black tea, the gentle spice of cinnamon and ginger, all blended with creamy milk and a hint of pure vanilla. Each sip feels like a warm hug on a chilly day, inviting you to slow down and savor life’s simple pleasures.

I first concocted this delightful drink during a cozy gathering with friends, where laughter filled the air and everyone shared their favorite warmer recipes. This Vanilla Chai Latte not only impressed my guests but also quickly became a beloved staple in my own kitchen. Beyond being utterly delicious, the beauty of this beverage lies in its ease; you can whip it up in just 15 minutes, making it a fantastic alternative to fast-food lattes without compromising on flavor. So, let’s dive into this delightful recipe that promises to elevate your mornings or evenings and bring the café experience right to your home!

Why You'll Love This Vanilla Chai Latte

  • This Vanilla Chai Latte is incredibly easy to make, taking just 15 minutes from start to finish, making it perfect for busy mornings or cozy evenings.
  • The rich blend of fragrant spices, creamy milk, and sweet vanilla creates a flavor profile that is both comforting and invigorating.
  • Its versatility allows you to adjust the sweetness and spices to suit your personal taste, making each cup uniquely yours.
  • Visually, it’s as pleasing as it is delicious, with the option to garnish with a sprinkle of cinnamon that adds an elegant touch to your presentation.

Vanilla Chai Latte Ingredients

For the Tea Base
• Black tea bags – a strong, bold foundation that pairs beautifully with spices.
• Ground cinnamon – adds warmth and a hint of sweetness to your Vanilla Chai Latte.
• Ground ginger – provides a zesty kick that complements the rich flavors.

For the Milk Mixture
• Milk – use whole, almond, or oat milk for creaminess that matches your preference.
• Pure vanilla extract – infuses a delightful aroma and natural sweetness into the latte.

For Sweetening
• Sweetener – adjust the sweetness to taste, whether using sugar, honey, or a sugar substitute.

This Vanilla Chai Latte is not just a drink; it’s a cozy ritual that brings warmth to your day!

How to Make Vanilla Chai Latte

  1. Brew the tea by steeping 2 black tea bags in 2 cups of boiling water for about 5 minutes. Feel free to adjust steeping time to find your perfect flavor strength.

  2. Heat 1 cup of milk in a saucepan over medium heat, stirring occasionally until it’s steaming but not boiling—this should take about 3-4 minutes.

  3. Remove the tea bags and stir in ½ teaspoon each of ground cinnamon and ginger, creating a fragrant spiced tea that pairs beautifully with the milk.

  4. Mix in 2 tablespoons of your chosen sweetener and 1 teaspoon of pure vanilla extract until fully dissolved, allowing the flavors to weave together seamlessly.

  5. Combine the spiced tea mixture with the warmed milk and froth it if desired, giving your Vanilla Chai Latte a luxurious texture before serving.

  6. Serve in your favorite mugs, and for an extra touch, sprinkle a bit of cinnamon on top for that café-style finish.

Optional: Drizzle honey or caramel for added sweetness!

Exact quantities are listed in the recipe card below.

How to Store and Freeze Vanilla Chai Latte

Fridge: Store your Vanilla Chai Latte in an airtight container in the fridge for up to 3 days. Reheat gently on the stove or in the microwave.

Freezer: For longer storage, pour the prepared latte into freezer-safe containers, leaving some space at the top. It can be frozen for up to 1 month.

Reheating: Thaw in the refrigerator overnight, then reheat over low heat, stirring occasionally, to retain that creamy texture.

Tip: If you plan to make a batch ahead, keep the milk and tea base separate until ready to combine for the best taste!

Vanilla Chai Latte Variations

Feel free to play with this recipe and discover your own delightful twist on the classic!

  • Dairy-Free: Substitute regular milk with almond, soy, or oat milk for a luscious non-dairy version that still satisfies.

  • Spice Boost: Add a pinch of cardamom or nutmeg for a more complex flavor, taking your taste buds on a spicy adventure.

  • Extra Sweet: Use whipped cream on top and a drizzle of caramel to transform your latte into a decadent dessert drink that’s hard to resist.

  • Iced Delight: Brew the tea and allow it to cool, then mix with cold milk and ice for a refreshing summer treat that still packs a cozy punch.

  • Reduced Sugar: Use a sugar substitute like stevia or monk fruit sweetener to enjoy a guilt-free version without sacrificing that delicious flavor.

  • Chai Tea Bags: Opt for pre-packaged chai tea bags instead of black tea for a quick and flavorful shortcut that’s perfect for busy mornings.

  • Hot Chocolate Fusion: Blend in cocoa powder or chocolate syrup for a chocolaty version of your Vanilla Chai Latte that makes for an irresistible evening indulgence.

  • Herbal Twist: Experiment with herbal tea blends like rooibos or peppermint for a unique spin while maintaining that warming hug in a mug!

What to Serve with Vanilla Chai Latte?

A cozy cup of Vanilla Chai Latte brings warmth to cool days, but pairing it with delightful treats can elevate your experience even further.

  • Fluffy Scones: These buttery delights add a perfect crumbly texture and are fantastic when slathered with clotted cream and jam, enhancing the cozy vibes of your latte.

  • Ginger Cookies: With their spicy crunch, ginger cookies mirror the warmth of your Vanilla Chai Latte, making each bite a sweet, complementary experience.

  • Oatmeal Pancakes: Soft and hearty, oatmeal pancakes act as a perfect counterpoint to the drink’s creaminess. Top them with banana slices and a drizzle of maple syrup for a wholesome side.

  • Fruit Salad: A refreshing blend of seasonal fruits adds a burst of brightness. The natural sweetness and vibrant colors create a delightful contrast to the spiced latte.

  • Cheese Platter: A selection of mild cheeses, such as brie or gouda, balances the spiced notes of the latte. Pairing with nuts and dried fruits creates an elegant touch.

  • Chia Seed Pudding: Light and nutritious, this creamy treat can be sweetened and flavored to match the spices of your latte, making for a beautiful breakfast or snack.

  • Dark Chocolate Squares: Rich dark chocolate offers a luxurious end note, complementing the drink’s spices with its depth of flavor, perfect for those who love indulgence.

Enhancing your Vanilla Chai Latte experience can turn a comforting drink into a delightful ritual, making every sip even more enjoyable!

Make Ahead Options

These Vanilla Chai Lattes are a superb choice for meal prep enthusiasts! You can brew the spiced tea mixture and store it in the refrigerator for up to 3 days. Simply steep the black tea and mix in the ground cinnamon, ginger, sweetener, and vanilla extract; then, let it cool before transferring it to an airtight container. When you’re ready to enjoy your latte, heat 1 cup of milk in a saucepan until steaming, combine it with your prepared tea base, and froth if desired for a luxurious finish. This way, you’ll always have a warm, comforting drink on hand without any extra hassle!

Chef's Helpful Tips

  • When making your Vanilla Chai Latte, ensure the tea is steeped for the right amount of time to extract the bold flavors without bitterness.
  • Use whole, almond, or oat milk to achieve the creaminess you desire, but avoid boiling the milk to prevent curdling.
  • Stir in the spices and vanilla extract thoroughly so each sip is rich and flavorful without any clumps.
  • Remember to froth the milk just before serving to enhance the texture and presentation of your drink.
  • Always taste your latte before serving and adjust the sweetness to fit your preference.

Vanilla Chai Latte Recipe FAQs

How do I choose the right black tea bags for my Vanilla Chai Latte?
Absolutely! For a robust and flavorful Vanilla Chai Latte, select high-quality black tea bags with strong flavor profiles, such as Assam or English Breakfast. Look for tea bags that are fresh and not past their expiration date. The fresher the tea, the more aromatic and delightful your chai will be!

How should I store leftover Vanilla Chai Latte?
Very! Store any leftover Vanilla Chai Latte in an airtight container in the fridge for up to 3 days. To reheat, simply warm it gently on the stove or in the microwave until heated through. Remember to stir well, as the spices may settle at the bottom.

Can I freeze my Vanilla Chai Latte?
Absolutely! You can freeze your Vanilla Chai Latte for up to 1 month. To do this, pour the prepared latte into freezer-safe containers, leaving some space at the top for expansion. When you’re ready to enjoy it, thaw in the refrigerator overnight, then reheat gently on low heat, stirring occasionally for a creamy texture.

What should I do if my Vanilla Chai Latte is too strong or bitter?
If you find your Vanilla Chai Latte has become too strong or slightly bitter, you can easily adjust it! Try adding a bit more milk to soften the flavor, or add a spoonful of sweetener or honey to balance the bitterness. Additionally, if you steep the tea for shorter durations in the future—around 3 minutes instead of 5—you’ll have a smoother finish.

Is the Vanilla Chai Latte suitable for those with dairy allergies?
Absolutely! To make this Vanilla Chai Latte dairy-free, simply substitute regular milk with your choice of plant-based milks, such as almond, oat, or coconut milk. These alternatives work beautifully with the spices and will maintain that cozy texture. Just be mindful of any added sugars in flavored options!

Can I use fresh spices instead of ground spices for my Vanilla Chai Latte?
Certainly! Using fresh spices like fresh ginger slices or cinnamon sticks can elevate the flavors even further. For fresh ginger, slice about a 1-inch piece and steep it with your tea bags. Use a cinnamon stick for a more aromatic infusion. Just remember to use more of the fresh spices to achieve the same hearty flavor!

Vanilla Chai Latte

Vanilla Chai Latte

Enjoy a comforting Vanilla Chai Latte, blending spices, creamy milk, and pure vanilla for a warm treat.
Print Recipe Pin Recipe
Prep Time 15 minutes mins
Total Time 15 minutes mins
Servings: 2 cups
Course: BREAKFAST & BRUNCH
Cuisine: Beverage
Calories: 150
Ingredients Equipment Method Nutrition Notes

Ingredients
  

For the Tea Base
  • 2 bags Black tea Strong and bold
  • 0.5 teaspoon Ground cinnamon
  • 0.5 teaspoon Ground ginger
For the Milk Mixture
  • 1 cup Milk Whole, almond, or oat
  • 1 teaspoon Pure vanilla extract
For Sweetening
  • 2 tablespoons Sweetener To taste

Equipment

  • Saucepan
  • Teapot
  • measuring cups
  • measuring spoons

Method
 

Preparation
  1. Brew the tea by steeping 2 black tea bags in 2 cups of boiling water for about 5 minutes.
  2. Heat 1 cup of milk in a saucepan over medium heat, stirring occasionally until it's steaming but not boiling.
  3. Remove the tea bags and stir in ground cinnamon and ginger.
  4. Mix in the sweetener and pure vanilla extract until fully dissolved.
  5. Combine the spiced tea mixture with the warmed milk and froth if desired.
  6. Serve in your favorite mugs and sprinkle a bit of cinnamon on top.

Nutrition

Serving: 1cupCalories: 150kcalCarbohydrates: 24gProtein: 4gFat: 5gSaturated Fat: 3gCholesterol: 15mgSodium: 100mgPotassium: 300mgSugar: 20gVitamin A: 10IUCalcium: 150mg

Notes

For added sweetness, drizzle honey or caramel on top. Store in an airtight container in the fridge for up to 3 days. Can be frozen for up to a month.

Tried this recipe?

Let us know how it was!

Filed Under: BREAKFAST & BRUNCH

  • « Previous Page
  • 1
  • …
  • 11
  • 12
  • 13
  • 14
  • 15
  • …
  • 49
  • Next Page »

Recent Posts

  • Crispy Potatoes in Oven
  • Lucky Charms Pancakes
  • Cheeseburger
  • Boiled Corn on the Cob
  • St. Patrick’s Day Dessert Parfaits

Recent Comments

No comments to show.

Footer

  • Contact
  • Privacy Policy
  • About Us
  • Terms
  • ↑ back to top

Copyright © 2024 www.Forkono.com

Table Of Content