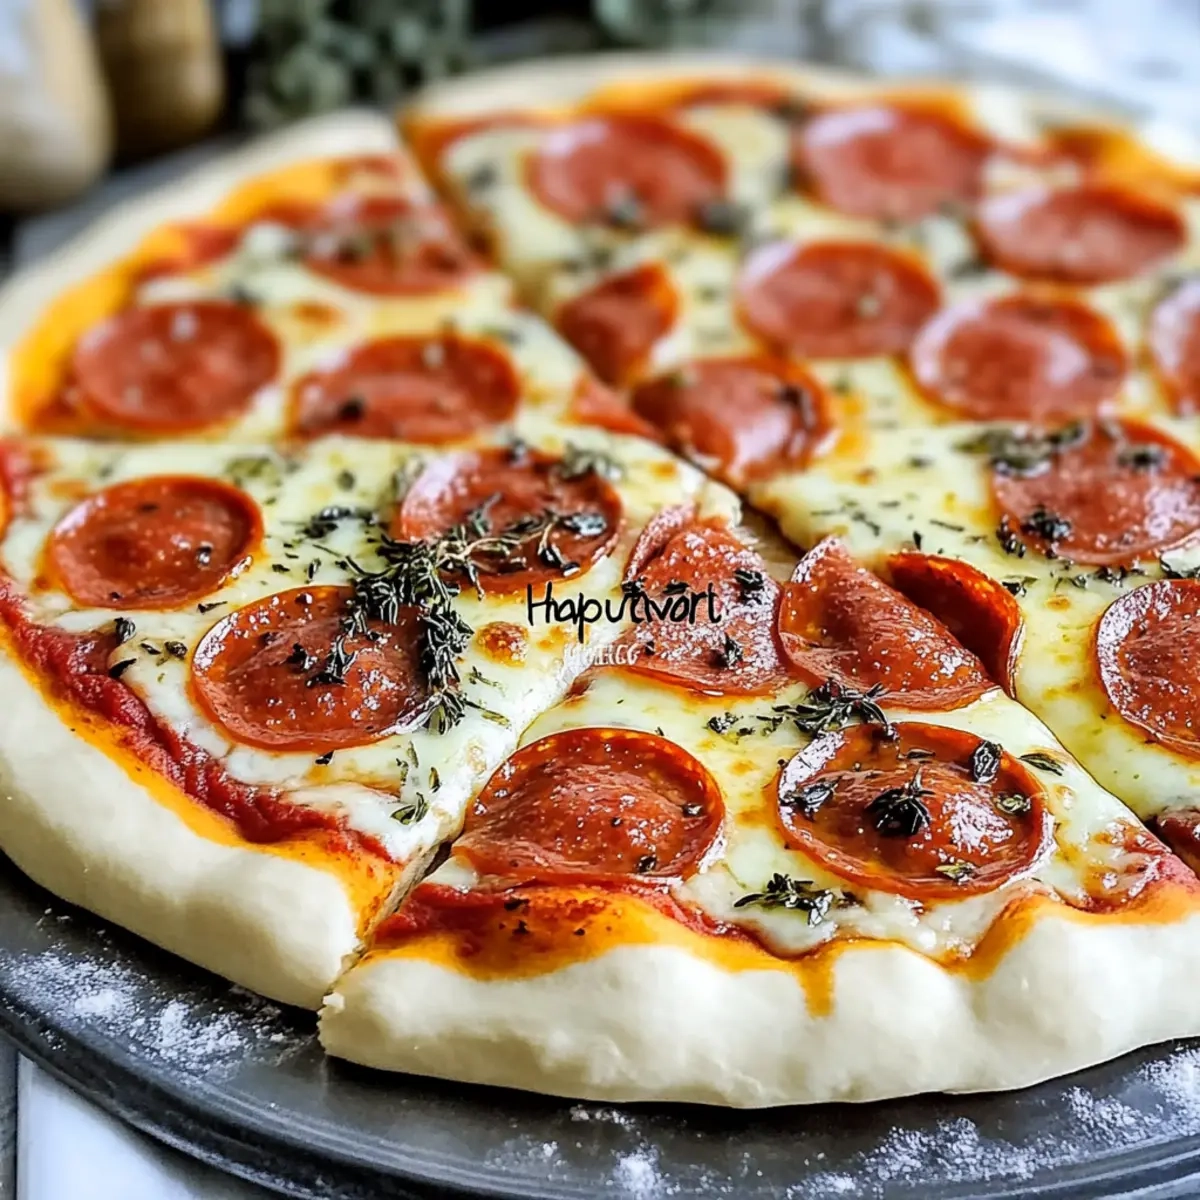
Forkono

  • BREAKFAST & BRUNCH
  • DESSERT RECIPES
  • DINNER RECIPES
  • LUNCH RECIPES
  • About uS
  • SNACKS & APPETIZERS
menu icon
go to homepage
  • BREAKFAST & BRUNCH
  • DESSERT RECIPES
  • DINNER RECIPES
  • LUNCH RECIPES
  • About uS
  • SNACKS & APPETIZERS
search icon
Homepage link
  • BREAKFAST & BRUNCH
  • DESSERT RECIPES
  • DINNER RECIPES
  • LUNCH RECIPES
  • About uS
  • SNACKS & APPETIZERS
×

Limoncello Spritz

December 20, 2025 by JudyWhite Leave a Comment

As the temperature rises and sunny days beckon, there’s nothing quite like sipping a refreshing drink that captures the essence of summer. The moment the fizz of Prosecco mingles with the zesty sweetness of limoncello, I can’t help but smile—it’s like a sunny Italian piazza in a glass. This Limoncello Spritz is the effortless cocktail that transforms any day into a celebration.

Imagine this: it’s a warm afternoon, and you’re entertaining friends on your patio, laughter filling the air. With just a handful of ingredients and under five minutes, you’ll create a delightful refreshment that rivals even the best cocktail bars. Garnishing it with fresh lemon slices and fragrant mint leaves makes it not only a treat for the taste buds but also a feast for the eyes.

Whether you’re winding down after a busy week or hosting a weekend gathering, this vibrant spritz is sure to be a crowd-pleaser. Let’s dive into this delightful concoction and add a touch of zest to your day!

Why You'll Love This Limoncello Spritz

  • This Limoncello Spritz is incredibly easy to make, requiring just five minutes and a few simple ingredients.
  • The delightful combination of Prosecco and limoncello offers a refreshing burst of flavor that will brighten any occasion.
  • Its vibrant colors and garnishes of lemon and mint make for a visually stunning presentation that impresses every time.
  • Perfect for any gathering, this cocktail is sure to be a hit with friends and family, making your summer celebrations even more enjoyable.

Limoncello Spritz Ingredients

For the Cocktail

  • Prosecco – a sparkling wine that adds a delightful fizz and lightness to your Limoncello Spritz.
  • Limoncello – an Italian lemon liqueur that brings a zesty sweetness to the drink, making it a refreshing choice.
  • Soda Water – this lightens the cocktail and adds a refreshing effervescence, perfect for a warm day.

For the Garnish

  • Lemon Slices – not only enhance the drink’s visual appeal but also provide an additional hint of citrusy flavor.
  • Mint Leaves – add a touch of aromatic freshness and a pop of color, enhancing the overall presentation.

How to Make Limoncello Spritz

  1. Fill a glass half full with ice. This will chill your cocktail and keep it wonderfully refreshing on a warm day.

  2. Pour in the ingredients slowly: first the 3 ounces of Prosecco, followed by 2 ounces of limoncello, and top it off with 1 ounce of soda water. Watch this bubbly mix come to life!

  3. Garnish beautifully by adding a fresh lemon slice and a sprig of mint leaves. These not only enhance the drink’s fragrance but also make it visually delightful.

Optional: Serve with a fun straw for a festive touch.
Exact quantities are listed in the recipe card below.

Make Ahead Options

The Limoncello Spritz is perfect for busy home cooks looking to save time while still impressing their guests! You can prepare the drink components up to 24 hours in advance. For the best results, mix the Prosecco and limoncello in a pitcher, but keep the soda water separate until just before serving to maintain the fizzy freshness. Refrigerate the mixture to keep it crisp. When ready to serve, simply fill glasses with ice, add your prepped blend, top it off with the soda water, and garnish with lemon slices and mint leaves. This way, you can enjoy refreshing cocktails with minimal last-minute effort, making your gatherings even more enjoyable!

Limoncello Spritz Variations

Feel free to get creative and add your own twist to this delightful drink!

  • Sparkling Pink: Use rosé wine in place of Prosecco for a beautiful blush color and a fruity flavor kick. The light berry notes will dance on your palate.

  • Herb-Infused: Swap mint leaves for basil or thyme for a sophisticated aroma and unique flavor profile. Each sip offers a surprising twist that delights the senses.

  • Citrus Burst: Add a splash of fresh orange juice or grapefruit juice for an extra citrus zing. This addition brightens the overall flavor, making the cocktail even more refreshing.

  • Fruity Fusion: Include muddled berries, like strawberries or raspberries, before pouring in the liquids. This adds a luscious fruitiness and a stunning color to your spritz.

  • Sugar-Free: Substitute limoncello for a sugar-free lemon syrup for a lighter version. Perfect for those watching their sugar intake while still enjoying a refreshing drink.

  • Spicy Kick: Infuse your spritz with a dash of jalapeño syrup for a surprising heat. This twist brings a bold flavor that pairs beautifully with the sweetness of limoncello.

  • Tropical Twist: Use coconut sparkling water instead of soda water for a tropical flair. It adds a creamy richness that’s perfect for summer sips by the pool.

  • Seltzer Style: For a less sweet option, replace soda water with a lemon-flavored seltzer. This keeps the drink light while adding a fizzy twist to the classic flavor.

How to Store and Freeze Limoncello Spritz

Room Temperature: Keep any leftover Limoncello Spritz at room temperature for up to 1 hour if it’s in a sealed container. Otherwise, enjoy it fresh, as the fizz diminishes quickly.

Fridge: If you have unused Prosecco or limoncello, store them in the fridge. Prosecco stays fresh for about 3 days once opened, while limoncello can last for up to 1 month in the fridge.

Freezer: You can freeze leftover limoncello to keep it fresh beyond that month. It will maintain its flavor and can be used to create frozen cocktails later.

Reheating: Since Limoncello Spritz is a chilled cocktail, it’s best served fresh. However, avoid reheating as it will lose its spritz and vibrant character; instead, make a new batch when cravings strike!

What to Serve with Limoncello Spritz?

Elevate your gathering by pairing this refreshing cocktail with delectable bites that harmonize beautifully with every zesty sip.

  • Bruschetta: Topped with fresh tomatoes and basil, this classic Italian appetizer offers a delightful contrast to the Limoncello’s sweetness.

  • Caprese Salad: Juicy tomatoes, creamy mozzarella, and a drizzle of balsamic add a fresh and tangy element, enhancing the cocktail experience.

  • Grilled Shrimp Skewers: These succulent bites of seafood enhance the spritz’s citrus notes, making for a light and enjoyable pairing on warm summer evenings.

  • Olive Tapenade: A savory spread of olives on crusty bread complements the Limoncello Spritz by balancing its sweetness with earthy flavors.

  • Chocolate-Dipped Biscotti: For a sweet finish, these crunchy treats dipped in chocolate provide a delightful contrast to the refreshing cocktail.

Pair your Limoncello Spritz with light appetizers or bold flavors to truly elevate the drinking experience. Let the refreshing drink and delicious bites bring your summer gathering to life!

Chef's Helpful Tips

  • When making a Limoncello Spritz, make sure to use chilled Prosecco to enhance the drink’s refreshing qualities.
  • A common mistake is pouring the soda water too quickly; gently add it after the other ingredients to maintain the cocktail’s fizz.
  • For the best flavor, choose high-quality limoncello that balances sweetness with a zesty kick.
  • Serve the drink immediately after preparing it to enjoy the full effervescence and fresh garnish aroma.

Limoncello Spritz Recipe FAQs

What type of Prosecco should I use for my Limoncello Spritz?
Absolutely! When selecting Prosecco, look for one that is labeled “Extra Dry” or “Brut” for a balanced taste. These will complement the sweet notes of the limoncello while providing lovely bubbles to your drink. Generally, the better quality Prosecco you choose, the more delightful your cocktail will be.

How long can I store leftover Limoncello Spritz?
You can keep any leftover Limoncello Spritz at room temperature for up to 1 hour, but after that, it’s best to enjoy it fresh since the fizz will diminish rapidly. If you have unused Prosecco or limoncello from your preparation, store them in the fridge; Prosecco will stay good for about 3 days once opened, and limoncello can last up to 1 month when refrigerated.

Can I freeze limoncello to make cocktails later?
Yes! Freezing limoncello is a wonderful option. To do so, simply pour your leftover limoncello into an airtight container or ice cube trays, leaving some space for expansion. It can be frozen for up to 3 months. When you’re ready to use it, you can let it thaw in the fridge or blend the frozen pieces into a refreshing slushy cocktail.

What should I do if my Limoncello Spritz is flat?
If your cocktail seems flat, it could be due to pouring the soda water too quickly. To avoid this, gently add the soda water after mixing the other ingredients to preserve the fizz. Also, ensure that your Prosecco is well-chilled before use, as temperature can greatly impact carbonation.

Are there any dietary considerations for making Limoncello Spritz?
While this delicious drink is generally safe for most, it’s important to be cautious if you or your guests have alcohol sensitivities or allergies. The limoncello used in this spritz contains alcohol, so make sure to enjoy responsibly. For a non-alcoholic version, try substituting limoncello with lemon soda or lemonade along with sparkling water to maintain that refreshing citrus zing!

Can I use another type of citrus besides lemon for garnish?
Very! While lemon is the traditional choice, feel free to experiment with other citrus fruits such as lime or even orange for a unique twist. Each will lend different flavor profiles to the drink while keeping that refreshing element intact!

Limoncello Spritz

Limoncello Spritz

Enjoy a refreshing Limoncello Spritz cocktail that combines Prosecco and limoncello for a perfect summer drink.
Print Recipe Pin Recipe
Prep Time 5 minutes mins
Total Time 5 minutes mins
Servings: 1 cocktail
Course: Snacks & Appetizers
Cuisine: Italian
Calories: 180
Ingredients Equipment Method Nutrition Notes

Ingredients
  

For the Cocktail
  • 3 oz Prosecco
  • 2 oz Limoncello
  • 1 oz Soda Water
For the Garnish
  • 1 slice Lemon
  • 1 sprig Mint Leaves

Equipment

  • Glass

Method
 

Instructions
  1. Fill a glass half full with ice.
  2. Pour in the ingredients slowly: first Prosecco, followed by limoncello, and top it off with soda water.
  3. Garnish beautifully with a fresh lemon slice and a sprig of mint leaves.

Nutrition

Serving: 1cocktailCalories: 180kcalCarbohydrates: 18gSodium: 5mgPotassium: 156mgSugar: 12gVitamin C: 7mgCalcium: 1mgIron: 1mg

Notes

Serve immediately and enjoy with a fun straw for a festive touch.

Tried this recipe?

Let us know how it was!

Filed Under: SNACKS & APPETIZERS

Creamy White Chicken and Rice Soup

December 20, 2025 by JudyWhite Leave a Comment

On a chilly evening, nothing warms the soul quite like a bowl of homemade soup. As I set the table, the fragrant aroma of my Creamy White Chicken and Rice Soup fills the air, instantly transporting me to cozy family dinners that once brought everyone together. There’s something about the combination of tender chicken, wild rice, and rich, creamy broth that simply wraps around you like a soft blanket—comfort food at its finest.

I remember the first time I stumbled upon this recipe; it was a gaming night with friends, and I wanted to impress them without spending hours in the kitchen. Remarkably, this soup turned out to be a crowd-pleaser and quickly became a staple in my home. It’s not just the flavor that captivates but the simplicity of the cooking process, making it perfect for busy weeknights or laid-back weekends.

So grab your aprons, gather the ingredients, and let’s dive into this deliciously creamy dish that will surely banish any lingering fast-food cravings!

Why You'll Love This Creamy White Chicken and Rice Soup

  • This recipe is incredibly easy to make, allowing you to whip up a comforting meal in just over an hour.
  • The rich flavors of tender chicken, wild rice, and creamy broth create a sumptuous experience that will leave you wanting more.
  • Its versatility means you can customize the recipe with your favorite vegetables or spices to suit your taste.
  • Plus, this soup is visually appealing, with vibrant colors that make it a stunning centerpiece for any table.

Creamy White Chicken and Rice Soup Ingredients

For the Soup Base

  • Olive oil – Adds depth and richness to the flavors as you sauté the veggies.
  • Yellow onion – Use a medium-sized onion for sweetness; diced small for quicker cooking.
  • Garlic – Freshly minced garlic will elevate the aroma and taste of your creamy soup.
  • Carrots – Sliced to add natural sweetness and a pop of color.
  • Celery – Adds a satisfying crunch and flavor balance to the soup.
  • Chicken breast – Boneless and skinless ensures a tender, juicy finish in your Creamy White Chicken and Rice Soup.
  • Bay leaf – Infuses herbal notes into the broth; remember to discard it before serving.
  • Dried oregano – This herb complements the chicken beautifully for a classic flavor profile.
  • Dried thyme – Another essential herb that adds warmth and earthiness to your soup.
  • Black pepper – Freshly cracked gives a delightful hint of spice.

For the Rice and Broth

  • Wild rice mix – This unique rice blend enhances the texture and nuttiness of the soup.
  • Water – The base of your broth, adjusting the amount depending on desired thickness.

For the Creamy Finish

  • Butter – A key ingredient for creating a silky roux that thickens your soup.
  • All-purpose flour – Combines with butter to form a roux, helping achieve that creamy consistency.
  • Whole milk – Provides the rich creaminess that makes this soup decadent.
  • Fresh parsley – Adds vibrant color and a fresh pop of flavor right before serving.
  • Salt – Use 1-2 tsp to taste, enhancing all the ingredients’ natural flavors in your delightful soup.

How to Make Creamy White Chicken and Rice Soup

  1. Heat Oil: In a large pot, warm the olive oil over medium heat. This initial step is essential for building flavor, so wait until it shimmers before moving on.
  2. Sauté Onion: Add the diced yellow onion and cook until it becomes translucent—about 5-7 minutes. This softens the onion and releases its natural sweetness.
  3. Add Garlic: Stir in the minced garlic and sauté for an additional minute. The fragrant aroma will begin to fill your kitchen, inviting everyone to gather around.
  4. Incorporate Vegetables: Toss in the sliced carrots and celery, cooking until they soften, usually around 5-6 minutes. Let the veggies bloom in flavor!
  5. Add Chicken and Spices: Place the chicken breast into the pot, along with the bay leaf, oregano, thyme, and black pepper. Stir well to combine all the lovely flavors.
  6. Pour in Rice and Water: Add the wild rice mix and 6 cups of water to the pot. Bring the mixture to a boil, letting the anticipation build for that creamy soup!
  7. Simmer: Once boiling, reduce the heat and let it simmer for about 45 minutes or until the rice is tender and absorbs the flavors beautifully.
  8. Shred Chicken: Remove the chicken breast from the pot, shred it, and return it to the soup for that delightful texture in each spoonful.
  9. Make the Roux: In a separate pan, melt the butter and whisk in the flour to create a roux. Cook for a few minutes until golden; this base will bring the creaminess together.
  10. Whisk in Milk: Gradually whisk in the whole milk to the roux, cooking until it thickens, about 4-5 minutes. This will elevate your soup to lusciousness!
  11. Combine and Season: Stir the roux into the soup along with fresh parsley and salt to taste, bringing everything together for a final burst of aroma and flavor.

Optional: Garnish with extra parsley or a sprinkle of fresh black pepper before serving.
Exact quantities are listed in the recipe card below.

Make Ahead Options

These Creamy White Chicken and Rice Soup preparations are perfect for meal prep enthusiasts looking to save time during the week! You can chop the vegetables—onion, carrots, and celery—and store them in an airtight container for up to 3 days in the refrigerator. Additionally, you can cook the rice in advance and refrigerate it separately for up to 3 days as well, preventing it from becoming overly soggy when combined later. When you’re ready to enjoy the soup, simply sauté the veggies, add the chicken, broth, and pre-cooked rice, simmer, and then stir in your roux just before serving. This approach ensures your soup remains just as delicious and comforting while slashing your cooking time!

Creamy White Chicken and Rice Soup Variations

Feel free to make this delicious soup your own with these exciting twists and substitutes!

  • Dairy-Free: Substitute whole milk with coconut milk or cashew milk for a creamy, dairy-free version that adds a delightful nutty flavor.

  • Vegetable Boost: Add spinach or kale in the last few minutes of cooking for an extra dose of greens and a vibrant color boost.

  • Spicy Kick: Throw in some diced jalapeños or a pinch of red pepper flakes to elevate the heat level for those who enjoy a bit of spice.

  • Hearty Grains: Swap wild rice with quinoa or brown rice for a different texture and added health benefits, making it equally satisfying.

  • Herb Infusion: Experiment with fresh herbs like thyme, dill, or rosemary for a flavor enhancement that can completely transform the profile of the soup.

  • Zesty Lemon: Squeeze in some fresh lemon juice before serving to brighten the flavors and add a refreshing burst of citrus.

  • Protein Swap: Use shredded rotisserie chicken or even turkey to save time and add an interesting flavor twist without sacrificing tenderness.

  • Umami Upgrade: Add a splash of soy sauce or Worcestershire sauce for a deeper flavor that adds richness and complexity to the broth.

What to Serve with Creamy White Chicken and Rice Soup?

As the heartwarming aroma of soup fills the air, envision the perfect companions that will make your meal extraordinary.

  • Garlic Bread: Perfectly toasted, this bread adds a delightful crunch and buttery garlic flavor, making it the ideal side for dipping into the creamy soup.
  • Simple Salad: A mix of fresh greens, cherry tomatoes, and a light vinaigrette offers a crisp contrast to the rich, creamy broth, balancing your meal beautifully.
  • Roasted Vegetables: Caramelized seasonal veggies bring a slight sweetness and earthy flavor, complementing the hearty chicken and wild rice. You might just find your new favorite flavor combination here!
  • Homemade Biscuits: Fluffy and buttery, they are not only comforting but also perfect for soaking up every last bite of the creamy soup.
  • Cornbread: Slightly sweet and moist, cornbread is a classic pairing that brings warmth and heartiness, making your meal even more satisfying.
  • Crispy Potato Wedges: Seasoned and baked to perfection, they provide a delightful crunch alongside the creamy soup, enhancing the overall texture of your meal.
  • Sparkling Water: Light and refreshing, a fizzing beverage cuts through the richness of the soup while keeping you refreshed and hydrated.
  • Apple Crisp: A warm, comforting dessert with a perfect crumble that complements the soup’s heartiness, finishing off your meal on a sweet note.

How to Store and Freeze Creamy White Chicken and Rice Soup

Fridge: Store leftovers in an airtight container in the fridge for up to 3 days. This keeps the flavors intact and makes for a quick meal option.

Freezer: For longer storage, freeze the soup in freezer-safe containers or bags for up to 3 months. Make sure to leave some space for expansion.

Reheating: To reheat, thaw in the fridge overnight, then heat on the stove over low-medium heat, stirring often. You may need to add a splash of milk to restore creaminess.

Avoid Freezing: Note that the rice may absorb too much liquid upon freezing. If you plan to freeze, consider adding it freshly cooked when reheating for optimal texture.

Chef's Helpful Tips

  • When making Creamy White Chicken and Rice Soup, be sure to sauté the onion until it’s fully translucent for the best flavor development.
  • Avoid overcooking the chicken by checking its internal temperature at 165°F before shredding it for the soup.
  • To ensure a creamy texture, whisk the roux continuously while adding the milk to prevent lumps from forming.
  • Remember to simmer the soup long enough—approximately 45 minutes—so the wild rice can absorb the flavors and become perfectly tender.

Creamy White Chicken and Rice Soup Recipe FAQs

How do I choose the right chicken breast for this recipe?
Absolutely! Look for boneless, skinless chicken breasts that feel firm to the touch and have a light pink color. Avoid any pieces with dark spots or a sour smell, as that indicates they might not be fresh.

How should I store leftovers of Creamy White Chicken and Rice Soup?
Very simply! Transfer the leftover soup into an airtight container and place it in the fridge. It will stay fresh for up to 3 days. Just make sure it’s cooled down before sealing it tightly.

Can I freeze Creamy White Chicken and Rice Soup?
Absolutely! You can freeze this delicious soup in freezer-safe containers or heavy-duty freezer bags for up to 3 months. It’s best to leave about an inch of space at the top of the container to allow for expansion. Just remember to thaw it overnight in the fridge before reheating!

How do I reheat frozen Creamy White Chicken and Rice Soup?
For a cozy bowl of soup, first, thaw it in the refrigerator overnight. When you’re ready to enjoy, heat it on the stovetop over low to medium heat, stirring often. You may need to add a splash of whole milk to bring back that luscious creaminess!

Is this soup suitable for people with allergies?
Great question! The recipe contains common allergens such as milk and flour. If you’re serving someone with gluten intolerance, consider substituting the all-purpose flour with a gluten-free blend. Always check ingredient labels to ensure safety for those with allergies or sensitivities.

What if my soup turns out too thick after refrigerating?
No worries! If you find your Creamy White Chicken and Rice Soup has thickened upon chilling, simply stir in a bit of warm water or milk as you reheat it. This not only restores the consistency but keeps it rich and enjoyable!

Creamy White Chicken and Rice Soup

Creamy White Chicken and Rice Soup

Enjoy a cozy bowl of Creamy White Chicken and Rice Soup, perfect for chilly evenings and easy to prepare.
Print Recipe Pin Recipe
Prep Time 15 minutes mins
Cook Time 45 minutes mins
Total Time 1 hour hr
Servings: 4 bowls
Course: DINNER RECIPES
Cuisine: American
Calories: 350
Ingredients Equipment Method Nutrition Notes

Ingredients
  

For the Soup Base
  • 2 tablespoons Olive oil Adds depth and richness
  • 1 medium Yellow onion Diced small for quicker cooking
  • 3 cloves Garlic Freshly minced
  • 2 medium Carrots Sliced
  • 2 stalks Celery
  • 1 pound Chicken breast Boneless and skinless
  • 1 leaf Bay leaf Discard before serving
  • 1 teaspoon Dried oregano Classic flavor profile
  • 1 teaspoon Dried thyme Adds warmth and earthiness
  • 1 teaspoon Black pepper Freshly cracked
For the Rice and Broth
  • 1 cup Wild rice mix Enhances the texture
  • 6 cups Water Adjust depending on desired thickness
For the Creamy Finish
  • 4 tablespoons Butter Key for roux
  • 1/4 cup All-purpose flour For roux
  • 2 cups Whole milk For richness
  • 1 tablespoon Fresh parsley Chopped, for garnish
  • 1-2 teaspoons Salt To taste

Equipment

  • Large pot
  • separate pan

Method
 

How to Make Creamy White Chicken and Rice Soup
  1. In a large pot, warm the olive oil over medium heat until it shimmers.
  2. Add the diced yellow onion and cook until translucent, about 5-7 minutes.
  3. Stir in the minced garlic and sauté for an additional minute.
  4. Toss in the sliced carrots and celery and cook until softened, around 5-6 minutes.
  5. Place the chicken breast into the pot along with bay leaf, oregano, thyme, and black pepper.
  6. Add the wild rice mix and 6 cups of water to the pot and bring to a boil.
  7. Once boiling, reduce heat and let it simmer for about 45 minutes until rice is tender.
  8. Remove the chicken breast from the pot, shred it, and return it to the soup.
  9. In a separate pan, melt the butter and whisk in the flour to create a roux.
  10. Gradually whisk in whole milk to the roux and cook until thickened, about 4-5 minutes.
  11. Stir the roux into the soup along with fresh parsley and salt to taste.

Nutrition

Serving: 1bowlCalories: 350kcalCarbohydrates: 40gProtein: 30gFat: 10gSaturated Fat: 4gPolyunsaturated Fat: 0.5gMonounsaturated Fat: 0.5gCholesterol: 75mgSodium: 500mgPotassium: 800mgFiber: 3gSugar: 2gVitamin A: 500IUVitamin C: 4mgCalcium: 200mgIron: 3mg

Notes

Garnish with extra parsley or a sprinkle of fresh black pepper before serving.

Tried this recipe?

Let us know how it was!

Filed Under: DINNER RECIPES

Blueberry Lemon Curd Donut Holes

December 20, 2025 by JudyWhite Leave a Comment

There’s a certain joy in creating warm, sweet bites that never fail to bring a smile — and these Blueberry Lemon Curd Donut Holes are the perfect way to elevate your treat game. Picture this: a soft, fluffy interior bursting with juicy blueberries, all enveloped in a sweet, tangy lemon glaze that dances on your taste buds. Just thinking about it makes my mouth water!

On a recent Sunday morning, as the sun streamed through my kitchen window, I decided to forgo the drive-thru and whip up a batch of these delightful donut holes instead. Not only are they simple to prepare, but they also banish any cravings for fast food by adding a homemade touch that feels like a warm hug. Whether you’re impressing guests or indulging in a little self-care, this recipe will quickly become your go-to weekend ritual. Let’s dive into how you can bring these little bites of heaven to your table!

Why You'll Love This Blueberry Lemon Curd Donut Holes

  • These Blueberry Lemon Curd Donut Holes are incredibly easy to make, allowing you to whip up a delicious treat in no time at all.
  • The burst of flavor from the juicy blueberries combined with the tangy lemon glaze creates an irresistible taste sensation that will leave everyone wanting more.
  • They are also wonderfully versatile, making them perfect for breakfast, dessert, or an afternoon snack at any gathering.
  • With their vibrant colors and delightful presentation, these donut holes are sure to impress your guests and brighten up any table.

Blueberry Lemon Curd Donut Holes Ingredients

For the Donut Holes

  • All-purpose flour – provides the perfect base for these fluffy bites.
  • Granulated sugar – balances the tartness of the blueberries and lemon.
  • Baking powder – helps the donut holes rise to that heavenly fluffiness.
  • Baking soda – adds a little extra lift for a light, airy texture.
  • Salt – enhances all the flavors, making each bite even more delicious.
  • Buttermilk – keeps the donut holes moist and tender; you can substitute with milk plus a squeeze of lemon juice!
  • Greek yogurt or sour cream – adds creaminess and tang; feel free to use low-fat versions for a lighter treat.
  • Salted butter (melted) – contributes rich flavor and moisture to the batter.
  • Vanilla extract – infuses a lovely sweetness that pairs beautifully with the blueberries.
  • Fresh or frozen blueberries – the star ingredient that adds juicy bursts of flavor throughout.
  • Avocado oil – perfect for frying, it has a high smoke point and a mild flavor.

For the Glaze

  • Salted butter (melted) – delivers a luscious richness that envelops each donut hole.
  • Fresh lemon juice – brightens the glaze with a tangy kick, complementing the blueberry flavor.
  • Granulated sugar – sweetens the glaze to perfection; adjust to taste!
  • Lemon zest – intensifies the lemon flavor, making the glaze irresistibly aromatic.
  • Powdered sugar – adds the ideal sweetness and a silky texture to the glaze.
  • Cultured buttermilk – adjust for consistency to achieve a drizzle-worthy glaze.
  • Vanilla extract or paste – a final touch that enhances the glaze’s flavor profile.

Now, you’re just a few steps away from enjoying these delightful Blueberry Lemon Curd Donut Holes!

How to Make Blueberry Lemon Curd Donut Holes

  1. Combine Dry Ingredients: In a large mixing bowl, whisk together the flour, granulated sugar, baking powder, baking soda, and salt until well mixed. This creates a solid base for your donut holes.

  2. Mix Wet Ingredients: In a separate bowl, blend the buttermilk, Greek yogurt (or sour cream), melted butter, and vanilla extract. Stir until smooth and creamy to ensure a delightful texture in the batter.

  3. Combine Mixtures: Gently fold the wet ingredients into the dry ones, mixing just until combined. It’s important not to overmix to keep your donut holes light and airy.

  4. Fold in Blueberries: Carefully add the blueberries to the batter, folding them in with a spatula. This ensures that each bite has a burst of juicy fruit flavor.

  5. Heat Oil: In a deep frying pan, heat avocado oil over medium heat until it reaches approximately 350°F. To check if it’s ready, drop a small amount of batter into the oil; it should sizzle immediately.

  6. Fry Donut Holes: Drop spoonfuls of the batter into the hot oil, being careful not to crowd the pan. Fry them until they are golden brown, about 3-4 minutes per side.

  7. Drain Oil: Once golden, remove the donut holes and let them drain on paper towels. This step helps eliminate excess oil for a lighter treat.

  8. Make the Glaze: In a separate bowl, whisk together the melted butter, lemon juice, granulated sugar, lemon zest, powdered sugar, cultured buttermilk, and vanilla extract until smooth. Adjust consistency with more buttermilk if needed.

  9. Glaze Donut Holes: Dip each warm donut hole into the lemon glaze, allowing the excess to drip off. Set them aside on a wire rack to let the glaze set for a few minutes.

Optional: Sprinkle with extra lemon zest for an added flavor boost!

Exact quantities are listed in the recipe card below.

How to Store and Freeze Blueberry Lemon Curd Donut Holes

Room Temperature: Store donut holes in an airtight container for up to 2 days. Keep them cool and away from direct sunlight to maintain freshness.

Fridge: If you want to extend their shelf life, keep the donut holes in the fridge for up to 5 days. Layer with parchment paper to prevent sticking and maintain texture.

Freezer: Freeze donut holes by placing them in a single layer on a baking sheet for 1-2 hours, then transfer to a freezer-safe bag. They’ll keep well for up to 3 months!

Reheating: For the best results, reheat frozen donut holes in a preheated oven at 350°F for about 10-15 minutes until warmed through. Glaze after reheating for that fresh-baked flavor!

Make Ahead Options

These Blueberry Lemon Curd Donut Holes are perfect for busy home cooks looking to save time without sacrificing flavor! You can prepare the batter up to 24 hours in advance; simply mix the dry and wet ingredients separately, then combine them and refrigerate. To keep the blueberries from sinking, fold them in just before frying. Additionally, you can make the lemon glaze ahead of time and store it in the fridge for up to 3 days. When you’re ready to enjoy, simply fry the donut holes as directed and glaze them while warm for irresistible, fresh-from-the-kitchen flavor that’s just as delightful as when made from scratch!

Blueberry Lemon Curd Donut Holes Variations

Feel free to get creative with these simple twists that will take your donut holes to the next level!

  • Gluten-Free: Substitute all-purpose flour with a gluten-free blend to make these donut holes friendly for gluten-sensitive diets. They’ll still turn out tender and delicious!

  • Berry Medley: Swap out blueberries for a mix of fresh raspberries, blackberries, or even chopped strawberries. Each berry adds its unique burst of flavor.

  • Citrus Kick: For a zesty variation, add a teaspoon of orange zest to the batter. The extra citrus will elevate the flavors beautifully!

  • Maple Glaze: Replace the lemon glaze with a maple syrup glaze by mixing powdered sugar with pure maple syrup until smooth. This gives a cozy, autumn twist to the classic.

  • Coconut Bliss: Fold in unsweetened shredded coconut into your batter for a tropical flair. The coconut adds a lovely chewiness that pairs wonderfully with the blueberries.

  • Chili Heat: For an adventurous kick, add a pinch of cayenne pepper to the glaze. The subtle heat complements the sweetness in a surprising way.

  • Nutty Crunch: Sprinkle chopped nuts like pecans or walnuts over the glaze for added texture and a nutty flavor that enhances the overall experience.

  • Mini Doughnut Shape: Use a mini doughnut maker instead of frying for bite-sized versions that are perfect for snacking. You’ll get those delightful donut holes in a unique shape!

Each of these variations brings a delightful twist and can make your Blueberry Lemon Curd Donut Holes even more special and personalized. Enjoy experimenting!

What to Serve with Blueberry Lemon Curd Donut Holes?

Savoring these delightful treats is just the beginning—complement them with simple sides that elevate your experience even further.

  • Fresh Fruit Salad: A refreshing mix of seasonal fruits enhances the sweetness of the donuts, offering a burst of color and flavor.

  • Creamy Greek Yogurt: Silky and tangy, a dollop of Greek yogurt served alongside adds a perfect contrast to the sweet glaze.

  • Coffee or Tea: A warm cup of coffee or herbal tea balances the sweetness, making for a cozy afternoon snack or breakfast.

  • Honey Drizzle: A light drizzle of honey on top adds an extra layer of sweetness that pairs beautifully with the tartness of the lemon.

  • Crispy Bacon: The salty, smoky flavor of crispy bacon creates a delightful savory contrast to the sweet donut holes.

Indulging in these pairings not only amplifies the flavors of the Blueberry Lemon Curd Donut Holes but also transforms them into a complete meal experience, perfect for any occasion!

Chef's Helpful Tips

  • To achieve the perfect texture in your Blueberry Lemon Curd Donut Holes, make sure to mix the wet and dry ingredients just until combined to avoid overmixing which can lead to dense donut holes.
  • When folding in the blueberries, do so gently to prevent them from breaking and releasing too much juice into the batter.
  • It’s important to monitor the oil temperature and keep it consistent around 350°F to ensure even cooking and a golden-brown exterior.
  • Lastly, after frying, allow the donut holes to cool slightly on paper towels before glazing to ensure the glaze adheres properly and adds a delightful finish.

Blueberry Lemon Curd Donut Holes Recipe FAQs

What type of blueberries should I use?
Absolutely! Fresh blueberries are ideal for these Blueberry Lemon Curd Donut Holes, as they offer the best flavor and juiciness. If fresh berries aren’t available, feel free to substitute with frozen blueberries. Just make sure to thaw and drain them to avoid excess moisture in the batter.

How should I store leftover donut holes?
To keep your delicious donut holes fresh, store them in an airtight container at room temperature for up to 2 days. If you want to extend their shelf life, refrigerate them for about 5 days. Layer them with parchment paper to help them maintain their delightful texture!

Can I freeze Blueberry Lemon Curd Donut Holes?
Yes, you can! To freeze, first place the donut holes in a single layer on a baking sheet and freeze for 1-2 hours until solid. Then, transfer them to a freezer-safe bag, removing as much air as possible. They will stay fresh in the freezer for up to 3 months.

How can I reheat frozen donut holes?
To enjoy your frozen donut holes, preheat your oven to 350°F. Arrange the donut holes on a baking sheet and reheat for about 10-15 minutes. This method ensures they warm through while retaining their soft and fluffy texture. Remember to glaze them after reheating for the perfect finish!

Are these donut holes safe for pets or people with allergies?
While Blueberry Lemon Curd Donut Holes are safe for human consumption, they may not be suitable for pets, particularly due to ingredients like sugar and butter. For those with allergies, always check the labels of your ingredients—substituting almond milk for buttermilk or using egg replacements can help accommodate various dietary needs.

What if my batter is too thick or too runny?
Very good question! If your batter is too thick, you can gently stir in a little more buttermilk—add a tablespoon at a time until the desired consistency is reached. Conversely, if it’s too runny, consider adding a touch more flour, about 1 tablespoon at a time, until it thickens enough to hold its shape when dropped into the oil. Remember, the goal is to achieve a dough that’s thick enough to hold its form while still being able to easily drop spoonfuls into the frying oil!

Blueberry Lemon Curd Donut Holes

Blueberry Lemon Curd Donut Holes

Delight in these Blueberry Lemon Curd Donut Holes, featuring soft, fluffy bites filled with juicy blueberries and a tangy lemon glaze.
Print Recipe Pin Recipe
Prep Time 20 minutes mins
Cook Time 20 minutes mins
Cooling Time 10 minutes mins
Total Time 50 minutes mins
Servings: 12 donut holes
Course: DESSERT RECIPES
Cuisine: American
Calories: 120
Ingredients Equipment Method Nutrition Notes

Ingredients
  

For the Donut Holes
  • 2 cups all-purpose flour
  • 3/4 cup granulated sugar
  • 2 teaspoons baking powder
  • 1 teaspoon baking soda
  • 1/2 teaspoon salt
  • 1 cup buttermilk can substitute with milk plus a squeeze of lemon juice
  • 1/2 cup Greek yogurt or sour cream low-fat versions work
  • 1/4 cup salted butter (melted)
  • 1 teaspoon vanilla extract
  • 1 cup fresh or frozen blueberries
  • 2 cups avocado oil for frying
For the Glaze
  • 1/4 cup salted butter (melted)
  • 1/4 cup fresh lemon juice
  • 1/2 cup granulated sugar adjust to taste
  • 1 tablespoon lemon zest
  • 1 cup powdered sugar
  • 2 tablespoons cultured buttermilk adjust for consistency
  • 1 teaspoon vanilla extract or paste

Equipment

  • large mixing bowl
  • separate mixing bowl
  • deep frying pan
  • Spatula
  • Whisk
  • Wire Rack

Method
 

How to Make Blueberry Lemon Curd Donut Holes
  1. In a large mixing bowl, whisk together the flour, granulated sugar, baking powder, baking soda, and salt until well mixed.
  2. In a separate bowl, blend the buttermilk, Greek yogurt (or sour cream), melted butter, and vanilla extract. Stir until smooth and creamy.
  3. Gently fold the wet ingredients into the dry ones, mixing just until combined.
  4. Carefully add the blueberries to the batter, folding them in with a spatula.
  5. In a deep frying pan, heat avocado oil over medium heat until it reaches approximately 350°F.
  6. Drop spoonfuls of the batter into the hot oil, frying them until golden brown for about 3-4 minutes per side.
  7. Once golden, remove the donut holes and let them drain on paper towels.
  8. In a separate bowl, whisk together the melted butter, lemon juice, granulated sugar, lemon zest, powdered sugar, cultured buttermilk, and vanilla extract until smooth.
  9. Dip each warm donut hole into the lemon glaze, allowing the excess to drip off. Set aside on a wire rack to let the glaze set for a few minutes.

Nutrition

Serving: 1donut holeCalories: 120kcalCarbohydrates: 16gProtein: 2gFat: 6gSaturated Fat: 3gPolyunsaturated Fat: 0.5gMonounsaturated Fat: 2gCholesterol: 20mgSodium: 150mgPotassium: 75mgFiber: 0.5gSugar: 6gVitamin A: 200IUVitamin C: 2mgCalcium: 50mgIron: 0.5mg

Notes

Optional: Sprinkle with extra lemon zest for added flavor.

Tried this recipe?

Let us know how it was!

Filed Under: BREAKFAST & BRUNCH

Lemon Drop Spritz

December 20, 2025 by JudyWhite Leave a Comment

There’s something truly refreshing about the first sip of a Lemon Drop Spritz, especially as the warm sun begins to set. Just imagine sitting on your patio after a long day, the citrusy scent of limoncello mingling with the effervescence of prosecco—a perfect way to unwind. I stumbled upon this delightful recipe during a little gathering with friends, and it quickly became our go-to drink whenever we wanted to add a splash of joy to our evenings.

This cocktail is not just delicious; it’s also incredibly easy to whip up, taking only five minutes from start to finish. With its zesty flavor and bubbly appeal, the Lemon Drop Spritz is a crowd-pleaser that does wonders in breaking the ice and elevating any occasion, from BBQs to cozy dinners at home. And while it’s fabulous as is, a touch of fresh mint and lemon slices can take it to another level. Let me show you how to create this effortless sparkler for your next gathering!

Why You'll Love This Lemon Drop Spritz

  • This Lemon Drop Spritz is incredibly easy to make, taking just five minutes from start to finish, so you can spend more time enjoying your drink and less time in the kitchen.
  • The zesty and refreshing flavors of limoncello and prosecco come together to create a delightful and bubbly cocktail that is perfect for any occasion.
  • This drink is a true crowd-pleaser, effortlessly elevating gatherings with its vibrant taste that everyone will love.
  • Plus, it offers versatility with optional garnishes like fresh mint and lemon slices, allowing you to customize it to your preference and make it visually stunning.

Lemon Drop Spritz Ingredients

• Get ready to mix up this refreshing delight!

For the Cocktail

  • Limoncello – a bright Italian lemon liqueur that adds a sweet citrusy punch to your Lemon Drop Spritz.
  • Prosecco – the bubbly base that brings a celebratory fizz; you can also use other sparkling wines if preferred.
  • Club Soda – adds a refreshing sparkle and balances the sweetness of the limoncello.
  • Ice – essential for keeping your drink chilled and invigorating.

For the Garnish (Optional)

  • Mint Sprig – a fresh and aromatic touch that enhances the lemony flavor of your Spritz.
  • Lemon Slices – adds a vibrant visual appeal while deepening that lovely citrusy essence.

Enjoy creating your Lemon Drop Spritz with these delightful ingredients that are sure to brighten up your gatherings!

How to Make Lemon Drop Spritz

  1. Combine Ingredients: In a glass, pour in 2 oz of limoncello, followed by 3 oz of prosecco and 1 oz of club soda. Stir gently to blend the vibrant flavors together.

  2. Add Ice: Fill the glass with 1 cup of ice, ensuring it’s packed well to keep your drink refreshingly chilled as you sip.

  3. Garnish Creatively: Top off your drink with a sprig of mint and 3 slices of lemon for a bright and inviting presentation.

Optional: For an extra citrus burst, consider adding a splash of fresh lemon juice before serving.

Exact quantities are listed in the recipe card below.

Make Ahead Options

Preparing the Lemon Drop Spritz ahead of time is a fantastic way to save precious moments during your gathering! You can mix the limoncello, prosecco, and club soda up to 24 hours in advance and store it in the fridge to maintain its refreshing quality. Just remember to wait to add ice until you’re ready to serve, as this will prevent dilution. When it’s time to impress your guests, simply pour the chilled mixture over ice, garnish with mint and lemon slices, and serve. This way, you can enjoy the delightful flavors of your Lemon Drop Spritz with minimal effort, making your hosting experience all the more enjoyable!

Lemon Drop Spritz Variations

Feel free to put your spin on this refreshing drink, making it uniquely yours!

  • Berry Burst: Add a handful of muddled raspberries or blueberries for a fruity twist that complements the lemon’s brightness.

  • Herbal Delight: Substitute mint with basil for a fragrant, herbal note that pairs beautifully with the citrus flavors.

  • Spicy Kick: A dash of spicy ginger beer can be swapped for club soda to give your spritz a delightful warmth.

  • Citrus Medley: Combine limoncello with a splash of orange liqueur for an extra layer of citrus complexity that tantalizes the taste buds.

  • Lower Sugar: Use diet limoncello or sparkling water for a lighter version, ensuring you don’t miss out on that lovely fizz.

  • Frozen Treat: Blend the ingredients with ice instead of serving over it for a slushy, refreshing cocktail perfect for warm days.

  • Sparkling Mocktail: For a non-alcoholic option, replace the prosecco with a sparkling lemonade to keep the fizz without the alcohol.

  • Flavored Spirits: Experiment with flavored limoncello or replace it with elderflower liqueur for an elegant floral twist that surprises and delights.

How to Store and Freeze Lemon Drop Spritz

Fridge: Store any leftover Lemon Drop Spritz in the fridge for up to 2 hours, but be aware that the bubbles may dissipate, slightly altering the drink’s effervescence.

Freezer: While it’s not recommended to freeze a Lemon Drop Spritz, if you have excess ingredients, limoncello can be stored in the freezer for up to 6 months without losing quality.

Glassware: Serve fresh for the best taste; avoid storing the drink in a glass, as it should be enjoyed immediately for maximum flavor.

Reheating: Not applicable; this cocktail is best enjoyed chilled and bubbly straight from the glass!

What to Serve with Lemon Drop Spritz?

Imagine the lively atmosphere of a summer gathering where every sip of your spritz dances in harmony with delicious accompaniments.

  • Fresh Bruschetta: The bright toppings of tomatoes and basil provide a refreshing bite that pairs perfectly with the zesty cocktail.
  • Caprese Salad Skewers: Juicy cherry tomatoes, mozzarella, and basil skewered for easy eating; their freshness complements the citrus notes.
  • Shrimp Cocktails: Chilled shrimp with a tangy cocktail sauce elevate the dining experience, mirroring the spritz’s bright flavors.
  • Grilled Lemon Herb Chicken: This dish enhances the lemony essence of the drink while adding depth with its savory herbs.
  • Crispy Potato Wedges: The golden crunch provides a satisfying texture that contrasts beautifully with the bubbly delight of the spritz.
  • Lemon Sorbet: Keep that citrus theme going with this cool, sweet dessert; it’s a delightful way to cleanse your palate in style.
  • Gin & Tonic: For a more robust drink option, this classic cocktail with its own citrusy tones can be a lovely complement.

Chef's Helpful Tips

  • When making a Lemon Drop Spritz, ensure you stir the ingredients gently to maintain the bubbles from the prosecco.
  • A common mistake is overfilling the glass with ice; for optimal results, pack it snugly but leave some space for the drink to mix.
  • For the freshest flavor, use chilled limoncello and prosecco, as temperature greatly enhances the drink’s refreshing qualities.
  • Finally, let your drink sit for a minute after garnishing to allow the mint and lemon slices to infuse their flavors into the cocktail before enjoying it.

Lemon Drop Spritz Recipe FAQs

How do I choose the right limoncello for my Lemon Drop Spritz?
Absolutely! Look for a limoncello that is made from real lemons, as this will give your cocktail a fresh and vibrant flavor. A good limoncello should have a sweet taste with a balanced acidity. Check the label for natural ingredients and avoid overly artificial options for the best result.

How should I store any leftover Lemon Drop Spritz?
You can store your Lemon Drop Spritz in the fridge for up to 2 hours. However, keep in mind that the bubbles could diminish, changing the drink’s effervescence. If you’d like to save leftover ingredients, it’s best to keep limoncello in the freezer for up to 6 months, which keeps its quality intact.

Can I freeze limoncello or other ingredients for my Lemon Drop Spritz?
Very! While you shouldn’t freeze a Lemon Drop Spritz itself, you can freeze limoncello for up to 6 months. Simply pour it into an airtight container or ice cube trays. Just remember not to fill containers all the way, as liquids expand when frozen. This way, you can easily make a fresh cocktail later!

What do I do if my Lemon Drop Spritz loses its fizz?
If you find your cocktail has lost its fizz before finishing, try adding a splash of fresh club soda or sparkling water to reintroduce the effervescence. This can breathe new life into your drink. Another tip is to ensure you’re using chilled ingredients as it helps maintain the bubbles longer.

Is this recipe suitable for people with dietary restrictions?
Absolutely! The Lemon Drop Spritz can be enjoyed safely by most. However, if you’re making drinks for guests with allergies, make sure to check for any specific sensitivities to alcohol or citrus. For a non-alcoholic version, you could use a lemon-flavored sparkling water instead of limoncello and prosecco to mimic that fizzy delight!

Can I adjust the sweetness level in my Lemon Drop Spritz?
Certainly! If you prefer a less sweet cocktail, consider reducing the amount of limoncello and adding extra club soda for balance. Alternatively, you could add more lemon juice for a tangy twist. Experimenting with the proportions can help you find that perfect level of sweetness that suits your taste!

Lemon Drop Spritz

Lemon Drop Spritz

Enjoy a refreshing Lemon Drop Spritz, a delightful cocktail combining limoncello and prosecco perfect for any gathering.
Print Recipe Pin Recipe
Prep Time 5 minutes mins
Total Time 5 minutes mins
Servings: 1 drink
Course: Snacks & Appetizers
Cuisine: Italian
Calories: 150
Ingredients Equipment Method Nutrition Notes

Ingredients
  

For the Cocktail
  • 2 oz limoncello a bright Italian lemon liqueur
  • 3 oz prosecco bubbly base; can use other sparkling wines
  • 1 oz club soda adds refreshing sparkle
  • 1 cup ice essential for chilling the drink
For the Garnish (Optional)
  • 1 sprig mint fresh and aromatic touch
  • 3 slices lemon adds visual appeal

Equipment

  • Glass

Method
 

How to Make Lemon Drop Spritz
  1. In a glass, pour in 2 oz of limoncello, followed by 3 oz of prosecco and 1 oz of club soda. Stir gently to blend the vibrant flavors together.
  2. Fill the glass with 1 cup of ice, ensuring it’s packed well to keep your drink refreshingly chilled as you sip.
  3. Top off your drink with a sprig of mint and 3 slices of lemon for a bright and inviting presentation.

Nutrition

Serving: 1drinkCalories: 150kcalCarbohydrates: 15gSodium: 5mgPotassium: 150mgSugar: 12gVitamin C: 15mgCalcium: 1mg

Notes

For an extra citrus burst, consider adding a splash of fresh lemon juice before serving. Serve fresh for the best taste.

Tried this recipe?

Let us know how it was!

Filed Under: SNACKS & APPETIZERS

Gingerbread Espresso Martini Recipe

December 20, 2025 by JudyWhite Leave a Comment

As the chilly air settles in and the joyous spirit of the season begins to emerge, there’s a cocktail that perfectly captures those cozy vibes: the Gingerbread Espresso Martini. I was inspired to whip this up after discovering a blend of festive spices lurking in my pantry, just waiting to add warmth to my evenings. This delightful drink combines the robust flavor of freshly brewed espresso with the sweetness of gingerbread, transforming your usual martini into a festive delight that’s sure to impress.

Picture this: sipping on a creamy, spiced concoction crowned with a perfectly baked gingerbread cookie while cozying up with loved ones. This easy-to-make Gingerbread Espresso Martini Recipe is not only a treat for your taste buds but a delightful centerpiece for your holiday gatherings. Forget the mundane fast-food runs; this is the ideal antidote to hustle and bustle, offering a comforting sip of cheer. Let’s dive into this simple yet sensational recipe, perfect for both seasoned cooks and novices alike!

Why You'll Love This Gingerbread Espresso Martini

  • This Gingerbread Espresso Martini is incredibly easy to prepare, making it a fantastic choice for both novice and experienced mixologists.
  • The flavors are a delightful blend of rich espresso and festive gingerbread, creating a tasty experience that will surely impress your guests.
  • Its versatility allows you to enjoy this cocktail during holiday gatherings or even cozy evenings at home.
  • Plus, garnishing with a gingerbread cookie adds a charming visual appeal that makes every sip feel like a special occasion.

Gingerbread Espresso Martini Ingredients

• Dive into the festive flavors with this delightful Gingerbread Espresso Martini recipe!

For the Syrup

  • Dark brown sugar – a rich sweetness that enhances the overall depth of flavor.
  • Molasses – brings a warm, earthy taste that complements holiday spices.
  • Water – needed to dissolve the sugars and create a syrupy base.
  • Cinnamon sticks – infuse the syrup with a cozy aroma and warm spice notes.
  • Allspice berries – add a unique blend of flavors reminiscent of gingerbread.
  • Whole cloves – their strong, aromatic flavor elevates the festive profile.
  • Fresh grated ginger – introduces a zesty kick that brightens the drink.

For the Cocktail

  • Vodka – serves as the neutral base spirit, allowing other flavors to shine.
  • Irish cream liqueur – adds creaminess and a touch of sweetness for a decadent mouthfeel.
  • Coffee liqueur – enhances the espresso with a sweet, coffee flavor that’s impossible to resist.
  • Gingerbread syrup – the star ingredient that ties all the festive flavors together.
  • Espresso coffee – fresh brews bring a rich, bold coffee flavor that’s essential for this martini.

For Garnish

  • Gingerbread cookie – adds a delightful touch of festivity and a touch of nostalgia.

How to Make Gingerbread Espresso Martini

  1. Combine ingredients: In a saucepan, mix dark brown sugar, molasses, water, cinnamon sticks, allspice berries, cloves, and fresh grated ginger. Stir together to combine all the warm spices.

  2. Simmer: Bring the mixture to a boil, then reduce the heat and let it simmer for 20 minutes. Stir occasionally until it thickens slightly and becomes aromatic.

  3. Cool: Remove the saucepan from heat and allow the syrup to cool completely. This step is essential for blending the flavors beautifully.

  4. Mix: In a cocktail shaker, combine cooled syrup, vodka, Irish cream liqueur, coffee liqueur, gingerbread syrup, and fresh espresso coffee. This flavorful mix is what will truly elevate your martini!

  5. Shake: Secure the lid on the shaker and shake it well. Aim for a nice frothy texture, which usually takes about 15-20 seconds.

  6. Strain: Strain the mixture into a chilled martini glass, ensuring a smooth consistency without any solids.

  7. Garnish: Finally, add a gingerbread cookie on the rim of the glass. This not only looks adorable but offers a delightful bite alongside your drink.

Optional: Add a sprinkle of cinnamon on top for an extra festive touch.

Exact quantities are listed in the recipe card below.

Make Ahead Options

These Gingerbread Espresso Martinis are perfect for busy home cooks looking to streamline their holiday gatherings! You can prepare the gingerbread syrup up to 3 days in advance by following the syrup-making steps (just refrigerate it in an airtight container). This allows the flavors to deepen and truly shine. When you’re ready to serve, simply combine the refrigerated syrup with vodka, Irish cream liqueur, coffee liqueur, gingerbread syrup, and freshly brewed espresso in a cocktail shaker. Shake well, strain into a martini glass, and garnish with a gingerbread cookie! Your guests will be impressed with this festive cocktail that’s just as delicious and refreshing, making your hosting duties a breeze.

How to Store and Freeze Gingerbread Espresso Martini

Fridge: Store any leftover Gingerbread Espresso Martini in an airtight container for up to 3 days. Keep it chilled for quick access during holiday celebrations!

Freezer: If you want to momentarily stop the clock, you can freeze the syrup base separately in ice cube trays for up to 3 months. Just thaw and mix with fresh espresso when you’re ready to enjoy!

Reheating: While it’s best enjoyed fresh, if you’ve got extra syrup, gently reheat it on low heat before mixing into your martini for optimal flavor.

Gingerbread Espresso Martini Variations

There’s plenty of room to get creative with this festive cocktail, making it truly your own!

  • Spice It Up: Add a pinch of nutmeg or cardamom for a warm twist that intensifies the holiday flavors. These spices breathe new life into the drink while still keeping its cozy essence.

  • Make It Vegan: Swap the Irish cream liqueur for a coconut cream alternative to craft a delicious vegan version without losing creaminess. This option keeps the indulgence intact while catering to plant-based diets.

  • Chocolate Lovers Delight: Drizzle some chocolate syrup into the mix or rim the glass with cocoa powder for an irresistible chocolate-gingerbread fusion. This little touch brings a delightful decadence that’s hard to resist!

  • Nutty Flavor: For an extra layer of richness, consider adding a splash of hazelnut liqueur. This nutty twist will add depth and complexity, making every sip a new experience filled with nostalgia.

  • Mocha Magic: Incorporate a tablespoon of chocolate coffee syrup for an exciting mocha flavor that marries beautifully with the spices. This variation adds delightful sweetness and coffee richness, perfect for the chocoholics among us!

  • Lower Sugar: Substitute the brown sugar with a sugar alternative like stevia or monk fruit for a lighter version that doesn’t skimp on flavor. You can enjoy the holiday spirit while being mindful of sugar intake.

  • Extra Creamy: Switch out regular vodka for whipped cream vodka, enhancing the smooth texture and making it a true dessert-style martini that’s especially comforting on a cozy evening.

  • Chili Kick: For those who like a little heat, a dash of chili powder can be added to the mix. This unexpected twist surprises your palate and adds an intriguing layer of flavor!

Explore these variations, and make this Gingerbread Espresso Martini uniquely yours, sharing every delicious twist with family and friends!

What to Serve with Gingerbread Espresso Martini?

Picture a cozy gathering filled with laughter and the aroma of spices in the air, creating a perfect setting for delightful pairings.

  • Spiced Nuts: Ideal for snacking, these crunchy bites complement the cocktail’s warmth with spices that echo the festive flavors.
  • Chocolate-Covered Pretzels: The sweet and salty contrast enhances the rich sweetness of your martini, making each bite a blissful treat.
  • Cheesecake Bites: The creamy texture and slight tang of cheesecake pair beautifully with the boldness of espresso, creating a delightful harmony.
  • Pumpkin Spice Cupcakes: These fall-inspired treats bring warmth and sweetness, perfectly matching the cozy essence of your cocktail.
  • Cinnamon Rolls: Soft, gooey, and richly spiced, their warmth enhances the heartiness of the Gingerbread Espresso Martini experience, perfect for sharing.
  • Apple Cider: Spice-infused, this warm drink feels like a hug in a mug, echoing the gingerbread flavors for a perfectly festive balance.
  • Vanilla Ice Cream with Caramel Sauce: The smooth, creamy scoop is a classic match that will cool your palate while echoing the gingerbread notes with a decadent touch.
  • Mulled Wine: With its aromatic spices and rich flavors, this warm beverage is the ultimate companion, setting a festive tone for your evening.

Chef's Helpful Tips

  • When making the Gingerbread Espresso Martini, ensure that your syrup mixture simmers long enough to fully develop the flavors from the spices.
  • It’s important to cool the syrup completely before mixing, as this prevents the ice in your shaker from melting too quickly and diluting the drink.
  • Shake the cocktail vigorously for at least 15-20 seconds to achieve that desirable frothy texture, which makes the martini visually appealing.
  • Finally, use a chilled martini glass to serve, which enhances the drinking experience by keeping your cocktail cool longer.

Gingerbread Espresso Martini Recipe FAQs

How do I select the best ingredients for my Gingerbread Espresso Martini?
Absolutely! When choosing your ingredients, look for dark brown sugar that feels moist and has a rich aroma, as this enhances the drink’s sweetness. For spices, whole cloves and allspice should be aromatic and fresh. When selecting ginger, fresh roots without dark spots are ideal for that zesty kick.

How should I store my leftover Gingerbread Espresso Martini?
Very good question! Store any leftover Gingerbread Espresso Martini in an airtight container in the refrigerator for up to 3 days. This way, you can enjoy a quick festive sip whenever the mood strikes! Just give it a good shake before serving.

Can I freeze the Gingerbread Espresso Martini?
Absolutely! If you have leftover syrup, pour it into ice cube trays and freeze for up to 3 months. When you’re ready to indulge, simply pop out a cube and thaw it at room temperature or in a microwave. Combine it with fresh espresso and shake for a quick martini fix!

What if my Gingerbread Espresso Martini turns out too sweet?
If your cocktail is a bit too sweet for your palate, consider adding a little more espresso or a splash of club soda. This can help to balance out the sweetness and provide a refreshing twist. Remember, adjusting flavors to your taste makes the experience all the more enjoyable!

Are there any dietary considerations for this recipe?
Great question! The Gingerbread Espresso Martini contains alcohol, so it’s not suitable for those avoiding alcohol for health, religious, or personal reasons. If you have allergies, pay attention to the ingredients in the liqueurs, as some brands may contain dairy, nuts, or gluten. You can substitute the Irish cream liqueur with a dairy-free alternative for a more inclusive option.

Gingerbread Espresso Martini Recipe

Gingerbread Espresso Martini Recipe

This Gingerbread Espresso Martini combines festive gingerbread flavors and rich espresso for a perfect holiday cocktail.
Print Recipe Pin Recipe
Prep Time 10 minutes mins
Cook Time 20 minutes mins
Cooling Time 30 minutes mins
Total Time 1 hour hr
Servings: 1 cocktail
Course: DESSERT RECIPES
Cuisine: American
Calories: 350
Ingredients Equipment Method Nutrition Notes

Ingredients
  

Gingerbread Syrup
  • 1 cup dark brown sugar
  • 1/2 cup molasses
  • 1/2 cup water
  • 2 sticks cinnamon for infusion
  • 1 tablespoon allspice berries
  • 5 pieces whole cloves
  • 1 tablespoon fresh grated ginger adds zesty kick
Cocktail Ingredients
  • 2 ounces vodka neutral base spirit
  • 1 ounce Irish cream liqueur adds creaminess
  • 1 ounce coffee liqueur enhances espresso flavor
  • 1 ounce gingerbread syrup homemade syrup
  • 1 ounce espresso coffee freshly brewed
Garnish
  • 1 cookie gingerbread cookie for garnish

Equipment

  • Saucepan
  • Cocktail shaker
  • Martini glass

Method
 

Syrup Preparation
  1. In a saucepan, mix dark brown sugar, molasses, water, cinnamon sticks, allspice berries, cloves, and fresh grated ginger. Stir together to combine.
  2. Bring the mixture to a boil, then reduce heat and let it simmer for 20 minutes. Stir occasionally until it thickens slightly.
  3. Remove the saucepan from heat and allow the syrup to cool completely.
Cocktail Mixing
  1. In a cocktail shaker, combine cooled syrup, vodka, Irish cream liqueur, coffee liqueur, gingerbread syrup, and fresh espresso coffee.
  2. Secure the lid on the shaker and shake well for 15-20 seconds until frothy.
  3. Strain the mixture into a chilled martini glass.
  4. Add a gingerbread cookie on the rim of the glass to serve.

Nutrition

Serving: 1cocktailCalories: 350kcalCarbohydrates: 45gProtein: 2gFat: 7gSaturated Fat: 4gPolyunsaturated Fat: 0.5gMonounsaturated Fat: 2.5gCholesterol: 5mgSodium: 25mgPotassium: 150mgSugar: 30gVitamin A: 100IUCalcium: 50mgIron: 1mg

Notes

For an extra festive touch, sprinkle cinnamon on top before serving.

Tried this recipe?

Let us know how it was!

Filed Under: BREAKFAST & BRUNCH

Amalfi Cocktail

December 20, 2025 by JudyWhite Leave a Comment

As summer’s warmth envelops us, there’s nothing quite like a refreshing drink to elevate your spirits. Picture this: you’ve just come back from a sun-soaked day at the beach, and nostalgia washes over you as you sip a bright, fizzy Amalfi Cocktail that instantly transports you to the charming cliffs of Italy. It’s amazing how simple ingredients like chilled prosecco and zesty limoncello can create such a vibrant escape.

In just five minutes, you can whip up this delightful blend that’s perfect for unwinding after a long day or impressing friends at your next gathering. The combination of sparkling water and fresh lemon adds a crisp touch, while a sprig of mint enhances the drink with a burst of freshness. Whether you’re an aspiring mixologist or simply searching for a way to break free from your usual routine, this Amalfi Cocktail is bound to become a cherished favorite in your home. So, let’s dive in and mix up a little Italian magic!

Why You'll Love This Amalfi Cocktail

  • This Amalfi Cocktail is a breeze to prepare, taking just five minutes to mix up a delicious drink that refreshes your spirit.
  • The incredible blend of chilled prosecco and zesty limoncello offers a burst of flavor that transports you to the sunny shores of Italy with every sip.
  • Its visual appeal, enhanced by a lemon wheel and mint sprig, makes it a stunning centerpiece for any gathering or casual evening at home.
  • Plus, this versatile cocktail can be adjusted to your taste, ensuring that each glass is uniquely yours while impressing your guests.

Amalfi Cocktail Ingredients

• Get ready for a zesty treat!

For the Cocktail

  • Chilled prosecco – a sparkling base that ignites the cocktail’s festive spirit.
  • Chilled sparkling water – adds a refreshing effervescence to balance the flavors.
  • Chilled limoncello – provides a luscious, tangy sweetness that defines the Amalfi Cocktail.

For the Garnish

  • Lemon wheel or wedge – adds a bright pop of color and enhances the citrus aroma.
  • Fresh mint sprig – gives a delightful freshness and makes your drink look picture-perfect.

This Amalfi Cocktail is not just a drink; it’s a sensory journey you won’t forget!

How to Make Amalfi Cocktail

  1. Fill a wine glass with ice.
    Begin by adding a generous amount of ice to your favorite wine glass. The ice ensures your Amalfi Cocktail stays chillingly refreshing on those warm days!

  2. Pour in the liquids.
    Carefully add 3 ounces of chilled prosecco, followed by 3 ounces of chilled sparkling water and 1 1/2 ounces of chilled limoncello. This blend creates a harmonious dance of flavors just waiting to dazzle your taste buds.

  3. Stir gently to combine.
    With a soft touch, give the mixture a gentle stir to integrate all the ingredients. You want to maintain that bubbly texture—just enough to make it lively without losing the effervescence!

  4. Garnish if desired.
    For a finishing touch, adorn your cocktail with a lemon wheel and a sprig of fresh mint. This not only looks exquisite but also adds an enchanting aroma that elevates each sip.

Optional: Add a splash of flavored seltzer for an extra twist!
Exact quantities are listed in the recipe card below.

How to Store and Freeze Amalfi Cocktail

Fridge: Store any leftover Amalfi Cocktail in an airtight container for up to 2 days. However, it’s best enjoyed fresh to keep the fizz intact!

Freezer: It’s not recommended to freeze the Amalfi Cocktail, as the sparkling elements will lose their effervescence and the flavors may not blend well after thawing.

Serving: For the best experience, serve your Amalfi Cocktail immediately after preparation. If desired, you can prepare the limoncello and prosecco mixture in advance, just remember to add the sparkling water just before serving to keep it bubbly!

What to Serve with Amalfi Cocktail?

As you sip on this vibrant drink, imagine a delightful spread of dishes that elevate your gathering into a memorable event.

  • Bruschetta: The fresh tomatoes and basil on toasted bread bring a burst of flavor that perfectly balances the Amalfi Cocktail.
  • Caprese Salad: Creamy mozzarella and ripe tomatoes harmonize with the zesty notes, offering a refreshing contrast to the cocktail’s sweetness.
  • Grilled Seafood: Lightly seasoned shrimp or scallops grilled to perfection enhance the cocktail’s coastal vibe, creating a beautiful synergy of flavors.
  • Garlic Butter Shrimp Pasta: A rich and garlicky pasta dish provides a comforting companion, creating a satisfying pairing with the Amalfi’s crispiness.
  • Italian Antipasto Platter: Featuring cured meats, olives, and marinated veggies, this platter adds a savory touch that enhances every sip of your cocktail.
  • Lemon Sorbet: For dessert, this light and refreshing treat echoes the cocktail’s flavors, finishing your meal on a dreamy note.
  • Sparkling Water: Keep the effervescence alive with a glass of sparkling water, cleansing your palate and allowing the Amalfi Cocktail to shine.

Each of these options beautifully complements the Amalfi Cocktail, inviting friends and family to gather around the table for a spectacular experience!

Amalfi Cocktail Variations

Feel free to explore these fun twists and alternatives to customize your Amalfi Cocktail experience!

  • Non-Alcoholic: Substitute the prosecco and limoncello with non-alcoholic sparkling wine and lemon-lime soda for a refreshing mocktail.

  • Citrus Burst: Enhance the flavor by adding a splash of fresh orange juice for a zesty twist that brightens your drink.

  • Herbal Infusion: Try using basil instead of mint for a unique herbal undertone that complements the limoncello beautifully.

  • Berry Bliss: Muddle fresh berries like strawberries or raspberries at the bottom of your glass before mixing for a fruity explosion.

  • Spicy Kick: Infuse your cocktail with a slice of jalapeño or a dash of hot sauce for a sweet and spicy flavor adventure.

  • Flavored Sparkling Water: Experiment with flavored sparkling water, like grapefruit or lemon-lime, to enhance the cocktail’s refreshing qualities.

  • Minty Green Tea: Replace half of the sparkling water with chilled mint-infused green tea for a sophisticated touch and extra depth.

  • Frozen Delight: Blend the ingredients with ice to create a slushy version, perfect for hot summer afternoons!

Get creative with these variations and make the Amalfi Cocktail your own!

Make Ahead Options

The Amalfi Cocktail is a fantastic choice for meal prep, allowing you to mix up a delightful experience ahead of time! You can prepare the base of your cocktail—combining the chilled prosecco, sparkling water, and limoncello—up to 24 hours in advance. Simply mix these liquids in a large pitcher and refrigerate them to maintain that refreshing chill. When you’re ready to serve, fill individual glasses with ice, pour the prepped cocktail mixture, and give it a gentle stir. Don’t forget to garnish with a lemon wheel and mint sprig just before serving for that perfect finishing touch. This preparation method not only saves you time but ensures that your Amalfi Cocktail remains just as delicious and lively!

Chef's Helpful Tips

  • When making the Amalfi Cocktail, ensure all your ingredients are well-chilled to maintain the refreshing taste.
  • A common mistake is adding warm prosecco or limoncello, which can dilute the special flavors.
  • For the perfect garnish, gently slap the mint sprig between your hands before adding it to release its oils and aroma.
  • Serve the cocktail immediately after mixing to preserve the bubbly effervescence created by the sparkling water and prosecco.

Amalfi Cocktail Recipe FAQs

What type of prosecco or sparkling wine should I use for the Amalfi Cocktail?
Absolutely! When selecting your prosecco, look for a dry sparkling wine to maintain the cocktail’s refreshing flavor balance. Brands labeled “Brut” are great choices as they provide the perfect blend of bubbles without being overly sweet. You can also explore local wines from your area; just ensure it’s chilled before mixing!

How should I store any leftover Amalfi Cocktail?
You can store any leftover Amalfi Cocktail in an airtight container in the fridge for up to 2 days. However, keep in mind that the fizz from the sparkling elements will begin to diminish, so it’s best to enjoy it fresh. If you’re feeling adventurous, consider using any remaining drink as a base for a fun dessert cocktail by mixing it with sorbet!

Can I freeze the Amalfi Cocktail?
Very! While it’s technically possible to freeze the ingredients separately, I wouldn’t recommend freezing the entire cocktail. Freezing can cause the carbonation to dissipate, leading to a flat drink once thawed. Instead, if you want to enjoy the flavors later, prepare the limoncello and prosecco mixture and keep it in the fridge, making sure to add the sparkling water just before serving for the best fizz.

What if I can’t find limoncello?
No worries! If limoncello is hard to find, you can make a simple lemon syrup by mixing equal parts sugar and water, heating until dissolved, and then incorporating fresh lemon juice to taste. This will give you that tangy sweetness that defines the Amalfi Cocktail. Alternatively, you might experiment with other citrus liqueurs like orange curacao for a unique twist!

Are there any dietary considerations I should keep in mind?
Absolutely! The Amalfi Cocktail is inherently gluten-free, making it a great choice for guests with gluten sensitivities. However, if someone is avoiding alcohol altogether, you can easily swap the prosecco and limoncello with non-alcoholic sparkling wine and lemon-flavored soda. For those with mint allergies, feel free to skip the garnish or use a thin slice of cucumber instead for a refreshing touch.

Amalfi Cocktail

Amalfi Cocktail

Experience the vibrant Amalfi Cocktail, a refreshing blend of prosecco, limoncello, and sparkling water that captures the essence of summer.
Print Recipe Pin Recipe
Prep Time 5 minutes mins
Total Time 5 minutes mins
Servings: 1 drink
Course: Snacks & Appetizers
Cuisine: Italian
Calories: 200
Ingredients Equipment Method Nutrition Notes

Ingredients
  

For the Cocktail
  • 3 ounces chilled prosecco a sparkling base
  • 3 ounces chilled sparkling water adds refreshing effervescence
  • 1.5 ounces chilled limoncello provides tangy sweetness
For the Garnish
  • 1 lemon wheel or wedge adds color and citrus aroma
  • 1 fresh mint sprig adds freshness

Equipment

  • wine glass

Method
 

How to Make Amalfi Cocktail
  1. Fill a wine glass with ice.
  2. Pour in the chilled prosecco, followed by the sparkling water and limoncello.
  3. Stir gently to combine.
  4. Garnish with a lemon wheel and a mint sprig.

Nutrition

Serving: 1drinkCalories: 200kcalCarbohydrates: 15gSodium: 5mgPotassium: 80mgSugar: 10gVitamin C: 10mgCalcium: 1mg

Notes

Serve the cocktail immediately for the best experience. Optional: add a splash of flavored seltzer for extra twist.

Tried this recipe?

Let us know how it was!

Filed Under: SNACKS & APPETIZERS

Slow Cooker Chicken Stew

December 19, 2025 by JudyWhite Leave a Comment

There’s something incredibly comforting about coming home to the warm embrace of a home-cooked meal, especially on those chilly evenings when time seems to slip away. Picture this: the rich aroma of a slow-cooked chicken stew wafting through your living space, mingling with hints of fragrant rosemary and thyme. It’s a scene that invites both warmth and hunger!

I discovered this Slow Cooker Chicken Stew with White Wine and Veggies on one such gray afternoon, where I found myself yearning for something hearty yet effortless. All it took was a handful of ingredients, and a trusty slow cooker, to transform simple chicken thighs and vibrant vegetables into a culinary delight that would have anyone forgetting fast food forever.

Perfect for busy weeknights or cozy gatherings, this stew isn’t just about ease—it’s a celebration of flavors, with tender chicken and veggies that lure everyone to the table. So, if you’re tired of the same old dinner routine and want to impress without the stress, let’s dive into this delightful recipe!

Why You'll Love This Slow Cooker Chicken Stew

  • This Slow Cooker Chicken Stew is a dream come true for busy cooks since it requires minimal prep and allows the slow cooker to do all the work for you.
  • The combination of white wine and fresh herbs brings an incredible depth of flavor that elevates this dish to comfort food perfection.
  • Its versatility means you can easily adapt the ingredients based on what you have on hand, making it a great option for any day of the week.
  • With its inviting aroma and hearty ingredients, this stew is guaranteed to impress your family and friends, turning any meal into a memorable gathering.

Slow Cooker Chicken Stew Ingredients

• Get ready to savor every spoonful!

For the Stew

  • 1 tablespoon olive oil – a heart-healthy fat that helps to brown the chicken perfectly.
  • 1.5 pounds boneless skinless chicken thighs – these provide a juicy texture and rich flavor to the stew.
  • freshly ground salt – enhances all the flavors; adjust to your taste.
  • freshly ground black pepper – add to taste for a nice kick of heat.
  • 2 cups chicken broth – the base of your stew, lending savory depth.
  • 0.5 cup dry white wine – adds a wonderful acidity and richness; think of it as a secret ingredient!
  • 1 tablespoon worcestershire sauce – brings umami goodness and a delightful complexity.
  • 1 teaspoon balsamic vinegar – this cuts through the richness, adding just the right touch of sweetness.

For the Herbs and Aromatics

  • 2 teaspoons chopped fresh rosemary – this aromatic herb brings a pine-like freshness to the stew.
  • 2 teaspoons chopped fresh thyme – adds an earthy, grounding flavor that complements the chicken beautifully.
  • 0.5 teaspoon dried oregano – a classic herb that enhances the overall flavor profile.
  • 6 garlic cloves – these pack a flavorful punch and should never be skimped on!
  • 1 large yellow onion – it adds sweetness and depth when caramelized.

For the Vegetables

  • 3 large carrots – these lend a natural sweetness and vibrant color.
  • 1 pound yukon gold potatoes – creamy and buttery, they make the stew hearty and satisfying.
  • 0.67 cup frozen peas – for a pop of color and sweetness to balance the dish.

For Thickening the Stew

  • 0.25 cup all purpose flour – helps to thicken the stew and create a luscious consistency.
  • 0.5 cup unsweetened almond milk – this adds creaminess without dairy; perfect for those with dietary restrictions.

Feel the excitement build as you gather these ingredients for your Slow Cooker Chicken Stew!

How to Make Slow Cooker Chicken Stew

  1. Sauté the chicken: Add 1 tablespoon olive oil to a large skillet and place over high heat. Season the chicken thighs with salt and pepper, and brown them for about 5-6 minutes until golden. Transfer to a large slow cooker.

  2. Combine the liquids and seasonings: In the slow cooker, add chicken broth, dry white wine, Worcestershire sauce, balsamic vinegar, thyme, rosemary, oregano, salt, and pepper. Stir well to blend all the flavors.

  3. Add the vegetables: Toss in minced garlic, diced onion, sliced carrots, and cubed potatoes. Cover and cook on low for 7-8 hours or on high for 4-5 hours, until everything is tender and fragrant.

  4. Thicken the stew: Remove 1/2 cup of broth from the slow cooker and combine it in a medium bowl with ½ cup almond milk and ¼ cup flour, whisking until completely smooth. Stir this mixture back into the slow cooker and mix gently.

  5. Finish with peas: Stir in frozen peas and cook uncovered on HIGH for 15-20 minutes until the stew thickens up beautifully. Taste and adjust seasoning with extra salt and pepper as necessary.

Optional: Garnish with fresh parsley for an extra splash of color and flavor!

Exact quantities are listed in the recipe card below.

Slow Cooker Chicken Stew Variations

Feel free to get creative with this stew and make it your own, enhancing flavors and personalizing ingredients to suit your taste!

  • Dairy-Free: Substitute almond milk with coconut milk for a creamy, tropical twist that adds a hint of sweetness.

  • Vegetable-Loaded: Add more veggies like bell peppers, zucchini, or celery for extra nutrition and colors that make every bowl a feast.

  • Spicy Kick: Toss in a teaspoon of red pepper flakes or diced jalapeños to bring some heat, warming you from the inside out.

  • Herb Medley: Experiment with different herbs like parsley, dill, or tarragon for unique flavor profiles that take your stew to new heights.

  • Protein Swap: If you’re not a fan of chicken, try using turkey, beef, or even mushrooms for a hearty, satisfying alternative that’s equally delicious.

  • Wine Flavor Boost: Replace dry white wine with a splash of sherry or add a hint of lemon juice for a zesty and bright twist.

  • Root Veggie Variation: Replace Yukon gold potatoes with sweet potatoes or parsnips for a sweet, earthy flavor that pairs beautifully with the spices.

  • Global Twist: Stir in a tablespoon of curry powder or harissa for an exotic flavor journey that makes this dish truly memorable.

Each variation invites you to savor new experiences, enriching the joyful ritual of preparing a home-cooked meal. Happy cooking!

How to Store and Freeze Slow Cooker Chicken Stew

Room Temperature: Store any leftovers at room temperature for no more than 2 hours to prevent bacterial growth.

Fridge: Place cooled stew in an airtight container and refrigerate for up to 3 days. When reheating, make sure it is heated thoroughly.

Freezer: Freeze Slow Cooker Chicken Stew in a freezer-safe container for up to 3 months. Thaw overnight in the fridge before reheating.

Reheating: Reheat on the stovetop or in the microwave until heated through. Stir well to ensure even heating.

What to Serve with Slow Cooker Chicken Stew?

Set the stage for a cozy dinner with delicious side dishes that will complement every warm spoonful of your savory stew.

  • Crusty Bread: A slice of freshly baked bread is perfect for soaking up the rich broth, creating a delightful textural contrast. There’s nothing quite like tearing off a piece and diving into the stew.

  • Garlic Green Beans: Steamed green beans tossed with garlic offer a bright, fresh crunch, balancing the heartiness with a touch of vibrancy. Their crispness makes for the ideal pairing!

  • Simple Salad: A light mixed greens salad with a vinaigrette can brighten the meal, adding freshness and a pop of color to counter the rich flavors of the stew.

  • Creamy Polenta: Velvety polenta serves as a comforting base, soaking up all the delicious juices and adding a creamy dimension to your dinner. It’s an unexpected twist that will impress your loved ones!

  • Roasted Brussels Sprouts: Crispy, caramelized sprouts with a sprinkle of parmesan offer an earthy side, enhancing the wholesome nature of the stew. Their nutty flavors will echo those of the herbs in the dish.

  • Chardonnay: A chilled glass of chardonnay would mirror the wine used in cooking, providing smooth notes that lift the meal while enhancing its flavors.

  • Apple Crisp: For dessert, a warm apple crisp drizzled in caramel adds a sweet finishing touch, making the evening feel complete and oh so satisfying. It’s the perfect sweet closure to a heartwarming meal!

Make Ahead Options

Preparing this Slow Cooker Chicken Stew ahead of time is a fantastic way to streamline your meal planning and save precious time on busy days! You can chop the vegetables (carrots, onions, and potatoes) and marinate the chicken in the seasonings up to 24 hours in advance; just be sure to refrigerate them tightly sealed to maintain freshness. Additionally, you can combine the broth, white wine, and thickening ingredients in a separate container to make the cooking process even smoother. When you’re ready to serve, simply transfer everything into your slow cooker, set it to cook, and let the flavors develop beautifully—enjoy a comforting meal that tastes like you’ve slaved away in the kitchen but is ready with minimal effort!

Chef's Helpful Tips

  • When making Slow Cooker Chicken Stew, always brown the chicken in the skillet first to develop a rich flavor before adding it to the slow cooker.
  • Don’t rush the cooking time; low and slow allows the ingredients to meld beautifully, creating a stew that’s bursting with flavor.
  • To ensure the perfect consistency, remove a portion of broth to mix with flour and almond milk before adding it back into the slow cooker for thickening.
  • Remember that different slow cookers may vary in temperature, so check for doneness and adjust the cooking time if necessary to prevent overcooking.

Slow Cooker Chicken Stew with White Wine and Veggies Recipe FAQs

How do I select the best chicken thighs for my stew?
Absolutely! When choosing chicken thighs, look for pieces that are plump and have a nice, pink hue. Avoid any thighs with dark spots or a dull appearance, as they might be past their prime. Fresh chicken should feel moist but not sticky.

What are the best storage methods for my Slow Cooker Chicken Stew?
You can store your leftover stew in an airtight container in the fridge for up to 3 days. Make sure it cools completely before sealing it up. When reheating, do so gently on the stovetop until heated through to maintain flavor and texture.

Can I freeze my Slow Cooker Chicken Stew?
Yes, you can! To freeze your stew, transfer it to a freezer-safe container once it has cooled. It’s best to freeze it in individual portions for easy reheating later. It should be consumed within 3 months for optimal quality. When you’re ready to enjoy it again, simply thaw overnight in the fridge and reheat on the stovetop or in the microwave until steaming hot.

What should I do if my stew is too thin after cooking?
If you find your stew isn’t thickening as you’d like, don’t worry! You can create a simple slurry by mixing equal parts of flour and cold water, then whisking it into your stew about 15-20 minutes before serving. Stir well and let it cook uncovered; this will help it reach the desired consistency.

Is this recipe safe for someone with dairy allergies?
Very! This Slow Cooker Chicken Stew is made with unsweetened almond milk instead of traditional dairy milk, making it a suitable option for those with lactose intolerance or dairy allergies. Always double-check the labels of your ingredients to ensure they’re allergy-friendly, and feel free to customize further based on specific dietary needs!

Slow Cooker Chicken Stew

Slow Cooker Chicken Stew

This Slow Cooker Chicken Stew is the perfect cozy dish for chilly evenings, combining flavorful chicken, vegetables, and aromatic herbs effortlessly.
Print Recipe Pin Recipe
Prep Time 15 minutes mins
Cook Time 8 hours hrs
Total Time 8 hours hrs 15 minutes mins
Servings: 6 servings
Course: DINNER RECIPES
Cuisine: American
Calories: 350
Ingredients Equipment Method Nutrition Notes

Ingredients
  

For the Stew
  • 1 tablespoon olive oil a heart-healthy fat that helps to brown the chicken perfectly.
  • 1.5 pounds boneless skinless chicken thighs these provide a juicy texture and rich flavor to the stew.
  • freshly ground salt enhances all the flavors; adjust to your taste.
  • freshly ground black pepper add to taste for a nice kick of heat.
  • 2 cups chicken broth the base of your stew, lending savory depth.
  • 0.5 cup dry white wine adds a wonderful acidity and richness.
  • 1 tablespoon worcestershire sauce brings umami goodness and a delightful complexity.
  • 1 teaspoon balsamic vinegar this cuts through the richness, adding just the right touch of sweetness.
For the Herbs and Aromatics
  • 2 teaspoons chopped fresh rosemary this aromatic herb brings a pine-like freshness.
  • 2 teaspoons chopped fresh thyme adds an earthy, grounding flavor that complements the chicken beautifully.
  • 0.5 teaspoon dried oregano a classic herb that enhances the overall flavor profile.
  • 6 garlic cloves these pack a flavorful punch.
  • 1 large yellow onion it adds sweetness and depth when caramelized.
For the Vegetables
  • 3 large carrots these lend a natural sweetness and vibrant color.
  • 1 pound yukon gold potatoes creamy and buttery, they make the stew hearty and satisfying.
  • 0.67 cup frozen peas for a pop of color and sweetness.
For Thickening the Stew
  • 0.25 cup all purpose flour helps to thicken the stew and create a luscious consistency.
  • 0.5 cup unsweetened almond milk this adds creaminess without dairy.

Equipment

  • Slow Cooker
  • Skillet

Method
 

How to Make Slow Cooker Chicken Stew
  1. Sauté the chicken: Add 1 tablespoon olive oil to a large skillet and place over high heat. Season the chicken thighs with salt and pepper, and brown them for about 5-6 minutes until golden. Transfer to a large slow cooker.
  2. Combine the liquids and seasonings: In the slow cooker, add chicken broth, dry white wine, Worcestershire sauce, balsamic vinegar, thyme, rosemary, oregano, salt, and pepper. Stir well to blend all the flavors.
  3. Add the vegetables: Toss in minced garlic, diced onion, sliced carrots, and cubed potatoes. Cover and cook on low for 7-8 hours or on high for 4-5 hours, until everything is tender and fragrant.
  4. Thicken the stew: Remove 1/2 cup of broth from the slow cooker and combine it in a medium bowl with ½ cup almond milk and ¼ cup flour, whisking until completely smooth. Stir this mixture back into the slow cooker and mix gently.
  5. Finish with peas: Stir in frozen peas and cook uncovered on HIGH for 15-20 minutes until the stew thickens up beautifully. Taste and adjust seasoning with extra salt and pepper as necessary.

Nutrition

Serving: 1servingCalories: 350kcalCarbohydrates: 30gProtein: 25gFat: 15gSaturated Fat: 3gPolyunsaturated Fat: 1gMonounsaturated Fat: 5gCholesterol: 100mgSodium: 800mgPotassium: 800mgFiber: 5gSugar: 4gVitamin A: 300IUVitamin C: 20mgCalcium: 50mgIron: 2mg

Notes

Optional: Garnish with fresh parsley for an extra splash of color and flavor!

Tried this recipe?

Let us know how it was!

Filed Under: DINNER RECIPES

Slow Cooker Chicken Stew

December 19, 2025 by JudyWhite Leave a Comment

There’s something incredibly comforting about coming home to the warm embrace of a home-cooked meal, especially on those chilly evenings when time seems to slip away. Picture this: the rich aroma of a slow-cooked chicken stew wafting through your living space, mingling with hints of fragrant rosemary and thyme. It’s a scene that invites both warmth and hunger!

I discovered this Slow Cooker Chicken Stew with White Wine and Veggies on one such gray afternoon, where I found myself yearning for something hearty yet effortless. All it took was a handful of ingredients, and a trusty slow cooker, to transform simple chicken thighs and vibrant vegetables into a culinary delight that would have anyone forgetting fast food forever.

Perfect for busy weeknights or cozy gatherings, this stew isn’t just about ease—it’s a celebration of flavors, with tender chicken and veggies that lure everyone to the table. So, if you’re tired of the same old dinner routine and want to impress without the stress, let’s dive into this delightful recipe!

Why You'll Love This Slow Cooker Chicken Stew

  • This Slow Cooker Chicken Stew is a dream come true for busy cooks since it requires minimal prep and allows the slow cooker to do all the work for you.
  • The combination of white wine and fresh herbs brings an incredible depth of flavor that elevates this dish to comfort food perfection.
  • Its versatility means you can easily adapt the ingredients based on what you have on hand, making it a great option for any day of the week.
  • With its inviting aroma and hearty ingredients, this stew is guaranteed to impress your family and friends, turning any meal into a memorable gathering.

Slow Cooker Chicken Stew Ingredients

• Get ready to savor every spoonful!

For the Stew

  • 1 tablespoon olive oil – a heart-healthy fat that helps to brown the chicken perfectly.
  • 1.5 pounds boneless skinless chicken thighs – these provide a juicy texture and rich flavor to the stew.
  • freshly ground salt – enhances all the flavors; adjust to your taste.
  • freshly ground black pepper – add to taste for a nice kick of heat.
  • 2 cups chicken broth – the base of your stew, lending savory depth.
  • 0.5 cup dry white wine – adds a wonderful acidity and richness; think of it as a secret ingredient!
  • 1 tablespoon worcestershire sauce – brings umami goodness and a delightful complexity.
  • 1 teaspoon balsamic vinegar – this cuts through the richness, adding just the right touch of sweetness.

For the Herbs and Aromatics

  • 2 teaspoons chopped fresh rosemary – this aromatic herb brings a pine-like freshness to the stew.
  • 2 teaspoons chopped fresh thyme – adds an earthy, grounding flavor that complements the chicken beautifully.
  • 0.5 teaspoon dried oregano – a classic herb that enhances the overall flavor profile.
  • 6 garlic cloves – these pack a flavorful punch and should never be skimped on!
  • 1 large yellow onion – it adds sweetness and depth when caramelized.

For the Vegetables

  • 3 large carrots – these lend a natural sweetness and vibrant color.
  • 1 pound yukon gold potatoes – creamy and buttery, they make the stew hearty and satisfying.
  • 0.67 cup frozen peas – for a pop of color and sweetness to balance the dish.

For Thickening the Stew

  • 0.25 cup all purpose flour – helps to thicken the stew and create a luscious consistency.
  • 0.5 cup unsweetened almond milk – this adds creaminess without dairy; perfect for those with dietary restrictions.

Feel the excitement build as you gather these ingredients for your Slow Cooker Chicken Stew!

How to Make Slow Cooker Chicken Stew

  1. Sauté the chicken: Add 1 tablespoon olive oil to a large skillet and place over high heat. Season the chicken thighs with salt and pepper, and brown them for about 5-6 minutes until golden. Transfer to a large slow cooker.

  2. Combine the liquids and seasonings: In the slow cooker, add chicken broth, dry white wine, Worcestershire sauce, balsamic vinegar, thyme, rosemary, oregano, salt, and pepper. Stir well to blend all the flavors.

  3. Add the vegetables: Toss in minced garlic, diced onion, sliced carrots, and cubed potatoes. Cover and cook on low for 7-8 hours or on high for 4-5 hours, until everything is tender and fragrant.

  4. Thicken the stew: Remove 1/2 cup of broth from the slow cooker and combine it in a medium bowl with ½ cup almond milk and ¼ cup flour, whisking until completely smooth. Stir this mixture back into the slow cooker and mix gently.

  5. Finish with peas: Stir in frozen peas and cook uncovered on HIGH for 15-20 minutes until the stew thickens up beautifully. Taste and adjust seasoning with extra salt and pepper as necessary.

Optional: Garnish with fresh parsley for an extra splash of color and flavor!

Exact quantities are listed in the recipe card below.

How to Store and Freeze Slow Cooker Chicken Stew

Room Temperature: Store any leftovers at room temperature for no more than 2 hours to prevent bacterial growth.

Fridge: Place cooled stew in an airtight container and refrigerate for up to 3 days. When reheating, make sure it is heated thoroughly.

Freezer: Freeze Slow Cooker Chicken Stew in a freezer-safe container for up to 3 months. Thaw overnight in the fridge before reheating.

Reheating: Reheat on the stovetop or in the microwave until heated through. Stir well to ensure even heating.

Make Ahead Options

Preparing this Slow Cooker Chicken Stew ahead of time is a fantastic way to streamline your meal planning and save precious time on busy days! You can chop the vegetables (carrots, onions, and potatoes) and marinate the chicken in the seasonings up to 24 hours in advance; just be sure to refrigerate them tightly sealed to maintain freshness. Additionally, you can combine the broth, white wine, and thickening ingredients in a separate container to make the cooking process even smoother. When you’re ready to serve, simply transfer everything into your slow cooker, set it to cook, and let the flavors develop beautifully—enjoy a comforting meal that tastes like you’ve slaved away in the kitchen but is ready with minimal effort!

What to Serve with Slow Cooker Chicken Stew?

Set the stage for a cozy dinner with delicious side dishes that will complement every warm spoonful of your savory stew.

  • Crusty Bread: A slice of freshly baked bread is perfect for soaking up the rich broth, creating a delightful textural contrast. There’s nothing quite like tearing off a piece and diving into the stew.

  • Garlic Green Beans: Steamed green beans tossed with garlic offer a bright, fresh crunch, balancing the heartiness with a touch of vibrancy. Their crispness makes for the ideal pairing!

  • Simple Salad: A light mixed greens salad with a vinaigrette can brighten the meal, adding freshness and a pop of color to counter the rich flavors of the stew.

  • Creamy Polenta: Velvety polenta serves as a comforting base, soaking up all the delicious juices and adding a creamy dimension to your dinner. It’s an unexpected twist that will impress your loved ones!

  • Roasted Brussels Sprouts: Crispy, caramelized sprouts with a sprinkle of parmesan offer an earthy side, enhancing the wholesome nature of the stew. Their nutty flavors will echo those of the herbs in the dish.

  • Chardonnay: A chilled glass of chardonnay would mirror the wine used in cooking, providing smooth notes that lift the meal while enhancing its flavors.

  • Apple Crisp: For dessert, a warm apple crisp drizzled in caramel adds a sweet finishing touch, making the evening feel complete and oh so satisfying. It’s the perfect sweet closure to a heartwarming meal!

Slow Cooker Chicken Stew Variations

Feel free to get creative with this stew and make it your own, enhancing flavors and personalizing ingredients to suit your taste!

  • Dairy-Free: Substitute almond milk with coconut milk for a creamy, tropical twist that adds a hint of sweetness.

  • Vegetable-Loaded: Add more veggies like bell peppers, zucchini, or celery for extra nutrition and colors that make every bowl a feast.

  • Spicy Kick: Toss in a teaspoon of red pepper flakes or diced jalapeños to bring some heat, warming you from the inside out.

  • Herb Medley: Experiment with different herbs like parsley, dill, or tarragon for unique flavor profiles that take your stew to new heights.

  • Protein Swap: If you’re not a fan of chicken, try using turkey, beef, or even mushrooms for a hearty, satisfying alternative that’s equally delicious.

  • Wine Flavor Boost: Replace dry white wine with a splash of sherry or add a hint of lemon juice for a zesty and bright twist.

  • Root Veggie Variation: Replace Yukon gold potatoes with sweet potatoes or parsnips for a sweet, earthy flavor that pairs beautifully with the spices.

  • Global Twist: Stir in a tablespoon of curry powder or harissa for an exotic flavor journey that makes this dish truly memorable.

Each variation invites you to savor new experiences, enriching the joyful ritual of preparing a home-cooked meal. Happy cooking!

Chef's Helpful Tips

  • When making Slow Cooker Chicken Stew, always brown the chicken in the skillet first to develop a rich flavor before adding it to the slow cooker.
  • Don’t rush the cooking time; low and slow allows the ingredients to meld beautifully, creating a stew that’s bursting with flavor.
  • To ensure the perfect consistency, remove a portion of broth to mix with flour and almond milk before adding it back into the slow cooker for thickening.
  • Remember that different slow cookers may vary in temperature, so check for doneness and adjust the cooking time if necessary to prevent overcooking.

Slow Cooker Chicken Stew with White Wine and Veggies Recipe FAQs

How do I select the best chicken thighs for my stew?
Absolutely! When choosing chicken thighs, look for pieces that are plump and have a nice, pink hue. Avoid any thighs with dark spots or a dull appearance, as they might be past their prime. Fresh chicken should feel moist but not sticky.

What are the best storage methods for my Slow Cooker Chicken Stew?
You can store your leftover stew in an airtight container in the fridge for up to 3 days. Make sure it cools completely before sealing it up. When reheating, do so gently on the stovetop until heated through to maintain flavor and texture.

Can I freeze my Slow Cooker Chicken Stew?
Yes, you can! To freeze your stew, transfer it to a freezer-safe container once it has cooled. It’s best to freeze it in individual portions for easy reheating later. It should be consumed within 3 months for optimal quality. When you’re ready to enjoy it again, simply thaw overnight in the fridge and reheat on the stovetop or in the microwave until steaming hot.

What should I do if my stew is too thin after cooking?
If you find your stew isn’t thickening as you’d like, don’t worry! You can create a simple slurry by mixing equal parts of flour and cold water, then whisking it into your stew about 15-20 minutes before serving. Stir well and let it cook uncovered; this will help it reach the desired consistency.

Is this recipe safe for someone with dairy allergies?
Very! This Slow Cooker Chicken Stew is made with unsweetened almond milk instead of traditional dairy milk, making it a suitable option for those with lactose intolerance or dairy allergies. Always double-check the labels of your ingredients to ensure they’re allergy-friendly, and feel free to customize further based on specific dietary needs!

Slow Cooker Chicken Stew

Slow Cooker Chicken Stew

This Slow Cooker Chicken Stew is the perfect cozy dish for chilly evenings, combining flavorful chicken, vegetables, and aromatic herbs effortlessly.
Print Recipe Pin Recipe
Prep Time 15 minutes mins
Cook Time 8 hours hrs
Total Time 8 hours hrs 15 minutes mins
Servings: 6 servings
Course: DINNER RECIPES
Cuisine: American
Calories: 350
Ingredients Equipment Method Nutrition Notes

Ingredients
  

For the Stew
  • 1 tablespoon olive oil a heart-healthy fat that helps to brown the chicken perfectly.
  • 1.5 pounds boneless skinless chicken thighs these provide a juicy texture and rich flavor to the stew.
  • freshly ground salt enhances all the flavors; adjust to your taste.
  • freshly ground black pepper add to taste for a nice kick of heat.
  • 2 cups chicken broth the base of your stew, lending savory depth.
  • 0.5 cup dry white wine adds a wonderful acidity and richness.
  • 1 tablespoon worcestershire sauce brings umami goodness and a delightful complexity.
  • 1 teaspoon balsamic vinegar this cuts through the richness, adding just the right touch of sweetness.
For the Herbs and Aromatics
  • 2 teaspoons chopped fresh rosemary this aromatic herb brings a pine-like freshness.
  • 2 teaspoons chopped fresh thyme adds an earthy, grounding flavor that complements the chicken beautifully.
  • 0.5 teaspoon dried oregano a classic herb that enhances the overall flavor profile.
  • 6 garlic cloves these pack a flavorful punch.
  • 1 large yellow onion it adds sweetness and depth when caramelized.
For the Vegetables
  • 3 large carrots these lend a natural sweetness and vibrant color.
  • 1 pound yukon gold potatoes creamy and buttery, they make the stew hearty and satisfying.
  • 0.67 cup frozen peas for a pop of color and sweetness.
For Thickening the Stew
  • 0.25 cup all purpose flour helps to thicken the stew and create a luscious consistency.
  • 0.5 cup unsweetened almond milk this adds creaminess without dairy.

Equipment

  • Slow Cooker
  • Skillet

Method
 

How to Make Slow Cooker Chicken Stew
  1. Sauté the chicken: Add 1 tablespoon olive oil to a large skillet and place over high heat. Season the chicken thighs with salt and pepper, and brown them for about 5-6 minutes until golden. Transfer to a large slow cooker.
  2. Combine the liquids and seasonings: In the slow cooker, add chicken broth, dry white wine, Worcestershire sauce, balsamic vinegar, thyme, rosemary, oregano, salt, and pepper. Stir well to blend all the flavors.
  3. Add the vegetables: Toss in minced garlic, diced onion, sliced carrots, and cubed potatoes. Cover and cook on low for 7-8 hours or on high for 4-5 hours, until everything is tender and fragrant.
  4. Thicken the stew: Remove 1/2 cup of broth from the slow cooker and combine it in a medium bowl with ½ cup almond milk and ¼ cup flour, whisking until completely smooth. Stir this mixture back into the slow cooker and mix gently.
  5. Finish with peas: Stir in frozen peas and cook uncovered on HIGH for 15-20 minutes until the stew thickens up beautifully. Taste and adjust seasoning with extra salt and pepper as necessary.

Nutrition

Serving: 1servingCalories: 350kcalCarbohydrates: 30gProtein: 25gFat: 15gSaturated Fat: 3gPolyunsaturated Fat: 1gMonounsaturated Fat: 5gCholesterol: 100mgSodium: 800mgPotassium: 800mgFiber: 5gSugar: 4gVitamin A: 300IUVitamin C: 20mgCalcium: 50mgIron: 2mg

Notes

Optional: Garnish with fresh parsley for an extra splash of color and flavor!

Tried this recipe?

Let us know how it was!

Filed Under: DINNER RECIPES

Homemade Brownies Recipe

December 19, 2025 by JudyWhite Leave a Comment

There’s nothing quite like the sheer joy of pulling a pan of freshly baked brownies out of the oven. The moment that warm, fudgy aroma drifts through your kitchen, it transforms the atmosphere into something magical. The rich scent of cocoa and the hint of vanilla beckon you, promising a deliciously indulgent treat that’s perfect for cozy nights in or sharing with friends.

I stumbled upon this homemade brownies recipe during one of my weekend adventures in the kitchen, searching for a dessert that would elevate my usual routine. I wanted something that felt a bit fancy yet was still easy to whip up—even on a busy evening. These brownies hit all the right notes: they’re incredibly rich and chocolaty, with a delightful crust on top that gives way to a gooey interior. Plus, there’s a secret touch of espresso powder that enhances the chocolate flavor without overpowering it.

With just a few simple ingredients—most of which you probably have on hand—you’ll create a treat that delights the senses and satisfies that sweet craving. So, let’s dive into this homemade brownies recipe and bring some warmth and happiness to your kitchen!

Why You'll Love This Homemade Brownies Recipe

  • This homemade brownies recipe is incredibly easy to make, perfect for anyone looking to bake a delicious dessert without spending hours in the kitchen.
  • The rich chocolate flavor will have you craving more, while the addition of espresso powder takes it to a whole new level of indulgence.
  • These brownies are versatile enough to serve at a gathering or enjoy as a cozy treat at home, making them a great choice for any occasion.
  • Not only will you impress your friends and family with their fudgy texture and delightful crust, but the enticing aroma will fill your home with warmth and joy while they bake.

Homemade Brownies Recipe Ingredients

Discover the magic behind the perfect brownie!

For the Brownie Batter
• All-purpose flour – gives structure for your fudgy brownies.
• Baking powder – adds a slight lift for a lighter texture.
• Salt – enhances the chocolate flavor for a richer taste.
• Unsweetened cocoa powder – provides the deep chocolate richness you crave.
• Espresso powder – intensifies the chocolate flavor in your homemade brownies recipe.
• Unsalted butter – adds a creamy richness and moisture.
• Oil – helps achieve an extra fudgy texture.
• Granulated sugar – sweetens and creates that delightful crust.
• Large eggs – bind the ingredients and add moisture.
• Large egg yolk – enriches the batter for an even fudgier result.
• Vanilla extract – contributes warmth and depth of flavor.
• Chocolate chips – offer bursts of melty chocolate in every bite.

Enjoy this comforting treat with loved ones or savor it all to yourself!

How to Make Homemade Brownies

  1. Preheat the oven: Set your oven to 350°F (175°C). Prepare a 9×9-inch baking pan by lining it with parchment paper and giving it a light spray of non-stick baking spray.

  2. Sift the dry ingredients: In a large bowl, sift together the all-purpose flour, baking powder, salt, cocoa powder, and espresso powder. This ensures your brownies will be light and free of lumps—set this bowl aside.

  3. Melt the butter: In a medium saucepan, combine the unsalted butter, oil, and 1/3 cup of the granulated sugar. Heat over medium heat, stirring frequently until the butter melts completely. Remove from heat once smooth and glossy.

  4. Mix the wet ingredients: In a separate large mixing bowl, whisk together the eggs, egg yolk, vanilla extract, and the remaining sugar until well combined—about 30 seconds should do the trick.

  5. Combine the mixtures: Slowly pour the warm butter mixture into the egg mixture. Add it gradually while whisking constantly to ensure everything is fully incorporated.

  6. Fold in the dry ingredients: Gently add the sifted dry ingredients and the chocolate chips to the wet mixture. Using a rubber spatula, stir until just combined—be careful not to overmix for that perfect fudgy texture!

  7. Prepare for baking: Scrape the brownie batter into the prepared pan. Use the spatula to smooth the top, making sure it’s even and ready to go.

  8. Bake: Place your pan in the oven and bake for 28 to 30 minutes. Keep an eye on them until the edges feel firm and the top has that shiny, slightly cracked look.

  9. Cool and slice: Once baked, transfer the pan to a cooling rack. Allow the brownies to cool completely before slicing them into squares—this’ll help achieve those clean edges!

Optional: Dust with powdered sugar for an elegant touch before serving.
Exact quantities are listed in the recipe card below.

Make Ahead Options

These Homemade Brownies Recipe are perfect for meal prep enthusiasts! You can prepare the brownie batter up to 24 hours in advance. Simply follow the recipe instructions up until step 6, then cover the bowl with plastic wrap and refrigerate it. This helps the flavors meld together while keeping the batter fresh. When you’re ready to bake, just take the batter out, give it a gentle stir to incorporate, and spread it into the prepared pan. Bake as directed in step 8, and you’ll have delicious, fudgy brownies that taste just as good as if you’d made them fresh! Perfect for busy weeknights or unexpected guests!

What to Serve with Homemade Brownies Recipe?

There’s nothing quite like indulging in rich, chocolatey brownies as the centerpiece of a delightful dessert experience.

  • Vanilla Ice Cream: The creamy, cool ice cream pairs perfectly with warm brownies, creating a luxurious contrast that’s hard to resist.
  • Fresh Berries: Juicy strawberries or raspberries add a refreshing tartness that balances the sweetness of the brownies beautifully.
  • Chocolate Sauce: Drizzling warm chocolate sauce enhances the chocolate flavor, making each bite even more decadent and delightful.
  • Whipped Cream: A dollop of freshly whipped cream brings a light, airy texture to the dish, inviting you to take another bite.
  • Coffee: Enjoy a rich cup of coffee alongside your brownies; the warm, bold flavors enhance the chocolate and keep the experience cozy.
  • Nutty Caramel Sauce: A drizzle of nutty caramel adds a sweet, crunchy texture that complements the fudgy interior of the brownies.
  • Peanut Butter Swirl: Adding a peanut butter swirl to your brownies brings an irresistible salty-sweet flavor that chocolate lovers will adore.
  • Chocolate Mint Smoothie: A cool, minty smoothie grounds the indulgence of the brownies in refreshing freshness, creating a well-rounded dessert experience.

Homemade Brownies Recipe Variations

Feel free to get creative and customize these brownies to suit your taste buds!

  • Nutty Delight: Add 1/2 cup of chopped walnuts or pecans for a delightful crunch. The rich flavors of the nuts beautifully complement the chocolate.

  • Mint Chocolate: Stir in 1/2 teaspoon of peppermint extract into the batter for a refreshing twist. It brings a cool, invigorating flavor that transforms every bite.

  • Spicy Kick: Add a pinch of cayenne pepper or chili powder for a surprising heat that balances the sweetness perfectly. This spicy twist is sure to excite your palate!

  • Gluten-Free: Substitute the all-purpose flour with a 1-to-1 gluten-free baking blend. It’s a delicious way to cater to your gluten-sensitive friends.

  • Vegan-Friendly: Replace the eggs with 1/4 cup of unsweetened applesauce and use a plant-based butter alternative. You won’t miss a thing with this velvety vegan version.

  • Fruit Infusion: Fold in 1/2 cup of fresh raspberries or blueberries into the batter for a fruity burst. The combination of chocolate and berries is simply divine!

  • Caramel Swirl: Drizzle caramel sauce into the brownie batter just before baking for a sweet surprise. Swirling caramel gives an extra gooey texture and irresistible flavor.

  • Chocolate Overload: Mix in an additional 1/2 cup of chocolate chips or chunks for an extra chocolatey experience. It’s a chocoholic’s dream come true!

How to Store and Freeze Homemade Brownies

Room Temperature: Keep your brownies in an airtight container at room temperature for up to 3 days to maintain their fudgy texture and delicious flavor.

Fridge: If you want to extend freshness, store brownies in the fridge for up to a week in an airtight container. Let them come to room temperature before serving for the best taste.

Freezer: Freeze brownies by wrapping them tightly in plastic wrap, then aluminum foil, storing them for up to 3 months. Thaw in the fridge or at room temperature before enjoying.

Reheating: For a warm treat, reheat individual brownies in the microwave for about 10-15 seconds. This enhances the gooeyness and brings back that fresh-baked taste.

Chef's Helpful Tips

  • For the Homemade Brownies Recipe, be sure to sift your dry ingredients together to eliminate lumps and ensure a smoother batter.
  • A common mistake is overmixing the batter; instead, stir until just combined for that ideal fudgy texture.
  • Use a rubber spatula to gently incorporate the chocolate chips, as this helps maintain the integrity of your mixture.
  • When baking, check for doneness around 28 minutes, and remember that the brownies will continue to cook slightly as they cool in the pan.

Homemade Brownies Recipe FAQs

What kind of cocoa powder should I use for this brownies recipe?
Absolutely! Unsweetened cocoa powder is crucial for achieving that deep chocolate flavor in your homemade brownies recipe. I recommend using the highest quality cocoa powder for the best taste, as it significantly affects the overall richness. Brands like Valrhona or Ghirardelli work wonders!

How should I store leftover brownies?
To keep your brownies fresh longer, store them in an airtight container at room temperature for up to 3 days. If you want to extend their life, pop them in the fridge; they can last up to a week that way! Just be sure to let them return to room temperature before enjoying for optimal flavor and texture.

Can I freeze homemade brownies? If so, how?
Very! Freezing brownies is an excellent way to preserve your tasty treats. First, let the brownies cool completely. Once cooled, wrap them tightly in plastic wrap and then in aluminum foil. This double-wrapping method helps prevent freezer burn. They can last for up to 3 months in the freezer! When you’re ready to indulge, simply thaw them in the refrigerator overnight or at room temperature for a few hours.

What if my brownies turn out too cakey?
Ah, a common concern for brownie lovers! If your brownies feel cakey rather than fudgy, it’s typically due to overmixing or adding too much flour. To prevent this, mix your batter just until combined—no more! It’s also important to check your oven temperature, as baking too long can dry them out. Remember, the edges should be firm, but the center should still feel a bit soft when you take them out!

Are these brownies safe for my pet?
Unfortunately, no! Chocolate can be toxic to pets, especially dogs and cats. It’s best to keep your homemade brownies completely out of their reach. If you ever want to treat your furry friends, consider making a special pet-friendly treat using oats, peanut butter, and pumpkin instead!

Can I customize the recipe for dietary restrictions?
Absolutely! If you’re looking for gluten-free brownies, you can substitute the all-purpose flour with a 1-to-1 gluten-free flour blend. For a dairy-free option, replace the butter with coconut oil or a dairy-free butter substitute. You could also use flax eggs (1 tablespoon ground flaxseed mixed with 2.5 tablespoons of water) as an egg substitute for a vegan option. Just keep in mind that results will vary slightly with these swaps, but it’s a lovely way to tailor the recipe to your needs!

Homemade Brownies Recipe

Homemade Brownies Recipe

Experience the joy of making homemade brownies with this easy recipe that combines fudgy texture with rich chocolate flavor.
Print Recipe Pin Recipe
Prep Time 15 minutes mins
Cook Time 30 minutes mins
Cooling Time 15 minutes mins
Total Time 1 hour hr
Servings: 16 squares
Course: DESSERT RECIPES
Cuisine: American
Calories: 200
Ingredients Equipment Method Nutrition Notes

Ingredients
  

For the Brownie Batter
  • 1 cup All-purpose flour
  • 1 tsp Baking powder
  • 1/2 tsp Salt
  • 3/4 cup Unsweetened cocoa powder
  • 1 tsp Espresso powder
  • 1/2 cup Unsalted butter melted
  • 1/4 cup Oil
  • 1 1/4 cup Granulated sugar
  • 2 large Large eggs
  • 1 large Large egg yolk
  • 1 tsp Vanilla extract
  • 1 cup Chocolate chips optional

Equipment

  • 9×9-inch baking pan
  • medium saucepan
  • large mixing bowl
  • rubber spatula
  • sifter

Method
 

How to Make Homemade Brownies
  1. Preheat the oven to 350°F (175°C) and prepare a 9×9-inch baking pan by lining it with parchment paper and spraying it lightly with non-stick baking spray.
  2. In a large bowl, sift together the all-purpose flour, baking powder, salt, cocoa powder, and espresso powder.
  3. In a medium saucepan, combine the melted butter, oil, and 1/3 cup of the granulated sugar, and heat over medium until melted and smooth.
  4. In a separate mixing bowl, whisk together the eggs, egg yolk, vanilla extract, and remaining sugar until well combined.
  5. Gradually pour the warm butter mixture into the egg mixture while whisking constantly.
  6. Fold in the sifted dry ingredients and chocolate chips using a rubber spatula until just combined.
  7. Scrape the batter into the prepared pan and smooth the top evenly.
  8. Bake for 28 to 30 minutes, until the edges are firm and the top is shiny and slightly cracked.
  9. Allow to cool completely on a cooling rack before slicing into squares.

Nutrition

Serving: 1squareCalories: 200kcalCarbohydrates: 28gProtein: 2gFat: 10gSaturated Fat: 6gPolyunsaturated Fat: 1gMonounsaturated Fat: 1gCholesterol: 30mgSodium: 150mgPotassium: 120mgFiber: 1gSugar: 15gVitamin A: 200IUCalcium: 10mgIron: 1mg

Notes

Optional: Dust with powdered sugar before serving.

Tried this recipe?

Let us know how it was!

Filed Under: BREAKFAST & BRUNCH

Chicken Enchiladas with Sour Cream White Sauce

December 19, 2025 by JudyWhite Leave a Comment

As I flipped through my recipe collection on a rainy afternoon, I stumbled across a dish that instantly transported me to sun-soaked evenings filled with laughter: Chicken Enchiladas with Sour Cream White Sauce. The thought of tender chicken wrapped in pillowy tortillas, smothered in a velvety, tangy sauce got my taste buds tingling with anticipation.

With each bite, the gentle heat of serrano and jalapeño peppers dances with the creamy richness of sour cream, creating a delightful harmony that feels both comforting and exciting. This dish is not just another weeknight meal; it’s a celebration of flavors that brings family and friends together around the table.

The best part? You won’t need to spend hours in the kitchen to impress your loved ones. In just under an hour, you can serve these cheesy, scrumptious enchiladas straight from your oven. Whether you’re a seasoned chef or just starting on your culinary journey, this recipe is your ticket to a satisfying home-cooked meal that’s sure to leave everyone asking for seconds. Ready to dive in? Let’s get cooking!

Why You'll Love This Chicken Enchiladas with Sour Cream White Sauce

  • This recipe is incredibly easy to whip up, making it a perfect choice for busy weeknights or impromptu gatherings.
  • The flavor combination of the creamy sour cream and zesty peppers will tantalize your taste buds and leave everyone craving more.
  • With its versatility, you can easily customize the fillings or toppings to suit any dietary preference, ensuring everyone at the table is satisfied.
  • Plus, the visual appeal of these cheesy, bubbling enchiladas fresh from the oven is simply irresistible, making them a crowd-pleaser that is sure to impress.

Chicken Enchiladas with Sour Cream White Sauce Ingredients

Unlock the secrets to this flavorful dish!

For the Sauce
• Butter – adds richness and depth to the sauce.
• Serrano peppers – provides a mild heat that elevates the dish.
• Jalapeño pepper – adds a zesty kick; feel free to adjust to your spice level.
• Garlic – brings aromatic flavor to the sauce base.
• All-purpose flour – thickens the sauce for a creamy consistency.
• Chicken broth – infuses a savory depth to the sauce.
• Sour cream – gives a creamy tanginess that pairs beautifully with the spices.
• Salsa verde – adds a fresh, tangy kick to the overall flavor profile.
• Cumin – contributes earthy warmth, essential for authentic taste.
• Salt – enhances all flavors in the sauce.
• Garlic powder – boosts garlic taste without the hassle of peeling.
• White pepper – imparts subtle spice without affecting the color.
• Cayenne – adds a bit of heat; adjust according to preference.
• Cilantro – brings freshness and a hint of brightness.

For the Filling
• Cooked and shredded chicken – the star protein of your enchiladas, full of flavor.
• Flour tortillas – soft and pliable, perfect for wrapping up delicious fillings.
• Sharp cheddar cheese – adds a bold, cheesy flavor that melts beautifully.
• Monterrey Jack cheese – gives a creamy texture that balances well with cheddar.
• Yellow onion – sautéed for sweetness and added depth in the filling.

Dive into making these Chicken Enchiladas with Sour Cream White Sauce for a delightful meal everyone will adore!

How to Make Chicken Enchiladas with Sour Cream White Sauce

  1. Melt Butter: In a skillet, melt the butter over medium heat until bubbling and fragrant. Add the diced serrano and jalapeño peppers along with the onion, sautéing until softened, about 3-5 minutes.

  2. Add Garlic: Stir in the minced garlic and cook for another minute, letting that delicious aroma fill your kitchen.

  3. Mix in Flour: Sprinkle in the all-purpose flour, stirring continuously for 1-2 minutes to create a roux, which will help thicken the sauce.

  4. Whisk in Broth: Gradually whisk in the chicken broth, bringing the mixture to a gentle simmer. This will create a savory base for your sauce.

  5. Incorporate Sour Cream: Stir in the sour cream, salsa verde, cumin, salt, garlic powder, white pepper, cayenne, and half of the cilantro. Allow to simmer for about 5 minutes, until thick and well combined.

  6. Preheat Oven: While the sauce simmers, preheat your oven to 350°F (175°C) to prepare for baking those tasty enchiladas.

  7. Prepare Filling: In a separate bowl, mix together the cooked chicken, shredded cheeses, and the remaining cilantro until fully combined and creamy.

  8. Fill Tortillas: Take each tortilla and fill it generously with the chicken mixture. Roll them up tightly and place seam side down in a greased baking dish.

  9. Add Sauce: Pour the luscious sour cream sauce generously over the enchiladas, ensuring every bit is covered.

  10. Bake: Place the dish in the preheated oven and bake for 25-30 minutes, or until the enchiladas are bubbly and golden brown on top.

Optional: Garnish with fresh cilantro or a sprinkle of lime juice before serving for an added zest!

Exact quantities are listed in the recipe card below.

Storage Tips for Chicken Enchiladas with Sour Cream White Sauce

Fridge: Keep any leftovers in an airtight container for up to 3 days. This will preserve the creamy texture of the sour cream sauce while allowing you to enjoy these delicious enchiladas again.

Freezer: Store wrapped enchiladas in freezer-safe containers or tightly covered with foil for up to 3 months. Thaw in the fridge overnight before reheating for best results.

Reheating: To reheat, place enchiladas in a baking dish, cover with foil, and heat at 350°F (175°C) for about 20-25 minutes, or until warmed through. Add a splash of chicken broth to maintain moisture.

Serving Recommendations: For the best flavor experience, garnish with fresh cilantro or a squeeze of lime right before serving those tasty Chicken Enchiladas with Sour Cream White Sauce!

Chicken Enchiladas with Sour Cream White Sauce Variations

Feel free to get creative and tailor these enchiladas to your personal taste with these fun and delicious ideas!

  • Veggie Delight: Substitute shredded chicken with sautéed bell peppers, zucchini, and mushrooms for a hearty vegetarian option. This addition infuses fresh flavors and a satisfying texture.

  • Spicy Kick: Add extra jalapeño slices or a splash of hot sauce to the filling for those who crave heat. You’ll awaken those taste buds and keep everyone on their toes!

  • Creamy Avocado: Blend ripe avocado into the sour cream sauce for a rich, creamy twist that brings a hint of sweetness. This twist adds a lovely creamy layer that balances the spices beautifully.

  • Cheese Lover’s Dream: Swap the cheddar and Monterey Jack for a mixture of pepper jack cheese and queso fresco. This blend creates a flavorful, cheesy richness that enchilada enthusiasts will adore.

  • Whole Wheat Tortillas: Use whole wheat tortillas for a healthier and heartier option. Not only do they offer extra fiber, but they also bring a nutty flavor that complements the dish.

  • Cilantro-Lime Sauce: Replace sour cream with Greek yogurt mixed with lime juice and zest for a tangy flair that brightens the entire dish. This refreshing change will leave everyone wanting more!

  • Smoky Tomatillo: Trade the salsa verde for smoked tomatillo sauce to add a depth of flavor that brings a whole new dimension to these enchiladas. Smoky meets creamy in the best way!

  • Pineapple Salsa: Top your baked enchiladas with a refreshing pineapple salsa for a sweet and tangy contrast to the spiciness. The balance of flavors will take your enchiladas to new tropical heights!

What to Serve with Chicken Enchiladas with Sour Cream White Sauce?

Looking to create a memorable dining experience that complements your flavorful enchiladas? Here are some delightful options!

  • Refried Beans: These creamy and savory beans add a hearty touch, balancing the flavors and textures beautifully.

  • Mexican Rice: Fluffy, seasoned rice provides a perfect base, soaking up the delicious sauce and adding depth to your meal.

  • Guacamole: Smooth and creamy, guacamole brings a refreshing coolness that contrasts the heat from the peppers, enhancing every bite.

  • Corn Salad: A vibrant mix of sweet corn, tomatoes, and lime juice adds a fresh and crunchy element, brightening up the dish’s rich flavors.

  • Pico de Gallo: This zesty salsa adds a burst of freshness with its chopped tomatoes, onions, and cilantro, making the entire meal feel light and rejuvenating.

  • Chips and Salsa: A side of crispy tortilla chips with zesty salsa is the perfect starter, setting a festive tone for your enchilada feast.

  • Margaritas: For a fun pairing, sip on a classic margarita. Its refreshing tang complements the savory notes of the enchiladas.

  • Flan: This creamy dessert, with its caramel topping, offers a sweet and satisfying finish that leaves you and your guests smiling.

Each pairing adds its own unique twist to the meal, ensuring a delightful dining experience that lingers long after the last bite of enchilada is enjoyed!

Make Ahead Options

These Chicken Enchiladas with Sour Cream White Sauce are a fantastic option for meal prep enthusiasts! You can prepare the filling (chicken, cheeses, and spices) and sauce up to 24 hours in advance, allowing the flavors to meld beautifully. Store them in airtight containers in the refrigerator for optimal freshness. When you’re ready to cook, fill the tortillas with the prepared mixture, roll them up, and place them in a greased baking dish. Pour the sauce over the top and bake according to the original instructions. This way, you can enjoy a comforting, homemade meal with minimal effort on busy weeknights!

Chef's Helpful Tips

  • When making Chicken Enchiladas with Sour Cream White Sauce, be sure to sauté the peppers and onions until they are softened to enhance their flavors and sweetness.
  • A common mistake is overcooking the garlic, so add it towards the end of the sautéing process to prevent bitterness.
  • For a smoother sauce, gradually whisk in the chicken broth to avoid lumps and ensure even consistency.
  • To achieve that perfect bubbly and golden top, make sure your oven is preheated to 350°F and keep an eye on your enchiladas during the final minutes of baking to avoid overcooking.

Chicken Enchiladas with Sour Cream White Sauce Recipe FAQs

How do I choose the right peppers for my enchiladas?
Absolutely! For Chicken Enchiladas with Sour Cream White Sauce, select firm serrano and jalapeño peppers with vibrant colors—avoid any that have dark spots or wrinkles. Fresh peppers will give your sauce the best flavor and the right amount of kick.

How should I store leftovers?
Very! To store any leftovers, place the enchiladas in an airtight container in the fridge for up to 3 days. This will keep the creamy texture of the sour cream sauce intact while you savor each delicious bite over the next few days!

Can I freeze my enchiladas?
You bet! For freezing, wrap the enchiladas tightly in foil or use freezer-safe containers, ensuring no air can enter. They can be stored for up to 3 months. When you’re ready to enjoy them, thaw overnight in the fridge, and then reheat as needed.

What’s the best way to reheat enchiladas?
Here’s a comprehensive method: Preheat your oven to 350°F (175°C). Place your enchiladas in a baking dish and cover them with foil to retain moisture. Heat for about 20-25 minutes or until they are warmed through. If they seem a bit dry, adding a splash of chicken broth before covering can work wonders!

Is this recipe suitable for those with allergies?
Absolutely! If you have specific dietary needs, you can easily adapt the Chicken Enchiladas with Sour Cream White Sauce. For a dairy-free option, consider using cashew or coconut cream in place of sour cream. Always check ingredients such as chicken broth for potential allergens, and feel free to substitute with vegetable broth if needed.

Do I need to adjust the recipe for my pets?
It’s a great consideration! While some components like shredded chicken may be pet-friendly, ingredients such as onions and peppers can be harmful to dogs and cats. It’s best to set aside plain cooked chicken for your pets instead. Enjoy your meal worry-free!

Chicken Enchiladas with Sour Cream White Sauce

Chicken Enchiladas with Sour Cream White Sauce

Delicious Chicken Enchiladas with Sour Cream White Sauce combining tender chicken, zesty peppers, and a creamy sauce for a satisfying dinner.
Print Recipe Pin Recipe
Prep Time 20 minutes mins
Cook Time 30 minutes mins
Total Time 50 minutes mins
Servings: 4 enchiladas
Course: DINNER RECIPES
Cuisine: Mexican
Calories: 350
Ingredients Equipment Method Nutrition Notes

Ingredients
  

For the Sauce
  • 4 tablespoons Butter adds richness and depth
  • 1 medium Serrano pepper diced, provides mild heat
  • 1 medium Jalapeño pepper diced, adds a zesty kick
  • 2 cloves Garlic minced, brings aromatic flavor
  • 1/4 cup All-purpose flour thickens the sauce
  • 2 cups Chicken broth infuses savory depth
  • 1 cup Sour cream gives creaminess
  • 1/2 cup Salsa verde adds fresh tang
  • 1 teaspoon Cumin contributes earthy warmth
  • 1/2 teaspoon Salt enhances flavors
  • 1/2 teaspoon Garlic powder boosts garlic taste
  • 1/4 teaspoon White pepper adds subtle spice
  • 1/4 teaspoon Cayenne add heat to preference
  • 1/4 cup Cilantro for garnish and flavor
For the Filling
  • 2 cups Cooked and shredded chicken star protein
  • 8 large Flour tortillas soft and pliable
  • 1 cup Sharp cheddar cheese bold flavor
  • 1 cup Monterrey Jack cheese creamy texture
  • 1 medium Yellow onion sautéed for sweetness

Equipment

  • Skillet
  • Baking dish
  • Mixing bowl

Method
 

Directions
  1. In a skillet, melt the butter over medium heat until bubbling and fragrant. Add the diced serrano and jalapeño peppers along with the onion, sautéing until softened, about 3-5 minutes.
  2. Stir in the minced garlic and cook for another minute, letting that delicious aroma fill your kitchen.
  3. Sprinkle in the all-purpose flour, stirring continuously for 1-2 minutes to create a roux, which will help thicken the sauce.
  4. Gradually whisk in the chicken broth, bringing the mixture to a gentle simmer.
  5. Stir in the sour cream, salsa verde, cumin, salt, garlic powder, white pepper, cayenne, and half of the cilantro. Allow to simmer for about 5 minutes.
  6. While the sauce simmers, preheat your oven to 350°F (175°C).
  7. In a separate bowl, mix together the cooked chicken, shredded cheeses, and the remaining cilantro until fully combined.
  8. Take each tortilla and fill it generously with the chicken mixture. Roll them up tightly and place seam side down in a greased baking dish.
  9. Pour the luscious sour cream sauce generously over the enchiladas.
  10. Place the dish in the preheated oven and bake for 25-30 minutes, or until the enchiladas are bubbly and golden brown on top.

Nutrition

Serving: 1enchiladaCalories: 350kcalCarbohydrates: 40gProtein: 22gFat: 15gSaturated Fat: 7gPolyunsaturated Fat: 1gMonounsaturated Fat: 3gCholesterol: 75mgSodium: 800mgPotassium: 300mgFiber: 2gSugar: 3gVitamin A: 8IUVitamin C: 15mgCalcium: 20mgIron: 10mg

Notes

Garnish with fresh cilantro or a sprinkle of lime juice before serving for an added zest.

Tried this recipe?

Let us know how it was!

Filed Under: DINNER RECIPES

  • « Previous Page
  • 1
  • …
  • 23
  • 24
  • 25
  • 26
  • 27
  • …
  • 37
  • Next Page »

Recent Posts

  • One Pot Cheesy Pasta
  • Steak with Mushroom Sauce
  • St. Patrick’s Day Puppy Chow
  • Salmon with Lemon Butter
  • St. Patrick’s Day Puppy Chow

Recent Comments

No comments to show.

Footer

  • Contact
  • Privacy Policy
  • About Us
  • Terms
  • ↑ back to top

Copyright © 2024 www.Forkono.com

Table Of Content