Forkono

  • BREAKFAST & BRUNCH
  • DESSERT RECIPES
  • DINNER RECIPES
  • LUNCH RECIPES
  • About uS
  • SNACKS & APPETIZERS
menu icon
go to homepage
  • BREAKFAST & BRUNCH
  • DESSERT RECIPES
  • DINNER RECIPES
  • LUNCH RECIPES
  • About uS
  • SNACKS & APPETIZERS
search icon
Homepage link
  • BREAKFAST & BRUNCH
  • DESSERT RECIPES
  • DINNER RECIPES
  • LUNCH RECIPES
  • About uS
  • SNACKS & APPETIZERS
×

Easy Cucumber Caprese Salad

December 11, 2025 by JudyWhite Leave a Comment

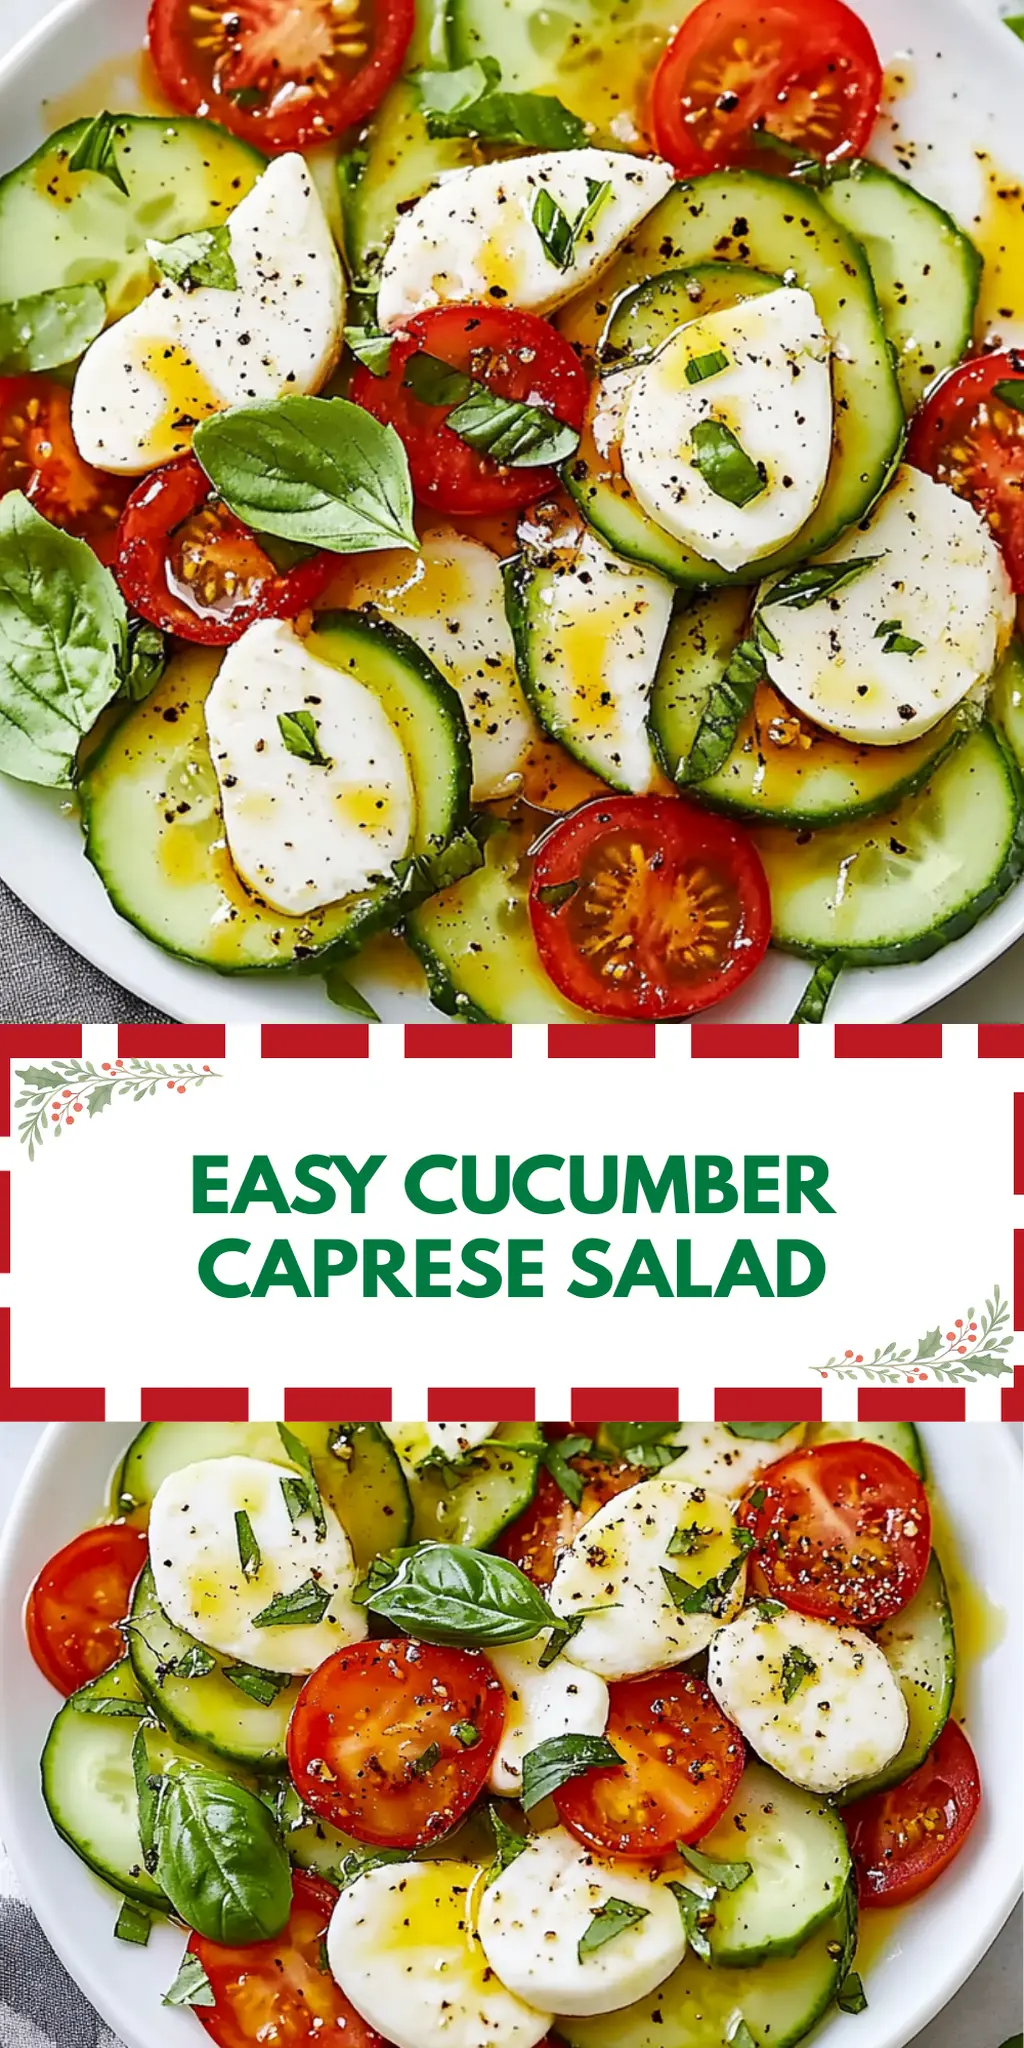
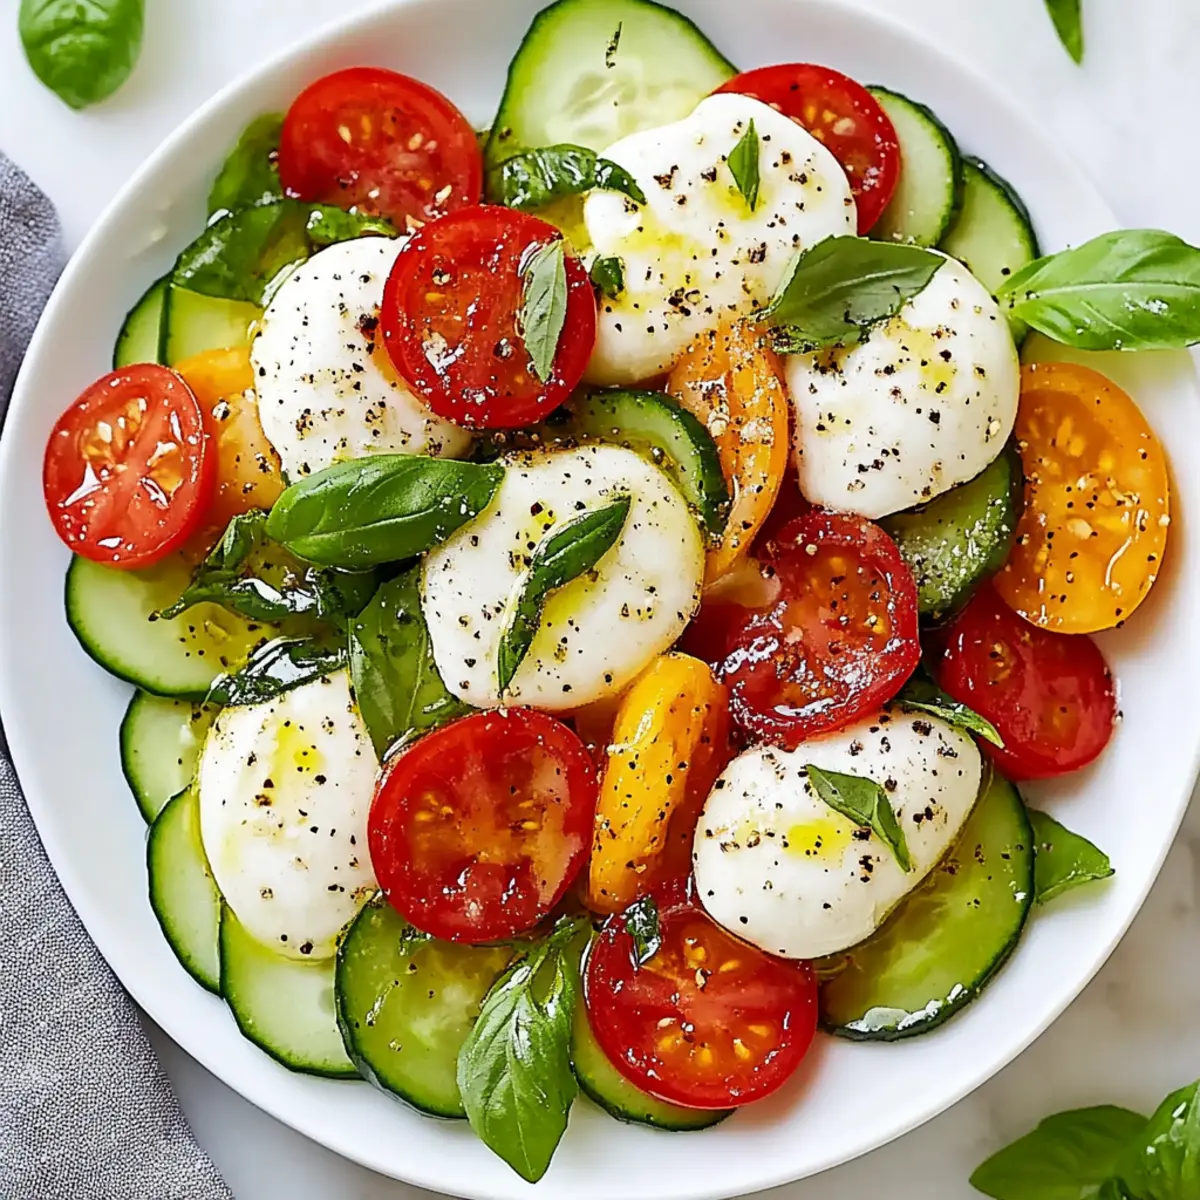
There’s something so refreshing about the crunch of a cucumber paired with the sweetness of ripe tomatoes that instantly transports me to summer picnics and sun-kissed gardens. One day, while cleaning out my fridge, I found a bounty of garden-fresh tomatoes and crispy cucumbers; a delicious idea sparked in my mind. What better way to showcase these vibrant flavors than with an Easy Cucumber Caprese Salad?

With just a handful of ingredients and a mere 10 minutes of your time, you’ll whip up a dish that’s not only visually stunning but also bursting with flavor. This salad is a perfect side for any barbecue or a light solo lunch, making it a versatile addition to your culinary repertoire. Whether you’re an experienced chef or someone simply seeking to create healthier, homemade meals, this salad is here to rejuvenate your menu. Let’s dive into the simple steps that turn ordinary ingredients into a refreshing feast!

Why You'll Love This Easy Cucumber Caprese Salad

  • This Easy Cucumber Caprese Salad is a breeze to make, requiring only 10 minutes of prep time to create a delicious dish.
  • The refreshing combination of crunchy cucumbers and sweet tomatoes makes it a flavor-packed choice that will delight your taste buds.
  • Its vibrant colors and presentation make it an eye-catching addition to any table, ensuring that it will be a hit at gatherings.
  • Plus, this salad is incredibly versatile, perfect as a side dish, a light lunch, or even an appetizer that everyone will enjoy.

Easy Cucumber Caprese Salad Ingredients

For the Salad

  • 1 pound beefsteak or heirloom tomatoes – sliced 1/4-inch thick for juicy sweetness.
  • 3 units Persian cucumbers – or use 1 large English cucumber, thinly sliced for that refreshing crunch.
  • 8 ounces fresh mozzarella cheese – sliced into rounds for creamy richness.
  • Extra-virgin olive oil – drizzled on top for a burst of flavor.
  • Balsamic vinegar – adds a tangy note that complements the salad beautifully.
  • Flaky sea salt – enhances all the vibrant flavors in this Easy Cucumber Caprese Salad.
  • Freshly ground black pepper – adds a subtle kick to round out the taste.
  • 6 to 8 leaves fresh basil – torn into pieces for aromatic freshness.

How to Make Easy Cucumber Caprese Salad

  1. Arrange sliced tomatoes on a serving platter, creating a colorful base that adds a burst of freshness to your salad. Each slice should be about 1/4-inch thick for the best presentation and flavor.

  2. Layer sliced cucumbers and fresh mozzarella cheese on top of the tomatoes, alternating between the two. This adds both texture and a lovely visual appeal to your Easy Cucumber Caprese Salad.

  3. Drizzle extra-virgin olive oil and balsamic vinegar all over the salad, allowing the flavors to mix. Use enough to coat the ingredients lightly—just a tablespoon of each will do the trick!

  4. Season with flaky sea salt and freshly ground black pepper, adjusting to taste. The salt will draw out the moisture in the tomatoes, enhancing the overall flavor and making every bite delightful.

  5. Add torn basil leaves for garnish; this final touch brings a fragrant aroma and a pop of color to your dish, making it Instagram-worthy!

Optional: Serve immediately for the freshest taste, or chill for 10-15 minutes to let the flavors meld.

Exact quantities are listed in the recipe card below.

What to Serve with Easy Cucumber Caprese Salad?

Elevate your meal with delightful pairings that enhance the flavors of this refreshing salad.

  • Grilled Chicken: Tender, juicy grilled chicken adds a hearty protein component that beautifully complements the lightness of the salad.

  • Garlic Bread: The warmth and crunch of garlic bread bring a comforting contrast, perfect for scooping up those flavorful juices.

  • Quinoa Pilaf: A fluffy quinoa pilaf with herbs adds a nutty flavor that balances well with the crisp cucumbers and sweet tomatoes.

  • Roasted Vegetables: Earthy roasted veggies offer a caramelized sweetness that pairs delightfully with the salad’s fresh ingredients.

  • Pasta Primavera: Tossed with seasonal vegetables, a light pasta primavera enhances the vibrant nature of your meal while remaining satisfying.

  • Chilled White Wine: A crisp Sauvignon Blanc or Pinot Grigio refreshes your palate, bringing out the flavors of the cucumber and basil.

  • Lemon Sorbet: For dessert, a light lemon sorbet cleanses the palate and adds a zesty finish to your meal.

Enjoy a full sensory experience with these pairings that celebrate fresh, homemade goodness!

How to Store and Freeze Easy Cucumber Caprese Salad

  • Fridge: Store any leftover Easy Cucumber Caprese Salad in an airtight container in the refrigerator for up to 3 days. Be aware that the cucumbers may lose their crunch over time.

  • Avoid Freezing: It’s best not to freeze this salad, as the tomatoes and cucumbers will turn mushy once thawed. Fresh is always best when it comes to this delightful dish!

  • Reheating: This salad is best served cold or at room temperature. No reheating is necessary, but if you do prefer it poked in the microwave for a few seconds, remove the cheese and reassemble after warming.

  • Garnish Separately: If preparing in advance, consider adding the basil leaves just before serving to keep them fresh and vibrant.

Easy Cucumber Caprese Salad Variations

Feel free to get creative and personalize your salad to ignite your taste buds with these delicious tweaks!

  • Herbed Boost: Add fresh oregano or thyme for a fragrant touch that enhances the salad’s aroma and flavor. A simple sprinkle can transform every bite!

  • Spicy Kick: Toss in thinly sliced jalapeños or a pinch of red pepper flakes for a zesty contrast. This adds a delightful layer of heat that keeps things exciting!

  • Vegan: Substitute mozzarella with almond-based cheese or marinated tofu for a plant-based delight. You won’t miss the dairy with these creamy alternatives!

  • Add Fruit: Try adding fresh strawberries or sliced peaches for a fruity twist that balances sweetness with the savory elements beautifully. The juicy bursts will surprise and delight!

  • Nutty Crunch: Sprinkle some toasted pine nuts or sunflower seeds for extra crunch and healthy fats. The texture contrast elevates the whole dish, making it unforgettable.

  • Balsamic Reduction: Create a balsamic glaze by reducing vinegar on the stovetop for a more intense, sweet tang. Drizzle this over the salad for a sophisticated flavor upgrade!

  • Mediterranean Flair: Include kalamata olives or artichoke hearts for a Mediterranean vibe. Each addition brings a briny depth that pairs beautifully with the existing flavors.

  • Roasted Veggies: Add roasted red bell peppers or zucchini for a warm twist that adds richness and earthy notes. This twist is especially lovely in cooler months!

Make Ahead Options

These Easy Cucumber Caprese Salad components are perfect for meal prep, allowing you to create a delightful dish with minimal time investment! You can slice the tomatoes, cucumbers, and mozzarella and refrigerate them separately for up to 24 hours to maintain their crispness and freshness. Just remember to toss the basil in right before serving to keep it vibrant and aromatic. When you’re ready to enjoy your salad, simply layer the prepped ingredients, drizzle with olive oil and balsamic vinegar, and season as desired. This way, you’ll have a refreshing Easy Cucumber Caprese Salad ready in a flash for busy weeknights or surprise guests!

Chef's Helpful Tips

  • When preparing the Easy Cucumber Caprese Salad, make sure to slice the tomatoes, cucumbers, and mozzarella evenly for a balanced texture and presentation.
  • Avoid using overly ripe tomatoes as they can become mushy; instead, choose firm and juicy varieties.
  • Drizzle the extra-virgin olive oil and balsamic vinegar just before serving to keep the ingredients fresh and vibrant.
  • Remember to taste and adjust the seasoning with flaky sea salt and freshly ground black pepper to enhance the flavors to your liking.

Easy Cucumber Caprese Salad Recipe FAQs

What kind of cucumbers should I use for this salad?
Absolutely! Using Persian cucumbers gives you that refreshing crunch, but you can also opt for a large English cucumber if that’s what you have on hand. Just make sure to slice them thinly to keep the texture balanced and enjoyable.

How should I store leftovers of the Easy Cucumber Caprese Salad?
Store any leftover salad in an airtight container in the fridge for up to 3 days. Keep in mind that the cucumbers may lose their crispness over time, but the flavors will still be delicious! I often recommend enjoying it fresh for the optimal taste experience.

Can I freeze this salad?
No, I recommend against freezing your Easy Cucumber Caprese Salad. Freezing will cause the tomatoes and cucumbers to turn mushy once thawed, robbing the dish of its delightful textures. Fresh ingredients shine in this recipe!

What should I do if my tomatoes are super ripe?
In that case, look for beefsteak or heirloom tomatoes that are firm to the touch without dark spots all over. Ripe tomatoes should yield slightly to pressure without being overly soft. You want those juicy bites without the risk of mushiness!

Is this dish suitable for anyone with allergies?
While this salad is quite simple, it does contain dairy from the mozzarella cheese. If you or any of your guests have lactose intolerance or a dairy allergy, consider substituting with a vegan cheese option or simply omitting it entirely. The salad will still be refreshing and tasty without it!

How can I enhance the flavor of this dish without adding extra ingredients?
Very! You can enhance the flavor by letting the salad sit for about 10-15 minutes before serving. This allows the olive oil, balsamic vinegar, and seasonings to mingle beautifully with the tomatoes, cucumbers, and mozzarella. Enjoy it cool for a refreshing taste!

Easy Cucumber Caprese Salad

Easy Cucumber Caprese Salad

This Easy Cucumber Caprese Salad combines cucumbers and tomatoes in a refreshing dish perfect for summer gatherings.
Print Recipe Pin Recipe
Prep Time 10 minutes mins
Total Time 10 minutes mins
Servings: 4 servings
Course: Snacks & Appetizers
Cuisine: Italian
Calories: 200
Ingredients Equipment Method Nutrition Notes

Ingredients
  

For the Salad
  • 1 pound beefsteak or heirloom tomatoes sliced 1/4-inch thick for juicy sweetness
  • 3 units Persian cucumbers or use 1 large English cucumber, thinly sliced
  • 8 ounces fresh mozzarella cheese sliced into rounds
  • extra-virgin olive oil drizzled on top
  • balsamic vinegar adds a tangy note
  • flaky sea salt enhances flavors
  • freshly ground black pepper adds a subtle kick
  • 6 to 8 leaves fresh basil torn into pieces

Equipment

  • Serving platter

Method
 

How to Make Easy Cucumber Caprese Salad
  1. Arrange sliced tomatoes on a serving platter, creating a colorful base.
  2. Layer sliced cucumbers and fresh mozzarella cheese on top of the tomatoes, alternating.
  3. Drizzle extra-virgin olive oil and balsamic vinegar all over the salad.
  4. Season with flaky sea salt and freshly ground black pepper, adjusting to taste.
  5. Add torn basil leaves for garnish.

Nutrition

Serving: 1servingCalories: 200kcalCarbohydrates: 10gProtein: 8gFat: 15gSaturated Fat: 5gPolyunsaturated Fat: 0.5gMonounsaturated Fat: 10gCholesterol: 25mgSodium: 200mgPotassium: 300mgFiber: 2gSugar: 4gVitamin A: 500IUVitamin C: 20mgCalcium: 200mgIron: 1mg

Notes

Best served cold or at room temperature. Chill for 10-15 minutes to let flavors meld before serving.

Tried this recipe?

Let us know how it was!

Filed Under: SNACKS & APPETIZERS

Delicious Orange Jelly Candy

December 11, 2025 by JudyWhite Leave a Comment

The first time I tasted homemade orange jelly candy, I was transported back to my childhood summers spent under the warm sun, the only sound being the gentle rustle of leaves. This delightful treat captures that essence, combining the tartness of sour oranges with just the right amount of sweetness, resulting in a chewy, zesty candy that is simply irresistible.

When I stumbled upon some forgotten sour oranges in my fridge, I knew I had to put them to good use. The result? A vibrant, flavorful candy that not only satisfies my sweet tooth but also adds a touch of sunshine to any day. This delicious orange jelly candy is the perfect antidote to those mundane fast-food cravings—refreshing, fun to make, and a guaranteed crowd-pleaser for friends and family alike.

If you’re looking for a delightful way to bring nostalgia back into your kitchen, look no further. With just a handful of ingredients and a bit of patience, you’ll be creating these orange-flavored bites of joy in no time. Let’s dive into this simple recipe that will leave you and your loved ones smiling!

Why You'll Love This Delicious Orange Jelly Candy

  • This recipe is incredibly easy to make, requiring just a few simple ingredients and minimal cooking time.
  • The vibrant flavor of sour oranges combined with the sweetness makes each bite a delightful explosion of taste.
  • You’ll love how versatile this candy is, as it can be enjoyed as a snack, a party treat, or even a thoughtful homemade gift.
  • Plus, its eye-catching color and unique shape give it an appealing visual that impresses everyone at the table.

Delicious Orange Jelly Candy Ingredients

• These fantastic ingredients create a delightful treat that’s sure to impress!

For the Jelly Mixture

  • Sour orange juice – this adds a vibrant tartness to balance the sweetness.
  • Sugar – granulated sugar is key for sweetness; you can use coconut sugar for a healthier alternative.
  • Agar agar – a plant-based gelling agent that helps firm up the jelly, making it vegan-friendly.

Optional Coatings

  • Powdered sugar – for sprinkling; it prevents sticking and adds a sweet finish.
  • Food coloring – a few drops can brighten up your jelly candy, making it even more visually appealing.

These ingredients come together to create the delicious orange jelly candy that’s bound to brighten your day!

How to Make Delicious Orange Jelly Candy

  1. Combine Ingredients: In a large saucepan, mix together the sugar, sour orange juice, and agar agar powder. If you’d like, add a few drops of orange or yellow food coloring to enhance the candy’s brightness.

  2. Cook Mixture: Stir the mixture CONSTANTLY over medium-high heat until it reaches a rolling boil. Lower the heat to medium-low and cook for about 4-5 minutes until the mixture thickens and bubbles.

  3. Pour and Chill: Pour the hot mixture into a rimmed 10×10-inch pan lined with parchment paper, making sure it’s evenly distributed. Allow it to chill in the fridge for at least two hours until set.

  4. Prepare for Cutting: Once chilled, take the pan out and cover about 1/2 inch at one edge with new parchment paper. Sprinkle powdered sugar over the remaining jelly surface to prevent sticking.

  5. Cut the Candy: Dip a sharp knife in warm water to loosen the jelly. Carefully slice the jelly into two blocks, running the knife across the middle for even portions.

  6. Roll into Logs: Gently roll each piece into a tight log, ensuring you don’t get powdered sugar on the sticky edge where the parchment paper was; this is crucial for keeping your log intact!

  7. Slice and Serve: Use a sharp knife to cut each log into 1/2-inch pieces. Serve and enjoy these delightful bites of homemade candy!

Optional: Dust the candy pieces with extra powdered sugar for a sweet finish.

Exact quantities are listed in the recipe card below.

Delicious Orange Jelly Candy Variations

Feel free to let your creativity flow and personalize this delightful treat with these fun, delicious twists!

  • Citrus Medley: Use a blend of lemon and lime juices along with the sour orange juice for an extra tart kick. It adds layers of flavor that will surprise and delight every taste bud.

  • Spicy Kick: Add a pinch of cayenne pepper or chili powder to the mixture for a hint of heat. This unexpected twist can turn your candy into an exciting treat that tantalizes the senses.

  • Herb Infusion: Incorporate a few sprigs of fresh mint or basil while cooking. Strain the mixture before cooling to infuse it with refreshing herbal notes that make it truly unique.

  • Fruit Flavors: Substitute sour orange juice with other citrus juices like grapefruit or tangerine for different taste profiles. Each fruit brings its own character, making it fun to explore new flavors!

  • Colorful Layers: Create a layered candy by dividing the mixture into two bowls, tinting each with different food colorings, and then carefully pouring them in layers. The visual appeal will impress anyone who has the pleasure of enjoying this candy!

  • Nutty Crunch: Mix in finely chopped nuts or seeds, such as pistachios or sesame seeds, before pouring into the pan. This adds a delightful crunch that contrasts beautifully with the chewy candy.

  • Sweet Chocolate Dip: Melt dark or milk chocolate and dip the finished candy pieces for a luxurious touch. The rich chocolate pairs exquisitely with the vibrant orange flavor, creating a decadent treat.

  • Zesty Glaze: Brush finished candy pieces with a light glaze made of orange juice and powdered sugar for a shiny, sweet finish. This not only enhances the look but adds another layer of sweetness that elevates the already delicious candy.

What to Serve with Delicious Orange Jelly Candy?

Looking to complement your sweet and zesty orange jelly candy experience? Here are some delightful pairings to elevate your treat!

  • Fresh Fruit Salad: A mix of juicy berries and tart apples enhances the candy’s citrus notes and adds a refreshing crunch.

  • Dark Chocolate Dipping Sauce: Rich, melted chocolate provides a luscious contrast that beautifully balances the candy’s tangy sweetness.

  • Mint Tea: This aromatic herbal tea offers a mild, soothing flavor that cools the palate while highlighting the candy’s brightness.

  • Cheese Platter: A selection of sharp cheeses contrasts well with the sweetness of the jelly, creating a sophisticated flavor combination.

  • Vanilla Ice Cream: Creamy ice cream balances the chewy texture of the candy, creating a delightful and indulgent treat.

  • Sparkling Water with Citrus: The fizz and brightness of citrus-enhanced sparkling water refreshes your taste buds, making each bite of candy even more enjoyable.

These pairings will create a delightful spread that everyone will love to savor alongside your delicious orange jelly candy!

How to Store and Freeze Delicious Orange Jelly Candy

Fridge: Keep your delicious orange jelly candy stored in an airtight container in the fridge for up to 1 week. This ensures it remains fresh and chewy.

Freezer: If you want to extend its shelf life, freeze the candy in a single layer on a baking sheet for about 2 hours, then transfer to an airtight bag. It can last up to 3 months.

Reheating: To enjoy the frozen candy, let it thaw in the fridge overnight or at room temperature for a couple of hours. There’s no need to reheat; it’s delightful served cold!

Serving: For best taste, roll the thawed candy in powdered sugar just before serving to bring back that fresh look and texture.

Make Ahead Options

These delicious orange jelly candies are perfect for busy weeknights or last-minute gatherings! You can prep the jelly mixture up to 24 hours in advance by following steps 1 through 3, allowing you to save time when you’re ready to serve. Simply pour the hot mixture into the pan and let it chill in the fridge overnight. When you’re ready to roll and cut the candy, take it out of the fridge and proceed with steps 4 to 7. To maintain quality, ensure that the candy is tightly wrapped in parchment paper before refrigerating, preventing moisture from affecting the texture. Enjoy making the process easier with these make-ahead tips for your delicious orange jelly candy!

Chef's Helpful Tips

  • To enhance the flavor of your Delicious Orange Jelly Candy, opt for freshly squeezed sour orange juice for a brighter and more complex taste.
  • Be sure to stir your mixture continuously while cooking to prevent the agar agar from clumping, which can lead to uneven texture.
  • For best results, allow your jelly to chill for a full two hours; this ensures it sets properly and can be easily cut.
  • When cutting your jelly, dipping the knife in warm water not only aids in slicing but also helps achieve clean edges, making for a professional-looking finish.

Delicious Orange Jelly Candy Recipe FAQs

How do I choose the right sour orange juice?
Absolutely! For the best flavor, opt for fresh or freshly squeezed sour oranges. Look for oranges that are firm and heavy for their size, with a vibrant color. Avoid any fruit with dark spots or an overly dull appearance, as that can indicate overripeness or spoilage.

What’s the best way to store leftover orange jelly candy?
Very! To keep your delicious orange jelly candy fresh, store it in an airtight container in the fridge. It will remain chewy and tasty for up to 1 week. If you notice any signs of moisture or it’s getting too sticky, simply dust it with a little extra powdered sugar before sealing.

Can I freeze this orange jelly candy?
Indeed! To freeze your jelly candy, first, place it in a single layer on a baking sheet and freeze for about 2 hours. Once frozen, transfer the pieces to an airtight bag, ensuring to remove as much air as possible. It’ll keep well in the freezer for up to 3 months. When you’re ready to enjoy it, thaw it in the fridge overnight or at room temperature for about two hours.

What if my jelly candy doesn’t set properly?
No worries! If your delicious orange jelly candy doesn’t set, it might be due to insufficient cooking time or too little agar agar. First, you can try briefly reheating the mixture until it comes to a rolling boil again, ensuring you stir constantly. If needed, add more agar agar (1/2 teaspoon, dissolved in a little water) and allow it to boil for an extra minute. Pour it back into the mold and chill again. If your jelly sets too hard, you can add a little water and gently reheat, mixing until it reaches your desired texture.

Are there any dietary concerns with this recipe?
Absolutely! This delicious orange jelly candy is naturally vegan, thanks to the agar agar. However, if you or your loved ones have specific allergies, be cautious about the sugar option. Granulated sugar is generally safe but always check labels if you’re using specialty sugars. If you’re making this candy for pets, remember that sugar is not advisable for animal diets, so it’s best for people only!

Delicious Orange Jelly Candy

Delicious Orange Jelly Candy

This delicious orange jelly candy combines the tartness of sour oranges with just the right amount of sweetness for a chewy, zesty treat.
Print Recipe Pin Recipe
Prep Time 10 minutes mins
Cook Time 5 minutes mins
Chilling Time 2 hours hrs
Total Time 2 hours hrs 15 minutes mins
Servings: 12 pieces
Course: DESSERT RECIPES
Cuisine: American
Calories: 50
Ingredients Equipment Method Nutrition Notes

Ingredients
  

Jelly Mixture
  • 1 cup sour orange juice freshly squeezed for best flavor
  • 1 cup sugar granulated or coconut sugar
  • 2 tablespoons agar agar powder form
Optional Coatings
  • 1/4 cup powdered sugar for sprinkling
  • 5 drops food coloring orange or yellow for enhancement

Equipment

  • large saucepan
  • rimmed 10x10 inch pan
  • sharp knife
  • parchment paper

Method
 

Making the Candy
  1. In a large saucepan, mix together the sugar, sour orange juice, and agar agar powder. If you'd like, add a few drops of food coloring.
  2. Stir the mixture CONSTANTLY over medium-high heat until it reaches a rolling boil. Lower the heat to medium-low and cook for about 4-5 minutes until it thickens.
  3. Pour the hot mixture into a lined pan and chill in the fridge for at least two hours until set.
  4. Take the pan out, cover an edge with new parchment paper, and sprinkle powdered sugar over the jelly surface.
  5. Dip a knife in warm water to loosen the jelly. Slice it into two blocks.
  6. Gently roll each piece into a tight log.
  7. Cut each log into 1/2-inch pieces. Serve and enjoy!

Nutrition

Serving: 1pieceCalories: 50kcalCarbohydrates: 13gPotassium: 30mgSugar: 12gVitamin C: 10mg

Notes

For best results, use freshly squeezed sour orange juice and allow the jelly to chill fully before cutting.

Tried this recipe?

Let us know how it was!

Filed Under: DESSERT RECIPES

Chocolate Orange Truffles

December 11, 2025 by JudyWhite Leave a Comment

There’s something undeniably delightful about the combination of rich chocolate and zesty orange that instantly transports me to a cozy café in Paris. As I whisk together creamy, melted chocolate and the bright essence of fresh orange zest, I can’t help but smile at how effortlessly these Chocolate Orange Truffles come together. Perfect for impressing guests or simply indulging myself, this recipe has a way of turning any ordinary day into a special occasion.

Best of all, these truffles require just a handful of ingredients and a little patience to chill, which means you can whip them up even on a busy weeknight. Imagine sinking your teeth into the smooth, velvety chocolate exterior, only to discover the burst of citrus flavor waiting inside. Whether you serve them at a gathering or enjoy them as an evening treat, these truffles are sure to satisfy your sweet cravings without the heaviness of traditional desserts. Let’s dive into making your new favorite chocolatey delight!

Why You'll Love This Chocolate Orange Truffles

  • These Chocolate Orange Truffles are incredibly easy to make, requiring just a few simple ingredients and minimal effort.
  • The delightful flavor combination of rich chocolate and zesty orange creates a memorable treat that is sure to please everyone.
  • Their versatility means they can be served at any occasion, from casual gatherings to elegant dinner parties.
  • Plus, the striking visual appeal of these truffles makes them a show-stopping dessert that is as stunning as it is delicious.
  • They are perfect for impressing guests while being time-saving, as they can be prepared in advance and chilled until ready to serve.
  • You will find these truffles are a crowd-pleaser that brings joy with every bite!

Chocolate Orange Truffles Ingredients

• Get ready to delight your taste buds!

For the Truffles

  • Semi Sweet or Dark Chocolate – finely chopped to ensure it melts smoothly into a luscious filling.
  • Heavy Whipping Cream – adds a rich, creamy texture that makes these Chocolate Orange Truffles heavenly.
  • Orange – zested to unleash its vibrant, citrusy essence and enhance the flavor profile beautifully.

For Coating

  • Chocolate Sprinkles – for a fun, crunchy texture and an extra touch of sweetness.
  • Cocoa Powder – use for a classic, bittersweet coating that perfectly complements the rich chocolate inside.

How to Make Chocolate Orange Truffles

  1. Chop the chocolate into small pieces and place them in a mixing bowl. This step allows for easier melting, so ensure they’re finely chopped—about the size of chocolate chips works perfectly.

  2. Heat the heavy whipping cream in a saucepan over medium heat until it begins to simmer. Watch closely; you want it hot, but not boiling, to avoid scalding the cream.

  3. Pour the hot cream over the chopped chocolate and let it sit for about 3-5 minutes. This gentle melting time helps create a smooth, silky texture for your truffles.

  4. Stir the mixture until it’s smooth and well combined. You should see a glossy, rich chocolate consistency that’s calling your name!

  5. Add the grated orange zest to the chocolate mixture and stir until fully incorporated. This will infuse your truffles with that delightful citrus burst—don’t skip this step!

  6. Refrigerate the mixture for approximately 120 minutes or until it firms up. You want it to be scoopable, so give it that time to chill well!

  7. Scoop out small amounts of the mixture and roll them into balls, using your hands. Aim for about a tablespoon’s worth for perfect bite-sized truffles.

  8. Roll the truffles in chocolate sprinkles or cocoa powder to coat them. This adds both flavor and a lovely finish—make sure they’re well-coated!

  9. Place the coated truffles on a baking sheet and refrigerate until ready to serve. This final chill helps the coatings set perfectly.

Optional: Dust with extra orange zest before serving for a fresh touch!

Exact quantities are listed in the recipe card below.

How to Store and Freeze Chocolate Orange Truffles

Fridge: Keep your Chocolate Orange Truffles in an airtight container in the fridge for up to 1 week to maintain their freshness and flavor.

Freezer: For longer storage, freeze the truffles in a single layer on a baking sheet, then transfer to an airtight container where they can last for up to 3 months.

Thawing: When you’re ready to enjoy, simply remove the truffles from the freezer and let them thaw in the fridge for a couple of hours—they’ll be just as delicious!

Reheating: No need to reheat; serve these truffles chilled for the best texture and flavor experience!

What to Serve with Chocolate Orange Truffles?

Imagine gathering around a table, laughter in the air, as you savor delightful treats that perfectly complement the zesty richness of these indulgent truffles.

  • Rich Dark Coffee: The deep flavors of a well-brewed dark coffee provide a luscious contrast to the sweet and tangy truffles, enhancing their chocolate notes.

  • Fresh Berries: Brightly colored berries like raspberries or strawberries add a refreshing burst that beautifully balances the richness of the chocolate. Their natural sweetness paired with the citrus notes creates an enchanting flavor experience.

  • Vanilla Ice Cream: The creamy, smooth texture of vanilla ice cream serves as a rich background that allows the truffles to shine. It’s a classic combination that feels like a warm hug on a plate.

  • Sparkling Wine: A chilled glass of sparkling wine or champagne provides a festive touch, highlighting the truffles’ flavors while cleansing the palate with each sip.

  • Chocolate Mousse: Consider serving a light, airy chocolate mousse alongside for a delightful textural contrast. The mousse’s creaminess complements the truffles, making for a decadent dessert pairing.

  • Orange Zest Infused Cheesecake: An orange-infused cheesecake enhances the citrus flavor found in the truffles, creating a delightful harmony of flavors that your guests will adore.

  • Mint Tea: A soothing cup of mint tea helps cleanse the palate and offers a refreshing finish to the chocolate experience. It’s simple yet effective in bringing balance to your dessert table.

  • Almond Biscotti: Provide a crunchy texture with almond biscotti for a delightful dipper. The nutty flavor pairs beautifully with the chocolate and orange, creating an extra layer of enjoyment.

Make Ahead Options

These Chocolate Orange Truffles are ideal for meal prep, making your sweet indulgence even more convenient! You can prepare the truffle mixture up to 3 days in advance. Simply follow the recipe up to step 6, then refrigerate it tightly covered to maintain freshness. When you’re ready to enjoy them, scoop and roll the truffles in your desired coatings just before serving, ensuring they’re as delightful as freshly made. This method not only saves time but also ensures that the flavors have time to meld beautifully, leaving you with consistently rich and zesty truffles that taste just as delicious. Enjoy the satisfaction of having a scrumptious treat ready whenever you need it!

Chocolate Orange Truffles Variations

Feel free to explore a world of flavors and textures with these delightful twists to your truffles!

  • Nutty Add-In: Mix in 1/4 cup of finely chopped hazelnuts or almonds for added texture and flavor. The nutty crunch beautifully complements the creamy chocolate.

  • Spicy Kick: Add a pinch of cayenne pepper or chili powder to the chocolate mixture for an unexpected burst of heat. It creates a delightful contrast to the sweetness!

  • Vegan Friendly: Substitute heavy cream with coconut cream and use dairy-free chocolate to create a luscious vegan treat. You won’t miss the dairy with the rich coconut flavor!

  • Liqueur Infusion: Stir in a tablespoon of orange liqueur, like Grand Marnier or Cointreau, for a sophisticated flavor enhancement. This little touch elevates your truffles to a decadent dessert!

  • Fruit Fusion: Swap the orange zest for lemon or raspberry purée for a refreshing twist. Each variation offers its own unique burst of tanginess that pairs wonderfully with chocolate.

  • Sweet & Salty: Incorporate a sprinkle of flaky sea salt to the chilled truffles before serving to enhance and balance the sweetness. It brings a mouthwatering contrast that everyone will love!

  • Cocoa Roll Variation: Roll the truffles in finely chopped toasted coconut or crushed pistachios for a unique twist on the traditional coating. Each bite becomes an adventure in flavor and texture!

  • Herbal Essence: Experiment by adding a touch of fresh mint or rosemary to the chocolate mixture for an aromatic and refreshing flavor. It’s a unique way to impress your guests with a sweet herbal blend!

Chef's Helpful Tips

  • When making Chocolate Orange Truffles, be sure to finely chop your chocolate to ensure it melts evenly and creates a smooth ganache.
  • Avoid boiling the heavy whipping cream; just bring it to a simmer to prevent curdling or scalding the cream.
  • Allow the mixture to rest for a few minutes after pouring the hot cream over the chocolate to achieve that glossy texture without overmixing.
  • Finally, make sure to refrigerate the mixture long enough to firm up properly, so your truffles hold their shape when rolled.

Chocolate Orange Truffles Recipe FAQs

How do I choose the best chocolate for my truffles?
Absolutely! When selecting chocolate, look for high-quality semi-sweet or dark chocolate with a cocoa content of at least 60-70%. Check for a glossy appearance and a smooth texture. Avoid chocolate chips, as they’re formulated to hold their shape and may not melt as smoothly.

How long do Chocolate Orange Truffles last in the fridge?
Very! If stored in an airtight container, your Chocolate Orange Truffles can last up to 1 week in the fridge. Just make sure to keep them sealed to prevent them from absorbing any unwanted odors from the refrigerator.

Can I freeze Chocolate Orange Truffles, and if so, how?
Yes, you can! To freeze, first lay the truffles in a single layer on a baking sheet and place them in the freezer until they are solid. This usually takes about 1-2 hours. Once they are firm, transfer them to an airtight container or a freezer bag. They can last for up to 3 months. When you’re ready to indulge, thaw them in the fridge for a couple of hours.

What should I do if my chocolate ganache is too runny?
If you find your chocolate ganache is too runny to scoop, don’t worry! Simply place the mixture back in the refrigerator for an additional 30-60 minutes to firm it up, checking periodically. If time is short, consider adding a bit more chopped chocolate or cocoa powder and gently stir until smooth. This can help thicken the texture while maintaining flavor.

Are there any dietary considerations I should think about when making these truffles?
Absolutely! If you’re preparing these truffles for someone with dietary restrictions, consider using dairy-free chocolate and heavy cream to make them vegan. Also, check the specific brands for potential allergens, such as nuts or gluten, as some chocolates may have cross-contamination. Always ensure the ingredients align with personal dietary needs.

Chocolate Orange Truffles

Chocolate Orange Truffles

Delightful Chocolate Orange Truffles combining rich chocolate and zesty orange for an exquisite treat.
Print Recipe Pin Recipe
Prep Time 15 minutes mins
Cook Time 5 minutes mins
Chilling Time 2 hours hrs
Total Time 2 hours hrs 20 minutes mins
Servings: 12 truffles
Course: DESSERT RECIPES
Cuisine: French
Calories: 120
Ingredients Equipment Method Nutrition Notes

Ingredients
  

For the Truffles
  • 8 oz Semi Sweet or Dark Chocolate finely chopped
  • 1 cup Heavy Whipping Cream adds richness
  • 1 medium Orange zested
For Coating
  • 1 cup Chocolate Sprinkles
  • 1/2 cup Cocoa Powder for coating

Equipment

  • Mixing bowl
  • Saucepan
  • Baking sheet

Method
 

Making Truffles
  1. Chop the chocolate into small pieces and place them in a mixing bowl.
  2. Heat the heavy whipping cream in a saucepan over medium heat until it begins to simmer.
  3. Pour the hot cream over the chopped chocolate and let it sit for about 3-5 minutes.
  4. Stir the mixture until it’s smooth and well combined.
  5. Add the grated orange zest to the chocolate mixture and stir until fully incorporated.
  6. Refrigerate the mixture for approximately 120 minutes or until it firms up.
  7. Scoop out small amounts of the mixture and roll them into balls.
  8. Roll the truffles in chocolate sprinkles or cocoa powder to coat them.
  9. Place the coated truffles on a baking sheet and refrigerate until ready to serve.

Nutrition

Serving: 1truffleCalories: 120kcalCarbohydrates: 10gProtein: 1gFat: 9gSaturated Fat: 5gMonounsaturated Fat: 4gCholesterol: 15mgSodium: 5mgPotassium: 60mgFiber: 1gSugar: 8gVitamin A: 200IUVitamin C: 2mgCalcium: 20mgIron: 1mg

Notes

Optional: Dust with extra orange zest before serving for a fresh touch. Store in an airtight container for up to 1 week.

Tried this recipe?

Let us know how it was!

Filed Under: DESSERT RECIPES

Orange-Rosemary Glazed Salmon

December 11, 2025 by JudyWhite Leave a Comment

There’s something truly invigorating about cooking with fresh ingredients, and nothing embodies that spirit quite like Orange-Rosemary Glazed Salmon. Imagine the bright, zesty aroma of oranges mingling with the earthy fragrance of rosemary wafting through your kitchen; it instantly lifts your mood and makes cooking feel like a celebration. This recipe came to life on a delightful afternoon when I decided to explore new flavors with salmon, and let’s just say, it’s been a staple in my home ever since.

In just 25 minutes, you can serve up a dish that looks and tastes gourmet, yet is incredibly simple to prepare. Not only is the salmon perfectly tender and flaky, but the herb-infused glaze strikes a harmonic balance of sweetness and savory, making it a guaranteed hit at any dinner table. Whether you’re tired of fast food or simply yearning for a touch of elegance in your meals, this Orange-Rosemary Glazed Salmon will leave your taste buds dancing with joy. Let’s dive into this delightful recipe and elevate your weeknight dinners!

Why You'll Love This Orange-Rosemary Glazed Salmon

  • This Orange-Rosemary Glazed Salmon is incredibly easy to make, allowing you to whip up a gourmet meal in just 25 minutes.
  • The vibrant flavors of the orange and rosemary create a deliciously unique glaze that will captivate your taste buds.
  • Its beautiful presentation makes it perfect for impressing guests or enjoying a special family dinner.
  • Plus, this recipe is versatile enough to pair with a variety of sides, making it a great option for any occasion.
  • Lastly, you’ll love how this dish transforms a simple weeknight dinner into an extraordinary culinary experience.

Orange-Rosemary Glazed Salmon Ingredients

• Let’s gather what we need for this delightful dish!

For the Salmon

  • Salmon fillets – Dive into the heart of this dish; 1-inch thick fillets ensure perfect cooking.
  • Olive oil – Essential for achieving that beautiful golden-brown sear on the salmon.
  • Salt and freshly ground black pepper – These staples enhance the natural flavor of the salmon, so season to your taste!

For the Glaze

  • Garlic – A touch of minced garlic elevates the flavor profile and adds depth to the glaze.
  • Fresh rosemary – Minced for a fragrant herb infusion; substitute with dried rosemary if needed, but fresh is best!
  • Chicken broth – This adds savory richness; feel free to use vegetable broth for a lighter option.
  • Orange zest – Packed with citrusy aromas, it brightens the glaze and complements the salmon perfectly.
  • Fresh orange juice – A key ingredient in the glaze, its sweetness pairs wonderfully with the salmon.
  • Lemon juice – A dash of acidity to balance the flavors; fresh is preferred for maximum zest!
  • Honey – This natural sweetener enhances the glaze’s brightness and introduces a subtle caramel note.
  • Cornstarch – It helps thicken the glaze, making sure every bite is coated in that mouthwatering Orange-Rosemary flavor.

How to Make Orange-Rosemary Glazed Salmon

  1. Heat the Oil:
    In a large non-stick sauté pan, warm the olive oil over medium-high heat, letting it shimmer. This step sets the stage for a delightful sear on your salmon.

  2. Sear the Salmon:
    Season both sides of the salmon fillets with salt and pepper. Add them to the pan, cooking for about 3 – 4 minutes per side until they are golden brown and cooked through. Transfer to a plate, keeping that lovely oil in the pan.

  3. Sauté Aromatics:
    Toss in the minced garlic and rosemary to the pan, sautéing for approximately 20 seconds until fragrant. Afterward, pour in 1/4 cup of chicken broth and let it simmer until mostly reduced, infusing the oil with delicious flavors.

  4. Prepare the Glaze:
    Stir in the orange zest, orange juice, lemon juice, and honey. In a small bowl, mix the remaining 1 Tbsp chicken broth with cornstarch until smooth and add it to the pan.

  5. Thicken the Sauce:
    Season the sauce with salt and pepper, then bring it to a boil, stirring constantly for about 1 minute until it thickens to a luscious glaze.

  6. Return the Salmon:
    Add the salmon back into the pan, spooning that wonderful sauce over each fillet. This last step ensures each bite is bursting with flavor!

Optional: Garnish with additional fresh rosemary for a fragrant touch.
Exact quantities are listed in the recipe card below.

How to Store and Freeze Orange-Rosemary Glazed Salmon

Fridge: Store any leftover Orange-Rosemary Glazed Salmon in an airtight container in the refrigerator for up to 3 days. This will help retain its delicious flavor and moisture.

Freezer: For longer storage, you can freeze the glazed salmon for up to 3 months. Wrap each fillet tightly in plastic wrap and then place in a freezer-safe bag to prevent freezer burn.

Thawing: When ready to enjoy, thaw the salmon overnight in the fridge. This preserves the texture and taste much better than microwaving.

Reheating: To reheat, gently warm the salmon in a skillet over low heat, spooning any remaining glaze over the top to revive its flavor and moisture.

Orange-Rosemary Glazed Salmon Variations

Feel free to get creative with this recipe and make it your own in delightful ways!

  • Herb Swap: Use fresh thyme or dill instead of rosemary for a different flavor profile that complements the salmon beautifully.

  • Citrus Fusion: Mix in lime or grapefruit juice alongside the orange for a zesty citrus kick that brightens the dish.

  • Spicy Kick: Add a pinch of red pepper flakes to the glaze for a subtle heat that awakens your taste buds with every bite.

  • Sweet Twist: Substitute maple syrup or agave for honey to create a distinct sweetness that adds a unique layer of flavor.

  • Nutty Crunch: Sprinkle slivered almonds or toasted pecans on top of the finished dish for a wonderful texture contrast and nutty flavor.

  • Vegetarian Option: Replace salmon with firm tofu, ensuring it’s pressed and marinated to soak up all the delicious flavors of the glaze.

  • Extra Veggies: Toss in seasonal vegetables such as asparagus or bell peppers in the last few minutes of cooking for a colorful, nutritious addition.

  • Infused Broth: Use vegetable broth or even coconut milk instead of chicken broth for a lighter, creamier sauce that appeals to various dietary preferences.

Make Ahead Options

These Orange-Rosemary Glazed Salmon fillets are perfect for meal prep enthusiasts! You can season and refrigerate the salmon (covered) up to 24 hours in advance, allowing the flavors to deepen beautifully. Additionally, the glaze can be prepared ahead of time and stored in an airtight container for up to 3 days in the refrigerator. Just remember to reheat it gently over low heat before serving. When you’re ready to enjoy your dish, simply cook the salmon in the hot pan as directed and drizzle the warmed glaze over it. This method not only saves time but ensures your salmon remains just as delicious and flavorful, transforming busy weeknights into extraordinary dining experiences!

What to Serve with Orange-Rosemary Glazed Salmon?

Imagine the delight of a full meal that elevates the freshness of your Orange-Rosemary Glazed Salmon with complementary companions that sing in harmony.

  • Creamy Mashed Potatoes: The velvety texture provides a comforting contrast to the flaky salmon while soaking up the glaze perfectly.

  • Lemon-Dill Quinoa: This fresh, zesty side brings a nutty flavor that pairs well with the citrus notes in the salmon, offering a light and bright element to the meal.

  • Steamed Asparagus: Tender asparagus spears add a crisp, vibrant green that complements the salmon beautifully; their earthy flavor balances the sweetness of the glaze.

  • Roasted Brussels Sprouts: Caramelized Brussels sprouts add a delightful crunch and a slightly bitter note that balances the citrusy sweetness of the salmon.

  • Cucumber and Tomato Salad: Refreshing and light, this salad offers a crisp bite and acidity that cuts through the richness of the fish, making every mouthful a pleasure.

  • Garlic Bread: The buttery, garlicky goodness of toasted bread is perfect for mopping up any leftover glaze, ensuring none of that delicious flavor goes to waste.

  • Chilled White Wine: A glass of chilled Sauvignon Blanc or Pinot Grigio enhances the dish, bringing out the herbal and citrus accents in the salmon.

  • Pineapple Upside-Down Cake: Finish off your meal with a slice of this sweet and tangy dessert; its vibrant flavors work beautifully alongside the salmon’s glaze.

Each of these pairings enhances your dining experience, making your meal feel complete and utterly satisfying!

Chef's Helpful Tips

  • For the Orange-Rosemary Glazed Salmon, ensure your salmon fillets are similar in size for even cooking.
  • Avoid overcrowding the pan when searing the salmon to prevent steaming; give them enough space to brown beautifully.
  • When incorporating the garlic and rosemary, cook them just until fragrant to avoid burning, which can introduce bitterness.
  • Finally, monitor the sauce closely as it thickens to prevent overcooking and maintain that luscious glaze consistency.

Orange-Rosemary Glazed Salmon Recipe FAQs

How do I choose the best salmon fillets?
Absolutely! When selecting your salmon fillets, look for bright, vibrant flesh with minimal dark spots. The skin should appear shiny, and the fillets should feel firm to the touch. Fresh salmon will have a mild, ocean-like scent, not a strong fishy odor. If possible, try to buy wild-caught salmon for the best flavor and texture!

How should I store leftover Orange-Rosemary Glazed Salmon?
For optimal freshness, place your leftover Orange-Rosemary Glazed Salmon in an airtight container and refrigerate for up to 3 days. This method will keep the salmon moist and flavorful. When you’re ready to enjoy it again, simply reheat it gently to maintain its delicate texture.

Can I freeze Orange-Rosemary Glazed Salmon?
Very! You can easily freeze your Orange-Rosemary Glazed Salmon for up to 3 months. Wrap each fillet tightly in plastic wrap, then place it in a freezer-safe bag to protect against freezer burn. When it’s time to enjoy, thaw the salmon overnight in the refrigerator, ensuring it retains its flavor and consistency.

What should I do if the glaze is too thin?
If you find your glaze isn’t thickening as you’d like, don’t worry! Simply mix another teaspoon of cornstarch with a tablespoon of cold water until smooth, then stir it back into the sauce while it’s simmering. Continue cooking until it thickens to your desired consistency. Remember to keep stirring frequently to prevent lumps!

Are there any dietary considerations I should be aware of?
Certainly! While this Orange-Rosemary Glazed Salmon is healthy and delicious, if you have allergies, be aware that the dish contains fish, chicken broth, and honey. For a vegetarian option, you can substitute the salmon with firm tofu or a vegetable of your choice, utilizing the glaze for flavor. Just ensure any substitute is equally flavorful and well-seasoned!

Orange-Rosemary Glazed Salmon

Orange-Rosemary Glazed Salmon

This Orange-Rosemary Glazed Salmon combines vibrant flavors and a gourmet presentation, perfect for weeknight dinners or special occasions.
Print Recipe Pin Recipe
Prep Time 10 minutes mins
Cook Time 15 minutes mins
Total Time 25 minutes mins
Servings: 4 fillets
Course: DINNER RECIPES
Cuisine: American
Calories: 250
Ingredients Equipment Method Nutrition Notes

Ingredients
  

For the Salmon
  • 4 fillets Salmon 1-inch thick for perfect cooking
  • 2 tablespoons Olive oil For searing
  • to taste Salt Enhances flavor
  • to taste Freshly ground black pepper Enhances flavor
For the Glaze
  • 2 cloves Garlic Minced
  • 2 tablespoons Fresh rosemary Minced, dried can be substituted
  • 1/4 cup Chicken broth Or vegetable broth for lighter option
  • 1 tablespoon Orange zest Freshly grated
  • 1/4 cup Fresh orange juice Key ingredient
  • 1 tablespoon Lemon juice Fresh preferred
  • 1 tablespoon Honey Natural sweetener
  • 1 tablespoon Cornstarch For thickening glaze

Equipment

  • Large non-stick sauté pan

Method
 

How to Make Orange-Rosemary Glazed Salmon
  1. In a large non-stick sauté pan, warm the olive oil over medium-high heat until shimmering.
  2. Season both sides of the salmon fillets with salt and pepper. Add to the pan and cook for 3-4 minutes per side until golden brown and cooked through. Transfer to a plate.
  3. Add minced garlic and rosemary to the pan and sauté for about 20 seconds until fragrant. Pour in 1/4 cup of chicken broth and let simmer until mostly reduced.
  4. Stir in orange zest, orange juice, lemon juice, and honey. Mix remaining 1 Tbsp chicken broth with cornstarch and add it to the pan.
  5. Season sauce with salt and pepper. Bring to a boil, stirring constantly for about 1 minute until thickened.
  6. Add salmon back into the pan, spooning sauce over each fillet.

Nutrition

Serving: 1filletCalories: 250kcalCarbohydrates: 10gProtein: 30gFat: 10gSaturated Fat: 2gPolyunsaturated Fat: 2gMonounsaturated Fat: 6gCholesterol: 70mgSodium: 200mgPotassium: 400mgSugar: 5gVitamin A: 200IUVitamin C: 10mgCalcium: 20mgIron: 1mg

Notes

Garnish with additional fresh rosemary if desired. Store leftovers in an airtight container in the fridge for up to 3 days, or freeze for up to 3 months. Thaw overnight in the fridge and reheat gently in a skillet.

Tried this recipe?

Let us know how it was!

Filed Under: DINNER RECIPES

Easy and Delicious Snack Platter

December 11, 2025 by JudyWhite Leave a Comment

There’s nothing quite like the uncomplicated joy of a beautifully arranged snack platter, especially on a bustling weeknight or when hosting friends for a casual gathering. Just recently, after a long day filled with endless to-dos, I decided to whip up an Easy and Delicious Snack Platter—a hybrid of flavors that perfectly balances savory, crunchy, and creamy delights. The moment I set it on the table, the vibrant colors of fresh veggies and fruit drew everyone in, while the rich dips beckoned for a scoop.

As I watched my guests dive into the hummus, guacamole, and salsa, I couldn’t help but smile. This platter not only took me just 15 minutes to prepare, but it has also become a go-to in my kitchen repertoire for its versatility and ability to please even the pickiest eaters. Whether it’s game day, a cozy night in, or just a craving for something fresh, this snack platter proves that you don’t need elaborate recipes to make something truly enjoyable. Let’s dive in and assemble this crowd-pleaser together!

Why You'll Love This Easy and Delicious Snack Platter

  • This Easy and Delicious Snack Platter is incredibly easy to prepare, taking just 15 minutes to assemble, making it perfect for last-minute gatherings.
  • With its colorful array of fresh veggies, fruits, and dips, this platter is not only visually appealing but also a feast for the senses.
  • The versatility of this recipe allows you to mix and match your favorite ingredients, appealing to diverse tastes and dietary preferences.
  • It’s a guaranteed crowd-pleaser that will impress your guests and keep everyone coming back for more.

Easy and Delicious Snack Platter Ingredients

Prepare to make a delightful assortment perfect for any occasion!

For the Base

  • Assorted crackers – a variety of textures will keep everyone snacking happily.

For the Dips

  • Hummus – adds creaminess and a burst of flavor; try different flavors for fun!
  • Guacamole – a creamy avocado dip that’s always a hit; add lime juice to keep it fresh.
  • Salsa – offers a refreshing kick and complements the other dips nicely.

For the Cheese

  • Sliced cheese – a comforting addition; choose your favorite cheese variety for extra flair.

For the Colorful Veggies

  • Chopped veggies – crisp veggies add crunch and color; consider bell peppers, cucumbers, or carrots.

For the Fresh Fruits

  • Assorted fruits – sweet fruits balance the savory elements well; berries or grapes are excellent choices.

For the Crunch Factor

  • Mixed nuts – provide an additional texture and healthy fats; choose unsalted for a healthier option.

This Easy and Delicious Snack Platter is sure to be the star at your next gathering!

How to Make an Easy and Delicious Snack Platter

  1. Arrange the assorted crackers on a large serving platter. Start by spreading them out in a visually appealing manner, creating sections for different types so guests can easily grab their favorites.

  2. Place the hummus, guacamole, and salsa in small bowls. Set these bowls on the platter, ensuring they are spaced out for easy access. This will entice your guests to dig in right away!

  3. Add the sliced cheese, chopped veggies, and assorted fruits to the platter. A colorful combination not only looks appealing but also provides a tempting variety of flavors and textures for everyone to enjoy.

  4. Sprinkle mixed nuts around the platter. These crunchy gems will add a delightful contrast to the creamy dips and juicy fruits, enticing your guests with every bite.

  5. Serve immediately for guests to enjoy. Watch the smiles appear as everyone relishes the mix of flavors and textures you’ve curated in just a few minutes.

Optional: Serve with toothpicks for easy picking!

Exact quantities are listed in the recipe card below.

Easy and Delicious Snack Platter Variations

Ready to spice up your snack platter? Let’s explore fun twists to make this dish uniquely yours!

  • Spicy Salsa: Add diced jalapeños or a splash of hot sauce to your salsa for a flavorful kick. This variation will set the taste buds tingling!

  • Creamy Zaatar Hummus: Mix in zaatar seasoning into your hummus for a Middle Eastern twist. This aromatic herb blend elevates your dip experience to new heights.

  • Cheese Selection: Use a mix of cheeses like pepper jack, gouda, or aged cheddar to add depth. Choose your favorites for a custom cheese board that excites every palate.

  • Fruit Medley: Incorporate tropical fruits like mango or pineapple for an exotic touch. The sweet contrast with savory dips makes each bite a delightful surprise.

  • Roasted Veggies: Swap out fresh veggies for roasted ones. Roasted red peppers or zucchini add a warm, rich flavor that complements creamy dips beautifully.

  • Nut Mix Upgrade: Use a seasoned nut mix or add roasted chickpeas for an extra crunch. This adds texture and a protein boost, turning your platter into a true masterpiece.

  • Flavorful Guacamole: Mix in diced tomatoes and cilantro or a dash of cumin for an extra layer of flavor in your guacamole. Your guests will be begging for the recipe!

  • Herbed Crackers: Choose herb-infused or whole grain crackers for a healthful upgrade. The added flavors will pair beautifully with your dips, keeping them colorful and inviting.

Get ready to dazzle your guests with these variations, turning your easy snack platter into a memorable spread!

What to Serve with Easy and Delicious Snack Platter?

Transform your snacking experience with delightful accompaniments to elevate your gathering’s flavors and textures.

  • Savory Meatballs: Perfectly seasoned meatballs can add a hearty touch, balancing the lightness of your snacks while giving a protein boost to the platter.

  • Greek Salad: Featuring crunchy cucumbers and tangy feta, a Greek salad introduces freshness that harmonizes beautifully with the dips.

  • Stuffed Mini Peppers: These colorful bites burst with flavor and are a fun way to add more veggies to the mix; their sweetness contrasts nicely with savory dips.

  • Cheesy Garlic Bread: Adding warmth and comfort, cheesy garlic bread brings a satisfying crunch that complements the creamy dips perfectly.

  • Wine Pairing: A chilled Sauvignon Blanc with its crisp acidity will cut through the richness of the dips and enhance the entire platter.

  • Chocolate-Dipped Strawberries: End your snacking on a sweet note. These juicy, indulgent treats balance the savory elements with their luscious sweetness.

Dare to mix and match these options, creating a fabulous feast that will keep your guests talking long after the last bite!

How to Store and Freeze Easy and Delicious Snack Platter

Fridge: Store leftover components separately in airtight containers for up to 3 days to ensure freshness and flavor preservation.

Dips: If you have leftover hummus, guacamole, or salsa, they can be refrigerated in sealed containers for about 5 days. Just give them a good stir before serving again.

Cheese: Keep sliced cheese in an airtight bag or container in the fridge. Consume within 5 days for the best taste.

Freezer: For longer storage, freeze dips like hummus and guacamole in freezer-safe containers for up to 3 months. Thaw in the fridge overnight before serving.

Make Ahead Options

Preparing your Easy and Delicious Snack Platter ahead of time is a fantastic way to save precious moments on busy days! You can chop the veggies and fruits up to 24 hours in advance, storing them in airtight containers to maintain their freshness and prevent browning (for fruits, a little lemon juice works wonders). The dips—hummus, guacamole, and salsa—can be prepped up to 3 days in advance and refrigerated, ensuring they are ready to go when you’re craving that vibrant platter. When you’re ready to serve, simply arrange everything on the platter, add the previously prepared components, and delight in the effortless appeal of your snack platter, all with minimal effort.

Chef's Helpful Tips

  • For the Easy and Delicious Snack Platter, choose a variety of crackers with different textures to keep your guests snacking happily.
  • To enhance the flavors of your dips, consider adding spices or herbs to the hummus, guacamole, and salsa to create unique variations.
  • When arranging the platter, use small bowls for dips and place them evenly spaced to encourage easy access without overcrowding.
  • To keep the guacamole fresh for longer, add a splash of lime juice and cover it with plastic wrap until serving time.

Easy and Delicious Snack Platter Recipe FAQs

What should I look for when selecting ripe ingredients for my snack platter?
Absolutely! When it comes to selecting fresh veggies and fruits for your platter, look for bright colors and firm textures. For avocados, you want them to give slightly when pressed but not be overly soft. If your tomatoes are part of the selection, choose ones that have no dark spots or blemishes—these are signs of ripeness!

How do I store leftovers from my snack platter?
Very simple! Store leftover components separately in airtight containers. Dips like hummus, guacamole, and salsa can last about 5 days — just make sure to cover them tightly. Sliced cheese should be consumed within 5 days as well, while chopped veggies can be stored for up to 3 days.

Can I freeze any of the items from my snack platter?
Yes, you can! For longer storage, freeze dips like hummus and guacamole in freezer-safe containers. Make sure to leave some space for expansion. They can be frozen for up to 3 months. Thaw them overnight in the fridge before serving again and give them a good stir once thawed to restore their creaminess.

What if I have guests with dietary restrictions?
The more the merrier! If you’re entertaining guests with dietary restrictions, consider offering gluten-free crackers for those sensitive to gluten. For nut allergies, skip the mixed nuts and include more fruits and veggies. You can also create a dairy-free version of your platter by using dairy-free cheese alternatives.

What if my guacamole turns brown before serving?
No worries! To keep your guacamole fresh for longer, add a splash of lime juice before covering it with plastic wrap. The citric acid helps prevent browning. Additionally, try pressing the plastic wrap directly onto the surface of the guacamole to minimize air exposure. If it does turn brown, simply give it a good stir; it’ll still taste great!

Easy and Delicious Snack Platter

Easy and Delicious Snack Platter

Create a vibrant and tasty Easy and Delicious Snack Platter that’s perfect for gatherings in just 15 minutes.
Print Recipe Pin Recipe
Prep Time 15 minutes mins
Total Time 15 minutes mins
Servings: 4 people
Course: Snacks & Appetizers
Cuisine: American
Calories: 300
Ingredients Equipment Method Nutrition Notes

Ingredients
  

For the Base
  • 1 box Assorted crackers a variety of textures for snacking
For the Dips
  • 1 cup Hummus try different flavors for fun
  • 1 cup Guacamole add lime juice to keep it fresh
  • 1 cup Salsa offers a refreshing kick
For the Cheese
  • 8 slices Sliced cheese choose your favorite variety
For the Colorful Veggies
  • 2 cups Chopped veggies consider bell peppers, cucumbers, or carrots
For the Fresh Fruits
  • 2 cups Assorted fruits berries or grapes are excellent choices
For the Crunch Factor
  • 1 cup Mixed nuts choose unsalted for a healthier option

Equipment

  • Serving platter

Method
 

How to Make an Easy and Delicious Snack Platter
  1. Arrange the assorted crackers on a large serving platter, creating sections for different types.
  2. Place the hummus, guacamole, and salsa in small bowls and set them on the platter, ensuring they are spaced out.
  3. Add the sliced cheese, chopped veggies, and assorted fruits to the platter for a colorful variety.
  4. Sprinkle mixed nuts around the platter for a delightful contrast.
  5. Serve immediately for guests to enjoy.

Nutrition

Serving: 1platterCalories: 300kcalCarbohydrates: 25gProtein: 8gFat: 20gSaturated Fat: 5gPolyunsaturated Fat: 2gMonounsaturated Fat: 10gCholesterol: 15mgSodium: 400mgPotassium: 300mgFiber: 5gSugar: 5gVitamin A: 15IUVitamin C: 20mgCalcium: 10mgIron: 6mg

Notes

Consider using optional toothpicks for easy picking.

Tried this recipe?

Let us know how it was!

Filed Under: SNACKS & APPETIZERS

Bruschetta Dip Recipe Perfect for Parties

December 11, 2025 by JudyWhite Leave a Comment

There’s something truly inviting about the fresh, vibrant flavors of tomatoes and basil mingling together, especially when whipped into a creamy Bruschetta Dip. Picture yourself hosting a gathering, the sun setting softly outside, and a bowl of this enticing dip at the center of your table, beckoning guests to taste its deliciousness.

This Bruschetta Dip recipe is perfect for parties, effortlessly combining rich cheeses with the brightness of fresh ingredients. After a long week of takeout and fast food fatigue, it feels incredibly satisfying to whip up a dish that doesn’t just taste gourmet but lets you indulge in homemade goodness.

Whether you’re hosting a casual get-together or a festive celebration, this dip promises to impress, all while being super simple to prepare. Grab your ingredients, and let’s create some magic that your friends and family will rave about!

Why You'll Love This Bruschetta Dip Recipe Perfect for Parties

  • This Bruschetta Dip is incredibly easy to make, requiring only 20 minutes of prep time which means you can spend more time enjoying your gathering.
  • The explosion of fresh flavors from the tomatoes and basil, combined with the creamy texture of the cheeses, will have everyone coming back for more.
  • Its versatility makes it perfect for any occasion, whether it’s a cozy family dinner or a lively celebration with friends.
  • Visually stunning, with vibrant colors and enticing garnishes, this dip will be the centerpiece of your appetizer spread and a guaranteed crowd-pleaser.

Bruschetta Dip Ingredients

• Dive into the flavors of this Bruschetta Dip recipe perfect for parties!

For the Tomato Mixture

  • Roma tomatoes – these juicy gems bring freshness and a sweet tang to your dip.
  • Basil leaves – use fresh basil for a fragrant herbal note that brightens the dish.
  • Garlic – minced garlic adds a bite that enriches the overall flavor.
  • Extra Virgin olive oil – this high-quality oil enhances the taste and provides richness.
  • Balsamic vinegar – a splash of this gives a depth of flavor to your tomato blend.
  • Salt – just a pinch will elevate all the natural flavors of the ingredients.

For the Cheese Mixture

  • Feta cheese – crumbled feta adds a salty creaminess that pairs beautifully with tomatoes.
  • Cream cheese – this gives the dip a smooth, luscious texture that everyone loves.
  • Sour cream – for tanginess and a rich consistency, blend this in for the perfect combo.
  • Garlic – another clove, minced, deepens the flavor of your cheese base.
  • Lemon juice – a bright splash to cut through the richness and add zing.
  • Olive oil – a touch helps create a creamy, cohesive mixture.
  • Salt – again, adjust to taste for the perfect balance.

For Garnishing

  • Basil leaves – fresh leaves not only enhance the aesthetic but add a burst of flavor.
  • Red pepper flakes – sprinkle on top for a subtle kick of heat that invites curiosity.
  • Parmesan cheese – freshly grated adds a nutty, savory finish that brings it all together.

How to Make Bruschetta Dip

  1. Combine In a medium bowl, mix together diced Roma tomatoes, chopped basil leaves, and minced garlic. The bright colors will set the stage for a fresh and flavorful dip.

  2. Drizzle Add Extra Virgin olive oil and balsamic vinegar to your tomato mixture, then season generously with salt. Stir everything well until flavorful and bright, allowing the ingredients to blend for about 5 minutes.

  3. Blend In another bowl, combine crumbled feta cheese, cream cheese, sour cream, minced garlic, lemon juice, and olive oil. Mix until you achieve a creamy and smooth consistency, about 3-5 minutes.

  4. Layer Gently spread your tomato mixture over the creamy cheese base. Aim for an even layer to showcase the vibrant colors of the tomatoes and herbs.

  5. Garnish Top your Dip with freshly chopped basil leaves, a sprinkle of red pepper flakes for a bit of heat, and freshly grated Parmesan cheese for that savory finish.

Optional: Serve with crusty bread or vegetable sticks for dipping!
Exact quantities are listed in the recipe card below.

Make Ahead Options

This Bruschetta Dip recipe is perfect for meal prep, allowing you to enjoy homemade goodness on busy nights! You can prepare the tomato mixture and the cheese mixture separately up to 24 hours in advance. Simply combine the diced Roma tomatoes, basil, and garlic in one bowl and the cheeses along with the garlic, lemon juice, and olive oil in another. Store both mixtures in the refrigerator in airtight containers to keep them fresh. When it’s time to serve, quickly layer the tomato mixture over the cheese blend and garnish with basil, red pepper flakes, and Parmesan just before presenting. This way, you ensure the flavors remain vibrant and delicious!

What to Serve with Bruschetta Dip?

Imagine the laughter and chatter of friends mingling with the rich aroma of fresh ingredients, creating the perfect ambiance for your gathering.

  • Crispy Crostini: Perfect for scooping up the creamy dip, these crunchy bites add an excellent texture complementing the soft cheese and fresh toppings.

  • Garlic Breadsticks: Their buttery goodness and garlic flavor pair beautifully with the zesty notes of the dip, enhancing every scrumptious bite.

  • Fresh Vegetable Platter: Bright, crunchy veggies like bell peppers and cucumbers bring a refreshing contrast to the rich flavors of the Bruschetta Dip.

  • Caprese Skewers: Skewered mozzarella, basil, and cherry tomatoes echo the dip’s fresh flavors while providing a delightful and easy-to-eat option.

  • Sparkling Wine: A chilled glass of bubbly adds a festive touch, with its effervescence cleansing the palate between bites.

  • Pasta Salad: The hearty, tangy elements of a pasta salad can round out the meal, making it a well-balanced spread that’s both satisfying and delicious.

  • Fruit Salad: A light fruit salad can contrast the savory notes of the dip, offering a sweet finish that refreshes the palate.

  • Chocolate Fondue: For dessert, this delightful treat can provide a sweet end to your meal and offers a fun, interactive experience for guests!

How to Store and Freeze Bruschetta Dip

Fridge: Keep your Bruschetta Dip in an airtight container for up to 3 days. Make sure to seal it well to maintain freshness and flavor.

Freezer: While it’s best enjoyed fresh, you can freeze the cheese mixture for up to 2 months. Thaw in the fridge and re-combine with the tomato mixture before serving.

Reheating: If you prefer to warm it slightly, microwave in short bursts (15-30 seconds), stirring in between. Enjoy the burst of flavors all over again!

Bruschetta Dip Variations

Embrace your culinary creativity with these delightful variations that will transform your Bruschetta Dip into a new experience every time!

  • Vegan-Friendly: Substitute cream cheese and sour cream with cashew cream for a delicious plant-based option that retains the creaminess.

  • Spicy Kick: Add diced jalapeños or a splash of hot sauce to the tomato mixture for a zesty flavor that brings the heat.

  • Herb Medley: Incorporate chopped fresh parsley and oregano along with the basil for an aromatic twist that enhances the overall flavor profile.

  • Roasted Garlic: Instead of raw garlic, use roasted garlic in the cheese mixture for a sweeter, mellower taste that adds depth.

  • Goat Cheese Blend: Swap the feta for crumbled goat cheese for a tangy bite that pairs beautifully with the freshness of tomatoes.

  • Creamy Avocado: Fold in mashed avocado to the cheese mixture for an extra creamy texture and a rich, buttery flavor.

  • Italian Stir-In: Mix in some sun-dried tomatoes and sliced olives to your tomato mixture for an Italian flair that’ll make your dip truly memorable.

  • Smoky Flavor: A dash of smoked paprika can bring an intriguing smoky flavor to your cheese mixture, making every bite exciting.

Chef's Helpful Tips

  • To ensure the best flavor in your Bruschetta Dip, use ripe Roma tomatoes as they have the perfect balance of sweetness and acidity.
  • When mixing your cheese base, make sure all the cheeses are at room temperature for a smoother blending process.
  • Don’t skip the resting time for your tomato mixture; letting it marinate for about 5 minutes enhances the overall flavor.
  • For a creamy texture, make sure to mix the olive oil gradually into the cheese mixture to achieve an even consistency without lumps.

Bruschetta Dip Recipe FAQs

What kind of tomatoes should I use for Bruschetta Dip?
Absolutely! I recommend using ripe Roma tomatoes because they have a wonderful balance of sweetness and acidity. Look for tomatoes that are firm with smooth skin and a deep red color. Avoid any that have dark spots all over, which might indicate overripeness.

How long can I store Bruschetta Dip in the fridge?
You can keep your Bruschetta Dip in an airtight container for up to 3 days. Be sure to seal it well to maintain its freshness and avoid any unwanted odors from your fridge. Just give it a gentle stir before serving to blend the flavors again!

Can I freeze Bruschetta Dip?
Very! While fresh Bruschetta Dip is ideal, you can freeze the cheese mixture for up to 2 months. To do this, place it in a freezer-safe container and label with the date. When you’re ready to enjoy it again, simply thaw it in the fridge overnight and then re-combine it with the fresh tomato mixture before serving.

What can I do if my dip is too runny?
If you find that your Bruschetta Dip is a bit runny, you might need to adjust the cheese mixture. You can add a little more cream cheese or sour cream to thicken it up. Another option is to let it sit in the fridge for 30 minutes, allowing it to firm up a bit as the flavors meld together.

Are there any dietary considerations for this Bruschetta Dip?
I often make this dip gluten-free by serving it with fresh vegetables like cucumbers and bell peppers. If you or any guests have dairy allergies, consider swapping the cheese for a dairy-free alternative like cashew cheese or hummus for a tasty, plant-based version. Always check labels for allergens!

How can I make this Bruschetta Dip spicier?
If you want to turn up the heat, you can add more red pepper flakes or even a dash of hot sauce to the tomato mixture. For an extra kick, consider mixing in some finely chopped jalapeños or a pinch of cayenne pepper in the cheese layer. The more the merrier!

Bruschetta Dip Recipe Perfect for Parties

Bruschetta Dip Recipe Perfect for Parties

This Bruschetta Dip is a perfect party starter, offering fresh tomato and basil flavors in a creamy blend.
Print Recipe Pin Recipe
Prep Time 20 minutes mins
Resting Time 5 minutes mins
Total Time 25 minutes mins
Servings: 8 servings
Course: Snacks & Appetizers
Cuisine: Italian
Calories: 150
Ingredients Equipment Method Nutrition Notes

Ingredients
  

For the Tomato Mixture
  • 4 medium Roma tomatoes diced
  • 1/4 cup fresh basil leaves chopped
  • 1 clove garlic minced
  • 2 tablespoons Extra Virgin olive oil
  • 1 tablespoon balsamic vinegar
  • 1 pinch salt
For the Cheese Mixture
  • 1 cup feta cheese crumbled
  • 8 ounces cream cheese softened
  • 1/2 cup sour cream
  • 1 clove garlic minced
  • 1 tablespoon lemon juice
  • 1 tablespoon olive oil
  • 1 pinch salt
For Garnishing
  • 1/4 cup fresh basil leaves chopped
  • 1 teaspoon red pepper flakes for sprinkling
  • 1/4 cup Parmesan cheese freshly grated

Equipment

  • Mixing bowl
  • Spoon

Method
 

How to Make Bruschetta Dip
  1. In a medium bowl, mix together diced Roma tomatoes, chopped basil leaves, and minced garlic.
  2. Add Extra Virgin olive oil and balsamic vinegar to your tomato mixture, then season generously with salt. Stir everything well.
  3. In another bowl, combine crumbled feta cheese, cream cheese, sour cream, minced garlic, lemon juice, and olive oil. Mix until you achieve a creamy and smooth consistency.
  4. Gently spread your tomato mixture over the creamy cheese base.
  5. Top your Dip with freshly chopped basil leaves, a sprinkle of red pepper flakes, and freshly grated Parmesan cheese.

Nutrition

Serving: 1servingCalories: 150kcalCarbohydrates: 8gProtein: 6gFat: 12gSaturated Fat: 6gPolyunsaturated Fat: 1gMonounsaturated Fat: 5gCholesterol: 30mgSodium: 300mgPotassium: 150mgFiber: 1gSugar: 3gVitamin A: 500IUVitamin C: 5mgCalcium: 100mgIron: 1mg

Notes

Serve with crusty bread or vegetable sticks for dipping.

Tried this recipe?

Let us know how it was!

Filed Under: SNACKS & APPETIZERS

Homemade Limoncello

December 11, 2025 by JudyWhite Leave a Comment

There’s something wonderfully refreshing about a homemade limoncello that just beckons you to take a sip. Imagine the bright yellow hue catching the sunlight, each glass a celebration of citrusy goodness! One evening, while enjoying the vibrant scent of fresh lemons in my kitchen, I couldn’t shake the feeling that something magical was about to happen. In mere minutes, I put together this delightful liqueur, which takes just a bit of patience to reach perfection.

This recipe is not just about mixing ingredients; it’s an invitation to embrace the art of slow living and savor the flavors of the season. Perfect for warm evenings or holiday gatherings, my homemade limoncello dazzles your taste buds and becomes the star of any dinner table. Versatile and easy to make, this beloved Italian favorite will leave your friends and family begging for more. Ready to craft your own batch and add a touch of sunshine to your next gathering? Let’s dive into this deliciously simple recipe!

Why You'll Love This Homemade Limoncello

  • This Homemade Limoncello is incredibly easy to make, requiring just a few simple ingredients and minimal effort.
  • The vibrant flavor of fresh lemons shines through, providing a refreshing burst that everyone will adore.
  • Its versatility means you can enjoy it on its own, in cocktails, or even as a delightful dessert pairing.
  • Plus, the beautiful bright yellow color adds a stunning visual appeal to any gathering, making it a perfect crowd-pleaser that will impress your guests.

Homemade Limoncello Ingredients

• Get ready to bring sunshine into your glass!

For the Limoncello Base

  • Organic lemons – Zesting these beauties releases a burst of fresh flavor that’s essential for authentic homemade limoncello.
  • High proof alcohol – Opt for 95% to ensure a robust infusion; it’s ideal for drawing out the lemony essence.

For the Simple Syrup

  • Water – This will balance the potency of the alcohol; feel free to adjust the amount to taste!
  • White sugar – The key to creating a luscious syrup; use granulated sugar for the best results.

Now, you’re all set to create a limoncello that will evoke memories of sun-soaked Italian summers, and the balance of sweet and sour will dance on your palate!

How to Make Homemade Limoncello

  1. Zest the lemons.
    Begin by zesting the organic lemons using a microplane or a zester, ensuring you only take the yellow part. This fragrant zest is the backbone of your homemade limoncello, bursting with citrus aroma.

  2. Combine the zest and alcohol.
    In a clean, airtight jar, mix the lemon zest with the high proof alcohol. Give it a gentle stir to combine, ensuring the zest is fully submerged. This is where the magic starts—allow it to infuse for at least 10 days.

  3. Shake it up!
    Every couple of days, give the jar a little shake. This helps the flavors mingle beautifully, enhancing the richness of your limoncello. You’ll notice the mixture turning a bright yellow as it infuses.

  4. Prepare the simple syrup.
    After 10 days, it’s time for the simple syrup. In a saucepan, heat the water and add the white sugar, stirring until dissolved. Bring it to a gentle simmer and then let it cool completely.

  5. Strain and mix.
    Carefully strain the lemon zest from the infused alcohol using a fine mesh sieve. Combine this vibrant liquid with your cooled simple syrup. Give it a good stir to blend everything together, creating your homemade limoncello.

  6. Bottle your creation.
    Finally, pour your limoncello into clean bottles. Seal them tightly and keep them in the freezer so they’re ready to serve ice-cold at your next gathering!

Optional: Serve with a twist of lemon peel for a gorgeous garnish.
Exact quantities are listed in the recipe card below.

Homemade Limoncello Variations

Dive into the world of homemade limoncello and let your creativity shine! With a few simple twists, you can elevate this classic recipe to new heights.

  • Herbal Infusion: Add a handful of fresh basil or mint to the lemon zest and alcohol for a refreshing herbal note.
  • Berry Blast: Incorporate raspberries or strawberries during the infusion for a fruity twist that adds a pop of color and flavor.
  • Spicy Kick: Add a few slices of fresh ginger or a whole cinnamon stick to the mason jar for warmth and spice.
  • Creamy Delight: For a limoncello cream, blend the final mixture with sweetened condensed milk for a dessert-like indulgence.
  • Lemonade Remix: Mix in a splash of lemonade before serving for a refreshing summer cocktail, perfect for hot days.
  • Nutty Undertone: Toasted almonds or hazelnuts can be steeped with the lemon zest, imparting a warm, nutty flavor that surprises the palate.
  • Citrus Medley: Mix the zests of oranges and limes along with the lemons for a vibrant, zesty blend that brings a whole new depth.
  • Sparkling Twist: Serve your limoncello with a splash of soda water for a sparkling, lighter version, ideal for daytime gatherings.

Make Ahead Options

Preparing your Homemade Limoncello in advance is a brilliant way to streamline your meal planning! You can zest the lemons and combine the zest with the high proof alcohol up to 10 days ahead of time, allowing the flavors to infuse beautifully. This infusion process is essential, so be sure to shake the jar occasionally during this period. Furthermore, you can prepare the simple syrup (water and sugar) up to 3 days in advance; just store it in the refrigerator until you’re ready to mix it with the infused alcohol. When you’re set to serve, simply strain the zest, mix your infused alcohol with the cooled syrup, and bottle up your delightful limoncello for a refreshing treat that’s just as delicious as fresh!

How to Store and Freeze Homemade Limoncello

Fridge: Keep your homemade limoncello in the fridge for up to 1 month. Serve it chilled for the best flavor experience at your gatherings.

Freezer: For longer storage, limoncello can be stored in the freezer for up to a year. It won’t freeze solid due to the alcohol content, ensuring it’s always ready to enjoy.

Bottling: Use airtight bottles to store your limoncello, preventing any loss of flavor or aroma over time.

Serving: Serve limoncello ice-cold, straight from the freezer or fridge, for a refreshing treat that will impress your guests.

What to Serve with Homemade Limoncello?

Elevate your dining experience with delightful pairings that beautifully complement the refreshing taste of limoncello.

  • Grilled Chicken Skewers: The smoky flavor and tender texture of grilled chicken pairs brilliantly with the tart brightness of limoncello.
  • Margherita Pizza: Simple yet delicious, a classic Margherita pizza offers a comforting base that lets the citrusy zing of limoncello shine.

Nothing beats the harmony of flavors when you savor each bite with a sip of your homemade creation.

  • Italian Antipasto Platter: A medley of cured meats, olives, and cheeses that enhances the limoncello’s vibrant notes, making for a perfect appetizer.
  • Fresh Caprese Salad: Juicy tomatoes and creamy mozzarella drizzled with balsamic glaze create a refreshing contrast that harmonizes with your limoncello.

For a memorable gathering, consider serving the limoncello alongside these delectable pairings for a truly unforgettable culinary experience.

  • Pistachio Biscotti: The nutty crunch of biscotti beautifully balances the sweet tang of limoncello, creating a delightful dessert moment.
  • Sparkling Water: A refreshing non-alcoholic option that cleanses the palate between sips, allowing you to fully appreciate the flavors of limoncello.
  • Lemon Sorbet: For a cool, sweet finish, serve lemon sorbet as a delightful dessert to complement the citrus profile of your limoncello.

Chef's Helpful Tips

  • When making Homemade Limoncello, ensure you zest only the yellow part of the lemon to avoid any bitterness from the white pith.
  • Choose a high proof alcohol like 95% to effectively extract the bright lemon flavors during the infusion process.
  • Remember to shake the jar every couple of days, as this helps to evenly distribute the flavors and enhance the color of your limoncello.
  • After letting the mix steep for at least 10 days, always let the simple syrup cool completely before combining it with the infused alcohol to maintain the integrity of the flavors.

Homemade Limoncello Recipe FAQs

How do I choose the best lemons for limoncello?
Absolutely! When selecting lemons for your homemade limoncello, look for organic lemons that are firm and glossy. They should be bright yellow and free from dark spots. Organic lemons are preferred because they are less likely to have pesticide residues, ensuring a cleaner zest. You can often find the freshest lemons at local farmers’ markets.

What’s the best way to store homemade limoncello?
Very! Store your homemade limoncello in airtight bottles in the fridge for up to 1 month. For longer storage, you can keep it in the freezer for up to a year. The alcohol content keeps it from freezing solid, so it’s always ready to pour straight from the freezer when you’re ready to serve.

Can I freeze homemade limoncello?
Yes, you can! To freeze homemade limoncello, pour it into airtight containers, leaving some space at the top for expansion. Alternatively, you can also use ice cube trays for individual servings. It’ll remain great for up to a year, always maintaining that refreshing lemony flavor.

What should I do if my limoncello is too strong?
If you find that your homemade limoncello is too strong for your taste, don’t worry! You can balance the flavors by adding more simple syrup to it. Simply mix equal parts water and sugar in a saucepan to create a syrup, allowing it to cool before stirring it into your limoncello until the desired taste is achieved.

Can I give homemade limoncello as gifts?
Absolutely! Homemade limoncello makes a fantastic gift. Be sure to bottle it in beautiful bottles and consider adding a label with the preparation date. For an extra touch, you can even add a twist of lemon peel as a garnish. Just remember to include a note about serving it ice-cold for everyone to enjoy!

Is limoncello safe for pets?
It’s important to note that limoncello contains alcohol, which is harmful to pets. Always keep your homemade limoncello out of reach of your furry friends to ensure their safety. If you’re looking for pet-friendly treats, consider making fresh lemon-flavored frozen dog treats with lemon juice and water instead!

Homemade Limoncello

Homemade Limoncello

This Homemade Limoncello is a refreshing treat that captures the essence of fresh lemons, perfect for gatherings or a relaxing evening.
Print Recipe Pin Recipe
Prep Time 15 minutes mins
Infusion Time 10 days d
Total Time 10 days d 15 minutes mins
Servings: 8 servings
Course: DESSERT RECIPES
Cuisine: Italian
Calories: 120
Ingredients Equipment Method Nutrition Notes

Ingredients
  

For the Limoncello Base
  • 8 large Organic lemons Zest only the yellow part
  • 750 ml High proof alcohol Opt for 95% for robust infusion
For the Simple Syrup
  • 250 ml Water Adjust to taste
  • 200 g White sugar Use granulated sugar for best results

Equipment

  • Airtight jar
  • Saucepan
  • Fine mesh sieve
  • Microplane or zester

Method
 

How to Make Homemade Limoncello
  1. Zest the organic lemons using a microplane or zester, ensuring you only take the yellow part.
  2. In a clean, airtight jar, mix the lemon zest with the high proof alcohol.
  3. Every couple of days, give the jar a little shake to help the flavors mingle.
  4. In a saucepan, heat the water and add the white sugar, stirring until dissolved. Let it cool completely.
  5. Carefully strain the lemon zest from the infused alcohol using a fine mesh sieve.
  6. Combine the infused alcohol with the cooled simple syrup and stir well.
  7. Pour your limoncello into clean bottles, seal tightly, and keep in the freezer.

Nutrition

Serving: 50mlCalories: 120kcalCarbohydrates: 30gSugar: 30g

Notes

Serve limoncello ice-cold, straight from the freezer or fridge, for a refreshing treat.

Tried this recipe?

Let us know how it was!

Filed Under: DESSERT RECIPES

Sweet Potato Casserole with Streusel Topping

December 11, 2025 by JudyWhite Leave a Comment

There’s a special comfort that washes over me when I pull a bubbling Sweet Potato Casserole with Streusel Topping from the oven. It’s that delightful moment when the warm, earthy aroma of sweet potatoes mingles with the sweet, nutty scent of pecans, instantly transporting me to family gatherings where smiles and laughter filled the air. This recipe was born out of a desire to bring a little more warmth into my home amid the hustle and bustle of daily life.

After several attempts to spice up humdrum weeknight dinners, I stumbled upon this delightful casserole that combines simplicity with an upscale flair. It’s incredibly easy to whip up and can be served as a side dish or a sweet treat that steals the spotlight at any potluck. Perfect for enticing fast-food-loving friends, this isn’t just food—it’s an invitation to savor the joys of homemade goodness. So grab your apron, and let’s create a dish that brings smiles to the dinner table!

Why You'll Love This Sweet Potato Casserole with Streusel Topping

  • This Sweet Potato Casserole with Streusel Topping is incredibly easy to make, allowing you to whip it up quickly even on busy weeknights.
  • The harmonious blend of sweet potatoes and crunchy streusel topping creates a flavor profile that will have everyone coming back for seconds.
  • Its versatility shines through as it can be served both as a comforting side dish or a delightful dessert, making it perfect for any occasion.
  • Visually appealing with its golden brown topping and vibrant orange filling, this casserole is sure to impress and become a new family favorite.

Sweet Potato Casserole with Streusel Topping Ingredients

For the Casserole

  • Sweet potato puree – a creamy base that adds natural sweetness and nutrition.
  • Granulated sugar – enhances the sweetness and complements the sweet potatoes perfectly.
  • Unsalted butter (melted) – brings richness and depth to the dish; can be substituted with coconut oil for a dairy-free option.
  • Milk – adds moisture and creaminess; feel free to use almond milk for a lighter version.
  • Vanilla extract – infuses a warm, aromatic flavor that elevates the sweet potatoes.
  • Eggs (beaten) – binds all ingredients together, creating a fluffy texture when baked.

For the Streusel Topping

  • Chopped pecans or walnuts – adds a delightful crunch and nutty flavor; walnuts are a great budget-friendly alternative.
  • Brown sugar – adds extra caramel-like richness to the crumble topping.
  • All-purpose flour – forms the structure of the streusel; for a gluten-free option, substitute with almond flour.
  • Unsalted butter (softened and cut into small cubes) – melds the topping ingredients into a scrumptious crumble; you can use a vegan butter substitute if you prefer a plant-based option.

Creating this Sweet Potato Casserole with Streusel Topping is not just about cooking; it’s about crafting warmth and joy to be shared with loved ones. Happy cooking!

How to Make Sweet Potato Casserole

  1. Preheat your oven! Start by heating your oven to 350°F (175°C). This little step ensures that your casserole bakes evenly and develops that delightful golden crust.

  2. Mix the casserole base. In a large bowl, stir the sweet potato puree, granulated sugar, melted butter, milk, vanilla extract, and beaten eggs together until smooth and creamy. Pour this luscious mixture into a greased casserole dish and spread it evenly.

  3. Prepare the streusel topping. In a medium bowl, combine the chopped pecans, brown sugar, all-purpose flour, and softened butter. Use your fingers or a fork to mix until it forms a coarse, crumbly texture. This is where the magic happens!

  4. Assemble and bake. Generously sprinkle the streusel topping over the sweet potato base in the casserole dish. Pop it into the preheated oven and let it bake for 40 minutes, or until the topping is golden brown and bubbly.

Optional: Serve warm with a scoop of vanilla ice cream for a special treat!

Exact quantities are listed in the recipe card below.

Sweet Potato Casserole with Streusel Topping Variations

Feel free to explore these delightful twists to create your very own signature casserole!

  • Nut-Free: Swap nuts with toasted oats for crunch, perfect for those with nut allergies. This will still add a delightful texture!

  • Vegan: Replace eggs with flaxseed meal mixed with water and use almond or coconut milk to keep it dairy-free. Your casserole will still be heartwarming and delicious!

  • Maple Pecan: Use maple syrup instead of granulated sugar for a deeper, caramel flavor and sprinkle extra pecans on top. Just imagine that maple aroma filling the kitchen!

  • Spicy Kick: Add a pinch of cayenne pepper or chili powder to the sweet potato mixture for a surprising heat. This twist creates a fun flavor contrast that kick up the excitement!

  • Coconut Bliss: Substitute regular milk with coconut milk and stir shredded coconut into the topping for an exotic twist. This will lend a tropical flair to your casserole!

  • Apple-Peach Fusion: Mix in diced apples or peaches with the sweet potato puree for fruity brightness. This combination will introduce a juicy surprise in every bite!

  • Ginger Zing: Incorporate finely grated fresh ginger into the sweet potato base for a warm, spiced flavor. Just close your eyes and let the comforting scent transport you to a cozy kitchen!

  • Chocolate Drizzle: For a decadent finish, swirl melted chocolate into the sweet potato mixture before baking or drizzle it over the cooled casserole. This will transform it into a sweet dream!

How to Store and Freeze Sweet Potato Casserole with Streusel Topping

Fridge: Keep the Sweet Potato Casserole with Streusel Topping covered in an airtight container for up to 3 days. This helps maintain its flavor and prevents drying out.

Freezer: If you have leftovers, freeze the casserole before baking—wrap tightly in aluminum foil or plastic wrap for up to 2 months. Thaw in the fridge before baking.

Reheating: To reheat, bake the thawed casserole at 350°F (175°C) for 20-25 minutes until heated through and crispy on top. Enjoy that comforting flavor all over again!

What to Serve with Sweet Potato Casserole with Streusel Topping?

There’s nothing quite like the warmth of a homemade meal, especially one that combines sweet, earthy flavors with a satisfying crunch.

  • Savory Green Beans: The crispness and slight bitterness of green beans balance out the sweetness of the casserole beautifully.

  • Honey-Glazed Carrots: Their natural sweetness complements the casserole while adding vibrant color to your plate.

  • Crispy Brussels Sprouts: Roasting these Brussels sprouts brings out a nutty flavor, enhancing the overall meal experience.

  • Creamy Mushroom Risotto: The creaminess of risotto adds a luxurious touch to your dining experience, making it feel extra special.

  • Roasted Chicken: A simple roast chicken drizzled with lemon can cut through the richness of the casserole, making every bite delightful.

  • Spiced Apple Cider: Serve warm with cinnamon; this drink adds a comforting touch to your meal, echoing seasonal flavors beautifully.

  • Pecan Pie Bars: For dessert, these bars share the same nutty essence as the streusel topping, ensuring a perfect sweet ending to your meal.

Make Ahead Options

This Sweet Potato Casserole with Streusel Topping is perfect for meal prep enthusiasts, allowing you to save precious time on busy weeknights! You can prepare the casserole base up to 24 hours in advance by mixing the sweet potato puree, sugar, melted butter, milk, vanilla extract, and beaten eggs, then refrigerating the mixture covered. The streusel topping can also be made ahead and stored separately in the fridge for up to 3 days to keep its crunch. When you’re ready to serve, simply pour the casserole base into a greased dish, sprinkle the topping over it, and bake as directed for a dish that’s just as delicious as if it were made fresh!

Chef's Helpful Tips

  • When making Sweet Potato Casserole with Streusel Topping, ensure your sweet potato puree is smooth to achieve a fluffy texture in the final dish.
  • A common mistake is overmixing the casserole base; mix just until all ingredients are combined to avoid a dense texture.
  • For a perfectly crumbly streusel topping, use cold butter and mix until it resembles coarse crumbs, avoiding excessive heat from your hands.
  • Make sure to bake at 350 degrees F for exactly 40 minutes to allow both the casserole and streusel to develop their rich flavors and golden color.

Sweet Potato Casserole with Streusel Topping Recipe FAQs

What type of sweet potatoes should I use for the casserole?
Absolutely! The best choice is to go for medium-sized, firm sweet potatoes with a smooth skin. Look for those without any dark spots or blemishes, as they can impact the flavor. Generally, orange-fleshed sweet potatoes work best for that creamy sweetness we crave in this casserole!

How should I store leftovers of the Sweet Potato Casserole with Streusel Topping?
Very simple! After allowing the casserole to cool, place it in an airtight container and store it in the fridge. It will last for up to 3 days, preserving its delightful flavor and texture. Alternatively, if you want to enjoy it later, you can freeze it (before baking) wrapped tightly in aluminum foil for up to 2 months.

What is the best method for freezing this casserole?
I often recommend freezing the casserole before baking to maintain freshness. First, let it cool completely if you’ve baked it. Then, wrap your casserole dish tightly with plastic wrap, followed by aluminum foil for extra protection against freezer burn. When you’re ready to bake it, just thaw it in the fridge overnight and follow the baking instructions!

How can I troubleshoot if the casserole turns out too dense?
No worries—this can happen! A common cause for density is overmixing the casserole base. Ensure that you mix just until all ingredients are combined. If you see any lumps, that’s okay! The goal is to keep it light and fluffy. Also, make sure your eggs are at room temperature, which helps in achieving that airy texture.

Is this recipe suitable for people with nut allergies?
Absolutely! If you’re preparing this dish for someone with nut allergies, simply omit the chopped pecans or walnuts from the streusel topping. You can replace them with seeds like sunflower seeds or even skip them altogether if you want to keep it simple. It will still taste delightful without the nuts!

Sweet Potato Casserole with Streusel Topping

Sweet Potato Casserole with Streusel Topping

Delight in a Sweet Potato Casserole with Streusel Topping, a comforting dish perfect for any occasion.
Print Recipe Pin Recipe
Prep Time 15 minutes mins
Cook Time 40 minutes mins
Total Time 55 minutes mins
Servings: 8 slices
Course: DESSERT RECIPES
Calories: 250
Ingredients Equipment Method Nutrition Notes

Ingredients
  

Casserole
  • 2 cups sweet potato puree
  • 1 cup granulated sugar
  • 1/2 cup unsalted butter (melted) or coconut oil for dairy-free
  • 1/2 cup milk or almond milk for lighter version
  • 1 teaspoon vanilla extract
  • 2 large eggs (beaten)
Streusel Topping
  • 1 cup chopped pecans or walnuts walnuts are budget-friendly alternative
  • 1/2 cup brown sugar
  • 1 cup all-purpose flour or almond flour for gluten-free
  • 1/2 cup unsalted butter (softened and cut into small cubes) can use vegan butter

Equipment

  • Large Bowl
  • medium bowl
  • casserole dish
  • Fork

Method
 

Preparation
  1. Preheat your oven! Start by heating your oven to 350°F (175°C).
  2. Mix the casserole base. In a large bowl, stir the sweet potato puree, granulated sugar, melted butter, milk, vanilla extract, and beaten eggs together until smooth and creamy.
  3. Prepare the streusel topping. In a medium bowl, combine the chopped pecans, brown sugar, all-purpose flour, and softened butter.
  4. Assemble and bake. Generously sprinkle the streusel topping over the sweet potato base in the casserole dish and bake for 40 minutes.

Nutrition

Serving: 1sliceCalories: 250kcalCarbohydrates: 35gProtein: 3gFat: 12gSaturated Fat: 7gPolyunsaturated Fat: 1gMonounsaturated Fat: 5gCholesterol: 60mgSodium: 180mgPotassium: 300mgFiber: 3gSugar: 15gVitamin A: 10000IUVitamin C: 15mgCalcium: 80mgIron: 1mg

Notes

Serve warm with a scoop of vanilla ice cream for a special treat.

Tried this recipe?

Let us know how it was!

Filed Under: DESSERT RECIPES

Sheet Pan Garlic Roasted Salmon & Brussels Sprouts

December 11, 2025 by JudyWhite Leave a Comment

The moment I opened my oven door, the inviting scent of garlic mingling with roasted Brussels sprouts enveloped my kitchen, instantly lifting my spirits. There’s something remarkably satisfying about serving a meal that truly hits all the right notes—comforting yet healthy, simple yet impressive. Enter my Sheet Pan Garlic Roasted Salmon & Brussels Sprouts. This dish is the answer to those chaos-filled evenings when the last thing I want to do is spend hours at the stove.

This recipe has quickly become a weeknight favorite in our home, effortlessly combining tender, flaky salmon with perfectly caramelized Brussels sprouts. It requires only one pan—an absolute game-changer for both cleanup and flavor retention. In just 35 minutes, you can deliver a nutritious and delicious feast that will have everyone at the table feeling cherished. Join me in elevating dinner with this delightful combination of ease, taste, and wholesome ingredients!

Why You'll Love This Sheet Pan Garlic Roasted Salmon & Brussels Sprouts

  • This recipe is incredibly easy to prepare, allowing you to whip up a delicious meal with minimal effort and just one pan to clean.
  • The flavors of the garlic and roasted Brussels sprouts perfectly complement the tender salmon, creating a satisfying dish that is both healthy and comforting.
  • Its versatility makes it an ideal choice for weeknight dinners or special occasions alike, as it pleases even the pickiest eaters.
  • The vibrant colors and appealing aroma not only make for a visually stunning plate but also fill your kitchen with irresistible scents, making mealtime feel extra special.

Sheet Pan Garlic Roasted Salmon & Brussels Sprouts Ingredients

• To create this flavorful dish, you’ll need just the right ingredients to ensure the salmon and Brussels sprouts shine.

For the Brussels Sprouts

  • 2 pounds Brussels sprouts – trim the ends for the best texture.
  • 3 tablespoons olive oil – helps to caramelize the Brussels sprouts beautifully.
  • 1 clove garlic, finely minced – infuses a delicious aroma and flavor.
  • ½ teaspoon salt – enhances the natural sweetness of the sprouts.
  • ¼ teaspoon freshly ground black pepper – adds a hint of warmth and spice.

For the Salmon

  • 6 to 8 fillets salmon – aim for 3 to 4 ounces each for even cooking.
  • 1 tablespoon olive oil – keeps the salmon moist while roasting.
  • 4 cloves garlic, finely minced – provides a wonderful garlic flavor throughout the dish.
  • 1 tablespoon dried oregano – adds a fragrant herbal note to the salmon.
  • ¾ teaspoon salt (to taste) – season according to your preference for flavor.
  • ¼ teaspoon freshly ground black pepper (to taste) – balances the flavors beautifully.

With these fresh and simple ingredients, you’re well on your way to impressing your family with this mouthwatering Sheet Pan Garlic Roasted Salmon & Brussels Sprouts dish!

How to Make Sheet Pan Garlic Roasted Salmon & Brussels Sprouts

  1. Preheat the oven to 400°F (200°C). Spread a clean sheet pan with a light coat of cooking spray or line it with parchment paper for easy cleanup.

  2. Trim the ends of the Brussels sprouts, ensuring they are fresh and ready. Place them neatly on the sheet pan, giving them room to roast evenly.

  3. Drizzle with 3 tablespoons of olive oil, add 1 clove of minced garlic, sprinkle with ½ teaspoon salt, and ¼ teaspoon black pepper. Toss everything gently, making sure the sprouts are well-coated!

  4. Arrange the Brussels sprouts in a single layer on the sheet pan, and pop them into the oven to roast for 20 minutes, until they start to turn golden brown and crisp.

  5. Season the salmon fillets with 1 tablespoon of olive oil, 4 cloves of minced garlic, 1 tablespoon of dried oregano, ¾ teaspoon salt, and ¼ teaspoon black pepper. Ensure every little piece is covered in that delicious mixture.

  6. Add the salmon fillets to the sheet pan after the Brussels sprouts have roasted for 20 minutes, and continue roasting everything together for an additional 10–12 minutes or until the salmon flakes easily with a fork and the Brussels sprouts are tender.

Optional: Garnish with fresh lemon wedges for an extra zing of flavor!

Exact quantities are listed in the recipe card below.

How to Store and Freeze Sheet Pan Garlic Roasted Salmon & Brussels Sprouts

Fridge: Store leftover salmon and Brussels sprouts in an airtight container for up to 3 days. Reheat in the microwave or oven until warmed through for best flavor.

Freezer: Freeze cooked salmon and Brussels sprouts in a freezer-safe container for up to 2 months. Thaw in the refrigerator overnight before reheating.

Reheating: When ready to enjoy, reheat in the oven at 350°F (175°C) for about 15 minutes. This will help restore the texture, especially for the Brussels sprouts.

Room Temperature: Avoid leaving the dish out for more than 2 hours to maintain food safety and quality.

What to Serve with Sheet Pan Garlic Roasted Salmon & Brussels Sprouts?

Creating the perfect meal is all about balancing flavors and textures, making every bite a pleasure to savor.

  • Creamy Mashed Potatoes: The rich, buttery potatoes create a comforting contrast to the lightness of the salmon.

  • Citrusy Quinoa Salad: This refreshing salad adds a burst of flavor and lovely crunch, enhancing your meal’s freshness.

Indulging in a colorful salad brings brightness to your plate while providing a nutritious sidekick.

  • Garlic Bread: A toasty loaf slathered in garlic butter is perfect for soaking up those delicious juices.

  • Roasted Carrots: Sweet, caramelized carrots offer a delightful crunch that pairs beautifully with the tender fish.

  • Steamed Asparagus: Crisp-tender asparagus brings a gourmet touch and complements the salmon’s flavor beautifully.

  • Chilled White Wine: A glass of dry Sauvignon Blanc elevates the meal with its crisp acidity and refreshing notes.

  • Lemon Sorbet: End on a light note with this zesty dessert, cleansing your palate after the savory feast.

Each of these delightful pairings serves to elevate your Sheet Pan Garlic Roasted Salmon & Brussels Sprouts, making your dinner a cozy, memorable occasion.

Sheet Pan Garlic Roasted Salmon & Brussels Sprouts Variations

Feel free to get creative with this dish—there are so many delicious ways to put your unique spin on it!

  • Lemon Zest: Add the zest of one lemon to the salmon for a bright, fresh flavor that complements the garlic beautifully. The citrus will elevate the entire dish!

  • Maple Glaze: Drizzle a little maple syrup over the Brussels sprouts before roasting. This will caramelize perfectly, adding a delightful sweetness that contrasts the savory garlic.

  • Spicy Kick: Sprinkle red pepper flakes over the salmon before baking for a little heat. The spice will awaken your taste buds and bring an exciting twist to the meal.

  • Herbs de Provence: Swap dried oregano for herbs de Provence for a fragrant twist. The blend of dried herbs will add a sophisticated flavor profile to your salmon.

  • Honey Garlic Brussels: Toss the Brussels sprouts in a mixture of honey and minced garlic before roasting. This sweetness will create a glossy finish that’s simply irresistible.

  • Vegetable Medley: Mix in some cherry tomatoes and sliced bell peppers for a colorful addition. They’ll roast perfectly on the sheet pan and add extra vitamins!

  • Mustard Glaze: Brush a little Dijon mustard on the salmon fillets before seasoning. This adds a tangy depth that pairs beautifully with the salmon’s richness.

  • Nutty Topping: Top the roasted Brussels sprouts with toasted almonds or crushed walnuts just before serving for a delightful crunch and nutty flavor.

Use these variations to make the dish your own and enjoy the wonderful aromas and flavors that fill your home!

Make Ahead Options

These Sheet Pan Garlic Roasted Salmon & Brussels Sprouts are perfect for meal prep enthusiasts! You can wash and trim the Brussels sprouts, then toss them with olive oil, minced garlic, salt, and pepper up to 24 hours in advance. Store them in an airtight container in the fridge to maintain their freshness. The salmon can be seasoned ahead too; just wrap the marinated fillets in plastic wrap and refrigerate for up to 3 days. When you’re ready to cook, simply preheat the oven and roast the Brussels sprouts for 20 minutes before adding the salmon for another 10-12 minutes, ensuring everything remains just as delicious with minimal effort!

Chef's Helpful Tips

  • For the Sheet Pan Garlic Roasted Salmon & Brussels Sprouts, evenly trim the ends of the Brussels sprouts to ensure they cook uniformly.
  • Avoid overcrowding the sheet pan as this can lead to steaming rather than roasting, which prevents the vegetables from achieving that crispy texture.
  • When seasoning the salmon, make sure to coat each fillet generously to enhance flavor during the roasting process.
  • Keep a close eye on the salmon as it cooks; it should reach an internal temperature of 145°F for perfect doneness.

Sheet Pan Garlic Roasted Salmon & Brussels Sprouts Recipe FAQs

How do I choose fresh Brussels sprouts?
Absolutely! When selecting Brussels sprouts, look for firm, compact heads that are bright green. Avoid any with yellowing leaves or dark spots all over, as these indicate they may be past their prime. If possible, choose smaller sprouts, as they’re often sweeter and more tender.

What’s the best way to store leftover salmon and Brussels sprouts?
Very! Store any leftovers in an airtight container in the refrigerator for up to 3 days. If you’re reheating, you can pop them back into the microwave or oven until they’re warmed through. For best flavor, remember to keep the heat gentle!

Can I freeze the cooked salmon and Brussels sprouts?
Definitely! To freeze your Sheet Pan Garlic Roasted Salmon & Brussels Sprouts, place them in a freezer-safe container, leaving a bit of space to allow for expansion, and freeze for up to 2 months. When you’re ready to enjoy, thaw in the refrigerator overnight and then reheat in the oven at 350°F (175°C) for about 15 minutes to maintain texture.

What should I do if my salmon is overcooked?
Oh no! If your salmon comes out a bit dry, there are a couple of tricks to salvage it. Consider serving it with a drizzle of olive oil or a sauce—like a lemon dill sauce—to help add moisture back. In the future, be sure to check for doneness around the 10-minute mark after adding the salmon to the oven; it should flake easily with a fork at 145°F internally.

Can my pet eat salmon?
Yes, however, it’s crucial to prepare the salmon without any seasonings or oils. Plain cooked salmon can be a tasty treat for dogs, but always consult your vet for dietary questions, especially regarding allergies, as some pets may have sensitivities.

What if I have a garlic allergy?
If you’re allergic to garlic, I recommend substituting it with a different herb like lemon zest or a blend of fresh herbs like rosemary or thyme for flavor without the garlic. This substitution brings a fresh brightness to the dish without compromising on taste!

Sheet Pan Garlic Roasted Salmon & Brussels Sprouts

Sheet Pan Garlic Roasted Salmon & Brussels Sprouts

A comforting yet healthy sheet pan dish featuring succulent salmon and caramelized Brussels sprouts, seasoned with garlic and spices.
Print Recipe Pin Recipe
Prep Time 10 minutes mins
Cook Time 25 minutes mins
Total Time 35 minutes mins
Servings: 4 servings
Course: DINNER RECIPES
Cuisine: American
Calories: 350
Ingredients Equipment Method Nutrition Notes

Ingredients
  

For the Brussels Sprouts
  • 2 pounds Brussels sprouts trim the ends for the best texture
  • 3 tablespoons olive oil helps to caramelize the Brussels sprouts beautifully
  • 1 clove garlic finely minced
  • ½ teaspoon salt enhances the natural sweetness of the sprouts
  • ¼ teaspoon freshly ground black pepper adds a hint of warmth and spice
For the Salmon
  • 6 to 8 fillets salmon aim for 3 to 4 ounces each for even cooking
  • 1 tablespoon olive oil keeps the salmon moist while roasting
  • 4 cloves garlic finely minced
  • 1 tablespoon dried oregano adds a fragrant herbal note to the salmon
  • ¾ teaspoon salt to taste
  • ¼ teaspoon freshly ground black pepper to taste

Equipment

  • sheet pan
  • Oven
  • cooking spray
  • parchment paper

Method
 

Instructions
  1. Preheat the oven to 400°F (200°C). Spread a clean sheet pan with a light coat of cooking spray or line it with parchment paper for easy cleanup.
  2. Trim the ends of the Brussels sprouts, ensuring they are fresh and ready. Place them neatly on the sheet pan, giving them room to roast evenly.
  3. Drizzle with 3 tablespoons of olive oil, add 1 clove of minced garlic, sprinkle with ½ teaspoon salt, and ¼ teaspoon black pepper. Toss everything gently, making sure the sprouts are well-coated!
  4. Arrange the Brussels sprouts in a single layer on the sheet pan, and pop them into the oven to roast for 20 minutes, until they start to turn golden brown and crisp.
  5. Season the salmon fillets with 1 tablespoon of olive oil, 4 cloves of minced garlic, 1 tablespoon of dried oregano, ¾ teaspoon salt, and ¼ teaspoon black pepper. Ensure every little piece is covered in that delicious mixture.
  6. Add the salmon fillets to the sheet pan after the Brussels sprouts have roasted for 20 minutes, and continue roasting everything together for an additional 10–12 minutes or until the salmon flakes easily with a fork and the Brussels sprouts are tender.
  7. Optional: Garnish with fresh lemon wedges for an extra zing of flavor!

Nutrition

Serving: 1servingCalories: 350kcalCarbohydrates: 12gProtein: 30gFat: 20gSaturated Fat: 3gPolyunsaturated Fat: 2gMonounsaturated Fat: 12gCholesterol: 70mgSodium: 480mgPotassium: 800mgFiber: 4gSugar: 2gVitamin A: 400IUVitamin C: 90mgCalcium: 50mgIron: 2mg

Notes

Evenly trim the ends of the Brussels sprouts for uniform cooking. Avoid overcrowding the sheet pan to achieve crispy texture. Salmon should reach an internal temperature of 145°F for perfect doneness.

Tried this recipe?

Let us know how it was!

Filed Under: DINNER RECIPES

Cinnamon Pumpkin Cathead Biscuits with Blueberries

December 10, 2025 by JudyWhite Leave a Comment

As the first hints of autumn fill the air and leaves crunch underfoot, I find myself yearning for the comforting flavors of fall. That’s when the idea of making Cinnamon Pumpkin Cathead Biscuits with Blueberries struck me. Imagine the warm aroma of cinnamon wafting through your kitchen, mingling with the bold scent of pumpkin and bursts of juicy blueberries. This delightful combination not only fills your home with a cozy vibe but also promises to be an irresistible treat for both family and guests alike.

One unforgettable evening, I had a sudden craving for something that felt both homey and special. I decided to blend the richness of pumpkin with my favorite blues, resulting in biscuits that are truly a feast for the senses. They come together effortlessly, allowing even the busiest of cooks to whip up a batch in no time. Each bite offers a delightful crunch on the outside, followed by a fluffy, tender interior that practically melts in your mouth. Whether you’re enjoying them for breakfast or as a sweet snack, these biscuits are sure to brighten your day and banish any thoughts of fast food. So roll up your sleeves and let’s dive into this delicious fall-inspired recipe!

Why You'll Love This Cinnamon Pumpkin Cathead Biscuits with Blueberries

  • These Cinnamon Pumpkin Cathead Biscuits with Blueberries are incredibly easy to make, making them perfect for bakers of all skill levels.
  • The warm and inviting flavors of cinnamon, pumpkin, and blueberries create a deliciously unique taste that’s hard to resist.
  • Their versatility allows you to enjoy them for breakfast, dessert, or any time in between, adapting to any occasion.
  • Visually appealing and perfectly golden, these biscuits will impress your family and guests alike, making them a guaranteed crowd-pleaser.
  • Enjoy the delightful aroma and comforting taste of fall with every bite!

Cinnamon Pumpkin Cathead Biscuits Ingredients

Get ready to bake these delightful biscuits!

For the Biscuit Dough

  • ⅓ cup light brown sugar (packed) – Adds depth and sweetness, perfectly complementing the pumpkin.
  • 1 teaspoon cinnamon – This fragrant spice infuses the biscuits with warmth reminiscent of autumn.
  • 1 cup salted butter (grated, cold) – Cold butter ensures flakiness; grating it helps it blend into the dough.
  • 4 cups all-purpose flour – The base for these biscuits, providing structure and texture.
  • 2 tablespoons granulated sugar – A touch of sweetness that balances the flavors in the dough.
  • ½ teaspoon baking soda – Helps the biscuits rise for that perfect fluffy texture.
  • 2 tablespoons baking powder – Works with the baking soda for a nice lift in your biscuits.
  • 2 cups buttermilk – Adds moisture and a slight tang, making these Cinnamon Pumpkin Cathead Biscuits extra tender.

For the Add-ins

  • 1 cup blueberries (fresh or frozen) – Bursting with flavor, they bring a juicy surprise to each bite; don’t thaw if frozen.

For the Topping

  • 3 tablespoons heavy cream – Brushed on top before baking for a rich, golden finish.
  • 2 tablespoons unsalted butter (melted) – Adds a luscious finish that enhances the warm, comforting flavors.

With these ingredients, you’re just a few simple steps away from baking your very own warm and delightful Cinnamon Pumpkin Cathead Biscuits with Blueberries!

How to Make Cinnamon Pumpkin Cathead Biscuits with Blueberries

  1. Preheat your oven to 450°F. This high temperature is essential for those perfectly fluffy biscuits. Spray a 12-inch cast-iron skillet or a large round baking pan with baking spray to prevent sticking.

  2. Grate the cold butter using the fine side of a grater onto a piece of parchment paper. Place it in the freezer for about 5 minutes, which will help keep your biscuits tender.

  3. Mix the brown sugar and cinnamon in a small bowl. This fragrant mixture will enhance the flavor of your biscuits and will be sprinkled on top for that sweet crunch.

  4. Sprinkle 1 tablespoon of the cinnamon sugar mixture evenly into the bottom of the prepared pan. Reserve the remaining mixture for the tops of the biscuits to create a beautiful finish.

  5. Whisk together the flour, granulated sugar, baking soda, and baking powder in a large bowl. This will be the dry base for your dough, ensuring a perfectly risen biscuit.

  6. Incorporate the grated butter into the dry ingredients using a fork. The goal is to have small, crumbly bits of butter evenly mixed throughout the flour.

  7. Pour in the buttermilk and stir until mostly combined. Gently fold the dough over a few times until it’s sticky with no dry bits remaining. If the dough feels too dry, add 1-2 tablespoons of buttermilk.

  8. Fold in the blueberries carefully until just incorporated, being gentle to keep them intact. If using frozen blueberries, do not thaw them to maintain their juicy goodness.

  9. Divide the dough into 7 equal portions and shape each into a rough ball. This is where the fun begins—make sure they’re not perfect; rustic is the goal!

  10. Arrange 6 balls of dough around the edge of the pan, leaving space in the center for the last ball. They should touch, but not be stacked, allowing them to rise beautifully.

  11. Brush the tops with heavy cream for a golden finish and sprinkle with the remaining cinnamon sugar mixture. This adds an extra layer of sweetness and crunch.

  12. Bake for 22-27 minutes, until the tops are golden brown and the biscuits are puffed up. Enjoy the delightful aroma filling your kitchen!

  13. Brush the tops with melted butter right after removing them from the oven. This adds a glossy finish and enhances the comfort of every bite.

  14. Serve warm for the best experience, allowing everyone to enjoy that fluffy biscuity goodness while fresh!

Optional: Enjoy these biscuits with a dollop of cream or a drizzle of honey for an extra special treat.
Exact quantities are listed in the recipe card below.

How to Store and Freeze Cinnamon Pumpkin Cathead Biscuits with Blueberries

Room Temperature: Keep the biscuits in an airtight container for up to 2 days to maintain freshness; perfect for enjoying warm or as a delightful snack.

Fridge: Store in the refrigerator for up to 5 days in an airtight container. Reheat in the oven for about 5-10 minutes at 350°F for that fresh-out-of-the-oven feel.

Freezer: For longer storage, freeze the biscuits in a single layer on a baking sheet, then transfer to a zip-top bag for up to 3 months. Reheat directly from frozen, baking at 350°F for 15-20 minutes.

Reheating: For best results, reheat the biscuits in the oven rather than the microwave to keep them crispy on the outside and soft inside—delicious!

Cinnamon Pumpkin Cathead Biscuit Variations

Feel free to explore these delightful twists on the traditional recipe for an even more personalized treat!

  • Dairy-Free: Substitute buttermilk with almond or oat milk and use plant-based butter for a creamy texture without dairy.
    Plant-based options won’t skimp on flavor or fluffiness, so everyone can enjoy a taste of autumn!

  • Pumpkin Spice Lovers: Add 1 tablespoon of pumpkin pie spice to the dry ingredients for an extra kick of warm, seasonal flavors.
    This twist will intensify the cozy essence of fall, making your biscuits a true celebration of the season!

  • Nutty Crunch: Fold in ½ cup of chopped walnuts or pecans to add a satisfying crunch and nutty flavor.
    Nuts bring texture and depth, enhancing the delightful bites with added nutrition and earthy nuances.

  • Zest It Up: Incorporate 1 teaspoon of orange or lemon zest into the dough for a refreshing citrus note.
    Brightening up the flavors, this simple addition creates a harmonious balance with the spices and pumpkin.

  • Savory Option: Swap out blueberries for 1 cup of grated cheese (like cheddar) and bacon bits for a savory treat.
    These biscuits transform into a delightful appetizer, perfect for parties or brunch, proving versatility in every bite!

  • Sweet Swirl: Mix in ¼ cup of caramel or chocolate chips for a sweet, gooey surprise in each biscuit.
    This indulgent addition will satisfy any sweet tooth, creating a decadent experience that’s simply unforgettable.

  • Herb Infusion: Adding fresh or dried herbs, like rosemary or thyme, to the dough can create a unique twist for a savory version.
    The fragrant herbs will make your kitchen smell amazing and elevate the flavor profile beautifully!

  • Spicy Kick: Toss in a pinch of cayenne pepper for a gentle heat that complements the sweetness of the blueberries.
    This unexpected flavor will intrigue your taste buds, offering a delightful contrast that keeps everyone guessing.

What to Serve with Cinnamon Pumpkin Cathead Biscuits with Blueberries?

These delightful biscuits are the perfect start to a cozy fall meal, inviting comforting flavors to the table.

  • Maple Syrup: A drizzle adds a sweet, warm touch that enhances the cinnamon flavor beautifully.
  • Spiced Apple Cider: This warm beverage complements the cozy vibes of the biscuits while echoing their autumnal spices.
  • Fresh Fruit Salad: A mix of seasonal fruits provides a refreshing contrast to the richness of the biscuits.
  • Creamy Yogurt: Adding a dollop of vanilla yogurt adds a tangy creaminess that perfectly balances the sweetness.
  • Nutty Granola: Sprinkle some on top for a delightful crunch and texture contrast, elevating your biscuit experience.
  • Whipped Cream: Serve with freshly whipped cream for a decadent treat that invites indulgence and warmth.

Pairing your Cinnamon Pumpkin Cathead Biscuits with Blueberries with these delightful choices will create a memorable meal that warms hearts and homes alike!

Make Ahead Options

These Cinnamon Pumpkin Cathead Biscuits with Blueberries are ideal for meal prep, making your busy mornings a breeze! You can prepare the biscuit dough up to 24 hours in advance. Simply follow the recipe until step 8, then wrap the shaped balls of dough tightly in plastic wrap and refrigerate. To maintain quality, avoid adding the blueberries until you’re ready to bake; folding them in just before cooking ensures they remain juicy and prevent discoloration. When you’re ready to enjoy them, preheat the oven, fold in the blueberries, brush with heavy cream, and bake as directed for that fresh-from-the-oven taste that will delight your family!

Chef's Helpful Tips

  • For the best results with your Cinnamon Pumpkin Cathead Biscuits with Blueberries, it’s crucial to use cold grated butter as it creates a flaky texture.
  • Be careful not to overmix the dough after adding buttermilk; you want a sticky dough without dry bits, which helps the biscuits rise beautifully.
  • When incorporating blueberries, gently fold them in and avoid thawing if using frozen to keep their burst of flavor intact.
  • Always preheat your oven to 450°F for the perfect bake time of 22-27 minutes, ensuring a golden brown top and fluffy interior.

Cinnamon Pumpkin Cathead Biscuits with Blueberries Recipe FAQs

What type of blueberries should I use?
You can use fresh or frozen blueberries in this recipe. If you opt for frozen, there’s no need to thaw them first; they’ll bake up beautifully and add a delicious burst of flavor to each biscuit.

How should I store leftover biscuits?
To keep your Cinnamon Pumpkin Cathead Biscuits with Blueberries fresh, store them in an airtight container at room temperature for up to 2 days. If you’d like to extend their shelf life, refrigerate them for up to 5 days. Just reheat in the oven at 350°F for about 5-10 minutes to enjoy that freshly baked taste again!

Can I freeze these biscuits?
Absolutely! To freeze your biscuits, first place them in a single layer on a baking sheet until they’re frozen firm—this usually takes about 1-2 hours. Once frozen, transfer them to a zip-top freezer bag, and they can stay in the freezer for up to 3 months. To reheat, simply bake them straight from the freezer at 350°F for 15-20 minutes until heated through.

What if my biscuit dough is too dry?
If you find your dough is too dry when mixing, just add in 1-2 tablespoons of buttermilk until it reaches that perfect sticky consistency. The right amount of moisture is essential for fluffy, tender biscuits, so don’t hesitate to adjust!

Can I make these biscuits gluten-free?
Yes, you can! Substitute the all-purpose flour with a 1:1 gluten-free flour blend. Make sure it contains xanthan gum to maintain the right texture. Just follow the same instructions as you would with regular flour; many gluten-free blends work beautifully with biscuit recipes!

Cinnamon Pumpkin Cathead Biscuits with Blueberries

Cinnamon Pumpkin Cathead Biscuits with Blueberries

These Cinnamon Pumpkin Cathead Biscuits with Blueberries are a cozy fall treat that combines warm cinnamon, pumpkin, and juicy blueberries.
Print Recipe Pin Recipe
Prep Time 15 minutes mins
Cook Time 25 minutes mins
Total Time 40 minutes mins
Servings: 7 biscuits
Course: BREAKFAST & BRUNCH
Cuisine: American
Calories: 300
Ingredients Equipment Method Nutrition Notes

Ingredients
  

Biscuit Dough
  • ⅓ cup light brown sugar packed
  • 1 teaspoon cinnamon
  • 1 cup salted butter grated, cold
  • 4 cups all-purpose flour
  • 2 tablespoons granulated sugar
  • ½ teaspoon baking soda
  • 2 tablespoons baking powder
  • 2 cups buttermilk
Add-ins
  • 1 cup blueberries fresh or frozen
Topping
  • 3 tablespoons heavy cream
  • 2 tablespoons unsalted butter melted

Equipment

  • cast-iron skillet
  • Mixing bowl
  • grater
  • parchment paper

Method
 

Preparation
  1. Preheat your oven to 450°F. Spray a 12-inch cast-iron skillet or a large round baking pan with baking spray.
  2. Grate the cold butter and place it in the freezer for about 5 minutes.
  3. Mix the brown sugar and cinnamon in a small bowl, then sprinkle 1 tablespoon into the bottom of the prepared pan and reserve the rest.
  4. Whisk together the flour, granulated sugar, baking soda, and baking powder in a large bowl.
  5. Incorporate the grated butter into the dry ingredients using a fork.
  6. Pour in the buttermilk and stir until mostly combined. Gently fold the dough until it's sticky with no dry bits remaining.
  7. Fold in the blueberries carefully.
  8. Divide the dough into 7 portions and shape each into a rough ball.
  9. Arrange 6 balls around the edge of the pan and leave space in the center.
  10. Brush the tops with heavy cream and sprinkle with the remaining cinnamon sugar mixture.
  11. Bake for 22-27 minutes until golden brown.
  12. Brush with melted butter after removing from the oven.
  13. Serve warm.

Nutrition

Serving: 1biscuitCalories: 300kcalCarbohydrates: 40gProtein: 4gFat: 15gSaturated Fat: 9gPolyunsaturated Fat: 1gMonounsaturated Fat: 4gCholesterol: 30mgSodium: 250mgPotassium: 200mgFiber: 2gSugar: 8gVitamin A: 200IUVitamin C: 2mgCalcium: 100mgIron: 1mg

Notes

For the best results, use cold grated butter and avoid overmixing the dough. For extra treats, enjoy with cream or honey.

Tried this recipe?

Let us know how it was!

Filed Under: BREAKFAST & BRUNCH

  • « Previous Page
  • 1
  • …
  • 43
  • 44
  • 45
  • 46
  • 47
  • …
  • 49
  • Next Page »

Recent Posts

  • Crispy Potatoes in Oven
  • Lucky Charms Pancakes
  • Cheeseburger
  • Boiled Corn on the Cob
  • St. Patrick’s Day Dessert Parfaits

Recent Comments

No comments to show.

Footer

  • Contact
  • Privacy Policy
  • About Us
  • Terms
  • ↑ back to top

Copyright © 2024 www.Forkono.com

Table Of Content