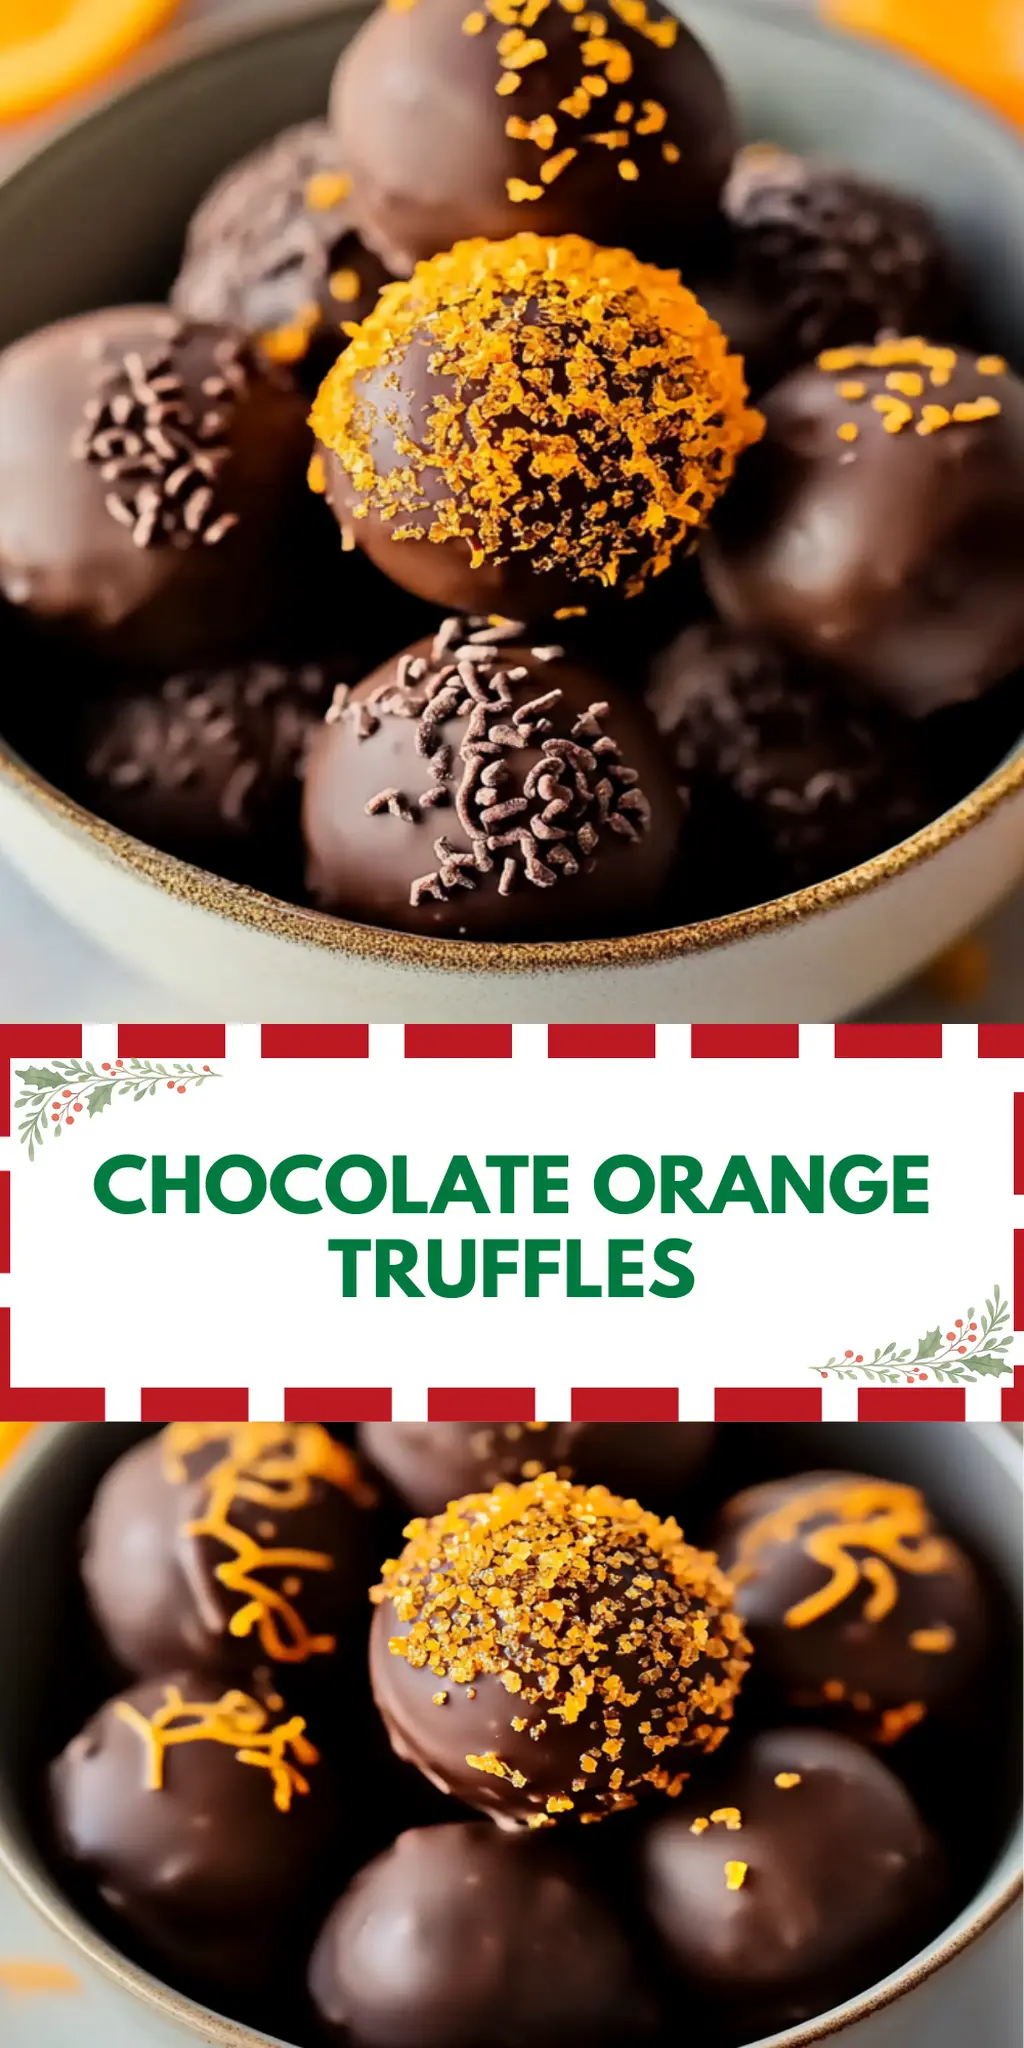
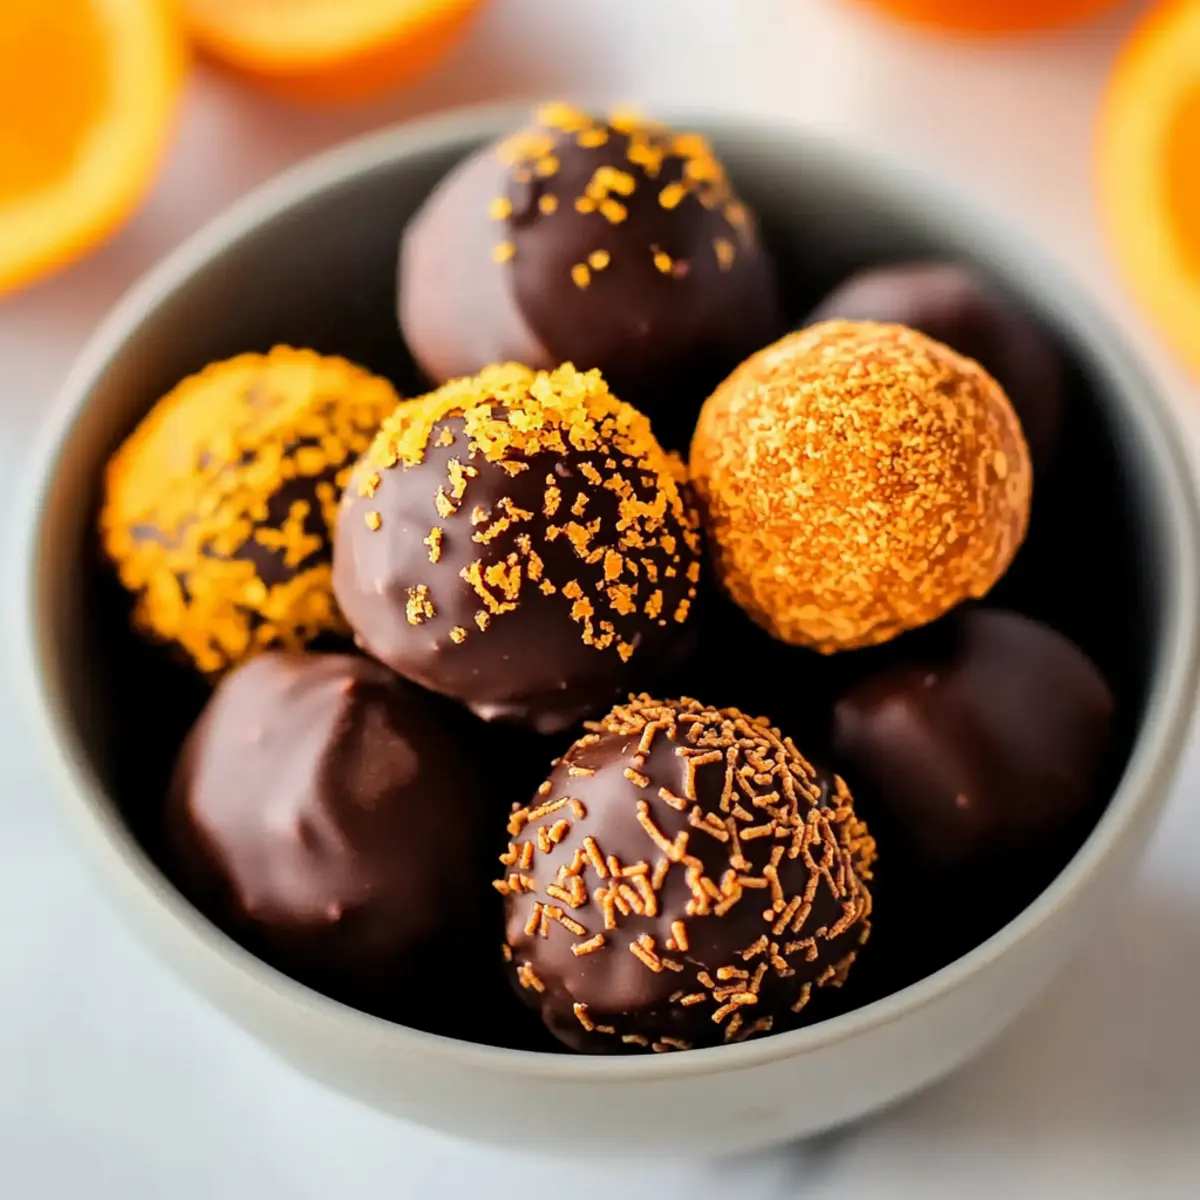
Forkono

  • BREAKFAST & BRUNCH
  • DESSERT RECIPES
  • DINNER RECIPES
  • LUNCH RECIPES
  • About uS
  • SNACKS & APPETIZERS
menu icon
go to homepage
  • BREAKFAST & BRUNCH
  • DESSERT RECIPES
  • DINNER RECIPES
  • LUNCH RECIPES
  • About uS
  • SNACKS & APPETIZERS
search icon
Homepage link
  • BREAKFAST & BRUNCH
  • DESSERT RECIPES
  • DINNER RECIPES
  • LUNCH RECIPES
  • About uS
  • SNACKS & APPETIZERS
×

No Bake Avalanche Cookies

December 2, 2025 by JudyWhite Leave a Comment

There’s something truly exhilarating about whipping up a sweet treat in practically no time at all. Enter No Bake Avalanche Cookies—my delightful concoction that balances crunchy Rice Krispies, gooey marshmallows, and creamy white chocolate in a whimsical, no-bake wonder. I stumbled upon this recipe during a spontaneous afternoon dessert craving, and oh, what a delicious discovery it turned out to be!

Perfect for gatherings or simply a cozy night in, these cookies are not your ordinary snacks. In just 15 minutes, you can transform simple ingredients into a decadent masterpiece that looks and tastes like you spent hours in the kitchen. The best part? You can customize them with mini chocolate chips for an extra layer of indulgence. As I watch my family dive into these treats, I can’t help but feel a warm glow knowing they’re enjoying something homemade and utterly delightful. So, let’s dive into this easy recipe that’s sure to please both young and old alike!

Why You'll Love This No Bake Avalanche Cookies

  • These No Bake Avalanche Cookies are incredibly easy to make, allowing you to whip them up in just 15 minutes without turning on the oven.
  • Their delightful flavor combination of crunchy Rice Krispies, gooey marshmallows, and creamy white chocolate is sure to satisfy any sweet tooth.
  • Versatile and customizable, you can add mini chocolate chips or experiment with other mix-ins to create your perfect treat.
  • Not only are they visually appealing with their generous dollops and inviting textures, but they’re also a guaranteed crowd-pleaser at any gathering.

No Bake Avalanche Cookies Ingredients

• Get ready for a sweet adventure!

For the Base

  • Rice Krispies Cereal – 2 cups for that perfect crunch and lightness in each bite.
  • Mini-Marshmallows – 1 cup to add gooey sweetness and delightful texture.
  • White Chocolate Chips – 2 cups (1 bag) for its creamy richness that brings everything together.
  • Creamy Peanut Butter – 1/2 cup for a nutty flavor that balances the sweetness beautifully.

Optional Topping

  • Mini-Chocolate Chips – Sprinkle on top for an extra chocolatey crunch and visual appeal.

These No Bake Avalanche Cookies are a sweet treat you won’t want to miss!

How to Make No Bake Avalanche Cookies

  1. Prepare the Baking Sheet:
    Start by lining a baking sheet with parchment paper to prevent sticking. This will also make cleanup a breeze!

  2. Combine the Crunch:
    In a large bowl, mix together the Rice Krispies and mini-marshmallows until they are evenly distributed. Set this mixture aside while you prepare the next step.

  3. Melt the Chocolate Bliss:
    Over low heat, melt the white chocolate chips and creamy peanut butter together. Stir constantly until the mixture is smooth and creamy, ensuring that it doesn’t burn.

  4. Mix it All Together:
    Once melted, pour this luscious chocolate-peanut butter blend over the Rice Krispies and marshmallow mixture. Stir until everything is well combined and covered in that delicious mixture.

  5. Spoon the Mixture:
    Using a spoon, drop the mixture in generous spoonfuls onto your prepared baking sheet. This will create little cookie clusters that are just waiting to set!

  6. Add a Chocolatey Touch (Optional):
    If you’re feeling adventurous, sprinkle mini chocolate chips on top of your cookie clusters for an extra indulgent touch.

  7. Allow to Firm Up:
    Let the cookies sit at room temperature until they are firm to the touch. This usually takes about 30 minutes.

Optional: Drizzle with melted chocolate for an extra special finishing touch.
Exact quantities are listed in the recipe card below.

Make Ahead Options

These No Bake Avalanche Cookies are a fantastic time-saver for busy cooks! You can prepare the mixture up to 24 hours in advance—just follow the first five steps and then store the mixture in an airtight container in the refrigerator. This keeps everything fresh and prevents the marshmallows from melting. When you’re ready to serve, simply scoop the mixture onto a baking sheet, add any optional mini chocolate chips, and allow them to set for about 30 minutes at room temperature. By prepping ahead, you can easily surprise your family with these sweet, homemade treats without the last-minute rush!

How to Store and Freeze No Bake Avalanche Cookies

Room Temperature: Keep the cookies in an airtight container at room temperature for up to 3 days. This keeps them fresh and chewy.

Fridge: Store in the fridge for about a week if you prefer a firmer texture. Just ensure they’re covered to prevent drying out!

Freezer: For longer storage, freeze the cookies in an airtight container for up to 2 months. To enjoy, simply thaw them at room temperature.

Reheating: If you like them warm, microwave individual cookies for about 10-15 seconds. This brings back that gooey goodness!

No Bake Avalanche Cookies Variations

Feel free to unleash your creativity and customize these cookies to suit your tastes and dietary preferences!

  • Nut-Free: Substitute peanut butter with sunflower seed butter for a nut-free option that maintains creaminess and richness.

  • Dark Chocolate Switch: Use dark chocolate chips instead of white for a deeper, more intense flavor that pairs beautifully with the sweetness.

  • Gluten-Free Delight: Replace Rice Krispies with gluten-free cereal to whip up a deliciously satisfying treat that everyone can enjoy.

  • Add Some Crunch: Fold in a cup of chopped nuts, like almonds or pecans, to add a delightful crunch and heartiness to each bite.

  • Coconut Flake Twist: Mix in shredded coconut for a tropical flair, elevating the flavors to create a chewy, sweet sensation.

  • Minty Fresh: Stir in some peppermint extract, or add crushed peppermint candies for a refreshing minty version, perfect for the holidays!

  • Fruit Fusion: Toss in dried cranberries or raisins for a fruity twist that adds a pop of color and texture to your cookies.

  • Spicy Kick: Sprinkle in a pinch of cinnamon or chili powder for a surprising heat that enhances the sweetness and flavor complexity.

Exploring these variations can turn the simple No Bake Avalanche Cookies into a personalized treat that delights everyone!

What to Serve with No Bake Avalanche Cookies?

Imagine a cozy gathering filled with laughter and delightful treats that perfectly complement the sweet and crunchy bliss of your No Bake Avalanche Cookies.

  • Tall Glass of Milk: A classic pairing, milk enhances the flavors of the cookies while smoothing out the sweetness in every bite.
  • Creamy Vanilla Ice Cream: Scoop some vanilla ice cream alongside the cookies for an irresistible contrast—creamy versus crunchy that your guests will love!
  • Fresh Fruit Salad: The refreshing burst of berries and tropical fruit adds a bright, zesty note that balances the sweetness of the cookies beautifully.
  • Chocolate Dipped Strawberries: Coat some fresh strawberries with chocolate for an elegant treat that ties in with the chocolatey goodness of the cookies.
  • Caramel Sauce Drizzle: Offer a versatile drizzle of warm caramel for guests to pour on top, creating an indulgent experience. Who could resist that?
  • Coffee or Hot Chocolate: Serve alongside a rich coffee or a comforting cup of hot chocolate—perfect for those sweet tooth moments!
  • Mini Cheesecake Bites: Pair these delightful little cakes as a secondary dessert; their creamy texture offers a lovely contrast to the crunchy cookies.
  • Nutty Snack Mix: Creating a sweet and salty contrast, this mix makes for an enjoyable, crunchy side and a fun way for guests to nibble.
  • Sparkling Lemonade: A refreshing drink to cleanse the palate between bites; the citrusy notes uplift each sweet morsel of the cookies!

Chef's Helpful Tips

  • For the No Bake Avalanche Cookies, ensure your white chocolate chips and peanut butter are fully melted and combined over low heat to prevent burning.
  • Avoid using large marshmallows, as mini-marshmallows blend more easily into the cereal mixture, providing a better texture.
  • When mixing the chocolate blend with the Rice Krispies and marshmallows, work quickly to ensure every piece is coated before it begins to set.
  • Finally, allow the cookie clusters to firm up at room temperature for at least 30 minutes for the best texture before serving.

No Bake Avalanche Cookies Recipe FAQs

What type of Rice Krispies cereal should I use?
Absolutely! Regular Rice Krispies cereal is best for this recipe, as it provides that signature crunch. I recommend avoiding flavored or sweetened versions, as they may alter the overall taste of these No Bake Avalanche Cookies.

How long can I store No Bake Avalanche Cookies?
You can keep these delightful cookies stored in an airtight container at room temperature for up to 3 days. If you prefer a firmer texture, they can be stored in the fridge for about a week—just make sure they’re well covered to avoid drying out!

Can I freeze No Bake Avalanche Cookies?
Yes, you can freeze these cookies! Place them in a single layer on a baking sheet to freeze for about 1 hour, then transfer them to an airtight container and freeze for up to 2 months. To enjoy, simply thaw at room temperature for about 15-30 minutes.

My cookies are too crumbly; what should I do?
Very! If your cookies turn out crumbly, it’s often due to not mixing everything thoroughly. Make sure when you combine the melted white chocolate and peanut butter with the Rice Krispies and marshmallows, you’re mixing until everything is well coated. Alternatively, you can add a bit more peanut butter or melted chocolate to help bind them better.

Are there any dietary considerations I need to keep in mind?
Absolutely! Since this recipe includes peanut butter, those with nut allergies should avoid these cookies or consider using sunflower seed butter as a nut-free alternative. For those with dairy restrictions, a dairy-free white chocolate option can be used to keep the treat deliciously enjoyable without triggering allergies.

Can I use different types of chocolate chips?
Very! You can definitely swap white chocolate chips with milk chocolate or dark chocolate chips for a different flavor profile. If you decide to do this, keep in mind that the cookies will have a richer taste, which many chocolate lovers absolutely adore!

No Bake Avalanche Cookies

No Bake Avalanche Cookies

Enjoy these delightful No Bake Avalanche Cookies made with Rice Krispies, marshmallows, and white chocolate in just 15 minutes!
Print Recipe Pin Recipe
Prep Time 15 minutes mins
Setting Time 30 minutes mins
Total Time 45 minutes mins
Servings: 12 cookies
Course: Dessert
Cuisine: American
Calories: 150
Ingredients Equipment Method Nutrition Notes

Ingredients
  

Base
  • 2 cups Rice Krispies Cereal for that perfect crunch and lightness
  • 1 cup Mini-Marshmallows to add gooey sweetness
  • 2 cups White Chocolate Chips for creamy richness
  • 1/2 cup Creamy Peanut Butter for nutty flavor
Optional Topping
  • Mini-Chocolate Chips for extra chocolatey crunch

Equipment

  • Large Bowl
  • Baking sheet
  • parchment paper
  • Spoon

Method
 

Preparation Steps
  1. Prepare the Baking Sheet: Line a baking sheet with parchment paper to prevent sticking.
  2. Combine the Crunch: In a large bowl, mix together the Rice Krispies and mini-marshmallows.
  3. Melt the Chocolate Bliss: Melt white chocolate chips and creamy peanut butter together over low heat until smooth.
  4. Mix it All Together: Pour the chocolate-peanut butter blend over the Rice Krispies and marshmallow mixture, and stir.
  5. Spoon the Mixture: Drop the mixture in spoonfuls onto the prepared baking sheet.
  6. Add a Chocolatey Touch (Optional): Sprinkle mini chocolate chips on top of the cookie clusters.
  7. Allow to Firm Up: Let the cookies sit at room temperature until firm, about 30 minutes.

Nutrition

Serving: 1cookieCalories: 150kcalCarbohydrates: 20gProtein: 2gFat: 7gSaturated Fat: 3gPolyunsaturated Fat: 1gMonounsaturated Fat: 2gSodium: 50mgPotassium: 50mgSugar: 10gCalcium: 1mgIron: 2mg

Notes

For best texture, use mini-marshmallows and ensure the chocolate blend is fully melted before mixing.

Tried this recipe?

Let us know how it was!

Filed Under: DESSERT RECIPES

Apple Slab Pie

November 30, 2025 by JudyWhite Leave a Comment

Every now and then, there’s a recipe that feels like a warm embrace, and this Apple Slab Pie is undoubtedly one of them. As I stood in my kitchen, the sweet scent of cinnamon and baked apples drifting through the air, I realized just how much joy this dessert brings. Perfect for gatherings or family dinners, the best part? It’s surprisingly easy to make!

I stumbled upon this delightful recipe during a weekend baking spree, searching for something to elevate my usual dessert game. With just a handful of ingredients—think sweet apples, crispy crust, and a dreamy vanilla icing—this slab pie comes together quickly and feeds a crowd. Unlike traditional pies, the slab format means no fussing with pie plates or individual servings; just cut, serve, and watch it disappear!

So, if you’re ready to impress your friends and family with a stunning homemade treat that has an irresistible flavor, this is the recipe for you! Let’s dive into how to create your own mouthwatering Apple Slab Pie that will have everyone begging for seconds.

Why You'll Love This Apple Slab Pie

  • This Apple Slab Pie is incredibly easy to make, allowing you to enjoy delicious homemade dessert without the fuss.
  • The combination of sweet apples and warm cinnamon creates a flavor that will remind you of cozy fall days.
  • Its slab format is not only time-saving, but it also makes serving a breeze, which is perfect for gatherings.
  • Plus, the beautiful glaze on top adds a stunning visual appeal that will wow your guests and make this dessert the star of the table.

Apple Slab Pie Ingredients

Get ready to create a delightful masterpiece!

For the Icing
• Powdered Sugar – adds a sweet finishing touch to your Apple Slab Pie.
• Vanilla – enhances the icing with a lovely flavor that complements the pie.
• Milk – use as needed to achieve your desired icing consistency.

For the Crust
• Flour – the base of the crust; all-purpose works best for a tender texture.
• Crisco – helps create a flaky crust; you can substitute with unsalted butter if preferred.
• Sugar – adds a hint of sweetness to the crust.
• Salt – balances the flavors and enhances sweetness.
• Egg Yolk – enriches the dough, making it more tender and flavorful.
• Milk – brings the dough together and adds moisture.

For the Filling
• Apples (Peeled, Cored & Sliced) – choose your favorite variety for sweetness and tartness; Granny Smith or Honeycrisp are great options!
• Sugar – sweetens the apple filling perfectly.
• Cinnamon – infuses the filling with warm, comforting spice.

For the Bottom Layer
• Cornflake Crumbs – gives a delightful crunch that keeps the crust from getting soggy.

For the Top Crust
• Egg – brush on top for a golden finish.

Gather these ingredients, and you’ll be on your way to baking a scrumptious Apple Slab Pie that your loved ones will adore!

How to Make Apple Slab Pie

  1. Preheat Oven: Begin by preheating your oven to 400°F. Spray your 10 x 15 x 1 pan with non-stick spray, ensuring it’s ready for that delicious pie crust to come!

  2. Mix Dry Ingredients: In a medium bowl, combine the flour, Crisco, sugar, and salt. This mixture will form the heart of your crust, so mix it well until combined.

  3. Incorporate Wet Ingredients: In a small bowl, whisk together the egg yolk and milk. Pour this into your flour mixture and stir until a dough begins to form. It should be cohesive and slightly sticky.

  4. Divide Dough: Take your dough and divide it, keeping a little more than half for the bottom crust. This helps create a solid foundation for your delicious filling!

  5. Roll Out Crust: On a floured surface, roll out the larger half of the dough until it fits the size of your prepared pan, leaving a little overhang for crimping. This will create a lovely crust layer.

  6. Add Cornflake Crumbs: Sprinkle the cornflake crumbs evenly over the bottom crust layer. This will help absorb excess moisture from the apples, keeping your pie crust crisp.

  7. Prepare Apples: Peel, core, and slice the apples, then transfer them to a large mixing bowl. Toss the apple slices with sugar and cinnamon until they’re well coated. This will ensure every bite is bursting with flavor!

  8. Layer Apples: Carefully layer the cinnamon-sugar apples over the cornflake crumbs. Make sure to spread them evenly for consistent flavor in every piece.

  9. Top Crust: Roll out the remaining dough on a floured surface and lay it over the apple filling. Don’t forget to make slits in the top crust to allow steam to escape while baking!

  10. Bake: Place the pie in the preheated oven and bake for 30 minutes. You’ll know it’s ready when the crust is golden brown and the apple filling is bubbling.

  11. Cool Down: Remove the pie from the oven and let it cool for 15 minutes. This will help set the filling and make it easier to slice.

  12. Make Icing: In a bowl, whisk together the powdered sugar, vanilla, and enough milk to achieve your desired icing consistency. Drizzle this sweet glaze over your warm pie before serving!

Optional: Serve warm with a scoop of vanilla ice cream for an extra special touch.

Exact quantities are listed in the recipe card below.

Make Ahead Options

Perfect for busy home cooks, this Apple Slab Pie can be prepped in advance to save you time on those hectic days! You can prepare the crust and apple filling up to 24 hours ahead of time. Simply mix the crust ingredients, form the dough, and wrap it tightly in plastic wrap. For the filling, slice your apples and toss them with sugar and cinnamon, then refrigerate in an airtight container. When you’re ready to bake, roll out the dough, layer the cornflake crumbs and apple filling, add the top crust, and bake. This means you can serve a delightful homemade dessert with minimal effort, just as delicious as if you made it fresh!

How to Store and Freeze Apple Slab Pie

Room Temperature: Store uncovered at room temperature for up to 2 days. This allows the crust to maintain its crispness while keeping the filling fresh.

Fridge: If you plan to enjoy your Apple Slab Pie for up to a week, cover it with plastic wrap and chill in the fridge. This helps preserve its flavor and prevents spoilage.

Freezer: For longer storage, freeze the pie either whole or in individual slices. Wrap tightly in plastic wrap and then in aluminum foil for up to 3 months. Thaw overnight in the fridge before serving.

Reheating: To reheat, place slices in a 350°F oven for about 10-15 minutes until warmed through. This will revive that delightful crispy crust and delicious, gooey apple filling!

What to Serve with Apple Slab Pie?

Every slice of this delightful dessert deserves the perfect companions to enhance its flavors and make your gathering truly special.

  • Vanilla Ice Cream: The creamy, rich ice cream melts beautifully over warm pie, adding a delightful contrast to the warm, spiced apples.

  • Caramel Sauce: Drizzling warm caramel over your slice takes the caramel flavor to the next level, adding extra indulgence to every bite.

  • Fresh Whipped Cream: Light and airy, whipped cream provides a luscious topping that balances the pie’s sweetness while adding a delightful fluffiness.

  • Coffee: A piping hot cup of coffee complements the sweetness of the pie, making it the perfect pairing for an afternoon treat.

  • Cinnamon Sugar Dust: Sprinkling a mix of cinnamon and sugar on top before serving adds an extra layer of warmth that perfectly complements the apples.

  • Chai Tea: The spicy notes of chai will mingle beautifully with the flavors of your pie, providing a warm and inviting beverage that enhances the cozy vibe.

  • Berry Compote: A tangy berry sauce adds a fresh burst of flavor alongside the rich, sweet pie, balancing the sweetness beautifully.

  • Cheese Platter: A selection of sharp cheese works surprisingly well with the sweetness of the pie, creating a sophisticated flavor combination that’s always a hit.

  • Sparkling Cider: For a festive feel, serve chilled sparkling cider that refreshes your palate between sweet bites of pie.

Apple Slab Pie Variations

Feel free to unleash your creativity and put your own twist on this delightful dessert!

  • Gluten-Free: Substitute all-purpose flour with a gluten-free flour blend for a deliciously inclusive version that everyone can enjoy.

  • Alternative Sweeteners: Use honey or maple syrup instead of sugar for a natural, caramel-like sweetness that enhances the apple flavors beautifully.

  • Spiced Up: Add a dash of nutmeg or cardamom along with the cinnamon for a warm, complex flavor profile that teases the senses.

  • Berry Blast: Mix in a handful of fresh or frozen berries with the apples for a delightful tartness that adds vibrant color and texture.

  • Nutty Crunch: Fold in chopped pecans or walnuts into the apple mixture for a satisfying crunch that complements the tender filling perfectly.

  • Caramel Drizzle: Drizzle with store-bought or homemade caramel sauce right before serving to elevate the sweetness and give an indulgent finish.

  • Cheese Topping: Sprinkle some crumbled blue cheese or goat cheese over the apples before adding the top crust for a surprising savory element that balances the sweetness.

  • Coconut Flakes: Incorporate unsweetened coconut flakes into the crust or filling for a tropical twist that adds flavor and chewiness to each bite.

These variations not only explore new flavor horizons but also invite you to tailor the recipe to your taste and dietary needs, ensuring each pie is a reflection of your creativity!

Chef's Helpful Tips

  • When making Apple Slab Pie, ensure that your crust is not overworked as this can make it tough; mix just until combined for a tender texture.
  • Use cold Crisco or butter for the crust to achieve a flaky finish, and remember to keep your dough chilled before rolling it out.
  • To prevent a soggy bottom, the cornflake crumbs should be evenly distributed and act as a moisture barrier between the crust and the apple filling.
  • Check for doneness at the 25-minute mark, as oven temperatures can vary, and you want a golden crust and bubbling filling for the perfect pie.

Apple Slab Pie Recipe FAQs

What kind of apples should I use for my Apple Slab Pie?
Absolutely! For a balanced flavor in your Apple Slab Pie, opt for a mix of sweet and tart apples, such as Granny Smith and Honeycrisp. This combination will give you a deliciously complex taste, enhancing the sweetness of the sugar and the warmth of the cinnamon. You can even try adding a touch of Golden Delicious for added sweetness!

How do I store leftover Apple Slab Pie?
Very easy! If you’re enjoying your pie within 2 days, simply cover it with a clean kitchen towel and store it at room temperature. For up to a week of freshness, wrap it tightly with plastic wrap and pop it in the fridge. This will keep the flavors fresh while maintaining the pie’s crisp crust.

Can I freeze Apple Slab Pie?
Yes, indeed! To freeze your Apple Slab Pie, wrap it tightly in plastic wrap and then in aluminum foil to prevent freezer burn. It can be stored for up to 3 months. When you’re ready to enjoy a slice, thaw it overnight in the fridge, then warm it up in a 350°F oven for about 10-15 minutes to bring back that fresh-out-of-the-oven taste.

What is the best way to prevent a soggy bottom crust?
To keep your crust crisp, sprinkle a layer of cornflake crumbs before adding the apple filling. These crumbs act as a barrier, absorbing excess moisture from the apples. Also, ensure you layer the apples evenly, as this helps distribute the juices during baking, keeping the bottom crispier for longer!

Can I adapt this Apple Slab Pie recipe for allergies or dietary restrictions?
Absolutely! If you’re concerned about allergies, consider using dairy-free alternatives like coconut oil instead of Crisco and almond milk in your icing. For gluten-free needs, you can substitute the all-purpose flour with a gluten-free flour blend; just ensure it contains xanthan gum for better texture. Enjoy the flexibility of making this delicious pie suitable for everyone!

Apple Slab Pie

Apple Slab Pie

This Apple Slab Pie is a warm embrace of sweet apples and cinnamon, perfect for gatherings and remarkably easy to make.
Print Recipe Pin Recipe
Prep Time 20 minutes mins
Cook Time 30 minutes mins
Cooling Time 15 minutes mins
Total Time 1 hour hr 5 minutes mins
Servings: 12 slices
Course: Dessert
Cuisine: American
Calories: 320
Ingredients Equipment Method Nutrition Notes

Ingredients
  

Icing
  • 2 cups Powdered Sugar adds a sweet finishing touch
  • 1 teaspoon Vanilla enhances flavor of icing
  • as needed cups Milk use to achieve desired consistency
Crust
  • 3 cups Flour all-purpose works best for a tender texture
  • 1 cup Crisco substitute with unsalted butter if preferred
  • 1 cup Sugar adds sweetness to the crust
  • 1 teaspoon Salt balances sweetness
  • 1 large Egg Yolk enriches the dough
  • 1/2 cup Milk adds moisture to the dough
Filling
  • 6 cups Apples Peeled, Cored & Sliced; Granny Smith or Honeycrisp are great options!
  • 1/2 cup Sugar sweetens apple filling perfectly
  • 1 teaspoon Cinnamon infuses filling with warm spice
Bottom Layer
  • 1 cup Cornflake Crumbs gives a delightful crunch
Top Crust
  • 1 large Egg brush on top for a golden finish

Equipment

  • 10 x 15 x 1 pan
  • Mixing bowls
  • Whisk
  • Rolling pin

Method
 

Preparation Steps
  1. Preheat your oven to 400°F. Spray your 10 x 15 x 1 pan with non-stick spray.
  2. In a medium bowl, combine the flour, Crisco, sugar, and salt.
  3. In a small bowl, whisk together the egg yolk and milk. Pour into the flour mixture and stir until a cohesive dough forms.
  4. Divide the dough, keeping a little more than half for the bottom crust.
  5. On a floured surface, roll out the larger half of the dough to fit your prepared pan.
  6. Sprinkle the cornflake crumbs evenly over the bottom crust layer.
  7. Prepare the apples by peeling, coring, and slicing them. Toss with sugar and cinnamon.
  8. Layer the cinnamon-sugar apples over the cornflake crumbs evenly.
  9. Roll out the remaining dough and lay it over the apple filling, making slits to allow steam to escape.
  10. Bake in the preheated oven for 30 minutes until the crust is golden browned and filling is bubbling.
  11. Remove from the oven and let it cool for 15 minutes.
  12. Whisk together the powdered sugar, vanilla, and enough milk for icing consistency. Drizzle over warm pie before serving.

Nutrition

Serving: 1sliceCalories: 320kcalCarbohydrates: 45gProtein: 2gFat: 15gSaturated Fat: 5gCholesterol: 35mgSodium: 150mgPotassium: 100mgFiber: 2gSugar: 20gVitamin A: 200IUVitamin C: 5mgCalcium: 30mgIron: 1mg

Notes

Serve warm with a scoop of vanilla ice cream for an extra special touch.

Tried this recipe?

Let us know how it was!

Filed Under: DESSERT RECIPES

Reindeer Donuts

November 30, 2025 by JudyWhite Leave a Comment

During a recent gathering with friends, the laughter and joy around the table took a delicious turn toward creativity. As I glanced at the array of holiday treats, a lightbulb went off in my head, sparking the idea for these delightful Reindeer Donuts. Picture this: soft, chocolatey donuts transformed into adorable reindeer, complete with pretzel antlers and candy eyes that will have everyone smiling.

The best part? These treats are incredibly easy to make, requiring just 30 minutes from start to finish. Whether you’re looking to add some festive flair to a party or simply want to impress your family during the holidays, these Reindeer Donuts are the perfect blend of whimsy and flavor. Trust me, watching them come to life as you assemble each one will bring out your inner child and turn dessert-making into a joyous experience. Let’s dive into this fun, festive recipe that’s sure to become a seasonal favorite!

Why You'll Love This Reindeer Donuts

  • These Reindeer Donuts are a breeze to make, taking just 30 minutes to whip up, allowing you to spend more time enjoying the festivities.
  • With their delightful combination of chocolate, candy, and pretzels, they burst with flavor that both kids and adults will admire.
  • Their whimsical design instantly captures attention, making them an eye-catching addition to any holiday spread.
  • Plus, their versatility means you can easily customize them with different candies to suit your personal taste or theme.

Reindeer Donuts Ingredients

Get ready to create these festive delights!

For the Donuts

  • Mini Chocolate Donuts – these serve as the delicious base for your Reindeer Donuts, offering rich chocolate flavor.

For the Decoration

  • Chocolate Chips – melt these down to use as ‘glue’ for attaching the decorations effortlessly.
  • Mini-Pretzels – break them in half to make perfect antlers that add a playful touch.
  • Candy Eyes – these fun little pieces make your donuts come alive with character!
  • Mini-Nilla Wafers – serve as the face of your reindeer, providing a lovely contrast in texture.
  • Red M&M’s – use these for the nose; they add a pop of festive color and sweetness to your Reindeer Donuts!

How to Make Reindeer Donuts

  1. Prepare your workspace.
    Lay out a sheet of parchment paper on a flat surface to create a clean area for decorating your Reindeer Donuts.

  2. Melt the chocolate.
    In a microwave-safe bowl, melt the chocolate chips in 30-second intervals, stirring between each until smooth. This melted chocolate will act as your ‘glue’ for the toppings.

  3. Add the antlers.
    Break a pretzel in half and gently push each half into the top of a mini donut to create antlers. Make sure they are secure and balanced!

  4. Attach the face.
    Using a toothpick, place a small dollop of the melted chocolate on the back of a mini-Nilla wafer. Press it into the lower center of the donut to create the reindeer’s face.

  5. Add the eyes.
    With the same toothpick technique, ‘glue’ two candy eyes just above the wafer. These playful features will give your reindeer personality!

  6. Finish with the nose.
    Take a red M&M and use your toothpick to apply a bit of melted chocolate on its back. Press it onto the face above the Nilla wafer for a bright, festive nose.

  7. Repeat the process.
    Continue decorating the remaining donuts, following the same steps for each one. Enjoy the creativity as your reindeer take shape!

  8. Let them set.
    Allow your assembled Reindeer Donuts to sit until the chocolate hardens completely, which gives them a lovely touch and keeps everything in place.

Optional: Drizzle extra melted chocolate over the donuts for a festive touch!

Exact quantities are listed in the recipe card below.

What to Serve with Reindeer Donuts?

These charming holiday treats are the perfect centerpiece, inviting creativity and camaraderie at your festive gatherings.

  • Hot Cocoa: A warm cup of rich hot cocoa enhances the chocolatey goodness of the donuts, making for a cozy pairing.

  • Milk and Cookies: The classic duo of milk and cookies never fails. A cold glass of milk beautifully balances the sweetness of the donuts.

  • Fruit Platter: Fresh fruit adds a refreshing contrast and a splash of color to your dessert table, making the donuts even more delightful.

  • Gingerbread Men: Another holiday classic, these spiced cookies complement the sweetness of the Reindeer Donuts while keeping the festive spirit alive.

  • Christmas Punch: A fruity holiday punch can bring joy to your party, perfectly cutting through the richness of the donuts with a tangy zest.

  • Spiced Tea: A warm cup of spiced tea with cinnamon notes offers a comforting, aromatic contrast that can bring out the richer flavors of each bite.

  • Sugar Cookies: Decorated sugar cookies add a playful touch and are a hit with kids, enhancing the overall festive experience for everyone.

  • Caramel Sauce: A drizzle of warm caramel over the donuts adds an indulgent twist, inviting guests to savor every delightful bite.

  • Nut Mix: A savory nut mix can balance out the sweetness, providing a satisfying crunch that pairs wonderfully with the donut’s soft texture.

How to Store and Freeze Reindeer Donuts

Room Temperature: Keep Reindeer Donuts in an airtight container at room temperature for up to 2 days to maintain their softness and flavor.

Fridge: For extended freshness, refrigerate the donuts in a tightly sealed container, where they can last up to 5 days.

Freezer: If you wish to store them longer, freeze the Reindeer Donuts in a single layer on a baking sheet before transferring to an airtight container. They can stay frozen for up to 1 month.

Reheating: To enjoy a warm treat, allow thawed donuts to come to room temperature, then pop them in the microwave for about 10-15 seconds or enjoy at room temperature.

Make Ahead Options

These Reindeer Donuts are a festive treat that can easily be prepped in advance, saving you time during the busy holiday season! You can prepare the mini chocolate donuts and store them in an airtight container for up to 3 days. Additionally, you can melt the chocolate and store it in a sealed container in the fridge for up to 1 week (just reheat gently before use). For best quality, assemble the donuts with pretzels, candy eyes, and M&M noses the day you plan to serve them, ensuring they look fresh and delightful. With these make-ahead options, you can enjoy your gatherings without the last-minute rush!

Reindeer Donuts Variations

Don’t hesitate to let your creativity shine with these delightful twists!

  • Gluten-Free: Use gluten-free mini donuts and certified gluten-free pretzels for a safe treat that everyone can enjoy.

  • Nut-Free: Swap out mini-Nilla wafers for nut-free cookies, ensuring a delicious reindeer treat for those with nut allergies.

  • Dairy-Free: Melt dairy-free chocolate chips for a vegan-friendly adaptation, keeping the sweetness without any dairy.

  • Colorful Treats: Explore different colored M&M’s or candy-coated chocolates to match your party theme; the variations will pop with color!

  • Seasonal Spices: Add a pinch of cinnamon or nutmeg to the melted chocolate for a warming spice twist that’ll elevate the flavor.

  • Caramel Drizzle: Drizzle some caramel sauce over the finished donuts for a sticky allure that adds an irresistible sweetness.

  • Coconut Flakes: Top your donuts with a sprinkle of toasted coconut for extra texture and a tropical twist on the festive delight.

  • Minty Fresh: Use mint chocolate chips as your ‘glue’ for a refreshing take that adds a fun, minty flavor to these reindeer delights.

Chef's Helpful Tips

  • Make sure to melt the chocolate chips slowly using the microwave in 30-second intervals to avoid burning.
  • When attaching the pretzel antlers, position them securely to ensure they don’t tip over.
  • For a cleaner look, use a toothpick for precise application of the melted chocolate on the mini-Nilla wafers and M&M’s.
  • Allow the Reindeer Donuts to harden in a cool place to set the decorations properly before serving.

Reindeer Donuts Recipe FAQs

What types of chocolate chips work best for melting?
Absolutely! You can use any kind of chocolate chips for your Reindeer Donuts, whether semi-sweet, dark, or even milk chocolate. Just ensure they’re made for melting; avoid regular chocolate bars, as they may not melt smoothly.

How should I store leftover Reindeer Donuts?
Keep those festive treats in an airtight container at room temperature for up to 2 days to preserve that delightful softness. If you want them to last longer, refrigerate them for up to 5 days in a tightly sealed container.

Can I freeze the Reindeer Donuts for later?
Definitely! To freeze your Reindeer Donuts, place them in a single layer on a baking sheet until solid, then transfer them to an airtight container. They can last up to 1 month in the freezer. When you’re ready to enjoy, let them thaw in the fridge overnight, or at room temperature for about an hour.

What should I do if the chocolate isn’t melting properly?
If your chocolate isn’t melting smoothly, try reducing the microwave time to 20-second intervals instead of 30. Stir gently after each interval until it’s completely melted. If it seems too thick, add a teaspoon of vegetable oil to help it blend smoothly.

Can these Reindeer Donuts be made gluten-free?
Very! To make these adorable treats gluten-free, simply substitute the mini chocolate donuts and Nilla wafers with gluten-free versions. Look for gluten-free chocolate chip varieties to ensure every ingredient suits your dietary needs while keeping the festive spirit intact!

Are Reindeer Donuts safe for pets?
Great question! While they are delightful for us humans, be cautious as the chocolate and candy can be harmful to pets, especially dogs. If pets are around, it’s best to keep these treats out of their reach!

Reindeer Donuts

Reindeer Donuts

Delightful Reindeer Donuts with chocolatey flavor and festive decorations, perfect for holiday gatherings.
Print Recipe Pin Recipe
Prep Time 30 minutes mins
Total Time 30 minutes mins
Servings: 12 donuts
Course: Dessert
Cuisine: Holiday
Calories: 150
Ingredients Equipment Method Nutrition Notes

Ingredients
  

For the Donuts
  • 12 mini Chocolate Donuts These serve as the base for your Reindeer Donuts.
For the Decoration
  • 1 cup Chocolate Chips Melt these to use as 'glue' for decorations.
  • 12 Mini-Pretzels Break them in half for antlers.
  • 24 Candy Eyes Use for decoration.
  • 12 Mini-Nilla Wafers Serve as the face of the reindeer.
  • 12 Red M&M's Use for the nose.

Equipment

  • microwave-safe bowl
  • parchment paper
  • Toothpick

Method
 

How to Make Reindeer Donuts
  1. Prepare your workspace by laying out parchment paper on a clean surface.
  2. Melt the chocolate chips in a microwave-safe bowl in 30-second intervals until smooth.
  3. Break a pretzel in half and push each half into the top of a mini donut to create antlers.
  4. Place a dollop of melted chocolate on the back of a mini-Nilla wafer and press it into the lower center of the donut.
  5. Glue two candy eyes above the Nilla wafer using the melted chocolate.
  6. Use a toothpick to apply melted chocolate on the back of a red M&M and press it onto the face above the Nilla wafer.
  7. Continue decorating the remaining donuts following the same steps.
  8. Allow the assembled donuts to sit until the chocolate hardens completely.

Nutrition

Serving: 1donutCalories: 150kcalCarbohydrates: 22gProtein: 2gFat: 7gSaturated Fat: 4gPolyunsaturated Fat: 0.5gMonounsaturated Fat: 2gCholesterol: 5mgSodium: 50mgPotassium: 50mgFiber: 1gSugar: 10gCalcium: 2mgIron: 4mg

Notes

Optional: Drizzle extra melted chocolate over the donuts for a festive touch.

Tried this recipe?

Let us know how it was!

Filed Under: DESSERT RECIPES

Butterfinger Nutter Butter Truffles

November 30, 2025 by JudyWhite Leave a Comment

There’s something truly irresistible about the combination of sweet and salty, and that’s exactly what you’ll find in these Butterfinger Nutter Butter Truffles. Imagine sinking your teeth into a creamy, crunchy delight that is both nostalgic and utterly satisfying—the perfect antidote to dull, fast-food desserts. I stumbled upon this recipe while searching for a way to impress friends with minimal effort. With just a handful of ingredients, including those beloved Nutter Butter cookies and fun-sized Butterfingers, these truffles come together in no time, making them a crowd-pleaser for any occasion.

Whether it’s a last-minute gathering or a cozy night at home, these bite-sized treats offer a delightful burst of flavor that will have everyone reaching for more. Plus, with only 20 minutes of prep time, you’ll have the perfect sweet indulgence ready to chill while you unwind. Let’s dive into this simple yet decadent recipe that turns a quick snack into an unforgettable experience!

Why You'll Love This Butterfinger Nutter Butter Truffles

  • These Butterfinger Nutter Butter Truffles are incredibly easy to make, letting you whip up a delicious treat in just 20 minutes.
  • The combination of creamy and crunchy textures, paired with the rich flavor of chocolate and the nostalgic taste of Butterfinger, creates a dessert that is simply unforgettable.
  • Their versatility means you can serve these truffles at any occasion, from casual get-togethers to festive celebrations.
  • With their eye-catching appearance and irresistible taste, these truffles are sure to impress and satisfy any crowd.

Butterfinger Nutter Butter Truffles Ingredients

Get ready to create a sweet sensation!

For the Truffle Mixture

  • Nutter Butter Cookies – 16 oz, crushed to provide a deliciously creamy foundation for your truffles.
  • Cream Cheese – 8 oz, softened for a smooth and rich texture that binds everything together.
  • Butterfinger Candy Bars – 10 Fun-Size, crushed to add that iconic chocolate-peanut butter crunch with every bite.

For the Chocolate Coating

  • Milk Chocolate Chips – 16 oz, melted until silky smooth to create a decadent outer layer for your truffles.

These ingredients come together to make the ultimate Butterfinger Nutter Butter Truffles that you and your loved ones will adore!

How to Make Butterfinger Nutter Butter Truffles

  1. Prepare the Baking Sheet:
    Line a baking sheet with parchment paper to prevent sticking and make cleanup a breeze once your delightful truffles are ready.

  2. Crush Cookies:
    Place the Nutter Butter cookies in a food processor and crush them until fine. This crumbly base will create a rich texture when combined with the cream cheese.

  3. Mix Cream Cheese:
    In a separate bowl, beat together the crushed cookies with the softened cream cheese. Mix until the mixture is well incorporated and creamy, about 1-2 minutes.

  4. Add Candy Bars:
    Crush the Fun-Size Butterfinger candy bars in the food processor until they’re chunky yet fine. Stir them into the cookie-cream cheese mixture until evenly combined, creating a delightful chocolate-peanut butter blend.

  5. Form Truffles:
    Roll the mixture into 1-inch balls using your hands, and place them on the prepared baking sheet. This step is where the fun really begins; get ready to indulge!

  6. Chill Truffles:
    Refrigerate the truffle balls until they’re firm, about 30 minutes. This chilling time helps them hold their shape when coated in chocolate.

  7. Melt Chocolate:
    In a microwave-safe bowl, melt the milk chocolate chips in 30-second intervals, stirring in between, until completely smooth. The chocolate should be silky and shiny—perfect for dipping!

  8. Coat Truffles:
    Use a fork to dunk each truffle into the melted chocolate, ensuring it’s fully coated. Tap off any excess chocolate and place back on the lined pan to set.

  9. Garnish:
    While the chocolate is wet, sprinkle additional crushed Butterfinger pieces on top of the truffles for an extra crunch. Once all are coated, return them to the refrigerator until the chocolate is firm.

Optional: Drizzle some melted white chocolate on top for an eye-catching finish!

Exact quantities are listed in the recipe card below.

Make Ahead Options

These Butterfinger Nutter Butter Truffles are perfect for busy home cooks looking to save time without sacrificing flavor! You can prepare the truffle mixture up to 24 hours in advance. Simply follow the recipe through forming the truffles, then place them in an airtight container and refrigerate until ready to finish. When it’s time to serve, melt the chocolate chips and coat the truffles as directed, ensuring they maintain that deliciously creamy center. To prevent any sogginess, be sure to refrigerate the truffles until you’re ready to dip them in chocolate, and remember to sprinkle on the crushed Butterfinger pieces while the chocolate is still wet for that extra crunch!

Butterfinger Nutter Butter Truffles Variations

Get ready to personalize your truffles to fit any taste preference or dietary need!

  • Gluten-Free: Use gluten-free cookie alternatives to keep the delightful crunch without the gluten.

  • Peanut-Free: Substitute with SunButter or another nut-free spread to maintain that creamy texture without the nuts.

  • White Chocolate Drizzle: Instead of milk chocolate, coat with white chocolate for a beautiful contrast and a sweet twist.

  • Miniature Treats: Roll the mixture into smaller balls for bite-sized poppable treats, perfect for parties or snacks.

  • Minty Fresh: Incorporate a few drops of peppermint extract into the mixture for a refreshing mint flavor; it adds a lovely holiday touch!

  • Spicy Kick: Mix in a pinch of cayenne or chili powder for those who enjoy a spicy twist that enhances the sweetness of the chocolate.

  • Cookie Layer: For an extra texture boost, crush some Nutter Butter cookies and mix them into the coating chocolate before dipping.

  • Nut Lover’s Delight: Fold in chopped nuts like pecans or almonds to the mixture for added crunch and flavor.

Each variation brings a unique twist while maintaining that beloved Butterfinger Nutter Butter essence. Enjoy exploring these delightful possibilities!

How to Store and Freeze Butterfinger Nutter Butter Truffles

Fridge: Store truffles in an airtight container for up to 1 week. Keep them chilled to maintain their texture and flavor, and enjoy them as a delightful dessert or snack.

Freezer: For longer storage, freeze truffles in a single layer on a baking sheet before transferring to an airtight container. They will stay fresh for up to 2 months; just remember to thaw them in the fridge before serving.

Reheating: For best results, let the truffles sit at room temperature for about 15 minutes before enjoying them, allowing the chocolate coating to soften slightly, enhancing the taste experience.

What to Serve with Butterfinger Nutter Butter Truffles?

Create a delightful dessert spread that complements these sweet truffles beautifully!

  • Coffee: The rich, bold flavors of coffee balance the sweetness of the truffles, enhancing every bite for coffee lovers.

  • Milkshake: A creamy chocolate or vanilla milkshake pairs perfectly, creating a retro dessert vibe that evokes nostalgia.

  • Fruit Salad: Fresh, bright fruits add a contrasting freshness and vibrant color, lightening up the dessert table with natural sweetness.

  • Ice Cream: Serve your truffles alongside a scoop of rich vanilla or salted caramel ice cream for a decadent treat.

  • Chocolate Sauce: Drizzling extra chocolate sauce enhances the already chocolatey goodness, inviting a delightful indulgence.

  • Whipped Cream: Light and airy, whipped cream serves as a perfect topping alongside the truffles for a touch of creamy texture.

  • Sparkling Water: For a refreshing contrast, fizzy sparkling water infused with lemon or lime cuts through the richness of the truffles.

  • Caramel Sauce: A drizzle of warm caramel next to the truffles adds a buttery richness that will have guests coming back for more.

  • Red Wine: A glass of sweet red wine nicely complements the flavors of the truffles, making for a more sophisticated pairing.

Chef's Helpful Tips

  • When making Butterfinger Nutter Butter Truffles, ensure your cream cheese is fully softened for a smoother blend with the crushed cookies.
  • Avoid overmixing the cookie-cream cheese mixture to keep the texture light and fluffy.
  • For a neater coating, use a fork with tines wide enough to easily dunk and lift the truffles from the melted chocolate.
  • Make sure the chocolate is at a temperature of around 90 to 95 degrees Fahrenheit for the best dipping consistency, which will help prevent it from clumping.

Butterfinger Nutter Butter Truffles Recipe FAQs

How do I select ripe ingredients for my Butterfinger Nutter Butter Truffles?
Absolutely! For the best flavor, ensure that your cream cheese is fresh and softened properly; this eliminates any lumps. When choosing Butterfinger candy bars, look for ones without any dark spots, as this may indicate that they’ve started to lose freshness.

What is the best way to store Butterfinger Nutter Butter Truffles?
Very! Store your truffles in an airtight container in the refrigerator for up to 1 week to maintain their delightful texture. If they’re not quite finished, you can layer them with parchment paper to avoid sticking—this way, they are easy to grab when you need a sweet treat!

Can I freeze Butterfinger Nutter Butter Truffles?
Absolutely! To freeze, line a baking sheet with parchment paper and place the truffles in a single layer, not touching. Freeze them for about 1-2 hours until firm, then transfer them to an airtight container. They’ll keep well for up to 2 months! Just remember to let them thaw in the fridge for a few hours before indulging.

What should I do if my chocolate coating is clumpy?
If your melted chocolate is clumpy, don’t worry! Stir in a tiny bit of vegetable oil (about 1 teaspoon for every cup of chocolate) to help smooth it out. Ensure you melt the chocolate slowly in the microwave, stirring after each 30-second interval to prevent overheating and clumping.

Are there any dietary considerations I should be aware of?
Very! These Butterfinger Nutter Butter Truffles contain gluten from the Nutter Butter cookies and dairy from the cream cheese and chocolate. If you’re concerned about gluten or dairy allergies, look for gluten-free cookie options or non-dairy substitutes. Always check labels to ensure they meet your dietary needs.

Butterfinger Nutter Butter Truffles

Butterfinger Nutter Butter Truffles

Enjoy these easy-to-make Butterfinger Nutter Butter Truffles, a delightful mix of creamy and crunchy flavors.
Print Recipe Pin Recipe
Prep Time 20 minutes mins
Chilling Time 30 minutes mins
Total Time 50 minutes mins
Servings: 24 truffles
Course: Dessert
Cuisine: American
Calories: 150
Ingredients Equipment Method Nutrition Notes

Ingredients
  

For the Truffle Mixture
  • 16 oz Nutter Butter Cookies crushed
  • 8 oz Cream Cheese softened
  • 10 Fun-Size Butterfinger Candy Bars crushed
For the Chocolate Coating
  • 16 oz Milk Chocolate Chips melted

Equipment

  • Food processor
  • microwave-safe bowl
  • Baking sheet
  • parchment paper
  • Fork

Method
 

How to Make Butterfinger Nutter Butter Truffles
  1. Line a baking sheet with parchment paper to prevent sticking.
  2. Crush the Nutter Butter cookies in a food processor until fine.
  3. In a separate bowl, beat together the crushed cookies with the softened cream cheese until creamy.
  4. Crush the Fun-Size Butterfinger bars until chunky yet fine, then stir into the cookie-cream cheese mixture.
  5. Roll the mixture into 1-inch balls and place them on the prepared baking sheet.
  6. Refrigerate the truffle balls until firm, about 30 minutes.
  7. Melt the milk chocolate chips in a microwave-safe bowl until smooth.
  8. Use a fork to dunk each truffle in the melted chocolate, coating it completely.
  9. Sprinkle additional crushed Butterfinger pieces on top of the truffles while the chocolate is wet.
  10. Return the truffles to the refrigerator until the chocolate is firm.

Nutrition

Serving: 1truffleCalories: 150kcalCarbohydrates: 20gProtein: 2gFat: 8gSaturated Fat: 4gPolyunsaturated Fat: 0.5gMonounsaturated Fat: 2gCholesterol: 10mgSodium: 50mgPotassium: 100mgFiber: 1gSugar: 12gVitamin A: 2IUCalcium: 2mgIron: 4mg

Notes

For an eye-catching finish, drizzle melted white chocolate on top of the truffles.

Tried this recipe?

Let us know how it was!

Filed Under: DESSERT RECIPES

  • « Previous Page
  • 1
  • …
  • 3
  • 4
  • 5

Recent Posts

  • One Pot Cheesy Pasta
  • Steak with Mushroom Sauce
  • St. Patrick’s Day Puppy Chow
  • Salmon with Lemon Butter
  • St. Patrick’s Day Puppy Chow

Recent Comments

No comments to show.

Footer

  • Contact
  • Privacy Policy
  • About Us
  • Terms
  • ↑ back to top

Copyright © 2024 www.Forkono.com

Table Of Content