Forkono

  • BREAKFAST & BRUNCH
  • DESSERT RECIPES
  • DINNER RECIPES
  • LUNCH RECIPES
  • About uS
  • SNACKS & APPETIZERS
menu icon
go to homepage
  • BREAKFAST & BRUNCH
  • DESSERT RECIPES
  • DINNER RECIPES
  • LUNCH RECIPES
  • About uS
  • SNACKS & APPETIZERS
search icon
Homepage link
  • BREAKFAST & BRUNCH
  • DESSERT RECIPES
  • DINNER RECIPES
  • LUNCH RECIPES
  • About uS
  • SNACKS & APPETIZERS
×

Valentine’s Day Chocolate Bark

February 3, 2026 by JudyWhite Leave a Comment

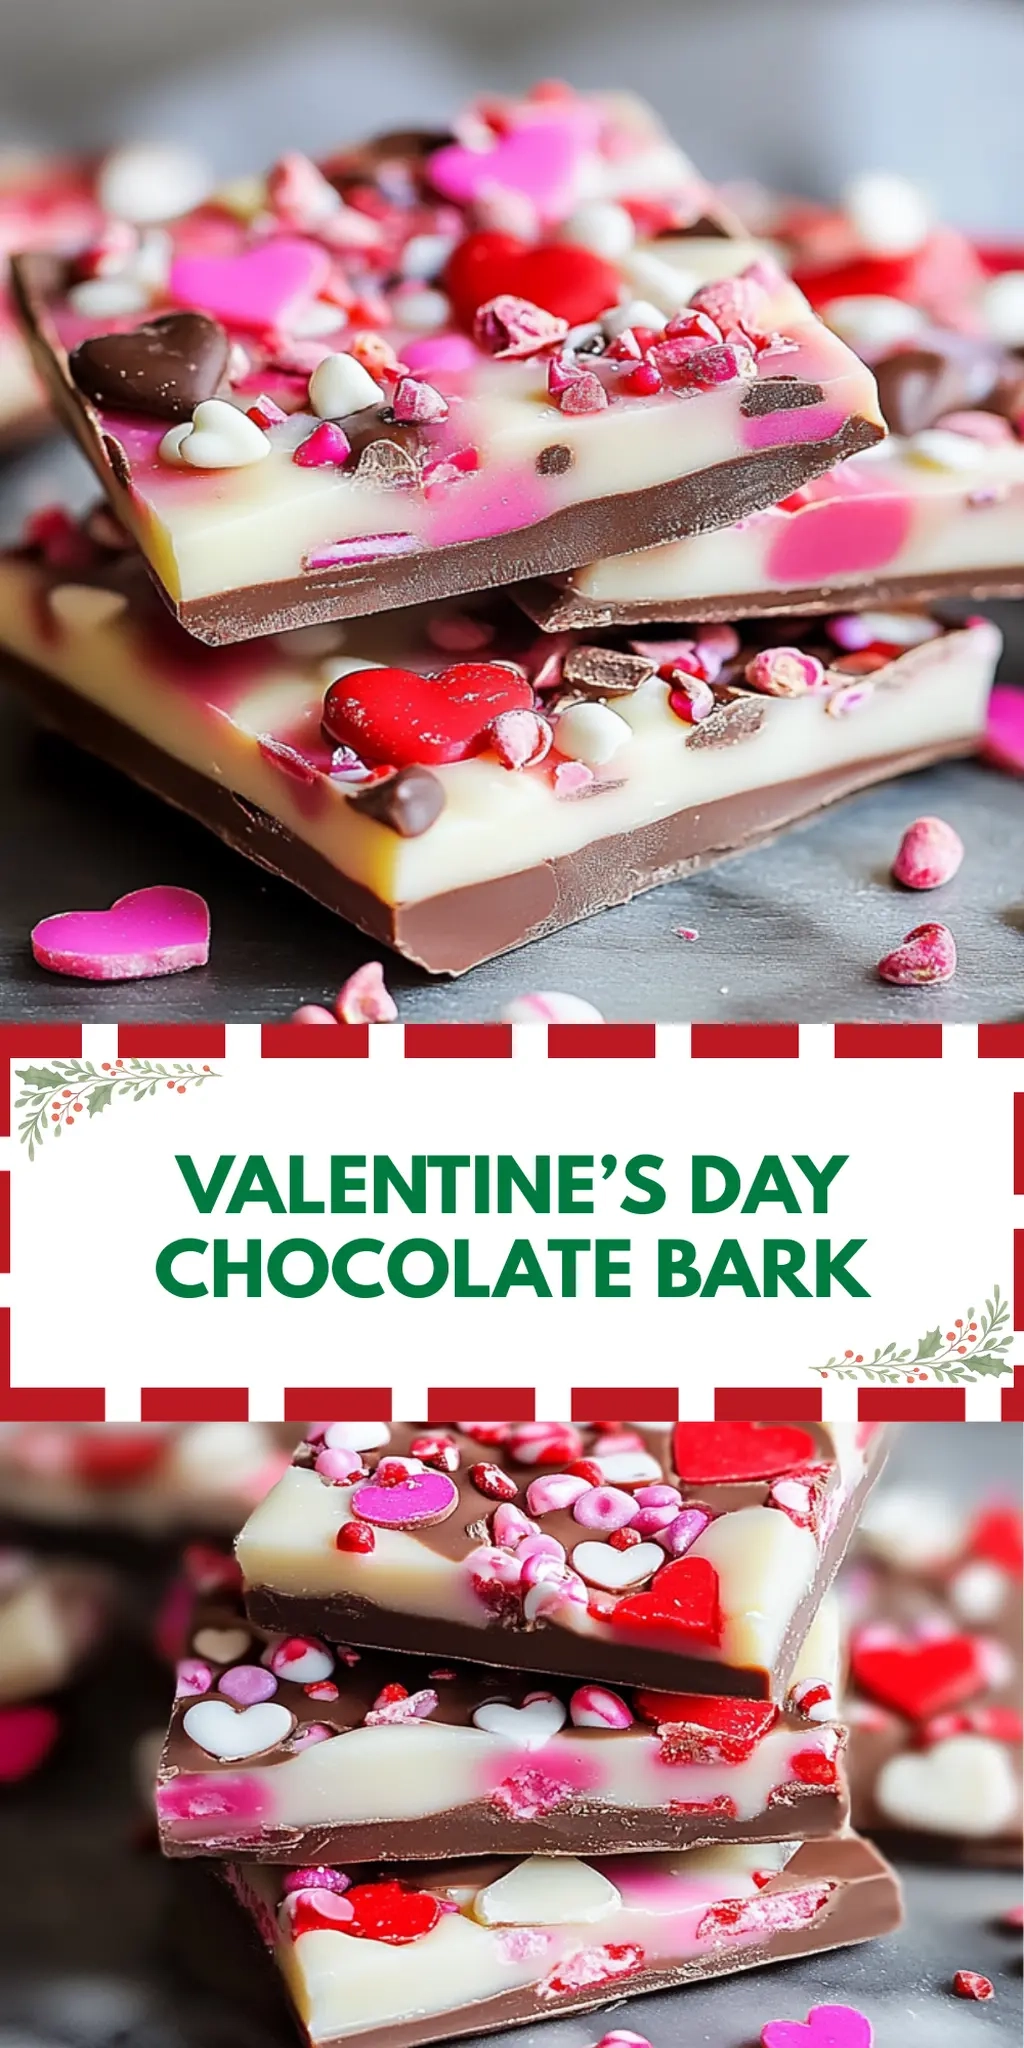
As Valentine’s Day approaches, I find myself swept away by the sweet nostalgia of gifting homemade treats. Last year, my kitchen transformed into a heart-filled wonderland, and the crowning glory was my Valentine’s Day Chocolate Bark. Imagine the rich, velvety aroma of dark chocolate wafting through the air, mingled with the crunch of nuts and the chewiness of dried fruit. It’s a simple recipe that allows you to create something truly special, even if you’re strapped for time.

The beauty of this chocolate bark lies not only in its delightful flavor but also in its versatility. You can mix and match ingredients to suit anyone’s taste, making it the perfect gift for lovers, friends, or even yourself. Whether you’re looking to impress at a gathering or to send a surprise to someone you care about, this treat is sure to bring smiles and warmth. Join me as we dive into this straightforward yet oh-so-satisfying recipe that can be made in mere minutes, allowing you to focus on what truly matters this Valentine’s Day—creating love-filled memories.

Why You'll Love This Valentine’s Day Chocolate Bark

  • This Valentine’s Day Chocolate Bark is incredibly easy to make, taking just 15 minutes of prep time and allowing you to whip up a delicious treat without any hassle.
  • The rich flavors of dark chocolate combined with crunchy nuts and chewy dried fruit create a delightful taste experience that your loved ones will adore.
  • Its versatility means you can customize the ingredients to appeal to different palates, making it perfect for sharing with friends, family, or that special someone.
  • Visually, the heart-shaped sprinkles add a charming touch that makes this bark an appealing gift for any occasion.

Valentine’s Day Chocolate Bark Ingredients

Get ready to create a delightful treat!

For the Bark

  • Dark chocolate chips – the star of the show; choose high-quality chocolate for the best flavor.
  • Chopped almonds or walnuts – add a crunchy texture; try hazelnuts for a unique twist.
  • Unsweetened dried cranberries or cherries – their tartness balances the sweetness beautifully; feel free to substitute with raisins for a different flavor.
  • Heart-shaped sprinkles – perfect for adding romance; use edible glitter for an extra touch of sparkle.

Feel free to enjoy making this Valentine’s Day Chocolate Bark as you share it with your loved ones!

How to Make Valentine’s Day Chocolate Bark

  1. Prepare your baking sheet.
    Line a baking sheet with parchment paper, ensuring it covers the entire surface. This will prevent your chocolate bark from sticking and make cleanup a breeze.

  2. Melt the chocolate.
    Place the dark chocolate chips in a microwave-safe bowl. Heat them in 30-second intervals, stirring after each until completely smooth. Aim for a silky, melted consistency to create the perfect bark.

  3. Combine the ingredients.
    Gently fold in the chopped nuts and dried fruit into the melted chocolate. Mix until all pieces are evenly coated, ensuring every bite is a delicious surprise.

  4. Pour and spread.
    Transfer the chocolate mixture onto your lined baking sheet. Use a spatula to spread it out evenly to about ½ inch thick, creating a lovely base for your bark.

  5. Add sprinkles.
    While the chocolate is still melty, generously sprinkle the heart-shaped sprinkles on top. This adds a charming, festive touch that’s perfect for Valentine’s Day.

  6. Set in the fridge.
    Refrigerate the chocolate bark for about 30 minutes or until fully set. It should feel firm to the touch when ready; this is key to getting clean breaks when you’re ready to serve.

Optional: Drizzle some melted white chocolate on top for an eye-catching design.
Exact quantities are listed in the recipe card below.

Make Ahead Options

These Valentine’s Day Chocolate Bark treats are ideal for busy home cooks looking to save time! You can prepare the bark up to 3 days in advance by following these easy steps. Melt the chocolate and mix in the chopped nuts and dried fruit as directed, then spread it on the lined baking sheet and sprinkle the heart-shaped sprinkles on top. Once set, break the bark into pieces and store them in an airtight container in the refrigerator to keep it fresh and prevent any unwanted melting. When you’re ready to share, simply pull out your delicious, homemade chocolate bark and enjoy the “wow” factor with minimal last-minute effort!

Valentine’s Day Chocolate Bark Variations

Get creative with this delightful homemade treat!

  • Nut-Free: Swap nuts for pumpkin or sunflower seeds for a safe, crunchy alternative that everyone can enjoy.

  • Fruit-Filled: Use dried apricots or banana chips instead of cranberries or cherries for a tropical twist that adds a sweet, chewy experience.

  • Spicy Kick: Add a dash of cayenne pepper or crushed red pepper flakes to the chocolate for a surprising heat that balances beautifully with the sweet chocolate.

  • Craving Crunch: Toss in some crushed pretzels or graham cracker crumbs for a delightful crunchy texture that enhances each bite with a salty surprise.

  • Vegan Delight: Choose dairy-free chocolate chips and substitute maple syrup for sprinkles to create a delicious vegan-friendly treat, still rich with flavor.

  • Minty Fresh: Stir in a few drops of peppermint extract for a refreshing minty flavor that pairs perfectly with the dark chocolate.

  • Swirled Delight: Drizzle melted white chocolate over the top for a beautiful contrast that adds a sweet and creamy flavor to your bark.

  • Flavored Chocolate: Experiment with flavored chocolate chips, like hazelnut or mocha, to elevate your bark with an exciting twist on taste!

What to Serve with Valentine’s Day Chocolate Bark?

As you create this delightful treat, consider pairing it with these charming options that will elevate your Valentine’s Day celebration.

  • Sparkling Rosé: A bubbly wine that adds a festive touch; its sweetness harmonizes beautifully with rich chocolate.
  • Fresh Strawberries: Juicy and vibrant, they offer a refreshing contrast to the richness of the bark. Dip them in melted chocolate for a romantic twist!
  • Vanilla Ice Cream: The creamy, cool scoop pairs perfectly with the crunchy bark, creating a delightful balance of textures.
  • Chocolate-Covered Pretzels: Adding a sweet and salty crunch, these are the perfect nibble to enjoy alongside your chocolate bark.

Create a lovely display by arranging the chocolate bark and these treats on a platter for an enchanting dessert table.

  • Coffee or Espresso: A warm cup enhances the experience; the bitter notes contrast well with the sweetness of the bark.
  • Humorous Love Notes: Pair the bark with little love notes; each bite will be a sweet reminder of your affection.

These delightful accompaniments not only complement the flavors of the chocolate bark but also bring a festive spirit to your Valentine’s celebration.

How to Store and Freeze Valentine’s Day Chocolate Bark

  • Room Temperature: Store your Valentine’s Day Chocolate Bark in an airtight container at room temperature for up to 1 week. Keep it in a cool, dry place away from direct sunlight.
  • Fridge: If you prefer an extra layer of freshness, refrigerate the bark in an airtight container for up to 2 weeks. Just allow it to come to room temperature before enjoying.
  • Freezer: For longer storage, freeze the chocolate bark in a freezer-safe container for up to 3 months. Wrap pieces in parchment paper and layer them in the container for easy separation.
  • Reheating: Avoid reheating chocolate bark, as it can lose its texture. Instead, let frozen pieces thaw in the fridge for a few hours before serving.

Chef's Helpful Tips

  • When making Valentine’s Day Chocolate Bark, always choose high-quality dark chocolate chips for the best flavor and texture.
  • Avoid overheating the chocolate by melting it in 30-second intervals, ensuring you stir well between intervals until smooth.
  • When folding in the nuts and dried fruits, do so gently to maintain the chocolate’s silky consistency and avoid clumping.
  • Ensure the chocolate is spread to an even thickness of about ½ inch so that it sets properly and breaks into nice pieces.

Valentine’s Day Chocolate Bark Recipe FAQs

How do I select the best chocolate chips for my Valentine’s Day Chocolate Bark?
Absolutely! When choosing chocolate chips, opt for high-quality dark chocolate with at least 60% cocoa content for a rich flavor. Look for brands that list cocoa butter as one of the main ingredients and avoid those with added waxes or fillers. If you enjoy a sweeter bark, you can mix semi-sweet and dark chocolate chips for a balanced sweetness.

What is the best way to store Valentine’s Day Chocolate Bark?
To keep your homemade treat fresh, store your Valentine’s Day Chocolate Bark in an airtight container at room temperature for up to a week. If you live in a warm climate, consider refrigerating it in an airtight container where it can last for up to 2 weeks. Just let it sit at room temperature for a few minutes before indulging for the best taste.

Can I freeze Valentine’s Day Chocolate Bark?
Certainly! For longer storage, you can freeze your chocolate bark. First, cut it into pieces and wrap each piece in parchment paper to prevent sticking. Then, place them in a freezer-safe container and store for up to 3 months. To enjoy, simply transfer the pieces to the fridge for a few hours to thaw before sharing or snacking.

What should I do if my chocolate isn’t melting smoothly?
If your chocolate gets gritty or doesn’t melt smoothly, it may have been overheated. Be sure to melt in 30-second intervals, stirring thoroughly after each until it’s just melted and still shiny. If you find yourself in this situation, try adding a teaspoon of vegetable oil to the chocolate, stirring until smooth. This can sometimes help revive it back to a silky consistency.

Are there any allergy considerations I should keep in mind?
Very much so! If you’re making this Valentine’s Day Chocolate Bark for someone with allergies, be sure to use nut-free chocolate chips and substitute the chopped almonds or walnuts with seeds like sunflower seeds or pumpkin seeds. Additionally, always check the labels on your ingredients to ensure they are free from allergens, especially as cross-contamination can occur.

Can I adapt the ingredients based on personal preferences?
Absolutely! The beauty of this recipe lies in its versatility. Feel free to swap out the dried cranberries for raisins, cherries, or even diced apricots, depending on your loved ones’ preferences. You can also try using different types of nuts or omitting them altogether for a nut-free version. Don’t hesitate to get creative—mix and match to create your custom version of this Valentine’s Day Chocolate Bark!

Valentine’s Day Chocolate Bark

Valentine’s Day Chocolate Bark

Indulge in homemade Valentine’s Day Chocolate Bark, a delightful mix of dark chocolate, nuts, and dried fruit.
Print Recipe Pin Recipe
Prep Time 15 minutes mins
Setting Time 30 minutes mins
Total Time 45 minutes mins
Servings: 8 pieces
Course: DESSERT RECIPES
Cuisine: American
Calories: 200
Ingredients Equipment Method Nutrition Notes

Ingredients
  

For the Bark
  • 2 cups dark chocolate chips choose high-quality chocolate
  • 1 cup chopped almonds or walnuts or hazelnuts for a twist
  • 1 cup unsweetened dried cranberries or cherries substitute with raisins if desired
  • 1/2 cup heart-shaped sprinkles use edible glitter for sparkle

Equipment

  • microwave-safe bowl
  • Baking sheet
  • parchment paper
  • Spatula

Method
 

How to Make Valentine’s Day Chocolate Bark
  1. Line a baking sheet with parchment paper.
  2. Place dark chocolate chips in a microwave-safe bowl and melt in 30-second intervals, stirring until smooth.
  3. Fold in chopped nuts and dried fruit gently into the melted chocolate.
  4. Transfer the mixture onto the lined baking sheet and spread evenly to about ½ inch thick.
  5. Sprinkle heart-shaped sprinkles on top while the chocolate is still melty.
  6. Refrigerate for about 30 minutes or until fully set.

Nutrition

Serving: 1pieceCalories: 200kcalCarbohydrates: 24gProtein: 3gFat: 10gSaturated Fat: 5gPolyunsaturated Fat: 3gMonounsaturated Fat: 2gSodium: 5mgPotassium: 150mgFiber: 2gSugar: 15gCalcium: 2mgIron: 5mg

Notes

Drizzling melted white chocolate on top is optional for decoration.

Tried this recipe?

Let us know how it was!

Filed Under: BREAKFAST & BRUNCH

Chocolate Covered Strawberry Cheesecake

February 3, 2026 by JudyWhite Leave a Comment

There’s a certain allure that comes with the indulgence of a Chocolate Covered Strawberry Cheesecake; it’s a dessert that seems to whisper “celebration” with each creamy, decadent bite. Imagine hosting friends or simply treating yourself after a long week—this cheesecake transforms an ordinary day into something special.

When I first attempted to create a dessert that married my two favorite treats, chocolate and strawberries, the result was pure magic. The way the rich cream cheese filling perfectly complements the nutty notes of the chocolate graham cracker crust is something to rave about. Plus, it’s surprisingly easy to whip up!

Whether it’s a birthday bash or a casual Sunday dinner, this showstopper not only pleases the palate but is also a charming conversation starter. Trust me, your loved ones will be coming back for seconds (and thirds!). Let’s get baking and create a dessert that will leave everyone craving just one more slice!

Why You'll Love This Chocolate Covered Strawberry Cheesecake

  • This Chocolate Covered Strawberry Cheesecake is not only incredibly easy to make, but it’s also a stunning centerpiece for any gathering.
  • You will be amazed at how the rich flavor of the cream cheese filling pairs perfectly with the delightful taste of fresh strawberries and chocolate.
  • Its versatility means it can be dressed up for special occasions or enjoyed casually at home with family.
  • Plus, with a prep time of just 30 minutes, this dessert is perfect for those who want to impress without spending all day in the kitchen.

Chocolate Covered Strawberry Cheesecake Ingredients

Get ready to gather some delightful ingredients for a dessert that truly impresses!

For the Crust

  • Chocolate graham cracker crumbs – these provide a rich, chocolatey foundation for your cheesecake.
  • Unsalted butter – helps to bind the crumbs together for a perfect crust.

For the Filling

  • Cream cheese – the star of the show, bringing creaminess and a tangy flavor to the cheesecake.
  • Granulated sugar – sweetens the filling beautifully, balancing the cream cheese’s tanginess.
  • Vanilla extract – adds a hint of warmth and depth to your cheesecake flavor.
  • Heavy cream – this ingredient is key for achieving a fluffier texture in your cheesecake.
  • Fresh strawberries – they not only add flavor but also brighten up the overall presentation.

For the Drizzle

  • Chocolate chips – melted and drizzled on top for that signature chocolate-covered element that elevates this dessert!

This Chocolate Covered Strawberry Cheesecake is easy to prepare and promises to be a delightful treat for any occasion!

How to Make Chocolate Covered Strawberry Cheesecake

  1. Preheat the oven to 350°F (175°C). This sets the perfect stage for your crust to bake. While your oven warms up, get your ingredients ready for a seamless process!

  2. Mix the chocolate graham cracker crumbs with melted butter in a bowl. Stir until the mixture is evenly moistened, then press it firmly into the bottom of a springform pan to form a solid crust.

  3. Beat the softened cream cheese in another bowl until it’s smoothly whipped. Gradually add sugar and vanilla extract, mixing until everything is well combined and you have a creamy texture.

  4. Add the heavy cream and beat until stiff peaks form. This step ensures your cheesecake filling is light and airy! Gently fold in the chopped strawberries for that delightful pop of freshness.

  5. Pour the cream cheese mixture over your cooled crust. Smooth the top with a spatula. Cover with plastic wrap and place it in the refrigerator for at least four hours, or overnight if you can wait!

  6. Melt the chocolate chips in the microwave or over a double boiler until smooth. Drizzle the melted chocolate over the chilled cheesecake before serving. Garnish with extra fresh strawberries for a beautiful touch!

Optional: Serve with whipped cream on the side for an extra indulgence!
Exact quantities are listed in the recipe card below.

Make Ahead Options

This Chocolate Covered Strawberry Cheesecake is ideal for busy home cooks looking to save time without sacrificing quality! You can prepare the crust and filling up to 24 hours in advance. Simply mix the chocolate graham cracker crumbs with melted butter and press into your springform pan; store it covered at room temperature. Then, combine and whip the cream cheese mixture (cream cheese, sugar, vanilla, heavy cream, and strawberries) and refrigerate it overnight, ensuring it stays fresh and creamy. When you’re ready to impress, simply pour the filling over the crust and let it chill for at least four hours before serving. Drizzle with melted chocolate before presenting, and you’ll have a delightful dessert ready to wow your guests with minimal last-minute effort!

Chocolate Covered Strawberry Cheesecake Variations

Feel free to personalize your Chocolate Covered Strawberry Cheesecake for a different twist that’s all your own!

  • Nut-Free: Use regular graham cracker crumbs instead of chocolate graham crackers for a simple crust change. You still get that delightful base without the nutty notes.

  • Vegan: Substitute cream cheese and heavy cream with plant-based alternatives. Almond or oat creams work beautifully, making this dessert dairy-free and just as creamy!

  • Sugar-Free: Swap out granulated sugar for a favorite sweetener like erythritol or monk fruit. You won’t lose flavor and can enjoy a guilt-free treat!

  • Chocolate Lovers: Add cocoa powder to the cream cheese mixture for an extra chocolatey flavor. This can make the filling decadently rich and indulgent!

  • Berry Medley: Instead of just strawberries, fold in raspberries or blueberries for a fresh twist. A medley of berries will surprise your taste buds in every bite.

  • Zesty Citrus: Incorporate some finely grated lemon or orange zest into the filling. This brightens up the flavors and adds a refreshing zing to the creamy cheesecake.

  • Spicy Kick: Add a pinch of cayenne pepper or chili powder to the chocolate drizzle. This surprising addition provides a delightful heat that beautifully balances the sweetness!

  • Crunchy Topping: Sprinkle crushed nuts or toffee bits over the top before drizzling chocolate. This adds a delightful crunch and new texture, elevating your dessert even more!

What to Serve with Chocolate Covered Strawberry Cheesecake?

Transform your dessert experience with delightful pairings that enhance the joy of your cheesecake!

  • Fresh Berries: Fresh raspberries or blueberries add a tart contrast, brightening up your dessert with freshness and color.

  • Whipped Cream: Light and airy, a dollop of whipped cream brings a luxurious touch, balancing the creaminess for a delightful bite.

  • Chocolate Sauce: A drizzle of rich chocolate sauce intensifies the chocolate flavor, creating a decadent layer of indulgence.

  • Vanilla Ice Cream: Creamy vanilla ice cream melts against the cheesecake’s richness, offering a soothing and delightful temperature contrast.

  • Coffee or Espresso: The boldness of coffee beautifully complements the sweetness of the cheesecake, making each bite even more satisfying.

  • Mint Leaves: A sprinkle of fresh mint brings a refreshing burst, cutting through the sweetness and adding a lovely touch of color.

  • Sparkling Wine: The bubbly effervescence of sparkling wine enhances the celebratory nature of your dessert, making it perfect for special occasions.

  • Chocolate-Covered Almonds: Adding crunchy chocolate-covered almonds on the side brings delightful texture and a nutty flavor that harmonizes beautifully.

Each of these pairings elevates your delectable Chocolate Covered Strawberry Cheesecake, creating an unforgettable dessert experience!

Storage Tips for Chocolate Covered Strawberry Cheesecake

  • Fridge: Store leftover cheesecake in an airtight container in the refrigerator for up to 3 days. This keeps it fresh and the flavors intact.

  • Freezer: You can freeze the cheesecake for up to 2 months. Wrap it tightly in plastic wrap and then in aluminum foil to prevent freezer burn.

  • Thawing: To enjoy a frozen cheesecake, transfer it to the fridge and let it thaw overnight before serving.

  • Reheating: Enjoy this Chocolate Covered Strawberry Cheesecake cold, or let it sit at room temperature for about 30 minutes for the best texture before serving.

Chef's Helpful Tips

  • When making Chocolate Covered Strawberry Cheesecake, ensure your cream cheese is at room temperature for easy blending to avoid lumps in your filling.
  • A common mistake is not incorporating enough air into the heavy cream; whip it until stiff peaks form for a light texture.
  • Use a spatula to gently fold in strawberries to maintain their shape and prevent them from sinking in the batter.
  • For best results, refrigerate the cheesecake overnight so it sets perfectly and flavors meld beautifully before serving.

Chocolate Covered Strawberry Cheesecake Recipe FAQs

What kind of strawberries should I use for the cheesecake?
Absolutely! Fresh strawberries are best for this Chocolate Covered Strawberry Cheesecake. Look for berries that are bright red, plump, and fragrant; avoid those with dark spots or signs of bruising. If fresh strawberries aren’t available, you can use frozen ones, just be sure to thaw and drain them beforehand.

How should I store the cheesecake once it’s made?
To keep your Chocolate Covered Strawberry Cheesecake fresh, cover it tightly with plastic wrap or transfer it to an airtight container. It will stay delicious in the refrigerator for up to 3 days. If you plan to enjoy it later, consider following the freezing instructions below!

Can I freeze the cheesecake? If so, how?
Yes, you can definitely freeze your Chocolate Covered Strawberry Cheesecake! Here’s how:

  1. Allow the cheesecake to chill completely in the fridge.
  2. Cut it into individual slices for easy serving later.
  3. Wrap each slice tightly in plastic wrap, ensuring no air gets in to prevent freezer burn.
  4. Place the wrapped slices in an airtight container or a heavy-duty freezer bag.
  5. Store in the freezer for up to 2 months. When you’re ready to enjoy, simply transfer a slice to the fridge overnight to thaw.

Why is my cheesecake not setting properly?
A common culprit for a cheesecake that doesn’t set well is not allowing enough refrigeration time. Make sure to refrigerate your Chocolate Covered Strawberry Cheesecake for a minimum of 4 hours, or ideally overnight, to allow it to fully firm up. Additionally, ensure your heavy cream is whipped to stiff peaks before folding, as this helps create structure. If you followed the recipe but it’s still too runny, it might need a bit more time in the fridge.

Can I make this cheesecake ahead of time?
Very much so! This cheesecake can be made a day or two in advance – the flavors meld beautifully the longer it sits in the refrigerator. Just don’t drizzle the chocolate on top until right before serving to ensure it looks fresh and appealing.

Is this cheesecake safe for pets or those with allergies?
While it’s tempting to share this delightful Chocolate Covered Strawberry Cheesecake with your furry friends, it’s best to keep it away from them. The sugar and dairy can upset their stomachs. Additionally, if anyone in your family has dairy allergies or lactose intolerance, consider using dairy-free cream cheese and coconut cream for a delicious alternative.

Chocolate Covered Strawberry Cheesecake

Chocolate Covered Strawberry Cheesecake

Experience the indulgence of a Chocolate Covered Strawberry Cheesecake, a delightful dessert perfect for celebrations.
Print Recipe Pin Recipe
Prep Time 30 minutes mins
Chilling Time 4 hours hrs
Total Time 4 hours hrs 30 minutes mins
Servings: 8 slices
Course: DESSERT RECIPES
Cuisine: American
Calories: 400
Ingredients Equipment Method Nutrition Notes

Ingredients
  

For the Crust
  • 1 cup chocolate graham cracker crumbs
  • 1/2 cup unsalted butter melted
For the Filling
  • 16 oz cream cheese softened
  • 3/4 cup granulated sugar
  • 1 tsp vanilla extract
  • 1 cup heavy cream
  • 1 cup fresh strawberries chopped
For the Drizzle
  • 1 cup chocolate chips melted

Equipment

  • Springform pan
  • Mixing bowl
  • Spatula
  • Microwave

Method
 

Preparation Steps
  1. Preheat the oven to 350°F (175°C).
  2. Mix the chocolate graham cracker crumbs with melted butter in a bowl and press firmly into the bottom of a springform pan.
  3. Beat the softened cream cheese until smooth, then mix in sugar and vanilla extract.
  4. Add the heavy cream and beat until stiff peaks form. Gently fold in the chopped strawberries.
  5. Pour the mixture over the cooled crust. Cover and refrigerate for at least four hours, or overnight if possible.
  6. Melt chocolate chips and drizzle over the chilled cheesecake before serving. Garnish with extra fresh strawberries.

Nutrition

Serving: 1sliceCalories: 400kcalCarbohydrates: 35gProtein: 5gFat: 30gSaturated Fat: 18gPolyunsaturated Fat: 2gMonounsaturated Fat: 8gTrans Fat: 1gCholesterol: 90mgSodium: 270mgPotassium: 150mgFiber: 2gSugar: 20gVitamin A: 500IUVitamin C: 10mgCalcium: 90mgIron: 1mg

Notes

For best results, refrigerate the cheesecake overnight for perfect setting and flavor melding.

Tried this recipe?

Let us know how it was!

Filed Under: BREAKFAST & BRUNCH

Chocolate Covered Strawberry Cheesecake

February 3, 2026 by JudyWhite Leave a Comment

There’s a certain allure that comes with the indulgence of a Chocolate Covered Strawberry Cheesecake; it’s a dessert that seems to whisper “celebration” with each creamy, decadent bite. Imagine hosting friends or simply treating yourself after a long week—this cheesecake transforms an ordinary day into something special.

When I first attempted to create a dessert that married my two favorite treats, chocolate and strawberries, the result was pure magic. The way the rich cream cheese filling perfectly complements the nutty notes of the chocolate graham cracker crust is something to rave about. Plus, it’s surprisingly easy to whip up!

Whether it’s a birthday bash or a casual Sunday dinner, this showstopper not only pleases the palate but is also a charming conversation starter. Trust me, your loved ones will be coming back for seconds (and thirds!). Let’s get baking and create a dessert that will leave everyone craving just one more slice!

Why You'll Love This Chocolate Covered Strawberry Cheesecake

  • This Chocolate Covered Strawberry Cheesecake is not only incredibly easy to make, but it’s also a stunning centerpiece for any gathering.
  • You will be amazed at how the rich flavor of the cream cheese filling pairs perfectly with the delightful taste of fresh strawberries and chocolate.
  • Its versatility means it can be dressed up for special occasions or enjoyed casually at home with family.
  • Plus, with a prep time of just 30 minutes, this dessert is perfect for those who want to impress without spending all day in the kitchen.

Chocolate Covered Strawberry Cheesecake Ingredients

Get ready to gather some delightful ingredients for a dessert that truly impresses!

For the Crust

  • Chocolate graham cracker crumbs – these provide a rich, chocolatey foundation for your cheesecake.
  • Unsalted butter – helps to bind the crumbs together for a perfect crust.

For the Filling

  • Cream cheese – the star of the show, bringing creaminess and a tangy flavor to the cheesecake.
  • Granulated sugar – sweetens the filling beautifully, balancing the cream cheese’s tanginess.
  • Vanilla extract – adds a hint of warmth and depth to your cheesecake flavor.
  • Heavy cream – this ingredient is key for achieving a fluffier texture in your cheesecake.
  • Fresh strawberries – they not only add flavor but also brighten up the overall presentation.

For the Drizzle

  • Chocolate chips – melted and drizzled on top for that signature chocolate-covered element that elevates this dessert!

This Chocolate Covered Strawberry Cheesecake is easy to prepare and promises to be a delightful treat for any occasion!

How to Make Chocolate Covered Strawberry Cheesecake

  1. Preheat the oven to 350°F (175°C). This sets the perfect stage for your crust to bake. While your oven warms up, get your ingredients ready for a seamless process!

  2. Mix the chocolate graham cracker crumbs with melted butter in a bowl. Stir until the mixture is evenly moistened, then press it firmly into the bottom of a springform pan to form a solid crust.

  3. Beat the softened cream cheese in another bowl until it’s smoothly whipped. Gradually add sugar and vanilla extract, mixing until everything is well combined and you have a creamy texture.

  4. Add the heavy cream and beat until stiff peaks form. This step ensures your cheesecake filling is light and airy! Gently fold in the chopped strawberries for that delightful pop of freshness.

  5. Pour the cream cheese mixture over your cooled crust. Smooth the top with a spatula. Cover with plastic wrap and place it in the refrigerator for at least four hours, or overnight if you can wait!

  6. Melt the chocolate chips in the microwave or over a double boiler until smooth. Drizzle the melted chocolate over the chilled cheesecake before serving. Garnish with extra fresh strawberries for a beautiful touch!

Optional: Serve with whipped cream on the side for an extra indulgence!
Exact quantities are listed in the recipe card below.

Chocolate Covered Strawberry Cheesecake Variations

Feel free to explore these exciting twists to make this dessert uniquely yours and delight your taste buds!

  • Gluten-Free: Substitute chocolate graham cracker crumbs with gluten-free chocolate cookies for a deliciously inclusive crust.

  • Nutty Crunch: Add ½ cup of finely chopped nuts to the crust. The added texture will create a delightful contrast with the creamy filling.

  • Flavor Infusion: Mix in a teaspoon of almond extract with the cream cheese for a subtle, nutty note that beautifully complements the strawberries.

  • Berry Medley: Swap out strawberries for a combination of fresh raspberries and blueberries for a vibrant, tangy twist.

  • Dairy-Free: Replace cream cheese with a dairy-free alternative made from cashews and use coconut cream instead of heavy cream for a luscious vegan option.

  • Chocolate Lover’s Delight: Fold in ½ cup of mini chocolate chips with the chopped strawberries for an extra chocolaty surprise in every bite.

  • Spicy Kick: Add a pinch of cayenne pepper to the chocolate drizzle for an unexpected heat that enhances its richness.

  • Citrus Burst: Incorporate the zest of one orange or lemon into the filling for a bright, refreshing flavor that contrasts beautifully with the chocolate.

Make Ahead Options

These Chocolate Covered Strawberry Cheesecakes are perfect for busy home cooks who want to deliver a delightful dessert without all the last-minute hustle! You can prepare the crust and filling up to 24 hours in advance; simply store the crust in an airtight container and keep the filling refrigerated. It helps to mix the strawberries just before serving to prevent them from releasing too much moisture. When ready to enjoy, pour the filling over the chilled crust and allow it to set in the refrigerator for at least four hours or overnight. Drizzle with melted chocolate right before serving and garnish with fresh strawberries for that irresistible look and flavor. This makes entertaining not only easier but incredibly enjoyable!

Storage Tips for Chocolate Covered Strawberry Cheesecake

  • Fridge: Store leftover cheesecake in an airtight container in the refrigerator for up to 3 days. This keeps it fresh and the flavors intact.

  • Freezer: You can freeze the cheesecake for up to 2 months. Wrap it tightly in plastic wrap and then in aluminum foil to prevent freezer burn.

  • Thawing: To enjoy a frozen cheesecake, transfer it to the fridge and let it thaw overnight before serving.

  • Reheating: Enjoy this Chocolate Covered Strawberry Cheesecake cold, or let it sit at room temperature for about 30 minutes for the best texture before serving.

What to Serve with Chocolate Covered Strawberry Cheesecake?

Transform your dessert experience with delightful pairings that enhance the joy of your cheesecake!

  • Fresh Berries: Fresh raspberries or blueberries add a tart contrast, brightening up your dessert with freshness and color.

  • Whipped Cream: Light and airy, a dollop of whipped cream brings a luxurious touch, balancing the creaminess for a delightful bite.

  • Chocolate Sauce: A drizzle of rich chocolate sauce intensifies the chocolate flavor, creating a decadent layer of indulgence.

  • Vanilla Ice Cream: Creamy vanilla ice cream melts against the cheesecake’s richness, offering a soothing and delightful temperature contrast.

  • Coffee or Espresso: The boldness of coffee beautifully complements the sweetness of the cheesecake, making each bite even more satisfying.

  • Mint Leaves: A sprinkle of fresh mint brings a refreshing burst, cutting through the sweetness and adding a lovely touch of color.

  • Sparkling Wine: The bubbly effervescence of sparkling wine enhances the celebratory nature of your dessert, making it perfect for special occasions.

  • Chocolate-Covered Almonds: Adding crunchy chocolate-covered almonds on the side brings delightful texture and a nutty flavor that harmonizes beautifully.

Each of these pairings elevates your delectable Chocolate Covered Strawberry Cheesecake, creating an unforgettable dessert experience!

Chef's Helpful Tips

  • When making Chocolate Covered Strawberry Cheesecake, ensure your cream cheese is at room temperature for easy blending to avoid lumps in your filling.
  • A common mistake is not incorporating enough air into the heavy cream; whip it until stiff peaks form for a light texture.
  • Use a spatula to gently fold in strawberries to maintain their shape and prevent them from sinking in the batter.
  • For best results, refrigerate the cheesecake overnight so it sets perfectly and flavors meld beautifully before serving.

Chocolate Covered Strawberry Cheesecake Recipe FAQs

What kind of strawberries should I use for the cheesecake?
Absolutely! Fresh strawberries are best for this Chocolate Covered Strawberry Cheesecake. Look for berries that are bright red, plump, and fragrant; avoid those with dark spots or signs of bruising. If fresh strawberries aren’t available, you can use frozen ones, just be sure to thaw and drain them beforehand.

How should I store the cheesecake once it’s made?
To keep your Chocolate Covered Strawberry Cheesecake fresh, cover it tightly with plastic wrap or transfer it to an airtight container. It will stay delicious in the refrigerator for up to 3 days. If you plan to enjoy it later, consider following the freezing instructions below!

Can I freeze the cheesecake? If so, how?
Yes, you can definitely freeze your Chocolate Covered Strawberry Cheesecake! Here’s how:

  1. Allow the cheesecake to chill completely in the fridge.
  2. Cut it into individual slices for easy serving later.
  3. Wrap each slice tightly in plastic wrap, ensuring no air gets in to prevent freezer burn.
  4. Place the wrapped slices in an airtight container or a heavy-duty freezer bag.
  5. Store in the freezer for up to 2 months. When you’re ready to enjoy, simply transfer a slice to the fridge overnight to thaw.

Why is my cheesecake not setting properly?
A common culprit for a cheesecake that doesn’t set well is not allowing enough refrigeration time. Make sure to refrigerate your Chocolate Covered Strawberry Cheesecake for a minimum of 4 hours, or ideally overnight, to allow it to fully firm up. Additionally, ensure your heavy cream is whipped to stiff peaks before folding, as this helps create structure. If you followed the recipe but it’s still too runny, it might need a bit more time in the fridge.

Can I make this cheesecake ahead of time?
Very much so! This cheesecake can be made a day or two in advance – the flavors meld beautifully the longer it sits in the refrigerator. Just don’t drizzle the chocolate on top until right before serving to ensure it looks fresh and appealing.

Is this cheesecake safe for pets or those with allergies?
While it’s tempting to share this delightful Chocolate Covered Strawberry Cheesecake with your furry friends, it’s best to keep it away from them. The sugar and dairy can upset their stomachs. Additionally, if anyone in your family has dairy allergies or lactose intolerance, consider using dairy-free cream cheese and coconut cream for a delicious alternative.

Chocolate Covered Strawberry Cheesecake

Chocolate Covered Strawberry Cheesecake

Indulge in the rich flavors of Chocolate Covered Strawberry Cheesecake, a perfect dessert for celebrations and casual gatherings.
Print Recipe Pin Recipe
Prep Time 30 minutes mins
Cook Time 1 hour hr
Chilling Time 4 hours hrs
Total Time 5 hours hrs 30 minutes mins
Servings: 8 slices
Course: DESSERT RECIPES
Cuisine: American
Calories: 350
Ingredients Equipment Method Nutrition Notes

Ingredients
  

For the Crust
  • 2 cups chocolate graham cracker crumbs
  • 1/2 cup unsalted butter melted
For the Filling
  • 16 oz cream cheese softened
  • 3/4 cup granulated sugar
  • 1 tbsp vanilla extract
  • 1 cup heavy cream
  • 1 cup fresh strawberries chopped
For the Drizzle
  • 1 cup chocolate chips melted

Equipment

  • Springform pan
  • Mixing bowls
  • Electric mixer
  • Spatula
  • microwave or double boiler

Method
 

Preparation
  1. Preheat the oven to 350°F (175°C).
  2. Mix chocolate graham cracker crumbs with melted butter in a bowl. Press firmly into the bottom of a springform pan.
  3. Beat softened cream cheese in another bowl until smooth. Gradually add sugar and vanilla, mixing until creamy.
  4. Add heavy cream, beating until stiff peaks form. Fold in chopped strawberries.
  5. Pour the cream cheese mixture over the cooled crust and smooth the top.
  6. Cover with plastic wrap and refrigerate for at least four hours, or overnight.
  7. Melt the chocolate chips and drizzle over the cheesecake before serving. Garnish with extra strawberries.

Nutrition

Serving: 1sliceCalories: 350kcalCarbohydrates: 30gProtein: 5gFat: 25gSaturated Fat: 15gPolyunsaturated Fat: 1gMonounsaturated Fat: 4gCholesterol: 70mgSodium: 200mgPotassium: 200mgFiber: 1gSugar: 20gVitamin A: 600IUVitamin C: 20mgCalcium: 80mgIron: 1mg

Notes

Press the crust mixture firmly into the pan to prevent crumbling. Use room temperature cream cheese for smoother filling. Allow cheesecake to chill for optimal texture and flavor.

Tried this recipe?

Let us know how it was!

Filed Under: BREAKFAST & BRUNCH

Strawberry Truffle Cupcakes

February 3, 2026 by JudyWhite Leave a Comment

There’s something undeniably tempting about the combination of fresh strawberries and rich chocolate, isn’t there? When I first combined these flavors into a cupcake, it transported me back to lazy summer afternoons, where every bite felt like a celebration. These Strawberry Truffle Cupcakes are my go-to when I’m craving a dessert that impresses without the fuss.

Perfect for any occasion—from casual family dinners to a chic gathering with friends—these cupcakes are deceptively easy to make yet bursting with vibrant flavor. The soft, moist sponge cradling juicy strawberries is crowned with an indulgent dark chocolate ganache that takes each bite to another level. Trust me; they will vanish off the plate before you know it!

Spend just 40 minutes bringing a taste of summer magic to your kitchen. Whether you’re a seasoned baker or someone looking to shake off the fast-food routine, these cupcakes are a delightful reminder that homemade treats can be as simple as they are gorgeous. Let’s dive into this recipe, shall we?

Why You'll Love This Strawberry Truffle Cupcakes

  • These Strawberry Truffle Cupcakes are incredibly easy to whip up, making them perfect for bakers of all skill levels.
  • The vibrant flavors of fresh strawberries combined with rich chocolate create a dessert that is sure to impress your guests.
  • With a total preparation and baking time of just 40 minutes, you can enjoy these delicious cupcakes without spending hours in the kitchen.
  • Their stunning appearance and delightful taste make them a crowd-pleaser for any occasion, from birthday parties to casual get-togethers.

Strawberry Truffle Cupcake Ingredients

Get ready to create cupcake magic!

For the Cupcake Batter

  • All-purpose flour – A versatile base that gives the cupcakes their structure and softness.
  • Granulated sugar – This sweetens the batter and helps create a delightful texture.
  • Baking powder – Essential for fluffiness, ensuring your cupcakes rise beautifully.
  • Salt – A pinch enhances the flavors, balancing the sweetness of the sugar.
  • Unsalted butter – Adds richness and moisture; make sure it’s softened to blend smoothly.
  • Large eggs – They bind the ingredients and create that lovely cupcake crumb.
  • Whole milk – Provides moisture; you can substitute with almond or oat milk for a dairy-free option.
  • Fresh strawberries – These juicy gems bring a burst of flavor; feel free to use frozen berries if fresh are unavailable.

For the Ganache Topping

  • Dark chocolate – The star ingredient that creates a luxurious ganache; choose a high-quality chocolate for the best flavor.

Dive into your baking adventure and indulge in these fantastic Strawberry Truffle Cupcakes!

How to Make Strawberry Truffle Cupcakes

  1. Preheat your oven to 350°F (175°C) and line a muffin tin with cupcake liners. This step is crucial to ensure your cupcakes bake evenly and have that perfect shape!

  2. Whisk together the flour, sugar, baking powder, and salt in a mixing bowl. This dry mixture will provide the foundation for your cupcakes, ensuring they rise beautifully.

  3. Cream the softened butter in another bowl until it’s light and fluffy, gradually adding the granulated sugar. This process helps to incorporate air, which makes your cupcakes tender and light.

  4. Mix in the eggs one at a time, then follow with the whole milk until everything is well combined. The mixture should be smooth and creamy; this is what keeps your cupcakes moist.

  5. Fold in the diced fresh strawberries gently into the batter. Take your time here—gently incorporating the strawberries ensures they remain intact and juicy, giving your cupcakes a burst of flavor.

  6. Fill each lined cupcake liner two-thirds full with the batter. Bake them in the oven for 18-20 minutes or until a toothpick comes out clean. Keep an eye on them; you want a golden top!

  7. Cool the cupcakes completely on a wire rack before frosting them generously with dark chocolate ganache. This step is vital for achieving that smooth ganache finish!

Optional: Drizzle with additional melted chocolate for an extra decadent touch.
Exact quantities are listed in the recipe card below.

Strawberry Truffle Cupcake Variations

Get ready to make these irresistible cupcakes even more exciting!

  • Gluten-Free: Substitute all-purpose flour with a 1:1 gluten-free blend for a fluffy, gluten-free cupcake that everyone can enjoy.

  • Vegan: Swap eggs for ¼ cup unsweetened applesauce and use almond milk along with vegan butter to create a decadent, plant-based treat.

  • Nutty Flavor: Add ½ cup of finely chopped nuts, like almonds or walnuts, to the batter for added crunch and a delightful nutty aroma.

  • Coco-Loco: Incorporate ¼ cup of unsweetened cocoa powder to the flour mixture for a rich, chocolate base that complements the strawberries perfectly.

  • Zesty Lemon: Add 1 tablespoon of lemon zest to the batter for a refreshing citrus twist that brightens the cupcakes and pairs beautifully with the strawberries.

  • Spice It Up: Mix in a teaspoon of cinnamon or cardamom into the batter for a warm, cozy flavor that elevates your baking to new heights.

  • Berry Bonanza: Replace strawberries with mixed berries like blueberries and raspberries for a vibrant, colorful explosion of flavor throughout the cupcakes.

  • Caramel Drizzle: After frosting with ganache, add a swirl of caramel sauce on top for an indulgent touch that takes these cupcakes over the top.

Each variation presents a unique flavor profile, allowing you to create a cupcake that fits any occasion or mood!

What to Serve with Strawberry Truffle Cupcakes?

Looking to create a delightful spread that perfectly complements these sweet, strawberry-laden treats?

  • Whipped Cream: Light and airy, this classic topping enhances the cupcake experience with an extra creaminess that pairs wonderfully with strawberries.

  • Fresh Fruit Salad: A medley of seasonal fruits brings a refreshing contrast, balancing the sweetness with vibrant flavors and textures.

  • Iced Tea: A crisp, refreshing glass of iced tea adds a versatile drink option, perfect for sipping between bites and cooling down those summer vibes.

  • Chocolate-Covered Strawberries: A lovely indulgent treat that echoes the flavors of the cupcakes, making your dessert table a decadent affair.

  • Vanilla Ice Cream: Creamy, cool, and delicious, a scoop of vanilla ice cream creates a perfect match, providing a delightful contrast to the cupcakes.

  • Lemonade: A zesty homemade lemonade cuts through the richness of the chocolate ganache, ensuring your palate stays refreshed and vibrant.

  • Chocolate Mousse: Silky and rich, the mousse echoes the chocolate aspect of the cupcakes, creating a luxurious dessert duo that will leave guests impressed.

These pairings not only enhance the experience but also create an inviting atmosphere, making any gathering feel extra special. Enjoy the warmth of home-cooked flavors intertwined with sweet memories!

Make Ahead Options

These Strawberry Truffle Cupcakes are a fantastic option for meal prep, allowing you to save time on busy days! You can prepare the cupcake batter up to 24 hours in advance. Just mix everything as instructed and store it in an airtight container in the refrigerator to keep it fresh and flavorful. The strawberry frosting can be made up to 3 days ahead; simply refrigerate it in a tightly sealed container. When you’re ready to bake, pour the chilled batter into cupcake liners and bake as directed. They’ll come out just as delicious, making your dessert prep a breeze and leaving you time to enjoy your day!

How to Store and Freeze Strawberry Truffle Cupcakes

  • Room Temperature: Keep cupcakes in an airtight container at room temperature for up to 3 days. This maintains their delightful texture and avoids drying out.

  • Fridge: For longer freshness, store cupcakes in the refrigerator for up to a week. Make sure they’re covered to prevent them from absorbing any fridge odors.

  • Freezer: Freeze the cupcakes without frosting for up to 3 months. Wrap each cupcake individually in plastic wrap, then place them in a freezer-safe bag.

  • Reheating: To enjoy your frozen Strawberry Truffle Cupcakes, thaw overnight in the fridge, then let them come to room temperature before frosting or enjoying as is.

Chef's Helpful Tips

  • For the best results with your Strawberry Truffle Cupcakes, make sure your butter is at room temperature to ensure it creams well with the sugar.
  • Avoid overmixing the batter after folding in the strawberries to keep their juicy texture intact and prevent tough cupcakes.
  • Use a cookie scoop for evenly filled cupcake liners to ensure uniform baking and consistent sizes.
  • Keep an eye on the cupcakes during the last few minutes of baking, as ovens can vary, and you want them just golden without overbaking.

Strawberry Truffle Cupcakes Recipe FAQs

What kind of strawberries should I use for the cupcakes?
Absolutely! Fresh strawberries are best for this recipe. Look for strawberries that are bright red, plump, and firm, avoiding any with dark spots or mold. If fresh isn’t an option, frozen strawberries can work splendidly—just make sure to thaw and drain them well before adding to the batter.

How should I store my Strawberry Truffle Cupcakes?
The more the merrier! Store your cupcakes in an airtight container at room temperature for up to 3 days to keep them soft and moist. If you’d like to enjoy them over a longer period, pop them in the fridge, where they can last up to a week. Make sure they’re covered to avoid absorbing fridge odors!

Can I freeze Strawberry Truffle Cupcakes, and if so, how?
Yes, you can freeze these delightful treats! To freeze, ensure the cupcakes are cooled completely. Wrap each cupcake individually in plastic wrap and then place them in a freezer-safe bag. They’ll keep well for up to 3 months. When you’re ready to indulge, simply thaw them overnight in the fridge and let them come to room temperature.

What if my cupcakes come out dry?
Don’t worry; dry cupcakes happen to the best of us! Ensuring you don’t overmix the batter after adding the strawberries is key. Also, double-check your oven temperature with an oven thermometer—sometimes they can run hot, leading to overbaking. If you find your cupcakes are a bit dry, try serving them with some whipped cream or ice cream to add moisture back.

Are these cupcakes safe for pets?
The dark chocolate ganache may not be safe for pets, especially dogs, as chocolate is toxic to them. If you plan to share your cupcakes with furry friends around, consider making a batch without the ganache or using a pet-safe alternative like yogurt icing.

Can I make these cupcakes gluten-free?
Absolutely, you can! Substitute the all-purpose flour with a 1:1 gluten-free flour blend. Make sure the blend contains xanthan gum or add it separately as instructed on the package. Swap-out will yield delightful results, maintaining the cupcakes’ moist texture and flavor.

Strawberry Truffle Cupcakes

Strawberry Truffle Cupcakes

These Strawberry Truffle Cupcakes combine fresh strawberries and rich chocolate for a delightful dessert experience.
Print Recipe Pin Recipe
Prep Time 20 minutes mins
Cook Time 20 minutes mins
Total Time 40 minutes mins
Servings: 12 cupcakes
Course: DESSERT RECIPES
Cuisine: American
Calories: 250
Ingredients Equipment Method Nutrition Notes

Ingredients
  

For the Cupcake Batter
  • 1 ½ cups all-purpose flour
  • 1 cup granulated sugar
  • 2 teaspoons baking powder
  • ½ teaspoon salt
  • ½ cup unsalted butter softened
  • 2 large eggs
  • 1 cup whole milk can substitute with almond or oat milk
  • 1 cup fresh strawberries diced, can use frozen if fresh unavailable
For the Ganache Topping
  • 8 ounces dark chocolate high-quality for best flavor

Equipment

  • Muffin tin
  • Mixing bowls
  • Whisk
  • Spatula
  • Wire Rack

Method
 

Preparation
  1. Preheat your oven to 350°F (175°C) and line a muffin tin with cupcake liners.
  2. Whisk together the flour, sugar, baking powder, and salt in a mixing bowl.
  3. Cream the softened butter until light and fluffy, gradually adding the granulated sugar.
  4. Mix in the eggs one at a time, then add the whole milk until well combined.
  5. Fold in the diced fresh strawberries gently into the batter.
  6. Fill each lined cupcake liner two-thirds full with the batter and bake for 18-20 minutes.
  7. Cool the cupcakes completely on a wire rack before frosting with dark chocolate ganache.

Nutrition

Serving: 1cupcakeCalories: 250kcalCarbohydrates: 35gProtein: 3gFat: 12gSaturated Fat: 7gPolyunsaturated Fat: 1gMonounsaturated Fat: 3gCholesterol: 50mgSodium: 150mgPotassium: 120mgFiber: 1gSugar: 20gVitamin A: 5IUVitamin C: 15mgCalcium: 8mgIron: 6mg

Notes

For best results, ensure butter is at room temperature and avoid overmixing the batter after adding strawberries. Use a cookie scoop for evenly filled liners.

Tried this recipe?

Let us know how it was!

Filed Under: BREAKFAST & BRUNCH

Roast Beef Sliders

February 3, 2026 by JudyWhite Leave a Comment

There’s something truly satisfying about the first bite of a warm slider, especially when it’s packed with layers of tender roast beef and melted cheese. I found myself craving something hearty and fulfilling after countless fast-food trips left me underwhelmed. That’s when these Roast Beef Sliders came to life—a delicious melding of flavors that turned a simple meal into a cherished occasion.

Picture friends gathered around your kitchen, laughter mingling with the irresistible aroma of caramelized onions and savory beef wafting through the air. With just a handful of ingredients and a mere 30 minutes, you’ll have a platter of sliders that not only ease weekday dinners but also elevate any gathering!

Whether you’re a seasoned chef or just starting to explore the joys of homemade comfort food, these sliders are a delicious solution that promises to impress without the hassle. Ready to dive in? Let’s bring that culinary magic to your home!

Why You'll Love This Roast Beef Sliders

  • These Roast Beef Sliders are incredibly easy to prepare, making them a perfect weeknight meal or party appetizer.
  • The combination of tender roast beef, melted cheese, and sweet caramelized onions creates a symphony of flavors that will delight your taste buds.
  • Their versatility allows you to customize toppings and sauces, ensuring everyone can enjoy their sliders just the way they like them.
  • Plus, they look stunning on a platter, making them a visual centerpiece that will have your guests excited to dig in.

Roast Beef Sliders Ingredients

Prepare for a mouthwatering experience with these essential ingredients!

For the Sliders

  • 1 lb thinly sliced roast beef – This is the star of your sliders, adding rich flavor and tenderness.
  • 12 soft slider buns – Opt for fluffy buns that cradle your fillings and soak up the delicious juices.
  • 8 oz Swiss or provolone cheese – These cheeses melt beautifully, creating a gooey, savory topping.

For the Toppings

  • 1 cup caramelized onions – Sweet, soft onions bring an irresistible depth of flavor to every bite.

For the Sauce

  • 1/2 cup beef broth – A drizzle of broth keeps the sliders moist and enhances the savory profile.
  • 2 tbsp horseradish sauce – Adds a zesty kick that balances the richness of the beef and cheese beautifully.

Dive into this delightful recipe and enjoy your homemade Roast Beef Sliders!

How to Make Roast Beef Sliders

  1. Preheat your oven to 350°F (175°C). This temperature is perfect for heating the sliders evenly while melting the cheese to gooey perfection.

  2. Slice the slider buns in half horizontally. Arrange them on a baking sheet lined with parchment paper for easy cleanup and to prevent sticking.

  3. Layer a generous amount of roast beef on the bottom half of each bun. Make sure to fill them well, as this is the heart of your delicious sliders!

  4. Top with cheese and caramelized onions. Feel free to be generous; the melty cheese and sweet onions will add wonderful flavor and texture.

  5. Mix beef broth and horseradish sauce in a small bowl. Drizzle this savory mixture over the sliders to keep them moist and flavorful.

  6. Cover with the bun tops and bake for 15-20 minutes. You want them heated through and the cheese to be bubbly and lightly golden.

Optional: Garnish with fresh parsley for a pop of color and added freshness!

Exact quantities are listed in the recipe card below.

Make Ahead Options

These Roast Beef Sliders are perfect for meal prep, allowing you to savor homemade comfort during busy weeknights. You can prepare most components in advance: the caramelized onions, roast beef, and even the mixed horseradish sauce can be made up to 3 days ahead. Store the onions and beef in airtight containers in the refrigerator to maintain moisture and flavor. When you’re ready to serve, simply layer the prepped beef and onions onto the buns, drizzle with the sauce, and bake as directed for about 15-20 minutes. This way, you’ll enjoy fresh, delicious sliders with minimal fuss—just as comforting as if you cooked them all at once!

How to Store and Freeze Roast Beef Sliders

Fridge: Store leftover Roast Beef Sliders in an airtight container for up to 3 days. Reheat in the oven at 350°F (175°C) until warmed through.

Freezer: Wrap each slider individually in plastic wrap and then foil, placing them in a freezer bag. They can be frozen for up to 2 months.

Reheating: For the best texture, reheat thawed sliders in the oven at 350°F (175°C) for about 10-15 minutes, ensuring that the cheese is melting and the beef is heated thoroughly.

What to Serve with Roast Beef Sliders?

Set the stage for a delightful feast with these perfect pairings that enhance the deliciousness of your sliders.

  • Crispy Sweet Potato Fries: Their natural sweetness and crunchy exterior provide a delightful contrast to the savory sliders, making every bite a treat.

  • Tangy Coleslaw: Bright and crunchy, coleslaw adds a refreshing bite that balances the richness of the roast beef and cheese.

  • Garlic Butter Green Beans: Tender beans sautéed in garlic butter create a wonderfully aromatic side that complements the hearty flavors of the sliders perfectly.

  • Creamy Potato Salad: This indulgent dish offers a comforting creaminess that melds beautifully with the sliders while adding a hearty touch.

  • Herb-Infused Pasta Salad: A light and vibrant pasta salad brings freshness with its medley of herbs and veggies, elevating the meal into a delightful feast.

  • Crisp Caesar Salad: With crunchy romaine and a tangy dressing, this classic salad cuts through the richness of the sliders, making it a refreshing addition to your spread.

  • Chilled Lemonade: This tangy drink refreshes the palate and complements the savory flavors of the sliders, making every sip an invigorating experience.

Enjoy these pairings that turn a simple gathering into an unforgettable culinary moment!

Roast Beef Sliders Variations

Feel free to sprinkle your own flair into these sliders, making them even more delightful and uniquely yours!

  • Spicy Kick: Add sliced jalapeños or a dash of hot sauce to introduce an exciting heat that awakens your taste buds. The balance between spicy and savory will be a game-changer!

  • Cheese Change: Substitute Swiss or provolone with pepper jack or gouda for a different flavor profile. Each option adds its own unique character that complements the beef beautifully.

  • Veggie Boost: Toss in some sautéed bell peppers or mushrooms to pack in additional nutrients and flavors. These additions not only amplify taste but also bring a lovely texture to each bite.

  • Herb Infusion: Mix fresh herbs like rosemary or thyme into the caramelized onions for a fragrant twist. Aromatic herbs elevate the dish’s depth, making each slider feel gourmet.

  • Dijon Delight: Swap out horseradish sauce for Dijon mustard to give your sliders a tangy sophistication. The zesty touch pairs wonderfully with the richness of the beef.

  • Gluten-Free: Use gluten-free slider buns or collard greens as a wrap for a delicious gluten-free version. This way, everyone can indulge without worry!

  • Slow Cooker Style: Cook roast beef low and slow in broth with garlic and spices, then shred it for a more tender, pulled-beef experience. You’ll love the depth of flavor from this method.

  • Sweet & Savory: Add a dollop of fig jam or a sweet onion spread before topping with meat and cheese, creating a delightful contrast to the savory elements. This twist will delight guests looking for something special!

Chef's Helpful Tips

  • When making Roast Beef Sliders, ensure the roast beef is sliced thinly for optimal tenderness and flavor integration.
  • Avoid overcomplicating the sauce by mixing beef broth and horseradish; drizzling it over the sliders enhances moisture without overwhelming the beef’s flavor.
  • Preheating the oven to 350°F (175°C) is crucial as it allows the cheese to melt perfectly while warming the filling evenly.
  • Finally, keep an eye on the baking time; sliders are best when heated through and the cheese is bubbly, typically taking about 15-20 minutes.

Roast Beef Sliders Recipe FAQs

How do I choose the right roast beef?
Absolutely! When selecting roast beef, look for a cut that is labeled “thinly sliced.” Ideally, you want roast beef that’s tender, well-marbled, and has a fresh aroma. If you can, visit a butcher shop for quality slices; this ensures rich flavor and delightful tenderness in your sliders.

How should I store leftover Roast Beef Sliders?
Very! To keep your sliders fresh, store them in an airtight container in the fridge for up to 3 days. If you’d like to keep them longer, it’s best to freeze them. Reheating can be done in the oven at 350°F (175°C) until they’re warmed through—about 10-15 minutes will do the trick.

Can I freeze Roast Beef Sliders?
You absolutely can! To freeze, wrap each slider individually in plastic wrap, followed by a layer of aluminum foil. Place them in a freezer bag for extra protection against freezer burn. They will stay fresh for up to 2 months. To reheat, thaw them overnight in the fridge and then bake at 350°F (175°C) for 10-15 minutes until heated through.

What if my sliders are too dry after baking?
No worries! If your sliders turn out a bit dry, it may be from either insufficient sauce or not enough beef broth during the cooking process. It’s important to drizzle a generous amount of the broth and horseradish mixture on before baking. If they seem dry after baking, you can always add a little warm beef broth directly on top before serving!

Are Roast Beef Sliders safe for pets or people with allergies?
Good question! Typically, these sliders are not suitable for pets, especially due to the cheese and horseradish’s potential harmful effects on dogs and cats. If you or your guests have allergies, ensure to check for any dairy or gluten sensitivities. You can easily substitute the cheese with dairy-free alternatives and use gluten-free buns to accommodate those dietary needs.

What if I can’t find slider buns?
The more the merrier! If slider buns aren’t available, feel free to use small dinner rolls, mini bagels, or even cut a large loaf into smaller pieces. Just ensure they can hold up to the fillings without falling apart! A sturdy bread will make for a delightful bite.

Roast Beef Sliders

Roast Beef Sliders

Delicious Roast Beef Sliders packed with tender beef, cheese, and caramelized onions, perfect for lunch or a gathering.
Print Recipe Pin Recipe
Prep Time 10 minutes mins
Cook Time 20 minutes mins
Total Time 30 minutes mins
Servings: 12 sliders
Course: LUNCH RECIPES
Cuisine: American
Calories: 250
Ingredients Equipment Method Nutrition Notes

Ingredients
  

For the Sliders
  • 1 lb thinly sliced roast beef This is the star of your sliders, adding rich flavor and tenderness.
  • 12 count soft slider buns Opt for fluffy buns that cradle your fillings and soak up the delicious juices.
  • 8 oz Swiss or provolone cheese These cheeses melt beautifully, creating a gooey, savory topping.
For the Toppings
  • 1 cup caramelized onions Sweet, soft onions bring an irresistible depth of flavor.
For the Sauce
  • 1/2 cup beef broth Keeps the sliders moist and enhances the savory profile.
  • 2 tbsp horseradish sauce Adds a zesty kick that balances the richness of the beef.

Equipment

  • Baking sheet
  • parchment paper
  • Small bowl
  • Oven

Method
 

How to Make Roast Beef Sliders
  1. Preheat your oven to 350°F (175°C).
  2. Slice the slider buns in half horizontally.
  3. Layer a generous amount of roast beef on the bottom half of each bun.
  4. Top with cheese and caramelized onions.
  5. Mix beef broth and horseradish sauce in a small bowl. Drizzle this over the sliders.
  6. Cover with the bun tops and bake for 15-20 minutes.

Nutrition

Serving: 1sliderCalories: 250kcalCarbohydrates: 30gProtein: 15gFat: 10gSaturated Fat: 4gPolyunsaturated Fat: 0.5gMonounsaturated Fat: 3gCholesterol: 50mgSodium: 800mgPotassium: 250mgFiber: 1gSugar: 2gVitamin A: 6IUVitamin C: 2mgCalcium: 15mgIron: 10mg

Notes

Optional: Garnish with fresh parsley for added freshness. Store leftovers in an airtight container for up to 3 days. Reheat in the oven until warmed through.

Tried this recipe?

Let us know how it was!

Filed Under: LUNCH RECIPES

Garlicky Mississippi Pot Roast

February 3, 2026 by JudyWhite Leave a Comment

There’s something truly comforting about the smell of a hearty roast slowly cooking away in the oven, and this Garlicky Mississippi Pot Roast is no exception. As the tantalizing aroma fills your kitchen, it transports you back to childhood family dinners, where every bite seemed to melt away the day’s worries. I discovered this fantastic recipe during a particularly chilly evening, when nothing felt more satisfying than indulging in a rich, savory meal that could be shared with loved ones.

With only a handful of simple ingredients—juicy chuck roast, aromatic garlic, and your favorite ranch dressing mix—this dish is as stress-free as it is delicious. What I love most about this pot roast is how effortlessly it transforms an everyday dinner into a special occasion. Perfect for impressing friends or simply treating yourself to a cozy night in, just set it in the oven and let the magic happen while you unwind!

Why You'll Love This Garlicky Mississippi Pot Roast

  • This recipe is incredibly easy to prepare, requiring just a few simple steps that anyone can follow.
  • The flavors come together in a way that creates a mouthwatering dish that your family and friends will rave about.
  • It’s versatile enough to serve on a busy weeknight or as the centerpiece of a special gathering, making it perfect for any occasion.
  • The visual appeal of the tender roast surrounded by vibrant carrots and onions will surely impress anyone at the dining table.

Garlicky Mississippi Pot Roast Ingredients

• A delightful array of flavors awaits!

For the Roast

  • Chuck roast – This tender cut is perfect for pot roasting, ensuring a juicy outcome.
  • Fresh garlic – Minced for optimal flavor, adding a robust aroma to your Garlicky Mississippi Pot Roast.

For the Seasoning

  • Ranch dressing mix – A key ingredient that imparts a savory depth and rich flavor.
  • Au jus gravy mix – Enhances the sauce and keeps the roast moist while cooking.

For Cooking

  • Unsalted butter – It adds richness to the dish and helps brown the roast beautifully.

For the Veggies

  • Baby carrots – Sweet and tender, they provide a lovely contrast to the savory meat.
  • Yellow onion – Sliced to infuse sweetness and depth, making for a deliciously aromatic base.

How to Make Garlicky Mississippi Pot Roast

  1. Preheat Oven: Start by preheating your oven to 275°F (135°C). This low heat will allow your roast to become tender and flavorful as it cooks.

  2. Season Roast: Generously season both sides of the chuck roast with salt and pepper. This simple step enhances the overall flavor and makes every bite delicious.

  3. Sear Meat: In a skillet over medium-high heat, melt 1 tablespoon of unsalted butter. Sear the roast until it’s browned on all sides, roughly 3 minutes per side. This adds a lovely crust and depth of flavor.

  4. Transfer and Assemble: Carefully transfer the seared roast to a Dutch oven or slow cooker. Surround it with the sliced onions and baby carrots for a beautiful presentation.

  5. Add Seasonings: Sprinkle the ranch dressing mix and au jus gravy mix evenly over the roast. This delightful combination is what makes your Garlicky Mississippi Pot Roast unforgettable.

  6. Top with Garlic and Butter: Add the minced garlic on top, followed by the remaining tablespoon of butter. This will melt into the roast, providing rich and savory tones during cooking.

  7. Cover and Bake: Cover the Dutch oven or slow cooker and let it bake in the oven for approximately 4 hours, or until the meat is fork-tender and falls apart beautifully.

Optional: Serve with crusty bread to soak up the delicious juices!

Exact quantities are listed in the recipe card below.

Garlicky Mississippi Pot Roast Variations

Feel free to play around with this recipe to suit your taste buds and dietary preferences!

  • Spicy Kick: Add 1-2 diced jalapeños or a few dashes of hot sauce to the roast for a fiery twist. The heat will harmonize beautifully with the savory flavors.

  • Herb-Infused: Toss in a few sprigs of fresh thyme or rosemary for an aromatic touch that elevates the dish. The herbal notes offer a delightful nuance to every bite.

  • Vegetarian Option: Swap the chuck roast for a hearty portobello mushroom cap and replace the au jus mix with vegetable broth for a plant-based version. It’s hearty and satisfying!

  • Root Vegetable Medley: Include parsnips or sweet potatoes along with the carrots for added depth and sweetness in flavor. They’ll complement the dish beautifully and create a colorful presentation.

  • Onion Variation: Use caramelized onions instead of raw for a sweet and rich layer of flavor. The sweetness of the caramelized onions balances the savory elements perfectly.

  • Wine Boost: Deglaze the skillet used to sear the roast with a splash of red wine before adding it to the pot. This adds immense depth and complexity to the overall flavor.

  • Creamy Touch: Stir in a splash of heavy cream or sour cream into the juices just before serving for a rich and creamy sauce. It enhances the dish’s comfort factor!

  • Sweet & Savory: Add a tablespoon of brown sugar to the seasoning mix for a hint of sweetness that balances the savory garlic and ranch flavors.

How to Store and Freeze Garlicky Mississippi Pot Roast

  • Fridge: Store any leftover Garlicky Mississippi Pot Roast in an airtight container in the fridge for up to 3 days. This keeps the roast moist and flavorful for your next meal.
  • Freezer: For longer storage, freeze portions of the pot roast in freezer-safe bags or containers for up to 2 months. Make sure to label with the date for easy referencing.
  • Thawing: When ready to enjoy again, thaw in the fridge overnight or use the microwave for a quick option.
  • Reheating: Reheat the roast gently in a covered skillet over low heat, or in the microwave, to prevent drying out. Add a splash of beef broth if needed for moisture.

Make Ahead Options

These Garlicky Mississippi Pot Roast preparations are perfect for busy weeknights! You can season and sear the chuck roast up to 24 hours in advance, and then refrigerate it (to preserve its juiciness). Additionally, slice the onions and chop the carrots ahead of time, keeping them stored in an airtight container in the fridge for up to 3 days. When you’re ready to cook, simply transfer the prepared roast to your Dutch oven, add the vegetables, sprinkle the seasoning mixes, and finish with garlic and butter. Cover and bake as directed for a comforting meal that tastes just as delicious as if it were made fresh!

What to Serve with Garlicky Mississippi Pot Roast?

The tantalizing aroma of Garlicky Mississippi Pot Roast deserves some delightful companions to create a memorable meal.

  • Creamy Mashed Potatoes: These buttery, smooth potatoes provide a perfect vehicle for soaking up the savory juices from the pot roast.

  • Honey Glazed Carrots: The sweetness of honey glazed carrots beautifully balances the rich flavors of the roast, offering a satisfying crunch.

  • Roasted Green Beans: Sautéed or roasted, green beans add a fresh, vibrant contrast to the hearty pot roast, making each bite sing.

  • Crusty Bread: A loaf of fresh, warm bread is ideal for mopping up those delicious juices, enhancing the comfort food experience.

  • Coleslaw: A tangy and crisp coleslaw introduces a refreshing crunch that complements the savory richness of the roast, creating wonderful texture.

  • Red Wine: A glass of full-bodied red wine enhances the meal’s savoriness, elevating the entire dining experience.

Don’t forget dessert! A slice of warm apple pie would be the perfect sweet ending to this comforting feast. Enjoy!

Chef's Helpful Tips

  • To ensure your Garlicky Mississippi Pot Roast is perfectly tender, always use a meat thermometer to check for doneness, aiming for an internal temperature of around 190°F (88°C) for optimal tenderness.
  • Avoid overcrowding the pot by evenly distributing the onions and carrots for even cooking and flavor absorption.
  • When searing the roast, let it sit undisturbed for the full 3 minutes per side for a nice crust to form, enhancing the dish’s flavor profile.
  • Finally, always cover the Dutch oven tightly to retain moisture during the long cooking process, allowing the roast to braise beautifully.

Garlicky Mississippi Pot Roast Recipe FAQs

How do I select the best chuck roast for this recipe?
Absolutely! Look for a chuck roast that has good marbling, which ensures tenderness and flavor. The best cuts will have specks of fat interspersed throughout the meat, giving it a juicy result. A roast that feels slightly firm yet has a bit of give when pressed is ideal.

How should I store leftover Garlicky Mississippi Pot Roast?
To keep your Garlicky Mississippi Pot Roast fresh, store any leftovers in an airtight container in the fridge for up to 3 days. Make sure it’s cooled before sealing to maintain its moisture. This way, every bite can remind you of that comforting meal!

Can I freeze my Garlicky Mississippi Pot Roast?
Very! Freezing is a fantastic option if you want to keep it longer. To freeze, portion the pot roast into freezer-safe bags or containers, ensuring you remove excess air. Label with the date, and it can last for up to 2 months. When you’re ready, just thaw it in the fridge overnight or use the microwave.

What’s the best way to reheat the pot roast without drying it out?
I often recommend reheating on the stove over low heat to maintain moisture. Place the roast in a covered skillet, and consider adding a splash of beef broth to keep it juicy. If using a microwave, heat it in short bursts and cover to retain moisture.

Can I make this recipe if I have dietary restrictions?
Absolutely! For gluten-free needs, look for gluten-free versions of the ranch dressing and au jus mixes. If you have allergies to garlic, you can skip it, but you may want to enhance flavor with fresh herbs like thyme or rosemary instead. When serving to pets, remember that onions and garlic can be harmful for them, so keep their portions separate.

Garlicky Mississippi Pot Roast

Garlicky Mississippi Pot Roast

This Garlicky Mississippi Pot Roast is a comforting dish filled with rich flavors, perfect for family dinners.
Print Recipe Pin Recipe
Prep Time 15 minutes mins
Cook Time 4 hours hrs
Total Time 4 hours hrs 15 minutes mins
Servings: 6 servings
Course: DINNER RECIPES
Cuisine: American
Calories: 350
Ingredients Equipment Method Nutrition Notes

Ingredients
  

For the Roast
  • 1 piece Chuck roast
  • 4 cloves Fresh garlic, minced
For the Seasoning
  • 1 packet Ranch dressing mix
  • 1 packet Au jus gravy mix
For Cooking
  • 2 tablespoons Unsalted butter
For the Veggies
  • 2 cups Baby carrots
  • 1 large Yellow onion, sliced

Equipment

  • Dutch oven
  • Skillet

Method
 

Instructions
  1. Preheat your oven to 275°F (135°C).
  2. Generously season both sides of the chuck roast with salt and pepper.
  3. Melt 1 tablespoon of unsalted butter in a skillet over medium-high heat and sear the roast until browned on all sides, about 3 minutes per side.
  4. Carefully transfer the seared roast to a Dutch oven or slow cooker. Surround it with the sliced onions and baby carrots.
  5. Sprinkle the ranch dressing mix and au jus gravy mix evenly over the roast.
  6. Add the minced garlic on top, followed by the remaining tablespoon of butter.
  7. Cover and bake in the oven for approximately 4 hours, or until the meat is fork-tender.

Nutrition

Serving: 1servingCalories: 350kcalCarbohydrates: 15gProtein: 45gFat: 15gSaturated Fat: 6gPolyunsaturated Fat: 1gMonounsaturated Fat: 5gCholesterol: 120mgSodium: 900mgPotassium: 1000mgFiber: 2gSugar: 3gVitamin A: 5000IUVitamin C: 5mgCalcium: 50mgIron: 3mg

Notes

Serve with crusty bread to soak up the delicious juices.

Tried this recipe?

Let us know how it was!

Filed Under: DINNER RECIPES

Hot Honey Ground Beef Bowl

February 3, 2026 by JudyWhite Leave a Comment

There’s something truly satisfying about the combination of sweet and spicy, especially when it comes together in a hearty meal. When I first drizzled hot honey over sautéed beef, I knew I had stumbled onto something magical. The Hot Honey Ground Beef Bowl is a delightful dish that not only tantalizes the taste buds but also brings comfort to the dinner table in just 25 minutes!

Imagine a sizzling skillet filled with vibrant bell peppers and aromatic garlic, mingling perfectly with succulent ground beef, all topped off with a sticky, sweet sauce that packs a punch. You won’t just be whipping up a meal; you’ll be creating a flavorful experience that’s bound to become a weeknight favorite. Perfect for those who are tired of the same old takeout routine, this dish offers a versatile delight that can easily be customized with your favorite veggies or served over rice, noodles, or greens.

Grab your skillet, and let’s turn those ordinary ingredients into an extraordinary Hot Honey Ground Beef Bowl that will leave everyone asking for seconds!

Why You'll Love This Hot Honey Ground Beef Bowl

  • This recipe is a total game changer for busy weeknights as it only takes 25 minutes from start to finish.
  • The unique blend of sweet and spicy flavors creates a mouthwatering dish that will excite your taste buds.
  • Its versatility allows you to customize with your favorite vegetables or serve it over various bases like rice or noodles.
  • Visually, the vibrant colors of the bell peppers and the glossy sauce make this bowl not just delicious, but a feast for the eyes as well.
  • This Hot Honey Ground Beef Bowl is sure to impress family and friends, making it a crowd-pleasing option for any gathering.

Hot Honey Ground Beef Bowl Ingredients

Get ready to whip up this delicious dish!

For the Beef

  • 1 lb lean ground beef – use a lean cut to keep the dish flavorful yet healthier.

For the Sauce

  • 1/4 cup hot honey – this adds the perfect balance of sweet and spicy that defines the Hot Honey Ground Beef Bowl.
  • 2 tbsp low-sodium soy sauce – enhances the umami flavor without the extra sodium.
  • 2 tbsp lime juice – freshens up the dish with a zesty kick.

For the Vegetables

  • 1 cup bell peppers (diced) – choose your favorite colors for a vibrant look and crunch.
  • 1 medium onion (diced) – adds a sweet and savory base to the beef mix.
  • 3 cloves garlic (minced) – infuses the dish with aromatic flavors.

For Cooking

  • 1 tbsp olive oil – use extra virgin for a richer flavor while sautéing the vegetables and beef.

How to Make Hot Honey Ground Beef Bowl

  1. Chop veggies: Begin by chopping the bell peppers and onion into bite-sized pieces. Don’t forget to mince the garlic, as it will add a delightful aroma to your dish!

  2. Sauté beef: In a large skillet, heat the olive oil over medium heat. Add the ground beef and cook until it’s nicely browned, breaking it apart until there’s no pink remaining.

  3. Add vegetables: Stir in the chopped onion and bell peppers, sautéing for about five minutes until they’ve softened and become fragrant. Then, add the minced garlic and continue to cook for another minute.

  4. Mix sauce: In a small bowl, whisk together the hot honey, soy sauce, and lime juice. Pour this scrumptious mixture over your cooked beef, stirring gently to coat the meat evenly.

  5. Simmer: Let everything simmer together on low heat for five minutes, allowing all those flavorful elements to meld beautifully.

  6. Serve: Serve your Hot Honey Ground Beef Bowl in bowls or plates, and feel free to garnish with fresh herbs if you desire a pop of color!

Optional: Sprinkle with sliced green onions for extra flavor and crunch.

Exact quantities are listed in the recipe card below.

What to Serve with Hot Honey Ground Beef Bowl?

Create a wonderful dining experience with perfect accompaniments that enhance flavors and textures!

  • Fluffy Rice: Steamed jasmine rice soaks up the delicious sauce, providing a neutral base that balances the sweet heat.

  • Crispy Salad: A fresh green salad with light vinaigrette brings a refreshing crunch that contrasts beautifully with the savory bowl.

  • Creamy Avocado: Sliced or diced avocado adds a rich, creamy texture, enhancing the dish without overpowering the hot honey flavor.

  • Grilled Corn: Sweet corn off the grill adds a smoky sweetness, echoing the warmth of the hot honey and adding a pop of color.

Pair your Hot Honey Ground Beef Bowl with these delectable sides to create a memorable meal that comforts and delights!

How to Store and Freeze Hot Honey Ground Beef Bowl

Fridge: Store any leftovers in an airtight container in the fridge for up to 3 days. Reheat in the microwave or on the stovetop until warmed through.

Freezer: For longer storage, freeze the Hot Honey Ground Beef Bowl in a freezer-safe container for up to 3 months. Thaw in the refrigerator overnight before reheating.

Reheating: To reheat, add a splash of water or broth in a skillet over medium heat, stirring gently until heated through. Avoid prolonged high heat to maintain moisture.

Serving Suggestions: When ready to serve again, consider adding freshly chopped herbs or a squeeze of lime to brighten the flavors!

Make Ahead Options

These Hot Honey Ground Beef Bowls are perfect for meal prep enthusiasts! You can chop the bell peppers, onion, and garlic up to 24 hours in advance; just store them in an airtight container in the refrigerator to maintain freshness. Additionally, you can cook the ground beef and mix in the sauce, then let it cool, cover, and refrigerate for up to 3 days. When you’re ready to serve, simply reheat the beef mixture in a skillet over medium heat until warmed through, and then add your prepped veggies for a quick sauté. This prep-ahead approach saves you time on busy weeknights while ensuring the dish remains just as delicious and delightful!

Hot Honey Ground Beef Bowl Variations

Feel free to make this dish your own with these delicious swaps and twists!

  • Spicy Kick: Add diced jalapeños or crushed red pepper flakes to the beef for an extra heat boost that’ll have you reaching for another bite.

  • Beef Alternative: Swap out ground beef with ground turkey or chicken for a lighter, leaner bowl that doesn’t compromise on flavor.

  • Vegetarian Option: Use lentils or chickpeas instead of beef for a hearty vegetarian version that’s just as satisfying and packed with nutrients.

  • Sweet & Savory Twist: Incorporate diced pineapple or mango for a tropical sweetness that pairs beautifully with the hot honey. It’s a sunny flavor explosion!

  • Add Crunch: Toss in some crushed peanuts or sesame seeds before serving to introduce a delightful crunch that complements the soft textures of the bowl.

  • Herb Infusion: Mix in fresh cilantro or basil just before serving to brighten up the dish with an aromatic touch that tantalizes the senses.

  • Umami Boost: Add a tablespoon of miso paste to the sauce for an extra depth of flavor; it elevates the savory aspects beautifully!

  • Citrus Zing: A splash of orange juice can replace lime for a sweeter, citrus-infused flavor that adds a refreshing twist to every bite.

Chef's Helpful Tips

  • When making the Hot Honey Ground Beef Bowl, be sure to use a lean ground beef to enhance the flavor without adding excessive fat.
  • It’s crucial to break the beef into small pieces while cooking to ensure even browning and texture.
  • Choose fresh and colorful bell peppers for a vibrant presentation and optimal crunch.
  • Let the dish simmer on low heat to allow the flavors to meld beautifully for a delicious finish.

Hot Honey Ground Beef Bowl Recipe FAQs

What type of ground beef should I use for this recipe?
Use lean ground beef for the best flavor and to keep the dish healthier. A lean cut helps in reducing excess grease while ensuring your Hot Honey Ground Beef Bowl remains succulent and tasty.

How should I store leftovers after making the Hot Honey Ground Beef Bowl?
Store any leftovers in an airtight container in the fridge for up to 3 days. Simply reheat them in the microwave or on the stovetop until warmed through. Enjoy a delicious meal without the fuss!

Can I freeze the Hot Honey Ground Beef Bowl?
Absolutely! For longer storage, freeze the Hot Honey Ground Beef Bowl in a freezer-safe container for up to 3 months. Just ensure it’s cooled completely before sealing. When you’re ready to eat it, thaw it in the refrigerator overnight, then reheat gently on the stovetop with a splash of water to keep it moist.

What if I have dietary restrictions or allergies?
If you have allergies, be cautious when selecting ingredients such as soy sauce, which typically contains gluten. You can substitute it with coconut aminos for a gluten-free option. Additionally, if you’re avoiding sugar, consider using a sugar-free hot honey or adjusting the quantity to taste, ensuring your dish still delivers on flavor while accommodating your dietary needs!

How can I enhance the flavors in the Hot Honey Ground Beef Bowl?
To enhance the flavors, consider adding fresh herbs like cilantro or basil just before serving. A squeeze of lime juice can also bring a refreshing brightness to the dish! For a little crunch, sprinkle with sliced green onions or sesame seeds while serving – the more the merrier!

What can I do if the sauce is too thick?
If you find the sauce is too thick, simply add a splash of water or broth while it simmers. Stir gently, allowing the sauce to loosen up and combine with the meat and veggies. This way, you’ll keep that delicious flavor balance without compromising texture!

Hot Honey Ground Beef Bowl

Hot Honey Ground Beef Bowl

This Hot Honey Ground Beef Bowl is a quick and satisfying blend of sweet and spicy flavors, perfect for busy weeknights.
Print Recipe Pin Recipe
Prep Time 10 minutes mins
Cook Time 15 minutes mins
Total Time 25 minutes mins
Servings: 4 bowls
Course: DINNER RECIPES
Cuisine: American
Calories: 450
Ingredients Equipment Method Nutrition Notes

Ingredients
  

For the Beef
  • 1 lb lean ground beef use a lean cut to keep the dish flavorful yet healthier.
For the Sauce
  • 1/4 cup hot honey adds the perfect balance of sweet and spicy.
  • 2 tbsp low-sodium soy sauce enhances umami flavor without extra sodium.
  • 2 tbsp lime juice freshens up the dish.
For the Vegetables
  • 1 cup bell peppers (diced) choose your favorite colors.
  • 1 medium onion (diced) adds a sweet and savory base.
  • 3 cloves garlic (minced) infuses with aromatic flavors.
For Cooking
  • 1 tbsp olive oil use extra virgin for richer flavor.

Equipment

  • Large skillet

Method
 

How to Make Hot Honey Ground Beef Bowl
  1. Begin by chopping the bell peppers and onion into bite-sized pieces. Mince the garlic.
  2. In a large skillet, heat the olive oil over medium heat. Add the ground beef and cook until nicely browned.
  3. Stir in the chopped onion and bell peppers, sautéing for about five minutes until softened. Add the minced garlic and continue to cook for another minute.
  4. In a small bowl, whisk together the hot honey, soy sauce, and lime juice. Pour over the cooked beef and stir to coat.
  5. Let everything simmer together on low heat for five minutes.
  6. Serve your Hot Honey Ground Beef Bowl and garnish with fresh herbs if desired.

Nutrition

Serving: 1bowlCalories: 450kcalCarbohydrates: 30gProtein: 30gFat: 25gSaturated Fat: 10gPolyunsaturated Fat: 5gMonounsaturated Fat: 8gCholesterol: 80mgSodium: 700mgPotassium: 800mgFiber: 3gSugar: 12gVitamin A: 15IUVitamin C: 50mgCalcium: 6mgIron: 15mg

Notes

Optional: Sprinkle with sliced green onions for extra flavor and crunch.

Tried this recipe?

Let us know how it was!

Filed Under: DINNER RECIPES

Strawberry Shortcake Cupcakes

February 3, 2026 by JudyWhite Leave a Comment

As I stood in my kitchen, the sweet scent of fresh strawberries began to fill the air, instantly brightening my mood. With summer in full swing, I often find myself yearning for a dessert that captures the essence of the season, and that’s when Strawberry Shortcake Cupcakes come to mind. They’re not just your ordinary cupcakes; these little beauties bring together fluffy vanilla cake, juicy strawberries, and a decadent whipped cream topping, creating a delightful treat that will have everyone reaching for seconds.

These Strawberry Shortcake Cupcakes are my go-to solution whenever I need to impress guests or simply indulge my cravings. They strike the perfect balance between lightness and richness, making them a crowd-pleaser at picnics, parties, or even quiet nights at home. With minimal prep time and easily accessible ingredients, you’ll be whipping up a batch before you know it. So, let’s dive into this recipe and bring some sunshine to your dessert table!

Why You'll Love This Strawberry Shortcake Cupcakes

  • You’ll adore how easy these Strawberry Shortcake Cupcakes are to make, allowing you to whip up a delightful dessert in just 40 minutes.
  • Their beautifully vibrant appearance will make your dessert table stand out and impress guests at any gathering.
  • The flavor combination of light vanilla cake, juicy strawberries, and creamy whipped topping is simply irresistible and will have everyone coming back for more.
  • Plus, these cupcakes are versatile enough to be served at various occasions, from picnics to birthday celebrations, making them a perfect treat for any time of year.

Strawberry Shortcake Cupcake Ingredients

• Gather everything you need to create these delightful treats!

For the Cupcake Batter

  • All-purpose flour – Provides the structure needed for a light, fluffy cupcake.
  • Granulated sugar – Sweetens the batter and helps achieve a moist texture.
  • Baking powder – Ensures the cupcakes rise beautifully while baking.
  • Salt – Balances the sweetness for a more flavorful treat.
  • Unsalted butter – Adds richness and a tender crumb; be sure it’s softened for easy mixing.
  • Large eggs – Act as a binding agent, contributing to the cupcake’s structure.
  • Vanilla extract – Infuses the batter with a lovely aromatic sweetness.
  • Whole milk – Creates moisture; feel free to substitute with almond or oat milk for a dairy-free version.

For the Strawberry Filling

  • Fresh strawberries – These are key for a fresh burst of flavor in each bite; make sure they’re ripe and sweet!
  • Granulated sugar – Helps macerate the strawberries, enhancing their natural sweetness.

For the Whipped Topping

  • Heavy cream – This creamy base whips up into a light, airy topping that complements the cupcakes perfectly.
  • Powdered sugar – Sweetens the cream while aiding in achieving the ideal consistency.

Get ready to indulge in these Strawberry Shortcake Cupcakes, where each bite brings you one step closer to summer bliss!

How to Make Strawberry Shortcake Cupcakes

  1. Preheat the oven to 350°F (175°C) and line a cupcake tin with paper liners. This initial step ensures your cupcakes bake evenly and don’t stick to the pan.

  2. Whisk together the flour, sugar, baking powder, and salt in a bowl until combined. Getting this dry mixture blended well is key for the perfect cupcake rise.

  3. Beat the softened butter in another bowl until creamy; gradually add sugar and mix until fluffy. Aim for a light, airy texture—this will make your cupcakes delightfully tender!

  4. Incorporate the eggs, one at a time, followed by vanilla extract until the mixture is smooth and well combined. Each egg adds richness, contributing to the overall flavor and texture.

  5. Alternate adding the milk and the dry ingredients to the butter mixture until just combined. Stir gently to avoid overmixing—the batter should be slightly lumpy for optimal fluffiness.

  6. Fill each liner about two-thirds full with the batter and bake for 18-20 minutes or until a toothpick inserted comes out clean. Perfectly baked cupcakes will be golden on top and spring back when lightly pressed.

  7. Mix the chopped strawberries with sugar while the cupcakes are baking and let them sit to release their juices. This delicious filling will seep into the cupcakes, elevating the flavor.

  8. Whip the heavy cream with powdered sugar until soft peaks form. This luscious topping will not only taste heavenly but also add a wonderful visual appeal to your cupcakes.

  9. Hollow out the centers of the cooled cupcakes slightly, then fill with the macerated strawberries and top generously with whipped cream. Every bite will be an explosion of strawberry goodness!

Optional: Garnish with a fresh strawberry slice on top for an extra pop of color!
Exact quantities are listed in the recipe card below.

Make Ahead Options

These Strawberry Shortcake Cupcakes are a fantastic choice for meal prep enthusiasts! You can prepare the cupcake batter and store it in the refrigerator for up to 24 hours before baking. Just be sure to cover it tightly to maintain freshness. The chopped strawberries can also be mixed with sugar and refrigerated to macerate for up to 3 days. When you’re ready to enjoy these delightful treats, simply bake the cupcakes as directed and proceed with hollowing them out, filling them with strawberries, and topping with whipped cream. This method ensures you can whip up a delicious dessert with minimal effort, making busy weeknights a little sweeter!

Strawberry Shortcake Cupcake Variations

Feel free to personalize your Strawberry Shortcake Cupcakes for even more delightful surprises!

  • Gluten-Free: Use a 1:1 gluten-free flour blend to ensure everyone can enjoy these cupcakes without compromising flavor or texture.

  • Dairy-Free: Substitute the butter with coconut oil and use almond milk instead of whole milk for a scrumptious dairy-free option!

  • Sweetness Boost: Add an extra tablespoon of sugar or two tablespoons of honey to enhance the sweetness. It’ll bring out the strawberries’ natural flavors even more.

  • Chocolate Twist: Fold in mini chocolate chips into the batter before baking to create a delicious chocolate-strawberry fusion that will wow your guests.

  • Lemon Zest: Grate the zest of one lemon into the cupcake batter for a refreshing citrus twist that complements the strawberries beautifully.

  • Spicy Kick: Add a pinch of cayenne or cayenne pepper to the strawberry filling for a surprising heat that balances the sweetness.

Imagine the fun of trying each version at your next gathering! Each variation brings its unique charm to the table.

What to Serve with Strawberry Shortcake Cupcakes?

As you prepare to delight in these airy treats, consider building a delightful meal that balances flavors and textures.

  • Fresh Berry Salad: A mix of strawberries, blueberries, and raspberries tossed with a drizzle of honey elevates the fruity essence of the cupcakes, creating a refreshing contrast.

  • Honey Vanilla Yogurt: Smooth, creamy yogurt serves as a perfect companion to your cupcakes, offering tangy sweetness that complements the strawberries beautifully.

  • Chocolate-Dipped Biscotti: The crunch of biscotti dipped in dark chocolate contrasts with the softness of the cupcakes, introducing a sophisticated touch to your dessert spread.

  • Lemonade Spritzer: Refresh your palate with a light and bubbly lemonade spritzer that pairs well with the sweet richness of the cupcakes, making each bite feel like a sunny afternoon.

  • Ice Cream Sundae Bar: Create a fun serving option with vanilla ice cream and assorted toppings. Guests can enjoy their cupcakes alongside an indulgent ice cream, adding whimsy to the dessert table.

  • Almond Scones: Light, nutty scones provide a nice balance to the sweetness of the cupcakes, allowing guests to mix and match flavors for a more complex dessert experience.

These pairings are sure to elevate your Strawberry Shortcake Cupcakes, making for an unforgettable gathering!

How to Store and Freeze Strawberry Shortcake Cupcakes

Room Temperature: Keep leftover Strawberry Shortcake Cupcakes in an airtight container for up to 2 days at room temperature. This maintains their fluffy texture and fresh flavor.

Fridge: These cupcakes can be stored in the refrigerator for up to 5 days. Make sure to cover them well to prevent them from drying out or absorbing fridge odors.

Freezer: For long-term storage, you can freeze the cupcakes (without the whipped cream topping) for up to 3 months. Wrap each cupcake tightly in plastic wrap and place them in a freezer-safe bag.

Reheating: Let frozen cupcakes thaw in the fridge overnight, then enjoy them at room temperature or warm them up briefly in the microwave before topping with fresh strawberries and whipped cream.

Chef's Helpful Tips

  • For the best Strawberry Shortcake Cupcakes, ensure your butter is perfectly softened to achieve a light and fluffy batter.
  • When combining wet and dry ingredients, mix just until incorporated to avoid dense cupcakes; a few lumps are okay.
  • Always keep an eye on your baking time, as oven temperatures may vary; check for doneness a couple of minutes before the recommended time.
  • To enhance the strawberry filling, allow it to sit longer so the sugar fully draws out the juices for maximum flavor.

Strawberry Shortcake Cupcakes Recipe FAQs

How do I choose ripe strawberries for the filling?
Absolutely! When selecting strawberries, look for ones that are vibrant red and feel firm to the touch. Avoid berries with dark spots or dull color, which can indicate overripeness. The aroma is also a great tell; ripe strawberries should have a sweet fragrance.

What’s the best way to store leftover strawberry shortcake cupcakes?
Very! To keep your cupcakes fresh, store any leftovers in an airtight container at room temperature for up to 2 days. For longer storage, place them in the refrigerator for up to 5 days, ensuring they’re well covered to prevent them from drying out or absorbing any other flavors.

Can I freeze these cupcakes?
Of course! To freeze your Strawberry Shortcake Cupcakes, it’s best to do so without the whipped cream topping. Wrap each cooled cupcake tightly in plastic wrap and place them in a freezer-safe zip-top bag. They can be stored for up to 3 months. When you’re ready to enjoy, thaw the cupcakes in the fridge overnight, then top them with fresh strawberries and whipped cream.

My cupcakes didn’t rise, what went wrong?
Oh no! If your cupcakes didn’t rise properly, it could be due to a few reasons. Firstly, check the freshness of your baking powder—it should be active. Make sure to measure your ingredients accurately, as too much flour can lead to dense cupcakes. Additionally, don’t overmix the batter; it’s best to mix just until combined to maintain that beloved fluffiness.

Are these cupcakes suitable for those with allergies?
Great question! This recipe contains common allergens like gluten (from the flour), dairy (from the butter and milk), and eggs. If you’re looking for alternatives, you might try using a gluten-free flour blend and egg replacements like applesauce or flaxseed meal. It’s always best to check with your guests regarding specific allergies before serving.

Can I make these cupcakes dairy-free?
Absolutely! For a dairy-free version of these Strawberry Shortcake Cupcakes, substitute unsweetened almond or oat milk for whole milk and use a plant-based butter in place of the unsalted butter. You can whip coconut cream as a delicious alternative for the topping!

Strawberry Shortcake Cupcakes

Strawberry Shortcake Cupcakes

These delightful Strawberry Shortcake Cupcakes combine fluffy vanilla cake, juicy strawberries, and whipped cream for a perfect summer dessert.
Print Recipe Pin Recipe
Prep Time 20 minutes mins
Cook Time 20 minutes mins
Total Time 40 minutes mins
Servings: 12 cupcakes
Course: DESSERT RECIPES
Cuisine: American
Calories: 220
Ingredients Equipment Method Nutrition Notes

Ingredients
  

For the Cupcake Batter
  • 2 cups all-purpose flour
  • 1 cup granulated sugar
  • 1 tbsp baking powder
  • 1 tsp salt
  • 1/2 cup unsalted butter, softened
  • 3 large eggs
  • 2 tsp vanilla extract
  • 1 cup whole milk Can be substituted with almond or oat milk.
For the Strawberry Filling
  • 2 cups fresh strawberries, chopped Ripe and sweet.
  • 1/4 cup granulated sugar
For the Whipped Topping
  • 1 cup heavy cream
  • 1/4 cup powdered sugar

Equipment

  • Cupcake tin
  • Mixing bowls
  • Whisk
  • Electric mixer
  • measuring cups
  • measuring spoons

Method
 

How to Make Strawberry Shortcake Cupcakes
  1. Preheat the oven to 350°F (175°C) and line a cupcake tin with paper liners.
  2. Whisk together the flour, sugar, baking powder, and salt in a bowl until combined.
  3. Beat the softened butter in another bowl until creamy; gradually add sugar and mix until fluffy.
  4. Incorporate the eggs, one at a time, followed by vanilla extract until the mixture is smooth.
  5. Alternate adding the milk and the dry ingredients to the butter mixture until just combined.
  6. Fill each liner about two-thirds full with the batter and bake for 18-20 minutes or until a toothpick inserted comes out clean.
  7. Mix the chopped strawberries with sugar while the cupcakes are baking and let them sit to release their juices.
  8. Whip the heavy cream with powdered sugar until soft peaks form.
  9. Hollow out the centers of the cooled cupcakes slightly, then fill with the macerated strawberries and top generously with whipped cream.

Nutrition

Serving: 1cupcakeCalories: 220kcalCarbohydrates: 28gProtein: 2gFat: 10gSaturated Fat: 6gMonounsaturated Fat: 4gCholesterol: 40mgSodium: 150mgPotassium: 100mgFiber: 1gSugar: 15gVitamin A: 250IUVitamin C: 5mgCalcium: 80mgIron: 1mg

Notes

For best results, ensure your butter is softened and be mindful of mixing gently to avoid dense cupcakes.

Tried this recipe?

Let us know how it was!

Filed Under: BREAKFAST & BRUNCH

Ham and Cheese Quiche

February 3, 2026 by JudyWhite Leave a Comment

Every now and then, life throws a delightful surprise your way. This Ham and Cheese Quiche is one of those surprises that turns even the simplest weeknight dinner into a special occasion. Just picture this: the aroma of sautéed onions mingling with rich, creamy eggs and savory ham wafts through your kitchen, instantly lifting your spirits.

One day, as I rummaged through my fridge for inspiration, I stumbled upon a lonely pie crust and some leftover ham. A little experimentation later, and I had created this creamy quiche that’s as comforting as it is versatile. Whether you enjoy it for brunch with friends or dinner on a cozy night in, it fits the bill perfectly.

What I love most about this quiche is how effortlessly it comes together. With just a handful of ingredients and under an hour to prepare, it’s the ultimate solution for anyone tired of the fast food rut. Its golden, flaky crust and velvety filling make it a crowd-pleaser that will have everyone asking for seconds! Let’s dive into making this fabulous dish a staple in your home!

Why You'll Love This Ham and Cheese Quiche

  • This Ham and Cheese Quiche is incredibly easy to make, allowing you to whip up a delicious meal without any fuss.
  • The rich and savory flavors of ham, cheese, and sautéed onions blend together perfectly, making every bite a delight.
  • Its versatility shines through as it can be enjoyed for breakfast, brunch, or dinner, adapting to whatever occasion you have in mind.
  • Visually, the golden crust and fluffy filling create an eye-catching centerpiece that will impress your guests and family alike.

Ham and Cheese Quiche Ingredients

For the Crust
• Pre-made pie crust – This saves time and ensures a flaky base for your delicious Ham and Cheese Quiche.

For the Filling
• Large eggs – Rich in protein, they create the creamy custard texture that holds everything together.
• Heavy cream – Adds a luscious richness, making every slice decadently smooth.
• Diced ham (cooked) – Leftover ham is perfect here, adding savory flavor and heartiness.
• Shredded Gruyère or cheddar cheese – Choose your favorite for a melty, flavorful bite; Gruyère gives a nutty taste.
• Medium onion (chopped) – Sautéing brings out its sweetness, balancing the savory elements beautifully.
• Butter (for sautéing) – Helps unlock rich flavors in the onions and contributes to a deeper taste.
• Salt and pepper to taste – Essential for seasoning; don’t skip these to let all flavors shine.

How to Make Ham and Cheese Quiche

  1. Preheat your oven to 375°F (190°C). This ensures an even bake, helping your quiche rise beautifully as it cooks.

  2. Place the pie crust in a pie dish. Gently press it against the sides, making sure it’s even all around. This forms the perfect base for your delicious filling.

  3. Melt butter over medium heat in a skillet. Then, sauté the chopped onions until they’re golden brown (about 5 minutes), releasing a sweet aroma that will invite everyone to the kitchen.

  4. Whisk together the eggs and heavy cream in a mixing bowl. Season with salt and pepper to your liking until everything is well combined for a creamy custard base.

  5. Stir in the diced ham, shredded cheese, and the sautéed onions. Make sure all ingredients are evenly distributed, ensuring every bite is packed with flavor.

  6. Pour the mixture into the prepared pie crust. Let it settle evenly so it cooks through nicely, filling your kitchen with delectable scents as it bakes.

  7. Bake for 35-40 minutes until the quiche is puffed and golden brown. A knife inserted in the center should come out clean.

  8. Cool for 10 minutes before slicing. This allows the quiche to set, making it easier to serve and more enjoyable to eat!

Optional: Sprinkle with fresh herbs like chives or parsley for a burst of color and freshness.

Exact quantities are listed in the recipe card below.

Make Ahead Options

These Ham and Cheese Quiches are perfect for meal prep enthusiasts! You can prepare the filling—whisking together the eggs, heavy cream, diced ham, cheese, and sautéed onions—up to 24 hours in advance. Simply store the mixture in an airtight container in the refrigerator to maintain its quality. The pie crust can also be placed into your pie dish and refrigerated to save time. When you’re ready to enjoy your quiche, pour the filling into the prepared crust and bake as directed. This way, you’ll have a delicious homemade meal ready with minimal effort, perfect for busy weeknights!

Ham and Cheese Quiche Variations

Feel free to let your creativity shine and customize this quiche to suit your tastes and dietary needs.

  • Vegetarian: Replace ham with sautéed spinach, mushrooms, or bell peppers for a delightful veggie-packed quiche.
  • Gluten-Free: Use a gluten-free pre-made pie crust or make a crustless version in a greased baking dish.
  • Spicy: Add diced jalapeños or a pinch of cayenne pepper to the egg mixture for a zesty kick. The extra heat can turn a cozy meal into a fun flavor adventure!
  • Herb-Infused: Incorporate fresh herbs like thyme, basil, or parsley into the filling for a fragrant and flavor-packed twist. Subtle yet aromatic changes elevate every bite.
  • Cheese Variety: Experiment with different cheeses like feta or goat cheese for a unique taste that adds a different creaminess and tang to your quiche.
  • Protein-Packed: Swap out the ham for cooked bacon or sausage for a heartier quiche that’ll satisfy the hungriest of diners.
  • Nutty Flavor: Add a sprinkle of toasted pine nuts or walnuts into the filling, providing a delightful crunch and enhancing the flavor profile.
  • Sweet Touch: For a sweet option, include caramelized onions and gruyère, creating a luxurious twist that intrigues your taste buds. Enrich your meal with this unexpected savory-sweet combination!

How to Store and Freeze Ham and Cheese Quiche

Room Temperature: Store any leftover quiche at room temperature for up to 2 hours. After that, refrigerate to keep it fresh and safe to eat.

Fridge: Keep the quiche covered with plastic wrap or in an airtight container in the fridge for up to 3 days. This helps maintain its flavor and moisture.

Freezer: If you plan to save it for later, freeze the quiche wrapped tightly in plastic and then foil for up to 2 months. Thaw in the fridge before reheating.

Reheating: To reheat, place slices in a preheated oven at 350°F (175°C) for about 15-20 minutes or until heated through. This ensures a warm, delightful taste reminiscent of fresh-baked Ham and Cheese Quiche.

What to Serve with Ham and Cheese Quiche?

Imagine sharing a delightful meal with loved ones, where every bite bursts with flavor and warmth, and every side dish elevates your quiche experience.

  • Mixed Green Salad: A light, tangy salad with a zesty vinaigrette provides a crisp contrast, balancing the richness of the quiche.

  • Roasted Asparagus: Tender, caramelized asparagus adds a delightful crunch and earthy flavor, making it a perfect sidekick to your creamy quiche.

  • Fresh Fruit Platter: Juicy berries, citrus slices, and melon offer a refreshing, sweet contrast, brightening up your plate and palate.

  • Garlic Breadsticks: Chewy and warm, these cheesy breadsticks complement the savory elements of the quiche while giving a satisfying bite.

  • Savory Potato Wedges: Crispy on the outside and fluffy on the inside, these seasoned wedges layer in another hearty texture making every meal more filling.

  • Sparkling Lemonade: A fizzy drink with a hint of tartness refreshes your taste buds, enhancing the flavors and creating a charming dining experience.

  • Chocolate Mousse: End your meal on a sweet note with a silky chocolate mousse, delightfully rich yet light enough to cap off your feast.

Chef's Helpful Tips

  • When making Ham and Cheese Quiche, always ensure your eggs are at room temperature before whisking them with the heavy cream for a smoother custard base.
  • Be careful not to overmix the filling; a gentle stir will keep the mixture light and airy, preventing a dense quiche.
  • Sautéing the onions until they are just golden enhances their sweetness, adding depth to the flavor profile.
  • Remember to check the quiche at the 35-minute mark; baking times can vary based on your oven, and you want it to be puffed and golden without overcooking it.

Ham and Cheese Quiche Recipe FAQs

How do I choose the best eggs for my quiche?
Absolutely! Look for large eggs with intact shells. Eggs should be stored in a cool place and can be bought organic or free-range for enhanced flavor. Checking for freshness is key—try the water test: place an egg in a bowl of water; fresh eggs sink, while older ones float.

What’s the best way to store leftover Ham and Cheese Quiche?
Very! After letting it cool, cover the quiche with plastic wrap or transfer it to an airtight container. It can be stored in the fridge for up to 3 days. This keeps it fresh and preserves the wonderful flavors, perfect for quick meals!

Can I freeze my Ham and Cheese Quiche?
Absolutely! To freeze, wrap the cooled quiche tightly in plastic wrap, then in aluminum foil. It can be saved in the freezer for up to 2 months. When you’re ready to enjoy it again, thaw it in the fridge overnight before reheating.

What if my quiche doesn’t set properly during baking?
Don’t worry! If the quiche is still liquid in the center after baking, simply continue baking it at 375°F (190°C) and check every 5 minutes until set. If you notice the edges browning too much before the center sets, cover the edges with foil to prevent burning.

Are there any dietary considerations for pets or allergies?
Very important! This Ham and Cheese Quiche includes ingredients like eggs and dairy which could pose risks to pets. Always keep any leftovers out of their reach. Additionally, it’s essential to ensure no one is allergic to specific ingredients, like dairy or eggs, before serving.

How can I make my quiche healthier or cater it to dietary restrictions?
Absolutely! To lighten things up, consider using a whole wheat crust or a cauliflower crust for a gluten-free option. You can swap heavy cream for milk or a non-dairy alternative (like almond or coconut milk) and use low-fat cheese for fewer calories without losing flavor.

Ham and Cheese Quiche

Ham and Cheese Quiche

This Ham and Cheese Quiche is a delightful surprise that elevates any weeknight dinner into a special occasion.
Print Recipe Pin Recipe
Prep Time 15 minutes mins
Cook Time 40 minutes mins
Cooling Time 10 minutes mins
Total Time 1 hour hr 5 minutes mins
Servings: 6 slices
Course: BREAKFAST & BRUNCH
Cuisine: French
Calories: 400
Ingredients Equipment Method Nutrition Notes

Ingredients
  

For the Crust
  • 1 pre-made pie crust This saves time and ensures a flaky base.
For the Filling
  • 4 large eggs Rich in protein, they create a creamy custard.
  • 1 cup heavy cream Adds richness and smoothness.
  • 1 cup diced ham (cooked) Leftover ham adds savory flavor.
  • 1 cup shredded Gruyère or cheddar cheese Choose your favorite for a melty bite.
  • 1 medium onion (chopped) Sautéing brings out its sweetness.
  • 1 tablespoon butter (for sautéing) Unlocks flavors in the onions.
  • to taste salt Essential for seasoning.
  • to taste pepper Essential for seasoning.

Equipment

  • pie dish
  • Skillet
  • Mixing bowl

Method
 

General Instructions
  1. Preheat your oven to 375°F (190°C).
  2. Place the pie crust in a pie dish and press it against the sides.
  3. Melt butter over medium heat in a skillet and sauté the chopped onions until golden brown.
  4. Whisk together the eggs and heavy cream in a mixing bowl and season with salt and pepper.
  5. Stir in the diced ham, shredded cheese, and sautéed onions.
  6. Pour the mixture into the prepared pie crust.
  7. Bake for 35-40 minutes until puffed and golden brown.
  8. Cool for 10 minutes before slicing.

Nutrition

Serving: 1sliceCalories: 400kcalCarbohydrates: 30gProtein: 20gFat: 25gSaturated Fat: 12gPolyunsaturated Fat: 1gMonounsaturated Fat: 5gCholesterol: 150mgSodium: 700mgPotassium: 200mgFiber: 1gSugar: 1gVitamin A: 500IUVitamin C: 2mgCalcium: 200mgIron: 2mg

Notes

Optional: Sprinkle with fresh herbs like chives or parsley before serving.

Tried this recipe?

Let us know how it was!

Filed Under: BREAKFAST & BRUNCH

Strawberry Cheesecake Truffle Bites

February 3, 2026 by JudyWhite Leave a Comment

The sun was shining, and the farmers’ market was bursting with vibrant strawberries, their sweet scent calling me over. As I picked up a pint of the juiciest ones, inspiration struck: why not blend that fresh fruit with creamy goodness into an easy, delightful treat? That’s how my Strawberry Cheesecake Truffle Bites were born—an irresistible fusion of flavors that captures the essence of summer in every bite.

These delightful morsels are not only a breeze to whip up but also a stunning addition to any gathering or a perfect way to satisfy your sweet tooth. With a balance of fluffy cream cheese, a hint of vanilla, and a rich chocolate coating, you’ll find yourself reaching for seconds—if not thirds! Get ready to impress friends and family, or simply indulge your own cravings with these luscious truffle bites that take less than an hour from start to finish. Let’s dive into this delicious adventure together!

Why You'll Love This Strawberry Cheesecake Truffle Bites

  • These Strawberry Cheesecake Truffle Bites are incredibly easy to make, requiring just 20 minutes of prep time and yielding a delightful treat in under an hour.
  • The combination of creamy cheesecake and fresh strawberries creates a burst of flavor that will leave your taste buds dancing with joy.
  • Perfect for parties or as a sweet snack, their versatility makes them suitable for any occasion, whether it’s a picnic or a cozy movie night.
  • Visually, these truffles are a feast for the eyes, with a rich chocolate coating that gives them an irresistible allure sure to impress your guests.

Strawberry Cheesecake Truffle Bites Ingredients

• Let’s gather everything we need to create these delightful bites!

For the Filling

  • Fresh Strawberries – 1 cup, hulled and chopped; these juicy fruits will add vibrant flavor to the truffles.
  • Cream Cheese – 8 oz, softened; this ingredient gives your truffles a rich and creamy base.
  • Powdered Sugar – 1/2 cup; adds sweetness while blending smoothly with the cream cheese.
  • Vanilla Extract – 1 tsp; brings warmth and depth to the overall flavor of your filling.

For the Coating

  • Graham Cracker Crumbs – 1/2 cup; for a classic cheesecake crunch, although optional for those who prefer a smoother bite.
  • Chocolate Coating – 8 oz (milk or white); use your favorite type of chocolate for a luscious outer layer that makes these Strawberry Cheesecake Truffle Bites truly special.

Now that we have our ingredients ready, let’s create a treat that’s sure to make your taste buds sing!

How to Make Strawberry Cheesecake Truffle Bites

  1. Prepare the Strawberries: Wash and hull the strawberries, ensuring they are dry before use. This helps maintain the truffle consistency and prevents excess moisture from ruining the filling.

  2. Mix the Filling: In a mixing bowl, blend the softened cream cheese with powdered sugar and vanilla extract until smooth. This creamy mixture will be the heart of your truffles, creating a delightful cheesecake base.

  3. Fold in the Strawberries: Gently fold the chopped strawberries into your cream cheese mixture. Take your time with this step; you want those juicy bits to be evenly distributed for that perfect strawberry surprise in every bite!

  4. Scoop and Shape: Using a small scoop or your hands, form the mixture into small balls, about 1 inch in diameter. Place them on a parchment-lined baking sheet; this ensures they don’t stick as they freeze.

  5. Freeze Until Firm: Place the baking sheet in the freezer for about 1 hour. This step is crucial for solidifying your truffles, making it easier to coat them in chocolate.

  6. Dip in Chocolate: Melt the chocolate coating according to the package instructions. Once melted, carefully dip each frozen truffle in the chocolate until fully coated, then return them to the baking sheet to set.

Optional: Drizzle some extra melted chocolate on top for a decorative touch.
Exact quantities are listed in the recipe card below.

What to Serve with Strawberry Cheesecake Truffle Bites?

To create a memorable gathering or treat yourself, consider these delightful pairs that enhance the truffle experience.

  • Fresh Whipped Cream: A dollop of light and airy whipped cream adds a luscious touch that balances the truffles’ richness, perfect for dipping.

  • Coffee or Espresso: The boldness of coffee or a smooth espresso complements the sweet cheesecake flavors, making it an excellent pairing for an afternoon treat.

  • Mixed Berry Salad: Vibrant and refreshing, a salad of mixed berries brings a burst of freshness that beautifully contrasts the creamy truffles, enhancing every bite.

  • Chocolate Dipped Strawberries: For an indulgent double treat, serve chocolate-dipped strawberries alongside the truffles, echoing their decadent flavor and adding a fun bite-sized option.

  • Sparkling Wine: The effervescence of sparkling wine, whether a sweet Prosecco or a dry Champagne, elevates the dessert experience, creating a festive atmosphere perfect for celebrations.

  • Mini Cupcakes: Light and airy mini cupcakes with cream cheese frosting create a delightful variety on your dessert table, appealing to lovers of sweet treats.

  • Dark Chocolate Squares: Rich dark chocolate squares provide a sophisticated counterpoint to the sweet truffles, allowing guests to choose their desired flavor intensity.

  • Green Tea: The subtle bitterness of green tea serves as a refreshing palate cleanser, balancing the sweetness of the truffles while adding a unique touch to your dessert experience.

Make Ahead Options

These Strawberry Cheesecake Truffle Bites are an ideal treat for busy home cooks looking to save time without sacrificing flavor! You can prepare the filling (cream cheese, powdered sugar, and strawberries) up to 24 hours in advance. Simply mix the ingredients and store them in an airtight container in the refrigerator to keep everything fresh and flavorful. When you’re ready to serve, scoop the mixture into balls and freeze them for about 1 hour, then dip in chocolate as directed. For the best results, finish the truffles just before your gathering to ensure the chocolate coating stays perfectly glossy and the truffles remain creamy and delicious!

How to Store and Freeze Strawberry Cheesecake Truffle Bites

Room Temperature: Keep these truffle bites at room temperature for up to 1 hour. If they sit out longer, the chocolate coating may soften, affecting their texture.

Fridge: Store in an airtight container in the fridge for up to 3 days. Make sure the container is sealed to maintain freshness and prevent the truffles from drying out.

Freezer: These Strawberry Cheesecake Truffle Bites freeze beautifully! Place them in a single layer in an airtight container or freezer bag, where they’ll last up to 2 months.

Reheating: For best results, let the truffles thaw in the fridge overnight before enjoying. Avoid using the microwave, as it can melt the chocolate coating.

Strawberry Cheesecake Truffle Bites Variations

Feel free to get creative and make these delightful truffles your own with a few simple swaps and enhancements!

  • Dairy-Free: Substitute cream cheese with dairy-free cream cheese and use a plant-based chocolate coating for a delicious, non-dairy option.

  • Fruit Variations: Swap strawberries for raspberries or blueberries to create a refreshing twist with different flavor profiles that sing of summer.

  • Nutty Delight: Add 1/4 cup of finely chopped nuts, like almonds or walnuts, to the filling for a delightful crunch that contrasts with the creamy texture.

  • Chocolate Twist: Use dark chocolate coating instead of milk or white chocolate for a rich, bold flavor that brings a touch of sophistication to your truffles.

  • Add Spice: Mix in a pinch of cinnamon or nutmeg for a warm, inviting spice that adds depth and warmth to every luscious bite.

  • Decadent Drizzle: After coating the truffles, drizzle with melted caramel or white chocolate for an elegant touch that beautifully elevates the presentation.

  • Zesty Lemon: Add the zest of one lemon to the filling for a bright, citrusy zing that complements the sweetness of the strawberries perfectly.

These variations not only enhance the flavors but also allow you to personalize your Strawberry Cheesecake Truffle Bites. Enjoy the journey of discovering your favorite combinations!

Chef's Helpful Tips

  • Make sure your strawberries are completely dry before mixing them into the filling, as excess moisture can affect the texture of your truffles.
  • When blending the cream cheese, powdered sugar, and vanilla extract, be patient and mix until fully smooth to ensure a creamy filling.
  • Gently fold in the strawberries to maintain their shape and flavor, preventing them from breaking down too much.
  • Always freeze the truffles for at least an hour to help them hold their shape during the chocolate dipping process.

Strawberry Cheesecake Truffle Bites Recipe FAQs

What kind of strawberries should I use for the best flavor?
Absolutely! For the best flavor, use ripe, fresh strawberries that are bright red and fragrant. Look for strawberries without dark spots or signs of mold. The juicier the berries, the more flavor they’ll contribute to your Strawberry Cheesecake Truffle Bites, making each bite a delicious taste of summer.

How should I store leftover Strawberry Cheesecake Truffle Bites?
To keep your truffle bites fresh, store them in an airtight container in the fridge for up to 3 days. Make sure the container is tightly sealed to prevent them from drying out. If you’re planning to eat them later, you can also freeze them.

Can I freeze these truffle bites for later?
Yes! To freeze Strawberry Cheesecake Truffle Bites, place them in a single layer in an airtight container or freezer bag. They will keep well in the freezer for up to 2 months. When you’re ready to enjoy them, simply thaw them in the refrigerator overnight for the best texture. Avoid the microwave, as it can melt the chocolate coating.

What if my chocolate coating doesn’t set properly?
No worries! If your chocolate coating isn’t setting, it might have been too warm when you dipped your truffles. To troubleshoot, quickly pop the dipped truffles back in the freezer for about 10-15 minutes to allow the chocolate to firm up. Additionally, ensure that your chocolate is melted at the correct temperature for a smooth coating.

Can I make these truffles gluten-free?
Very! To make your Strawberry Cheesecake Truffle Bites gluten-free, simply use gluten-free graham cracker crumbs or omit them entirely. The truffles will still be delicious thanks to the creamy cheesecake filling and chocolate coating. Always double-check your chocolate for gluten-free labeling, as some brands might contain traces.

How long will these bites keep in the fridge?
Stored properly in an airtight container, these Strawberry Cheesecake Truffle Bites can last for up to 3 days in the fridge. I recommend enjoying them within the first day or two for the best flavor and texture, but they will still be tasty after a couple of days.

Strawberry Cheesecake Truffle Bites

Strawberry Cheesecake Truffle Bites

Delight in these Strawberry Cheesecake Truffle Bites, a fusion of flavors perfect for summer and gatherings.
Print Recipe Pin Recipe
Prep Time 20 minutes mins
Freezing Time 1 hour hr
Total Time 1 hour hr 20 minutes mins
Servings: 12 bites
Course: DESSERT RECIPES
Cuisine: American
Calories: 120
Ingredients Equipment Method Nutrition Notes

Ingredients
  

For the Filling
  • 1 cup Fresh Strawberries hulled and chopped
  • 8 oz Cream Cheese softened
  • 1/2 cup Powdered Sugar
  • 1 tsp Vanilla Extract
For the Coating
  • 1/2 cup Graham Cracker Crumbs optional
  • 8 oz Chocolate Coating (milk or white)

Equipment

  • Mixing bowl
  • Baking sheet
  • parchment paper
  • small scoop
  • freezer
  • microwave or double boiler

Method
 

How to Make Strawberry Cheesecake Truffle Bites
  1. Prepare the Strawberries: Wash and hull the strawberries, ensuring they are dry before use.
  2. Mix the Filling: In a mixing bowl, blend the softened cream cheese with powdered sugar and vanilla extract until smooth.
  3. Fold in the Strawberries: Gently fold the chopped strawberries into your cream cheese mixture.
  4. Scoop and Shape: Using a small scoop or your hands, form the mixture into small balls, about 1 inch in diameter.
  5. Freeze Until Firm: Place the baking sheet in the freezer for about 1 hour.
  6. Dip in Chocolate: Melt the chocolate coating according to the package instructions and dip each frozen truffle.

Nutrition

Serving: 1biteCalories: 120kcalCarbohydrates: 15gProtein: 1gFat: 7gSaturated Fat: 4gMonounsaturated Fat: 2gCholesterol: 15mgSodium: 50mgPotassium: 65mgSugar: 10gVitamin A: 5IUVitamin C: 15mgCalcium: 2mgIron: 2mg

Notes

Store at room temperature for up to 1 hour, or in the fridge for up to 3 days. Freeze for up to 2 months. Thaw in the fridge before enjoying.

Tried this recipe?

Let us know how it was!

Filed Under: BREAKFAST & BRUNCH

  • « Previous Page
  • 1
  • …
  • 3
  • 4
  • 5
  • 6
  • 7
  • …
  • 49
  • Next Page »

Recent Posts

  • Crispy Potatoes in Oven
  • Lucky Charms Pancakes
  • Cheeseburger
  • Boiled Corn on the Cob
  • St. Patrick’s Day Dessert Parfaits

Recent Comments

No comments to show.

Footer

  • Contact
  • Privacy Policy
  • About Us
  • Terms
  • ↑ back to top

Copyright © 2024 www.Forkono.com

Table Of Content